

Page 1
DVD PLAYER
801EDVD
OPERATING MANUAL
Page 2
Important Safety Instructions
Introduction
Important Safety Instructions
Introduction
1. Read Instructions
All the safety and operating instructions should be read
before the product is operated.
2. Retain Instructions
The safety and operating instructions should be
retained for future reference.
3. Heed Warnings
All warnings on the product and in the operating
instructions should be adhered to.
4. Follow Instructions
All operating instructions should be followed.
5. Cleaning
Unplug this product from the wall outlet before cleaning.
Do not use liquid cleaners or aerosol cleaners. Use a
damp cloth for cleaning.
6. Attachments
Do not use attachments not recommended by the
product manufacturer as they may cause hazards.
7. Accessories
Do not place this product on an unstable cart, stand,
tripod, bracket, or table. The product may fall, causing
serious injury to a child or adult, and serious damage
to the product. Use only with a cart, stand, tripod,
bracket, or table recommended by the manufacturer, or
sold with the product. Any mounting of the product
should follow the manufacturer's instructions, and
should use a mounting accessory recommended by
the manufacturer.
8. Portable Cart Warning
A product and cart combination should be moved with
care. Quick stop, excessive force, and uneven
surface may cause the product and cart combination
to overturn.
(Symbol provided by RETAC)
9. Water and Moisture
Do not use this product near water for example, near
a bathtub, wash bowl, kitchen sink, or laundry tub; in a
wet basement; or near a swimming pool; and the like.
10. Ventilation
Slots and openings in the cabinet are provided for
ventilation and to ensure reliable operation of the
product and to protect it from overheating, and these
openings must not be blocked or covered. The
openings should never be blocked by placing the
product on a bed, sofa, rug, or other similar surface.
This product should not be placed in a built-in
installation such as a bookcase or rack unless proper
ventilation is provided or the manufacturer's
instructions have been adhered to.
11. Power Sources
This product should be operated only from the type of
power source indicated on the marking label. If you are
not sure of the type of power supply to your home,
consult your product dealer or local power company.
For products intended to operate from battery power
or other sources, refer to the operating instructions.
12. Grounding or Polarization
This product may be equipped with a polarized
alternating current line plug (a plug having one blade
wider than the other). This plug will fit into the power
outlet only one way. This is a safety feature. If you are
unable to insert the plug fully into the outlet, try
reversing the plug. If the plug should still fail to fit,
contact your electrician to replace your obsolete outlet.
Do not defeat the safety purpose of the polarized plug.
13. Power Cord Protection
Power supply cords should be routed so that they are
not likely to be walked on or pinched by items placed
upon or against them, paying particular attention to
cords at plugs, convenience receptacles, and the point
where they exit from the product.
14. Protective Attachment Plug
The product is equipped with an attachment plug
having overload protection. This is a safety feature.
See Instruction Manual for replacement or resetting of
protective device. If replacement of the plug is required,
be sure the service technician has used a replacement
plug specified by the manufacturer that has the same
overload protection as the original plug.
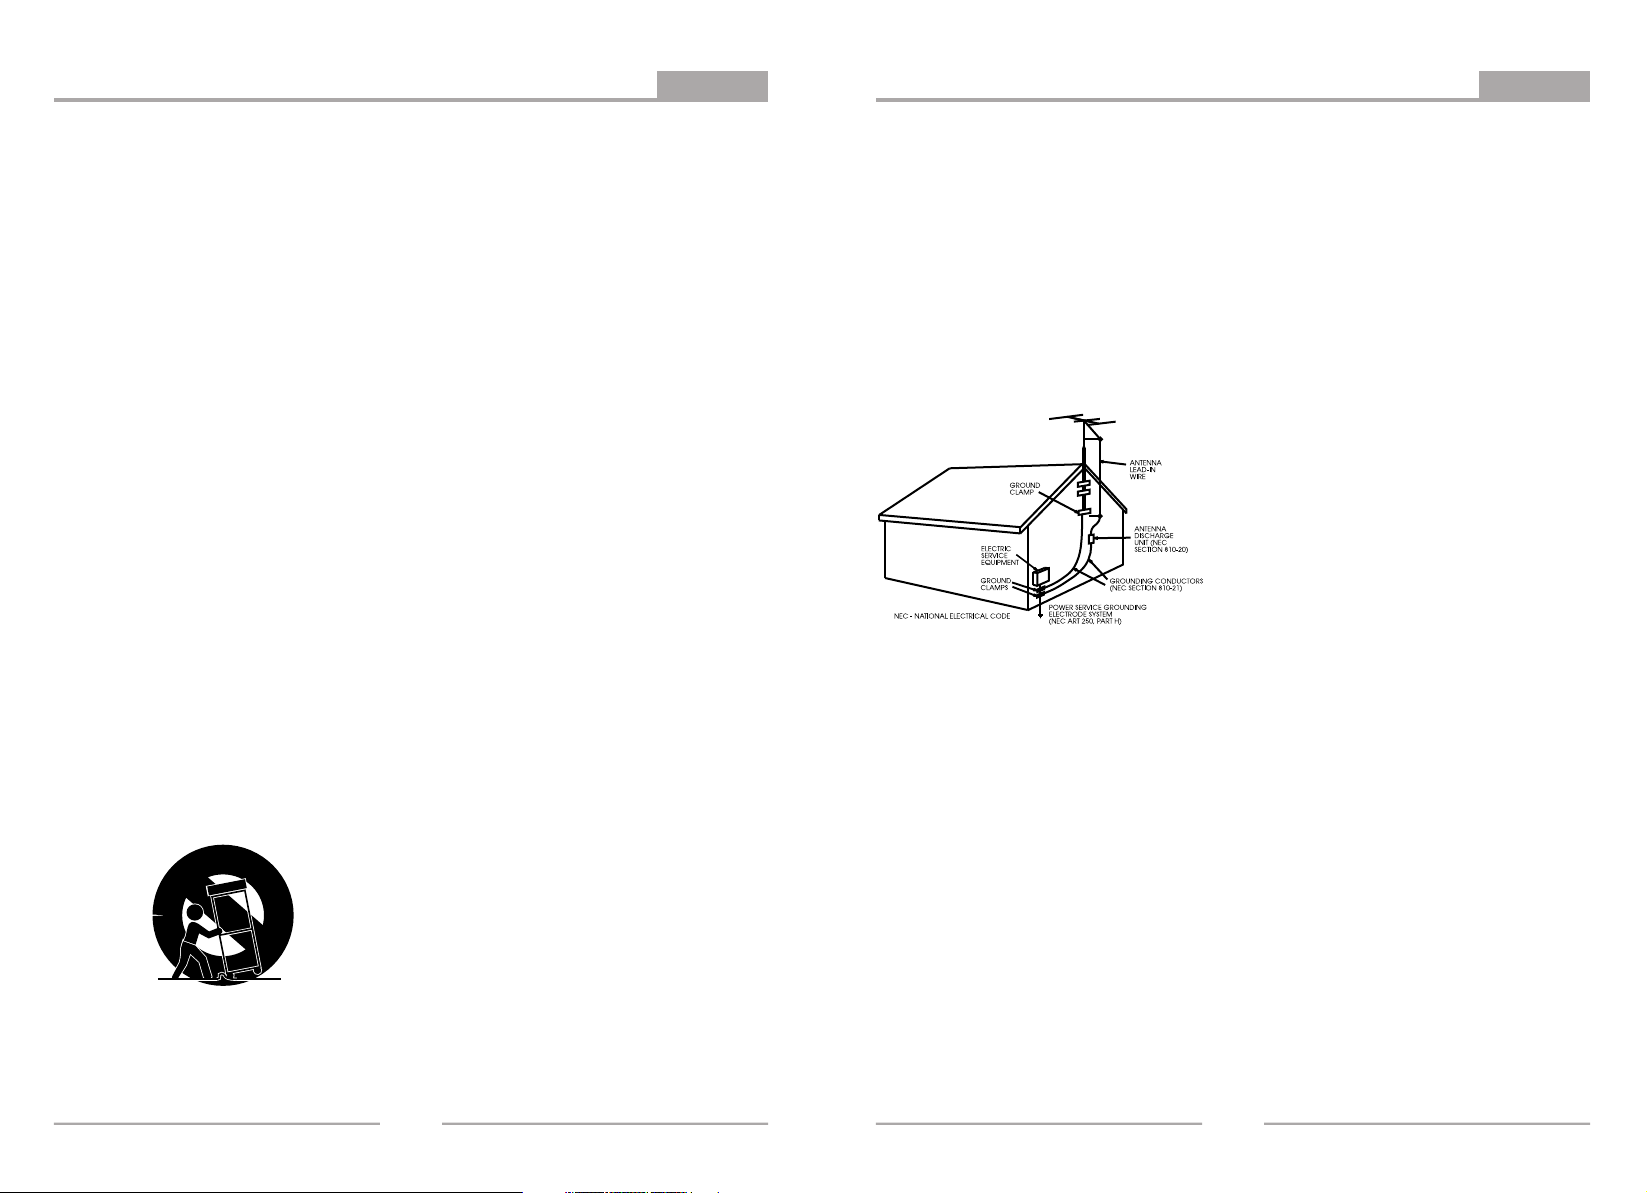
15. Outdoor Antenna Grounding
If an outside antenna or cable system is connected to
the product, be sure the antenna or cable system is
grounded so as to provide some protection against
voltage surges and built-up static charges. Article 810
of the National Electrical Code, ANSI/NFPA 70,
provides information with regard to proper grounding of
the mast and supporting structure, grounding of the
lead-in wire to an antenna discharge unit, size of
grounding conductors, location of antennadischarge
unit, connection to grounding electrodes, and
requirements for the grounding electrode. See figure
below.
16. Lightning
For added protection for this product during a lightning
storm, or when it is left unattended and unused for long
periods of time, unplug it from the wall outlet and
disconnect the antenna or cable system. This will
prevent damage to the product due to lightning and
power lines surges.
17. Power Lines
An outside antenna system should not be located in
the vicinity of overhead power lines or other electric
light or power circuits, or where it can fall into such
power lines or circuits. When installing an outside
antenna system, extreme care should be taken to keep
from touching such power lines or circuits as contact
with them might be fatal.
.
18. Overloading
Do not overload wall outlets, extension cords, or
integral convenience receptacles, as this can result in a
risk of fire or electric shock.
19. Object and Liquid Entry
Never push objects of any kind into this product
through openings as they may touch dangerous
voltage points or short-out parts that could result in a
fire or electric shock. Never spill liquid of any kind on
the product.
20. Servicing
Do not attempt to service this product yourself as
opening or removing covers may expose you to
dangerous voltage or other hazards. Refer all servicing
to qualified service personnel.
21. Damage Requiring Service
Unplug this product from the wall outlet and refer
servicing to qualified service personnel under the
following conditions:
A)When the power-supply cord or plug is damaged,
B)If liquid has been spilled, or objects have fallen
into the product,
C)If the product has been exposed to rain or water,
D)If the product does not operate normally by
following the operating instructions. Adjust only
those controls that are covered by the operating
instructions as an improper adjustment of other
controls may result in damage and will often
require extensive work by a qualified technician
to restore the product to its normal operation,
E)If the product has been dropped or damaged in
any way, and
F)When the product exhibits a distinct change in
performance this indicates a need for service.
22. Replacement Parts
When replacement parts are required, be sure the
service technician has used replacement parts
specified by the manufacturer or have the same
characteristics as the original part. Unauthorized
substitutions may result in fire, electric shock, or other
hazards.
23. Safety Check
Upon completion of any service or repairs to this
product, ask the service technician to perform safety
checks to determine that the product is in proper
operating condition.
24. Wall or Ceiling Mounting
The product should be mounted to a wall or ceiling only
as recommended by the manufacturer.
25. Heat
The product should be situated away from heat
sources such as radiators, heat registers, stoves, or
other products (including amplifiers) that produce heat.
1
2
Page 3

Content
Front Panel and Rear Panel Illustration
Introduction
Introduction
Important Safety Instructions
Front Panel and Rear Panel illustration
Remote Control
Connections
Connecting to a TV set
Connecting to an AV Receiver with 2 Channel Analog Audio Input
Connecting to an AV Receiver with Digital Audio Input
Basic Playback
Basic Operation
Advanced Features
Modes and Features Setup
System Setup
Audio Setup
Video Setup
Speaker Setup
Digital Setup
Remote Control Operation
MP3/MPEG4 Playback
KODAK Picture CD playback
Others
Troubleshooting
Care of discs
Specifications
12
13
14
16
16
17
17
18
Front panel
1
3
4
1 2
5
6
7
1. Power button
2. Microphone 1/2
3
3. Microphone vol 1/2
4. Disc tray
5. LED display
8
4
6. Remote sensor
7. Open/Close button
8. Previous button
9. Next button
10. Stop button
6
5
7
8109
11. R/L button
12. Pause button
13. N/P button
14. Play button
121114
13
Rear panel
9
9
11
11
L
2 CH 5.1 CH Audio out
1. 2 channels Audio output jacks
2. MR. Middle right channel
3. ML. Middle left channel
4. Component (Y, Pb/Cb, Pr/Cr) output
5. Video Output
6. SR. Surround right channel
4321 5
MLMRR
7 1098 11 126
R(pr)<cr>B(pb)<cb>G(y)<y>
Video
SUBSL CENSR
Digital Audio out
OpticalS-VideoCoaxial
7. SL. Surround left channel
8. CEN. Center channel
9. SUB. Subwoofer channel
10.Coaxial digital signal output
11. S-video output
12. Optical digital signal output
SN8281-5.1
3
Page 4
Remote Control
Mute L/R
Introduction
Connecting to a TV Set
Connections
Power
Subtitle
Language
Angle
Prog
Goto
Zoom
Left
PBC
DOWN
Menu
Fast forward
Fast backward
A-B Repeat
OSD
Stop
Slow
POWER
SUBT
LANG
ANGLE
PROG
ZOOM
MUTE
1
4
7
GOTO
OP/CL
L/R
2
5
8 9
0 10+
SETUP
MLMRR
Open/Close
L
2 CH 5.1 CH Audio out
3
6
Number Keys
Up
RED
WHITE
R(pr)<cr>B(pb)<cb>G(y)<y>
Video
SUBSL CENSR
Digital Audio out
OpticalS-VideoCoaxial
Composite video
YELLOW
Setup
Enter
ENTER
REPEAT A-B
P-SCAN
RETURN
VOLKEY
PBC
MENU TITLE
CLEAR
REV PREV NEXTFWD
#
b
#
OSD
b
STOP
SLOW PLAY/PAUSE
VIDEO
Right
Return
Title
Clear
Skip Backward
Skip Forward
Repeat
Volume+
P-Scan
Volume-
Play/Pause
AUDIO IN
L
R
Component video
VIDEO IN
Y
Pb/Cb
Pr/Cr
VIDEO IN
VIDEO
S-VIDEO
Note:
1. The left and right buttons are used to adjust echo,while the karaoke is on.
2. In this manual, will be use to represent different navigation arrows on the remote respectively.
4
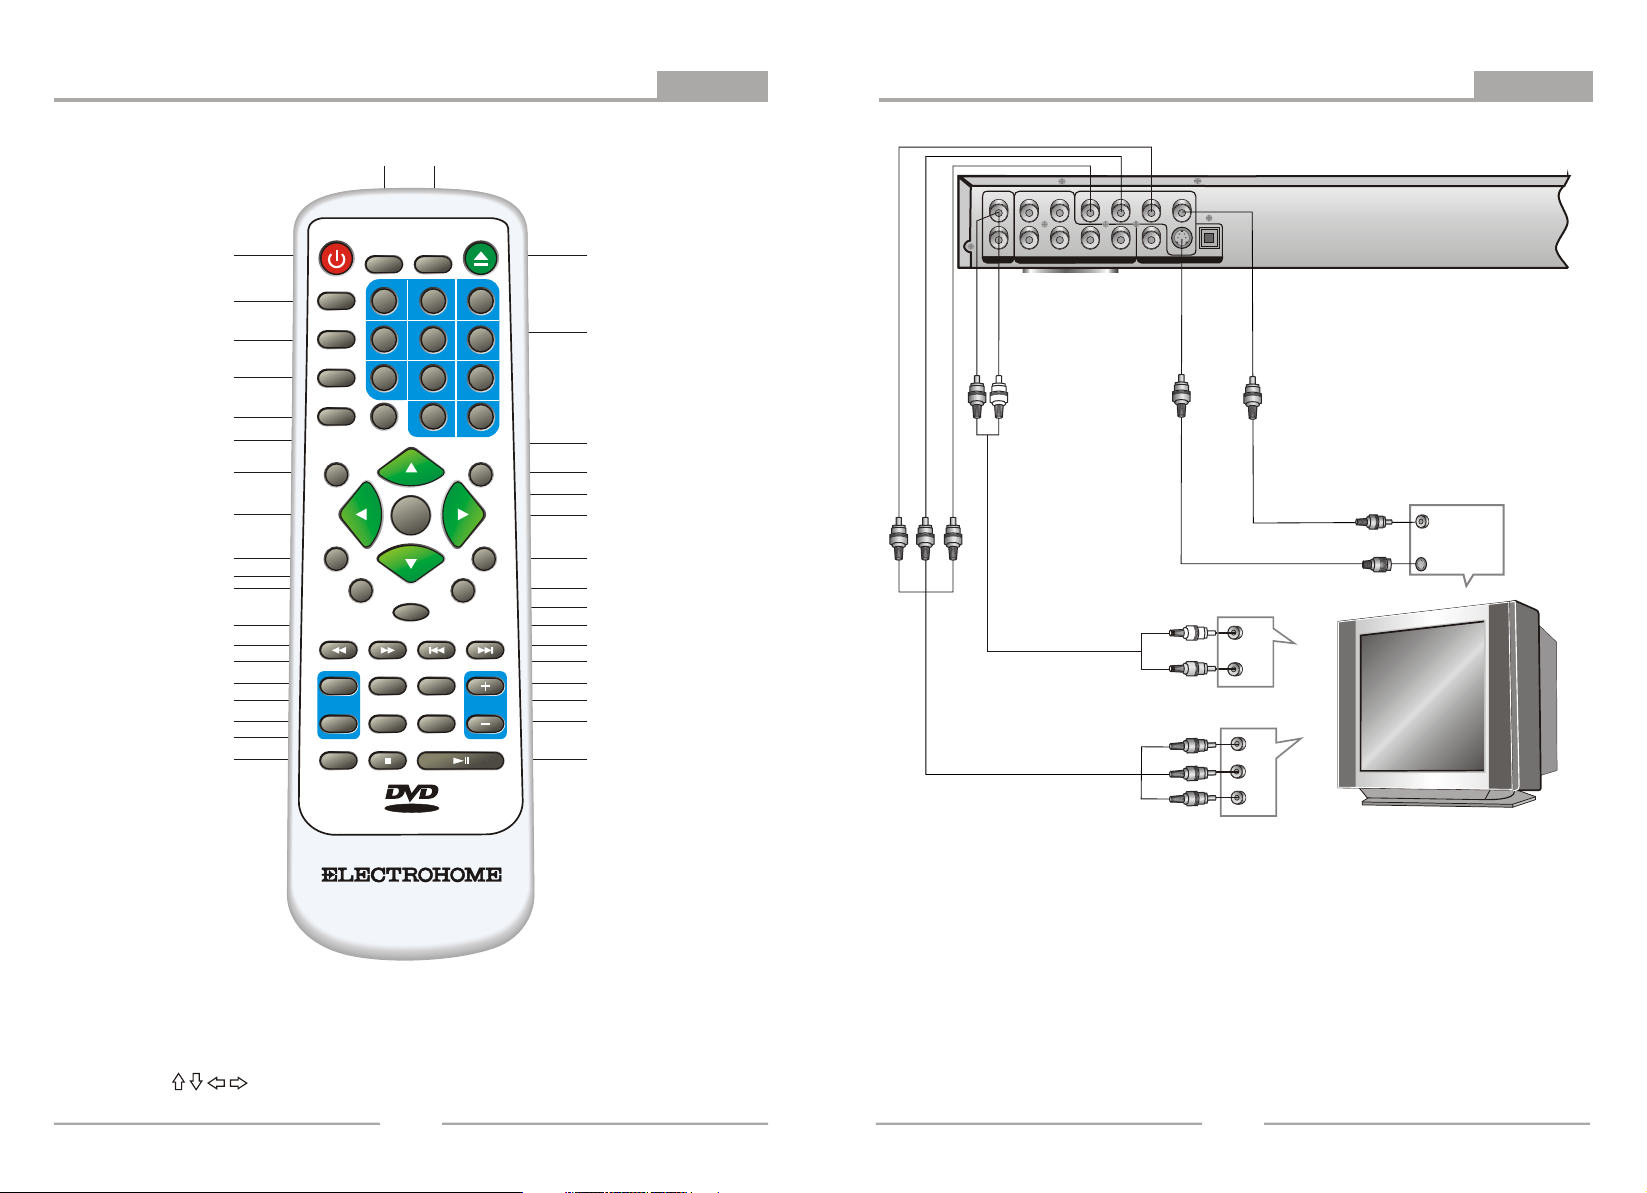
Notes:
There are three ways of connecting the player's AV output to the TV set:
1. S-video cable and left/right audio cable [set the (Video Type) to (S-Video)].
2. Composite video cable and left/right audio cable.
3. Component video cable and left/right audio cable set the (Video Type) to (Y, Pb/Cb, Pr/Cr).
5
Page 5

Connecting to an AV Amplifier with 2 Channel Analog Audio Input
Connections
Connecting to an AV Amplifier with Digital Audio Input
Connections
MLMRR
L
2 CH 5.1 CH Audio out
WHITERED
SUBSL CENSR
DVD IN
R
L(white)
R(pr)<cr>B(pb)<cb>G(y)<y>
(Red)
Video
Digital Audio out
MLMRR
OpticalS-VideoCoaxial
L
2 CH 5.1 CH Audio out
R(pr)<cr>B(pb)<cb>G(y)<y>
Video
SUBSL CENSR
Digital Audio out
OpticalS-VideoCoaxial
YELLOW
VIDEO IN
VIDEO
Amplifier
VOLUME
POWER
PRO LOGIC
MODE
3 STEREO
BYPASS
EXCITE
MIC
MIC VOL
211
2
INPUT SELECTOR
CHANNEL
MUTE
KARAOKE
TEST
DOWN UP
BASS
ECHO
MIC
TREBLE
Notes:
1. Set the TV to the AV input connected to the DVD player.
2. Set the Amplifier to the AV input connected to the DVD player.
6
7
Page 6

Basic Operation
Basic Playback
Modes and Features Setup
Advanced Features
Preparation before playing:
1. Connect the DVD player to your TV and amplifier.
2. Turn on the TV.
Set the TV to the AV input connected to the DVD player.
3.
4. Turn down the volume on your amplifier, and then power it on.
5.
Set the amplifier to the AV input connected to the DVD player.
STEP 1 - Press POWER to
start the player. The DVD
logo appears on the TV
screen.
STEP 2 - Press OPEN/CLOSE either on
the front panel or remote control. When
the tray is opened, place the disc on the
tray with the label side up. Press OPEN/
CLOSE again to close the disc tray.
Using the remote control
Point the remote control at the remote sensor.
(The pictures below are for reference only.)
STEP 3 - Press the PLAY/PAUSE
button on the front panel or
remote control. The player will
automatically read and identify
the disc, and begin playback.
Remarks: Do not expose the remote sensor of the
DVD Player to a strong light source, such as direct
sunlight.
SETUP
In stop mode, press <SETUP>, and the TV screen
will display the Setup Menu as follows:
Setup Menu
Press to change items
A. Press <ENTER> to display each submenu
B. Press <SETUP> to exit the Setup Menu
System Setup
Select [SYSTEM SETUP] in the Setup Menu, and
the submenu will arise as follow:
SYSTEM SETUP
TV SYSTEM
SCREEN SAVER
VIDEO
TV TYPE
PASSWORD
RATING
DEFAULT
EXIT SETUP
Press to select the menu item
A.Press <ENTER> or to set
B.Press or repeatedly to return to the Setup Menu
1. Select [TV SYSTEM] in the System Setup Menu
to display the [TV SYSTEM] Submenu:
2. SCREEN SAVER
SYSTEM SETUP
TV SYSTEM
SCREEN SAVER
VIDEO
TV TYPE
PASSWORD
RATING
DEFAULT
EXIT SETUP
If the screen saver is on,when your DVD player is in Stop,Open,or No Disc
state,or there is a frame frozen for more than 180sec,the screen saver will
be displayed.This feature can protect the screen from damage.
[ON] - Choose this setting to activate the screen saver.
[OFF]- Choose the setting to cancel the screen saver.
* The default setting is ON.
ON
OFF
3. VIDEO
SYSTEM SETUP
TV SYSTEM
SCREEN SAVER
VIDEO
TV TYPE
PASSWORD
RATING
DEFAULT
EXIT SETUP
Note: The Composite video and S-video output is always available.
[S-VIDEO]-Select if you connect the DVD player to your TV using
S-VIDEO output.
[INTERLACE-YUV] -Select if you connected the DVD player to your TV
using the YUV(Y,Cb,Cr) output.
[TV-RGB] -Select if you connected the DVD player to your TV using the
RGB output.
[P-SCAN YPbPr] - Select if you connected the DVD player to your TV
using progressive scan(Y,Pb,Pr).
* The default setting is S-VIDEO.
S-VIDEO
INTERLACE-YUV
TV-RGB
P-SCAN YPBPR
7m
Notes:
Point the remote control directly at the player's
remote sensor.
Do not leave the remote control in an extremely
o
o
30
30
hot or humid place.
Do not spill water or put anything wet on the
remote control.
Battery life is 1 year under normal conditions.
SYSTEM SETUP
TV SYSTEM
SCREEN SAVER
VIDEO
TV TYPE
PASSWORD
RATING
DEFAULT
EXIT SETUP
Press to select the menu item
A.Press <ENTER> to set
NTSC
PAL
B.Press or repeatedly to return to the Setup Menu
C.Press <SETUP> to exit the Setup Menu
[NTSC] -Select if you are using NTSC signal system to match your TV set.
[PAL] -Select if you are using PAL signal system to match your TV set.
* The default setting is NTSC.
8
4. TV TYPE
SYSTEM SETUP
TV SYSTEM
SCREEN SAVER
VIDEO
TV TYPE
PASSWORD
RATING
DEFAULT
EXIT SETUP
[4:3 PS] -Pan and scan refes to pictures where part of pictures is cut
off so it fills the whole screen.
[4:3 LB] -Letter Box refers to pictures where black bands appear at
the top and bottom.
[16:9] -The picture fills the screen of a wide-screen(16:9) television.
* The default setting is 4:3PS.
Note: Not all DVDs offer movies in Full Screen format. If not, the disc
will override your TV Display setting and the movie will be
displayed in Letter box format.
4:3 PS
4:3 LB
16:9
9
Page 7

Modes and Features Setup
Advanced Features
Modes and Features Setup
Advanced Features
5. PASSWORD
SYSTEM SETUP
TV SYSTEM
SCREEN SAVER
VIDEO
TV TYPE
PASSWORD
RATING
DEFAULT
EXIT SETUP
The password option is initialized locked, and you cannot set the ratings
limit or change the password. In order for the Rating feature work, the
password mode must be turned on. If you want to set the ratings limit, you
will need to enter the default password, which is 0000,then press
<ENTER> to confirm. To change the password, you will be prompted for
the old password, then be prompted for a new. Enter a 4-digit number
(this is your password).
6. RATING
SYSTEM SETUP
TV SYSTEM
SCREEN SAVER
VIDEO
TV TYPE
PASSWORD
RATING
DEFAULT
EXIT SETUP
The rating feature is rating limit system, like movie ratings. It works with
DVD discs that have been assigned a rating. This helps you control the
types of DVDs theat your family watches.
- There are 8 rating options: KID SAFE,G,PG,PG13,PG-R,R,NC-17,ADULT.
- Select ADULT to cancel the rating limit.
* The default setting is ADULT.
Note:
If the password option is locked, you cannot set the ratings limit; the
rating limit does not work when the password option unlocked.
1 KID SAFE
2 G
3 PG
4 PG13
5 PG-R
6 R
7 NC-17
8 ADULT
7. DEFAULT
SYSTEM SETUP
TV SYSTEM
SCREEN SAVER
VIDEO
TV TYPE
PASSWORD
RATING
DEFAULT
EXIT SETUP
Choose this option to resume all the setup options
to default settings.
RESTORE
Language Setup
LANGUAGE SETUP
OSD LANGUAGE
AUDIO LANG
SUBTITLE LANG
MENU LANG
EXIT SETUP
1. OSD LANGUAGE
LANGUAGE SETUP
OSD LANGUAGE
AUDIO LANG
SUBTITLE LANG
MENU LANG
EXIT SETUP
There are 2 optional OSD language: English,French .
Select the one you prefer.
2. AUDIO LANG
LANGUAGE SETUP
OSD LANGUAGE
AUDIO LANG
SUBTITLE LANG
MENU LANG
EXIT SETUP
There are 3 optional Audio language: English,French and
Spanish.
Select the one you prefer.
* This option vary by disc.
3. SUBTITLE LANG
LANGUAGE SETUP
OSD LANGUAGE
AUDIO LANG
SUBTITLE LANG
MENU LANG
EXIT SETUP
There are 3 optional Subtitle language: English,French,
Spanish. Select the one you prefer.
* This option vary by disc.
ENGLISH
CHINESE
ENGLISH
FRENCH
SPANISH
ENGLISH
FRENCH
SPANISH
OFF
4. MENU LANG
LANGUAGE SETUP
OSD LANGUAGE
AUDIO LANG
SUBTITLE LANG
MENU LANG
EXIT SETUP
ENGLISH
FRENCH
SPANISH
There are 3 optional Menu language:English,French,and
Spanish. Select the one you prefer.
* This option vary by disc.
Note:
- If your preferred language is not avaitable, the disc`s default
language will be played.
- The default language of your DVD player is English.
Audio Setup
AUDIO SETUP
AUDIO OUT
KEY
EXIT SETUP
1.AUDIO OUT
AUDIO SETUP
AUDIO OUT
MIC SETUP
ECHO
MIC VOL
KEY
EXIT SETUP
[SPDIF/OFF] -To disable Dolby Digital decoder.
[SPDIF/RAW] -Choose this setting if your DVD player is connected to a
power amplifier with a coaxial cable or an optical cable;
When playing a disc recorded with Dolby Digital,MPEG
audio formats,the corresponding digital signals will be
output from the Coaxial/Optical Output jacks.This player’s
digital output jacks are designed for a connection to a
Dolby Digital, or MPEG receiver or decoder.
[SPDIF/PCM] -Choose this setting if your DVD player is connected to a
2-channel digital stereo amplifier. When playing a disc
recorded with Dolby Digital and MPEG audio formats,
audio signals will be modulated into a 2-channel PCM signal,
and it will be output from the Coaxial/Optical Output jacks.
SPDIF/OFF
SPDIF/RAW
SPDIF/PCM
2.KEY
AUDIO SETUP
AUDIO OUT
KEY
EXIT SETUP
Press UP and DOWN to move the scroll and adjust the key.
Video Setup
VIDEO SETUP
BRIGHTNESS
CONTRAST
HUE
SATURATION
EXIT SETUP
1. BRIGHTNESS
VIDEO SETUP
BRIGHTNESS
CONTRAST
HUE
SATURATION
EXIT SETUP
Press UP and DOWN to move the scroll and adjust the
brightness.
2. CONTRAST
VIDEO SETUP
BRIGHTNESS
CONTRAST
HUE
SATURATION
EXIT SETUP
Press UP and DOWN to move the scroll and adjust the contrast.
12
10
8
6
4
2
0
12
10
8
6
4
2
0
10
11
Page 8

Modes and Features Setup
Advanced Features
Modes and Features Setup
Advanced Features
3. HUE
VIDEO SETUP
BRIGHTNESS
CONTRAST
HUE
SATURATION
EXIT SETUP
Press UP and DOWN to move the scroll and adjust the hue.
+6
+4
+2
0
-2
-4
-6
4. SATURTION
VIDEO SETUP
BRIGHTNESS
CONTRAST
HUE
SATURATION
EXIT SETUP
Press UP and DOWN to move the scroll and adjust the saturation.
12
10
8
6
4
2
0
Speaker Setup
SPEAKER SETUP
DOWNMIX
SUBWOFFER
BASS MODE
CENTER DELAY
REAR DELAY
EXIT SETUP
1. DOWINMIX
SPEAKER SETUP
DOWNMIX
SUBWOFFER
BASS MODE
CENTER DELAY
REAR DELAY
EXIT SETUP
[LT/RT] -Choose this setting, it will be sound like in a movie theatre,if the
original movie the disc was recorded from was encoded in the
Pro Logic Dolby Digital format.
[STEREO] -Choose this setting,when 5.1- channel sound playing,two
channels of signals will be output from the left and right soundtrack;
when 2-channel sound playing,stereo signal will be output.
[VSS] - Choose this setting to output the v s s from the
left and right soundtrack.
[5.1CH]- Choose this setting to output the 5.1-channel sound.
LT/RT
STEREO
VSS
5.1CH
irtual urround ound
2. SUBWOFFER
SPEAKER SETUP
DOWNMIX
SUBWOFFER
BASS MODE
CENTER DELAY
REAR DELAY
EXIT SETUP
[OFF] -Choose this setting,the subwoofer will not be output.
[ON] -Choose this setting,the player will auto detect the subwoofer
input then output it.
Note: This optin will be validated when DOWNMIX set to 5.1CH.
OFF
ON
3. BASS MODE
SPEAKER SETUP
DOWNMIX
SUBWOFFER
BASS MODE
CENTER DELAY
REAR DELAY
EXIT SETUP
There are three settings in this option: ALL LG SPK, ALL SM SPK,
MIXED SPK. You can adjust subwoofer volume in this option.
Note: This optin will be validated when DOWNMIX set to 5.1CH.
ALL LG SPK
ALL SM SPK
MIXED SPK
4. CENTER DELAY
SPEAKER SETUP
DOWNMIX
SUBWOFFER
BASS MODE
CENTER DELAY
REAR DELAY
EXIT SETUP
You can adjust center delay in this option.
Note: This optin will be validated when DOWNMIX set to 5.1CH.
+
4 MS
2 MS
0 MS
5. REAR DELAY
SPEAKER SETUP
DOWNMIX
SUBWOFFER
BASS MODE
CENTER DELAY
REAR DELAY
EXIT SETUP
You can adjust rear delay in this option.
Note: This optin will be validated when DOWNMIX set to 5.1CH.
+
12 MS
6 MS
0 MS
Digital Setup
DIGITAL SETUP
DYNAMIC RANGE
DUAL MONO
EXIT SETUP
1. DYNAMIC RANGE
DIGITAL SETUP
OP MODE
DYNAMIC RANGE
DUAL MONO
EXIT SETUP
Choose this setting to adjust the line out ratio and get different effect. If
adjusting to FULL,the audio signal peak value will be the minimum;while
adjusting to OFF,maximum.
Note: This optin will be validated when DOWNMIX set to 5.1CH.
2. DUAL MONO
DIGITAL SETUP
OP MODE
DYNAMIC RANGE
DUAL MONO STEREO
EXIT SETUP
Choose this option to setup the L and R mono output mode; There are four
modes in this option: STEREO, MONO L, MONO R, and MIX MONO.
It is mainly used in karaoke mode.
MONO L
MONO R
MIX MONO
FULL
6/8
4/8
2/8
OFF
12
13
Page 9

R
em
W
O
P
C
te
o
R
E
RETURN
Advanced Features
R
em
C
te
o
V
E
R
o
tr
n
o
o
tr
n
o
er
p
l O
l O
er
p
n
io
at
at
io
n
Advanced Features
During playback, press <POWER> to stop the player and
return to standby mode.
While the player is in standby, press <POWER> or any key
on the front panel to resume normal operation.
O
P
E
N
/
C
L
O
S
E
To open the disc tray, press <OPEN/CLOSE>.
To close the disc tray, press <OPEN/CLOSE> again.
s
y
e
k
+
0
1
-
0
These keys are used to input the time, as well as title,
chapter and track numbers.
When a numeric item is displayed on the screen, press the
0-10+ keys to select the desired entry, And press <ENTER>
to confirm.
P
L
A
Y
Press <PLAY> from stop mode to start playback.
Press <PLAY> during playback to replay the last 10 seconds.
This function is not available if the elapsed time of current
tracks less than 10 seconds.
Note: MP3 discs and some DVD discs do not have a 10 second
review feature.
E
S
U
A
P
Press <PAUSE> during playback to pause playback.
Press <PLAY> to resume normal playback.
P
O
T
S
Press <STOP> once during playback to stop and hold
playback.
Press <PLAY> to resume playback from the point you
pressed STOP.
Press <STOP> twice to stop playback completely.
Note:
The screen saver will automatically turn on if playback is
stoped about 3 Minutes (When Screen Saver is set to on).
SLOW
Press <SLOW> repeatedly to slow motion playback at
variable speeds: 1/2,1/3,1/4,1/5,1/6,1/7.
OSD
Press <OSD> to display the infomations of the video disc
on the TV screen, including song information, broadcast
time, remain time, etc..
P
re
ss
<
R
E
T
U
R
N
>
t
o
t
h
e
m
ai
n
m
en
u
w
h
en
M
U
TE
P
re
ss
<
M
U
T
E
>
t
o
m
u
te
t
h
e
A
u
d
io
o
u
tp
u
t.
P
re
ss
<
M
U
T
E
>
a
g
ai
n
t
o
r
es
u
m
L
/
R
During CD/VCD/SVCD playback.
Press <R/L> to select a audio channel (STEREO,
MONO L, MONO R, AUTO L, AUTO R).
e
n
o
rm
al
a
u
VOL+ VOL-
<
ss
re
P
t.
u
tp
u
o
C
PB
D
u
ri
n
g
V
ol) t
contr
S
U
B
T
I
T
L
During DVD playback, press <SUBTIT> repeatedly
to select from up to 32 subtitle languages.
is
h
T
:
te
o
N
L
A
N
G
U
A
G
During DVD playback, press <LANG> repeatedly to
select video languages.
N
o
te
:
T
h
is
P
-
S
C
A
During playback is stopped, press <P-SCAN> button
twice to switch to progressive scan mode, press
<P-SCAN>once to switch back to Interlace scan mode.
Note: If you connected the DVD player to your TV using the
component Video Output, you can use the <P-SCAN>
button to switch to progressive scan to superior
video quality.
AR
CLE
Press <CLEAR> to delete numbers you have selected.
Press once to deleteo one digit.
Press and hoid to delete all digits.
tt
u
b
>
L-
O
V
C
D
p
la
yb
ac
ect PB
o sel
E
s
i
n
o
ti
c
n
u
f
E
f
u
n
c
ti
o
n
v
a
N
ce
u
ed
r
o
t
n
o
k,
p
re
ss
<
P
off.
and
C on
(
ic
if
c
e
p
s
c
is
d
ry
b
y
t
h
e
d
is
c
l t
til
e
m
lu
o
v
B
C
>
(
p
la
yb
s
e
g
a
u
g
n
la
.
e.
m
lu
o
V
se
ea
cr
in
o
t
n
o
tt
u
b
>
L+
O
V
<
ss
re
P
14
P
B
C
is
o
n
.
d
io
o
u
tp
u
t.
e
m
lu
o
v
o
n
o
During DVD or CD/VCD playback, press <REV> once to
play the previous chapter, title or track.
During DVD or CD/VCD playback, press and hold <REV>
to scan in reverse.
The player will review the disc at 2, 4, 8 and 20 times
Normal speed as follows:
X20
Press <PLAY> to resume normal playback.
During DVD or CD/VCD playback, press <FWD> once to
play the next chapter, title or track.
During DVD or CD/VCD playback, press and hold <FWD>
to scan forward. The player will review
The disc at 2, 4, 8 and 20 times normal speed as follows:
2
4
X
X
8
X
0
2
X
Press <PLAY> to resume normal playback.
P
R
E
V
b
/
#
Press <#>/<b> to realize the tuning function.
(While MIC SETUP is set to AUTO)
[b,#,will be available shile set to 2 channel,will be not available
under 5.1channel.]
A
N
G
L
E
During DVD playback
Press <ANGLE> to view scenes from different camera angles.
Press <ANGLE> repeatedly to change from one camera
angle to another.
Note: This function is disc specific.
M
O
O
Z
Press <PREV> to skip to previous chapter or track.
N
E
X
T
ac
k
).
ry
a
v
l
il
w
Press <NEXT> to skip to next chapter or track.
M
E
N
U
During DVD, VCD or SVCD playback (with PBC on), press
<MENU> to return to the program menu.
In the Setup Menu, press <MENU> to return to the main
menu or stop mode.
Any time, press <MENU> to cancel the current OSD or
some menus.
N
o
te
:
T
h
is
f
u
n
c
ti
o
n
i
s
s
u
b
je
c
t
to
t
h
e
d
is
c
.
E
L
T
I
T
During DVD playback, press <TITLE> to display the DVD
title menu or play the first title.
N
o
te
:
T
h
is
f
u
n
c
ti
o
n
i
s
s
u
b
je
c
t
to
t
h
e
d
is
c
.
A
-
B
During playback, press <A-B> to select point A.
Press it again to select point B. The player will repeat the
section from A to B automatically.
Press <A-B> third time to cancel A-B repeat and clear points
A and B.
Note: 1. During CD/SVCD playback, points A and B must
be within the same track.During DVD playback, points
A and B can be selected from different chapters.
2. This function is subject to the disc.
REPEAT
Press <REPEAT> to select Repeat Title, Repeat chapter,
Repeat off during DVD playback.
Press REPEAT to select Repeat Single, Repeat All and
Repeat off when PBC is off ( VCD, CD, SVCD ).
During VCD/SVCD/DVD playback, press <ZOOM> to
magnify the image as follows:
ZO
O
M
1
Z
O
Z
O
O
M
:O
F
F
O
T
O
G
D
u
r
in
g
p
la
y
b
a
c
k
,p
r
e
s
s
<
G
D
D
C
V
3
D
b
e
r
N
E
,p
e
d
-
-
[
9
-
-
[
0
1
[
- -
]
1
1
-
-
[
2
1
T
C
-
:
-
-
9
1
0
-
-
:
-
-
:
-
-
1
1
-
:
-
-
2
1
C
LE
AR
K
R
T
T
R
K
TRK 01/16
K 01
TR
T
T
k
e
y
s
t
t
>
R
E
T
<
s
s
re
]
1
3
[
-
-
]
]
]
-
-
[
4
1
1
5
[
-
-
]
]
]
-
-
[
1
6
T
C
-
13
- - :
--
--
- - :
14
-
--
- - :
15
-
16 - - : --
-
O
0
0
0
7
o
i
n
o
c
o
R
P
a
s
f
o
ll
o
w
s
:
D
C
CD
D
C
V
VC
D
C
V
S
S
3
p
M
MP
D
V
D
DV
Notes:
1.Time searches for an exact time in the movie.
2.In Title/Chapter mode, you cannot select value outside the range of the
total number of titles or chapters.
3.For some DVD discs, the Search function is unavailable.
U
s
e
t
h
e
n
u
m
<
s
s
e
r
p
n
e
th
m
e
n
u.
P
R
O
G
o
m
p
to
s
n
I
CD
VCD
SVCD
OG
PR
1
[
-
-
5
]
[
-
-
]
2
]
-
-
[
]
-
-
[
6
]
-
-
[
3
]
-
-
[
7
4
[
-
-
]
8
[
-
-
]
PLAY CLEAR
D
M
V
p3
D
PR
OG
T
C
T
C
5 -
- :
--
1 -
- :
--
--
- :
6 -
--
- :
2 -
--
- :
7 -
--
- :
3 -
8 - - : --
4 - - : --
PL
AY
O
T
1
1
/
2
p
n
O
M
O
>
2
1
/
/
1
5
/10
7
C
u
t
t
r
fi
>
G
pu
In
e
lik
an
d
th
e
an
d
you ha
In
pu
th
e
es
pr
yo
u
to
c
2
,a
H
h
m
t t
th
th
ne
pr
t t
de
s
ha
le
n
d
e
d
r
.P
d
to
he
em
en
w
p
es
ve input.
he
si
re
<E
ve
ar
a
ZO
ZOOM1/3ZOOM1/4
t
h
e
[
T
r
X
X
X
X
0
0
1
/
0
e
s
ir
e
d
G
<
s
s
e
la
p
is
nu
k
ac
tr
y
la
p
to
p
re
ss
<
ro
gr
am
s
<E
N
TE
ti
tle
n
um
d
or
de
>
R
TE
N
s
et
. S
el
ll
th
e
nu
ZO
O
M
O
3
M
4
ZOOM1/2
a
c
k
S
e
a
r
c
h
]
m
e
n
u
w
il
l
d
is
0
0
:
0
1
:
3
1
0
0
:
0
0
:
4
1
0
0
:
0
1
:
2
2
9
4
:
0
0
:
0
0
0
0
:
0
1
:
1
0
1
T
im
e
,
T
a
>
O
T
O
ro
P
[
e
h
t
y
th
in
rs
be
m
is
fin
n
he
. W
EN
TE
R
>
m
ed
o
rd
er
R
>
to
c
le
be
r a
nd
th
r.
T
he
n
se
le
e
th
y
la
p
to
ec
t [
C
LE
AR
m
be
rs
y
ou
6
it
le
o
r
C
h
a
p
te
r
,
o
g
it
x
e
to
,
in
a
g
e
m
b
u
s
]
m
ra
g
ou
w
ou
r y
de
or
e
A
PL
t [
ec
el
s
d,
he
to
p
la
y
th
e
tra
ck
. S
ar
s
el
ec
t [
C
LE
AR
]
a
ll
th
e
nu
m
be
rs
e
ch
ap
te
r n
um
be
ct
[P
LA
Y]
a
nd
th
or
e
th
in
rs
te
ap
ch
] a
nd
p
re
ss
<
EN
h
av
e
in
pu
t.
p
la
y
to
:
u
n
ld
Y]
in
r i
n
en
r
de
TE
R
>
15
Page 10

MP3/MPEG4 Playback
Advanced Features
Troubleshooting
Other
MP3 is an audio compression mode using Level 3 of the international standard MPEG, whereby sound signal is
compressed in a rate of 12:1. A Mp3 disc can record music for playing of over 600 minutes or record over 170
songs, rivaling Cds in sound quality.
MPEG4 is set up by MPEG(Motion Picture Experts Group) a fourth edition audio and video standard.MPEG1
is audio and video compress standard for VCD. MPEG2 is audio and video compress for DVD,MPEG4 is one of
internet audio and video compress standard. Its most prominence character is its high compress rate and high
definition. A piece of DVD can be compressed and stored into one or two pieces of CD-R disc with MPEG4 format,
but the picture quality is better than VCD.
To play a Mp3 or MPEG4 disc
Select the track using direction buttons
1. Follow the basic operating instructions to insert a MP3 or MPEG4 disc, this machine will start to search the
information on the disc and show it in the display.
2. Press direction key to select MP3 or MPEG4 file and press <ENTER> key to play.
Repeat play
Using this function, the user will be able to enjoy a particular song or all the songs on the disc over and over again.
1. Choose a particular song to be repeated.
2. Press the <REPEAT> button you can choose folder repeat, single repeat or cancel the repeat Function.
Other functions:
When a MP3 disc is played, the features of mute,volume control, pause and forward and backward search will also
be available. The operations are the same with those of Cds.
Kodak Picture CD Playback
JPEG adopting the most efficient compression is widely used as picture storage type flattened and stored format.
Even if pictures are compressed 15-20 times. They still have good effect. Supported by most picture processing
software, fit for picture storage, it has small data and easy use .This machine can read. JPEG format picture CD disc.
Select to play by menu
1. Put in disc, the machinesearches disc information and main menu displays on screen. Press number key from 1 to
select picture, press play key to make sure.
2. Press direction key to select picture, then press <Enter> key to make sure.
3. In condition of stop, press direction key to select other pictures.
4. In condition of stop, select the first line file item on the right, then press play key to return to upper menu.
Other functions:
When playing picture CD. The machine allows pause,repeat and browsing. Use the Next or Previous key to browse.
Press <Zoom> key to enlarge picture. While in zoom mode press fast forward or backward key to control the zoom
scale. To move the view area of the enlarged picture, use the direction keys.In view mode, pictures can be rotated with
direction keys.The type of slide show transition can be selected from the navigation menu or simply by pressing
<Program> Key.
Advanced Features
For your convenience, we have enlisted some points to help solve problems you might encounter while using DVD player.
No sound
? Make sure the good connection between player and other appliances such as power amplifier or TV.
? Make sure the right operation on TV and power amplifier.
No picture
? Make sure the good connection between player and other appliances such as TV.
? Make sure TV works on well.
? Make sure the DVD player is in correct mode, otherwise, press <P/N> key several times to solve it.
Disc does not play
? Make sure the disc is loaded correctly (label side is facing up on the disc tray).
? Make sure the disc is clear.
Remote controller does not work
? Move the obstacle between player and remote controller away.
? Point the remote controller at the remote control sensor.
? Check the battery.
Picture dividing
? Make sure the disc is clear and no any scratch on it.
? For the player is controlled by micro-computer, if encountering problem, switch of the power first, and switch on again
in a few second, by then if no mistake notice is displayed, the player could work well.
SAFE MODE
The main unit will be in safe mode if it does not respond to any operation due to interference ty accident or strong noise
signals. To resolve this problem, you must pull out the power cord and plug it in again later 10 seconds.
Notes on condensation
Occasionally, condensation may occur within the device, resulting in drops of water forming on the optical pick-upinside
the unit. This is much like the condensation that takes place on a glass of cold water. This condensation may affect the
overall performance of the machine.
Condensation occurs when:
1. It is moved from a cold area to a warm area.
2. Its surrounding area is exposed to a sudden change in temmperature, for example, when located near an air-conditioner.
3. In summer, the unit is moved from a hot and humid environment immediately into an air-conditioned room.
4. The device is in a humid environment.
Care of discs
Protection
a. When loading or removing the discs, always hold them by the center and edge.
b. Do not stick or write anything on the surface.Protect discs against any fingerprint.
Cleaning
Wipe the discs from time to time using a soft cloth. Always wipe from the center toward the edge.
Storage
a. Never warp the discs. During no-sue periods,store them in their cases, which should be kept vertically. Do not expose
discs to high temperature,dampness or extremely low temperature, or else it may cause damage to the discs.
b. Do not expose discs to direct sunlight.
The DVD player contains laser devices. The top cover of the DVD module acts as a protective housing.Laser radiation is
dangerous when the top cover is removed or opened. Avoid direct exposure to beamduring service or repair.
Manufactured under license from Dolby Laboratories."Dolby", "Pro logic", and the double-D Symbol are trademarks of
Dolby Laboratories.
Other
16
This product incorporates copyright protection technology that is protected by method claims of certain U.S. patents and
other intellectual property rights owned by Macrovision Corporation and other rights owners.Use of this copyright protection
technology must be authorized by Macrovision Corporation, and is intended for home and other limited viewing uses only
unless otherwise authorized by Macrovision Corporation.Reverse engineering or disassembly is prohibited.
17
Page 11

Specifications
Other
Model
Play mode
Disc mode
Resolution
Video S/N ratio
Frequency response
Audio S/N ratio
Dynamic range
Distortion
D/A converter
Video output
S-Video output
801EDVD
NTSC/PAL/AUTO
DVD,DVD-R,DVD+R,DVD-RW,DVD+RW,SVCD,VCD,CD,
CD-R,CD-RW,JEPG,MP3,HDCD,WMA,MPEG4
500 lines
56dB
20Hz-20KHz:+/-1dB
90dB
90dB
<1%
192KHz/24bit
1Vp-p(75 )
Y: 1Vp-p(75 ) C:0.3Vp-p(75 )
Audio output
Digital audio output
AC-3
Power Voltage
Power consumption
Size
Weight
Accessories
Specifications are subject to change without notice.
2.0V +0.0V/-0.1V
Coaxial, Optical
5.1 channel output
~110/220V 60/50Hz
25W
430(L)x230(W)x43(H)mm
2.1Kg
Remote Control, AV Cable, Manual
18
 Loading...