

ElectroFlying Go-Go Dancer Instruction Manual
Sport Park Flyer Electric R/C Aircraft
Designed and Drawn by Steven E. Pauley • © 2005, ElectroFlying, Inc. All Rights Reserved
Wing Span: 26” Length: 25.6” Wing Area: 163 sq. in. Weight: 6.8 oz. Wing Loading: 6 oz. per sq. ft.
2 Cell 640 mAh LiPoly (7.4 v) @ 4.2 amps. Total Input Watts: 30 or 75 watts per lb.
Motor: GoBrushless V1 16T Outrunner and Thunderbird 9 Controller Prop: 6” x 4” Electric
Transmitter: 4-Channel Receiver: Micro 4 channel Servos: 3 Hitec HS-45HB
Go-Go Dancer Instruction Manual
ElectroFlying, Inc.
2547 83rd Court North, Minneapolis, MN 55444
763-560-5529 • contactefm@electroying.com
© 2005, ElectroFlying, Inc. All Rights Reserved
Rev. #1.3 – 9/14/2007

Go-Go Dancer - INTRODUCTION 2
M O D E L S
Read through this manual before starting construction. It contains important
instructions and warnings concerning the assembly and use of this model.
Go-Go Dancer is a 30-watt electric-powered sport park yer. Powered by a
small CD-ROM brushless motor and a 2-cell 640 mAh LiPoly battery, Go-Go
Dancer will give you spirited performance at a very affordable price.
The Go-Go Dancer Design
Go-Go Dancer is an original kit designed for modelers with an interest in
electric-powered airplanes capable of park ying and sport aerobatics. Go-Go
Dancer was designed from the beginning for lightweight brushless CD-ROM
motors and LiPoly cells. This airplane makes use of strong, lightweight design
and construction, which improves electric-powered ight performance and duration. Using the suggested motor and cells, Go-Go Dancer weighs about 7 oz.
ready-to-y. Go-Go Dancer was designed to y a wide speed range and handle
windier conditions than most park yers. Aerobatics, from very tight maneuvers to large, powerful loops, slow rolls, snaps, and big stall turns are possible
with Go-Go Dancer. Go-Go Dancer is very stable, and if trimmed out right, will
almost land itself. Go-Go Dancer is controllable and ies smoothly even in high
winds, yet slows down and lands like a feather. Go-Go Dancer is a great-ying
electric-powered model that ies predictably - not your typical “ip-and-op”
park yer. Go-Go Dancer should not be own by a beginner R/C pilot.
Go-Go Dancer was designed to make motor battery changes as easy as possible,
with no tools required. You don’t have to turn the airplane over or remove the
wing to change batteries. Just lift the front battery hatch up and ip it forward
for easy battery access. The hatch is hooked in the front and small magnets
hold the hatch rear in place. The recommended motor for Go-Go Dancer is the
GoBrushless basic CD-ROM motor kit with 16 turns powered by 2S1P - 640mAh
LiPoly cells at 5 amps. A 6” x 4” prop is recommended. This combination gives
spectacular performance and long ight times. Go-Go Dancer is light, yet tough.
Go-Go Dancer is a simple-to-build, y-anywhere airplane that is one of the best
ways to get into brushless performance on a budget.
This kit features leading edge design and interlocking laser-cut parts for exceptional t, quality, and ease of construction. A complete set of hardware is also
included. The Go-Go Dancer plans were drawn on a computer using professional
design software. We believe that the Go-Go Dancer plans are a work of art and
continue our high standards in kit manufacturing at ElectroFlying Models.
Easy-building engineering, great price, brushless performance and great ying
qualities, the Go-Go Dancer has it all.
WARNING!
This is not a beginner's airplane. This R/C kit and the model you will build from
it is not a toy! It is capable of serious bodily harm and property damage. It is
your responsibility, and yours alone, to build this kit correctly, properly install
all R/C components and ying gear (motor, batteries, speed control, radio,
servos, pushrods, etc.) and to test the model and y it only with experienced
competent help, using common sense and in accordance with all safety standards as set forth in the Academy of Model Aeronautics (AMA) Safety Code.
It is suggested that you join the AMA and become properly insured before
attempting to y this model.
Warranty
ElectroFlying, Inc. guarantees this kit to be free from defects in both materials
and workmanship at the date of purchase. This warranty does not cover any
components damaged by use or modication. In no case shall ElectroFlying‘s
liability exceed the original cost of the purchased kit. Further, ElectroFlying
reserves the right to change or modify this warranty without notice.
ElectroFlying has no control over the nal assembly or material used for nal
assembly, therefore no liability shall be assumed nor accepted for any damage
resulting from the use by the user of the nal user-assembled aircraft kit. By
the act of using the user-assembled aircraft kit, the user accepts all resulting
liability.
If the buyer is not prepared to accept the liability associated with the use of
this aircraft kit, the buyer is advised to return this kit immediately in new and
unused condition to ElectroFlying, Inc.
Follow These Important Safety Precautions:
1. This kit should not be considered a toy, but rather a sophisticated, working
model that functions very much like a full-size airplane. Because of its performance capabilities, it could cause injury to yourself and spectators or damage
to property, if it is not assembled and operated correctly.
2. You must assemble the model according to the instructions. Do not alter or
modify the model, as doing so may result in an unsafe or unyable model.
3. You must take time to build straight and strong. You should not use any
materials or kit supplied parts that you suspect are defective or damaged.
Request replacement kit parts from ElectroFlying, Inc.
4. You should only use R/C radio systems that are in perfect working order.
5. You must check the operation of the model before every ight to ensure
that all equipment is operating and that the model has remained structurally
sound. Replace any part that shows any sign of wear or fatigue.
6. Check control surface travel and direction before each ight.
7. Do a radio range check before the rst ight or after any change to the
model's radio system. Never use a radio system that has been involved in a
crash without a professional check-out and repair if needed.
8. Do not over-power this kit. Use only recommended electric motors and cells.
9. If you are not already an experienced R/C pilot, you should y the model
only with the help of a competent, experienced R/C pilot.
10. While this airplane kit has been ight tested to exceed normal use, the
airplane should not be used for high stress ying, such as racing.
We, as the kit manufacturer, provide you with a top quality kit and instructions,
but ultimately the quality and flyability of your finished model depends on how
you build it; therefore, we cannot in any way guarantee the performance of your
completed model, and no representations are expressed or implied as to the
performance or safety of your completed model.

Go-Go Dancer - INTRODUCTION 3
M O D E L S
Before You Start
Compare the parts in this kit with the parts list on this page, and note any
missing parts. Also inspect all parts to make sure they are of acceptable quality. If any part is missing, broken or poor quality, or if you have any questions
about building or ying this airplane, please call us at 763-560-5529, or email
us at contactefm@electroying.com. If you are contacting us for replacement
parts, please include the kit name, part name, part code/number and your
mailing address. You can also check our web site at www.electroying.com
for the latest updates.
Recommended Receiver, Motor and Batteries
The ElectroFlying Go-Go Dancer can use any standard 4-channel narrow-band
receiver, but to save a little weight you may want to use one of the smaller
receivers such as the Castle Creations Berg 4L. Go-Go Dancer has been design
to use 3 Hitec HS-45HB servos and a BEC. The recommended motor for Go-Go
Dancer is the GoBrushless basic CD-ROM motor kit with 16 turns powered by
2S1P - 640mAh LiPoly cells at 4.5 amps. A 6” x 4” prop is recommended. See
page 17 for more motor tips.
Supplied Parts List (Or What's In The Kit)
Use the checklist below to make sure you have everything before you
start. If you are missing any parts, contact us at 763-560-5529 or at
contactefm@electroying.com.
General
(1) This Manual (22 Pages, Illustrated)
(1) Plan Sheet Rolled (18" x 30")
Wood (Balsa, Birch & Lite-Ply)
(1) 1/16" x 2" Birch Dowels (Balance Point)
(1) Laser Cut 1/16" Balsa Sheet V1S1 (Wing Ribs & Hatch Top)
(1) Laser Cut 1/16" Balsa Sheet V1S2 (TE, Motor Mount & Hatch Parts)
(1) Laser Cut 1/16" Balsa Sheet V1S3 (Fuse Sides & Bottom)
(1) Laser Cut 1/16" Balsa Sheet V1S4 (Fuse Sides, Top & Bottom)
(1) Laser Cut 1/16" Balsa Sheet V1S5 (Fuse Sides & Bottom)
(1) Laser Cut 1/16" Balsa Sheet V1S6 (Fuse Sides & Top)
(1) Laser Cut 3/32" Balsa Sheet V1S7 (Ribs, Spar & LG Struts)
(1) Laser Cut 3/32" Balsa Sheet V1S8 (Ailerons)
(1) Laser Cut 1/8" Balsa Sheet V1S9 (Elevator, Stab, Fin & Rudder)
(1) Laser Cut 1/8" Balsa Sheet V1S10 (Nose, Pilot & Former)
(1) Laser Cut 1/8" Lite-Ply V1S11 (Formers and Motor Mount)
(1) Laser Cut 1/32" Plywood Sheet V1S12 (Doublers & Control Horns)
(1) Laser Cut 1/16" Plywood Sheet V1S13 (Wing Joiner & Motor Mount)
(1) 1/16" x 1/4" x 25 1/4" Balsa Stick (Bottom Wing Spar)
(1) 3/32" x 1/4" x 25 1/4" Balsa Stick (Top Wing Spar)
(1) 1/8" x 1/4" x 25 1/4" Balsa Stick (Wing Trailing Edge)
(1) 1/4" x 1/4" x 25 1/4" Balsa Stick (Wing Leading Edge)
Hardware
(4) Du-Bro Micro E/Z Links
(4) .032 Micro Pushrod Wires
(1) #2 x 1/2" Button Head Sheet Metal Screws (Du-Bro 526)
(1) #8 x 3/4" Nylon Bolt
(1) #8 Nylon Nut
(1) 3" x 3/4" Adhesive Back Velcro Strip (Hook and Loop Set)
Additional Items Required to Complete Go-Go Dancer
1 Roll of Lightweight Iron-On Plastic Covering
(Nelson LiteFILM or Ultracoat Lite Film)
Clear Packing Tape for Hinges
1" K&S 3/8" Brass Tube #135 (0.345 I.D.)(Solder to motor bearing holder)
Optional Landing Gear Hardware (Not Part of Basic Kit)
(1) 1/16"x 12" Music Wire (Landing Gear Legs)
(2) 1-1/2" Du-Bro Lightweight Foam Wheels
(1) 1" Du-Bro Lightweight Foam Wheel
(4) 1/16" Du-Bro Wheel Collars and Set Screws
Building Supplies/Adhesives
Thin C/A, Thick C/A, and Canopy Glue
C/A Accelerator (Optional)
120, 220, and 400 Grit Sanding Paper and Various Size Sanding Blocks
Waxed Paper
Thread Locker
Lite Hobby Filler
Building Tools
Flat, level building surface (2' x 4' Ceiling Tile recommended)
Hobby Knife with #11 Blades and Cutting Mat
Small T-Pins
.050 Hex Ball Wrench
Electric Drill, 1/32" Drill Bit
Small and Medium Flat-blade Screw Drivers
Small Phillips Screw Drivers (00)
Needle Nose Pliers and Various Small Clamps
Covering Iron and Sock
24" Straightedge/Ruler
Masking Tape and/or Small Rubber Bands
Rotary Tool and Reinforced Cut-off Wheel
Abbreviations
Fuse = Fuselage Stab = Horizontal Stabilizer
Fin = Vertical Stabilizer or Fin LG = Landing Gear
LE = Leading Edge TE = Trailing Edge
" = Inches Lite-Ply = Lightweight Plywood
Go-Go Dancer - INSTRUCTIONS 4
M O D E L S
Building Notes
Whenever you see the term "Glue" written in the instructions, you should use a quality hobby-grade Thin C/A type glue.
Photos and drawings in the instructions are placed to the left of the steps they refer to. It may be helpful to look ahead in the instructions or refer to the Plan callouts if you are confused about the current step or photo. Part numbers on laser-cut parts are top-side-up, unless otherwise noted.
Most of the wood parts in this kit have been laser-cut for accuracy and quality. The parts are held in place in each sheet by small tabs or breaks in the laser cut.
If you have trouble removing the parts from the sheets without damage, you can use a hobby knife to cut the tabs. Take your time and inspect all of the parts
after you have them removed. Save the wood scraps until you have nished the kit. Very light sanding of the parts can remove any tab bumps, but this should be
unnecessary for the most part.
The wood will have a light brown edge from the laser that will not have any effect on building strength. You may want to sand the brown edge of parts that will
be visible when using transparent coverings. Be careful not to over-sand the soft balsa wood and change the shape or size.
Take your time and enjoy building your Go-Go Dancer. Building from a kit can be a satisfying part of this sport and can add to your skills as an R/C pilot. You
will have a better understanding of your airplane because, unlike an ARF, you will get to know every part and function as you build. Go-Go Dancer has been
designed to build quickly, and with Go-Go Dancer's laser-cut parts, building accuracy is easier to achieve. The following instructions will lead you through
the building process, so clean off the building board and get started building your Go-Go Dancer. Building your own R/C airplane from a kit can be one of the
most rewarding experiences in this sport.
Tail Group Construction
Start the Horizontal Stabilizer and Elevator construction by
1
covering the Plan with wax paper to protect the Plan and keep the
parts from sticking to it. The Stabilizer and Elevator are constructed
from laser-cut 1/8" balsa stock. You will nd all of the parts on
sheet V1S9.
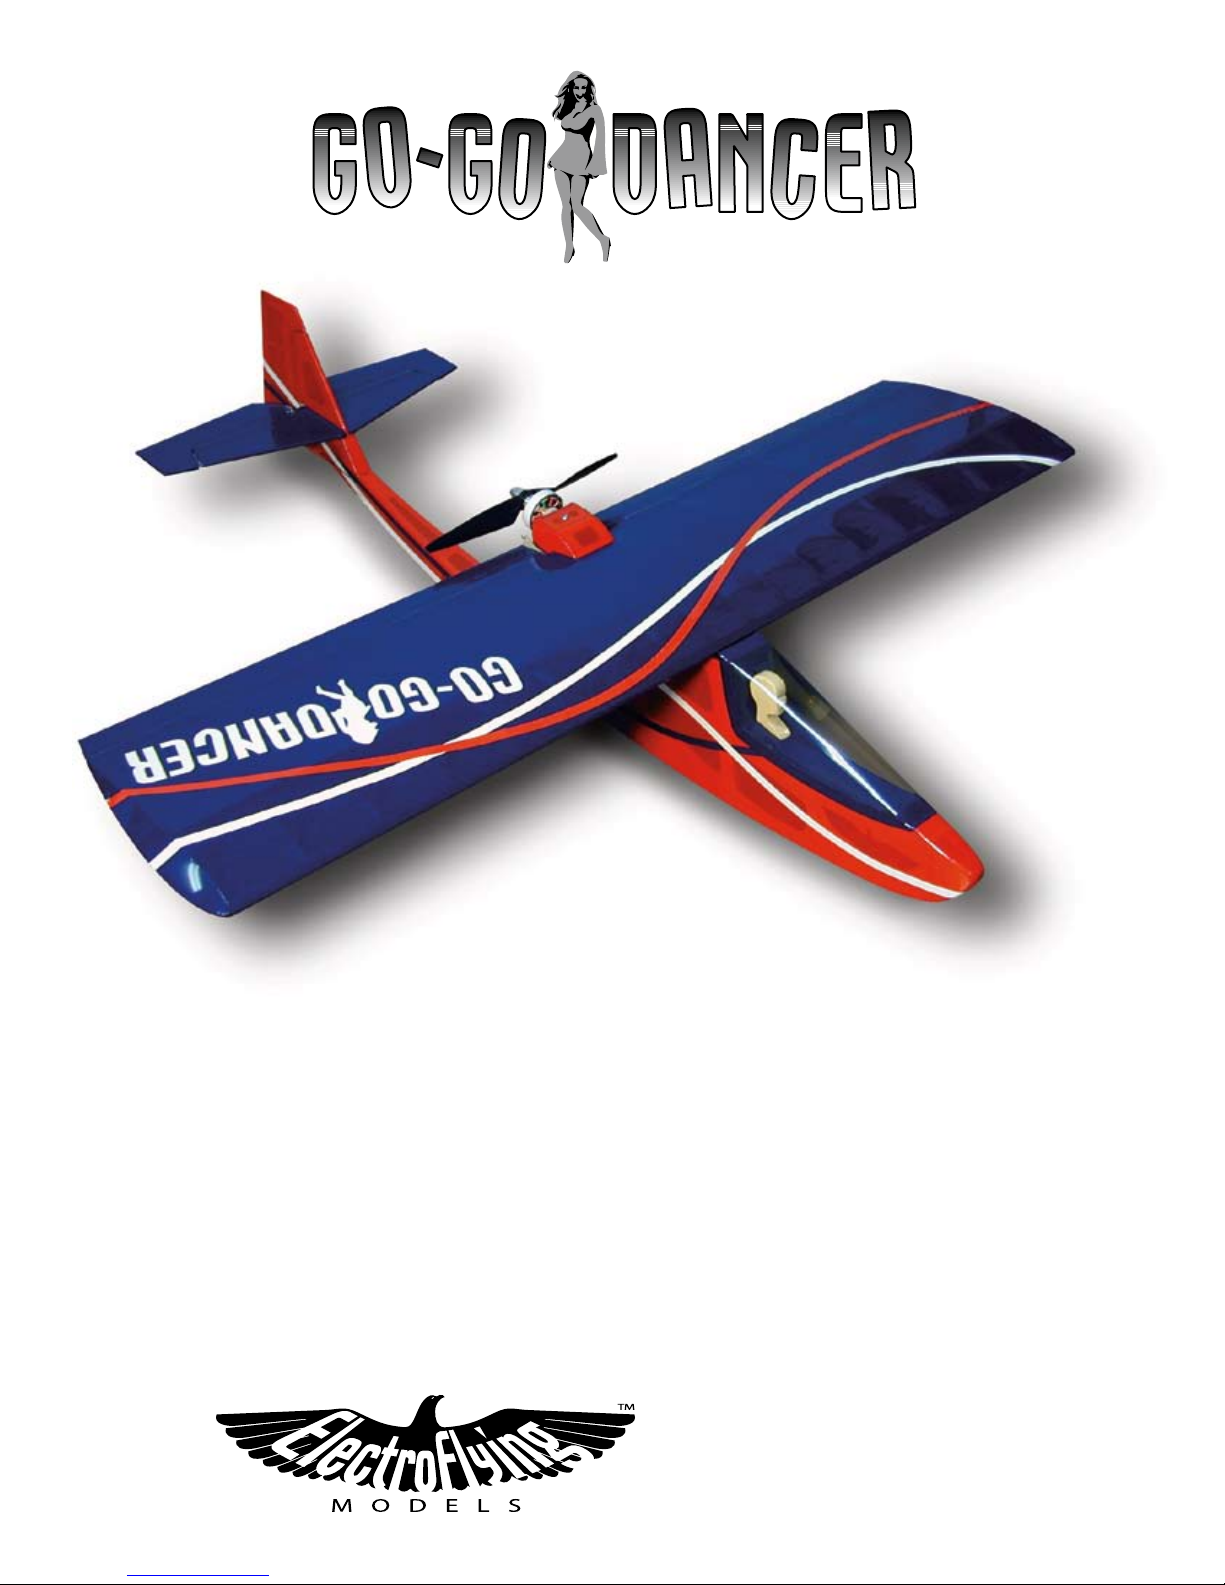
Fit the 6 pieces (R1 – R6) that make up the Rudder together
2
over the plans. Use thin C/A to hold the parts together. If you blocksand the Rudder joins, as soon as you apply the C/A you will ll
any gaps in the joins with balsa dust and make a nice tight t. The
Vertical Fin is just one piece and requires no building
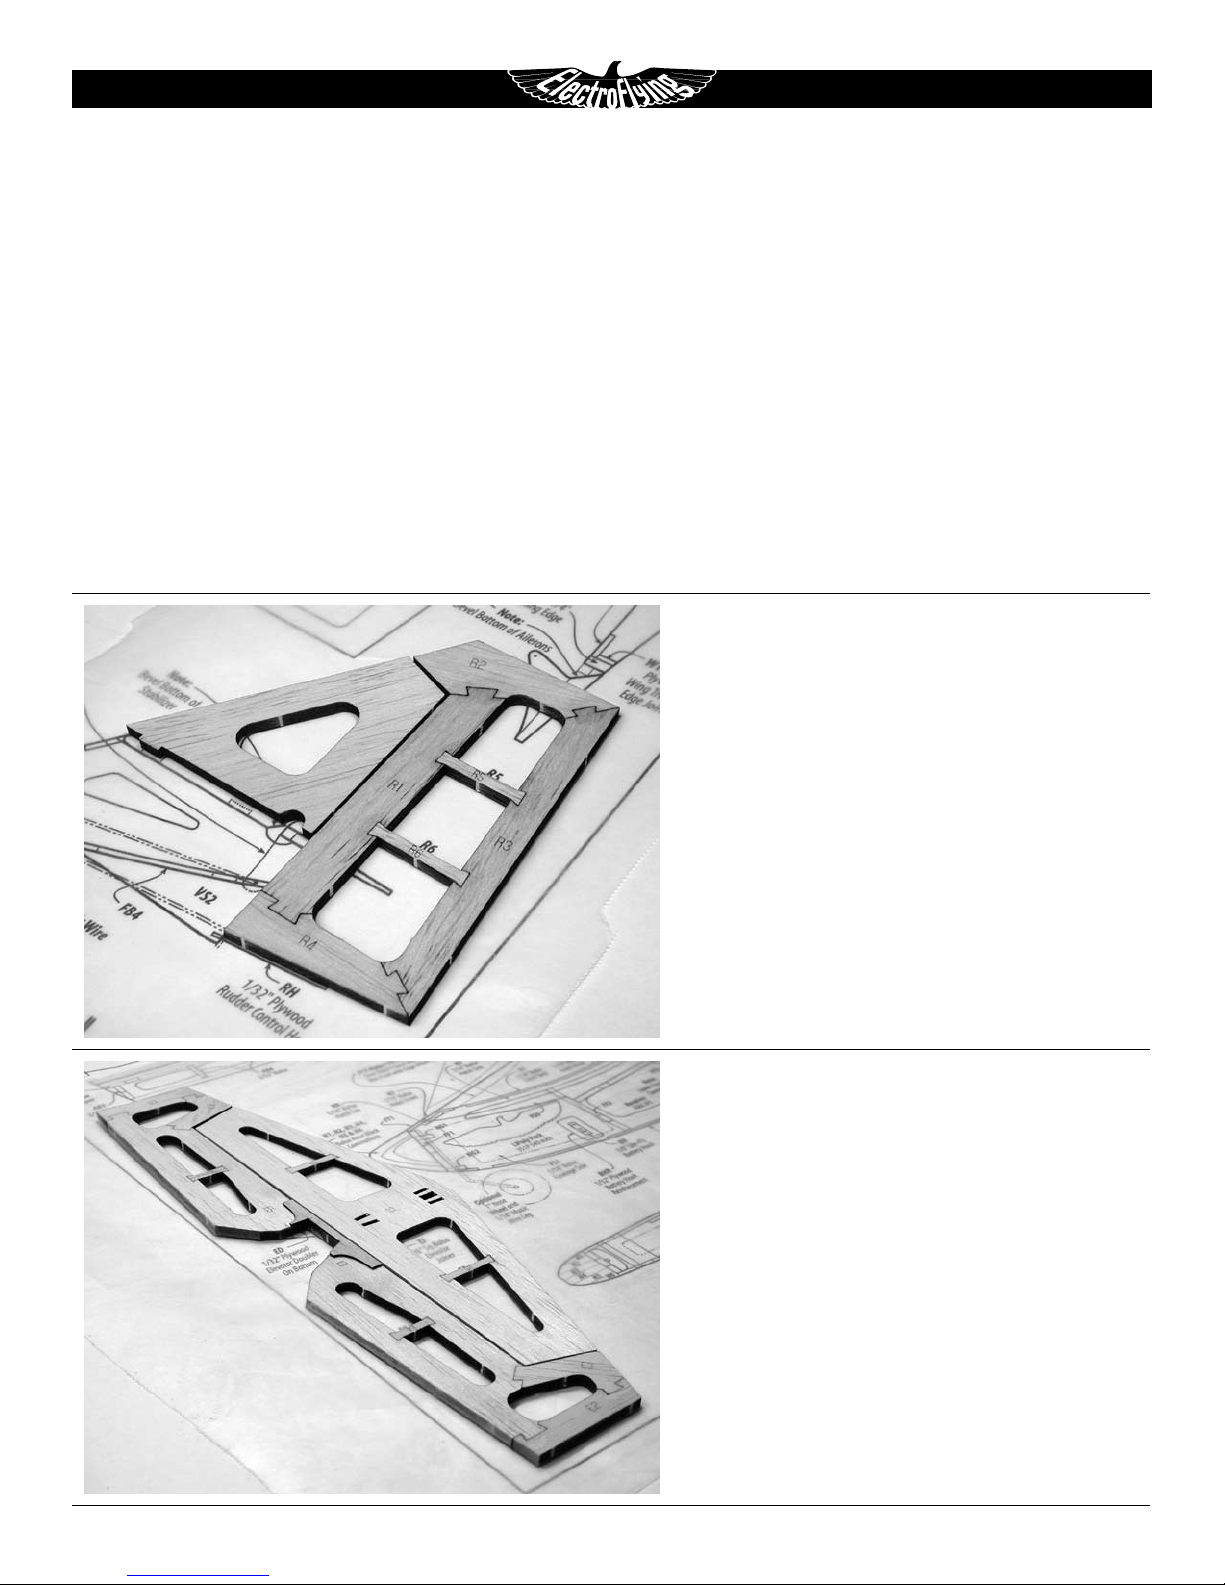
3 Build the Horizontal Stabilizer (S1, S2 & S3) and Elevator (E1
– E8 & EJ) over the plans like the Rudder. They are built top-side-up.
After the joints have been glued with C/A, the Elevator is turned
upside-down and the plywood Elevator Doubler (ED) is glued to
the bottom as shown in this photo. Make sure the plywood Elevator
Doubler is lined up with the balsa parts.
Go-Go Dancer - INSTRUCTIONS 5
M O D E L S
4 Sand a 45º bevel on the bottom trailing edge of the Horizon-
tal Stabilizer as shown in this photo. This is different from most kits,
which have you bevel the elevator leading edge.
Sand a 45º bevel on the left side of the Rudder. Take care not
5
to notch the top of the Rudder.
6
You should sand the trailing edge of the Elevator and Rudder
to about 1 /16". Tapering the trailing edges will reduce the weight
of the parts and improve the looks of your model. It will be easier
to balance your Go-Go Dancer if you keep the weight of Tail Group
parts to a minimum.
Set the Tail Group parts aside for now. You will be mounting them
on the Fuselage in a later step.
Wing Construction
7
Start the Wing construction by covering the Wing area of
the Plans with wax paper. Find all the Spars, Ribs, Joiners and other
Wing parts before you start.
Important Note: There are four 25 1/4" balsa sticks included in
the kit that are used in the Wing construction. They are very close
in thickness and you will have to be careful that you are using the
right one for each purpose. The 1/16" x 1/4" piece is used for the
Bottom Wing Spar. The 3/32" x 1/4" piece is for the Top Wing Spar.
The 1/8" x 1/4" piece is used for the Wing Trailing Edge. The 1/4" x
1/4" piece is used for the Wing Leading Edge.
8 Carefully pin the 1/16" x 1/4" x 25 1/4" balsa Bottom Wing
Spar to the plans. Locate the pins so that you can position the lasercut Center Spar on top.
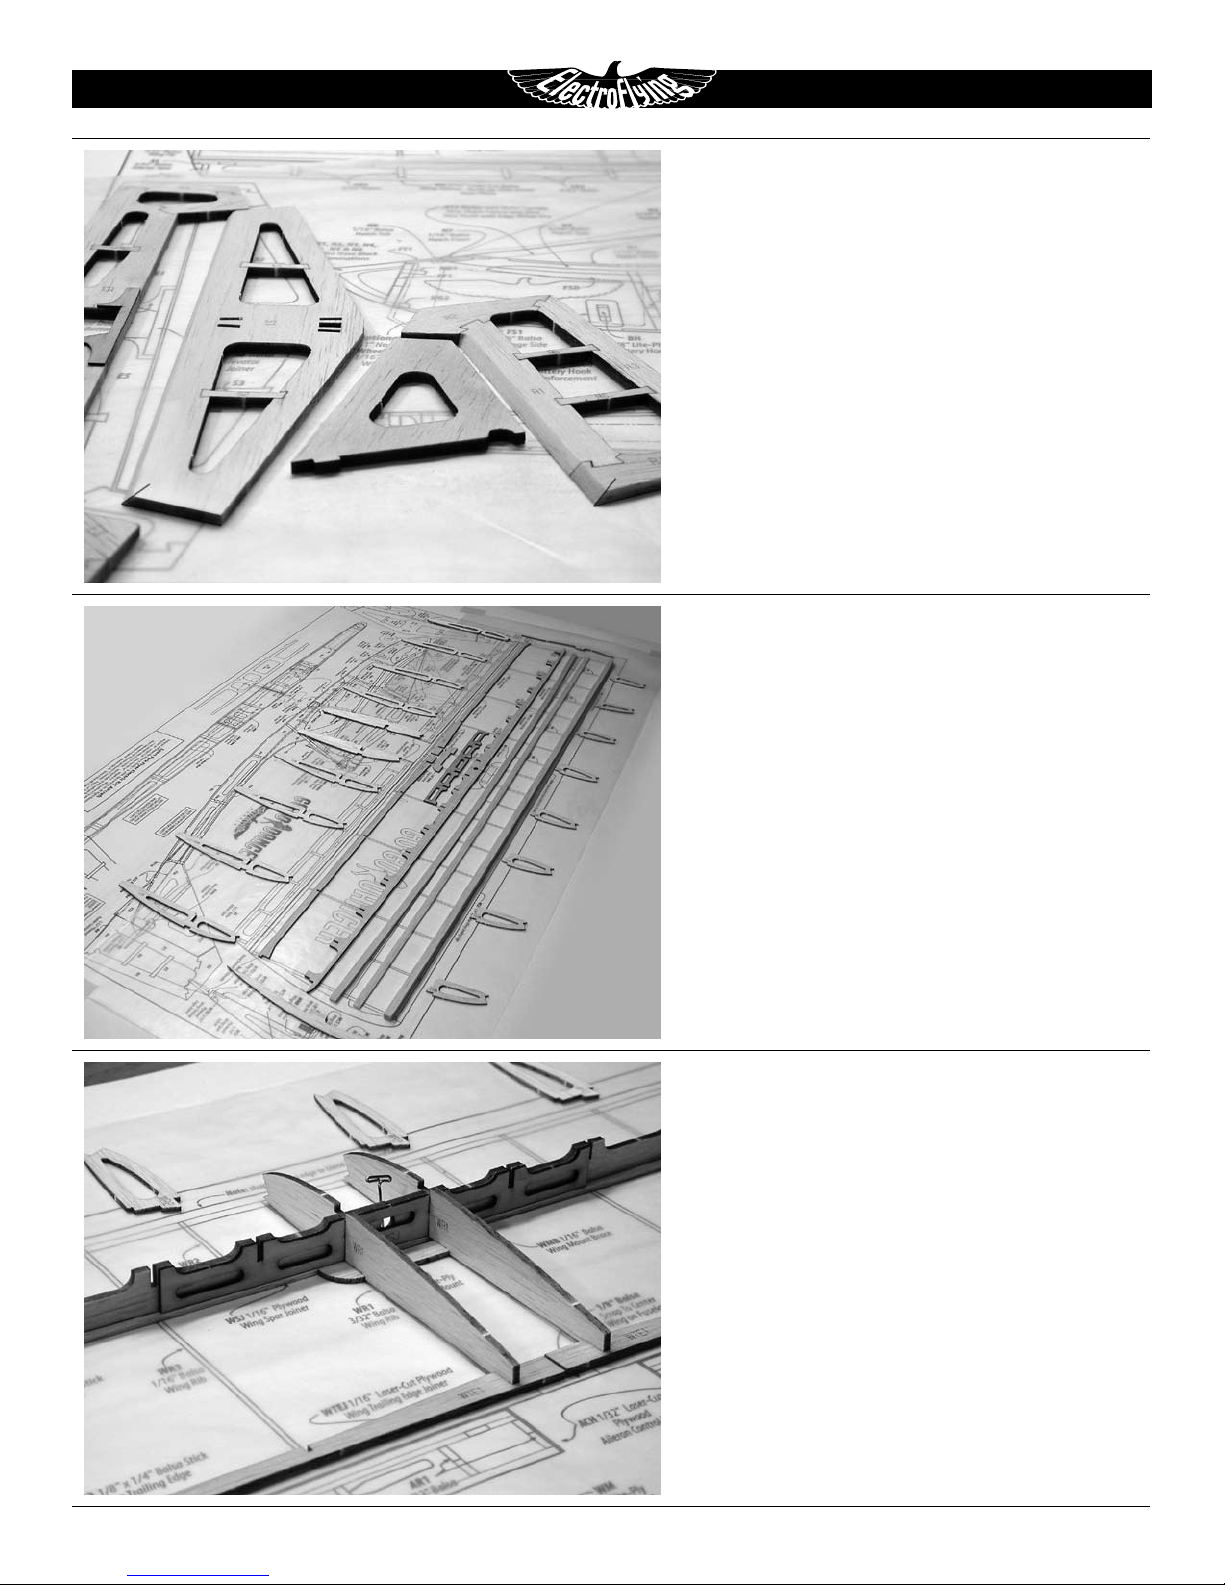
Lay the two Trailing Edge Spar (TES) pieces on the plans in
9
position. Position the Wing Mount Brace (WMB) in place on the
plans. Position the two Wing Center Spars (WCS) on top of the Bottom Wing Spar. Position the 1/16" plywood Wing Spar Joiner (WSJ)
and align it with the notches in the Wing Center Spars.
Slide the two center 3/32" Wing Ribs (WR1) in the center
10
notches of the Wing Spar Joiner. Fit them over the Wing Lower Spar,
Wing Mount Brace and into the notches on the Wing Trailing Edge.
They should friction-t into place, but you may tack them in place,
with C/A, if needed. You will glue the Spars and Ribs together after
all the full-length Ribs are in place.

Go-Go Dancer - INSTRUCTIONS 6
M O D E L S
11 Position the two 3/32" Wing Ribs (WR4) at each Wing Tip.
Make sure they t against the notch in the Wing Center Spar and in
the notch of the Wing Trailing Edge. You may have to use a little C/A
to hold these Ribs in place.
12 Fit the six Wing Ribs (WR3) to the Wing Spar notches and
the Trailing Edge notches. Wing should have all the full-length Ribs
in place as pictured here.
Use a straightedge along the Trailing Edge to help keep the
13
Wing straight as you now glue the full-length Ribs in place on the
Spar and Trailing Edge.
Glue the Wing Center Spar to the Wing Lower Spar along
14
the full length of the Wing.
15 Fit (Do Not Glue) the remaining Wing Ribs (WR2) into the
slots on the Wing Center Spar.
16
Position the 1/4" sq. Leading Edge. While holding the LE in
place, glue it to the center two Wing Ribs (WR1). Then glue the LE to
the two tip Wing Ribs (WR4).
Reposition the remaining Wing Ribs (WR2 & WR3) and C/A
17
them to the Leading Edge. Sand the end of the Leading Edge ush
with Wing Rib (WR4).
Glue Wing Ribs (WR2) to the Wing Spar.
18

Go-Go Dancer - INSTRUCTIONS 7
M O D E L S
19 Glue the 3/32" x 1/4" balsa Wing Top Spar (WTS) in place
with C/A. Sand the Wing Top Spar ush with Wing Ribs (WR4).
20
(WTE) to the rear edge of Trailing Edge Spar (TESs) and Ribs. Sand
the Wing Trailing Edge ush with Wing Ribs (WR4).
21
in place. It should t in the gap between WR1s and the WTE.
22
Remove Wing from the building board and check all your glue joints.
23 Locate all the laser-cut Aileron parts. They can be found on
sheet V1S8.
Note: You do not have to build the Ailerons over the Plans, but you
should use them as a guide. The Ailerons are built upside-down as
pictured here. You should use a straightedge to make sure LE of the
Ailerons are straight before you glue everything in place.
24
Aileron (WA).
Glue the 1/8" x 1/4" x 25 1/4" balsa Wing Trailing Edge
Glue the 1/16" plywood Wing Trailing Edge Joiner (WTEJ)
Position the Wing Tips (WT) in place and C/A.
Fit the Aileron Spar (AS) into the notches of the Wing
25
Fit the Aileron Ribs (AR1 – AR4) into the notches of the
Wing Aileron. There are Four different sizes of these and you should
use the Plans to get them located in the right position.
After all the Aileron pieces are in place, you can use C/A to
26
lock everything in place.
27 Sand a 40º bevel on the bottom LE of the Ailerons as
pictured here.
28
Sand the bottom of the Ailerons from the Aileron Spar to
the TE of the Aileron. The Aileron TE should be about 1/16" thick
after sanding.
Set the Wing and Ailerons aside for now. You will be mounting them
on the Fuselage in a later step.
 Loading...