

Page 1
THE ULTIMATE VOCODER
English v1.1
Page 2
CAUTION
ATTENTION: RISQUE DE CHOC ELECTRIQUE - NE PAS OUVRIR
WARNING: TO REDUCE THE RISK OF FIRE OR ELECTRIC
SHOCK DO NOT EXPOSE THIS EQUIPMENT TO RAIN OR MOISTURE
RISK OF ELECTRIC SHOCK
DO NOT OPEN
The lightning flash with arrowhead symbol, within an
equilateral triangle, is intended to alert the user to the
presence of uninsulated ìdangerous voltageî within the
productís enclosure that may be of sufficient
magnitude to constitute a risk of electric shock to
persons.
The exclamation point within a equilateral triangle is
intended to alert the uset to the presence of importat
operating and maintenance (sevicing) instruction in
the literature accomanying the product.
INSTRUCTIONS PERTAINING TO A RISK OF FIRE, ELECTRIC SHOCK, OR INJURY TO PERSON
IMPORTANT SAFETY INSTRUCTIONS
READ AND SAVE THESE INSTRUCTIONS
WARNING - When using electric products, basic precautions should always be followed, including the following:
1. Read all the instructions before using the product.
2. Do not use this product near water - for example near a bathtub,
washbowl, kitchen sink, in a wet basement, or near a swimming pool,
or the like.
3. This product should be used only with a cart or stand that is
recommended by the manufacturer.
4. This product, either alone or in combination with an amplifier and
headphones or speakers, may be capable of producing sound levels that
could cause permanent hearing loss. Do not operate for long period of
time at high volume level or at a level that is uncomfortable. If you
experience any hearing loss of ringing in the ears, you should consult
an audiologist.
5. The product should be located so that its location or position does
not interfere with its proper ventilation.
6. The product should be located away from heat sources such as
radiator, heat registers, or other products (including amplifiers) that
produce heat.
7. Clean only with a damp cloth. Before cleaning the unit, turn off the
power and unplug the power cord from the outlet.
8. The power supply cord of the product should be unplugged from the
wall outlet during lightning storms or when left unused for a long periods
of time.
9. Use only with attachments/accessories specified by the manufacturer.
10. The product should be serviced by qualified service personnel when:
A. The power supply cord or the plug has been damaged; or
B. Objects have fallen, or liquids has been spilled into the product; or
C. The product has been exposed to rain; or
D. The product does not appear to be operate normally or exhibits a
marked change in performance; or
E. The product has been dropped, or the enclosure damaged.
11. Do not attempt to service the product beyond that described in the
user maintenance instructions. All other servicing should be referred to
qualified service personnel.
This product may be equipped with a polarized line plug ( one blade wider than the other). This is a safety feature. If you
are unable to insert the plug into the outlet, contact an electrician to replace your obsolete outlet, Do not defeat the
safety purpose of the plug.
For Polarized Line Plug:
Caution: TO PREVENT ELECTRIC SHOCK, MATCH WIDE BLADE OF PLUG TO WIDE SLOT, FULLY INSERT.
Attention: POUR …VITER LES CHOCS …LECTRIQUES, INTRODUIRE LA LAME LA PLUS LARGE DE LA FICHE
DANS LA BORNE CORRESPONDANTE DE LA PRISE ET POUSSER JASQUí AU FOND.
IMPORTANT: THE WIRES IN THIS MAINS LEAD ARE COLOURED IN ACCORDANCE WITH THE FOLLOWING CODE:
BLUE: NEUTRAL
BROWN: LIVE
As the colours of the wires in the mains lead of this apparatus may not correspond with the coloured markings identifying
the terminals in you plug, proceed as follows.
The wire which is coloured BLUE must be connected to the terminal which is marked with the letter N or coloured BLACK.
The wire which is coloured BROWN must be connected to the terminal which is marked with the letter L or coloured RED.
Under no circumstances must either of the above wires be connected to the earth terminal of the three pin plug.
For the USA
For Canada
For the U.K.
Page 3

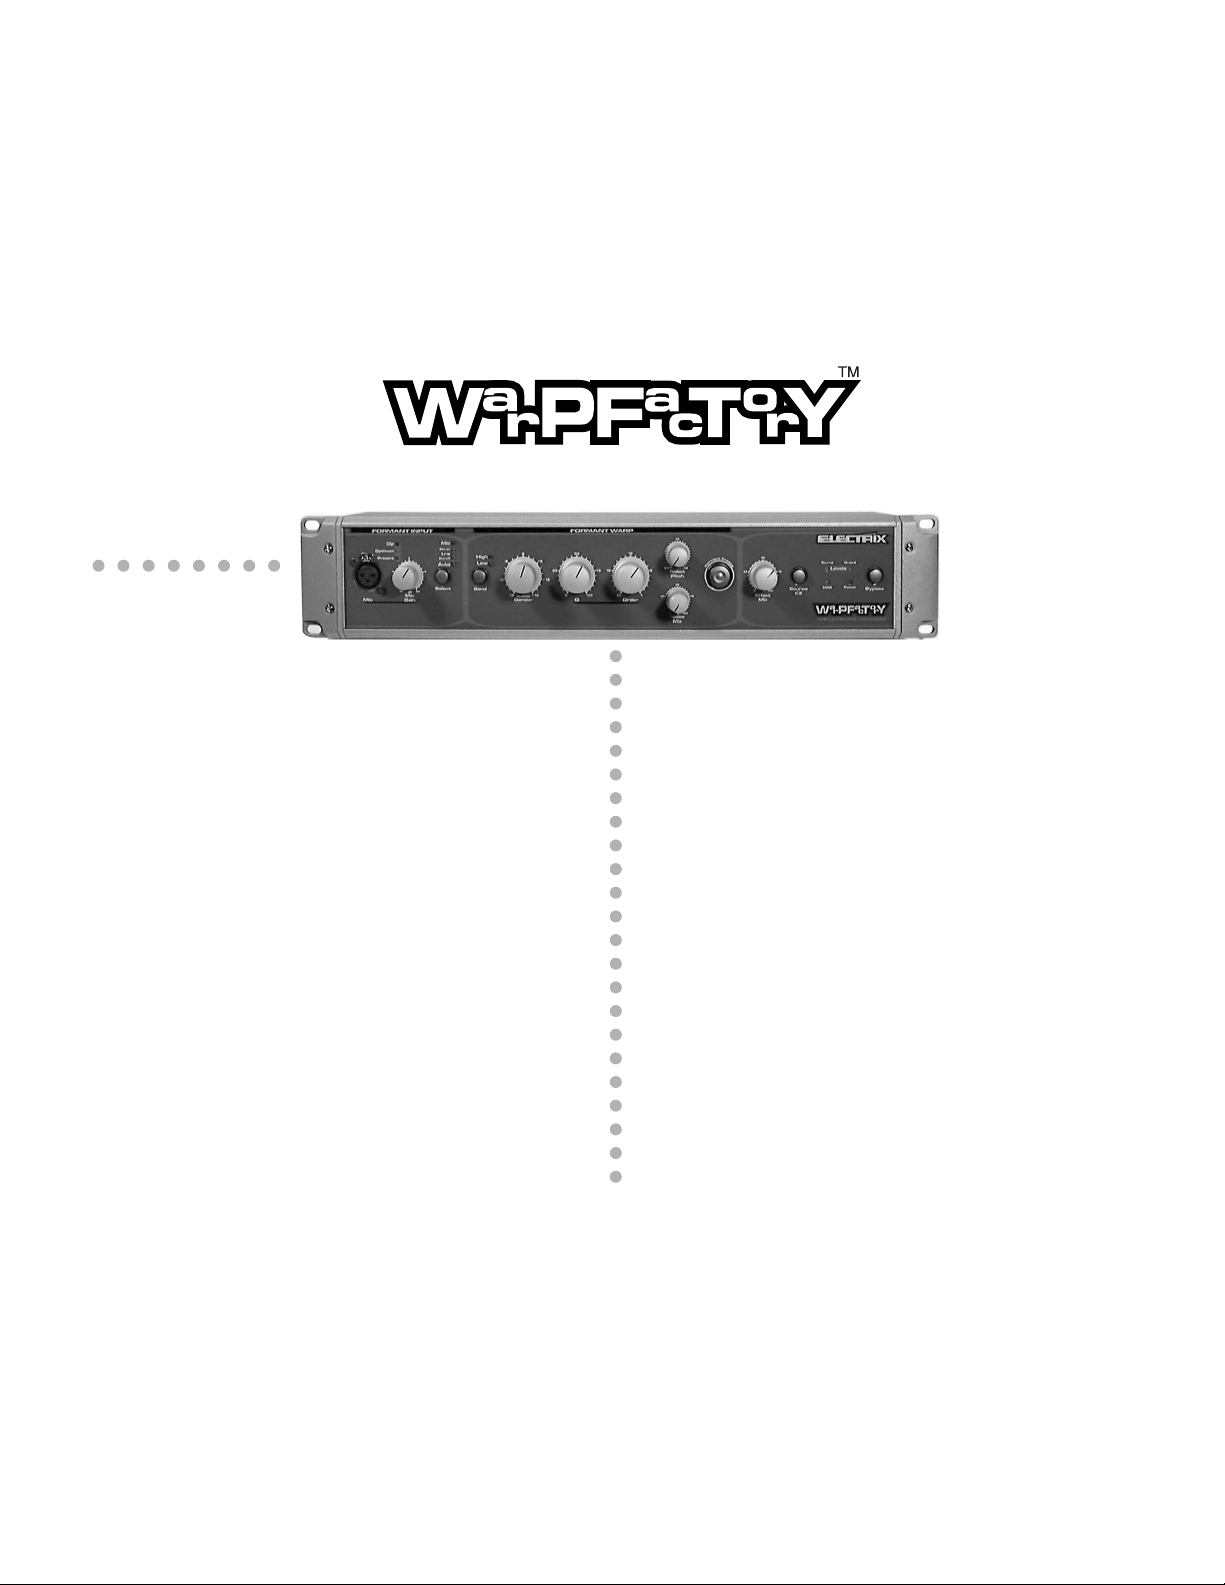
INTRODUCTION
W
elcome to the world of Electrix! We would like to thank you for purchasing
WarpFactory, The Ultimate Vocoder for musicians, DJs, producers and engineers.
WarpFactory is a unique new product with sound shaping capabilities never
before offered.
With WarpFactory incredible sounds can be created. The basic principle of WarpFactory is that
one signal ‘Warps’ another. This is accomplished by using two inputs:
• The Source - the sound to be shaped
• The Formant - the signal to shape the source
Formants are the resonances we form with our mouths and throat to articulate vowels and
consonants. The formant is then superimposed on the source sound forming an effect that can
be very human-like. This can be like having a speaker in the throat.!
Give WarpFactory a source such as a sampler, turntable, synthesizer or guitar. You can derive a
formant signal from a microphone and your voice or you can use other inputs such as a drummachine, turntable or ...well, get creative.
Unlike traditional vocoders, WarpFactory uses a powerful DSP (Digital Signal Processor) to run a
proprietary physical modelling algorithm instead of traditional multiband analog filtering.
WarpFactory’s unique future / retro case was designed to allow both desktop and rackmount
installation. This concept makes WarpFactory’s control surface optimimum for live performance
as well as studio use.
As an added bonus, WarpFactory has a built in phono pre-amp so you can plug your turntable
directly in. This allows you to cue the effect before it goes to the house by using the cueing
feature of your mixer. In the studio full MIDI implementation makes FilterFactory the perfect
recording tool. You can play the FilterFactory live and capture your performance in a sequence.
" INSPECTION
In your Electrix box you should find:
• 1 Electrix WarpFactory
• 1 Manual
• 1 Rackmount kit
• 1 Warranty Card
• 1 EIC Power Cable appropriate for your region
If this is not the case then please call your local Electrix distributor, agent or dealer.
Page 4

5
English
TABLE OF CONTENTS
Introduction . . . . . . . . . . . . . . . . . . . . . . . . . . . . . . . . . . . . . . . . . . . . 4
Inventory Inspection . . . . . . . . . . . . . . . . . . . . . . . . . . . . . . . . . . . . . 4
1 Quick Start
1.1 What to plug in . . . . . . . . . . . . . . . . . . . . . . . . . . . . . . . . . . . . . . 6
1.2 What to do . . . . . . . . . . . . . . . . . . . . . . . . . . . . . . . . . . . . . . . . . . 7
2 Understanding the Product
2.1 Front Panel . . . . . . . . . . . . . . . . . . . . . . . . . . . . . . . . . . . . . . . . . . 8
2.2 Back Panel . . . . . . . . . . . . . . . . . . . . . . . . . . . . . . . . . . . . . . . . . . . 9
3 Performance Guide
3.1 Setup 1: Pre Mixer . . . . . . . . . . . . . . . . . . . . . . . . . . . . . . . . . . 11
3.2 Setup 2: Mixer with Aux Send . . . . . . . . . . . . . . . . . . . . . . . . . 12
3.3 Setup 3: Post Mixer . . . . . . . . . . . . . . . . . . . . . . . . . . . . . . . . . . 13
3.4 Artist Applications . . . . . . . . . . . . . . . . . . . . . . . . . . . . . . . . . . . . 14
4 MIDI Applications
4.1 Recording Performances to a Sequencer . . . . . . . . . . . . . . . . . . 16
4.2 MIDI Implementation Chart . . . . . . . . . . . . . . . . . . . . . . . . . . . . 16
5 Specifications . . . . . . . . . . . . . . . . . . . . . . . . . . . . . . . . . . . . . . . . . . . 17
6 Safety & Conformity . . . . . . . . . . . . . . . . . . . . . . . . . . . . . . . . . . . . 18
Français . . . . . . . . . . . . . . . . . . . . . . . . . . . . . . . . . . . . . . . . . . . . . . . . . .21
Deutsch . . . . . . . . . . . . . . . . . . . . . . . . . . . . . . . . . . . . . . . . . . . . . . . . . .39
Español . . . . . . . . . . . . . . . . . . . . . . . . . . . . . . . . . . . . . . . . . . . . . . . . . .57
Page 5
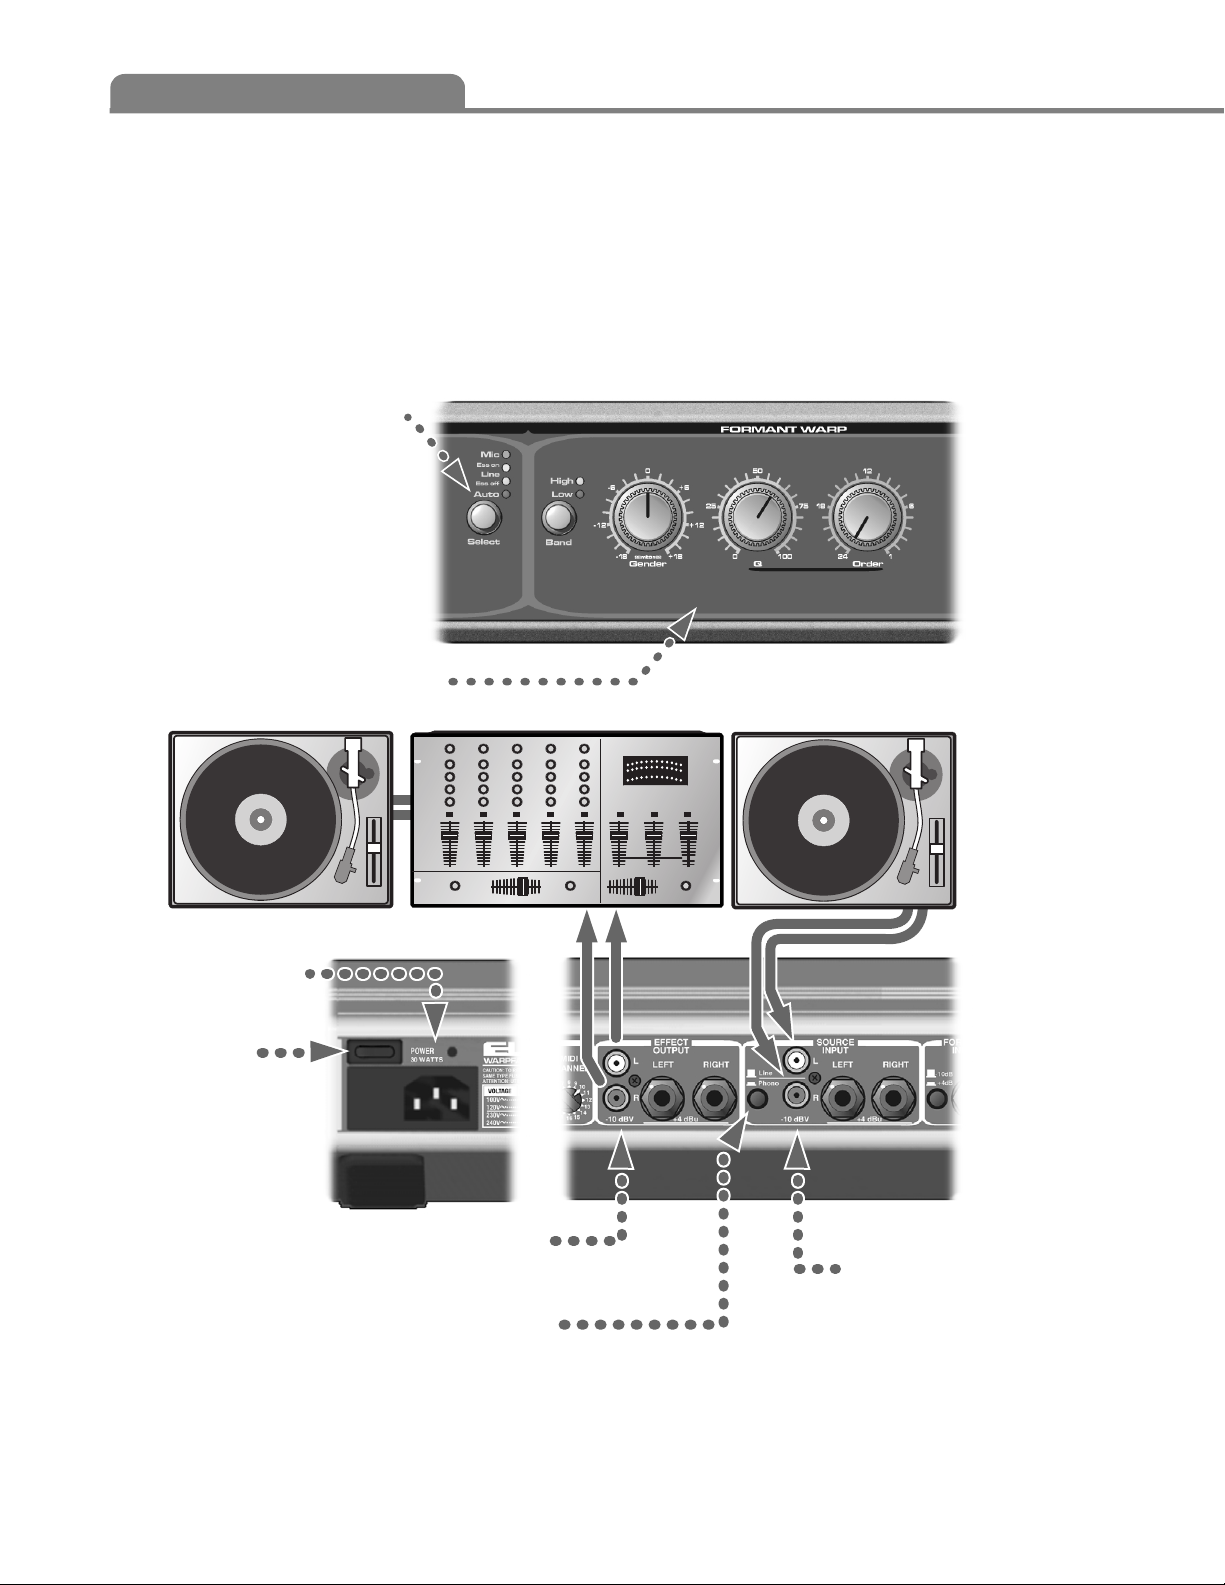
WHAT TO PLUG IN
1. QUICK START
Here’s the simplest way to get sound out of your
Electrix WarpFactory:
1.1
Set formant input to "Auto".
Set Gender, Q and Order like this.
Plug in AC here.
Turn it on.
Use these line level outputs to connect to your
mixer or power amplifier.
Turn on the phono pre-amp.
Plug in your
turntable here.
Phono Inputs.
Page 6

7
English
WHAT TO DO
Selects Formant Input. “Ess On” will give you a Vocoder effect.
“Ess Off” is better for modulating music with another music source.
Auto mode needs no formant input.It routes the source input to
the formant input as well.
Adjust the mic gain until the
“Optimum” LED lights solid when
speaking into the microphone.
High Band works best
for most types of music.
Low Band is better
for effecting drums and
bass.
Freezes the vowel/Warp soun
while allowing tweaking wi
the other contro
Introduces boadband noise to the source
signal.
Effects the Resolution of the Warp
effect from clearer to granular
Introduces a synth waveform to t
source input. Try this with the MIC inp
and no music for the classic Vocoder sound.
Works like an automatic gate for th
mic input. When source kill is
engaged, WarpFactory will only
pass sound while there is a
formant input.
Green and orange indicate optimu
source levels, red means that the input
being overdriven to clippin
1.2
Page 7

2. UNDERSTANDING THE PRODUCT
N
ote that there are no input or output level controls on the front panel. WarpFactory has been
designed to give you Unity Gain when in Bypass mode or when the Effect Mix control is at
0%. Audio signals passing through WarpFactory are not boosted or reduced in gain. When
using a line level input (as opposed to a turntable) set the output level from the mixer or source so
that WarpFactorys Input Level LED does not remain in “red”. Note: it is best to keep all input levels
in the “orange”, if possible, as this is the optimum WarpFactory operating level.
" Mic Input: You can connect a microphone to this XLR input to control the formant . There is
also a line input on the back panel that can control the formant.
" Mic Gain: Use the Mic Gain control to set the proper level for your microphone input. Talk
into the mic and set the mic gain to where the Optimum LED lights when you talk. Your signal
should only clip occassionally. The Formant Input LEDs will also light when a Line Input is used.
Robot Pitch:
We have included an oscillator to make it easy to get a Vocoder effect without
having to supply a synthesizer into the source input. To use this feature, talk into your microphone
while having the Mic or Line input selected. Set the Robot pitch to the desired frequency and talk
away.
" Formant Input Select:
Mic:
Uses the front panel microphone input as the formant
source.
Line (Ess on): Uses the line input for Formant
control. Ess enhances articulation for better intelligibility. This
is best for vocal based formant signals.
Line (Ess off): Best for non-vocal inputs.
Auto: Routes the source input to the formant input, so that
the music is ‘warping’ itself.
Band High/Low: This control has the effect of favoring the
upper or lower harmonics of the source. Select "Low” for Drum
and Bass types of sound. Use “High” for keyboard pads and
full range source material.
" Gender control: The Gender control moves the
harmonic content of the formant up or down without
affecting the fundamental pitch of the musical source. When
using the microphone formant input, the Gender control will
make the formants deeper (left) or thinner (right).
" Q control: This controls the width of the Warp filters.
Lower settings will smooth the effect out so much that it may
not be audible. A higher Q setting will give a much more
pronounced “tubular” effect. A good place to start is with this
control in the far left position.
" Order:
This sets the resolution of the filter algorithm. Lower
Order settings will give a more “granular” Warp effect,
especially when combined with higher settings of the Q control.
The maximum position (24) offers the highest resolution,
(or intelligibility) when speaking into the microphone.
Speech incorporates many
types of sounds. One
type of sound common to
both speech and singing
is Sibilance.
Sibilance is the S in ‘this’
or the CH in ‘check’.
WarpFactory deals with
sibilance differently than
traditional analog
vocoders.
With ‘Ess on’,
WarpFactory will preserve
speech intelligibility even
over the most complex of
music signals. This is the
normal operation of
WarpFactory.
Ess off turns that feature
off and disregards
sibilance. This is useful for
driving the Formant input
with signals other than
voice.
• WHAT IS ESS:
FRONT PANEL2.1
Page 8

9
English
" Noise: This introduces White Noise. THe Noise is affected by the various Warp
settings. This will give things a dirtier, more harsh sound. (And you put all that effort
into making your music sound cleaner...). Try adding a small amount of noise while
vocoding to make spoken words sound cleaner.
" Freeze Button: Freezes the formant shape. It’s like locking the warp filter.
This is cool for creating infinite syllables, i.e. ‘I love youuuuuuuuuuuuuuu’. Freeze
allows you to sing your own filter shape and lock it in. When a formant is frozen,
adjustments of the Gender control will sound like a sweeping filter on the signal.
" Source Kill: When the Source Kill is On, the source signal will come out of the
WarpFactory only while you are talking into a microphone that is plugged into the
Formant mic input. i.e. When you stop talking into the microphone, WarpFactory
will go quiet. When the Source Kill is Off, the WarpFactory will switch to the dry
signal when the microphone is not in use.
" Effect Mix: This controls the Mix of the Warp effect in relation to the dry signal.
0% is totally dry, or the same as bypassing WarpFactory. 100% is totally wet with
none of the dry signal audible.
" Bypass: THis will bypass the Warp Effect.
BACK PANEL2.2
" Power input This input will accept an IEC standard power cable. The internal
power supply can be used in any country. The fuse drawer can be rotated to
accomodate different power ratings from 100v to 240v. Check the printed chart
near the power entry for fuse ratings.
" Power Switch This turns the unit on and off. When turning on equipment, be
sure to switch the power amplifiers on last. This will ensure that any noise common
to audio mixers and signal processors will not cause damage to the speakers. When
powering down the system, be sure to turn the power amplifiers off first to avoid
creating “spikes” which can also damage the speakers.
" Footswitch A standard momentary footswitch can be usedto control the Bypass
of WarpFactory. Both normally open or normally closed footswitches cna be
accepted by WarpFactory, however the footswitch must be connected before the
power is turned on in order for WarpFactory to recognize this.
Page 9

" MIDI In/Out/Thru - Connect any MIDI devices here. See
the MIDI Applications section for more detail.
" Channel Select This selects the channel for both MIDI
input and output.
" Effect Output
RCA -stereo. The RCA output level is +4 dBu.
1/4”-stereo. This output produces a balanced +4 dBu signal.
Note: connecting both RCA and 1/4” inch jacks to the inputs
at the same time causes the level of the 1/4” input to drop.
Make sure that when using the 1/4” inputs that nothing is
connected to the RCA inputs.
" Source Input This is the sound to be shaped.
• Phono/Line Switch - this swiches the RCA inputs to accept
phono or line level.
• RCA -stereo - when the Phono/Line switch is in the Line
position, this input is optimized for a +4 dBu input signal.
When the Phono/Line switch is set to Phono, thie RIAA phono
pre-amp will accept a range of cartridge output levels.
Note: when using a turntable connected to the RCA input, the
output should still be connected to a line input on the mixer.
• 1/4” -stereo TRS Balanced This input is optimized for +4
dBu input signal. When using the 1/4” inputs be sure to use
the 1/4” outputs also to ensure there is no signal loss.
" Formant Input This is the signal input to shape or
“Warp” the sound.
• 1/4” unbalanced input.
• +4, -10 Switch. This sets WarpFactorys input level
sensitivity to either of these nominal levels. If it is set
incorrectly, audio distortion may be experianced (+4 signal
into a -10 input) or excessive hiss (-10 signal into a +4 input).
" Mic Bypass Output This is a bypass for your
microphone signal. Connect a Microphone cable from the
Bypass Output to the microphone input on the mixer. If the
mixer has Phantom power, ensure that it is switched off
before connecting WarpFactory’s Microphone thru to the
Microphone input on the mixer. If this is not done, the
phantom power will disrupt the Microphone bypass signal
completely and cause a substantial “thump” when bypassing
WarpFactory.
BACK PANEL2.2
2. UNDERSTANDING THE PRODUCT
Page 10

11
English
SET UP 1: PRE-MIXER
3. PERFORMANCE GUIDE
3.1
A
ll sound sources are conneted directly to the WarpFactory. The output is then
fed into the audio mixer. The level of the Warp effect is controlled using
WarpFactory’s wet/dry Effect mix.
The advantage of this setup in a live situation is that the WarpFactory effect can be
auditioned (cued) through the mixer while other sources are playing.
Line In
or
or
Front Panel Input
Page 11

SETUP 2: MIXER WITH AUX SENDS
3. PERFORMANCE GUIDE
T
his setup requires a mixer that features auxiliary (aux) send and return capabilities.
All audio sources are connected directly to the mixer channel inputs. WarpFactory is fed its
Source and Formant signals from the mixer’s aux sends.
The primary advantage of this setup is that it allows for any or all of your sound sources to be
routed to the source or formant input. The Effect Mix control should be set to 100% wet in
order that the dry source signal is only heard through the mixer.
If the mixer has enough aux sends you can create some interesting sounds by sending one source
(or mix of sources) to WarpFactory’s left input and another to the right.
3.1
Line in
Aux 1 Out
Aux In
Mic in
Line in
Phono in
Aux 2 Out
Page 12

13
English
T
his is a simple setup for stereo processing of the entire mix. Selecting the
Mic or the Auto settings for the formant input will provide plenty of sonic
possibilities. Use this setup only after you have explored all the sonic possibilities
of WarpFactory because cueing is not possible. The cueing limitation can be
minimized by bringing in the effect gradually with WarpFactorys mix control and
then making any adjustments from there.
The 1/4” output has a survo driver circuit which is capable of driving longer cables
to the power amp.
Line in
Line Out
to Crossover/Power Amp
Phono in
SET UP 3: POST MIXER3.1
Page 13

3. PERFORMANCE GUIDE
ARTIST APPLICATIONS3.2
"Auto Warp
Set the Input Select to Auto which will connect the source as its own formant input to create
some interesting Warp effects. The advantage of this setup is that no additional formant input
is necessary. This is the quickest method to get warped audio out of the WarpFactory.
Formant Input Select: Auto
Band: Low
Gender: To taste
Q: 0 to start but higher values offer more Warp effect
Order: 24 for clarity but sweeping the Order knob when the Q is set to
high values is cool too.
Robot Pitch: Off
Noise Mix: Off
Effect Mix: To taste
Source Kill: Off
"Percussion Warp
With this setup, a percussion source applies Warp formants to another non-percussive source.
Two audio sources are required: percussion for the Formant input and a sustained synthesizer
pad sound, for exapmle, for the Source input. When using a rhythmic sound for the Source
input, this should be beat synchronized to the Formant input for optimum effect.
Formant Input Select: Line Ess Off
Band: Low
Gender: To taste
Q: Set it high
Order: Sweep it.
Robot Pitch: Off
Noise Mix: Off
Effect Mix: To taste
Source Kill: Off
Page 14

15
English
"The Robot Voice Effect
With this setup, no audio source is required. A microphone connected to the mic input is
sufficient. The following settings are intended as a guide only. Adjust any of the
parameters. Be creative!
Formant Input Select: Mic
Band: High
Gender: 0
Q: 0
Order: 24
Robot Pitch: Choose a specific pitch or sweep it while you talk
Noise Mix: To taste
Formant Freeze: Off, however turning it on at the end of a word produces
an infinite sustaining vowel.
Effect Mix: 100% wet
Source Kill: Off
"The Classic Vocoder
To achieve a classic vocoder sound, connect a microphone to the Formant input and a
keyboard into the Source input. Select a string pad patch on the keyboard and talk into
the microphone. Set the Effect Mix (wet/dry) control to 100% wet.
This effect works best with “buzzy” sounding synthesizer pads for the Source input and a
mic. Experiment with different vocal sounds such as growls or squeals, or a sustained
“ooooeeeeeeaaaaaa” for example. Single line melodies played on the synth can be “sung”
if you vocalize while playing.
Formant Input Select: Mic
Band: High
Gender: 0
Q: 0
Order: 24
Robot Pitch: Off
Noise Mix: A very small amount can help clarity and add a
whisper-ey quality
Formant Freeze: Off, but turning it on at the end of a word produces an
infinite sustaining vowel.
Effect Mix: 100% wet
Source Kill: Off
Page 15

RECORDING PERFORMANCES TO A SEQUENCER
E
lectrix products are real performance products. They have been designed with this in mind
and can accurately transmit and receive your performance through MIDI. Every knob and
every switch can be automated. To do this, simply connect the WarpFactory to a sequencer.
WarpFactory has MIDI Control Change messages assigned to all of its functions. Any
performance will show up in the sequencer as MIDI CC’s (Control Change Messages).
Note that a press and hold of the bypass button will dump the present state of the controls.
MIDI CC #116 will request a dump of state.
Setting the MIDI channel: On the back of the WarpFactory is a small rotary switch labeled MIDI
channel. Use it to set the Transmit / Receive channel of WarpFactory.
Function Transmitted Recognized Remarks
Basic Channel Selectable 1-16 1-16
Mode Default X Mode 3
Messages X X
Note Number X X
Velocity Note ON X X
Note Off X X
After Touch X X
Pitch Bender X X
Control Change 102 0 0 Gender 4-124 (64 = no gender)
103 0 0 Q 0 - 127
104 0 0 Order 2-24
105 0 0 Noise Level 0-127
106
1
0 0 Waveform Pitch 0-125 (0 = off)
107 0 0 Freeze ( 0-63 off 64-127 = on)
108 0 0 Warp Band (0-63 low 64-127 - high)
110
2
0 0 Source Kill 0-90
111 0 0 Effect Mix 0-127
112
3
0 0 Bypass (0-63 off 64-127 on)
113
4
0 0 Ess On/Off 0-3
115
5
0 0 Formant input select 0-2
116 0 0 Dump request
Program Change X X
System Exclusive X X
System Common Song Position X X
Song Select X X
Tune Request X X
System Real Time Clock X X
Commands X X
Aux Messages Local On/Off X X
All notes Off X X
Active Sensing X X
System Reset X X
Notes
1. 0=mute. Values 1 to 125 increase pitch in 0.25 semitone steps from FO - C3.
2. The front panel Source Kill switch toggles between values of 20 and 90. CC edit allows fine threshold control between 0 and 90.
3. When bypass is held for 2 seconds, it will send CC values for all controls. This will ensure that all parameters are stored
during recording even when only one control is swept.
4. Will select Ess value only when Mic or Line input is selected. When formant input is set to auto, this CC will ahve no effect.
If Ess value 1 - 3 is received when Line is selected for formant input, the formant input selected will change to Line (voice).
5. Selects formant input. 0 = mic, 1= line, 2 = auto.
Mode 1: OMNI ON, POLY Mode 2: OMNI ON, MONO 0: YES
Mode 3: OMNI OFF POLY Mode 4: OMNI OFF MONO X: NO
4.2 MIDI IMPLEMENTATION CHART
4. MIDI
4.1
Page 16

17
English
5. SPECIFICATIONS
INPUT SOURCE SOURCE SOURCE FORMANT FORMANT
Connectors: 1/4” TRS RCA(phono) RCA(line) 1/4”TS XLR
(balanced)
Max Input Level: +16.0 dBu -24.5 dBV +16.0dBu +16.0 dBu +3.5 dBu
Impedance: 66KΩ 48.5KΩ 66KΩ 20KΩ 2KΩ
OUTPUT EFFECT OUTPUT MIC BYPASS
OUTPUTS
Connectors: 1/4”TRS bal RCA XLR
Impedance: 450Ω 1K0Ω 210Ω
Max Output Level: +16.0 dBu +16.0 dBu +13.0 dBu
PERFORMANCE 1/4” PHONO RCA MIC BYPASS
Dynamic Range: >90db >78db <85db >115db
THD: <0.04% <0.05% <0.05% <0.001%
Frequency Response:
10Hz-14.3kHz 10Hz-14.3kHz 10Hz-14.3kHz
10Hz-30kHz
A to D Conversion: 18bit/31.250 kHz Sampling rate CMRR > 50db
D to A Conversion: 18bit/31.250 kHz Sampling rate
POWER CONSUMPTION
30 watts VOLTAGE FREQUENCY FUSE
100 V 50/60 Hz 250mA 250V Slow blow
120 V 50/60 Hz
230 V 50/60 Hz 125mA 250V “T”
240 V 50/60 Hz
Actual measurements are subject to change
Page 17

This equipment has been tested and found to comply with the limits for a class A digital device,
pursuant to part 15 of the FCC rules.
These limits are designed to provide reasonable protection against harmful interference in a
residential installation.
This equipment generates, uses and can radiate radio frequency energy and, if not installed and
used in accordance with the instructions, may cause harmful interference to radio communications.
However, there is no guarantee that interference will not occur in a particular installation.
If this equipment does cause harmful interference to radio or television reception, which can be
determined by turning the equipment on and off, the user is encouraged to try to correct the
interference by one or more of the following measures:
• Reorient or relocate the receiving antenna.
• Increase the separation between the equipment and the receiver.
• Connect the equipment into an outlet on a circuit different from that to which the receiver
is connected.
• Consult a qualified dealer or an experienced radio TV technician for help.
The user may find the following booklet, prepared by the Federal Communications Commission,
helpful:
“How to identify and Resolve Radio/TV interference Problems.”
This booklet is available from the US Government Printing Office, Washington, DC 20402, Stock No.
004-000-0034-4.
" Caution:
You are cautioned that any change or modifications not expressly approved in this manual could
void your warranty.
" For customers in Canada:
This Class A digital apparatus meets all requirements of the Canadian Interference-Causing
Equipment Regulations.
Cet appareil Numerique de la Classe A respecte toutes les exigences du Reglement sur le materiel
brouilleur du Canada.
" Certificate of Conformity
Electrix, a div. of IVL Technologies Ltd., hereby declares on their own responsibility that the
following product:
Electrix WarpFactory
that is covered by this certificate and marked CE-label conforms with the following standards:
• EN 60065 Safety requirements for mains operated Electronic and related apparatus for
household and similar general use
• EN 55103-1 Product family standard for audio, video, audio-visual and entertainment
lighting control apparatus for professional use.
Part 1: Emission
• EN 55103-2 Product family standard for audio, video, audio-visual and entertainment
lighting control apparatus for professional use.
Part 1: Immunity
With reference to regulations in following directives:
72/23/EEC, 89/336/EEC as amended by directive 93/68/EEC
Issued in Victoria, March 31, 1999 by Brian Gibson, Executive Vice-President, Research and Development
6. SAFETY & CONFORMITY
 Loading...