

Page 1

Ableton Live Remote Script Guide
Ableton Live Remote Script Guide
1 Overview
The TWEAKER has two session views: Mixer and Clips.
The Mixer controls Volume, EQ and Devices, Solo, Arm Recording, Crossfader A/B Assign, and the
Crossfader.
The Clips controls consist of a 7x3 Clips launch grid, 3 rows of Scene launch, Stop All Clips for tracks,
and Clip Session navigation using the direction buttons or Session Shift. The colors of the Stop All
Clips buttons also help indicate the assignments of the Mixer controls.
The velocity sensitive drum pads are assigned to a Drum Rack, and can be transposed to access up
to 64 drum pads. Finally, the master volume and cue volume are assigned to the top potentiometers.
1
Page 2
Ableton Live Remote Script Guide
2 Installation
To begin the installation process, insert the installation CD into your computer’s optical drive. Open
the Ableton Remote Script folder.
i Requires Ableton Live 8.22 and higher.
MAC OS X: Double click the le TweakerLiveScript.dmg‘ to get started.
WINDOWS: Double click the le Tweaker_Live_Remote_Script_Installer.exe’ to get started.
The installer will guide you through the rest of the installation process. Follow the on-screen
instructions carefully.
3 Setup
2
Page 3

Ableton Live Remote Script Guide
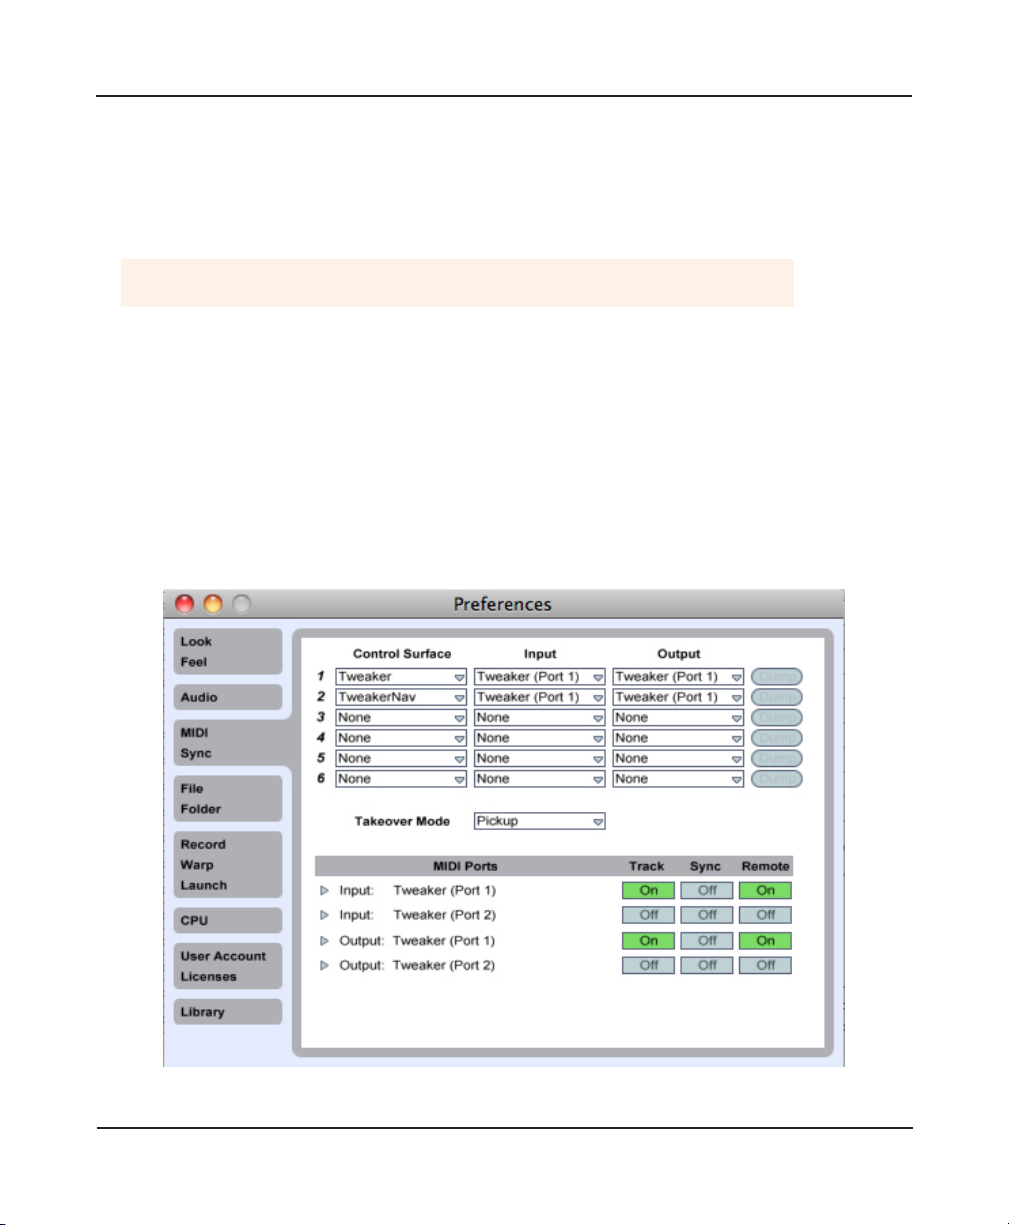
In order for Live to respond to the TWEAKER’s commands, it needs to be setup as a control surface in
Live’s MIDI Preferences. Once the Remote Script has been installed, it will become available in Live’s
control surface chooser. To setup the TWEAKER as a control surface:
1. Open the Live preferences window and select the MIDI/Sync tab,
2. Select Tweaker from the rst control surface chooser,
3. Select TweakerNav from the second control surface chooser,
4. Set inputs and outputs for both control surfaces as Tweaker (Port 1),
5. Make sure that Track and Remote are both on for Tweaker (Port 1) in the MIDI Ports menu.
4 Mapping Details
4.1 Session Navigation
The TWEAKER’s button grid is used to launch and stop Clips, and controls the current selection of
Live’s session view. The bottom right button is used as a Session Shift to access secondary controls.
The Session view can be navigated using the four directional buttons at the top of the TWEAKER’s
control surface or using Session Shift. While Shift is pressed, available locations will light up in the
grid. Pressing a lit grid button will jump to its respective location in the Session view.
The mixer’s channel strips are assigned using the large navigation encoder. The mixer assignment
is highlighted on the bottom row of the grid, in addition to Live’s Session view. Blue cells indicate
regular Live tracks, while Red ones indicate Returns. By default, the Mixer navigation is locked to the
Clip’s Session view. Press the large encoder unlock the Mixer navigation to span the entire set. This
is very useful for easily focusing the channel strips onto the Return tracks.
The Session is assignable to any of Live’s tracks, as well as any available Return tracks.
4.2 Mixer Controls
The two analog potentiometers at the top of the TWEAKER control the Master and Cue volumes. The
crossfader controls Live’s crossfader.
The channel strips consist of (starting from the bottom): crossfader assignment, volume fader, Arm
Recording, Solo, and EQ/Device control.
3
Page 4

Ableton Live Remote Script Guide
TURN:
DEVICE (EQ HIGH)
PUSH:
DEVICE ON/OFF
TURN:
DEVICE (EQ MID)
PUSH:
PREVIOUS DEVICE
TURN:
DEVICE (EQ LOW)
PUSH:
NEXT DEVICE
SOLO
REC ARM
VOLUME
CUE VOLUME
CLIPS LEFT
CLIPS UP
VOLUME
CLIPS DOWN
TURN:
MIXER CHANNEL
NAVIGATION
PUSH:
MIXER NAV
UNLOCK
A TRACK MUST HAVE A DRUM RACK AND HAVE
(HOLD SHIFT FOR CLIP NAVIGATION)
DRUM RACK
MIDI ARMED FOR TWEAKER
(HOLD SHIFT TO CHANGE BANKS)
CLIP LAUNCH GRID
CLIPS RIGHT
MASTER
VOLUME
SCENE
LAUNCH
TURN:
DEVICE (EQ HIGH)
PUSH:
DEVICE ON/OFF
TURN:
DEVICE (EQ MID)
PUSH:
PREVIOUS DEVICE
TURN:
DEVICE (EQ LOW)
PUSH:
NEXT DEVICE
SOLO
REC ARM
VOLUME
CROSSFADER
A/B ASSIGN
STOP CLIPS
(COLOR INDICATES MIXER NAV)
CROSSFADER
4
SHIFT
CROSSFADER
A/B ASSIGN
Page 5

Ableton Live Remote Script Guide
4.3 EQ and Device Controls
The TWEAKER’s channel strip encoders are assigned to control the Hi, Mid, and Low bands of Live’s
EQ Three, and also control the rst three parameters of other devices.
The encoders control the currently selected device of a selected Audio, MIDI, or Return track.
Pushing the bottom encoder selects the next device, while the middle encoder selects the previous
device. Pushing the top encoder turns the selected device on or o.
4.4 Drum Pads
The eight drum pads are assigned MIDI notes starting with C-2 (note #0). The drum pads will light
when pressed or struck. The eight pads can be transposed to access up to 64 drum pads.
Hold Shift while pressing one of the drum pads to change bank. The current bank is displayed on
the drum pads while shift is held down.
i For a Live Drum Rack to respond to the TWEAKER, set “MIDI From”
on Drum Rack’s host MIDI track to “Tweaker (Port 1), and set to “All
Channels” or “Channel 10.” The track must be armed for recording so
the MIDI input will trigger pads the Drum Rack.
Note: Track Input must be enabled for the TWEAKER’s In port in Live’s MIDI Preferences.
4.5 User Editing
Most of the color and control assignments are editable in the TweakerMap.py le. It is a simple
matter of editing the le using a text editor to assign desired color schemes for the script to use. It is
necessary after editing and saving the le to re-load the Remote Script in Ableton’s MIDI Preferences.
5
 Loading...