

Page 1
English v1.1
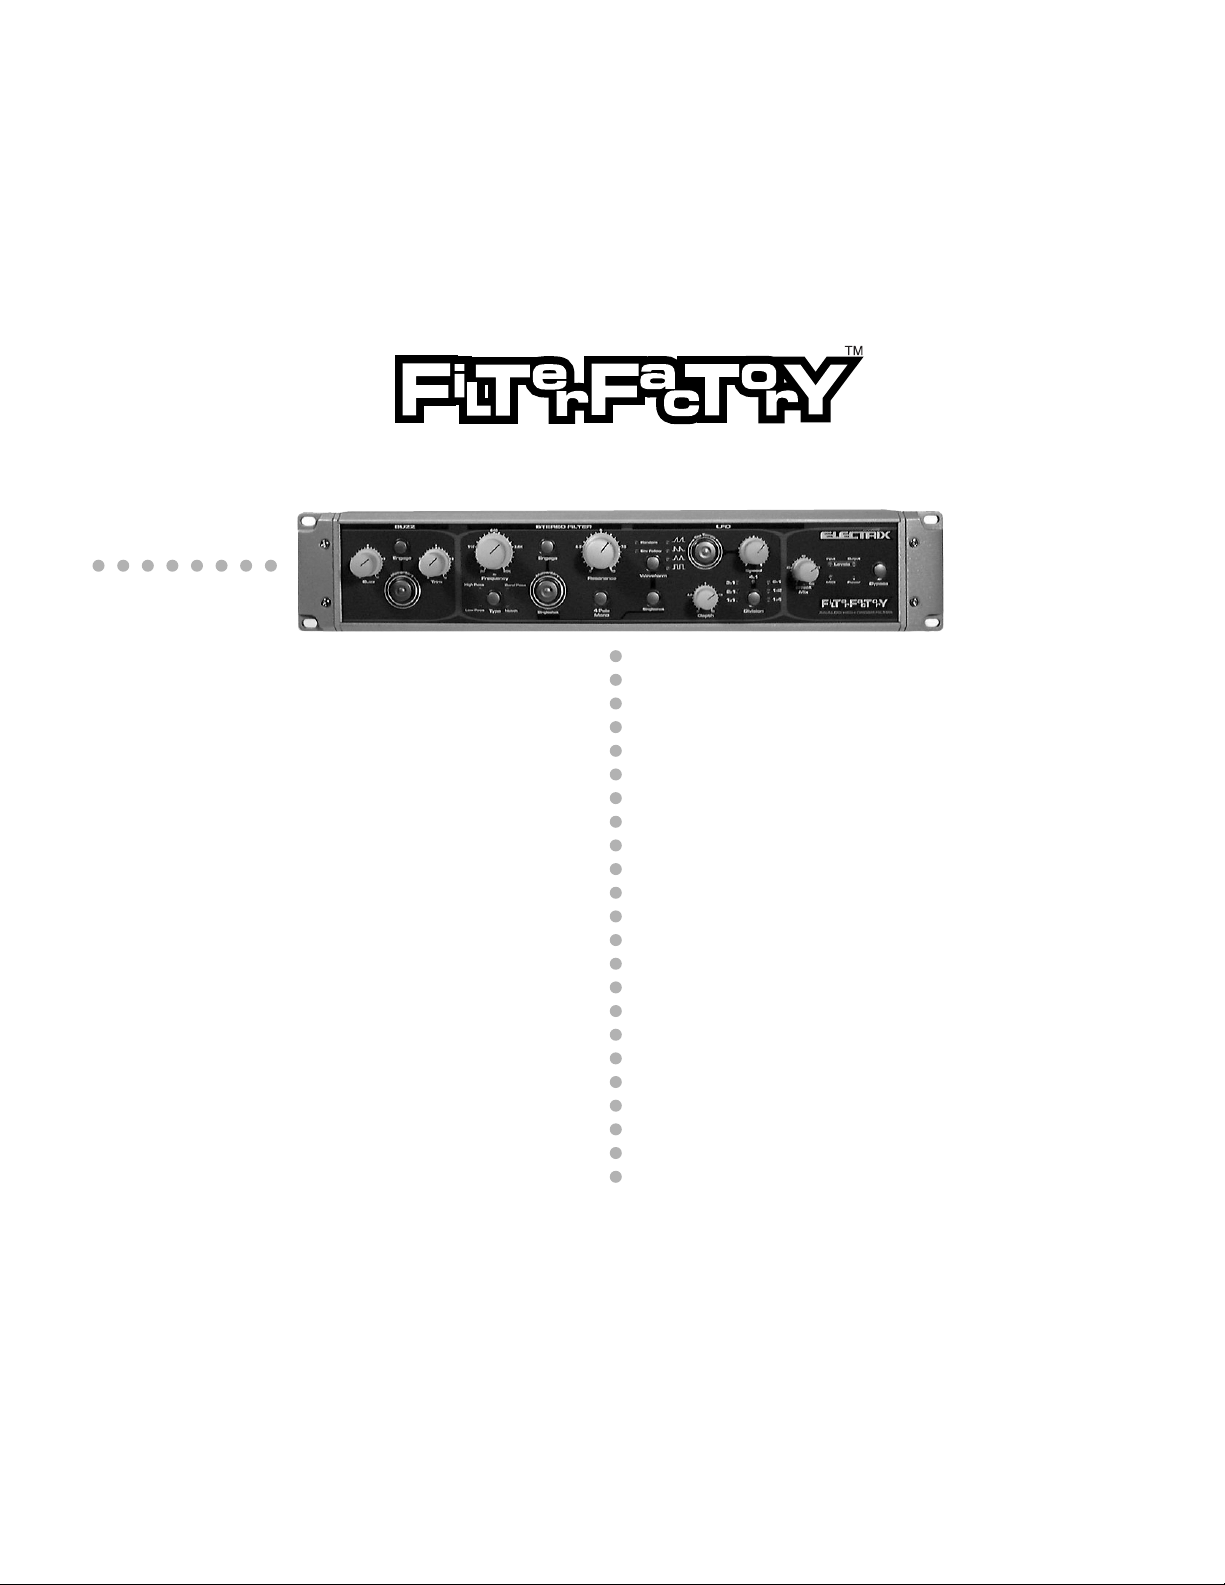
THE ULTIMATE FILTER
Page 2
CAUTION
ATTENTION: RISQUE DE CHOC ELECTRIQUE - NE PAS OUVRIR
WARNING: TO REDUCE THE RISK OF FIRE OR ELECTRIC
SHOCK DO NOT EXPOSE THIS EQUIPMENT TO RAIN OR MOISTURE
RISK OF ELECTRIC SHOCK
DO NOT OPEN
The lightning flash with arrowhead symbol, within an
equilateral triangle, is intended to alert the user to the
presence of uninsulated ìdangerous voltageî within the
productís enclosure that may be of sufficient
magnitude to constitute a risk of electric shock to
persons.
The exclamation point within a equilateral triangle is
intended to alert the uset to the presence of importat
operating and maintenance (sevicing) instruction in
the literature accomanying the product.
INSTRUCTIONS PERTAINING TO A RISK OF FIRE, ELECTRIC SHOCK, OR INJURY TO PERSON
IMPORTANT SAFETY INSTRUCTIONS
READ AND SAVE THESE INSTRUCTIONS
WARNING - When using electric products, basic precautions should always be followed, including the following:
1. Read all the instructions before using the product.
2. Do not use this product near water - for example near a bathtub,
washbowl, kitchen sink, in a wet basement, or near a swimming pool,
or the like.
3. This product should be used only with a cart or stand that is
recommended by the manufacturer.
4. This product, either alone or in combination with an amplifier and
headphones or speakers, may be capable of producing sound levels that
could cause permanent hearing loss. Do not operate for long period of
time at high volume level or at a level that is uncomfortable. If you
experience any hearing loss of ringing in the ears, you should consult
an audiologist.
5. The product should be located so that its location or position does
not interfere with its proper ventilation.
6. The product should be located away from heat sources such as
radiator, heat registers, or other products (including amplifiers) that
produce heat.
7. Clean only with a damp cloth. Before cleaning the unit, turn off the
power and unplug the power cord from the outlet.
8. The power supply cord of the product should be unplugged from the
wall outlet during lightning storms or when left unused for a long periods
of time.
9. Use only with attachments/accessories specified by the manufacturer.
10. The product should be serviced by qualified service personnel when:
A. The power supply cord or the plug has been damaged; or
B. Objects have fallen, or liquids has been spilled into the product; or
C. The product has been exposed to rain; or
D. The product does not appear to be operate normally or exhibits a
marked change in performance; or
E. The product has been dropped, or the enclosure damaged.
11. Do not attempt to service the product beyond that described in the
user maintenance instructions. All other servicing should be referred to
qualified service personnel.
This product may be equipped with a polarized line plug ( one blade wider than the other). This is a safety feature. If you
are unable to insert the plug into the outlet, contact an electrician to replace your obsolete outlet, Do not defeat the
safety purpose of the plug.
For Polarized Line Plug:
Caution: TO PREVENT ELECTRIC SHOCK, MATCH WIDE BLADE OF PLUG TO WIDE SLOT, FULLY INSERT.
Attention: POUR …VITER LES CHOCS …LECTRIQUES, INTRODUIRE LA LAME LA PLUS LARGE DE LA FICHE
DANS LA BORNE CORRESPONDANTE DE LA PRISE ET POUSSER JASQUí AU FOND.
IMPORTANT: THE WIRES IN THIS MAINS LEAD ARE COLOURED IN ACCORDANCE WITH THE FOLLOWING CODE:
BLUE: NEUTRAL
BROWN: LIVE
As the colours of the wires in the mains lead of this apparatus may not correspond with the coloured markings identifying
the terminals in you plug, proceed as follows.
The wire which is coloured BLUE must be connected to the terminal which is marked with the letter N or coloured BLACK.
The wire which is coloured BROWN must be connected to the terminal which is marked with the letter L or coloured RED.
Under no circumstances must either of the above wires be connected to the earth terminal of the three pin plug.
For the USA
For Canada
For the U.K.
Page 3

INTRODUCTION
W
elcome to the world of Electrix. We would like to thank you for purchasing
FilterFactory, The Ultimate Stereo Resonant Filter for musicians, DJs, producers and
engineers. FilterFactory is unique in its ease of use and its focus on directly filtering a
range of input signals from turntables to CD’S to Synths.
FilterFactory’s digitally controlled Analog filters were modeled after VCF’s (Voltage Controlled
Filters) like those found in traditional Analog synthesizers. Use FilterFactory to re-mix your vinyl live.
Just insert your FilterFactory between the turntable and the mixer and add your own filter sweeps,
LFO’s and distorted signals to the mix. FilterFactory has a built in phono pre-amp, so you can plug
in your turntable directly. This setup allows you to cue the effect before it goes to the house by
using the cueing feature of your mixer. In the studio full MIDI implementation makes FilterFactory
the perfect recording tool. You can play the FilterFactory live and capture your performance in a
sequence.
FilterFactory’s unique future / retro case was designed to allow both desktop and rackmount
installation. This concept makes FilterFactory’s control surface perfect for live performance and
studio use.
" INSPECTION
In your Electrix box you should find:
• 1 Electrix FilterFactory
• 1 Manual
• 1 Rackmount kit
• 1 Warranty Card
• 1 EIC Power Cable (appropriate for your region)
If this is not the case then please call your local Electrix distributor, agent or dealer.
Page 4

English
5
TABLE OF CONTENTS
Introduction . . . . . . . . . . . . . . . . . . . . . . . . . . . . . . . . . . . . . . . . . . . . 4
Inspection . . . . . . . . . . . . . . . . . . . . . . . . . . . . . . . . . . . . . . . . . . . . . . . 4
1 Quick Start . . . . . . . . . . . . . . . . . . . . . . . . . . . . . . . . . . . . . . . . . . . . . 6
2 Understanding the Product
2.1 Front Panel . . . . . . . . . . . . . . . . . . . . . . . . . . . . . . . . . . . . . . . . . . 8
2.2 Back Panel . . . . . . . . . . . . . . . . . . . . . . . . . . . . . . . . . . . . . . . . . . . 8
3 Performance Guide
3.1 Setups: . . . . . . . . . . . . . . . . . . . . . . . . . . . . . . . . . . . . . . . . . . 12
3.2 Artist Applications . . . . . . . . . . . . . . . . . . . . . . . . . . . . . . . . . . . . 15
4 MIDI Applications
4.1 Recording Performances to a Sequencer . . . . . . . . . . . . . . . . . . 17
4.2 MIDI Implementation Chart . . . . . . . . . . . . . . . . . . . . . . . . . . . . 18
5 Specifications . . . . . . . . . . . . . . . . . . . . . . . . . . . . . . . . . . . . . . . . . . . 19
6 Safety & Conformity . . . . . . . . . . . . . . . . . . . . . . . . . . . . . . . . . . . . 20
Français . . . . . . . . . . . . . . . . . . . . . . . . . . . . . . . . . . . . . . . . . . . . . . . . . .23
Deutch . . . . . . . . . . . . . . . . . . . . . . . . . . . . . . . . . . . . . . . . . . . . . . . . . . .43
Español
. . . . . . . . . . . . . . . . . . . . . . . . . . . . . . . . . . . . . . . . . . . . . . . . . .63
Page 5
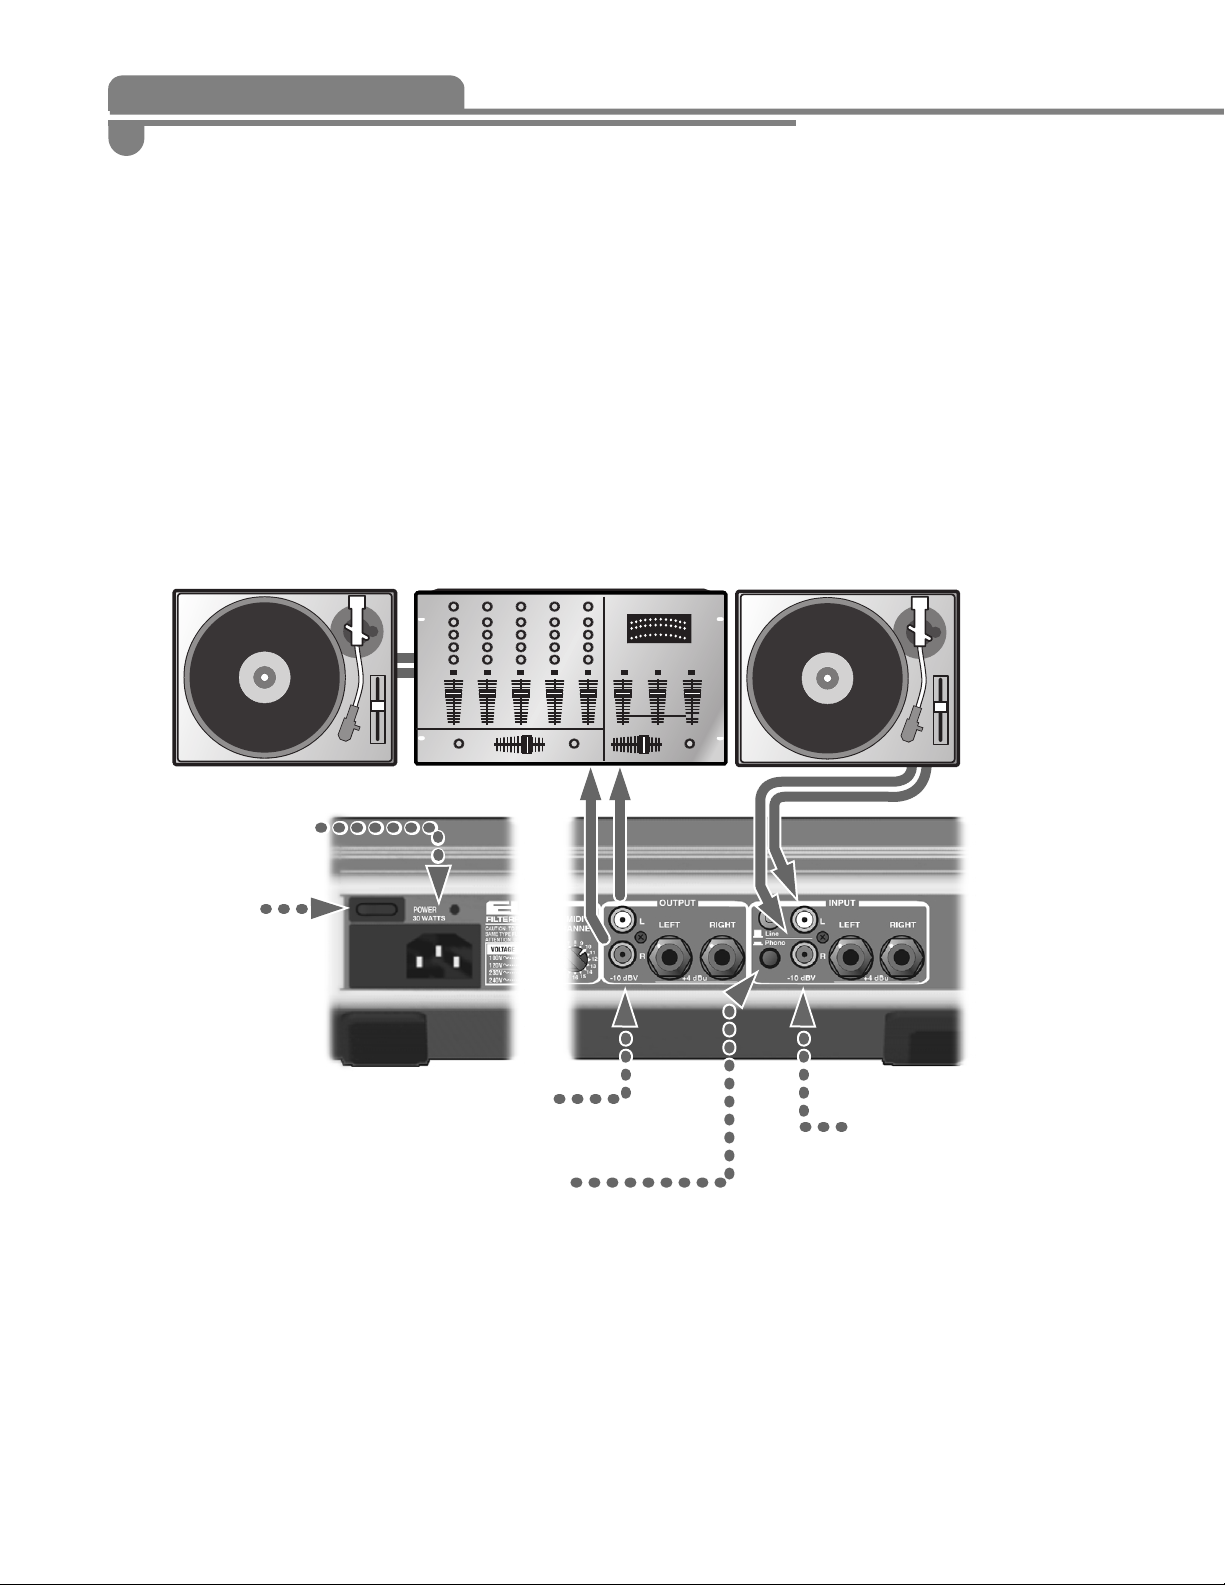
WHAT TO PLUG IN
Here’s the simplest way to get sound out of your
Electrix FilterFactory:
1.1
1. QUICK START
Plug in AC here.
Turn it on.
Use these line level outputs to connect to your
mixer or power amplifier.
Turn on the phono pre-amp.
Plug in your
turntable here.
Page 6
English
7
WHAT TO DO1.2
Distortion Gain
Resonance peak control
can go into self oscillation.
Momentary control kicks in the filter unless the
Single Shot control is engaged. When Single
Shot is on, this button will tyrigger modulation.
"
Env Follow" adjusts filter frequency
according to the dynamics of the input signal
Adjusts the amount of mod
effect on the filter
Global Bypass
When engaged, the
momentary triggers the filter
mod for the number of cycles
set by the division control.
Use the momentary button to play the effect.
As you tap it, the effect will momentarily engage.
When you engage an effect block, the
momentary button switches its function and
mutes the effect.
OverridesTap Tempo
Operation linked to
Type setting. Low pass is
the standard synth setting
Distortion level can
be louder than the
program level if
desired.
Page 7

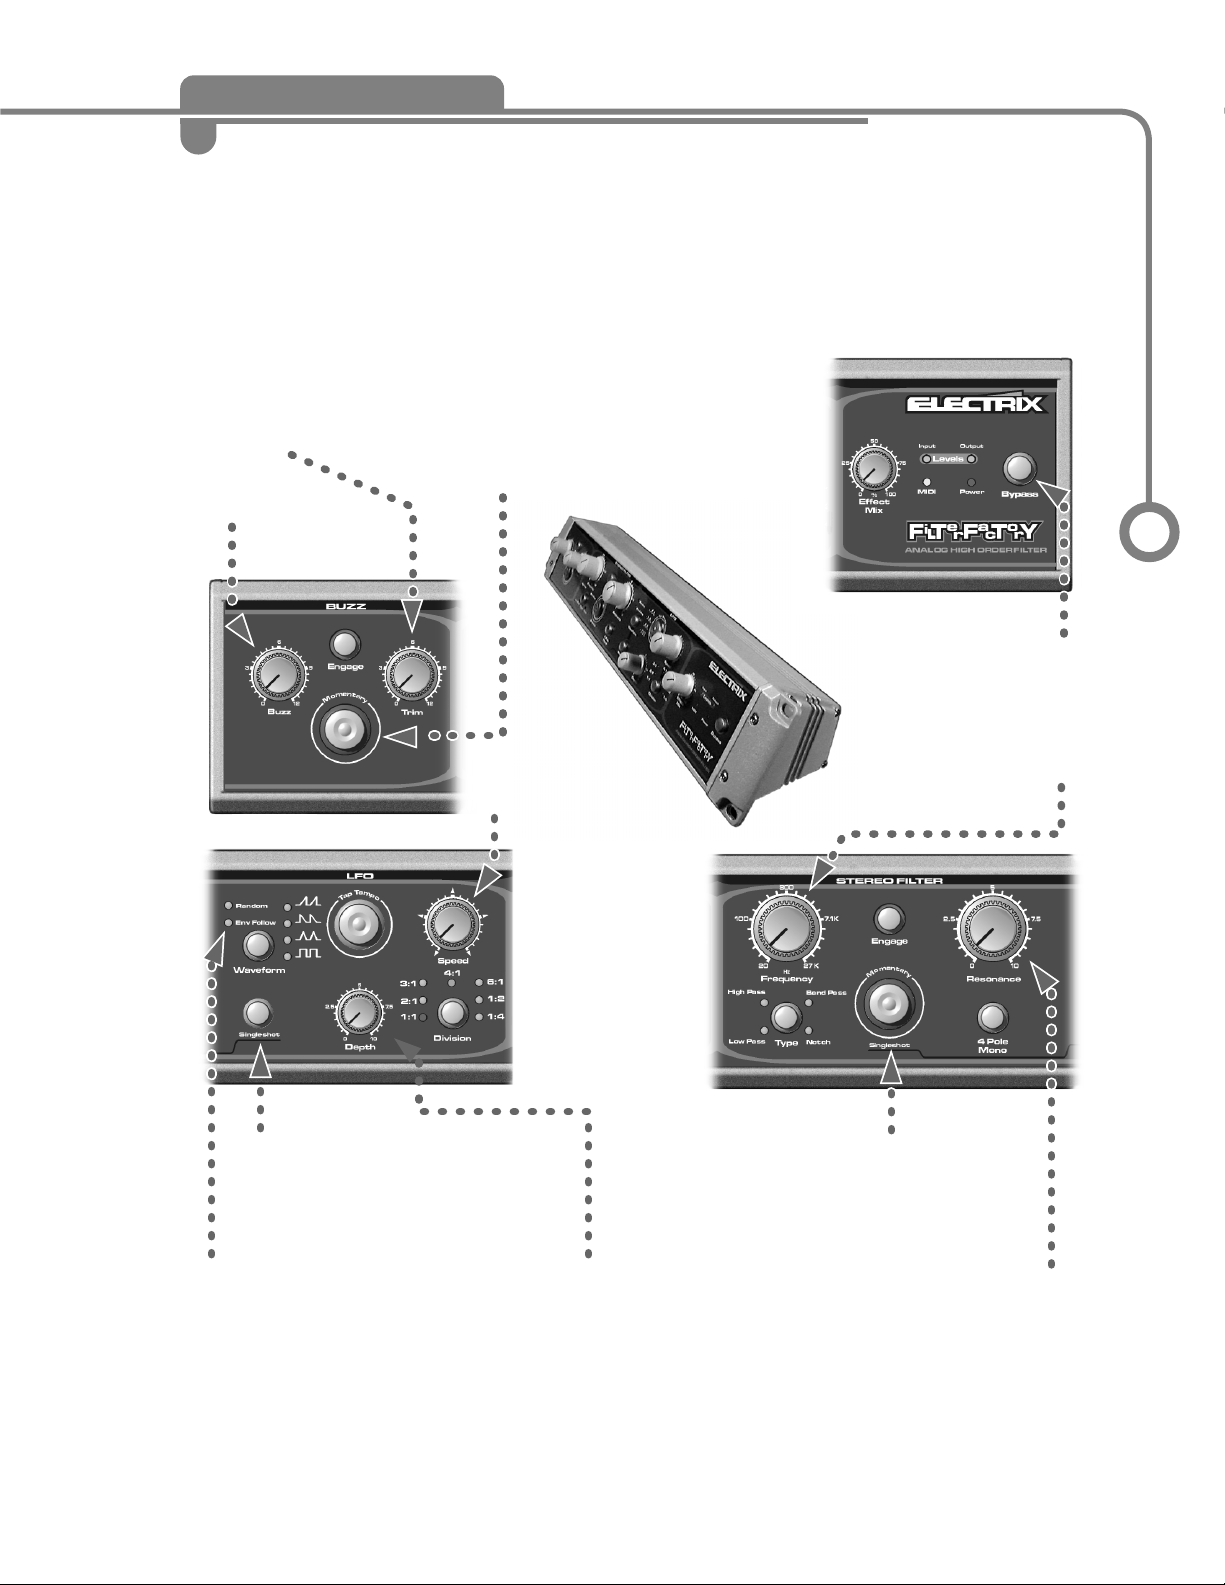
2. UNDERSTANDING THE PRODUCT
FRONT PANEL2.1
N
ote that there are no input or output controls. FilterFactory is set up to give you unity gain
when bypassed or when the Mix control is at 0%. This means that signals running through
it are not boosted or reduced in gain. If you are using a line level input (as opposed to a
turntable) set the output of your source so that FilterFactory’s Input Level LED doesn’t go Red all
that often. Try to keep your levels in the green which is the optimum level for FilterFactory.
" Buzz Buzz sets the amount of distortion. The more buzz, the more distortion you will have.
Buzz will take you from subtle, at the
farthest left, to heavy distortion at the
farthest right.
NOTE: Buzz will increase the level of
your output signal substantially as you
turn it up. Use the Trim control to get
the level back to where you want it
while the Buzz circuit is engaged.
" Trim: Sets the output level of the
Buzz circuit. This can be set anywhere
from inaudible to extremely loud. Use
with caution.
" Buzz Engage: Toggles the buzz
circuit in and out.
" Buzz Momentary: Temporaily
engages the buzz circuit. This is useful
for tapping patterns to create distortion
hits and rhythms.
Note: When an effect is engaged, the
Momentary will dis-engage it, when an
effect is not engaged the momentary
will engage it.
" StereoFilter: Frequency: Sets the
resonant frequency of the stereo filter.
Use it in conjunction with the
resonance control. The more resonance
you use the more distinct any changes
you make with frequency will be. The
frequency tuning range of the filter covers a 12 octave range from 10 Hz to 40 kHz. The External
CV input can control this and has been adjusted to provide standard 1 Volt/Octave response.
" Filter Type: This control selects the basic sound of the filter. Each filter type has a unique
sound. You will find situations where each one offers you a unique effect on a given signal.
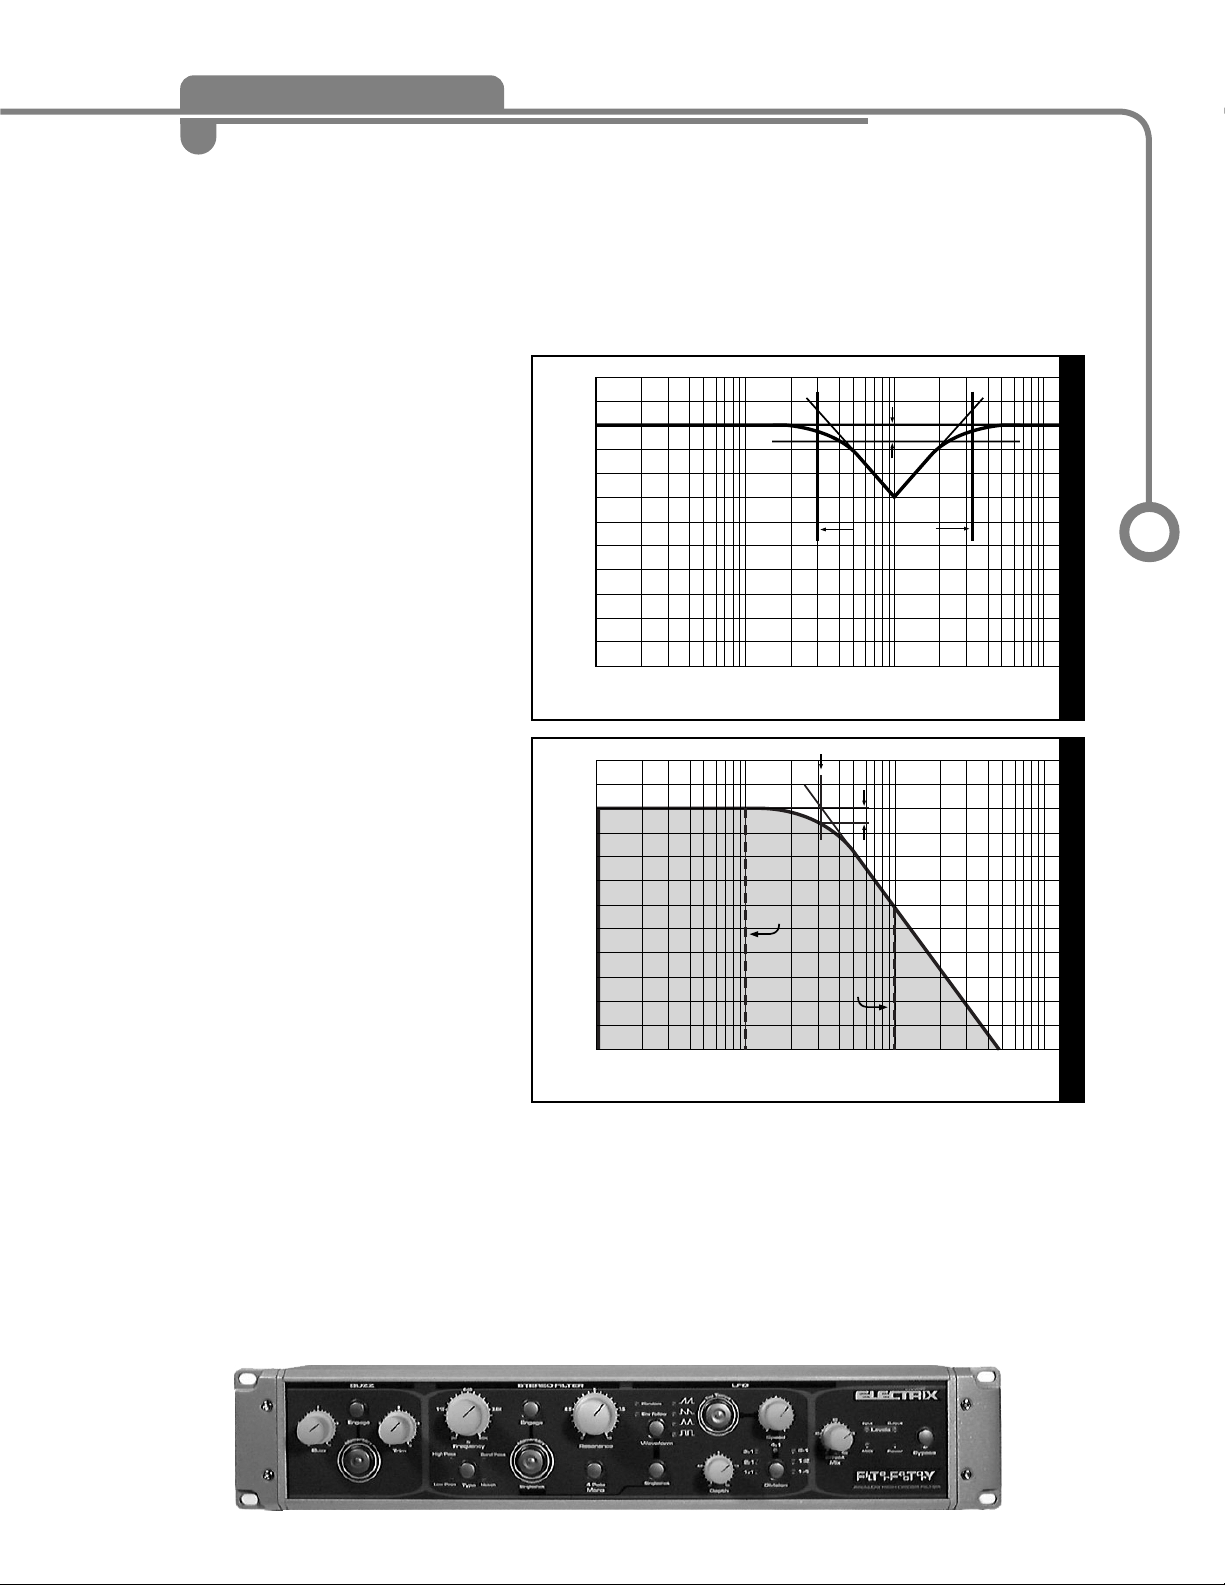
The High Pass will roll off the bass of your signal. It will make things sound thinner. (See Fig. 1)
The Band Pass filter acts like Wah pedal and puts a peak in the middle of your signal. (See Fig. 2)
This is great for hilighting certain frequency ranges or for creating a sweeping sound with the
frequency knob.
The Notch Filter works the exact opposite of the Band Pass filter. It puts a notch in your signal,
essentially killing a small frequency band. This effect often sounds like talking through a pipe.
It will also create unique sweeping sounds, (that is similar to a phase shifter) when used in
conjunction with the frequency knob. For best Notch result put the Resonance knob fully
counter-clockwise.
C
Fig. 1: High Pass Filter
Fig. 2: Band Pass Filter
dB
0
-10
-20
utoff point
-3 dB
-30
-40
-50
10 20 30 50 70 100 200 300 500 700 1000 2,000 3,000 5,000 7,000 10,000
FREQUENCY
0
-10
-20
dB
-30
-40
-50
10 20 30 50 70 100 200 300 500 700 1000 2,000 3,000 5,000 7,000 10,000
FREQUENCY
Bandwidth
-3 dB
Page 8
English
9
The Low Pass Filter is the most commonly used filter type. This is the kind of filter
you will find on vintage synths and envelope followers. It is useful for controlling the
amount of harmonics or the brightness of a signal. As you sweep the frequency
control, try adding some resonance to make the cutoff frequency more audible.
" Filter Engage: This control toggles the filter on and off. Turning this on restarts
the LFO or triggers it if it is in single shot mode.
" Filter Momentary: This
switch temporarily engages the
stereo filter. Try using it to tap
rhythmic patterns while
adjusting the frequency knob.
Pressing this button also
restarts the LFO.
" Resonance:
This controls the level of the
peak at the resonant frequency
of the filter, i.e. the frequency
you dialed in with the
frequency knob. FilterFactory
was designed to create
extreme effects, so be careful
because the resonance control
is able to cause the filters to
self-oscillate at higher settings.
Self oscillation produces a loud
tone at the resonant frequency.
It sounds a lot like sustained
feedback.
" 4 Pole Mono: The
FilterFactory operates in
a Stereo 2 Pole filter per
channel mode, ( unless you
switch to 4 Pole mode). When
in Four Pole mode, the
FilterFactory switches into
Mono operation by summing the left and right channels before the
4 pole filter. A two pole filter will give you a gentler response, in technical terms it is
defined as a 12dB/octave filter. A 4 pole or 24dB/octave filter will give you a much
steeper filter response that will sound more pronounced.
Fig. 3: Notch Filter
Fig. 4: Low Pass Filter
FRONT PANEL2.1
dB
0
-10
-20
-30
-3 dB
Bandwidth
-40
-50
10 20 30 50 70 100 200 300 500 700 1000 2,000 3,000 5,000 7,000 10,000
FREQUENCY
Cutoff point
0
-10
-20
dB
-30
-40
-50
10 20 30 50 70 100 200 300 500 700 1000 2,000 3,000 5,000 7,000 10,000
100 Hz
Sine wave
-3 dB
1,000 Hz
Sine wave
FREQUENCY
Page 9

LFO
" Waveform: The LFO provides the following cyclic (or repetitive) waveforms: Sawtooth,
Inverse Sawtooth, Triangle, Square Wave, Envelope Follow and Random. If you increase the LFO
depth and turn the LFO speed up a bit you will be able to hear their effect on your frequency
setting.
Note: Although ENV Follow isn’t a waveform we put it
here anyway. To get it working, select ENV Follow, set the
frequency down to 115Hz, on a Low Pass Filter, set your
resonance to 7.5 and adjust the LFO depth to taste.
" Singleshot: This button changes how the Filter and
the LFO Sections on your FilterFactory. Singleshot gives
you the ability to trigger Filter Effects in a simular way
that playing a note on an old synthesizer will trigger VCF
and VCA Envelopes. The FilterFactory Singleshot
Envelopes are borrowed from the LFO section. When
single shot is on, Triangle, Sawtooth, and Inverse Sawtooth all become triggerable envelopes.
The Division button allows you to select how many time the waveform envelope will trigger. LFO
Speed adjusts the duration of the envelope, and the Filter Momentary triggers the envelope.
Note: Singleshot does not work when the ENV Follower is selected.
Note 2: If the Filter is not engaged, the Singleshot does not automatically finish the waveform.
" Tap Tempo: The tap tempo button is another way to control the LFO rate to match the beat
of your music. When it is hit one time, it will restart the LFO at the beginning of its waveform. If
it is hit twice within 2 seconds, then the time between presses is used as the new rate or tempo.
It is hit 3 or more times, it will average the time between presses to come up with a more
accurate tempo.
" Depth: This controls the amount the LFO changes the filter frequency.
" Speed: LFO Speed controls the period of the LFO waveforms by changing the frequency of
the LFO. The LFO Frequency range covers 0.1 Hz to 100 Hz for subtle to extreme effects.
" Division: The LFO rate, as defined by Tap Tempo or MIDI clock can be divided (or doubled)
using this control. The actual rate is indicated by the flashing tempo LED.
GLOBAL
" Effect Mix: Controls the Mix of the Buzz and Filter Sections in relation to your dry signal.
0% is all dry, or the same as bypassing the FilterFactory. 100% will be all FilterFactory and none
of your dry signal.
" Bypass: Bypasses both effect blocks.
UNDERSTANDING THE PRODUCT
FRONT PANEL2.2
• Sawtooth
• Inverse Sawtooth
• Triangle
•Square
Waveforms
Page 10

English
11
" Power input: This input will accept an IEC standard
power cable. The internal power supply can be used in
any region. The fuse drawer can be rotated to
accomodate the different power ratings around the
world. Check the chart printed near the power entry for
fuse ratings.
" Power Switch: Turns the FilterFactory on and off.
When turning on your equipment be sure to turn your
power amplifiers on last. This will ensure that the noise
common to mixers and signal processors does not cause
damage to your speaker system. When powering down,
be sure to turn your power amplifiers off first.
" CV left and right: If you’ve got an old CV / Gate
keyboard rig, FilterFactory will work in your current
setup. You can control the Filter’s frequency with a CV
signal. (1 volt per octave).
" Footswitch: Use a standard momentary footswitch
to turn Bypass on and off. FilterFactory can accept
normally open or normally closed footswitches. The
footswitch must be inserted before power is turned on
so that FilterFactory can recognize its type.
" MIDI In/Out/Thru: Connect MIDI devices here. See
the MIDI Applications section for more detail.
" Channel Select: This selects the MIDI send and
receive channel.
" Output:
RCA -stereo - The RCA output level is nominally +4 dBu
1/4”-stereo TRS- This output produces a balanced +4 dBu
signal.
" Input:
Phono/Line Switch - this swiches the RCA inputs to
accept phono or line level.
RCA. -stereo - When the Phono/Line switch is in the
Line position, this input is optimized for a +4dBu input
signal. When the Phono/Line switch is set to Phono, the
RIAA phono pre-amp will accept a range of cartridge
output levels.
1/4” -stereo TRS Balanced - This input is optimized
for +4 dBu input signal. When using the 1/4” inputs, be
sure to use the 1/4” outputs as well. This will ensure no
noticeable signal loss.
Note: Connecting both RCA and 1/4 inch jacks to the
input causes the level of the 1/4” input to drop. Make
sure that when you are using the 1/4” inputs that
nothing is connected to the RCA inputs.
UNDERSTANDING THE PRODUCT
BACK PANEL2.3
Page 11

SET UPS
PERFORMANCE GUIDE
3.1
Pre-Mixer
T
he advantage of this setup in a live situation is that the FilterFactory effect can
be auditioned (cued) while other sources are playing. A caution though; it is
possible to get a large amount of gain with higher resonance settings, so when
auditioning FilterFactory through headphones keep the level low and be careful with
high settings of the Resonance control.
Line In
or
or
Page 12
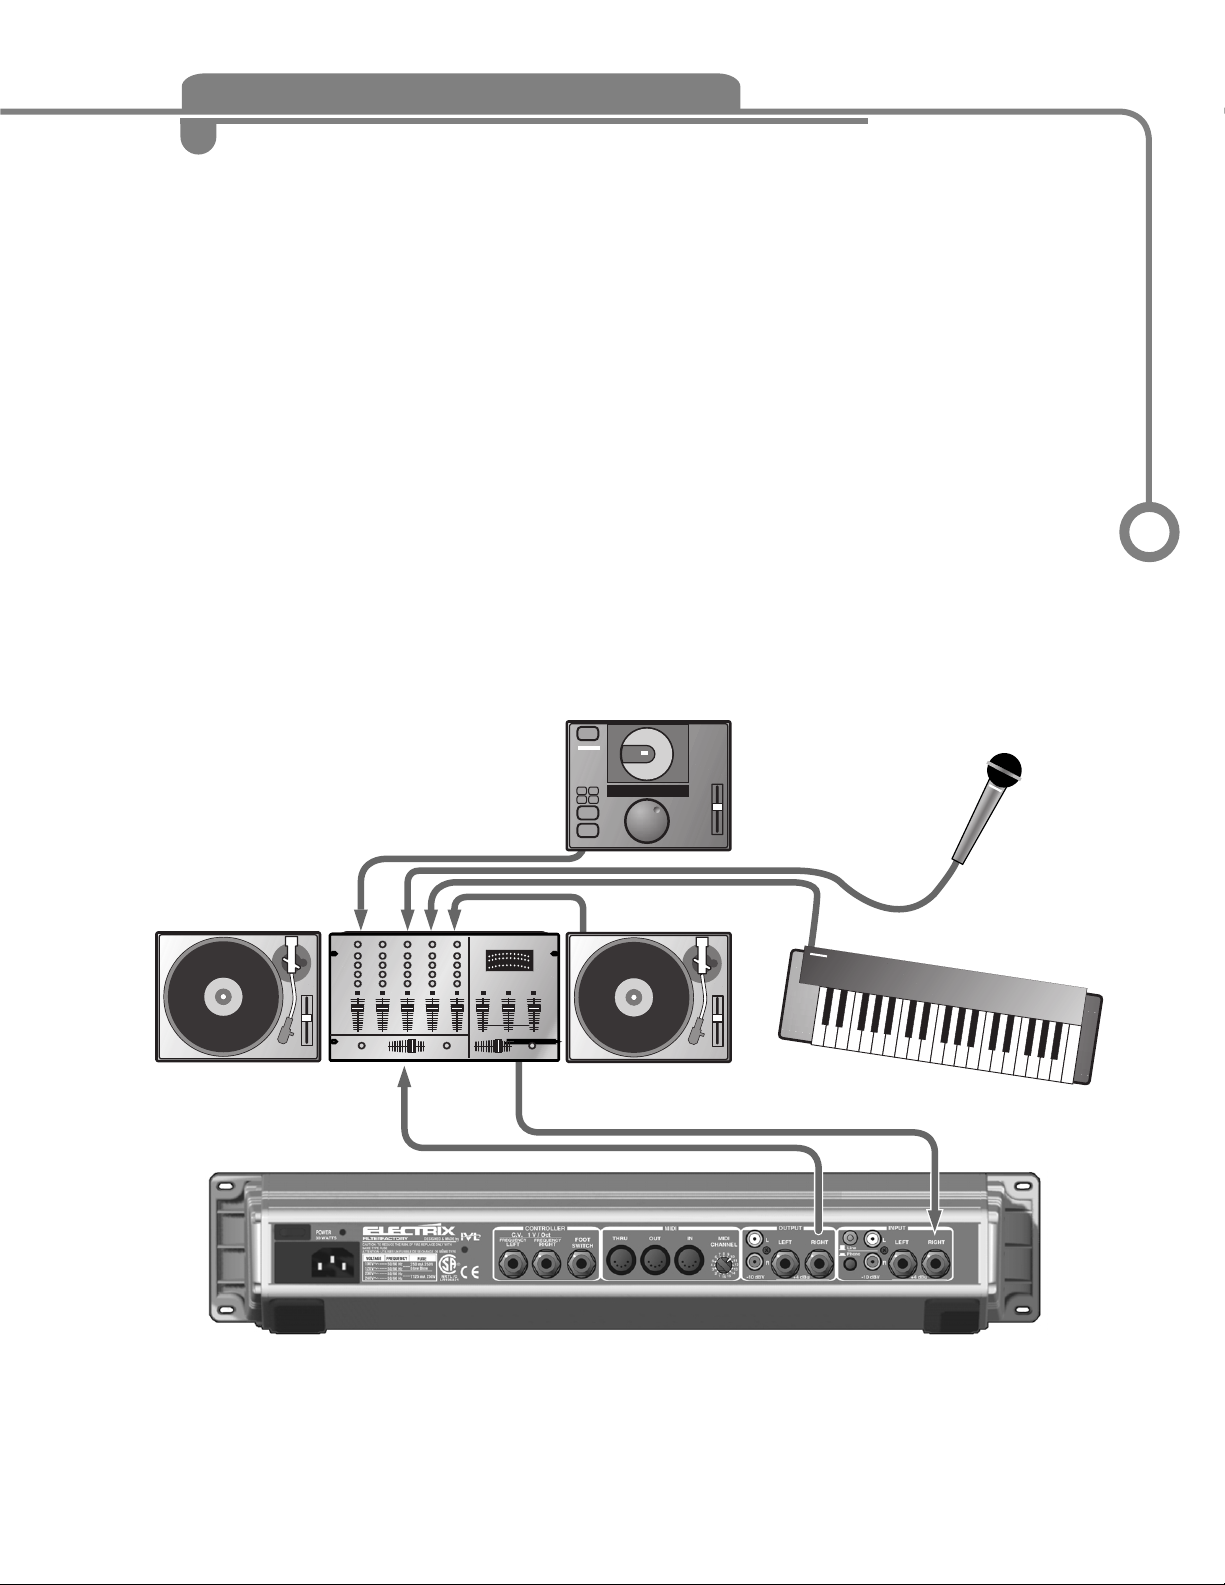
English
13
SET UPS
PERFORMANCE GUIDE
Mixer with Aux Send
T
his setup requires a mixer with auxiliary (aux) send and return capabilities. All
sources are connected directly to the mixer channel inputs. FilterFactory is fed its
signals from the mixer’s aux sends. This setup allows any or all of your sound
sources to be processed through FilterFactory at any time. The mix control on
FilterFactory should be set to 100% wet so that the dry source signal is only heard
through the mixer.
3.1
Line in
Aux In
Mic in
Line in
Phono in
Aux Out
Page 13

SET UPS
PERFORMANCE GUIDE
Post Mixer
T
his is a simple setup for stereo processing of your entire mix. You’ll want to use this setup
only after you have explored all the sonic possibilities of FilterFactory because cueing is not
possible. The cueing limitation can be minimized by bringing in the effect gradually with
FilterFactory’s mix control and doing any adjustments from there.
The 1/4” output jacks have servo driver circuits which are capable of driving longer cables to your
power amp.
Also, this setup comes with a warning: WATCH THAT RESONANCE CONTROL! Like any true analog
filter, FilterFactory is capable of generating ear- and PA-shredding peaks when you increase the
resonance control beyond halfway. Have we made this point enough?
3.1
Line in
Line Out
to Crossover/Power Amp
Phono in
Page 14

English
15
PERFORMANCE GUIDE
ARTIST APPLICATIONS3.2
"Tap Tempo Filter Swoosh
Buzz: optional
Frequency Knob: 640
Type: Low Pass, High Pass
Resonance Knob: Above 2.5 to as high as you dare.
4 Pole Mono: On, but if you want 2 Pole stereo,
turn up the Resonance and Depth more.
Waveform: Try Ramp Dwon first, then try the other waveforms.
Singleshot: On
Depth: 5
Speed: 9 O’Clock to 12 O’Clock on the knob
Division: 1:1 to start. Try the other divisions with faster Speed settings.
Effect Mix: 100 % or to taste
"Phase Shifter effect
That swooshy sound, that was initially made popular as a Fender Rhodes effect, is also
available in the FilterFactory. This effect works especially on sounds with sustained
portions such as voice, synth pads and of course, Fender Rhodes. A bass track with the
Buzz engaged and Notch filtering is awesome.
Buzz: optional
Frequency Knob: 115 plus 2 ticks
Type: Notch
Resonance Knob: 0
4 Pole Mono: On
Waveform: Triangle (looks like mountains)
Singleshot: Off
Depth: 10
Speed: Experiment - slow is good, medium warble is nice too.
Division: Off
Effect Mix: 100 %
Page 15

"Funk Drum FX
You can use the Envelope Follower waveform in the LFO section to create a “Bwow” sound
that exactly follows the dynamics of rhythmic input. Here’s how it’s done:
Buzz: off
Frequency Knob: 115
Type: Band Pass
Resonance Knob: 2.5
4 Pole Mono: Off
Waveform: EnvFollow
Singleshot: Off
Depth: Less than 10
Speed: Off
Division: Off
Effect Mix: To taste
Playing with the Depth and Frequency knobs will customize the effect to your liking.
Changing the Filter Type will emphasize different frequency bands. Note that when you try
the Notch filter type setting, you’ll have to set resonance to zero and the frequency knob to
around 640.
PERFORMANCE GUIDE
ARTIST APPLICATIONS3.2
Page 16

English
17
RECORDING AND PLAYING BACK
PERFORMANCES WITH A SEQUENCER
E
lectrix products are performance products. We have designed them to accurately
transmit and receive your performance through MIDI. That means every knob
and every switch can be automated. To do this, simply connect your FilterFactory
to a sequencer. FilterFactory has MIDI Control Change messages assigned to all of it’s
functions. That means your performance will show up in your sequencer as MIDI
CC’s (Control Change Messages).
Note that a press and hold of the bypass button will dump the present state of the
controls. MIDI CC #18 will request a dump of state.
" Real Time Control
The FilterFactory has a great alternative MIDI control feature.
You can control the frequency control with your keyboard using MIDI Note Numbers.
Here’s how...set the filter to self resonate by bring the resonance up quite high, then
play monophonically on a keyboard plugged into the MIDI in on the FilterFactory for
some pitched effects.
" MIDI Clock
The FilterFactory can receive MIDI clock messages. It will re-sync its Tap Tempo to the
incoming MIDI clock for you automatically. This could be a great convenience for you
if have a Drum Machine or Groovebox to sync to. Just set up your MIDI clock source
to transmit MIDI clock, connect a MIDI cable from the source’s MIDI OUT to the
FilterFactory’s MIDI in and press start on your MIDI clock source.
Note: The LFO speed control overrides the Tap Tempo and the incoming MIDI clock
tempo. That means if you adjust it you will loose sync to your Tap Tempo / MIDI Tempo.
To re-sync to MIDI Clock, hit Tap Tempo.
" Setting the MIDI Channel
On the back of your FilterFactory is a small rotary switch labeled MIDI channel. Use it
to set the Transmit / Receive channel of your FilterFactory.
MIDI
4.1
Page 17

MIDI
Function Transmitted Recognized Remarks
Basic Channel Selectable 1-16 1-16
Mode Default X Mode 3
Messages X X
Note Number X 0 Controls Filter Frequency
Velocity Note ON X X
Note Off X X
After Touch X X
Pitch Bender X O Controls Filter Frequency
Control Change 1 LFO Depth (Mod Wheel)
2 Pre-Buzz Level
3 Post-Buzz Level
4 Buzz Engage
5 Filter Frequency
6 Wet / Dry Mix
7 Filter Resonance
8
1
Filter Type
9 Filter Engage
10
2
LFO Waveform
11
3
LFO Single Shot
12 LFO Rate
13
4
LFO Division
16
5
Filter Poles
17 Bypass
18 Dump Request
67 Tap Tempo
Program Change X X
System Exclusive X X
System Common Song Position X X
Song Select X X
Tune Request X X
System Real Time Clock X 0 Tempo (LFO Speed)
Commands X 0 Restarts LFO in sync with MIDI clock
Aux Messages Local On/Off X X
All notes Off X X
Active Sensing X X
System Reset X X
Notes
1. Filter Type: 0 (low pass), 1 (high pass), 2 (band pass), 3 (notch)
2. LFO Waveform: 0 (sawtooth), 1 (inverse sawtooth), 2 (triangle), 3 (square), 4 (random), 5 (envelope follow)
3. LFO Single Shot, 0-63 (continuous LFO waveform), 64-127 (single shot LFO waveform)
4. LFO Division: 0 (1:1) 1 (2:1) 2 (3:1) 3 (4:1) 4 (6:1) 5 (1:2) 6 (1:4)
5. Filter Poles: 0-63 (2-pole), 64-127 (4-pole)
Mode 1: OMNI ON, POLY Mode 2: OMNI ON, MONO 0: YES
Mode 3: OMNI OFF POLY Mode 4: OMNI OFF MONO X: NO
4.2 MIDI IMPLEMENTATION CHART
Page 18

English
19
INPUT
Connectors: 1/4” TRS RCA (Phono) RCA (Line)
(balanced)
Max Input Level: +12.5 dBu -24.5dBV +12.5dBu
Impedance: 110KΩ 47.5KΩ 20KΩ
OUTPUT
OUTPUTS
Connectors: 1/4”TRS bal RCA RCA
Impedance: 600Ω 1KΩ 1KΩ
Max Output Level: +12.5 dBu +12.5 dBu +12.5 dBu
PERFORMANCE 1/4” PHONO RCA
Dynamic Range: >90db >75db <90db
THD: <0.3% <0.3% <0.3%
Frequency Response:
10Hz-20.0kHz 10Hz-20.0kHz 10Hz-20.0kHz
POWER CONSUMPTION
30 watts VOLTAGE FREQUENCY FUSE
100 V 50/60 Hz 250mA 250V Slow blow
120 V 50/60 Hz
230 V 50/60 Hz 125mA 250V “T”
240 V 50/60 Hz
SPECIFICATIONS
Actual measurements are subject to change
Page 19

This equipment has been tested and found to comply with the limits for a class A digital device,
pursuant to part 15 of the FCC rules.
These limits are designed to provide reasonable protection against harmful interference in a
residential installation.
This equipment generates, uses and can radiate radio frequency energy and, if not installed and
used in accordance with the instructions, may cause harmful interference to radio communications.
However, there is no guarantee that interference will not occur in a particular installation.
If this equipment does cause harmful interference to radio or television reception, which can be
determined by turning the equipment on and off, the user is encouraged to try to correct the
interference by one or more of the following measures:
• Reorient or relocate the receiving antenna.
• Increase the separation between the equipment and the receiver.
• Connect the equipment into an outlet on a circuit different from that to which the receiver
is connected.
• Consult the dealer or an experienced radio TV technician for help.
The user may find the following booklet, prepared by the Federal Communications Commission,
helpful:
“How to identify and Resolve Radio/TV interference Problems.”
This booklet is available from the US Government Printing Office, Washington, DC 20402, Stock No.
004-000-0034-4.
" Caution:
You are cautioned that any change or modifications not expressly approved in this manual could
void your warranty.
" For the customers in Canada:
This Class A digital apparatus meets all requirements of the Canadian Interference-Causing
Equipment Regulations.
Cet appareil Numerique de la Classe A respecte toutes les exigences du Reglement sur le materiel
brouilleur du Canada.
" Certificate of Conformity
Electrix, (a Div. of IVL Technologies LTD) hereby declares on own responsibility that the following
product
Electrix FilterFactory
that is covered by this certificate and marked CE-label conforms with the following standards:
• EN 60065 Safety requirements for mains operated Electronic and related apparatus for
household and similar general use
• EN 55103-1 Product family standard for audio, video, audio-visual and entertainment
lighting control apparatus for professional use.
Part 1: Emission
• EN 55103-2 Product family standard for audio, video, audio-visual and entertainment
lighting control apparatus for professional use.
Part 1: Immunity
With reference to regulations in following directives:
72/23/EEC, 89/336/EEC as amended by directive 93/68/EEC
Issued in Victoria, March 31, 1999 by Brian Gibson, Executive Vice-President, Research and Development
SAFETY & CONFORMITY
 Loading...