

Page 1
eIQ-RoboVac Robotic Vacuum Cleaner
USER MANUAL
Thank you for choosing ElectrIQ.
Please read this user manual before using this robotic vacuum cleaner
and keep it safe for future reference.
Visit our page www.electrIQ.co.uk for our entire range of Intelligent Electricals
Page 2

FEATURES
ElectrIQ brings you an easy to use robot vacuum cleaner that works both on hard
floor surfaces and carpets.
You can now enjoy your personal time while the robot will clean for you.
Slim profile at only 5.5 cm this time saving device will get in hard to reach places,
including under furniture.
Simple operation includes one touch setting to set your cleaning time from 10
minutes, 30 minutes to thorough cleaning of maximum 90 minutes.
Side brush around the outer edge ensure that dirt is collected even from hard to
reach areas. Middle brush will ensure carpet is swept and dirt and debris is efficiently
collected.
Anti-bump sensors will ensure robot stops before bumping into objects.
Ideal for hard floor and low and medium pile carpet.
Easy to use due to automated cleaning pattern one touch start button
Single area cleaning only, not to be used on uneven surface.
With carry handle and easy to empty bag less rubbish container.
Not to be used next to steps.
SAFETY INSTRUCTIONS
Important
• Carefully read the instructions before operating the unit
• This appliance is for indoor use only.
• Rating: This unit must be only connected to a 220-240 V / 50 Hz earthed outlet.
Always check the rating label against your electrical supply.
• If you are in any doubt about the suitability of your electrical supply have it
checked and, if necessary, retested by a qualified electrician.
• This robotic vacuum cleaner been tested and is safe to use. However, as with any
electrical appliances - use it with care.
• Disconnect the power plug from unit before dismantling, assembling or cleaning.
• Do not clean the unit by spraying it or immersing it in water.
• Never operate this appliance if the cord or power supply is damaged. Ensure the
power cord is not stretched or exposed to sharp object / edges.
• Do not pull the mains cable to disconnect the power supply from the mains.
• Do not use the appliance if any part or any accessory is damaged or defective.
• A damaged power supply should be replaced only with original parts from the
manufacturer
• Avoid touching any moving parts of the appliance.
• Never insert fingers, or any other objects while machine is in operation.
• This appliance is not intended for use by persons (including children) with
reduced physical, sensory or mental capabilities. It is also not intended for use by
those with a lack of experience and knowledge, unless they have been given
supervision or instruction concerning the use of the appliance by a person
responsible for their safety.
• Do not leave children unsupervised with this appliance.
Page 3
• Any service other than regular cleaning should be only performed by an
authorized service representative. Failure to comply could result in a voided
warranty.
• Do not use the appliance for any other purposes than its intended use.
• Do not use the appliance in places with high humidity (>80%RH)
• Do not immerse the robot in water or other liquids. If the robot is immersed in
water or other liquids by mistake, do not touch it with your hands. If the appliance is
immersed in water or other liquids, discard it.
Unit Safety Protection and Performance Tips
• Make sure unit is assembled correctly before use
• Charge for 24 hours before operating first time
• Clean robot and brushes regularly. Empty and hoover the dust container
• If the robot become entangled, remove brushes, clean the debris and
reassemble
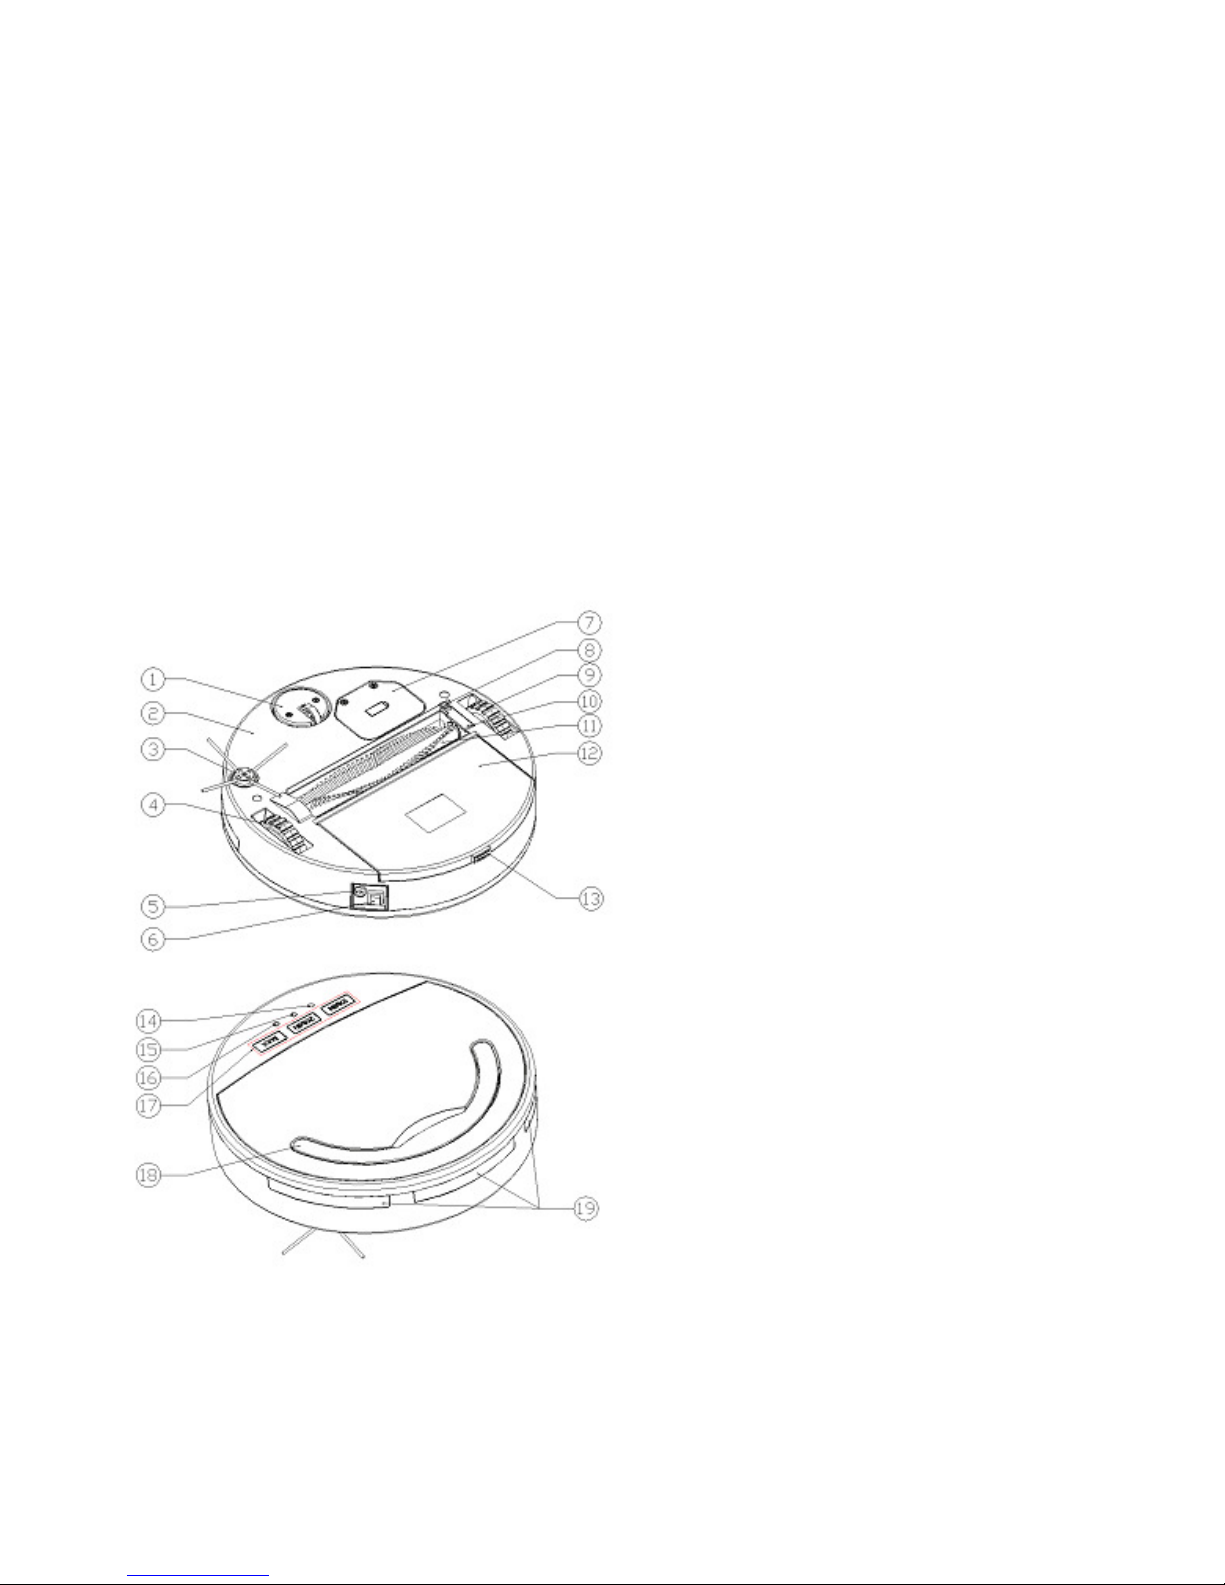
Product Features
1. Swivel caster
2. Robot body
3. Side brush
4. Right wheel
5. Charging port
6. On / Off button
7. Battery cover
8. Middle brush holder
9. Left wheel
10. Middle brush release catch
11. Brush wheel
12. Dustbin
13. Dustbin release button
14. Fault indicator light
15. Light-Sensor
16. Work indicator light
17. Work mode selection
18. Handle
19. Obstacles sensor
Page 4
Assembly
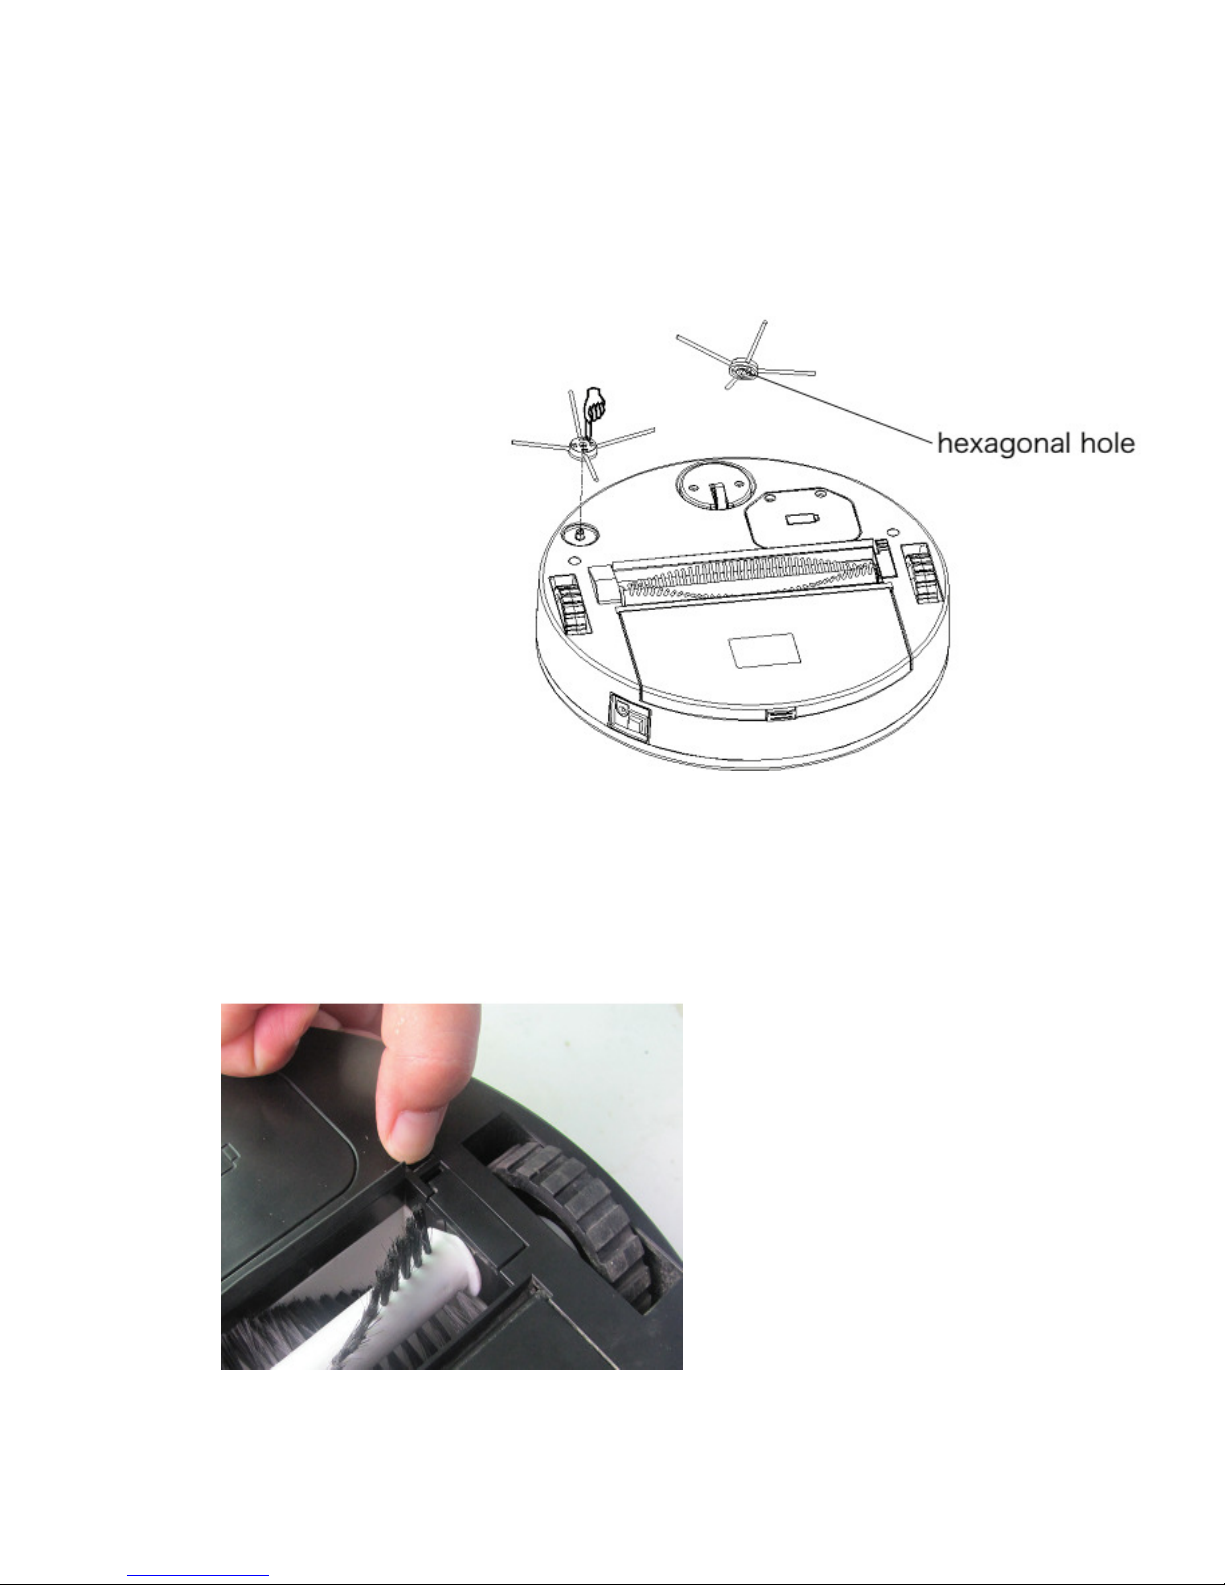
Installing the side brush
There is a hexagonal hole at
the bottom of the side
brush, align the brush and
press against until clicks in.
Removing and reinstalling the middle brush
Remove the charging plug and
turn off the robot by pressing
the power on / off button on the
side of the robot.
Turn the robot upside down on a
flat surface. Press the middle
brush release catch, take out
both brush and wheel.
Clean the brush and the side
wheel and reverse procedure to
reinstall.
Page 5

Operation
1. Assemble the robot and install the side brush as per instructions
2. Place the robot in the middle of the area to clean.
3. Turn on the robot by using the side red button.
4. Select the desired operation mode 10min, 20 min, Max. The robot will operate
according to the selection
5. Press any selection button to stop the robot while in operation.
6. If the robot shuts down while working and the red indicator light flashes, please
check if the brush wheel is trapped. Remove the brush wheel and clean it. Then
restart the robot on the even surface.
7. If the robot shuts down while working and the green indicator light flashes, please
charge the robot. Green indicator light keeps flashing while charging and than stays
on solid green when fully charged.
8. When the robot finishes the cleaning cycle, please lift it by handle over a large
dustbin, press the rubbish release button, and empty the rubbish collection
container. Please vacuum, brush or wipe the remaining dust in the collector and
clean the middle brush. Now robot is ready for a new cycle and can be recharged.
9. If the robot shut down while working and the red and green indicator light flashes
at the same time, press the side button for 5 seconds to turn off the robot, and then
press side button to restart the robot. Check if any debris are blocking the brushes.
If this fails to, please contact the service centre.
Notes:
1. The robot suitable for hard floor and low to medium pile carpet.
2. This robot is not suitable for uneven surface. Do not use in mixed carpet, hard
floor areas!
3. Please note that this robot will collect dust and small particles. It will not
clean paper, plastic bags and other large debris. It will get entangled in wires,
so please de-clutter floor surfaces before using
4. Do not leave bottles or other breakables on the floor
5. Do not use on wet or greasy dust.
6. Do not use next to steps or on balconies. This robot does not have step
avoidance sensors.
Page 6
Charging
If the robot shut down while working and the green indicator flashes, please charge
the robot immediately..
1. Plug the charger in the power outlet.
2. Plug the lead in charging port next to red power on / off button.
3. The green indicator flashes with a sound, it means the robot is charging normally.
4. The green indicator keeps flashing with a sound, it means the robot is fully
charged.
5. When fully charged plug out the charger and power cord.
Notes:
1. Charge the robot for at least 24 hours before the first use.
2. Each time the robot is fully depleted charge for at least 4 hours.
3. Never use the robot in temperatures less than 0℃ or over 40℃ as this will
reduce the battery life and performance.
4. It is normal for the temperature of the charger to increase during the charging
process
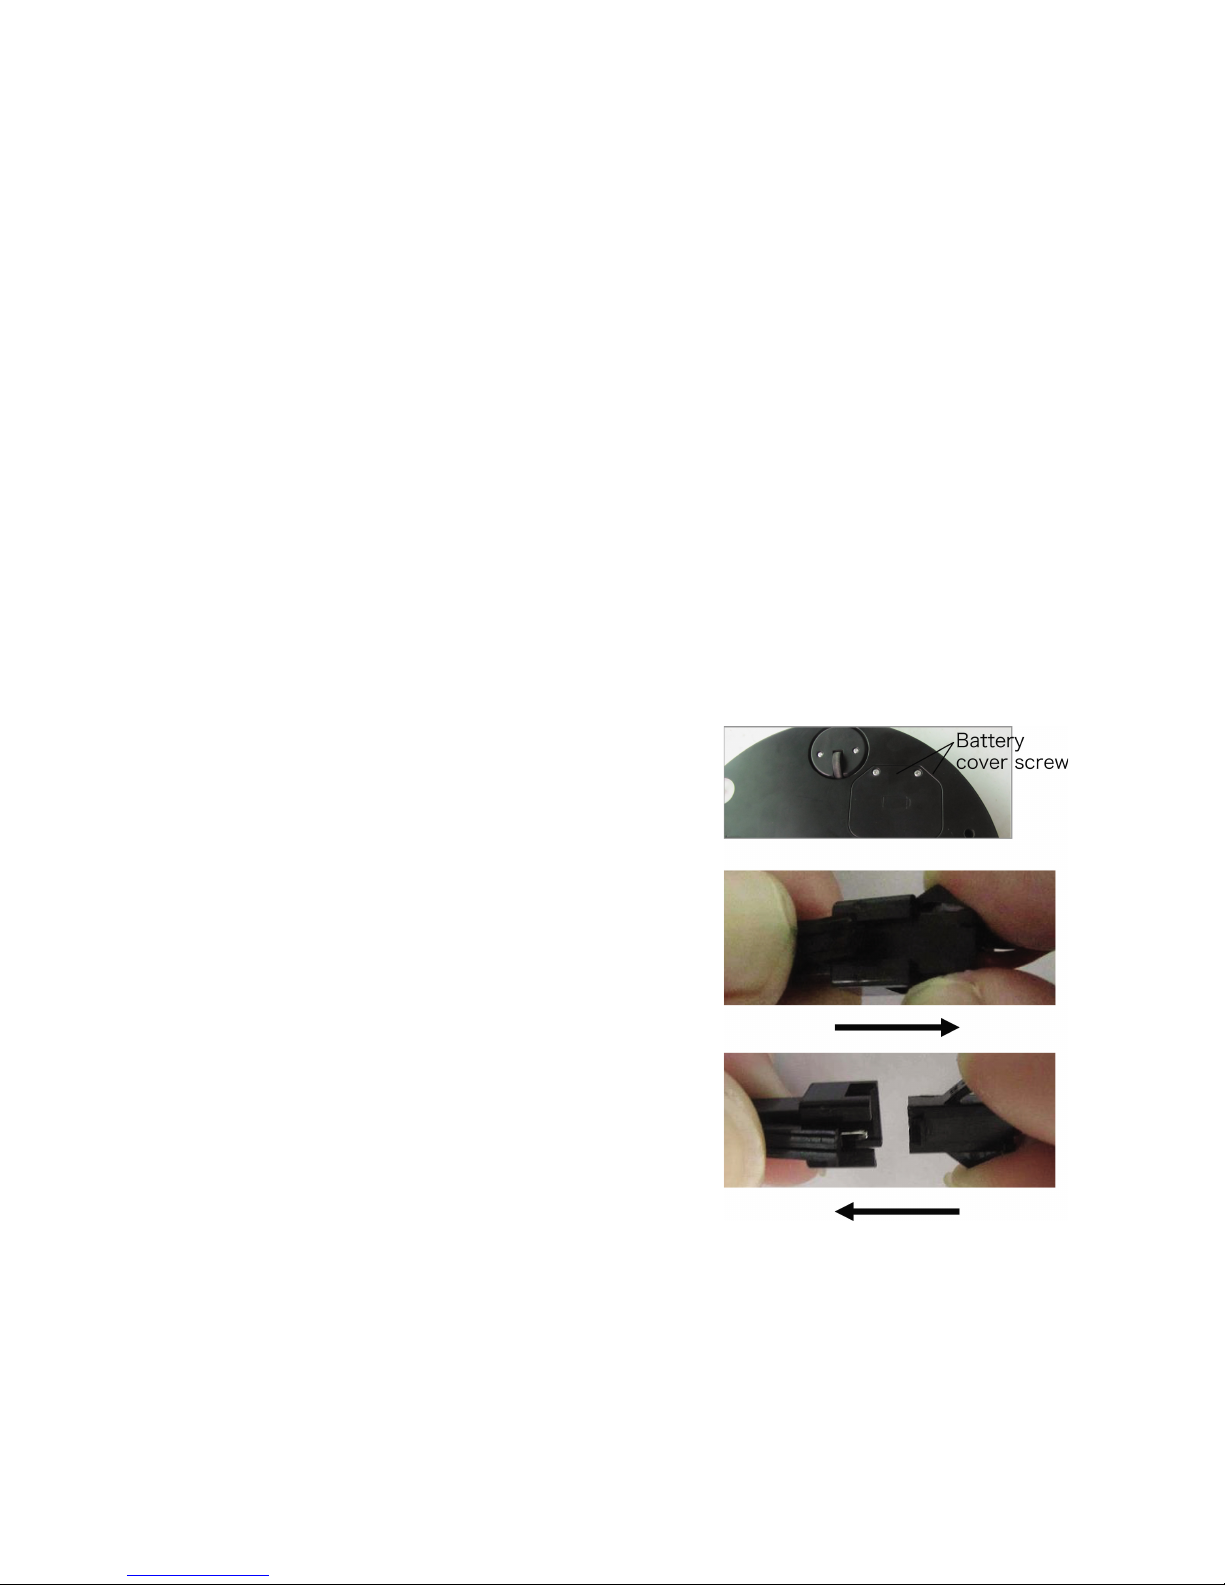
Battery replacement
The robot battery is user replaceable.
If the battery stops keeping its hold please re-order
replacement from the manufacturer or service
centre.
1. Make sure unit is unplugged and powered off
2. Open the battery cover (as in picture) and take
out of battery and save the screws.
3. Remove the connector. Press the lock on the
connector and pull off.
3. Replace with new battery: push down the lock
and push the right part to the left until you hear it
clicking into place.
4. Close the battery cover and secure it with the
screws you have.
Page 7

Clean and Maintainance
1. Make sure the unit is unplugged before cleaning.
2. Before first use and continuing after each use, wipe off unit with a damp
cloth and dry thoroughly.
3. Clean all the brushes and empty the rubbish container. Vacuum or wipe with
a cleaning wipe the inside of the container.
4. DO NOT immerse the robot or the power supply in any liquid.
5. Reassemble the unit following the instructions and charge it before the next
use.
6. Store the robot in a cool and dry place.
Product specifications
Power supply
Input: 110-240VAC 50-60Hz
Output: 9VDC, 400MA
Rechargeable battery NICD 7.2V,1300MAH
Charging time 3hrs
Operating Time Max 90 min.
Cleaning Efficiency 98%
Dustbin capacity 0.3 l
Dimension 286x286x65mm
Page 8

Troubleshooting
Please read this instruction manual carefully before you send the robot to the
service centre.
Problem Cause Solution
Abnormal sound The robot is trapped Clear the debris around
the brushes and wheels.
Only works for a short
period after battery is fully
charged
The robot is trapped or
battery is defective battery
Remove brushes and clean
them. If still does not work
re-order new battery.
Robot stops working after
a while and flashes down
while working and red
light flashes
Check if the robot is
trapped
Remove brushes and clean
them. Make sure robot
is working on even surface
Robot shuts down while
working and green light
flashes
Insufficient battery power Charge the battery
Both red and green light
are flashing
Faulty PCB
Faulty Motor
Faulty battery
Press off button for 5
seconds. Restart after 5
minutes.
Return to service centre if
re-start procedure does
not resolves the issue.
ElectrIQ UK SUPPORT
www.ElectrIQ.co.uk/support
If the unit still fails to operate call: 0871 620 1057 or
complete the online form
Office hours: 9AM - 5PM Monday to Friday
www.ElectrIQ.co.uk
Unit 2, The Nursery
Berristow Lane
South Normanton
Derbyshire, DE55 2FX
 Loading...