


USER MANUAL
7KG TUMBLE DRYER
eiQFFSTD7
Thank you for choosing electriQ
Please read this user manual before using this
Tumble Dryer and keep it safe for future reference.
Visit our page www.electriQ.co.uk for our entire product range

2
CONTENTS
SAFETY WARNINGS 3
PRECAUTIONS 5
KEY COMPONENTS 7
INSTALLATION 7
POSITION OF THE DRYER 7
ADJUSTING THE FEET 8
NOTES REGARDING POSITIONING 8
OPERATION 9
QUICK START 9
DRYING LABELS 9
BEFORE USE 10
CONTROL PANEL 11
FOLLOWING USE 12
DRYING PROGRAMMES TABLE 12
MAINTENANCE AND CARE 13
CLEANING THE FILTER 13
CLEANING THE CABINET AND DRUM 13
SAFETY CUT OUT 13
TROUBLESHOOTING 14
FAULT CODES 15
electriQ UK SUPPORT 15
DISPOSAL 15
PRODUCT FICHE 16
SPECIFICATION 16

3
SAFETY WARNINGS
For your continued safety and to reduce the risk of injury or electric
shock, please follow all the safety precautions listed below.
Read all instructions carefully before using the appliance and
keep them for future reference.
Retain the manual. If you pass the unit onto a third party, make
sure to include the manual.
This appliance can be used by children aged from 8 years and
above and persons with reduced physical sensory or mental
capabilities or lack of experience and knowledge if they have
been given supervision or instruction concerning use of the
appliance in a safe way and understand the hazards involved.
Children shall not play with the appliance. Cleaning and user
maintenance shall not be made by children without supervision.
Children should be supervised to ensure that they do not play
with the appliance.
Children of less than 3 years should be kept away unless
continuously supervised.
The unit must be maneuvered by a minimum of 2 people.
Do not use if the power cord is damaged.
Never touch the power cord/plug with wet hands. This may
cause a short circuit or electric shock.
If the supply cord is damaged, it must be replaced by the
manufacturer, its service agent or a similarly qualified person.
Do not store explosive substances such as aerosol cans with a
flammable propellant in this appliance.
Do not use extension cords or ungrounded adapters.
The tumble dryer is not to be used if industrial chemicals have
been used for cleaning.
When positioning the appliance, ensure the supply cord is not
trapped or damaged.
Use a dedicated power socket. The power socket shall not be
shared with other electrical appliances.
Ensure the socket is suitably earthed. If in any doubt a suitable
socket must be installed by a qualified electrician.
When unplugging the appliance firmly grasp the plug and pull out

4
from the socket. Do not pull the power cord.
This appliance is intended to be used in household and similar
applications and is not designed for use within a commercial
environment.
The lint trap has to be cleaned frequently.
Lint must not to be allowed to accumulate around the tumble
dryer.
Do not dry unwashed items in the tumble dryer.
Items that have been soiled with substance such as cooking oil,
acetone, alcohol, petrol, kerosene, spot removers, turpentine,
waxes and wax removers should be washed in hot water with
extra detergent before being dried in the tumble dryer.
Items such as foam rubber (latex form), shower caps,
waterproof textiles, rubber backed articles and clothes or
pillows fitted with foam rubber pads should not be dried in the
tumble dryer.
Fabric softeners, or similar products, should be used as
specified by the fabric softener instructions.
Never stop a tumble dryer before the end of the drying cycle
unless all items are quickly removed and spread out so that the
heat is dissipated.
Diagrams within the manual are for illustrative purposes only,
due to continual product improvement the product may vary from
the illustrations. The exhaust air must not be discharged into a
flue which is used for exhausting fumes from appliance burning
gas or other fuels.
The appliance must not be install behind a lockable door, a
sliding door or a door with a hinge on the opposite side, to that of
the tumble dryer. In such a way that a full opening of the tumble
dryer door is restricted.
Oil-affected items can ignite spontaneously, especially when
exposed to heat sources such as in a tumble dryer. The items
become warm, causing an oxidation reaction in the oil. Oxidation
creates heat. If the heat cannot escape, the items can become
hot enough to catch fire. Piling, stacking or storing oil-affected
items can prevent heat from escaping and so create a fire
5
hazard.
The appliance should not be overturned during normal use or
maintenance.
Remove all objects from pockets such as lighters and
matches.
For appliances with ventilation openings in the base, that a
carpet must not obstruct the openings.
The plug must be accessible after installation.
Warning: The appliance must not be supplied through an
external switching device, such as a timer, or connected to a
circuit that is regularly switched on and off by a utility.
Remove all packaging before using the appliance. Otherwise
serious damage may result.
PRECAUTIONS

6

7
KEY COMPONENTS
INSTALLATION
POSITION OF THE DRYER
The dryer should be placed in a
ventilated area with a gap of at
least 10cm between the rear of the
unit and the wall.
It is advisable to leave a space of
at least 1.5 metres in front of the
appliance.
Do not restrict the ventilation.

8
ADJUSTING THE FEET
Once the dryer is in its permanent
position it should be checked to
ensure it both level and stable.
Using a spirit level the feed should
be adjusted.
NOTES REGARDING POSITIONING
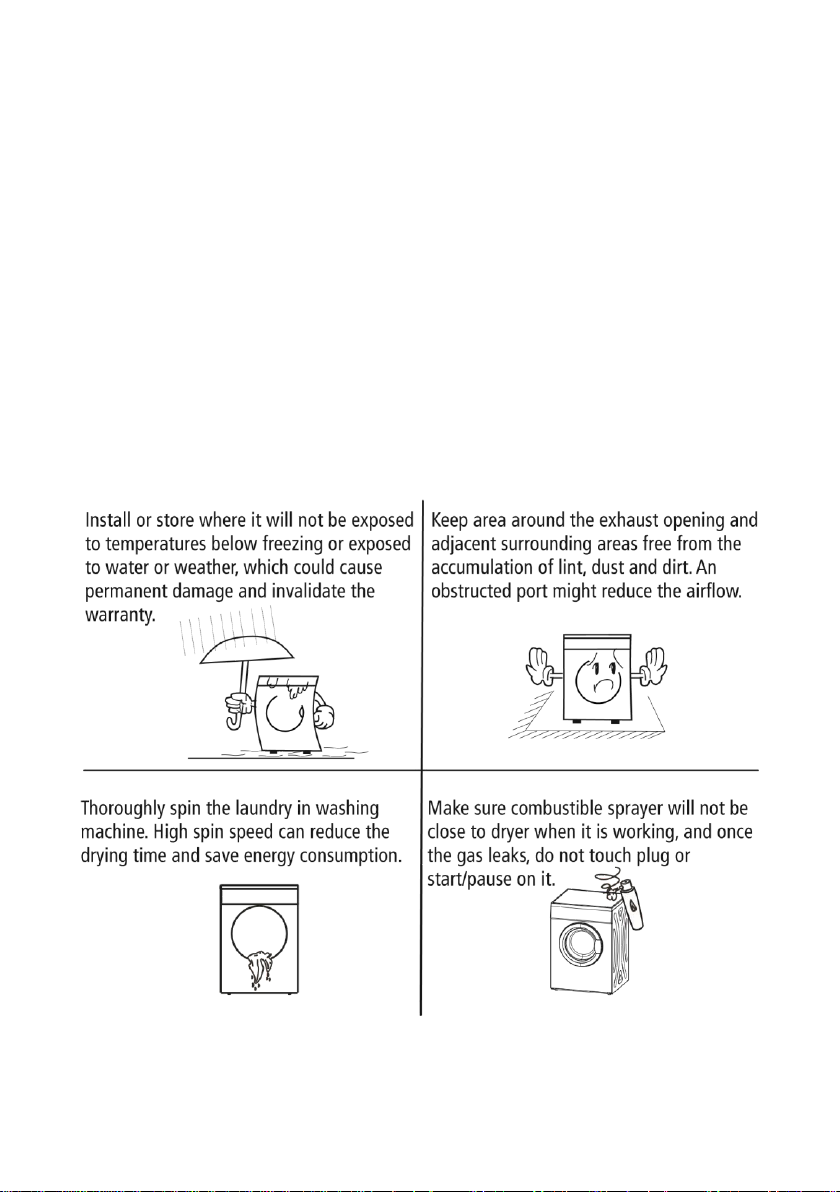
The appliance must be installed indoors. Do not install in a
position where is may be exposed to rain or excessive
moisture.
Do not place the rear of the dryer close to curtains, or
anything that could be caught by wind.
Do not place the dryer near gas appliances or close to
anything flammable.
FITTING THE VENT PIPE
Attach the vent pipe to the rear of the appliance using the
adaptor pre fitted to the vent pipe. Route the pipe so the
opposite end will expel the hot air outside. Where possible
bends to the pipework should be minimized.

9
OPERATION
QUICK START
Before use ensure the appliance is correctly installed, and there
are no signs of damage.
* If no function is selected, the appliance will start with the
default settings
DRYING LABELS
Plug In
Load Clothes
Close the door
Turn On
Choose
Function*
Start

10
BEFORE USE
Ensure the laundry is thoroughly spun in the washing machine.
This will reduce the drying time and reduce energy
consumption.
For best performance and uniform results, sort the laundry
according to the fabric type and most appropriate drying
program.
Before drying, please ensure zips, hooks and eyelets, buttons
and similar are fastened to prevent them catching during
operation.
Do not over dry clothes, because over dried clothes can
become creased easily.
Articles should be spun dried before placing in the dryer.
Putting soaking items into the dryer may result in damage.
Do not dry articles containing rubber or similar elastic materials.
The door should only be opened only after the drying
programme has finished to prevent scalding by hot steam or
over heating the dryer.
Clean the lint filter and empty the container after each use to
avoid extending the drying time and increasing energy
consumption.
Do not put clothes into the dryer if they have been dry cleaned.
Not suitable for silk or woolen textiles
Do not overload the appliance. Please see below for
approximate weights.
Mixedfabric
clothes
800g
Jacket
Cotton
800g
Jeans
800g
Towel
quilt
Cotton
900g
Single
bedsheet
Cotton
600g
Work
clothes
1120g
Sleepwear 200g
Long sleeve
shirt
Cotton 300g
Short
sleeve
shirt
Cotton
180g
Pants
Cotton 70g
Socks
mixedweave
50g

11
CONTROL PANEL
On/Off
Use to turn the appliance on and off.
CHOOSE THE DESIRED PROGRAMME
Program
Press to choose between the 4 available
functions: Mix, Cotton, Synthetic and 1 hour.
CHOOSE THE EXTRA FEATURES REQUIRED
Anti-Crease
Press to turn on / off the anti-crease function.
When activated the indicator light will be
illuminated.
Dryness
Press to choose the level of dryness, between
Iron Dry, Cupboard Dry and Extra Dry.
START THE DRYING PROGRAM
Start / Pause
Press the Start / Pause button to start the
drying program. Press again to pause it.
OTHER FEATURES
Child Lock
Press and hold the Program and dryness
buttons for 2 seconds to turn the child lock on /
off.

12
The symbol indicates the “standard cotton program,
which is the most appropriate to normal cotton garments at
the rated load.
Using the Cotton Program with the Dryness set to Extra is
ideal for cotton laundry and is the most efficient in terms of
energy consumption for drying wet cotton laundry.
FOLLOWING USE
Once the drying function has finished the appliance will
bleep.
Press the On/Off button and unplug the appliance.
Remove the dried clothes from the appliance
Clean the lint filter, cabinet and drum.
DRYING PROGRAMMES TABLE
Clothing
Type
Approximate
amount of
remaining humidity
Capacity
(KG)
Programs
Dryness
Level
Note
Cotton
70%
7 / 3.5 / 1
Cotton
Extra
Select the
most suitable
program and
Dryness
Level based
on the type
and quantity
of foods to be
dried.
60%
7 / 3.5 / 1
Cotton
Cupboard
7 / 3.5
Cotton
Iron
Mix
70%
7 / 3.5 / 1
Mix
Extra
60%
7 / 3.5 / 1
Mix
Cupboard
Synthetic
50%
3.5 / 1
Synthetic
Extra
40%
3.5 / 1
Synthetic
Standard
Cotton
-
1
1Hr
-

13
MAINTENANCE AND CARE
CLEANING THE FILTER
Clean the lint filter after each use. Remove
by pulling straight up.
To clean the filter wipe with a cloth to
remove any lint which has accumulated.
Allow the filter to dry before reinserting
back into the appliance.
CLEANING THE CABINET AND DRUM
Use a soft damp cloth to wipe the cabinet and drum
Do not directly rinse with water.
Do not use scourers or scrapers
Do not use alcohol, detergent or bleach wipes.
After cleaning the drum, ensure the door is left open to allow the drum to
dry naturaly.
SAFETY CUT OUT
This dryer has a safety cut out which is
activated if the temperature is too high.
If the unit cuts out, leave the appliance for
at least 10 minutes to cool before pressing
the rest button. (press until you hear it click,
you may require a pencil or similar)
The reset button is located on the rear of
the appliance.
The cutout may operate for one of the following reasons which should be
resolved before further use.
The lint filter is blocked
The exhaust outlet on the rear of the dryer is blocked.
Poor ventilation in the room where the dryer is located.
Lightweight article has been sucked over the filter.

14
TROUBLESHOOTING
You may try to solve the following simple problems by yourself.
If they cannot be solved, please contact the after-sales department.
Problem
Cause
Will not start
Power cut.
The power plug is not
plugged tight.
Appliance overloaded.
The safety cutout has
activated
Check electricity supply.
Check the power socket, make sure
the plug is correctly inserted.
Ensure there is not too much within
the appliance
Press the reset button on the rear of
the appliance.
External hot
or burning
smell
The lint filter is dirty.
The uptake or exhaust
duct is dirty.
Make sure the lint filter is clean.
Check to ensure the vent pipe is
unobstructed.
Clothes are
too dry
The machine is too full.
Clothes not removed
after the program has
finished.
The clothes aren’t
sorted properly.
The drying temperature
is too high.
Make sure the machine is not
overloaded.
Take out the clothes immediately
following completion f the program.
Observe the maintenance label on
clothes.
Clothes
shrink
Too dry.
Observe the maintenance label on
clothes. If prone to shrinking they
should examine the clothing when dry.
Use the iron dry setting or remove the
clothes early and then complete drying
by hanging until fully dry.
Hairball on
clothes
It is normal for synthetic
fibre and permanent
press fibre to cause
hairballs. This is due to
rubbing while washing /
drying.
Use fabric softener to lubricate the
fibre.
Turn garments inside out to reduce
rubbing.
Noises while
operating.
Wet clothes moving
within the drum
This is normal.
Air bumping
Bumping of the drum
due to steam expelled.
This is normal

15
FAULT CODES
Failure
indication
Description
Reason
Action by
Dryer
Iron and
Cupboard
LED’s flashing
Temperature
Sensor error
Temperature
Sensor is open or
PCB fault
Current
operation
cancelled
Extra LED
flashing
Temperature
Sensor error
Temperature
Sensor is short or
PCB fault
Current
operation
cancelled
electriQ UK SUPPORT
www.electriQ.co.uk/support
Call: 0333 043 6692 or complete the online form
Office hours: 9AM - 5PM Monday to Friday
www.electriQ.co.uk
Unit J6, Lowfields Business Park
Lowfields Way, Elland
West Yorkshire, HX5 9DA
DISPOSAL
Do not dispose this product as unsorted waste. Collection
of such waste must be handled separately as special
treatment is necessary.
Recycling facilities are now available for all customers at which you can
deposit your old electrical products. Customers will be able to take any old
electrical equipment to participating sites run by their local councils. Please
remember that this equipment will be further handled during the recycling
process, so please be considerate when depositing your equipment. Please
contact the local council for details of your local household waste recycling
centres.

16
PRODUCT FICHE
Model
eiQFSTD7
Rated Capacity
7Kg
Dryer Type
Air-Vented
Energy Efficiency Class
C
Weighted annual energy consumption(AEC)
451.6kWh*
Automatic or Non Automatic
Automatic
EU Ecolabel
N/A
Energy consumption of the standard cotton programme at full load
3.81 kWh
Energy consumption of the standard cotton programme at partial
load
2.05 kWh
Power Consumption of the off-Mode (Po)
0.46W
Power Consumption of the left-onMode (Po)
0.46W
Duration of the left-on mode
10 min
Programme time of the ‘Standard Cotton Program”
Weighted programme time of the ‘Standard Cotton Program” at full
and partial load
90 min
Programme time of the ‘Standard Cotton Program” at full load
120 min
Programme time of the ‘Standard Cotton Program” at partial load
68 min
Sound Power level for the ‘Standard Cotton Program” at full load
69dB
* Energy consumption per year is based on 160 drying cycles on the standard
cotton programme at full and partial load, and the consumption of the lowpower modes. Actual energy usage will depend on how the appliance is used.
SPECIFICATION
Dimensions
555 x 595 x 840 mm
Rated input power
2000W
Rated Voltage
220 – 240V
Rated Frequency
50 Hz
Weight
33KG
Rated Capacity
7KG
 Loading...