

ElectrIQ eiQ-43UHDT2SMH-V2, eiQ-50UHDT2SMH, eiQ-55UHDT2SMH, eiQ-65UHDT2SMH, eiQ-75UHDT2SMH User Manual

USER MANUAL
ULTRA HD SMART LED TV
eiQ-43UHDT2SMH-V2

2
CONTENTS
SAFETY INFORMATION
3
CONNECTION AND PREPARATION OF TV
6
WHAT IS INCLUDED
6
INSTALLATION OF LEGS
6
WALL MOUNTING
7
BUTTONS
8
INPUT / OUTPUT TERMINALS
9
CONNECTING TO EXTERNAL DEVICES
10
REMOTE CONTROL
11
INSTALLATION OF BATTERIES
12
INITIAL SETUP
12
BASIC OPERATION
13
SETTING OF STANDBY MODE
13
SETTING THE INPUT SOURCE
13
TV MENU
14
PICTURE SETUP
14
SOUND SETUP
15
CHANNEL SETUP
16
SETTINGS
17
TIME
18
LOCK
18
LAUNCHER
19
TV
19
APP
19
MEDIA
20
TECHNICAL SPECIFICATION
21
SUPPORTED SIGNAL MODES
22
SIMPLE TROUBLESHOOTING
23
MANUFACTURER SUPPORT
24

3
SAFETY INFORMATION
Read these instructions – All the safety and operating instructions should
be read before this product is operated.
Keep these instructions – The safety and operating instructions should be
retained for future reference.
Heed all warnings – All warnings on the appliance and in the operating
instructions should be adhered to.
Follow all instructions – All operating and usage instructions should be
followed.
Do not use this equipment near water – The appliance should not be used
near water or moisture e.g. in a wet basement or near a swimming pool.
Clean only with a dry cloth. Do not use solvents or petroleum based fluids.
Do not block any ventilation openings.
Do not install near any heat sources such as radiators, stoves or other
apparatus (including amplifiers) that produce heat.
Do not tamper with the supplied plug. This plug is a BS1363 standard plug.
Protect the power cord from being walked on or pinched, particularly at the
plug and at the point where they exit from the appliance.
Only use attachments/accessories specified by the manufacturer.
Unplug the apparatus during lightning storms or when unused for long
periods of time.
Refer all servicing to qualified personnel. Servicing is required when the
apparatus has been damaged in any way, such as power supply cord or
plug is damaged, liquid has been spilled or objects have fallen into the
apparatus or it has been exposed to rain or moisture, it does not operate
normally or has been dropped.
Please keep the unit in a well ventilated environment.
The TV should only be connected to an earthed mains power supply with
AC 100-240V~ 50/60Hz
To prevent overload, do not share the same power supply socket with too
many other electronic components.
Do not place any connecting wires where they may be stepped on or
tripped over.
Do not place heavy items on the cable as this may cause damage.
Hold the main plug, not the wires, when removing from a socket.
Unplug immediately and seek professional help if the plug or cable is
damaged, liquid has spilt onto the set, if accidentally exposed to water or
moisture, if anything accidentally penetrates the ventilation slots or if the
set does not work normally.
Do not remove the safety covers. There are no user serviceable parts
inside.
To avoid battery leakage, remove exhausted batteries from the remote
control when not in use for a long period.
Do not block ventilation slots on the back cover. The TV can be placed in a
4
cabinet but ensure there is at least 5cm (2”) clearance all around.
Do not tap or shake the TV screen, this may damage internal components.
At full volume, prolonged listening may damage the users hearing.
Diagrams within the manual are for illustrative purposes only, and as such
there may be differences to the actual product received.
WARNING
Never place a television set in an unstable location. A television set may
fall, causing serious personal injury or death. Many injuries, particularly to
children, can be avoided by taking simple precautions such as:
Use cabinets or stands recommended by the manufacturer of the
television.
Only use furniture that can safely support the television set.
Ensure the television is not overhanging the edge of the supporting
furniture.
Do not place the television on tall furniture (for example, cupboards or
bookcases) without anchoring both the furniture and the television to a
suitable support.
Do not place the television set on cloth or other materials that may be
located between the television set and the supporting furniture.
Educate children about the dangers of climbing on furniture to reach
the television or its controls.
If your existing television set is being retained and relocated, the same
considerations as above should be applied.
WARNING
To reduce the risk of fire or electric shock, do not expose this apparatus
to rain or moisture. The apparatus shall not be exposed to dripping or
splashing and objects filled with liquids, such as vases, shall not be
placed on or next to the apparatus.
WARNING
The wall plug socket is used as a disconnection device and should
remain readily accessible.
CAUTION
Danger of explosion if the battery is incorrectly replaced.
Replace only with the same or equivalent type.
Batteries shall not be exposed to excessive heat such as direct sunlight,
fire or the like. Used batteries should be recycled appropriately.
CAUTION
To reduce the risk of electric shock, DO NOT remove the cover (or back).
No user serviceable parts inside. Refer servicing to qualified service
personnel.
5
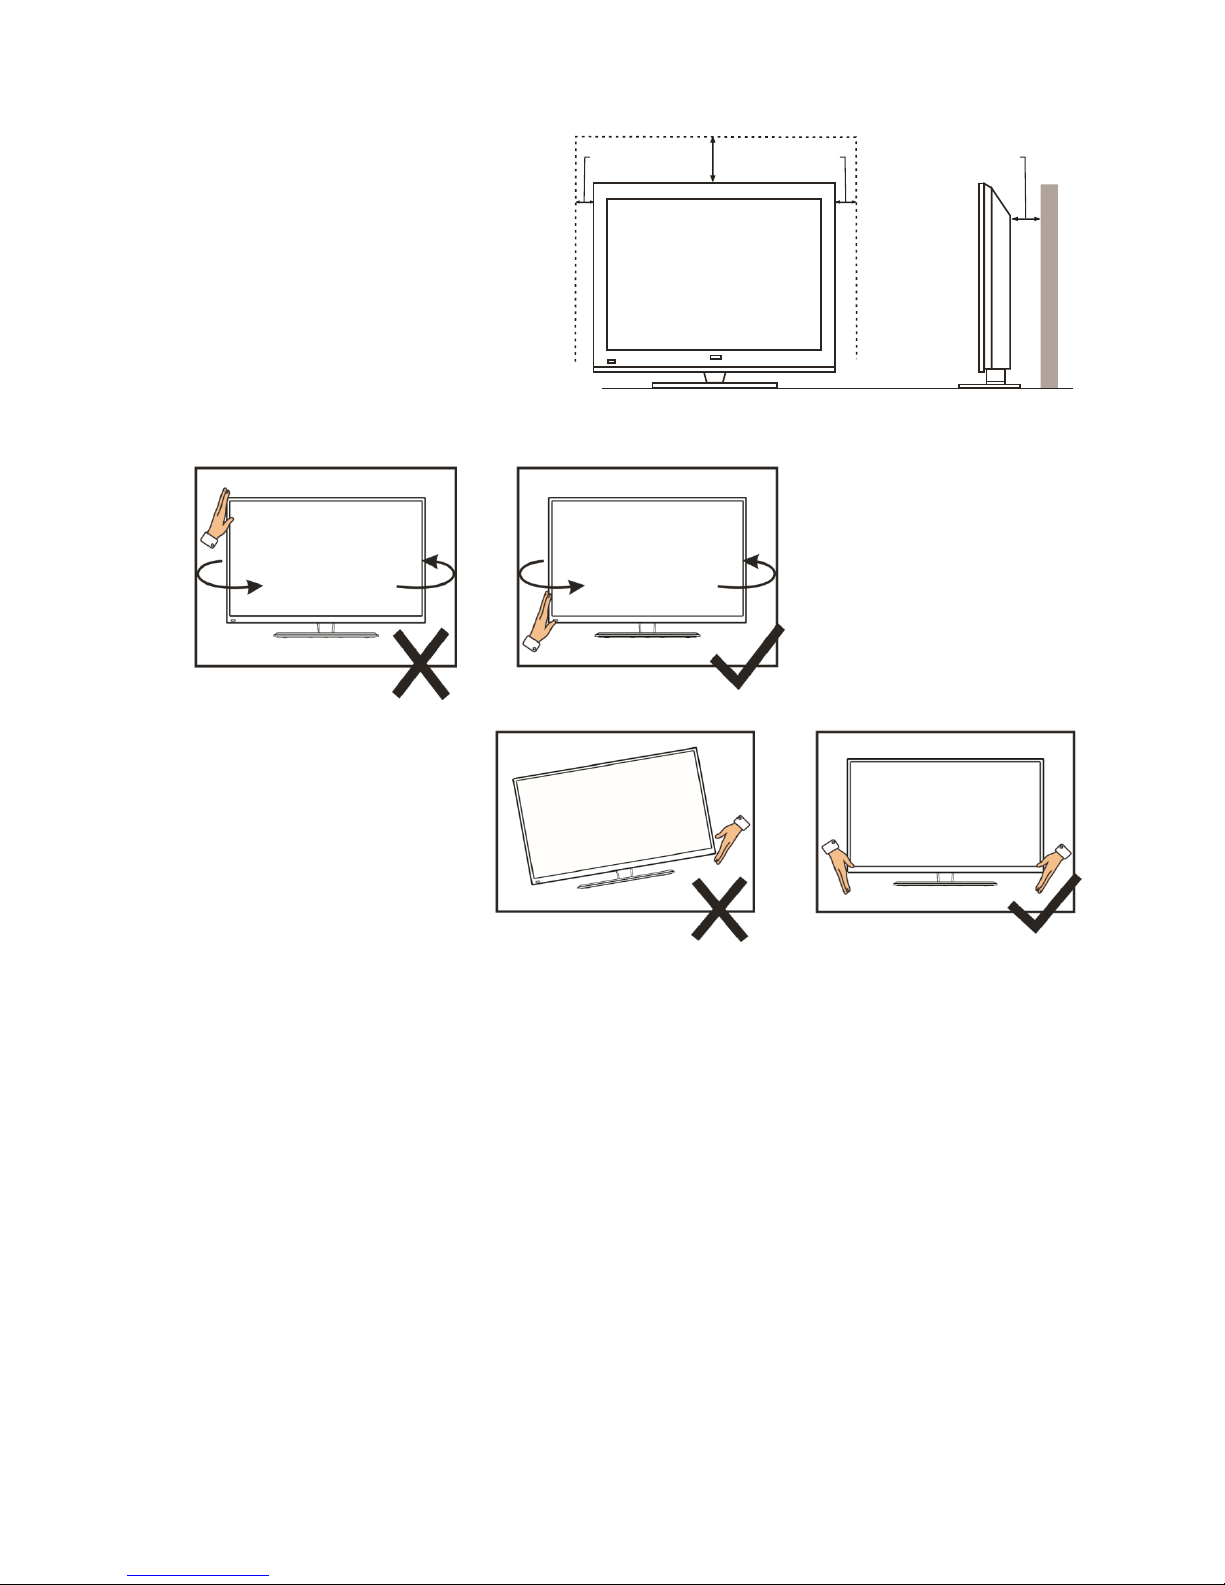
ATTENTION
Place the TV on a firm and
flat surface, leaving a space
of at least 10cm around the
set and 30cm from the top of
the set to the ceiling or
cabinet. Ensure the TV is
positioned close to the wall
to avoid it falling when
pushed.
When twisting the TV
set, do not hold the
top of the TV, you
should twist from the
base.
When lifting the TV,
do not use one hand
to handle it, you
should lift the TV
using two hands,
ensuring pressure is
not put on the screen
itself.
10
cm
30
cm
10
cm
cm
10
6
CONNECTION AND PREPARATION OF THE TV
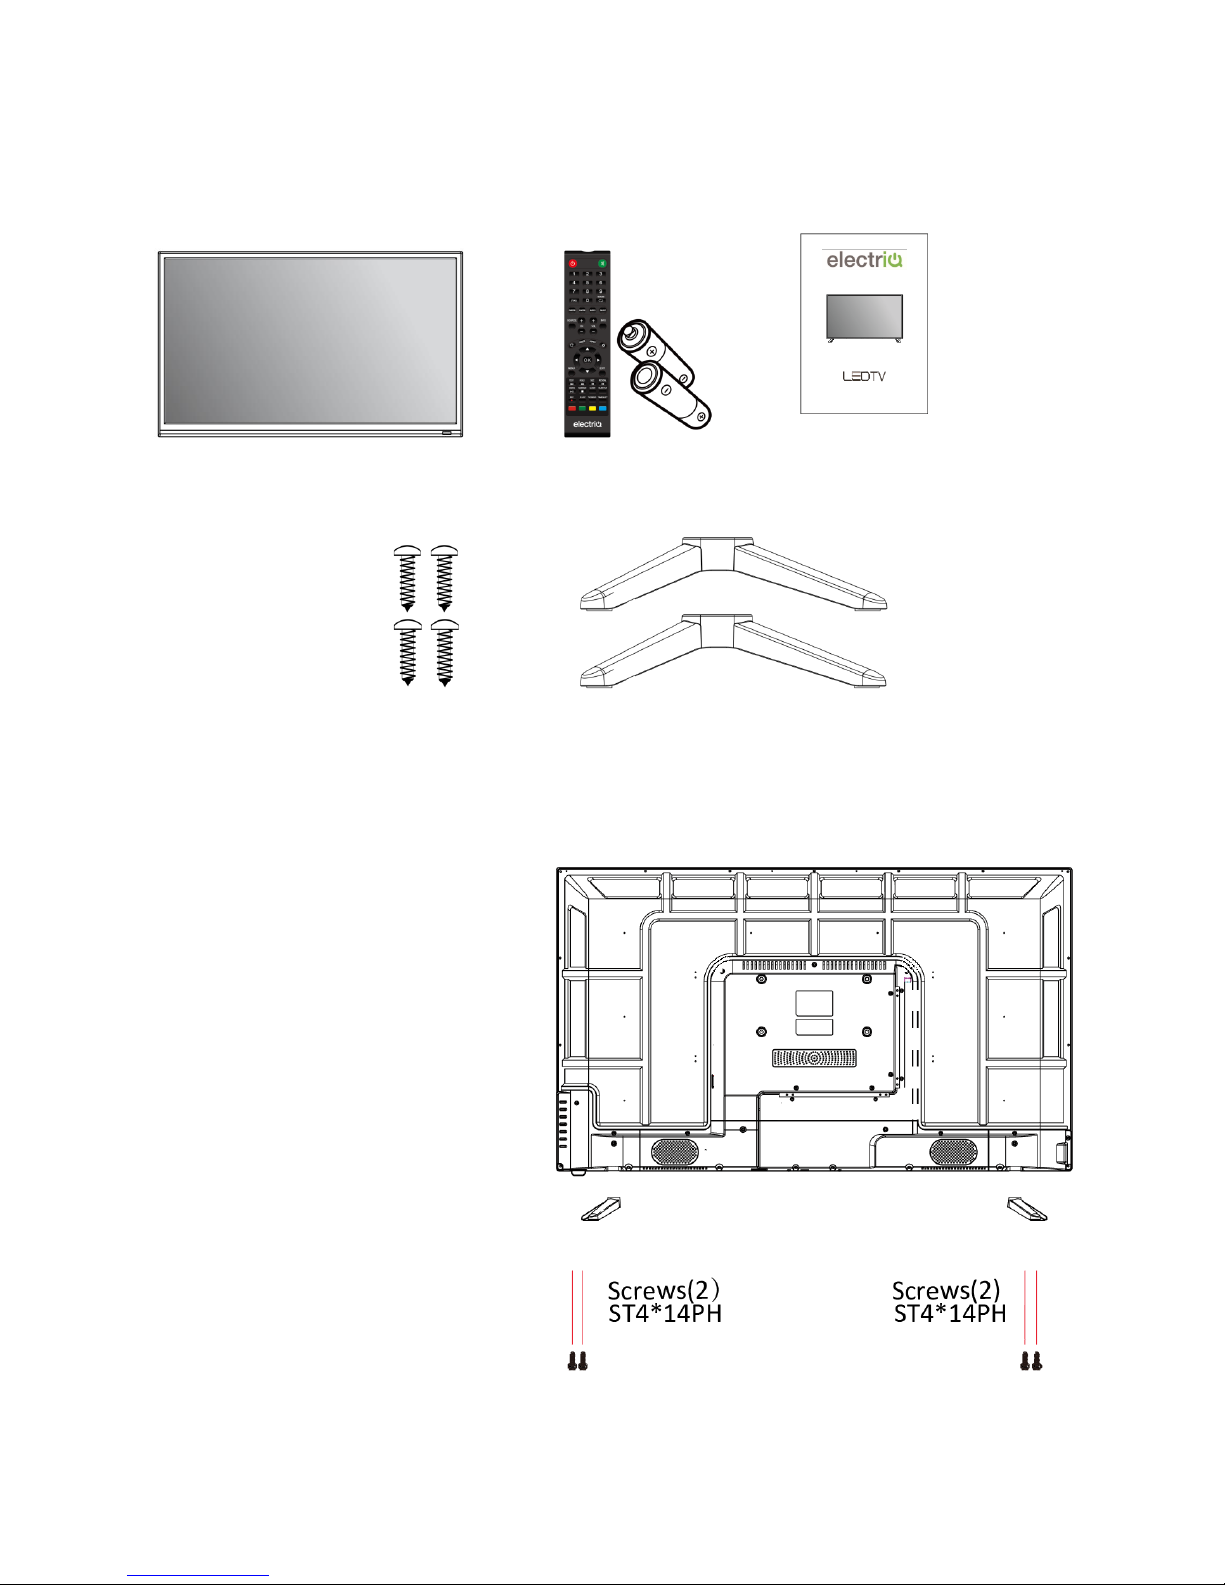
WHAT IS INCLUDED
TV Set Remote Control User Manual
(2 x AAA Batteries)
.
4 Screws 2 Legs
INSTALLATION OF LEGS
1 Place the TV with the front facing
downwards on a soft cloth pads
on a desk.
2 Insert the legs into the sockets on
the base of the TV.
3 Insert the screws into the sockets
and tighten them with a
screwdriver. Do not use an
electric screwdriver, or similar.
7
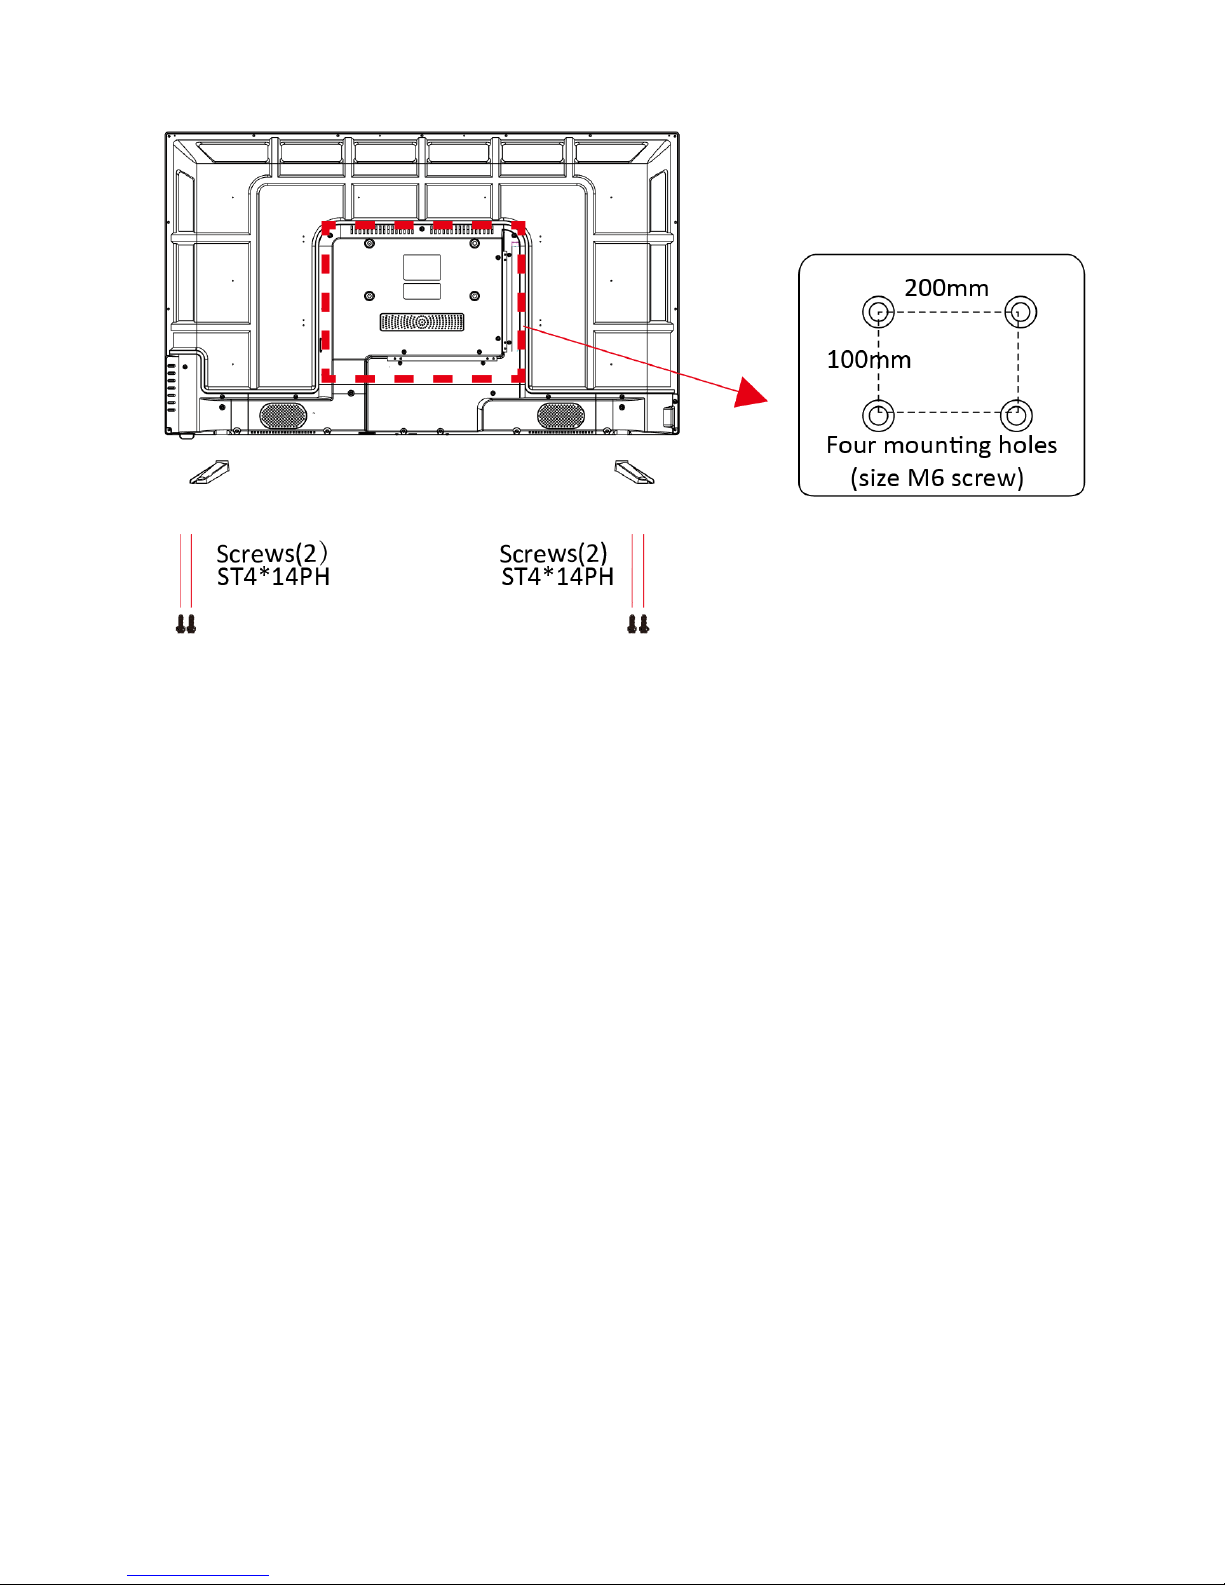
WALL MOUNTING
• The TV is provided with mounting holes for a VESA approved wall mounting bracket (not
supplied).
• The VESA mounting pattern is :
200x100mm and the size of the bolts for the top holes is 4 x M6 x 12(not supplied).
• Do not use bolts longer than the size specified above for your model or damage will
occur to the internal components.
NOTES:
Do not install this product until this manual has been read and understood thoroughly.
Please keep these instructions for future reference.
Due to the heavy weight and dimensions of the LCD screens and their fragile nature, we
recommend that they are unpacked and assembled by 2 people and professional
installers are used to wall mount them (Wall mounting is optional). If you do not
understand the instructions, or are unsure how to install this product, please contact a
professional for assembly advice and assistance.
Careful consideration should be made regarding the location the television is to be wall
mounted as some walls are not suitable for installation. If the television is to be mounted
on drywall, the mount must be anchored into a wooden stud, concrete block or brick
behind the drywall. Installing on drywall alone will not support the weight of the display.
When drilling holes it is particularly important to take care of electrical cables, water or
gas pipes in the wall. Please follow the instructions provided by the wall bracket
manufacturer and ensure that all fixing screws supplied are used.
electriQ and its distributors and dealers are not liable or responsible for damage or injury
caused by improper installation, improper use or failure to observe these safety
instructions. In such cases any guarantee will expire.
8
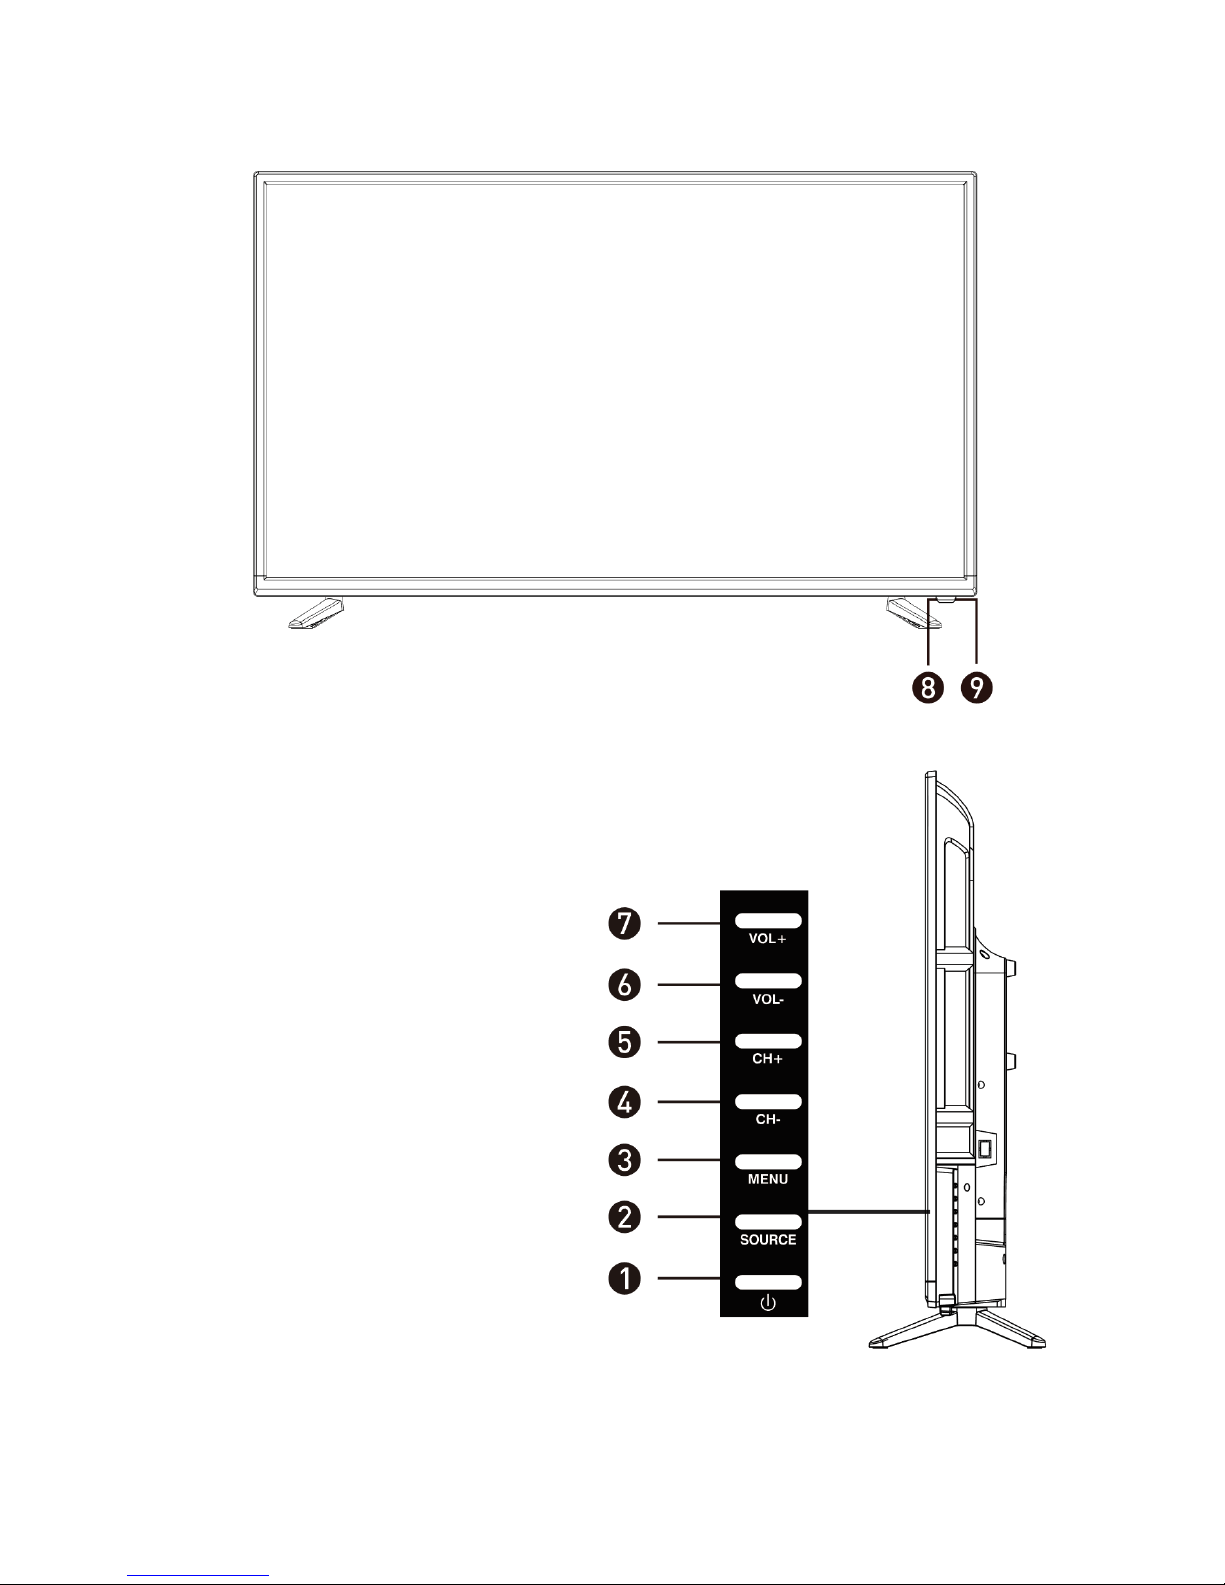
BUTTONS
1. POWER
BUTON
To turn the TV
ON/OFF
2. SOURCE
BUTTON
To select the input
source.
3. MENU
BUTTON
To enter the main
menu.
4. CHBUTTON:
To select the previous
channel
5. CH+
BUTTON:
To select the next
channel
6. VOLBUTTON:
To decrease the
volume.
7. VOL+
BUTTON:
To increase the
volume.
8. REMOTE
CONTROL
SENSOR
Receives signals from
the remote.
9. POWER
INDICATOR:
In standby mode the
indicator light will
display red, when
switched on the
indicator light will
display green.

9
INPUT / OUTPUT TERMINALS
1. USB
Provides access to SMART TV. Connect smart remotes, keyboards,
gaming accessories or USB flash drive. Can be used for DTV
recording, time shift or as a media player file.
Note: only connect low power USB flash drives or externally powered
hard drives to the USB ports as they only provide 0.5 Amps power.
2. RJ45
Wired network connection
3. HDMI x3.
DVD players, set top boxes, games consoles etc
4. EARPHONE
Earphones, headphones, or external speakers
5. SCART
For connecting older equipment such as VCRs
6. RF
Antenna connection.
7. Mini AV
Input:
External AV signal input and right/left sound channel input.
8. Mini YPbPr:
Connect to the YPbPr video output terminal from a DVD player or
similar
9. CI
For inserting a compatible CI card
10. OPTICAL:
Optical audio output.

10
CONNECTING TO EXTERNAL DEVICES

11
REMOTE CONTROL
31. 0~9 : Continue to press the keys to
select a channel.
32. DISPLAY : Display the information of
33.
34.
35.
36.
37.
38.
39.
40.
41.
42.
43.
44.
45.
46.
47.
48.
49.
50.
51.
52.
53.
54.
55.
56.
57.
58.
59.
60.
61.
62.
63.
64.
65.
66.
67.
68.
69. current video and audio.
1. STANDBY: Turn the TV On/Off
2. MUTE: Mute the sound.
3. 0-9: Press the buttons to select a channel
4. FAV: Favorite channel list.
5. MOUSE: Turn the remote control mouse On/Off.
: Return to previous channel.
6. AUDIO: Select TV audio mode between stereo/mono
(While playing DVD/multimedia): Switch audio
channel.
7. S.MODE: Set audio options
8. P.MODE: Set picture options
9. SLEEP: Auto power off timer.
10. VOL+: Increase the volume.
VOL -: Decrease the volume.
11. CH +: Next channel.
CH -: Previous Channel.
12. SOURCE: Select the signal source
13. INFO: Shows information about the current
programme.
14. ASPECT: Press repeatedly to select the desired
screen size.
15. FREEZE: To freeze the current picture.
16. : Go to the SMART homepage.
17. : Quick access to the SMART settings.
18. DIRECTION BUTTONS: used for menu navigation.
19. MENU: Enter the menu.
20. EXIT: Exit the menu or current operation.
21. (MEDIA mode): Fast rewind
SIZE (within TXT): Sets size of the characters.
22. (MEDIA mode): Next file or chapter.
HOLD: Hold the current page.
23. (MEDIA mode): Previous file or chapter.
TEXT: Enter or exit teletext.
24. (MEDIA mode): Fast forward.
REVEAL: Reveal hidden information
25. GUIDE: Enter or exit the electronic program guide.
26. (MEDIA mode): Press to stop playback.
SUBPAGE (within TXT): Enter sub page mode.
27. (MEDIA mode): Press to pause / play.
INDEX: Display the index page.
28. SUBTITLE: DTV mode select subtitle mode.
29. TV/RADIO: Change between TV or radio mode
30. R.LIST: Displays DVR list in DTV mode.
31. RECORD: DTV mode record to USB stick.
32. TIMESHIFT (Within DVR): Time shift
33. RED: Access the red item or page.
GREEN: Access the green item or page
YELLOW: Access the yellow item or page.
BLUE: Access the blue item or page.

12
INSTALLATION OF BATTERIES
1 Remove the battery cover from the rear of
the remote control.
2 Install two AAA 1.5V batteries.
(Ensure the correct polarity of the
batteries.)
3 Replace the battery cover.
Please take out of the batteries from the remote when it is not going to be used for a long
period of time.
If the remote control doesn't work properly, please carry out the following checks.
Check the TV is turned on.
Check the polarity of the batteries are correct.
Check the batteries and replace if necessary
Check the plug is fully inserted and the socket is switched on.
Check there are no special fluorescent light or neon light which could interfere with
remote signals.
INITIAL SETUP
1. Connect your TV to the power outlet.
2. Connect your aerial and/or set top box to the television.
3. Press the POWER button on the remote to turn on the TV.
CAUTION: Always disconnect the TV from the power outlet when the TV will not be
used for a long period of time. The POWER button on the television and remote is only
used for switching the TV into standby and does not disconnect the device from the
mains voltage. To completely disconnect the mains voltage, please remove the plug
from the socket.
4. Use the ▼/▲/◄ / ► buttons on the remote to follow the setup guide on screen.

13
BASIC OPERATION
STANDBY MODE
Press the STANDBY button to turn on the television.
Press the STANDBY button again to return the television to standby mode.
The power indicator will turn red.
Be sure not to set your TV in standby mode for a long period of time.
SELECT THE INPUT SOURCE
USING THE REMOTE:
Press the SOURCE button to display the input source list.
Use the ▲ and ▼ buttons to select the input.
Press the ENTER button on the remote to confirm
USING THE TV CONTROLS:
Press the SOURCE button repeatedly to scroll through the input source list

14
TV MENU
Press the MENU button to display the main menu. The menu is split into 6 sub menus:
Picture
Sound
Channel
Setting
Time
Lock
Use the ◄ and ► buttons to change between the sub menus. Once the required sub
menu has been selected, use the ▲ and ▼ buttons to select the setting within the sub
menu to change. Then use the ◄ and ► buttons to amend the values. The MENU button
can be pressed to navigate back a level in the menu, and the EXIT button can be used to
exit the menu.
PICTURE SETUP
PICTURE
MODE
Choice of 8 different picture modes: Standard, Soft, User, Game, Vivid, Natural,
Sports and Lightness. Individual picture settings are locked within each of the
modes apart from User.
Within the User Picture mode the Contrast, Brightness, Hue, Sharpness and Saturation can
be edited amend other settings, allowing the picture to be set to the users requirements.
COLOR TEMPERATURE
Used to set the colour temperature which is most comfortable.
ASPECT RATIO
Used to select the picture scale viewing mode required
NOISE REDUCTION
Used to reduce noise and improve picture quality
MPEG NR
Used to smooth the screen to reduce noise and improve image
quality.

15
SOUND SETUP
SOUND MODE
Select the sound mode required. When set to User, the bass and Treble
can be amended.
EQ SETTING
Press to enter the equaliser to adjust the gain on individual frequency
ranges.
BALANCE
Adjust the balance of the output between the left and right speakers.
AUTO VOLUME
Turn the auto volume control On / Off. When turned on if the volume
exceeds a set value, it will be automatically reduced to protect the
speakers / amplifier.
AD SWITCH
Designed for people with visual impairment.
HEARING
IMPARED
This setting will make changes to the sound, improving the experience
for users with hearing impairment.
SURROUND
Turn surround sound On / Off
SPDIF MODE
Select the Coaxial output mode.

16
CHANNEL SETUP
ANTENNA
TYPE
Select the Antenna type between Air / Cable
LCN
Select whether to use LCN to sort the channels.
AUTO TUNING
Choose the Automatic search in the submenu, select your country,
the TV will then search for all channels currently available in your
area.
DTV MANUAL
TUNING
Enter the sub menu to make
changes to the tuning for individual
channels.
PROGRAM
EDIT
Use the ▲ and ▼ buttons to select the channel you wish to edit. The
selected channel can be moved, deleted, jumped, or added to modify
your channel list.
SIGNAL
INFORMATION
Displays information about the Strength and quality of the signal for
each channel.

17
SETTINGS
OSD LANGUAGE
Set the OSD language.
AUDIO LANGUAGE
Set the audio language.
2ND AUDIO
LANGUAGE
Set the 2nd audio language.
SUBTITLE
Turn subtitles On/Off.
SUBTITLE
LANGUAGE
Set the 1st language for subtitles.
2ND SUBTITLE
LANGUAGE
Set the 2nd language for subtitles.
TELETEXT
LANGUAGE
Sets the language for teletext.
PVR FILE SYSTEM
Sets the file system used when recording within the PVR.
ENVIRONMENT
Change the mode between “HOME MODE” and “SHOP
MODE”
BLUE SCREEN
Turn the blue screen (when no reception) on and off.
RESET
Reset the TV to factory defaults. A dialogue box will request
confirmation before reset.

18
TIME
Date / Time
Shows the current date and time
Sleep time
Allows the system sleep time to be set.
Menu Time
Select how long the menu will be displayed on the screen without input
Standby Time
Select how long until the TV goes into standby when no input.
LOCK
Lock System
Allows the system lock to be activated and deactivated.
Set Password
Enter to set a password for the lock
Block Program
Enter to select a program to block.
Parental
Guidance
Enter to set the parental guidance level.
Button Lock
Press to lock the controls
Hotel Mode
Enter to set Hotel Mode

19
LAUNCHER
Press the HOME button on the remote to enter the launcher.
Press the DOWN button to select the icons at the bottom of the screen, then use the left and
right buttons to move between the TV, APP and MEDIA sections of the launcher.
Once the required section has been chosen, press the UP button to enter the section
Press the EXIT button to exit the launcher.
TV SECTION
Use the left and right buttons to change between the different input sources. Press the ENTER
button on the remote to select the input source in the centre of the screen.
APP SECTION
ALL APP
View all apps installed on the TV
FILE
Open the File manager to view files saved on the TV
BROWSER
Use to access the internet.
SETTING
Access and modify the Android settings.

20
SETTING
Network
Configure Network Settings
Apps
View and remove apps installed on the TV
Storage and reset
Gives storage information and the option to reset SMART
features to factory defaults
About
System Info
Date and Time
You can make the adjustment to the date and time;
Language
You can change the language that is displayed
Keyboard
Configure the keyboard
MEDIA
Within Media you can view Video, Audio and Pictures that have been saved to the TV or
inserted memory stick.

21
TECHNICAL SPECIFICATION
Note: Due to continued product development the specification shown above may change
without notice.
Product Model
eiQ-43UHDT2SMH-V2
Screen Size
43” Diagonal
Aspect Ratio
16:9
Power Supply
AC 100-240V, 50/60Hz
Power Consumption
95W
TV System
PAL DVB-T2/-T/-C
(There is no DVB-C signal in
some Countries or Areas.)
Audio Output Power (Internal)
8Wx2
Input Terminal
Antenna Input
x 1
USB Input
x 2
HDMI Input
x 3
VGA Input
NO
PC AUDIO Input
NO
Audio Input ( L/R)
NO
Video Input
x 1 (Mini)
YPbPr Input
x 1 (Mini)
RJ45 Input
x 1
CI card In
YES
SCART In
YES
DC In (12V)
NO
CARD SLOT
NO
Output Terminal
Earphone
x 1
Audio Line Out( L/R)
NO
Video Output
NO
Optical
x 1
Coaxial out
NO
Working Temperature
0°C ~40°C
Working Humidity
20% ~ 80% Non-condensing

22
SUPPORTED SIGNAL MODES
YPbPr MODE
Resolution
Horizontal Frequency (Khz)
Vertical Frequency (Hz)
480i
15.734
59.94
480p(720x480)
31.468
59.94
576i
15.625
50.00
576p(720x576)
31.25
50.00
720p(1280x720)
37.50
50.00
45.00
60.00
1080i
28.13
50.00
33.75
60.00
1080P(1920x1080)
67.50
60.00
56.25
50.00
HDMI MODE
Resolution
Horizontal Frequency (Khz)
Vertical Frequency (Hz)
480p
31.468
59.94
576p
31.25
50.00
720p
45.00
60.00
1080i
33.75
60.00
1080p(1920x1080)
67.50
60.00
2160p(3840x2160)
67.50
30.00
2160p(3840x2160)
135.00
60.00
When the signal received by the display is not within the allowed range, a warning message will
appear on the screen.
You can confirm the input signal format onscreen.

23
SIMPLE TROUBLESHOOTING
If the display fails or the performance changes dramatically, check the display in accordance
with the following instructions. Remember to check the peripherals to pinpoint the source of
the failure.
Symptom
Solution
Power cannot be turned
on. (Power indicator does
not illuminate.)
-Check that both ends of the power cable are plugged into the
socket appropriately and the wall socket is operational
No Input Signal message
appears.
-Check that the aerial cable is connected properly.
-Check that the power of the relevant peripherals is turned on.
-Check that the selected source matches the input.
The remote control does
not function properly.
-Check the batteries are not drained.(Use new batteries.)
-Check that the remote control is within the operating range.
-Check that the remote control is pointed to the remote control
window on the display.
-Check that there are no obstacles between the remote control
and the remote control window.
Flashing spots or stripes
appear on the screen.
-Check that there are no emission (Car, HV cable or
Neon lamp) or other possible interference sources.
Image colour or quality
deteriorates.
-Check that all the video settings are adjusted
appropriately, such as brightness, contrast, colour etc.
-For more information about video settings, refer to OSD
Functions
Screen position and size
are incorrect.
-Check that the screen position and size is adjusted
appropriately.
Image or colour is
incorrect.
-Check that the signal line is connected properly. -When
connecting to a PC, you can change the resolution of the PC
to acquire the correct image. The discrepancy of the PC
output signal may affect the display of the image.
Display warning
message.
-Check that the input signal line is properly fixed.
-Select the correct input signal.
-For more information, refer to Supported Signal Modes

24
PRODUCT DISPOSAL
Do not dispose this product as unsorted municipal waste. Collection of such waste
must be handled separately as special treatment is necessary.
Recycling facilities are now available for all customers at which you can deposit your old
electrical products. Customers will be able to take any old electrical equipment to participating
civic amenity sites run by their local councils. Please remember that this equipment will be
further handled during the recycling process, so please be considerate when depositing your
equipment. Please contact the local council for details of your local household waste recycling
centres.
electriQ UK SUPPORT
Complete online support form on www.electriQ.co.uk/support
Service Line: 0871 620 1057
Office hours: 9AM - 5PM Monday to Friday
Unit J6, Lowfields Business Park,
Lowfields Way, Elland
West Yorkshire, HX5 9DA
 Loading...