


55/65 inch UHD LED TV
EIQ-55UHDT2 / EIQ-65UHDT2

1 of 25
CONTENTS
Safety Information……………………………………………………………… 2
What’s included…………………………………………………………………. 4
TV Stand Installation/Removal……………………………………………. 5
Getting Started…………………………………………………………………… 6
Connecting to External Devices…………………………………………… 8
Remote Control………………………………………………………………….. 9
Settings………………………………………………………………………………11
Specifications……………………………………………………………………..23
Support & Disposal…………………………………………………………….24

2 of 25
SAFETY INFORMATION
• Read these instructions – All the safety and operating instructions should be read
before this product is operated.
• Keep these instructions – The safety and operating instructions should be
retained for future reference.
• Heed all warnings – All warnings on the appliance and in the operating
instructions should be adhered to.
• Follow all instructions – All operating and usage instructions should be followed.
• Do not use this equipment near water – The appliance should not be used near
water or moisture e.g. in a wet basement or near a swimming pool.
• Clean only with a dry cloth. Do not use solvents or petroleum based fluids.
• Do not block any ventilation openings.
• Do not install near any heat sources such as radiators, stoves or other apparatus
(including amplifiers) that produce heat.
• Do not tamper with the supplied plug. This plug is a BS1363 standard plug.
• Protect the power cord from being walked on or pinched, particularly at the plug
and at the point where they exit from the appliance.
• Only use attachments/accessories specified by the manufacturer.
• Use only with a cart, stand, tripod, bracket or table specified by the
manufacturer or sold with the apparatus. When a cart or stand is used, use
caution when moving it to avoid any injuries or damage from it tipping over.
• Unplug the apparatus during lightning storms or when unused for long periods of
time.
• Refer all servicing to qualified personnel. Servicing is required when the
apparatus has been damaged in any way, such as power supply cord or plug is
damaged, liquid has been spilled or objects have fallen into the apparatus or it
has been exposed to rain or moisture, it does not operate normally or has been
dropped.
• Please keep the unit in a well-ventilated environment.
• The TV set should only be connected to a mains power supply as rated on the
back of the equipment.
• To prevent overload, do not share the same power supply socket with too many
other electronic components.
• Do not place any connecting wires where they may be stepped on or tripped
over.
• Do not place heavy items on the cable as this may cause damage.
• Hold the main plug, not the wires, when removing from a socket.

3 of 25
• Pull the plug out immediately and seek professional help if the main plug or cable
is damaged, liquid has spilt onto the set, if accidentally exposed to water or
moisture, if anything accidentally penetrates the ventilation slots or if the set
does not work normally.
• Do not remove the safety covers. There are no user serviceable parts inside.
Trying to service the unit yourself is dangerous and may invalidate the product’s
warranty. Only qualified personnel should service this apparatus.
• To avoid battery leakage, remove exhausted batteries from the remote control
when not in use for a long period.
• Do not block ventilation slots on the back cover. The TV can be placed in a
cabinet but ensure at least 5cm (2”) clearance all around.
• Do not tap or shake the TV screen, this may damage internal components.
• WARNING: To reduce the risk of fire or electric shock, do not expose this
apparatus to rain or moisture. The apparatus shall not be exposed to dripping or
splashing and objects filled with liquids, such as vases, shall not be placed on the
apparatus.
• WARNING: The wall plug socket is used as a disconnection device and should
remain readily accessible.
•
WARNING: The batteries shall not be exposed to excessive heat such as direct
sunlight or fire.
This warning sign is to
warn of dangerous voltage
inside the product.
CAUTION: To reduce the risk of
electric shock, DO NOT remove the
cover (or back). No user serviceable
parts inside. Refer servicing to
qualified service personnel.
This warning sign is to alert
you of important
instructions accompanying
the product.
This equipment is a Class II or double insulated electrical appliance.
It does not require a grounded connection.
AT FULL VOLUME, PROLONGED LISTENING MAY DAMAGE THE
USER’S HEARING.

4 of 25
WHAT’S INCLUDED
TV Set Remote Control (2xAAA batteries)

5 of 25
TV STAND INSTALLATION/REMOVAL
WALL MOUNTING
• The TV is provided with mounting holes for a VESA approved wall mounting
bracket (not supplied)
• The VESA mounting pattern is:
o 55” 200x200mm and the size of the screws is 4 x M6 x 10 (not
supplied)
o 65” 400x400mm and the size of the screws is 4 x M6 x 20 (not
suppled)
• Do not use screws longer than specified or damage will occur to the
internal components.
NOTE: As the TV set is considered heavy, please consult with a professional
wall mount installer to perform the installation.

6 of 25
GETTING STARTED
BUTTON FUNCTIONS
1. POWER BUTON: To turn ON/OFF the TV
2. SOURCE Button: To select the input source.
3. MENU Button: To enter menu setting page.
4. VOL-: To decrease the volume level.
5. VOL+: To increase the volume level
6. CH-: To select previous channel
7. CH+: To select next channel
8. Remote Control Sensor
9. Power Indicator: In standby mode the indicator light will display red,
when switching on the unit the indicator light will display green.

7 of 25
INPUT / OUTPUT TERMINALS
1. USB input slot – for multimedia file playback
2. HDMI input X3
3. AV input terminal
4. YPbPr
5. Headphone output terminal
6. Coaxial output terminal
7. RF input terminals
8. Scart input terminal
9. RJ45 input terminal

8 of 25
CONNECTING TO EXTERNAL DEVICES

9 of 25
REMOTE CONTROL
1. POWER: Turn on the TV/Standby
2. MUTE: Mute or restore the sound
3. SOURCE: Press to change the signal source
4. S. MODE: Setting audio options
5. P. MODE: Output image mode selection
6. AUDIO: Switch the audio channel when DVD or
multimedia playing. I/II: In the TV mode, press this button
to select the stereo size
7. P. SIZE: Press to select the different picture size.
8. NUMBER KEYS: Change the channel
9. FAV. CH: Show the list of favourite channels
10. SLEEP: Auto Power Off Timer
11. JUMP: Return to the previous selected channel
12. MENU: Show settings menu
13. EXIT: Exit the menu
14. INFO: Show information about the current program
15. NAVIGATION KEYS (Up, Down, Left, Right and OK): To
move in the menus and confirm settings.
16. V+ / V-: Increase / decrease volume
17. P+ / P-: Next / previous channel
18. REPEAT: Repeat mode
19. Menu
20. Mouse (disabled for non smart models)
21.
Press the appropriate colour to direct access
functions in TELETEXT or EPG OSD mode
Menu/Back/Mouse/Search may be disabled on non smart models
22. TIME SHIFT: In DTV mode, press TIME SHIFT button to start the delay
function, press the button to start playing delay program, press the
button to terminate the delay function. Time shift function requires USB
flash drive or externally powered USB hardrive connected

10 of 25
Reveals hidden information such as the answers to a quiz in TELETEXT
Mode
23. PVR LIST: IN DTV mode, displays the executed PVR LIST.
Displays the main index in TELETEXT mode.
24. USB: Press to switch to USB signal source directly.
Displays the top, bottom or all of the page.
25. DTV/RADIO: In DTV mode, press DTV/RADIO button to enter DTV or RADIO
mode.
Freeze a multi-page selection on TELETEXT mode.
26. Stop Playback
27. REC: In DTV mode, press REC button to start recording, press button
stop recording.
28. Eject disc (disabled for non DVD combo models)
29. Play/Pause.
30. Fast Forward playback
31. Rewind playback
32. Previous file or chapter
33. Next file or chapter
34. TEXT: Turn on and off the Teletext function
35. Home: Press to open the Home Page
36. SUBTITLE: Select subtitle of media video file (requires the support of disk or
file)
37. GUIDE: Show the Electronic Program Guide (EPG)

11 of 25
BATTERY INSTALLATION
1. Open the battery cover.
2. Insert 2 AAA batteries in the battery compartment, matching the polarities
correctly.
3. Replace the battery cover.
SETTINGS
INITIAL SETUP
1. Connect the TV set to a power outlet.
2. Press the POWER button on the remote or on the TV set to turn on the TV
(the indicator will be lit green)
NOTE: Pressing the power button on the remote or TV set will place the TV
into standby mode only. If the TV set is expected to be not in use for a long
period of time, please disconnect it from the power source.

12 of 25
3. Press the to choose the preferred
item and press OK button to confirm the
settings.
SELECT INPUT SOURCE
Available options: DTV, ATV, AV, SCART, YPbPr, HDMI
1, HDMI 2, HDMI 3, PC, MEDIA
-
Press SOURCE button to display the input source
list.
-
Press
▲ ▼
/ or SOURCE button to select the
preferred input source.
-
Press OK button to confirm.
-
Press EXIT button to exit.
BASIC OPERATIONS
1. Press the MENU button on the remote
control or on the TV to enter the
menu page.
2. Use ◄ / ◄ buttons to select the main
menu options.
3. Use
▲ ▼
/ buttons to navigate up and
down within the menu.

13 of 25
4. Use the ◄ / ◄ buttons to alter the required setting then press the MENU
button to confirm and return to the previous menu page or press EXIT
button to exit the menu.
PICTURE MENU
Press MENU button to enter the main menu.
After the preferred settings are done, press MENU button
to confirm and return to the previous menu page or press
EXIT button to exit the menu.
SOUND MENU
Press MENU button to enter the main menu
After the preferred settings are done, press MENU button to confirm and
return to the previous menu page or press EXIT button to exit the menu.
CHANNEL MENU
Press MENU button to enter the main menu.

14 of 25
Press ◄ / ◄ button to select Channel in the main menu and press OK then ▼ to
enter.
1. Press
▲ ▼
/ button to select the option that you want to select the
preferred item.
2. Press OK button to enter sub-menu
3. Press MENU button to return back to previous menu or press EXIT button
to exit the menu
TUNER TYPE
Select the DVB Antenna Type
Press
▲ ▼
/ button to select DVB Antenna, then press ◄ / ◄ button to select
the type of antenna, either Antenna or Cable.

15 of 25
AUTO TUNING
Press
▲ ▼
/ to select Auto Tuning then press OK to enter sub-menu.
Country
Press ◄ / ◄ button to select country.
Operator
Press ◄ / ◄ button to select the operator.
Auto Tuning
Press OK / ◄ button to start the auto searching. It will search digital channels
first, then analogue channels.
Before executing auto channel search please make sure the preferred tuner
type is chosen. Wrongly setting the tuner type may cause failure to find
channels.
Signal Information
View the signal information.
Press
▲ ▼
/ button to select signal information, then press the OK button to
view the detailed information about the signal.
ELECTRONIC PROGRAM GUIDE (EPG)
Press the GUIDE button to enter the EPG menu.

16 of 25
Press the GREEN button to display the previous day
Press the YELLOW button to display next day
Press the RED button to record the selected program
Press the BLUE button to set a reminder for the selected program
LOCK SYSTEM MENU
Press MENU button to enter the main menu and select “Lock”.
The default password is “0000”.
TIME MENU
Press MENU button to enter the main menu and select “Time”

17 of 25
Off Time: Set the time for the TV to turn off automatically.
On Time: Set the time for the TV to turn on automatically.
Sleep timer: Set the time after which the TV will switch off. Either: Off, 10min.,
20min., 30min., 60min., 90min., 120min., 180min.
OSD Timer: Set the time at which the on screen display (OSD) turns off. Either:
Off, 5secs., 15secs., 30secs., 60secs.
Auto Sleep: Set the time at which the TV goes off after being idle. Either: Off, 3
hours, 4 hours, 5 hours.
NETWORK MENU
Press MENU button to display the main menu.
Press ◄ / ◄ button to select Network in the main menu.
Press
▲ ▼
/ button to select the option that you want to adjust
in the Network menu.
Press Enter button to adjust.
After finishing your adjustment, press the Enter button to save
and return to the previous menu.
IP CONFIGURATION
Press
▲ ▼
/ button to select IP Config.
Press Enter button to set the IP Configuration.

18 of 25
NETWORK INFO
Press
▲ ▼
/ button to select Network Info.
Press the Enter button to view the WiFi network information.
NETWORK TEST
Press
▲ ▼
/ button to select Network Test.
Press enter button to test the WiFi Network.
NOTE:
For non smart models network function is not in use and reserved
for service centre or OTA firmware upgrades.

19 of 25
SETTINGS
Press MENU button to enter the main menu and select “Settings”.
Change the settings as required using the ◄ / ◄ buttons.
Press the MENU button to confirm the changes and return to the previous
menu page or press EXIT button to exit the menu.
USB OPERATION
Before the external USB device is connected to the TV please first press
SOURCE button and set the input source to MEDIA.
Insert USB device.
Press ◄ / ◄ button to select the item you
require and press OK to enter.
Photo
Press
▲ ▼
/ button to select the file you wish to display then press OK button
to enter.

20 of 25
Press OK button to start a slideshow.
Press the ◄ / ◄ button to select the previous/next image.
Press EXIT to go back to the menu.
Music
Press the
▲ ▼
/ button to select the file you wish to play then press OK button
to enter.
Play or pause Rewind
Previous track Fast Forwards
Next track Stop
Repeat Show playlist
Show Track info
Press CH+/- to switch between Playlist and Play Screen
Press ◄ / ◄ to change page and press OK button to start playing
Press EXIT button to exit to previous menu.
Movie
Press
▲ ▼
/ button to select the file you would like to play then press OK
button to enter. Press
▲ ▼
/ button to select return option to go back to the
previous menu.
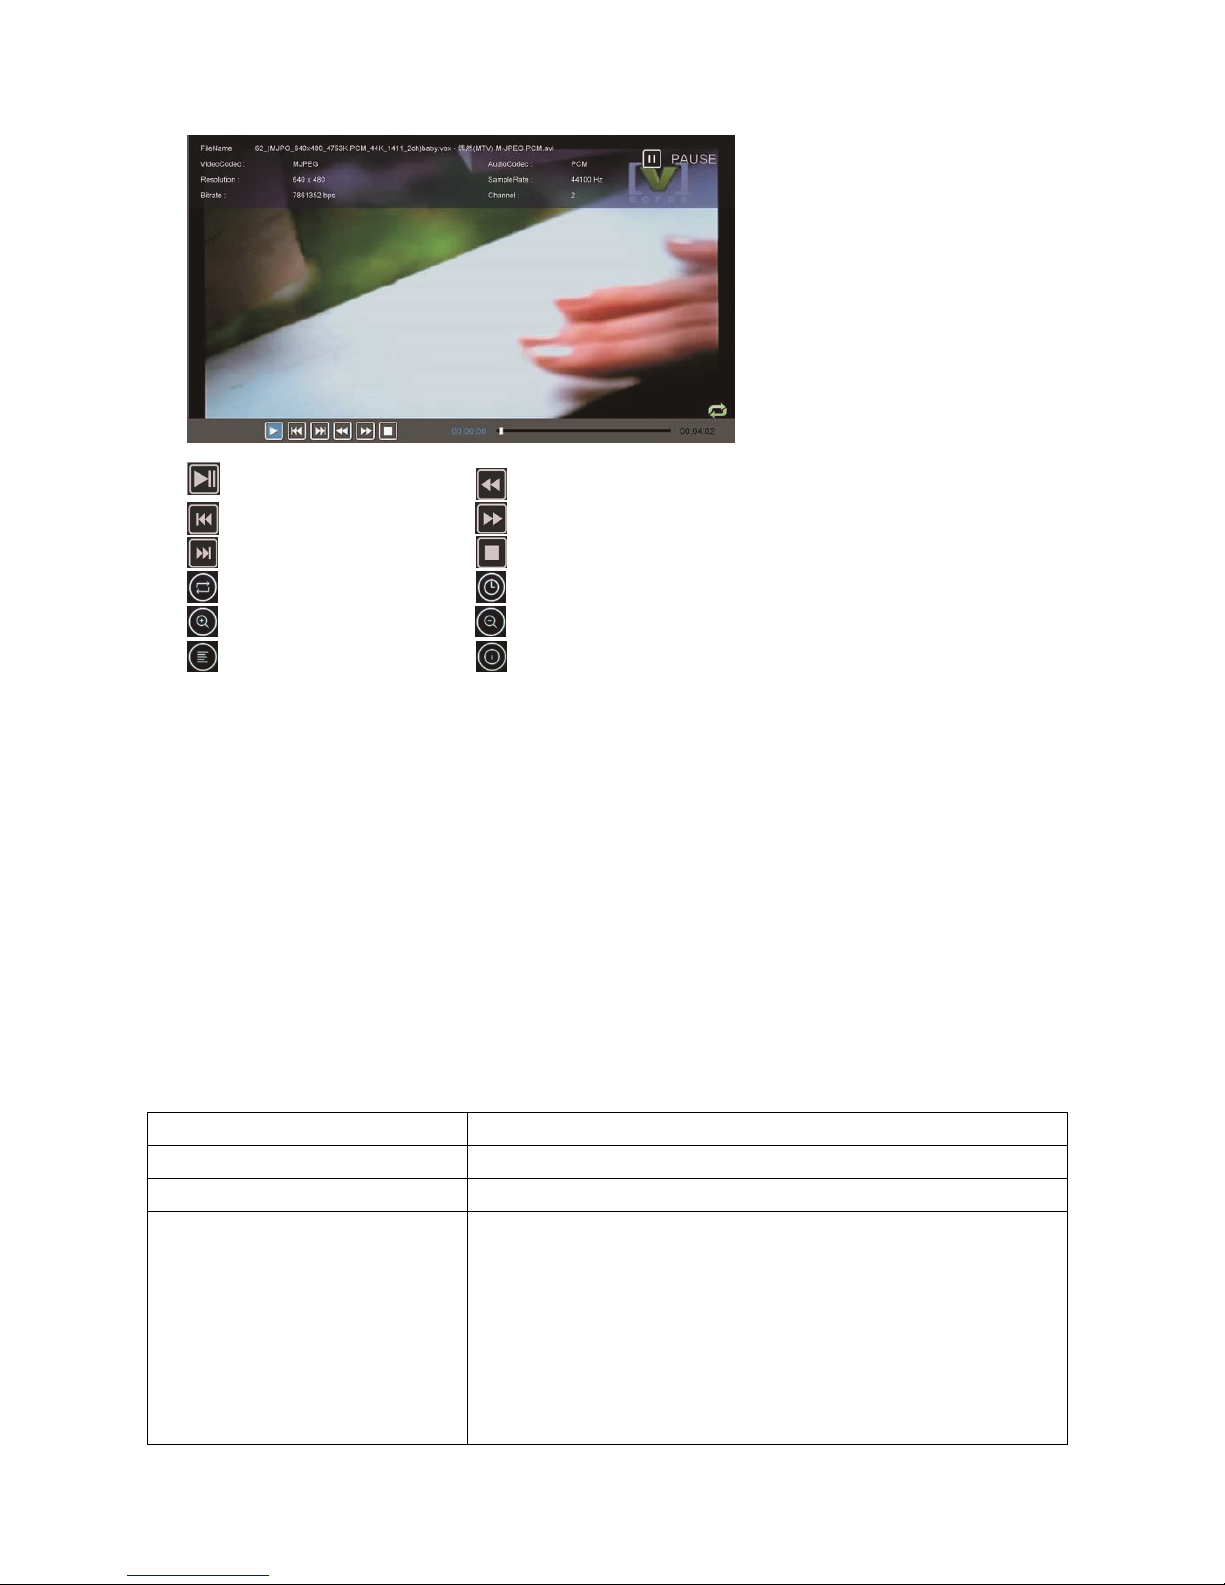
21 of 25
Play or pause Rewind
Previous file Fast Forwards
Next file Stop
Repeat the movie Set Play Time
Zoom in Zoom out
Show Playlist Show Information
Press EXIT button to exit to the previous page.
File
Press
▲ ▼
/ button to select the file you would like to play then press OK
button to enter.
Press ◄ / ◄ button to select the file you would like to play then press OK
button to enter.
Press EXIT button to go back to the previous menu.
TROUBLESHOTING
Problem Solution
No power Insert the power plug securely into the power outlet.
No picture Ensure that the equipment is connected properly.
Distorted or no sound
•
Ensure the equipment is connected properly
• Ensure that the input setting for the TV and
stereo system are correct.
• Adjust the master volume to a suitable volume by
pressing V+/V- button.
• Check audio settings are correct.
• Check set isn’t muted.

22 of 25
•
Unplug headphones
• Check the antenna connection.
Remote control not
working
•
Check the batteries are installed with the correct
polarities.
• Replace the batteries with new, fully charged
ones.
• Point directly at the remote sensor on the TV and
try again.
• Operate at a distance of no more than 6m.
• Remove any obstacles between the remote
control and the sensor.
Buttons on the TV don’t do
anything
Disconnect the power plug and then reconnect it.
(The unit may not be operating properly due to
lightning, static, or other factors.)
Poor picture or no picture
•
Adjust the indoor aerial, use an amplified aerial
or external digital antenna.
• Have the DTV antenna checked or installed by a
professional installer
• Move anything that may cause interference.
• Retry Auto tuning the unit.
• Try another channel.
Noise or other interference Electronic equipment near the unit may be causing
interference. Relocate the unit or move the
equipment.

23 of 25
SPECIFICATIONS
Panel 55”/ 65” LED panel
Resolution (pixels) 3840 x 2160
Pixel Pitch (mm) 0.1903(H)x0.5708(V)
Aspect Ratio 16:9
Contrast Ratio 4000:1 (55”) 4500:1 (65”)
Luminance 320cd/m2 (55”) / 350cd/m2 (65”)
View Angle 178(H) / 178(V)
Response Time 8ms
Life Time 30,000 Hours
Input Terminals RF (T2) x1
USB x1
AV (Video) x1
Component (YPbPr) x1
SCART x1
RJ45 x1
HDMI x4
Output Terminals Coaxial x1
Earphone x1
TV System
Receiving Range 48.25~863.25 MHz
Input Impedance 75Ω
Video System PAL, DVB-T2+C
Sound System BG, DK, I, L/L; NICAM/A2
Storage Channels 100CH
Teletext 1000pages
DTV System
Receiving Range
VHF: 50~230MHz
UHF: 474~862MHz
Input Impedance 75Ω
Channel Bandwidth 7 MHz / 8 MHz
Modulation
DVB-T: COFDM 2K/8K QPSK, 16QAM,
64QAM
DVB-C: 16QAM, 32QAM, 64QAM, 128QAM,
256QAM
Video System MPEG-2 MP@HL, MPEG-2 MP @HL H.264
Sound System MPEG-1 Layer 1/2, MPEG-2 Layer 2, DD,
DD+
Basic Function EPG, Subtitle, Teletext

24 of 25
Video Input / Audio Output
Video Input
AV Colour System PAL / DVB-T2+C
YPbPr Format 480i, 480p, 576i, 576p, 720p, 1080i,
1080p
HDMI Input format 480i, 480p, 576i, 576p, 720p, 1080i,
1080p, 4K
Audio Output
Frequency Response 100Hz~15KHz @ +/- 3db (1KHz, 0dB
reference signal)
Class D 2 x8W@8ohm THD<10%
Multimedia Playback Format
Multimedia
Categories
File Extension
Video AVI, MPEG 1/2, MPEG-4, WMV, TS
Music WMA, AAC, AC3, MP3
Photo JPEG, BMP, PNG, GIF
Text TXT
Remote Control
Signal Type Infrared
Control Distance 6 meters
Control Angle 30o (Horizontal)
Power Supply AAA 1.5V x 2
Others
Language English
Power Source AV 100~240V, 50/60Hz
Power Consumption <140W
Power Saving <0.5W
Operating Temperature -5oC to 45oC
55” Dimensions (mm)
1250.8(W) x 308.8(D) x 781.9(H)mm –
with stand
1250.8(W) x 87.6(D) x 729.5(H)mm –
without stand
65” Dimensions (mm)
1462.1(W) x 308.8(D) x 897.6(H) – with
stand
1462.1(W) x 73.8(D) x 848.5(H) –
without stand

25 of 25
electriQ UK SUPPORT
Complete online support form on www.electriQ.co.uk/support
Service Line: 0871 620 1057
Office hours: 9AM - 5PM Monday to Friday
www.electriQ.co.uk
Unit 2, The Nursery
Berristow Lane South Normanton
Derbyshire, DE55 2FX
PRODUCT DISPOSAL
Do not dispose this product as unsorted waste. Collection of such waste must be handled separately as
special treatment is necessary.
Recycling facilities are now available for all customers at which you can deposit your old electrical products. Customers
will be able to take any old electrical equipment to participating civic amenity sites run by their local councils. Please
remember that this equipment will be further handled during the recycling process, so please be considerate when
depositing your equipment. Please contact the local council for details of your local household waste recycling centres.
 Loading...