

ElectrIQ eiQ-32HDT2DVD User Manual
USER MANUAL
HD SMART LED TV WITH DVD PLAYER
eiQ-32HDT2DVD

2
CONTENTS
SAFETY INFORMATION
3
CONNECTION AND PREPARATION OF TV
6
WHAT IS INCLUDED
6
INSTALLATION OF LEGS
6
WALL MOUNTING
7
BUTTONS AND INTERFACE
8
CONNECTING TO EXTERNAL DEVICES
10
REMOTE CONTROL
11
INSTALLATION OF BATTERIES
12
INITIAL SETUP
13
BASIC OPERATION
14
CHANNEL SET UP
14
TUNING
15
TV MENU
16
PICTURE SETUP
16
SOUND SETUP
18
TIME
19
LOCK
20
SET UP MENU
21
MEDIA
24
DVD SETTINGS
28
TECHNICAL SPECIFICATIONS
31
TROUBELSHOOTING
32
MANUFACTURER SUPPORT
33

3
SAFETY INFORMATION
Read these instructions – All the safety and operating instructions should be
read before this product is operated.
Keep these instructions – The safety and operating instructions should be
retained for future reference.
Heed all warnings – All warnings on the appliance and in the operating
instructions should be adhered to.
Follow all instructions – All operating and usage instructions should be
followed.
Do not use this equipment near water – The appliance should not be used
near water or moisture e.g. in a wet basement or near a swimming pool.
Clean only with a dry cloth. Do not use solvents or petroleum-based fluids.
Do not block any ventilation openings.
Do not install near any heat sources such as radiators, stoves or other
apparatus (including amplifiers) that produce heat.
Do not tamper with the supplied plug. This plug is a BS1363 standard plug.
Protect the power cord from being walked on or pinched, particularly at the
plug and at the point where they exit from the appliance.
Only use attachments/accessories specified by the manufacturer.
Unplug the apparatus during lightning storms or when unused for long
periods of time.
Refer all servicing to qualified personnel. Servicing is required when the
apparatus has been damaged in any way, such as power supply cord or plug
is damaged, liquid has been spilled or objects have fallen into the apparatus
or it has been exposed to rain or moisture, it does not operate normally or
has been dropped.
Please keep the unit in a well-ventilated environment.
The TV should only be connected to a mains power supply with AC 100240V~ 50/60Hz
To prevent overload, do not share the same power supply socket with too
many other electronic components.
Do not place any connecting wires where they may be stepped on or tripped
over.
Do not place heavy items on the cable as this may cause damage.
Hold the main plug, not the wires, when removing from a socket.
Unplug immediately and seek professional help if the plug or cable is
damaged, liquid has spilt onto the set, if accidentally exposed to water or
moisture, if anything accidentally penetrates the ventilation slots or if the set
does not work normally.
Do not remove the safety covers. There are no user serviceable parts inside.
To avoid battery leakage, remove exhausted batteries from the remote control
when not in use for a long period.
Do not block ventilation slots on the back cover. The TV can be placed in a
4
cabinet but ensure the guidance on clearances are followed.
Do not tap or shake the TV screen, this may damage internal components.
Diagrams within the manual are for illustrative purposes only, and as such
there may be differences to the actual product received.
At full volume, prolonged listening may damage the users hearing.
WARNING
Never place a television set in an unstable location. A television set may
fall, causing serious personal injury or death. Many injuries, particularly to
children, can be avoided by taking simple precautions such as:
Use cabinets or stands recommended by the manufacturer of the
television.
Only use furniture that can safely support the television set.
Ensure the television is not overhanging the edge of the supporting
furniture.
Do not place the television on tall furniture (for example, cupboards or
bookcases) without anchoring both the furniture and the television to a
suitable support.
Do not place the television set on cloth or other materials that may be
located between the television set and the supporting furniture.
Educate children about the dangers of climbing on furniture to reach
the television or its controls.
If your existing television set is being retained and relocated, the
same considerations as above should be applied.
WARNING
To reduce the risk of fire or electric shock, do not expose this apparatus
to rain or moisture. The apparatus shall not be exposed to dripping or
splashing and objects filled with liquids, such as vases, shall not be
placed on or next to the apparatus.
WARNING
The wall plug socket is used as a disconnection device and should
remain readily accessible.
CAUTION
Danger of explosion if the battery is incorrectly replaced.
Replace only with the same or equivalent type.
Batteries shall not be exposed to excessive heat such as direct sunlight,
fire or the like. Used batteries should be recycled appropriately.
CAUTION
To reduce the risk of electric shock, DO NOT remove the cover (or back).
No user serviceable parts inside. Refer servicing to qualified service
personnel.
5
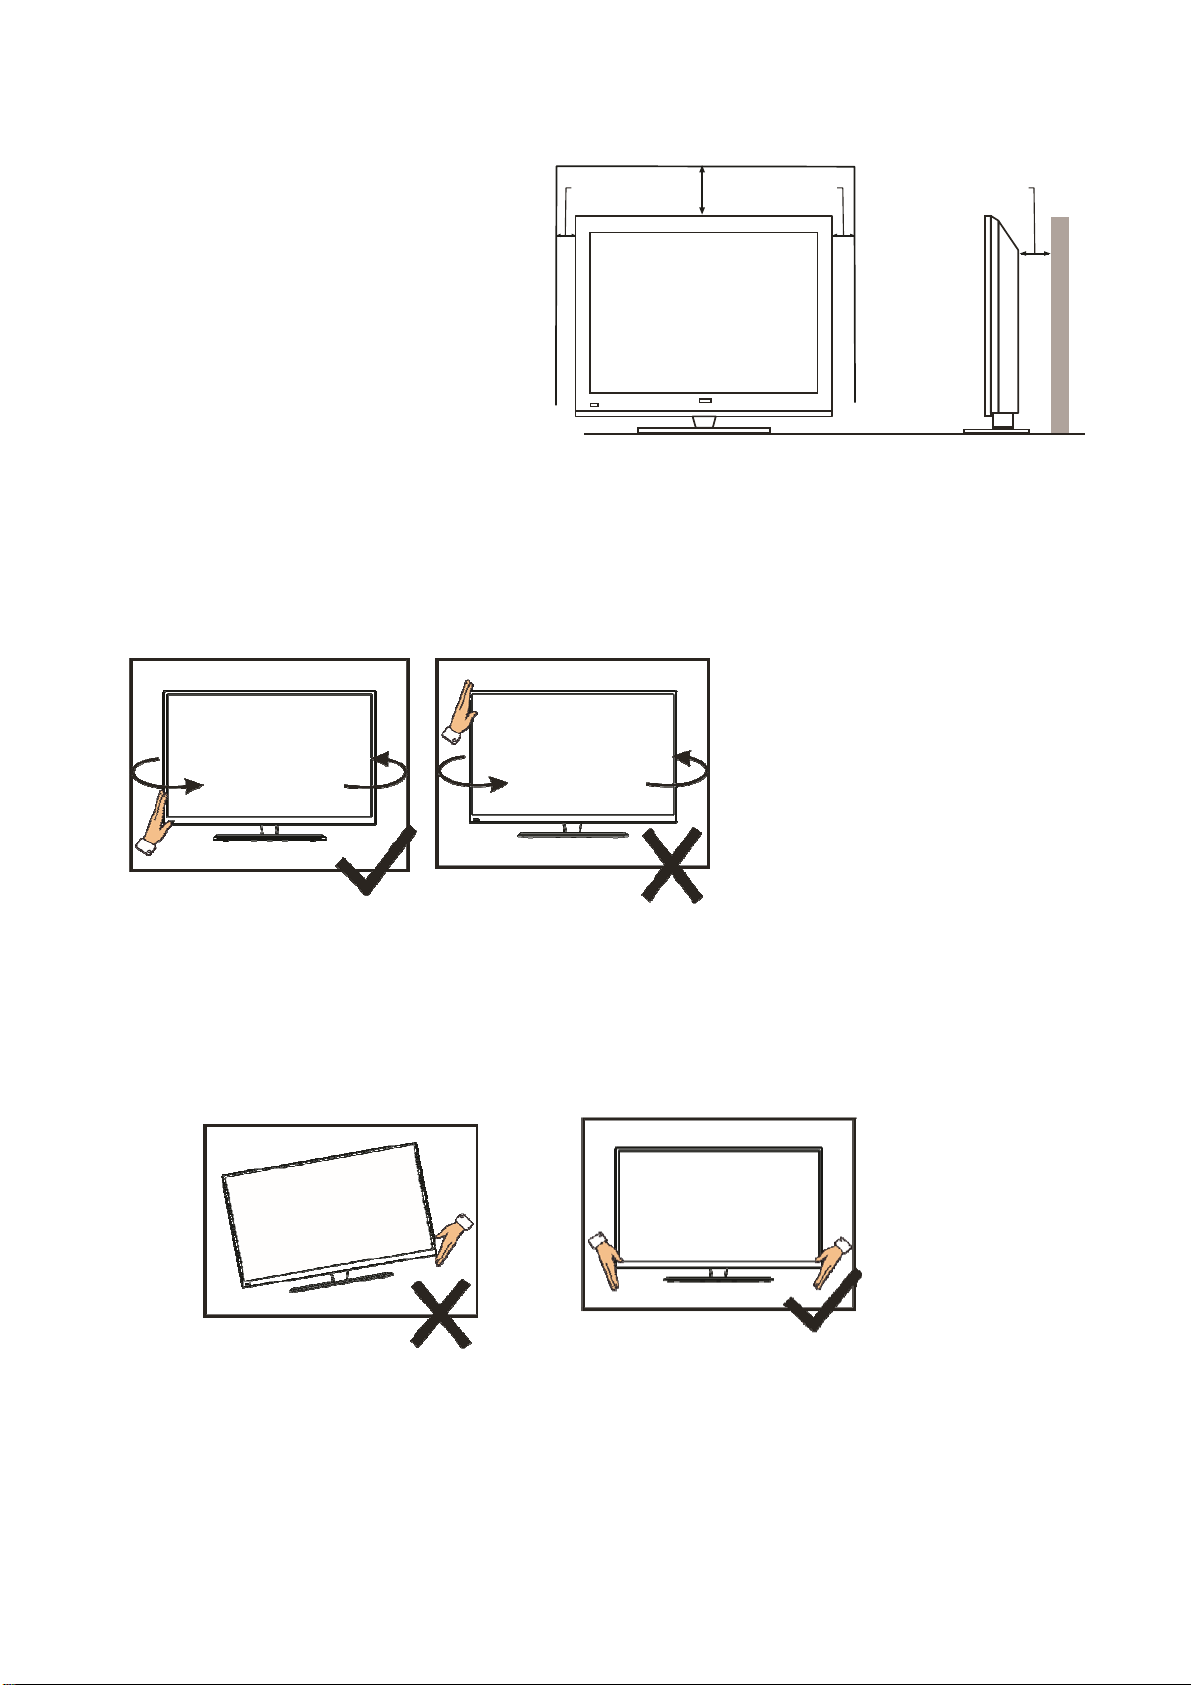
ATTENTION
Place the TV on a firm
and flat surface, leaving
a space of at least 10cm
around the set and
30cm from the top of the
set to the ceiling or
cabinet. Ensure the TV
is positioned close to the
wall to avoid it falling
when pushed.
When twisting the TV
set, do not hold the top
of the TV, you should
twist from the base.
When lifting the TV, do not use one hand to handle it, you should lift the TV
using two hands, ensuring pressure is not put on the screen
10 cm
30 cm
10 cm
10 cm

6
CONNECTION AND PREPARATION OF THE TV
WHAT IS INCLUDED
TV Set Remote Control User Manual
(2 x AAA Batteries)
.
4 Bolts 2 Legs
INSTALLATION OF LEGS
1 Place the TV with the front facing downwards on a soft cloth pads on a desk.
2 Insert the legs into the sockets on the base of the TV.
3 Insert the screws into the sockets and tighten them with a screwdriver. Do not use an
electric screwdriver, or similar.
100mm
200mm
Screws(2)
Screws(2)
BB4*12PH
BB4*12PH
Four mounting holes
M6 Screw

7
WALL MOUNTING
• The TV is provided with mounting holes for a VESA approved wall mounting bracket (not
supplied).
• The VESA mounting pattern is:
200x100mm and the size of the bolts is 4 x M6 x 10 (not supplied).
• Do not use bolts longer than the size specified above for your model or damage will occur
to the internal components.
NOTES:
• Do not install this product until this manual has been read and understood thoroughly.
Please keep these instructions for future reference.
• Due to the heavy weight and dimensions of the LCD screens and their fragile nature, we
recommend that they are unpacked and assembled by 2 people and professional installers
are used to wall mount them (Wall mounting is optional). If you do not understand the
instructions, or are unsure how to install this product, please contact a professional for
assembly advice and assistance.
• Careful consideration should be made regarding the location the television is to be wall
mounted as some walls are not suitable for installation. If the television is to be mounted on
drywall, the mount must be anchored into a wooden stud, concrete block or brick behind
the drywall. Installing on drywall alone will not support the weight of the display.
• When drilling holes, it is particularly important to take care of electrical cables, water or gas
pipes in the wall. Please follow the instructions provided by the wall bracket manufacturer
and ensure that all fixing screws supplied are used.
• electriQ and its distributors and dealers are not liable or responsible for damage or injury
caused by improper installation, improper use or failure to observe these safety
instructions. In such cases any guarantee will expire.
8
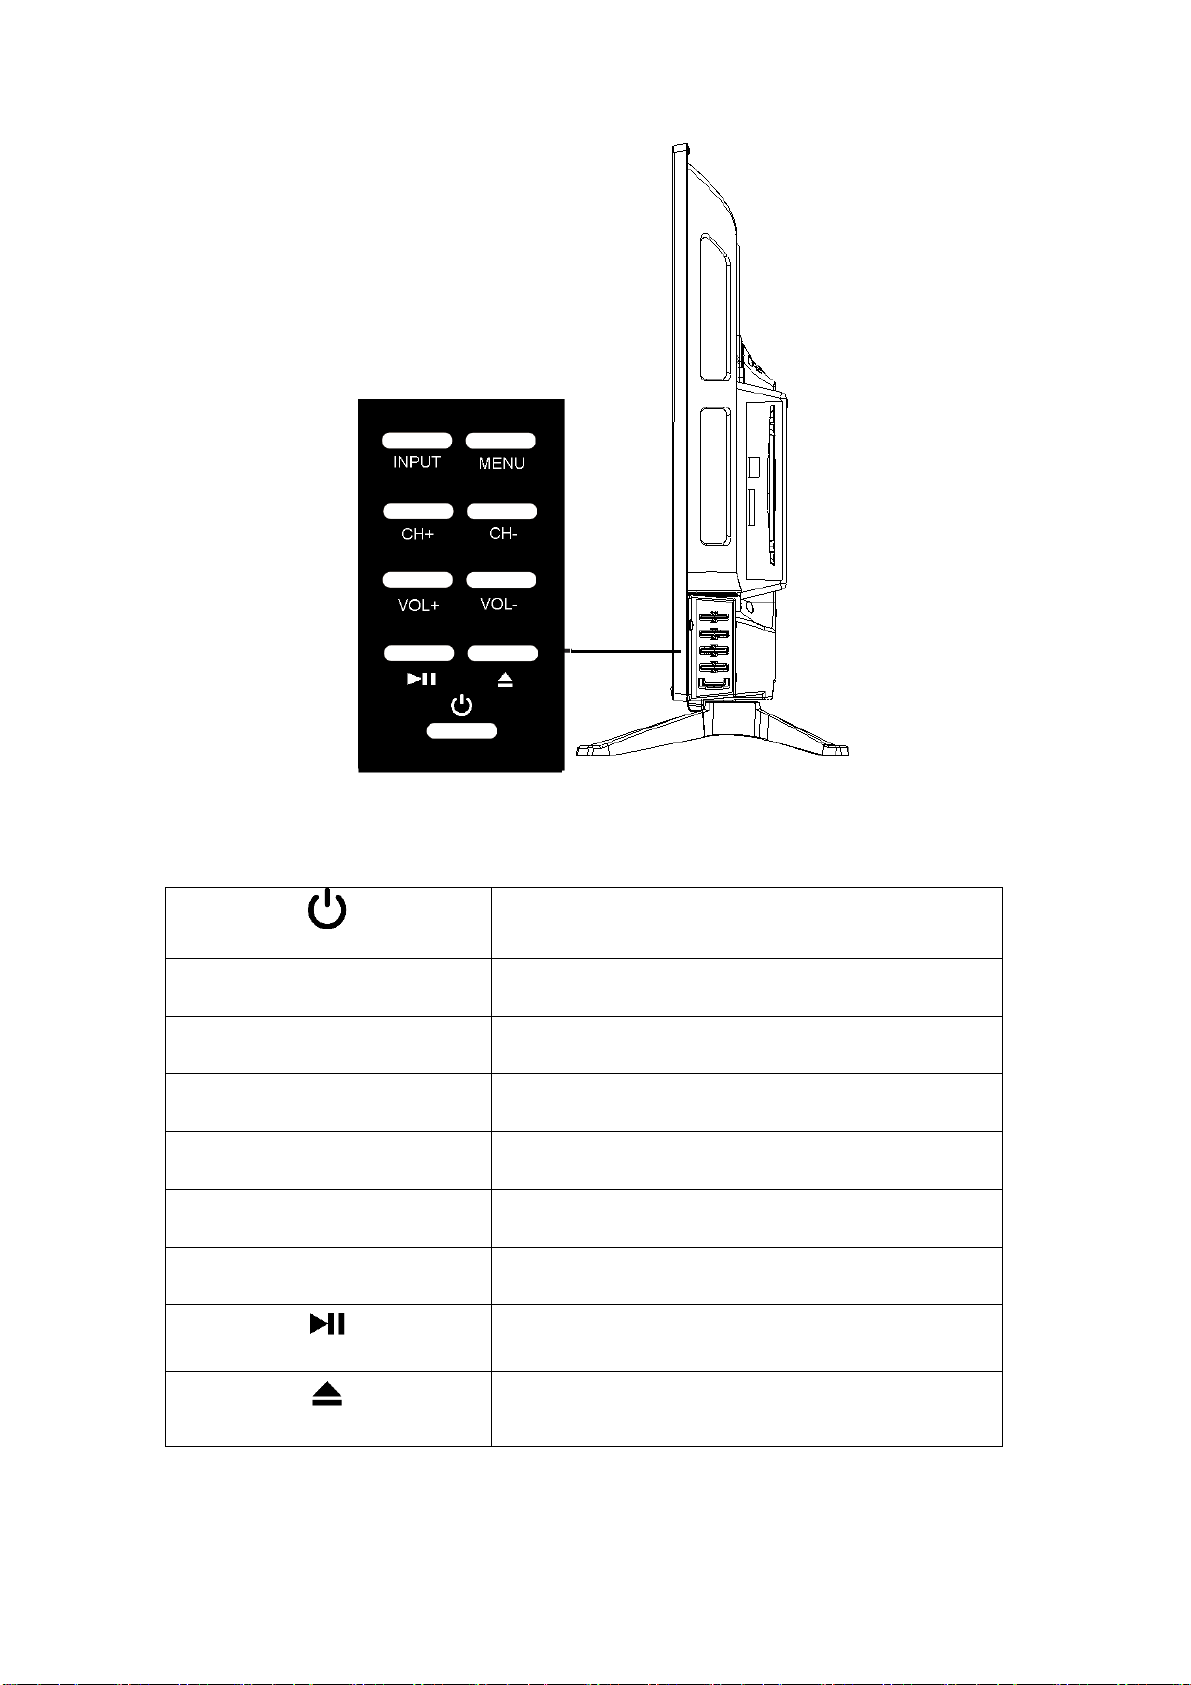
BUTTONS
POWER BUTON
To turn the TV ON/OFF
INPUT BUTTON
To select the input source.
MENU BUTTON
To enter the main menu.
CH+ BUTTON
To select the next channel
CH- BUTTON
To select the previous channel
VOL+ BUTTON
To increase the volume.
VOL- BUTTON
To decrease the volume.
PLAY / PAUSE BUTTON
To start or pause playback.
EJECT BUTTON
To eject the DVD from the internal drive.
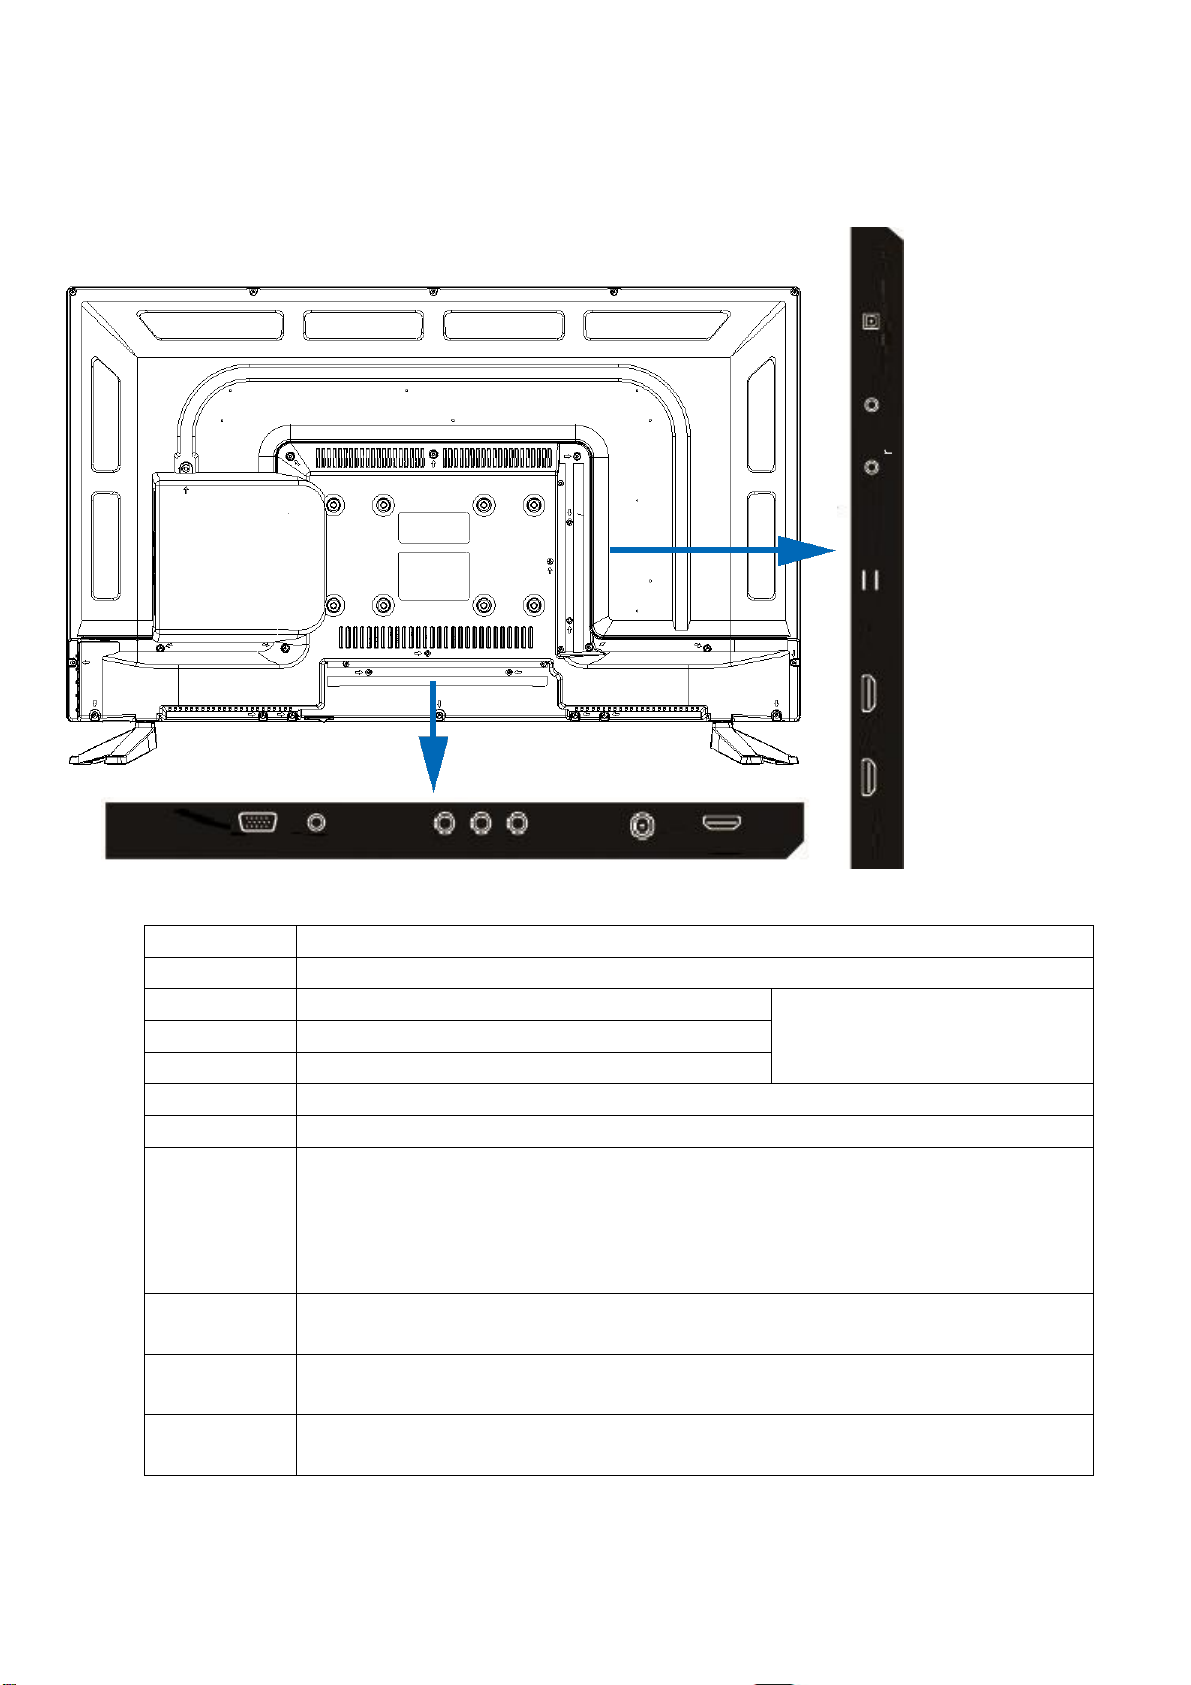
9
BUTTON FUNCTIONS
INPUT / OUTPUT TERMINALS
VGA
PC Video input.
AUDIO
PC Audio input.
VIDEO
Video input
Composite Video – can be
used for connecting older
equipment
L
Left Audio input
R
Right Audio input
RF IN
Antenna connection.
HDMI1-3
For connecting DVD players, set top boxes, games consoles, etc.
USB x2
Provides access to SMART TV. Connect smart remotes, keyboards,
gaming accessories or USB flash drive for DTV recording, timeshift or
media playback. Only connect low power USB flash drives or externally
powered hard drives to the USB ports as they only provide 0.5 Amps
power.
Mini YPbPr
Input
Connect to the YPbPr video output terminal of the DVD player
Headphone
Connect headphones, or can be used for compatible Soundbars /
audio equipment.
OPTICAL
Digital audio output, for use with compatible sound bars / audio
equipment.
VGA
AUDIO
VIDEO
L R RF IN
HDMI1
HDMI2
HDMI3
USB1 / USB2
YPbPr
OPTICAL
HEADPHONE
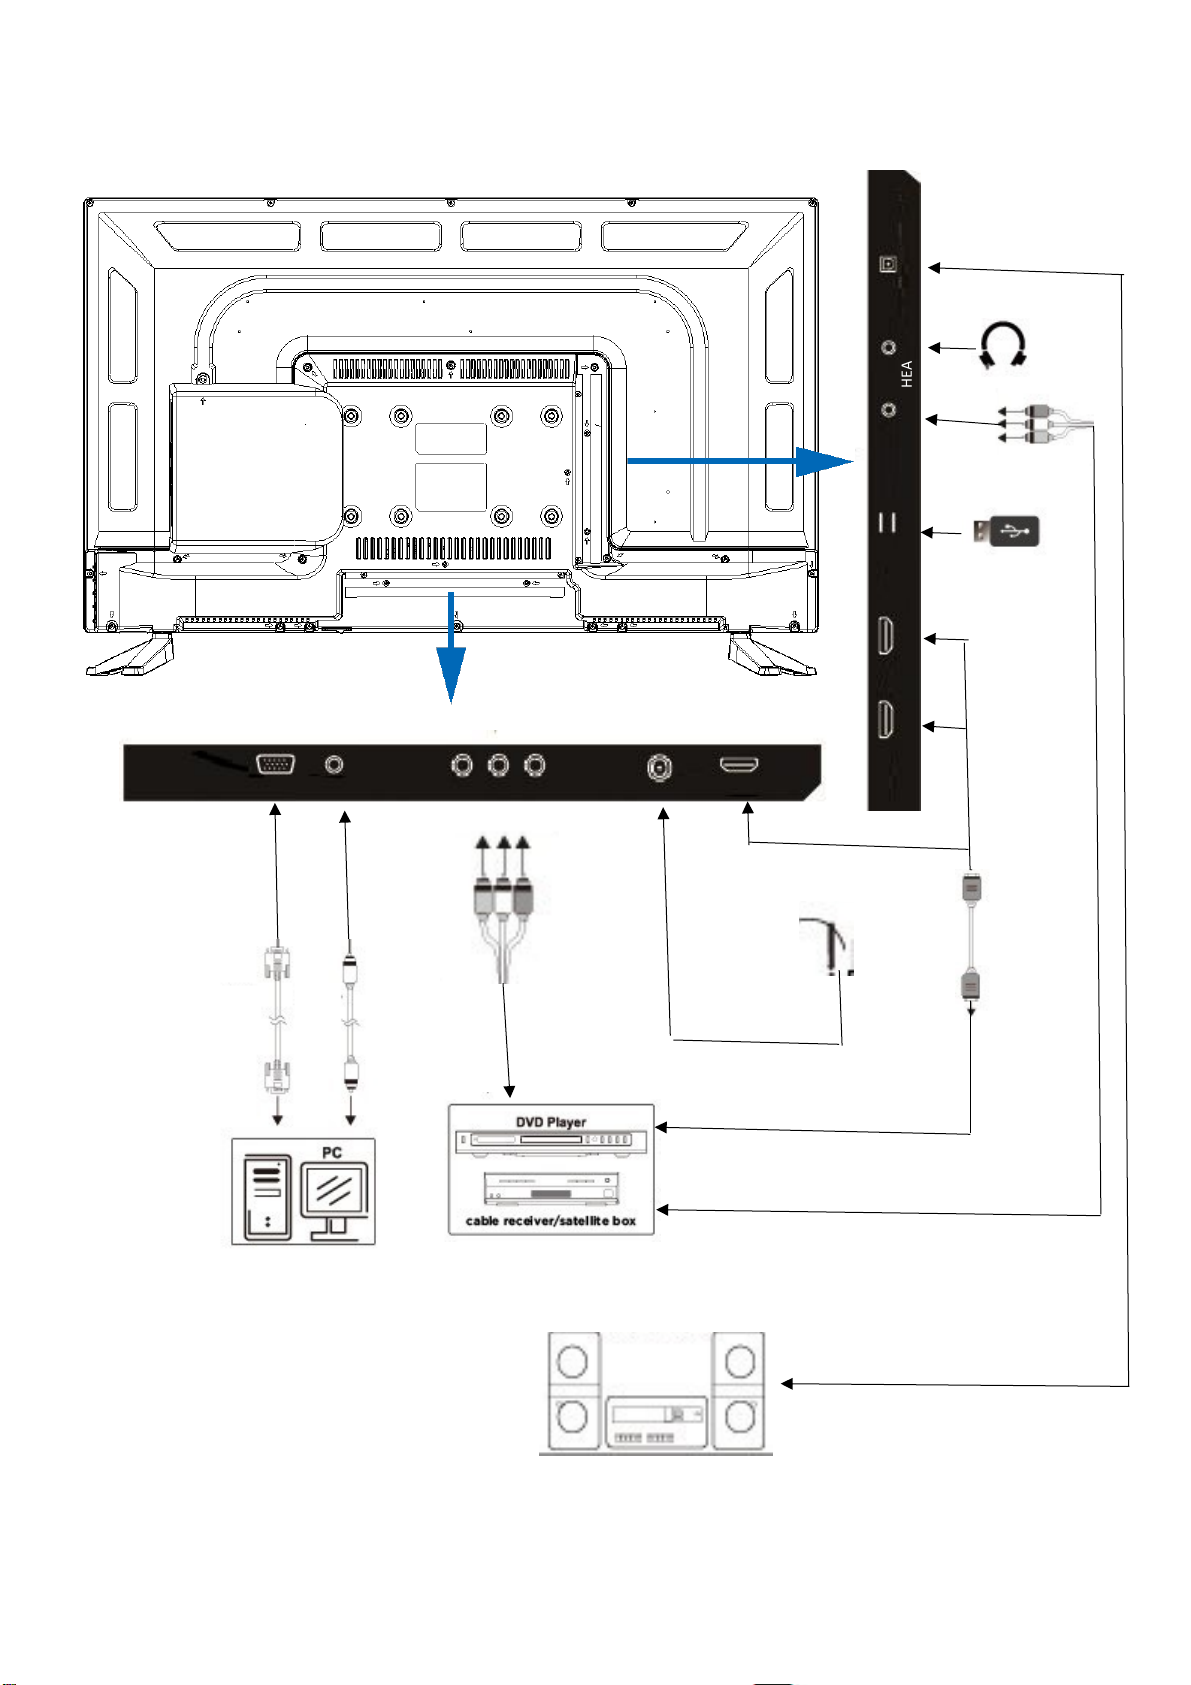
10
CONNECTING TO EXTERNAL DEVICES
VGA
AUDIO
VIDEO
L R RF IN
HDMI1
HDMI2 HDMI3
USB1 / USB2
OPTICAL
HEADPHONE
YPbPr
Headphones
Amplifier or Sound Bar
Aerial
HDMI
Cable
VGA
Cable
Audio
Cable
Optical Cable
 Loading...