

Page 1
AIRCUBE®
PORTABLE AIR CONDITIONER
DEHUMIDIFIER, HUMIDIFIER
AIR PURIFIER*
USER MANUAL
Thank you for choosing ElectrIQ
Please read this user manual before using this innovative appliance
and keep it safe for future reference.
Visit our page www.electrIQ.co.uk for our entire range of Intelligent Electricals
Page 2

Page 2 of 16
CONTENTS
1.SAFETY INSTRUCTIONS 3
2.FEATURES AND PARTS LIST 4
3.INSTALLATION 5
4.OPERATION AND SETTINGS 7
5.WATER-DRAINAGE 12
6.MAINTENANCE 13
7.TROUBLESHOOTING 14
8.APPENDIX 15
Page 3

Page 3 of 16
SAFETY INSTRUCTIONS
Important!
Carefully read the instructions before operating the unit. Note: This appliance is for indoor use only.
Rating: This unit must be only connected to a 220-240 V / 50 Hz earthed outlet.
Installation must be in accordance with regulations of the country where the unit is used.
If you are in any doubt about the suitability of your electrical supply have it checked and, if necessary,
modified by a qualified electrician.
This appliance has been tested and is safe to use. However, as with any electrical appliances - use it with
care.
Disconnect the power plug from socket before dismantling, assembling or cleaning.
Avoid touching any moving parts of the appliance.
Never insert fingers, pencils or any other objects through the guard
This appliance is not intended for use by persons (including children) with reduced physical, sensory or
mental capabilities. It is also not intended for use by those with a lack of experience and knowledge, unless
they have been given supervision or instruction concerning the use of the appliance by a person responsible
for their safety.
Do not leave children unsupervised with this appliance.
Do not clean the unit by spraying it or immersing it in water.
Never connect the unit to an electrical outlet using an extension cord. If an outlet is not available, one
should be installed by a qualified electrician.
Never operate this appliance if the cord or plug is damaged. Ensure the power cord is not stretched or
exposed to sharp object/edges.
A damaged supply cord should be replaced by the manufacturer or a qualified electrician in order to avoid a
hazard.
Any service other than regular cleaning or filter replacement should be performed by an authorized service
representative. Failure to comply could result in a voided warranty.
Do not use the appliance for any other purposes than its intended use.
This unit must always be stored and transported upright, otherwise irreparable damage may be caused to
the compressor; if in doubt we suggest waiting at least 24 hours before starting the unit.
Avoid restarting the air conditioning unit unless 3 minutes have passed since being turned off. This prevents
damage to the compressor.
Never use the mains plug as a switch to start and turn off the air conditioning unit. Use the provided
ON/OFF switch located on the control panel.
Always place the unit on a dry and stable surface.
The appliance should not be installed in laundry or wet rooms
Energy Saving and Unit Safety Protection Tips
Do not cover or restrict the airflow from the outlet or inlet grills.
For maximum performance the minimum distance from a wall or objects should be 50cm. Unit is fitted with
thermal cut off sensor that will prevent overheating
Keep the filters clean. Under normal conditions, filters should only need cleaning once every 2-3 weeks
(approximately). Since the filters remove airborne particles, more frequent cleaning maybe necessary,
depending on the air quality. Remove the HEPA filters for maximum cooling and dehumidifying performance.
Wash the mesh filters and gently vacuum clean the HEPA filters
For the initial start-up in air conditioning mode set the fan speed to maximum and the thermostat to 3-4
degrees lower than the current temperature. After, set the fan switch to low and set the thermostat to your
desired setting.
To protect the unit we recommend not using the cooling function when the ambient temperature > 35℃.
Page 4
Page 4 of 16
FEATURES AND PARTS LIST
1. Features
Part of ElectrIQ AirCube
®
range of Intelligent Air Conditioning products
Compact, designer inspired model
Cooling, Dehumidifying, Humidifying and Air Cleaning for all around the year use
Improves comfort and indoor air quality
Dual stage HEPA filters for efficient Air Cleaning (optional)
Self-evaporative system in cooling mode - no need to empty external water tank
Digital Control Panel with side vents to prevent dust and dirt entering the machine.
Intelligent LCD screen, indicates temperature, humidity, operation mode
Remote control that can be stored in slot at on the side of unit after use.
The hot air outlet is positioned high on the unit – this allows for improved performance with
the use of a short hose
On/Off timer function – allows you to choose when the unit operates both in air conditioning
and dehumidifying mode
Advanced Compressor protection technology
Recessed castors for improved portability
Self-Diagnostic intelligent appliance
2. Parts list:
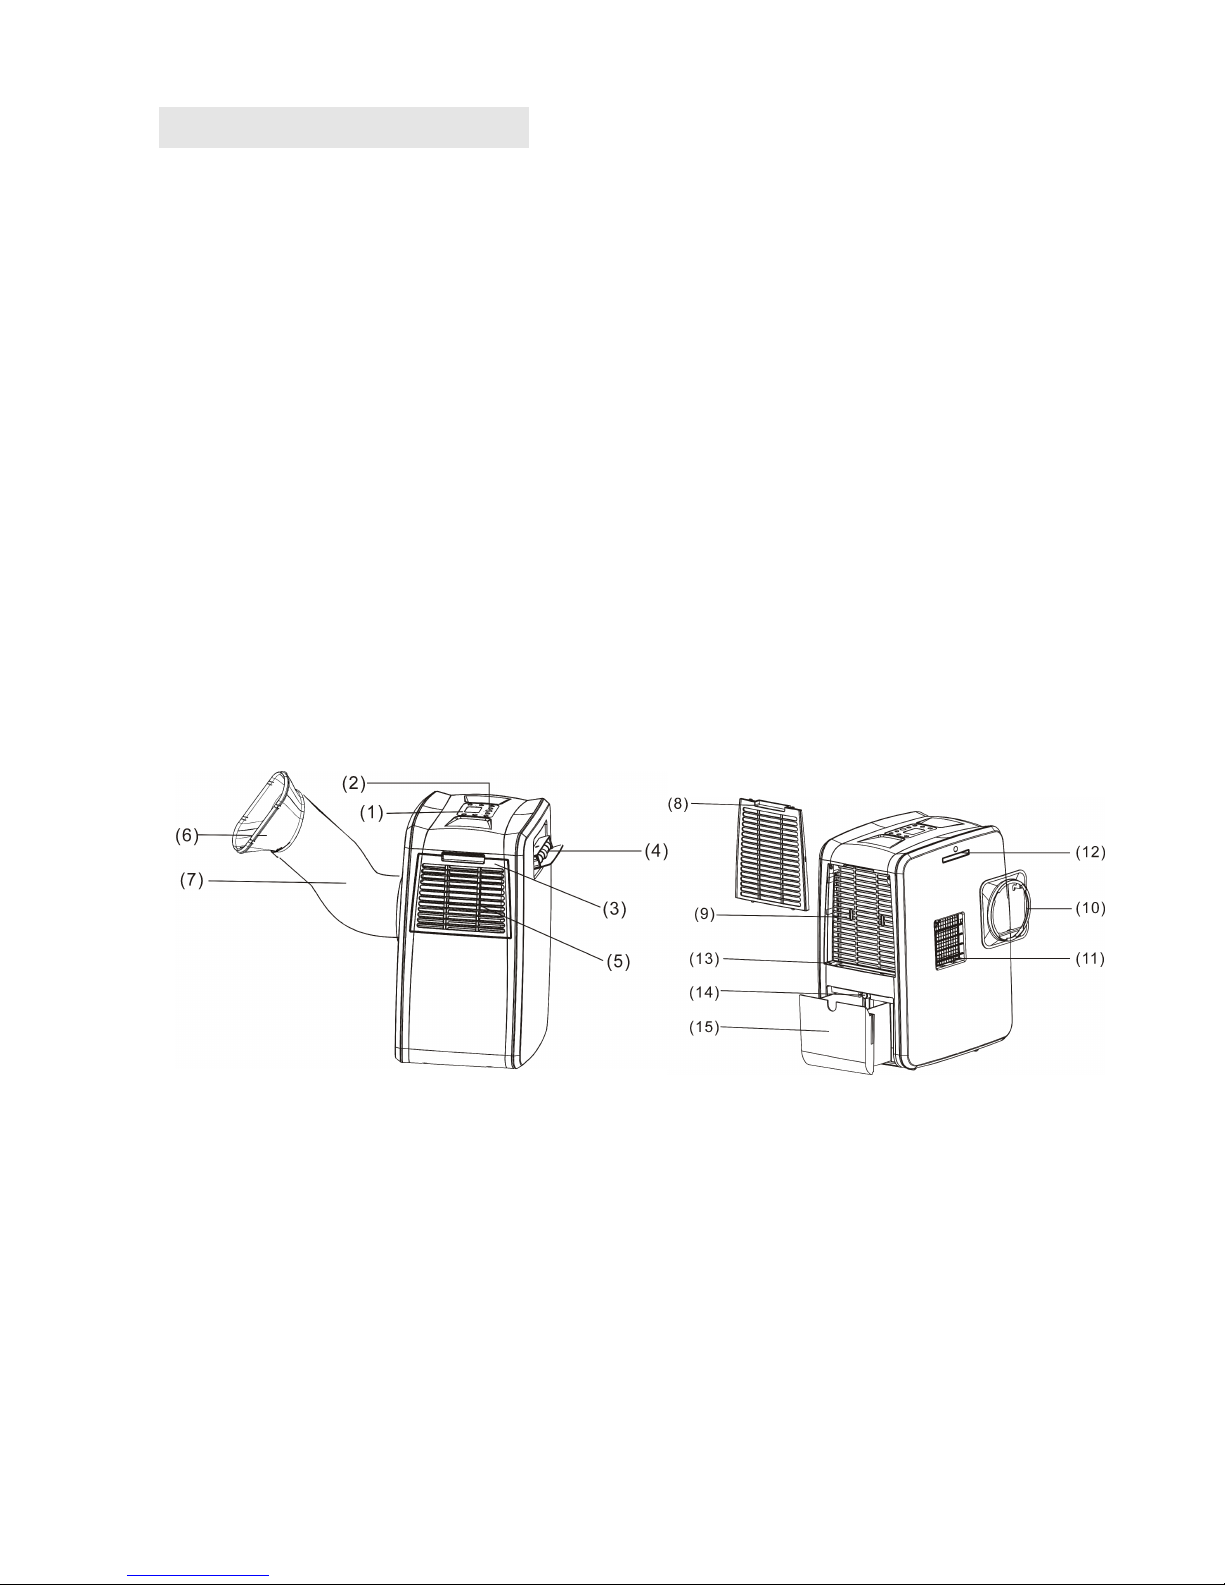
1. Control panel 9. Hot air inlet (mount clip (10) storage)
2. Remote control sensor 10. Hot air outlet hose mount adapter
3. Washable mesh filter (HEPA filter* holder) 11. Hot air outlet with directional louvres
4. Cold air outlet with swinging louvres 12. Remote control slide in slot
5. Cold air inlet 13. Water filling port (humidifier function)
6. Fishtail connector 14. Water drain port / Rubber water stopper
7. Hot air exhaust hose 15. Dehumidifier water tank
8. Washable mesh filter (HEPA filter* holder) * HEPA filters are optional
Page 5

Page 5 of 16
INSTALLATION
Warning:Before using this unit, please keep it upright for at least 3-4 hours.
This unit can easily be moved from one room to another.
While moving the unit please note that it must always be kept upright and then placed on an even
surface.
Unpacking
Open the box and remove all the packing out of way.
Grip the unit by the carry handles located on either sides of the unit and
carefully lift until it slides out of the foam base.
Open the water tank (15) and remove the exhaust hose (7) as in picture.
Remove the side mount clip (10) from hot air inlet (9)
Install the exhaust hose (7) if operating the unit in vented air conditioning
mode or spot drying mode
PACKAGE CONTENTS
1 / Air Treatment unit 2 / Remote control
3 / Side mount clip (10) 4 / Hose and window kit
5 / HEPA filters (available to be purchased separately)
Assemble the hose (for vented air conditioning mode and directional drying)
1. Remove the hot air exhaust hose (7) from the water tank (15). The fishtail (6) parts (a) and (b)
are stored within the hose (7). Prepare both parts (a) and (b) of hose adaptor and clip them
together. Do not push too hard as this may cause damage. Fr
2. Open filter (8) and remove hot air exhaust mount adapter (10) from its storage. Clip the hot air
exhaust mount (10) over hot air outlet (11) making sure it clicks into place.
The procedure is illustrated bellow.
1. Insert the hose (7) in to the fishtail (6) and rotate it at least 3 times until in place
2. Make sure hot air exhaust mount adapter (10) is clipped to the unit
3. Insert the assembled hose and fishtail
4. Rotate is firmly into adapter. To screw it into place should take no less than three rotations.
The procedure is illustrated bellow.
Note: To remove the hose and adapter reverse the procedure
Page 6
Page 6 of 16
Installation of window kit
If you want to use the unit more than a spot cooler
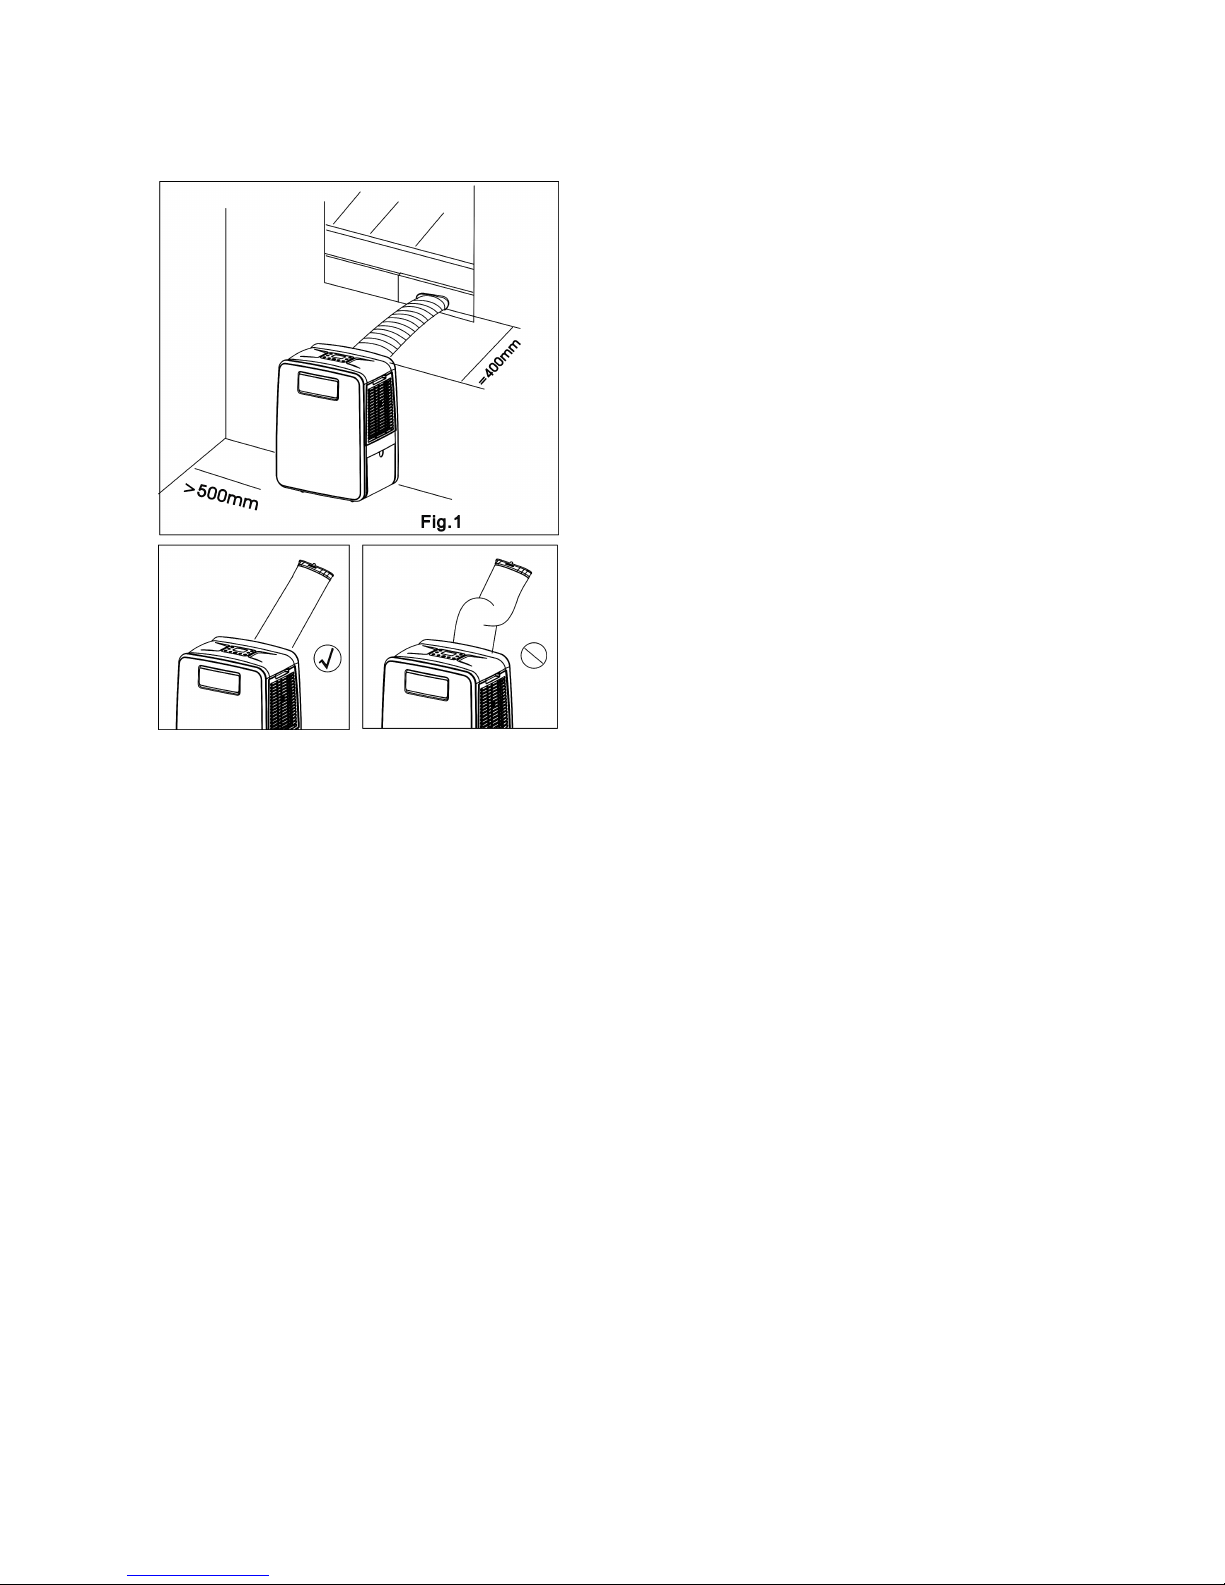
we recommend to vent it out using the supplied
window kit. Partially open the window and then fix
the window kit to the window either horizontally
(fig.1) or vertically. Clip the other end of the hose
with the fishtail adapter to the air outlet of the
window slider.
Make sure the unit is upright and there are no
obstructions to the air inlets and outlet grills.
Note: The window kit is only designed to be installed with
sliding or sash windows or doors. The window kit is not made to be
used with any other style of windows. However the fish tail adaptor
can be used with most windows / doors but there will be an old air
escape making unit less efficient. When using the cooling mode ensure
that the opening left is as small as possible. The best form of
installation is through a wall duct.
In order to achieve a drop of temperature in the room, note that the
unit will need to be vented out, ideally through the wall. By properly
venting your air conditioner expels heat out of your room while
efficiently cooling it.
Important safeguards
The length of the soft hose extends from 28 cm to 150 cm. If hose is extended above this length
the unit may malfunction and this can invalidate the warranty. Shorter the hose the better the
results, 40 cm is the ideal hose length for your AirCube. We recommend the outlet vent must be
well ventilated and not obstructed as this will cause the unit to overheat. Avoid bending the air
hose more than 30 degrees.
Page 7
Page 7 of 16
OPERATION AND SETTINGS
This portable air conditioner boasts four functions: cooling (spot cooling or vented), dehumidifying,
humidifying, air cleaning (with optional HEPA filters) / fan and humidifying.
The fan has three speeds: high, medium and low
Temperature range settings are: 17-300C
The unit will also display operating function, temperature, humidity, fault diagnostic and protective
functions on the LCD screen.
Control panel
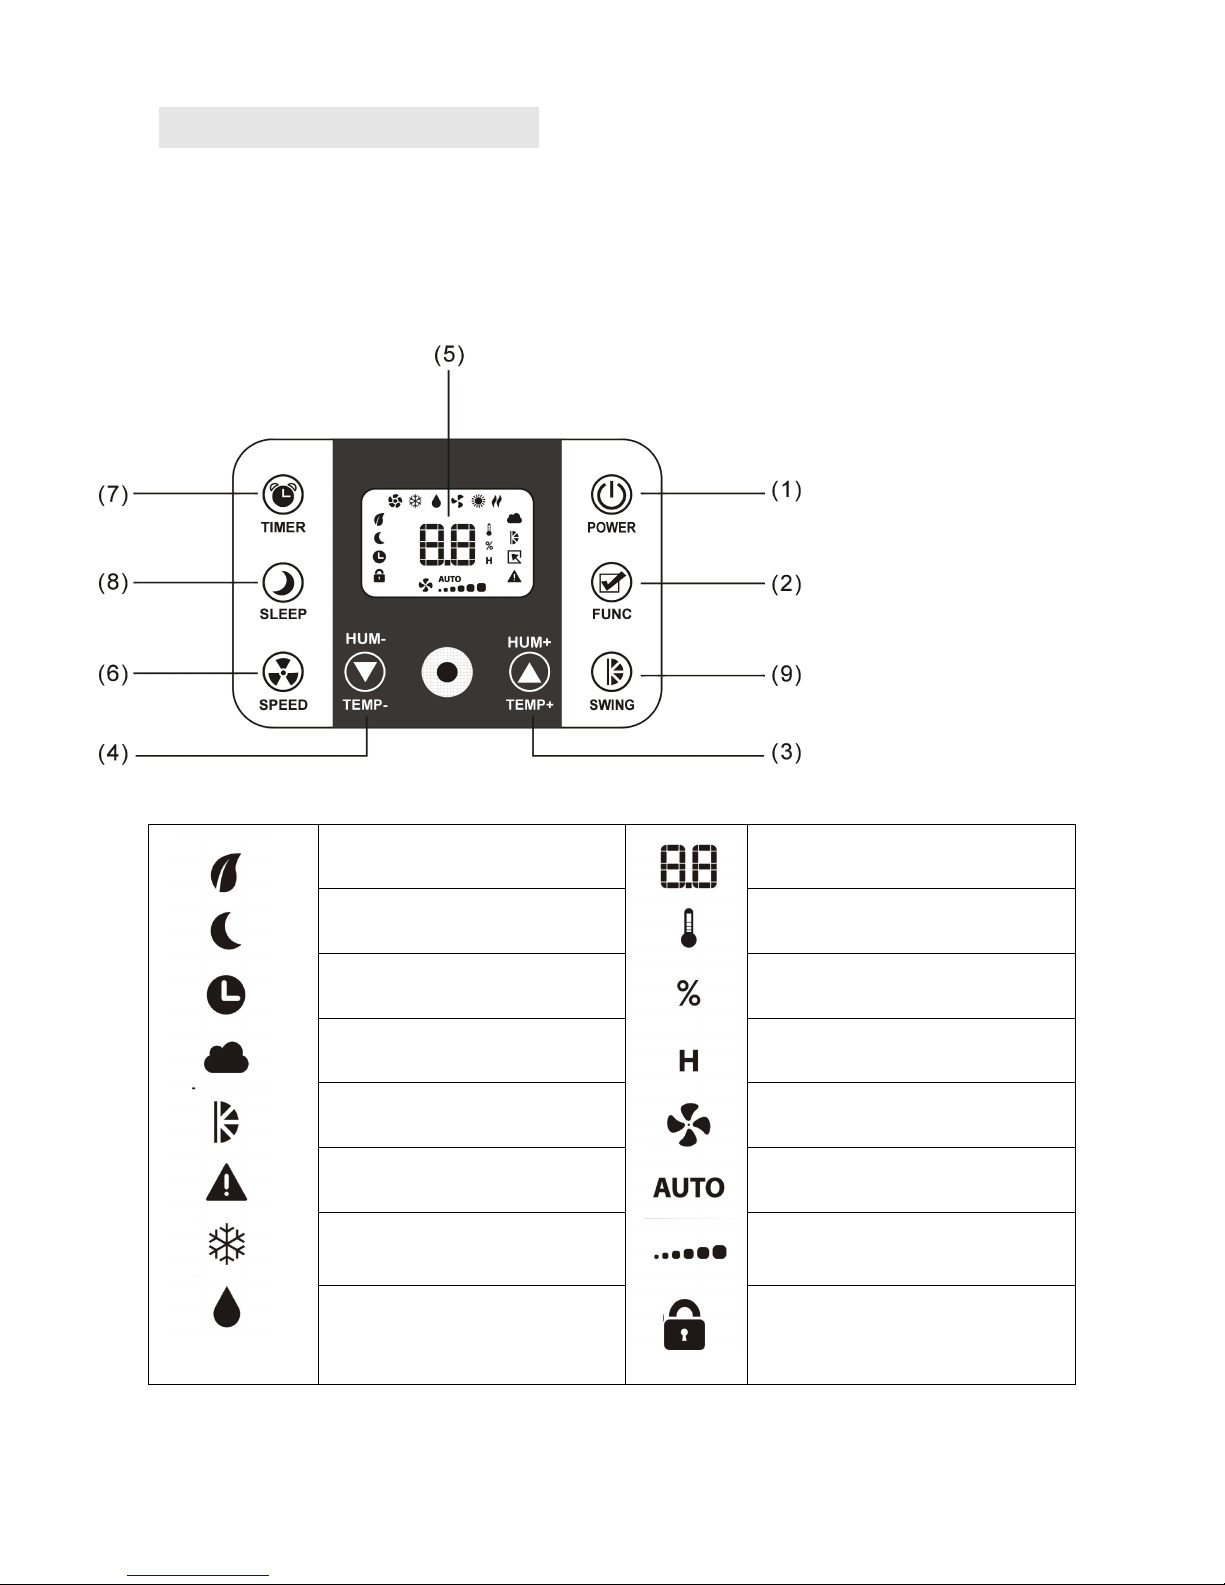
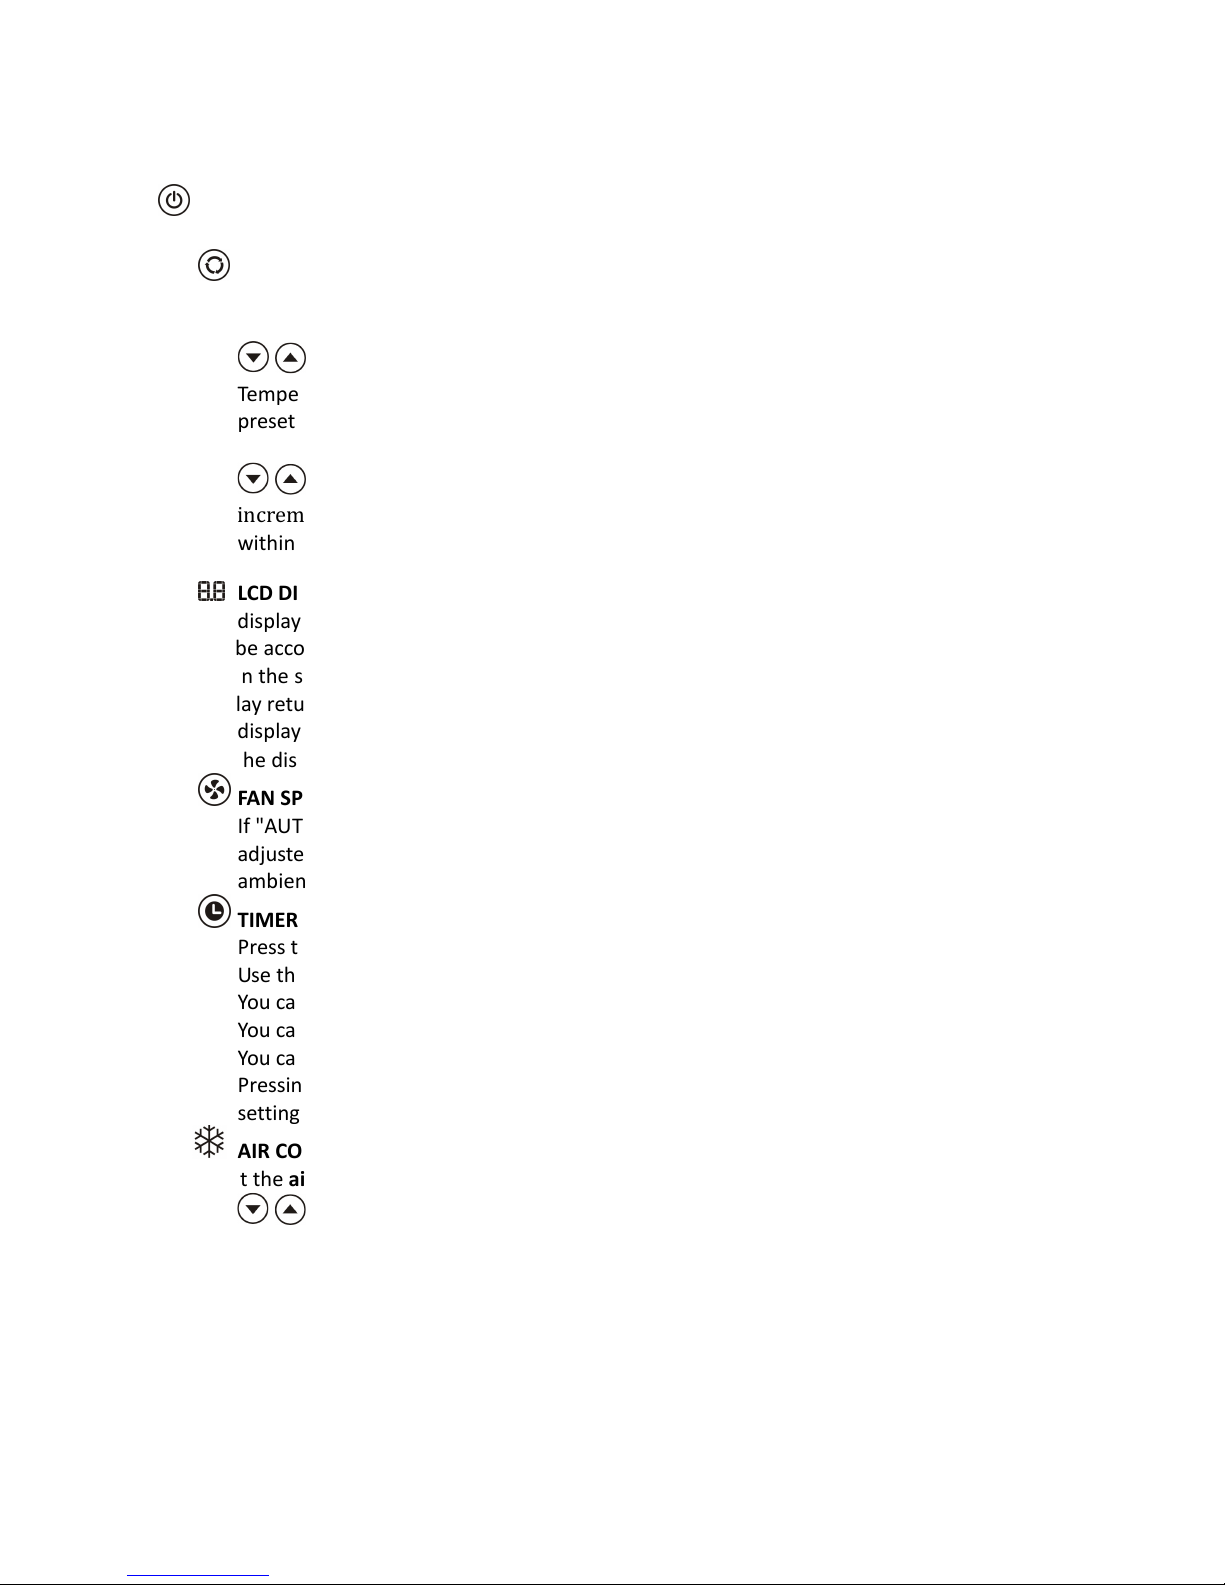
(1) Power ON / OFF
(2) Function selection
(3) Humidity / Temp +
(4) Humidity / Temp (5) LCD Display
(6) Fan Speed
(7) 24 hrs timer
(8) Sleep mode
(9) Swing function
Air Purifier mode
Temperature / Humidity / Hours
Sleep mode on
Temperature
Timer on
Humidity
Humidifier mode
Time
Swinging on
Fan speed icon
Error Alarm
Auto mode
Air Conditioner mode
Fan speed
Dehumidifier mode
Child Lock
Page 8
Page 8 of 16
OPERATION GUIDE
When plugged in the unit is automatically in standby status
POWER KEY Press Press this button to turn the unit on and enter cooling mode.
Press again and the unit will switch off.
FUNCTION Press this key to choose Air Conditioner, Dehumidifier, Humidifier or
Air Purifier Mode (with optional HEPA filters).
TEMP- and TEMP+ button: sets temperature in air conditioning mode.
Temperature can range from 17- 30℃. Those keys increment or decrement the
preset temperature by 1
℃
each time they are pressed within the 17- 30℃ range.
HUM- and HUM+ during dehumidifying & humidifying function:This key
increment or decrement the preset the preset humidity by 5% each time it is pressed
within 30- 90% range.
LCD DISPLAY
The display indicates the current setting temperature, humidity or the timer settings and
will be accompanied by temperature (
℃), humidity (%) or hours (H) signs.
When the set temperature or the timer is adjusted, the new setting is shown then the
display returns the current set temperature.
The display will also show function modes and fan speed informations.
※ The display is also used to show error codes should a fault occur, see ERROR CODES.
FAN SPEED HIGH→MEDIUM→LOW and AUTO
If "AUTO" is selected during cooling function the fan speed will automatically be
adjusted to HIGH, MEDIUM or LOW according to the difference between settings and
ambient temperature.
TIMER
Press the icon to select your desired operation time periods.
Use the TIMER button to turn on / off the unit after the set time is over.
You can only set the auto-shut off timer while the unit is operating (on)
You can only set the auto-start timer while the unit is in standby (off)
You can set the function and fan speed while setting the timer.
Pressing the POWER key before count down turns the unit on or off will clear the
settings
AIR CONDITIONER MODE
Select the air conditioner mode from function button.
Use TEMP- and TEMP+ keys to set temperature in air conditioning mode. Those
keys increment or decrement the preset temperature by 1℃ each time they are pressed
within the 17- 30℃ range. The AirCube is a fully climate control Air Conditioner. If
temperature in the room is higher than set temperature the micro-computer will start
the compressor, cooling down.
Also AUTO function can be set for easy operation.
You can use the air cube as personal / spot air cooler with cold air blowing through the
Page 9
Page 9 of 16
swinging louvres and hot air coming through the back. Please note that in this mode the
temperature in the room will not be reduced. You may use the air conditioner in an open
vented fireplace as heat will raise from the back of the unit while cooling through the front.
We recommend venting the air conditioner with the vent kit supplier through the wall or
through the window and using it in a room of appropriate size.
Note: When in air conditioning please make sure the rubber water stopper (14) is in place
to ensure maximum cooling and efficiency. Your AirCube is an advanced self-evaporative air
conditioner, which reduces the need to empty the water tank in cooling mode. If the unit is
vented correctly most of the water is reused to cool the condenser coils and any excess is
evaporated. Please do not use continuous drainage if you intend to use the self-evaporating
facility for improved cooling effect.
DEHUMIDIFIER MODE
Select the dehumidifier mode from function button. The AirCube dehumidifier contains an
intelligent micro-computer that will ensure humidity is measured exactly and is able to
maintain a constant humidity dehumidifying with minimum energy expense.
When ambient humidity is lower than set humidity by 2%, compressor will stop
automatically for 3.5 minutes saving energy. The micro-computer will measure the
humidity and restart the compressor only the ambient humidity is higher than set humidity
by 2%.
HUMIDITY SETTINGS (HUM-, HUM+)
CO(continuous)→30%→35%→40%→45%→50%→55%→60%→65%→70%→75%→80%→8
5%→90%→CO
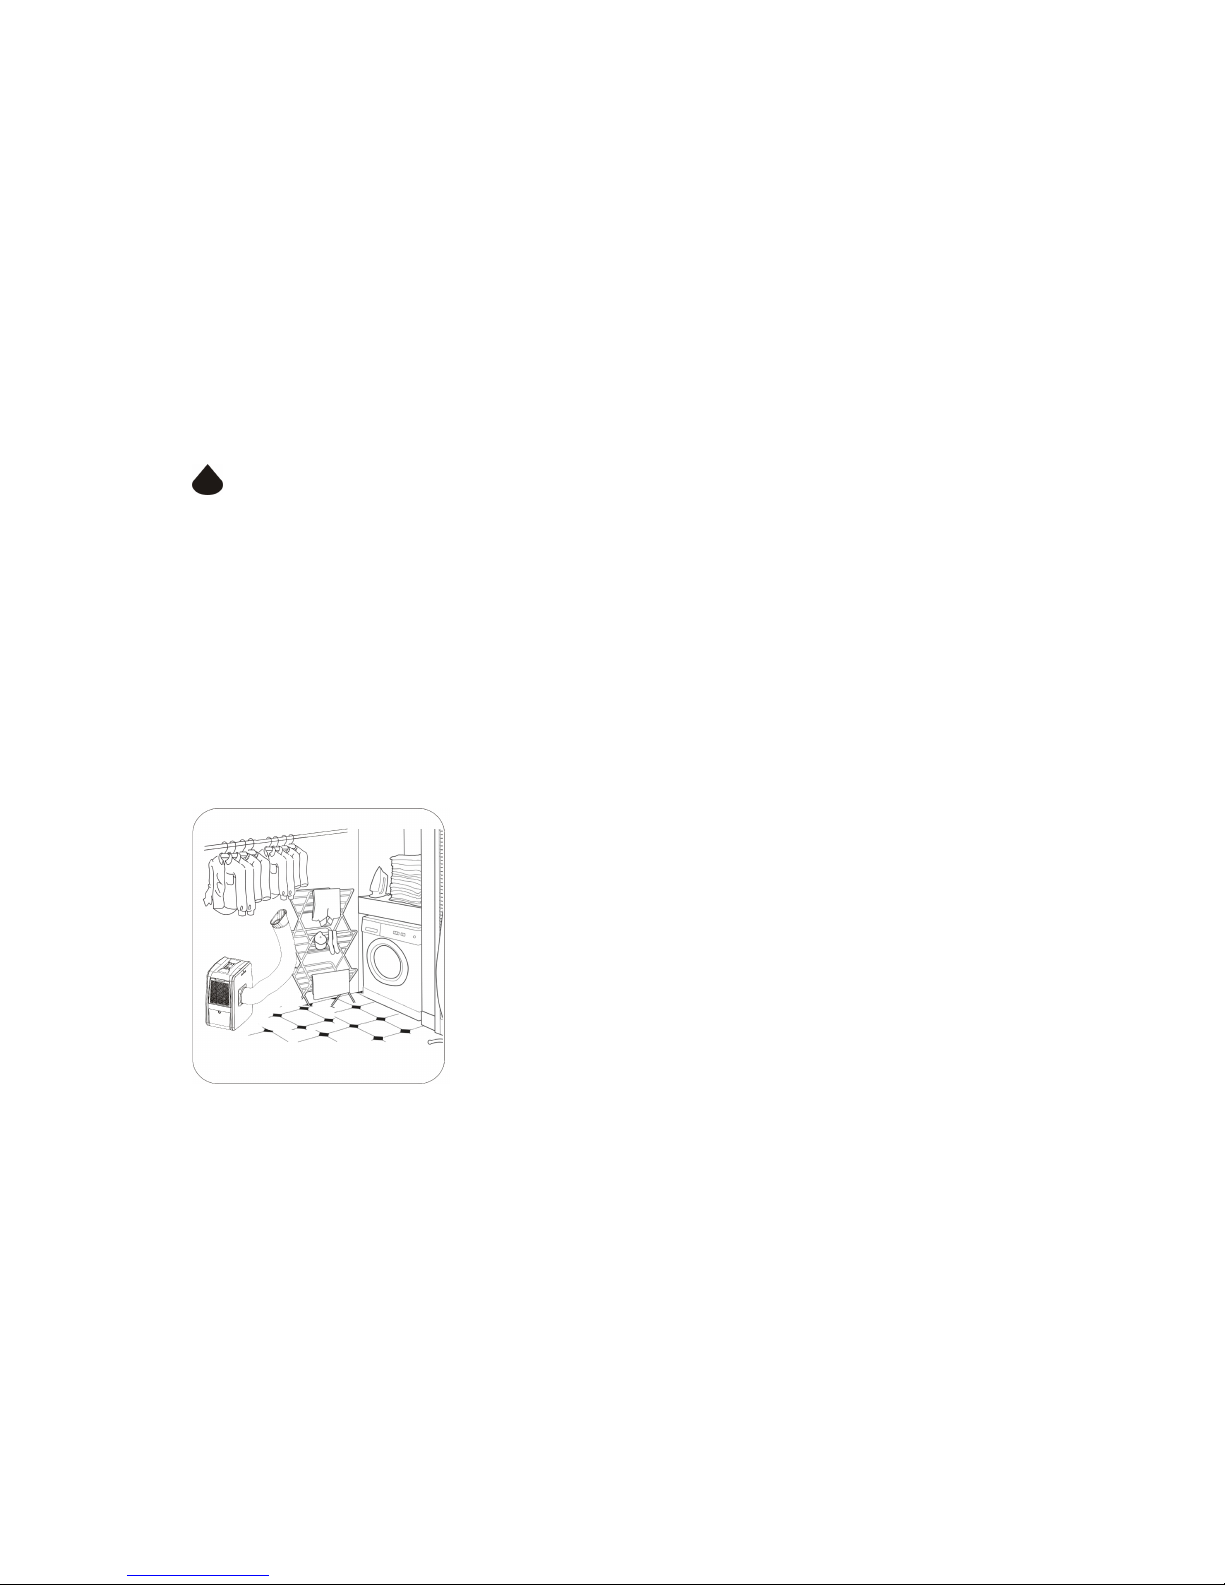
Laundry mode: Set the humidistat to continuous mode or set
the range from 30%-50% and fan speed to maximum and
place within 1.5 meters from clothes / laundry dryer. Do not
place clothes directly over any of the AirCube’s vents.
You can also install the hot air exhaust hose and direct it to
the spot you want to rapidly dry (e.g. plaster, clothes, shoes,
etc.). Make sure that there is nothing blocking the hot air
exhaust air flow.
On tank full the dehumidifier will stop operating. Do not
remove the water tank before is full and the dehumidifier
stops operating. Once the tank is full wait for another 30 minutes before removing it as
water may still defrost into the tank. Do not move the unit once the tank is displaced and
ensure rubber stopper in place to prevent water leaks. To resume operation insert the tank
back and press power button.
Note: When in dehumidifier mode remove the rubber water stopper (14) from drain.
Water will go in to the water tank (15). Permanent drainage and water pump can be
attached to the unit for unattended use. Occasionally the DF may appear on the LCD. The
dehumidifier is in defrost mode and normal operation will resume as soon as the defrost
cycle finishes. The lower the room temperature the more defrosting will happen.
Page 10
Page 10 of 16
HUMIDIFIER MODE
Select the humidifier mode from function button. The AirCube is a powerful 5 litres per
day humidifier.
If your room is too dry or suffering from allergies, your AirCube will help maintaining the
exact humidity level you need.
The AirCube intelligent micro-computer will measure the exact humidity in the room and
only add enough moisture to achieve the set humidity.
Initially add approximately a liter of water via water filling port (13) behind the filter. Set
the humidity from HUM- / HUM+ keys.
Unit will stop after about 4 hours. You will need to add more water if necessary (approx.
0.8 litres). Any excess water will go in the main water tank (15).
Fan and the water spray motor will work but the compressor will be turned off in this
mode.
Note: When in humidifier mode make sure the rubber water stopper (14) is in place
otherwise unit will not humidify.
HUMIDITY SETTINGS (HUM-, HUM+)
CO(continuous)→30%→35%→40%→45%→50%→55%→60%→65%→70%→75%→80%→8
5%→90%→CO
AIR PURIFIER / FAN MODE
Select the Air Purifier mode from function button. Your AirCube is a dual HEPA air
purifier and will improve the indoor air quality.
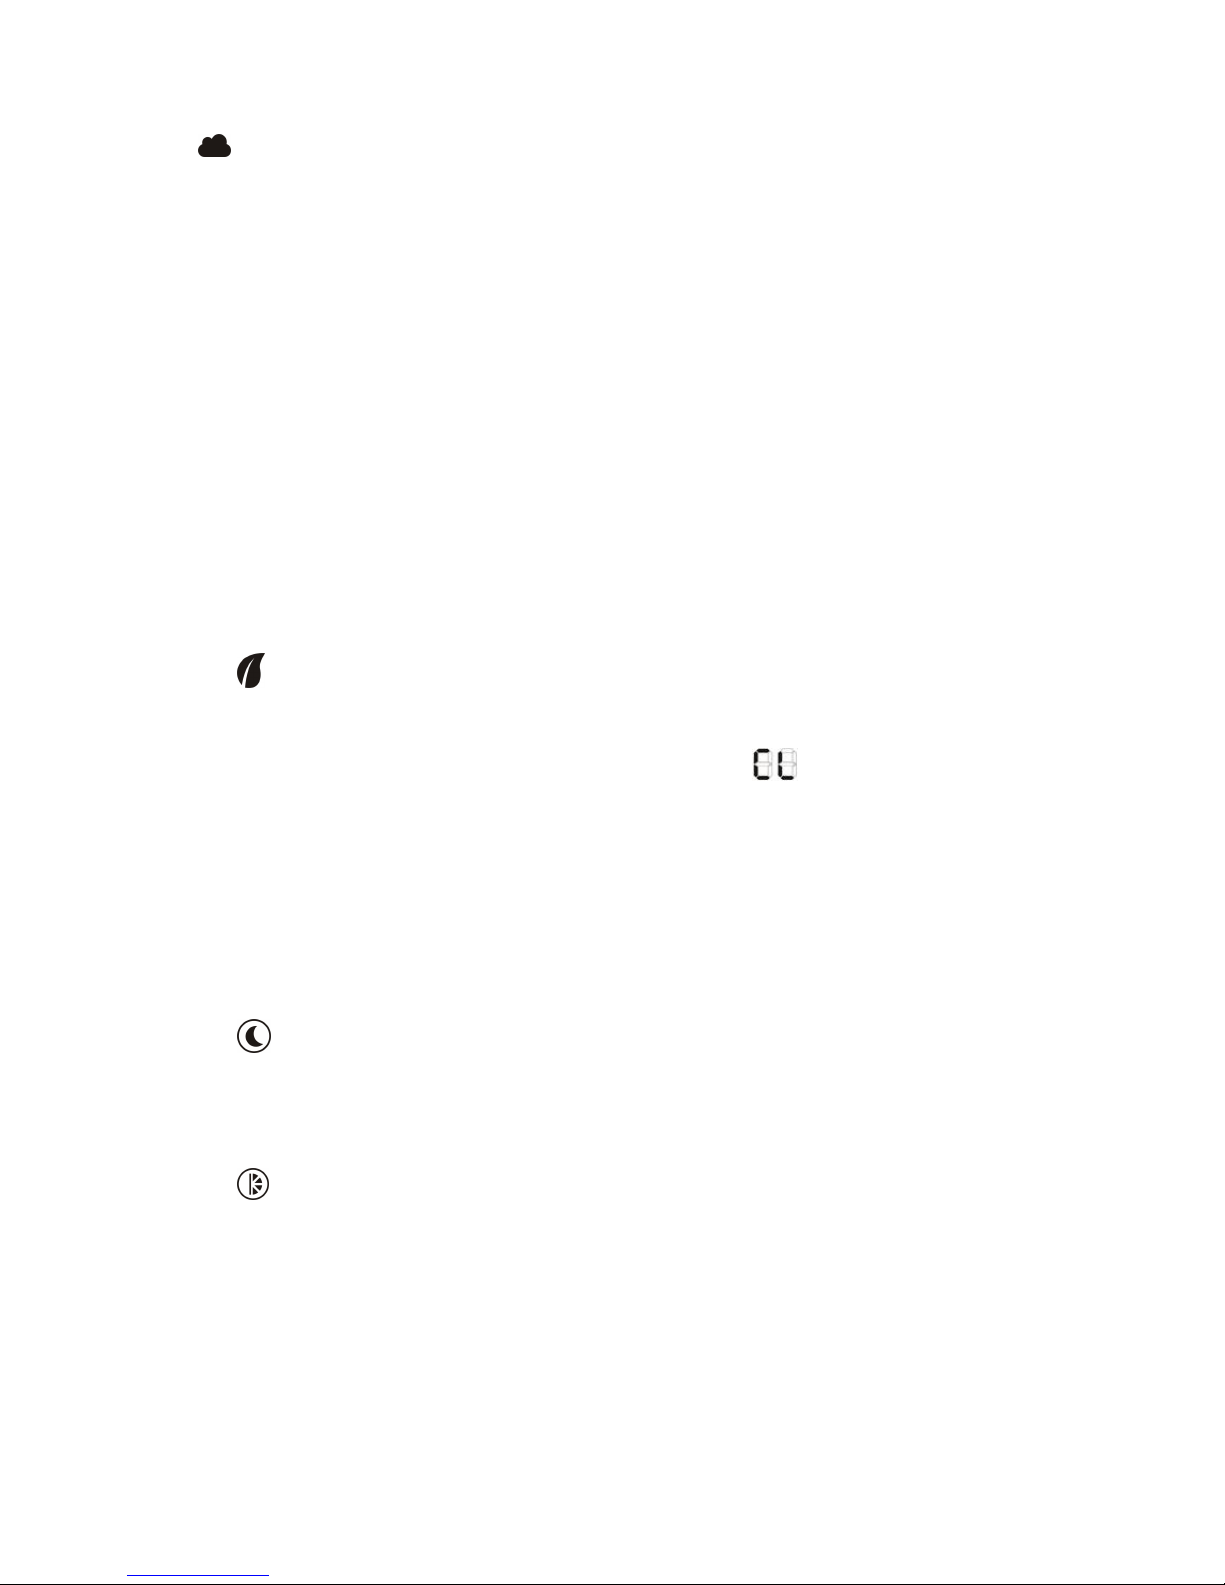
During normal air cleaning operation the LCD will show
symbol and only the fan
motor operates. If used without the optional HEPA filters the unit will operate in fan mode
only.
After 2000 hours of fan operation, the Alarm indicator will flash displaying E8 error.
Please change HEPA filters if necessary than press and hold SPEED button for 3
seconds to reset the filter change counter.
Note: For improved air flow and performance we recommend to remove the HEPA
filters in Air Conditioner and Dehumidifier mode. Vacuum clean every week the HEPA
filters and wash the mesh filters every 2-3 weeks to improve their life.
SLEEP MODE
Select SLEEP button to activate
While in cooling mode, press the SLEEP to enter SLEEP mode. It will increases the
setting with 1℃ after an hour and readjust to a 2℃ increase after 2 hours.
SWING
Press this key and the outlet will oscillating, and it will stop when this key is pressed
again. The outlet will close up automatically when the unit stops working.
Page 11
Page 11 of 16
ALARM When the water tank is full, E4 will be displayed on the LED panel. To resume
operation, please empty the tank if in Dehumidifier mode, or remove the rubber cap
from drain hose, wait for internal tank to empty than empty the main tank if in Air
Conditioner mode. The E4 warning will disappear after draining, and the unit can be
restarted by pressing the Power On key. E8 error / air filter change indicator can be
reset by pressing the FAN SPEED key on the control panel for 3 seconds.
CHILD LOCK
Press keys on the AirCube control panel at the same time for three seconds
and the unit will enter child lock mode; control panel and functions cannot be
operated until CHILD LOCK is disabled. To resume normal operation please press again
the same keys for 3 seconds.
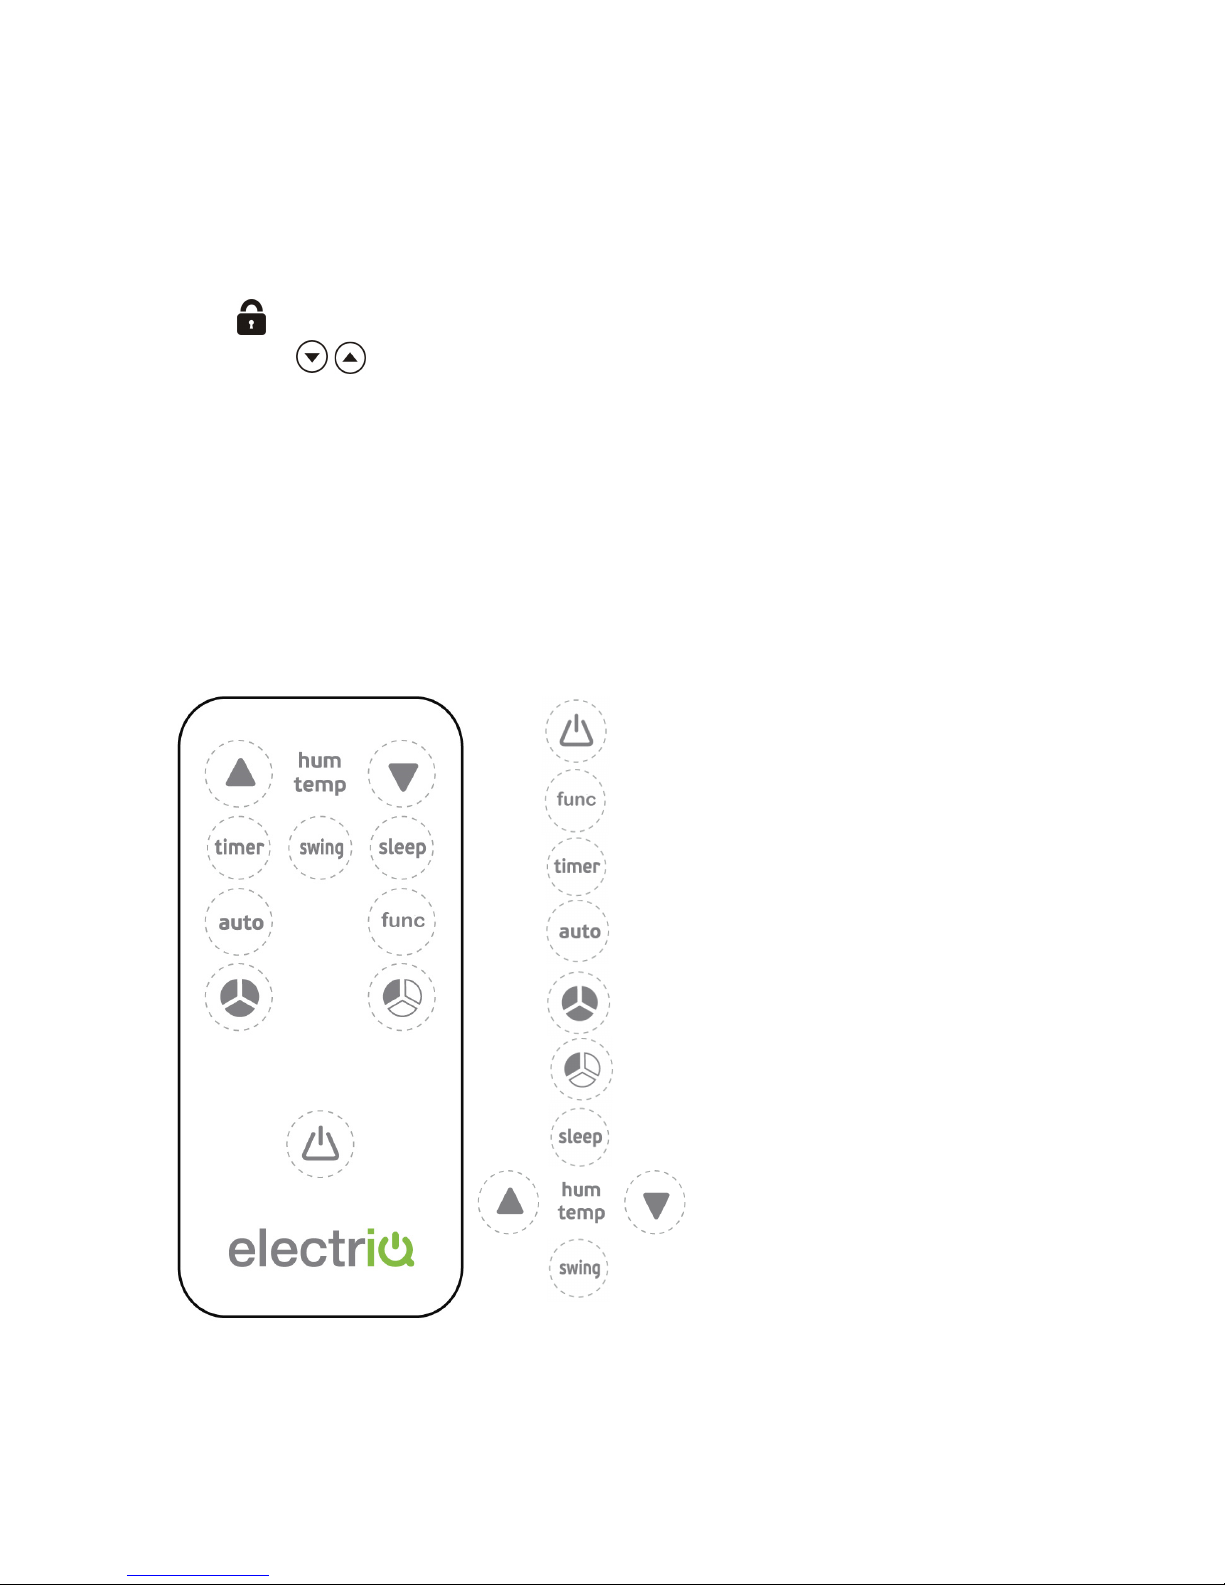
Remote control
On/Off
Function selection
Start/Stop timer
Auto operation
High fan speed
Low fan speed
Sleep mode
Temp/Humidity + / -
Swing mode
Page 12
Page 12 of 16
Multi protective function
1.1 Anti-freezing protecting control:
When the ambient temperature is low while in Air Conditioner or Dehumidifier mode, the
compressor and water pump will stop working if the copper coil temperature is too low. When
the copper coil temperature increases, the operation will resume.
1.2、Water-full protection:
When the water level in the internal / or external water tank is surpassing the maximum
level, the unit will alert automatically and E4 will be displayed on the LED screen. Please
discharge water in the machine according to “Water Drainage” section.
1.3 Compressor protection
Compressor has an overheating protection function and may stop to prevent compressor
damage. Also the compressor runs under a 3 minute delay protection function.
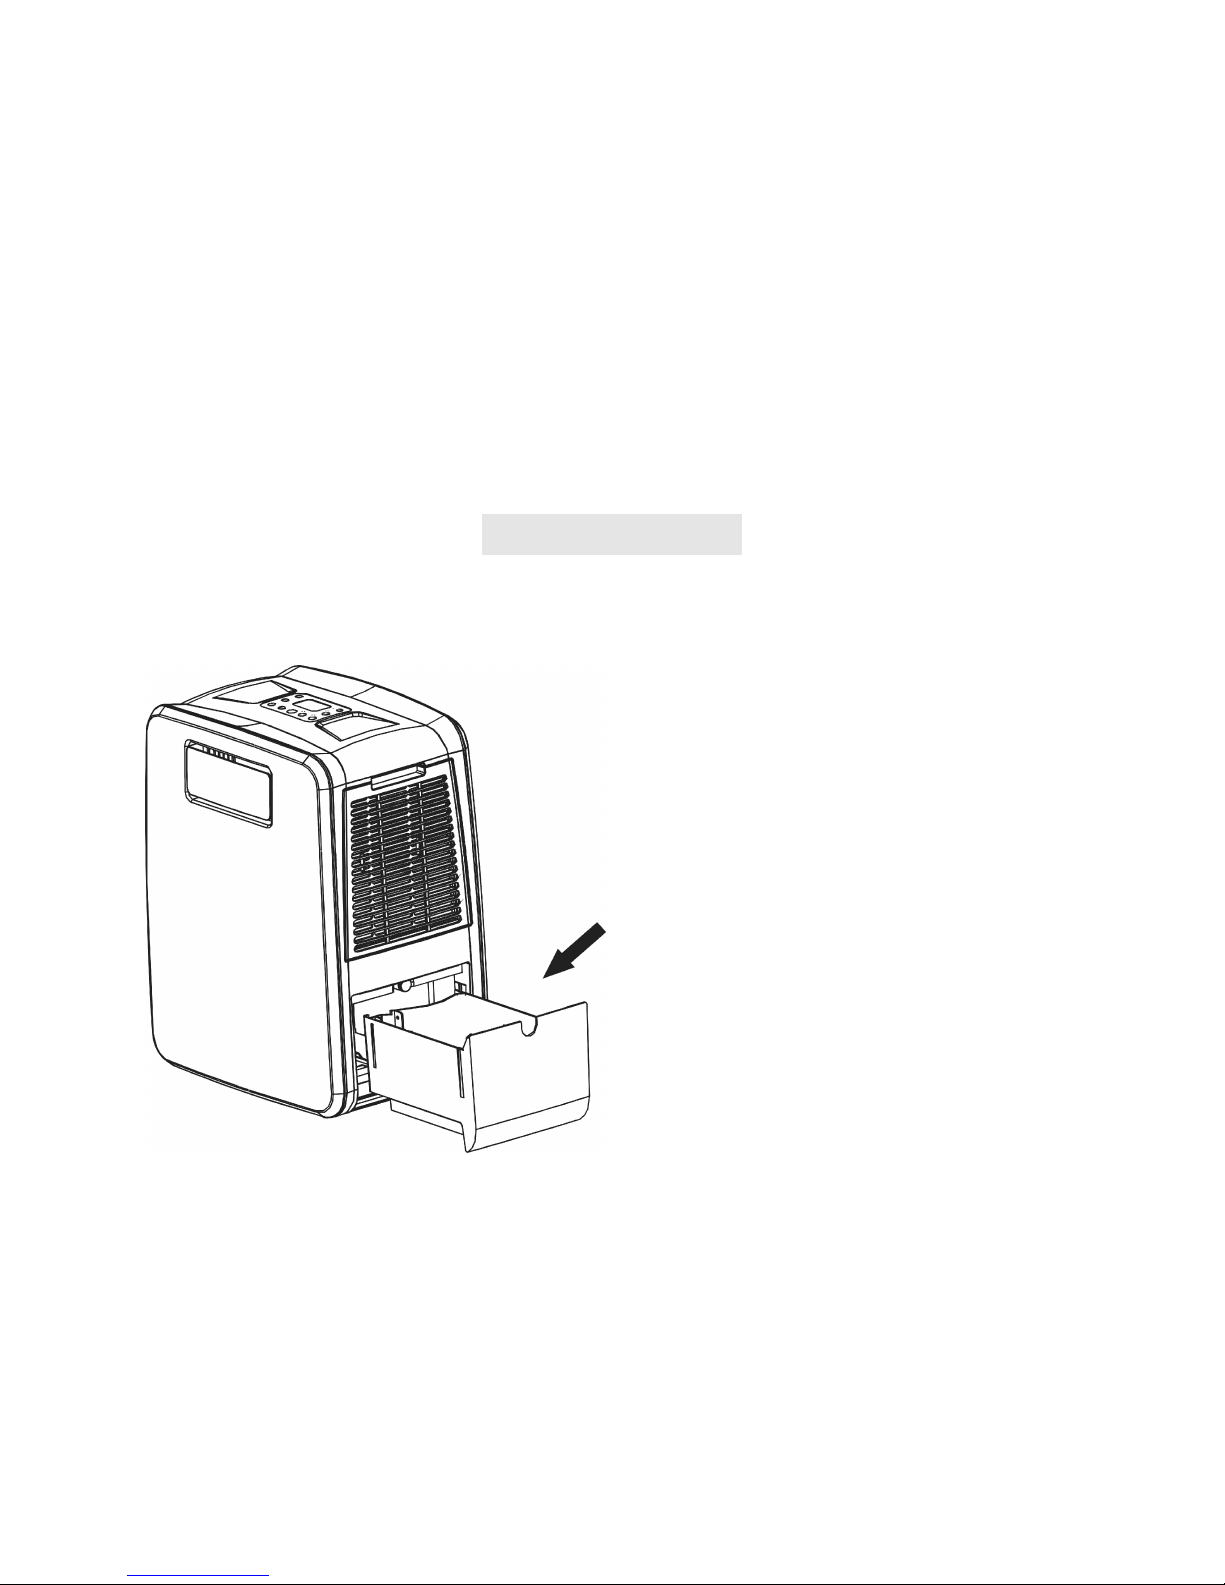
WATER-DRAINAGE
Your AirCube an advanced self-evaporative air conditioner, which reduces the need to empty the
water tank in cooling mode. If the unit is vented correctly most of the water is reused to cool the
condenser coils and any excess is evaporated.
Ensure the rubber water stopper is in place and
do not use continuous drainage if you intend to
use the self-evaporating facility for improved
cooling effect.
Manual drainage:
1.1 When either the internal or the external water tank is full the unit will stop working.
1.2 Shut off the unit and unplug. Remove the rubber water stopper and leave the internal
tank to drain in the external tank for at least 30 minute. Try not to move the
model abruptly as this may cause water to spill out from internal water tank.
1.3 Empty the external tank
1.4 Put the rubber water stopper back (or not if using next in dehumidifier mode).
Page 13

Page 13 of 16
Continuous drainage:
1.1 Remove the rubber water stopper (do not remove the water tank).
1.2 Use a water pipe to connect to the water outlet.
1.3 You can plumb this pipe into your current plumbing system, lead it outside or use it in
a conjunction with a water pump (e.g. cellar use).
1.4 This mode is recommended for dehumidifier mode continuous unattended operation.
Notes: When the unit is in the air conditioner mode, it is recommended not to have the water drain pipe
installed. Please make sure that the rubber water stopper is in place when the unit is running.
Please remove the air exhaust hose, connect a drain hose to the drain hole and lead the water to the outside
in order to intensify dehumidifying capacity.
※ When the water tanks are full,"E4" will be displayed on the display panel. Please remove the rubber water
stopper of the drain port to drain out the internal tank first than the external one. After the tanks are empty,
please restart the unit and then the unit can operate normally.
Maintenance
Cleaning
Please shut off the unit and unplug from the mains before cleaning or performing any
maintenance
Clean the surface
Clean the plastic housing with a duster or a soft wet cloth.
Do not use chemical solvents (such as benzene, alcohol or gasoline) as they may cause irreversible
damage.
Air filter cleaning
a) Clean the air filters at least every 2 weeks. If the air filters are blocked with dust, the unit’s
performance will be significantly affected.
b) Pull out both side mesh filters and gently wash them by immersing them in warm (about 40℃)
water with a neutral detergent.
c) Rinse it and then dry it thoroughly
d) Vacuum clean gently the optional HEPA filters. Never wash them.
e) Carefully re-install air filters
Page 14
Page 14 of 16
End of Season Maintenance:
1. Disconnect from main power.
2. Pull out the plug from the drainage hole and empty the internal tank. You can also drain
the water by leaning the unit toward the water tank.
3. Empty the external tank
4. Then plug back and switch the unit to low fan mode in air cleaning mode.
5. Keep the unit in this mode for half day - until the conduit is dried. Doing this helps to keep
the inside of the unit dry and prevents mold developing
6. Clean the filters as per filter cleaning procedure
7. Turn off the unit and pull out the plug.
8. Separate the air-exhausted pipe, fishtail and exhaust mount and store them safely as you
received them.
9. Cover the unit and keep it in a dry place.
10. Take the batteries out of remote control and store, or dispose, them safely
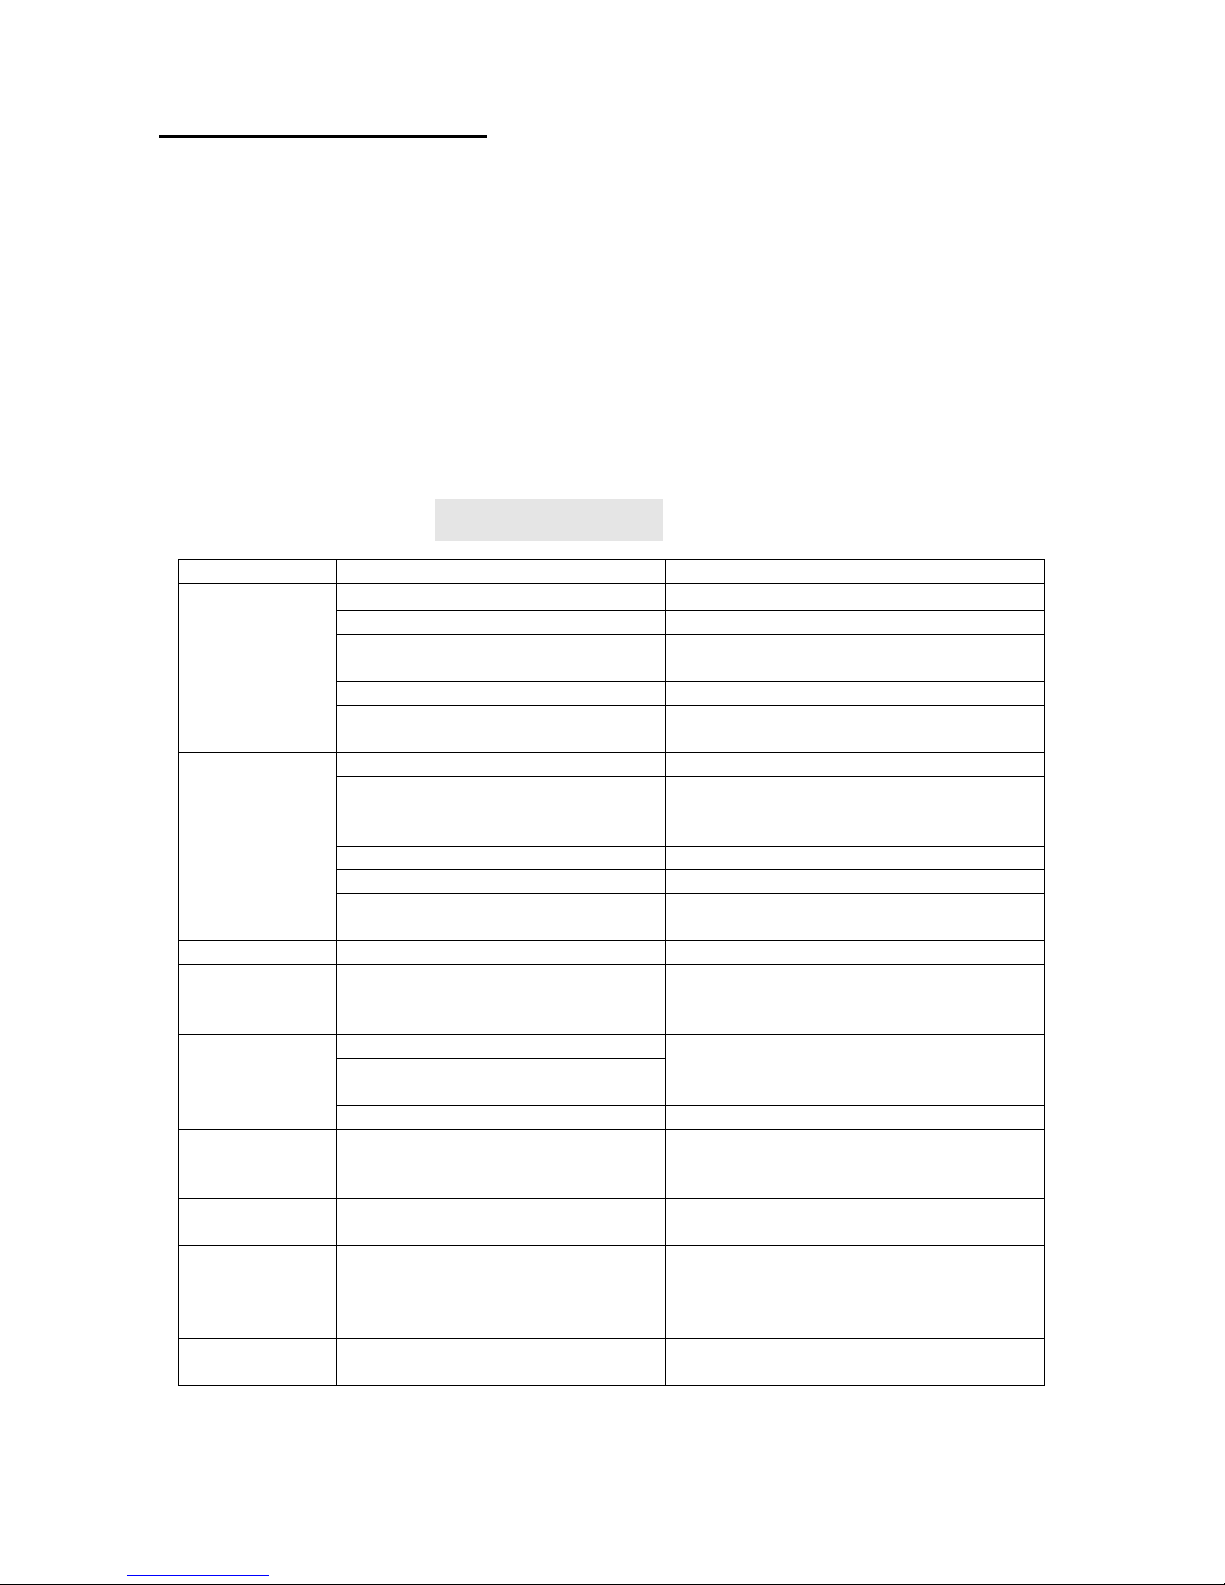
Troubleshooting
Do not repair or disassemble the unit by yourself, unauthorized repair attempts will invalidate the warranty and may cause bodily harm.
Trouble Reason Solution
The unit does not
work
No power supply Power-on and turn on the unit.
Water-full indicator (E4) Drain the internal / external water tanks
Filter change counter indicator (E8)
Change filters and / or reset the counter by
pressing fan speed key for 3 seconds
Timer function is active Cancel Timer function (press power on)
Room temperature too low or too high
Use only in ambient temperatures between
7-35℃
The unit does not
seem to perform.
In direct sunlight Draw the curtains, also UV affects RC
Windows or doors open.
Large amount of people or a heat
source in the room.
Close windows and turn on another air
conditioner
Filter is very dirty Clean or change the air filter
Air inlet or air outlet is blocked Clear out debris
Room temperature is lower than setting
temperature
Change the setting temperature
The unit loud The unit is not put on flat surface Put the unit on flat and hard surface
Compressor does
not work
Overheating protection is active
Check venting.
Restart the unit after 5 minutes when
compressor has cooled
Remote control
doesn’t work
Operating distance is too far.
Move remote control closer to the unit and
make sure it aims at temperature sensor
Control panel has not received the
signal from remote control.
The batteries is flat Replace the battery
E1 on LED Electrical short on both temperature
sensor and PCB
Refer to Service Centre
E2 on LED Electrical short on temperature sensor
copper tube and PCB wiring
Refer to Service Centre
E4 on LED
Indicates water tank full or poor contact
of signal plug.
If bottom tank was drained and unit restarted
refer to Service Centre (Check that the signal
plug has been wired correctly.)
DF on LED
Anti-freezing protection
Waiting for defrosting. Function will recover
automatically. No user input needed.
If the above solutions do not resolve the problem please contact the service centre.
Page 15
Page 15 of 16
APPENDIX
Disposal: Do not dispose this product as unsorted municipal waste. Collection of such
waste must be handled separately as special treatment is necessary.
Recycling facilities are now available for all customers at which you can deposit your old
electrical products. Customers will be able to take any old electrical equipment to participating
civic amenity sites run by their local councils. Please remember that this equipment will be further
handled during the recycling process, so please be considerate when depositing your equipment.
Please contact the local council for details of your local household waste recycling centres.
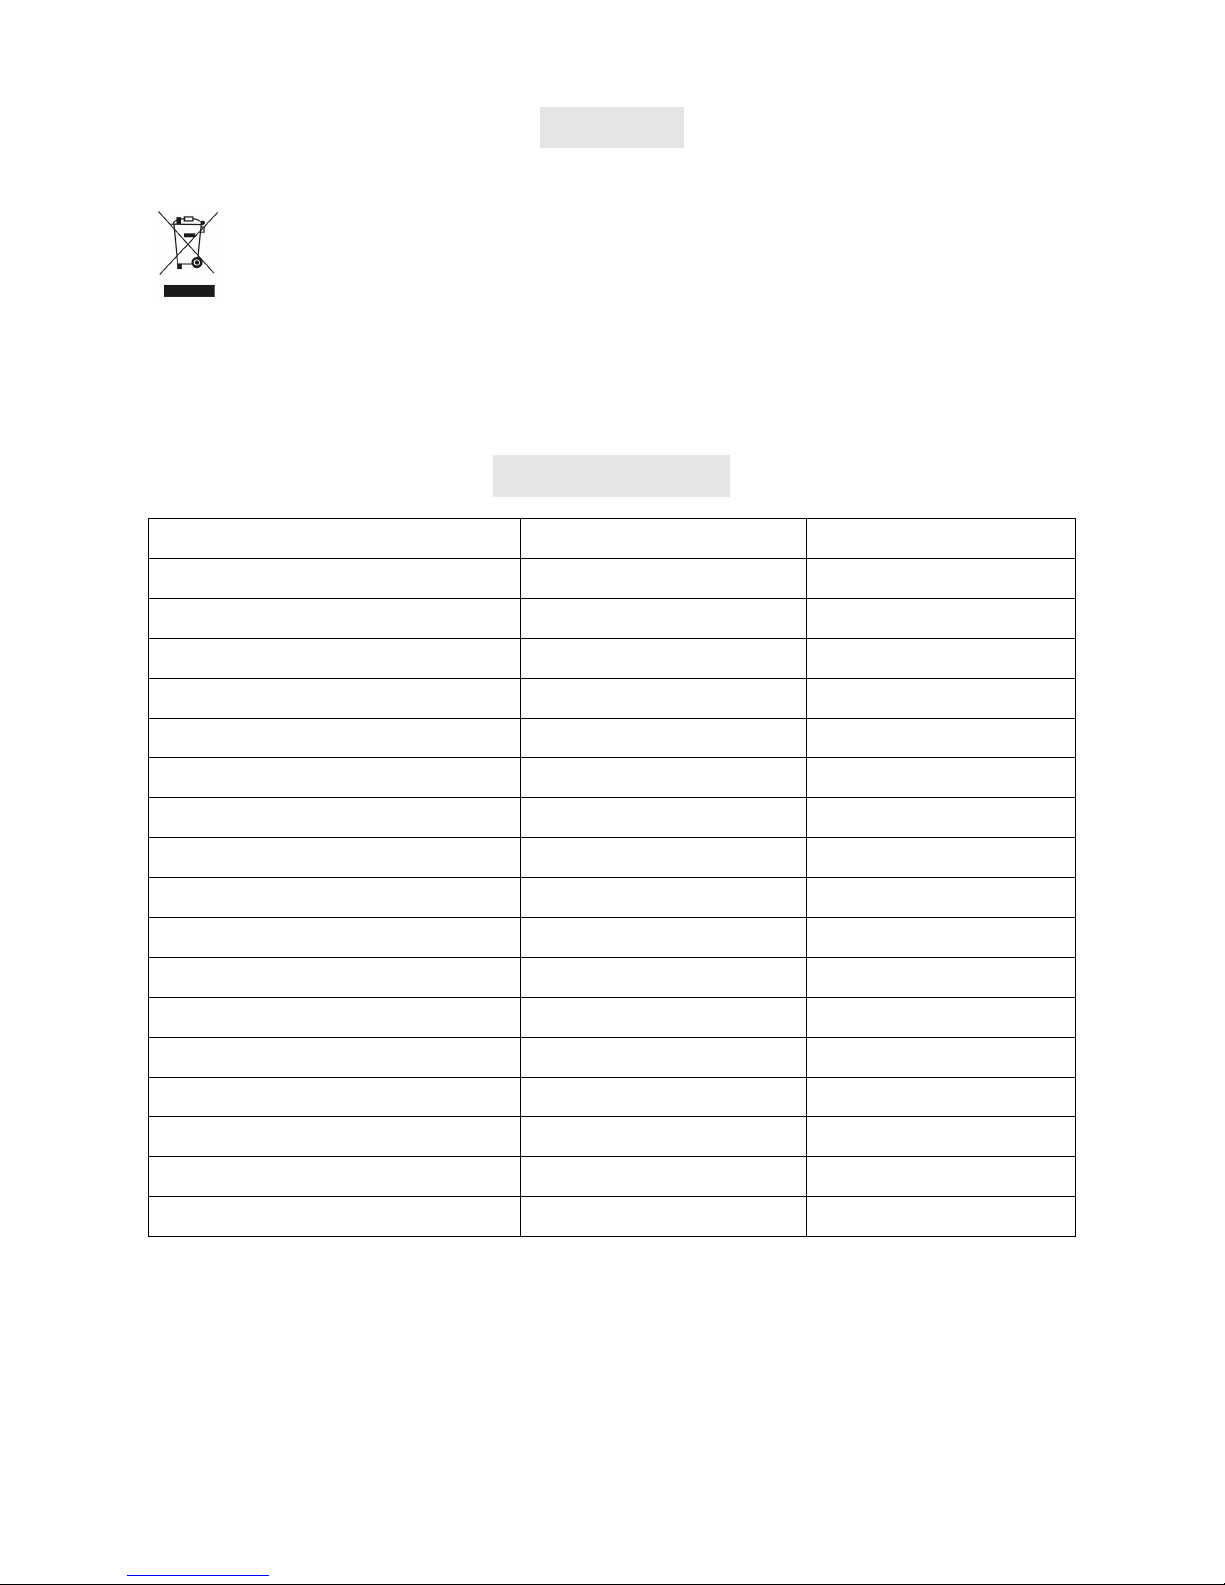
TECHNICAL DATA
(CE) N 842/2006: R410A/R134a is a type fluorinated greenhouse gases covered by the Kyoto Protocol.
R410A’s total global warming potential (GWP) is 1975, and R134a’s total global warming potential (GWP) is 1300.
MODEL AIRCUBE® AIRCUBE® MAX
Cooling Capacity 0.9 kW 1.1 kW
Moisture Removal 25l/day (at 30⁰C/ 80%sRH) 30l/day (at 30⁰C/ 80%sRH)
Humidifying Capacity 0.2 litres/ hour 0.2 litres/ hour
Rated Input (EN 60335) Cooling: 360 W Cooling: 610 W
Rated Dehumidifier power 360 W 610 W
Rated Humidifier power 60 W 60 W
Running Current Cooling: 1.6 A Cooling: 2.8 A
Max Noise Level (Sound Pressure) 56 dB(A) 56 dB(A)
Noise Level (Sound Energy) 46 dB(A) 46 dB(A)
Air Flow 150m3/hr 150 m3/hr
Maximum Allowable Pressure 5.5 Mpa 2.5 Mpa
Power Supply 220-240V/50Hz 220-240V/50Hz
Fuse 250VAC 2A 250VAC 2A
REFRIGERANT R410A, 185 g R134A, 210 g
Net Weight 15.5 kgs 17.4 kgs
Dimension(mm) 285Wx 375Dx 500H 285Wx 375Dx 500H
Water tank capacity 2.6 litres 2.6 litres
Page 16

Page 16 of 16
ElectrIQ UK SUPPORT
www.ElectrIQ.co.uk/support
Please, for your own convenience, read the troubleshooting
guide before calling the service line.
If the unit still fails to operate call: 0871 620 1057 or complete
the online form
Also check:
1. Has the unit been standing upright for at least 2 hours?
2. Is the unit plugged into the mains?
3. Is the fuse OK?
4. Switch the unit off and wait three minutes to see if the issue
is resolved. Restart the unit.
5. Check if the water tank is full.
Office hours: 9AM - 5PM Monday to Friday
www.ElectrIQ.co.uk
Unit 2, The Nursery
Berristow Lane
South Normanton
Derbyshire, DE55 2FX
 Loading...