

Page 1
500CAM
500GCAM
1080P Full HD
Micro SD
GPS Logger & Speed Camera Detector (500GCAM Only)
User Manual
Page 2

2 of 14
CONTENTS
Quick Start Guide………………………………………………………………3
Product Overview………………………………………………………………3
Button Functions……………………………………………………………….4
LED Status Lights……………………………………………………………….5
Operation.…………………………………………………………………………6
Menu Settings……………………………………………………………………8
Connection………………………………………………………………………12
DVR Player………………………………………………………………………13
Product Specifications……………………………………………………..13
Appendix…………………………………………………………………………14
Page 3
3 of 14
QUICK START GUIDE
Connect the camera to the camera mount by sliding the two parts together until they click
into place. Mount the camera in the desired location in the vehicle. Connect the power
supply cable to a 12V outlet in your vehicle and to the camera mount USB port. The camera
will power on and start recording video automatically. To stop video recording press the OK
button. To restart recording, press the OK button.
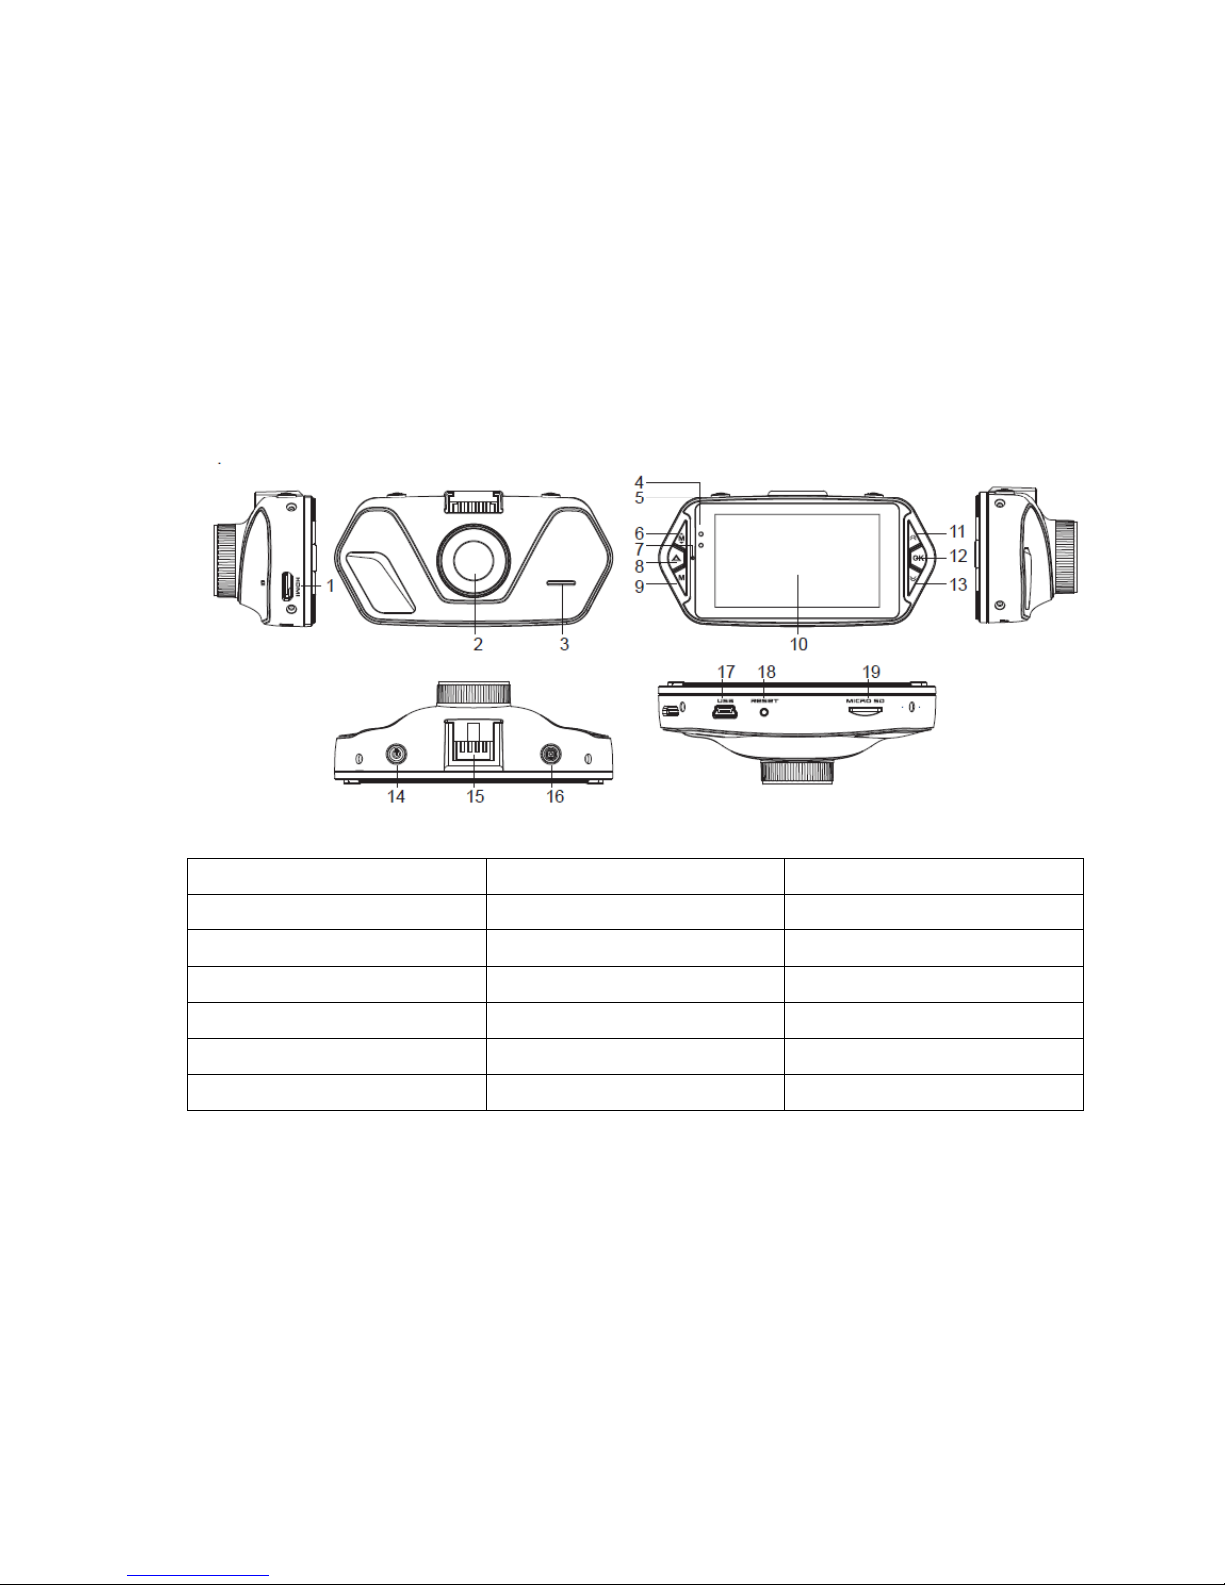
PRODUCT OVERVIEW
1. HDMI Port
2. Lens
3. Speaker
4. Status Light (blue)
5. Charging light (red)
6. Menu Button
7. Microphone
8. File Protection Button
9. Mode Button
10. LCD Display
11. Up Button
12. OK Button
13. Down Button
14. Power Button
15. Holder Connector
16. Camera Button
17. USB Port
18. Reset Button
19. Micro SD Card Slot
Page 4
4 of 14
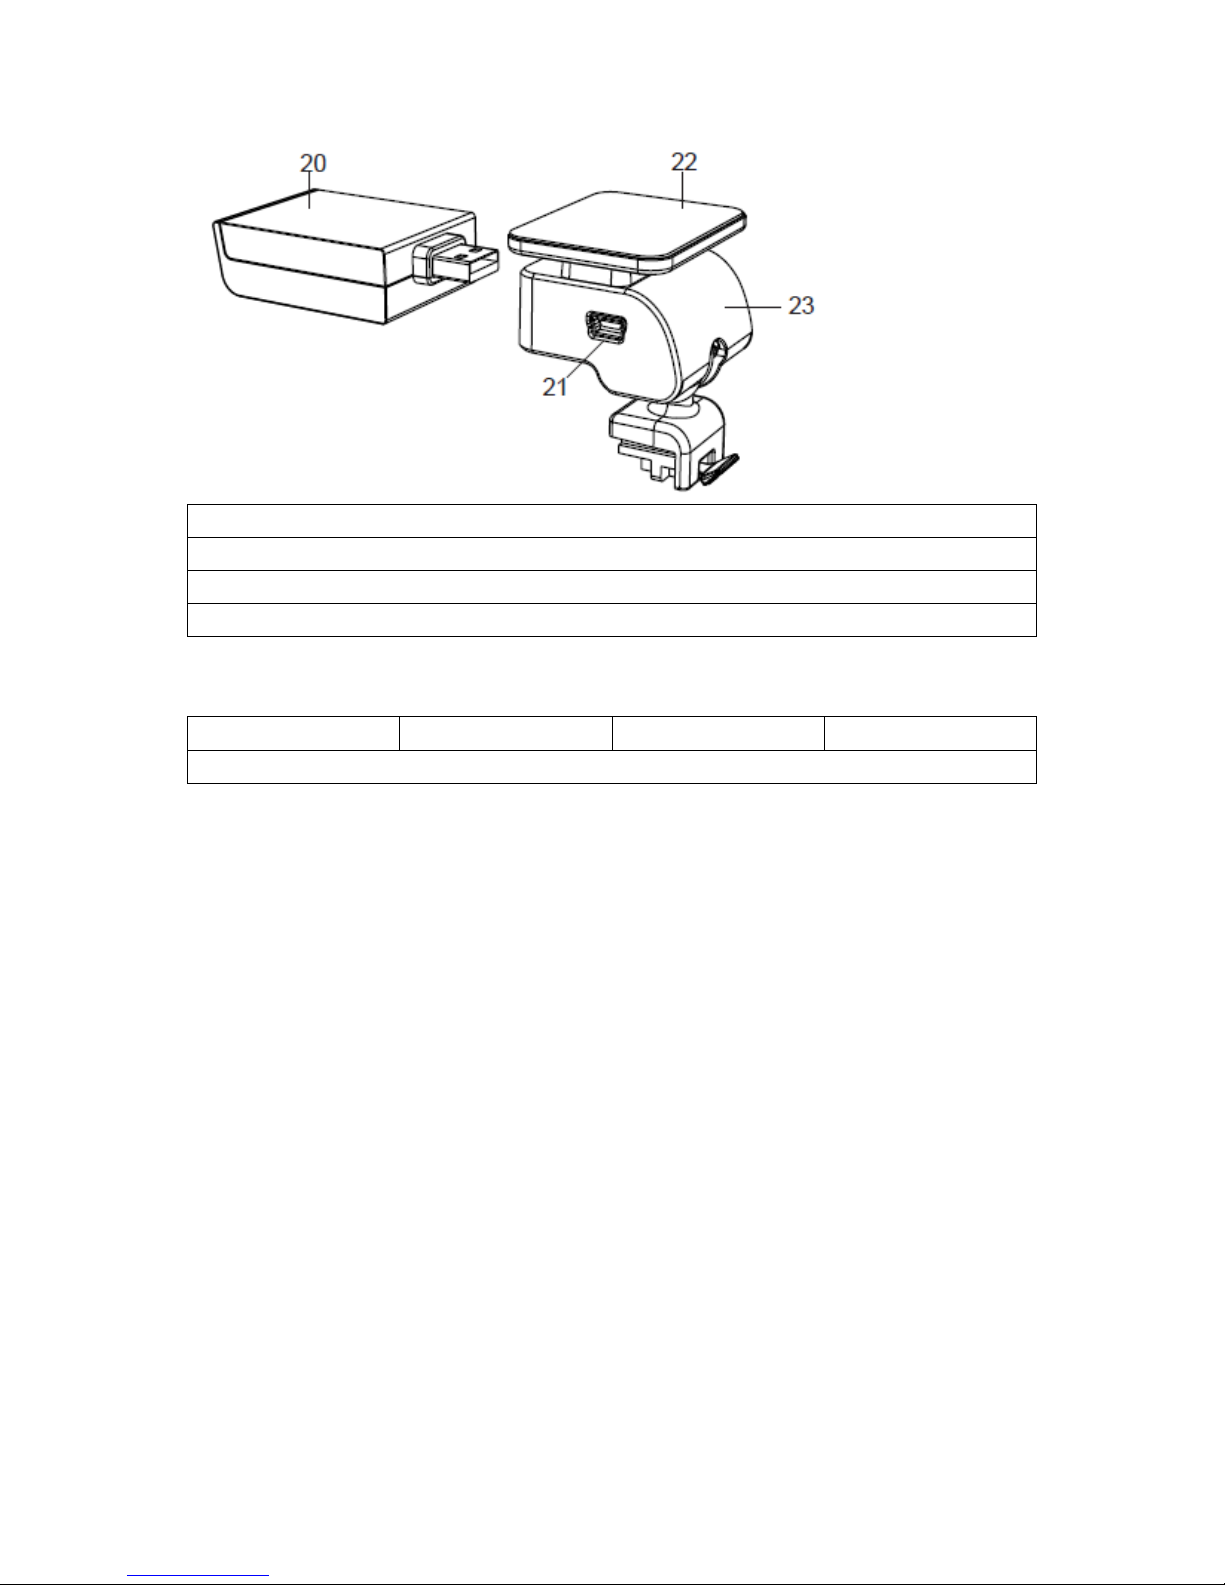
20. GPS/ Radar Detector Module
21. USB Port
22. Sticker/Suction Mount attachment
23. Camera Holder
Accessories:
Car Charger x1
Sticker x1
Suction cup x1
USB cable x1
GPS Module x1 (500GCAM only)
BUTTON FUNCTIONS
Power Button – Press this button for 2-3 seconds to turn on/off the device.
Power will only come on if the camera is connected to a power source.
Camera Button – In video mode, pressing the camera button will capture a still
image.
Reset Button – Should the system crash for any reason, press the reset button
to reset the device.
Menu Button – Pressing the menu button will access all the menus for the
camera. If this is pressed whilst the camera is recording nothing will happen.
Stop the recording to access the menus.
File Protection Button – In video mode, when the device is recording, press
this button to set the video recording to be protected manually. This will stop
it from being overwritten by loop recording.
Page 5
5 of 14
In playback mode, press this button to lock or unlock the video/picture file.
When file protection is active, the will appear on the LCD display.
Mode Button – The camera only has 2 modes, video and playback mode.
Pressing this button during standby will switch between playback and video
mode. If this is pressed whilst the camera is recording nothing will happen.
Up Button – In video and standby mode, pressing this button will turn on/off
the LCD display.
In the menu screen pressing this button will navigate upwards
In playback mode pressing this button will choose the previous file.
When playing a video in playback mode pressing this button will rewind the
video
OK Button – In video mode pressing this button will start/stop video recording.
In playback mode pressing this button will play/pause a video file.
In menu pressing this button will confirm the selection.
Down Button – In vide mode pressing this button will turn on/off the sound
recording function.
In menu pressing this button will navigate downwards.
In playback mode pressing this button will chose the next file.
When playing a video in playback mode pressing this button will fast forwards
the video.
LED STATUS LIGHTS
LED Light
Status
Meaning
Status Light (Blue)
Flashing
Video is recording
On
Camera is in standby or playback mode
Off
Device is off
Charging Light (Red)
On
Battery charging
Off
Charging complete
Page 6
6 of 14
OPERATION
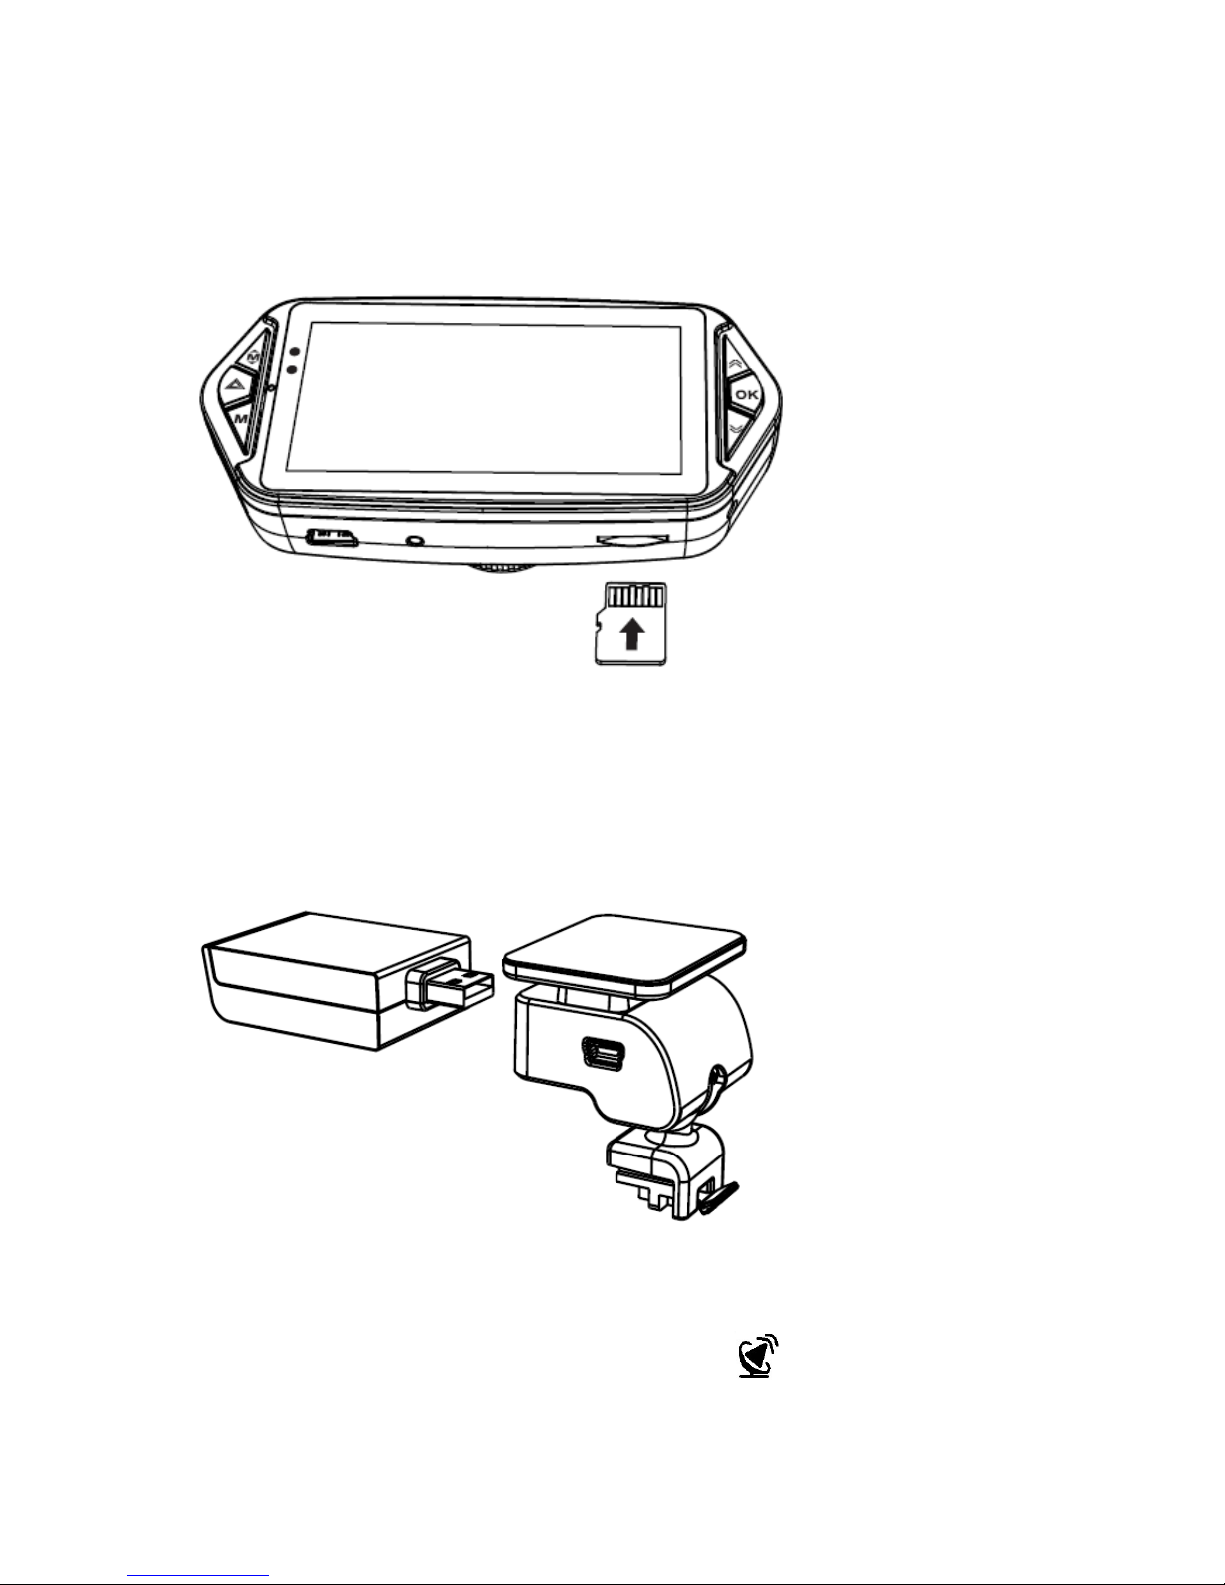
Micro SD Card Installation
Install the Micro SD card as shown below:
GPS Module Installation (500GCAM only)
Insert the GPS module into the camera holder as shown below:
Install the device on the windscreen using the sticker or sucker.
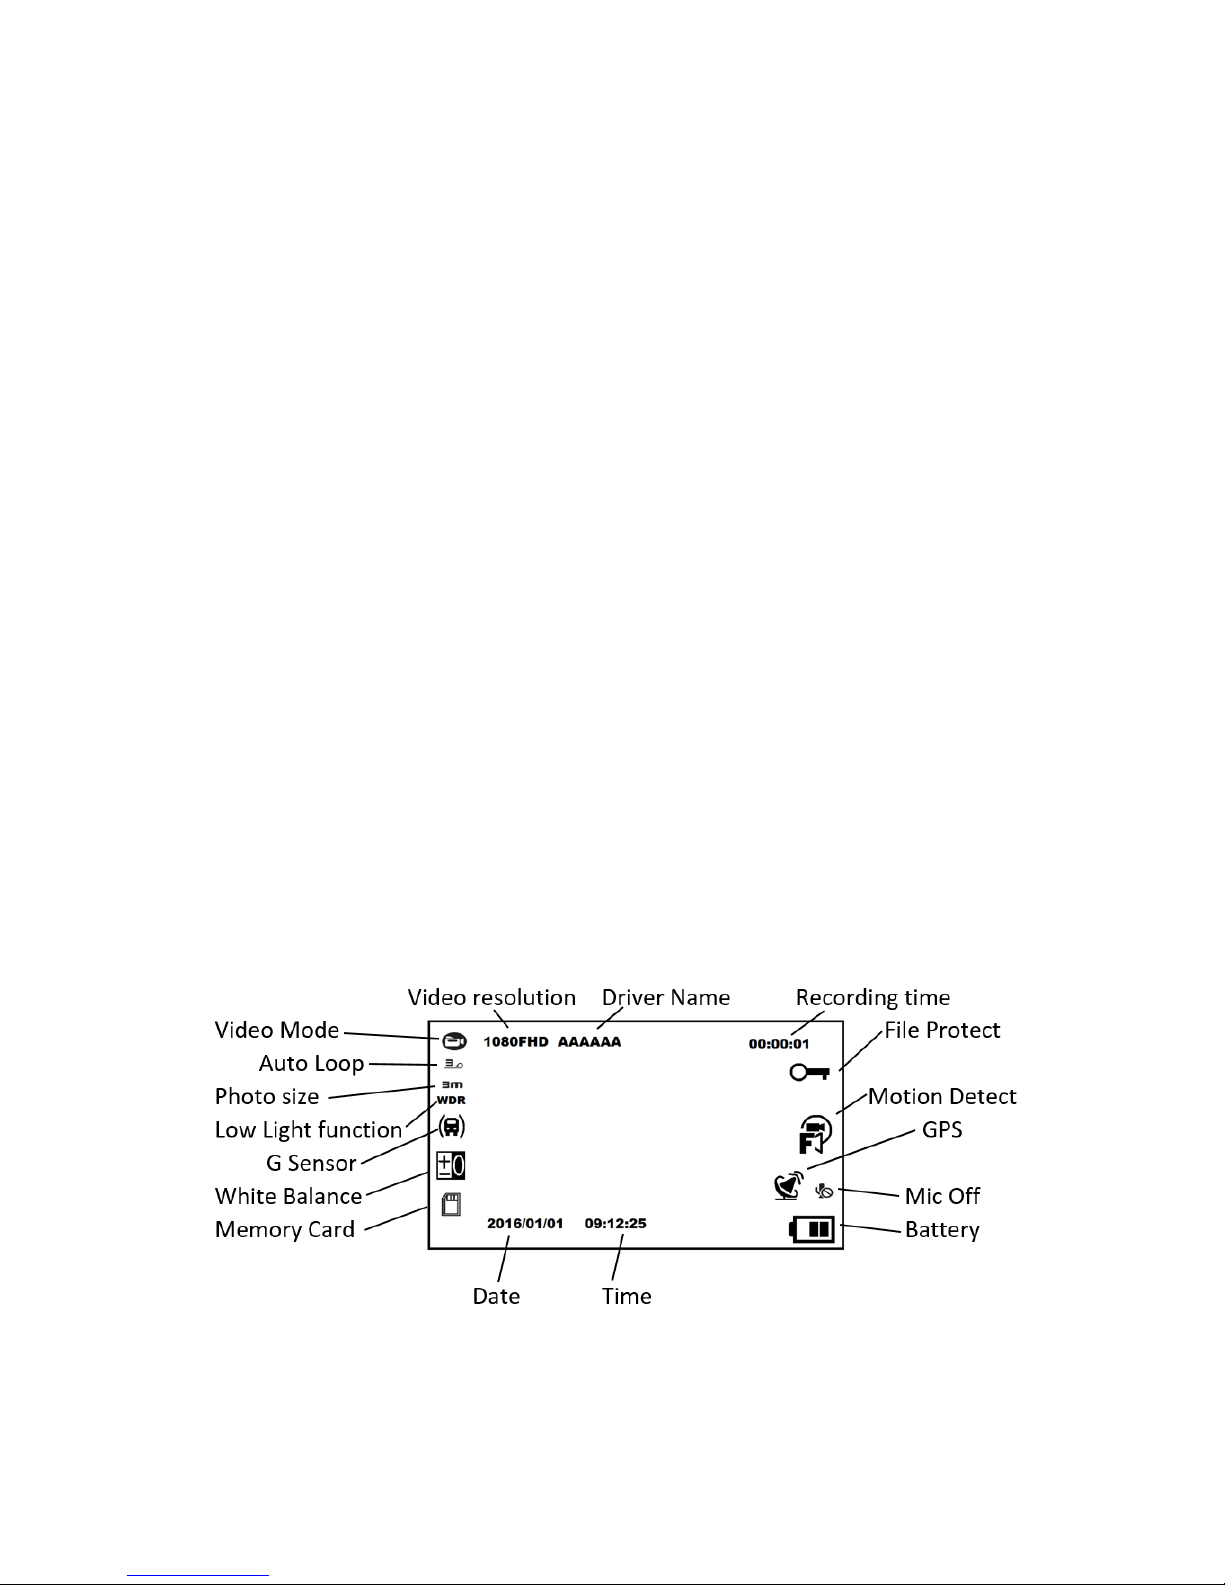
When the power is on, the device will automatically search and find GPS signal
where available.
When the unit has found a GPS signal the GPS icon will be shown on the
camera display.
Page 7
7 of 14
Power Connection
Connect the USB charger to the USB port (21) on the camera holder. Connect
the other end to the 12V outlet (e.g. cigarette lighter) in your vehicle. The
camera will power on automatically once the 12V outlet is turned on.
Note: There are 2 Mini USB ports on the device. One on the camera holder
and one on the camera. If you connect the power to the one on the device,
only the device will be powered. If you connect the power to the one on the
camera holder, both the camera and GPS module will be powered.
G-Sensor Function
In the event of a collision the Gravity Sensor (G Sensor) will record the
direction and data associated with that collision. The sensitivity of the G
Sensor can be set to activate the protection function for the current video file.
This will stop the file being over written in the event of a collision. The
sensitivity can be altered in the settings menu, the higher the value the more
sensitive the G Sensor will be.
Video Mode
When the device is powered on it will default to recording mode and the
screen will display as below:
The video mode icon will be a blinking red dot to indicate that the camera is
recording.
Page 8

8 of 14
Still Picture
To capture a still picture, press the Camera Button (14). In video mode this will
take a picture of the current view from the camera. In playback mode this will
take a snapshot of the current frame on the video.
MENU SETTINGS
Pressing the Menu button (6) once will bring up the Video Mode Menu.
Navigate the menu by pressing the Up (11) & Down (13) buttons. Make a
selection by pressing the OK (12) button.
The following settings can be selected and changed:
Item
Options
Remark
Resolution
1080FHD 1920x1080
720P 1280x720
WVGA 848X480
VGA 640X480
The higher the
resolution the better
quality the video but
the recording time on
your Micro SD card will
be reduced.
Loop Recording
Off
2 Minutes
3 Minutes
5 Minutes
The length of a file
created before it is
recorded over.
Picture Resolution
12M 4032x3024
8M 3264x2448
5M 2592x1944
3M 2048X1536
2M 1920X1080
The higher the
resolution the better
quality the picture will
be but it will use up
more space on your
Micro SD card.
Exposure
+2.0
+5/3
+4/3
+1.0
+2/3
+1/3
+0.0
-1/3
-2/3
-1.0
-4.3
-5/3
The higher the exposure
the brighter the image
will be, the lower it is
the darker it will be.
Start at +0.0 and adjust
as required to the
conditions you are
recording in.
Page 9
9 of 14
-2.0
White Balance
Auto
Daylight
Cloudy
Tungsten
Fluorescent
Under normal
conditions Auto will
adjust the white
balance accordingly. If
you need to alter this,
select the relevant
option to your
conditions.
WDR
Off
On
Turn this on for low
light use.
Motion Detection
Off
Low
Medium
High
The higher the setting
the more sensitive the
motion detection will
be.
G Sensor Set
Off
Low
Medium
High
The higher the setting
the more sensitive the
G Sensor will be.
Record Audio
Off
On
Turn on or off the built
in microphone.
Date Stamp
Off
On
Turn on or off the date
stamp on videos/images
Plate Number on Movie
AAAAAA – 999999
Press the up or down
arrow to navigate
alphabet and numbers.
Press OK to select
character and move to
next.
Car Plate Stamp
Off
On
Turn on or off the Plate
Number stamp on
videos.
Image rotation
Off
On
Rotate the image
display if the camera is
to be used upside
down.
Page 10

10 of 14
Pressing the Menu button (6) again will bring up the Setup Menu.
Navigate the menu by pressing the Up (11) & Down (13) buttons. Make a
selection by pressing the OK (12) button.
The following settings can be selected and changed:
Item
Options
Remark
Date/Time
2016/01/01
09:25:26
YY/MM/DD
Press the up or down
arrow to navigate
numbers. Press OK to
select and move to
next. Change date
format as required.
Press Menu button to
return to menu.
Power On Delay
Off
10 Seconds
20 Seconds
30 Seconds
Delay the point that the
camera turns on once it
receives power.
Power Off Delay
Off
10 Seconds
20 Seconds
30 seconds
Delay the point that the
camera turns off once it
stops receiving power.
Auto Power Off
Off
1 Minute
3 Minutes
5 Minutes
When the camera isn’t
recording it will turn
itself off after the
selected time period.
Beep Sound
Off
On
Turn on or off the beeps
when keys are pressed.
Screen Savers
Off Screen: 1Min
Off Screen: 3Min
Off Screen: 5Min
Off
Select the time point
that the screen powers
off whilst the camera is
running.
Keyboard Backlight
Auto
Off
On
Select whether the
buttons are illuminated
or not. Auto will
illuminate in low light
and turn off in daylight.
Page 11

11 of 14
TV Mode
NTSC
PAL
Select for region. UK
generally uses PAL.
Frequency
50Hz
60Hz
Choose the camera
frequency best suited to
your region. 50Hz will
generally work best for
UK.
Language
English
Français
Español
Português
Deutsch
Italiano
Čeština
Polski
Mandarin
Cantonese
Russian
Japanese
Select your desired
language.
Format
Cancel
OK
Selecting OK will format
the memory card and all
recordings will be lost.
Select cancel to avoid
formatting.
Default Setting
Cancel
OK
Selecting OK will return
the camera to its
default settings. Select
cancel to avoid
resetting.
Version
CR500S_V1.5_20150720
Displays the software
version currently
installed.
Press the Menu button again to return to Video Mode.
Page 12

12 of 14
CONNECTION
Connect to TV
The device can connect to any screen with an HDMI connection.
1. Insert the Micro SD card to the device
2. Connect HDMI cable to the video playback equipment (TV or monitor)
and device.
3. Power on the device.
4. Select the HDMI input on the video equipment.
5. Select the videos/photos to display from the playback menu.
Note: When you connect the camera to a TV or monitor, its LCD screen will
automatically shut off.
Connect to Computer
1. Insert Micro SD card to the device
2. Connect USB cable to device and computer. “USB connection” will be
shown on screen and removable disk will be shown on computer
3. Open the removable disk and pictures and video files will be present.
Page 13
13 of 14
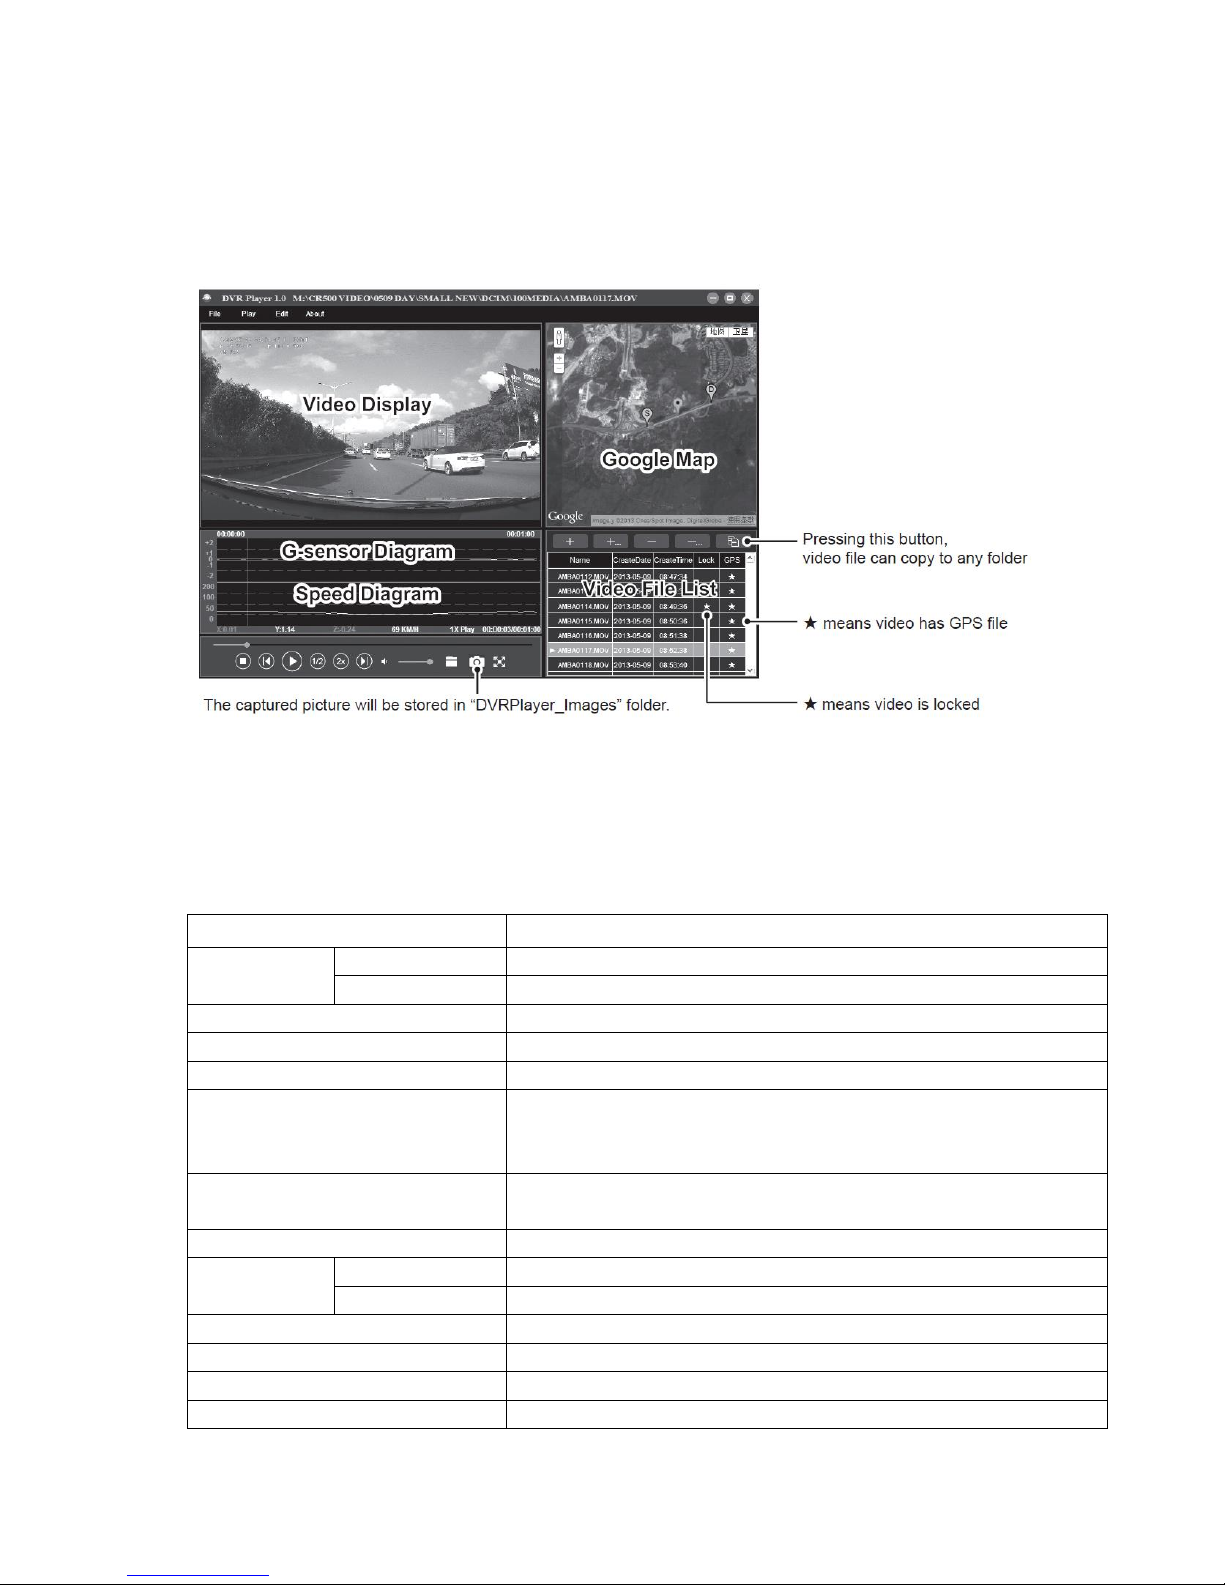
DVR PLAYER
When you open the Micro SD card on your computer the DVR player will be
installed on it. The DVR player will be displayed s below:
Note: Before using the player, please install Apple QuickTime, Microsoft
DirectX 9.0C and IE7.0 or higher.
PRODUCT SPECIFICATION
Chipset
Ambarella A2S60
Camera
Resolution
2 Mega CMOS Sensor, OV2710, good night vision performance
View Angle
135o in 1080P for 17mm lens, 110o in 1080P for 14mm lens
Audio
Built-in Microphone
Still Image
2560x1440, 2304x1296, 1920x1080, 1280x720
LCD
2.7 inch LCD Display
GPS Logger (500GCAM only)
Modulization GPS Logger
GPS Logger for path, position, speed and time record.
Replay path, position information on Google Map
G-Sensor
When encountering high impact, the device will automatically
protect the latest files so they are not deleted.
Micro SD Card Slot
Supports up to 64GB Micro SD Card
Interface
USB
USB 2.0
HDMI
HDMI
Battery
Built-in 250mAh Battery
Power
12-24V Car Charger
Colour
Black
Size
99x49x37mm
Page 14

14 of 14
APPENDIX
Disposal: Do not dispose this product as unsorted municipal waste. Collection of
such waste must be handled separately as special treatment is necessary.
Recycling facilities are now available for all customers at which you can deposit your old
electrical products. Customers will be able to take any old electrical equipment to participating sites run
by their local councils. Please remember that this equipment will be further handled during the recycling
process, so please be considerate when depositing your equipment. Please contact the local council
for details of your local household waste recycling centres.
www.ElectrIQ.co.uk/support
If the unit fails to operate call: 0871 620 1057 or complete
the online form
Office hours: 9AM - 5PM Monday to Friday
www.ElectrIQ.co.uk
Unit 2, The Nursery
Berristow Lane
South Normanton
Derbyshire, DE55 2FX
 Loading...