

ElectricUSA ESA1001ZB, ESA1202ZW Owner's Manual
OWNER’S MANUAL
GUIDE DU
PROPRIETAIRE
Electric bike with lithium-ion battery
Vélo électrique avec batterie au lithium-ion
ESA1001ZB
ESA1202ZW
IMPORTANT - READ THE OWNER’S MANUAL ATTENTIVELY
BEFORE USE
IMPORTANT - À LIRE AVANT TOUT UTILIZATION DU VÉLO À
ASSISTANCE ÉLECTRIQUE

1
ElectricSA International
580, Avenue Lépine, #200
Dorval, (Québec) Canada H9P 1G2
info@ElectricSA.com
www.ElectricSA.com

2
Contents
CONGRATULATIONS ON YOUR PURCHASE OF OUR
ELECTRIC BICYCLE ............................................................. 3
YOUR BIKE IS THE LATEST GENERATION OF ELECTRIC
BIKES ................................................................................ 3
APPLICATION .................................................................... 4
SECURITY FLAW ................................................................ 4
INDICATIONS OF RISKS AND DAMAGES AND HOW TO
PROTECT ........................................................................... 4
EXONERATION OF GENERAL RESPONSIBILITY .................. 5
WARRANTY AGAINST HIDDEN DEFECTS .......................... 6
WARRANTY AGAINS APPRENT ANOMALY ....................... 6
WARRANTY OF PROPULSION SYSTEM ............................. 6
FRAMEWORK ................................................................... 7
POLICY OF RETURN DURING THE WARRANTY PERIOD .... 7
VALIDITY OF LIMITED GARRANTY .................................... 7
ESA1202ZW ...................................................................... 9
ESA1001ZB ..................................................................... 10
ASSEMBLE THE BIKE (ESA1202ZW) ................................ 11
ASSEMBLE THE BIKE (ESA1001ZB) ................................. 16
STRUCTURE OF BATTERY GROUP ................................... 20
HOW TO CHARGE A BATTERY ........................................ 21
WHEN SHOULD CHARGE THE BATTERY? ....................... 21
WHAT SHOULD BE DONE IN WINTER TO MAINTAIN THE
BATTERY IN GOOD CONDITION? .................................... 22
HOW TO MAINTAIN THE BATTERY? ............................... 22
METHOD OF USE ............................................................ 23
DERAILLEUR UNITS ......................................................... 24
OPERATING PRINCIPLES ................................................. 25
CHECK BEFORE RIDE ....................................................... 25
THE ELECTRICAL USE AND MAINTENANCE .................... 25
3
CONGRATULATIONS ON YOUR PURCHASE
OF OUR ELECTRIC BICYCLE
Light weight, efficient and safe, you will live an extraordinary
experience. Whether you choose to pedal, to be assisted or to
have your bike travel in electric mode alone, you can enjoy all
the qualities of your electric bike which make it the number one
in its category.
YOUR BIKE IS THE LATEST GENERATION OF
ELECTRIC BIKES
This manual has been designed to show how you can optimize
the use of the bike. It contains the latest available information
and features of the bike.
ElectricSA Int reserves the right to modify this guide at any time
and to change the specifications, illustrations and explanations.
If you have problems using your bike, please contact us:
info@electrisa.com
Important: This manual contains information about care
and operation of your electric bike. Please take the time to
read and understand all instructions in this manual before
using your bike. Failure to follow these instructions could
damage your electric bike accessories or other, and it could
result in injury or even death.

4
APPLICATION
ElectricSA Int. notifies the owner or user (hereinafter "Owner")
of an electric assisted bicycle (hereinafter: "EAB") of the
ElectricSA disclaimer of responsibility and of the risks and
danger of the EAB and of the means to protect against them
following the purchase of the EAB from an authorized retailer
of ElectricSA
SECURITY FLAW
ElectricSA recommends the owner to operate and ride the EAB
in closed circuit during a period from six (6) to twelve (12) hours,
depending on the level of user’s experience, to allow the owner
to become familiar with the operation of EAB, to develop their
degree of knowledge, skill and adequate habits, and to provide
the user a level of security. The EAB was not designed,
developed, distributed or sold for professional or commercial
use, nor to be used for acrobatics ramp, jumps, aggressive
driving or in excessive climatic conditions such as: the rigorous
Canadian winter (contact with ice, water, salt, sand, and calcium)
and if travelling to tropical countries, (contact with sea salt) or
with heavy loads, or for any other similar activities.
Consequently, the non-compliance with these instructions and
recommendations will void the warranty of ElectricsSA to the
owner.
INDICATIONS OF RISKS AND DAMAGES AND
HOW TO PROTECT
To use only the battery and original charger recommended by
ElectricSA. Do not expose the battery or the charger to heat, do
not disassemble or modify the battery or the charger, do not
expose the battery or the charger to liquid, do not use a
damaged battery or charger, do not continue to charge the
battery if the load is incomplete at the end of the theoretical
charging time, do not use the battery or the charger if they emit

5
an unusual odor and heat or if something looks abnormal, do
not allow for children to touch the battery or the charger, do
not touch the battery or charger with wet hands, never turn on
the battery with a broken cable or damaged fasteners or if the
battery or the charger has a fault or has been damaged in any
way, always return the charger and battery to the dealers for
maintenance, examination, repair or adjustment, make sure to
connect properly the charger to the battery and the charger to
an alternative outlet A.C. 110V.
Do not place the battery or the charger near an electric heater,
a gas or microwave appliance, do not touch the charger or the
battery for too long during charging, do not place the charger
or the battery unstable and do not cover the battery or the
charger and never use the battery and the charger for a purpose
other than intended.
EXONERATION OF GENERAL RESPONSIBILITY
ElectricSA shall not be responsible for damages of any kind,
whether tangible, intangible or property damage suffered by
the Owner, including loss of time, loss of income, hardship and
inconvenience may result from:
• Bad uses of the EAB;
• The non-compliance with the instructions and
guidelines given in the owner’s manual;
• Any error of manipulation;
• Any abnormal use according to the use for which the
EAB is intended;
• Any cause of external origin.
ElectricSA advises the Owner that using the EAB entails inherent
risks and dangers that the Owner agrees to assume completely
whatever their nature. The Owner accepts to hold ElectricSA
harmless from any liability and to solely assume liability for any

6
damage of whatever nature that he might sustain or that the
Owner might cause to a third party.
The Owner renounces any claim and any procedures, of
whatever nature, against ElectricSA, following the occurrence
of loss, damage or injury of any kind that he or she might sustain
while using the EAB and this applies before, during and after use.
WARRANTY AGAINST HIDDEN DEFECTS
ElectricSA guarantees to the Owner that each EAB, when new,
is free from latent defects. If the Owner discovers what he
believes to be a defect, he must give written notice to ElectricSA
within three (3) days from the time when the owner suspects
the existence of the defect in order to give ElectricSA the chance
to correct it if possible, and at the sole discretion of ElectricSA
and provided ElectricSA can establish the existence of the
hidden defect before the expiration of the warranty.
WARRANTY AGAINS APPRENT ANOMALY
The Owner shall verify the apparent condition, quantity and
components of EAB following the purchase and proceed
immediately with a full inspection of EAB with the help of
Owner’s Manual. In the presence of damages, a part missing or
damaged, if the EAB is broken or the other similar problems
(hereinafter: the “apparent anomaly "), the owner must
immediately contact the after sale service Mecanair within
three (3) days from the date of purchase, a receipt must be kept
for reference. If the owner does not report the apparent
anomaly within the prescribed period, ElectricSA shall not be
responsible for any damage suffered by the Owner caused by
the apparent anomaly and the EAB will be considered without
apparent anomaly when purchased.
WARRANTY OF PROPULSION SYSTEM
ElectricSA guarantees to the Owner that the propulsion system
included with EAB, when new, is in good condition. This

7
guarantee shall expire twelve (12) months after the date of
purchase of the EAB at the retailer. The propulsion system is
defined as consisting of the control panel, the accelerator group,
the engine, the wire bundle components and electrical cables.
FRAMEWORK
ElectricSA guarantees to the Owner that the frame of the EAB,
when new, is free from defects in materials and workmanship.
This guarantee shall expire twelve (12) months after the date of
purchase of the EAB. The frame excludes the battery, all
electrical components, paint, finish, front fork, wheels, tires,
drive train of the brakes, seat post, handlebar and any
component of the suspension.
POLICY OF RETURN DURING THE WARRANTY
PERIOD
When a defect occurs during the warranty period, please
contact ElectricSA at 1.855.780.1529. Our customer support
personnel are available during support hours to assist you in
diagnosing and fixing any problems you may encounter in the
use of your EAB. In the event we cannot help you fix the
problem over the phone or email, you may be entitled to a
replacement product or return under the terms of ElectricSA
International' limited warranty. For all returns, you must pack
your ElectricSA product in its original packaging and include all
accessories and documentation. We reserve the right to charge
for any damage to the ESA product, and missing part fees may
apply.
Please contact Mecanair prior to returning any product to
receive a return authorization form.
VALIDITY OF LIMITED GARRANTY
ElectricSA limited warranty is conditional that the EAB has been
handled and properly maintained in accordance with the
8
instructions provided in the owner's manual and the EAB has
been stored under appropriate conditions and at a suitable
temperature given the specific characteristics of the EAB.
Without limiting the generality of the preceding, the limited
warranty excludes components of the EAB damaged by
negligence or error in the maintenance of EAB and its
components or resulting from an improper use that does not
conform to the owner’s manual. With the exception of the parts
specifically mentioned in the present Limited Warranty, the
purchase of the EAB is made at the risk and peril of the Owner.
DURING THE WARRANTY PERIOD, SHOULD THERE BE A
PROBLEM WITH YOUR EAB, YOU SHOULD HAVE REPAIRS MADE
BY MECANAIR IN ORDER TO CONSERVE YOUR RIGHTS UNDER
THE WARRANTY. If your ElectricSA product requires service, do
not return it to the store where purchased. Call Mecanair at 1866-206-0888 for the name and address of the service center
closest to you.
1380 Newton, suite 109,
Boucherville, (Québec) J4B 5H2
www.mecanair.net
T. 450-641-4111
T.1-866-206-0888
9
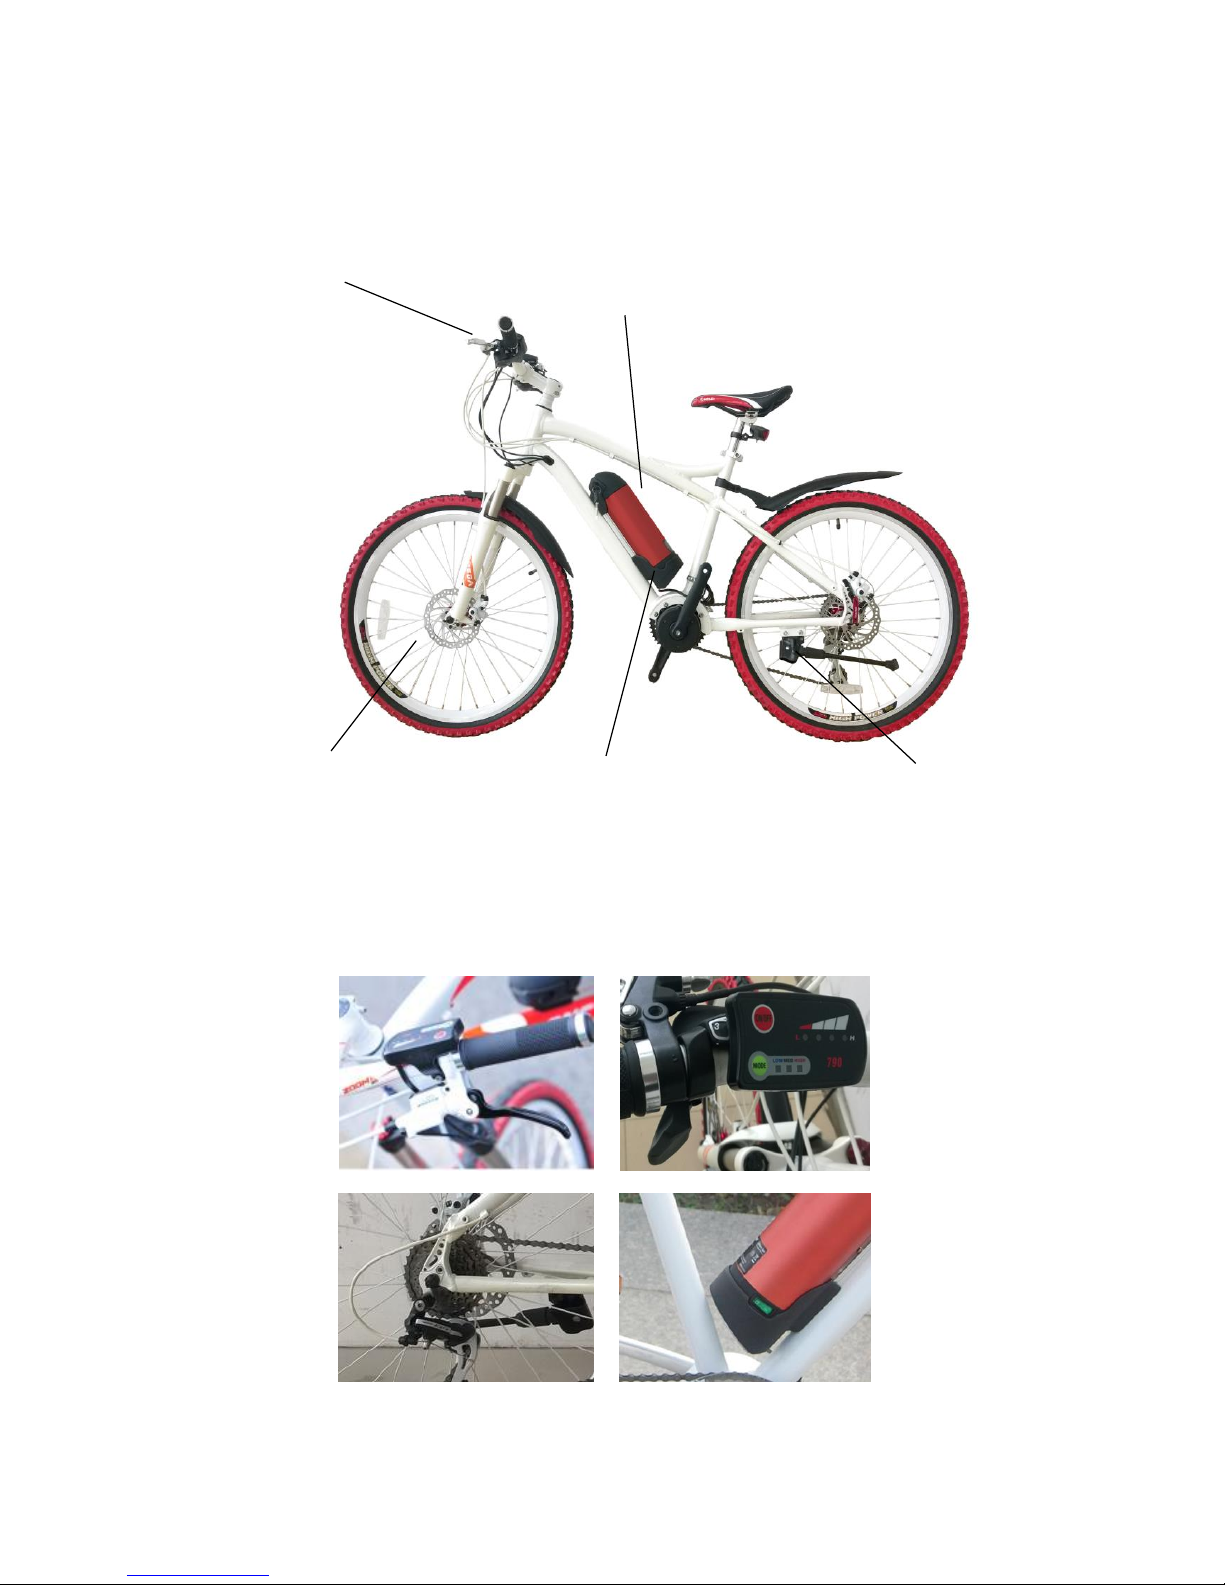
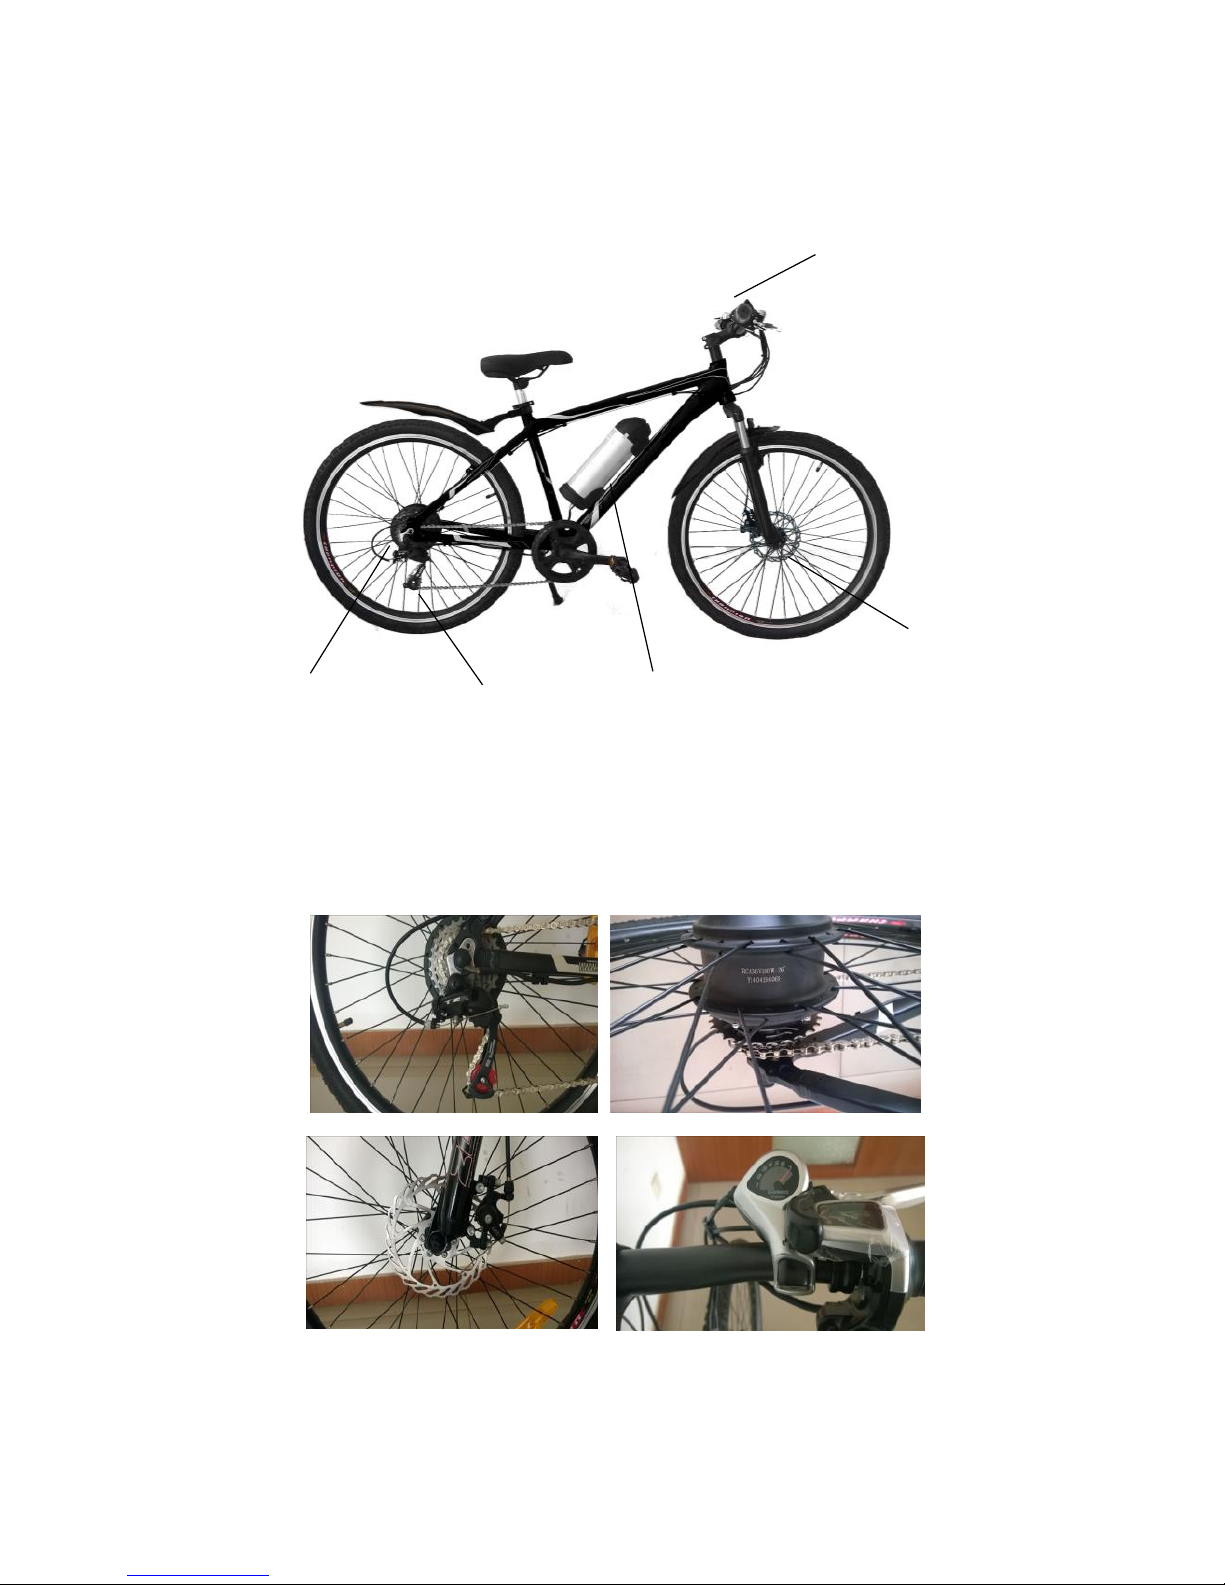
ESA1202ZW
1 2
5 3 4
*May differ from photograph
1. Power&PAS model display
3 Pedal Assistance Levels; Battery level
2. Battery 3. Controller 4. Derailleur 5. Disc brake
10
ESA1001ZB
1
2
5 4 3
1. Power&PAS model display
3 Pedal Assistance Levels; Battery level
2. Disc brake 3. Battery 4. Derailleur 5. Motor
11
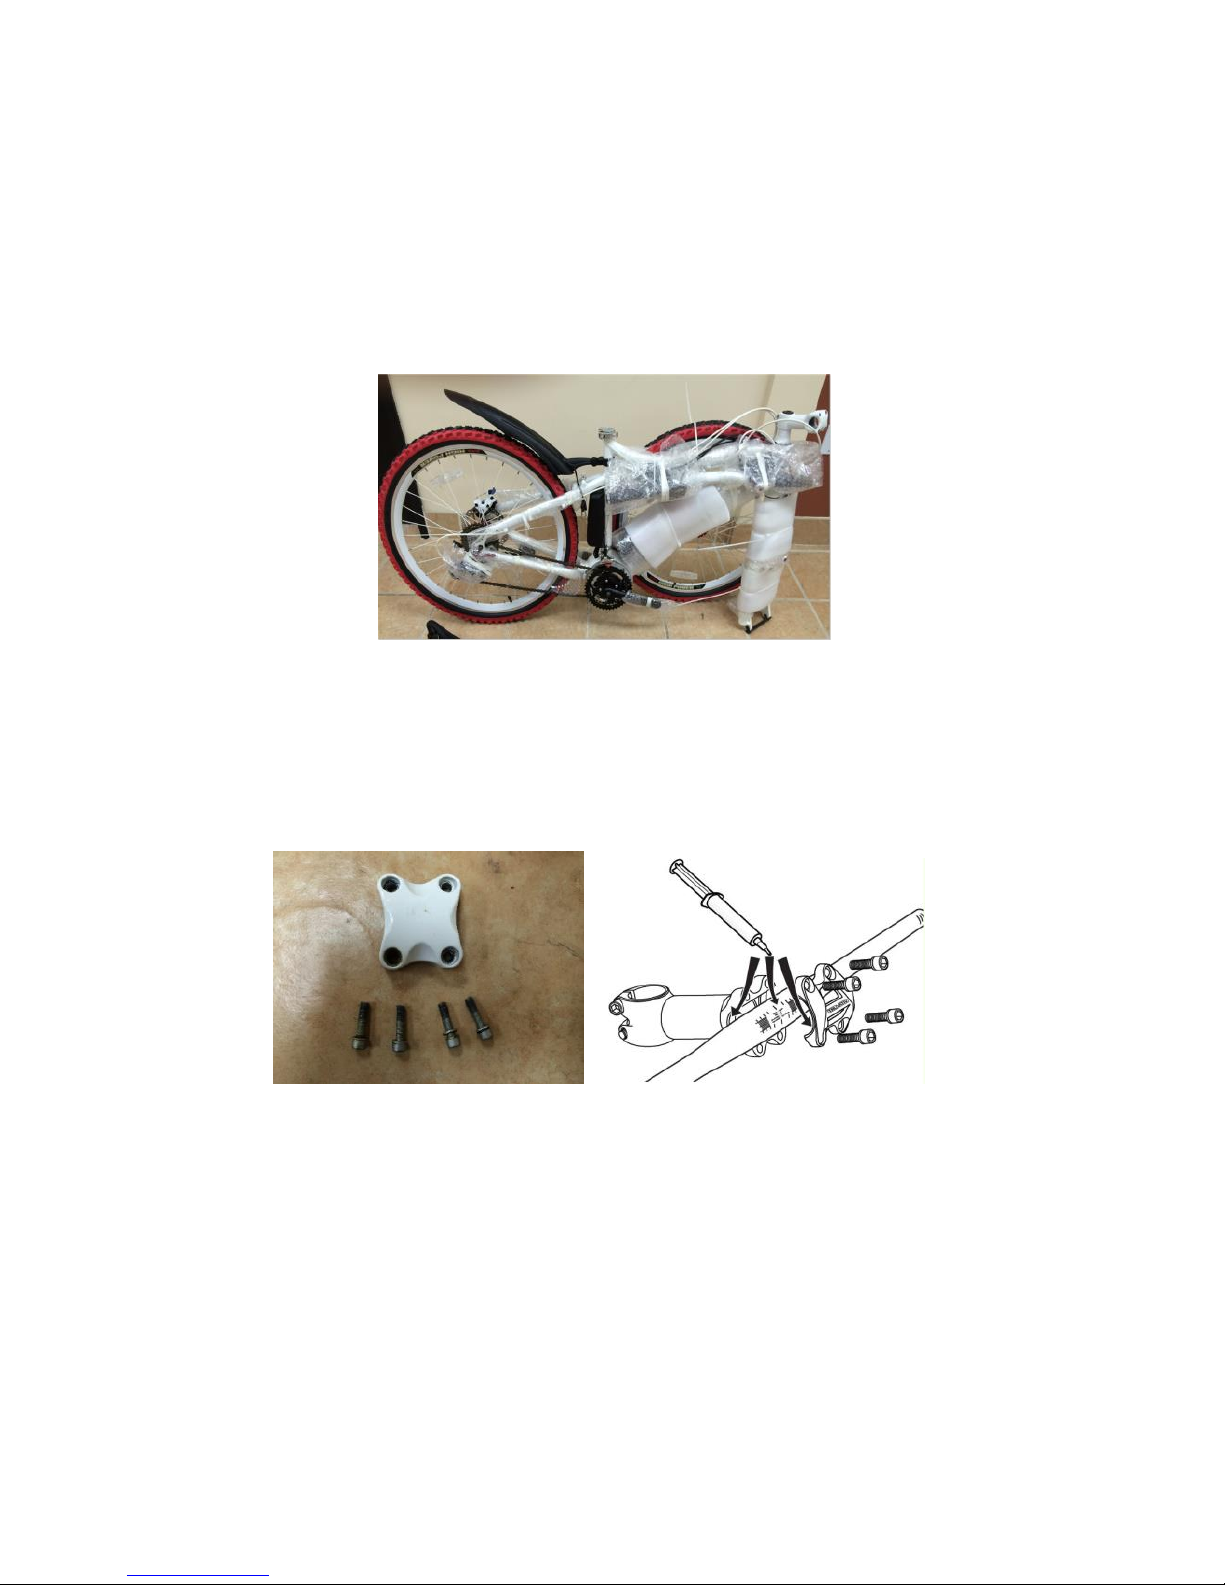
ASSEMBLE THE BIKE (ESA1202ZW)
1. Unpack the bike; remove all the bubble bags and zippers.
Handle bar, front wheel, saddle, pedals and lights are to be
assembled.
2. Unscrew the 4 screws in the frame by the Allen key, place
the handle bar in the middle and tighten the screws.
Note: the handle bar should be placed in the middle to ensure
that it is the same length on both sides.
3. In order to avoid damage to the battery when assembling
the front wheel, please remove the battery first. Turn off
the switch on the battery. Turn the key anti-clockwise and
pull gently the battery to remove it.
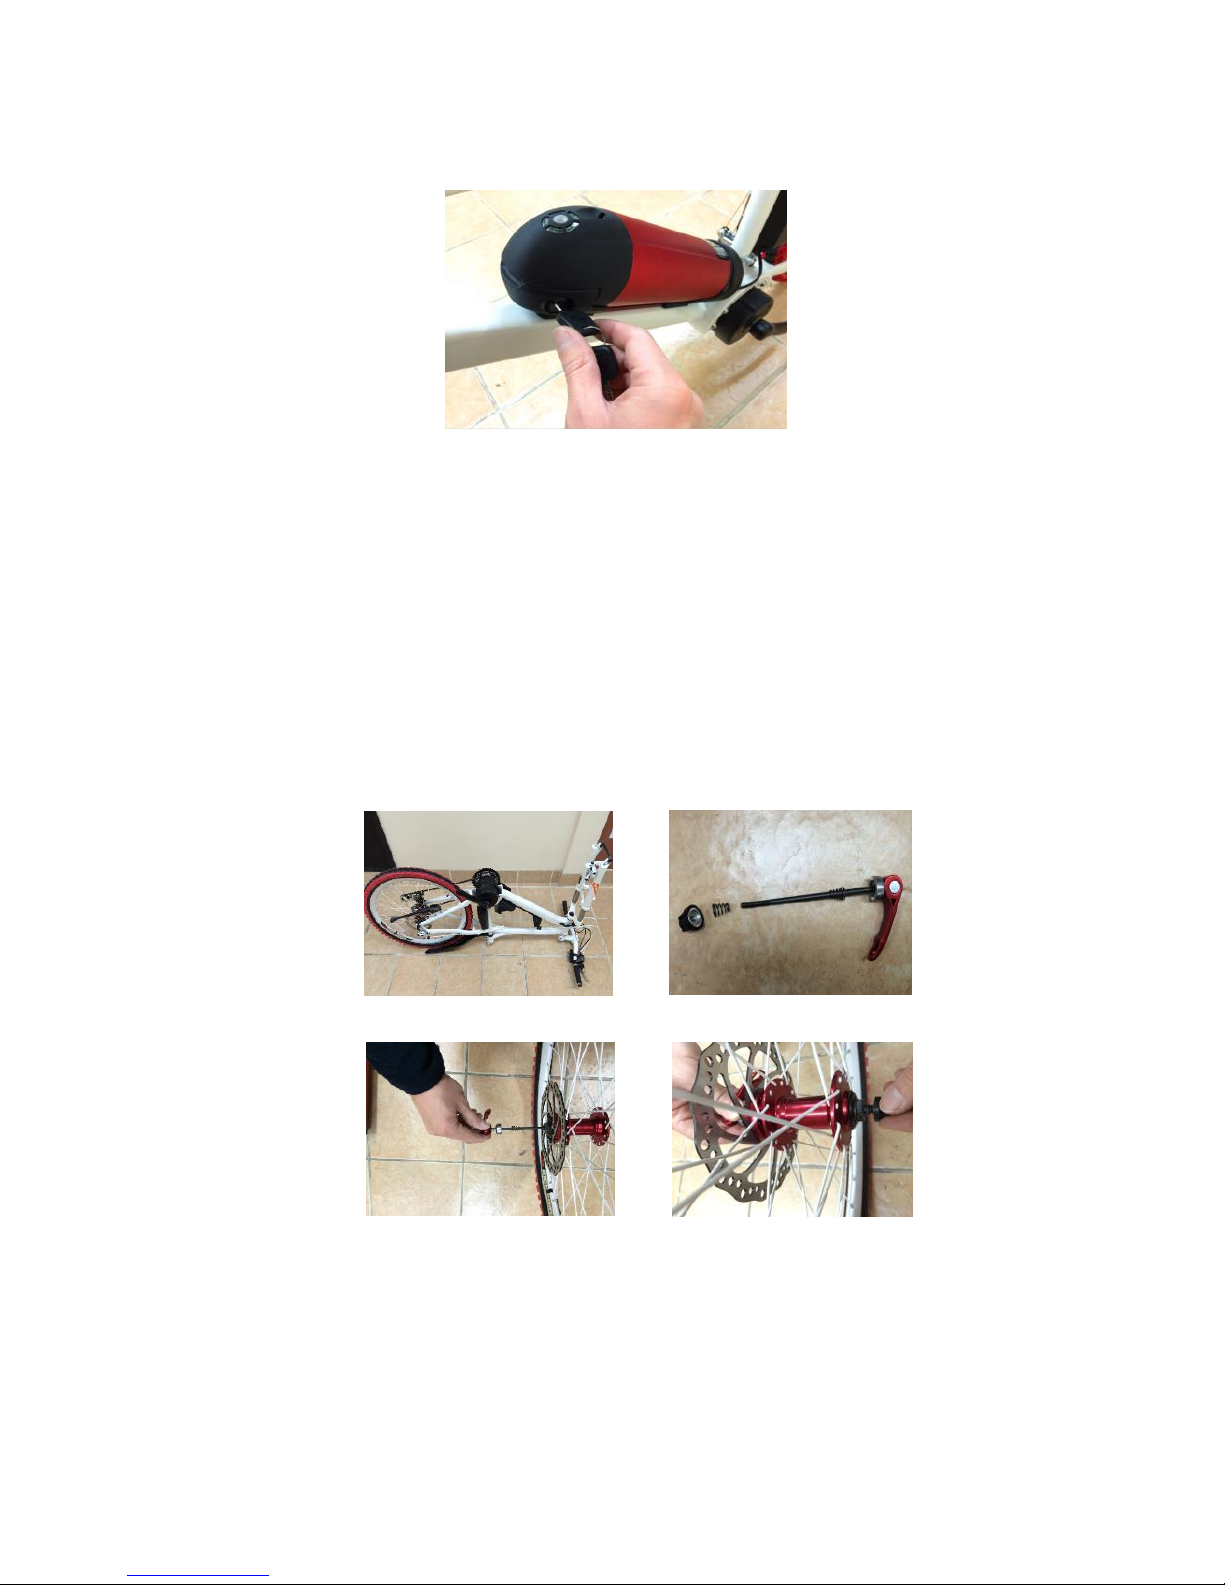
12
4. Assemble the shaft. Turn the bike upside down and remove
the front fork protector (picture just for reference, please
make sure the components on the handle bar are all well
protected when you turn the bike down). Taking off the
cap nut and a spring in the shaft. Then pass the shaft
through the front wheel. Put the spring on and then tighten
the cap nut a little bit. Please do not tighten completely the
cap nut because you have to re-loosen it when installing the
front wheel.
5. Secure the front wheel to the front fork. Please keep the
two disc brakes on the same side. Tighten the cap nut and
the clamp.
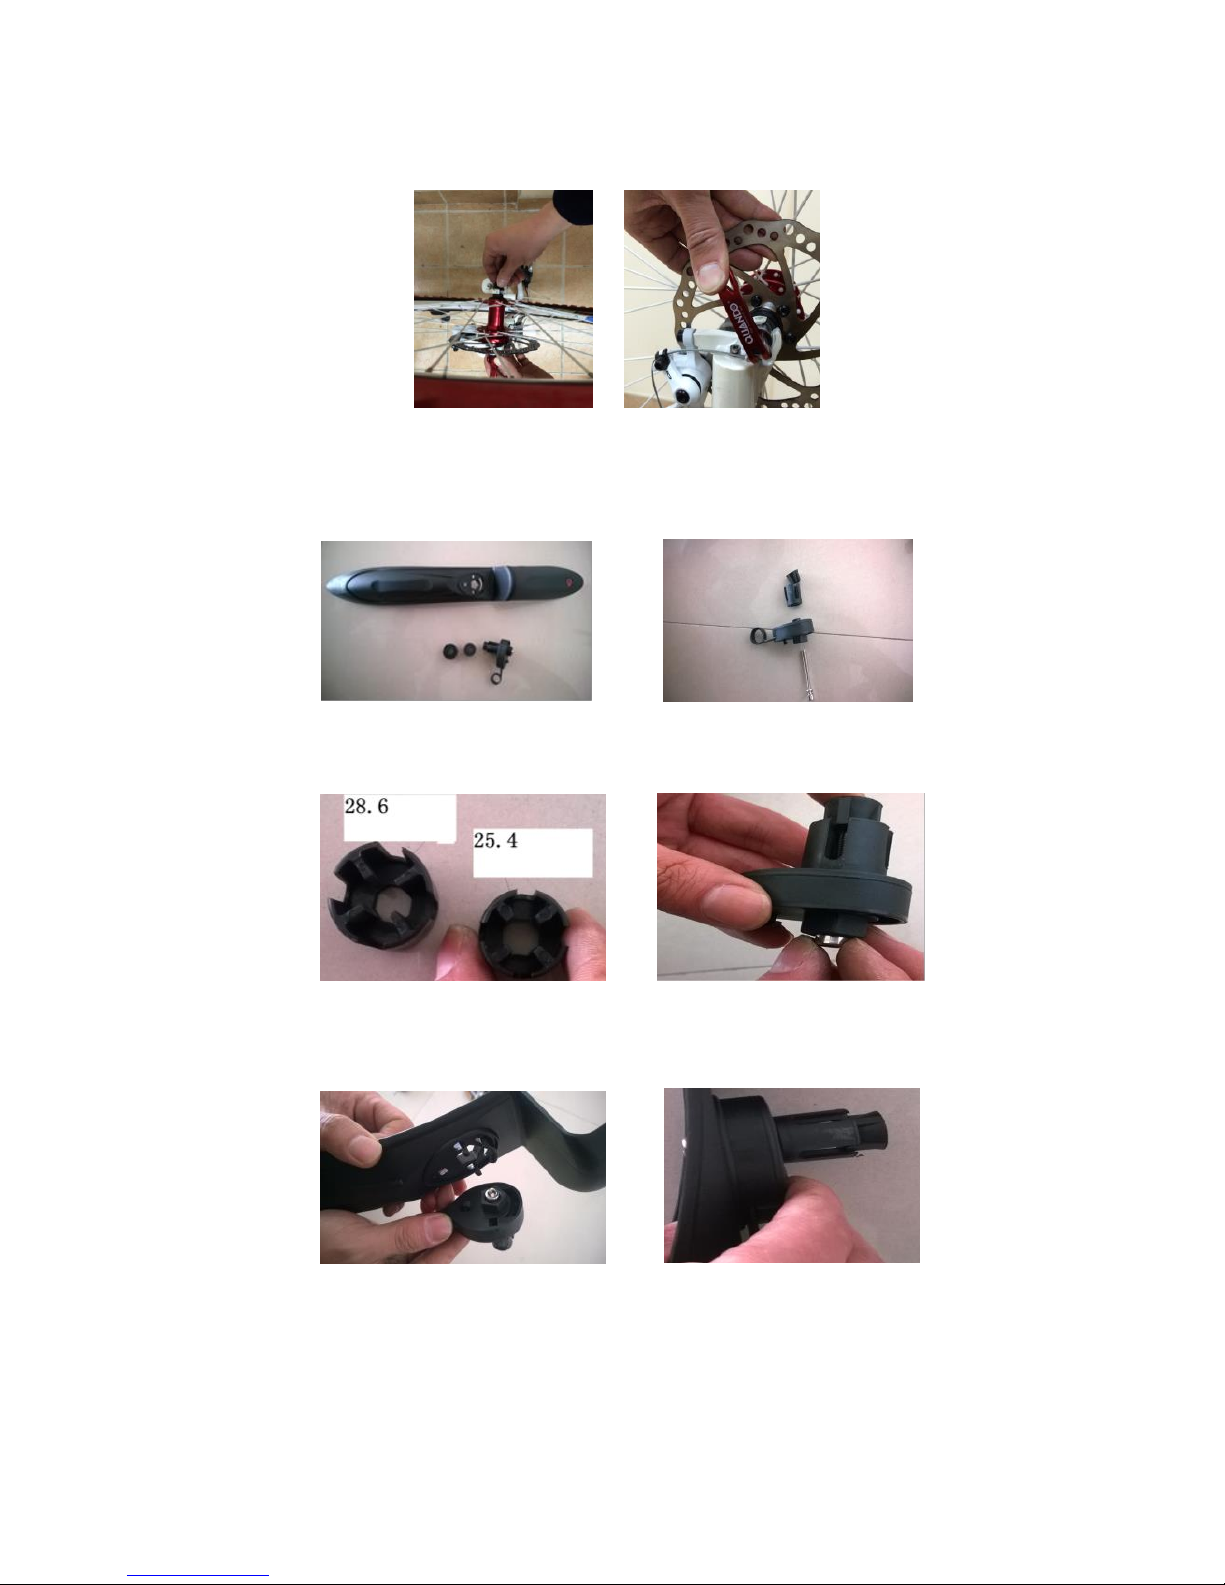
13
6. Fix the front mud-guard. Disassemble the connector cap by
using the Allen key (5mm).
Then replace the original connector cap with a 25.4mm one
and tighten the screws just a little bit.
Fix the connector cap into the front mud-guard like the
right lower picture.
Insert the front mud-guard into the front fork of the bike
and then tighten the mud-guard by the Allen-key (5mm)

14
7. Turn back the bike. Assemble the pedals by using the
spanner. Make sure the left and right pedals are mounted
correctly. Please notice that the screw threads will be able
to get a good grip, otherwise you will have dangers when
riding.
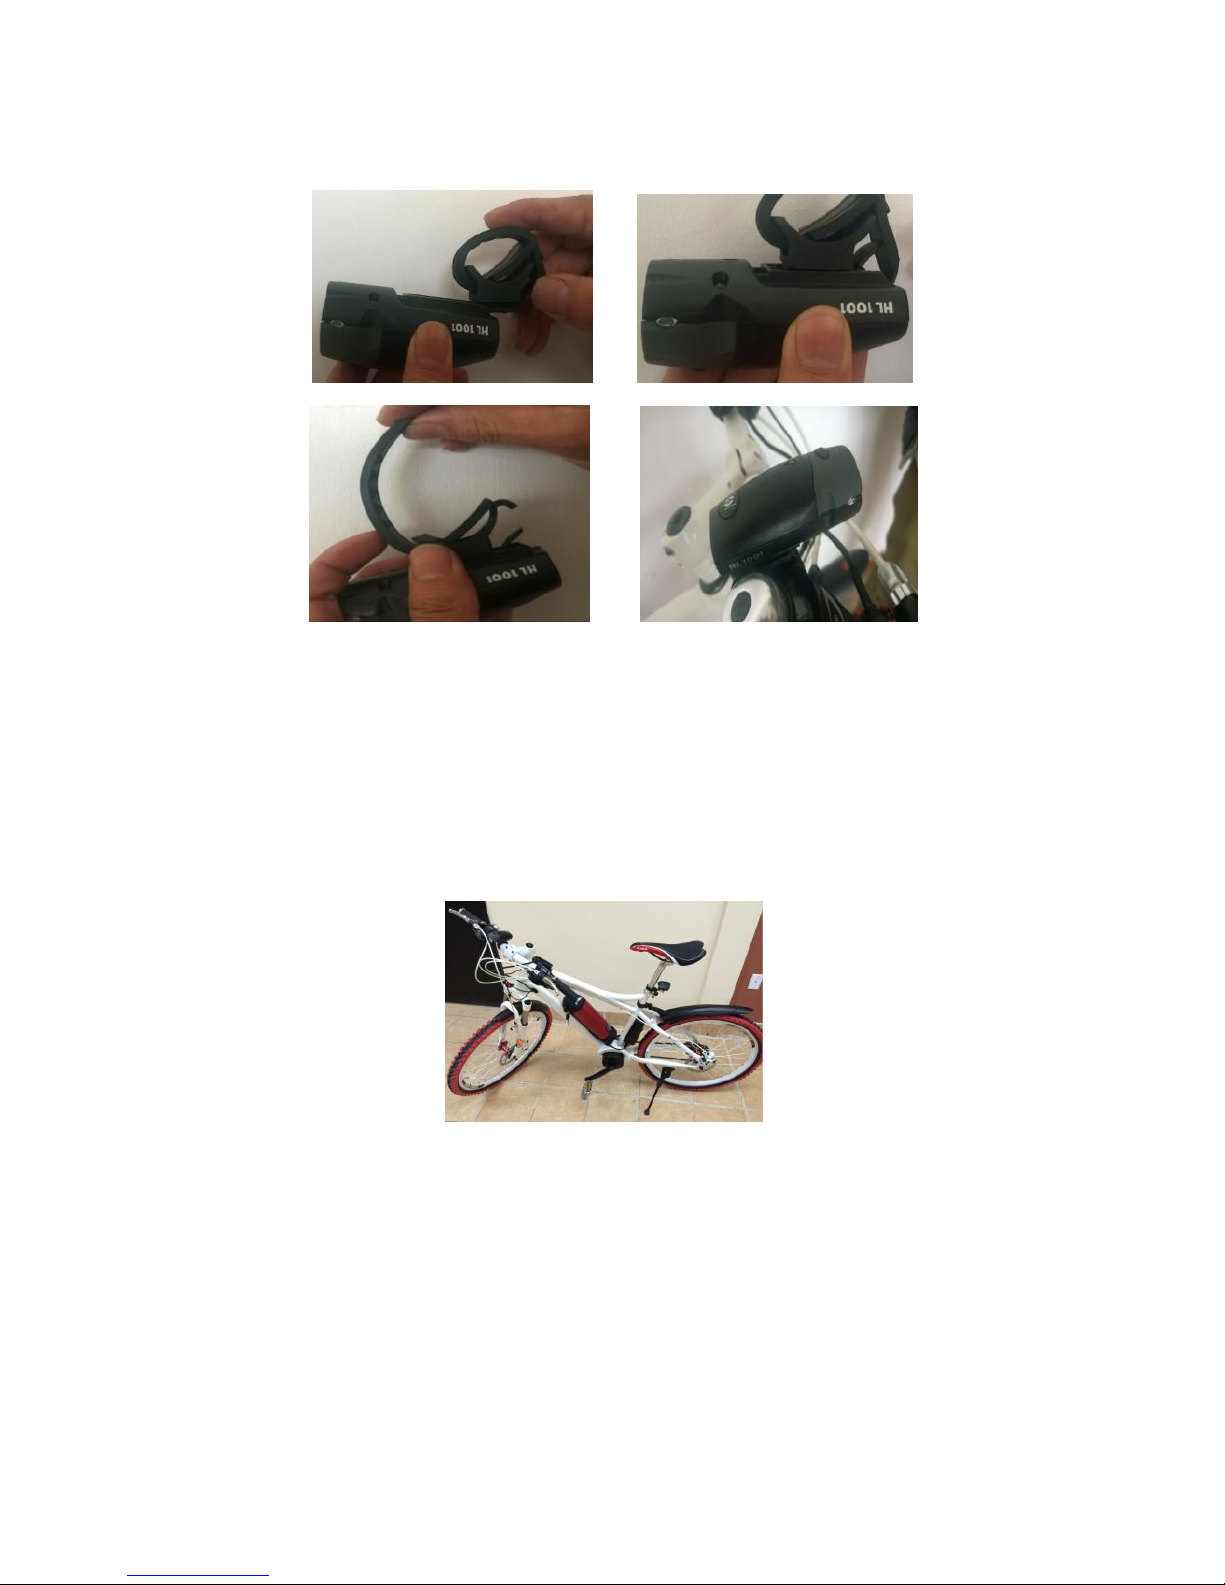
8. Secure the rear light on the saddle stem and tighten the
screw (please note that there is a rubber mat in the light
seat), remove the plastic insulator. Insert the saddle into
the frame, adjust the height and then tighten the clamp. Fix
the front light on the handle bar and remove the plastic
insulator.
15
9. Install the battery. Insert the key, turn the key anti-
clockwise and hold, then put the battery on the battery
seat. Turn the key clockwise to lock and remove the key.
Please note that the keys can be used only to lock and
unlock the battery. Keep the keys in a safe place when it is
not in use.
16
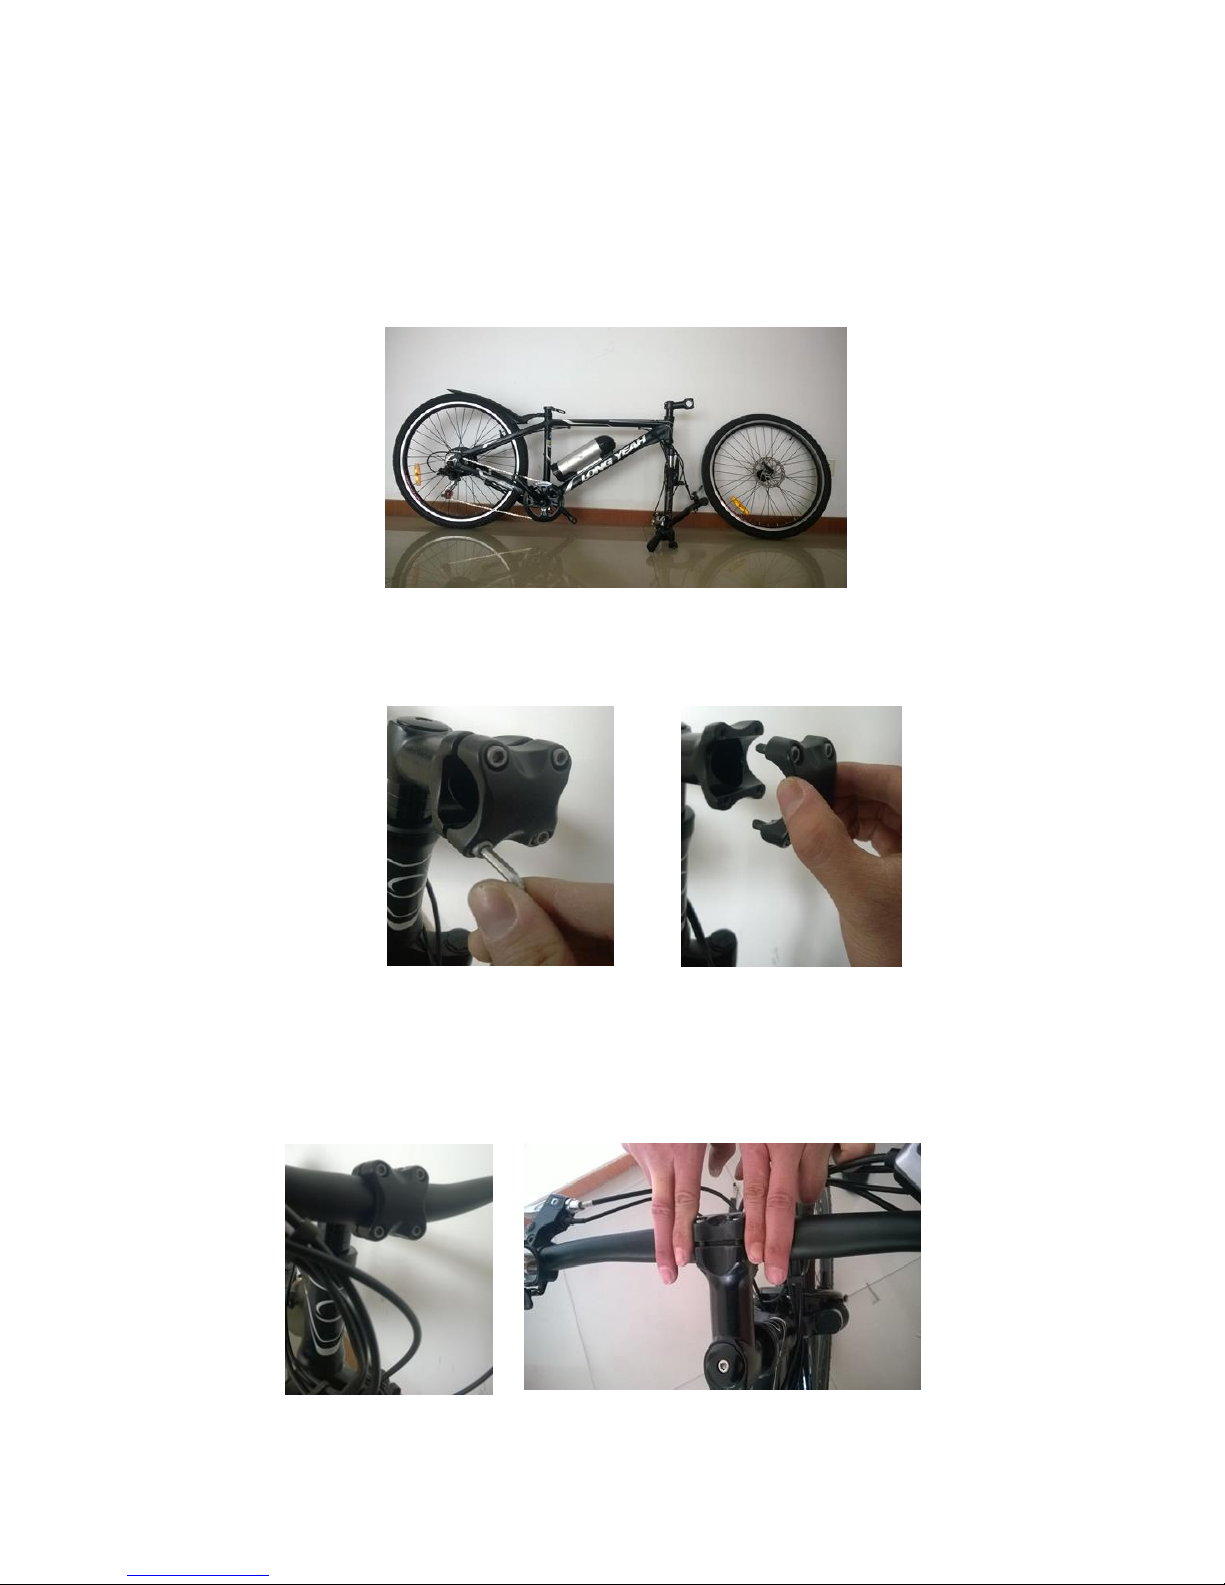
ASSEMBLE THE BIKE (ESA1001ZB)
1. Take out the bike from the carton, Handle bar, front wheel,
saddle, pedals and lights are to be assembled.
2. Please take the four screws down with hexagon wrench,
prepare to fix the handle bar.
3. Fix the bike like below, make sure the left and right side are
symmetrical, you can use your finger like below to have a
check.
 Loading...