


Instruction
manual for models:
Prisma+
Prisma+ iVISTA
Cast Aluminium Electric Radiators
High Performance with Intelligent Technology
INCORPORATiNG HiGH-PRECiSiON ELECTRONiC CONTROL
WiTH THE LATEST ENERGY SAViNG FEATURES:
Motion Sensor
Up to 12 % energy savings
O pen windows detector
Up to 4% energy savings
P rogrammable
Daily and weekly schedule
kW
h
Responsible consumption assistant
Colour variation of the screen according to temperature
Energy Monitor
Know your cumulative consumption
Babycare F unction
Limited surface temperature. Peace of mind for children


CONTENTS PAGE
Contents 3
Important Safety Notes 4
Installation & Assembly 6
Information on the Display & Control Panel 7
1.Setting The Time 8
2.Pairing your radiator with the iVISTA app 9
3. Modes of operation 10
4. Setting Your Own Programme
12
5. Setting The Temperature
13
6.Energy Saving Features
13
6.1. Motion Sensor
13
6.2. Window Open Detection 14
6.3. End User Behaviour Indicator
15
6.4. Energy Counter 16
7. Safety Features
18
7.1. Babycare Function
18
7.2. Keypad Lock
18
8. Temperature Offset 19
9. Restore Factory Settings 20
Questions and Answers
21
Warranty Conditions 22
3

IMPORTANT SAFETY NOTES
The location of you radiator should be chosen properly and must follow any existing rules
and regulations.
WARNING
•ONCE THE APPLIANCE HAS BEEN INSTALLED, THE PLUG
MUST BE ACCESSIBLE.
•KEEP CHILDREN YOUNGER THAN 3 YEARS OLD AWAY
FROM THE APPLIANCE UNLESS THEY ARE UNDER
CONSTANT SUPERVISION.
•CHILDREN BETWEEN 3 AND 8 YEARS OLD MAY ONLY
SWITCH THE APPLIANCE ON AND OFF IF THEY ARE
SUPERVISED OR HAVE BEEN INSTRUCTED ON THE
SAFE USE OF THE APPLIANCE AND UNDERSTAND THE
CONSEQUENTIAL DANGERS, PROVIDED THAT THE
APPLIANCE IS PLACED OR INSTALLED IN ITS NORMAL
OPERATING POSITION.
•CHILDREN BETWEEN 3 AND 8 YEARS OLD MAY NOT
PLUG IN THE APPLIANCE, OPERATE THE APPLIANCE,
CLEAN THE APPLIANCE AND/OR CARRY OUT USER
MAINTENANCE.
•WARNING! TO AVOID OVERHEATING, THE RADIATOR
MUST NOT BE COVERED FOR SAFETY REASONS.
•THE APPLIANCE MAY NOT BE INSTALLED DIRECTLY
UNDER A WALL SOCKET.
•IN BATHROOMS OR SHOWER ROOMS, THE APPLIANCE
MUST BE INSTALLED SUCH THAT THE SWITCHES AND
OTHER OPERATING CONTROLS CANNOT BE TOUCHED
BY SOMEONE USING THE BATH OR SHOWER.
•CAUTION - SOME PARTS OF THE RADIATOR MAY
BECOME VERY HOT AND CAUSE BURNS.
•SPECIAL CAUTION MUST BE TAKEN IF CHILDREN AND
VULNERABLE PERSONS ARE NEAR THE RADIATOR.
4

IMPORTANT SAFETY NOTES
THIS DEVICE IS NOT INTENDED FOR USE B Y PERSONS
(INCLUDING CHILDREN) WITH PHYSICAL, SENSORY
OR MENTAL DISABILITY , OR LACK EXPERIENCE OR
KNOWLEDGE, UNLESS THEY HAVE BEEN GIVEN
SUPERVISION OR INSTRUCTIONS CONCERNING USE OF
THE APPLIANCE B Y A PERSON RESPONSIBLE FOR THEIR
SAFETY . CHILDREN SHOULD BE SUPERVISED TO ENSURE
THEY DO NOT PLAY WITH THE APPLIANCE. CLEANING
AND USER MAINTENANCE SHALL NOT BE MADE B Y
CHILDREN WITHOUT SUPERVISION.
THE APPLIANCE SHOULD NEVER BE COVERED BY
CLOTHES, COVERINGS OR ANY OTHER OBJECT, NOR
SHOULD IT BE PLACED BEHIND OR BELOW FURNITURE
OR ANY OTHER OBSTACLE FOR THE CIRCULATION OF
AIR.
DO NOT USE THE RADIATOR TO DRY CLOTHES.
IF THE POWER CORD IS DAMAGED, IT MAY ONLY BE
REPLACED BY ERS IN ORDER TO AVOID RISKS.
DO NOT PLACE NEAR DRAUGHTS OR IN DIRECT
SUNLIGHT.
RECOMMENDATION FOR ENVIRONMENTAL PROTECTION
Do not dispose of electrical appliances as unsorted municipal waste, use separate
collection facilities. Contact your local government for information regarding the
collection systems available. If electrical appliances are disposed of in landfills or
dumps, hazardous substances can leak into the groundwater and get into the
food chain, damaging your health and well-being. When replacing old appliances
with new ones, the retailer is legally obligated to takeback your old appliance for disposals at
least free of charge.
5

Installation and Assembly
What’s in the box?
Radiator with moulded plug x 1, Wall Bracket x 1, Instruction Manual x 1, Screws & Fixings x 4
Wall Mounting
Where possible, always install the radiator on an outside/external (cold) wall, under a window.
Don’t install in a ventilated area (draught) or in direct sunlight.
Follow the minimum safety distances for installation.
Minimum distance from the ground or wall is 15cm.
1. Present the wall bracket on the floor in the position in which the radiator is to be
fitted, mark the wall through the upper drill hole of the bracket on both sides (Fig 1)
2. Drill in the markings and insert the rawlplugs (Fig 2)
3. Move the bracket up and position with the bracket lower holes covering the
rawlplugs, mark the upper holes again, drill and insert rawlplugs (Fig 3)
4. Screw the bracket into position (Fig 4)
5. Slide the radiator onto the bracket
PLEASE NOTE: The screws provided are for use on a solid wall only. For plasterboard walls,
please use specialist plasterboard screws such as REDIDRIVER or similar.
Once the radiator is on the wall, you can fit the safety clips as below:
6

Information on Display and Control Panel
Display
Programming
Comfort
Programming
Economy
Hours of
Programming
Mobile connection (*)
Time & Temperature
Window Opening
Detector Symbol
Motion Sensor
Indicator
Comfort Mode Economy Mode
Control P anel
Indicator degrees
Indicator of Power
Consumed
Days Of The Week
For Programming
Babycare Function
Heating Activated Indicator
Anti-Frost Mode
(*) Only for models Curvo+ iVISTA and
Prisma+iVISTA
+/-:
To change the temperature, change the time, day of week.
OK/Mode:
Press to confirm or terminate the actions, set the mode of operation
(in programming mode) and change the operating mode:
(Comfort/Eco/Anti-frost/Pro/Pro1/Pro2/Pro3)
ON/ OFF /PROG:
Press to turn On or Off (Standby), and also to go into
programming mode.
7

1. Setting The Time
When switched on the screen will flash. Press any button and the screen will stop
flashing. Press the ON button to switch the radiator off so the screen looks like this
-- : --
Press and hold the ON button for approx. 7 seconds until the screen changes to:
Press ON button once more and this screen will appear:
FLASHING
This is the clock setting screen
1-7 down the right hand side are the days of the week (1=Monday, 2 = Tuesday etc.)
Use + and – buttons to select day of week. (1=Monday, 2=Tuesday etc.). Press
OK
Hour will now flash. Use + and – to correct hour. Please note it is a 24 hour clock. Press
OK
to set.
Minutes will now flash. Use + and – to correct minutes. Press OK to set.
The
1-7 day markers will disappear.
The time is now set and appears on screen with the colon between the hours and
minutes flashing.
Please note when the time is on the screen as here the radiator is switched off (S tandby).

2.
Pairing your radiator with the iVISTA app
NB: please notice that this is only available for the models CURVO+iVISTA and
PRISMA+iVISTA
1) Install the heater and your MiniBox i-Vista. See each user manual of i-Vista MiniBox.
2) Set the thermostat in STOP/Standby mode by pressing On/Off button => The
thermostat goes in STOP/Standby mode showing current time or --:-- if time is
unknown.
3) Enter in setting configuration mode by pressing
MODE button for 2 seconds
4) Start wireless pairing on thermostat by pressing
“+” button. You can cancel paring with MODE or OFF
button.
5) Add a new device on smartphone advanced
settings menu to automatically discover your mobile
device. This process can take up to 8 minutes. Please
do not cancel any of the process of the pairing will
fail.
5) If the heater is well paired with the iVISTA app, the
word “Yes” will appear on the LCD screen and you
can now use your smart phone or tablet to control
the thermostat. If the word “no” appears on the LCD
screen, then check the status of the MiniBox and
your internet connexion and start again pairing on
step 2)
6) Quit pairing menu with STOP button
9
3. Modes Of Operation
OK - Now switch the radiator on using the ON button. The radiator will come on in
whatever mode it was on before it was switched off.
Pressing
OK MODE
button will change the mode of operation between:
COMFORT ( ) - ECONOMY ( ) - ANTI-FROST ( ) - PRO (User Defined
Programme) - PRO1 - PRO 2 - PRO 3
NOTE:
PRO1/PRO2/PRO3 are pre-set and not configurable. Also, these only appear
when the time has been set.
To configure the PRO mode, see page 12 section 4.
NOTE: please be aware that the described above is NOT VALID for the models
CURVO+iVISTA and PRISMA+iVISTA. These models do NOT have the PRO – PRO1PRO2-PRO3 modes of operation.
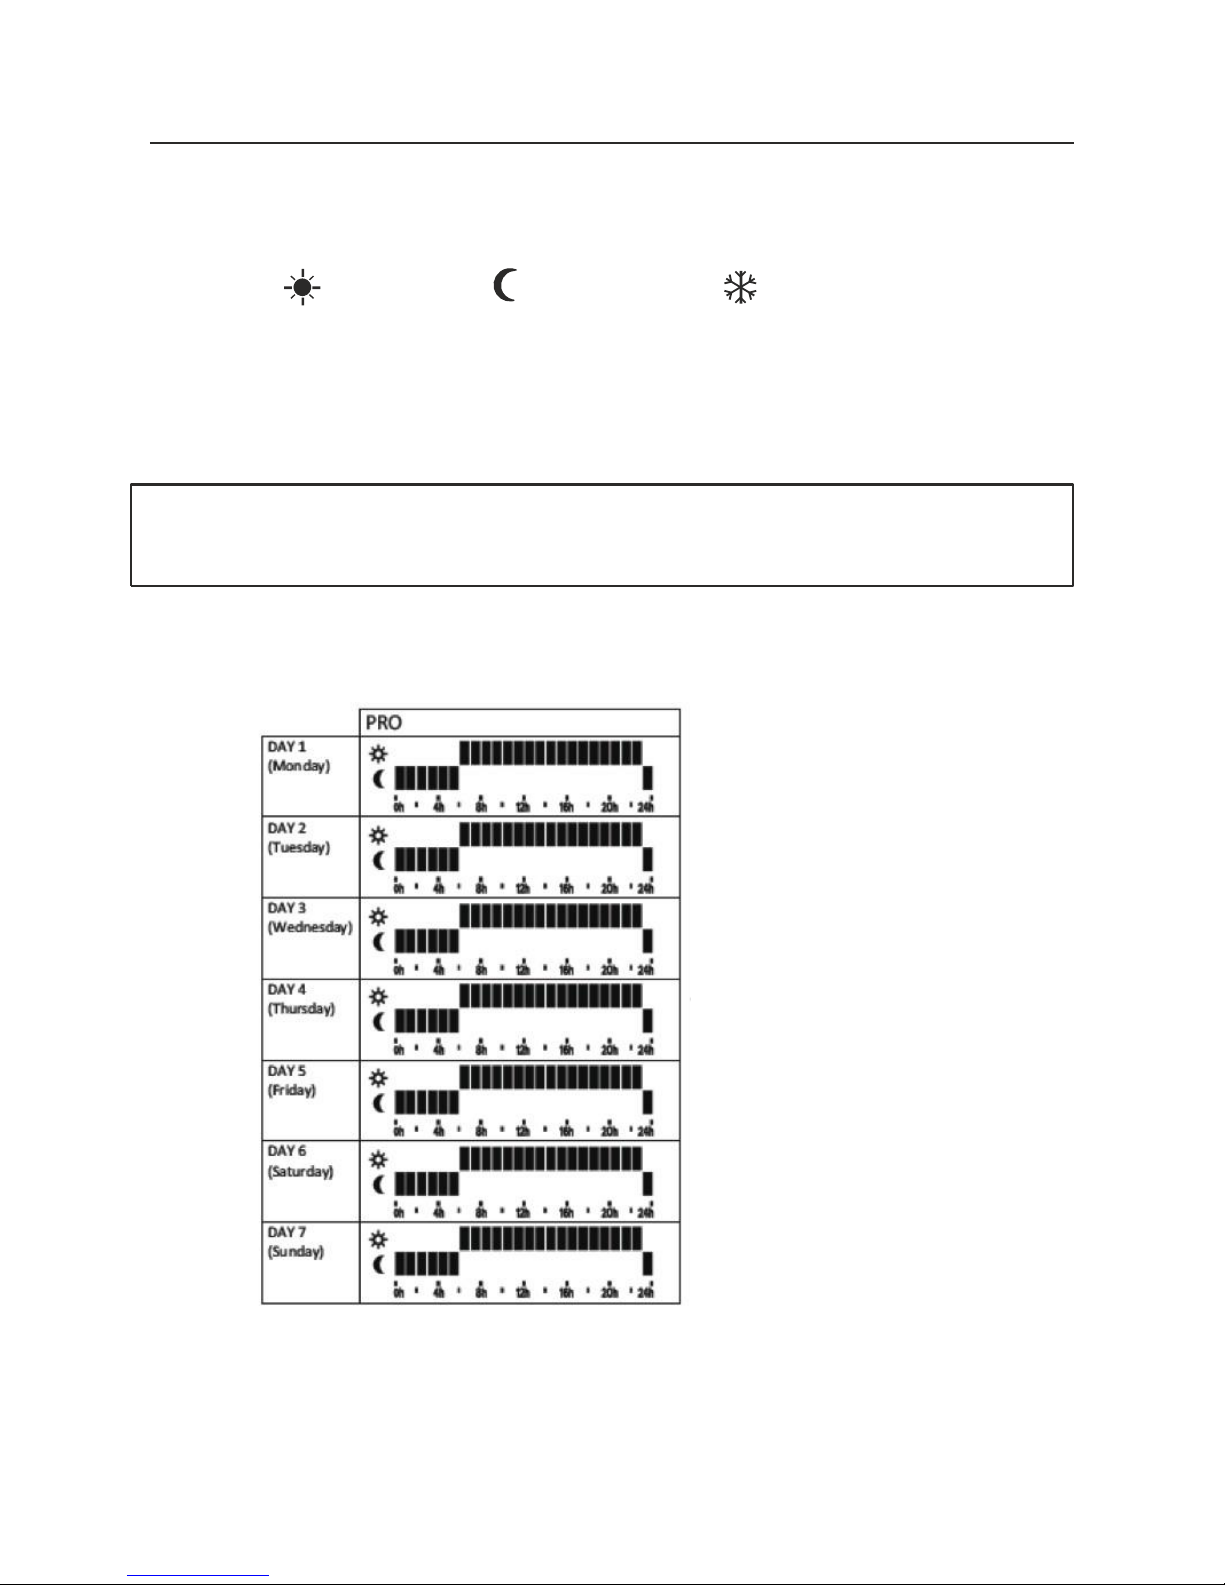
The PRO default programme is:
Note : This program is retrievable by Resetting in factory preset described in Section 9
10

3. Modes Of Operation
FIXED PRESET PROGRAMS PRO1/PRO2/PRO3
These programs are not changeable and are defined as follows:
Anti-Frost Mode
If you want to set a frost setting for holidays etc.
When the radiator is switched on in any mode (Comfort/Economy/Pro/PRO1/PRO2/
PRO3), hold down the OK/Mode button until 7oC appears on the screen. It will stay in this
mode until a short press of OK/Mode is made.
11

4. Setting Your Own Programme
It is a good idea to write down your desired programme before you start.
(Please note: In programming mode if there is a delay you will be timed out and have to
start again, however it does save what you have entered up to that point).
Write down when you require ECONOMY temperature (e.g. at night or when you are out
at work) and also when you want COMFORT temperature (e.g. on a morning when you
get up and on an evening when you get home from work). (We don’t recommend using
frost in the programming).
ACTION
SCREEN
a.
Switch the radiator off by pressing the ON but-
ton. The time or --:-- will be displayed.
Screen --:-- or hour : minutes and, after long press :
Top: Comfort
Bottom: Economy
Nothing: Antifreeze
FLASHING
b.
Press and HOLD down the ON button for
approx. 7 seconds until the screen changes to
what you see opposite.
The bottom sun Symbol may be a moon
or a frost
icon.
Programming always starts at midnight Sunday
night coming into Monday morning.
c.
Select the type of operation of the current selec ted hour and day by pressing the OK button.
CONFORT --> ECONOMY --> ANTIFREEZE
d.
Select the hours without modification by pressing + & - button (long press to go faster)
Exceed 23:00 to switch to next day at 00:00
e. A utomatically copy / paste forward mode from
current selected hour to next hours with + & - button
pressed together.
Long press + & - buttons to copy / paste repetitively
f.
To quit the setting programming mode, press ON button or exceed 23:00 at the last day.
Change the time if required or validate to return to the off position
OK - Now switch the radiator on using the ON button. The radiator will come on in
whatever mode it was on before it was switched off.
Pressing OK MODE button will change the mode of operation between:
COMFORT - ECONOMY
- PRO (User Defined Programme) - PRO1 - PRO 2 - PRO 3
NOTE - PRO1/PRO2/PRO3 are pre-set and not configurable. Also, these only appear when
the time has been set.
Leave on PRO. The screen will flash between PRO and the current mode & temperature for
the time as programmed. This is normal.
12

5. Setting The Temperature
When the radiator is on press the
OK Mode
button.
Stop at COMFORT (☼
) mode.
Use the
+
and – buttons to select the desired temperature for comfort. Comfort
temperature is generally regarded to be between 18 and 21 degrees for most people.
Remember, the lower you have it, the lower your bills will be.
Each radiator in different rooms can be different temperatures. Your Living room could be
19 for instance, and the bedroom 16.
You don’t need to turn the temperature up when it’s colder outside. The radiator will heat up
to the set temperature regardless.
Once the Comfort ( ) temperature is set, press the
OK Mode
button once to set the
ECONOMY ( ) temperature.
We recommend the ECONOMY (☾ ) temperature to be 3.5 degrees lower than the
comfort temperature.
This difference is set into the radiator. For example, if your comfort temperature is 19
degrees, you can only set the economy temperature to a maximum of 15.5. If you try to go
above this, it will default back to 7 degrees.
The difference of 3.5 degrees is the optimum for achieving the best running cost.
6. Energy Saving Functions
6.1. Motion sensor
Note: This function is only available in COMFORT ( ) mode (not in programming
modes PRO/PRO 1/PRO 2/PRO 3).
The radiator is equipped with a motion sensor that detects presence in the room. When
this function is on, the radiator will reduce its temperature over a configurable time of
absence.
You can set the time of absence from 10 minutes to 4 hours. When half this time
has passed with no motion detected, the radiator will reduce the COMFORT (
)
temperature by 1.5 degrees. When all of the time has passed, the radiator changes to
ECONOMY ( ) mode.
If at any time motion is detected, the radiator will return to COMFORT (
) mode.
ACTION
SCREEN
a. Ensure the thermostat is in the OFF/STANDBY
position otherwise press the ON/OFF PROG button to go to the OFF/STANDBY position
Screen --:-- or hour : minutes
Long press (3s) on the MODE button to go in
the presence detector setting
Select the absence time by pressing the + and button between 10min and 4 Hours.
The presence detector function can be disabled if
Off is selected, under 10min of time.
Exit with
button or go in Window open setting with MODE button.
Remember: Motion Sensor only works in COMFORT (☼ ) mode.
13

6. Energy Saving Functions
6.2. W indow Open Detection
The window open detection allows making energy savings in case you open the window to
refresh the ambient air and forget to switch off the radiator.
The windows open sensor saves energy by switching to shut down when it detects a
temperature drop of between 1.5 to 2 o C in less than 14 minutes. When the controller
detects a “window open” the back light and the window icon blink. The controller
automatically switches to OFF mode to make energy saving.
When the radiator detects that the room temperature begins to rise again, it will switch
back on to its normal operating mode.
This function will work in any operating mode: Comfort/Economy/Programme and can be
switched on or off.
ACTION
SCREEN
a. Ensure the thermostat is in the OFF/
STANDBY position otherwise press the ON/
OFF PROG button to go to the OFF/STANDBY position
Screen --:-- or hour : minutes
Program screen
b. Long press (3s) on the MODE button to
go in the presence detector setting
c. Short press MODE button to go in window open
setting menu.
d. Select OFF or ON by pressing the + & buttons
e. Exit with OFF button or MODE button.
14

6. Energy Saving Functions
6.3. End User Behaviour Indicator
The end user behaviour indicator is a traffic light system to warn of high temperature
(high consumption).
The display has a backlight that changes colour as the temperature set is increased or
lowered.
The indicator colour helps to educate the end user when they set manually the Comfort
temperature by visual information regarding the risk of energy consumption to maximise
energy savings.
Colour of screen:
GREEN from 7 to 19oC , when it is considered that power consumption and performance
are suitable.
YELLOW/ORANGE from 19 degrees to 24 oC, as the screen colour changes towards red,
this indicates an increased risk of higher power consumption.
RED 24oC and above indicates the risk of excessive consumption of electricity.
IMPORTANT NOTE: This colour is only indicative only and is assumed that the correct
size radiator has been chosen for the room size. If the radiator feels hot all the time and
the resistor symbol is displayed often, the radiator is too small for the area it is designed
to heat. The screen could still be GREEN but the radiator is working too hard.
Resistor symbol
15

6. Energy Saving Functions
6.4 Energy C ounter
The radiator is equipped with an energy counter so the user can view the cumulative
power consumption in K/wh.
Encourages end users to monitor their energy usage and make reductions in temperature
making energy savings.
First set the radiator power:
ACTION
SCREEN
a.
Ensure the thermostat is in the OFF/Stan-
dby position otherwise press the
ON/ OFF
PROG
button to go to the OFF position
Screen --:-- or hour : minutes
b.
Long press (2s) on the
MINUS
button to
display heater power
c.
Set the power value with
PLUS & MINUS button
d. Quit with MODE or OFF button
Screen --:-- or hour : minutes
Display the Energy C ounter:
ACTION
SCREEN
a. Ensure the thermostat is in the STOP
position otherwise press the STOP/WEEKLY
PROGRAM button to go to the STOP position
Screen --:-- or hour : minutes
b.
Long press (2s) on the
PLUS
button
Energy counter is displayed 8s :
Alternative Display of Energy counter and number of
days since last reset of the counter
c.
To quit, wait 8 seconds or press
OFF
button
Screen --:-- or hour : minutes
16

6. Energy Saving Functions
Reseting the Energy C ounter:
ACTION
SCREEN
a.
Ensure the thermostat is in the STOP
position otherwise press the STOP/WEEKLY PROGRAM button to go to the STOP
position
Screen --:-- or hour : minutes
b.
Long press (2s) on the
PLUS
button to
display counter
Energy counter is displayed 8s :
c.
Long press again the
PLUS
button to reset
counter
Screen --:-- or hour : minutes
d.
Quit with
MODE or OFF
button
Screen --:-- or hour : minutes
17

7. Safety Features
7.1. Babycare Function
The Baby care function limits the maximum surface temperature below 60oC.
IMPORTANT NOTE: Please read the safety standards on page 4 and 5. This is NOT a
LST (L ow Surface T emperature) radiator as dened in NHS guidelines.
This feature decreases the maximum heating power in order to have a surface
temperature below 60°C approximately. So the time to heat a room can be longer.
When this function is enabled, the baby icon (
) is displayed and blinks if the power is
effectively reduced.
Important note: when baby care function is enabled, the reaction time of the radiator
can take up to 1 minute when the desired temperature is changed by pressing PLUS or
MINUS.
This function is not
activated by default and
can be enabled with
long press on
MINUS
and MODE button in all
modes except in OFF or
setting functions.
LONG PRESS 2s
to enable/disable
Babycare function
7.2 Keypad L ock
The radiator is equipped with the option to lock the keypad.
This option is useful to prevent unwanted change in
settings (children, public buildings, offices, etc…)
To lock: long press (>3s) simultaneously on the
buttons + and -.
The screen displays for 2s all the horizontal bars
when a button is pressed and the keyboard lock is
enabled.
To unlock: long press (>3s) simultaneously on the
buttons “+” and “-” again.
Note: the locking of the keypad is also possible with the remote
control.
18

8. Temperature Offset
If the user wishes to set his value to be as close as possible to the room’s real
stabilized ambient temperature, measured using a suitable measuring device, and that
the measured temperature is not, for example, that of a cold draught passing over the
temperature probe (badly fitting window), an «offset» value can be manually applied.
ACTION
SCREEN
a. Go to STOP position
Press the STOP
key
Screen --:-- or hour : minutes
b. Repeat action 7a, 7b,
8b, 9b to pass through
previous setting menus,
1x Long Press
MODE and 2x
Short Press
MODE
c. Go to the offset setting menu
Short Press the
MODE key
The previous offset value is displayed
(0.0°C if not previously set: factory
setting).
d. Calculate the new
offset value
Measured temperature - Displayed set value = offset value to
be entered
>Example:
22°C room temperature (measured using a thermometer)
compared to the thermostat setting (displayed) of 20°C
The offset value is 22 - 20 = +2°C
The user should enter +2°C in the offset menu
e. Modify
Press the + and - buttons; offset adjusted by steps of 0.1°C
f. Save
Press (short
press) the MODE
or OFF button
Screen --:-- or hour : minutes
Please note, the manufacturer recommends that you keep at 0.0
19

9. Reset Factory Settings
This function erases all the setting of the thermostat for starting a new configuration.
ACTION
SCREEN
a. Go to STOP/STANDBY position
Screen --:-- or hour : minutes
b.
Long press an release (mini 10s) on
MODE and STOP
c.
Long press again (mini 5s) on MODE and
STOP button to reset the all the parameters
note : you can press 0.5s on STOP button to
cancel the reset.
After Reset, the programmer returns in COM-
FORT mode
BACKLIGHT FLASHING
20

 Loading...