

Electric Mobility Euro Limited Rascal Vision Owners Manual & Service Record
Electric Mobility Euro Limited, Canal Way, Ilminster , Somerset TA19 9DL
Telephone: 01460 258100 www.electricmobility.co.uk
Issue 1: 04/12
Rascal Vision
Scooter
Owner’s Manual & Service Record
Rascal Vision

Electric Mobility Euro Ltd has designed this powerful, durable, long range, road-capable scooter for comfort
during outdoor use. The Vision scooter is of fixed frame construction and not designed to be fully dismantled
for transportation, however it is compact enough to fit into some larger cars, MPVs and vans. Provided that
your scooter is maintained and operated in accordance with this manual it should last for many years, and
provide you with freedom and independence.
Please read this manual thoroughly before using this scooter. If you have any doubts about warnings or
instructions, ask your dealer for an explanation. If at any time you feel you may not be able to control your
scooter safely, do not drive it, and consult your dealer for a solution. If you think the scooter may be damaged,
do not drive it and contact your dealer for advice.
We suggest that you keep this owner’s manual in a safe place as it contains essential safety, operation and
maintenance information for this scooter.
2
2
Notice
All Electric Mobility Vehicles are sold through authorised dealers. Make sure your dealer demonstrates all
the features of the product prior to, or when, it is delivered.
Warning!
This manual contains important safety notices. Please take time to read and understand them. Ignoring
them may endanger you or others.
Rascal Vision Scooter Owner's Manual and Service Record
Rascal Vision

3
Contents
D
ealer information 4
Features and layout 4
Safety information 5
Intended use 5
Safety Information 6
Controls 8
Freewheel Device 10
Brakes 10
Armrest adjustment 11
Seat-back angle adjustment 11
Swivel seat 12
Seat position adjustment 12
Tiller folding 12
Transferring in and out of your scooter. 13
Operation 13
Driving the vehicle 14
Driving the vehicle - hazards 15
Transporting your scooter 16
Assembling your scooter following transportation 18
Battery charging 19
User maintenance 21
Servicing & maintenance 21
Scooter Diagnostic Functions 22
Troubleshooting guide 23
Additional safety information 23
Additional information 24
Frequently asked questions 24
Engineers checklist 25
Guarantees 26
Technical information regarding EMI 27
Technical specification 28
Brochure request 29
Guarantee Card - dealer information 29
Service log 31
4 Rascal Vision Scooter Owner's Manual and Service Record
Dealer Information
For product information see serial number plate on the seat post under the seat.
Manufacturer
Electric Mobility Euro Limited
Canal Way, Ilminster, Somerset TA19 9DL
Company Registration in England No. 2419231
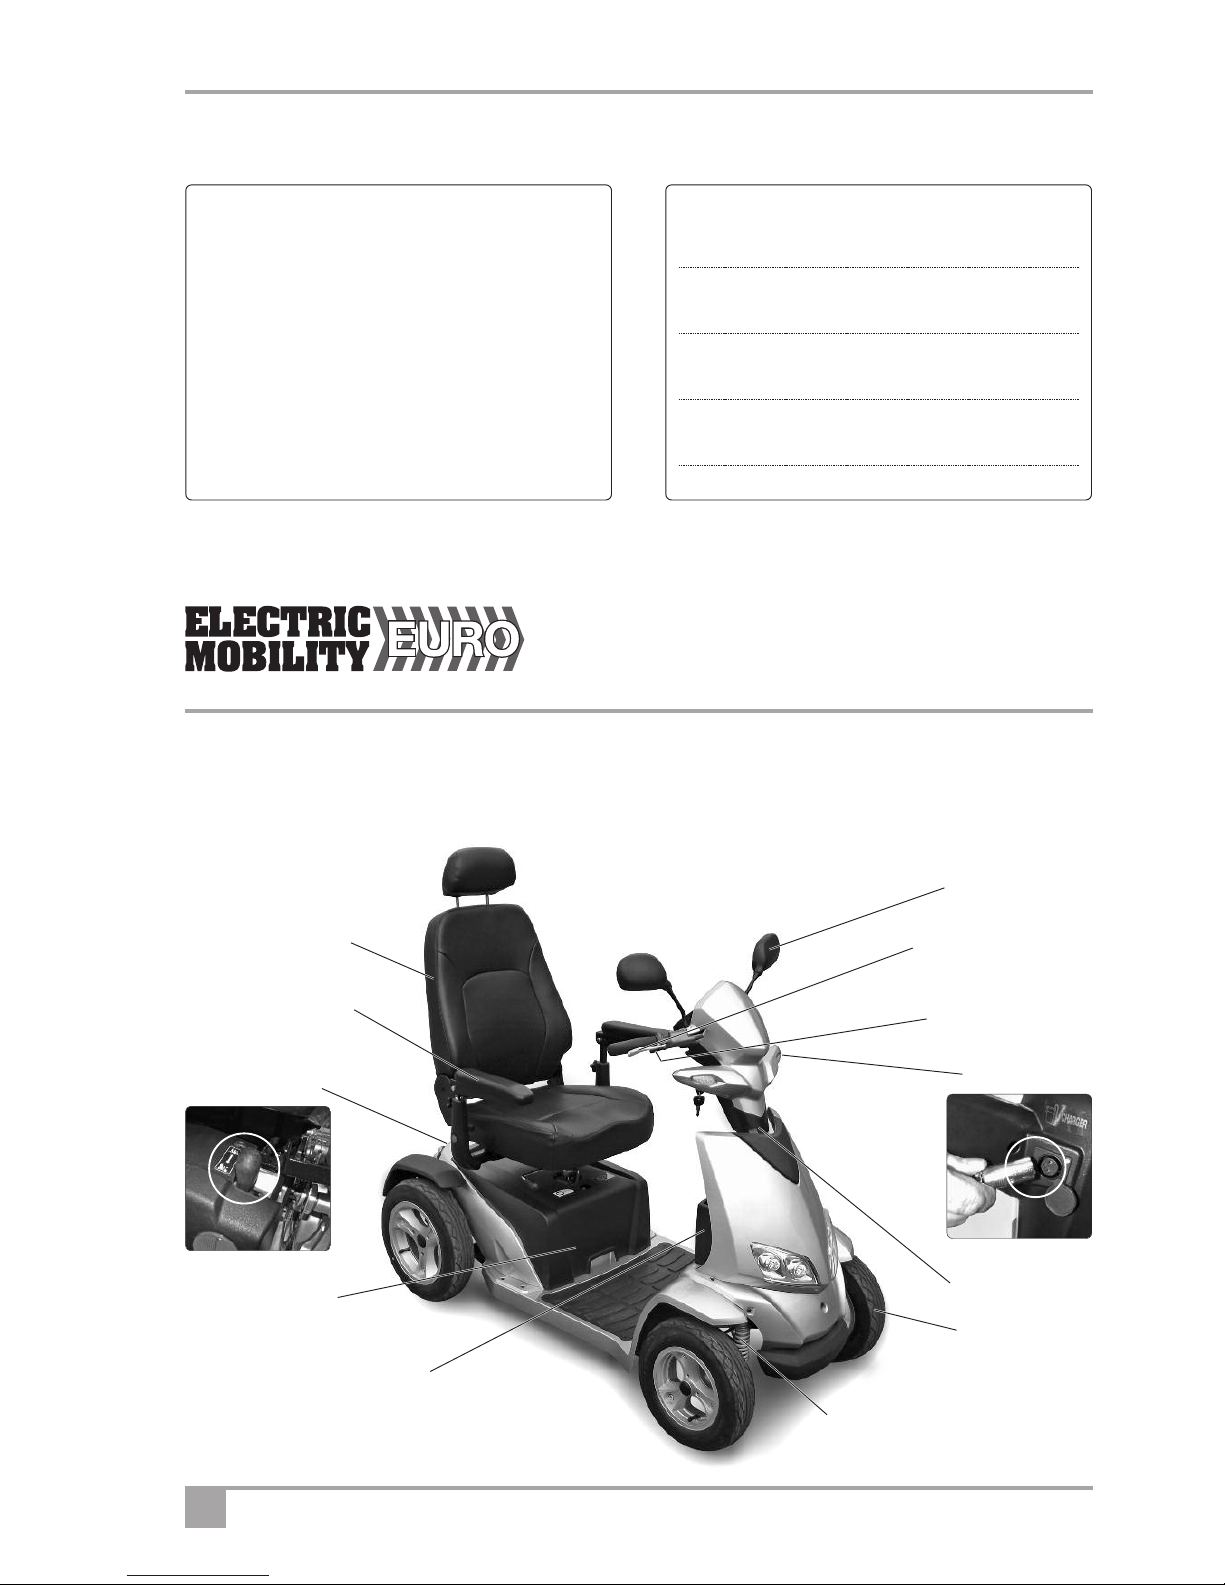
Features and Layout
Photo shows the Rascal Vision scooter. See the technical specification for full details.
This is your contact number
for service and support
Dealer Stamp
Telephone:
Email:
Product Model Number
Serial Number
Date of Purchase
Owner
Fold down lever
adjustable backrest
Fold up / adjustable
armrests
Freewheel lever
Emergency hydraulic
braking system
Finger control lever
Rear view mirrors
Tiller adjustment
Charging point
Pneumatic tyres
on alloy rims
Front coil and rear mono-shock
suspension for a superior ride.
Integrated battery
enclosure
Handy storage compartment
5
Safety Information
Read this manual thoroughly before driving or operating the vehicle.
If you have any doubt about the content of this manual phone your dealer to resolve the problem. Please read
this manual, and ensure your scooter is serviced regularly.
Book symbol: This symbol appears on the product. Please read this product manual before
assembling or operating the scooter.
Pinchpoint symbol: Wherever you see this sign there is a nearby risk of injury owing to a pinch or
crushing point.
Tip symbol: This sign indicates advice on how to get the most from your scooter.
© 2012 Electric Mobility Euro Ltd.
No liability is assumed with respect to the use of any information contained in this publication. While every precaution
has been taken in the preparation of this publication Electric Mobility Euro Ltd. assumes no responsibility for errors or
omissions nor is any liability assumed for damages resulting from the use of information contained in this publication.
This publication, as well as the operational details described herein, is subject to change without notice.
Intended use of the vehicle
The Vision scooter is designed for use by adults with a disability (up to the maximum recommended weight see Technical Specification Sheet) who require a robust, comfortable scooter that is ideal for shopping and
other visits. The Rascal Vision is a medium range 8mph scooter which is suited for travel on public roads when
this is required. When driven on pavements and other pedestrian areas, your scooter should be set on the low
preset speed setting (max 4 mph - see controls section of this manual). The Rascal Vision scooter has lighting
to enable it to operate in the dark. The Vision scooter is intended for use on pavements, roads and other hard
surfaces. The Vision can mount kerbs and obstacles up to the height specified in the Technical Specification
Sheet and, with careful driving, can tackle moderately difficult terrain, but high kerbs should be avoided.
Users could endanger themselves and others if they are not capable of driving this scooter safely. Dealers will
advise on the most suitable vehicle from the Electric Mobility range, but it is the user's responsibility to ensure
that they have the manual dexterity to drive the vehicle, adequate sight and hearing to perceive danger in time,
and can at all times operate the scooter safely in the expected conditions. If in doubt we suggest you consult
a healthcare professional and your nearest dealer for advice on the most suitable scooter for your particular
condition. Users should also regularly assess their ability to operate their vehicle safely.
The Rascal Vision scooter should not be used on slippery surfaces such as grass.
Within this manual there are important safety notices. They are clearly marked with the sign (left)
M
ake sure that you understand all these notices. If you have any doubt, contact your dealer.

6 Rascal Vision Scooter Owner's Manual and Service Record
Safety Information
General Warnings
Warning ! The operation of scooters can endanger the life of the driver or third parties. Any driver should
always be fully capable of operating this vehicle safely.
Warning ! Sitting for long periods may increase the chance of thromboses or pressure sores. Users prone to
such conditions are advised to take medical advice.
Warning ! The Rascal Vision scooter has been designed and tested for drivers with weights up to those in the
Technical Specification Sheets. These weights should never be exceeded.
Warning ! Do not exceed the specification; do not modify this scooter or use it other than as a scooter.
Warning ! Passengers, including children, should never be carried.
Warning ! Electromagnetic interference may affect the driving of this scooter:
• Do not operate devices such as CB radios or mobile phones while the vehicle is switched on.
• Avoid getting close to transmitter masts, such as television and radio stations.
If your vehicle ever starts to operate by itself switch it off and report this to your Dealer.
Warning ! The operation of any scooter may affect sensitive electronic circuits such as alarm systems or
automatic doors in shops.
Driving
Before driving, refer to ”Driving Your Vehicle” … later in this manual
Warning ! Ambient Operating Temperature Range. Do not use your scooter in temperatures outside the
range stated in the specifications section of this manual. Driving in very hot or very cold conditions
can make driving more hazardous.
Warning ! Freewheel Device/Mode. Before getting on your scooter always check that the freewheel lever is
in the Drive position. When the freewheel lever is in the freewheel position, the main brakes on your
scooter will not function. Extra care should be taken with your scooter when it is in freewheel
mode as it could move without warning. You must never sit on or try to ride your scooter when it is
in freewheel mode as serious injury or death may result.
NEVER SIT ON THE SCOOTER WHEN IN FREEWHEEL MODE.
Warning ! Transferring On and Off. Do not attempt to get on or off your scooter unless it is switched off, at
rest, and on a stable, level surface. Never get on or off on a hill.
Warning ! Damage. Before driving off, check the scooter for damage, particularly that which could affect the
controls, wheels, freewheel function and/or drive motor.
Warning ! Footrest. Before switching on the scooter, always make sure that your feet are safely on the
footrest areas. If you drive forward with your feet still on the ground, they could become trapped
under the scooter and serious injury may result.
Warning ! Armrests. Do not use the armrests as a support for your entire weight when getting in or out of
the scooter. Make sure the armrests are lowered and secure before you start off otherwise you may
fall out.
Warning ! Entanglement. Do not wear clothing or carry items on the scooter that could become entangled in
wheels or other moving parts whilst operating the scooter. Severe injury may result.

7
Warning ! Battery Charge Level. Before driving off, always check the battery indicator. If you are in any
d
oubt, ensure all the batteries are fully charged before starting on a journey.
Warning ! Castoring. Be aware that, if you set off when the front wheels are not straight, the initial movement
c
ould be partially sideways.
Warning ! Power. Unless there is an emergency, do not switch the power off when moving. The Scooter may
s
top very suddenly. Release the forward / reverse control and the scooter will come to a controlled stop.
Warning ! Slopes. On steep slopes the scooter could topple over. Always try to avoid crossing a slope. If you
h
ave to cross a slope, take great care to avoid tipping. Never make sharp turns on slopes. Never
drive on slippery or icy slopes. - If you are not comfortable with the hill gradient, consider an
alternative route. See “Driving Your Vehicle” – Hazards for more advice.
Warning ! Kerbs. You should always try to avoid driving up or down kerbs as this may cause the scooter to
topple. Use access ramps wherever possible. Never attempt to climb or descend kerbs greater
than that noted in the Technical Specification. If you have to climb or descend a low kerb, always
tackle it straight on. See “Driving Your Vehicle” – Hazards for more advice.
Warning ! Speed. Turning at maximum speed might cause the scooter to topple over. Always slow down for
turns. Always slow down when amongst pedestrians and ensure you do not run into them.
Warning ! Stopping. If the scooter stops suddenly when turning, it might topple. Try not to brake when
turning. Always take particular care when turning.
Warning ! Reversing. Always take particular care when reversing the scooter as injury to other people may
occur if safe distances are not maintained.
Warning ! Leaning Over. Do not lean sideways, as this could cause the scooter to topple.
Warning ! Escalators. Never drive the scooter onto an escalator as this could cause the scooter to topple
and result in severe injury.
Warning ! Roads. In the United Kingdom, Mobility scooters are not permitted on dual carriageways without
an additional amber warning beacon being fitted. Never take your scooter on a Motorway. For more
information please refer to the Highway code.
Warning ! Driving in Poor Visibility. Scooters are not easily seen. Always turn your lights on in poor visibility
or when travelling on roads. Consider wearing a high visibility jacket to warn others of your presence.
Warning ! Carrying Items. Do not carry or attach anything to the handlebars or controls as this could affect
the driving safety.
Warning ! Hot Surfaces. If the scooter is left out in the sun, surfaces could become extremely hot. Always try
to park the vehicle in the shade.
Warning ! Seats in Vehicles. This scooter is not suitable for use as a seat for an occupant when in a
motor vehicle.
8 Rascal Vision Scooter Owner's Manual and Service Record
Controls
Before driving your vehicle it is important to familiarise yourself with the controls. Do not attempt to drive the
vehicle before reading the rest of this Owner’s Manual.
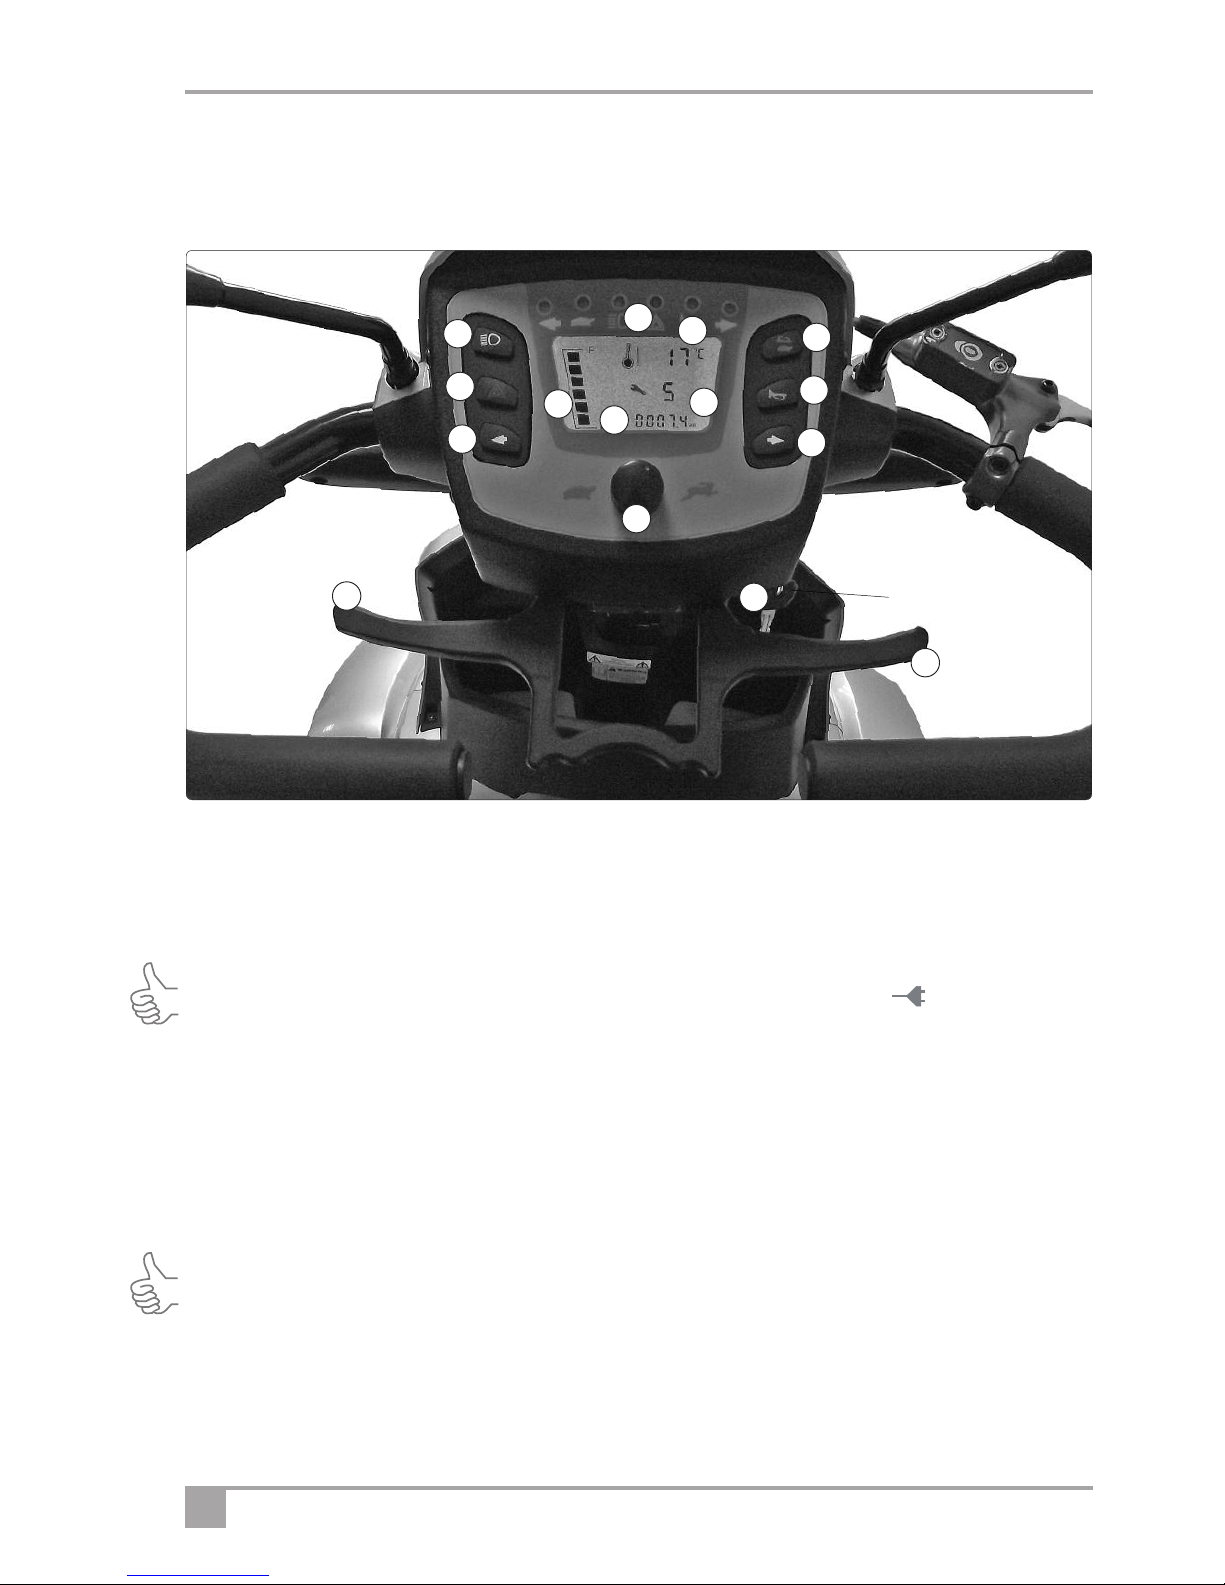
Dashboard Description
1. Battery Indicator: This indicator shows the level of charge in the batteries. When all segments are shown
the batteries are full. As the charge level of the batteries depletes, so the number of lit segments will drop.
Note: When the vehicle is climbing a steep incline or starting off, the level may drop momentarily; this is normal.
Tip: When the batteries need charging urgently the "mains plug" symbol will appear
Always fully charge your batteries before setting out on a trip.
2. Speed Control: This controls the preset top speed of your scooter. When the knob is turned anticlockwise
to the left, this is its slowest speed, marked by a tortoise. As the knob is turned to the right the speed will
increase to a maximum, marked by a hare. Set the speed before you move off. Do not adjust the speed
control dial when the vehicle is moving.
3. Power On Indicator: When the ignition key is inserted into the scooter and turned to the "on" or "I"
position, the LCD panel will illuminate.
Tip: If a spanner symbol and a number in the range 1 -10 appears and persists, this may indicate a fault.
A key to the fault codes can be found in the "Scooter diagnostic functions" section of this manual.
A common "fault" is that the scooter has been left in freewheel mode. This will be shown by the spanner
symbol flashing and the digit "5" being displayed. Turn the key to the "0" or off position, disengage the
free-wheel mode and turn the key back to the on or "I" position.
4. Horn: Press the button and the horn will sound, if power is on. Release and the horn will cease.
3
14
15
13
5
2
1
7
8
9
6
6
10
4
11
Ignition key
9
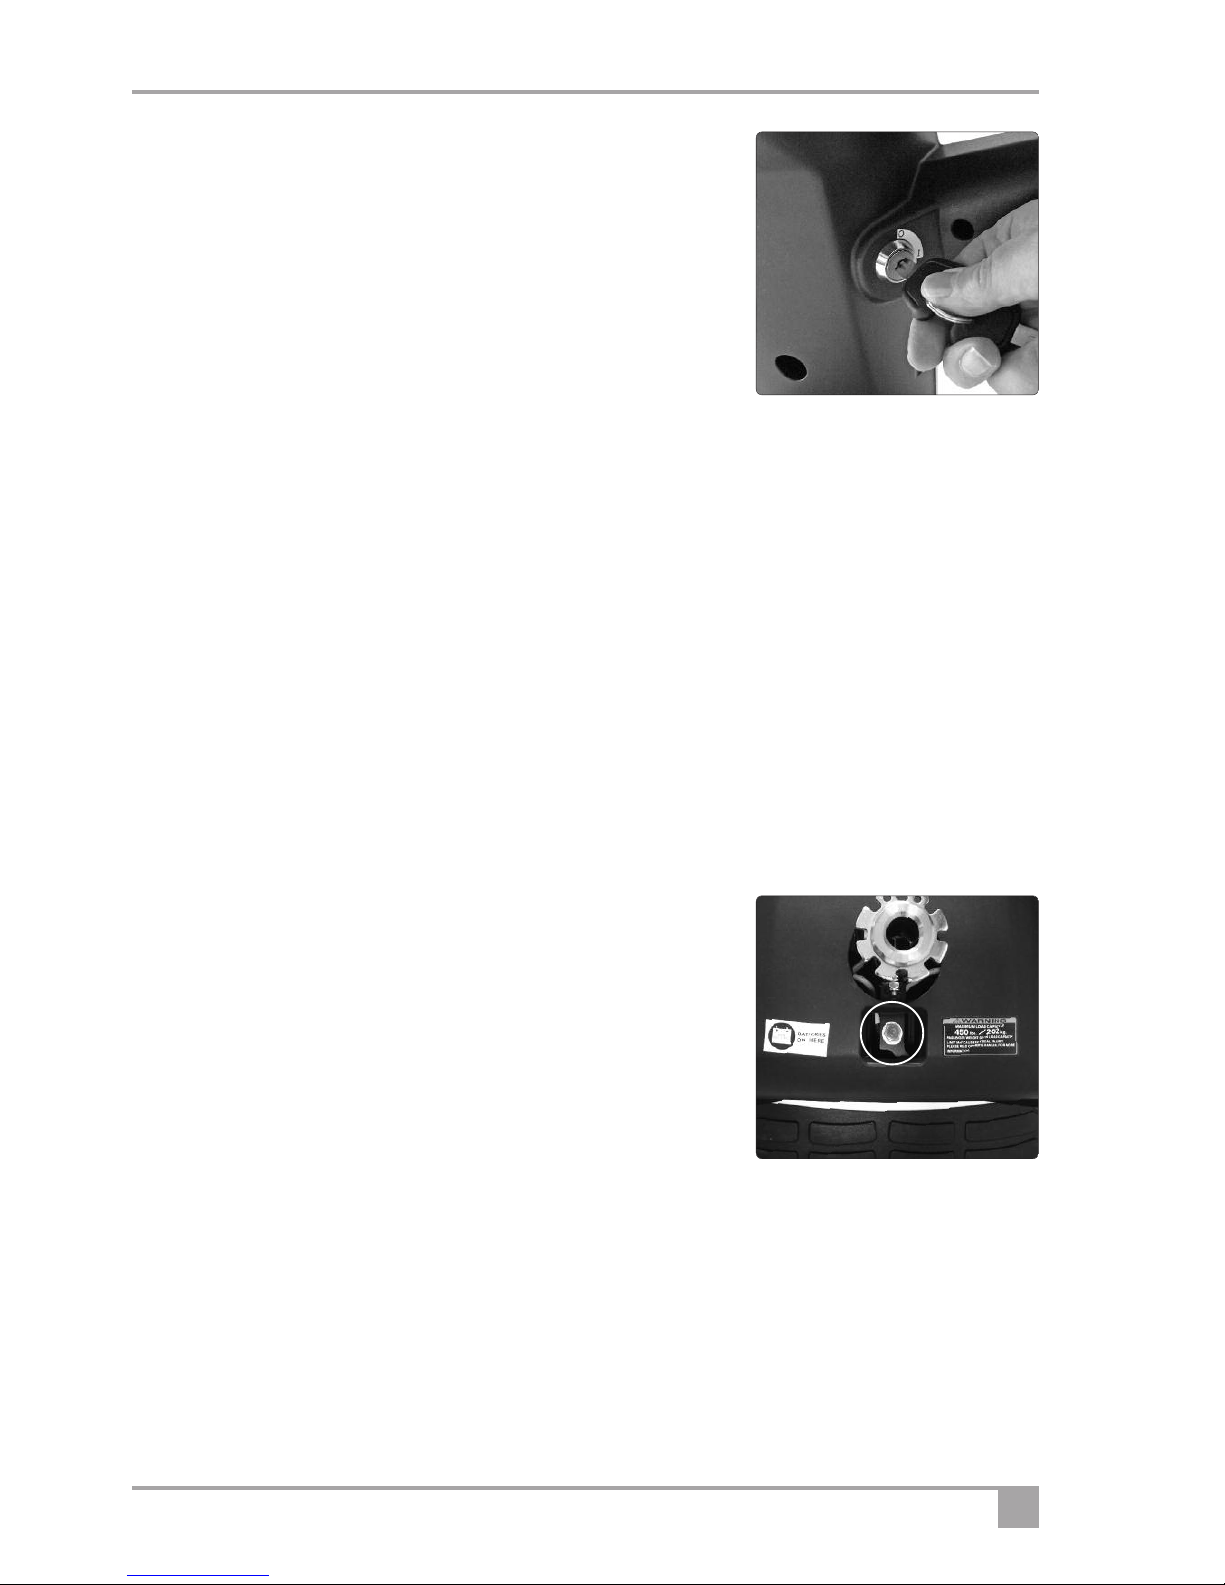
5. Ignition Key: Remember to remove the key when not in use. Do
n
ot leave the ignition on when not in use, especially when charging
the vehicle (Fig 1). Note: You may need to press the ignition key
gently inwards before it will allow itself to be turned.
6. Finger control: To operate, turn on the ignition. Pull the right hand
l
ever towards you and the machine moves forward. The more you pull
the lever the faster the scooter goes. To brake, release the lever. Again
the faster the lever is released the quicker you will stop. To reverse, pull
the left lever towards you. Do not pull both levers at once. Note: The
controls can be changed for customers with a left-hand bias. Please
contact your local dealer for information.
7. Lighting control: To switch on the scooter front and rear lighting press the lighting switch once, to turn it
off, press the switch a second time.
8. Hazard lights: In an emergency or during a break-down, the hazard lights should be switched on.
Press the hazard light button once to switch on - All turn indicators will flash together. Press the button for
a second time to switch the hazard lights off.
9. Indicator (left turn): Press this once to start the left turn indicator flashing, press again to stop.
10. Half speed switch: When travelling in pedestrian areas (not on the road) this switch can be pressed to
limit the maximum scooter speed to 50% of the value pre-selected by the speed control (2) knob. This
means that the scooter will not be able to travel at more than 4mph. To turn this function off, press the
switch for a second time.
11. Indicator (right turn): Press this once to start the right turn indicator flashing, press again to stop.
12. Battery cut-out: Your scooter is equipped with a battery cut-out
(Fig 2) that is designed to operate in the unlikely event of an electrical
or electromechanical overload and is located beneath the front edge
of the seat on the black cover. If this activates, all power will be cut
from the batteries to the scooter. This device can be re-set by
pressing the button shown in the illustration. Should it activate for a
second time please seek advice from your dealer.
13. Hour meter: Your scooter is equipped with an hour meter. This
records the total time that the scooter has been run from new. This
meter cannot be reset by the user.
14. Indicator Lights/ LEDs: Along the upper edge of the dashboard there are a row of LEDs that indicate
which functions are active. As a function becomes active, a corresponding LED will light - when the
function is switched off, the corresponding LED will extinguish.
15. Temperature Indicator: This shows the current ambient temperature in degrees Celsius.
Charging Point: The charging point is situated on the left hand side
of the scooter tiller. See the Charging section for further instructions.
2
1
10 Rascal Vision Scooter Owner's Manual and Service Record
Freewheel Device
When the vehicle is switched off the brakes are automatically
e
ngaged. This is called “Failsafe Braking”. Also, if the batteries are
flat, the brakes are applied. There may be occasions where you may
wish to move the vehicle without power. To do this there is a
Freewheel Device fitted.
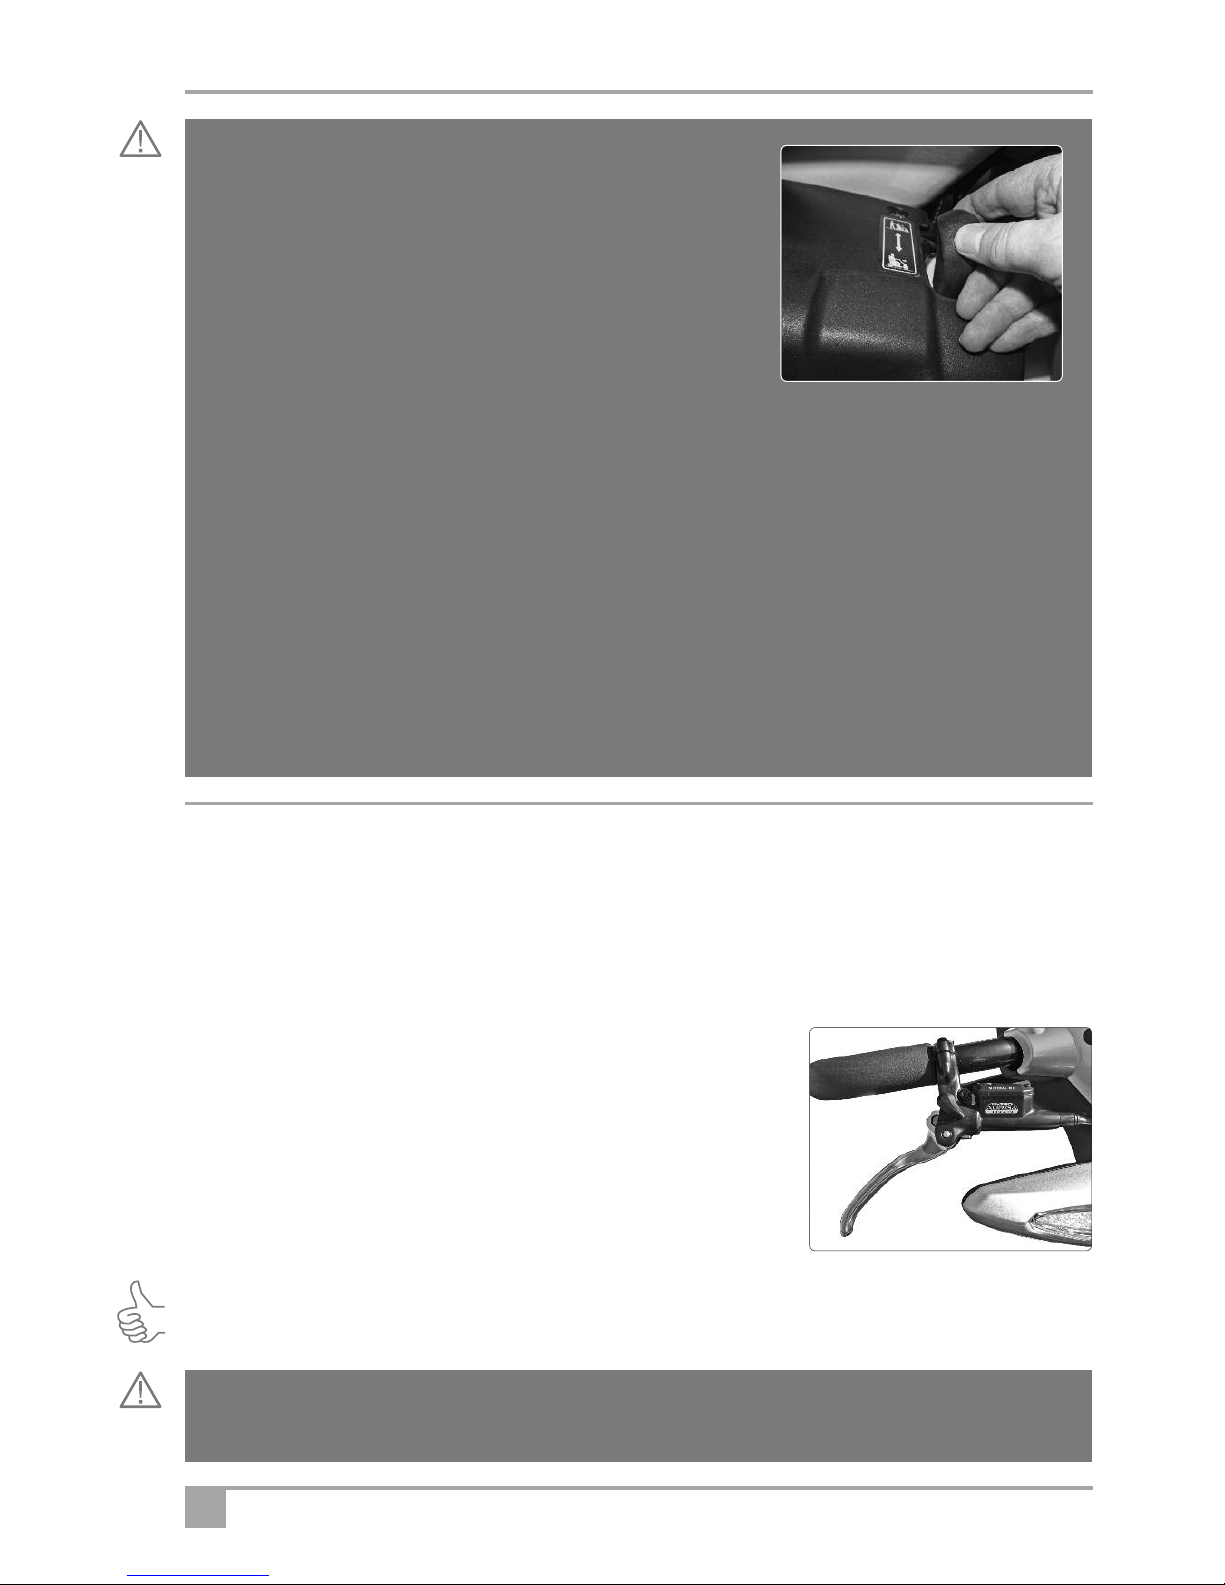
The Freewheel device allows the vehicle to be pushed without power.
To activate, first locate the lever. When standing behind the scooter, it
is located on the right hand side of the rear of the vehicle (see Fig 3)
• Make sure the On/Off (ignition) key is in the off position.
• Move the lever FORWARD The vehicle can now be pushed in Freewheel.
• Move the lever BACK to engage drive. The vehicle is now braked. This is the normal operating position.
• IF YOU ARE NOT COMPLETELY SURE OF THIS FEATURE CONTACT
YOUR DEALER BEFORE OPERATING THE SCOOTER.
NOTE: To avoid excessive strain on the tiller / handlebar assembly, never push or pull the scooter in
freewheel mode if a user is on-board. Push the lever FORWARDS to engage freewheel mode. Pull the lever
BACKWARDS to engage Drive mode.
Warning! If the freewheel device is in “freewheel” mode the braking is disabled. Never select the
freewheel mode if the Scooter is on a slope or could be pushed onto a slope.
Brakes
There are 3 braking systems. The first works with the finger controls. When the finger control is released the scooter
will automatically brake and bring the scooter to a stop. When the scooter stops the automatic parking brake will
engage. This will stop the vehicle rolling forward or backward. When you start the brake will automatically disengage.
If the battery should go flat the brakes automatically engage. Note that even when freewheel is selected, a secondary
regenerative braking system is applied automatically to limit the maximum speed. You may notice this system causing drag when moving the scooter in freewheel mode.
The third braking system is a state-of the-art twin hydraulic disc brake that can
be used in emergencies. This braking system is controlled by pulling/
compressing the lever on the right hand side of the handle bars/ tiller (see Fig 4).
The more pressure you apply to the lever the heavier the braking effect will be.
This braking system applies even braking to both back wheels making it one of
the safest designs on the market.
Tip: If you wish to lock this braking system on permanently to act as a
supplementary parking brake, you may do this by first pulling / compressing the lever and then move the locking
latch into position. When you release the lever it will stay compressed. Remember to always disengage the
locking latch before use by compressing the lever fully and rotaing the latch in the opposite direction.
4
3
Warning! Do not use the emergency brake for normal driving and never engage the lever locking latch
unless the scooter is stationery.
 Loading...