

Page 1
Electric Mobility Euro Limited, Canal Way, Ilminster , Somerset TA19 9DL
Telephone: 01460 258100 www.electricmobility.co.uk
Issue 3: 04/2016
Rascal Veo, Veo X
& Veo Sport Scooters
Owner’s Manual & Service Record
Rascal Veo Sport
Page 2
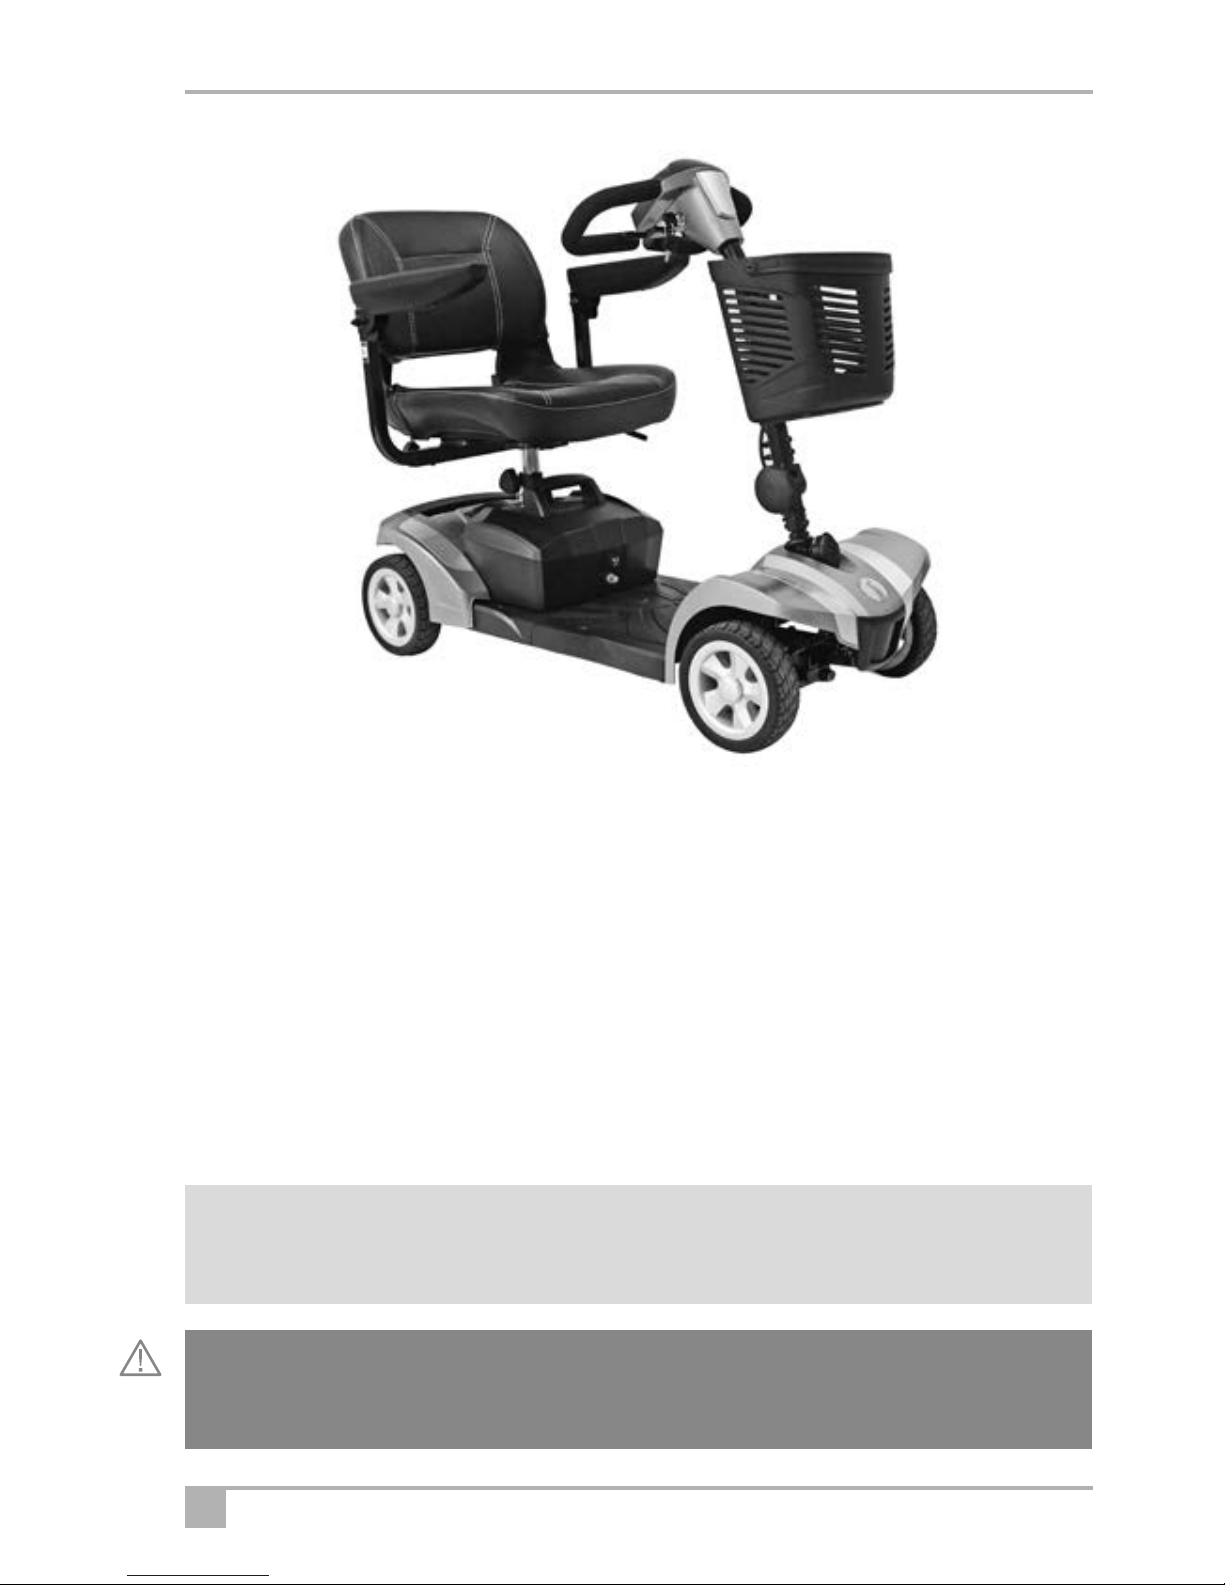
Electric Mobility Euro Ltd offers these robust, manoeuvrable scooters for convenient indoor and outdoor use.
The Veo series of scooters can easily be dismantled for transport in cars, MPVs and vans. The three different
models of Veo Scooter differ from each other in terms of specification - for information see the Specifications
section of this manual. Provided that your scooter is maintained and operated in accordance with this manual it
should last for many years, and provide you with freedom and independence.
Please read this manual thoroughly before using your scooter. If you have any doubts about warnings or
instructions, ask your dealer for an explanation. If at any time you feel that you may not be able to control your
scooter safely, do not drive it, and consult your dealer for a solution. If you think the scooter may be damaged,
do not drive it and contact your dealer for advice.
We suggest that you keep this owner’s manual in a safe place as it contains essential safety, operation and
maintenance information for this scooter.
2
2
Notice
All Electric Mobility Vehicles are sold through authorised dealers. Make sure your dealer demonstrates all
the features of the product prior to, or when, it is delivered.
Warning!
This manual contains important safety notices. Please take time to read and understand them. Ignoring
them may endanger you or others.
Rascal Veo, Veo X & Veo Sport Scooter
Rascal Veo Sport
Page 3

3
Contents
Dealer information 4
Features and layout 4
Safety information 5
Intended use 5
Safety Information 6
Controls 8
Freewheel Device 9
Brakes 9
Armrest adjustment 10
Seat back adjustment 10
Swivel seat 10
Tiller folding and tiller transport lock 10
Transferring in and out of your scooter. 11
Operation 12
Driving the vehicle 12
Driving the vehicle - hazards 13
Transporting your scooter 14
Assembling your scooter following transportation 16
Battery charging 17
User maintenance 19
Servicing & maintenance 19
Scooter Diagnostic Functions 20
Troubleshooting guide 22
Additional safety information 22
Additional information 23
Frequently asked questions 23
Engineers checklist 24
Guarantees 25
Technical information regarding EMI 26
Technical specification 27
Brochure request 31
Guarantee Card - dealer information 31
Service log 33
Page 4
4
Rascal Veo, Veo X & Veo Sport Scooter
Dealer Information
For product information see serial number plate on the seat post under the seat and / or as attached to the
scooter chassis.
Manufacturer
Electric Mobility Euro Limited
Canal Way, Ilminster, Somerset TA19 9DL
Company Registration in England No. 2419231
Features and Layout
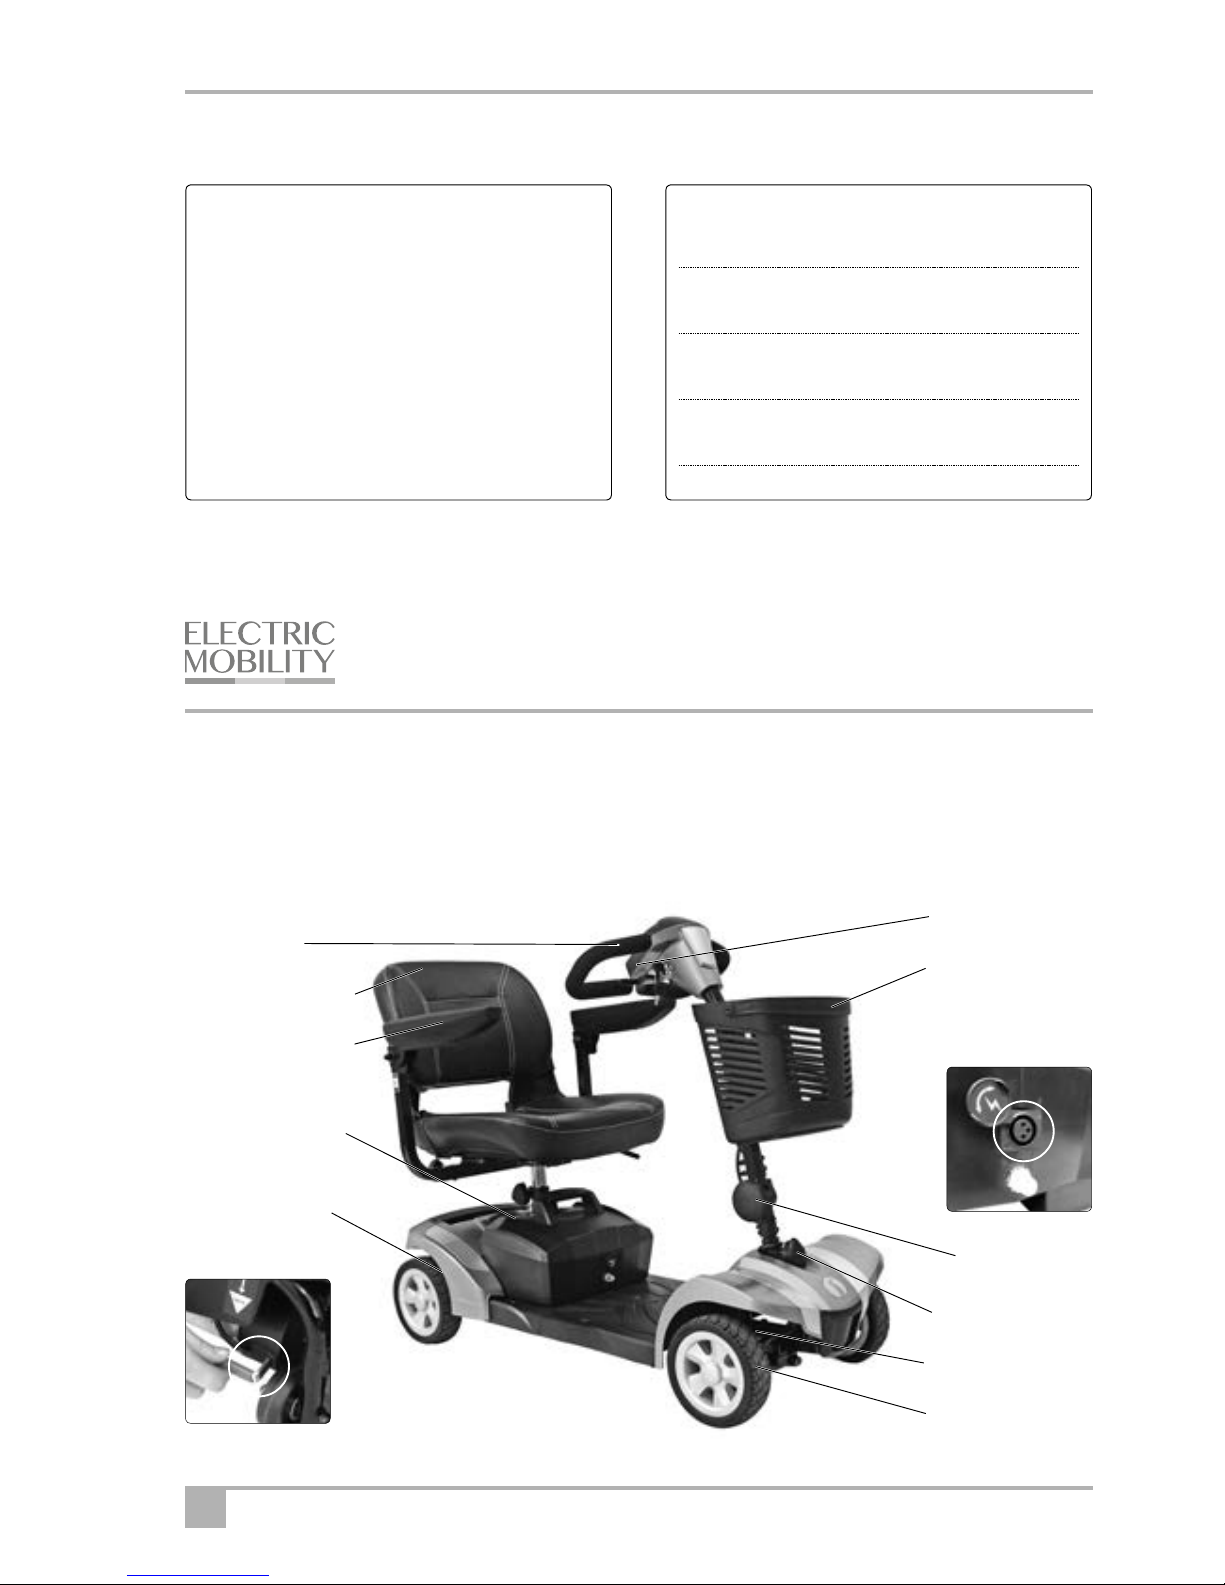
Photo shows the Rascal Veo Sport scooter. See the technical specification for full details.
This is your contact number
for service and support
Dealer Stamp
Telephone:
Email:
Product Model Number
Serial Number
Date of Purchase
Owner
Fold down backrest
Fold up / adjustable
armrests
Freewheel lever
Rear suspension
Finger control lever
Removable storage
basket
Tiller adjustment
Tiller transport lock
Front tilt suspension
Solid tyres all round
Charging point
Delta-bar tiller
Removable battery
pack
Page 5
5
Safety Information
Read this manual thoroughly before driving or operating the vehicle.
If you have any doubt about the content of this manual phone your dealer to resolve the problem. Please read
this manual, and ensure your scooter is serviced regularly.
Book symbol: This symbol appears on the product. Please read this product manual before
assembling or operating the scooter.
Pinchpoint symbol: Wherever you see this sign there is a nearby risk of injury owing to a pinch or
crushing point.
Tip symbol: This sign indicates advice on how to get the most from your scooter.
© 2016 Electric Mobility Euro Ltd.
No liability is assumed with respect to the use of any information contained in this publication. While every precaution
has been taken in the preparation of this publication Electric Mobility Euro Ltd. assumes no responsibility for errors or
omissions nor is any liability assumed for damages resulting from the use of information contained in this publication.
This publication, as well as the operational details described herein, is subject to change without notice.
Intended use of the vehicle/s
The Rascal Veo series of scooters are designed for use by adults with a disability (up to the maximum
recommended weight (see Technical Specification sheet) who require a robust daily use scooter that is ideal for
both indoor and outdoor use.
These scooters are intended for use both outdoors and indoors on hard /smooth surfaces. Kerbs should
be avoided, but the scooters can mount kerbs and small obstacles up to that specified in the Technical
Specification sheet.
Users could endanger themselves and others if they are not capable of driving their scooter safely. Dealers will
advise on the most suitable vehicle from the Electric Mobility range, but it is up to users to ensure that they
have the manual dexterity to drive the vehicle, adequate sight and hearing to perceive danger in time, and can
at all times operate the scooter safely in the expected conditions. If in doubt we suggest you consult a
healthcare professional and your nearest dealer for advice on the most suitable scooter for your particular
condition. Users should also regularly assess their ability to operate their vehicle safely.
The Rascal Veo series of scooters should not be used on potholed, rutted or slippery surfaces such as grass.
Within this manual there are important safety notices. They are clearly marked with the sign (left)
Make sure that you understand all these notices. If you have any doubt, contact your dealer.
Page 6

6
Rascal Veo, Veo X & Veo Sport Scooter
Safety Information
General Warnings
Warning ! The operation of scooters can endanger the life of the driver or third parties. Any driver should
always be fully capable of operating this vehicle safely.
Warning ! Sitting for long periods may increase the chance of thromboses or pressure sores. Users prone to
such conditions are advised to take medical advice.
Warning ! The Rascal Veo range of scooters has been designed and tested for drivers with weights up to
those in the Technical Specification Sheets. These weights should never be exceeded.
Warning ! Tiller Mounted Basket. The basket mounted on the tiller has a weight limit as shown in the
Technical specification. Do not exceed this as it could affect stability and performance. Do not carry
or attach anything to the handlebars or controls as this could affect driving safety.
Warning ! Do not exceed the specification; do not modify this scooter or use it other than as a scooter.
Warning ! Passengers, including children, should never be carried.
Warning ! Electromagnetic interference may affect the driving of this scooter:
• Do not operate devices such as CB radios or mobile phones while the vehicle is switched on.
• Avoid getting close to transmitter masts, such as television and radio stations.
If your vehicle ever starts to operate by itself switch it off and report this to your Dealer.
Warning ! The operation of any scooter may affect sensitive electronic circuits such as alarm systems or
automatic doors in shops.
Driving
Before driving, refer to ”Driving Your Vehicle” … later in this manual
Warning ! Ambient Operating Temperature Range. Do not use your scooter in temperatures outside the
range stated in the specifications section of this manual. Driving in very hot or very cold conditions
can make driving more hazardous.
Warning ! Freewheel Device/Mode. Before getting on your scooter always check that the freewheel lever
is in the Drive position. When the freewheel lever is in the freewheel position, the main brakes on
your scooter will not function. Extra care should be taken with your scooter when it is in freewheel
mode as it could move without warning. You must never sit on or try to ride your scooter when it
is in freewheel mode as serious injury or death may result.
NEVER SIT ON THE SCOOTER WHEN IN FREEWHEEL MODE.
Warning ! Transferring On and Off. Do not attempt to get on or off your scooter unless it is switched off, at
rest, and on a stable, level surface. Never get on or off on a hill.
Warning ! Damage. Before driving off, check the scooter for damage, particularly that which could affect the
controls, wheels, freewheel function and/or drive motor.
Warning ! Footrest. Before switching on the scooter, always make sure that your feet are safely on the
footrest areas. If you drive forward with your feet still on the ground, they could become trapped
under the scooter and serious injury may result.
Warning ! Armrests. Do not use the armrests as a support when getting in or out of the scooter. Make sure
the armrests are lowered and secure before you start off otherwise you may fall out.
Page 7

7
Warning ! Entanglement. Do not wear clothing or carry items on the scooter that could become entangled
in wheels or other moving parts whilst operating the scooter. Severe injury may result.
Warning ! Battery Charge Level. Before driving off, always check the battery indicator. If you are in any
doubt, ensure all the batteries are fully charged before starting on a journey.
Warning ! Castoring. Be aware that, if you set off when the front wheels are not straight, the initial
movement could be partially sideways.
Warning ! Power. Unless there is an emergency, do not switch the power off when moving. The Scooter may
stop very suddenly. Release the forward / reverse control and the scooter will come to a controlled stop.
Warning ! Slopes. On steep slopes the scooter could topple over. Always try to avoid crossing a slope. If you
have to cross a slope, take great care to avoid tipping. Never make sharp turns on slopes. Never
drive on slippery or icy slopes. - If you are not comfortable with the hill gradient, consider an
alternative route. See “Driving Your Vehicle” – Hazards for more advice.
Warning ! Kerbs. You should always try to avoid driving up or down kerbs as this may cause the scooter to
topple. Use access ramps wherever possible. Never attempt to climb or descend kerbs greater
than that noted in the Technical Specification. If you have to climb or descend a low kerb, always
tackle it straight on. See “Driving Your Vehicle” – Hazards for more advice.
Warning ! Speed. Turning at maximum speed might cause the scooter to topple over. Always slow down for
turns. Always slow down when amongst pedestrians and ensure you do not run into them.
Warning ! Stopping. If the scooter stops suddenly when turning, it might topple. Try not to brake when
turning. Always take particular care when turning.
Warning ! Reversing. Always take particular care when reversing the scooter as injury to other people may
occur if safe distances are not maintained.
Warning ! Leaning Over. Do not lean sideways, as this could cause the scooter to topple.
Warning ! Escalators. Never drive the scooter onto an escalator as this could cause the scooter to topple
and result in severe injury.
Warning ! Roads. This scooter is not designed or approved for use on public roads, apart from crossing
roads at designated places.
Warning ! Driving in Poor Visibility. Scooters are not easily seen. Your scooter is not intended for use in
darkness or in poor visibility.
Warning ! Carrying Items. Do not carry or attach anything to the handlebars or controls as this could affect
the driving safety.
Warning ! Hot Surfaces. If the scooter is left out in the sun, surfaces could become extremely hot. Always
try to park the vehicle in the shade.
Warning ! Seats in Vehicles. This scooter is not suitable for use as a seat for an occupant when in a
motor vehicle.
Page 8
8
Rascal Veo, Veo X & Veo Sport Scooter
Controls
Before driving your vehicle it is important to familiarise yourself with the controls. Do not attempt to drive the
vehicle before reading the rest of this Handbook.
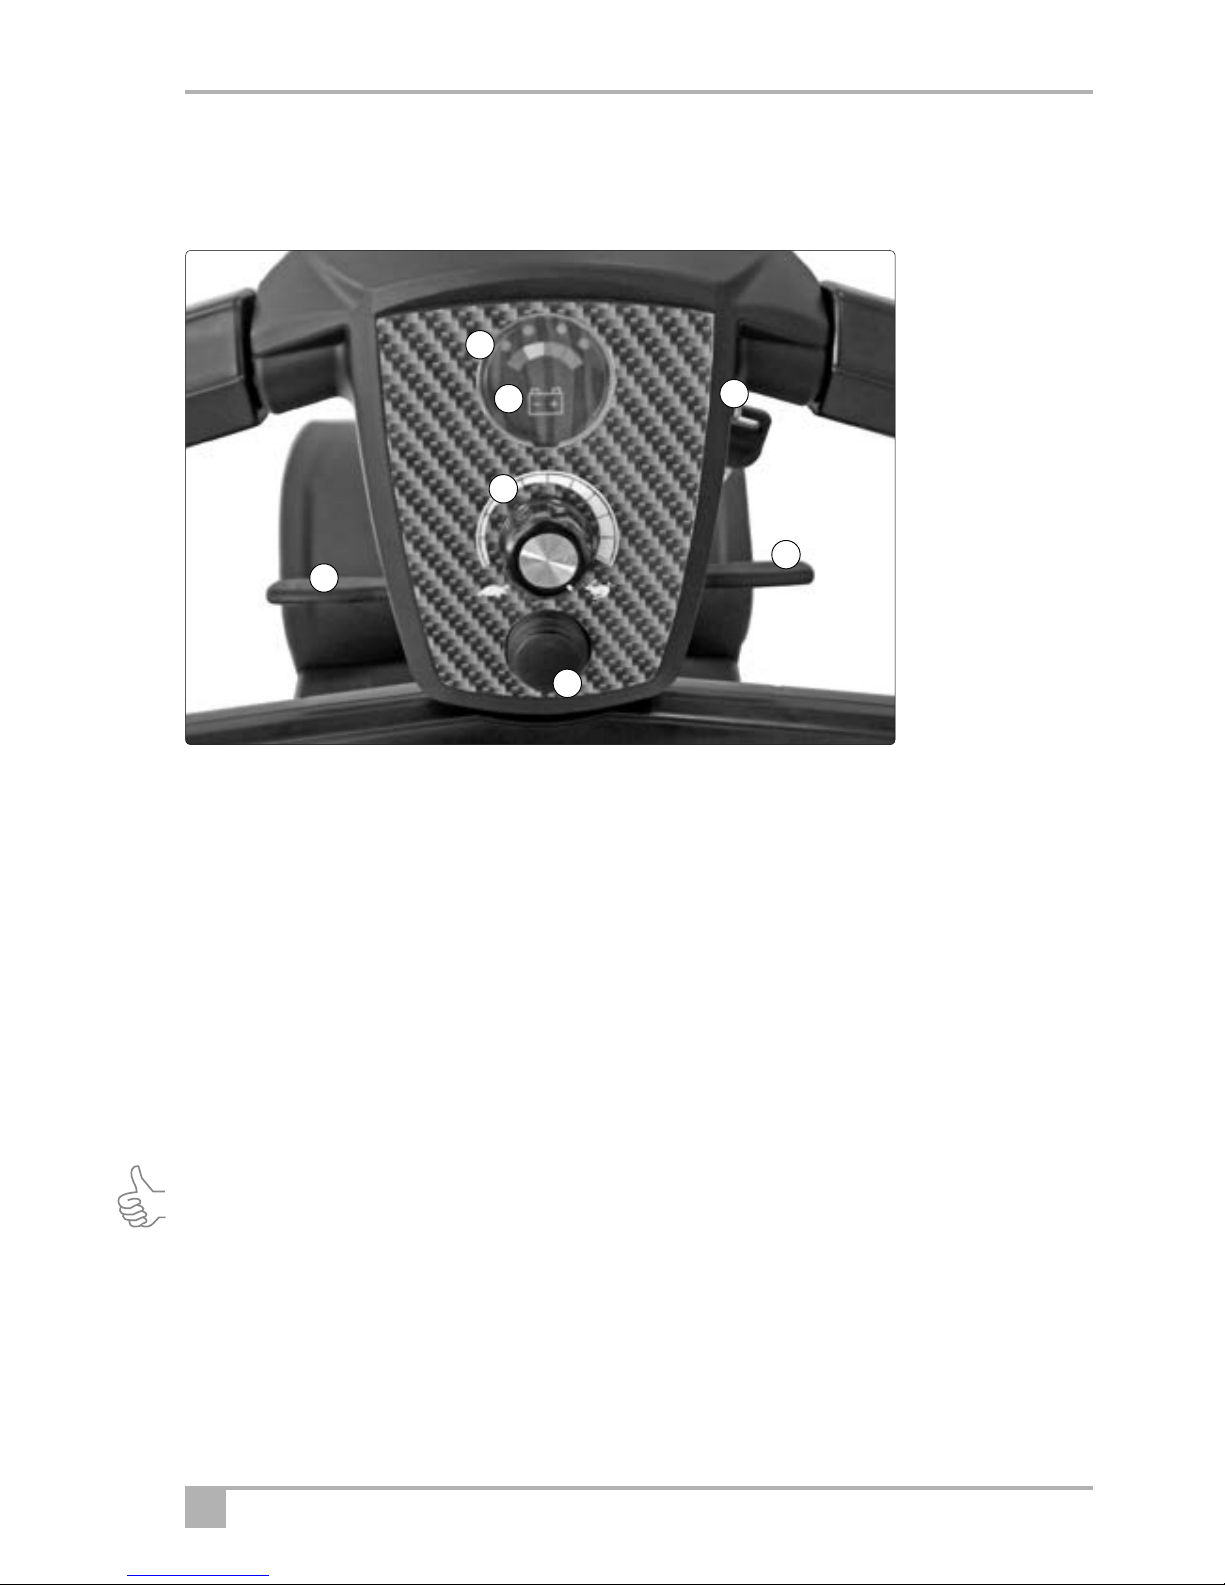
Dashboard Description
1. Battery Indicator: This indicator shows the level of charge in the batteries. When in the green area the
batteries are fully charged. When in the yellow area the batteries need recharging and when in the red area
the batteries urgently need recharging. Note: When the vehicle is climbing a steep incline or starting off, the
level may drop momentarily; this is normal.
2. Speed Control: This controls the top speed of your scooter. When the knob is turned fully to the left, this
is the slowest speed setting, marked by a tortoise. As the knob is turned to the right the speed will increase to a
maximum, marked by a hare. Set the speed before you move off. Do not adjust the speed control dial when
the vehicle is moving.
3. Power On Indicator / Status LED: This indicator (first LED on the battery indicator) shows the status of
the scooter – either on or off. Note. The controller has a diagnostic mode: If the red LED flashes, this indicates
that the controller has detected an error or fault. If this happens refer to the diagnostic table at the back of
this manual for a solution.
Tip: One of the most common “faults” is that the scooter has been switched on with the free-wheel function
enabled– Just turn the power on/off key to the off position, position the freewheel lever in drive and turn the
ignition key back to the ON position.
4. Horn: Press the button and the horn will sound. Release and the horn will cease.
5. Ignition Key: Dependent on the model of scooter, the ignition key may have to be pushed in before you can turn
the vehicle on or off. Remember to remove the key when not in use. Do not leave the ignition on when not in use,
especially when charging the vehicle.
1
2
3
4
5
6
6
Page 9
9
6. Finger control: To operate, turn the key to the “on” or “I” position on the ignition. Pull the right hand lever
towards you and the machine moves forward. The more you pull the lever the faster the scooter goes. To
brake, release the lever. Again the faster the lever is released the quicker you will stop. To reverse, pull the
left lever towards you. Do not pull both levers at once. Note. The controls can be changed for customers
with a left-hand bias. Please contact your local dealer for information.
Charging Point: The charging point is situated on the front face of the removable battery pack. (see Battery
Charging section for further instructions).
Freewheel Device
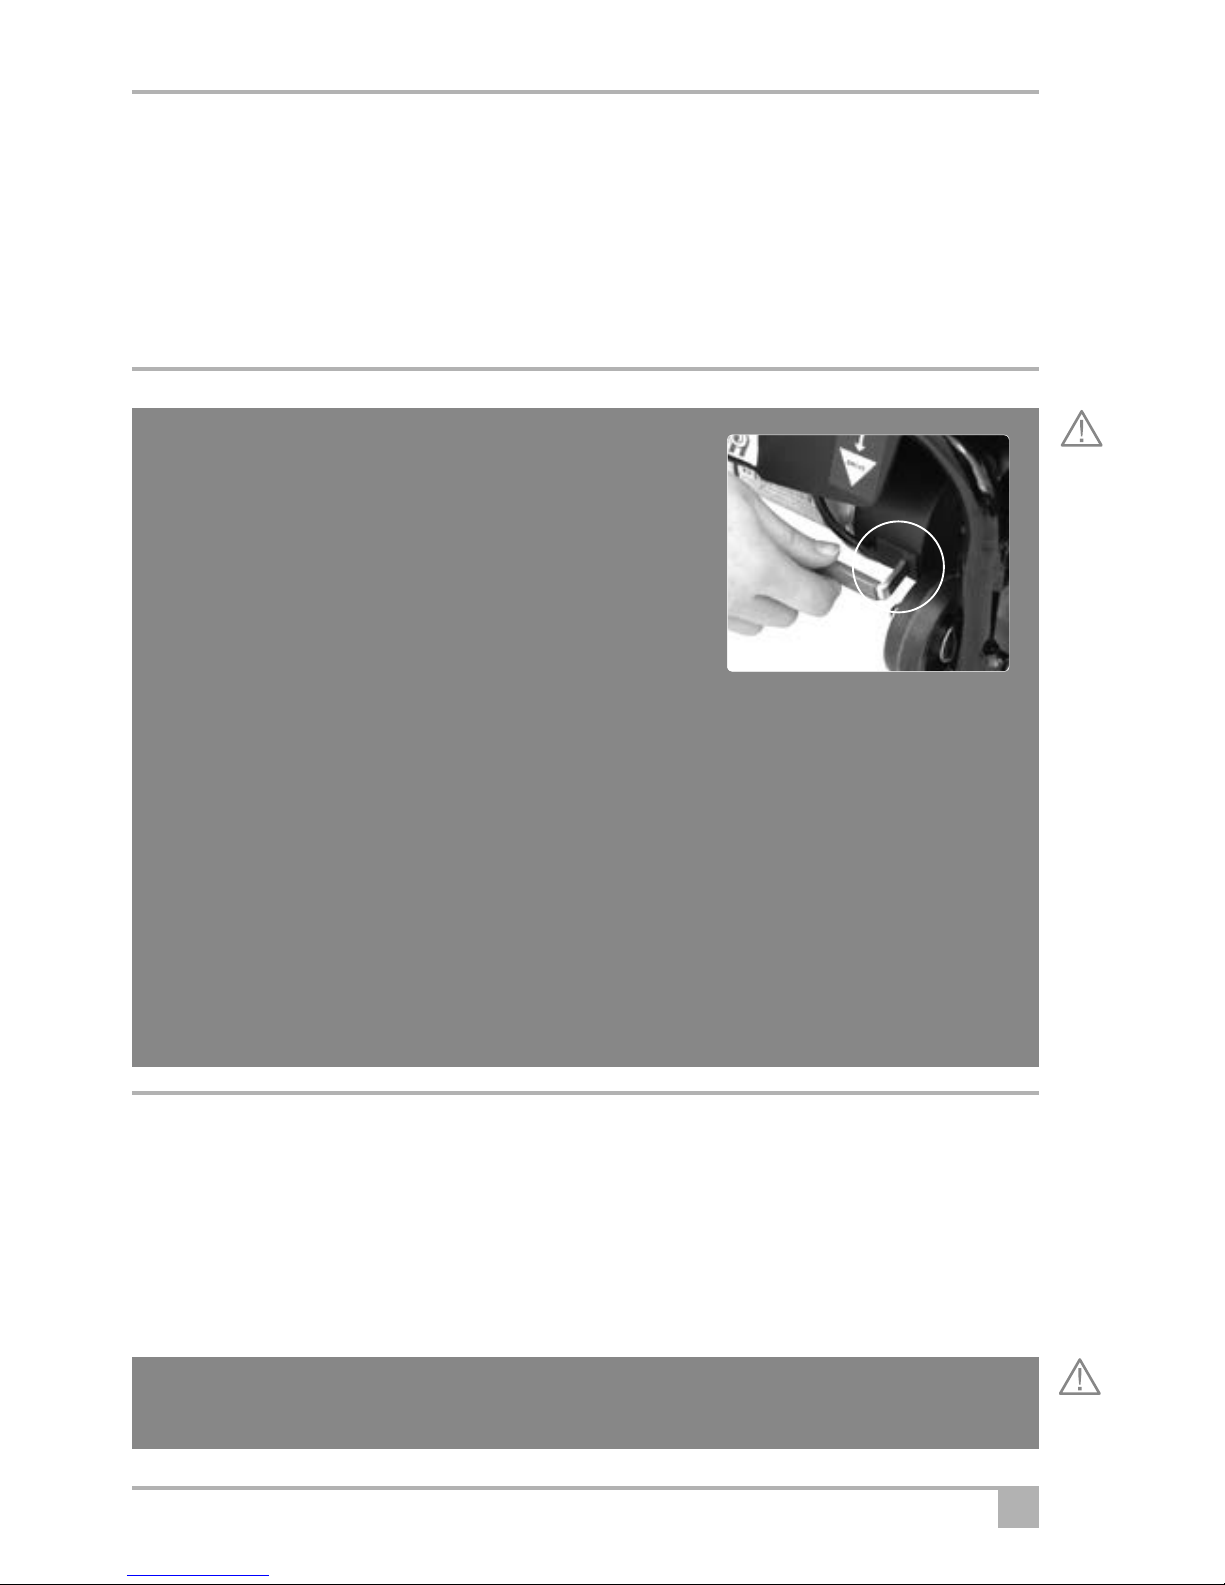
When the vehicle is switched off the brakes are automatically
engaged. This is called “Failsafe Braking”. Also, if the batteries are
flat, the brakes are automatically applied. There may be occasions
where you may wish to move the vehicle without power. To do this
there is a Freewheel Device fitted.
The Freewheel device allows the vehicle to be pushed without power.
To activate, first locate the lever. When standing behind the scooter, it is
located on the right hand side of the rear of the vehicle - See Illustration.
• Make sure the On/Off (ignition) key is in the off position.
• Move the lever UP The vehicle can now be pushed in Freewheel.
• Move the lever DOWN to engage drive. The vehicle is now braked. This is the normal operating position.
• IF YOU ARE NOT COMPLETELY SURE OF THIS FEATURE CONTACT
YOUR DEALER BEFORE OPERATING THE SCOOTER.
NOTE: To avoid excessive strain on the tiller / handlebar assembly, never push or pull the scooter in
freewheel mode if a user is on-board. Pull the lever UPWARDS to engage freewheel mode (no brakes -
caution). Push the lever DOWNWARDS to engage Drive mode.
Warning! If the freewheel device is in “freewheel” mode, the braking is disabled. Never select the
freewheel mode if the Scooter is on a slope or could be pushed onto a slope.
Brakes
There are 2 braking systems. The first works with the finger controls. When the finger control is released the
scooter will automatically brake and bring the scooter to a stop. When the scooter stops the automatic
brake will engage. This will stop the vehicle rolling forward or backward. When you start the brake will
automatically disengage. If the battery should run out, the brakes automatically engage. Note that even when
freewheel is selected, a secondary braking system is applied automatically to limit the maximum speed. You
may notice this system causing drag when moving the scooter in freewheel mode
Warning! If the freewheel device is in “freewheel” the automatic braking is disabled. Never select the
freewheel device if the scooter is on a slope or could be pushed onto a slope.
Page 10

10
Rascal Veo, Veo X & Veo Sport Scooter
Armrest
adjustment
When getting seated on the scooter
lift the armrest up. When riding
always have the armrest in the down
position. Avoid pinching fingers as
you lower the armrest.
If you require more room in the width of the seat undo the knobs at the rear of the seat. Slide the armrests in or
out to suit. Tighten both knobs to clamp. To ensure that the user is sitting centrally, the armrests should always
be adjusted to be equidistant from the centre of the seat.
Seat Back Adjustment
The angle of the seat back is fixed, however it can be folded to allow
easy storage and handling. To fold the seat, hold it by the top edge and
push forward.
Warning! Never drive with the armrest up or with the armrest knob loose.
Swivel seat
This allows easy access
1. To operate, locate the release lever under the seat.
2. Pull the lever up and the seat will release allowing it to rotate.
3. Release the lever and the seat should lock automatically, but always
check it has.
Warning! Do not use this device if the vehicle is on a slope. Always check the seat is locked in the
forward position before driving the vehicle.
Tiller Folding and Tiller Transport Lock
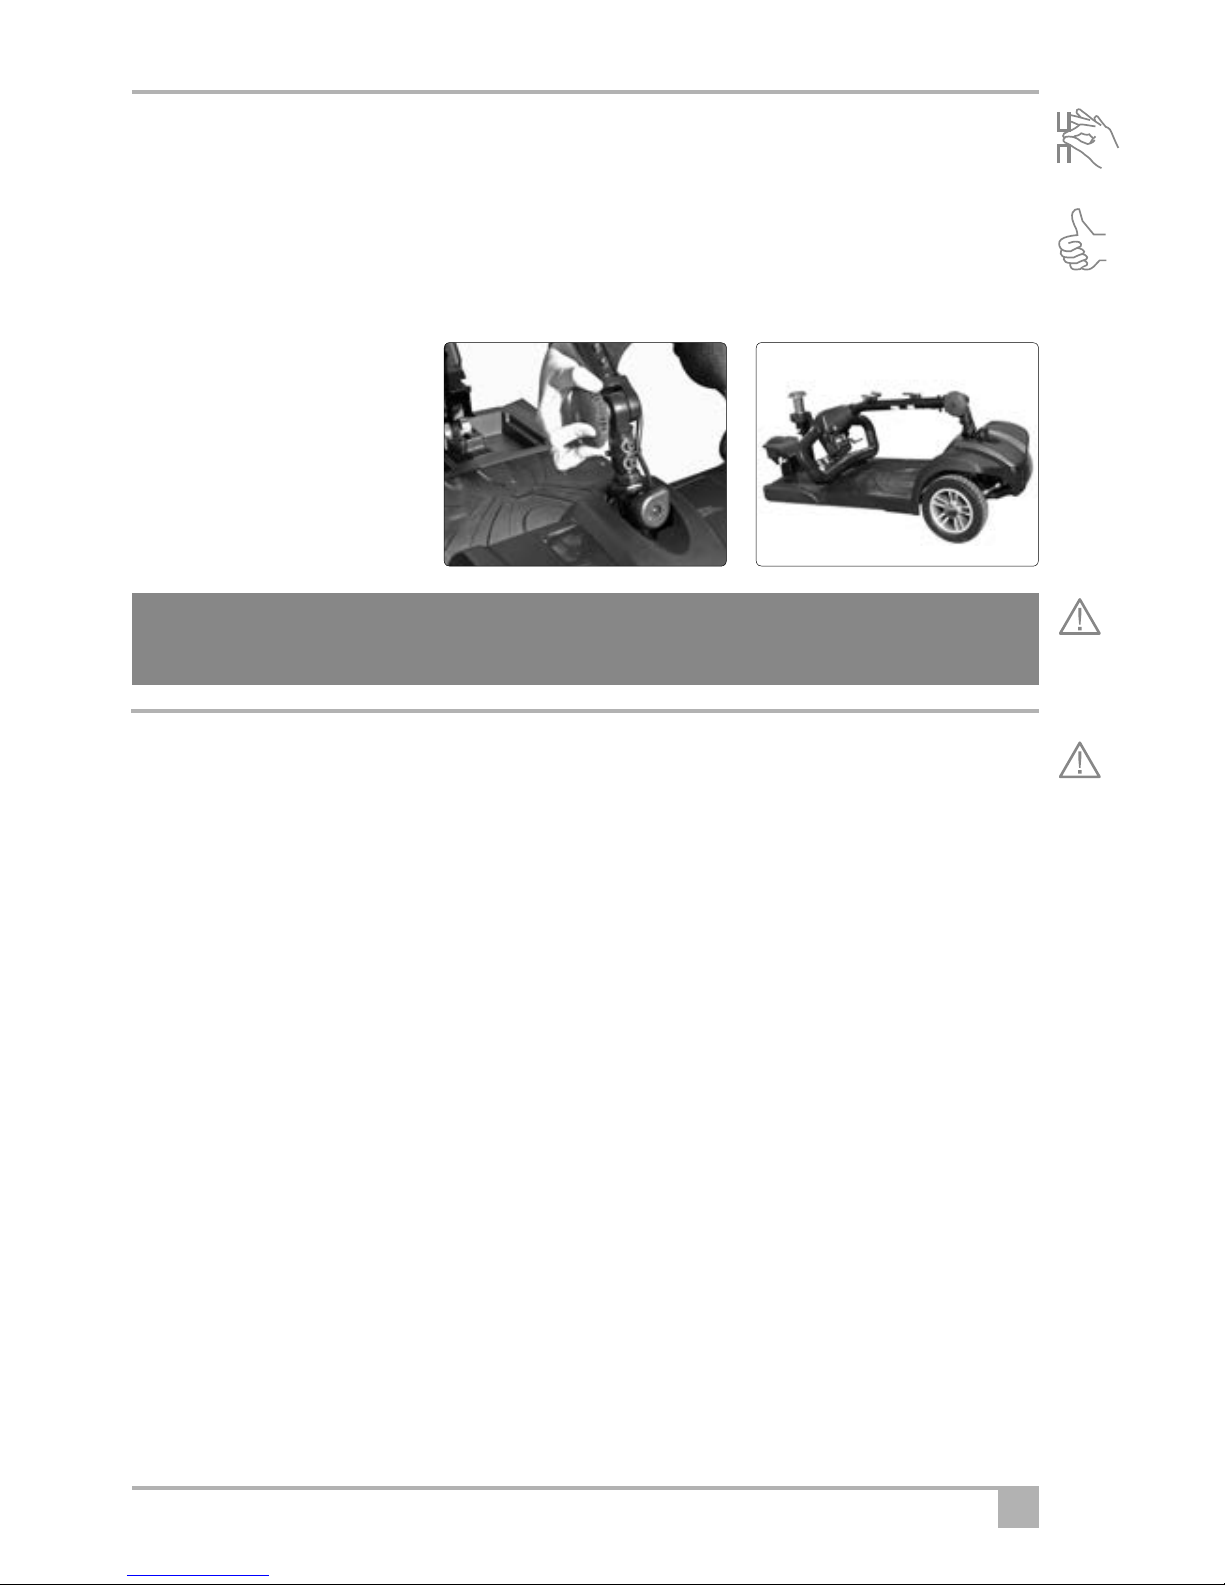
The tiller can be folded down for transporting and storage. Take care when lowering the tiller not to pinch your
fingers at the base of the tiller. Once in the folded position, the tiller can be locked in place to avoid tiller movement during transport and / or storage using the “transport lock” - See “ Transporting your scooter” section of
this manual for further details.
Page 11
11
• Rotate the knurled knob anti-clockwise sufficiently for the retaining serrations to allow the tiller to move.
• Lower the tiller so that it is in its lowest position.
• Rotate the knurled knob clockwise and ensure that it is tight and the retaining serrations are fully engaged.
Tip: The tiller can be adjusted to achieve a comfortable driving position.
• Rotate the knurled knob anti-clockwise sufficiently for the retaining serrations to allow the tiller to move.
Adjust the tiller so that your driving position is safe and comfortable.
• Rotate the knurled knob
clockwise and ensure that it is
tight and the retaining serrations
are fully engaged
• Adjust the tiller to suit your
driving position, ensuring the
tiller is firmly locked in place
before driving off.
Warning! Before driving, always check that the tiller is securely in the upright position and that the tiller
transport lock is disengaged. Safe steering will be impossible if you do not !
Transferring In And Out Of The Scooter
If you feel at all uncertain about getting in or out of the scooter seek assistance.
Transferring into the Scooter from the Front
Before getting in:
• Make sure that the scooter is on a level surface, and that it is not in Freewheel mode.
• Make sure the brakes are engaged - try to push the scooter a little to verify that the brakes are working.
• Ensure that the ignition key is turned off. (The red LED / lamp on the dashboard will not be on or flashing)
• Ensure that the handlebar / tiller adjustment is fully tightened and that any accessories are properly
fitted and secured.
• Ensure that the transport tiller lock is not engaged by checking that the steering is free to operate.
• The seat should be facing forwards with the seat back in the upright position.
• Adjust the handlebars / tiller so that the front wheels are facing forward.
You are now ready to get in:
• Approach the seat from the side and step over the centre part of the scooter with one foot. You should
now be straddling the scooter facing forwards and with the seat behind you. With your back to the seat,
you can steady yourself using the armrests and then lower yourself gently into the seat.
• Lift each of your feet onto the footrest platform.
Getting out of the Scooter:
• Before getting out of the scooter, be sure that it is on a level surface and the power key is switched to the
off position. - If you feel uncertain about getting out, seek assistance. Move the handlebars so that the front
wheels are facing directly forwards.
• Lift your feet off the footrest platform and stand up using the armrests to provide you with additional stability
if required. (Do not put your full weight on the armrests)
Page 12

12
Rascal Veo, Veo X & Veo Sport Scooter
Operation
Before using the scooter you should make sure that:
• The battery is fully charged. (indicating green on the battery indicator)
• There is no sign of damage to the scooter. All adjustment thumb-wheels are fully tightened. Any accessories
are properly attached.
• That you are capable of controlling the scooter at all times.
Kerbs and Obstacles: Try to avoid taking the scooter over obstacles or kerbs. Tackle obstacles head on.
Bad Weather: We suggest that it is better to stay at home in bad weather. Remember that you can
become wet and cold. Suitable clothes should always be worn. A high visibility jacket should be considered if
you are in poor visibility. Remember not to use the scooter in poor light or darkness.
Driving the Vehicle
1. Before you set out, do check the weather forecast. We suggest that you make sure you are wearing
suitable clothing, whether your journey is long or short.
2. Range. Your scooter has a limited range. Always ensure that your planned journey does not exceed the
maximum range in the Technical Specification Sheets and that your battery is fully charged.
3. If you are taking medication check with your doctor or physician that your ability to control the vehicle
will not be impaired and do not drink alcohol and drive.
4. Only use the vehicle for the purpose its intended for. Do not drive through water or on slippery
surfaces; do not transport more than one person; do not tow other vehicles or carry excess weight.
5. Check that the freewheel lever is not in the freewheel position / mode.
6. Check the battery charger is disconnected.
7. Check that you are properly seated with your feet on the footrest platform.
8. Check the backrest is upright.
9. Check that none of the items in your shopping basket are likely to fall out or become entangled
in the scooter wheels or other mechanisms.
10. Make sure that your shopping basket is not overloaded (See Technical Specification Sheets)
11. Ensure your feet are securely on the footrest areas.
12. Check that the tiller transport lock is disengaged (The tiller will have a full range of movement).
13. Check you have adjusted the seat as instructed in this manual.
14. Make sure the way ahead is clear.
Warning! Read this before driving the vehicle! Whether or not this is your first mobility
vehicle, please read these guidelines as all vehicles differ. Failure to do this may cause injury/damage to
you, a third party or the vehicle.
Page 13

13
15. Switch on the power. Check the battery level indicator is in the green area.
16. Speed Control. Set the speed control to a low setting.
17. Gently actuate the finger controls (either forward or reverse) and steer in the direction required.
The vehicle will now move off. The further you push the paddle (either forward or reverse) the faster the
vehicle will go.
18. To brake, return the paddles to the starting/neutral position. If you become unsure or feel
unsafe release the paddles immediately. Note: Never push or pull both paddles at the same time as
you may damage your scooter’s control system and cause it to behave erratically.
19. As you get accustomed to the power you can increase the speed.
20. Switch off when not in use. To conserve your batteries and prevent the vehicle accidentally moving,
always switch off the power when your Scooter is not in use. (On/Off or ignition key).
Tip: If you do leave your scooter switched on for a prolonged period of time without using it, it will enter
a sleep mode to conserve power. To reactivate the scooter, the On/Off key will need to be turned to the
“Off” position and then back to the “On” position.
Driving the vehicle - hazards
1. Getting on and off the vehicle: When getting on make sure that the vehicle is on level ground, and not
in freewheel mode. Ensure that the armrests are secure. When getting off, park on level ground, turn off
the ignition and remove the key before leaving your seat. Make sure you get off the vehicle in a safe area.
2. Tiller Position: Drive with the tiller in an upright position that feels comfortable with the controls in easy reach.
3. Kerbs and Obstacles: Try to avoid kerbs and obstacles. Never ride up or down kerbs or obstructions higher
than that in the Technical Specification Sheets. Always tackle obstacles head on. Use ramps wherever possible
and ensure that all wheels will fit on the ramp. Always try to avoid crossing a slope. If you have to cross a
slope, take great care to avoid tipping. Never make sharp turns on slopes or back down a slope. Note that
the anti-tip rollers at the rear of the scooter may contact the kerb as you descend; this is normal.
4. Hills & Slopes: Going Up Hill. Lean forward when going up. Make sure you have enough speed to
climb the slope. Do not stop or turn the vehicle around. If you have to turn while climbing an incline,
keep going until you reach a level area. If you have to start on an incline, lean forward and apply power
slowly – do not start and stop. If you are not comfortable about tackling a gradient, consider an
alternative route. Note: Always check that the battery level is high; going up hill takes a lot of energy. If the
level drops too low the vehicle will cut out leaving you stranded.
5. Hills & Slopes: Going Down Hill. Lean back in the seat when going down, and turn the speed
control dial to low. If you are not comfortable about tackling a gradient, consider an alternative route.
Try to avoid crossing slopes – always drive straight up or down the slope.
NEVER BACK DOWN A SLOPE!
Warning! Before driving the scooter you should be aware that, under certain circumstances it could
become unstable and tip over. Your scooter has been designed to operate on paved, even surfaces and
should not be used on rough or rutted terrain. Do not exceed the maximum safe slope recorded in the
Technical Specifications.
Page 14
14
Rascal Veo, Veo X & Veo Sport Scooter
6. Terrain: Do not drive your vehicle across deep, soft or slippery terrain ( for example, soft dirt, sand, or loose
gravel). You could get stuck. Also avoid rutted, bumpy ground and keep to well surfaces.
7. Turning: Always slow down before a turn; turning at speed can cause the scooter to topple. Look in the
direction you are travelling – If there is a blind corner, sound the horn.
8. Turning Circle: Practice manoeuvring your scooter so you can judge the turning circle. This is important
to avoid tipping off kerbs or for negotiating tight spaces.
9. Bad Weather: If it is snowing or icy stay at home! Remember that ice, snow and slippery surfaces such
as manhole covers, wet grass and drains could affect braking and steering. Use caution at all times.
10. Tyres: Your vehicle is fitted with solid tyres. Should they become damaged they should be replaced by
your dealer. Do not attempt to replace them yourself.
11. Pavements: It is illegal to drive at more than 4 m.p.h. on the pavement. Your scooter is limited to that
maximum speed but always slow down in crowded areas and take care not to collide with pedestrians.
12. Shower Rooms or Washing: Never take your scooter into a shower or steam room, and never hose it
down. Its sensitive electronics could malfunction if they get wet or damp.
13. Immersion: Never enter large puddles or areas of water where the depth and/or current is unknown.
Immersion or partial immersion of the scooter may damage it and could leave you stranded.
Transporting your Scooter
Warning! Dismantling the scooter involves lifting and handling heavy parts. Weights are given in the
Technical Specification; consider if you need help in handling parts before you try to lift them. Contact your
dealer for advice on how best to transport your scooter in your particular vehicle.
Warning! Pinching or Crushing. Be careful to avoid being pinched or having your hands crushed when
lifting or handling parts. Wear gloves whenever possible. Special attention should be paid when raising and
lowering armrests, splitting the front and rear parts of the chassis or rotating/handling the front wheels
when dismantling or during re-assembly for transportation in a car or similar.
Warning! Your scooter is not suitable for use as a seat for an occupant in a motor vehicle.
Warning! Do not stand the scooter up on its ends or sides as it may become unstable and topple
causing an injury.
Your Scooter has been designed to be dismantled and stowed in the average car boot. Contact your dealer for
advice on how best to transport your scooter in your vehicle. To transport your Scooter you may need to
dismantle it. Follow these instructions. The component weights are recorded in the Technical Specification
section of this manual. Do not attempt to undertake dismantling or lifting without assistance. You are advised
to wear gloves.
Page 15
15
1 32
54
6
Warning! Do not attempt to lift any of the scooter components unless you are capable of doing so. The
weight for each component is shown in the Technical Specification.
Warning! Do not attempt to lift the chassis unassisted - back or other injury may result!
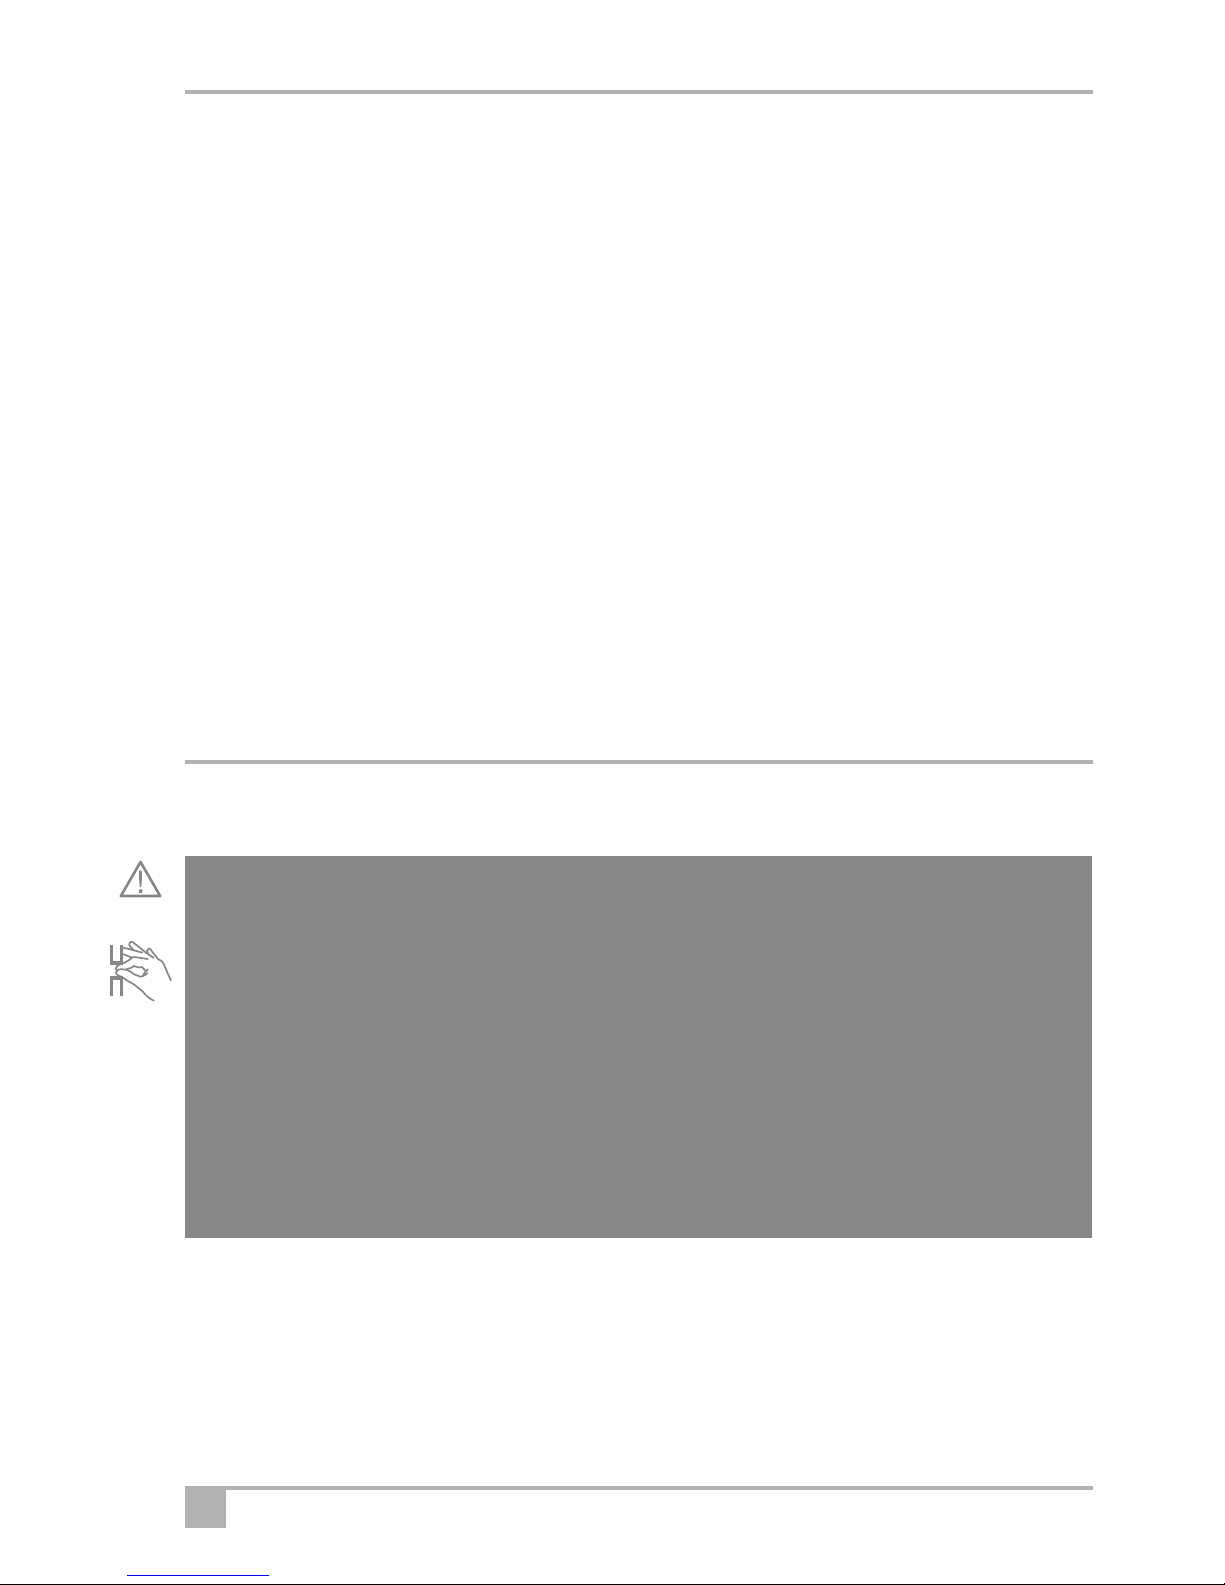
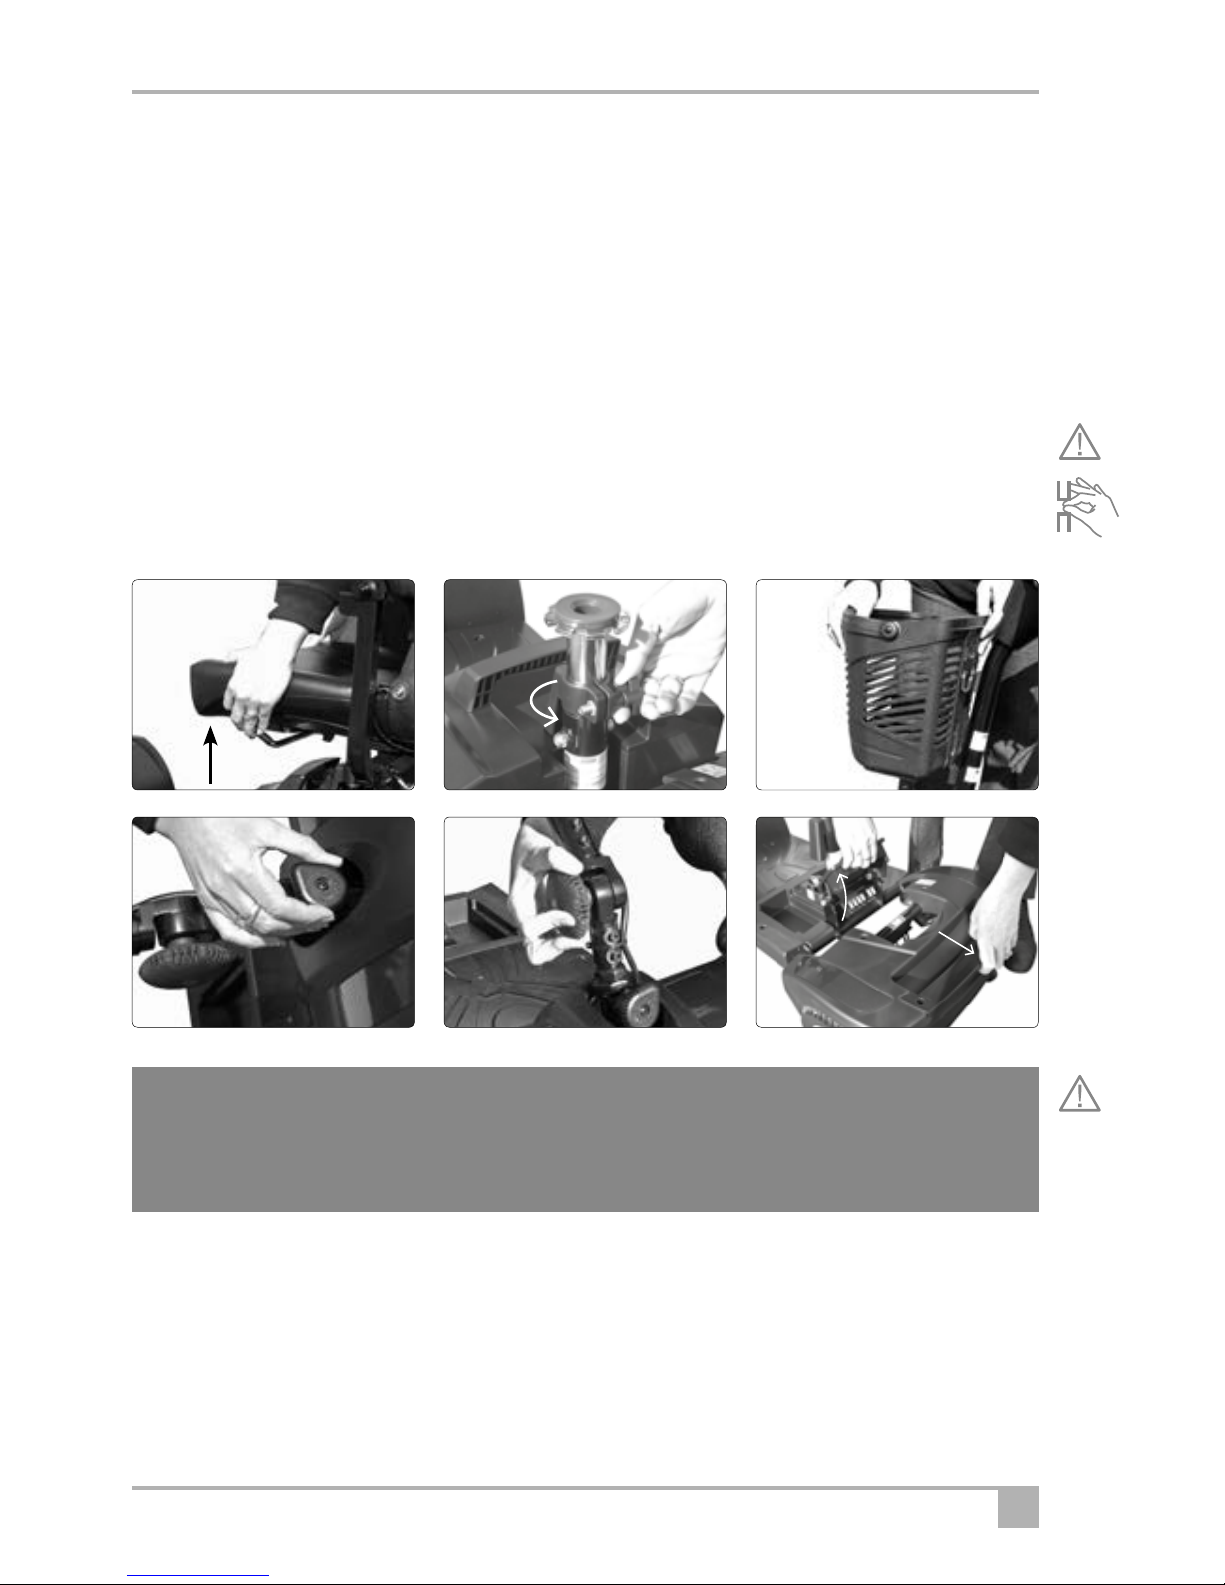
Disassembly:
• Turn the power off. (Turn key to the off position and remove from the scooter).
• Remove the seat by squeezing the seat swivel lever and lifting the seat off the seat post. (Fig 1)
• Fold the seat arms down & the seat-back forward on itself for easy storage.
• Remove the battery pack by loosening the battery securing clamp (Fig 2), and rotate it so that the
clamp no longer holds the battery in position. Now lift the battery clear. - Warning, these parts are heavy!
• Remove the shopping basket by lifting /sliding up. (Fig 3)
• Lock the steering position by pulling and then twisting the transport tiller lock knob with the
wheels pointing straight forwards. (Fig 4)
• Fold the tiller unit down by first loosening the tiller securing thumb-wheel, lower the tiller to the
desired position and re-tighten the thumb-wheel (Fig 5).
• Separating the chassis The two halves of the chassis can also be split apart to make transportation
more easy. To do this, raise the transaxle release handle with one hand. With the other hand grasp the
handle at the rear of the scooter and pull which will separate the front and rear halves. (Fig 6)
Be careful not to pinch your fingers between the two halves of the chassis
• Safely stow the component parts in the boot of the car.
Page 16
16
Rascal Veo, Veo X & Veo Sport Scooter
Assembling your Scooter following Transportation
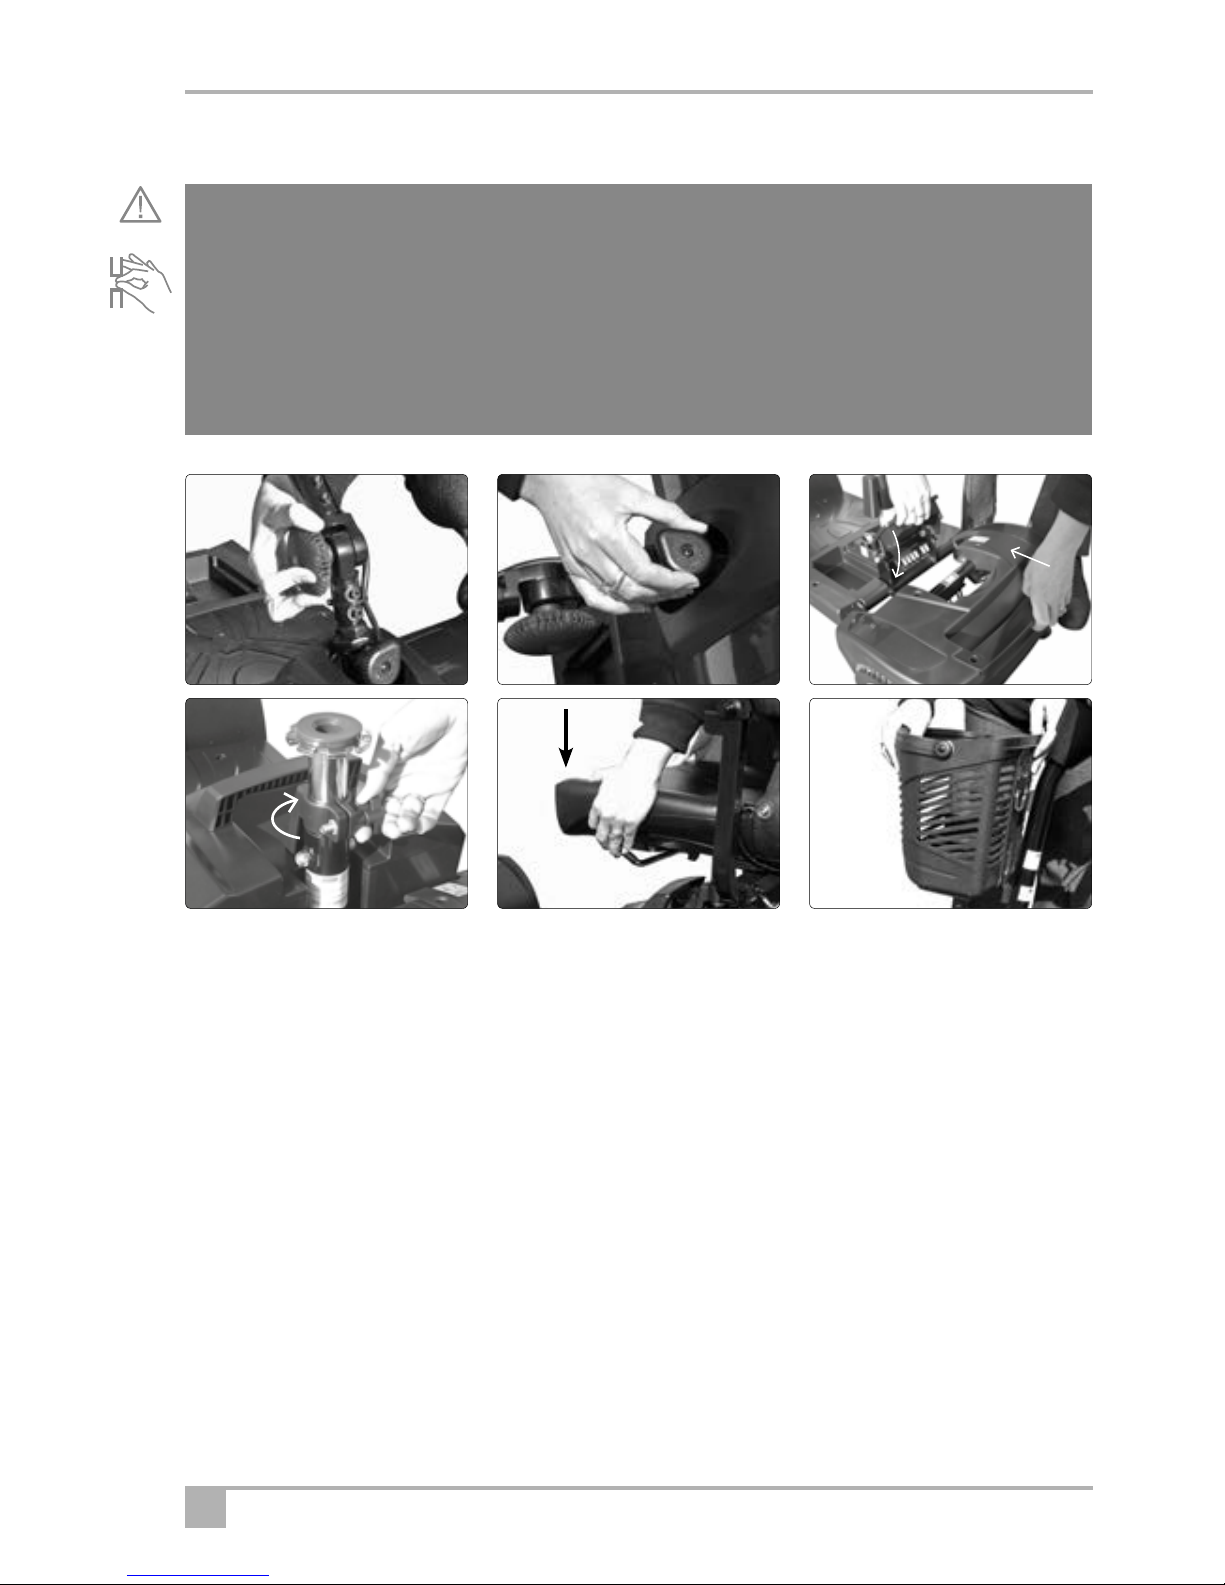
1. Loosen the tiller thumb-wheel and raise the tiller to the desired position - now re-tighten the
thumb-wheel to lock the tiller in position (Fig 1).
2. Pull and twist the tiller transit lock to allow for normal steering, unlocked, it will allow steering to
fully move (Fig 2)
3. Re-connect the front and rear chassis sections by reversing the procedure in the previous section. (Fig 3).
4. Rotate the battery securing clamp so it will not foul the battery.
5. Lift the battery pack into position
6. Rotate the battery securing clamp so that it is pushing down on the top of the battery pack casing,
tighten the battery securing clamp in position (Fig 4).
7. Replace the seat by squeezing the seat swivel lever and lifting the seat into position on the seat
post, (Fig 5) the seat should drop into position. Release the swivel lever and rotate the seat until it locks in
position . The seat should now only swivel if the lever is compressed / squeezed. Repeat this procedure if
the seat fails to lock on the first attempt. - Never drive the scooter unless the seat is properly installed and
locked against swivelling!
8. Fold the seat-back into the vertical position and ensure that the armrests are correctly adjusted
and secured.
9. Fit the basket and lock in position by pushing down on the top edge gently (Fig 6).
Warning! Assembling the scooter involves lifting and handling heavy parts. Your dealer should advise you
on the best way to assemble your scooter.
Warning! Pinching or Crushing. Be careful to avoid being pinched or having your hands crushed when
lifting or handling parts. Wear gloves whenever possible.
Warning! Never unload your scooter on sloping or uneven ground. It could run down the slope and
injure someone.
1 3
654
2
Page 17
Battery Charging
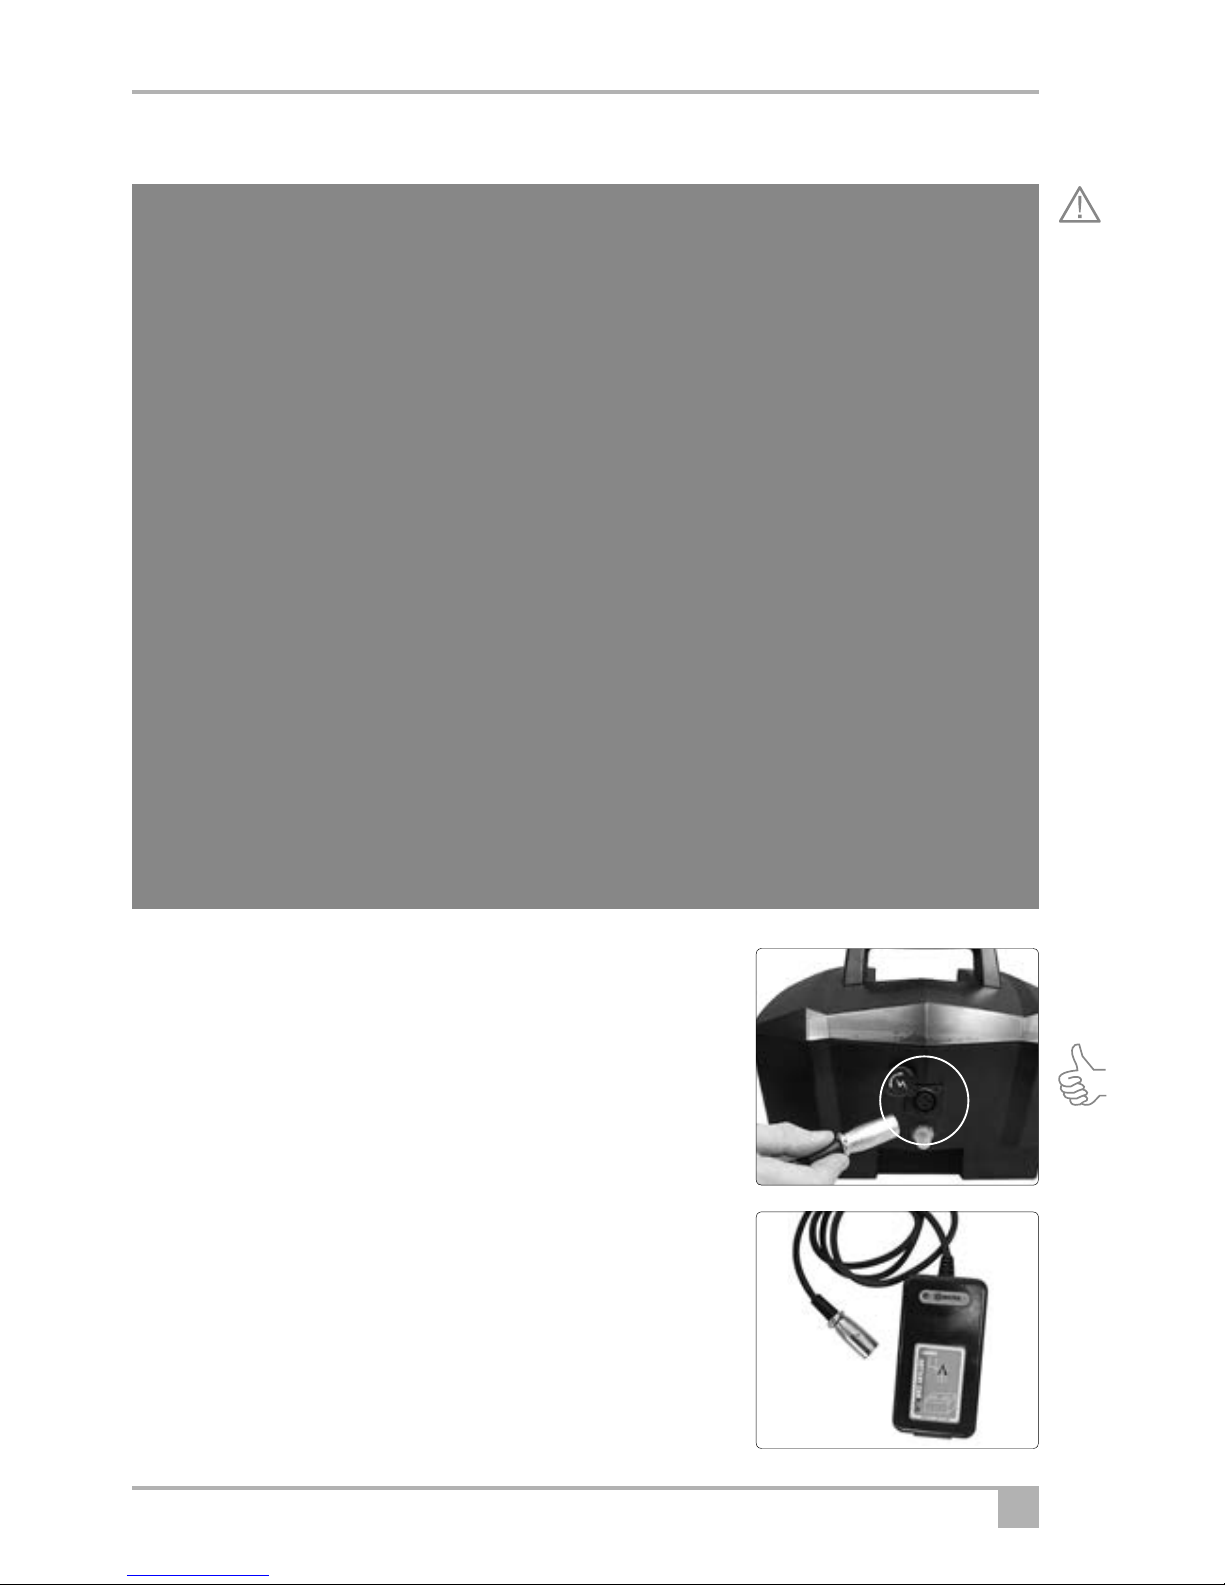
The charging socket is located on the front face of the removable battery
pack. Rotate the protective cover and push in the plug. When the vehicle
is charged remove the plug, and refit the protective cover to help protect
against dust and moisture ingress.
Tip: The battery pack can be removed or left on the scooter for charging
The battery charger has a small indicating lamp. When the charger is
connected to the mains supply and switched on the lamp will show green.
When the battery is being charged it shows red and when the battery is fully
charged the lamp will change to green. Always ensure that the lamp shows
green before switching off and disconnecting the charger at the mains.
Connection Instructions
When you receive your vehicle the batteries are only partially charged –
always fully charge them before use, preferably over-night.
1. Place your machine in an area that is dry and well ventilated.
Make sure a power point is nearby.
17
Warning! When charging batteries NEVER smoke or charge batteries in a place where there are naked
flames such as gas-fired heaters as, under exceptional circumstances, batteries may give off gases that
could ignite and explode. Always make sure that the battery pack is not damaged. Never charge the
scooter battery pack outside as the charger is not designed to get wet. If the charger appears damaged in
any way do not use it and contact your dealer for a replacement.
Warning! Always charge in a dry, well ventilated area.
Warning! It is strongly recommended that the mains socket used for charging the scooter is protected
by a 30 m/A RCD (residual current device). Many buildings have sockets protected by a system based
RCD. If you are in doubt as to the level of protection in your charging location then either purchase a plug
in RCD or consult a qualified electrician to verify that your charging location mains sockets are protected.
Warning! If batteries are damaged or frozen they could heat up during charging and in an extreme case,
explode.
Warning! Do not attempt to open the battery box/enclosure, there are no user serviceable parts inside.
It may be necessary for some carriers such as airlines to physically disconnect the batteries for transit.
If this is the case the battery pack can simply be removed from the scooter.
Warning! Never use a different battery charger to that supplied by your dealer. Damage or injury may
occur if you do!
Warning! When charging batteries NEVER connect or disconnect the charger from the scooter while it
is still connected to the mains. - Remove the charger mains plug from the wall socket having first switched
the mains socket off if a switch is provided.
Page 18

18
Rascal Veo, Veo X & Veo Sport Scooter
2. Check the vehicle is switched off and the key removed.
3. Check the mains switch is off. Never connect or disconnect the charger with the mains on.
4. Connect the charger to the charging point on the front of the battery pack.
5. Connect the mains plug and switch on.
6. The lamp illuminates green when the charger is powered up, then red when it is charging. The
charger lamp changes to green when the battery is fully charged.
7. Switch off the mains and remove the plug from the battery pack when fully charged. Do not leave
the charger plugged in with the power off. This will gradually discharge your battery.
Tip: You can charge you battery pack either installed or uninstalled from the scooter using exactly the
same method.
The batteries are the lifeblood of your vehicle. Their characteristics can change depending on charging,
temperature, usage and other factors. Listed below are guidelines to prolong battery life.
1. After using your vehicle always charge it at the end of the day even after a short journey.
2. If you do not use your vehicle for a prolonged period, place it on charge once a week, overnight.
3. Always use the correct charger with the correct batteries as recommended by Electric Mobility (Euro) Ltd
4. If the batteries have been flat for a long time (about 2 months) it is recommended you contact your
dealer before charging
5. Do not charge the vehicle in the open / out of doors – it may rain and the battery charger is not
waterproof.
6. Keep the vehicle in a well-ventilated area and away from any naked flame.
7. Do not part charge the batteries. Allow the charger to complete its cycle.
Note: Avoid storing your scooter in cold/damp places. This will shorten battery life and may cause
deterioration in the structure. Batteries are expensive to replace – it is wise to look after them.
Warning! Never disconnect a battery or the charger while the charger is connected to the mains
Warning! If one or both batteries are damaged they could heat up when charging and, in an extreme
case, explode.
Notice Your battery pack/s is/are not user-serviceable. Your dealer will replace them when they are
exhausted and dispose of them in line with environmental regulations applicable at the time.
It may be necessary for some carriers such as airlines to physically disconnect the battery packs. The
battery pack can simply be removed from the scooter to achieve disconnection.
Page 19

19
User Maintenance
It is important for safety that you carry out the following checks before use.
1. Visually check the machine for damage.
2. Visually check the tyres for damage.
3. Check the steering moves freely.
4. Check that the tiller is secure and that the tiller thumb-wheel is tight.
5. Check that the front and rear chassis halves are properly attached to each other.
6. Check that the seat is located correctly.
7. Check the armrests are secure.
8. The battery should be fully charged.
9. Keep your vehicle clean by using a damp cloth and soapy water – never use a hose.
Important – Possible faults
As you get used to your vehicle you will get a feel for how it behaves. If something feels unusual, for instance
the vehicle does not accelerate or brake smoothly; the brakes are not holding on a slope or the steering
feels different, stop using the scooter, contact your dealer immediately and explain to the engineer exactly
what the problem is.
Disposal
Contact your dealer for advice before you consider disposing of your scooter. They will be aware of the
environmental regulations in force at the time and will assist you to meet the applicable environmental legislation.
Servicing and Maintenance
1. This vehicle is designed for minimum maintenance. However it is recommended that your vehicle is
serviced at least once a year, by an approved Electric Mobility Dealer. If the vehicle is used constantly we
recommend a twice yearly maintenance.
2. Ensure the engineer stamps the Service Log (page 28) on completion of all servicing. Keep all receipts
for servicing and repairs with this handbook. This may add value when selling the vehicle.
3. When the vehicle is due for its annual service make sure you report any concerns you have,
preferably when you book the service (See points to look out for below).
4. On completion of the service, always test the vehicle before the engineer leaves and make sure you
are satisfied with the work carried out.
Points to look out for:
• Are there any strange noises from the wheels or does the frame creak when going over rough ground?
• Is the battery charged up correctly – is the “full” charge green light on after charging?
• Is the steering tight or is it loose when turning? Is there any play in the steering?
• Are the brakes effective ?
• Is there any damage to spigots or parts related to disassembly ?
• Has anything come loose?
• Does the vehicle perform as well as it did when it was new?
• Are there noises or rattles that were not there before?
• Are there any signs of damage, corrosion or cracking?
Page 20
20
Rascal Veo, Veo X & Veo Sport Scooter
Scooter Diagnostic Functions
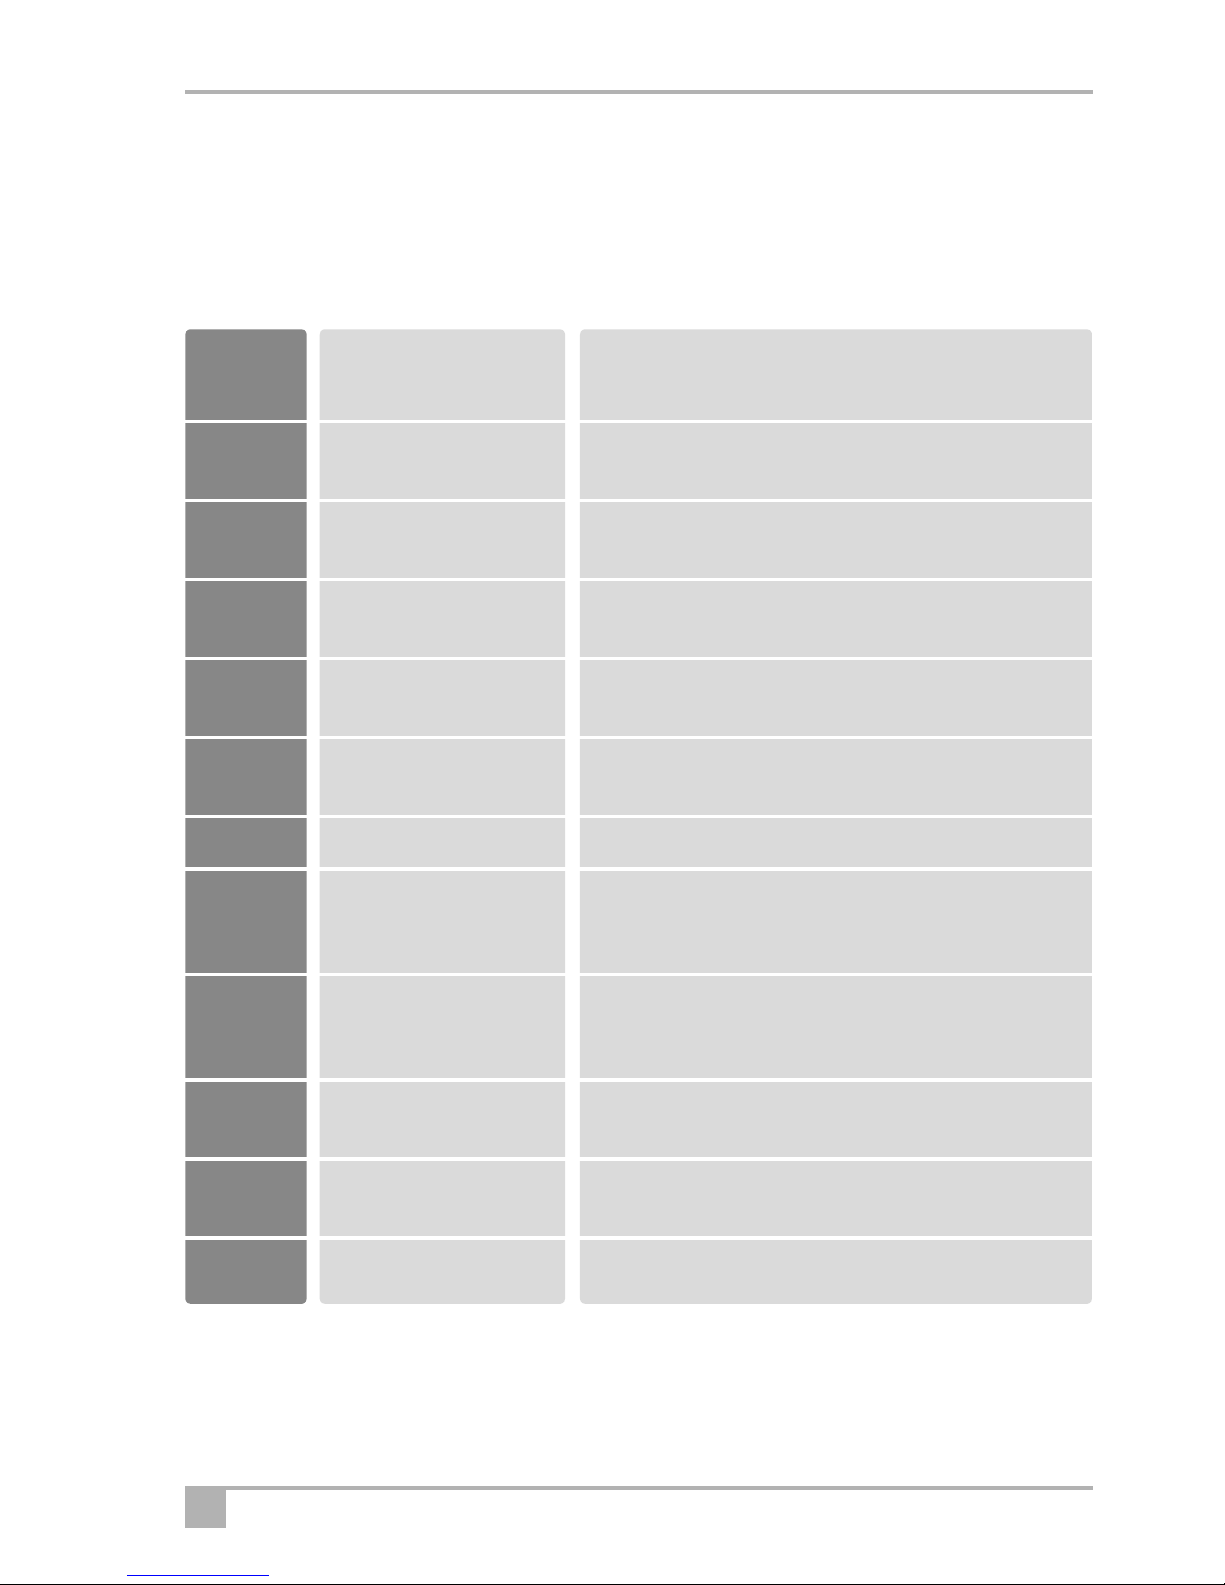
Your Scooter Controller provides diagnostic information in the form of flash-codes. The first LED on the battery
indicator flashes to indicate a problem has been detected. On switching on, the controller conducts a
diagnostic test. If there is a fault, the first lamp/LED in the battery indicator will flash a sequence of flashes to
indicate what the fault is. There will be two groups of flashes separated by a 2 to 3 second pause. Count the
number of flashes in each group and decode the fault using the table below.
Number Indicated fault Possible cause
of Flashes
4,5 Battery disconnected 1. Battery not connected.
2. Poor connection to battery terminals.
4,4 Motor Open 1. Incorrect motor wiring.
2. Motor defective.
3,4 Brake Off fault 1. Electromagnetic brake driver open.
2. Electromagnetic brake coil shorted.
3,2 Brake On fault 1. Electromagnetic brake driver shorted.
2. Electromagnetic brake coil open.
4,1 Current sense out of range 1. Short in motor or in motor wiring.
2. Controller failure*
4,3 EEPROM fault 1. EEPROM failure or fault.
4,2 Motor voltage out of range 1. Motor voltage does not correspond to throttle request.
2. Short in motor or in motor wiring.
3. Controller failure*
3,5 HPD (High Pedal Disable) 1. Improper sequence of throttle and KSI, push,
or inhibit inputs.
2. MIsadjusted throttle pot.
2,3 Main contactor fault 1. Main contactor welded or stuck open.
2. Main contactor driver fault.
2,2 Motor stalled 1. Motor blocked/stalled.
2. Motor defective.
2,1 Main contactor driver 1. Main contactor driver failed open.
Off fault
* Jack the vehicle and retest to confirm diagnosis. Clean connections, inspect system wiring, and retest.
Page 21
21
If in doubt switch off and switch on – if this does not cure the fault contact your dealer. Your dealer is there to
help you but they can only do this if you give them as much information as possible. Remember correct
information will get the problem fixed more quickly and save you money. Phone the dealer and explain exactly
what the problem is, recounting as much detail as possible. Tell them about the flash code; this will help the
engineer to identify the problem before he calls to fix it. Your dealer is there to help you.
Number Indicated fault Possible cause
of Flashes
2,4 Main contactor driver 1. Main contactor driver failed closed.
On fault
1,5 Battery voltage too high 1. Battery voltage >31 volts.
2. Vehicle operating with charger attached.
3. Intermittent battery connection.
3,3 Precharge fault 1. Brake driver shorted.
2. Precharge circuit damaged.
3. MOSFET failure.
1,3 Speed limit pot wiper 1. Speed limit pot wire(s) broken or shorted.
out of range 2. Broken speed limit pot.
1,1 Over-/under-temperature 1. Temperature >80˚C or <-10˚C.
cutback 2. Excessive load on vehicle.
3. Operation in extreme environments.
4. Electromagnetic brake not releasing.
1,2 PotLow and/or PotWiper 1. Throttle input wire open or shortened.
out of range 2. Throttle pot defective.
3. Wrong throttle type selected.
1,4 Battery voltage too low 1. Battery voltage <17 volts.
2. Bad connection at battery or controller.
3,1 HPD fault present >10 sec. 1. Misadjusted throttle.
2. Broken throttle pot of throttle mechanism.
Page 22
22
Rascal Veo, Veo X & Veo Sport Scooter
Troubleshooting Guide
This table is a guide to fault finding. The fault may be a simple fix. If you have any doubts phone your dealer.
Symptom
• Scooter does not move.
when power is switched on.
• Steering is loose or wobbly when driven.
• Vehicle behaves erratically when driven.
or judders or cuts out ?
• Short Range
Tip: To save the batteries, the scooter controller has a sleep mode, which is activated if the scooter is not used but
left switched on for some time. To reset, switch the scooter off and then on again.
Solution
• Batteries flat - check level.
• Is the charger connected?
• Is Freewheel engaged?
• Freewheel has been selected while power is on
Ensure freewheel is not selected; switch off and
on. NB the power indicator may flash indicating
that freewheel has been selected.
• Safety cut-out has operated due to overload?
Press the reset button next to the charging port
on the battery pack. If the cut-out operates again,
contact your service agent for assistance.
• Check for tyre damage or punctures.
• Damaged steering - contact dealer.
• Loose seat - contact dealer.
• Possible electronic problems - contact dealer.
• Check tyres for damage.
• Check batteries are fully charging.
• Check vehicle moves easily in Freewheel
Additional Safety Information
Carrying Weight on the Vehicle
Tiller Basket The tiller baskets have maximum weight limits as described in the Technical
Specification. Do not exceed the stated limit as it could affect handling.
Handlebars Do not carry or attach anything to the handlebars. Anything attached to the
handlebars will affect the control of the vehicle.
Floor Area Do not use the floor area to carry things apart from in the under-seat basket.
They might fall off, or obstruct your movement.
Other Precautions
Modifications Unauthorised modifications could result in injury or permanent damage. Such
modifications will invalidate any guarantees.
Other Items Only fit approved products or accessories.
Child Safety
This product is designed to be operated by adults. Children should not be allowed to tamper with the controls
or play on the vehicle. Do not carry children as passengers. The product is designed for single person use
only. Keep all packaging well away from children. They could be harmed.
Page 23

23
Frequently Asked Questions
I want to transport my vehicle in a car.
Your scooter can be dismantled for transportation as described in this manual. Your dealer can advise you on
the correct equipment to be used depending on your vehicle and your physical capabilities.
Can I fit weatherproofing such as a canopy ?
No, the Rascal Veo models are too small to have a canopy as they can adversely affect stability and handling.
How long will my batteries last ?
This is a difficult question as it depends on many factors. The life of a battery depends upon the number of
cycles the battery goes through, the peak loads and on the conditions of use. Some general advice about
battery care:
• Keep it charged, and do not let the battery run completely flat.
• Ensure the scooter is fully charged at the end of the charging cycle
• Batteries may not perform as well in very cold weather.
• Ask you dealer to test and change your batteries if they have reached the end of their useful life.
Care can prolong the life of the batteries but remember that, in time, all batteries will fail to perform to
specification.
What range can I expect ?
The generally expected range is recorded in the Technical Specification Sheet. Remember, range can be
affected by many things such as:
• Temperature. Cold weather can reduce the output of the batteries.
• Type of terrain. Obviously climbing hills takes more energy than driving on the flat.
• Weight of the person.
• The condition and charge of the batteries.
• Faulty or old batteries or a faulty charger.
NB. Always use the correct charger with the correct batteries and ensure the scooter is fully charged before
you start out.
How long should I keep my vehicle before I change it?
It is important that the vehicle you have suits your needs and abilities. Your scooter should serve you well for
many years but change it if at any time you feel it no longer meets your needs. Consult your dealer on the condition of your vehicle and remember vehicles of any type become more expensive to maintain the older they get
Additional Information
Owners Manual: Replacement copies are available from: Electric Mobility Euro Ltd. Canal Way, Ilminster,
Somerset, TA19 9DL Telephone: 01460 258100.
If you are visually impaired, please contact the Company to discuss your requirements. However, you should
not drive a vehicle in a public place if you cannot see well enough to ensure your own, and others safety. Each
vehicle comes with a copy of the BHTA Highway Code. Please make sure you read it. Telephone BHTA on
02077 022 141 for a new copy.
Important note on the BHTA Highway Code: On page 3 of the Code under “Consider Investing in a
mobile phone” Read the section of this manual under “Safety Information”. If in doubt contact your dealer.
For Information regarding other Electric Mobility products contact your dealer or log on to the Electric Mobility
Website www.electricmobility.co.uk
Page 24

24
Rascal Veo, Veo X & Veo Sport Scooter
Engineer’s Checklist for the Rascal Veo range of scooters
Important Note for the Engineer
Enquire if the customer is satisfied with the product. Please report all points good or bad directly to:
Electric Mobility 01460 258100 If you have any comments please include them.
Obtain all comments from the customer on the condition and serviceability of the scooter and then complete
an Initial diagnostic road test. Record all defects to be corrected. Now check, test and complete the following:
• Wheel bearings wear and lubricate
• Wheel alignment and tracking
• Speed dial works correctly
• Wear or damage to tyres or wheels
• Bodywork fixtures for damage, or cracking
• Throttle play and adjustment
• Battery packs and internal electrical
connections for condition and corrosion.
• Check all cables for damage, abrasion, corrosion
and that screening is intact. Replace as necessary
• Steering bearing (adjust as required)
• Check suspension components on
Veo Sport model.
• Tiller adjustment - functioning, wear and damage
• All assembly spigots and hooks for wear or damage.
• Seat mounting for wear or damage
• Revolving seat mechanism locates correctly
and spring lever engages. Lubricate as necessary.
• Handlebar/tiller alignment
• Check motor and gearbox for unusual noise or
vibration; investigate as necessary.
• Electromagnetic brake operation – does the
scooter slow when the hand control is released?
Does the brake engage when the scooter is
pushed when in freewheel?
• Freewheel operation
• Frame for damage or cracks
• General check for corrosion, repair or protect as
necessary
• All operational controls work correctly
• Battery condition and charger operation
• Tighten all nuts & bolts
• Correct all defects found and determine if the vehicle
is roadworthy.
• Final road test
• Clean the vehicle.
• Customer road test
Page 25

Guarantees
12 Month Guarantee
Electric Mobility Euro Limited (the ‘Company’) guarantees its products against defects in materials and
workmanship under normal use for a period of one year from the date of purchase by the original retail
purchaser (the ‘Guarantee Period’). If a defect arises and a valid claim is received within the Guarantee Period,
at its option, the Company may either (1) repair the defect at no charge, using new or replacement parts; (2)
replace the defective part with a new part or a part that is either the same as, or functionally equivalent to, the
original part; (3) replace the product with a new product which is the same as, or at least functionally
equivalent to, the original product; or (4) refund the purchase price of the product. A replacement product or
part assumes the time remaining on the Guarantee Period of the original product or 30 days from the date of
replacement or repair, whichever provides longer coverage. When a product or part is exchanged, any
replacement item becomes the property of the consumer and the replaced item becomes the Company’s
property. When a refund is given, the product for which the refund is provided must be returned to
the company and becomes the Company’s property.
Lifetime Frame Guarantee
The Company guarantees the frame of its products against defects in materials and workmanship under
normal use for the lifetime of the product. If a defect arises and a valid claim is received under the Lifetime
Frame Guarantee, at its option, the Company will repair the defect at no charge, using new or replacement
parts or will replace the frame. When a frame is exchanged, the replacement frame becomes the consumer’s
property and the replaced frame becomes the Company’s property. The Lifetime Frame Guarantee covers the
cost of parts and materials only. Services performed by the Company in replacing the parts or materials or the
frame may be subject to additional charges for labour and transportation.
Exclusions and Limitations
The 12 Month Guarantee and the Lifetime Frame Guarantee (the ‘Guarantees’) apply provided only that the
guarantee card has been correctly filled out and returned to the Company within 15 days from delivery of the
product to the original consumer. The Guarantees do not apply to the following: (1) damage caused by
accident, abuse, misuse, flood, fire, earthquake or other external cause; (2) damage caused by operating the
product outside the permitted or normal use of the product; (3) damage caused to products that were not
operated, maintained or serviced in accordance with the Owner’s Manual; (4) to a product or part that has
been modified or repaired otherwise than in accordance with the Owner’s Manual or with the express written
authority of the Company; or (5) to normal wear or tear, normal maintenance, service or periodic adjustments
necessitated by normal use. In addition to the above, the Company shall be under no liability in respect of any
defect arising from wilful damage, negligence, or misuse.
The Guarantees only apply to the original purchaser and are non-transferable. Except in respect of death or
personal injury caused by the Company’s negligence, the Company shall not be liable by reason of any
representation (unless fraudulent), or any implied warranty, condition or other term, or any duty at common law
or under the terms of the Guarantees, for any indirect, special or consequential loss or damage (whether for
loss of profit or otherwise), costs, expenses or other claims for compensation whatsoever (whether caused by
the negligence of the Company or its employees or otherwise) which arise out of or in connection with the
supply of the product(s) or their use or resale, and the entire liability of the Company under or in connection
with the products and the Guarantees shall not exceed the price paid for the products. Any descriptions,
specifications, samples, models, bulletins or similar materials used in connection with the sale of products by
the Company are only for information and should not be construed as warranties.
The consumer’s statutory rights are not affected by the Guarantees.
25
Page 26
26
Rascal Veo, Veo X & Veo Sport Scooter
Technical Information Regarding EMI
Important Technical Information regarding Electromagnetic Interference (EMI)
The intensity of interference from electromagnetic energy is measured in volts per meter (v/m), which refers to the
strength of the electrical source (voltage) as it relates to the distance away from the object being considered (in
meters). Resistance of a scooter/wheelchair to certain EMI intensity is commonly called its “immunity level”.
20 volts/meter is a generally achievable and useful immunity level against interference from radio wave sources (the
higher the immunity level, the greater protection).
Your scooter has been tested and found to meet the required immunity level from Electromagnetic Interference
(20v/m): the recommended density of interference from electromagnetic energy.
• Do not operate devices such as CB radios or mobile phones while the vehicle is switched on.
• Avoid getting close to transmitter masts, such as television and radio masts.
• Note you may experience interference when close to ambulance or fire stations.
If your vehicle starts to operate by itself switch it off and report this to your Dealer.
Warning! Even with the immunity level of 20 volts/meter, certain precautions must be followed to ensure
your scooter/wheelchair will not be affected by outside electromagnetic sources.
Page 27

Technical Specification - Rascal Veo Scooter
Wheelchair type Class Class A, B or C Class B
Department of Transport Class Class 1 2 or 3 Class 2
Overall dimensions fully assembled length x width x height mm (in) 1080 (42.5) x 505 (19.9) x 883 (34.8)
Dimensions seat back and tiller folded length x width x height mm (in) 1080 (42.5) x 505 (19.9) x 700 (27.6)
Maximum carrying capacity kg (lb) 113 (250)
Mass (weight) including 14 Ah batteries kg (lb) 45.8 (101.9)
Mass (weight) of heaviest part kg (lb) Front chassis 17.4 (38.3)
Mass (weight) of battery pack kg (lb) 9.8 (21.7)
Maximum shopping basket load (wire-mesh) kg (lb) 3.5 (7.7)
Standard battery voltage and capacity Volts and Ampere hours 12V / 14Ah x 2
Type of seat Standard seat with folding backrest and adjustable arms
Mass (weight) of seat kg (lb) 7.5 (16.5)
Wheel size front & rear mm (in) 200 (8) x 50 (2.0)
Type of tyres Solid foam filled
Suspension Type N/A
Maximum speed km/h (m.p.h.) 6.4 (4)
Minimum braking distance from maximum speed m (ft) 1.1 (3.60)
Range* km (miles) Up to 18.5 (11.5)
The turn-around width m (ft) 1.40 (4.6)
The maximum safe slope degrees of slope 8˚ - Do not exceed the scooter may topple
The maximum climbing ability facing upwards degrees of slope 8˚
Ground clearance mm (in) 60 (2.36)
Maximum obstacle climbing ability mm (in) 50 (2)
Maximum safe descendable kerb height mm (in) 50 (2)
Force to operate Accelerator control Newtons (lbs) 2.5 (0.55)
Force to operate Freewheel lever Newtons (lbs) 58.8 (13.2)
Ambient operating temperature range °C (°F) 2 (35.6) to 40 (104)
This scooter meets the relevant requirements of ISO 7176:14 2008 *Range on full charge and flat ground. Due to a policy of continual improvement,
Electric Mobility reserves the right to change specifications without prior notice.
27
Page 28

28
Rascal Veo, Veo X & Veo Sport Scooter
Technical Specification - Rascal Veo X Scooter
Wheelchair type Class Class A, B or C Class B
Department of Transport Class Class 1 2 or 3 Class 2
Overall dimensions fully assembled length x width x height mm (in) 1080 (42.5) x 600 (23.6) x 883 (34.8)
Dimensions seat back and tiller folded length x width x height mm (in) 1080 (42.5) x 600 (23.6) x 710 (27.9)
Maximum carrying capacity kg (lb) 129.2 (285)
Mass (weight) including 22 Ah batteries kg (lb) 54.3 (119.71)
Mass (weight) of heaviest part kg (lb) Front chassis 17.4 (38.3)
Mass (weight) of battery pack kg (lb) 14.3 (31.5)
Maximum shopping basket load (Plastic) kg (lb) 4.5 (9.9)
Battery voltage and capacity Volts and Ampere hours 12V / 22Ah x 2
Type of seat Upgraded seat with folding backrest and adjustable arms
Mass (weight) of seat kg (lb) 10.8 (23.8)
Wheel size front & rear mm (in) 200 (8) x 50 (2.0)
Type of tyres Solid foam filled
Suspension Type Enhanced tyre compound
Maximum speed km/h (m.p.h.) 6.4 (4)
Minimum braking distance from maximum speed m (ft) 1.1 (3.60)
Range* km (miles) Up to 21 (13.5)
The turn-around width m (ft) 1.40 (4.6)
The maximum safe slope degrees of slope 8˚ - Do not exceed the scooter may topple
The maximum climbing ability facing upwards degrees of slope 8˚
Ground clearance mm (in) 60 (2.36)
Maximum obstacle climbing ability mm (in) 50 (2)
Maximum safe descendable kerb height mm (in) 50 (2)
Force to operate Accelerator control Newtons (lbs) 2.5 (0.55)
Force to operate Freewheel lever Newtons (lbs) 58.8 (13.2)
Ambient operating temperature range °C (°F) 2 (35.6) to 40 (104)
This scooter meets the relevant requirements of ISO 7176:14 2008 *Range on full charge and flat ground. Due to a policy of continual improvement,
Electric Mobility reserves the right to change specifications without prior notice.
Page 29

29
Technical Specification - Rascal Veo Sport Scooter
Wheelchair type Class Class A, B or C Class B
Department of Transport Class Class 1 2 or 3 Class 2
Overall dimensions fully assembled length x width x height mm (in) 1080 (42.5) x 600 (23.6) x 883 (34.8)
Dimensions seat back and tiller folded length x width x height mm (in) 1080 (42.5) x 600 (23.6) x 710 (27.9)
Maximum carrying capacity kg (lb) 129.2 (285)
Mass (weight) including 22 Ah batteries kg (lb) 57.9 (127.6)
Mass (weight) of heaviest part kg (lb) Front chassis inc. basket 20.2 (44.53)
Mass (weight) of battery pack kg (lb) 14.3 (31.5)
Mass (weight) of rear chassis kg (lb) 12.6 (27.77)
Maximum shopping basket load (Plastic) kg (lb) 4.5 (9.9)
Battery voltage and capacity Volts and Ampere hours 12V / 22Ah x 2
Type of seat Upgraded seat with accent stitching, folding backrest and adjustable arms.
Mass (weight) of seat kg (lb) 10.8 (23.8)
Wheel size front & rear mm (in) 200 (8) x 50 (2.0)
Type of tyres Solid foam filled
Suspension Type Enhanced tyre compound, rear coil
& front tilt coil.
Maximum speed km/h (m.p.h.) 6.4 (4)
Minimum braking distance from maximum speed m (ft) 1.1 (3.60)
Range* km (miles) Up to 21 (13.5)
The turn-around width m (ft) 1.40 (4.6)
The maximum safe slope degrees of slope 8˚ - Do not exceed the scooter may topple
The maximum climbing ability facing upwards degrees of slope 8˚
Ground clearance mm (in) 60 (2.36)
Maximum obstacle climbing ability mm (in) 50 (2)
Maximum safe descendable kerb height mm (in) 50 (2)
Force to operate Accelerator control Newtons (lbs) 2.5 (0.55)
Force to operate Freewheel lever Newtons (lbs) 58.8 (13.2)
Ambient operating temperature range °C (°F) 2 (35.6) to 40 (104)
This scooter meets the relevant requirements of ISO 7176:14 2008 *Range on full charge and flat ground. Due to a policy of continual improvement,
Electric Mobility reserves the right to change specifications without prior notice.
Page 30

30
Rascal Veo, Veo X & Veo Sport Scooter
Notes
Page 31
31
Brochure Request
Do you have a friend or colleague that would be interested in an Electric Mobility product?
If so cut out this coupon and send it to the address shown on the back of the manual.
If you are visually impaired, please contact the Company to discuss your requirements. However, you should
not drive a vehicle in a public place if you cannot see well enough to ensure your own, and others safety.
Postage will be paid by: Electric Mobility Euro Ltd., FREEPOST (SWBI 1045), Ilminster, Somerset, TA19 9ZA
My Dealer’s Company name is:
Please can I have a free no-obligation home demonstration.
Please send me a brochure of the range of products.
My friend’s name is:
My friend’s address is:
County: Postcode:
My friend’s telephone number is:
Dealer:
Product Description:
Serial No.: Invoice No.:
Customer Name & Address:
County: Postcode:
Telephone No.:
Date received at Dealers:
Dealer Information - Guarantee Card
This section is to be filled out by the Dealer and sent to Electric Mobility Euro Ltd.
Postage will be paid by: Electric Mobility Euro Ltd., FREEPOST (SWBI 1045), Ilminster, Somerset, TA19 9ZA
#
#
Page 32

Electric Mobility Euro Ltd.,
FREEPOST (SWBI 1045),
Ilminster,
Somerset,
TA19 9ZA
Electric Mobility Euro Ltd.,
FREEPOST (SWBI 1045),
Ilminster,
Somerset,
TA19 9ZA
Page 33

33
Service Log
Notice for the Service Engineer.
Please make sure this part is stamped and dated after each service.
Dealer stamp - 1st Service
Dealer stamp - 2nd Service
Dealer stamp - 3rd Service Dealer stamp - 4th Service
Dealer stamp - 5th Service Dealer stamp - 6th Service
Dealer stamp - 7th Service Dealer stamp - 8th Service
Page 34

34
Rascal Veo, Veo X & Veo Sport Scooter
Notes
Page 35

35
Notes
Page 36
Electric Mobility Euro Limited, Canal Way, Ilminster, Somerset TA19 9DL
Telephone: 01460 258100 www.electricmobility.co.uk
E.and 0.E. Issue 3: 04/2016
Rascal Veo range of Scooters
Manufactured by
 Loading...