

Electric Bike Outfitters KT-LCD3 User Manual
KT-LCD3 User Manual

Contents
Preface
4
Outlook and Size
4
Installation Instruction
6
Function Overview
7
Display Content...………………………………………………………………………………………...
7
Button Definition
8
Basic Operation
8
...........................................................................................................................................
On/Off...………………………………………………………………………………………... 8
Display Interface...………………………………………………………………….………… 8
Battery Capacity Indicator...………………………………………………………………... 12
...……………………………………………………………………………………….
...………………………………………………………………………………...
...…………………………………………………………………………………......
...……………………………………………………………………………………….
...………………………………………………………………………………………...
Pedal Assist Level………......……….………..…………................................................. 12
Power Walk Function...……………………………………………………………………... 13
Cruise Function...……………………………………………………………………………. 13
Backlight…………………...…………………………………………………………………. 13
Motor Operating Power and Temperature.……………………………….………………. 14
Ambient Temperature.……………………………………………………….……………… 14
Single Data Clearing.………………………………………………………….……….……. 14
Automatically Prompt Interface.………………………………………………….………… 15
User Setting..………..…………………………………………………………………………………... 16
General Setting.…………………………………………………………………………………………. 16
Maximum Speed.……………………….…………………………………………………… 16
Wheel Diameter.....…………………………………….……………………………………. 17
Units.………………………………………………………………………………….………. 17
P Parameter Setting..…………………………………………………………………………………... 18
P1 Motor Characteristic Parameter Setting.……………………………………….……... 18
P2 Wheel Speed Pulse Signal Setting.…………………………………………………… 18
P3 Throttle Assist Level Control Setting.…………………………………………………. 19
2

20
P4 Throttle Activation Setting.……………….……………………………………………..
P5 Battery Monitoring Setting.………………………………………………………...……
C Parameter Setting.…………………………………………………………………………………... 20
C1 Pedal Assist Sensor Setting.…………..………………………………………………. 21
C2 Motor Phase Classification Coding Mode.…………………………………………… 22
C3 Pedal Assist Ratio Level Initialization.……………….…………………….…………. 22
C4 Throttle Function Setting.………………………………….…………………………… 23
C5 Controller Maximum Current Setting.……………………….………………………… 23
C6 Backlight Brightness Setting…….…………….……….…………………….………… 24
C7 Cruise Control Function Setting.……………….……………………………………… 25
C8 Motor Operating Temperature Display Setting.……………………………………… 25
19
C9 Startup Password Setting………………………………………………………………. 26
C10 Restore Default Setting………………………………………………………...……... 27
C11 LCD System Version Setting…………………………………………………………. 27
C12 Controller Minimal Voltage Setting……………………………………………...…… 28
C13 ABS Brakes and Anti-Charge Control Setting……………………………...………. 29
C14 Pedal Assist Tuning Setting……………………………….……………………….…. 30
Parameter Copy…………………………………………………………………………………………. 30
Version Information……………………………………………………………………………………. 31
Contact Us…….……………………………………………………………………………...…………. 32
Default Settings………………………………………………………………………………...………. 33
3
30
14
12
PREFACE
This manual aims to help the user understand and familiarize themselves with the KT-LCD3
functions, operation, setting the e-bike Parameters, how to achieve the best match of the ebike components to improve performance of the electric bike system. The manual covers
installation, operation, parameter setting of the LCD and how to use it properly, which help
user setup the functionality of the electric bike system.
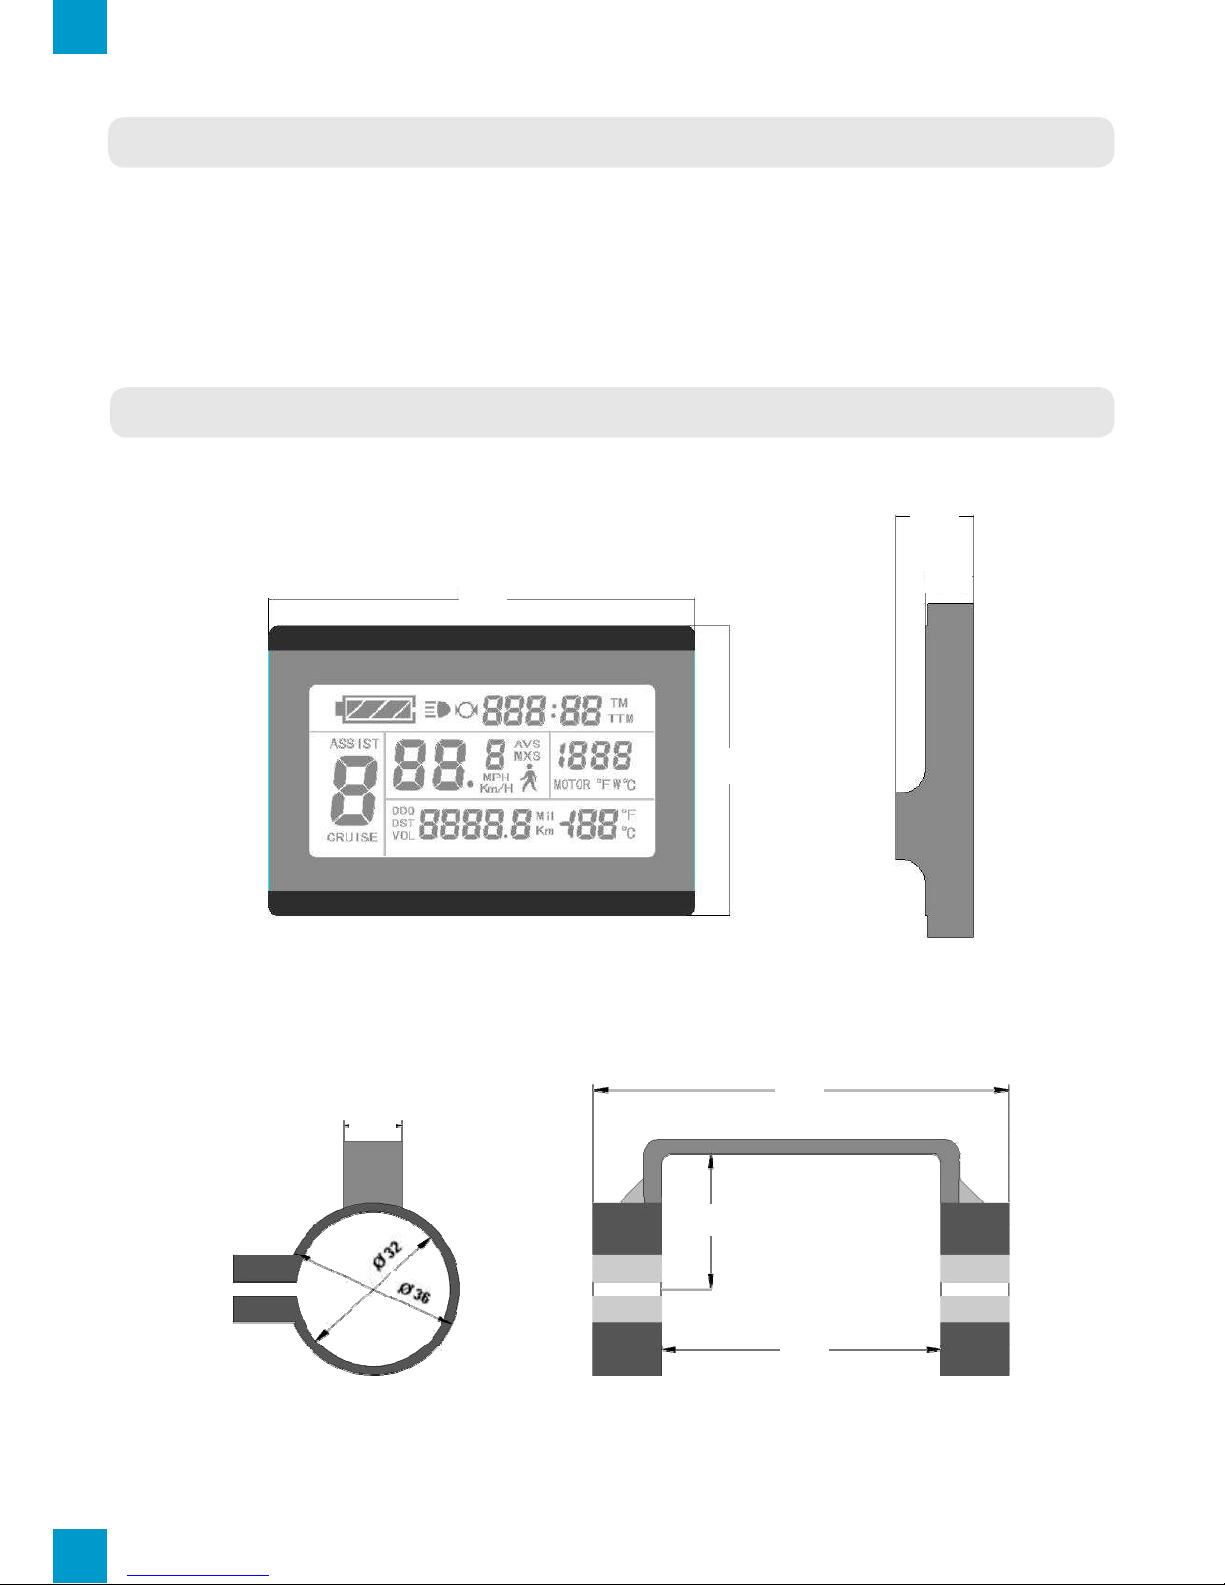
OUTLOOK AND SIZE
4
LCD Dimension (mm)
Dual Bracket Mounting Dimension (mm)
20
96
65
86
58
11
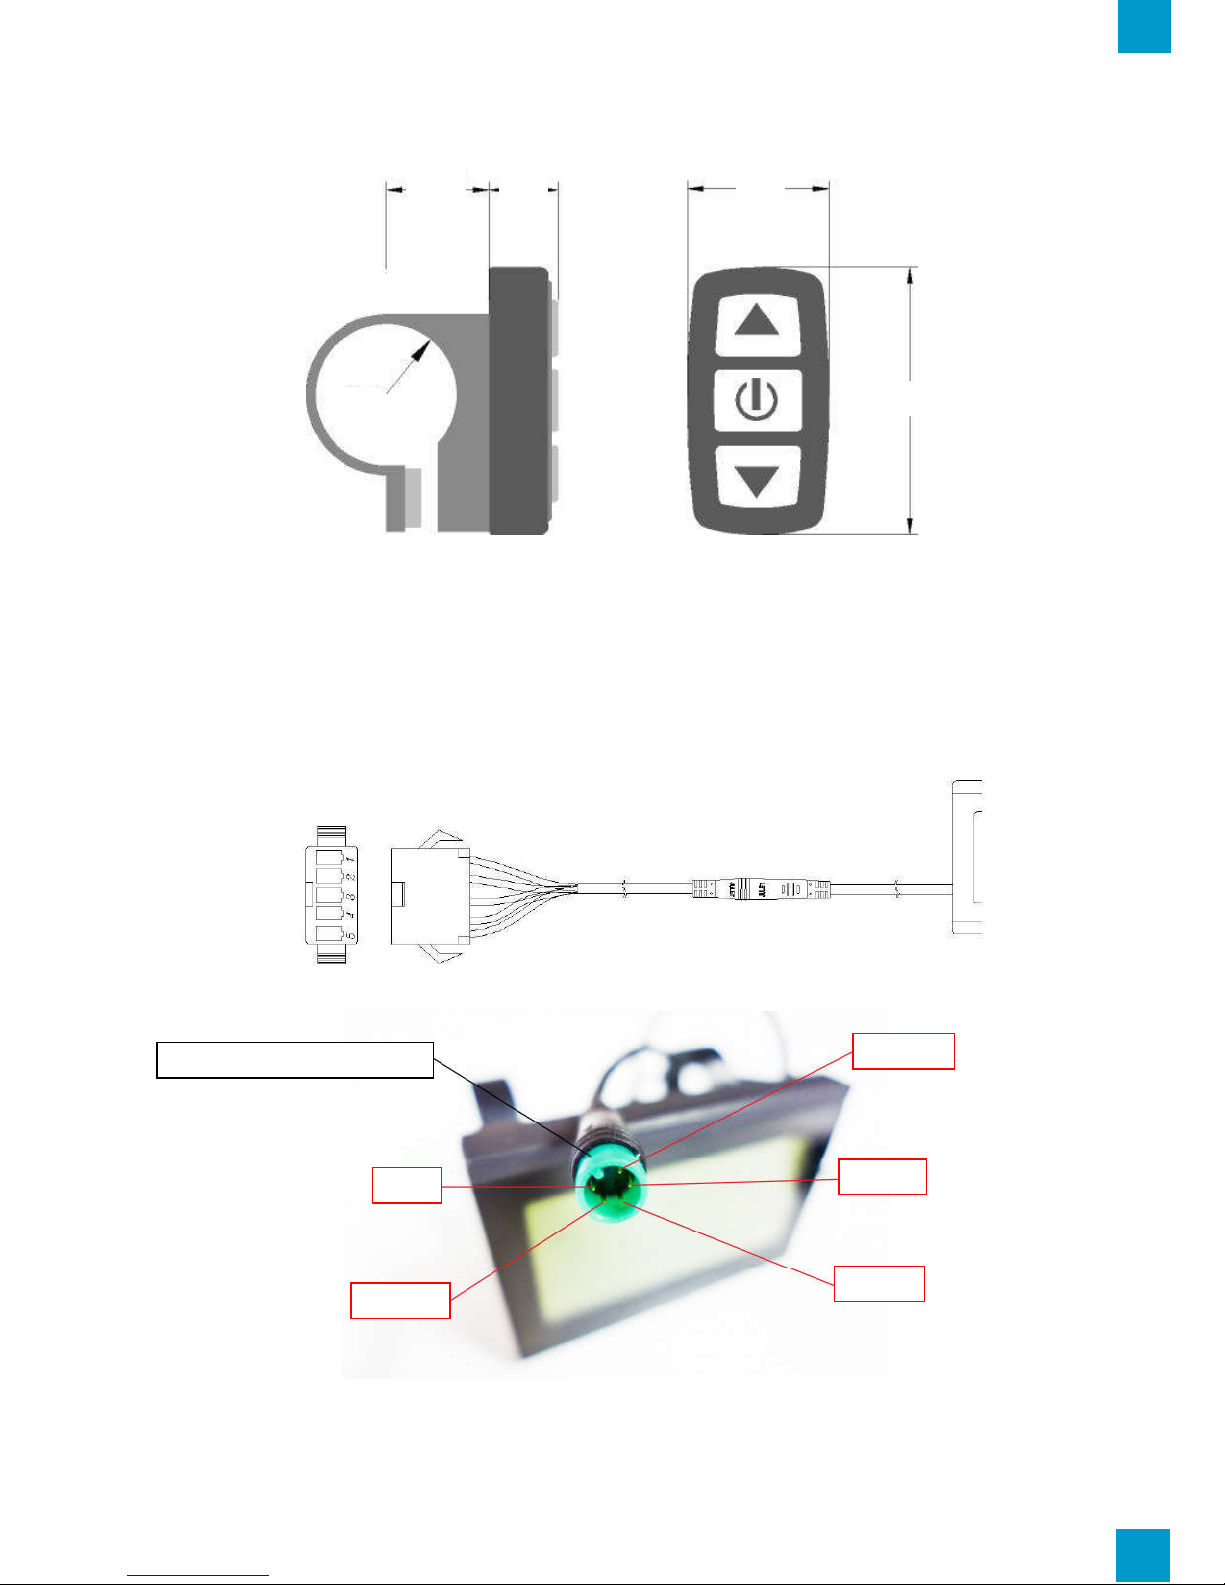
JULET KT-LCD3 Connector
Ground
36V
Data 2
Data 1
Control
Button Control Box Dimensions (mm)
16.3
23
Ø 22.2
45
Main Material and Color
The KT-LCD3 and button control box are primarily constructed of polycarbonates (PC)
and are of a dark gray or black color.
Wiring Schematic
36V
Control
Ground
Data 1
Data 2
Red
Blue
Black
Green
Yellow
JULET Connectors
LCD
5
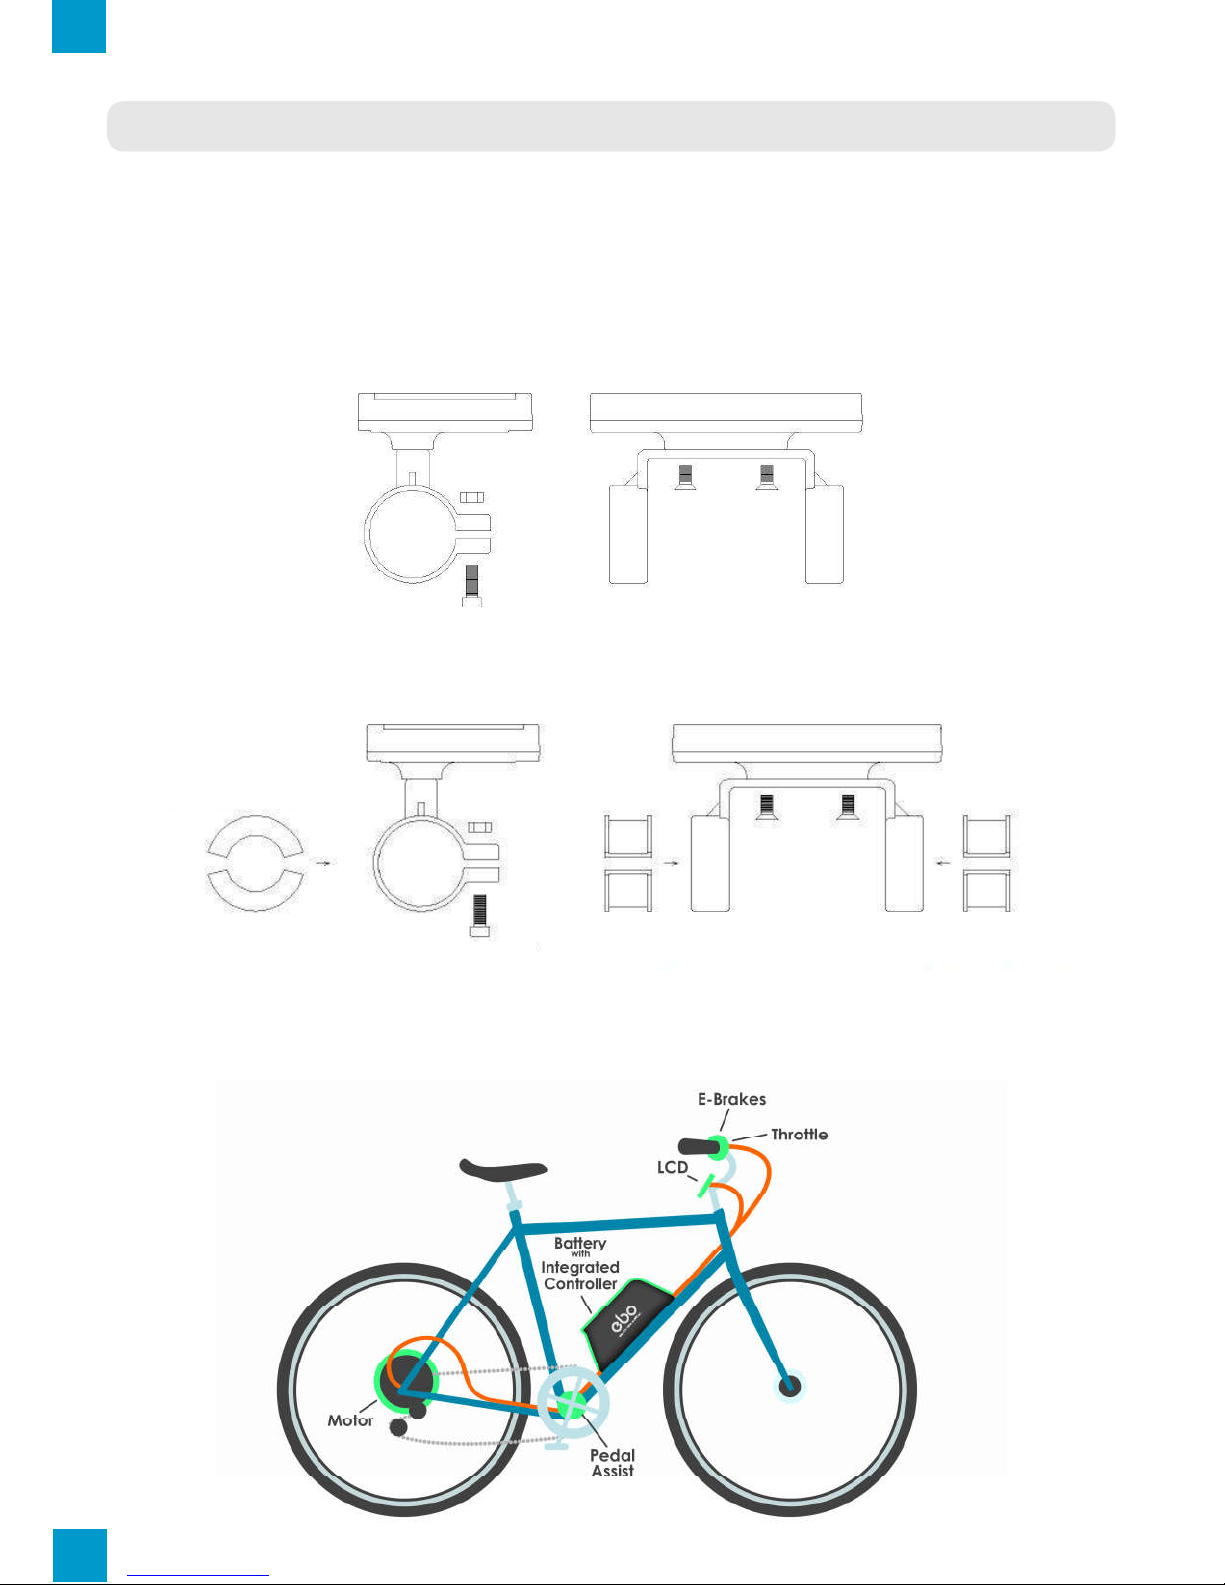
INSTALLATION INSTRUCTION
Using the appropriate methods and fixtures, mount the LCD screen and button box onto
the handle bar to the rider’s desires. Refer to the following images below for installation on
specific handle bar diameters. While the e-bike is off, connect the necessary wiring and
check to make sure all connections are firmly attached. Finally, remove the protection film
from the display.
Optional Encircled Rubber LCD
Bracket Mounts Ø22.2 or Ø25.4
LCD and Bracket Side View
LCD and Bracket Side View
Ø 31.8 Handlebar Diameter Install
LCD and Bracket View
Ø 22.2 Handlebar Diameter Install
Optional Encircled Rubber LCD
Bracket Mounts Ø22.2 or Ø25.4
LCD and Bracket View
Installed KT-LCD3
Optional Encircled Rubber LCD
Bracket Mounts Ø22.2 or Ø25.4
6

Cruise Function
FUNCTION OVERVIEW
KT-LCD3 provides a variety of functions such as electric bike controls and electric bike
status digitally displayed to meet the trip demands.
Trip time display (with displays of a single trip time (TM) and total trip time (TTM));
Trip speed display (with displays of real-time speed (Km/H or MPH) and a single
maximum speed (MXS) and a single average speed (AVS));
Trip distance display (with displays of a single trip distance (DST) and total trip distance
(ODO));
Functions of throttle;
Functions of pedal assist system;
Pedal Assist Level (ASSIST);
6Km/H power walk ( ) function;
Cruise function (CRUISE);
Battery capacity indicator ( );
Real-time battery voltage (VOL) display;
Motor power and temperature (MOTOR) display;
Brake display ( );
Turn on backlighting and lights ( );
Environment temperature (°C or °F) display;
Data clearing;
Fault code display;
User Parameter setting
24V, 36V, 48V supply voltage can automatic identification and be compatible
DISPLAY CONTENT
Battery Capacity
Indicator
Pedal Assist Level and
Backlight Status
Trip Distance or Real-time
Battery Voltage
Brake Status E-Bike Speed
Environment Temperature Motor Operation Power (Watts)
Trip Time and
Total Trip Time
or Motor Run Temperature
Power Walk Function
7
BUTTON DEFINITION
KT-LCD3 is designed with the display in the center of the handlebars and electric bike
control buttons next to the left-hand grip of the handlebars for ease and safety.
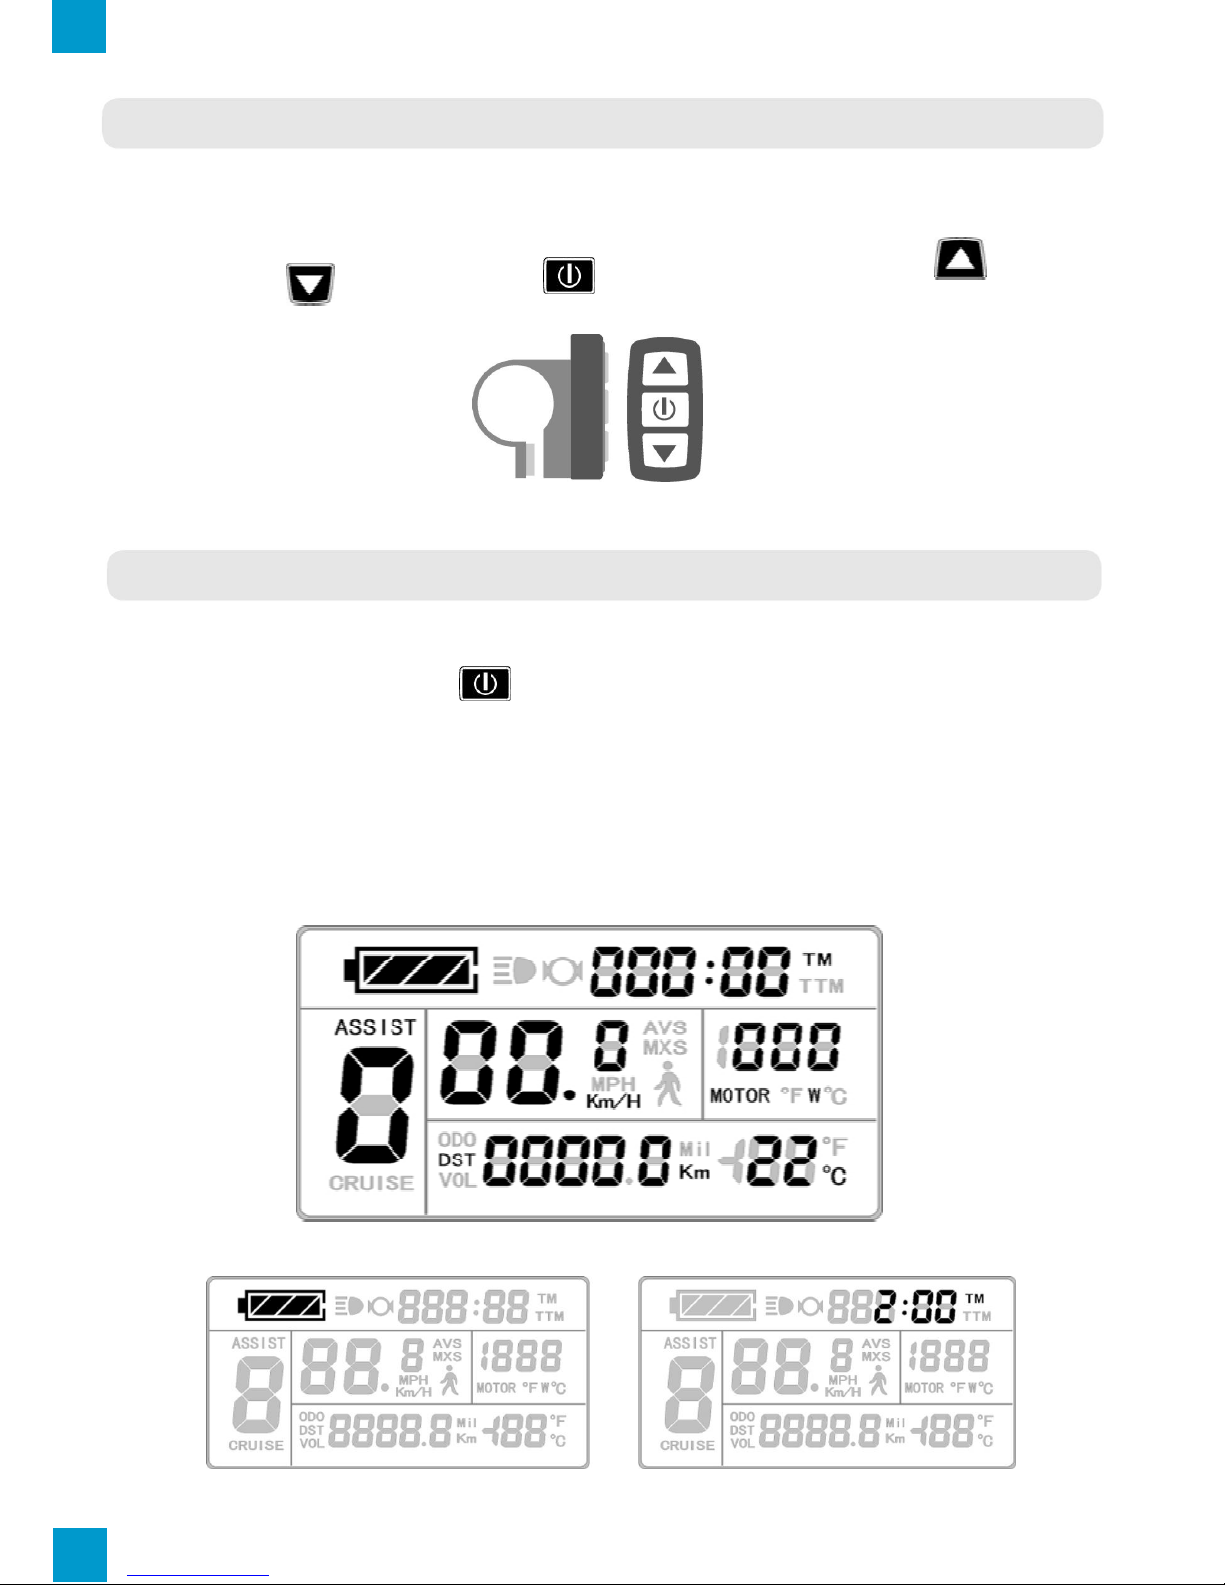
There are three buttons on the operating panel of the box, which are icons of
button (UP), button (DOWN) and button (POWER).
Button Control Box and Operating Panel
BASIC OPERATION
On/Off
To turn on or off, hold down button for 2 seconds. System will automatically shut
down when stationary and not in use for five minutes. Note: System requires PAS or
throttle in use for a constant of 20 – 25 seconds to activate. When powered off, the power
consumption of the LCD and controller is zero.
Display Interface
Display 1: The LCD is configured to enter this display on start-up.
The following are shown on display 1.
Battery Capacity Indicator
8
Single Trip Time (TM)
Pedal Assist Levels
Single Trip Distance (DST)
Real-Time Trip Speed (Km/H)
6Km/H Walk Function
Motor Operation Power
Backlight
Cruise Function (CRUISE)
Environment Temperature
Brake Status
Motor Running Temperature
9

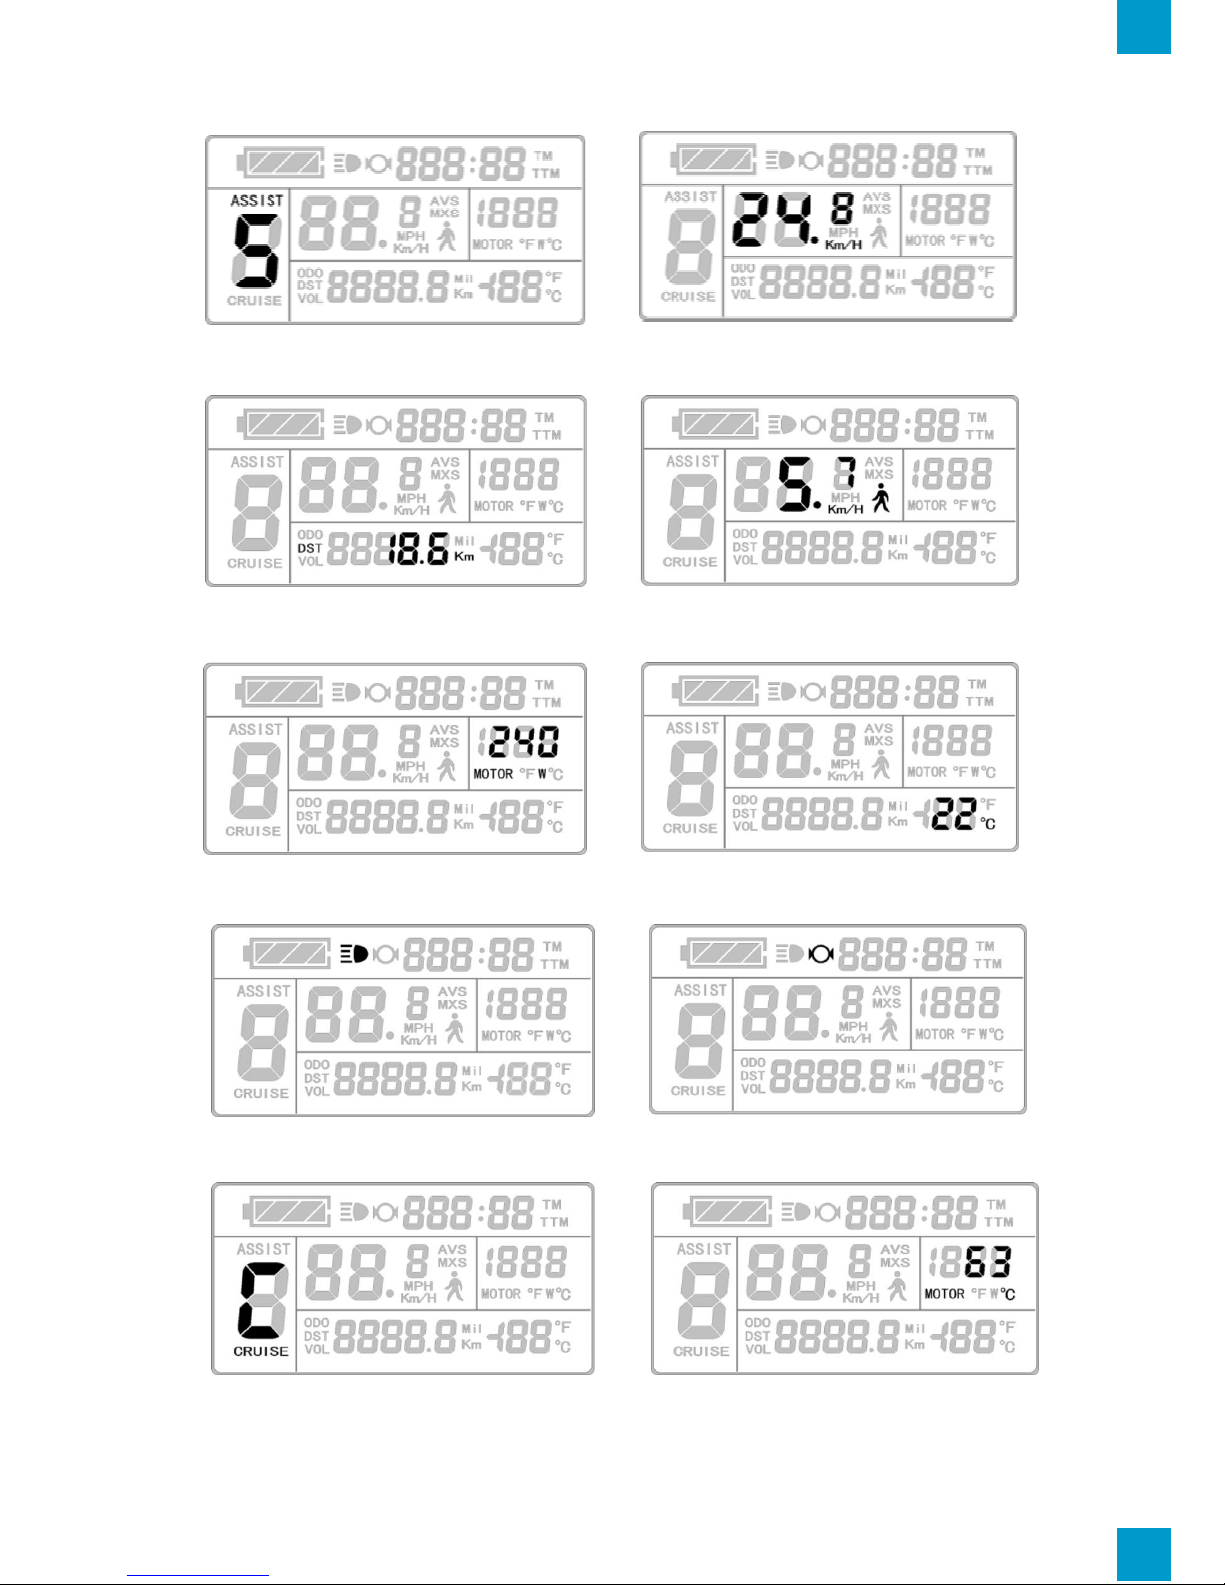
Display 2: To enter display 2, press the button while in display 1. The interface will
display as shown below.
Total Trip Time (TTM)
Single Average Speed (AVS)
Display 2
Motor Operating Temperature
Total Trip Distance (ODO)
Once the e-bike is in riding mode, after five seconds display 2 automatically reverts to
display 1. The original motor power is replaced by the motor running temperature as
shown below. To return to motor output, cycle through the displays back to display 1.
10
 Loading...