

Electone 06E123456L, 06E123456R Operating Instructions Manual

Operating Instructions
for Hearing Instruments

i
Your hearing care provider has
carefully prescribed an Electone
hearing instrument designed to meet
your individual hearing requirements.
This booklet contains operating
instructions for your specific hearing
instrument as well as operating
instructions for other hearing
instrument models. Refer to the Table
of Contents for instructions on using
your particular instrument.
Electone hearing instruments are
manufactured and tested to stringent
quality control standards, ensuring
excellent performance. Your decision
to purchase Electone hearing
instruments reflects the importance
you place on quality and reliability.

ii
ii
Welcome to Better Hearing!
Congratulations! You are about to enter a new
world of better hearing.
As you become familiar with your hearing
instruments, you will be able to live a fuller life
enjoying the sounds of your environment, your
family and your friends.
Please keep in mind that learning to use
your hearing instruments requires a period
of adjustment and patience. The adjustment
period varies for each individual depending on
your dedication and motivation.
Remember that just as hearing loss generally
occurs gradually over time, it may take time to
get used to the sounds hearing instruments
bring back. Take time to familiarize your family
with your new instruments and ask them to work
with you and to be patient as you rediscover
sounds you haven’t heard for awhile.

iii
Table of Contents
Getting The Most From Your Hearing Instruments .........1
Binaural Amplification .........................................................
2
Custom In-the-Ear Hearing Instruments .........................
3
Getting Familiar With Your Custom In-the-Ear Instruments ..
3
Inserting the Battery ...........................................................
4
Inserting and Removing the Instruments ........................... 5
Inserting and Removing the CIC Hearing Instrument .......
5
Volume Controls ..................................................................
6
Manual Volume Controls ....................................................
7
Screw Set Volume Controls ................................................
8
Directional Microphone System ......................................... 8
Using the Telephone ...........................................................
9
Telecoil Switches .................................................................
9
Behind-The-Ear Hearing Instruments ............................
10
Getting Familiar With Your Behind-the-Ear Instruments .
10
Inserting the Battery ......................................................... 11
How To Put On the Instruments .......................................
12
BTE Volume Controls ........................................................
13
Using the Telephone .........................................................
14
Microphone-Telecoil Controls ..........................................
14
Audio Input ........................................................................ 16

iv
iv
Battery Compartment Safety Lock for BTE Hearing
Instruments ........................................................................
17
Open Fit Behind-the-Ear (BTE) Hearing Instruments ..
17
Digitally Programmable Hearing Instruments ..............
18
Using the Optional Memory Selection Switch .................
19
Reset Function .................................................................. 21
General Use .......................................................................
21
Digital Hearing Instruments ...........................................
22
General Use .......................................................................
22
Maintenance & Daily Care ..............................................
23
Health Considerations ................................................... 27
Important Notice to Hearing Instrument Users ............. 27
Hearing Instrument Warranty ........................................
29
Replacement Opportunity ................................................
31
To Return Your Hearing Instruments for Service .............. 31
Warranty Information ........................................................32
Battery Tips .....................................................................
33
Battery Sizes for Hearing Instruments .......................... 35
Troubleshooting Hearing Instruments .......................... 36

1
Getting The Most From Your Hearing
Instruments
From the first fitting of your hearing instruments
there are things that you can do to increase
your listening satisfaction. Remember that there
may be sounds, both wanted and unwanted,
you may not have heard for a long time.
Practice identifying and then ignoring sounds
which at first may be disturbing to you.
Below are suggested guidelines for adjusting
to your new hearing instruments. Your hearing
care professional may provide additional or
modified guidelines to meet your individual
needs.
• For the first few days wear your hearing
aids in surroundings in which you are most
comfortable. For instance, you might only
wear them for a few hours a day at home.
• Increase your wearing time gradually as the
hearing aids become more familiar to you.
• If at any time you feel nervous or tired,
turn your hearing aids off and rest awhile.
Remember, your ultimate goal is daily all - day
use.

2
2
• Converse with only one person at a time
initially until you feel comfortable using your
instruments. Then move on to group listening
situations.
• When engaging in group conversations,
request that one person speak at a time.
• When in a church or theater, experiment with
finding a place to sit where you can hear best.
Don’t be discouraged. It may simply be a
matter of finding the proper spot in order to
hear more clearly.
Binaural Amplification
Nature gives us two ears for a reason. Binaural
amplification (the wearing of two hearing
instruments) is recommended to receive the
full benefits of amplification. By wearing two
hearing instruments, both ears receive sound
signals allowing for improved clarity, a sense
of direction, more balanced sound, and more
relaxed listening.
Binaural amplification may provide improved
understanding along with better hearing.
3
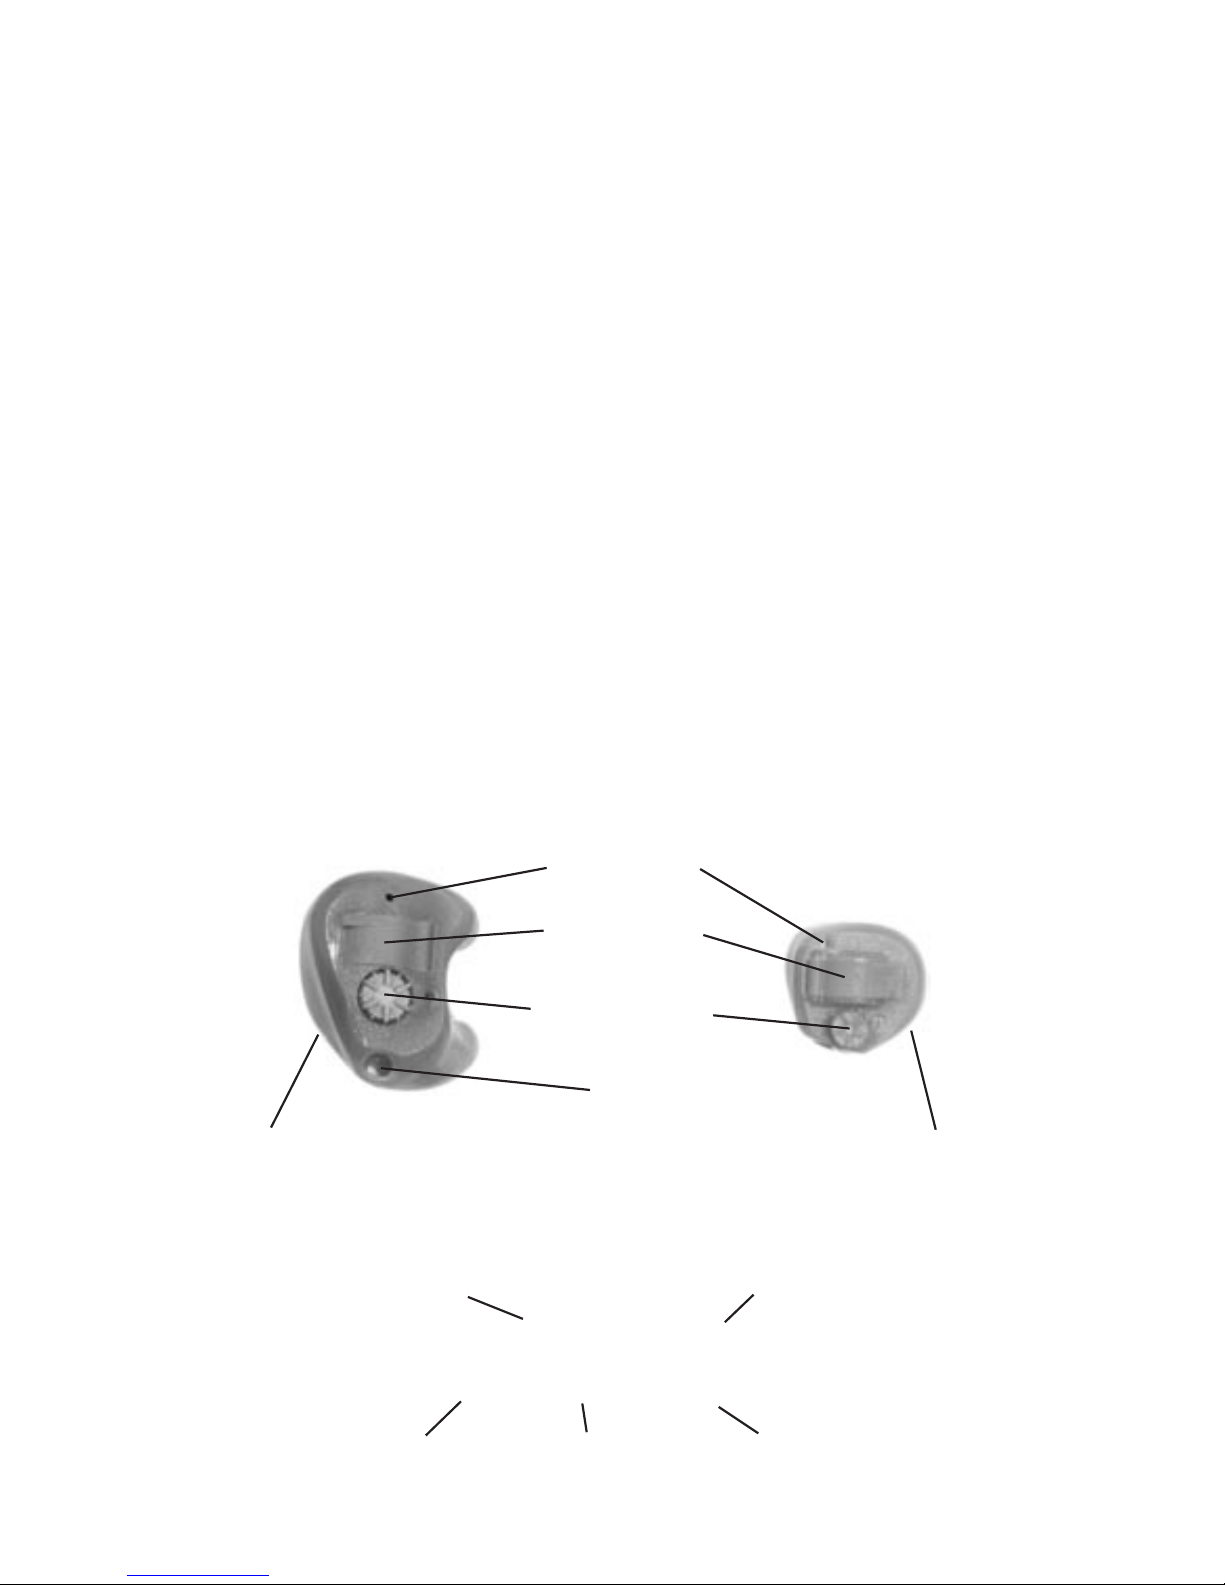
Custom In-the-Ear Hearing
Instruments
Getting Familiar With Your Custom In-theEar Instruments
Your in-the-ear hearing instruments are customfit to the contours of your ear. Red or blue
laser-etched numbers on the instruments’
shells denote the manufacturer, size, year
of manufacture, and the serial number. Red
numbers indicate the instrument is for the right
ear, blue is for the left.
In-the-Ear In-the-Canal
Electone FS
06E123456[L or R]
Microphone
Battery Door
Volume Control
On-Off Switch
Vent
Laser-etched
Serial Number
(on back side)
Laser-etched
Serial Number
(on back side)
Manufacturer Size of instrument
Year of manufacture Serial number Left or Right instrument
4
4
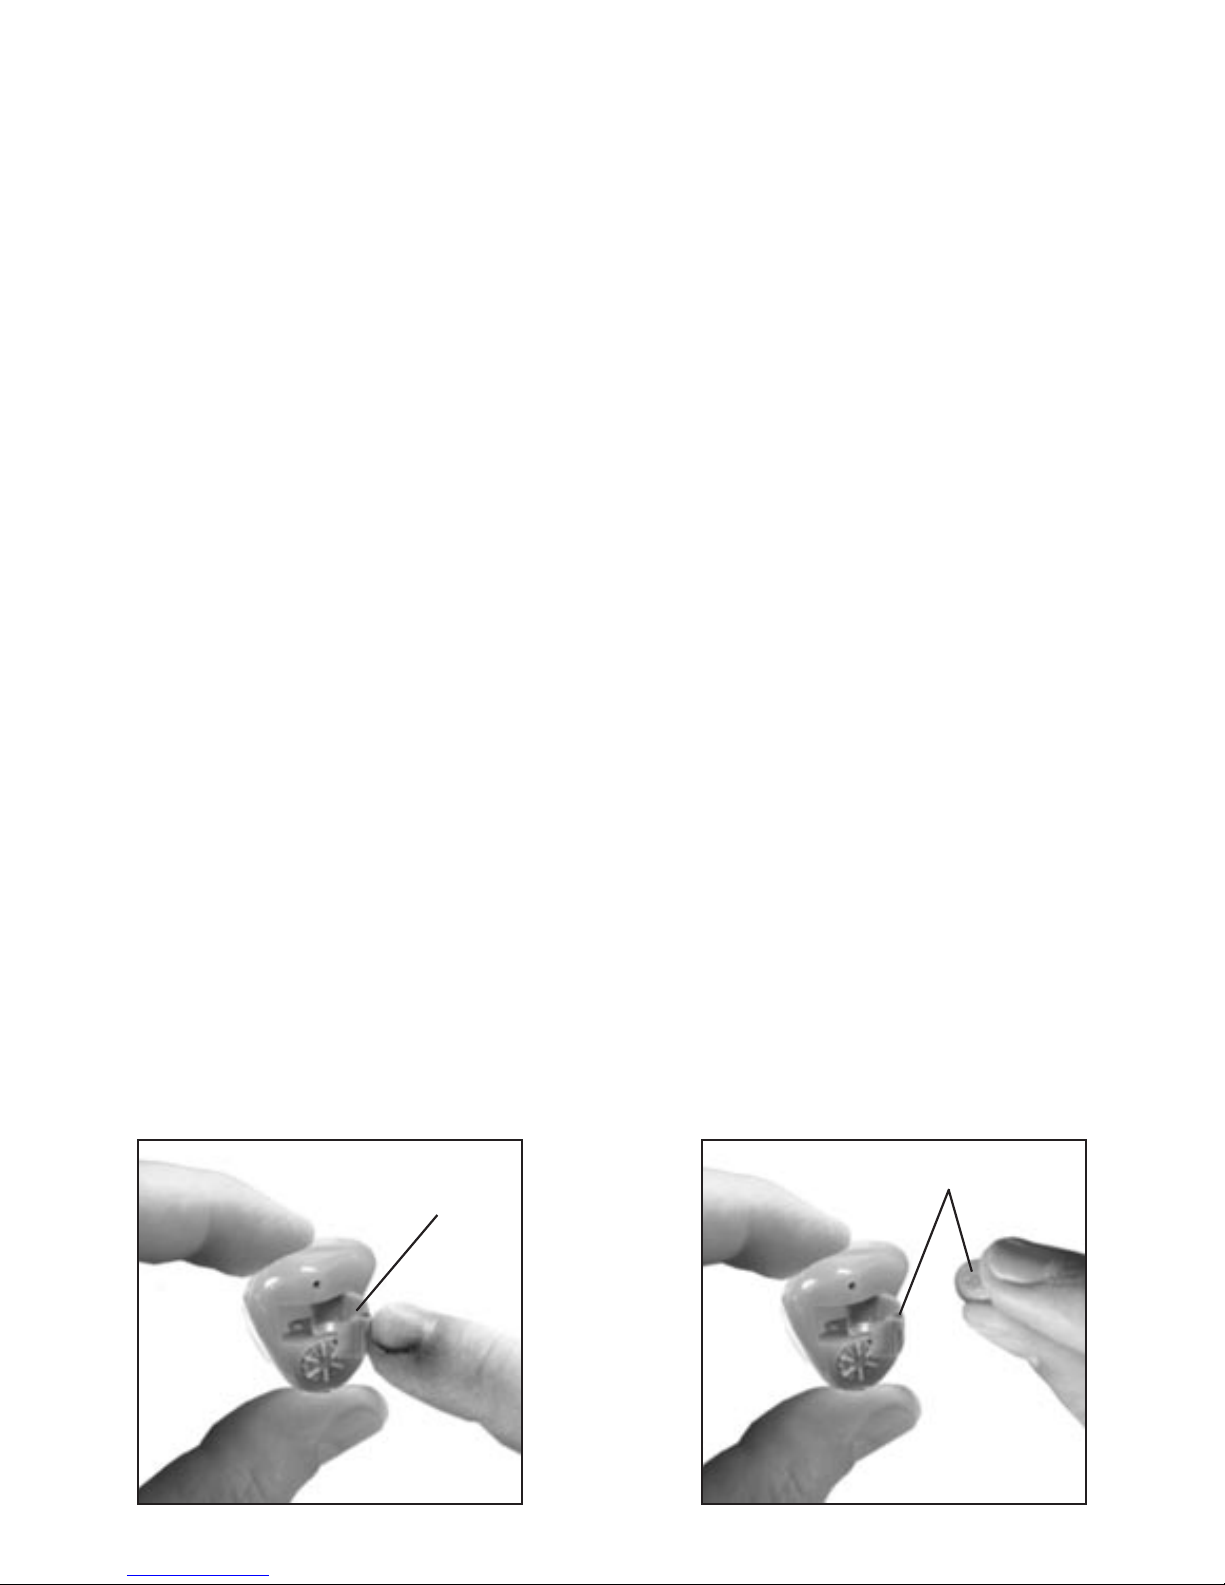
Inserting the Battery
To insert the battery, pull the tab on the battery
door outward until the door swings all the way
open (see figure 1). Remove the paper tab
from the back of a proper size battery. Place
the battery into the battery door (see figure 2).
Observe the correct polarity. The “+” sign on
the battery must match the “+” sign stamped
on the battery door.
Gently close the battery door. Avoid forcing
the battery door shut. If the door doesn’t
close, check to see the correct size battery was
inserted and that the “+” signs are aligned.
If your instrument’s battery door does not have
a “+” sign, insert the proper size battery and
gently close the battery door. If it doesn’t close
easily, remove the battery, turn it over and
reinsert it. The battery door should now close
easily.
Battery
door
Figure 1
“+” Positive Sign
Figure 2
5
Inserting and Removing the Instruments
Hold the instrument between your thumb and
index finger (see figure 3). Turn down the volume
(if applicable) to reduce feedback (a whistling
sound). (See note on page 6.) With the face of
the instrument facing away from the ear, place
the canal portion into your ear canal. Gently work
the instrument into its proper position by slightly
twisting until it is firmly seated in your ear. Lightly
press inward for a secure and comfortable fit (see
figure 4).
When removing the instrument, reverse the
insertion process. It often helps to push on
the back of the ear to help release the hearing
instrument.
Inserting and Removing the CIC Hearing
Instrument
With the removal cord on the bottom, guide the
CIC into your ear canal (see figure A). Once it’s
in the ear canal, lightly pull on your earlobe and
Figure 3 Figure 4 Figure A Figure B
Removal
Cord
Removal
Cord

6
6
press the CIC in place. If you experience irritation,
inflammation, or pain when inserting your CIC
hearing instrument, immediately contact your
hearing care provider.
To remove the CIC, simply grasp the removal cord
with your thumb and index finger and gently pull
the CIC out of your ear canal (see figure B).
CAUTION! Do not pull on the volume control or
battery door as this may cause damage to the
hearing instrument.
NOTE: Your hearing instrument may include a
feature which delays “power-on” of the instrument
for a few seconds to allow insertion without
feedback. Your hearing instrument provider will
inform you if this feature is present.
Volume Controls
Your hearing instruments may be equipped with
one of many different types of volume controls.
Most volume control options available today
also control the on/off function of the hearing
instrument.
If your instruments do not have this feature,
the battery door must be opened or the battery
removed to turn off the instruments and prevent
battery drain. If you are not certain about which
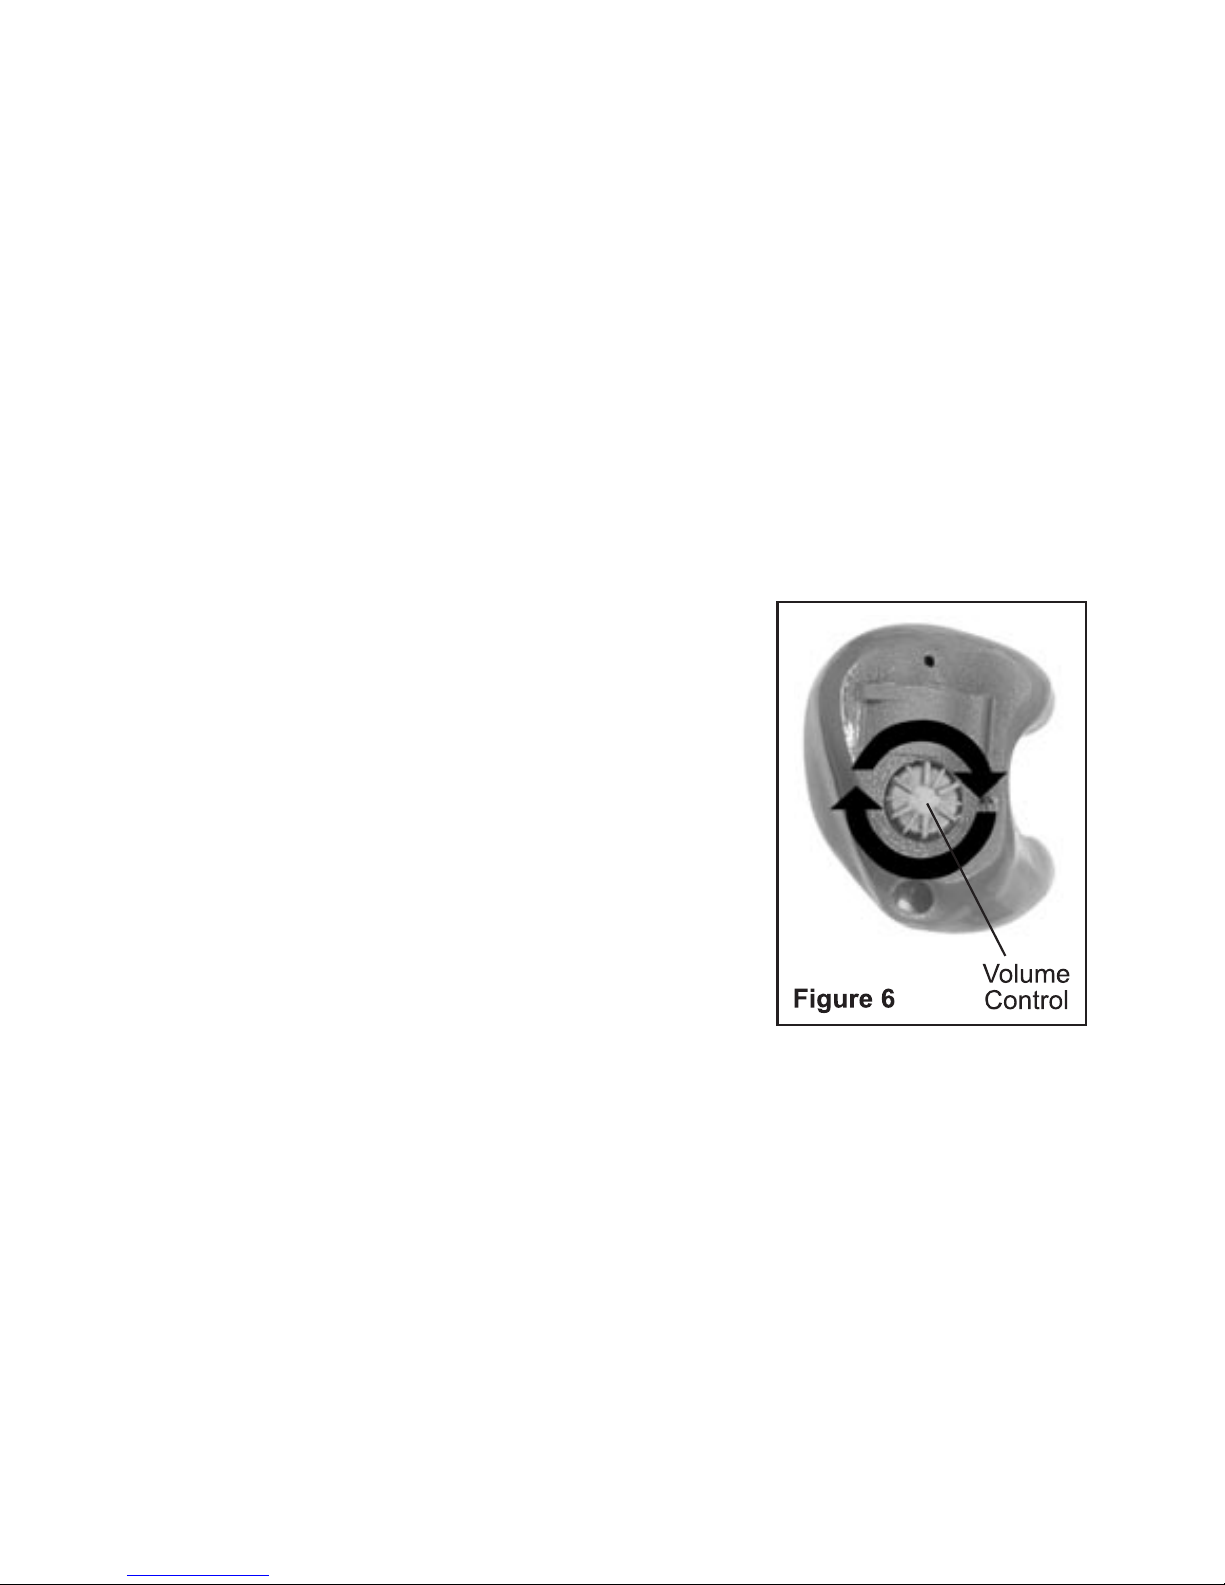
7
type of volume controls your custom hearing
instruments use, be sure to ask your hearing
care provider.
Manual Volume Controls
The wheel shaped controls are rotated to select
the most desirable listening position (louder
or softer). Be sure volume controls are set at
minimum before placing instruments in your
ears.
To turn the instrument on and
increase volume, place the
forefinger gently against the
wheel and turn, rotating the
wheel in a forward direction
(towards your nose). When the
wheel stops, the instrument is at
full volume (see figure 6).
To reduce volume, rotate the wheel backward
(toward the back of your head or away from
your nose). When the wheel will not turn any
further, the instrument is off.
Do not force the volume control past the stops
in either direction.
8
8
Screw Set Volume Controls
Your hearing care provider will adjust screw set
volume controls. There is no on/off switch built
into the screw set volume control. To turn off
your instruments, you must leave the battery
door open or remove the battery. An optional
on/off toggle switch may be used if space is
available.
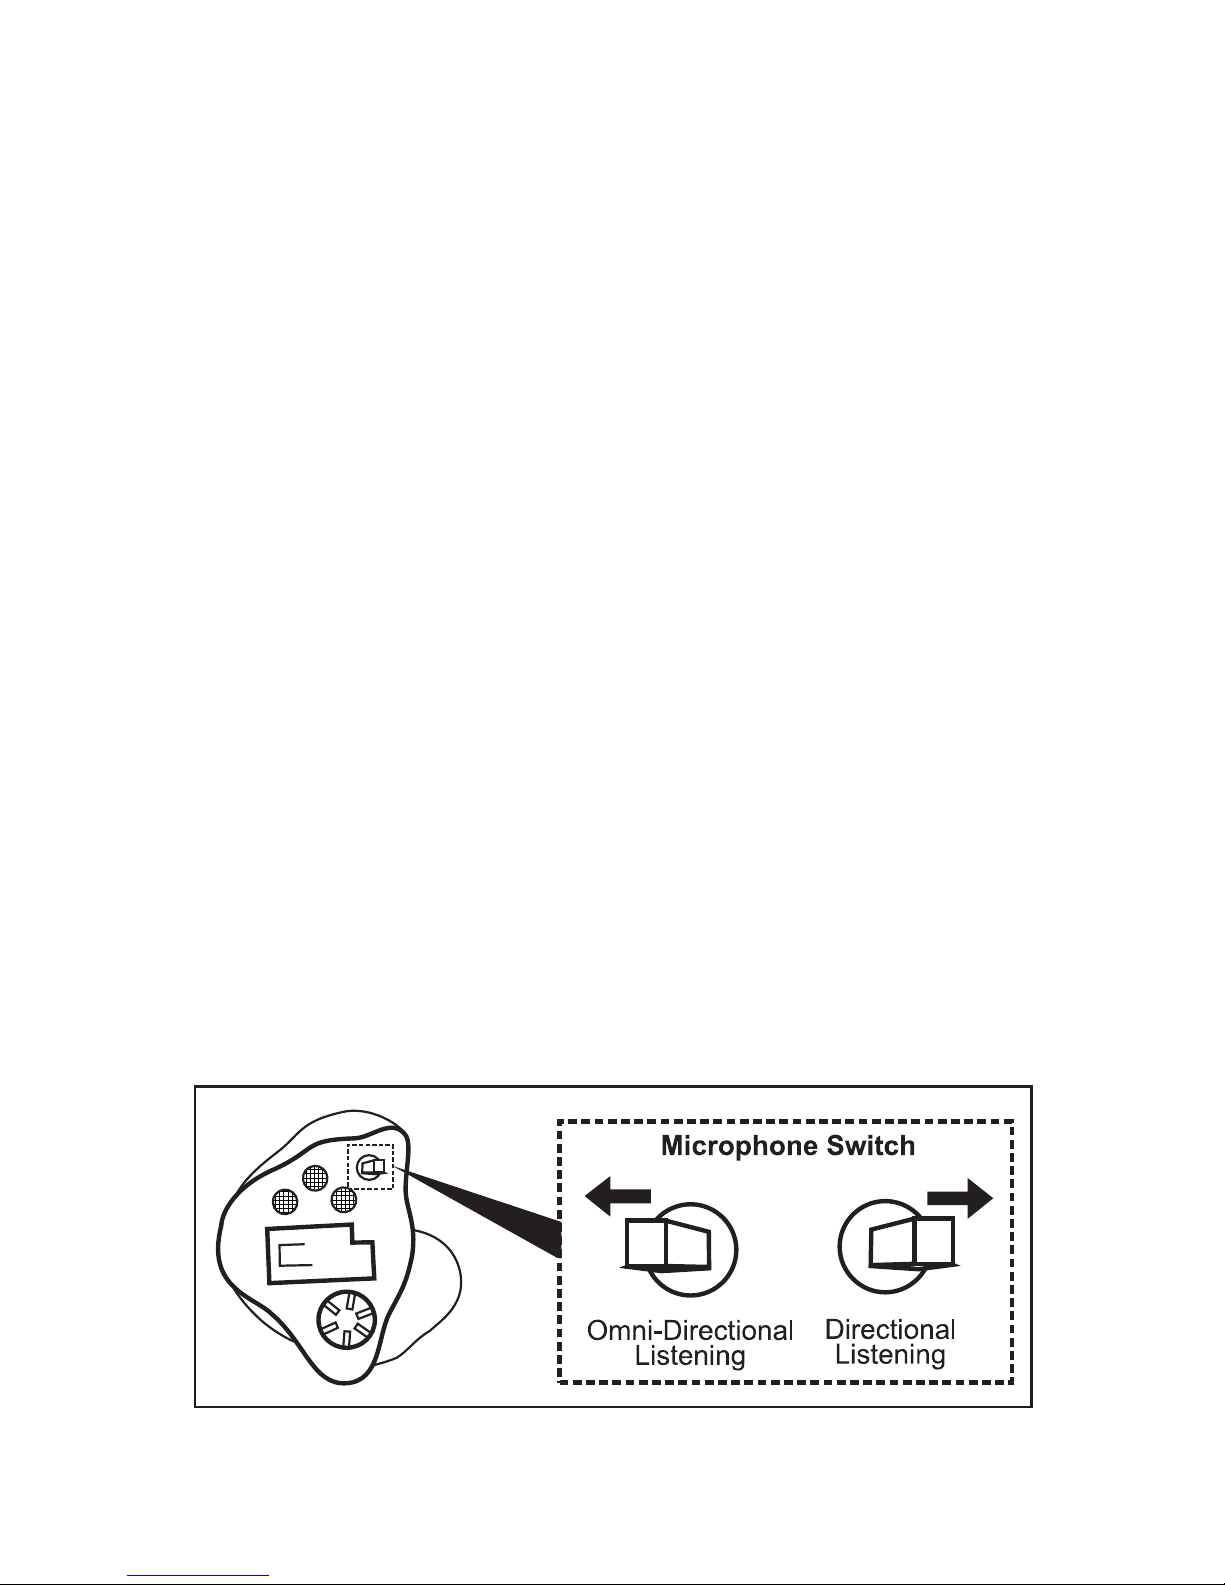
Directional Microphone System
Your hearing instrument may be equipped
with a Directional Microphone System. For
listening in noisy situations (directional mode),
simply move the microphone switch forward.
For listening in a quiet environment (omnidirectional mode), move the switch backward
(see figure 7).
Figure 7
 Loading...