

Electia SRA-8 Owner's Manual
SSRRAA--88
O
O
W
WNNEERR’’SS
M
MAANNUUAALL
AArrtt.. 3366..22886699
1
GGBB
WWiirreelleessss IInnddoooorr SSiirreenn ((SSRRAA--88))
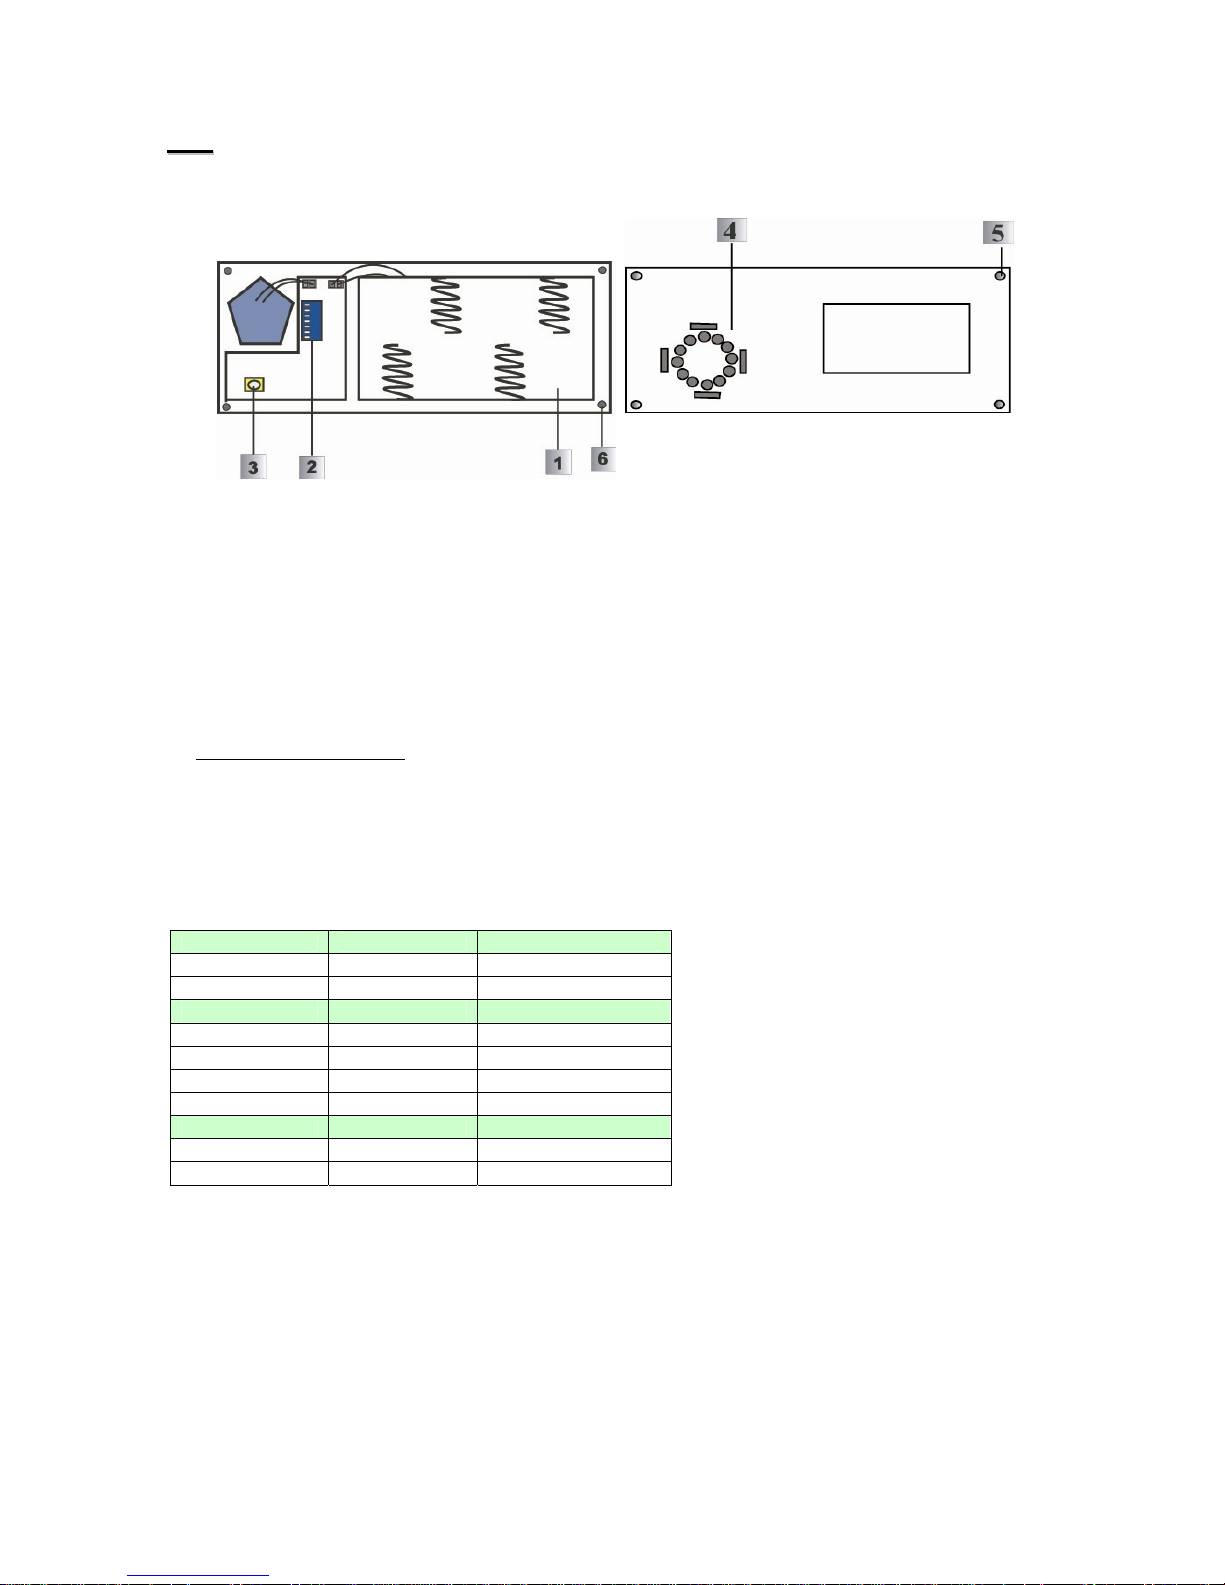
BACK VIEW
INSIDE VIEW
1. Battery Compartment
(with a lid secured with 4 screws)
2. Function Dip Switch
Contains 7 dip switches to enable the learning mode and to set the alarm period of siren.
3. Tampe r
4. Buzzer hole
5. 4 Mounting holes
Accessories included
In addition to the SRA-8 itself, the following accessories are also included in the package:
a. 4 x D-cell Alkaline Batteries to be placed in
b. 4 x 6mm dowels.
c. 4 x screws to be placed in four corners
DDiipp SSwwiittcchh PPoossiittiioonn TTaabbllee
You can find dip switches marked 1-7 from left to right. The function of each dip switch is stated in the table below.
2
Dip 1
ON Learning Mode
OFF Normal Mode
Dip 3 Dip 4 Alarm Period
ON OFF 5 min
OFF ON 90 sec.
OFF OFF 3 min.
ON ON 1 sec.
Dip 6
ON Clear Memory
OFF Normal
*
*
ddiipp sswwiittcchh 22,, 55,, aanndd 77 iiss pprreesseett.
.
SSRRAA--88 FFuunnccttiioonn OOvveerrvviieeww
SSiirreenn MMeemmoorryy CClleeaarr
The siren can be reset and the memory contents cleared by removing the batteries, waiting for 1 minute, sliding dip
switch 6 to ON position and then re-inserting the batteries. The siren will produce a short confirmation tone. Dip switch
should then be slid to OFF position otherwise the siren code learning will be reset every time the siren has a power-up
sequence.

3
SSiirreenn AAuuddiibbllee PPeerrffoorrmmaannccee
The siren produces a minimum of 104 dBA sound pressure at 1 meter on axis.
4 different siren duration is programmable via dip switch 3 and 4 (please refer to the table above):
1) 3 min.
2) 5 min.
3) 90 sec.
4) 1 second (test)
The fourth position (1 second) is used for testing during installation process.
The siren is silenced when either the siren duration expires or the control panel turns off the siren.
For Burglary alarm, SRA-8 gives continuous alarm sound.
For Fire and Water, SRA-8 gives an intermittent alarm sound for 460 ms ~ 1400 ms second and 460 ms of cyclical
sound during the programmed alarm duration.
TTaammppeerr AAllaarrmm
The siren is protected from its top lid removal. If the siren detects a tamper condition, it will activate the siren for the
programmed period. If the tamper condition persists, the siren will sound a series of five pips either every time the
system is armed or when the tamper is enabled, to indicate a fault. Tamper feature can be enabled/disabled from the
control unit by selecting the “Device +/-“ menu then “Program Siren”, and choosing between “Siren Tamp. ON” and
“Siren Tamp. OFF”. To confirm selection press OK.
CCoonnffiirrmm OOnn,, CCoonnffiirrmm OOffff
The siren can be programmed to produce additional confirmation beeps to tell you when the system is armed,
disarmed, and low in battery. The setting up procedure can be done from the control panel under “Device +/-“ menu
which leads to “Program Siren” menu which leads to selection of “Confirm On” or “Confirm Off”
Disable the Siren Confirmation by selecting “Confirmation Off” and press “OK”.
Enable the Siren Confirmation by selecting “Confirmation On” and press “OK”.
Mode Siren Audio
Arm 1 beep
Home 1 beep
Disarm 2 beeps
Low Battery Arm 5 beeps
Low Battery Home 5 beeps
Low Battery Disarm 5 beeps
At fault status it will perform the following:
Mode Siren Audio
Arm/ Home 5 beeps
Disarm 2 beeps
EEnnttrryy SSoouunndd OOnn,, EEnnttrryy SSoouunndd OOffff
The SRA-8 can be enabled or disable from sounding the Entry Delay warning beeps. The setting up procedure can be
done from the control panel under “Program Siren” menu.
Disable the Siren Entry Sound by selecting “Entry Snd Off” and press “OK”.
Enable the Siren Entry Sound by selecting “Entry Snd On” and press “OK”.
PPrreevviioouuss AAllaarrmm wwaarrnniinngg
If there has been an alarm when you were away, the siren will sound for 3 seconds when being disarmed.
WARNING: If the siren is activated for 3 seconds when you disarm your system, this means there could be an intruder
still in your premises.

4
PPoowweerr SSuuppppllyy
SRA-8 features completely wire-free operation and uses four alkaline D cells. The battery-life is estimated for 3 years.
The SRA-8 can detect if the battery is low. Low battery detection operates at a threshold of 4.4V +/- 10% where the
SRA-8 has enough power to typically operate for 1 month before complete exhaustion. The siren low battery signal will
be enunciated by five beeps under Operation Mode.
On the other hand, during an alarming period low battery status, the siren sound will be incomplete. For Burglary, Fire
and water alarm duration, SRA-8 gives an Intermittent alarm sound of 500 ms, 460 ms and 460 ms ~ 1400 ms of
cyclical accordingly.
GGeettttiinngg SSttaarrtteedd
To insert the batteries:
Step 1. Release the screws at the bottom of SRA-8 and pull the outer case out carefully.
Step 2. The battery compartment is a large box in the SRA-8 with a lid secured with 4 screws.
Step 3. Remove the four screws as shown and take off the compartment lid.
Step 4. Insert the D cell alkaline batteries provided into the battery compartment, taking care to put
the batteries in the right way around.
Step 5. The siren will give a short confirmation tone when the last battery is inserted.
Step 6. Replace the battery compartment lid with the four screws taking care not to over tighten
PPrrooggrraammmmiinngg SSRRAA--88
Note: Remember to learn in at least one other device into control panel before SRA-8 can be added
Step 1. Locate dip switches.
Step 2. Slide dip switch 1 to ON. The siren will give two short beeps to indicate it is now in the learn mode.
Step 3. Program the control unit by selecting “Device +/-“ menu, then “Program Siren” menu, then “Learn Siren”.
Step 4. Press OK and the control unit will give a long beep to confirm, followed by the siren’s response of two short
beeps. If the Siren has been already learnt-in, then, one short beep will performed to notify the user.
Step 5. Slide dip switch 1 to OFF position, the siren will give one short beep to confirm that the siren is now in Normal
Operation mode.
Step 6. Select “Confirm ON” or “Confirm OFF” under the “Program Siren” menu on the control unit, and press “OK”.
The siren will perform one short beep to notify the user.
Step 7. Select “Entry Sound ON” or “Entry Sound OFF” under the “Program Siren” menu on the control unit, and
press “OK”. The siren will perform one short beep to notify the user.
Step 8. Set dip switch 3 and 4 for your desired alarm period.
Step 9. The Learn-in process is now completed.
<<NNOOTTEE>>
For Step 4, 6 and 7, please wait for 6 seconds after press the “OK” button each time.
IInnssttaalllliinngg SSRRAA--88
Step 1. Find the location where SRA-8 is to be mounted
Step 2. Using the 4 holes on the back of the base as shown as a template, mark off the holes’
positions.
Step 3. Drill 4 holes and using the wall plugs and screws provided fix to a suitable wall.
Step 4. Close the lid and tighten the lid fixing screw.
Step 5. Enable Tamper switch by selecting “Siren Tamp ON” under the “Program Siren” menu
on the control unit
Step 6. Installation is now completed.
CChhaannggiinngg tthhee BBaatttteerryy
Whenever low battery enunciation arises and it is time for you to replace the batteries, remember to first disable the
Tamper Protection from the Control Panel by selecting “Device +/-“ menu, then “Program Siren” menu, then “Siren
Tamp. OFF” and press OK.
When changing the batteries, please wait for one minute before inserting the new battery in. After the batteries have been
replaced, remember to enable the Tamper Switch again. Or the Disabled Tamper Switch will automatically revert to ON
after about an hour if not switched back on again manually by selecting “Siren Tamp. On”.
 Loading...