

Elecom UCAM-S1C30 UCAM-S1C30 Series, UCAM-E1C30T SeriesUCAM-E1C30T SeriesUCAM-B1C30T Series, UCAM-B1C30T Series Setup Manual
Page 1

UCAM-S1C30
UCAM-S1C30
SETUP GUIDE
SETUP GUIDE
* The names of products or companies appearing in this guide are the trademarks or registered trademarks of their respective owners. Symbols ® and ™ are omitted from names in this text.
Series
Series
PC Camera Installation and Setup
Driver Utility Installation............................................................2
Installation Check
Driver Utility Uninstallation........................................................9
Image Adjustment
Image Adjustment...................................................................10
Troubleshooting
Troubleshooting ......................................................................12
.....................................................................8
Page 2

PC Camera Installation and Setup
This chapter explains how to install the included Driver Utility and connect the PC camera to a PC. The
PC camera operates also as a TWAIN device that can be used with Adobe Printshop and Microsoft Imaging. These image processing applications enable you to take VGA size still pictures with the PC camera.
Driver Utility Installation
This procedure explains how to install the Driver
Utility rst and then connect the PC camera.
DirectX 8.1 or later is requi red to
run the Driver Utility. If not already
installed, use Windows Update or
other means to install DirectX.
Using Windows Update installs the
latest version (as of October 2004),
DirectX 9.0c.
Install the Driver Utility before con-
necting the PC camera to the PC.
If done the other way around by mistake, cancel inst allat ion of th e displayed USB device, disconnect the PC
camera and install the Driver Utility.
Installing in Windows XP
Load the Install Disk into the CD-ROM
1.
drive.
Click on
2.
3.
" ファイル名を指定して実行 …"
in the Start menu and, when the
名を指定して実行」
"D:¥setup.exe" into the text box and click
on the button.
"D" is the CD-ROM drive of your PC.
Normally, it is the D drive.
Click on the button.
window appears, type
「ファイル
2 3
Page 3

Select "Complete" and then click on the
4.
5.
button.
Click on the
Installation will begin.
button.
Plug the USB connector of the PC cam-
8.
era into a USB port of the PC.
Thoug h thi s PC camera consu mes a
maximum 100 mA of power, because of
specications, connect it to a USB port
that supplies 500 mA.
The PC camera may be co nnected
and disconnected while power to the
PC is ON.
Do not try plugging the USB connector
in upside-down.
This completes Driver Utility installation.
Next, check that the Driver Utility was correctly
installed. Go to pg. 8.
Click on the
6.
Peel off the sticker from the USB connec-
7.
tor of the PC camera.
button.
Page 4

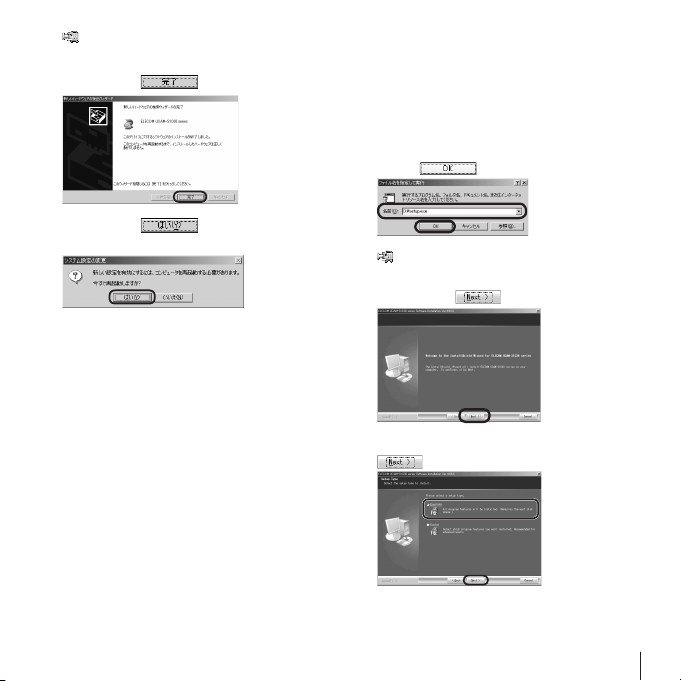
Installing in Windows 2000
Load the Install Disk into the CD-ROM
1.
drive.
Click on
2.
3.
Select "Complete" and then click on the
4.
" ファイル名を指定して実行…"
in the Start menu and, when the
名を指定して実行」
"D:¥setup.exe" into the text box and click
on the button.
"D" is the CD-ROM drive of your PC.
Normally, it is the D drive.
Click on the button.
button.
window appears, type
「ファイル
Click on the button.
5.
Installation will begin.
Click on the button.
6.
Peel off the sticker from the USB connec-
7.
tor of the PC camera.
Plug the USB connector of the PC cam-
8.
era into a USB port of the PC.
The 「新しいハードウエアの検出ウイザー
ド」 window will appear.
The PC camera may be co nnected
and disconnected while power to the
PC is ON.
Though this PC c amera consumes a
maximum 100 mA of po wer, becaus e
of specications, connect it to a USB
port that supplies 500 mA.
4 5
Page 5
Do not try plugging the USB connector
in upside-down.
Click on the button.
9.
Click on the button.
10.
The PC will restart.
This completes Driver Utility installation.
Next, check that the Driver Utility was correctly
installed. Go to pg. 8.
Installing in Windows Me
Load the Install Disk into the CD-ROM
1.
drive.
Click on
2.
3.
Select "Complete" and then click on the
4.
" ファイル名を指定して実行…"
in the Start menu and, when the
名を指定して実行」
"D:¥setup.exe" into the text box and click
on the
"D" is the CD-ROM drive of your PC.
Normally, it is the D drive.
Click on the button.
button.
window appears, type
button.
「ファイル
Page 6

Click on the button.
5.
Installation will begin.
Click on the button.
6.
Peel off the sticker from the USB connec-
7.
tor of the PC camera.
Plug the USB connector of the PC cam-
8.
era into a USB port of the PC.
The PC camera will be recognized automatically.
The PC camera may be co nnected
and disconnected while power to the
PC is ON.
Do not try plugging the USB connector
in upside-down.
Though this PC c amera consumes a
maximum 100 mA of po wer, becaus e
of specications, connect it to a USB
port that supplies 500 mA.
This completes Driver Utility installation.
Next, check that the Driver Utility was correctly
installed. Go to pg. 8.
Installing in Windows 98/98SE
Load the Install Disk into the CD-ROM
1.
drive.
Click on
2.
3.
4.
" ファイル名を指定して実行…"
in the Start menu and, when the
名を指定して実行」
"D:¥setup.exe" into the text box and click
on the button.
"D" is the CD-ROM drive of your PC.
Normally, it is the D drive.
Click on the button.
Select "Complete" and then click on the
button.
window appears, type
「ファイル
6 7
Page 7

Click on the button.
5.
Installation will begin.
Click on the button.
6.
Peel off the sticker from the USB connec-
7.
tor of the PC camera.
Plug the USB connector of the PC cam-
8.
era into a USB port of the PC.
The PC camera may be co nnected
and disconnected while power to the
PC is ON.
Do not try plugging the USB connector
in upside-down.
Though this PC c amera consumes a
maximum 100 mA of po wer, becaus e
of specications, connect it to a USB
port that supplies 500 mA.
This completes Driver Utility installation.
Next, check that the Driver Utility was correctly
installed. Go to pg. 8.
Page 8

Installation Check
This procedure explains how to check whether the
Driver Utility was correctly installed or not.
Connect the PC camera to the PC.
1.
Click on
2.
If a message like
th a t at r i g h t appears, the Driver
Utility was not correctly installed or the PC camera is not
correctly connected to the PC. Click on
the [OK] button and check whether the
PC camera is correctly installed or not. If
there is nothing wrong with how the PC
camera is installed, the Driver Utility was
not correctly installed. Therefore, disconnect the PC camera, uninstall the Driver
Utility and repeat the procedure in "PC
Cam era Installation and Setup" of the
Setup Guide.
"プログラム"
S1C30 series" >> "AMCap" from the Start
menu.
The AMCap video capture tool will start up.
Note
>> "ELECOM UCAM-
Click on the Device menu and verify that
3.
a checkmark appears next to "ELECOM
UCAM-S1C30 series".
If it does not, click on it so that a check-
mark appears.
Click on Preview in the Option menu to
4.
add a checkmark to the item. The camera
image will be shown.
The camera image means the Driver Utility was
correctly installed and the PC camera is working properly.
8 9
Page 9

Driver Utility Uninstallation
This procedure explains how to uninstall the installed Driver Utility. If the Driver Utility is no lon-
ger needed, uninstall it as follows.
If using Windows XP, click on
1.
If using Windows 2000/Me/98SE/98, click on
2.
3.
>> "ELECOM UCAM-B1C30&E1C30
グラム"
series" >> "Uninstall" from the Start menu.
" プログ ラム "
series" >> "Uninstall" from the Start menu.
The Installer will start up and the 「メンテナン
ス」 window will appear.
Check that
click on the button.
Click on the button.
Uninstallation will begin.
>> "ELECOM UCAM-S1C30
Remove
"
"すべてのプロ
is selected, then
"
Click on the button.
4.
The PC will restart.
This completes uninstallation.
Page 10

Image Adjustment
The Settings window of the USB camera can be
called from the video capture application or the
video chat application. This window is for setting
brightness, white balance, etc.
• Image Mirror Flip
Inverts the image horizontally.
• Image Vertical Flip
Inverts the image vertically.
• Brightness
Adjusts the brightness.
• Contrast
Adjusts the difference between dark and bright
areas so as to sharpen the image.
• Gamma
Sets the gamma of the camera image.
• Hue
Adjusts the hue.
• Saturation
Adjusts the color saturation.
• Sharpness
Brings out the contours in the camera image.
• Image Quality
Sets the image quality. Image quality is prioritized
the farther to the right the bar is. If the PC cannot
keep up with processing and the image becomes
grainy, set the bar farther to the left.
• USB Bandwidth
Sets the bandwidth of the USB connection. Placing a checkmark in the checkbox sets bandwidth
and adjusts the image quality automatically.
• Exposure
Sets the image exposure. Placing a checkmark in
the checkbox sets the image exposure automatically.
• WhiteBalance
Sets the white balance. Placing a checkmark in the
checkbox sets the white balance automatically.
• In/Out Door
Selects whether the PC camera is installed Outdoor or Indoor.
10 11
Page 11

• Flicker
Sets the frequency if the light source ickers because of location.
• Display
Selects the type of display being used.
• Backlight Comp
Placing a checkmark in the checkbox brightens
the image.
• Reset
Returns settings to their defaults.
• Save
Saves the current setup.
• Restore
Reads the saved setup.
Page 12

Troubleshooting
What operating systems can this Driver Utility run on?
The Driver Utility can be used with Windows 98, Windows 98SE, Windows Me, Windows 2000 and
Windows XP.
It cannot be used with Macintosh operating systems.
I connected the PC camera before installing the Driver Utility.
If the PC camera is connected by mistake before installing the Driver Utility, cancel installation of the
displayed USB device, disconnect the PC camera and install the Driver Utility.
12 13
Page 13

-MEMO-
Page 14

-MEMO-
14 15
Page 15

USB Connection PC Camera
Setup Guide
UCAM-SC30 Series
Published by … ELECOM Corporation
2nd Edition … October 8, 2004
C04002 C4-WU-2
2004 ELECOM Corporation. All rights reserved.
©
Page 16

USB Connection PC Camera Setup Guide
 Loading...