

Page 1

- 1 -
Forward
Thank you for purchasing the MR3-A001 S eries USB 3.0 multi-memory reader/
writer.
This us er’s manual explains h ow to set up the product. Please tho roughly read
this user’s manual before use, to ensu re proper setup of the product.
Safety Precaut ions
Always observe the cautions issued by PC and peripheral device manufacturers •
when connecting and disconnecting this product.
Do not attempt to disassemble, modify or repair this product by yourself.•
Doing so may cause a fire, electric shock, or prod uct damage and may void the
war rant y.
Do not use t his product or an y PC t o which this prod uct is connected in areas •
where water is used or in very humid environments.
Doing so may cause a fire, electric sh ock, or product damage.
When connecting and disconnecting this product, always touch a metal object •
(such as a steel desk or a metal door handle) to discharge static electricity before
touching this product.
Static electricity may da mage this product.
If you suspect something is wrong with the product, discontinue use immediately.•
Specifications
OS• .................................. Windows® 7, Windows Vista® (up to SP2), Windows® XP
(SP1 to SP3), Windows
®
2000 (SP4)
Mac OS X (10.2 to 10.6.6)
In the above OSs, the drivers provided with the OSs can
be used.
Interface• ......................... USB 3.0
A USB 3.0 interface (or PC supporting USB 3.0) is required
when using USB 3.0 SS Mode (max. data transfer speed
of 5 Gbps).
Operating temperature• ..5 to 40°C
Operating humidity• ........30 to 80%
Dimensions • ................... 85.0 (W) x 52.5 (D) x 15.0(H) mm
(Not including protruding parts)
Included items• ............... Manual x1
USB 3.0 cable (Approx. 0.5 m) x1
Usage Precautions
This product is USB 3.0 certified. The product will operate at USB 2.0 speeds when •
connected to a USB 2.0 port or Mac.
If the PC is started when a memory card is inserted in this product, a disk scan may •
be performed automatically, even if the PC had no previous abnormal termination
errors.
If the PC is started when a memory card is ins erted in this product , even if the •
device has been connected before, the "Found New Hardware" message may be
displayed.
It may take a minute or so for this produc t to be recognised by the PC after it has been •
connected. Wait un til you can operat e the computer.
Certain types of media, including older media and media that uses special formats, •
may not be compatible with this product.
Before using media with digital cameras, mobile phones, or other devices, format it •
with the device that you use.
It may not always be possible to use m edia that has been formatted using a PC. In
such cases, medi a can be used by first formatting it on the device with which it is
to be used.
MagicGate has a copyright protection feature. •
Please follow the removal of this product, to the procedure "5 Disconnect the card •
reader from the PC ". There is a possibility the file disappearing.
ELECOM C o., Ltd. shall bear no responsibility whatsoever for any data loss o r damage •
resulting from the us e of this product.
Always insert and remove media from this product with the correct orientation and •
alignment.
This product does not support standby or sleep modes.•
This product does not support modem cards or similar I/O cards.•
Do not use this product in humid o r dusty environments .•
Do not subject this product to strong shocks.•
To clean the product, wip e it with a soft, dry cloth.•
Do not use benzene, paint thinn er, alcohol or similar liquids.
How to insert memory cards into the corresponding card slots
Ensure the memory c ard is oriented correctly, and inser t it straight into the correct me mory card slot.
•
For the latest informatio n on supported media, visi t the official ELECOM website.
http://www.eleco m.co.jp/global/download/compat ibility.html
This product is d esigned to continue suppor ting the latest media via firmware up dates.
•
See th e rever se side of the manua l for in format ion on conne cting to/rem oving f rom th e PC.
Slot
1
SlotSlot
43
Slot
5
Slot
2
MMCm icro can be writ ten to or read with the
use of a conversion a dapter.
microSD Memo ry Card
microSDHC M emory Card
Memory Sti ck micro (M2)
Memory Sti ck
Memory Sti ck PRO
Memory Sti ck Duo
Memory Sti ck PRO Duo
CompactFlash
Microdrive
Face the
terminal end
downwards
Face the termina l
end downwards
Face the terminal
end downwards
Face the
terminal end
upwards
Face the
terminal
end
downwards
Face the
terminal
end
downwards
Align c ard with centre upper
edge of slot
Face the
terminal end
downwards
Multimedia C ard
Reduced Siz e Multimedia Card RS MMC
USB 3.0 Multi-memory Reader/Writer
MR3-A001 series
User's Manual
SD Memory Ca rd
SDHC Memor y Card
SDXC Memory Car d
SDXC Cards
Reading/wr iting is possible with W indows 7 and Windows Vist a (SP1 or above).
For Windows Vista , it is necessary to up date it to SP1 or above.
For sup port for SDXC (exFAT) format in Windo ws XP, it is necessar y to down load the Windows XP
update program K B955704.
exFAT format is not supporte d in Windows 2000 as of Dec ., 2010.
exFAT format is supported in M ac OS X 10.6.5 or above as of Dec., 2010.
xD Picture Card
Narrow
Align the co nvex par t of th e memo ry ca rd slot
with t he con cave par t of t he mem ory ca rd.
Wide
Face the label
side upwards
WideNarrow
label side
miniS D memor y card s can be wri tten to or
read with the use of a c onversion adapter.
Slot
4
Slot
3
Slot
5
Part names and inform ation on the memory card slot
and USB port
USB3.0 port
LED
The L ED of this pr oduct will li ght gre en when insert a me mory c ard and flash green
when writing to or r eading a memory card.
D o not remo ve a memor y card fro m the slot w hile the P C is writi ng to or rea ding from it.
Do not disconnect this product from the PC while it is writing to or reading from a memory car d. Doing s o may cause product damage an d result i n file dam age or loss .
Slot
2
Slot
1
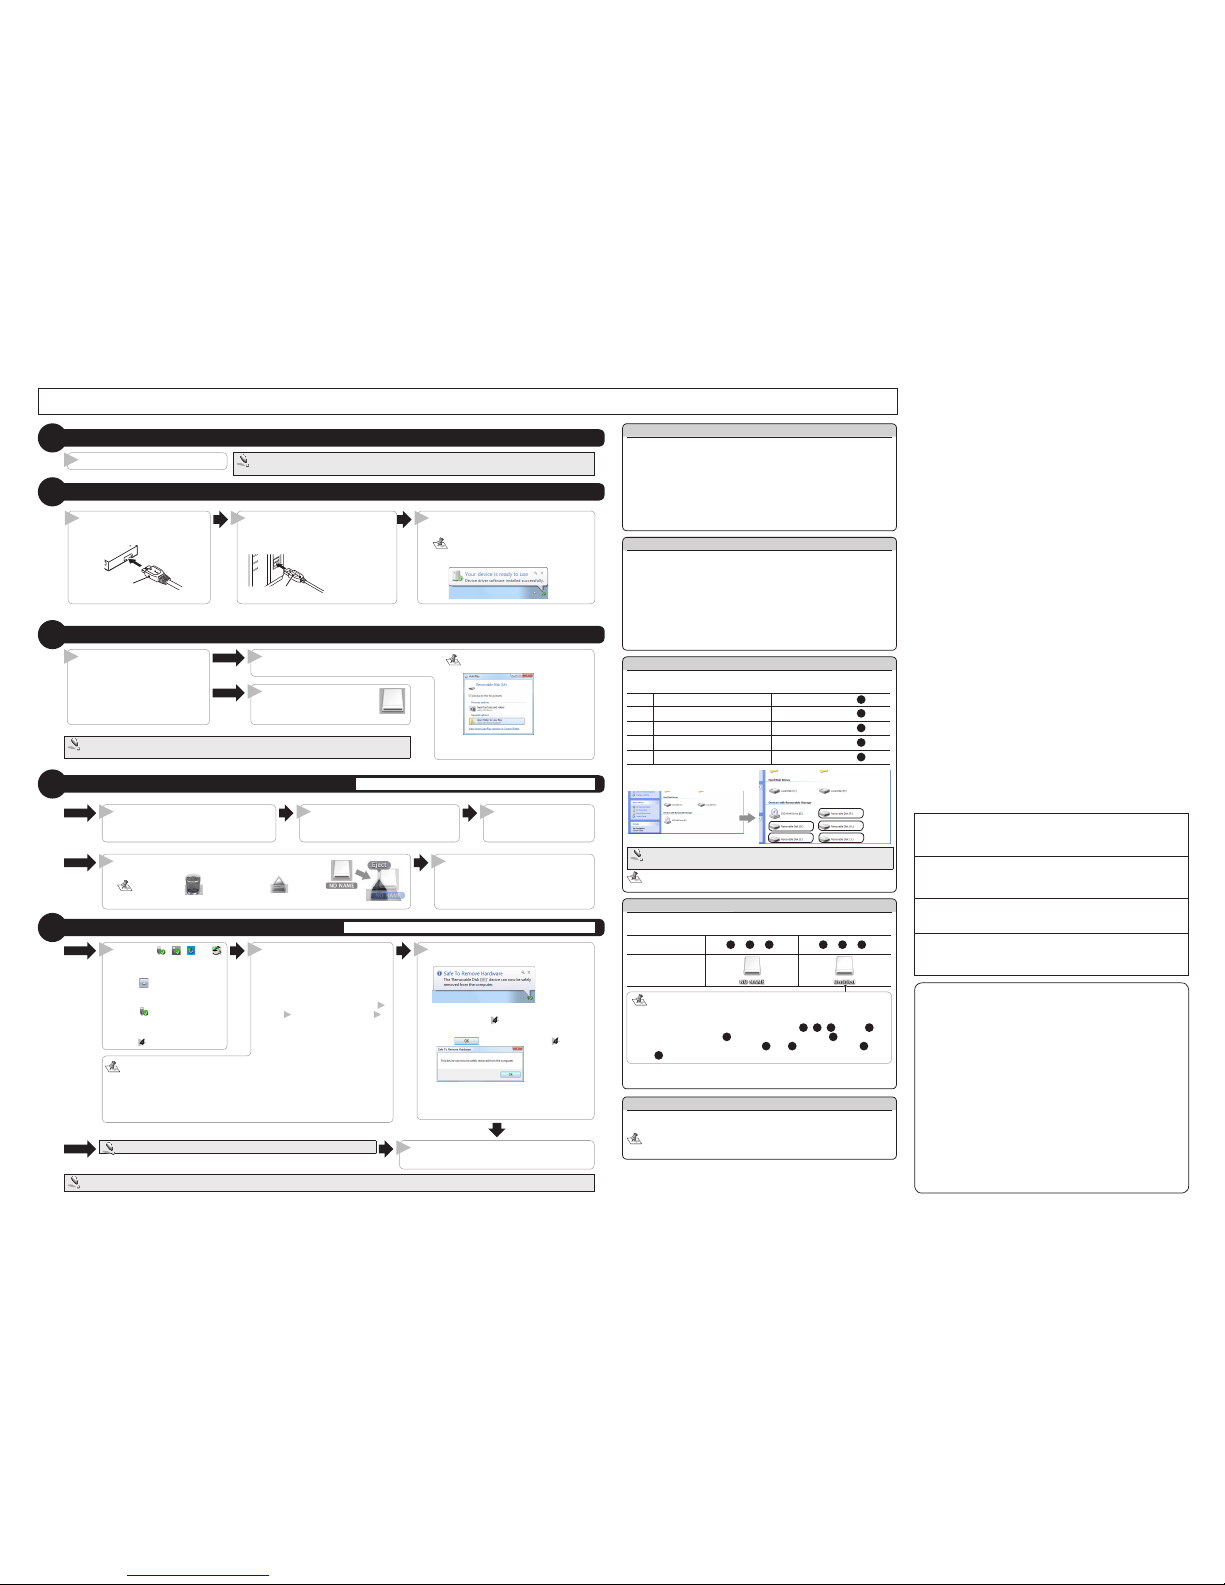
Page 2
- 2 -
Connect USB connector [A] of the
provid ed cab le to th e USB po rt of t he PC
The product will be automatically rec ognised by the PC.
* Confi rm the pro per up/
down ori entation of the
connect or when yo u
connect it.
USB connector [A]
©
2012 ELECOM Co., Ltd. All Rights Re served.
Conn ect U SB co nnecto r [B] of
the provid ed ca ble t o the USB
3.0 port of the prod uct.
USB connector [ B]
21
The card reader is automatically rec ognised
and the co nnection pro cedure is comp lete.
When using Windows®, an “installation
com plet e” noti fic atio n w ill appe ar in the
taskbar.
3
About Windows® drive letters
In Windows®, the memory cards slot s are as signed in the follo wing order. (the
information in brackets assume s that the PC’s last assigned drive letter is E)
1st
Removable device (F:)
Memory card slot 2
2nd
Removable device (G:)
Memory card slot
4
3rd
Removable device (H:)
Memory card slot
1
4th
Removable device (I:)
Memory card slot
3
5th
Removable device (J:)
Memory card slot
5
The order of driv e assign ment in Windows® 7 may d iffer, dep ending o n
your PC.
In Windo ws® 7, th e drive icon will appear once a memory card is inserted
into a slot.
About Macintosh® drive icons
When using a Macintosh®, a different drive icon will appear depending on which
memory slot you inse rt a card into.
Slot 1 or 2 or 5
*1
3 or 4 or 5
*2
Drive icon
*1 When a microSD or microS DHC memory card is inserte d.
*2 When a Memory S tick micro (M2) is inserted.
• If mul tipl e m emo ry card s are ins erte d i nto car d s lots at t he sam e t ime, th e
drives n ames w ill be na med “U ntitled ”, “Untit led1”, “Unti tled2”, e tc.
• The drive priority is “Untitle d”, “Untitled1” and “Untitled2”. For example,
if me mory ca rds are inserted in the order
3 , 4 , 5 *2, the n 2 will
becomes “Un titled”,
3 will become “Untitled1”, and 5 *2 will becom e
“Untitled2”. If you remove cards
3 and 4 , and then reinsert 4 , then
4 will be designated “untitled”.
Reading from and writing to a memory card using a PC
Connect to the PC
2
Insert a memory card
3
Insert a memory card in the
appropriate slot with the correct
orientati on and alignme nt.
Refer to “How to insert memory cards
into the corresponding card slots” (on
the front side) for details.
A drive ic on appears on the
desk top an d you can acces s the
memor y card .
The in serted memor y card can be a ccess ed.
I f a n Auto Pla y d ialog b ox appea rs, sel ect
the act ion tha t you wa nt Wind ows to p erfor m.
* If the c ard i s em pty, i t is open ed di rectly
as a rem ovable d isk.
Windows
®
Macintosh
®
2
2
1
Activate the PC
1
If the PC is st arted with this prod uct connected, the pr oduct may not be recogni zed.
If this problem o ccurs, remove and recon nect the product.
The power of PC is turned on.
1
Remove the memory card
4
Do not remove a memory card while the PC is writing to or reading from it.
Disconnect the card reader from the PC
5
Do not disconnect the card reader while the PC is writing to or reading from it.
Click the , , , or
icon in the Taskbar or t he
Notification Are a.
* If the icon is displayed i n the
Notificati on Area in Win dows
®
7 ,
click it and then click the USB
icon (
) that appear s.
* If r emov ing a me mor y ca rd
using Windows
®
7, proceed to
step
.
The “Safe to Remove Hardware” notific ation is displayed.
Windows• ® 7, Windows® XP
Proceed to Step
Windows Vista•
®
7, Windows® 2000
Click , and proceed to Step
Disconnect th e card reader from the USB port.
Click the messag e that appears.
* In Windows 7, if a memory card is in
memory sl ots 1 to 4, the mes sage
“Eject remova ble media” is display ed
for each slot.
For each mes sage, perform s teps
2
and
3
and then proc eed to step 4.
•
If using a USB d evice or PC card be sides this prod uct, both names w ill be displayed. In this case, click the m essage that appe ars for this produ ct (indicatin g a
USB mass stor age device or USB d isc).
If a memory card i s inserted into the mem ory card slot when usin g Windows
•
®
7, click “Remove Mass Sto rage Device” (When con nected with USB 2.0, cli ck
“USB3.0- CRW” (or “USB3.0-CRW ” if connected via USB 2.0).
2 3
Windows
®
1
Macintosh
®
4
Remove all m emory cards from the c ard reader slots.
Always dis connect the card read er from the PC before turning o ff the PC.
Drag the drive icon to t he Trash (Eject).
The Trash icon( ) becomes an Ejec t ( ) icon.
Check th at the drive icon has d isappeared and r emove the memory c ard
from the slot.
Macintosh
®
1 2
Open “My Computer” (“Computer” in
Windows 7 and Windows V ista).
Right-click the removable disk that the
memor y car d was assig ned t o, and on t he
contex t menu that ap pears, click [ Eject].
Re mov e the m emo ry
card from the slot.
Windows
®
1
2 3
Only ins ert one media card at a ti me.
Media may not be rec ognised if multiple c ards are inserted at the s ame time.
USB 3.0 Multi- memory Reader/ Writer
MR3-A001 seri es
User’s manual
1st edition, Janu ary 10, 2012
This manual is copyrig ht of ELECOM Co., Ltd.•
•
Unauthorised copying and/or reproducing of all or part of this manual is prohibited.
The specifications and appearance of this product may be changed without prior notice for •
product improvement purposes.
ELECOM Co., Ltd. shall bear no responsibility for any and all affects resulting from the use •
of this product regardless of the above reasons.
Export or service transaction permission under the Foreign Exchange and Foreign Trade •
Control Law is required in order to export this product or parts of this product that constitute
strategic materials or services.
The SD logo, SDHC logo, SDXC logo, microSD logo, and microSDHC l ogo are trademarks of •
SD-3C, LLC.
MultiMediaCard is a trademark of Infineon Technologies AG.•
•
Memory Stick, Memory Stick PRO, Memory Stick Duo, Memory Stick PRO Duo, and
Memory Stick Micro are trademarks of Sony Corporation.
Microdrive is a registered trademark of Hitachi Global Storage Technologies.•
CompactFlash is a registered trademark of the US SanDisk Corporation.•
xD Picture Card is a trademark of Fujifilm Corporation.•
Windows and the Windows logo are trademarks of the Microsoft group of companies.•
•
Mac and the Mac logo are trademarks of Apple Inc., registered in the United States and other
countries.
•
Company names, product names, and other names in this manual are generally trademarks
or registered trademarks.
If your P C does not s upport US B 3.0 in Win dows
®
When performi ng step 2 of “2. Connect to th e PC”, the f ollowing taskbar message or
system n otifica tion wi ll appea r when you con nect th e USB c onnecto r to the PC US B port.
When using Windows•
®
XP Service Pack 1 or earlier
"HI-SPE ED USB Device Plugged into non- HI-SPEED USB Hub"
When using Windows Vista•
®
or Windows® XP Service Pack 2 or above
"This Device Can Per form Faster"
This is a message informing you that even though this product is a USB 3.0
device, the port that it is connected to does not support USB 3.0. In this case,
this product will operate at USB 2.0 s peed.
When using this pro duct with Windows® 2000
Windows® 200 0 Service Pack 4 or above is required to use this product. Pe rform
the follow ing steps to confirm your version. If using Service Pack 3 o r earlier, us e
Windows Up date to update i t to the late st version of Windows
®
2000. For information on performing the update, refer to your PC manual or consult the manufacturer
of your PC.
1. Right-click the My Compute r icon on your desktop, and then click “Pr operties”
from the menu.
The system properties win dow is displayed.
2. Confirm your version o f Windows
®
2000.
If the PC does not r ecognise the card reade r
If the PC doe s not recogni se the card rea der, disc onnect it from the P C and t ry co nnectin g
it again .
In Windows® 7, even if this p roduct is recognised, the drive will not be dis-
played until a memor y card has been inser ted.
ELECOM CO., LTD.
1-1 Fushimi-machi 4-Cho me Chuoku, Osaka Japan 541-8765
URL: http://www.elecom. co.jp/global/
overseas@elecom.co.jp
宜麗客(上海)貿易有限公司
上海市徐匯区肇嘉浜路1065甲号飛雕国際大厦704 号
電話 : 86-21-33680011
FAX : 86-21-64271706
URL : http://www.ele com-china.com/
ELECOM Korea Co., Ltd.
5F Suam Bl dg. 135 8-17, S eocho2- dong, Seocho -gu, S eoul 13 7-862, Korea
TEL : 1588-9514
FAX : (02)3472-5533
URL : www.elecom.co.kr
ELECOM Singapore Pte. Ltd
33 UBI AVENUE 3 # 03-56. VER TEX SINGAPORE (408 868)
TEL : (65)-6347-7747
FAX : (65)-6753-1791
ELECOM India Pvt. Ltd.
408-Deepal i Build ing, 92 - Nehru Place, New De lhi-110 019, India
TEL: 011-40574543
e-mail: support @elecom-india.com
URL: http://www.elecom- india.com/
 Loading...