

Page 1

ELECOM MouseAssistant
ELECOM MouseAssistant
Thank you very much for purchasing this ELECOM mouse.
This dedicated mouse function allocation software is intended to allocate the desired functions to the mouse buttons.
This help file explains the procedures for installing/uninstalling the software, setting the allocation of mouse button functions, changing the horizontal scrolling speed, flying scroll function settings and mouse
cursor moving speed.
Use this help file if you have any questions or problems during use of the software.
Contents
1. Operating Environment
- Supported Operating Systems
2. Installation/Un-installation Procedure
- Installation
- Uninstallation
3. Usage
- Checking the horizontal scrolling
- Allocating buttons
- Checking the flying scroll function
- Setting profiles
- Setting gesture functions
- Mouse selection
- "Writing" and "Reading" the settings files
4. Other Precautions
1. Operating Environment
- Supported Operating Systems
The OS supported by ELECOM Mouse Assistant depends on the OS supported by the mouse to use.
For the OS supported by the mouse, refer to the ELECOM website or the product package.
*Windows® RT is not supported.
* Procedure for checking the version
[Windows® 10 users]
Right-click the [Start] button on the lower-left corner of the screen, then click [System].
The window shown below appears.
Page 2

ELECOM MouseAssistant
[Windows® 8.1 users]
Right-click the [Start] button on the lower-left corner of the screen, then click [System].
The window shown below appears.
[Windows® 7 , Windows Vista® users]
Click [Start] - [Control Pane,] - [System and Maintenance] and the window shown below appears.
Page 3

ELECOM MouseAssistant
(Windows® 7 version screen)
2. Installation/Uninstallation Procedure
- Installation
Return to Contents
Access ELECOM's home page using the following URL and download the latest applications.
http://www.elecom.co.jp/global/download-list/utility/mouse_assistant/win/
* Precaution
Log onto the computer with a user account that has administrative privileges, and then install the software.
After installation is complete, Windows® must be restarted.
It is recommended that all open applications are closed before installing the software.
Double-click the downloaded mouse_driver_xxxx.exe file (xxxx differs depending on the version).
1
According to the system environment, installer can be started up soon after downloading.
After the installer has been activated, install the software by following the instructions on the screen.
2
* When the [User Account Control] screen is displayed, click the [Yes] button (Windows® 10, Windows® 8.1, Windows® 8 or Windows® 7) or the [Allow] button (Windows Vista®).
Select [English], and click [OK].
Page 4

ELECOM MouseAssistant
Click the [OK] button.
* If a different mouse utility is already installed on your computer, click [Cancel] and remove it.
* If a previous version of ELECOM Mouse Assistant is already installed on your computer, remove it following the directions on the screen.
Click the [Next] button.
* Clicking the [Cancel] button during the installation process will cancel the installation.
If using Windows® 8 or later, setting screen of the shortcut keys for the tilt wheel is displayed. In the combo box, select and click the [Next (N)] button.
Click the [(N)ext] button.
* Clicking the [Cancel] button during the installation process will cancel the installation.
Page 5

ELECOM MouseAssistant
Click the [Install] button.
* Clicking the [Cancel] button during the installation process will cancel the installation.
In subsequent processes, the installation cannot be canceled.
Click the [OK] button to begin installing the device driver.
* Even if the window is closed by clicking the [
Click the [OK] button.
] button on the upper right of the window, the installation will continue.
Page 6

ELECOM MouseAssistant
After installation is complete, make sure that the box for [Yes, restart the computer now] is checked and click the [Finish] button.
* Installation is complete.
- Uninstallation
* Precaution
Log onto the computer with a user account that has administrative privileges, and then uninstall the software.
After uninstallation is complete, Windows® must be restarted. It is recommended that all open applications are
closed before uninstalling the software.
Procedure for starting the uninstaller
1
[Windows® 10 users]
Right-click the [Start] button on the lower-left corner on the screen, and click [Programs and Features].
Return to Contents
Page 7

ELECOM MouseAssistant
Click [ELECOM MouseAssistant5] on the screen above and then click the [Uninstall] button.
[Windows® 8.1 users]
Right-click the [Start] button on the lower-left corner on the screen, and click [Programs and Features].
Click [ELECOM MouseAssistant5] on the screen above and then click the [Uninstall] button.
[Windows® 7 or Windows Vista® users]
Click [Start] – [Control Panel] – [Programs] – [Programs and Features].
Page 8

ELECOM MouseAssistant
Click [ELECOM MouseAssistant5] on the screen above and then click the [Uninstall] button.
®
* When the [User Account Control] screen is displayed in Windows Vista
Once the uninstaller has been activated, uninstall the software by following the instructions on the screen.
2
Click the [Yes] button.
* Clicking the [No] button will cancel the uninstallation.
Clicking [No] will cancel uninstallation. In subsequent processes, uninstallation cannot be cancelled.
, click the [Continue] button.
Page 9
ELECOM MouseAssistant
Make sure that the box for "Yes, restart the computer now" is checked and click the [Finish] button.
* Uninstallation is complete.
3. Usage
- Checking the horizontal scrolling
The tilt wheel horizontal scrolling function is enabled once "ELECOM MouseAssistant5" has been installed successfully.
* This function is only enabled in an
If using Windows® 10, click [Start] - [All Applications] - [Windows Accessory] - [Internet Explorer®] in the Desktop mode.
1
If using Windows® 8.1, click the "Internet Explorer®" icon on the desktop.
If using Windows® 7, Windows Vista®, click [Start] - [All Programs] - [Internet Explorer].
Internet Explorer® is activated.
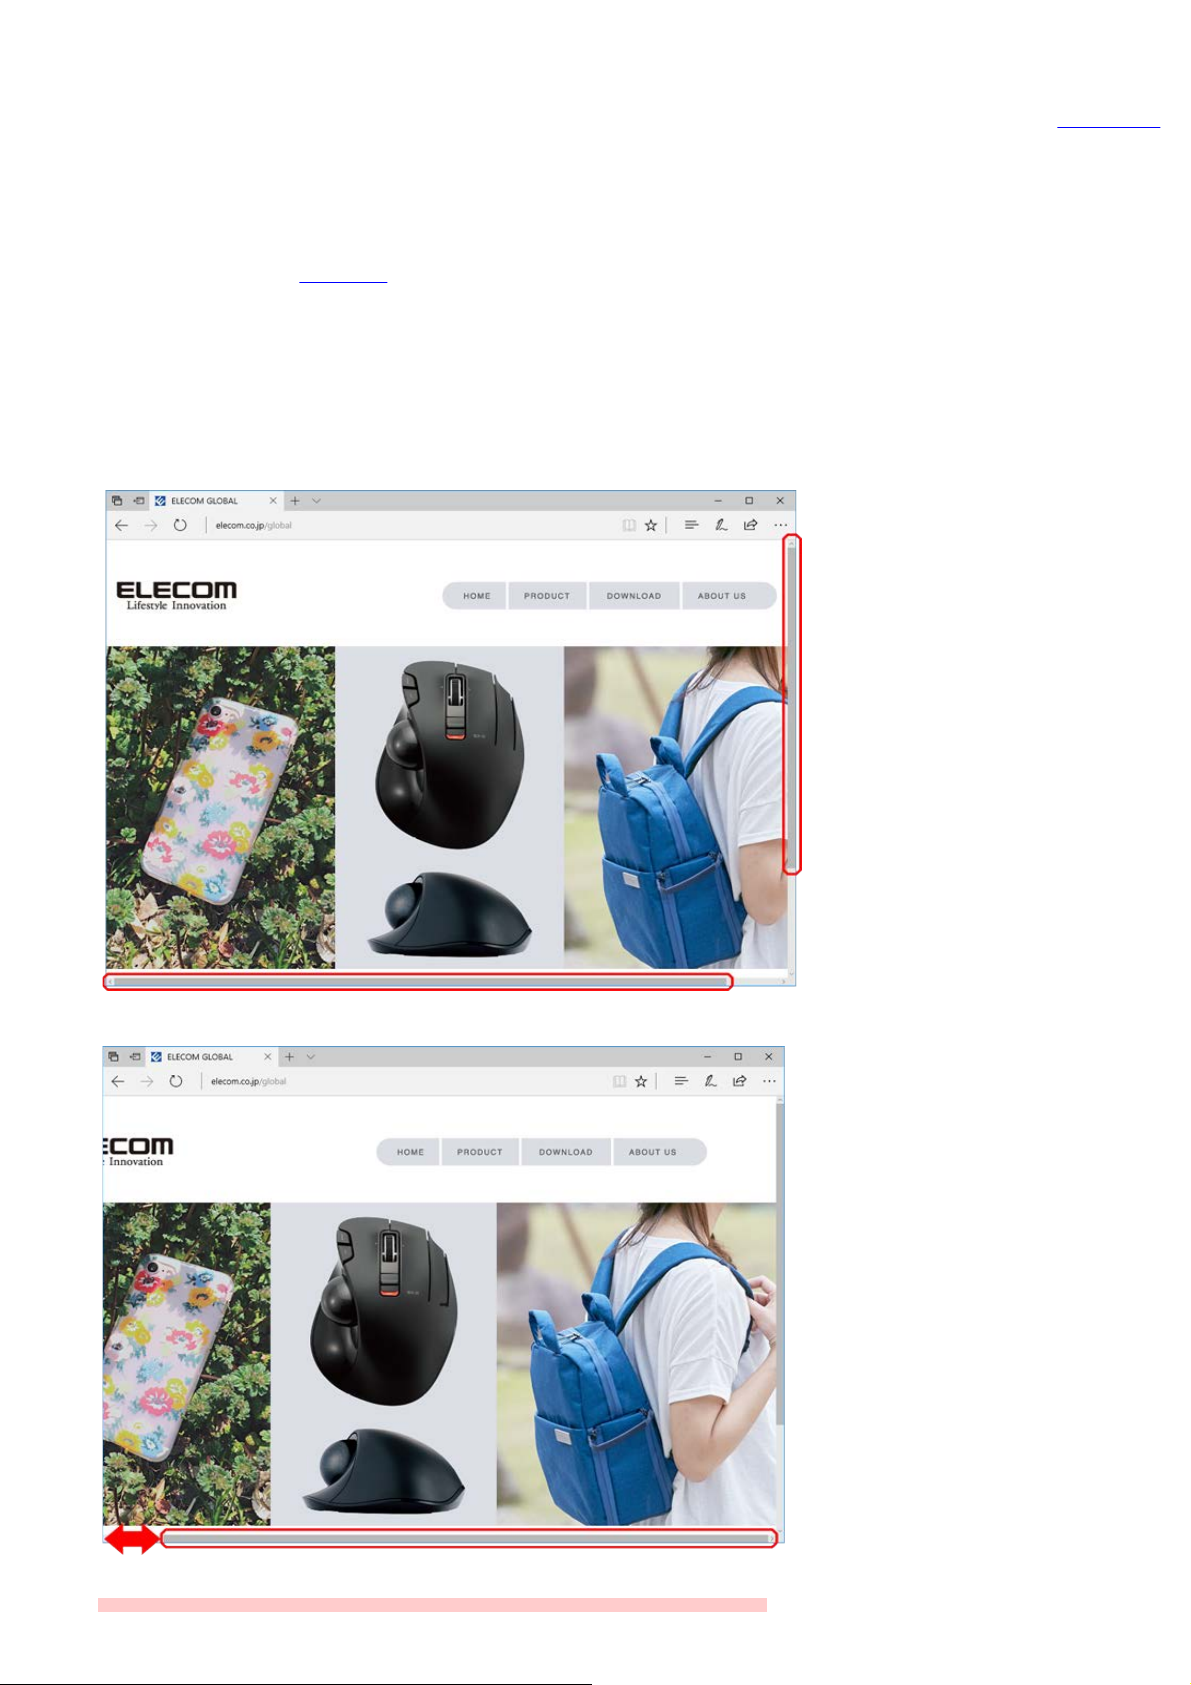
Display the desired home page with Internet Explorer® and change the screen to make the vertical and horizontal scrollbars visible.
2
* ELECOM's homepage is displayed here as an example.
Return to Contents
ELECOM mouse that has the horizontal scrolling function.
Move the tilt wheel of the mouse from side to side.
3
If the screen scrolls from side to side as the tilt wheel is moved from side to side, then the tilt wheel is functioning normally.
Page 10

ELECOM MouseAssistant
Some applications do not support the horizontal scrolling function, so the tilt wheel may not work even if it is moved
from side to side.
For some products, the
speed of the horizontal scrolling cannot be controlled.
* For the applications using the horizontal scrolling function supported by OS as standard, the
speed cannot be controlled.
- Allocating buttons
Once the "ELECOM MouseAssistant5" is installed, the functions allocated to the buttons of your mouse can be changed.
Right-click the icon of [ELECOM mouse] on the task tray or notification area.
1
From the pop-up menu displayed, click [Open setting application].
(When this software is already running)
* Other activation methods
Double-click the icon on the task tray or notification area.
(When this software is already running)
Press the Application button, and click [ELECOM] – [MouseAssistant5]. (Windows®10, Tablet mode)
Click the [Start] button, and click [All Applications] - [ELECOM] - [MouseAssistant5]. (Windows®10, Desktop mode)
Click the tile [MouseAssistant5] tile on the application screen. (Windows® 8.1)
Double-click the icon on the desktop. (Except for Windows®10, Tablet mode)
Click [Start] – [Programs] – [ELECOM] – [MouseAssistant5] – [MouseAssistant5]. (Windows®7, Windows Vista®)
Return to Contents
Changing settings on the settings screen
2
[ELECOM MouseAssistant5] is automatically displayed with an optimum layout corresponding to both horizontally and vertically oriented displays.
Horizontally oriented (“Landscape”) display
Page 11

ELECOM MouseAssistant
Vertically oriented (“Portrait”) display
(The screen shown is the screen when setting the left button of the M-XGx20DL Series.)
* Settings cannot be enabled for buttons that the currently
In (1) Profile, settings for the (2) [Allocate button function] tab and the (3) [Allocate gesture function] tab can be registered for individual programs.
Because it detects the program currently in operation and automatically switches profiles, it is possible to have the mouse operate in response to a program without switching settings.
*For a detailed explanation on profiles, see
In the (2) [Allocate button function] tab, function allocation for each button, horizontal scrolling speed and flying scroll function can be set.
In the (3) [Allocate gesture function] tab, functions executed with an input gesture that have been allocated to a button as a "Gesture function" can be set.
* For a detailed explanation on gesture functions, see
In the selection boxes from (4) to (13), the following functions can be set.
The functions available depend on the operating system of the computer.
Those functions that are generic, or standard are displayed for all operating systems.
Name displayed on the screen Function explanation
Left click Left-button click
Right click Right-button click
Back (InternetExplorer) Returns to the previous browser screen.
Forward (InternetExplorer) Proceeds to the next browser screen.
Switch applications Displays the application switching screen (Alt+Tab).*1
Close the window Closes the active window.
Maximize the window Enlarges the active window to full size.
Minimize the window Reduces the active window to an icon.
Middle Click/Auto-scroll Enables the middle click/auto scroll function.
My Computer Opens My Computer.
Ctrl + C Copies the selected string or file.
Setting profiles.
selected mouse does not have.
Setting gesture functions.
Page 12

ELECOM MouseAssistant
Ctrl + X Cuts the selected string or file.
Ctrl + V Pastes the copied or cut string or file.
Ctrl + Z Undoes the previous operation.
Ctrl + Y Repeats the previous operation.
Enter The [Enter] key on the keyboard
Esc The [Esc] key on the keyboard
Tab The [Tab] key on the keyboard
Shift *2 The [Shift] key on the keyboard
Alt The [Alt] key on the keyboard
Ctrl The [Ctrl] key on the keyboard
Delete The [Delete] key on the keyboard
Back Space The [Back Space] key on the keyboard
Ctrl + S Saves the data for the corresponding application.
Start button
Web browser (8.1, 7, Vista) Opens the default Web browser.
Explorer Starts Explorer (Windows + E).
Control Panel Opens the control panel.
Printer settings Opens the print screen for the corresponding application. (Ctrl + P)
Double click Double-clicks the mouse.
Flip3D (7, Vista)
Magnifying glass (8.1, 7, Vista) Activates the magnifying glass.
Left Scroll Scrolls left.
Right Scroll Scrolls right.
Gesture function Executes functions in response to the path of the mouse. For a detailed explanation, see
Arbitrary key Simultaneously inputs a registered key. *3 *4
Volume Up Increases the entire volume of the Windows®.
Volume Down Decreases the entire volume of the Window®.
Mute Stops entire sound output of the Windows®. Pressing this button again releases the mute function.
Zoom in Enlarges the display.
Zoom out Reduces the display.
Open charms (8.1) Opens the charms and the time/date/notification overlay.
Open Share charm (10, 8.1) Opens the Share charm.
Open Settings charm (10, 8.1) Opens the Settings charm.
Open Devices charm (10, 8.1) Opens the Devices charm.
Open Second Display charm (10, 8.1) Opens the Second Display charm.
Open Search charm (8.1) Opens the Search charm and searches for apps.
Open Ease of Access Center (10, 8.1) Switches to the desktop and launches the Ease of Access Center.
Search settings with Search charm (8.1) Opens the Search charm and searches for settings.
Displays customize bar (8.1) Displays the Customize bar. (Windows® 8.1) Performs the same function as right click on the Start screen. *5
Launch Narrator (10, 8.1) Switches to the desktop and launches Narrator.
Display app switcher (10, 8.1) Displays the app switcher.
Cycle through apps (8.1) Switches and displays the running apps sequentially.
Off Disables all clicks of the set buttons.
*1 Pressing the mouse button for which a function is to be allocated to, causes the selection screen to appear.
The choice of items listed here varies depending on the operating system of the computer.
Opens the [Start] menu for Windows®.
(Windows® 8.1) Switches the screen alternately between the Start screen and the desktop.
®
Executes the Flip3D function with the Windows
7 / Windows Vista® aero setting.
Setting gesture functions.
When using Windows® 7 or Windows Vista, the screen design can be set as Windows Standard, Classic or High
Contrast. When the screen appearance is standard, classic, high contrast in Windows® 7 or Windows Vista® By
pressing the button assigned to this function, you can switch applications displayed in the foreground. When
selecting an application and switching,
When selecting an application and switching,
press a different button (other than the one assigned to this function).
press a different button (other than the one assigned to this
function).
If the situation is not as above,
Pressing the button to which the function is allocated allows selection of a different application, which is
then performed by placing the mouse cursor over the application and clicking the same button to allocate
it.
*2 Cannot be set to [Tilt left] or [Tilt right].
*3 When [Arbitrary key] is selected, the Register arbitrary key screen will be displayed.
Choose from the selection boxes marked [Input 1] through [Input 3] or press a key on the keyboard in coordination with the cursor.
Page 13

ELECOM MouseAssistant
Once registration is complete press the [OK] button.
If "Tilt left" or "Tilt right" is allocated to [Arbitrary key], a key can be input while the tilt wheel is held down continuously.
Depending on the operating system or the application being used, certain arbitrary key combinations may not
work.
For reasons of system security Ctrl+Alt+Del cannot be changed to other functions.
*4 [Tilt left], [Tilt right] cannot register Shift to the arbitrary key individually. A combination of Shift and other key can be registered (except for the combination of Shift and Shift).
Click the [OK] button and redo the settings.
*5 This function is only available on the Start screen.
In (14) flying scroll, high speed scrolling can be set.
* For a detailed explanation on flying scroll, see
Checking the flying scroll function.
Number of revolutions:
The number of revolutions necessary before switching to high speed scrolling can be set.
When set to Invalid, high speed scrolling will not activate even when the tilt wheel is spun quickly.
Revolution speed:
The revolution speed of the tilt wheel can be set in eight steps.
Scroll speed:
High speed scrolling speed can be set in eight steps.
The mouse pointer speed (15) ouse cursor to movement of the mouse.
The horizontal scrolling speed in Item (16) can be set in eight steps.
* For a detailed explanation of this functionality, see
Checking the horizontal scrolling.
* The settings in Items (1) to (16) take effect once [OK] or [Apply] is clicked.
Clicking [Cancel] exits [Mouse setting tool] without saving the settings.
* If [Left click] is not allocated to any of the buttons (4) to (13), the following message appears.
Click the [OK] button and redo the settings.
Clicking the [Help] button in Item (17) activates this help file.
Clicking the [Return to initial value] button in Item (18) displays the following window.
Page 14

ELECOM MouseAssistant
Clicking the [OK] button returns all the settings in Items (4) to (16) to their initial values.
- Checking the flying scroll function
The flying scroll function is a function that will perform high speed scrolling when the tilt wheel is quickly spun forward or backward.
* When spun by plucking it with your finger, the tilt wheel can be spun quickly.
* The number of screens (rows) that it advances in one spin of the tilt wheel will increase, and scrolling will continue automatically.
* When slightly spun in the opposite direction, high speed scrolling will stop.
High speed scrolling will also stop once a set amount of time has passed.
Spin the tilt wheel forward.
1
Return to Contents
If the screen (rows) is scrolling upward at high speed, then the tilt wheel is functioning normally.
Spin the tilt wheel backward.
2
If the screen (rows) is scrolling downward at high speed, then the tilt wheel is functioning normally.
Some applications do not support the flying scroll function, so the tilt wheel may not work even if it is spun forward and
backward.
* Flying scroll settings, such as
scroll speed, can be changed.
Return to Contents
- Setting profiles
Mouse operations for individual programs are set in profiles.
Complete settings for the (2) [Allocate button function] tab and the (3) [Allocate gesture function] tab.
1
Click the [Edit Profile] button.
2
Page 15

ELECOM MouseAssistant
Click the [Add] button in Profile.
3
Enter a profile name and click the [OK] button.
4
Select the created profile from the profile list and click the [Add] button in [Allocation program].
5
Page 16

ELECOM MouseAssistant
To delete a profile, select a profile from the profile list and click the [Delete] button in [Profile].
To change the name of a profile, select a profile from the profile list and click the [Change name] button in [Profile].
To copy a profile, select a profile from the profile list and click the [Copy] button in [Profile].
Select the allocation program and click the [OK] button.
6
Example: Allocating to Internet Explorer 11®
(Other allocation methods)
Allocating with the [Select window] button
Activate the program to be used in allocation and while that program is selected click the [Select window] button.
Page 17

ELECOM MouseAssistant
A confirmation message will be displayed. Click the [OK] button.
Allocating with the [Reference] button
Click the [Reference] button. The open screen will be displayed. Indicate a program and click the [Open] button.
Page 18

ELECOM MouseAssistant
To allocate to multiple programs, repeat steps 5 through 6.
7
* To delete a program allocation, select a profile from the profile list, select a file name from the list of allocation programs, then click the [Delete] button in [Allocation program].
Click the [OK] button in the Edit Profile screen.
8
Click the [OK] button on the setting screen.
9
The contents that were set in the Edit Profile screen will not be reflected unless the [OK] button on the setting screen is
clicked.
Also, if the [Cancel] button is clicked, settings will not be reflected and the setting screen will end.
Using these procedures, the profile settings are now complete.
- Setting gesture functions
Moving the mouse while pressing a button that was set to a gesture function executes the function assigned to that path.
Choose "Gesture function" from the selection box of the button to be set.
1
Example: Setting button 5, the [Forward] button.
Return to Contents
Page 19

ELECOM MouseAssistant
Click the [Allocate gesture function] tab.
2
Click the [Add] button.
3
Page 20

ELECOM MouseAssistant
Click the "Input gesture" box.
4
Once "Start" has been displayed in "Input gesture", move the mouse while pressing the button that was set in step 1 to input a gesture.
5
Example: Setting button 5, the [Forward] button to a left gesture.
* In "Input gesture", the path of the mouse can be input as U (Up), D (Down), L (Left), and R (Right) gestures.
* The path of the mouse will be displayed in yellow-green.
* Gestures can be entered in up to a maximum of four directions. These are: up, down, left, right.
Select the function to be executed from the "Functions" selection box and click the [OK] button.
6
Page 21

ELECOM MouseAssistant
Example: Selecting [Control Panel] from the Functions selection box.
* Input a brief summary of the gesture function in "Instructions" as necessary.
The set contents will be displayed on the list.
To allocate gesture functions to multiple programs, repeat steps 3 through 6.
7
Deselecting the "Display the gesture tracking" checkbox allows you to hide the gesture locus during gesture execution.
Click the [OK] button on the setting screen.
8
Using these procedures, the gesture function settings are now complete.
The set contents will not be reflected unless the [OK] button or the [Apply] button is clicked.
Also, if the [Cancel] button is clicked, settings will not be reflected and the setting screen will end.
- Mouse selection
With this software, the button allocation, horizontal scrolling, and flying scroll functions are only available with one mouse.
If two or more applicable mouse devices are connected, select the mouse that is to be used with this software.
Right-click [ELECOM icon] on the task tray or notification area. From the displayed pop-up menu, click [Switch the mouse].
1
Return to Contents
Page 22

ELECOM MouseAssistant
Select the mouse for which the button allocation, horizontal scrolling, and flying scroll functions are to be used.
2
Under [Select the model that will be used.], the model names of the ELECOM mouse devices are displayed.
From the list in the combo box, select the mouse that will be or is using the button allocation, horizontal scrolling, and flying scroll functions.
Click the [OK] button.
3
The mouse for which the button allocation, horizontal scrolling, and flying scroll functions are to be used has been changed.
Return to Contents
- "Writing" and "Reading" the settings files
- "Write"
The present settings information, such as function allocation, can be saved in a file.
Right-click [ELECOM icon] on the task tray or notification area.
1
From the utilities menu, click [Settings file] – [Write].
Specify the file name and the destination where it will be saved.
2
Click [Save].
3
Using the above procedure, the settings information is saved in the specified location.
* The saved file can also be read from another PC (Macintosh, Windows®) in which the "ELECOM MouseAssistant5" has
been installed.
Page 23

ELECOM MouseAssistant
However, [Arbitrary key] settings will not be reflected between Macintosh and Windows®.
- [Read]
The settings information, such as function allocation, saved with [Write] can be enabled on this PC.
Right-click [ELECOM icon] on the task tray or notification area. From the utilities menu, click [Settings file] – [Read].
1
Select the desired file.
2
Return to Contents
Click [Open].
3
Using the above procedure, the saved settings, such as function allocation, become enabled on this PC.
* The settings that were saved in your PC before or the settings saved in another PC (Macintosh, Windows®) in which
the "ELECOM MouseAssistant5" has been installed can also be read.
However, [Arbitrary key] settings will not be reflected between Macintosh and Windows®.
* The settings file for a mouse that is different from the selected mouse in the [
4. Other Precautions
1. If the tilt function or the allocated functions do not work after restoring from the sleep state, remove the mouse from the USB port and re-insert it.
If the mouse still does not work, re-start this application.
2. If the mouse is removed from the USB port and reinserted while switching users, a message box may be displayed in an unexpected place.
In this case, click the [OK] button or select the mouse as usual.
3. Depending on the page displayed with [Internet Explorer], the horizontal scrolling function with the tilt button may or may not work.
4. When this software does not work as expected, do either of the following procedures.
(1) Restart this software.
(2) Reconnect the mouse and start this software.
Mouse selection] screen cannot be read.
Return to Contents
 Loading...