

Page 1
1 2 3
1 2 3
1 2 3
Manual
Bluetooth® Mouse
with Clip
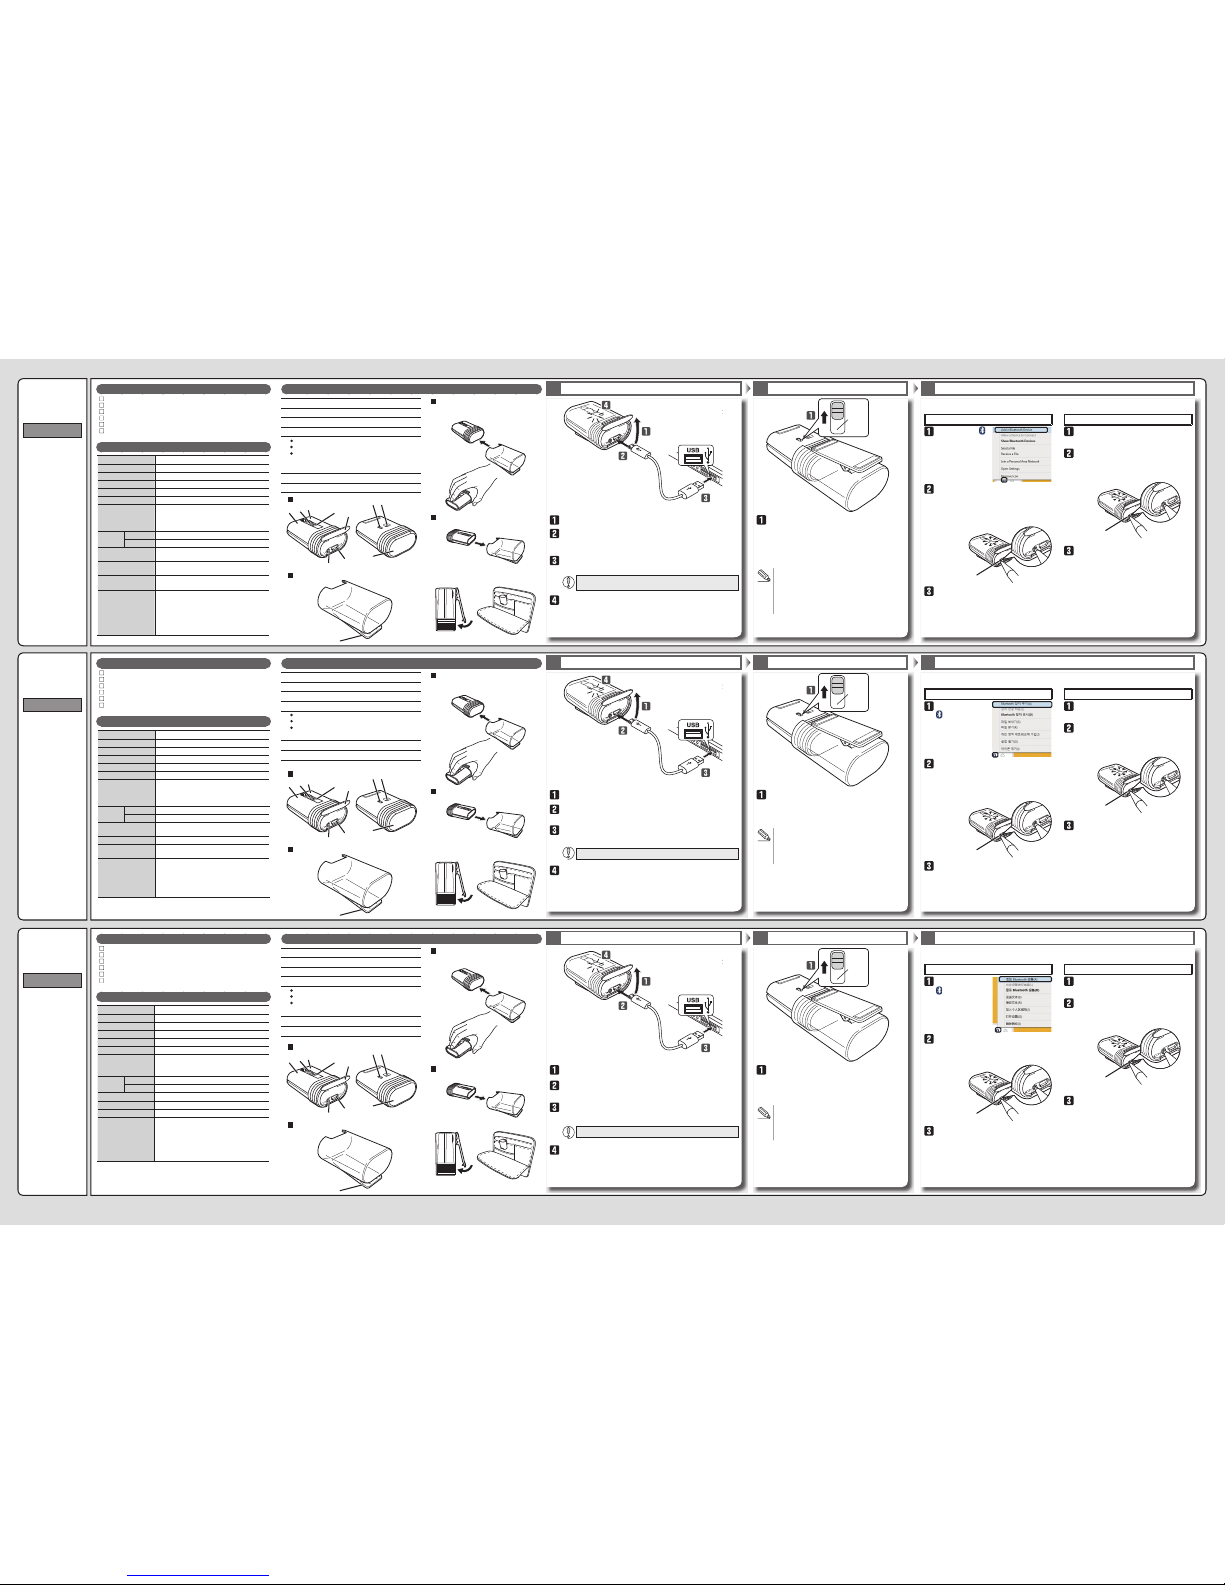
Package Contents
Basic Specications
1. Left button
7. Pairing button
2. Right button
8. Power switch
3. Wheel
9. Optical sensor
Clip
4. LED light
10.
5. Connector cover
6. Micro USB connector for charging
Blinks in red when in pairing standby mode
Turns on in red when charging
Turns on in red for a xed period of time when the
power turns on
Blinks in red when the remaining battery charge is low
ENGLISH
1
2
3
4
5
5
8
9
6
7
10
Mouse x 1
Cap with clip x 1
USB charger cable (15 cm) x 1
Manual x 1
Safety precautions x 1
Compliance with regulations x 1
Name and Function of Each Part
Resolution
1200 dpi
Connection method Wireless Bluetooth® connection
Compatible standard Bluetooth
®
3.0 Class 2
HID (Human Interface Device)
Radio frequency 2.4 GHz band
Radio wave method FH-SS
Operation distance Non-magnetic surface (e.g. wooden desk) approx. 10 m
Magnetic surface (e.g. steel desk) approx. 3 m
*These values were obtained in ELECOM's test
environment and are not guaranteed.
Dimensions
(W × D × H)
When in use 41.0 mm × 87.0 mm × 30.3 mm
When stored 41.0 mm × 52.0 mm × 30.3 mm
Operating temperature/
humidity
5°C to 40°C/90%RH or less (without condensation)
Storage temperature/
humidity
-10°C to 60°C/90%RH or less (without condensation)
Battery Built-in lithium-ion rechargeable battery
(the battery cannot be removed or replaced)
Operating time Guidelines when used with a fully charged battery
Continuous operation time: Approx. 18 hours
Continuous standby time: Approx. 36 days
Estimated usage time: Approx. 32 days
(The usag e t ime is estimated given a mouse
operation percentage of 5% of the 8 hours per
day spent operating a PC.)
Prole
Mouse
Cap with clip
Using the mouse
Storing the mouse
Attach the cap to the rubber part on the rear
of the mouse.
Store the mouse in the cap.
You can carry the mouse around with you by
clipping it onto an item such as a bag, a
breast pocket, or a PC.
Green
취급설명서
클립 부착
Bluetooth
®
마우스
패키지 내용 확인
기본 사양
1. 좌 버튼
7. 페어링 버튼
2. 우 버튼
8. 전원 스위치
3. 휠
9. 광학식 센서
클립
4. LED 램프
10.
5. 커넥터 커버
6. microUSB 충전 커넥터
페어링 대기 상태 적색으로 점멸
충전 중 적색으로 점등
전원 ON 시 일정시간 적색 점등
전지 잔량 부족 적색으로 점멸
Windows
®
OSX 10.9
Charging Turning the Power On Pairing with a PC
한국어
1
2
3
4
5
5
8
9
6
7
10
마우스 본체 x 1
클립 부착 캡 x 1
USB 충전 케이블(15cm) x 1
취급설명서 x 1
취급 주의 사항 x 1
규칙 준수 x 1
각 부분의 명칭 및 기능
마우스 본체
클립 부착 캡
마우스 사용 시
마우스 수납 시
마우스 뒤쪽의 고무 부분에 캡을 부착해
사용합니다.
마우스 본체를 캡에 수납합니다.
가방, 가슴주머니, PC 등에 끼워 부착한 다음,
가지고 다닐 수 있습니다.
Open the connector cover.
Connect the USB [micro-B] connector of the included
USB charger cable to the charging micro USB connector
of the product.
Connect the USB [A] connector of the USB charger cable
to the USB port on a PC.
Be sure to sufciently check the connector orientation
and the insertion location.
If the PC is not on, turn it on.
The LED light turns on in red, and charging begins.
When charging is nished, this light will turn off.
Slide the power switch to the on position
(the green side of the label).
The LED light turns on in red for a xed period of
time.
* When the remaining battery charge is low, this will
blink in red for a xed period of time.
Low-energy mode
When a xed period of time elapses with the
power switch in the on position and with no
operations performed, the mouse will
automatically switch to low-energy mode.
Move the mouse to return from low-energy mode.
The pairing method may vary depending on the PC that you are using.
In this situation, see the PC's instruction manual.
Right-click the
icon in the
lower-right part of
the screen, and
then click "Add a
Bluetooth Device."
Open the connector cover, and then use
an item with a pointed tip to hold down
the pairing button for 2 to 3 seconds.
The mouse will switch to pairing mode, and
the LED light will blink in red.
* The search method varies depending on
the device that you use.
When the LED light turns off, the pairing is
complete.
Pairing button
On the PC, select "ELECOM IR
Optical Mouse" to register the device.
On the Bluetooth
®
menu, click "Open
Bluetooth Preferences."
Open the connector cover, and then use
an item with a pointed tip to hold down
the pairing button for 2 to 3 seconds.
From Macintosh, select "ELECOM
Bluetooth BlueLED Mouse" to register
the device.
The LED light blinks in red.
Pairing button
When the LED light turns off, the pairing is
complete.
绿色
使用说明书
带夹子的
Bluetooth
®
鼠标
确认包装内容
基本规格
1. 左键
7. 配对键
2. 右键
8. 电源键
3. 滚轮
9. 光学传感器
夹子
4. LED灯
10.
5. 连接器盖子
6. microUSB充电接口
配对待机状态 红灯闪烁
充电中 点亮红灯
电源开启时 点亮红灯片刻
电池余量较少 红灯闪烁
Windows® 时 OSX 10.9 时
充电 打开电源 与计算机配对
中文·简体
1
2
3
4
5
5
8
9
6
7
10
鼠标本体 x 1
带夹子的盖子 x 1
USB充电连接线(15 cm) x 1
使用说明书 x 1
安全注意事项 x 1
法规标示 x 1
各部分的名称及其作用
鼠标
带夹子的盖子
使用鼠标时
收纳鼠标时
将盖子装到鼠标后部的橡胶部分处。
将鼠标本体收纳到盖子中。
可夹在皮包、胸前口袋、PC等处携带。
打开接口保护盖
将附带的USB充电连接线的USB[microB]接头连接到本产品
的microUSB充电接口上。
将USB充电连接线的USB[A]接头连接到计算机的USB端口
上。
请仔细确认接头的方向和插入部位。
如果计算机电源没有打开,打开电源。
LED灯点亮红灯,开始充电。
充电完成后,灯熄灭。
将电源开关滑动到ON的位置(标签在绿色一
侧)。
LED灯点亮红灯片刻。
※电池余量较少时,红灯闪烁片刻。
关于节电模式
若在打开电源状态下时隔一段时间不进行操
作,自动进入省电模式。
移动鼠标,即可从省电模式恢复工作。
配对方法可能因使用的计算机不同而有所差异。
这种情况下,请确认计算机的使用说明书。
右击画面右下的
,点击“添加
Bluetooth设备”。
打开接口保护盖,用尖头的物品按配对
键2~3秒后松开。
进入配对模式,LED红灯闪烁。
※ 搜索方法因使用的机器不同而有所差异。
LED灯熄灭后,配对完毕。
配对键
在计算机上选择“ELECOM IR Optical
Mouse”注册。
在 Bluetooth
®
菜单上点击“ 打开
‘Bluetooth' 环境设定…”。
打开连接器盖子,用尖头的物品按压配
对键2~3秒后松开。
在Macintosh上选择“ELECOM Bluetooth
BlueLED Mouse”注册。
LED红灯闪烁。
配对键
LED 灯熄灭后,配对完毕。
녹색
Windows® 의 경우 OSX 10.9 의 경우
충전하기 전원 켜기 컴퓨터와 페어링 하기
커넥터 커버를 엽니다
본 제품의 microUSB 충전 커넥터에 부속된 USB 충전 케이블의
USB[microB]커넥터를 연결합니다.
USB 충전 케이블의 USB[A]커넥터를 컴퓨터의 USB 포트에
연결합니다.
커넥터 방향과 삽입 장소를 정확히 확인하십시오.
컴퓨터의 전원이 켜져 있지 않을 경우에는 전원을 켭니다.
LED 램프가 적색으로 점등한 후, 충전을 시작합니다.
충전이 완료되면 소등합니다.
전원 스위치를 ON 위치(녹색 쪽)로 밉니다.
LED 램프가 일정시간 적색으로 점등합니다.
※ 건전지 잔량이 적을 때, 일정 시간 적색 점멸합니다.
절전 모드에 대해
전원 스위치는 ON인 상태에서 조작 없이 일정
시간이 지나면, 자동으로 절전 모드로 이행됩니다.
마우스를 움직이면 절전 모드에서 복귀합니다.
페어링 방법은 사용하는 컴퓨터에 따라 다를 수 있습니다.
그 경우 컴퓨터 취급설명서를 확인하십시오.
화면 오른쪽 아래의
를 우클릭해서
「Bluetooth
디바이스 추가」를
클릭합니다.
커넥터 커버를 열어 끝이 뾰족한 것을
사용해 페어링 버튼을 2~3초 눌렀다가
땝니다.
페어링 모드가 되고, LED 램프가 적색으로
점멸합니다.
※ 검색 방법은 사용하는 기기에 따라 다릅니다.
LED 램프가 소등하면 페어링이 완료됩니다.
페어링
컴퓨터에서 「ELECOM IR Optical Mouse」
를 선택하고 등록합니다.
Bluetooth
®
메뉴에서 「“Bluetooth”
환경설정을 열기」를 클릭합니다.
커넥터 커버를 열어 끝이 뾰족한 것을
사용해 페어링 버튼을 2~3초 눌렀다가
땝니다.
Macintosh에서 「ELECOM Bluetooth
BlueLED Mouse」를 선택하고
등록합니다.
LED 램프가 적색으로 점멸합니다.
페어링
LED 램프가 소등하면 페어링이 완료됩니다.
分辨率
1200 DPI
连接方式 Bluetooth®无线方式
符合规格 Bluetooth
®
3.0 Class 2
规范 HID (Human Interface Device)
电波频率 2.4GHz频段
电波方式 FH-SS方式
电波传播距离 非磁性物体(木桌等):约 10 m
磁性物体(铁桌等):约 3 m
※这是在本公司环境下的测试值,并非保证值。
外观尺寸 使用时 W41.0 mm × D87.0 mm × H30.3 mm
收纳时 W41.0 mm × D52.0 mm × H30.3 mm
工作温度/湿度 5℃~ 40℃ ,相对湿度最高 90%(但无结露)
存放温度/湿度 -10℃~ 60℃,相对湿度最高 90%(但无结露)
电池 )换更、出取能不池电( 池电电充子离锂置内
工作时间 充满电后的大致时间
连续工作时间:约18 小时
连续待机时间:约36 天
估计可用时间:约32 天
(假设1天使用计算机8小时,其中 5%的时间在
操作鼠标)
카운트 수
1200 카운트
접속 방식 Bluetooth® 무선 방식
적합 규격 Bluetooth® 3.0 Class 2
프로파일 HID (Human Interface Device)
전파 주파수 2.4GHz대
전파 방식 FH-SS 방식
전파 도달 거리 비자성체(나무판 등 ) : 약 10m
자성체(철판 등) : 약 3m
※폐사 환경에서의 테스트 값이며
보증값은 아닙니다.
외형 치수 사용 시 W41.0 mm × D87.0 mm × H30.3 mm
수납 시 W41.0 mm × D52.0 mm × H30.3 mm
동작 온도/습도 5℃ ~ 40℃ / ~ 90% RH(단 , 결로가 없을 때 )
보존 온도/습도 -10℃ ~ 60℃/ ~ 90% RH( 단 , 결로가 없을 때 )
사용 전지 내장 리튬이온 충전지
(전지는 분리 또는 교환되지 않습니다 )
동작 시간 완충 상태에서의 예상 시간
연속 동작 시간: 약 18 시간
연속 대기 시간: 약 36 일
예상 사용 가능 시간: 약 32 일
(1일 8 시간 컴퓨터 조작 중 5% 를 마우스 조작에
할당한 경우)
Product number: M-CC1BR
Page 2

1 2 3
ءﺰﺠﻟا ﲆﻋ دﻮﺟﻮﳌا ﻲﻃﺎﻄﳌا ءﺰﺠﻟا ﰲ ءﺎﻄﻐﻟا ﺐﻴﻛﱰﺑ ﻢﻗ
.ةرﺄﻔﻟا ﻦﻣ ﻲﻔﻠﺨﻟا
.ءﺎﻄﻐﻟا ﰲ ةرﺄﻔﻟا ﻦﻳﺰﺨﺘﺑ ﻢﻗ
ﰲ ﻚﺒﺸﳌﺎﺑ ﺎﻬﻘﻴﻠﻌﺗ ﻖﻳﺮﻃ ﻦﻋ ﻚﻌﻣ ةرﺄﻔﻟا ﻞﻤﺣ ﻚﻨﻜ
زﺎﻬﺟ وأ ،رﺪﺼﻟا ﺐﻴﺟ ،ﺔﺒﻴﻘﺣ ﻞﺜﻣ ﴏﺎﻨﻌﻟا ﺪﺣأ
.ﺮﺗﻮﻴﺒﻤﻛ
ناﱰﻗﻻا داﺪﻌﺘﺳا ﻊﺿو ﰲ نﻮﻜﻳ ﺎﻣﺪﻨﻋ ﺮﻤﺣﻷا نﻮﻠﻟﺎﺑ ﺾﻣﻮﻳ
ﻦﺤﺸﻟا ﺪﻨﻋ ﺮﻤﺣﻷا نﻮﻠﻟﺎﺑ ءﴤﻳ
ﺔﻗﺎﻄﻟا ﻞﻴﻐﺸﺗ ﺪﻨﻋ ﻦﻣﺰﻟا ﻦﻣ دﺪﺤﻣ ةﺪﳌ ﺮﻤﺣﻷا نﻮﻠﻟﺎﺑ ءﴤﻳ
ﺔﻳرﺎﻄﺒﻟﺎﺑ ﻲﻘﺒﺘﳌا ﻦﺤﺸﻟا نﻮﻜﻳ ﺎﻣﺪﻨﻋ ﺮﻤﺣﻷا نﻮﻠﻟﺎﺑ ﺾﻣﻮﻳ
ﺎًﻀﻔﺨﻨﻣ
.ﻦﺤﺸﻟا أﺪﺒﻳو ،ﺮﻤﺣﻷا نﻮﻠﻟﺎﺑ LED حﺎﺒﺼﻣ ءﴤﻳ
.حﺎﺒﺼﳌا اﺬﻫ ﺊﻔﻄﻨﻳ فﻮﺳ ،ﻦﺤﺸﻟا ءﺎﻬﺘﻧا ﺪﻨﻋ
ةدﺪﺤﻣ ةﺪﳌ ﺮﻤﺣﻷا نﻮﻠﻟﺎﺑ LED حﺎﺒﺼﻣ ءﴤﻳ
.ﻦﻣﺰﻟا ﻦﻣ
،ﺎًﻀﻔﺨﻨﻣ ﺔﻳرﺎﻄﺒﻟﺎﺑ ﻲﻘﺒﺘﳌا ﻦﺤﺸﻟا نﻮﻜﻳ ﺎﻣﺪﻨﻋ *
ةﱰﻔﻟ ﺮﻤﺣﻷا نﻮﻠﻟﺎﺑ ﺔﻘﻄﻨﳌا هﺬﻫ ﺾﻣﻮﺘﺳ
.ﻦﻣﺰﻟا ﻦﻣ ةدﺪﺤﻣ
.ﻪﻣﺪﺨﺘﺴﺗ يﺬﻟا ﺮﺗﻮﻴﺒﻤﻜﻟا زﺎﻬﺟ ﲆﻋ اًدﺘﻋا ناﱰﻗﻻا ﺔﻘﻳﺮﻃ ﻒﻠﺘﺨﺗ ﺪﻗ
.ﺮﻤﺣﻷا نﻮﻠﻟﺎﺑ LED حﺎﺒﺼﻣ ﺾﻣﻮﻳ فﻮﺳو ،ناﱰﻗﻻا ﻊﺿو ﱃإ ةرﺄﻔﻟا لﻮﺤﺘﺗ فﻮﺳ
.ﻞﻤﺘﻛا ﺪﻗ ناﱰﻗﻻا نﻮﻜﻳ ،LED حﺎﺒﺼﻣ ﺊﻔﻄﻨﻳ ﺎﻣﺪﻨﻋ
ناﱰﻗﻻا رز
.ﻪﻣﺪﺨﺘﺴﺗ يﺬﻟا زﺎﻬﺠﻟا ﲆﻋ اًدﺘﻋا ﺚﺤﺒﻟا ﺔﻘﻳﺮﻃ ﻒﻠﺘﺨﺗ *
綠燈
使用說明書
附夾子的
Bluetooth
®
滑鼠
確認包裝內容
基本規格
1. 左鍵
7. 配對鍵
2. 右鍵
8. 電源開關
3. 滾輪
9. 光學式感應器
夾子
4. LED燈
10.
5. 連接器蓋
6. 充電用microUSB 連接器
配對待機狀態 閃爍紅燈
充電中 亮紅燈。
電源開啟時 亮紅燈片刻
電池剩餘電量少 閃爍紅燈
Windows® 時 OSX 10.9 的情況下
充電 開啟電源 和電腦配對
中文•繁體
1
2
3
4
5
5
8
9
6
7
10
クリップ付き
Bluetooth®マウス
取扱説明書
日本語
各部の名称とはたらき
■マウス本体
■クリップ付きキャップ
1
2
3
4
5
5
8
9
6
7
10
1.左ボタン
2.右ボタン
3.ホイール
4.LED ランプ
ペアリング待機状態 赤色で点滅
充電中 赤色で点灯。
電源ON 時 一定時間赤色点灯
電池残量少 赤色で点滅
5.コネクターカバー
6.充電用 microUSB コネクター
8.トラックボール
7.ペアリングボタン
8.電源スイッチ
9.光学式センサー
10. クリップ
充電する
コネクターカバーを開きます。
本製品の充電用microUSB コネク
ターに付属の充電用 USB ケーブル
の USB[microB]コネクターを接続
します。
充電用 USB ケーブルの USB[A]コ
ネクターをパソコンの USBポート
に接続します。
パソコンの電源が入っていない場
合は、電源を入れます。
LED ランプが赤色に点灯し、充電を開
始します。
充電が完了すると、消灯します。
■マウス使用時
マウス後部のラバー部分にキャップ
を取り付けて使用します。
■マウス収納時
マウス本体をキャップに収納します。
カバン、胸ポケット、PCなどに挟ん
で取り付けて、持ち運びできます。
電源をオンにする
緑色
電源スイッチをO N の位
置(ラベルが緑側)にスラ
イドさせます。
LED ランプが一定時間赤色
に点灯します。
、はきといな少が量残池電※
一定時間赤色に点滅します。
パソコンとペアリングする
ペアリング方法はご使用のパソコンによって異なる場合がありま
す。
ペアリング画面を開きます。
■ Windows®の場合
画面右下の を右クリックし、「Bluetooth デ
バイスの追加」をクリックします。
■ OSX 10.9 の場合
Bluetooth
®
定を開く ...」をクリックする。
コネクターカバーを開けて、先の尖ったものを
使用してぺアリングボタンを2〜 3 秒押して、
離します。
ペアリングモードになり、LED ランプが赤色で点
滅します。
ペアリングボタン
パソコンから「ELECOM IR Optical Mouse」
を選択して登録します。
。すまりな異てっよに器機の用使ごは法方索検※
LED ランプが消灯すると、ペアリングは完了です。
滑鼠本體 x 1
附夾子的蓋子 x 1
USB充電線(15cm) x 1
使用說明書 x 1
安全注意事項 x 1
遵守規則 x 1
各部位名稱及功能
滑鼠本體
附夾子的蓋子
使用滑鼠時
收納滑鼠時
將蓋子安裝於滑鼠後部的橡膠部分使用。
將滑鼠本體收納於蓋子。
能夠夾於包包、胸前口袋、電腦等攜帶。
打開連接器蓋。
將附屬的充電用USB線的USB﹝microB﹞連接器,連接於本
產品的充電用microUSB 連接器。
將充電用 USB 線的USB﹝A﹞連接器,連接於電腦的 USB
埠。
請確認連接器方向與插入部位。
如果電腦電源未開啟,開啟電源。
LED 燈閃爍紅燈,開始充電。
充電完成之後,會熄燈。
將電源開關滑至開啟的位置(標籤為綠色那一
側)。
LED 燈會亮紅燈片刻。
*電池殘餘量變少時,會閃爍一陣子紅燈。
省電模式
在開啟電源的狀態下如果有一段時間沒有操
作,就會自動進入省電模式。
移動滑鼠,就會從省電模式恢復運作。
配對方法可能會依您使用的電腦而有所不同。
該情況下,請確認電腦的使用說明書。
按滑鼠右鍵點選畫
面右下方的 ,點
選「新增
Bluetooth 設備」。
打開連接器蓋,使用前端尖銳物按配對
鍵2∼3秒,然後放開。
變成配對模式,LED 燈閃爍紅燈。
※ 搜尋方法會依您使用的機器而有所不同。
LED 燈熄燈之後,配對即完成。
配對鍵
從電腦選擇「ELECOM IR Optical
Mouse」登錄。
從Bluetooth
®
選單,點選「開啟
“Bluetooth”環境設定...」。
打開連接器蓋,使用前端尖銳物按配對
鍵2∼3秒,然後放開。
從Macintosh 選擇「ELECOM Bluetooth
BlueLED Mouse」登錄。
LED 燈閃爍紅燈。
配對鍵
LED 燈熄燈之後,配對即完成。
Mouse Bluetooth®
dengan Klip
Manual
Bahasa Indonesia
Nama dan Fungsi dari Setiap Bagian
1
2
3
4
5
5
8
9
6
7
10
1.Tombol kiri
2.Tombol kanan
3.Roda
4.Cahaya LED
Mengisi daya
Menggunakan mouse
Nyalakan Daya.
Hijau
Memasangkan dengan PC
Mouse
Tutup dengan klip
Menyimpan mouse
5.Penutup konektor
6.Konektor micro USB untuk pengisian daya
7.Tombol memasangkan
8.Sakelar daya
9.Sensor Optik
10.Penjepit
Berkedip merah saat dalam modus siaga
memasangkan
Menyala merah saat mengisi daya
Menyala merah untuk jangka waktu
tertentu saat daya menyala
Berkedip merah bila daya baterai lemah
Pasang tutup ke bagian karet di
bagian belakang mouse.
Simpan mouse di dalam tutupnya.
Anda dapat membawa mouse
bersama dengan Anda dengan
mengklip ke item seperti tas, saku
baju atau PC.
Buka penutup konektor.
Nyalakan PC jika dalam keadaan
mati.
Hubungkan USB [A] konektor
kabel charger USB ke port USB
pada PC.
Hubungkan konektor USB
[micro-B] dari kabel charger USB
yang disertakan ke konektor micro
USB produk.
Cahaya LED berubah merah, dan
pengisian daya dimulai.
Saat mengisi daya seleasi, lampu ini
akan mati.
Geser sakelar daya ke
posisi menyala (sisi hijau
dari label).
Lampu LED menyala merah
untuk jangka waktu tertentu.
* Saat sisa pengisian baterai
lemah, area ini akan
berkedip merah untuk
jangka waktu tertentu.
Metode memasangkan dapat berbeda tergantung pada
PC yang Anda gunakan.
Buka "Layar Memasangkan".
Pada PC, pilih "ELECOM IR Optical Mouse"
untuk mendaftarkan perangkat.
Buka penutup konektor, lali gunakan item
dengan ujung yang runcing untuk menekan
tombol memasangkan selama 2 hingga 3 detik.
Windows
®
Klik kanan ikon di bagian kanan bawah layar,
lalu klik "Tambahkan Perangkat Bluetooth".
OSX 10.9
Pada menu Bluetooth®, klik "Buka Preferesi
Bluetooth."
Mouse akan beralih ke modus memasangkan, dan
cahaya LED akan berkedip merah.
* Metode pencarian dapat berbeda tergantung
pada perangkat yang Anda gunakan.
Bila lampu LED mati, memasangkan telah selesai.
Tombol memasangkan
Bluetooth® Mouse
con Clip
Manual
Español
Nombres y funciones de cada parte
1
2
3
4
5
5
8
9
6
7
10
1.Botón izquierdo
2.Botón derecho
3.Rueda
4.Luz LED
Cargando
Uso del mouse
Encienda la energía
Verde
Emparejamiento con una PC.
Mouse
Estuche con clip
Almacenamiento del mouse
5.Cobertura del conector.
6.Conector Micro USB para cargar
7.Botón de emparejamiento
8.Interruptor de energía
9.Sensor óptico
10.Clip
Se enciende y apaga en color rojo cuando se
encuentra en modo espera de emparejamiento
Se enciende en color rojo durante la carga.
Se enciende en color rojo durante un
período determinado de tiempo.
Cuando la carga de batería restante sea
baja, este área se enciende en color rojo.
Una el estuche a la parte con goma
en la parte trasera del mouse.
Guardar el mouse en el estuche.
Puede transportar el mouse consigo
en un elemento como una bolsa, un
bolsillo o una PC.
Abra la cobertura del conector.
Si la PC no se encuentra
encendida, enciéndala.
Conecte el conector USB [A] del
cable cargador USB al puerto
USB de una PC.
Conecte el conector USB
[micro-B] del cargador USB
incluido al conector micro USB del
producto.
La luz LED se encenderá en color rojo y
comenzará la carga.
Cuando haya terminado la carga se
apagará la luz.
Deslice el interruptor de
alimentación principal a la
posición ON (encendido)
(el lado verde de la
etiqueta).
La luz LED se enciende en
color rojo durante un período
determinado de tiempo.
* Cuando la carga de batería
restante sea baja, este área
se encenderá en color rojo
durante un período
determinado de tiempo.
El método de emparejamiento puede variar según la PC
que esté utilizando.
Abra la "Pantalla de emparejamiento".
En la PC, seleccione "ELECOM IR Optical
Mouse" para registrar el dispositivo.
Abra la cobertura del conector y utilice un
elemento con punta para sostener el botón
de emparejamiento durante 2 o 3 segundos.
Windows
®
Haga clic con el botón secundario en el icono
en la parte inferior derecha de la pantalla y
luego en "Agregar un dispositivo Bluetooth."
OSX 10.9
En el menú Bluetooth®, haga clic en "Abrir
preferencias Bluetooth."
El mouse cambiará al modo de emparejamiento y la
luz LED se encenderá y apagará en color rojo.
* El método de búsqueda varía según el dispositivo
que esté utilizando.
Cuando la luz LED se apaga, ha terminado el
emparejamiento.
Botón de emparejamiento
解析度
1200 dpi
連接方式 Bluetooth® 無線方式
適合規格 Bluetooth
®
3.0 Class 2
規範 HID (Human Interface Device)
電波頻率 2.4GHz頻段
電波方式 FH-SS方式
電波距離 非磁性物體(木桌等):約10m
磁性物體(鐵桌等):約3m
※這是本公司環境下的測試值,並非保證。
外型尺寸 使用時 W41.0 mm × D87.0 mm × H30.3 mm
收納時 W41.0 mm × D52.0 mm × H30.3 mm
動作溫度/濕度 )結凝氣水無須必( HR%09 ∼ / ℃04 ∼℃5
存放溫度/濕度 )結凝氣水無須必( HR%09 ∼ /℃06 ∼℃01-
電池 )換更、卸拆法無池電( 池電充子離鋰建內
動作時間 充滿電後的大致時間
連續動作時間:約18 小時
連續待機時間:約36 天
估計可用時間:約32 天
(假設1天使用8小時電腦,其中5% 時間使用滑鼠)
1
2
3
4
5
5
8
9
6
7
10
1.
2.
3.
4.
5.
6.
7.
8.
9.
10.
Windows
®
OSX 10.9
ﺔﻴﺑﺮﻌﻟا
ﻦﺤﺸﻟا
ﺔﻗﺎﻄﻟا ﻞﻴﻐﺸﺗ
ﻞﻴﻐﺸﺘﻟا ﻞﻴﻟد
®Bluetooth ةرﺄ ﻓ
ﻚﺒﺸ ةدوﺰﻣ
ءﺰﺟ ﻞﻛ ﻒﺋﺎﻇوو ءﺳأ
ةرﺄﻔﻟا
ﻚﺒﺸﳌا ﻊﻣ ءﺎﻄﻐﻟا
ةرﺄﻔﻟا ماﺪﺨﺘﺳا
ةرﺄﻔﻟا ﻦﻳﺰﺨﺗ
ﴪﻳﻷا رﺰﻟا
ﻦﻷا رﺰﻟا
ﺔﻠﺠﻌﻟا
LED نﺎﻴﺒﻟا حﺎﺒﺼﻣ
ﻞﺻﻮﳌا ءﺎﻄﻏ
ﻦﺤﺸﻠﻟ ﻐﺻ USB ﻞﺻﻮﻣ
ناﱰﻗﻻا رز
ﺔﻗﺎﻄﻟا حﺎﺘﻔﻣ
يﴫﺑ ﺮﻌﺸﺘﺴﻣ
ﻊﻄﻘﻣ
.ﻞﺻﻮﳌا ءﺎﻄﻏ ﺢﺘﻓا
صﺎﺨﻟا [USB [micro-B ﻞﺻﻮﻣ ﻞﺻﻮﺘﺑ ﻢﻗ
ﻐﺼﻟا USB ﻞﺻﻮ ﻖﻓﺮﳌا USB ﻦﺣﺎﺸﻟا ﻞﺑﺎﻜﺑ
.ﺞﺘﻨﳌﺎﺑ صﺎﺨﻟا
ﻞﺑﺎﻜﺑ صﺎﺨﻟا [USB [A ﻞﺻﻮﻣ ﻞﻴﺻﻮﺘﺑ ﻢﻗ
.ﺮﺗﻮﻴﺒﻤﻛ زﺎﻬﺟ ﲆﻋ USB ﺬﻔﻨﻣ ﰲ USB ﻦﺣﺎﺸﻟا
ﻢﻗ ،ﻞﻴﻐﺸﺘﻟا ﺪﻴﻗ ﺲﻴﻟ ﺮﺗﻮﻴﺒﻤﻜﻟا زﺎﻬﺟ نﺎﻛ اذإ
.ﻪﻠﻴﻐﺸﺘﺑ
ﴬﺧا
ﻞﻴﻐﺸﺘﻟا ﻊﺿو ﱃإ ﺔﻗﺎﻄﻟا حﺎﺘﻔﻣ كّﺮﺣ
.(ﻖﺼﻠﳌا ﻦﻣ ﴬﺧﻷا ﺐﻧﺎﺠﻟا)
ﺮﺗﻮﻴﺒﻤﻛ زﺎﻬﺟ ﻊﻣ ناﱰﻗﻻا
."Pairing Screen" ﺢﺘﻓا
،ﺔﺷﺎﺸﻟا ﻦﻣ ﻦﻷا ﲇﻔﺴﻟا ءﺰﺠﻟا ﰲ ﺰﻣﺮﻟا ﲆﻋ ﻦﻷا رﺰﻟﺎﺑ ﺮﻘﻧا
."Add a Bluetooth Device" ﺮﻘﻧا ﻢﺛ
،ﺔﺷﺎﺸﻟا ﻦﻣ ﻦﻷا ﲇﻔﺴﻟا ءﺰﺠﻟا ﰲ ﺰﻣﺮﻟا ﲆﻋ ﻦﻷا رﺰﻟﺎﺑ ﺮﻘﻧا
."Add a Bluetooth Device" ﺮﻘﻧا ﻢﺛ
ﻂﻐﻀﻠﻟ ﺐﺑﺪﻣ فﺮﻃ وذ ﴫﻨﻋ مﺪﺨﺘﺳا ﻢﺛ ،ﻞﺻﻮﳌا ءﺎﻄﻏ ﺢﺘﻓا
.ناﻮﺛ 3 ﱃإ 2 ةﺪﳌ ناﱰﻗﻻا رز ﲆﻋ راﺮﻤﺘﺳﺎﺑ
"ELECOM IR Optical Mouse" ﱰﺧا ،ﺮﺗﻮﻴﺒﻤﻜﻟا زﺎﻬﺟ ﲆﻋ
.زﺎﻬﺠﻟا ﻞﻴﺠﺴﺘﻟ
ML-M-CC1BR ver.1
1st edition, November 25, 2014 ©2014 ELECOM Co., Ltd. All Rights Reserved.
 Loading...