

Page 1
- 1 -
BlueLED Bluetooth® Mouse
M-BL3BB Series
User’s Manual
Thank you for purchasing the ELECOM M-BL3BB Series BlueLED Bluetooth®
Mouse. The M-BL3BB is a wireless laser mouse that employs Bluetooth®
wireless technology. It also features a resolution switch that allows you to
change the mouse movement speed.
This manual describes the operating instructions and safety precautions
for using the M-BL3BB Series. Ensure that you have read this manual before
using the product. After reading this manual, store it somewhere safe for
future reference.
* Except in certain cases, the M-BL3BB Series is referred to as “this product”
in this manual.
WARNING
Do not drop or hit this product.
If this pro duct is dam aged, im medi ately st op u sing th e
product and turn the mouse body o, and remove the battery
from the mouse.
If you continue to use the product under these conditions, it
may cause a re or electric shock.
Do not attempt to disassemble, modify or repair this product by
yourself, as this may cause a re, electric shock or product damage.
Do not put this produc t in fire, as t he pro duct may b urst,
resulting in a re or injury.
CAUTION
Do not place this product in any of the following environments:
In a car exposed to sunlight, a place exposed to direct
•
sunlight, or a place that becomes hot (around a heater, etc.)
In a moist place or a place where condensation may occur
•
In an uneven place or a place exposed to vibration
•
In a place where a magnetic field is generated (near a magnet, etc.)
•
In a dusty place
•
This product does not have a waterproof structure. Use and
store this product in a place where the product body will not
be splashed with water or other liquid.
Rain, water mist, juice, coee, steam or sweat may also cause
product damage.
When you no l onge r n eed to use t his pro duct an d t he
battery, be sure to dispose of it in accordance with the local
ordinances and laws of your area.
Batteries
CAUTION
Use AAA alkaline batteries, AAA manganese batteries, or AAA nickel
hydride storage batteries with this product.
If this product will be unused for a long period of time, remove the
battery to avoid battery leakage and failure.
Cleaning the Mouse
If the product body becomes dirty, wipe it with a soft, dry cloth.
Use of a volatile liquid (paint thinner, benzene, alcohol, etc.) may
affect the material quality and colour of the product.
Cautions for Wireless Equipment
This product is wireless equipment using the entire range of the 2.4 GH z
band and it is possible to avoid the band of mobile object identication
systems. GFSK is used for the radio wave method. The interference distance
is 10 m.
The 2.4 GHz band is also used by medical equipment, Bluetooth, and
wireless LAN equipment conforming to the IEEE802.11b/11g /11n standard.
Before us ing this pro duct, ch eck that the re are no other “radi o
•
stations”* operating nearby.
If ele ctromagn etic interfere nce o ccurs between this produc t and
•
other “radio stations”, move this product to another location or stop
using this product.
* Other “radio stations” refer to industrial, scientific and medical devices using the
2.4 GHz band like this product, other radio stations of this type, licensed radio
station premises for mobile objec t identification system that is used in factory
production lines, certain non-licensed low power radio stations and amateur
radio stations.
WARNING
Do not use this product with a device that may have a serious
●
function or inuence. There are rare cases where an external
radio wave at the same frequency or the radio wave emitted
from a mobile phone causes this product to malfunction, slow
down, or fail to operate.
Do not use this product in a hospital or other locations where
●
the use of radio waves is prohibited. The radio waves of this
product may affect elec tronic and medical devices (e.g.
pacemaker).
The use of a wireless mouse in an aircraft is prohibited by
●
aviation law because doing so may interfere with ight safety.
Turn off the power of the mouse body before boarding an
aircraft and do not use it in the aircraft.
* ELECOM is not liabl e for any accident or s ocial damages
incurred by the failure of this product.
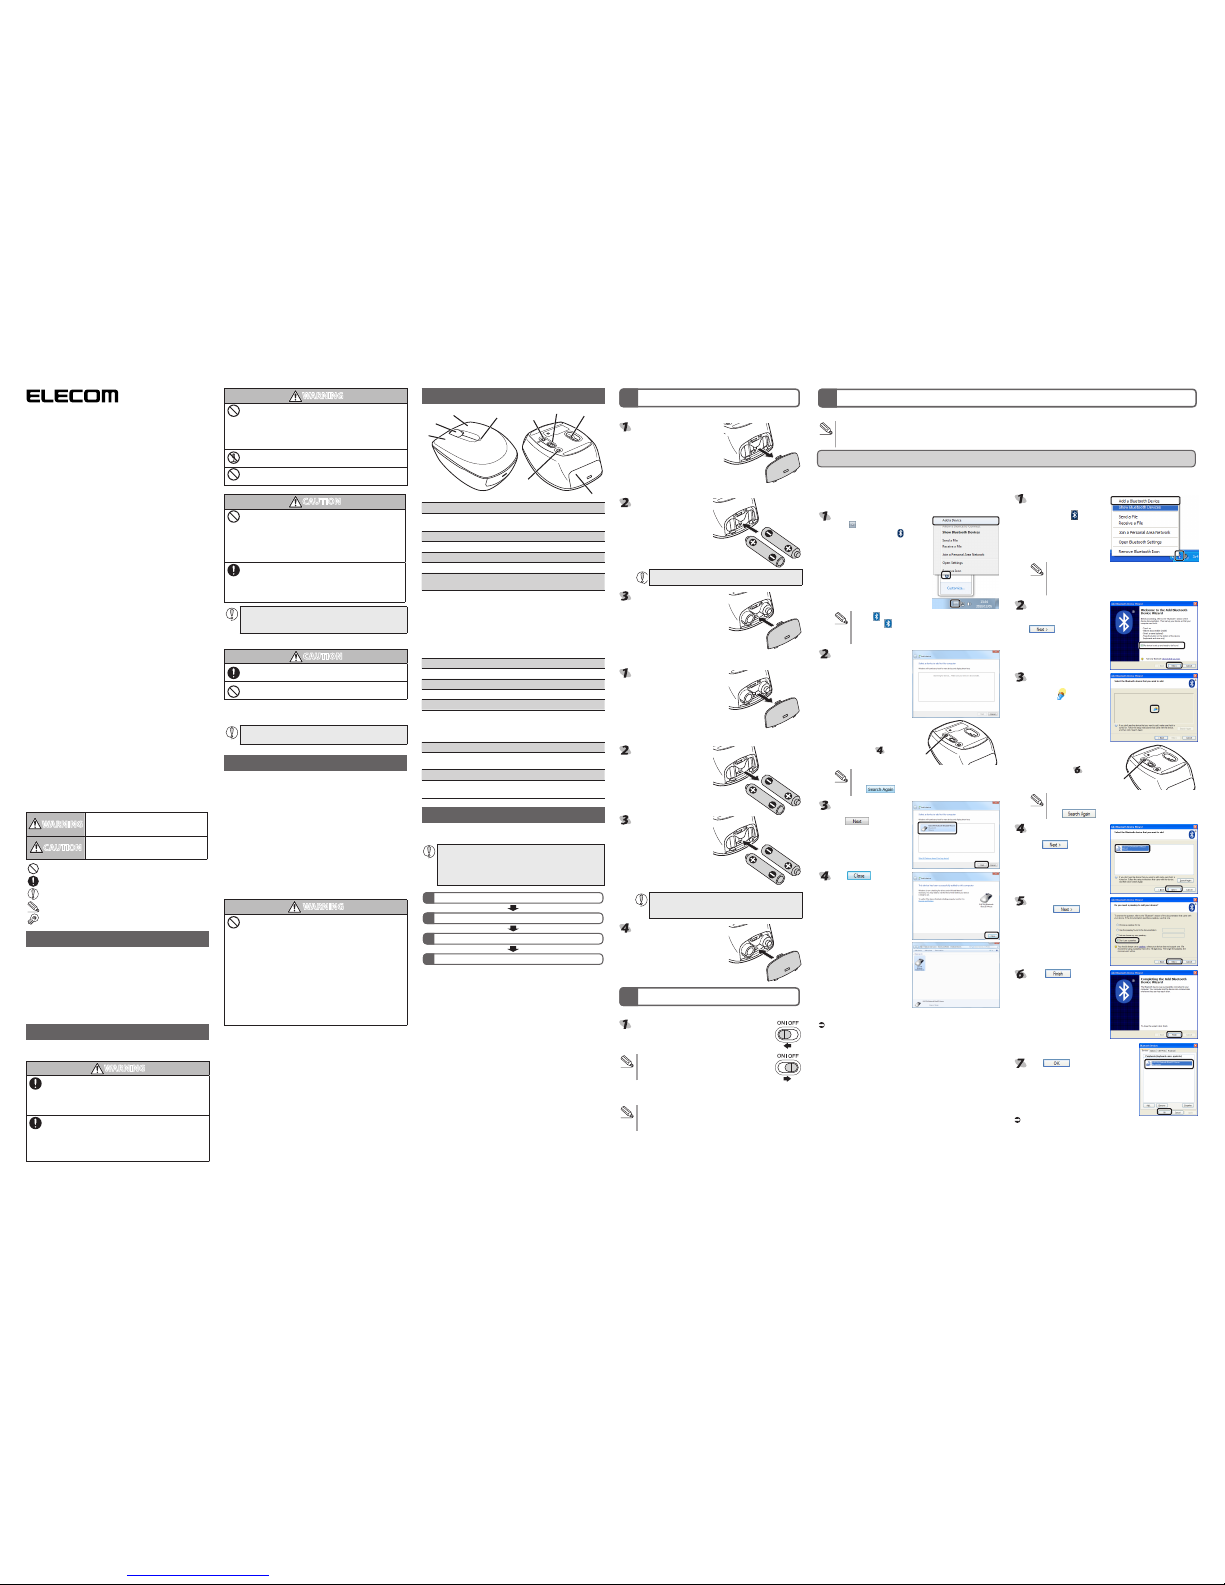
Part Names
(Bottom)
a
Wheel
The wheel can be turned back and forward with your nger or pressed
like a button to operate the PC.
Right button
Used for right-click operation.
Left button
Used for left-click operation.
d
Remaining battery level i ndicator lamp/ Re solution
switch indicator lamp/pairing indicator lamp
Turns red when the mouse is in a pairing standby state.
y
Indicates when to replace the batteries.
y
* When a battery has been inserted, if there are sufficient
remaining battery levels, it will illuminate in red for a cer tain
period of time. If the remaining battery level becomes low
during use, it will ash in red for a certain period of time.
Flashes when the resolution (mouse cursor speed) is changed.
y
* Flashes twice when switching from 800 to 1600
Flashes once when switching from 1600 to 800
e
Pairing button
Pairs the mouse with a PC Bluetooth module or a Bluetooth adapter.
f
Power switch
Used to turn the mouse body on and o.
g
Optical sensor
Lights blue when the mouse is powered on.
When the mouse body is moved, this sensor detects mouse movement.
Avoid looking directly at the light of the sensor as doing so may cause *
eye damage.
h
Battery cover
This cover is removed to install batteries.
There is battery housing inside, batteries are inserted there.
i
Resolution switch
Switches the resolution (mouse cursor speed) between 800 and 1600
each time the button is pressed.
Initial Setup Procedure
When using thi s product for the rst time, operate and congure this
product and the PC in the order shown below.
To use this product, your PC must support the Bluetooth •
HID prole or have a Bluetooth adapter connected.
Do no t re move your existi ng mo use until this prod uct •
is success fully con nected. You need to use yo ur exist ing
mouse to congure the PC.
Insert the batteries
1
Turning on the mouse
2
Pair the mouse with the PC
3
Check mouse operation
4
* Refer to the back of this sheet.
Installing / Replacing the Battery
1
Before using this product, install two AAA batteries in the mouse body.
Remove the battery cover.
Insert the batteries.
Make sure that the polarity is correct.
y
Install the battery cover as
before.
Replacing the Battery
When batteries are drained, replace them following the instructions below.
Remove the battery cover.
Remove the batteries.
Insert the battery.
Do not mix different types of batteries or use old
y
batteries with new batteries to avoid battery leakage
and failure.
Install the battery cover as before.
Turning on the mouse
2
When using this product, turn the mouse body power on.
Slide the power switch to the ON position.
The rema inin g b atte ry leve l i ndic ator la mp is
illuminated in red for a certain period.
When no t usi ng thi s prod uct, turn t he mo use
body o to save battery power.
Slide the power switch to the OFF position.
Restoring from sleep state
Click the right mouse button.
To reduce battery drain, the mouse enters sleep mode automatically
if it is lef t without being operated for a certain period of time with
the power or switch turned on.
Hook a nger on part to remove
the cover easily.
Hook a nger on part to remove
the cover easily.
Meaning of symbols
WARNING
Failure to observe precautions may result in
serious personal injury or death due to fire,
electric shock, or other causes.
CAUTION
Failure to observe precautions may result in
personal injury due to electric shock or other
causes, and may damage other equipment.
Prohibited action
Mandatory action
Situation that needs attention
Notes and reference information
Information that is handy to know
Package Contents
This product’s packaging contains the items listed below. Before using
the product, check that all items are present. We make every eort to
ensure that all produc ts are packaged correctly. However, in the event
that an item is missing or damaged, contact the retailer from whom you
purchased the product.
Mouse x1
•
AAA alkaline battery x2
•
Carry bag x1
•
User’s Manual x1
•
Safety Precautions
Observe these precaution s carefully to avoid personal injur y, damage,
re, and other problems.
WARNING
If a foreign object (water, metal chip, etc.) enters the product,
immediately stop using the produc t, and remove the batter y
from the mouse. If yo u contin ue to use t he produ ct unde r
these conditions, it may cause a re or electric shock.
If an abnormality is found with this product (emission of heat,
smoke or abnormal smell from the product), immediately stop
using the produc t, shutdo wn the PC, a nd after thoroug hly
checking that heat fr om the produc t will not cause burns,
remove the battery from the mouse. After doing this, contact
the retailer from whom you purchased the product.
Pairing the mouse with the PC
3
To connect this product to the PC using Bluetooth, you need to pair the product with the PC.
Pairing involves registering Bluetooth devices (in this case, the mouse and the PC) with each other, and authorising a connection with a registered
•
device.
Use your existing mouse or touch pad to operate the PC until the pairing process is completed successfully.
•
When using Windows®
This sec tion de scri bes the pr oced ure when u sing th e s tanda rd
Windows® Bluetooth function.
Windows® 7 and Windows Vista® SP2
* Screen appearance may change depending on operating system, but
the procedure is the same.
In the notification area,
click
, then right-click
the Bluetooth icon (
)
and click [Add a Device].
The [Add a Device] window
is displayed.
If the • is displayed in the notication area in Windows® 7,
right-click
and then click [Add a Device].
If no icon is dis played, click the [S tart] button, click
•
[Control Panel], and then click [Add a Device].
Press the pairing button
on this product.
The pairing indicator lamp turns
on during the pairing procedure
and turns o when the procedure
is complete (step
).
If this pro duct is n ot displayed in the lis t, check th at its
power is tu rned on, press the pairing button , and th en
click .
Click [ELECOM Bluetooth
BlueLED MOUSE] and then
click
.
Product registration starts.
Click .
[ELECOM BLUETOOTH LASER
MOUSE] is added to the [Bluetooth
Devices] window.
You can now use the mouse.
Refer to “4. Checking Mouse Operation” on the back of this sheet to
conrm that the mouse works correctly.
Pairing button
Windows Vista® (up to SP1) and Windows® XP
* Screen appearance may change depending on operating system, but
the procedure is the same.
In the task tray or the
notification area, right-click the
Bluetooth icon (
) and click
[Add a Bluetooth Device].
The [Add Bluetooth Device
Wizard] is displayed.
If the icon is not displayed, click the [Star t] button, click
[Control Pan el], cl ick [Ha rdware an d Sound ], and then
click [Bluetooth Dev ices]. When the [Bluetooth Devices]
window is displayed, click [Add].
Select the [My device is set
up and ready to be found.]
check box and then click
.
The system starts searching for
Bluetooth devices to add.
Hold down the pairing button
on this product while the
torch icon (
is displayed.
The pairing indicator lamp turns
on during the pairing procedure
and turns o when the procedure
is complete (step
).
If this product is not displayed i n the list, chec k that its
power is turned on, pre ss the pairing button, and the n
click
.
Click [ELECOM Bluetooth
BlueLED MOUSE] and then
click
.
Select [Don't use a passkey],
and click
.
Product registration starts.
Click .
[ELECOM Bluetooth BlueLED MOUSE] is added
to the [Bluetooth Devices] window.
Click
.
You can now use the mouse.
Refer to “4. Checking M ouse Operation” on the back of this sheet to
conrm that the mouse works correctly.
Pairing button
Page 2
- 2 -
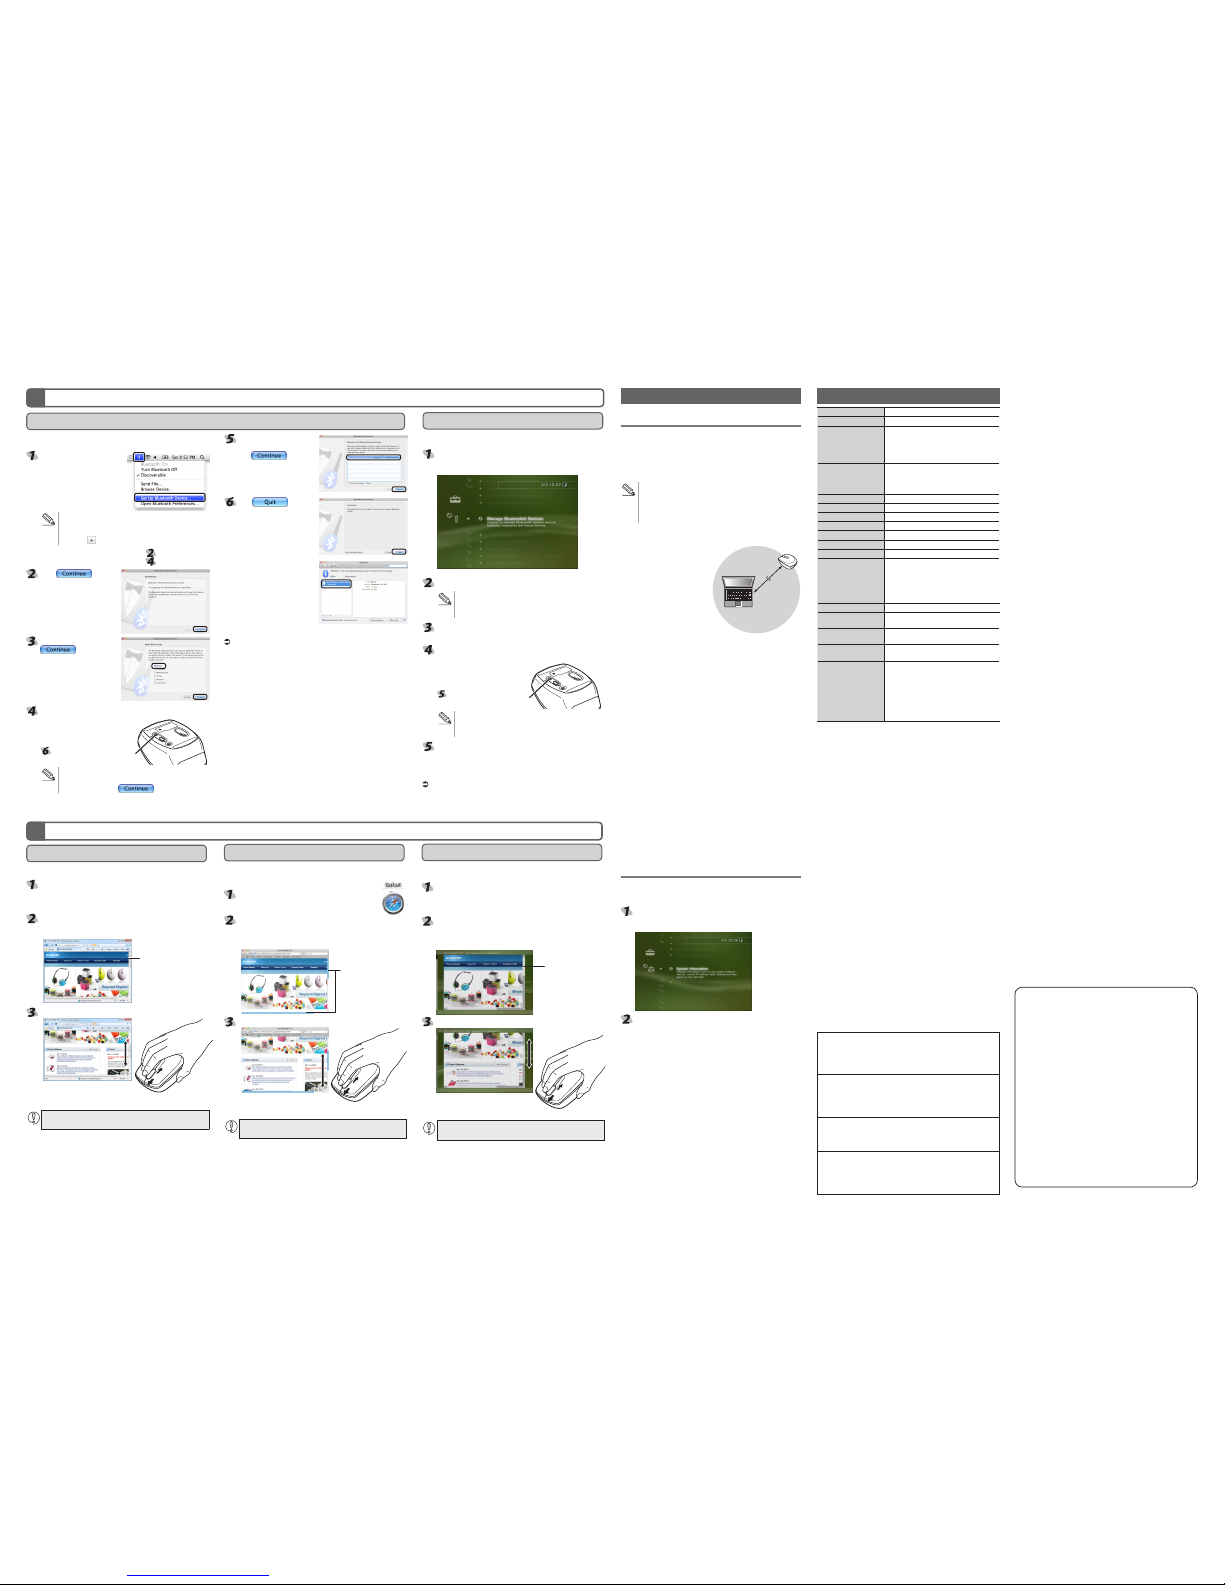
* Screen appearance may change depending on your Mac OS version,
but the procedure is the same.
From the Bluetooth menu,
click [Set up Bluetooth
Device].
The Blueto oth Setup Assistan t
is displayed.
If the Bl uetooth menu is not displayed, from the Apple
menu, click [Sy stem Prefer ences] . When th e [Sy stem
Preferences] window is displayed, click [Bluetooth], and
then click
on the [Bluetooth] window.
If using Mac OS X 10.5.x, proceed to step
.
If using Mac OS X 10.6.x, proceed to step
.
Click .
Select [Mouse], and click
.
The system starts searching
for Bluetooth devices to add.
Press the pairing button on this product.
The pa ir in g in di ca to r la mp
tur ns o n dur in g th e pai ri ng
procedu re a nd turns off when
the procedure i s complete ( step
)
.
If a m essage sayi ng that registration failed is displayed,
check t hat thi s produ ct is turned on, press the p airing
button, and then click
.
Pairing button
Click [ELECOM BLUETOOTH
LASER MOUSE] and then
click
.
Click .
When registration is completed
successfully, [ELECOM Bluetooth
BlueLED MOUSE] appears in the
[Bluetooth] window.
You can now use the mouse.
Refer to “4. Checking Mouse Operation” to confirm that the mouse
works correctly.
When using Mac OS X
Check that the mouse vertical scrolling functions are working correctly
in Safari.
Click the Safari icon in the Dock.
Safari will launch.
Display your favourite web site in Safari and change the size
of the window so that the vertical and horizontal scrollbars
appear.
* The sample website used here is the ELECOM homepage.
Scrollbar
Scroll the wheel back and forth.
The mouse is operating normally
if the screen moves up and down
as you scroll the tilt wheel.
In applications that do not support scrolling, the screen will not
move when you scroll the wheel.
When using Windows®
Check that the mouse vertical scrolling functions are working correctly
in Windows® Internet Explorer.
From the [Start] menu, select [All Programs], and then
[Internet Explorer].
Internet Explorer will launch.
Display your favourite web site in Internet Explorer and change
the size of the window so that the vertical scrollbar appears.
* The sample website used here is the ELECOM homepage.
Scrollbar
Scroll the wheel back and forth.
The mouse is operating normally
if the screen moves up and down
as you scroll the tilt wheel.
In applications that do not support scrolling, the screen will not
move when you scroll the wheel.
Basic specications
Product name BlueLED Bluetooth® Mouse
Article No. M-BL3BB Series
Supported devices Devices that support the Bluetooth HID prole
(A Bluetooth® adapter that supports the HID
prole is required to use this product with a PC
that does not support Bluetooth®.)
PlayStation® 3 (system software version 3.60)
OS Windows 7 (up to SP1), Windows Vista (up to
SP2), Windows XP (SP3)
Mac OS X (10.5 to 10.5.8, 10.6 to 10.6.8, 10.7 to
10.7.2)
Sensor method Optical
Resolution (dpi)
800/1600 (Switchable)
Connection method Bluetooth® wireless
Compliant standard Bluetooth® v3.0 Class 2
Prole HID (Human Interface Device)
Radio frequency 2.4 GHz bandwidth
Radio wave method GFSK modulation
Radio wave outreach Non-magnetic substance (e.g. wooden desk):
Approx. 10 m
Magnetic substance (e.g. metal desk): Approx.
3 m
* Values indicated are those obtained by
ELECOM and are not guaranteed.
Mouse Dimensions 74.3 (W) x 52.3 (D) x 33.4 (H) mm
Operating temperature/
humidity
5 to 40°C, 90% RH max. (no condensation)
Storing temperature/
humidity
-10 to 60°C, 90% RH max. (no condensation)
Batteries AAA alkaline battery, AAA manganese battery,
rechargeable AAA nickel hydride battery
Operating time Measure of the operating time when an AAA
alkaline battery is used
Continuous operating time: Approx. 75 hours
Continuous standby time: Approx. 125 days
Estimated serviceable time: Approx. 34 days
(when the PC is operated for eight hours a day
and 25% of the PC operation is assigned to
mouse operation)
When using Mac OS X
When using PlayStation® 3
This product supports PlayStation® 3 system software version 3.60. For
details, refer to “Troubleshooting”.
From the home menu, select [Settings], and then select [Manage
Bluetooth® Devices].
The Manage Bluetooth Devices screen is displayed.
Select [Register New Device].
If you have not registered any Bluetooth devices, you will
be asked if you want to register the device. S elect [Yes]
to continue.
Select [Start Scanning].
The system starts searching for Bluetooth devices to add.
Press the pairng button on this
product.
The p ai rin g in di cat or l am p
turn s on du rin g the p air ing
procedure and turns off wh en
the procedure is complete (step
).
If t his prod uct is not fou nd, check th at its power is
turned on, press the pairing button, and then select [Start
Scanning].
Select [ELECOM Bluetooth BlueLED MOUSE].
When registration is completed successfully, [ELECOM BLUETOOTH
LASER MOUSE] appears in the list of registered devices.
You can now use the mouse.
Refer to “4. Checking M ouse Operation” to confirm that the mouse
works correctly.
Pairing button
When using PlayStation® 3
Check that the mouse vertical scrolling functions are working correctly
in the PlayStation® 3 Internet browser.
From the XMB™ home menu, select [Network], and then
select [Internet Browser].
The Internet browser is displayed.
Display your favourite website in the Internet browser, and
change the size of the browser window so that the scroll bar
is displayed.
*The sample website used here is the ELECOM hompage.
Scroll bar
Scroll the wheel back and forth.
If the screen scrol ls up and down
in time with the movement of your
nger, operation is normal.
In applications that do not support scrolling, the screen will
not move when you scroll the wheel.
Troubleshooting
When the product appears to be
malfunctioning
When the mouse pointer on the screen does not move, or
moves unstably, when the mouse is moved
Check tha t t his pro duc t, and the PC ’s Blue toot h f unct ion or
Bluetooth adapter are turned on.
Check pairing status to ensure that this product is paired correctly with
the PC and that pairing has not been cancelled.
The p airin g in dicato r l amp turns on duri ng t he pairin g
•
procedure and turns o when the procedure is complete.
For detai ls on the PC’s Blue tooth f unction and B luetooth
•
ada pte r, re fer to th e re lev an t ins tr uct io n man ua ls.
Alternatively, contact the manufacturer.
The PC and the mouse body are too far apart or there is a possibility
that the PC is fac ing in a d irection from which i t cann ot recei ve
radio signals.
Adjust the position of the PC.
The operable range of this
product is the area within a
circle with a radius of 10 m
from the PC. Depending on
the usage environment, the
mouse may not operate even
when it is within approximately
10 m of the PC. In such cases,
move the mouse closer to the PC until operation stabilises.
It is possible that the reectivity of the sur face on which this product
is being used is not suitable for an optical mouse. Use this product on
a mouse pad that is designed for use with optical mice.
When using this product on a metallic surface such as a steel desk,
radio wave outreach may be shortened. In such cases, move the PC
closer to the mouse until mouse operation stabilises.
Interference may occur if multiple units of this product are used
together or if this produc t is used with other wireless devices. In this
case, change the channel of other wireless devices.
Operation becomes unstable when battery power is low. See
“Installing·Replacing the Battery” on the reverse of this sheet, and
replace the batteries as soon as possible.
The alkaline batteries supplied with this product are for checking
•
product ope ration. These bat teries may disc harge and drain
during storing and shipping.
When the re maining batter y level i s low, the remaining b attery
•
level indicator lamp is ashed in red for a certain period.
* When not using the mouse, turn it o to save battery power.
It is possible that the driver is conicting with another driver such
as that for a laptop to uch pad. To use thi s product correctly, you
must delete the touch pad driver. However, if you delete this driver,
you may not be able to use the touch pad or touch pad functions.
Contact the PC manufacturer for more details.
Ch ec ki ng the Pl ay St at io n® 3 sys te m
software version
You must have system s oftware version 3.60 to use this product with
PlayStation® 3.
Follow the procedure below to check the system software version.
From the XMB™ home menu, select [Settings], select [System
Settings], and then select [System Information].
System information is displayed.
Check that the system software version is 3.60.
If th e sys tem s oftware vers ion i s no t 3.6 0, pe rform a s ystem
update to update the PlaySt ation® 3 system softw are t o th e
most rec ent vers ion. For detail s regar ding th e syste m update
procedure, refer to the PlayStation® 3 manual.
Approximately
10 m
Pairing the Mouse with the PC
3
Checking Mouse Operation
4
BlueLED Bluetooth® Mouse
M-BL3BB Series
User's Manual
1st edition, January 10, 2012
ELECOM Co., Ltd.
This manual is copyright of ELECOM Co., Ltd.•
Unauthorised copying and/or reproducing of all or part of this manual is •
prohibited.
The specifications and appearance of this product may be changed •
without prior notice for product improvement purposes.
ELECOM Co., Ltd. shall bear no responsibility for any and all affects •
resulting from the use of this product regardless of the above reasons.
Export or service transaction permission under the Foreign Exchange and •
Foreign Trade Control Law is required in order to export this product or
parts of this product that constitute strategic materials or services.
Windows and the Windows logo are trademarks of the Microsoft group of •
companies.
Mac, Mac OS, and Macintosh are registered trademarks or trademarks of •
Apple Inc., in the United States.
“PlayStation” and “PS3” are trademarks or registered trademarks of Sony •
Computer Entertainment Inc.
The Bluetooth word mark and Bluetooth logo are all trademarks that are •
owned by the Bluetooth SIG and licensed out for use to ELECOM Co., Ltd.
that are incorporating Bluetooth wireless technology into their products.
Company names, product names, and other names in this manual are •
generally trademarks or registered trademarks.
©2012
ELECOM Co., Ltd. All Rights Reserved.
ELECOM CO., LTD.
1-1 Fushimi-machi 4-Chome Chuoku, Osaka Japan 541-8765
URL: http://www.elecom.co.jp/global/
overseas@elecom.co.jp
宜麗客(上海)貿易有限公司
上海市徐匯区肇嘉浜路1065甲号飛雕国際大厦704 号
電話 : 86-21-33680011
FAX : 86-21-64271706
URL : http://www.elecom-china.com/
ELECOM Korea Co., Ltd.
5F Suam Bldg. 1358-17, Seocho2-dong, Seocho-gu, Seoul 137-862, Korea
TEL : 1588-9514
FAX : (02)3472-5533
URL : www.elecom.co.kr
ELECOM Singapore Pte. Ltd
33 UBI AVENUE 3 # 03-56. VERTEX SINGAPORE (408868)
TEL : (65)-6347-7747
FAX : (65)-6753-1791
ELECOM India Pvt. Ltd.
408-Deepali Building, 92- Nehru Place, New Delhi-110 019, India
TEL: 011-40574543
e-mail: support@elecom-india.com
URL: http://www.elecom-india.com/
 Loading...