

Page 1
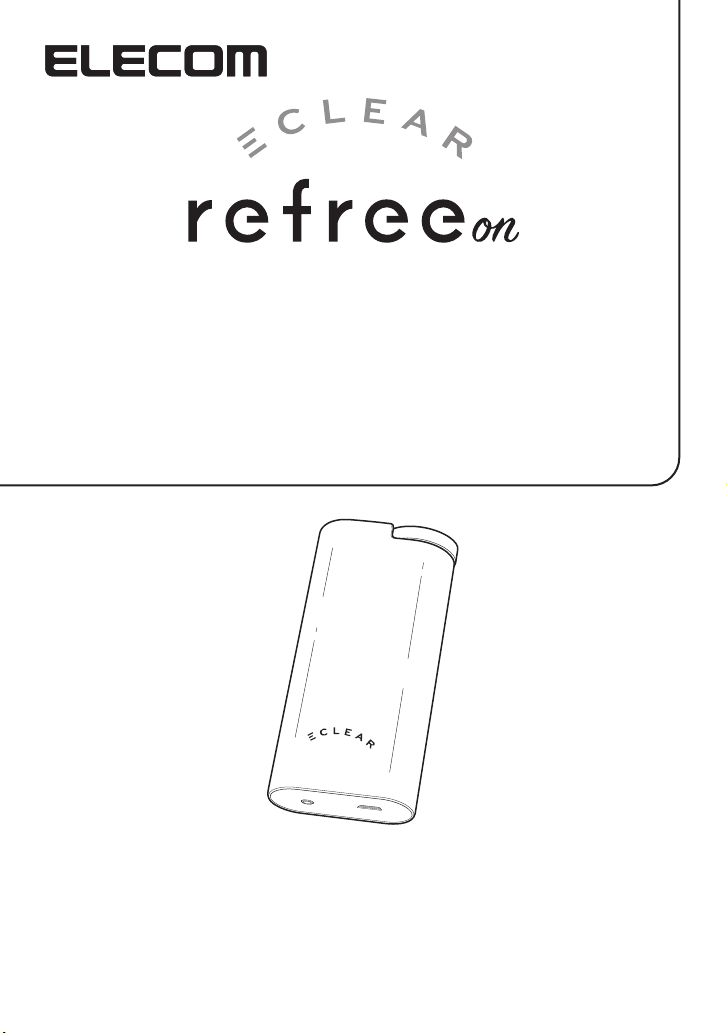
ECLEAR refree on
Instruction Manual
HCM-PH01 Series
For use in Hong Kong and Philippines only.
If you made your purchase in another country, please refer to that country’s manual.
www.elecom.co.jp/global/download-list/manual/
Thank you for purchasing Eclear Lean.
This manual details the operation method and precautions for the safe handling of the product.
Please read this manual before use. After reading, keep this manual in a safe location for future
reference.
Page 2

Contents
Forward
About this product ・・・・・・・・・・・・・・・・・・・・・・・・・・・・・・・・・・・・・・・・・・・・・・・・・・・・・・・・3
Safety Precautions
Package contents ・・・・・・・・・・・・・・・・・・・・・・・・・・・・・・・・・・・・・・・・・・・・・・・・・・・・・・・・・9
Part names ・・・・・・・・・・・・・・・・・・・・・・・・・・・・・・・・・・・・・・・・・・・・・・・・・・・・・・・・・・・・・・ 10
(Be sure to always follow these precautions)
・・・・・・・・・・・・・・・・4
Pre-use
Preparation for Use ・・・・・・・・・・・・・・・・・・・・・・・・・・・・・・・・・・・・・・・・・・・・・・・・・・・・・ 11
Placement of the gel pad ・・・・・・・・・・・・・・・・・・・・・・・・・・・・・・・・・・・・・・・・・・・・・・・・ 13
Example of gel pad attachment ・・・・・・・・・・・・・・・・・・・・・・・・・・・・・・・・・・・・・・・・・ 14
In Usage
How to use ・・・・・・・・・・・・・・・・・・・・・・・・・・・・・・・・・・・・・・・・・・・・・・・・・・・・・・・・・・・・・・ 16
After use
Care of this equipment ・・・・・・・・・・・・・・・・・・・・・・・・・・・・・・・・・・・・・・・・・・・・・・・・・・ 21
How to store ・・・・・・・・・・・・・・・・・・・・・・・・・・・・・・・・・・・・・・・・・・・・・・・・・・・・・・・・・・・・ 22
Disposal ・・・・・・・・・・・・・・・・・・・・・・・・・・・・・・・・・・・・・・・・・・・・・・・・・・・・・・・・・・・・・・・・・ 23
Others
Troubleshooting ・・・・・・・・・・・・・・・・・・・・・・・・・・・・・・・・・・・・・・・・・・・・・・・・・・・・・・・・・ 25
Product specications ・・・・・・・・・・・・・・・・・・・・・・・・・・・・・・・・・・・・・・・・・・・・・・・・・・ 28
2
Page 3
About this product
■ Intended purpose
This product is a massage appliance that combines low frequency and heating (this product is
not a medical instrument).
This instrument releases low frequency current to the body through electrodes attached on the
body, which triggers vibration that is utilized to massage tired body parts. Furthermore, electric
heat is used to provide heat for relaxing the muscles.
The product is designed for home use.
■ What is low frequency instrument?
This instrument releases low frequency current to the body through electrodes attached on the
body, which triggers vibration that is utilized to massage tired body parts.
■ What is heating instrument?
Applying heat on human body dilates the blood vessels due to the rise in temperature of the
skin, which in turn promotes better circulation of blood.
■ Rough standard on operating time
Approximately 15 minutes per site is the rough standard of operation. Continuing beyond
15 minutes can cause poor health.
The product incorporates a timer that automatically turns o power when about 15 minutes are
elapsed since the start of an operation.
CAUTION:
Wipe all sweat or moisture from the skin prior to use.
3
Page 4
Safety Precautions
In order to prevent personal injury or damage to property involving you or any other persons,
please be sure to observe the precautions outlined below.
■ The degree of the possible damage or risk you may cause if you misuse this product against
these precautions are described in the following categories:
DANGER
WARNING
CAUTION
This symbol refers to things which must not be done, i.e. are “prohibited”.
This symbol refers to things which must be done, i.e. are “mandatory”.
Sections with this heading have contents that “have a high possibility of
death or suering from serious injuries.”
Sections with this heading have contents that “are assumed to have a possibility of death or suering from serious injuries.”
Sections with this heading have contents that “have a possibility of suering from injuries or assumed to have a possibility of property damage only
occurring.”
(Be sure to always follow these precautions)
DANGER
Do not use this equipment in combination with the following medical devices.
• Implanted electrical devices such as pace makers.
• Heart-lung machines and other life-supporting medical electronic equipment
• Electrical devices for sustaining life such as articial heart and lung machines.
This product may open such equipment to malfunctions and may lead to serious consequences for your health.
WARNING
Do not use the product near heart, or on the head, face, inside mouth or genitals, as well as
injured or diseases skin sites, tattoos, etc. Furthermore, do not use the product simultaneously on the bottom of the left and right feet or in arrangement that puts the heart between
two sites of applications when performing the Low Frequency Course or the Heated Low
Frequency Course.
Doing so can cause accidents, injuries and poor physical health.
Do not use the product together with any other therapeutic apparatuses.
Doing so can cause poor physical health and can make the user feel unwell.
Do not allow children to use the product and do not allow them to play on or ride the
base unit or the gel pad of the apparatus.
It will cause accidents or injuries.
Do not use the product while the gel pad is in contact with any metal objects, such as a
watch or necklace or the like.
It will cause accidents or injuries.
Do not use the product when the surface of the gel pad is missing or deteriorating.
If there is any, it will cause accidents, problems and malfunctions.
Make sure to turn o the power when you are connecting/disconnecting the gel pad,
putting on / re-positioning / peeling o the gel pad or changing the gel pad.
4
Page 5
WARNING
Be sure to observe following matters when performing heat operation.
• Do not cover the gel pad with a towel or use it under a blanket and other such conditions in which heat can become conned.
• Do not use the product while the body part to which a gel pad has been attached is
pressed.
• If there is no sensation of warmth ve minutes after the heat operation starts, stop
using the product immediately.
• If the gel pad feels hot, remove it.
Failure to do so may cause accidents, burns, low temperature burns and poor physical
health.
Individuals who fall under any of the following categories must not use the product:
• People who are unable to freely manipulate their body and infants
• People who have taken sleeping pills or have had alcoholic beverages
Failure to do so may cause accidents, burns, low temperature burns and poor physical
health.
Individuals who fall under any of the following categories must consult a physician:
• People who are receiving medical treatment, particularly when they are aware of any
physical anomalies
• Persons with malignant tumours
• People who have an abnormality in their heart or cerebral nerve
• People who are conrmed to have lost temperature sensations
• People who are pregnant and people who have just given birth
• People with body temperature of 38C or higher (in fever stage) ( ※ Example 1: Period
with pronounced acute onset of symptoms (such as fatigue, chills, blood pressure variation, etc.); ※ Example 2: Debilitated).
• People who have contracted an infectious disease
• People with tactile perception disorder, or skin disorders
• People with acute (painful) conditions such as a fractured spine, strained or pulled
muscles
• People that need to remain rested
• People taking medication
• People with blood pressure abnormality
• People who are physically handicapped
• People who are unable to express their will on their own
• People with perceptual disorder due to serious peripheral circulation disorder (e.g. diabetic)
• People with a low body temperature
• People with circulatory disorders
• People who have experienced low temperature burns
• People who are allergic to gel pads
Failure to do so may cause accidents, burns, low temperature burns and poor physical
health.
5
Page 6
WARNING
Do not connect the product to any devices other than special gel pads or USB cables.
Furthermore, do not use any of the accessories with other products either.
Doing so can potentially lead to burns, as well as heating or short circuiting that can
cause accidents, re, other problems and malfunctions.
This product is intended for one person use only.
Do not use this product with more than one person.
Doing so can cause electric shocks and accidents.
Do not disassemble, repair or modify.
It will cause a re or electric shock.
Do not
disassemble
CAUTION
Do not use or store this product in the following locations:
• A place with direct sunlight
• Locations near heating devices, electric blankets, heated carpets, space heater and
other locations where the temperature is high.
• Places with high humidity (e.g. bathroom)
• Near water
• Locations with a lot of dust.
• Places with a lot of vibration
It will cause re, electric shock or malfunctions.
Do not use while sleeping.
Doing so can cause accidents, burns, low temperature burns and poor physical health.
Do not use the product immediately before or during operation of a car, motorcycle, bicycle and the like.
It will cause accidents or problems.
Do not leave the gel pad on your skin for a long period of time.
It will cause skin inammation.
Do not use the gel pad when it is wet.
It will cause an electric shock.
Do not use the product for more than 15 minutes per location (this includes alternating
modes between low frequency and heating).
Using the product for long hours can cause accidents, burns, low temperature burns
and poor physical health.
Do not use the product when two gel pads are overlapped.
Doing so can cause electric shocks and accidents.
Be sure to avoid cords becoming entangled on the neck when applying gel pads.
Doing so can cause accidents and injuries.
6
Page 7
Safety Precautions
(Be sure to always follow these precautions)
CAUTION
Please make sure the main unit and the gel pad are connected correctly and securely
before use.
Check that each operation button functions correctly before use.
Verify that the product operates normally and safely before use according to the operations described by the Instruction Manual when using the product for the rst time or if
the device has not been used for long hours.
If you feel any strong stimuli, rash, redness, itch or any abnormalities on your skin during use, stop using it immediately and consult a doctor.
It will cause accidents or health problems.
Be sure to prevent hands, ngers or any other parts of the body from coming into contact with a USB connector receptacle.
It will cause an electric shock, fault or malfunction.
Do not insert any metal object into a USB connector receptacle.
It will cause a re or heat generation.
Do not forcibly pull, bend, or place any heavy objects on top of the cable.
It can cause cable damage, disconnection, and lead to a re or electric shock.
Do not use a special USB cable when it is damaged, or when the USB connector insertion receptacle is loose.
It will cause a re or electric shock.
Do not charge it using a transformer such as a travel converter.
It will cause a re or heat generation.
Do not charge the product in a car using a cigar socket or the like.
It will cause a re or electric shock.
Do not touch a special USB cable or a gel pad with wet hands.
It will cause an electric shock, failure or accidents.
No wet
hands
Do not use a special cable for purposes other than charging the base unit.
A special USB cable must not be used for communication purposes or for charging of
other devices.
Securely insert the special USB cable to the root when charging.
If it is not inserted completely when charging, it might cause a re or electric shock.
Be sure to charge the product at least once in three month.
After it is completely discharged, charging might be impossible.
7
Page 8
Safety Precautions
(Be sure to always follow these precautions)
CAUTION
Stop using the product immediately and shut o power when a malfunction with the
device occurs or when there are damages or cable disconnection of gel pads. Contact
your retailer.
Do not pull on the electrode cord but instead hold the plug when removing a gel pad
from the base unit.
Doing so can cause electric shocks, accidents and malfunctions.
Do not store this product in a place where children can reach it.
Doing so can cause accidents. If a child swallows the main unit, consult a doctor immediately.
Do not submerge the main unit in water or any liquid, or let it become wet.
It will cause heat generation, bursting or a re.
Do not connect the product to any devices other than special gel pads or USB cables.
Furthermore, do not use any of the accessories with other products either.
Doing so can potentially lead to burns, as well as heating or short circuiting that can
cause accidents, re, other problems and malfunctions.
When disposing of this product, please do so in accordance with the regulations of your
municipality.
Remove contamination and store the device and accessories after use in a place with
little humidity.
8
Page 9
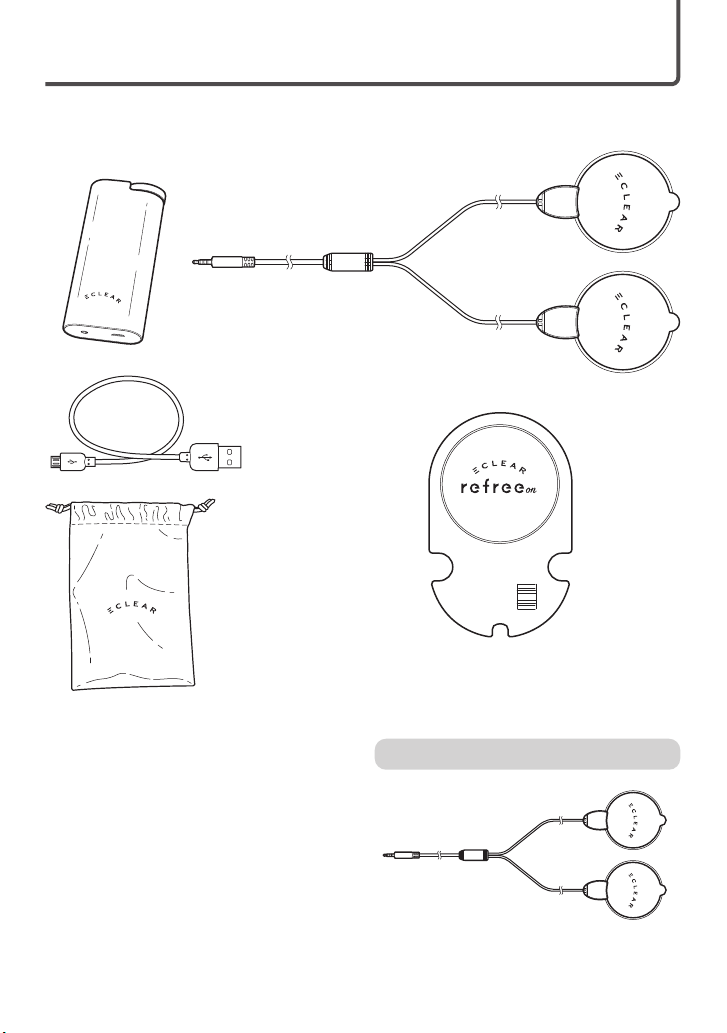
Package contents
Make sure there are no missing parts before use. Every eort has been made to ensure proper
packaging, however in the event any shortage or damage is discovered, contact the retailer
where the product was purchased.
Main Unit
Special USB Cable
Storage pouch
Gel Pads (consumables)
Protective plate
ECLEAR refree on
■ Separately Sold Accessories
Inquire the retailer for details on separately
sold accessories.
The following items are sold separately.
Instruction Manual (This document)
Gel Pad PH01 Model number: HCM-PH01G1
Gel Pads (consumables)
■
■
Accessories
・Instruction Manual x 1
・Protective plate x1
9
Page 10

Part names
■ Main Unit
Low frequency mode
Switch button
Heat button
LED light
Low Frequency lamp
Power lamp
Heat lamp
Intensity dial
Connection terminal (Main Unit side)
■ Gel pad
Plug
■ Dedicated USB cable
USB A connector
USB connector inserting slot (base unit side)
Electrode cord
USB micro-B connector
Pad section
10
Page 11

Preparation for Use
Be sure to charge the battery fully on rst use (following purchase or after a long period without
use) or if the batteries have run out during use.
1
Charging
Insert the USB micro B connector of a special USB cable to the USB connector
①
insertion receptacle on the base unit.
Connect the USB A connector of a special USB cable to the USB port described
②
below and turn on the power.
※ There is a beep sound when correct connection is established and the Power
lamp on the base unit starts to ash or tuns on.
Charging time: Approx. 2.5 hours
Power lamp
Remaining charge 0 to 29%: Red, ashing
Remaining charge 30 to 79%: Yellow, ashing
Remaining charge 80 to 99%: Green, ashing
100% (fully charged): Green, turned on
①
USB connector slot
■ When connecting to a personal computer
Use a USB2.0, USB3.0 or USB3.1 cable for personal computers that comply
with the IEC60950 standard
Dedicated USB cable
②
USB A connector
Dedicated USB cable
CAUTION:
• Charging the product using a transformer, such as a travel converter, can potentially cause heating or ignition of re.
• The product cannot be operated while charging.
• Repeatedly charging the base unit gradually shortens the duration of operating
time after a full charge. If the operation time becomes extremely short, the battery
has expired but it is not replaceable.
Once charging has been completed there is a beep sound and the Power lamp
③
stops ashing and remains turned on.
Once charged, remove the special USB cable by following the procedures described
above in the order of ②→① for safety.
11
Page 12

Connecting gel pad to main unit
2
Take gel pads out of the bag when using the product for the rst time
①
(Do not remove the protective lm on the gel pad yet.)
Verify that all LED lamps have turned o and that the power to the base unit has
②
been shut o.
Securely connect the plug on a gel pad to a connection terminal on the base unit.
③
LED light
O
Set dial to "○" position
CAUTION:
• Hold onto the plug and insert securely as far as it goes.
• Do not connect the product to any devices other than special gel pads.
Preparation for Use
■ When replacing a gel pad
Verify that all LED lamps have turned o and that the power to the base unit has
①
been shut o.
Remove the plug on gel pads from the base unit.
②
Take new gel pads out of the bag
③
(Do not remove the protective lm
on the gel pad yet.)
Securely connect the plug on a gel pad to a connection terminal on the base unit.
④
CAUTION:
Read the Instruction Manual of gel pads also when replacing gel pads.
12
Page 13

Placement of the gel pad
Hold and peel o the protective lm from gel pads
1
※ Use the pads by removing protective plates from the second use.
※ Peel o the protective plate slowly when removing a gel pad.
Attach the gel pads on locations of the body where an operation is desired.
2
Make sure the gel pad is rmly attached to your skin.
※ The power on the base unit automatically shuts o after a certain amount of time
when a gel pad is detached from the skin.
CAUTION:
Do not attach the gel pad over any metallic items such as a necklace or a body piercing. Do not use the product on parts of the body where a tattoo has been put on.
■ Handling of gel pads
• Do not touch the attachment surface of the gel pad. Follow the procedures described
in the section on "Servicing Gel Pads" ( ➡ P.21) when the adhesion of gel pads become weak.
• Do not bend the gel pad.
13
Page 14

Example of gel pad attachment
■ Low Frequency, Heat or Heat and Low Frequency Course
Attach the gel pads on following types of locations on the body.
Shoulder - trapezius muscle
Upper arm - brachial muscles
Arm - forearm exor muscle group
Upper and lower back - spinal column erector muscle
Thighs - hamstring muscle Calf - triceps muscle
Buttocks - gluteus maximus
CAUTION:
• Do not use the product simultaneously on the bottom of the left and right feet or in arrangement that puts the heart between two sites of applications when performing the Low Frequency Course or the Heated Low Frequency Course.
• Do not use the product when two gel pads are overlapped.
14
Page 15

Attach the gel pads to sandwich the joint.
Attach one on the bottom of a foot and the other on the calf or ankle of the foot.
※ Do not use the product simultaneously on
both feet.
■ For Heat Course
Attach gel pads for Heat Course by referencing following attachment examples aside from attachment examples for Low Frequency or Heated Low Frequency Courses.
Apply on left and right sides of the stomach Apply on left and right sides of the hips
Apply on the bottom of both feet Apply on the back of the neck
15
Page 16

How to use
Three courses, the "Heat Course", "Low Frequency Course" and "Heated Low Frequency Course"
are available with this product. There are ve modes that can be selected with the "Low Frequency Course" and the "Heated Low Frequency Course".
❷
Power OFF
❶
Standby
❸
Turning Power On (bring product to standby mode)
1
Turn the Intensity dial to the "-" position. A beep sound is emitted and the power is
turned on and the product enters the standby mode.
The Power lamp turns on in green.
※ In the event the Intensity dial is not at the " ○ " position, return it to the " ○ " position
rst and then turn on the power.
Using Low Frequency Course
2
Pressing on the Heat Course button while the Intensity dial is at the "-" position starts
by heat. The Heat lamp ashes.
Press the Heat Course button during an ongoing Heat Course to stop the Heat
Course and bring the product to a standby mode.
・ There is no temperature or mode switching feature with the Heat Course.
Intensity dial
Low Frequency
Course
Heat Course
Power lamp: Green, turned on
※ All three LEDs ash when the charge
level of the battery becomes low. No
buzzer is sounded on such instances.
In such cases, return the Intensity
dial to the "O" position and turn the
power off, then charge the product
before using.
❹
Heated Low
Frequency Course
❹
Heat button
16
Page 17

↓
+
-
↓
+
-
↓
+
-
↓
+
-
Using Low Frequency Course
3
Turn the Intensity dial clockwise from the "-" condition (standby mode) to start the
①
Low Frequency Course. The Low Frequency lamp ashes.
Select the desired strength from the 10 levels.
Turning the Intensity dial back to the “-” position terminates the Low Frequency
Course and brings the product to the standby mode.
Low frequency mode
Switch button
Modes can be switched while the product is in operation by pressing on the Low
②
Frequency Mode Switch button.
※ Start operation with the "System Selected" mode when the power is turned on.
・ The product mode switches in the manner described below, each time the Lowe
Frequency Mode Switch button is pressed. The number of buzzer beeps changes,
depending on the type of the mode.
Mode
Auto
Number of buzzer
sound emissions
1 time
Intensity dial
Movement
"Deep" → "Standard" → "Rhythmical"
→ “Solid" continuously cycles.
Deep
Standard
Rhythmical
Solid
2 times
3 times
4 times
5 times
Voltage
Voltage
Voltage
Voltage
17
Time
Time
Time
Time
Page 18

1分1分1分
1分
Using Heated Low Frequency Course
4
The low frequency and heat alternating switching can be applied.
The Low Frequency and Heat switches every minute.
1 minute
1 minute
1 minute
1 minute
Low
Frequency
Heat
Low
Frequency
Heat
■ Changes to the Heated Low Frequency Course when in Low Frequency Course
Press the Heat Course button during an ongoing Low Frequency Course to perform the
Heated Low Frequency Course.
Turn the Intensity dial clockwise from the "-" condition (standby state) to start with
①
Low Frequency.
Intensity dial
Low frequency mode
Switch button
Press the Heat button during an ongoing Low Frequency Course to perform the
②
Heated Low Frequency Course.
Low Frequency lamp: Flashing for Low Frequency Course and turned on for Heat Course
Heat lamp: Flashing for Heat Course and turned on for Low Frequency Course
Heat button
Levels and modes of Low Frequency can be changed just like the Low Frequency Course.
Turning the Intensity dial back to the "-" position during an ongoing Heated Low
Frequency Course terminates the Low Frequency component of the course only
and brings the product back to the Heat Course.
Furthermore, pressing the Heat button terminates the Heat Course component of
the course only and brings the product back to the Low Frequency Course.
18
Page 19

How to use
■ Changing to Heated Low Frequency Course while in Heat Course
Turn the Intensity dial clockwise during an ongoing Heat Course to perform the Heated
Low Frequency Course.
Pressing on the Heat button while the Intensity dial is at the "-" position starts by
①
heat.
Heat button
Turn the Intensity dial clockwise during an ongoing Heat Course to perform the Heated
②
Low Frequency Course.
Low Frequency lamp: Flashing for Low Frequency Course and turned on for Heat Course
Heat lamp: Flashing for Heat Course and turned on for Low Frequency Course
Intensity dial
Low frequency mode
Switch button
Levels and modes of Low Frequency can be changed just like the Low Frequency Course.
Turning the Intensity dial back to the "-" position during an ongoing Heated Low Frequency
Course terminates the Low Frequency Component of the course only and brings the product
back to the Heat Course. Furthermore, pressing the Heat button terminates the Heat Course
component of the course only and brings the product back to the Low Frequency Course.
Turning o
5
Return the Intensity dial to the " ○ " position to turn o power during an ongoing operation.
Furthermore, a beep sound is emitted and the power is shut o automatically when
about 15 minutes are elapsed since the start of an operation. In such cases, return
the Intensity dial to the " ○ " position.
Set the dial position
to "○"
LED light
O
・ Even when courses are switched during an ongoing operation, the power is
shut o once the total time of 15 minutes elapses.
・ A beep sound is emitted and the product operation is terminated when a gel pad
becomes detached from the body or a gel pad is removed from the base unit.
19
Page 20

6
How to use
Storing
Peel o the gel pad from the skin.
①
Pinch the grip of the gel pad and peel it o being careful not to touch the adhesive
surface.
Remove the plug on gel pads from the base unit and attach it to the protective
②
plate.
ECLEAR refree on
Wind electrode cords of gel pads onto the protective plate.
③
Place the bundle into the storage pouch provided for storage.
④
CAUTION:
Store the gel pad in a place free from direct sunlight, high humidity and high temperature.
20
Page 21

Care of this equipment
To care for the gel pad, disconnect it from the main unit.
■ Servicing gel pads
The gel pad needs to be cared for in the following situations:
• Gel pad has lost adhesiveness
• When stimulation during use has weakened
• When stimulation during use feels strengthened
• When the gel pad is dirty
• Gel pads do not stick to the protective plate
Replace the gel pad if you feel there is not enough/too much stimulus during use even after
caring for the gel pad.
Drip a few drops of water and rub with the ball of a nger to remove lifted contaminants
①
※ Do not pour too much water. It will cause loss of adhesive strength or damage to the ad-
hesive surface.
※ Do not scrape the surface with a nail or a brush.
※ Do not use any detergent or the like.
※ Prevent dripping water drops on a plug, electrode cord or handle.
Handle
Adhesive surface
Hold on the handle and thoroughly eliminate water and dry naturally with pad surface facing
②
up, ensuring that no water drop drips onto the handle.
※ With insucient drying, the adhesive strength becomes weak.
※ Never wipe the adhesive surface with tissue paper or a cloth.
※ Avoid direct sunlight.
■ Servicing base unit
• When the main unit is dirty, wipe it with a dry soft cloth.
CAUTION:
Take care not to allow water etc. to enter the Main Unit or the USB connector port.
21
Page 22

How to store
Store this product in an environment meeting the following conditions:
Storage temperature: -10°C to 60°C
Storage humidity: 20 - 85% RH
■ Precautions for servicing and storing
• Do not use benzine or paint thinner when caring for the
product.
• Do not store this product in any of the following places:
— A place with direct sunlight
— Locations with high temperature, high humidity, near water
or a lot of dust.
— A place with high vibration
— A place where chemicals are stored or an environment with
corrosive gas
• Keep this product away from children.
• Fully charge the product and store it in a location with normal
temperature (10 to 30°C) as much as possible when not using the product for many hours.
• Charge the product at least once in three months. Leaving
the product completely discharged may render it incapable of charging.
Paint thinner
Benzine
Alcohol
Nail polish
remover
Checks concerning care
Do you
notice any
of the
following?
Inspect the thermal low frequency equipment used for many years.
●
During charging or operation there
are unusual sounds or vibrations
●
The Main Unit is abnormally hot
●
The Main Unit shows changes in
shape or gives o a burning smell
22
To prevent accidents, turn o
Stop
the power or pull out the dedicated USB cable and contact
use
the distributor for a check up.
Page 23

Disposal
■ Request about recycling of lithium ion batteries
A lithium ion battery is included in this product. It is a recyclable, valuable resource, so please recycle. When disposing, follow the instructions from your
local municipal government.
• Do not disassemble the battery when disposing.
• Do not dispose this product as household waste.
The destroyed lithium ion battery inside a garbage truck causes a
short-circuit and may lead to a re or heat generation.
23
Page 24

■ Removing lithium ion battery
⑥
Do not disassemble this product unless you are disposing of it.
The procedure described below outlines the steps taken to dispose of the
WARNING
●Fully discharge the battery.
●Disassemble the product in the following manner with a screw driver.
Peel o the sticker on the Intensity dial.
①
Remove the screw that is securing the Intensity dial.
②
Remove the screws that are securing the base unit.
③
Insert a minus screwdriver in the location de-
④
scribed in the figure and gradually pry open
the entire circumference.
※ The case has been glued together, so force
must be gradually applied with the minus
screwdriver to pry open the product.
Take out the battery from the case, still mounted
⑤
on the substrate.
Cut o the negative black cord from battery,
⑥
located on the reverse side of the substrate,
using a pair of cutting nippers.
Remove the battery
⑦
product and is not intended for repairs. If you disassemble this product on your
own, the functions will not be maintained and may cause failures or accidents.
④
①
③
Disposal
②
⑦
⑤
● On the removed battery, place a piece of tape on the terminals to isolate them, paying attention not to shirt-circuit the + and ⊖ terminals.
24
Page 25

Troubleshooting
Trouble Cause Solution
Does not turn on Battery is not charged fully
The power quickly cuts
o
All three LEDs are
ashing
Power goes o during
use
All three LEDs are
ashing
The device cannot be
charged
or there is no power left in
battery
During charging Once the battery has been
Turn o the power and charge the battery.
If the product still does not operate, there is malfunction inside
the product.
Stop using the product and contact your retailer.
Battery is not charged fully
or there is no power left in
battery
Main unit and gel pad are
not connected correctly
to each other
Gel pad is not attached to
skin correctly
Battery has discharged
after a long period of
storage
Dislodged special USB
cable
Turn o the power and charge
the battery. ➡ P.11
charged, remove the special
USB cable before using the
product. ➡ P.11
Turn o the power and charge
the battery. ➡ P.11
Turn the power off and securely
insert the plug on the gel pads
as far as it goes. ➡ P.12
Turn o the power then attach
the gel pad to your skin
correctly. ➡ P.13
Cannot be used. Charge the
product at least once in about
three months to prevent a
complete discharge. ➡ P.11
Connect the special USB cable
➡ P.11
25
Page 26

Trouble Cause Solution
Gel pads do not stick to
the skin
Gel pad adhesive surface
peels o or slides out of
position
There is no feeling
of stimulation or the
stimulation is weak
Transparent protective
lm is not removed from
the adhesive surface of
the gel pad
The adhesive surface of
the gel pad has become
dirty
It is being used
immediately after washing
with water
Adhesive surface of the
gel pad is damaged
Excess amount of sweat
or water on adhesive
surface of gel pad
Gel pad is not attached to
skin rmly
Gel pads have been
placed overlaying each
other
The adhesive surface of
the gel pad has become
dirty
Remove the transparent protective
lm from the adhesive surface of
the gel pad. ➡ P.13
Drip a few drops of water and rub
with the ball of a nger to remove
lifted contaminants. ➡ P.21
Shake o the excess water and
air dry the adhesive surface.
➡ P.21
The gel pad is a consumable. Stop
using it when the adhesive surface
is damaged and purchase another
gel pad. ➡ P.9
The gel pad is a consumable. Stop
using it when the adhesive surface
is damaged and purchase another
gel pad. ➡ P.9
Apply gel pads on the skin by
establishing sealed contact on
the skin. ➡ P.13
Attach it being careful not to
overlap with another gel pad.
➡ P.14
Drip a few drops of water and
rub with the ball of a nger to
remove lifted contaminants.
➡ P.21
Gel pad is not connected
correctly
Level is set to “Weak” Adjust the level. ➡ P.17
It is not charged enough
or the battery is out of
power
Securely insert the plug on the
gel pads into the base unit, as
far as it goes.
Charge the battery. ➡ P.11
26
Page 27

Troubleshooting
Trouble Cause Solution
There is no feeling
of stimulation or the
stimulation is weak
The skin becomes
red or there is
tingling irritation of
skin
Pads do not warm up
even when the product
is set to the heat mode
Pads are too hot.
Burning smell comes out
of a pad
Adhesive surface of
the gel pad is dirty or
damaged
Used for too long Use for up to 15 minutes on any
Gel pad is not attached to
skin rmly
Adhesive surface of the
gel pad is dirty or dry
Adhesive surface of the
gel pad is damaged
One of the gel pads has
come o the skin
An electrode cord is
disconnected or shorted.
The gel pad is a consumable. Stop
using it when the adhesive surface
is damaged and purchase another
gel pad.
➡ P.9
single location, then peel o the
gel pad after use. ➡ P.20
Apply gel pads on the skin by
establishing sealed contact on
the skin. ➡ P.13
Drip a few drops of water and
rub with the ball of a nger to
remove lifted contaminants. ➡
P.21
The gel pad is a consumable. Stop
using it when the adhesive surface
is damaged and purchase another
gel pad.
➡ P.9
Seal both gel pads securely on
the skin.
Stop using the product
immediately and replace the gel
pad.
The product does not
stop automatically when
a gel pad is dislodged
The device may be
malfunctioning.
27
Stop using the product and
contact your retailer.
Page 28

Product specications
Series model number HCM-PH01
Rated input voltage DC 5V
Internal battery Lithium ion battery (2,600 mAh*1, *2)
Service life Approximately 5 years (according to our measurements) *3
Charging time Approximately 2.5 hours *4
Operating time Approximately 2.5 hours (with full charge) *5
Maximum output current 10 mA or less
Rated output voltage Approximately 60 V
Fundamental frequency Approximately 2.7 to 1,200 Hz
Output pulse width Approximately 45 to 200 μs
Power consumption
Timer Approximately 15 minutes
Main unit dimensions Approximately W 26mm x D 48 mm x H 97 mm
Main Unit Weight Approximately 100 g (not including gel pad)
Operating temperature /
humidity
Storage temperature /
humidity
Accessories
Special USB cable length Approximately 20 cm
Gel pad electrode cord
length
Approximately 3.8 W (heating heater) / Approximately 0.3 W
(low frequency)
0℃ to 40℃ /20 to 85% RH
-10℃ to 60℃ /20 to 85% RH
Approximately 110 cm
* 1 According to JIS C 8711.
* 2 Excessive charging, discharging and excessive voltage protection functions built in.
* 3 Rough standard when charged twice weekly.
* 4 Rough standard when fully charging depleted battery.
* 5 Varies depending on operating details and operating environment.
28
Page 29

ELECOM CO., LTD.
www.elecom.co.jp/global/
ELECOM Korea Co., Ltd.
5F Suam Bldg. 1358-17, Seocho2-dong,
Seocho-gu, Seoul 137-862, Korea
TEL : +82 (0) 2 - 1588 - 9514
FAX : +82 (0) 2 - 3472 - 5533
www.elecom.co.kr
新宜麗客 ( 上海 ) 商貿有限公司
上海市徐汇区肇嘉浜路
+86 (0) 40 - 0867 - 3568
電話 :
www.elecom.cn
1065甲号1603H
室
• ELECOM CO., LTD. owns the copyright of this manual.
• Duplicating and transferring this document in part or whole is prohibited.
• The specication or appearance of this product might be changed without prior notice to improve
the product quality.
• ELECOM is not responsible for any damage to, or failure of other devices caused by using this
product.
• To export the part of this product applicable to strategic goods or services, export or service
trading permission according to foreign currency laws is necessary.
• All products and company names on the product and the package are trademarks or registered
trademarks of their respective holders.
A customer who purchases outside Japan should contact the local retailer in the country of purchasefor enquiries. In
“ELECOM CO., LTD. (Japan)”, no customer support is available forenquiries about purchases or usage in/from any
countries other than Japan. Also, no foreign language other than Japanese is available. Replacements willbe made
under stipulation of the Elecom warranty, but arenot available from outside of Japan.
ECLEAR refree on
Instruction Manual For use in Hong Kong and Philippines
1st edition, December 19, 2017
©2017 ELECOM Co., Ltd. All Rights Reserved.
ELECOM Sales Hong Kong Ltd.
2/F, Block A, 2-8 Watson Road,
Causeway Bay, Hong Kong
TEL : +852 2806 - 3600
FAX : +852 2806 - 3300
email : info@elecom.asia
ELECOM Singapore Pte. Ltd
33 UBI AVENUE 3 # 03-56.
VERTEX SINGAPORE (408868)
TEL : +65 6347 - 7747
FAX : +65 6753 - 1791
29
MSC-HCM-PH01-HK_eng_ver.111
 Loading...