

Page 1
ECLEAR LEANUP
Instruction Manual
HCT-BTP01 series
A customer who purchases outside Japan should refer to the
localized manuals in the country of purchase.
www.elecom.co.jp/global/download-list/manual/
Thank you for purchasing Eclear leanup.
This Instruction Manual features operating methods, as well as precautions for safe handling of
the product.
Be sure to read this Instruction Manual prior to using the product. Store this Instruction Manual
for safekeeping once you have finished reading.
For use in Japan only.
Created: May 2018 (1st Edition)
Page 2
Advantages of the product
This product is an EMS product that supports Bluetooth® connection. You can install
the dedicated app on your smartphone or other device, and use this product via the
app for workout.
All recommended workout moves are displayed in the app and are easy to learn.
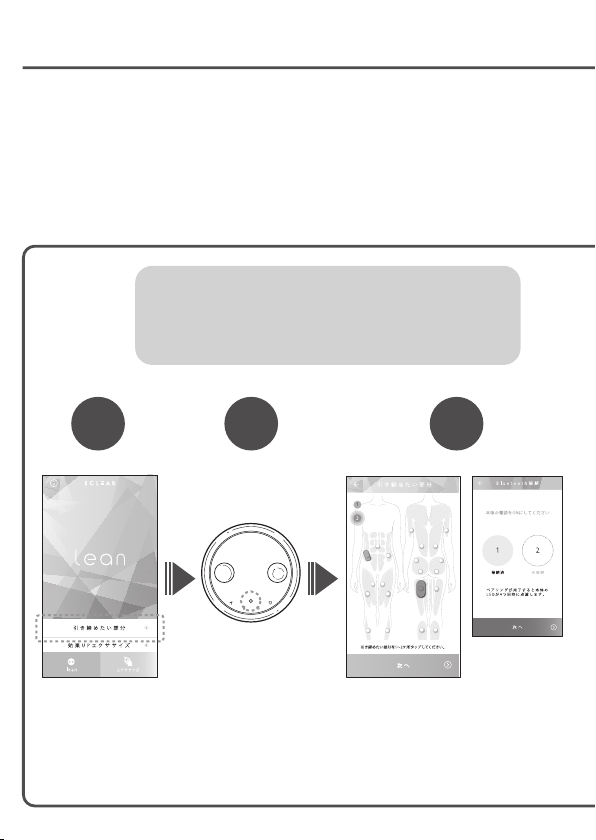
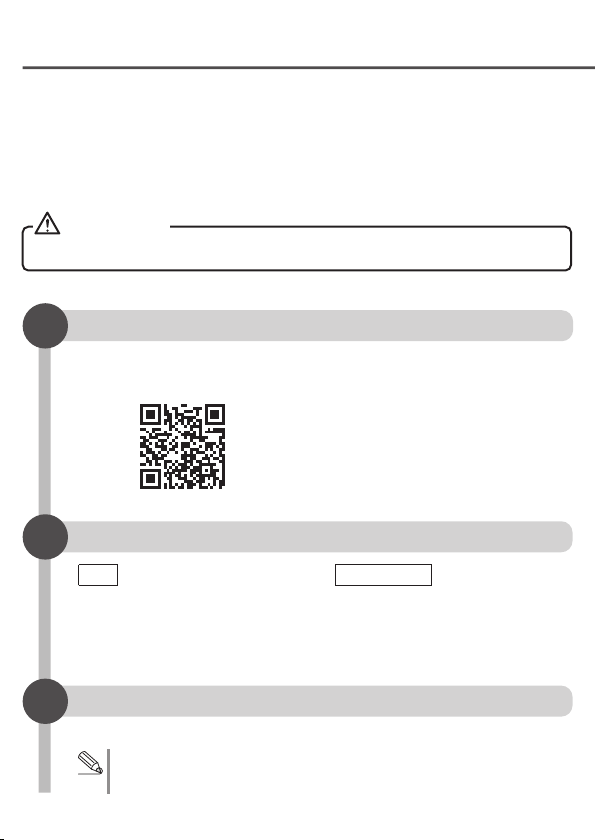
Simple four-step operations via the app
®
Ensure that the Bluetooth
※
laptop is set to ON
on your smartphone/
Step
1
Select "
引き締めた
(place(s) to
い部分
be toned)"
Due to continuous version upgrades, specifications are subject to change without notice
※
Step
2
Power ON
(long press)
Select one or two
places for toning
2
Step
3
When
※
unconnected
to the main
unit, the pairing
settings
interface is
displayed.
Page 3
Contents
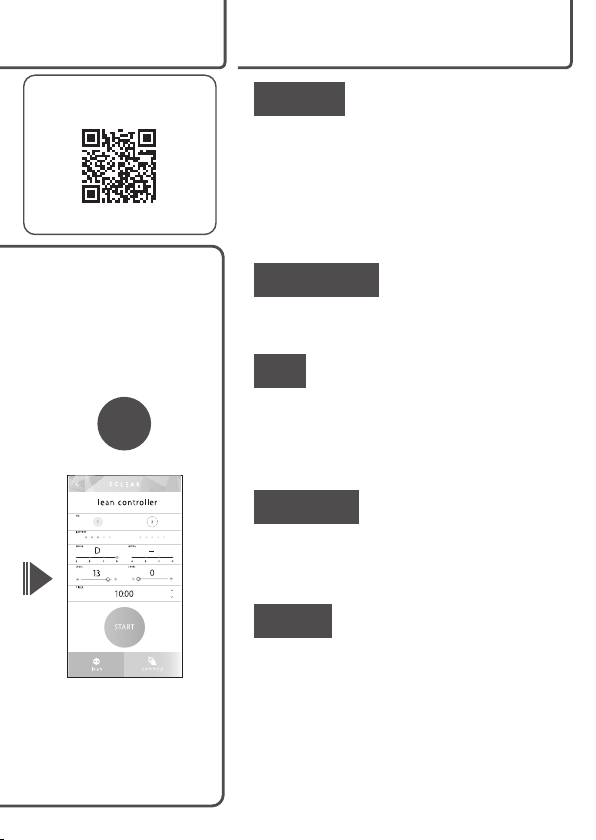
Workout app
ECLEAR APP
Download here
Step
4
Set the intensity and
timer, and then start
Preface
About the product ...................................4
Safety precautions (Important) ..............5
Precautions for cordless (Wireless)
security..................................................... 9
Package contents ................................. 10
Names of individual components ........11
Preparation
Charging................................................. 12
Attaching the gel pad............................ 14
Use
Basic operations ................................... 16
Using the dedicated app "ECLEAR
APP" ....................................................... 18
Examples for applying gel pads...........23
After Use
Storing .................................................... 26
Maintenance ..........................................27
How to store ..........................................28
Others
Disposing ...............................................29
Troubleshooting..................................... 30
Product specifications.......................... 33
3
Page 4
About this product
What is EMS?
■
EMS, short for Electrical Muscle Stimulation, is a product that stimulates
mechanical movements of muscles through electrical stimulation to achieve a
workout result.
What is deep layer frequency?
■
The deep layer frequency is a high frequency in the range of 2,000 to 5,000 Hz.
The higher the frequency, the more body parts where fat has accumulated can
be stimulated. The core muscles of the body that are normally hard to stimulate
can be stimulated.
What is relaxation frequency?
■
The relaxation frequency is a low frequency in the range of 20 to 30 Hz. By
relaxing the muscles contracted by the deep layer frequency, you can train for
long hours without exhausting your muscles.
Stretching
■
By using this product while your muscles are stretched, you can train
hard-to-stretch tendons and improve flexibility.
Dedicated app
■
By pairing this product with a smartphone using Bluetooth®, you can use up to
two products with the dedicated app. This product can also be used without
the dedicated app.
Recommended operating time
■
Use the gel pad on one place in one day, for about 30 minutes. Do not use this
product for a long time since it might cause injury.
Set the product timer. The product will automatically power off 15 minutes after
the workout started.
CAUTION:
Do not use this product when you are exercising vigorously.
Moisture in sweat may cause skin inflammation or the gel pad to lose
adhesive strength.
4
Page 5
Safety precautions (Important)
To avoid injury and property damage to the user and other people, comply with the
following instructions:
■ The categories of degree of damage or risk caused by failing to following these
instructions are as follows:
Preface
DANGER
WARNING
CAUTION
This symbol indicates a prohibited action.
These images indicates "compulsory" items that must be performed.
This symbol indicates a high probability of death or serious injury.
This symbol indicates a probability of death or serious injury.
This symbol indicates the possibility of bodily harm or damage to
property.
DANGER
Never use this product together with the following medical equipment:
• Internally implanted electronic devices such as pacemakers
• Electrical life support devices such as artificial hearts and lungs
• Wearable medical electrical devices such as an ECG
If used with the product, these types of medical devices may malfunction and
endanger life.
WARNING
The following people must not use this product.
• People suffering venous thrombosis or arterial thrombosis
• People who a doctor has instructed not to exercise
• Pregnant women
• People with telangiectasia due to prolonged use of steroid hormone drugs or
hepatic dysfunction
Do not use this product in the following cases.
• The skin near the gel pad(s) is painful • When drinking alcohol or smoking
• When you are extremely tired • During sleep or when taking a shower
Do not use the product for any other purpose than working out.
Otherwise, accidents and problems may occur.
5
Page 6
WARNING
Do not use this product on any of the following body parts:
• Chest and other parts near the heart; parts above the neck such as the head and face
• Mucosal surfaces such as wounds, eyes, mouth and genitals
• Areas where plastic surgery has been performed
• Where metal, plastic or silica gel is implanted
• Spine • Areas with tattoos • Abdomen (during menses)
• Parts where necklaces and watches are worn, or puncture sites
Do not let children use the device. Do not let children play or step on top device's
main unit or gel pads.
Doing so risks accidents or injuries.
Check for damage, chipping or deformation of the gel pad surface before use.
Otherwise, an accident, fault or malfunction may occur.
Turn off the power before connecting or removing the main unit and gel pads, and
before repasting or removing the gel pads.
You must consult your doctor before using the product if any of the following
conditions apply:
• You are undergoing treatment or suffering a health condition
• Malignant cancer • Heart or cranial nerve abnormalities
• Your temperature is above 38℃ (fever)
※
Example 1: Acute onset of symptoms (e.g. fatigue, chills and blood pressure
fluctuation)
※
Example 2: When feeling weak
• Infectious disease • Dermatological issues
• Acute pain, e.g., spinal fractures, contusions, or pulled muscle
• You are convalescing • Taking medication • Abnormal blood pressure
• Impaired mobility
• Impaired perceptual disability due to severe peripheral circulatory disorder caused by
diseases such as diabetes
• Low body temperature• Circulatory problems
• Your skin reacts badly to gel pads
• Epilepsy
Otherwise, accidents or discomfort may occur.
Do not disassemble, repair or modify the product.
Otherwise, a fire or electric shock may occur.
Do not
disassemble
This product is intended for use by one person only. It cannot be used by multiple
people at a time.
Otherwise, an electric shock or accident may occur.
6
Page 7

CAUTION
Do not use or store the product in the locations described below.
• Areas exposed to direct sunlight
• Places near a heating device or other high-temperature unit
• Where humidity is high such as bathrooms
• Wet places • Dusty environments • On vibrating surfaces
Otherwise, fire, electric shock or malfunctions may occur.
Do not use while sleeping.
Doing so risks accidents or injuries.
Do not use immediately before driving or while driving.
Otherwise, accidents and problems may occur.
Do not leave the gel pads attached on the skin for a long time.
Otherwise, inflammation of the skin may occur.
Do not use a damp gel pad.
Otherwise, an electric shock may occur.
Use the gel pad in one place only on the same day. Do not use it for more than
30 minutes.
It may cause accidents or discomfort.
Do not use it on more than two locations at the same time.
It may cause accidents or discomfort.
Ensure the main unit and gel pad are connected correctly and securely before use.
Do not use the device until you are sure that all operation buttons are working
normally.
When using the device for the first time or after storing a long time, follow the
instruction manual. Before use, check that the device is working.
If you feel any discomfort or skin irritation such as eczema or redness or itching,
stop using the device immediately and consult a specialist.
It may cause accidents or discomfort.
Do not touch the USB port with your hand, finger or any other body part.
Doing so may cause an electric shock, fault or malfunction.
Do not insert metal objects into the USB port.
This may cause heating and fire.
Preface
7
Page 8
CAUTION
Do not pull, bend or place a heavy object on top of a cable.
Otherwise, the cable may be damaged, and a fire or electric shock may occur.
Do not use a special USB cable when it is damaged, or when the USB
connector insertion receptacle is loose.
Otherwise, a fire or electric shock may occur.
Do not use a travel converter or other transformers to charge the product.
It may cause heating and fire.
Do not charge the device using a vehicle's cigarette lighter.
Otherwise, a fire, heating or electric shock may occur.
Do not touch the special USB cable or gel pad with wet hands.
Otherwise, an electric shock, malfunction or accident may occur.
No wet hands
The attached dedicated USB cable is for charging the main unit only.
The dedicated USB cable cannot be used for communications or charging
other devices.
If you are charging it with a commercial charger using an AC power supply, read
the charger's instruction manual thoroughly and follow the safety instructions.
When charging, insert the dedicated USB cable all the way.
Otherwise, a fire or electric shock may occur.
Charge the product at least once every three months.
The product may not be able to charge if it is fully discharged.
If any failures occur, stop using it immediately and turn it off. Contact the
distributor or our information center.
Keep the device away from children.
Otherwise, accidents may occur. If a child swallows the main unit, consult a
specialist immediately.
Do not pour water or any other liquid into the main unit. Do not let the main
unit get wet.
Otherwise, heating, cracks or fire may occur.
Follow local disposal requirements to dispose of the product.
Attach the gel pad onto the skin securely.
The main unit will automatically power off when the gel pad is removed from
the skin.
The gel pad cannot securely attach to body hair and doing so will age the gel pad.
8
Page 9
Precautions for cordless (Wireless) security
This product is a radio device that uses the 2.4 GHz band, which does not
conflict with the frequency of detecting moving objects. FH-SS is adopted, and
the interference distance is 10 m.
Medical devices and WLAN devices under IEEE802.11b/11g/11n also use
2.4 GHz.
Before using this product, ensure no other radios※ are operating nearby.
•
If a radio wave causes interference between this product and another
•
radio※, move to another location or stop using the product.
※ Other radios include industrial, scientific, and medical devices that use 2.4 GHz;
other radio stations of the same type; internal radio stations used in assembly
lines; environments for detecting mobiles objects that require a license;
specific low-power radio stations that require no license; and amateur radio
stations.
WARNING
Do not use this product on a machine that may have significant adverse
•
effects due to misoperation. This product may malfunction, slow down
or not react if it is interrupted by an external electromagnetic wave at
the same frequency or one generated by a mobile phone.
• Do not use this product in places where electromagnetic waves are
pr
ohibited such as hospitals. The electromagnetic waves generated
from this product may affect electrical devices and medical equipment
such as pacemakers.
•
This product cannot be used in an airplane cabin according to aviation
law, as it may compromise the safe running of the aircraft. Power off
the main unit before boarding. Do not use the product during a flight.
※
ELECOM assumes no liability for accidents and danger to the public
arising from product malfunctions.
Preface
9
Page 10

Package contents
Make sure there are no missing parts before use. We've done everything
possible to ensure the quality of packaging. In case of missing components or
damaged packaging, please immediately contact the dealer or ELECOM
one-stop shop (P.35).
Main unit type: HCT-BTP01
■
Main unit × 2
■
(Ivory white/Gray)
Accessories (Sold Separately)
■
Inquire the retailer for details on separately sold accessories.
The following items are sold separately.
Twin pad (2 pieces)
Twin pad × 2
■
(consumable)
Gel pad
■
Twin pad × 2 (consumable)
•
Core pad × 1 (consumable)
•
Accessory
■
Instruction Manual × 1
•
Accessory
■
Instruction Manual × 1
•
Storage sheet × 1
•
Storage bag × 1
•
Dedicated USB
•
cable × 1
SN: HCT-BTP01G1
SN: HCT-BTP01G1
Storage sheet × 1
•
Core pad (1 piece)
Core pad × 1
■
(consumable)
Used for HCT-P01 series gel pads only.
Twin pad (2 pieces) SN: HCT-P01G1
Core pad (1 piece) SN: HCT-P01G2
Accessory
■
Instruction Manual × 1
•
10
SN: HCT-BTP01G2
SN: HCT-BTP01G2
Storage sheet × 1
•
Page 11
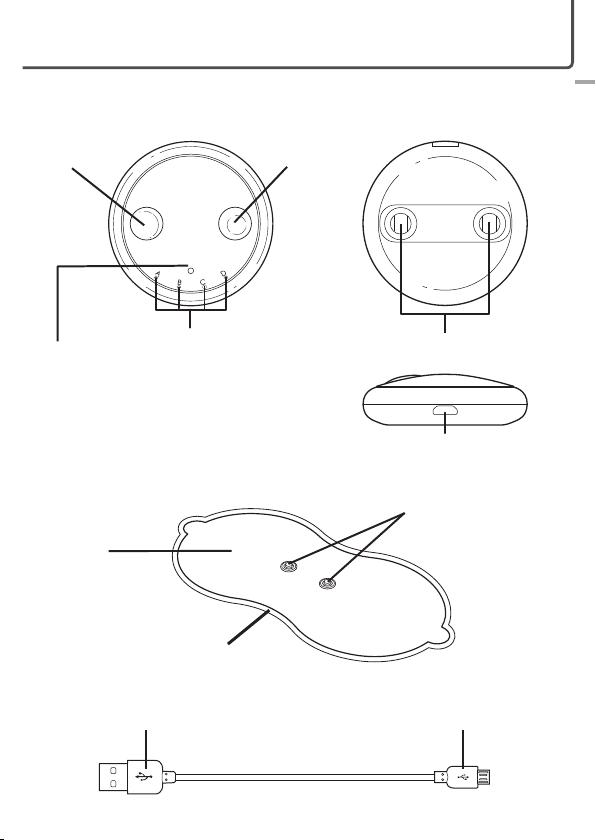
Names of individual components
Main Unit
■
Concave
"Weak" button
Front side Back side
Convex
"Strong" button
Preface
Power button
(switch mode button)
Gel pad
■
When using the core pad
※
Gel Pad
Dedicated USB Cable
■
LED light
Protective film
USB A port USB micro B connector
Connection terminal
(Main Unit side)
USB port (for charging)
Connection terminal (gel pad side)
11
Page 12

Charging
Before using the product (not long after purchasing or if it is has not been used for a long
time) or in case of a low battery during use, fully charge the product. (Charging time:
Approx. 2.5 hours)
① Connect the USB micro B connector of the dedicated USB cable to the
USB port of the main unit.
② Connect the USB A connector of the dedicated USB cable to the USB port
of a computer or AC charger to connect to the power supply.
③ It makes a long beep when charging is completed.
USB micro B connector
①
USB connector slot
Hotel mobile phone charging services and
other methods are also supported
LED
The pattern of LED changes depending on the remaining amount of battery.
[0 to 24%] [25~49%]
Dedicated USB cable
PC
②
USB A port
AC adapter
for charging
[50~74%]
A blinks
[75~99%] [Fully charged]
D blinks, A, B, and C
are continuously lit
continuously lit
A, B, C and D are
all continuously lit
B blinks, A is
12
C blinks, A and B are
continuously lit
Off
Continuously lit
Blink
Page 13

CAUTION:
• Use the 5V AC charger that has an USB output.
• Do not use a travel converter or other transformer to charge the
product, as it may cause it to heat up or start a fire.
• The product cannot be operated while charging.
• Certain mobile power supplies may not be suitable for charging.
• After repeated charging of the main unit, the time a full charge lasts
will gradually shorten. If the operation time becomes extremely short,
the battery has expired but it is not replaceable.
Preparation
13
Page 14

Attaching the gel pad
Install the gel pad onto the main unit
1
① Take the gel pad out from the bag the first time you use it.
(Do not remove the protective film from the gel pad yet.)
② Make sure that the main unit is powered off (LED indicator is off).
③ Connect the gel pad terminal to the main unit until you hear a click.
CAUTION:
Use only gel pads specified by ELECOM.
When replacing the gel pad
■
① Remove the main unit from the gel pad.
② Take a new gel pad out from the package.
(Do not remove the protective film from the gel pad yet.)
③ Turn OFF the power supply to the main unit and ensure the
LED indicator is off.
④ Connect the gel pad terminal to the main unit until you hear a
click.
14
Page 15
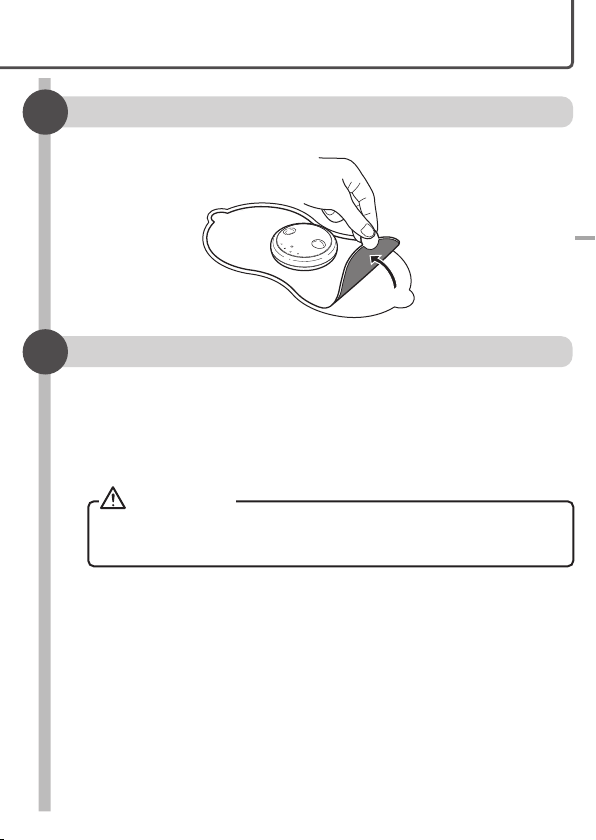
Removing the protective film
2
Hold the grip on the protective film of the gel pad and peel it off.
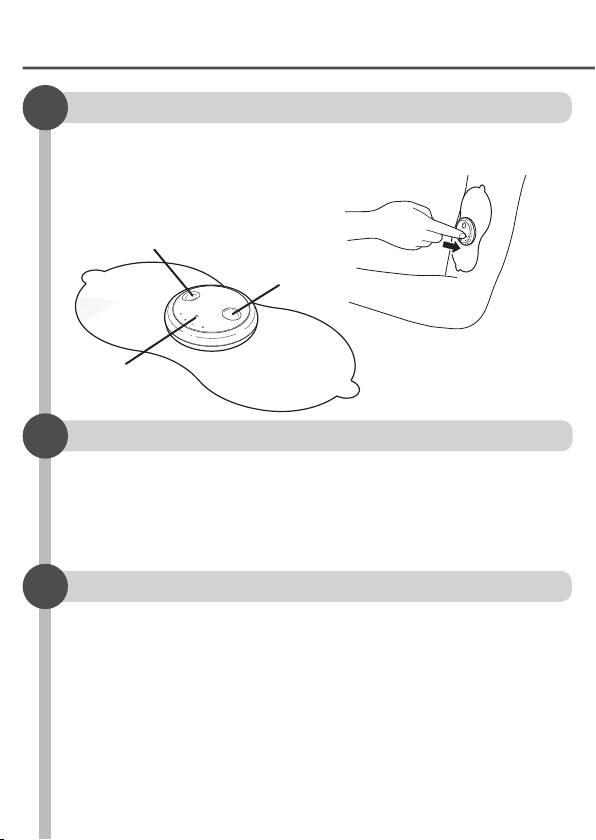
Attaching the gel pad
3
Attach the gel pads to the desired body parts.
Attach the gel pad onto the skin securely.
※ If the gel pad separates from the skin, or the main unit is removed
from the gel pad, the device automatically powers off.
CAUTION:
Do not place the gel pads on top of metal, such as a necklace
or navel piercing. Do not apply gel pads on tattoos.
Handling Gel Pads
■
• Do not touch the surface of the attachable side on gel pads. If
you have trouble applying the gel pads, refer to "Gel Pad
Maintenance" (P.27).
• Do not bend the gel pads.
• When using two products at the same time, ensure they do not
overlap.
※ After the second time, remove from the storage sheet before use.
Preparation
15
Page 16
Basic operations
Turning the power on
1
When the gel pads are applied on the skin, long press the power button to
turn on the power. A beep will sound and you can start your workout.
The LED light turns on.
Concave "Weak" button
Power button
Switching mode
2
2
When the product is running, press the power button to switch mode.
※ When the power is connected, the product always starts in mode A.
• It beeps every time you press the power button and the mode changes.
It makes a long beep sound when it returns to mode A.
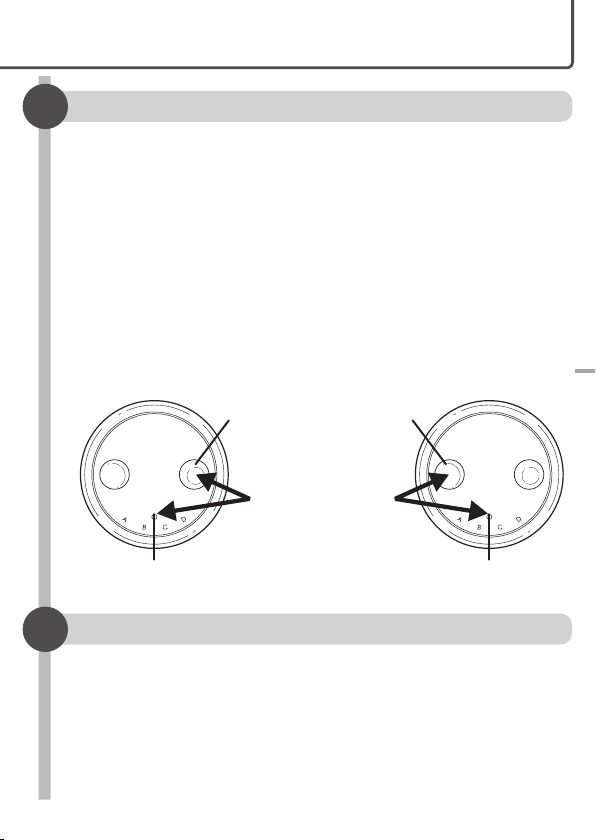
Adjusting the training level
3
You can choose the desired intensity from fifteen levels.
※ When connecting to the power supply for the first time or when changing mode,
the intensity setting is "1".
• Press the convex "Strong" button. A "beep" is generated, and the intensity
setting increases by 1.
• Press the indented button. A "beep" is generated, and the intensity setting
decreases by 1.
• If you press the convex "Strong" button when the intensity setting is at "15" or
pressing the concave "Weak" button when the intensity setting is at "1", a beep
will be heard but the intensity level will not change.
Convex
"Strong" button
"A→B→C→D→A→…"
16
Page 17
Setting the operation sound
4
The buzzer can be turned on/off as required.
• If the concave "Weak" button is pressed at the same time, two
"beeps" will sound, indicating that all sound has been muted.
• If the convex "Strong" button is pressed at the same time, two
"beeps" will sound, indicating that all sound has been muted.
※ For security reasons, sound is generated for certain operations even
in mute mode. This is not a fault.
※ If you accidentally mute the system, you can press the convex "Strong"
button and the power button at the same time to turn on the sound.
Beeping sound ON Beeping sound OFF
Convex
"Strong" button
Pressing at
the same time
Power button Power button
Turning the Power Off
5
About 15 minutes of starting, a "beep" sounds and the product
powers off automatically.
• You can long press the power button, the convex "Strong" button or
the concave "Weak" button to turn off the power during a workout.
※ When the gel pad is removed from the skin or the main unit, the power
turns off automatically.
Concave
"Weak" button
Pressing at
the same time
17
use
Page 18
Using the dedicated app "ECLEAR APP"
Please use the dedicated "ECLEAR APP" to activate and use the product.
Although this product can be used separately, you are advised to download the
dedicated app on your smartphone or laptop to get full access to its features.
Install "ECLEAR APP"
■
Install "ECLEAR APP" on your smartphone or other device.
CAUTION:
Downloading the app using a data connection may incur fees.
Access the "ECLEAR APP" download page
1
Two methods are available.
A Scan the QR code to visit B Enter the URL in the browser
http://app.elecom.co.jp/eclear/
Windex.html
※ Please confirm the latest terminal device and
the operating system on the download page.
Download "ECLEAR APP"
2
iOS: Android OS:
Click [Download iOS version]
The APP Store download page is
displayed.
Click [Download Android version].
The Google Play download page
is displayed.
Install "ECLEAR APP"
3
Follow prompts on the page to install "ECLEAR APP".
For details about how to use and set the "ECLEAR APP", refer to
the help pages of the "ECLEAR APP".
18
Page 19
Using the Dedicated "ECLEAR APP"
■
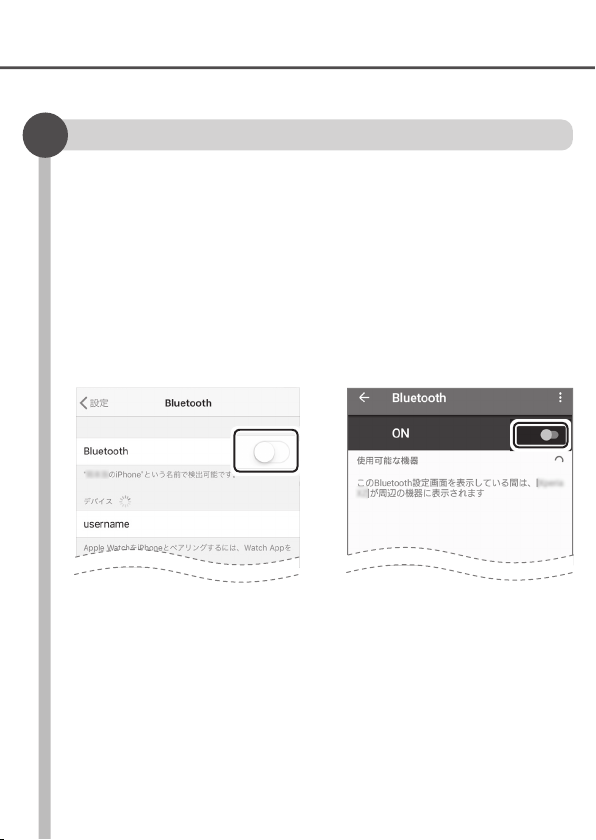
Paring phone and product
1
On a smartphone with the dedicated "ECLEAR APP" installed, pair the
smartphone with the product using Bluetooth®.
For details, refer to the smartphone user manual.
■
iOS
Android OS
■
(For example, iOS 11.2) (For example, Android 7.0)
Choose [Settings] -
①
[Bluetooth]. In the Bluetooth
page, set [Bluetooth] to "ON".
Pairing should be completed using the dedicated "ECLEAR APP"
19
Choose [Settings] -
①
[Bluetooth]. In the Bluetooth
page, set [Bluetooth] to "ON".
Page 20
Using the dedicated app "ECLEAR APP" (Continued)
Starting the dedicated "ECLEAR APP"
2
Tap the icon.
Starting the Dedicated "ECLEAR APP".
For details about how to use the dedicated
"ECLEAR APP", refer to the help pages of
"ECLEAR APP".
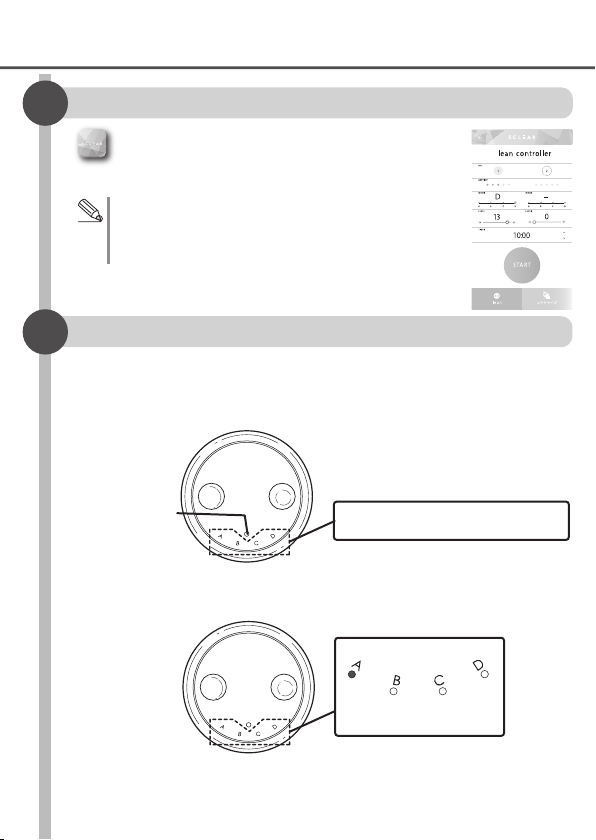
Pair the product with a smartphone.
3
① When the power button is pressed, the power supply will be
connected, which is indicated by a "beep".
• The pairing enters standby status, and the LED blinks in the sequence
of "A→B→C→D→A→…".
Power button
• After the gel pads are applied to the skin and when the power button is
pressed, the A LED will light up, indicating pairing standby status.
※ Before successful pairing, workout at intensity level 1 in mode A.
20
Blinks in the sequence of
"A→B→C→D→A→…"
Aislit
Page 21
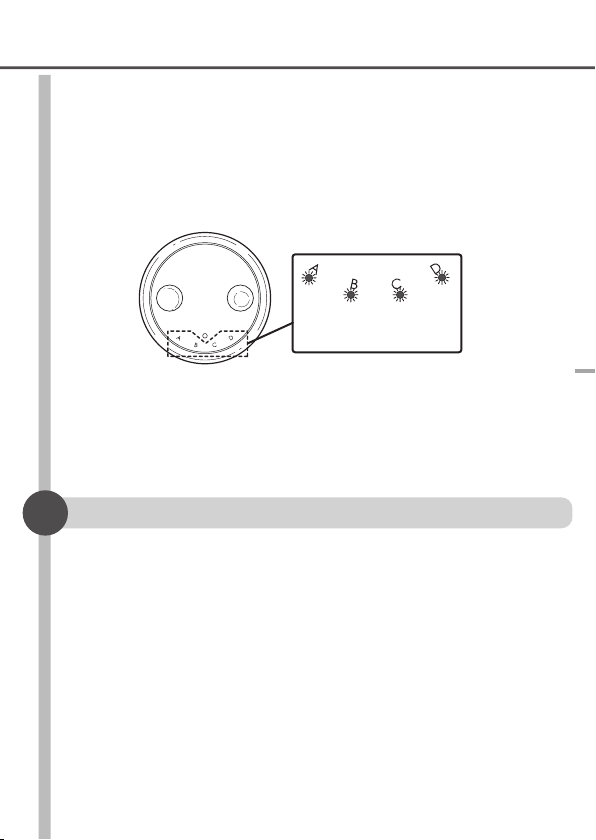
② When the pairing settings page is displayed, follow the
prompts on the page to pair the product with the smartphone
or laptop.
③ After successful pairing, the four LEDs "A, B, C, D" blink
simultaneously and two "beeps" will sound.
A, B, C, D
Blink simultaneously
※ If one minute has elapsed or if any button on the product is
pressed before successful pairing, the pairing has failed.
To operate the product on the app, reconnect the product
power supply.
Start your workout
4
Follow the prompts on the page for the product to
automatically start the workout.
※ The auto frequency setting and 16-grade intensity adjustment
are available only in the dedicated app.
※ Only someone who is wearing the product can operate the
dedicated app.
※ Do not hold anything in your hand when you are wearing this
product, or you may drop it.
use
21
Page 22

Using the dedicated app "ECLEAR APP" (Continued)
Turning the power off
5
About 15 minutes of starting, a "beep" sounds and the product
powers off automatically.
• You can press the stop button or long press the power button,
convex "Strong" button or concave "Weak" button to turn off the
power during a workout.
※
When the gel pad is removed from the skin or the main unit, the
power turns off automatically.
※
To disconnect the product during a workout via the app, use the
button(s) on the product.
※
To change the connected or paired mobile phone, unbind the devices
first on the app, and then start a new pairing.
22
Page 23
Examples for applying gel pads
This product supports 4 modes. There are suitable training modes and
attachment methods for the respective body parts and level of body fat.
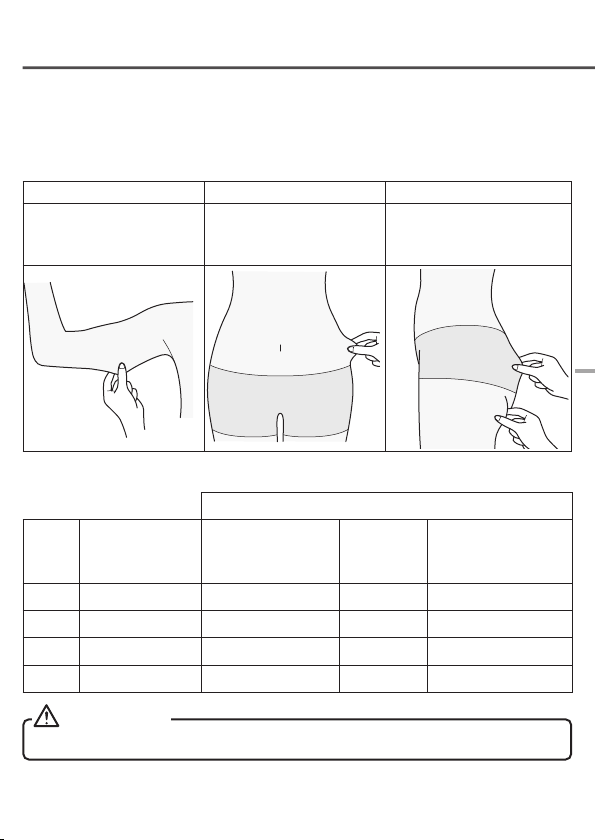
Reference standard for thickness of fat under the skin
■
Arm Abdomen Buttocks
Half of the thickness when
you pinch the arm with your
elbow bent at 90 degrees
Mode
■
Thickness of fat
Mode Overweight Normal Lean
under the skin
(mm)
A 25~ Abdomen, buttocks Abdomen
B 20~ Arm, back Buttocks Abdomen
C 10~ Thigh Arm, back Buttocks
D 0~ Calf Calf, thigh Arm, back, thigh, calf
Half of the thickness when
you pinch your abdomen
with it tightened.
Your body type
Half of the thickness when
you pinch the buttocks with
it tightened
use
CAUTION:
Do not use it on more than two locations at the same time.
23
Page 24
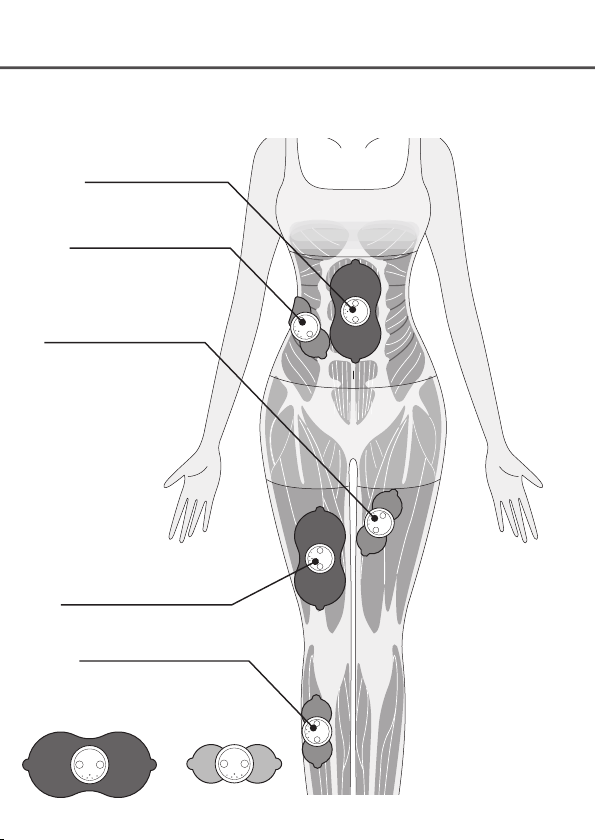
Examples for applying gel pads (Continued)
Front
Rectus
abdominis/core pad
Abdominal
oblique/twin pad
Adductor
muscles/twin pad
Quadriceps
femoris/core pad
Tibialis anterior/twin pad
Attach the gel pad directly on to your skin.
※
Core pad
Twin pad
24
Page 25

Back
Gluteus
medius/core pad
Triceps brachii/twin pad
Latissimus
dorsi/core pad
Gluteus
maximus/core pad
use
Biceps femoris/core pad
Triceps surae/twin pad
25
Core pad
Twin pad
Page 26

Storing
① Ensure the power is turned off
before peeling the gel pad from
your skin.
Do not touch the adhesive surface
of the gel pad. Instead, hold onto
the knob to peel it off.
② Do not disconnect the gel pad from the main unit. Attach it to the
storage sheet.
※ Paste the one core pad on one side of the storage sheet, and the
two twin pads on the other side.
Storage sheet
③ Place it in the attached
bag for storage.
Protrusion
CAUTION:
Store the gel pad in a place out of direct sunlight, high humidity and high
temperature.
26
Page 27
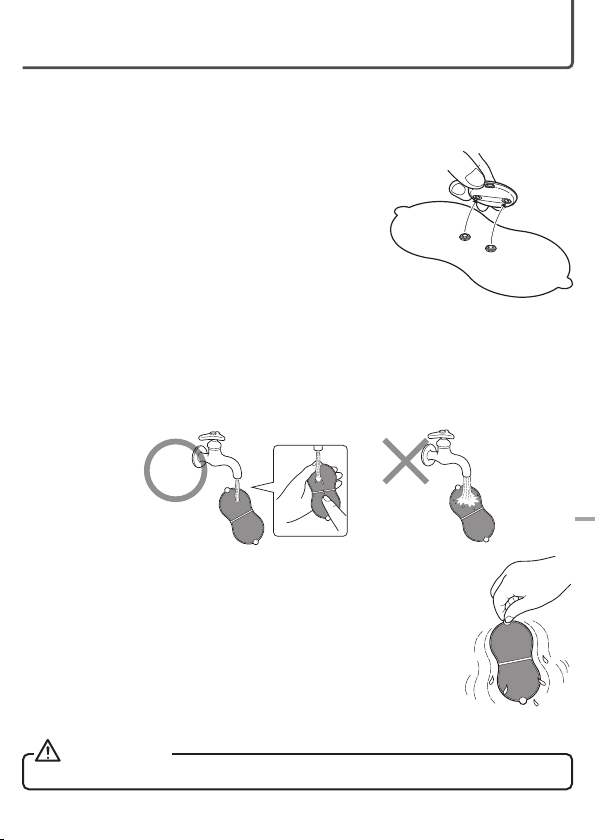
Maintenance
Before maintenance, remove the gel pad from the main unit.
Gel pad maintenance
■
Clean the gel pad in any of the following cases:
The gel pad cannot be securely fixed
•
Weak stimulation during use
•
Tingling in skin during use
•
Dirty gel pad
•
The gel pad cannot be fixed to the storage sheet
•
Maintain the gel pads after every 30 times of use.
If the stimulation is still weak or your skin tingles after
maintenance, replace the gel pad.
① Run a small amount of water on the surface and rub it gently with
your fingertips for several seconds.
※ Do not pour on too much water. Otherwise, the viscosity would reduce
and the contact surface to be bonded would be damaged.
② Hold it by the grip and shake it sufficiently to remove
excess water and let it air dry.
※ If not dried thoroughly, adhesion decreases.
※ Do not wipe the adhesive surface with a tissue or cloth.
※ Avoid direct sunlight.
After use
Main unit maintenance
■
Wipe dirt off the main unit with a soft cloth.
•
CAUTION:
Do not let water get into the main unit or USB port.
27
Page 28

How to store
Please store this product in a place that meets the following conditions.
Storage temperature: -10°C to 60°C
Storage humidity: 20 - 85% RH
Maintenance and storage precautions
■
• Do not use benzene or thinner to service the product.
• Do not store the product in the locations described below.
- Under direct sunshine
- High temperatures, high humidity, near water, or
dusty environments
- Vibrating surfaces
- Where chemical agents are stored, or a corrosive
gas is produced
• Place the product at a location that is out of reach of infants.
• Fully charge the product and store in where the temperature is 10 to 30°C
if the product if you won’ t use the product for a long time.
• Charge the battery at least once every three months. The product may not
be able to charge if it is fully discharged.
Benzine
Alcohol
Thinner
Nail polish
remover
Check
Do you
notice any
of the
following?
Check your Eclear Lean if you’ve use it for a long time
● During charging or use,
there are unusual sounds
or vibrations
● Main unit becomes
extremely hot
● The main unit deforms or
generate a burning smell
To avoid accidents, cut off
the power or disconnect
Stop
the dedicated USB cable,
using
and ask a dealer to check
the product.
28
Page 29

Disposing
Precautions for disposing of lithium ion batteries
■
A lithium ion battery is included in this product. Lithium ion batteries
are precious resources that can be recycled, so we request that
you recycle them. Lithium ion batteries are precious resources that
can be recycled, so we request that you recycle them.
• Do not disassemble the battery when disposing of it.
• Do not disposed of the device in regular household waste. Lithium ion
batteries that are damaged in a garbage truck may cause a fire or heat up due
to short circuiting.
How to remove the lithium-ion battery
■
Never disassemble the product, except to dispose of it.
Warning
● Fully discharge the battery.
● Use a screwdriver to disassemble the unit by
following these steps.
① Insert a flat head screwdriver into the groove
just beneath the Power button on the Main Unit
② Unscrew the base plate screw.
③ Use a pair of combination cut pliers to cut
down the black connector lug at the negative
electrode of the battery at the back.
※
④ Remove the battery.
● On removed batteries, place a piece of tape on
the terminals to isolate them, paying attention not
to shirt-circuit the "+" and "-" terminals.
The procedure described below outlines the steps taken to dispose of
the product and not repair it. Disassembling the product yourself can
disable the product, cause it to malfunction, or lead to an accident.
②
Do not cut down both the black and red
connector lugs at the same time.
③
Battery
Groove
①
Others
29
Page 30

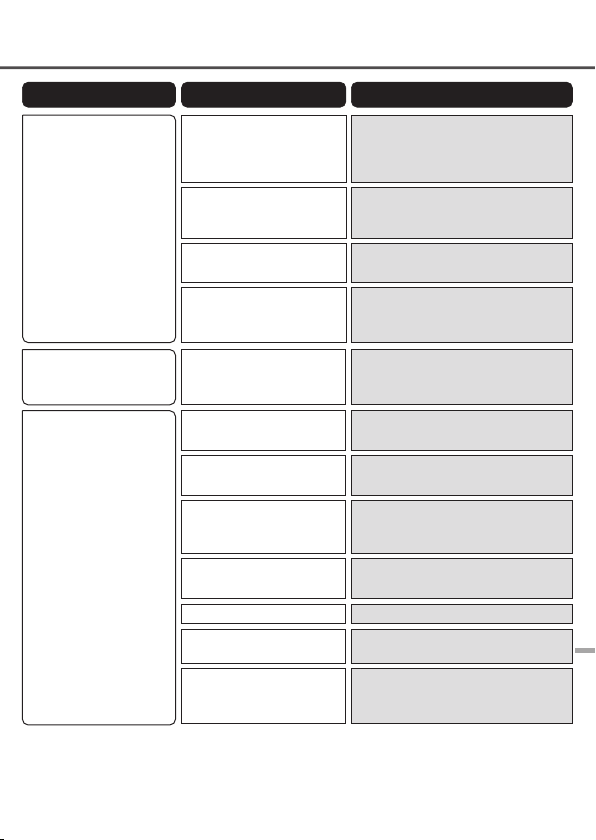
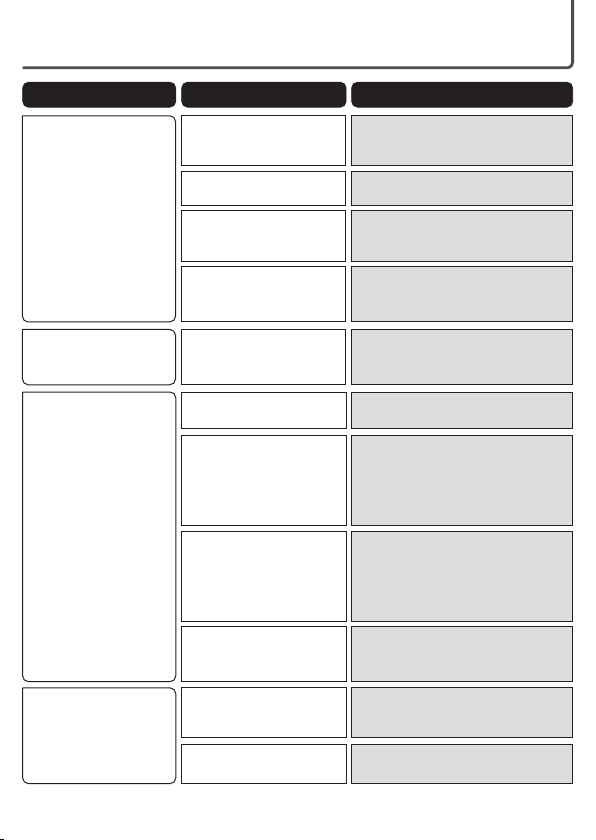
Troubleshooting
Trouble Cause How to troubleshoot
Power does not turn on
Power disconnected
during use
The device cannot be
charged
The battery is not charged
fully or there is no power left
in the battery
During charging
Gel pad is not attached to
skin
Muted by mistake
The battery is not charged
fully or there is no power left
in the battery
The main unit and gel pad
are not connected correctly
A gel pad is not properly
sealed onto the skin
Long press the power
button or the intensity
adjustment button to cut the
power supply.
Dry skin
Battery completely
discharged after storing the
product for a long period
Turn off the power and charge the
battery. P.12
Once the battery has been charged,
remove the special USB cable before
using the product. P.13
Turn on the power after attaching the
gel pad to your skin correctly. P.15
Muting can be canceled by pressing
both the "Strong" button and the
power button simultaneously. P.17
Turn off the power and charge the
battery. P.12
Disconnect the power and then
reconnect the main unit and gel pad.
P.14
Turn off the power then attach the gel
pad to your skin correctly. P.15
Short press the button during use.
P.16
Use a wet towel to wet the skin.
The product can no longer be used.
Charge the product at least once in
about three months to prevent a
complete discharge. P.28
30
Page 31
Trouble Cause How to troubleshoot
The gel pad does not stay
on the skin
The adhesive surface of
the gel pad detaches or
shifts
No / weak stimulus felt
The transparent protective
film is not removed from the
adhesive surface of the gel
pad
The adhesive surface of the
gel pad is dirty
Using immediately after
rinsing with water
The adhesive surface of the
gel pad is damaged
There is excessive sweat or
water on the adhesive
surface of gel pad
The gel pad not securely
applied to the skin
Overlapped gel pads
The adhesive surface of the
gel pad is dirty
The gel pad is not properly
connected
The level is set to "Weak"
Insufficient charging or
depleted battery
The adhesive surface of the
gel pad is dirty or damaged
Remove the transparent protection
film from the adhesive surface. P.15
Run a small amount of water on the
surface and rub it with your fingertips
for several seconds. P.27
Shake off the excess water and air dry
the adhesive surface. P.27
Gel pads are consumables. When the
adhesive surface has deteriorated,
stop using and purchase optional pads.
Gel pads are consumables. When the
adhesive surface has deteriorated,
stop using and purchase optional pads.
Attach the gel pad to your skin firmly.
P.15
Attach it, but be careful not to overlap
with another gel pad. P.15
Run a small amount of water on the
surface and rub it with your fingertips
for several seconds. P.27
Connect it correctly by pushing it in
until it clicks. P.14
Adjust to a stronger intensity. P.16
Charge the battery. P.12
Gel pads are consumables. When the
adhesive surface has deteriorated,
stop using and purchase optional pads.
Others
31
Page 32
Troubleshooting (Continued)
Trouble Cause How to troubleshoot
Skin becomes red/skin
feels prickly
No sound
Cannot pair
Used for too long
The gel pad not securely
applied to the skin
The adhesive surface of the
gel pad is dirty or dry
The adhesive surface of the
gel pad is damaged
Muted by mistake
The Bluetooth
on your smartphone.
Connect to the power
supply, and wait before
starting the dedicated app.
®
is disabled
Do not use the gel pad in one position
for over 30 minutes. After use, remove
the gel pad from the skin. P. 4
Attach the gel pad to your skin firmly.
P.15
Run a small amount of water on the
surface and rub it with your fingertips
for several seconds. P.27
Gel pads are consumables. When the
adhesive surface has deteriorated,
stop using and purchase optional pads.
Muting can be canceled by pressing
both the "Strong" button and the
power button simultaneously. P.17
Check whether Bluetooth
on your smartphone. P.19
Reconnect the product power supply.
If the problem persists, unbind the
machine from the Bluetooth list of the
dedicated app, and then start pairing
again. P.21
®
is enabled
The product cannot be
operated via a
smartphone
Before pairing, press the
button on the product
Already paired with another
EMS machine
The battery is not charged
fully or there is no power left
in the battery
The product is too far from
the smartphone.
32
Before pairing, press the button on the
product to start a workout without
pairing. In this case, you need to
reconnect the product power supply.
P.21
Cut the power to the EMS machine
that is not in use, and then start
pairing again.
Turn off the power and charge the
battery. P.12
Place the product nearer to the
smartphone. P. 9
Page 33
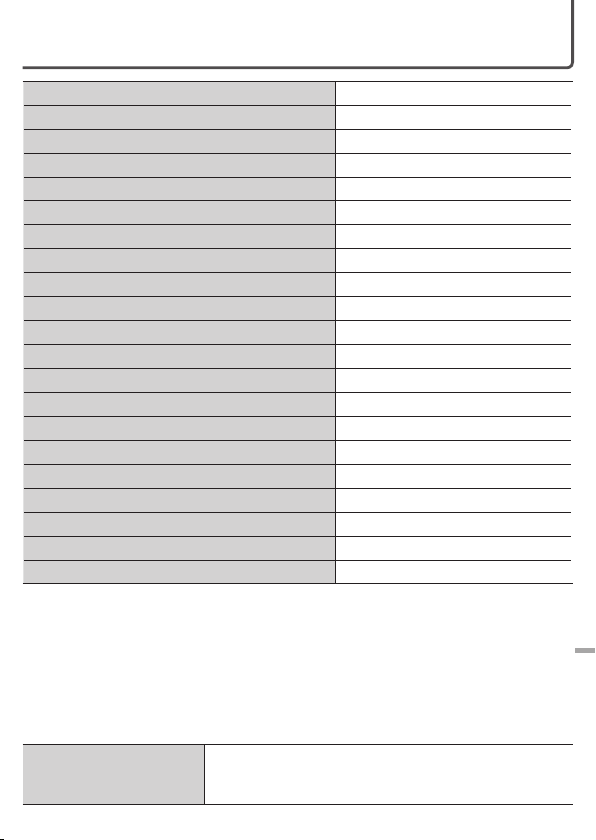
Product specifications
Product name ECLEAR LEANUP
Series model number HCT-BTP01
Power source voltage DC 5.0V
Built-in battery lithium-ion battery 75 mAh ※1 ※2
Number of times you can charge the device Approx. 500 times ※1
Charge time Approx. 2.5 hours ※3
Operating time Over 90 minutes (fully charged) ※4
Rated output voltage Approx. 42 V
Deep layer frequency Approx. 2000 ~ 5000 Hz
Relaxation frequency Approx. 20 ~ 30 Hz
Timer Approx. 15 minutes
Supported Bluetooth
Radio frequency 2.4 GHz band
Radio wave method GFSK
Operation distance Approx. 10 m (no obstacles) ※5
Main Unit dimensions Approx. φ48 mm × D16 mm
Main Unit Weight Approx. 20 g
Length of the connecting cable Approx. 0.2 m
Operating temperature and humidity ranges 0°C to 40°C; 20 to 85% RH
Storage environment temperature and humidity -10℃ ~ 60℃ 20 ~ 85%RH
Made in China
※1 According to JIS C 8711
※2 With protection function for over-charging, over-discharging and over-voltage
※3 Reference standard for fully charging a fully discharged battery
※4 Depends on the operation and environment
※5 The distance depends on the performance, battery capacity, and
surrounding environment of the device connected via Bluetooth.
®
version
Bluetooth
®
4.1 (Bluetooth low energy)
Others
Dedicated app
■
OS that support
the dedicated app
iOS 10.0 or later, Android 5.0 or later (may vary
with the update of the dedicated app)
※ May 2018
33
Page 34

A customer who purchases outside Japan should contact the local retailer in the
country of purchase for enquiries. In "ELECOM CO., LTD. (Japan)", no customer
support is available for enquiries about purchases or usage in/from any countries other
than Japan. Also, no foreign language other than Japanese is available. Replacements
will be made under stipulation of the Elecom warranty, but are not available from
outside of Japan.
ECLEAR HCT-BTP01 series
Instruction Manual
May 2018 Version 1
ELECOM CO., LTD.
• The copyright of this manual is owned by ELECOM Co., Ltd.
• Unauthorized reproduction/reprint of all or part of this manual is prohibited.
• If you have comments or questions about this User Manual, please contact Elecom
Information Center.
• The specifications and appearance of this product may be changed without prior notice
for product improvement purposes.
• ELECOM will not bear any responsibility for faults or problems in other devices caused
by using this product.
• Permission for exporting this products or service transactions under the Foreign
Exchange and Foreign Trade Control Act is required to export this product or any of its
parts that constitute strategic materials or services.
• Android, Android trademark, Google, "Google" trademark, Google Play, Google Play
trademark, Google LLC trademark or registered trademark.
• Apple, Apple trademark, iPad, iPhone are trademarks of Apple Inc. registered in the
U.S. and other countries. App Store is the service trademark of Apple Inc.
• Bluetooth® and the trademark are trademarks of Bluetooth SIG, Inc., and ELECOM
CO., LTD. is authorized to use these trademarks.
• Company names, product names, and other names in this manual are generally
trademarks or registered trademarks.
©2018 ELECOM Co., Ltd. All Rights Reserved.
34
Others
MSC-HCT-BTP01_JP_eng_ver.111
 Loading...