

Elcon Models TRAXX 2WD Assembly Manual

Elcon Models – 2017
Assembly quick guide – TRAXX 2WD ©
1
Assembly Manual

Elcon Models – 2017
Assembly quick guide – TRAXX 2WD ©
2
Contents
1. Introduction ..................................................................................................................................... 3
2. General guide lines .......................................................................................................................... 4
3. Mid Section ...................................................................................................................................... 5
4. Rear End .......................................................................................................................................... 6
4.1 Gear train & Dif ............................................................................................................................. 6
4.2 Clutch bell ..................................................................................................................................... 7
4.3 Lay Shaft ....................................................................................................................................... 8
4.4 Central Brake ................................................................................................................................ 9
4.5 Wishbone and Upright ............................................................................................................... 10
4.6 Spline Drive ................................................................................................................................. 11
5 Front-end ....................................................................................................................................... 13
5.1 C-hubs and uprights .................................................................................................................... 17
6 Shock absorbers ............................................................................................................................ 19
7 Optional parts ................................................................................................................................ 20
7.1 Air Brake ................................................................................................................................ 20
7.2 Air pump ................................................................................................................................ 21
7.3 Sway bar ................................................................................................................................ 22

Elcon Models – 2017
Assembly quick guide – TRAXX 2WD ©
3
1. Introduction
Welcome and thank you for choosing the Elcon Models TRAXX 2WD off-road buggy!
In this quick guide for assembly of the TRAXX, we guide you through the build of the car.
Each step can contain 1 or more components for assembly.
We will start building at the rear-end and will end with the front of the car.
NOTE: Each item in the building kit is packed with its needed assembly materials.
We advise you to unpack only the part needed per building step.
This document is meant as guide and help for building your car.
Pictures, colours, items can be subject of change and might differ from the part delivered.
We wish you a lot of pleasure in building and driving the car.

Elcon Models – 2017
Assembly quick guide – TRAXX 2WD ©
4
2. General guide lines
It is advised to degrease components where are used bolts to assemble the item in place. Degreasing
can be done using brake cleaner or any similar product.
When mounting components to the chassis we advise to use Loctite. Only where nyloc nuts are used
Loctite is not needed. It is advised to use Loctite 243 (blue).
When running the car first time, it can happen parts come loose due to vibrations. Do not go out for
much longer than 5 minutes running the car first time. Check you car on loose bolts after the first 5
minutes. Better be safe than sorry.
After racing store your car in a dry place.
We wish you a joyful build and a great time driving your new purchased kit.

Elcon Models – 2017
Assembly quick guide – TRAXX 2WD ©
5
3. Mid Section
The fuel tank and front end plate are mounted onto the chassis.
Pre-assemble the servos in the top deck together with the radio box. Install the open rubber
grommet in the hole of the top deck to protect your wires. With the radio box a closed grommet is
supplied. Use a hobby knife and make a line cut. Servo wires can go through this cut into the radio
box. Slide over at the end of the top deck, where the middle bended edge goes back to the chassis,
the rubber anti-vibrant strip.
Use your Tx/Rx manual for wiring and setting up your radio.
Mount the side guards to the chassis, do not forget to put the top deck strips of the left picture.
Start mounting the chassis side guards starting at the middle hole. There is 1 bushing with thread
inside. Together with the shorter screw this is used on the right side guard at the last rear hole at the
engine pull starter.
Elcon Models – 2017
Assembly quick guide – TRAXX 2WD ©
6
4. Rear End
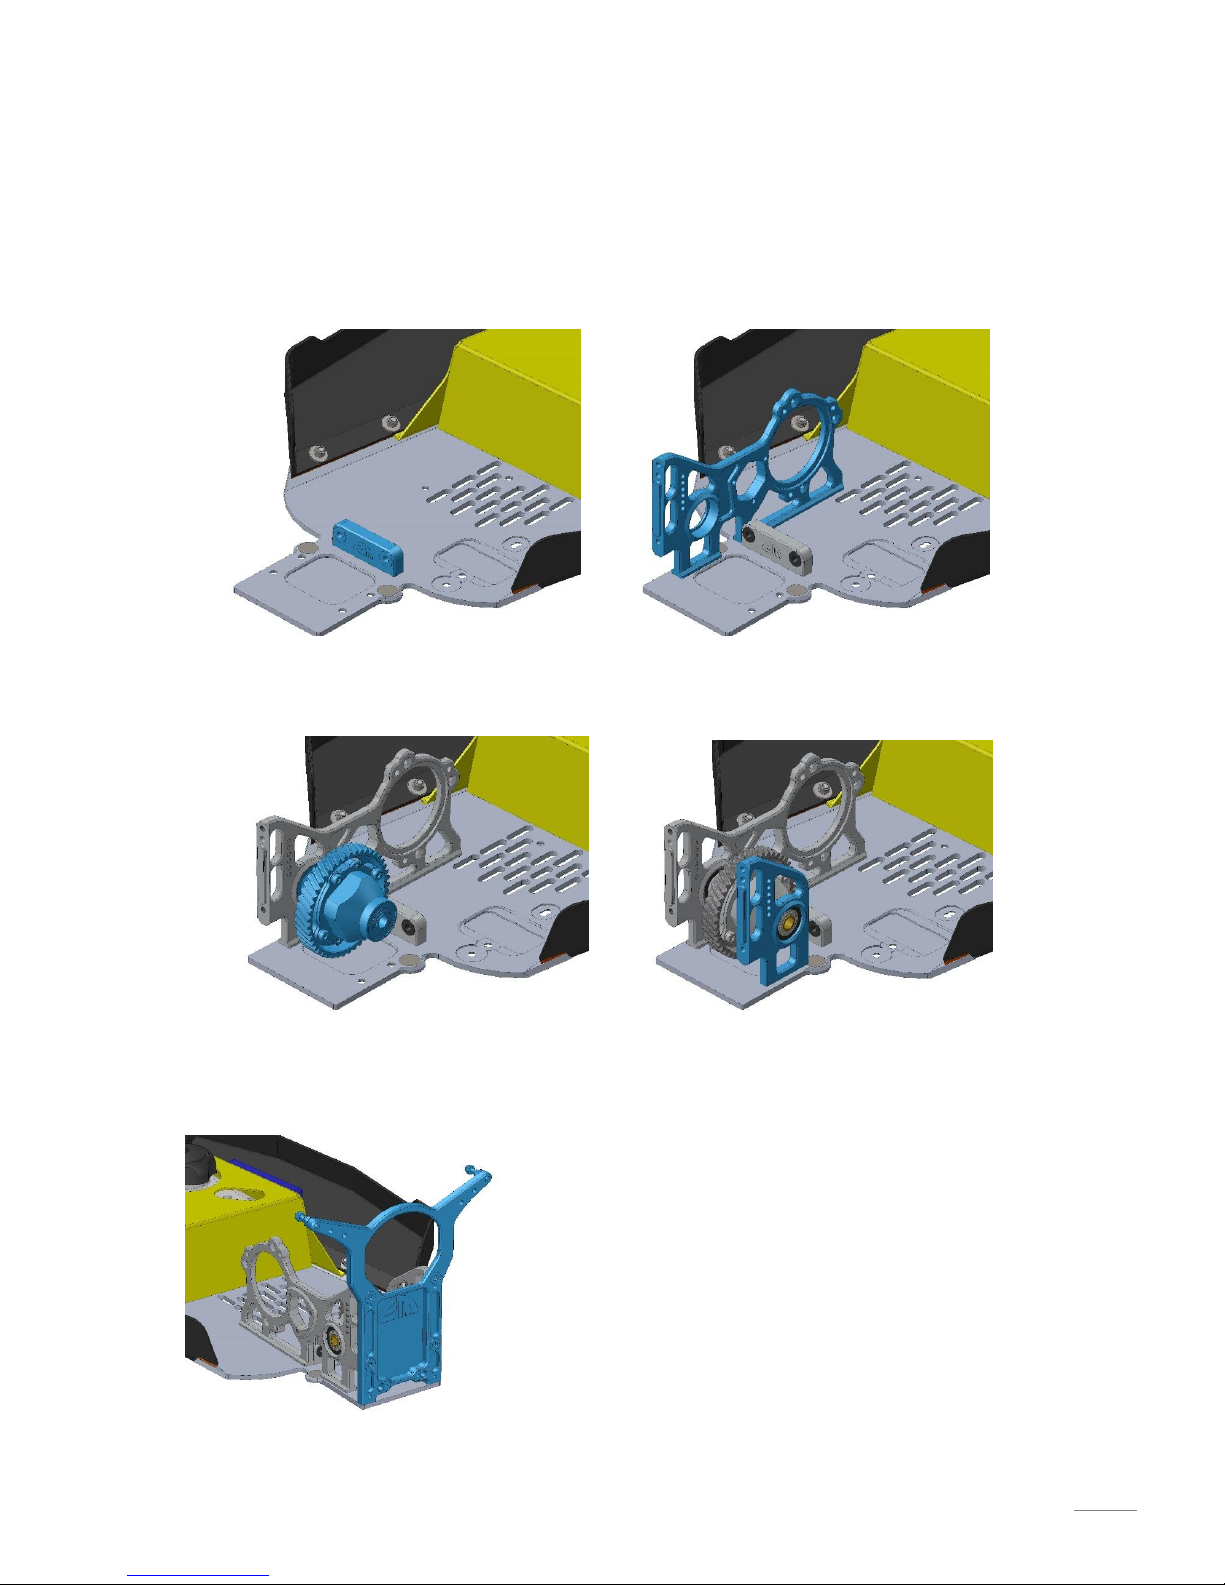
4.1 Gear train & Dif
Insert the bushings into the wishbone mount.
Mount the wishbone mount to the chassis and assemble the main gear plate to the chassis.
Mount the dif gear to the differential and place it in the main gear plate. Place the dif mount on the
other side and secure in place.
The rear shock tower is mounted on the main
gear plate and dif mount. Make sure it sits
correct in the slots.
Mount the shock bolts in the top ears of the
shock tower.

Elcon Models – 2017
Assembly quick guide – TRAXX 2WD ©
7
4.2 Clutch bell
Put a bearing in the clutch carrier.
Place a shim ring on the clutch bell.
Put the clutch bell through the bearing.
Place the pinion on the clutch bell.
Add shims when needed.
Fix the grubs of the pinion.
Press the 2nd bearing in the
end-carrier.
Place the end carrier on the clutch bell
carrier, use shims when needed.
Fix the clutch bell with the flat head
screw and rings.
The whole unit can be mounted now with the 3 distance posts to the main gear plate as shown
below.
 Loading...