

ELCOM Euro-500TE, The Euro-500TE Handy User Manual
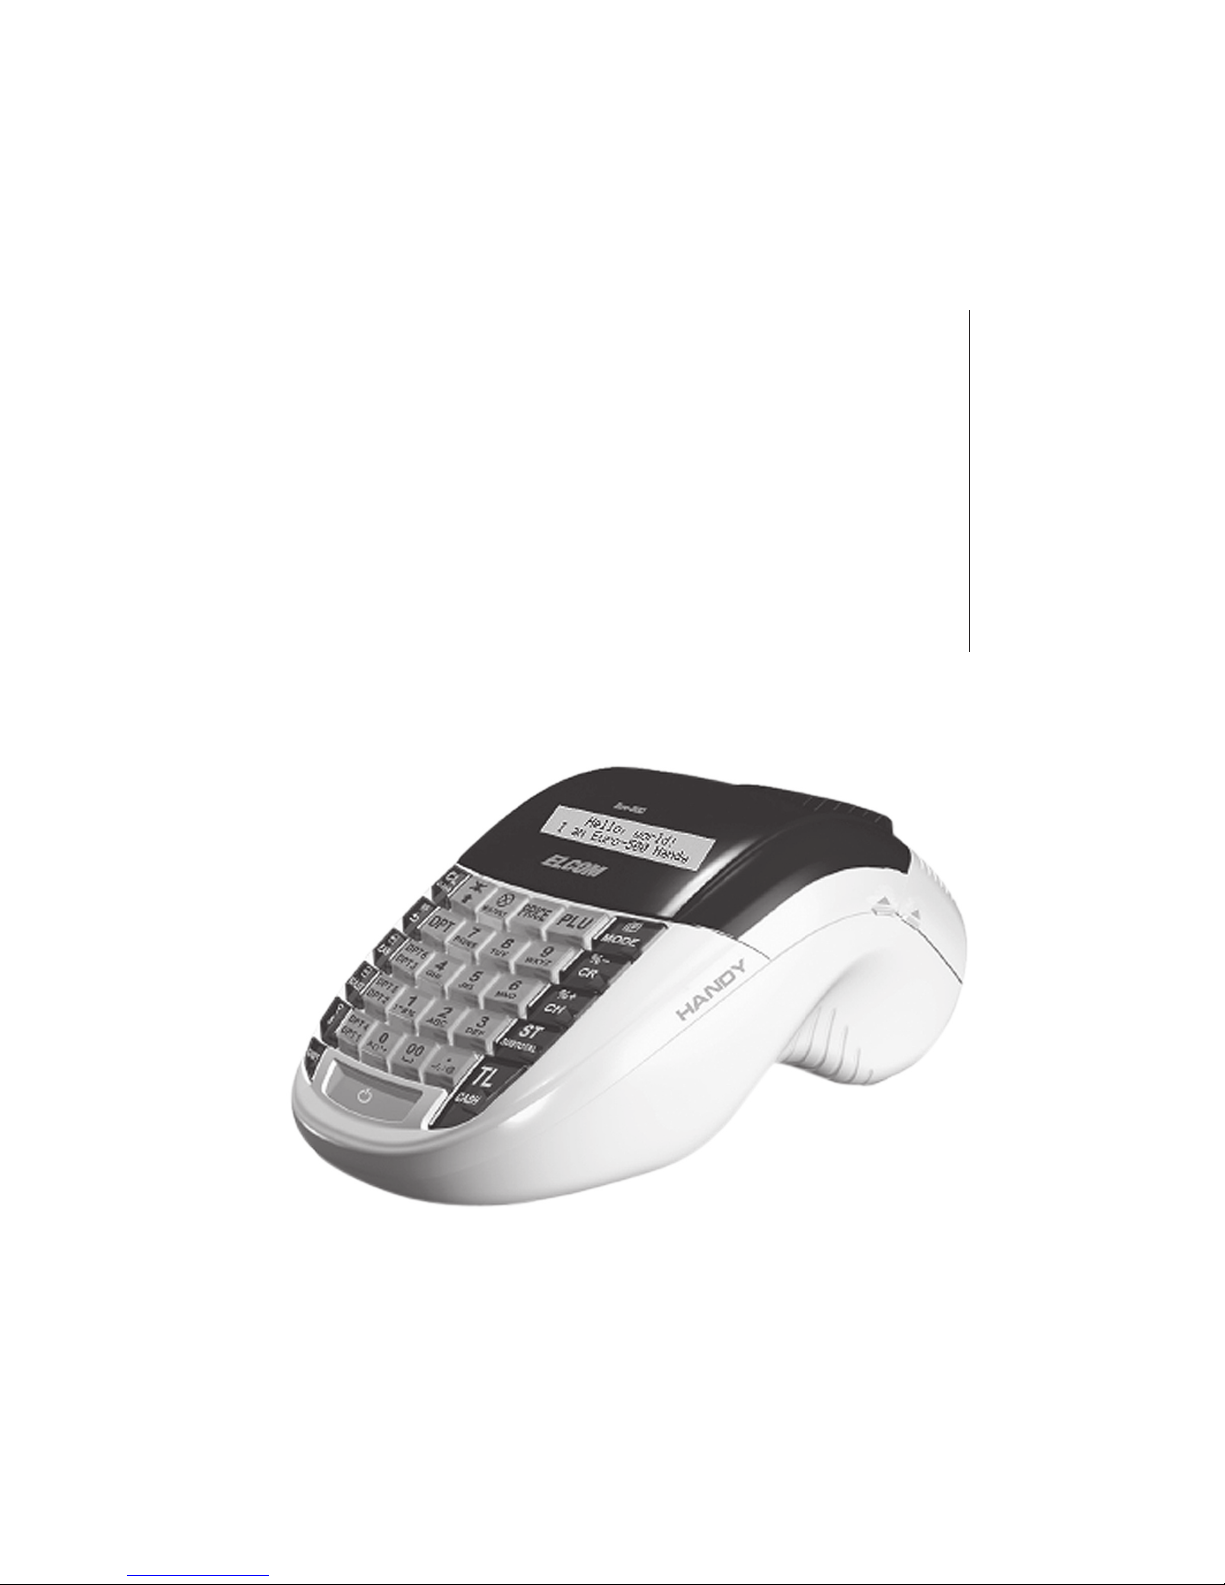
Euro-500TE
Handy
User manual (Swedish)
version 1.1

This manual was not subject to any language revision.
This manual cannot be copied or otherwise forwarded without editor
’s consent.
All rights reserved
© 2009, Elcom s. r. o.

TABLE OF CONTENTS
INTRODUCTION ..........................................................................................................................7
Important .................................................................................................................. 8
Basic definitions ........................................................................................................ 9
Logo .................................................................................................................................. 9
Department ......................................................................................................................... 9
Tax level .............................................................................................................................
9
Sales units ..........................................................................................................................9
PLU ................................................................................................................................. 10
Connection between departments and PLUs .......................................................................... 10
Report ............................................................................................................................. 10
Bar code .......................................................................................................................... 10
Bar-code scanner .............................................................................................................
11
System flags .....................................................................................................................
11
Cumulated totals (grandtotals) ..............................................................................................
11
Concepts defining the launch of the euro currency, or payment in a foreign currency ...........11
Conversion rate ..............................................................................................................................11
Dual display ....................................................................................................................................11
Dual cash circulation ........................................................................................................................11
Primary currency ............................................................................................................................ 12
Dual currencies ............................................................................................................................. 12
CASH REGISTER CHARACTERISTICS ...................................................................................13
Parts of the cash register, basic parameters ................................................................. 14
Peripheral devices ............................................................................................................. 16
The Euro-500TE Handy keyboard .............................................................................. 18
Names and functions of the cash register keys ............................................................. 18
The electronic cash register displays description ........................................................... 20
Cashier display description .................................................................................................. 20
Customer display description ...............................................................................................
20
Changing of display backlight ...............................................................................................
20
Modes switching ..................................................................................................... 20
Placing the paper tapes into printer ............................................................................. 21
Usage and storage of paper tapes. ............................................................................. 23
PROGRAMMING MANUAL .......................................................................................................25
Initialization ............................................................................................................. 26
Recommended procedure for the Euro-500TE Handy programming ................................ 26
The menu in Programm
ing mode .......................................................................................... 26
List with items in the P mode menu .......................................................................................
27
System Flags programming ....................................................................................... 27
Initial programming of system flags ........................................................................................
28
System flags correction ......................................................................................................
28
System flags values print out ................................................................................................
28
Flag 1 – Number of decimal places, method of rounding, TAX system… .................................................. 28
Flag 2 - TAX printing, number of logo lines, blank lines… ....................................................................... 29
Flag 3 - Receipt consecutive number, cash register number .................................................................. 29
Flag 4 - Required operations ............................................................................................................ 29
Flag 5 - Communication with PC and payment terminal ......................................................................... 30

Flag 6 - Printing mode settings ......................................................................................................... 30
Flag 7 - Limit and value of the percent add-on ..................................................................................... 30
Flag 8 - Limit and value of the percent discount ................................................................................... 31
Flag 9 - Time setting ....................................................................................................................... 31
Flag 10 - Date setting ...................................................................................................................... 31
Extended flags programming ..................................................................................... 31
First extended flag .......................................................................................................................... 32
Second extended flag ..................................................................................................................... 32
Third extended flag ......................................................................................................................... 32
Sixth extended flag ......................................................................................................................... 33
Printing of the extended flag values .......................................................................................
33
Tax rates programming ............................................................................................. 33
Correction of the tax level values .......................................................................................... 34
Printing of the programmed tax values ...................................................................................
34
Programming of organization ID ............................................................................................
34
PROGRAMMING OF TOP AND BOTTOM TEXT LOGO .................................................. 34
Printing the programmed logo lines .......................................................................................
35
Receipt graphic logo programming ............................................................................. 35
Cashiers programming ............................................................................................. 35
Correction of cashiers values ...............................................................................................
37
Printing of cashiers values ...................................................................................................
37
Function texts programming ...................................................................................... 37
Correction of function texts ..................................................................................................
38
Function texts print out ....................................................................................................... 38
Departments programming ........................................................................................ 39
Departments correcting ...................................................................................................... 40
Department values print out ................................................................................................. 40
Sale units programming ............................................................................................ 40
Programmed sale units correcting ........................................................................................ 41
Sale unit settings print out ................................................................................................... 41
PLU PROGRAMMING .............................................................................................. 41
Setting up the bar-code scanner ...........................................................................................
43
Quick PLU price programming .............................................................................................
44
Quick PLU stock programming ............................................................................................. 44
Correction of programmed PLUs ..........................................................................................
44
Programmed PLUs print out .................................................................................................
45
PROGRAMMING OF THE EURO CURRENCY ............................................................. 45
Getting information about the actual Euro phase .................................................................................. 45
Default phase - using the main currency and a foreign currency .................................................
45
First Euro phase – the start of dual display .............................................................................
46
Second Euro phase – dual currency circulation ......................................................................
46
Third Euro phase ...............................................................................................................48
Entering texts into the cash register ............................................................................ 49
OPERATION IN REGISTRATION MODE ..................................................................................51
Recommended procedures at the beginning of the day .................................................. 52
Status and functions that are required to know before the beginning of registration ............. 52
Error warning: the C
LEAR key ................................................................................................ 52
Cashier log in: the Password key .......................................................................................... 52
Cashier log out: the Password key ........................................................................................ 52
Finish sale with cash, check and credit payment method .........................................................
53
Samples of basic registration procedures .................................................................... 53

Registration using departments .................................................................................. 54
Basic registration using departments .....................................................................................
55
Registration using departments with price entry from keyboard ..................................................
55
Registration using departments with pre-programmed price ...................................................... 55
Registering multiple items using departments .........................................................................
56
Items multiplying during registration using departments ............................................................
56
Registering fractions of items using departments .....................................................................
57
Double multiplication of items during registration using departments ...........................................
57
Single item sales using departments ..................................................................................... 58
PLU registration ....................................................................................................... 59
Basic PLU registration ........................................................................................................
59
Multiplication in PLU registration ........................................................................................... 59
Individual PLU registration ...................................................................................................
60
Overwriting the pre-programmed PLU price ............................................................................
60
Fractional PLU registration ..................................................................................................
60
Double multiplication in PLU registration ................................................................................
61
Linked PLUs registration. .................................................................................................... 61
Registration with customer number .......................................................................................
61
Registration using bar-codes ...............................................................................................
61
Weight entry by electronic scales .........................................................................................
62
Connection of two electronic scales .................................................................................................. 63
Registration using an external PC keyboard ............................................................................ 63
Corrections ............................................................................................................ 63
Clearing ........................................................................................................................... 63
Voidance .......................................................................................................................... 63
Percentage and value surcharge ................................................................................ 65
Percent discount ...............................................................................................................
65
Value discount ................................................................................................................... 65
Value surcharge and discount .......................................................................................................... 65
Percentage and value surcharge ....................................................................................................... 66
Reference number or customer number printing ........................................................... 66
Received on account ............................................................................................... 66
Paid out (cash or cheque) ......................................................................................... 67
Refunds ................................................................................................................. 68
Non-financial PLU movements .................................................................................... 69
ACCOUNTING DURING THE EURO PHASES .............................................................. 70
Use of a foreign currency
................................................................................................... 71
The first Euro phase - dual currency display ............................................................................
72
The second Euro phase ...................................................................................................... 72
Payment in second Euro phase ........................................................................................................ 73
The third Euro phase .......................................................................................................... 74
Completion of dual display of informational currency conversion ............................................................. 74
REPORTS ...................................................................................................................................75
How to print out reports ............................................................................................ 76
Generated reports ................................................................................................... 76
Reports contents ..................................................................................................... 76
Report menu .....................................................................................................................
76
Department report .......................................................................................................................... 77
PLU report ........................................................................................................................
77
PLU stock report ................................................................................................................
78
Financial report ................................................................................................................. 78

Cashier report ................................................................................................................... 78
Total daily “X” report ...........................................................................................................
79
Periodical “X” report ...........................................................................................................
79
Total daily “Z” report ...........................................................................................................
79
Periodical “Z” report ........................................................................................................... 79
Combined report ...............................................................................................................
79
Electronic journal and sale data ............................................................................................
79
How to print “X” reports .......................................................................................................
80
Samples of “X” reports ........................................................................................................
81
How to print “Z” reports ...................................................................................................... 83
Samples of “Z” reports ........................................................................................................
83
How to erase text electronic journal ......................................................................................
85
PC sale data .....................................................................................................................
85
EURO2A SOFTWARE ................................................................................................................89
OPTIONAL ELECTRONIC CASH REGISTER ACCESSORIES ..............................................91
Cash drawers ....................................................................................................................
92
Electronic scales ...............................................................................................................92
Bar-code scanners .............................................................................................................
92
Metrologic MS-5145 ECLIPSE ......................................................................................................... 92
Metrologic MS-6720 ...................................................................................................................... 93
Metrologic Orbit MS-7120 ............................................................................................................... 93
Metrologic MS-9520 Voyager .......................................................................................................... 93
External keyboard ..............................................................................................................
93
Optional internal battery ...................................................................................................... 93
External battery box ...........................................................................................................
93
External journal downloader .................................................................................................
94
LAN connection options ...................................................................................................... 94
Extended RS-232 ports ......................................................................................................
94
New features of Elcom cash registers ................................................................................... 94
HELPFUL ADVICE .....................................................................................................................95
Information and error messages ................................................................................. 96
What to do in case of power failure? ............................................................................ 99
Power failure .....................................................................................................................
99
Failures of the cash register as a result of interference in power network ....................................
99
Signalization of internal accumulator conditions .......................................................................
99
Self tests ................................................................................................................ 99
Self-test of the electronics and display ...................................................................................
99
Self-test of the printer .......................................................................................................
100
Self-test of the thermo printer head position ...................................................................................... 100
Self-test of the paper ribbons sensor ............................................................................................... 100
Self-test of the keyboard ...................................................................................................
100

INTRODUCTION

8
Introduction
ELCOM company wishes to thank you for the purchase of the Euro-500TE Handy. Please read the instructions to
become familiar with its functions and operations before you start to operate this equipment. Keep this manual for
future use. It will help you solve most problems encountered in operating the Euro-500TE Handy.
IMPORTANT
• Do not leave appliance unattended.
• Install the cash register in a place where it will not be exposed to direct sunlight, unusual temperature
changes (under 0°C and above 45°C) or high humidity. Installation in such places could result in damage to both the casing and electrical components.
• Before first use leave the cash register turned on connected to external charger for at least eight hours
to charge the internal accumulator.
• It is strongly recommended to start battery charging after battery discharge signal to ensure long ope
-
rating life and preservation of battery capacity.
• During the cash register battery recharging, the cover can increase its temperature. We do not recommend to place the cash register near flammable materials.
• After transporting the unit from a cold environment to a warm one and reversal, do not turn the cash
register on for a minimum of 20 minutes in order to give all components time to adjust to the new tem
-
perature conditions.
• Person having wet hands should not operate the cash register. Water could seep into the interior of the
Euro-500TE Handy and cause component failure.
• Clean the cash register with a dry, soft cloth. Never use cleaning agents such as petrol or solvents.
Using such chemicals can result in discolouration or deterioration of covering.
• Avoid spilling of any liquids on the cash register as it may cause damage. The keyboard should be pro
-
tected extra carefully.
• Connect the cash register with the supplied adapter into a standard network plug (230V ± 10%). Other
electrical equipment connected in the same network circuit may cause improper functioning of the
cash register. In an environment with strong interference use the special anti-interference equipments
recommended by the manufacturer of the cash register.
Warning: adapter is only for interior use!
• If the cash register malfunctions, contact your authorised dealer for service. Do not try to repair the register yourself. Do not open the cash register!
• Unplug the AC/DC adapter from its electrical outlet if the device is to be fully disconnected.
• If the external adapter is connected to the cash register, the internal accumulator is charged even when
the cash register is turned off.
• If the red streak appears at the end of the paper ribbon, exchange this ribbon as soon as possible. If
the ribbon is exchanged too late, it can damage the printer, or decrease its lifetime.
• Use the paper ribbon, whose end is not glued. If such paper ribbon is used and not exchanged early
enough, the printer could be damaged or its lifetime could be shortened. In this case, the damaged
printer warranty is not valid.
• Use only high-quality thermal paper ribbons. Improper ribbons may damage the printer or shorten its
lifetime. When using suitable ribbons and by properly maintaining the printer, the average lifetime is up
to 25 million printed lines!
• Journal paper storage recommendations: Do not expose thermal paper to the sun light. Store at a temperature not higher than 40°C. Avoid contact with PVC, mollificators, organic solvents or glue. It is im
portant to use only paper ribbons, where manufacturer warrants all needed characteristics. In case of
storage recommendations break or using low-class paper ribbons, Elcom company cannot guarantee
printing quality and paper ribbons storage.
• Use only the supplied AC/DC adapter or a adapter recommended by an authorised dealer for electrical
connection. Using other adapter types may result in damage to the adapter or the cash register.
• Use only the program recommended by your authorised dealer and use only the original interconnecting
cable for cash register communication with a computer. For bar code scanners, use only the connection
recommended in these instructions.
9
Introduction
• If the cash register is used in different ways than those described in these instructions, the dealer cannot be responsible for incorrect data or damage that may result.
• Only equipment which meets the European Union standards (CE) can be connected to the Euro-500TE
Handy. In other cases, the Elcom company cannot guarantee the adherence to standards of whole system. About possibilities of connection with different equipments ask the Elcom company or your authorised dealer of Euro-500TE Handy for more information.
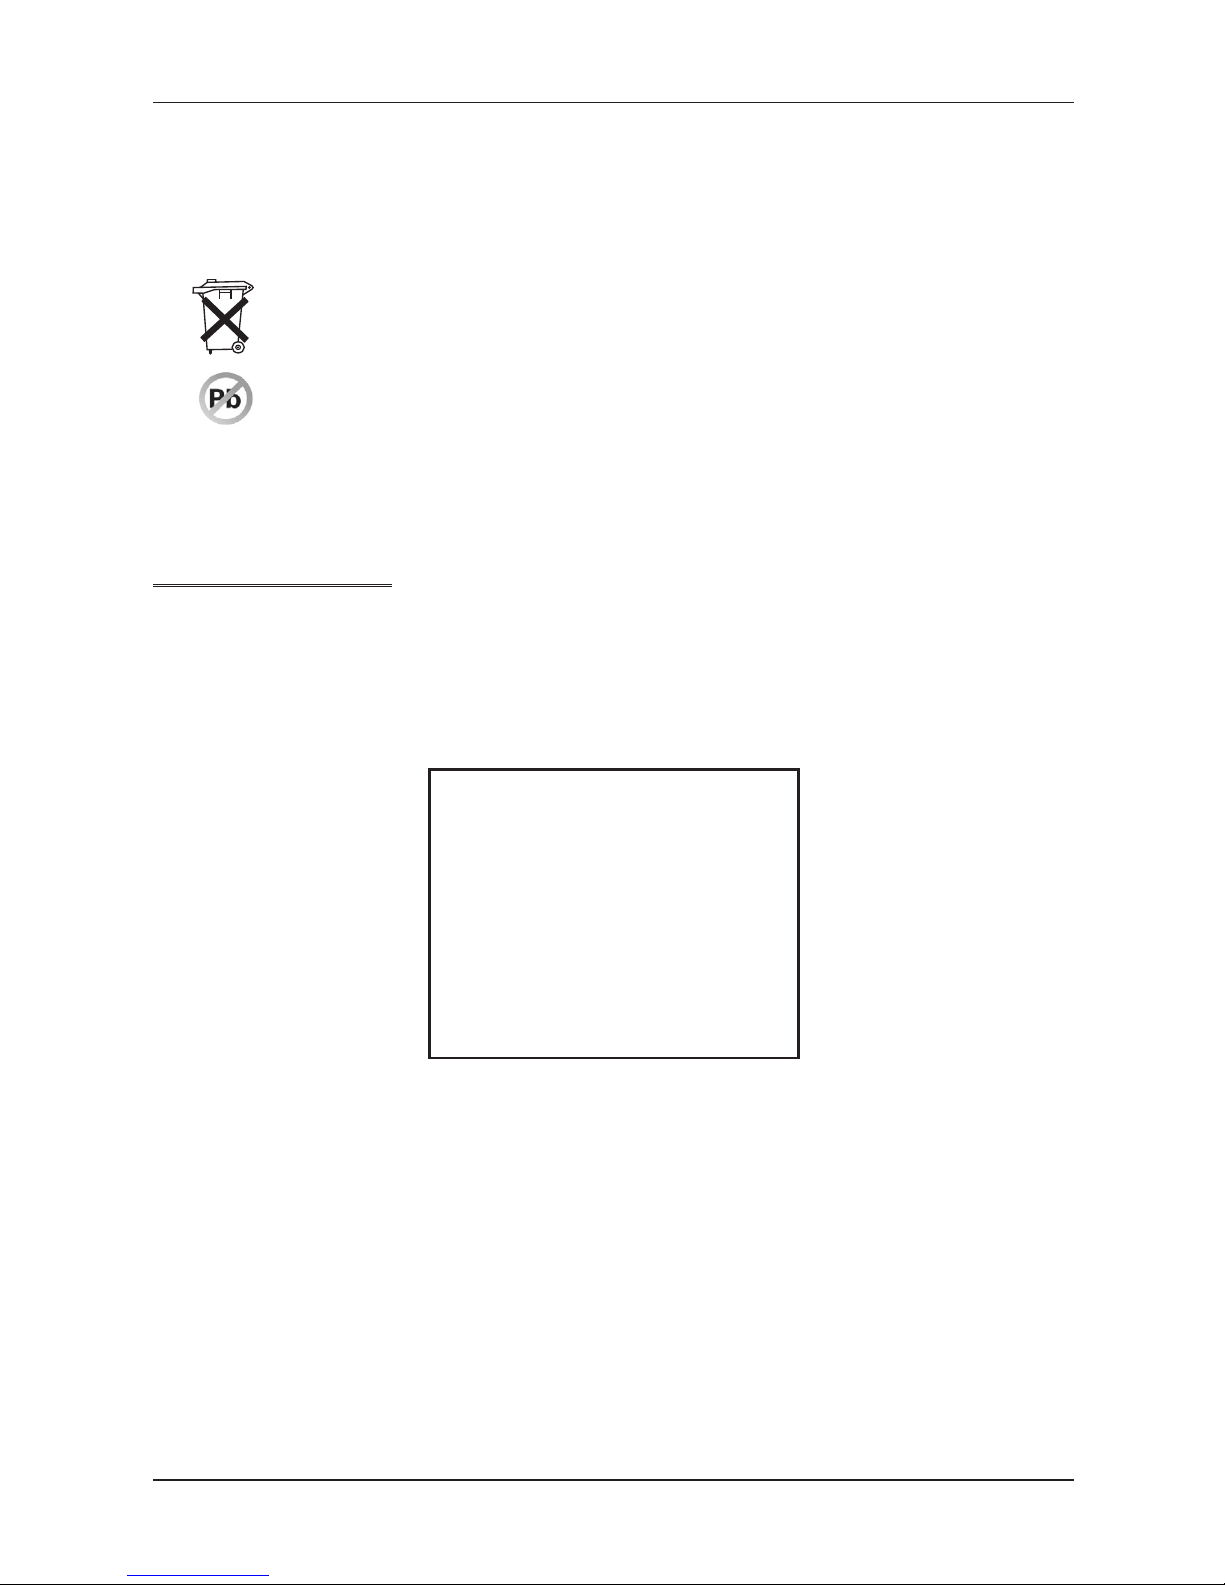
• The symbol on the product or on its packaging indicates that this product shall not be treated as
household waste. Instead it shall be handed over to the applicable take-back scheme for the recycling of electrical and electronic equipment. By ensuring this product is disposed of correctly,
you will help prevent potential negative consequences for the environment and human health.
• Lead-free technology.
Note:
After four years of purchase cash register, it is necessary to replace the battery backup for the RAM in order
to avoid loss of data stored in backup memory.
BASIC DEFINITIONS
Logo
The heading on each printed receipt is introductory information prior to the description of the purchased
goods. It is mainly used to identify the cash register owner (company name, tax information, company
identification, etc.).
Figure 1.1 Receipt logo
YOUR SHOP
Perfect goods ANYWHERE
DKP: 0123456789876543546
TPN: 01234567/9876
------------------------------------
Ta c k
Välk o m m e n ater
Org. N u m m er: 0123 4 5 - 6 7 89
Department
Departments (DPTs) are used to denote groups of goods having some common features (dairy products,
foodstuffs, fruit, etc.). A department is characterised by it’s name, parameters, and by the preprogrammed
selling price, if it is used for direct sale.
Tax level
Tax level is used for the tax assessment of the sale goods. It’s characterized by the percent value, name
and tax type (VAT, DO).
Sales units
Sales units are used in connection with the quantity of sold goods (metres, litres, etc.). Each PLU has assigned a specific sales unit in which the quantity of sold goods is indicated. It’s possible to program 8 sales
units with a maximum of three characters.
10
Introduction
PLU
PLU (Price Look Up) is an abbreviation for the denomination of the specific goods (goods item). The PLU code
represents the goods name, the sale price, bar-code and flags (assignment to an department, VAT level, PLU
type etc.). For example: Fat milks - 0,85 GBP, White yoghurt - 1,20 GBP).
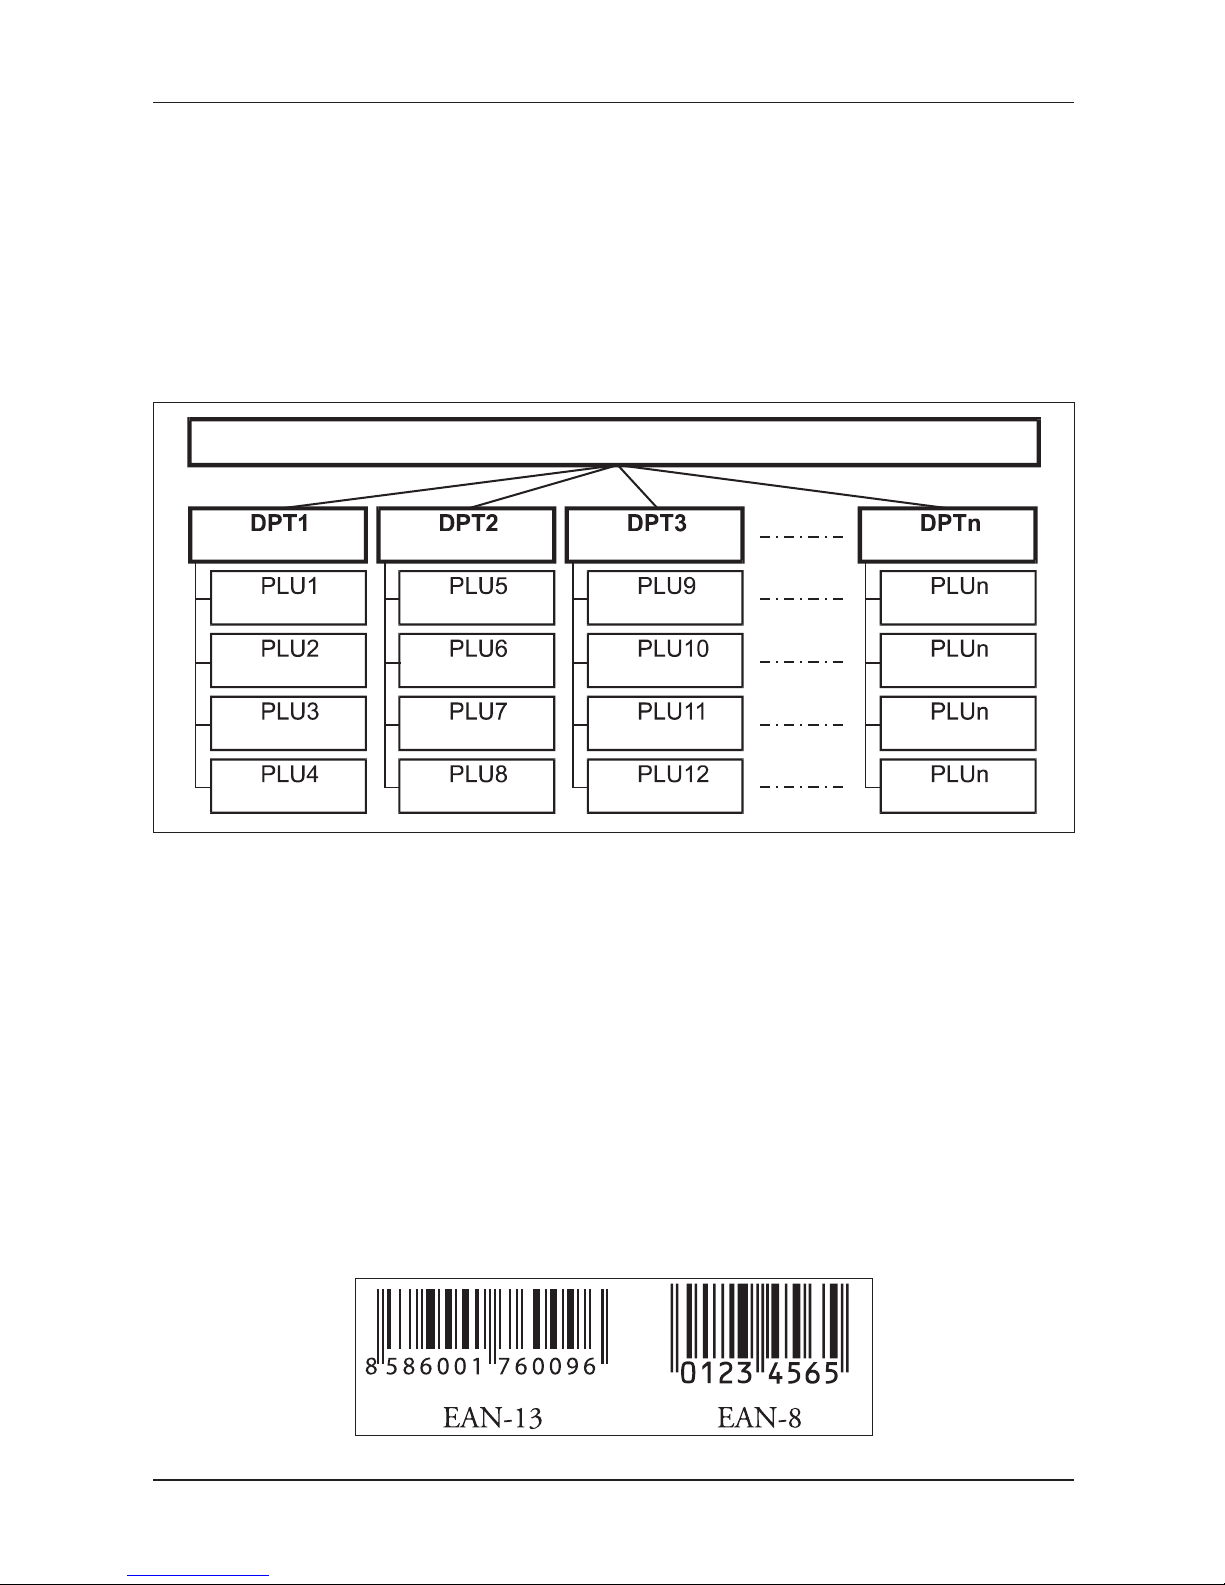
Connection between departments and PLUs
The example in figure 1.2 clearly illustrates the relation between the departments and the goods items
(PLUs). Sixteen PLUs and four goods groups were used here.
Figure 1.2 Connection between PLUs and departments
GOODS
Milk produce
Yogurt white
Whole milk 1L
Curdy cream
Eidam 30%
Report
A report is a sales overview of a particular choice (financial, total, cashier, PLU etc.)
There are two basic types of reports: “X” and “Z”.
“X” reports print the concrete sales values (according to the report chosen) without resetting the data.
“Z” reports print the sales values of the chosen report. After values print out, all values are reset to zero in
the cash register memory.
Bar code
Coding of the numeric description of products into bars corresponds with clearly defined international rules.
If a product has an assigned bar-code, it appears on each of these goods. The most frequently used code
for product or merchandise denomination in Europe is the 13-digit code according to the EAN norm (EAN-
13) and the 8-digit code (EAN-8).
Figure 1.3 EAN bar-codes

11
Introduction
Bar-code scanner
A bar-code scanning device is used to improve speed and accuracy in goods registration.
Figure 1.4 Bar-code scanner
System flags
System flags are basic settings of the cash register that largely influence correctness of cash register functions (number of decimal places, system of numbers rounding, date, time, etc.).
Cumulated totals (grandtotals)
Cumulated totals are variables that cumulate the values from all sales. There are usually three known grandtotals: GT1, GT2, and GT3. Their meaning is as follows:
GT1 – gross turnover - this means the cumulated total of all positive values registered in the cash register
GT2 – net turnover - the net turnover means the difference between gross turnover and negative turnover
GT3 – negative turnover - this means the cumulated total of all negative values (refunds, discounts...) regis
-
tered in the cash register.
CONCEPTS DEFINING THE LAUNCH OF THE EURO CURRENCY, OR PAYMENT
IN A FOREIGN CURRENCY
Conversion rate
The conversion rate is the total irrevocable fixed exchange rate between the euro and the national currency
which the Council of the Europe Union accepts according to special provisions and according to which the
currency will be replaced by the euro from the day the euro is introduced into the country.
Dual display
The dual display of prices, payments and other values is the depiction and introduction of prices simultaneously in the national currency as well as in the euro currency exclusively according to the fixed exchange
rate and other regulations for the changeover from national currency to the euro. Thus, prior to the day the
euro is launched, monetary sums presented in the national currency are at the same time introduced, for
informational purposes, in euros, and from the day the euro is launched, including the day of its launch,
sums presented in euros are also, For informational purposes, shown in the national currency.
Dual cash circulation
The period of dual cash circulation is designated as a temporary period of cash circulation which begins on
the day the euro is introduced and during which, by law, all cash payments may be made in any valid euro
banknotes and coins, including commemorative euro coins which were issued by the European Central
Bank, the National Bank, elsewhere in the eurozone or in participating third-party states, and at the same
time valid national banknotes and coins, including commemorative national coins which were issued by the
National Bank and which were valid on the day the euro was introduced.

Primary currency
The currency in which all important financial calculations are made and which for the authorised period of
the changeover to the euro currency is valid by law in a particular country.
Foreign (secondary) currency
An optional other currency serving for the making of payments and withdrawals concurrently with the primary currency. The cash register allows the recording of withdrawals and payments for one foreign currency.
The foreign currency can be the euro currency or another such as, for example, the American dollar. During
the phase of dual circulation of the euro currency and the national currency, however, the foreign currency
must be the national currency.
Dual currencies
The currency serving for informational calculation and display of monetary sums. It is generally not possible
to make payments, deposits or withdrawals in this currency. This does not apply if the dual currency is
identical to the foreign currency (dual cash circulation).

CASH REGISTER
CHARACTERISTICS

14
Cash register characteristics
PARTS OF THE CASH REGISTER, BASIC PARAMETERS
The Euro-500TE Handy electronic cash register belongs among portable electronic cash registers. It is light
and compact in design. The destination of such electronic cash registers usually are small establishments,
tent sale or as a back-up electronic cash register for the emergencies when power goes off. It is possible
to connect this electronic cash register to the computer, bar-code scanner and electronic scales. Other
accessories include external PC keyboard or cash drawer. Inner electronic cash register compartments can
hold two paper tape reels.
The characteristical feature of the Euro-500TE Handy is the capability to store the journal tape contents
electronically and printing it later. The memory capacity for the storage of electronic journal is at least 500
receipts, with eight items each.
According to the electronic journal flags, the stored journal can be printed along with daily report or separa
tely, or it can be transferred to a PC and there consequently processed/archived with accordance to local
fiscal law regualtions.
The data stored in the electronic cash register memory can be arranged in two formats (how to set up this
format, see next chapter on programming). The first format contains the sale data themselves, as shown in
the actual journal. Second format is designed for PC communication/processing (invoices, stock inventories…).
Other noticeable features include sales that must have a customer assigned (sales without assigned customer are not possible) and non-financial PLU movements.
Customer number is used for tracking of receipts in text and binary journal, usually by using of specialised
PC software. After transferring the sale data to PC, it is possible to process the sale data further to get
a more detailed overview of sales.
The special key sequences enable non-financial PLU movements (i. e. receiving/handing out stock, invento
ries and invoices) that allow you to issue special documents like delivery lists or others. This feature allows
the cashiers to make changes to electronic cash register’s article stocks and amounts, but the sale is not
included in the electronic cash register financial data. Depending on the cash register settings, the cash
register can perform a check that the given customer exists in the cash register descriptive PLUs database
prior actual handing out from stock. This handing out from stock can then be conveniently used when transferred into PC (issue an invoice, process stock, etc.).
The power for the Euro-500TE Handy can be supplied from:
• the mains, using a power adapter
• the internal accumulator
• from car battery (24 V) by using the CL (cigarette lighter) cable
Power adapter and accumulator are included with the cash register.
Optional accessories include customer display back-light, cash drawer, external battery box, PC communi
cation software…
15
Cash register characteristics
The electronic cash register offers many managerial functions. Its main destinations are small or medium
establishments or tent sale. Thanks to its low price, this electronic cash register is also frequently used as
back-up for larger electronic cash register models in case of power emergencies.
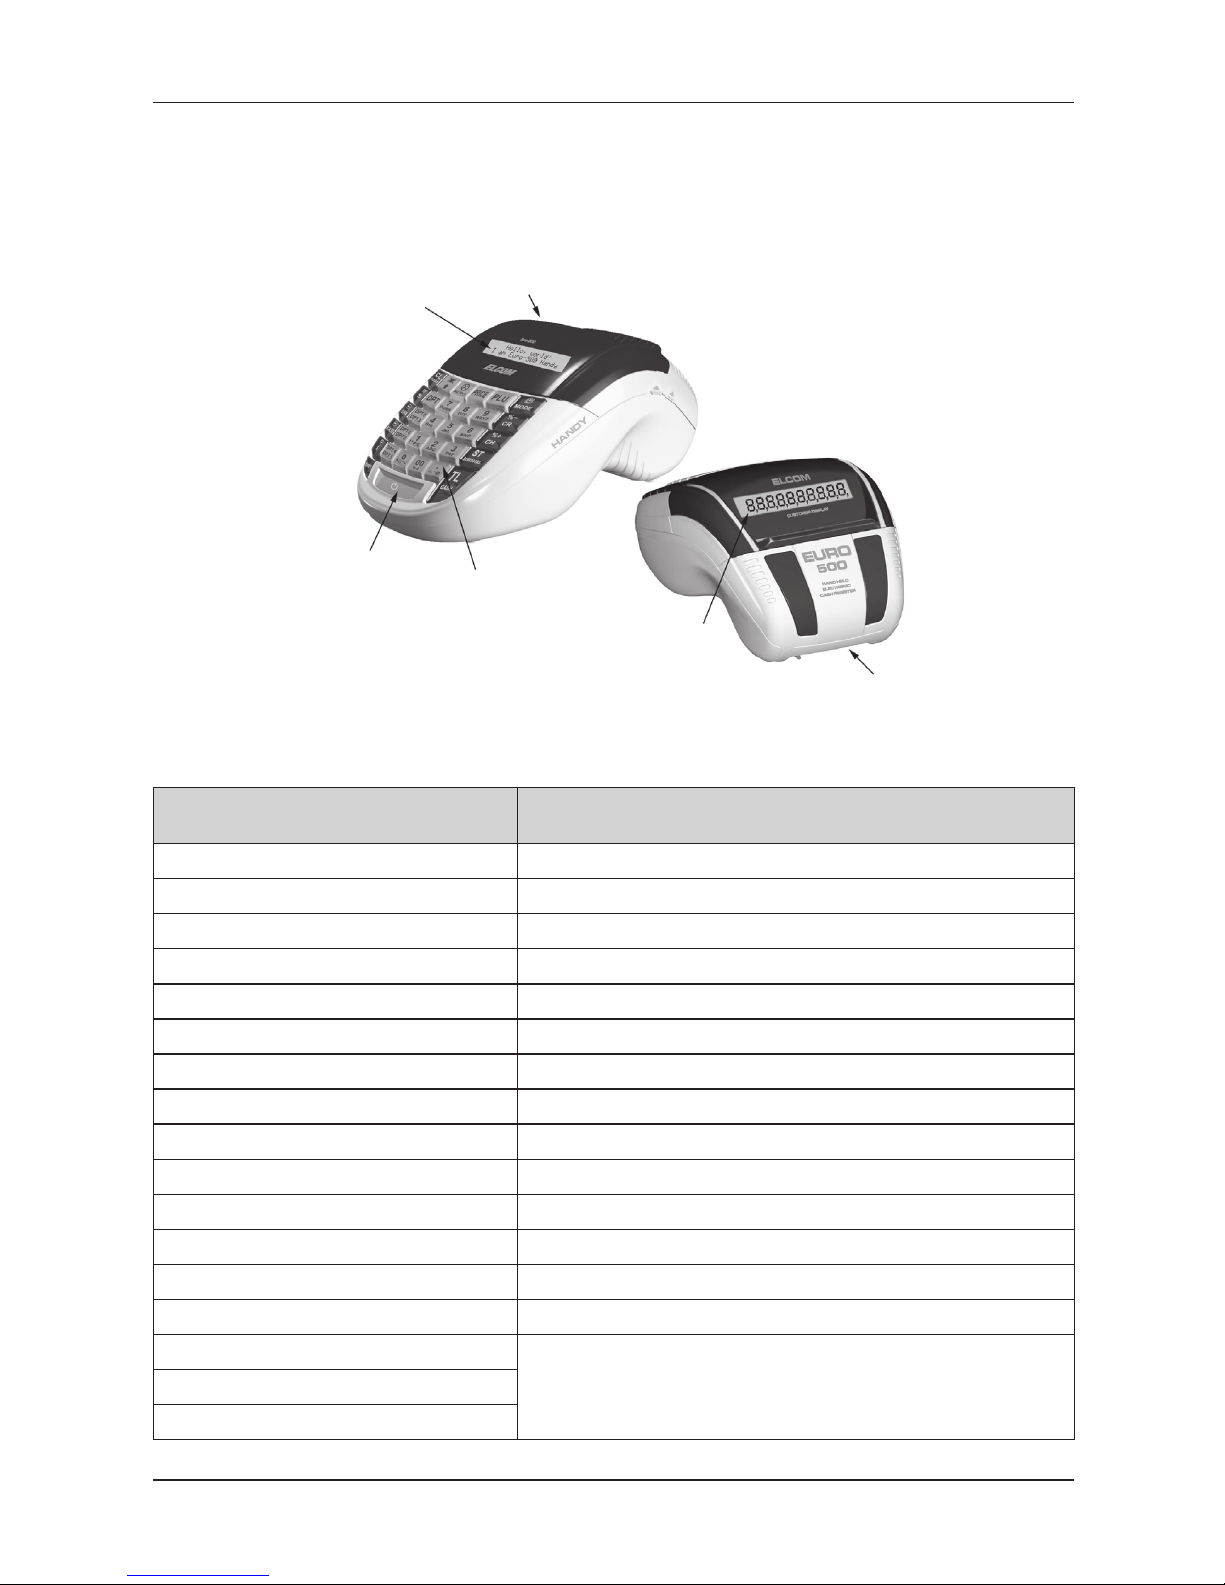
Figure 2.1 – Basic features of the Euro-500TE Handy
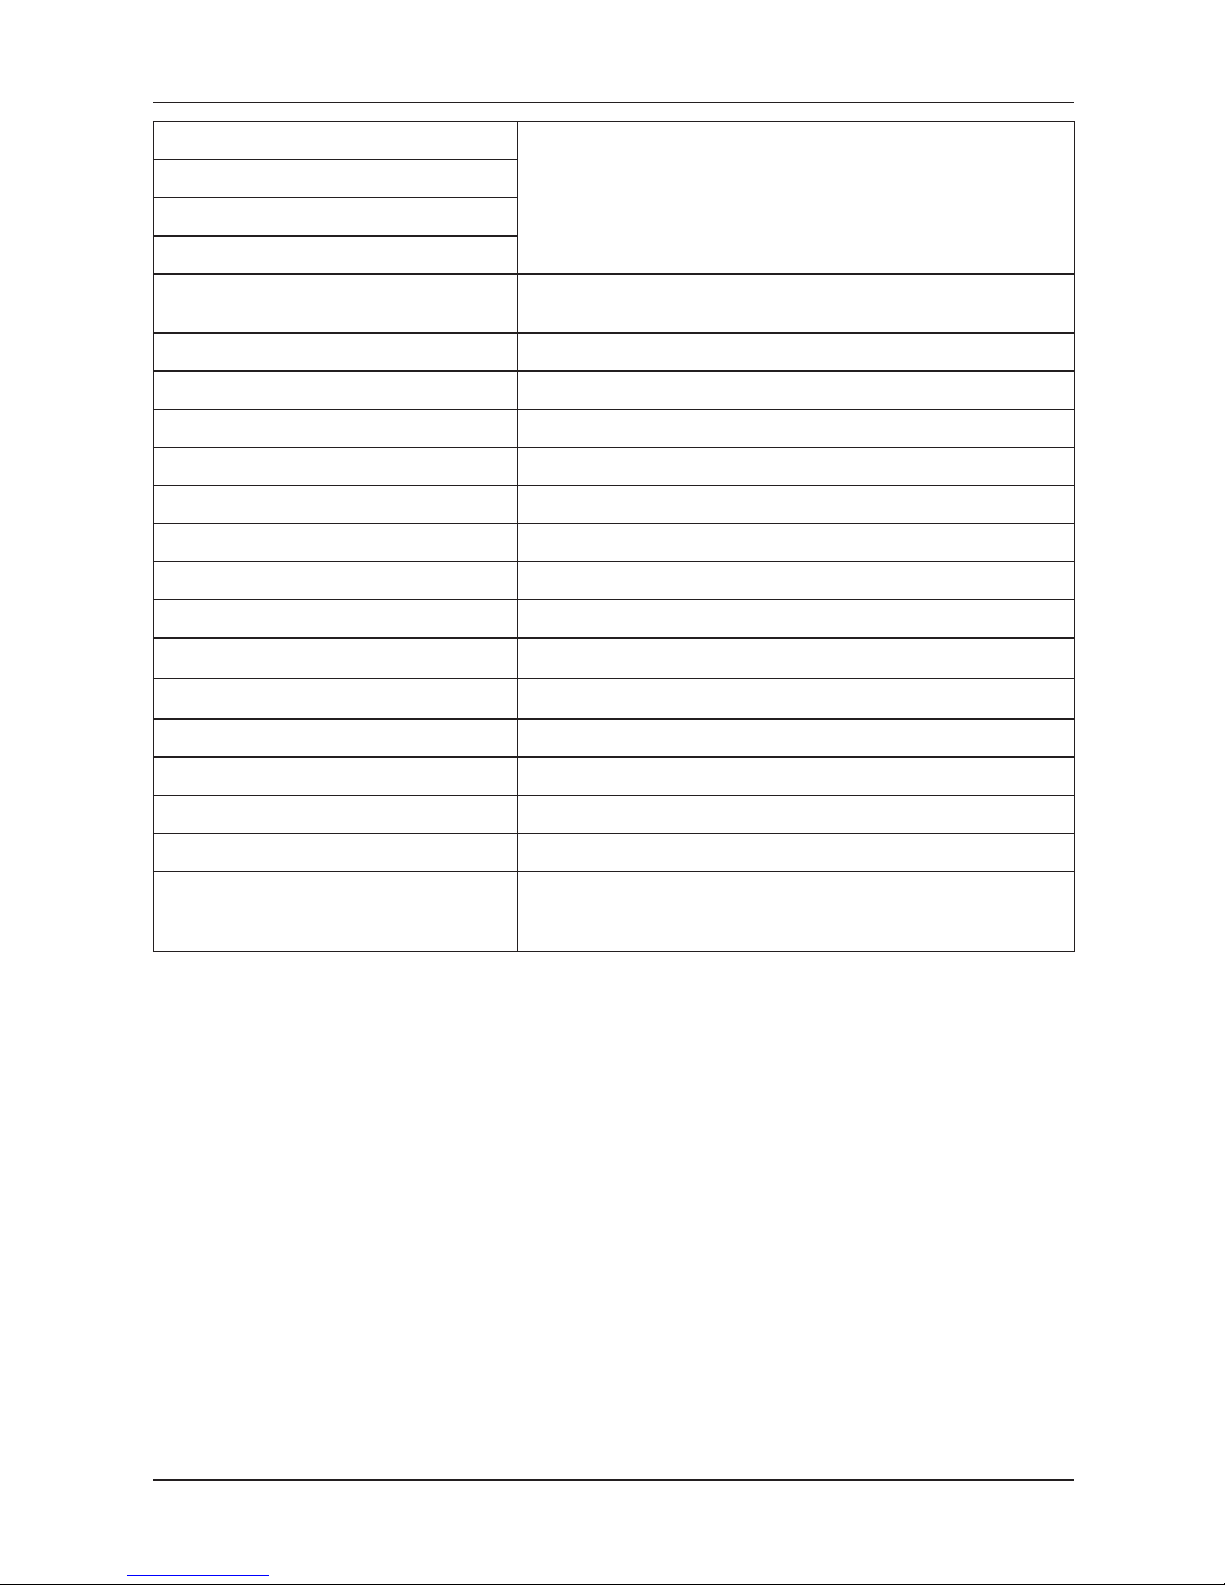
Figure 2.2. The Euro-500TE Handy parameters
Destination
from smaller businesses, drugstores, stationery stores, pubs, newspaper
stands to middle size supermarkets
PLUs 2400/5400 stock
DPTs 30
Cashiers 6
Cashiers login password, access rights
Tax levels
4
Printer thermal, Citizen MLT-288
Printing speed avg. 9lps
Paper ribbon thermo, 1x57 mm
Number of PLU name characters 14
Number of logo line characters 24/12 (normal/bold)
Top text logo max 6 lines (last line organization ID)
Bottom text logo
max 2 lines
Top graphic logo 360 x 120 pixels
Bottom graphic logo 360 x 240 pixels
Capital characters
yesBold characters
Special characters
16
Cash register characteristics
Keyboard description
Swedish
Programming language
Receipts language
Reports language
Reports
DPT, PLU, financial,
daily and monthly hourly, cashiers, daily, periodical,
interval, el. journal, data for PC, stock
Operation conditions temperature 0-45°C, humidity 80 % and lower by teperature 30°C
Cashier display alphanumerical 2 x 20 characters
Customer display 10 characters LCD
Clean Cash interface
RS–232
PC interface
RS–232
Scales and scanner 2 x RS–232
External keyboard PS/2, PC keyboard, EK-3000, EK-5000
Cash drawer solenoid 12 V, Rmax=30
�
Dimensions [mm]
165 x 300 x 130 mm
Weight
1,4 kg
Power adapter 230 V AC/12 V, 1,2A DC
Accumulator 2× NiMH 7,2 V/1500 mAh
Power saving mode yes
Power consumption max. 14
W
Optional accessories
cash drawer, digital scales, scanner, external keyboard, external PC key
-
board, built-in programmable keyboard, external battery box with car ligh
-
ter cable, car lighter cable, RS-232/Ethernet interface
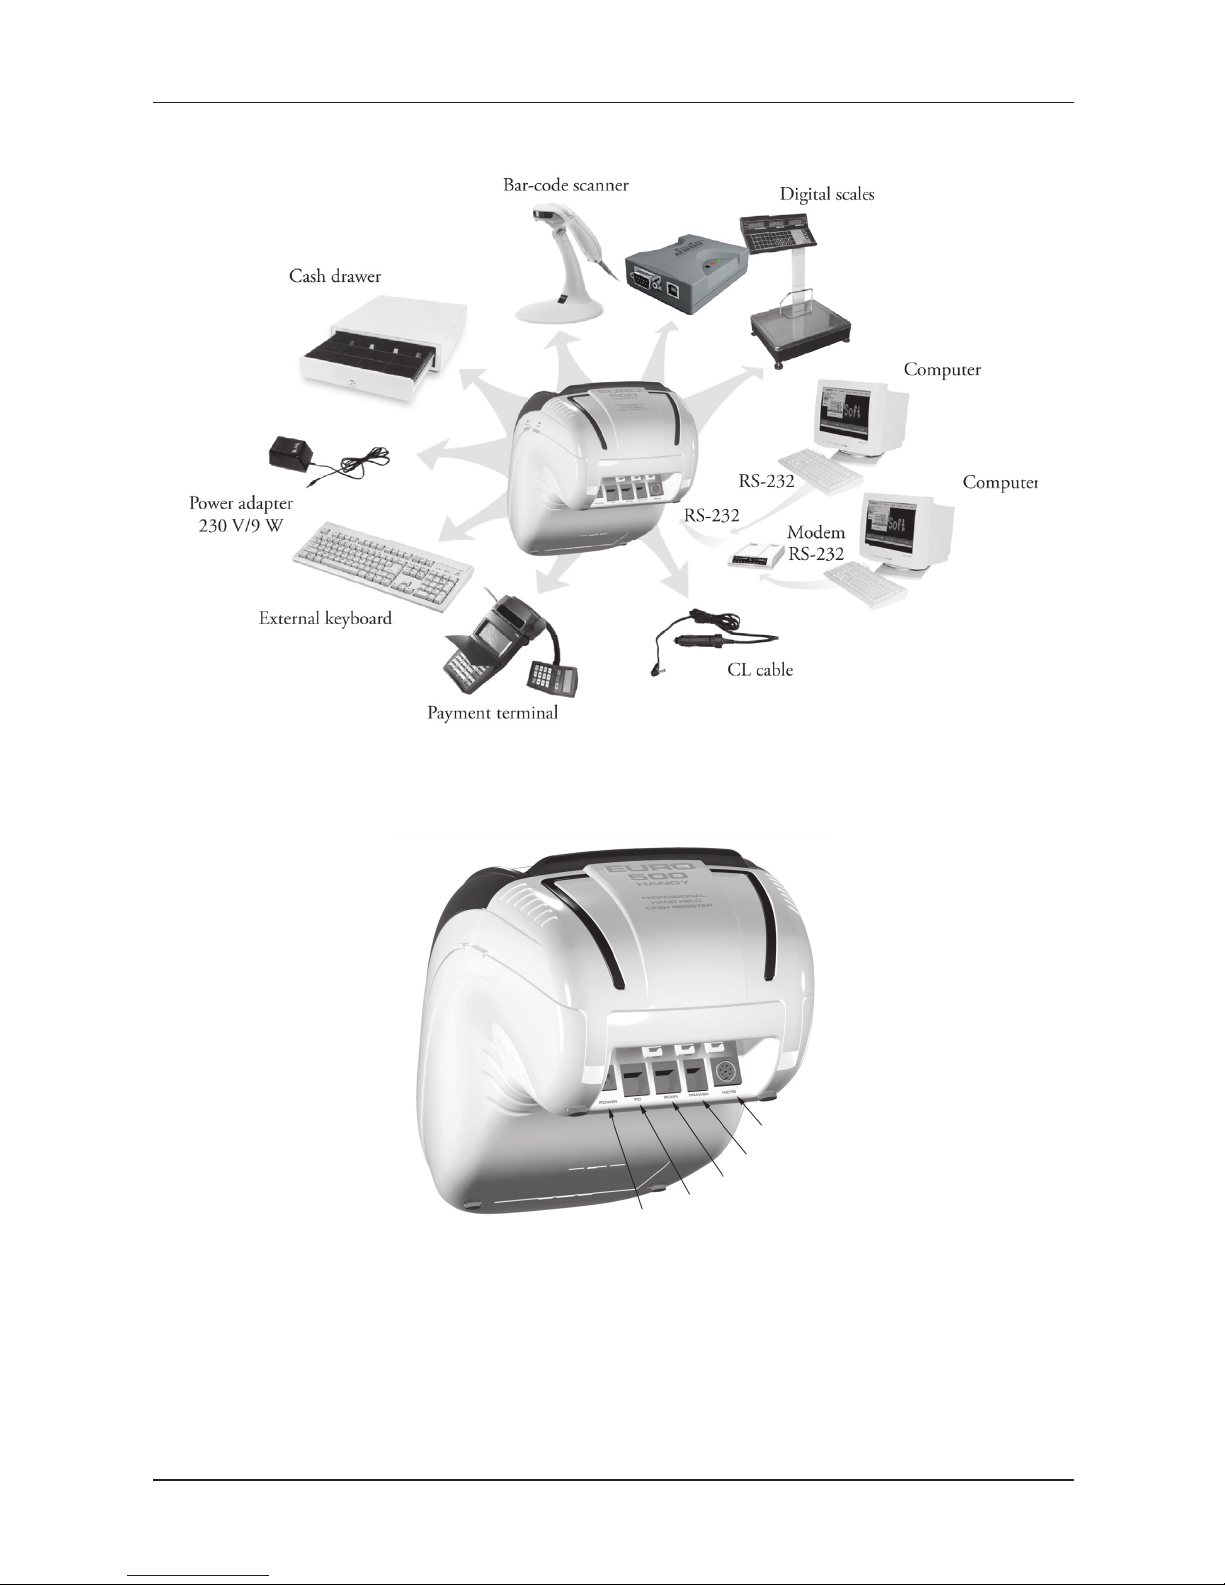
Peripheral devices
The optional external devices are plugged into connectors that are shown in figure 2.4.
Recommendation: Ask your cash register dealer on the possibilities for connecting optional external devi
ces to the electronic cash register.
17
Cash register characteristics
Figure 2.3 – External equipments for the Euro-500TE Handy
Journal
downloader
Figure 2.4 – Rear connectors of the Euro-500TE Handy cash register
POWER: Connection of the adapter or other external power supply
PC : Connection of the CleanCash, PC, External journal downloader
SCAN/SCALE
: Connection of the, scanner, electronic scales port
DRAW: Connection of the cash drawer
KEYB: Connection of the external keyboard
18
Cash register characteristics
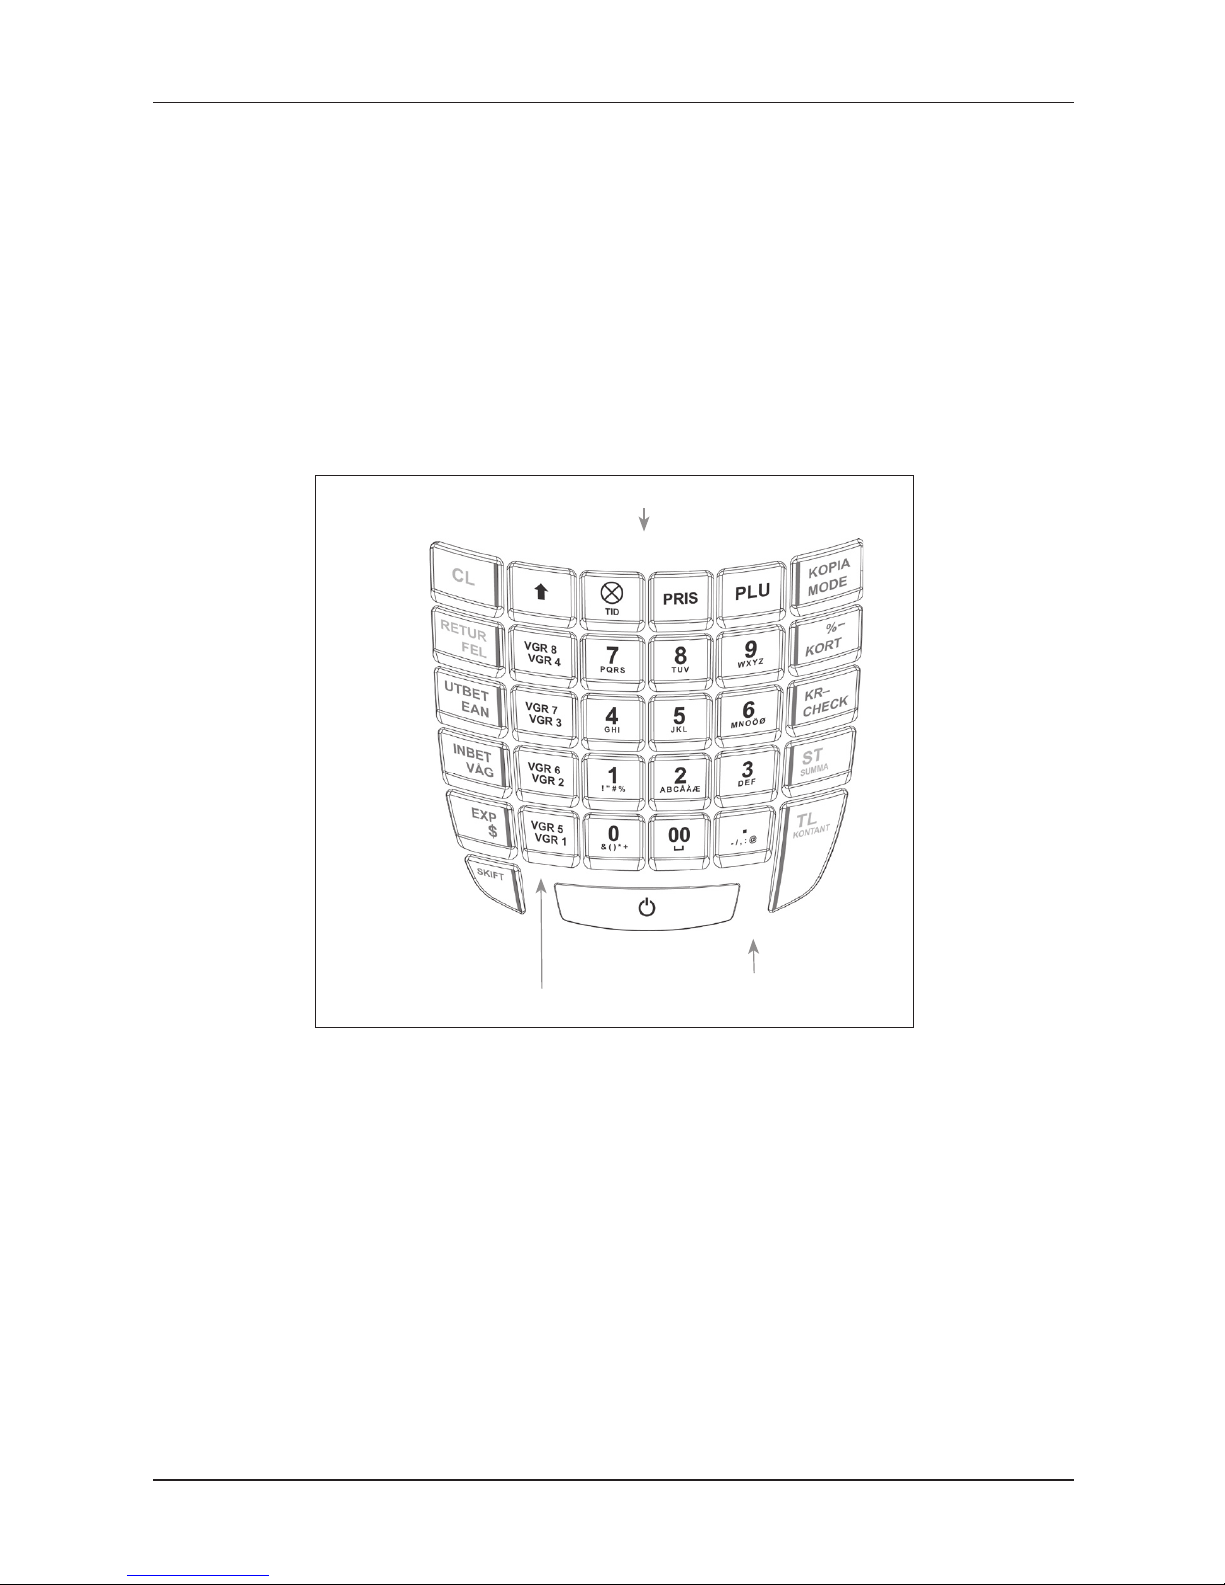
THE EURO-500TE HANDY KEYBOARD
Keyboard of the cash register Euro-500TE Handy is divided into three basic key groups – department
keys, numeric keys and function keys. If there are two functions on a single key, then you select the bottom
function by simply pressing the key. When you wish to use the top function on a key, the first press key,
then press the desired button. Shift key works in the sticky key mode. The keyboard is very comfortable and
is ready for daytime work. The keys are marked by large simple icons for fast orientation.
Warning: The keyboard is sensitive to dusty environments, humidity and dirt. Use dry clean cloth to clean
the plastic covers of the cash register. Never use cleaning agents as technical gasoline or solvents. Such
chemicals can damage the plastic cover or cause discolouration. If you need to clean heavily soiled plastic
parts, we recommend 3M cleaning spray.
Figure 2.5 – The Euro-500TE Handy keyboard
numerical keys
functional keys
department keys
NAMES AND FUNCTIONS OF THE CASH REGISTER KEYS
… NUMERICAL KEYS are used for entering numerical values and in the programming mode
„P“ are used for entering text. In Menu mode, numeric keys are used for direct contact to
items.
…
DPT1 and DPT10 provide direct contact to concrete DPT groups that can be sold.
The CLEAR button is used to clear an amount that has been entered incorrectly from the nume-
ric keyboard. This button also cancels an incorrectly entered function and the sound signalling
ERROR/ALARM. It cancels wrong letters when writing texts. In Menu mode is used to cancel
programming.
The VOID button is used to correct an item that has already been registered. It is also used for
function texts programming in “P” mode.
The Refund button enables you to pay back money, e. g. for damaged goods, during the sale
or as an independent transaction. It is also used for VAT levels programming in “P” mode.

19
Cash register characteristics
In the P mode it is used to program the bottom text logo, and in the menu listing it is used to
switch to the next item. This key allows you to enter the bar code directly from the keyboard in
“R” and “T” mode. In “P” mode, pressing this button allows you to print the concrete programmed values.
In the menu listing it is used to switch to the previous item. The Scales button is used to register
the weight of goods from the electronic scales. It is also used for PLU stock programming in “P”
mode. In “X” mode you can print out el. journal by pressing this key.
The PO (Paid out) button is used to register the paid out cash or checks from the cash register
as a non-business transaction. See paid-out function. In the void mode („R“ or „T“) this button
is used for page up or jump through 5 items back. It evokes a monthly (periodical) report in “X”
or “Z” mode. It is also used for logo programming in “P” mode.
The RA (Received on account) button is used to register the received payments if no business
transaction has been executed. It records, for example, the insertion of daily opening cash into
the drawer. In the void mode („R“ or „T“) this button is used for page down or jump forward
through 5 items. It is also used for system flags programming in “P” mode.
The Drawer button is used to print the customer number or other reference numbers on the
receipt. It is also used to open the drawer with no sale. In the void mode („R“ or „T“) this button
is used as arrow down or jump to next item. In the “X“ mode you can print out PC sale data by
pressing this key.
The Password button is used in “R” mode to identify the cashier by password and to permit the
cashier to log in. Through this method, the proper cashier claims responsibility for the transactions. The name of the logged-in cashier, is printed on each receipt header. The transactions are
recorded in the cashier’s account and are displayed in the cashier’s report. In the void mode
(„R“ or „T“) this button is used as arrow up or jump to the previous item. It is also used to evoke
the cashier report in “X” mode and for the cashier programming in “P” mode.
The Paper feed button feed the receipt ribbon without printing. The receipt ribbon is fed in
1,5 cm by pressing this button.
The Multiply button is utilized for multiplication if two or more pieces of the same item are being
sold. It is used for displaying the time in the registration mode.
The Price button enables manual entry of an item price rather than the preprogrammed PLU
or DPT price. It is also used for fast PLU price programming in “P” mode.
The PLU button (price look-up) enables to call out the programmed data about an item, price,
name, department, VAT, etc. See PLU transactions. It evokes a PLU report in “X” or “Z” mode.
It is also used for PLU programming in “P” mode.
The Mode button is used for switching into the individual modes of the cash register. Exit the
STANDBY mode by pressing this button. This key is used to enter menu mode in X, Z and P
mode.
After finishing a transaction, print out the same receipt again by pressing Duplicate button. The
receipt is denoted “COPIA”.
The Credit button is used to finalize the sale in case of credit card payment. In “P” mode, when
programming PLUs. This key is used in P mode to initialize the cash register. In X and Z mode
is used to print daily and monthly hour report.
The Check button is used to finalize the transaction in case of check payment. It also evokes
a financial report in “X” mode and is used for the programmed data printing in “P” mode.
, These buttons are used to substract percent or value discount for a particular item or for the
complete transaction according to the programmed values.
The value discount button is also used for sales units programming in “P” mode. The
percent discount button
is also used for extended flags programming in “P“ mode.
20
Cash register characteristics
The Subtotal button displays and prints the actual subtotal value according to the setting of the
fourth system flag. Also swith betwen submodes of non-financial PLU movements in “R” and
“T” modes. In P mode is used to set value and in menu mode is used to start programming.
The Total/Cash button is used to finalize the sale in case of cash payment. It also evokes a dai-
ly report in “X” or “Z” mode. This key is used to enter item in menu mode.
The function in an upper part of a key is chosen by pressing the Shift button and then pressing
the key with two functions. This key works similar to CAPS LOCK.
THE ELECTRONIC CASH REGISTER DISPLAYS DESCRIPTION
Cashier display description
The cashier display of Euro-500TE Handy is a two line alphanumeric LCD display with green back-light. In
first line is possible to display 10 characters, in second line 10 characters. The customer display has back-
-light installed by default.
Figure 2.6 – Alphanumerical LCD display
15:12:20
PROGRAM LÄGE P
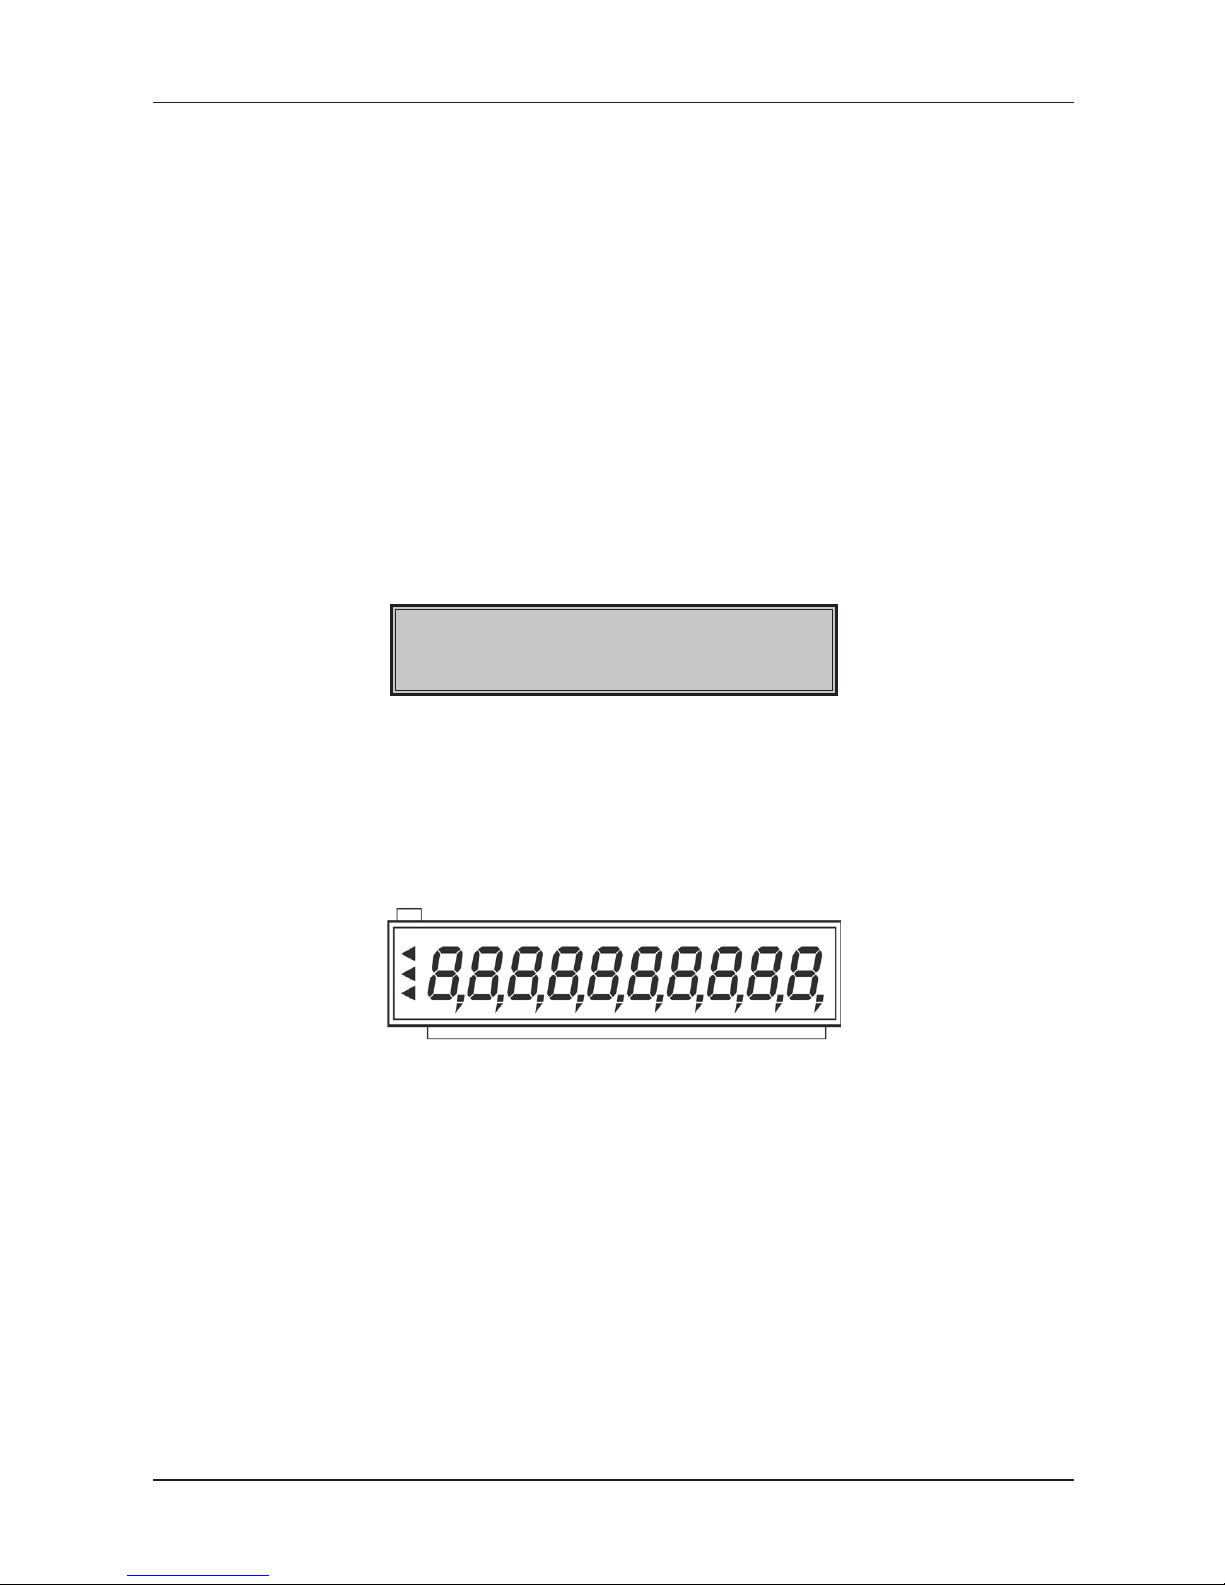
Customer display description
The customer display of the Euro-500TE Handy is the LCD type and contains 10 large numeric segments
and three arrow-shaped segments. This display can be divided into a numeric part and the part with arrows.
Figure 2.7 – Allocation of segment LCD display
Arrows
Numerical part
Changing of display backlight
The customer and operator display has backlight by default. The backlight of the displays can be switch
OFF or ON in X Mode ( ) by pressing key to change.
MODES SWITCHING
By combining the numerical keys from to and the (Mode) button it is possible to set the mode
of the cash register. Such switching thus enables the operator to work in different cash register modes
(registration, programming, reports, etc.).
„R“ Registration mode. This mode is used for all registrations and transactions. After switching into this
mode, the current date in the first line and current time in the second line appears on the display until you
begin registration.
Switching into the
„R“ mode:

21
Cash register characteristics
„X“ The „X“ mode is used to print sales reports. The printing of “X” reports does not reset the current sales
data.
Switching into the „X“ mode:
15:12:50
X LÄGE
„Z“ The „Z“ mode is used to print various reports. The printing of “Z” reports resets the cash register sales
data.
Switching into the „Z“ mode:
15:12:50
Z LÄGE
„P“ The “P” program mode is used to program all values and functions of the cash register.
Switching into the “P” mode:
15:12:50
PROGRAM LÄGE P
„T“ The training mode provides all functions of the “R” mode, but in this mode, the transactions are not included
in the daily or monthly (periodical) reports. The receipts printed in this mode are marked by the text “Invalid document”.
15:12:50
OVNINGSLÄGE
Switching into the “T” mode:
„STANDBY“ When the cash register is not operated for certain time limit (see chap. System flags program-
ming) and it is supplied from internal power supply, it will switch into the “Standby” mode. A cash register in
the “Standby” mode has a low consumption of energy. The notification “Standby” appears on the display.
STANDBY
Exit the “STANDBY” mode by pressing the (Mode) button. In case the cash-register is supplied from
external power supply then stand by mode is not called.
PLACING THE PAPER TAPES INTO PRINTER
The cash register Euro-500TE Handy uses thermal paper tapes of 57 mm/1 1/10" width. Left paper tape
(viewing from the cash register front, see figure 2.1) is the receipt tape, the paper tape on the right is the
journal tape.
Only quality paper reels are recommended, with maximum diameter of 55 mm/2 1/6". Make sure, that
the print is sufficiently visible on the tape. If you encounter any problems, please contact your authorised
dealer.

22
Cash register characteristics
How to place the paper tape reels into the Euro-500TE Handy (numbers are relative to figure 2.8):
Pull back the cash register cover (2) open by pulling its side grips and consequently also flip the middle
cover (1) open. Take out the reel separator (5) along with empty paper tape reel, remove the reel and replace
it with new one so that it unwinds in the indicated direction (see arrows). Insert the separator back into its
ridges in the back compartment of the cash register. Trim the tape’s end using scissors and make sure that
the end is not soiled with dirt or glue. Gently insert the receipt tape (3) into printer. The printer will feed the
tapes into its mechanism automatically. Close the middle cash register cover (1). Fix the journal tape onto its
winding reel; feed some more tape if needed by pressing
g
. Wind back any slack tape onto its reel. Finally,
trim the receipt tape as needed.
Figure 2.8 Inserting the paper tapes into the cash register printer
Figure 2.9 Inserting the paper tapes into the cash register printer (lateral view)
Figure 2.10 The Euro-500TE Handy printer head positions

23
Cash register characteristics
Note: If the tape will be jammed, lift the printing head by printer head lever (see figure 2.10) and remove the
tape. Trim or otherwise remove the jammed paper and re-insert the tape.
USAGE AND STORAGE OF PAPER TAPES.
The Euro-500TE Handy uses paper tapes of 57 mm width. The common storage conditions for maintaining
the print are:
• do not expose tapes to direct sunlight
• do not expose tapes to temperatures above 40 °C/104 F
• avoid contact with mollified PVC, mollifying agents, organic solvents, glues, and water; avoid using glue
on printed parts when storing receipts in an accounting book
Some legal systems may require you to store receipts for certain period of time. Stick to the storage conditi
ons described by the thermal paper manufacturer. Recommended thermal tape is the Jujo Thermal paper.
The selected paper tapes must preserve the print for prescribed legal period. If you use low quality paper
tapes, Elcom doesn’t guarantee for required length of print durability.
Replace the paper tapes when the coloured side strip appears, indicating the tape’s end. Late exchange
could damage the cash register printer or shorten its life span.


PROGRAMMING MANUAL

26
Programming manual
INITIALIZATION
If the electronic cash register is being used for the first time, it’s suggested to first initialize the electronic
cash register. At initialization, all information will be erased from the electronic cash register and the electronic cash register will have factory default settings and data. Only the cumulative sum – GT, the order number
of the daily and monthly reports and the value of the first system flag – will be unaffected. Initialization can be
done only after a daily or monthly (periodic) report in Z mode and the saving of the electronic journal.
Initialization procedure:
1) Start the cash register by pressing
, then switch to P mode.
15-05-2009
P 19:05:33
2) Press key . The words „Memory clearing“ will appear on the display and in the bottom row will be the options for continuing with data erasing ( Y-ST ) or cancellation of initialization
( N-CL ).
Minnet Rensas
PROGRAM LÄGE P
3) To confirm initialization, press (SUBTOTAL). To cancel, press .
4) To confirm the setting for the number of PLUs, press
(SUBTOTAL), or cancel the initialization
with key (TOTAL).
5) Enter the date in the format (DDMMRR) and the time as (HHMM).
ANGE DATUM ANGE TID
6) After entering of the date and time, the cash register will print a message summarizing memory allocation Memory clearing.
Minnet rensas
Minnet rensat
RECOMMENDED PROCEDURE FOR THE EURO-500TE HANDY PROGRAMMING
The menu in Programming mode
This function allows the user to list the electronic cash register settings on the display and to set parameters
like PLU, system flags and descriptive text. This menu can be accessed after switching into P mode, by
pressing the (MODE) key. The setting parameter will appear in the top row, and the order number of the
set item with the description “Select – TL” will appear in the second row.
PLU LAGER
1 SELECT - TL

27
Programming manual
Shifting between items can be done with the (SUBTOTAL), (SCALE) or
(RA) keys to switch to next item
and with the
(EAN),
(PO) key to go back to the previous item in the list. To start the setting dialog, press the
(TOTAL) key or to cancel a listing, press (CLEAR).
After entering the programming dialog, the electronic cash register will request the input of the specific
item number to be programmed (number of PLU, DPT, system flag, etc.). The entered number has to be
confirmed with the
(TOTAL) key or programming cancelled with the (TOTAL) key. Incorrect values
can be deleted with the (CLEAR) key.
Please note: If when selecting a specific item no number is entered, programming will start from the first
item. To enter an item number, use the numeric pad
– or use , and to enter a 10th,
11th, and 12th, number.
List with items in the P mode menu
Euro-500 TE
1. PLU STOCK
2. PLU
3. PLU PRICE
4. DPT
5. SYSTEM FLAG
6. EXT FLAG
7. UPPER LOGO
8. LOWER LOGO
9. FUNCTIONAL TEXTS
10. TAX
11. UNITS
12. CASHIER
13. CURRENCY
14. VERSION INFO
The recommended procedure for electronic cash register programming advises a user to program the
electronic cash register in the following order: 1) system flags, 2) tax levels, 3) extended flags, 4) receipt
logo, 5) cashiers, 6) function texts, 7) departments, 8) sale units, and finally 9) article items (PLUs)
The Version Info is showing the actual firmware version that is installed on the electronic cash register and
the manufacturer of the electronic cash register.
SYSTEM FLAGS PROGRAMMING
Prior to programming of the electronic cash register, it is recommended that this subchapter is carefully
studied and clearly understood.
Note: If a key is used for two functions, choose the function in a lower part of a key by pressing the key. To
choose the function in the upper part of a key, press the (Shift) key and press the particular key. The
key is working in sticky shift mode.

28
Programming manual
Initial programming of system flags
The system flags represent settings that have primary influence on the proper performance of the cash
register (number of decimal places, rounding, date, time, etc.).
System flags programming procedure:
1) Switch the cash register into the “P” mode by pressing
. On the display appears „P” (left
bottom on the display). Only a cashier authorised for the programming mode can set the cash register into the “P” mode.
2) Press
(RA) buttons.
301222
SF1:
3) After entering flag values, store them by pressing the (Subtotal) button. The programming of
the next flag follows. Continue until you have programmed all necessary flags.
4) Finish flags programming by pressing the (Total) button.
System flags correction
1) To change the settings of any system flags, switch the cash register into the “P” mode by pressing
.
2) Enter the flag number to be edited and press the
(RA) buttons.
3) Enter desired flag value and press the (Subtotal) button.
4) Print the new programmed settings by pressing the (Check) button.
5) Finish the programming by pressing the (Total) button.
System flags values print out
In the programming mode, select the flags programming by pressing the
(RA) buttons. Press the
(Check) button to print the flags values. It is possible to print the value of currently programmed flag by
pressing the (EAN) button.
Flag 1 – Number of decimal places, method of rounding, TAX system…
Figure 3.1 First system flag values
Digit
Default setting
Meaning
Valid values
1 3
System of rounding:
0 – up from 5,
1 – always up,
2 – always down,
3 –special rounding
2 0
Tax system:
0 – VAT
1 – TAX
3 1 Number of decimal places to which total price should be rounded 0 - 2
4 2 Number of decimal places to which VAT should by rounded
0 – 35 2 Number of decimal places to which price should be rounded
6 2 Number of decimal places to which price, VAT should be displayed
Note: Value of the first system flag can be changed only if Grand Totals are zero.
29
Programming manual
Flag 2 - TAX printing, number of logo lines, blank lines…
Figure 3.2 Second system flag values
Digit
Default setting
Meaning Valid values
1
0
TAX values printing
0 - Net and gross tax value are not printed
1 - Net and gross tax value are printed
2
0
Date format 0 – dd-mm-yyyy, 1 – mm-dd-yyyy
3
3
Number of decimal places of quantity values 0 – 3
4
3
Number of blank lines between receipts 0 – 6
5
6
Number of logo lines 0 - 6
6
0
Split pricing/successive multiplication entries
0 – split pricing,
1 – successive multiplication
7
0
Print of unit amount
0 - not printed
1 - printed
Flag 3 - Receipt consecutive number, cash register number
Figure 3.3 Third system flag values
Digit Default setting Meaning Valid values
1 01 Cash register number (01 – 99)
Flag 4 - Required operations
Figure 3.4 Fourth system flag values
Digit Default setting Meaning Valid values
1 1 Subtotal amount print out after Subtotal key is pressed 0 – no, 1 – yes
2 0 Required Subtotal key pressed before receipt is finished
0 – not required,
1 – required
3 0 Required Credit Card number entering if paid by Credit
0 – not required,
1 – required
4 0 Required customer’s payment amount entering
0 – not required,
1 – required
30
Programming manual
Flag 5 - Communication with PC and payment terminal
Figure 3.5 Fifth system flag values
Digit Default setting Meaning Valid values
1 0 Terminal character for bar-code scanners 0 – CR LF, 1 – CR, 2 – LF
2 3 Bar-code scanner communication speed
0 – 1,200 Bd, 1 – 2,400 Bd, 2 – 4,800 Bd,
3 – 9,600 Bd, 4 – 19,200 Bd
3 1 PC/CleanCash communication speed 0 – 9,600 Bd, 1 – 38,400 Bd
4 0 Digital scales’ communication protocol
0 - CAS Morcan, MARTES T
1 - Euro scales, MARTES M
2 - Macca K
3 - Dibal
4 - Motex R
6 - Mettler Toledo
7 - ACOM
8 - CAS Morcan TP2
5 0 Data transfer direction in PC ON-LINE mode 0 – function is not used
6 0 Payment terminal’s communication protocol
0 – communication with payment terminal is
forbidden
7 0
External Journal Reader connectivity (Port replica
-
tion)
0 - device is not used
1 - device is connected
Flag 6 - Printing mode settings
Figure 3.6 Sixth system flag values
Digit
Default setting
Meaning Valid values
1 0
Printing modes without external power
supply
0 – normal mode
2 0 Printing modes with external power supply
3 0 Upper graphical logo printing
0 - Logo is not printed
1 - Logo is printed
4 0 Lower graphical logo printing
5 0 Font size 0 – normal font: character height approx. 3 mm,
6 1 Standby mode
0 – standby inactive,
1 – standby after 1 min.,
2 – standby after 5 min.,
3 – standby after 10 min.,
4 – standby after 15 min.
Note: Graphic logo can be programmed with help of the Euro2A software.
Flag 7 - Limit and value of the percent add-on
You can shift from limit to value programming by pressing the (SUBTOTAL) button. The directional arrow
shows if either limit or value, is actually programmed.
Figure 3.7 Seventh system flag values
Digit Default setting Meaning Valid values
1 - 2 Left 00 Limit for the percent add-on entered during sale 00–99
3 - 6 Right 0000 Programmed percent add-on value (to program 10% add-on enter 1 0 0 0) 0000–9999
 Loading...