

Page 1
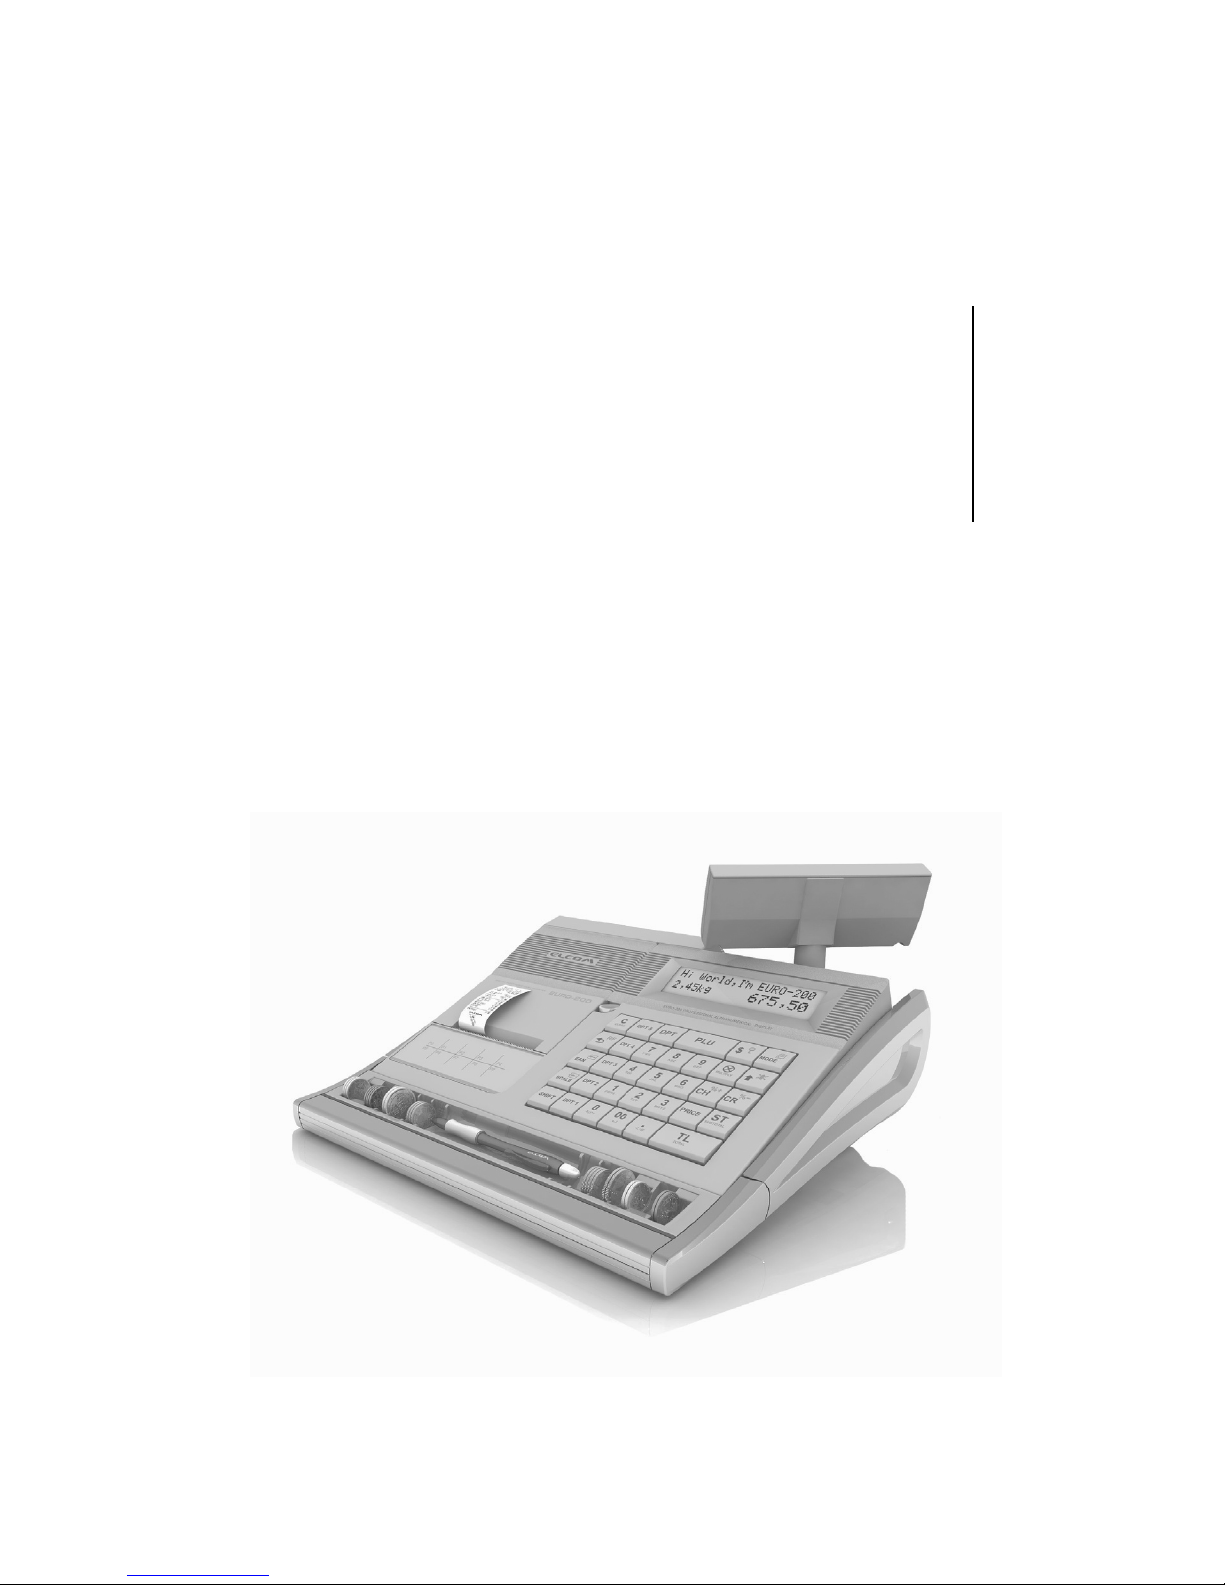
Euro-200T/TX
User manual
version 1.0
Page 2

This manual was not subject to any language revision.
This manual cannot be copied or otherwise forwarded without editor’s consent.
All rights reserved © 2006, Elcom s. r. o.
Page 3

TABLE OF CONTENTS
INTRODUCTION ..........................................................................................................................7
Important .................................................................................................................. 8
Basic definitions ........................................................................................................ 9
Logo .................................................................................................................................. 9
Department ......................................................................................................................... 9
Tax level .............................................................................................................................
9
Sales units ..........................................................................................................................9
PLU ................................................................................................................................... 9
Connection between departments and PLUs .......................................................................... 10
Report .............................................................................................................................
10
Bar code .......................................................................................................................... 10
Bar-code scanner .............................................................................................................
10
System flags .....................................................................................................................
11
Cumulated totals (grandtotals) .............................................................................................. 11
CASH REGISTER CHARACTERISTICS ...................................................................................13
Parts of the cash register, basic parameters ................................................................. 14
Peripheral devices ............................................................................................................. 16
Euro-200T/TX keyboard ........................................................................................... 17
Names and functions of ECR keys .............................................................................. 18
Optional programmable keyboard ............................................................................... 19
ECR displays description .......................................................................................... 20
Cashier display description ..................................................................................................
20
Customer display description ...............................................................................................
20
Modes switching ..................................................................................................... 20
Paper ribbons instalation ........................................................................................... 21
Usage and storage of thermal paper ...................................................................................... 22
Customer display slide-out ........................................................................................ 22
Gripping of money separator to ECR ........................................................................... 23
PROGRAMMING MANUAL .......................................................................................................25
Initialisation ............................................................................................................. 26
Recommended procedure for Euro-200T/TX programming ............................................ 26
System Flags programming ....................................................................................... 26
Initial programming of system flags ........................................................................................ 26
System flags correction ...................................................................................................... 27
System flags values print out ................................................................................................
27
Flag 1 – Number of decimal places, method of rounding, TAX system… .................................................. 27
Flag 2 - TAX printing, number of logo lines, blank lines… ....................................................................... 27
Flag 3 - Receipt consecutive number, cash register number .................................................................. 28
Flag 4 - Required operations ............................................................................................................ 28
Flag 5 a) - Communication with PC and payment terminal ...................................................................... 28
Flag 5 b) - Scanner and scales configuration ....................................................................................... 28
Flag 5 c) - External RS-485 converter settings .................................................................................... 29
Flag 6 - Printing mode settings ......................................................................................................... 29
Flag 7 - Limit and value of the percent add-on ..................................................................................... 29
Flag 8 - Limit and value of the percent discount ................................................................................... 30
Flag 9 - Time setting ....................................................................................................................... 30
Flag 10 - Date setting ...................................................................................................................... 30
Page 4

Extended flags programming ..................................................................................... 30
Tax rates programming ............................................................................................. 31
Correction of the tax level values ..........................................................................................
31
Printing of the programmed tax values ...................................................................................
32
Receipt text logo programming .................................................................................. 32
Correction of the text logo lines ............................................................................................
32
Printing the programmed logo lines .......................................................................................
32
Receipt graphic logo programming ............................................................................. 33
Cashiers programming ............................................................................................. 33
Correction of cashiers values ...............................................................................................
34
Printing of cashiers values ...................................................................................................
34
Function texts programming ...................................................................................... 34
Correction of function texts ..................................................................................................
34
Function texts print out ....................................................................................................... 35
Departments programming ........................................................................................ 35
Departments correcting ...................................................................................................... 36
Department values print out ................................................................................................. 37
Sale units programming ............................................................................................ 37
Programmed sale units correcting ........................................................................................ 37
Sale unit settings print out ................................................................................................... 37
Article items (PLU) programming ................................................................................. 38
Setting up the bar-code scanner ...........................................................................................
40
Quick PLU price programming .............................................................................................
40
Quick PLU stock programming .............................................................................................
41
Correction of programmed PLUs ..........................................................................................
41
Programmed PLUs print out ................................................................................................. 41
Programming the Euro currency ................................................................................. 42
Phase without Euro currency ............................................................................................... 42
First Euro currency phase ................................................................................................... 42
Second Euro currency phase ..............................................................................................
43
Third Euro currency phase ..................................................................................................
43
Entering texts into the ECR ........................................................................................ 44
Programming of the optional programmable keyboard keys ............................................. 44
The key function deleting .................................................................................................... 45
Printing of the programmed key name ................................................................................... 45
Printing of the programmed key function ................................................................................
45
Printing of the settings for all keys .........................................................................................
45
OPERATION IN REGISTRATION MODE ..................................................................................47
Recommended procedures at the beginning of the day .................................................. 48
Status and functions that are required to know before the beginning of registration ............. 48
Error warning: the C
LEAR key ................................................................................................ 48
Cashier log in: the Password key ..........................................................................................
48
Cashier log out: the Password key ........................................................................................ 48
Finalizing a transaction: Cash, Cheque, Credit keys .................................................................
49
Samples of basic registration procedures .................................................................... 49
Registration using departments .................................................................................. 50
Basic registration using departments .....................................................................................
50
Registration using departments with price entry from keyboard ..................................................
50
Registration using departments with pre-programmed price ...................................................... 51
Registering multiple items using departments .........................................................................
52
Page 5

Items multiplying during registration using departments ............................................................ 52
Registering fractions of items using departments .....................................................................
52
Double multiplication of items during registration using departments ...........................................
53
Single item sales using departments ..................................................................................... 53
PLU registration ....................................................................................................... 54
Basic PLU registration ........................................................................................................
54
Multiplication in PLU registration ........................................................................................... 54
Individual PLU registration ...................................................................................................
55
Overwriting the pre-programmed PLU price ............................................................................
55
Fractional PLU registration ..................................................................................................
56
Double multiplication in PLU registration ................................................................................
56
Linked PLUs registration. .................................................................................................... 56
Other possibilities of registration ................................................................................. 56
Registration using bar-codes ...............................................................................................
56
Weight entry by electronic scales ......................................................................................... 57
Connection of two electronic scales ......................................................................................
57
Registration using an external PC keyboard ............................................................................
57
PC ON-LINE mode ............................................................................................................. 58
Data are transmitted from a PC to the cash register .............................................................................. 58
Data are transmitted from the cash register to PC ................................................................................ 58
Corrections ............................................................................................................ 59
Clearing ........................................................................................................................... 59
Voidance .......................................................................................................................... 59
Percent surcharge and discount ................................................................................. 60
Percent surcharge .............................................................................................................
60
Percent discount ............................................................................................................... 61
Value surcharge and discount ..............................................................................................
61
PLU price lookup .................................................................................................... 62
Reference number or customer number printing ........................................................... 62
Received on account ............................................................................................... 62
Paid out (cash or cheque) ......................................................................................... 63
Refunds ................................................................................................................. 63
Registration using the Euro currency ........................................................................... 65
Phase without Euro ............................................................................................................ 65
First Euro currency phase ...................................................................................................
65
Second Euro currency phase ..............................................................................................
66
Third phase of the Euro .......................................................................................................
66
REPORTS ...................................................................................................................................69
How to print out reports ............................................................................................ 70
Generated reports ................................................................................................... 70
Reports contents ..................................................................................................... 70
Department report .............................................................................................................
70
PLU report ........................................................................................................................
70
PLU stock report ................................................................................................................
71
Financial report ................................................................................................................. 71
Cashier report ...................................................................................................................
71
Total daily “X” report ...........................................................................................................
72
Periodical “X” report ...........................................................................................................
72
Total daily “Z” report ...........................................................................................................
72
Periodical “Z” report ........................................................................................................... 72
Hours daily report ..............................................................................................................
72
Page 6

Hours periodical report ....................................................................................................... 72
How to print “X” reports ............................................................................................ 72
Samples of “X” reports ........................................................................................................
73
How to print “Z” reports ............................................................................................ 76
Samples of “Z” reports ........................................................................................................ 76
EURO2A SOFTWARE ................................................................................................................79
OPTIONAL ECR ACCESSORIES ..............................................................................................81
Cash drawers ....................................................................................................................
82
Electronic scales ............................................................................................................... 82
Bar-code scanners .............................................................................................................
82
Metrologic MS-5145 ECLIPSE ......................................................................................................... 82
Metrologic MS-6720 ...................................................................................................................... 82
Metrologic Orbit MS-7120 ............................................................................................................... 82
Metrologic MS-9520 Voyager .......................................................................................................... 83
Electronic payment terminals ...............................................................................................
83
External keyboard ..............................................................................................................
83
UV LED banknote checker ..................................................................................................
83
LAN connection options ...................................................................................................... 83
New features of Elcom ECRs ............................................................................................... 83
Optional programmable keyboard .........................................................................................
84
Extended RS-232 ports ......................................................................................................
84
RS-485 interface ...............................................................................................................
84
HELPFUL ADVICE .....................................................................................................................85
Information and error messages ................................................................................. 86
What to do in case of power failure? ............................................................................ 88
Power failure .....................................................................................................................
88
Failures of ECR as a result of interference in power network ..................................................... 88
Signalization of internal accumulator conditions .......................................................................
88
Self tests ................................................................................................................ 88
Self-test of the electronics and display ................................................................................... 89
Self-test of the printer .........................................................................................................
89
Self-test of the thermo printer head position ........................................................................................ 89
Self-test of the paper ribbons sensor ................................................................................................. 89
Self-test of the keyboard .....................................................................................................
89
Self-test of the keyboard II. .................................................................................................. 90
Page 7

INTRODUCTION
Page 8

8
Introduction
ELCOM company wishes to thank you for the purchase of the Euro-200T/TX. Please read the instructions to become
familiar with its functions and operations before you start to operate this equipment. Keep this manual for future use.
It will help you solve most problems encountered in operating the Euro-200T/TX.
IMPORTANT
• Do not leave appliance unattended.
• Install the cash register in a place where it will not be exposed to direct sunlight, unusual temperature
changes (under 0 °C and above 45 °C) or high humidity. Installation in such places could result in damage to both the casing and electrical components.
• Before first use leave the cash register turned on connected to external charger for at least eight hours
to charge the internal accumulator.
• It is strongly recommended to start battery charging after battery discharge signal to ensure long operating life and preservation of battery capacity.
• During the cash register battery recharging, the cover can increase its temperature. We do not recommend to place the cash register near flammable materials.
• After transporting the unit from a cold environment to a warm one and reversal, do not turn the cash
register on for a minimum of 20 minutes in order to give all components time to adjust to the new temperature conditions.
• Person having wet hands should not operate the cash register. Water could seep into the interior of the
Euro-200T/TX and cause component failure.
• Clean the cash register with a dry, soft cloth. Never use cleaning agents such as petrol or solvents.
Using such chemicals can result in discolouration or deterioration of covering.
• Avoid spilling of any liquids on the cash register as it may cause damage. The keyboard should be protected extra carefully.
• Connect the cash register with the supplied adapter into a standard network plug (230V ± 10%). Other
electrical equipment connected in the same network circuit may cause improper functioning of the
cash register. In an environment with strong interference use the special anti-interference equipments
recommended by the manufacturer of the cash register.
Warning: adapter is only for interior use!
• If the cash register malfunctions, contact your authorised dealer for service. Do not try to repair the re
-
gister yourself. Do not open the cash register!
• Unplug the AC/DC adapter from its electrical outlet if the device is to be fully disconnected.
• If the external adapter is connected to the cash register, the internal accumulator is charged even when
the cash register is turned off.
• If the red streak appears at the end of the paper ribbon, exchange this ribbon as soon as possible. If
the ribbon is exchanged too late, it can damage the printer, or decrease its lifetime.
• Use the paper ribbon, whose end is not glued. If such paper ribbon is used and not exchanged early
enough, the printer could be damaged or its lifetime could be shortened. In this case, the damaged
printer warranty is not valid.
• Use only high-quality thermal paper ribbons. Improper ribbons may damage the printer or shorten its
lifetime. When using suitable ribbons and by properly maintaining the printer, the average lifetime is up
to 25 million printed lines!
• Journal paper storage recommendations: Do not expose thermal paper to the sun light. Store at a temperature not higher than 40 °C. Avoid contact with PVC, mollificators, organic solvents or glue. It is important to use only paper ribbons, where manufacturer warrants all needed characteristics. In case of
storage recommendations break or using low-class paper ribbons, Elcom company cannot guarantee
printing quality and paper ribbons storage.
• Use only the supplied AC/DC adapter or a adapter recommended by an authorised dealer for electrical
connection. Using other adapter types may result in damage to the adapter or the cash register.
Page 9
9
Introduction
• Use only the program recommended by your authorised dealer and use only the original interconnecting
cable for cash register communication with a computer. For bar code scanners, use only the connection
recommended in these instructions.
• If the cash register is used in different ways than those described in these instructions, the dealer cannot be responsible for incorrect data or damage that may result.
• Only equipment which meets the European Union standards (CE) can be connected to the Euro-200T/TX.
In other cases, the Elcom company cannot guarantee the adherence to standards of whole system. About
possibilities of connection with different equipments ask the Elcom company or your authorised dealer of
Euro-200T/TX for more information.
• The symbol on the product or on its packaging indicates that this product shall not be treated as
household waste. Instead it shall be handed over to the applicable take-back scheme for the recycling of electrical and electronic equipment. By ensuring this product is disposed of correctly,
you will help prevent potential negative consequences for the environment and human health.
• Lead-free technology.
BASIC DEFINITIONS
Logo
The heading on each printed receipt is introductory information prior to the description of the purchased
goods. It is mainly used to identify the cash register owner (company name, tax information, company
identification, etc.).
Figure 1.1. Receipt logo.
Department
Departments (DPTs) are used to denote groups of goods having some common features (dairy products,
foodstuffs, fruit, etc.). A department is characterised by it’s name, parameters, and by the preprogrammed
selling price, if it is used for direct sale.
Tax level
Tax level is used for the tax assessment of the sale goods. It’s characterized by the percent value, name
and tax type (VAT, DO).
Sales units
Sales units are used in connection with the quantity of sold goods (metres, litres, etc.). Each PLU has assigned a specific sales unit in which the quantity of sold goods is indicated. It’s possible to program 8 sales
units with a maximum of three characters.
PLU
PLU (Price Look Up) is an abbreviation for the denomination of the specific goods (goods item). The PLU code
represents the goods name, the sale price, bar-code and flags (assignment to an department, VAT level, PLU
type etc.). For example: Fat milks - 0,85 GBP, White yoghurt - 1,20 GBP).
YOUR SHOP
Perfect goods ANYWHERE
DKP: 0123456789876543546
TPN: 01234567/9876
T H A N K Y O U
Your receipt
Page 10
10
Introduction
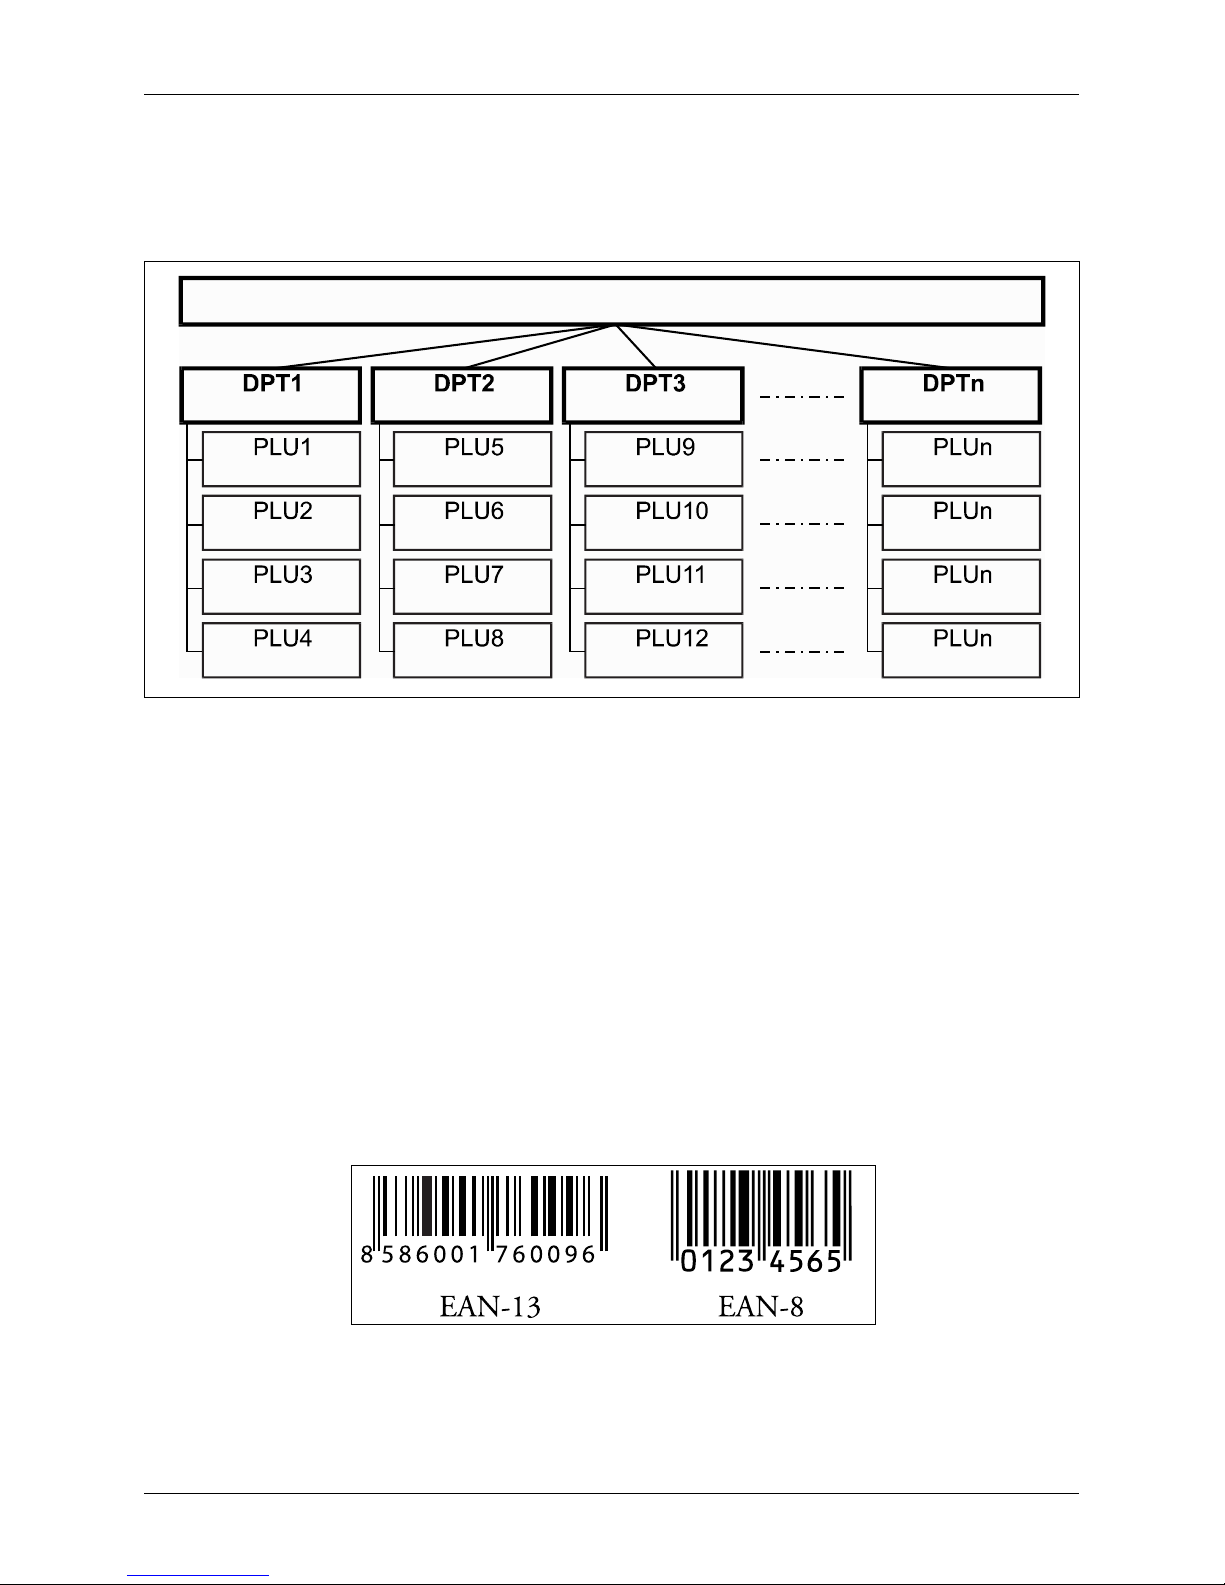
Connection between departments and PLUs
The example in figure 1.2 clearly illustrates the relation between the departments and the goods items
(PLUs). Sixteen PLUs and four goods groups were used here.
Figure 1.2. Connection between PLUs and departments.
Report
A report is a sales overview of a particular choice (financial, total, cashier, PLU etc.)
There are two basic types of reports: “X” and “Z”.
“X” reports print the concrete sales values (according to the report chosen) without resetting the data.
“Z” reports print the sales values of the chosen report. After values print out, all values are reset to zero in
the cash register memory.
Bar code
Coding of the numeric description of products into bars corresponds with clearly defined international rules.
If a product has an assigned bar-code, it appears on each of these goods. The most frequently used code
for product or merchandise denomination in Europe is the 13-digit code according to the EAN norm (EAN-
13) and the 8-digit code (EAN-8).
Figure 1.3. EAN bar-codes.
Bar-code scanner
A bar-code scanning device is used to improve speed and accuracy in goods registration.
GOODS
Milk produce
Yogurt white
Whole milk 1L
Curdy cream
Eidam 30%
Page 11

11
Introduction
Figure 1.4. Bar-code scanner.
System flags
System flags are basic settings of the ECR that largely influence correctness of cash register functions
(Number of decimal places, system of numbers rounding, date, time, etc.).
Cumulated totals (grandtotals)
Cumulated totals are variables that cumulate the values from all sales. There are usually three known grandtotals: GT1, GT2, and GT3. Their meaning is as follows:
GT1 – gross turnover - this means the cumulated total of all positive values registered in the ECR
GT2 – net turnover - the net turnover means the difference between gross turnover and negative turnover
GT3 – negative turnover - this means the cumulated total of all negative values (refunds, discounts...) regis
-
tered in the ECR.
Page 12

Page 13

CASH REGISTER
CHARACTERISTICS
Page 14
14
Cash register characteristics
PARTS OF THE CASH REGISTER, BASIC PARAMETERS
The Euro-200T and Euro-200TX cash registers belongs to a family of portable cash registers. They are
both light and compact. Are equipped with telescopic and adjustable customer display with blue back-light,
which has better contrast and better readability for customers. For improving speed and accuracy in goods
registration you can use optional programmable keyboard. Built-in UV Led module became hit for merchants. For communication with PC you can use USB or serial interface. Simply you can create cash registers network, or connect many different peripheral devices - such as a cash drawer, personal computer, bar
code scanner, payment terminal, external programmable keyboard and two electronic scales in the same
time. Euro-200T/TX already now fully supports payments in Euro currency. It is designed for wide range of
businesses from smaller businesses, drugstores, stationery stores to middle size supermarkets.
The Euro-200T/TX can be powered from:
– 230V (± 10%) power mains via power adapter
– built-in accumulator
– external battery box
– car accumulator (12–24 V) by using a car lighter cable
The packaging contains the ECR itself, power adapter, accumulator and CD with PC communication software suite. Optional accessories are: cash drawer, payment terminal, electronic scales, external PC keyboard,
external programmable keyboard, built-in programmable keyboard, bar code scanner, external battery box
with the cord, car lighter cable, UV LED module for checking of banknotes, module for Ethernet communication, memory extension 1MB for increasing PLUs no. to 10 000 PLUs.
The Euro-200T/TX provides several management functions and reports. It supports completely national or
native language and its special characters. Both the programming and the reports are in native languages.
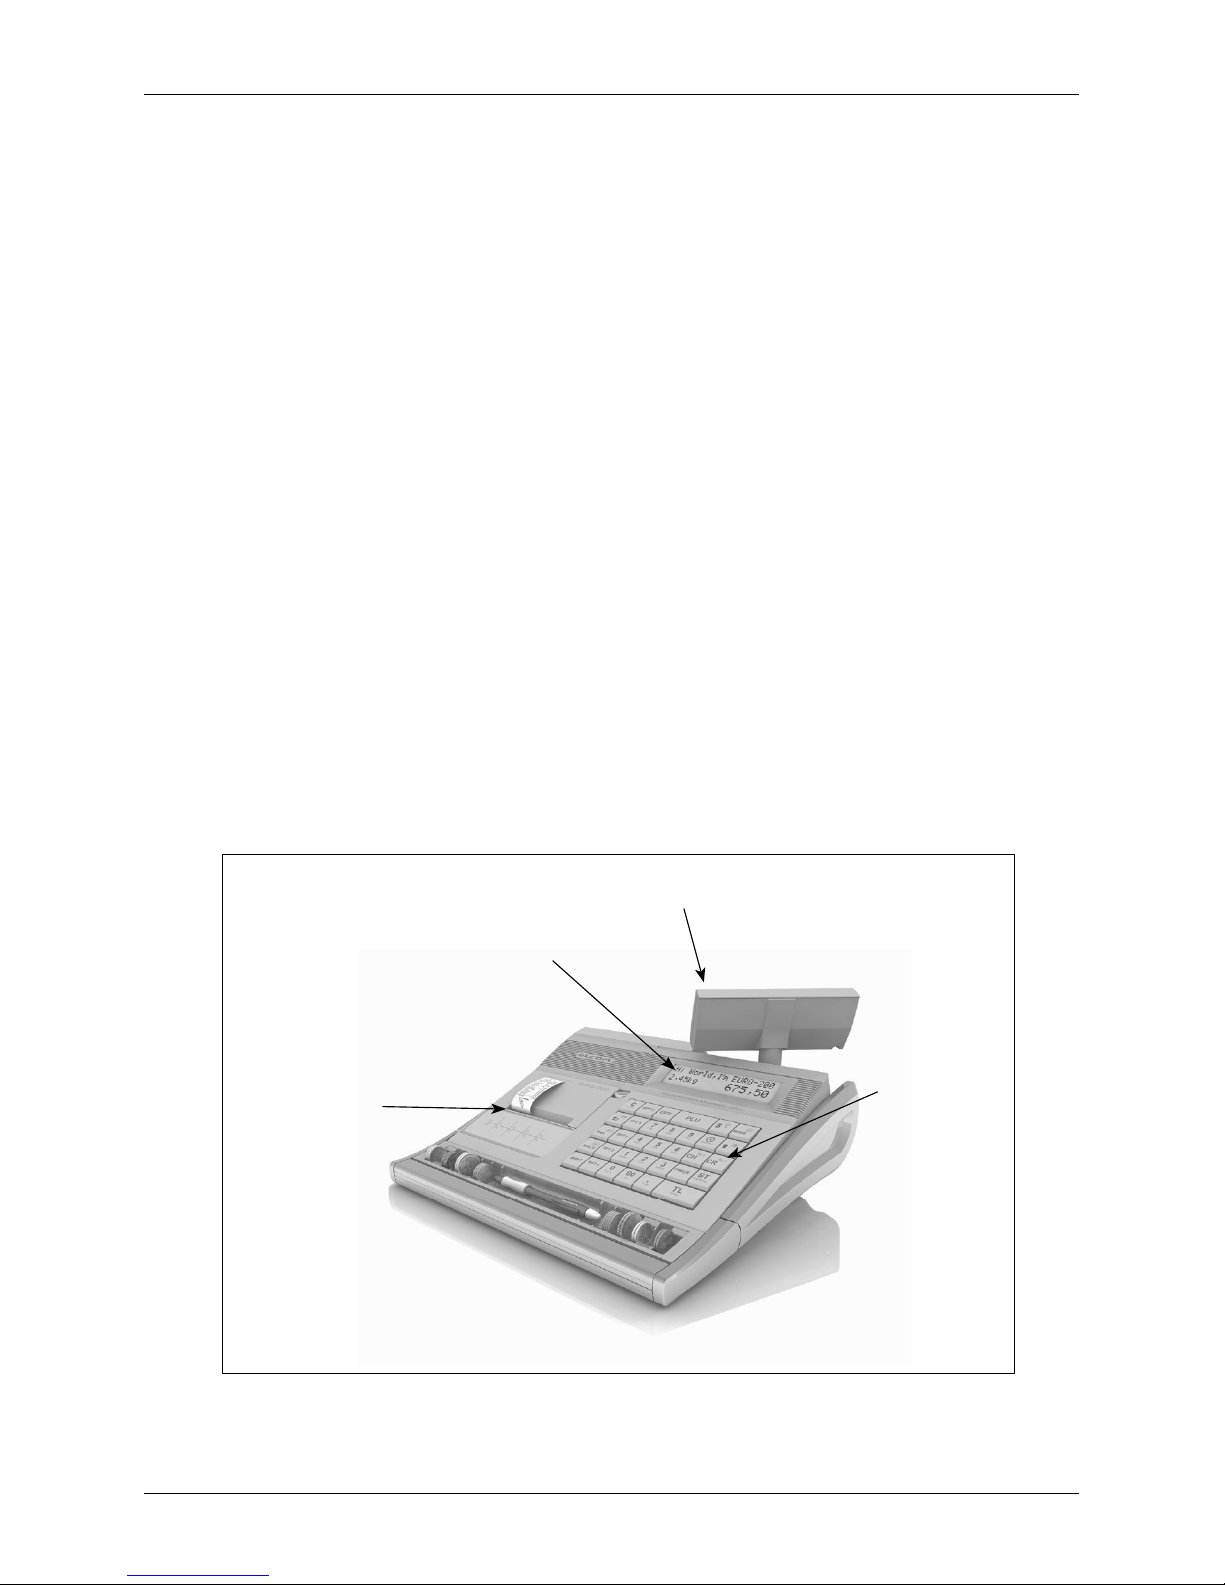
Figure 2.1 – Basic features of Euro-200T/TX
Customer display
Cashier display
Keyboard
Receipt gap
Page 15
15
Cash register characteristics
Figure 2.2. Euro-200T/TX parameters
Destination
from smaller businesses, drugstores, stationery stores, pubs, newspaper
stands to middle size supermarkets
PLUs 2 400 – 10 000 (with external memory module)
DPTs 30
Cashiers 6
Cashiers login password, access rights
Tax levels
6+1
Printer for 200T thermal, Citizen MLT-289
Printer for 200TX thermal, Citizen MLT-389
Printing speed avg. 9lps TX model, avg. 11lps T model
Paper ribbon for 200T
thermo, 2×28 mm
Paper ribbon for 200TX
thermo, 2x38 mm
Number of PLU name characters for 200T 18
Number of PLU name characters for 200TX 24
Number of logo line characters for 200T 18/9 (normal/bold)
Number of logo line characters for 200TX 24/12 (normal/bold)
Logo max. 9 lines
Graphical logo for 200T 160x180 pixels
Graphical logo for 200TX 240x160 pixels
Capital characters
yesBold characters
Special characters
Keyboard description
native
Programming language
Receipts language
Reports language
Reports DPT, PLU, financial, cashiers, daily, periodical, interval
Operation conditions temperature 0-45°C, humidity 80 % and lower by teperature 30°C
Cashier display alphanumerical 20+10+6 characters
Customer display 10 characters LCD
PC interface
USB, RS–232, RS-485
Scales and scanner RS–232
External keyboard PS/2, PC keyboard, EK-3000
Cash drawer solenoid 12 V, Rmax=30 �
Page 16
16
Cash register characteristics
Dimensions [mm]
315 x 275 x 115 mm
Weight
2,2 kg
Power adapter 230 V AC/12 V DC
Accumulator 2× NiMH 7,2 V/1600 mAh
Power saving mode yes
Power consumption
7W
Optional accessories
cash drawer, digital scales, scanner, payment terminal, external keyboard,
external PC keyboard, built-in programmable keyboard, external battery
box with car lighter cable, car lighter cable, expansion module with two
RS 232 ports, UV LED module for banknotes checking, RS-232/Ethernet
interface, memory expansion to 10 000PLU
Standard specifications EN 55024, EN 61000-4-2, 3, 4, 5, 6, EN 61000-3-2, 3, EN55022 - class B
Peripheral devices
The optional external devices are plugged into connectors that are shown in figure 2.4.
Recommendation: Ask your cash register dealer on the possibilities for connecting optional external devices to the ECR.
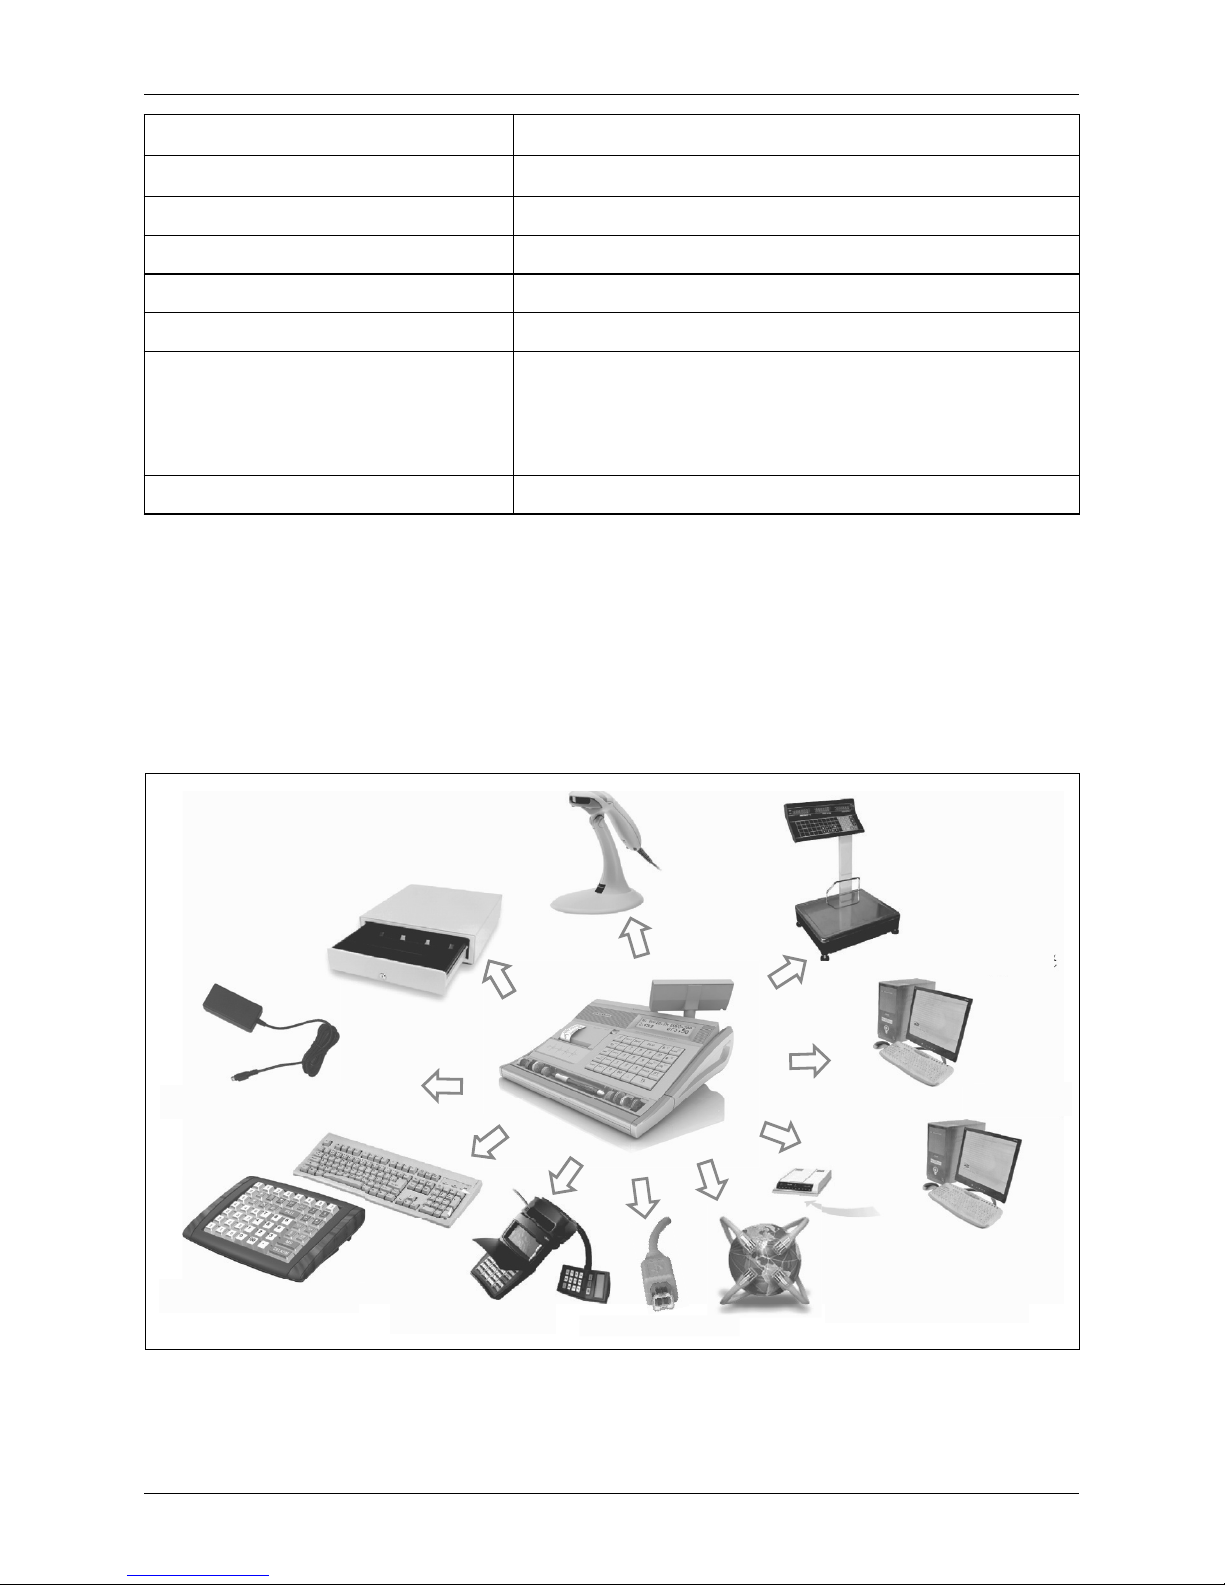
Figure 2.3 – External equipments for Euro-200T/TX.
External keyboard
Power adapter 230/24V
Cash drawer
Bar-code scanner
Digital scales
PC
PC
PC
Payment terminal
Modem
RS-232
USB Slave 2.0
Ethernet
communication module
RS-232
PC keyboard
USB
RS-485
Page 17
17
Cash register characteristics
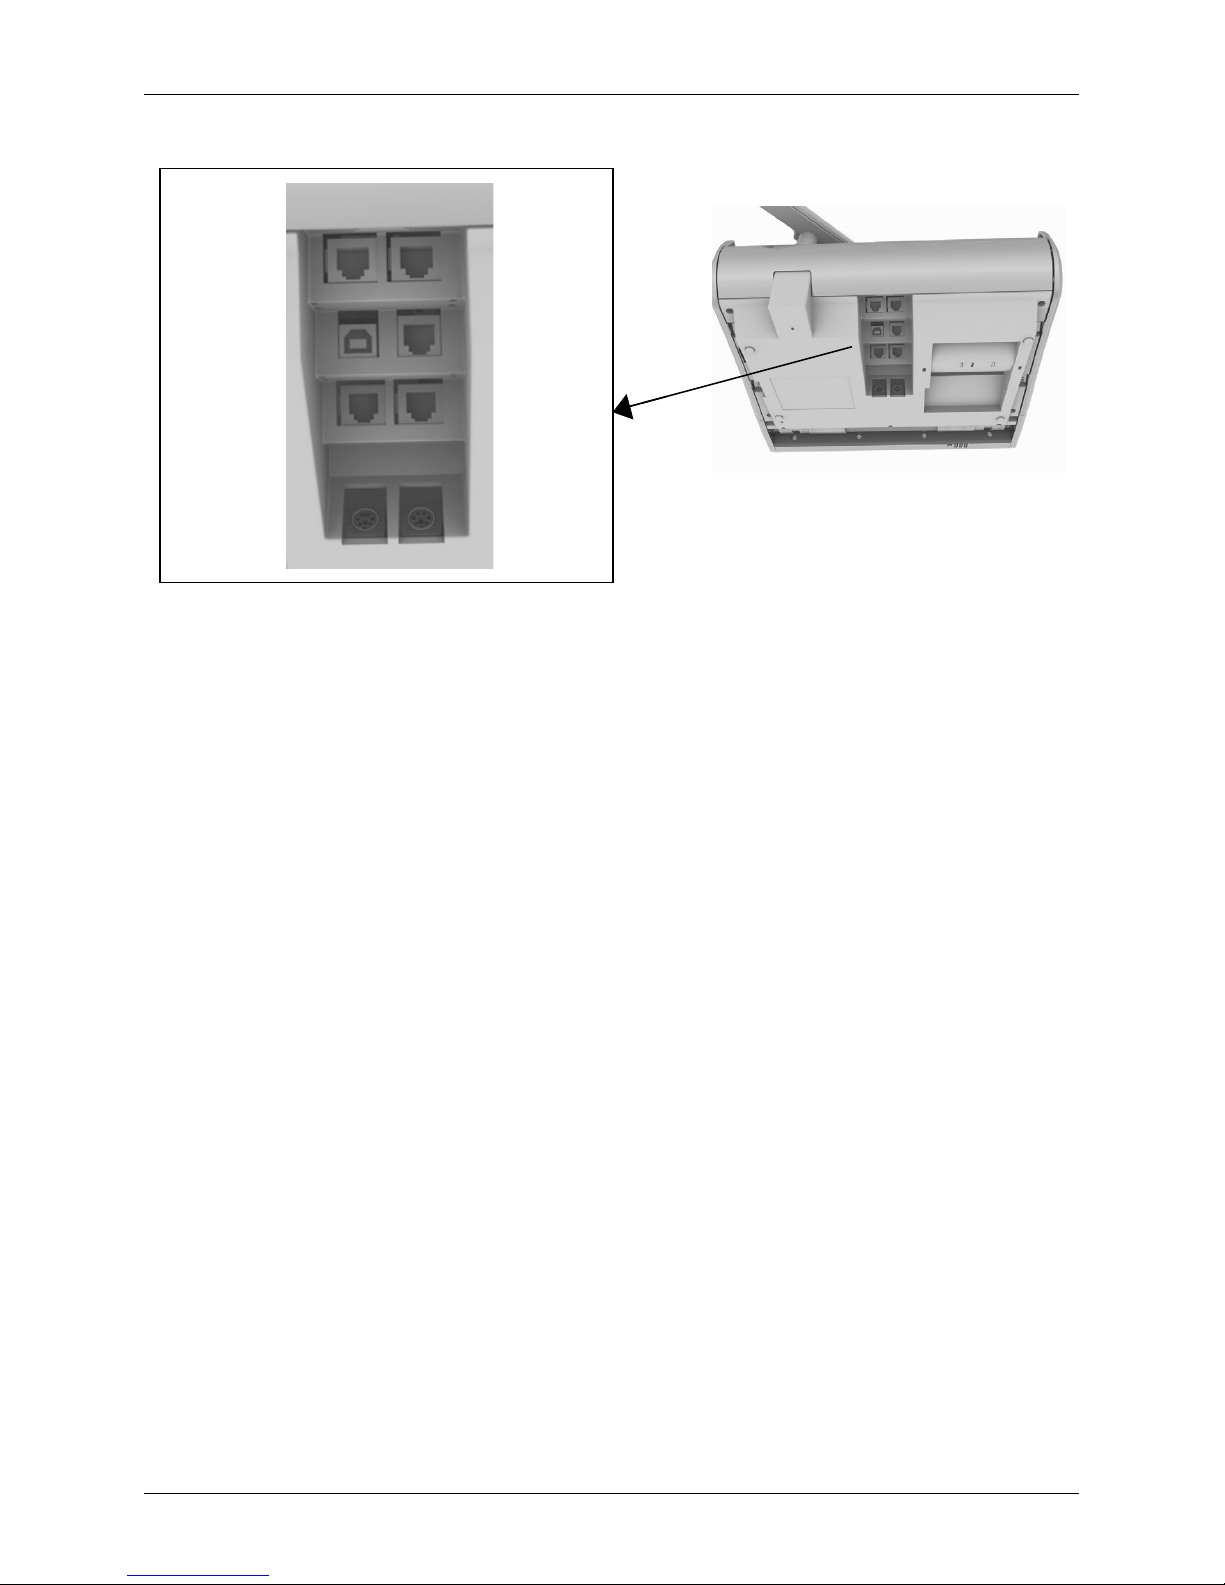
Figure 2.4 – Rear connectors of Euro-200T/TX cash register.
COM1-2: Connection of the computer, payment terminal, scanner or electronic scales
USB:
Connection of the computer through the USB
DRAW: Connection of the cash drawer
COM3-4:
Connection of the computer, payment terminal, scanner or electronic scales - Optional
POWER: Connection of the adapter or other external power supply
KEYB: Connection of the external keyboard
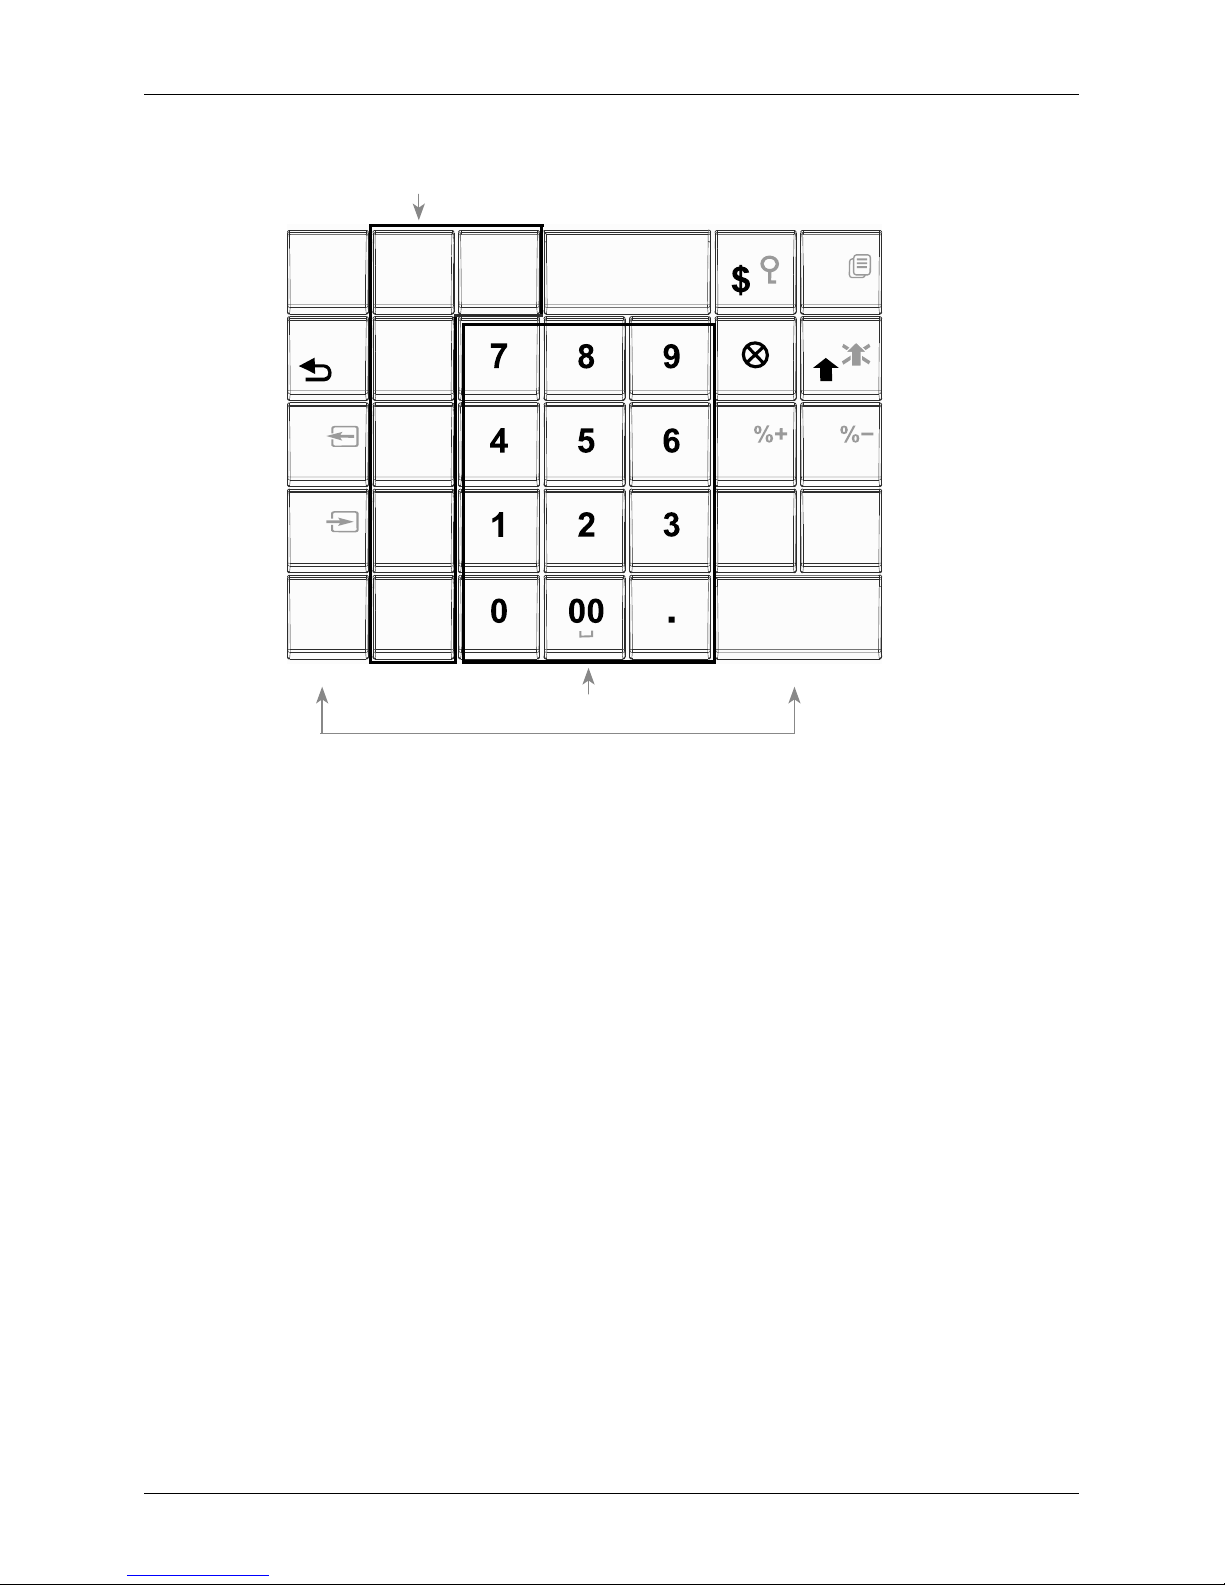
EURO-200T/TX KEYBOARD
Keyboard of Euro-200T/TX ECR is divided into three basic key groups – department keys, numeric keys
and function keys. If there are two functions on a single key, then you select the bottom function by simply
pressing the key. When you wish to use the top function on a key, the first press and hold Shift key, then
press the desired button. The keyboard is very comfortable and is ready for daytime work. The keys are
marked by large simple icons for fast orientation.
Warning: The keyboard is sensitive to dusty environments, humidity and dirt. Use dry clean cloth to clean
the plastic covers of the ECR. Never use cleaning agents as technical gasoline or solvents. Such chemicals
can damage the plastic cover or cause discolouration. If you need to clean heavily soiled plastic parts, we
recommend 3M cleaning spray.
<— COM2
<— DRW
<— COM3
<— KEYB
COM1 —>
USB —>
COM4 —>
POWER
—>
Page 18
18
Cash register characteristics
Figure 2.5 – Euro-200T/TX keyboard
NAMES AND FUNCTIONS OF ECR KEYS
… NUMERICAL KEYS are used for entering numerical values and in the programming mode
„P“ are used for entering text.
… DEPARTMENT KEYS are used for registration of department sales. Also used for reports of
department sales in “X” mode and for department programming in “P” mode.
The CLEAR button is used to clear an amount that has been entered incorrectly from the nume-
ric keyboard. This button also cancels an incorrectly entered function and the sound signalling
ERROR/ALARM. It cancels wrong letters when writing texts.
The VOID button is used to correct an item that has already been registered. It is also used for
function texts programming in “P” mode.
The Refund button enables you to pay back money, e. g. for damaged goods, during the sale
or as an independent transaction. It is also used for VAT levels programming in “P” mode.
Pressing the EAN button allows you to enter the bar code or reference number directly from the
keyboard in “R” and “T” mode. In “P” mode, pressing this button allows you to print the concrete
programmed values.
The Scales button is used to register the weight of goods from the electronic scales. It is also
used for PLU stock programming in “P” mode.
The PO (Paid out) button is used to register the paid out cash or checks from the cash register
as a non-business transaction. See paid-out function. In the void mode („R“ or „T“) this button
is used for page up or jump through 5 items back. It evokes a monthly (periodical) report in “X”
or “Z” mode. It is also used for logo programming in “P” mode.
The RA (Received on account) button is used to register the received payments if no business
transaction has been executed. It records, for example, the insertion of daily opening cash into
the drawer. In the void mode („R“ or „T“) this button is used for page down or jump forward
through 5 items. It is also used for system flags programming in “P” mode.
numerical keys
functional keys
department keys
DPT 1
SHIFT
DPT 2
DPT 3
DPT 4
DPT 5
DPT 6
DPT 7
DPT 8
DPT 9
DPT 10
SCALE
EAN
MODE
PRICE
CLEAR
C
RF
!" #% AB C
MULTIPLY
SUBTOTAL
TOTAL
TL
ST
CH CR
PLU
DPT
DE F
GH I JK L M NO
PQ RS TUV WX YZ
&( )*+
– /,: @
Page 19

19
Cash register characteristics
The Drawer button is used to print the customer number or other reference numbers on the
receipt. It is also used to open the drawer with no sale. In the void mode („R“ or „T“) this button
is used as arrow down or jump to next item.
The Password button is used in “R” mode to identify the cashier by password and to permit the
cashier to log in. Through this method, the proper cashier claims responsibility for the transactions. The name of the logged-in cashier, is printed on each receipt header. The transactions are
recorded in the cashier’s account and are displayed in the cashier’s report. In the void mode
(„R“ or „T“) this button is used as arrow up or jump to the previous item. It is also used to evoke
the cashier report in “X” mode and for the cashier programming in “P” mode.
The Paper feed button feed the receipt ribbon without printing. The receipt ribbon is fed in
1,5 cm by pressing this button.
Pressing the Receipt button in “T” mode allows you to switch the receipt printing on and off.
The printing switched off is signalized by “Prn” at the display.
The Multiply button is utilized for multiplication if two or more pieces of the same item are being
sold. It is used for displaying the time in the registration mode.
The Price button enables manual entry of an item price rather than the preprogrammed PLU
or DPT price. It is also used for fast PLU price programming in “P” mode.
The PLU button (price look-up) enables to call out the programmed data about an item, price,
name, department, VAT, etc. See PLU transactions. It evokes a PLU report in “X” or “Z” mode.
It is also used for PLU programming in “P” mode.
The Mode button is used for switching into the individual modes of the cash register. Exit the
STANDBY mode by pressing this button.
After finishing a transaction, print out the same receipt again by pressing Duplicate button. The
receipt is denoted “DUPLICATE”.
The Credit button is used to finalize the sale in case of credit card payment.
The Check button is used to finalize the transaction in case of check payment. It also evokes
a financial report in “X” mode and is used for the programmed data printing in “P” mode.
, These buttons are used to add the percent add-on or to subtract the percent discount for
a particular item or for the complete transaction according to the programmed values.
The percent add-on button is also used for sales units programming in “P” mode. The
percent discount button
is also used for extended flags programming in P mode.
The Subtotal button displays and prints the actual subtotal value according to the setting of the
fourth system flag.
The Total/Cash button is used to finalize the sale in case of cash payment. It also evokes a dai-
ly report in “X” or “Z” mode.
The function in an upper part of a key is chosen by holding the Shift button and then pressing
the key with two functions
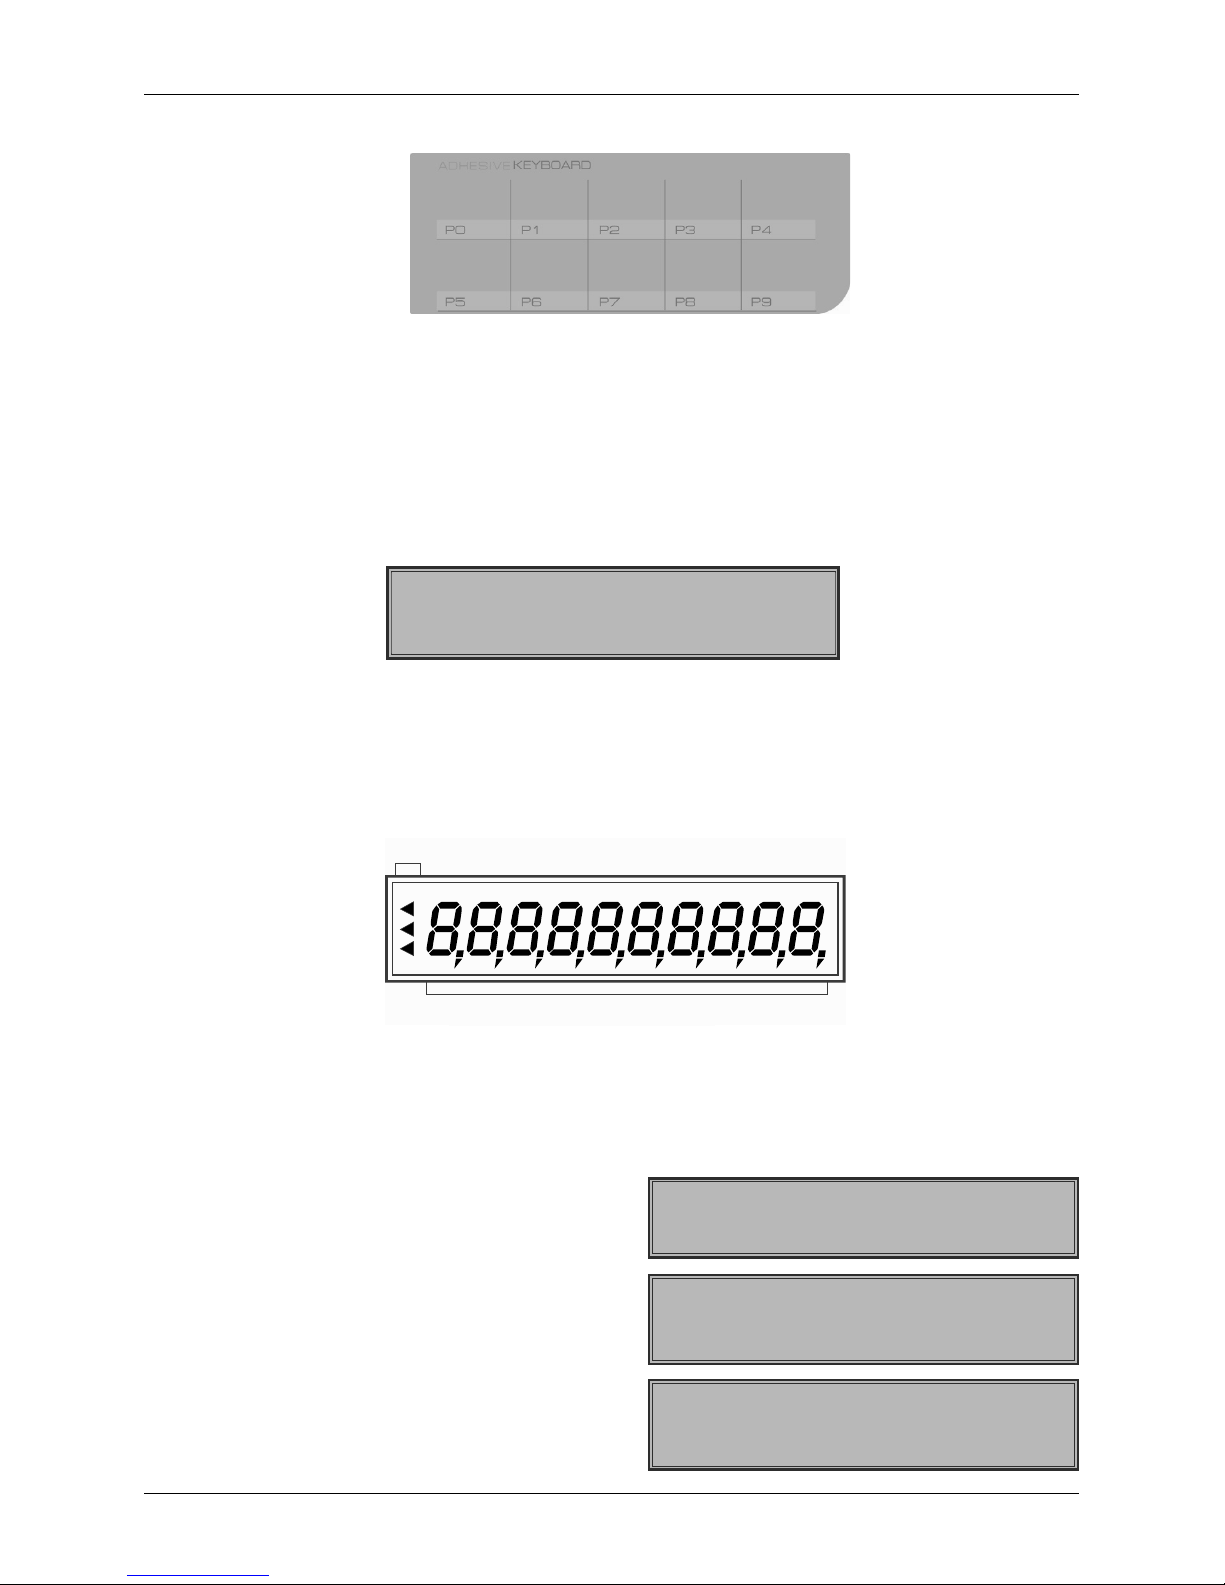
OPTIONAL PROGRAMMABLE KEYBOARD
Programmable keyboard is optional accessory, contains 10 fully programmable keys. By default they are
programmed as PLU1 - PLU10 and second level (with SHIFT key pressed) PLU11 - PLU20.
For every key you can program 16 scan codes (see end of the PROGRAMMING MANUAL chapter) i.e.
sequence of 16 pressed keys. That way you can sell e.g. package containing 4 items with discount by pres
-
sing only one key. For improving registration speed you can also program there the most selling PLUs.
Page 20
20
Cash register characteristics
Figure 2.6 - Programmable keyborad (optional accessory) for Euro-200T/TX.
ECR DISPLAYS DESCRIPTION
Cashier display description
The cashier display of Euro-200T/TX is a two line alphanumeric LCD display with blue back-light. In first line
is possible to display 20 characters, in second line 6+10 characters. The customer display has back-light
installed by default.
Figure 2.7 – Alphanumerical LCD display.
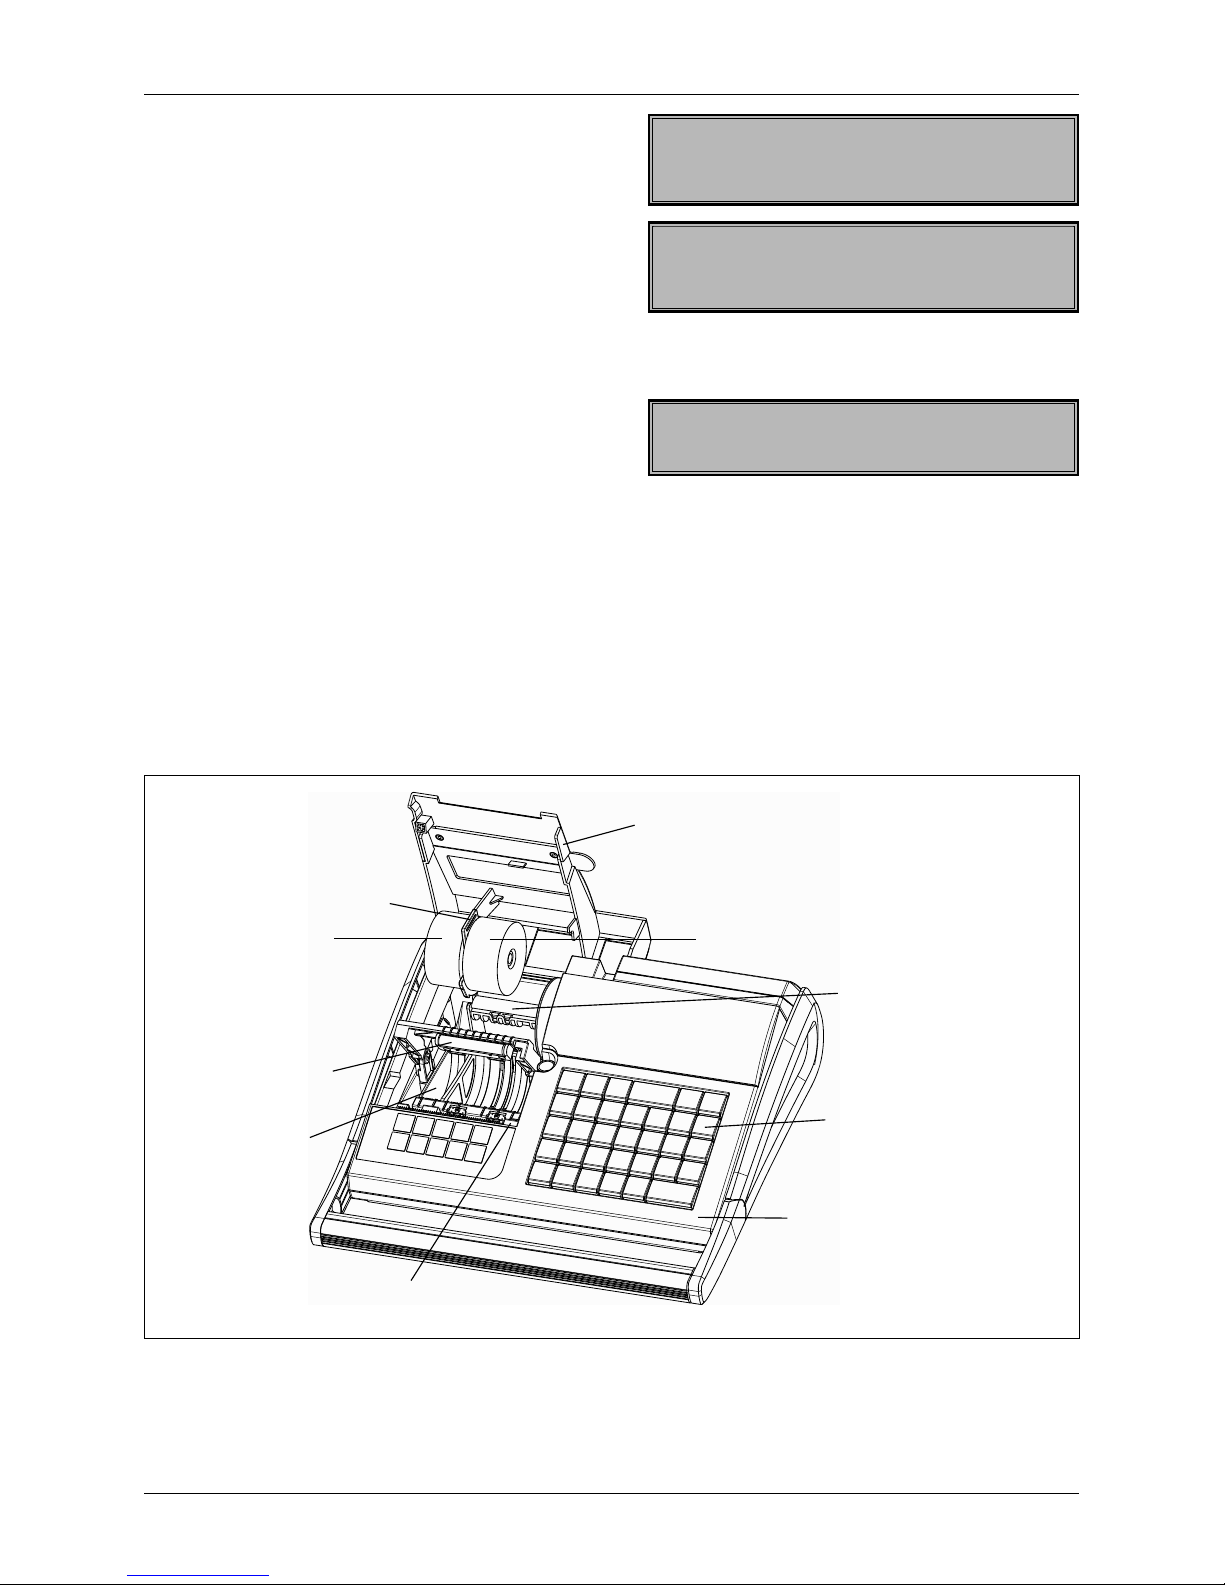
Customer display description
The customer display of the Euro - 200T/TX is the LCD type and contains 10 large numeric segments and
three arrow-shaped segments. This display can be divided into a numeric part and the part with arrows.
Figure 2.8 – Allocation of segment LCD display
MODES SWITCHING
By combining the numerical keys from to and the (Mode) button it is possible to set the mode
of the cash register. Such switching thus enables the operator to work in different cash register modes
(registration, programming, reports, etc.).
„R“ Registration mode. This mode is used for all registrations and transactions. After switching into this
mode, the current date in the first line and current time
in the second line appears on the display until you begin registration.
Switching into the
„R“ mode:
„X“ The „X“ mode is used to print sales reports. The printing of “X” reports does not reset the current sales data.
Switching into the „X“ mode:
„Z“ The „Z“ mode is used to print various reports. The
printing of “Z” reports resets the cash register sales data.
15-12-2005
P 11:07:39
15-12-2005
R 11:07:39
15-12-2005
Z 11:07:39
Ší
Arrows
Numerical part
15-12-2005
X 11:07:39
Page 21
21
Cash register characteristics
Switching into the „Z“ mode:
„P“ The “P” program mode is used to program all values and functions of the cash register.
Switching into the “P” mode:
„T“ The training mode provides all functions of the “R”
mode, but in this mode, the transactions are not included in
the daily or monthly (periodical) reports. The receipts prin
-
ted in this mode are marked by the text “Invalid document”.
Switching into the “T” mode:
„STANDBY“ When the cash register is not operated
for certain time limit (see chap. System flags programming) and it is supplied from internal power supply, it
will switch into the “Standby” mode. A cash register in
the “Standby” mode has a low consumption of energy. The notification “Standby” appears on the display.
Exit the “STANDBY” mode by pressing the
(Mode) button. In case the cash-register is supplied from
external power supply then stand by mode is not called.
PAPER RIBBONS INSTALATION
The Euro-200T/TX cash register uses two thermal paper ribbons, 28 mm wide for T model and 38 mm for
TX mode. The left one (a front view on the cash register, see the picture below) is designed for the printing
of customer receipts and the right one for the printing of the control ribbon - journal.
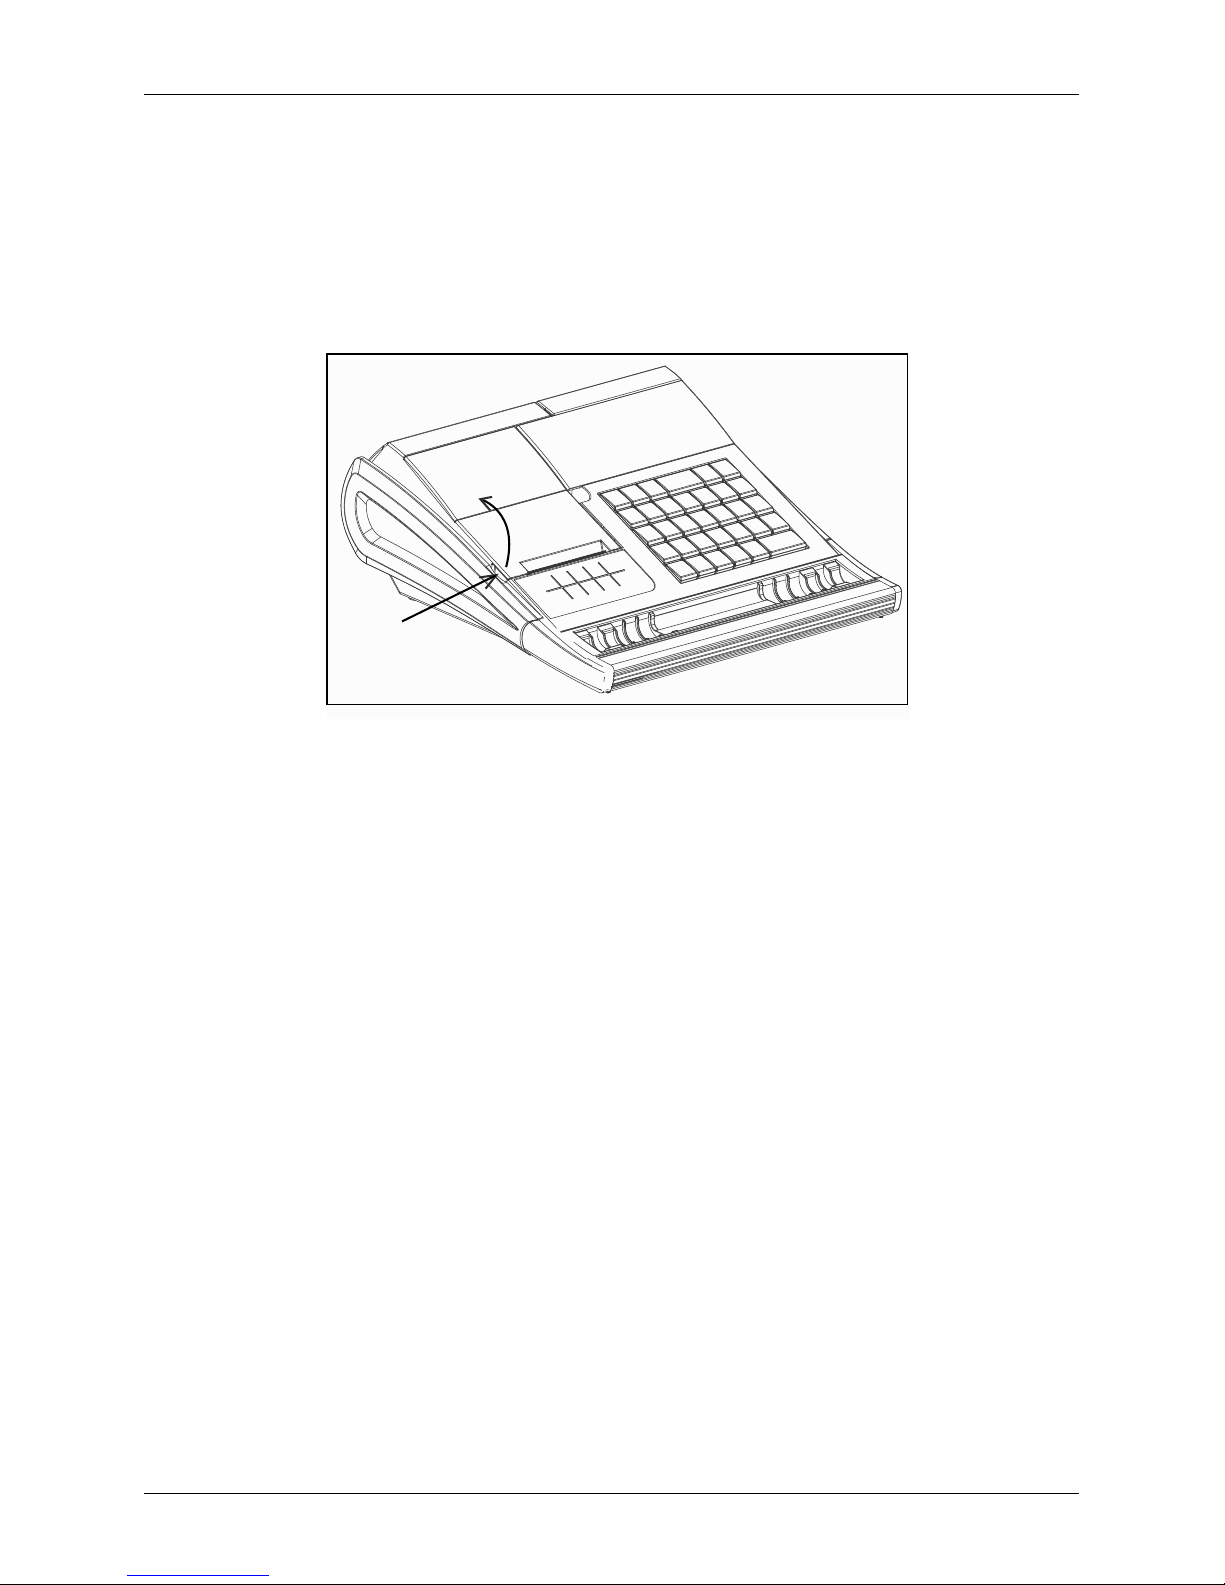
Figure 2.9 - Paper ribbons installation procedure for Euro- 200T/TX:
We recommend to use only rolls of good quality paper with the maximum diameter of 55 mm. To ensure
proper cash register operation, make sure that the printing saturation is correct. If any problems occur,
contact your local authorized dealer of Euro-200 T/TX.
15-12-2005
P 11:07:39
15-12-2005
T 11:07:39
STANDBY
tape cover (1)
journal ribbon (6)
tape separator (4)
customer ribbon (5)
the printer roller (8)
the winding reel (7)
the paper feed button (9)
upper cover (2)
bottom cover (3)
the lever to release
of the printer roller (10)
Page 22
22
Cash register characteristics
Paper ribbons installation procedure for Euro-200T/TX (numbers according to Figure 2.9):
Open the tape cover (1), follow the picture below. Take out the paper tape separator (4) and install new
paper tape reel. Insert the separator with installed tapes into the bottom cover (3). Use the lever (10) to rele
ase the printer roller and lift it up. Hold the ends of the ribbons over the upper cover (2), press the roller on
the original place and press the paper feed button (9) make sure that paper ribbons are installed properly.
Close the tape cover (1).
Figure 2.10 - Opening of tape cover.
Usage and storage of thermal paper
The Euro-200T/TX printer prints on paper 28/38 mm wide.
Journal paper storage recommendations:
• do not expose thermal paper to direct light,
• store at temperature not higher than 40°C,
• avoid contact of thermal paper with PVC, mollificators, organic solvents or glue.
It is necessary to use good quality paper rolls.
If usage or storage recommendations are not followed, Elcom s. r. o. does not guarantee high quality prin
ting or preservation of printed data.
Change the paper roll immediately, if the red colour stripe marking the paper end appears at the paper
ribbon. Late change of the paper roll can cause the damage of the printer or it can shorten the printer’s
lifetime.
CUSTOMER DISPLAY SLIDE-OUT
• open the tape cover (Figure 2.10)
• grab customer display at the places marked with arrows no.1 (Figure 2.11) and pull it upwards
• display is fixed in max. position. To get in to this position you have to pull it out till you will hear click.
• in this position you can turn it within 270°
1
2
Page 23
23
Cash register characteristics
Figure 2.11 - Customer display slide-out
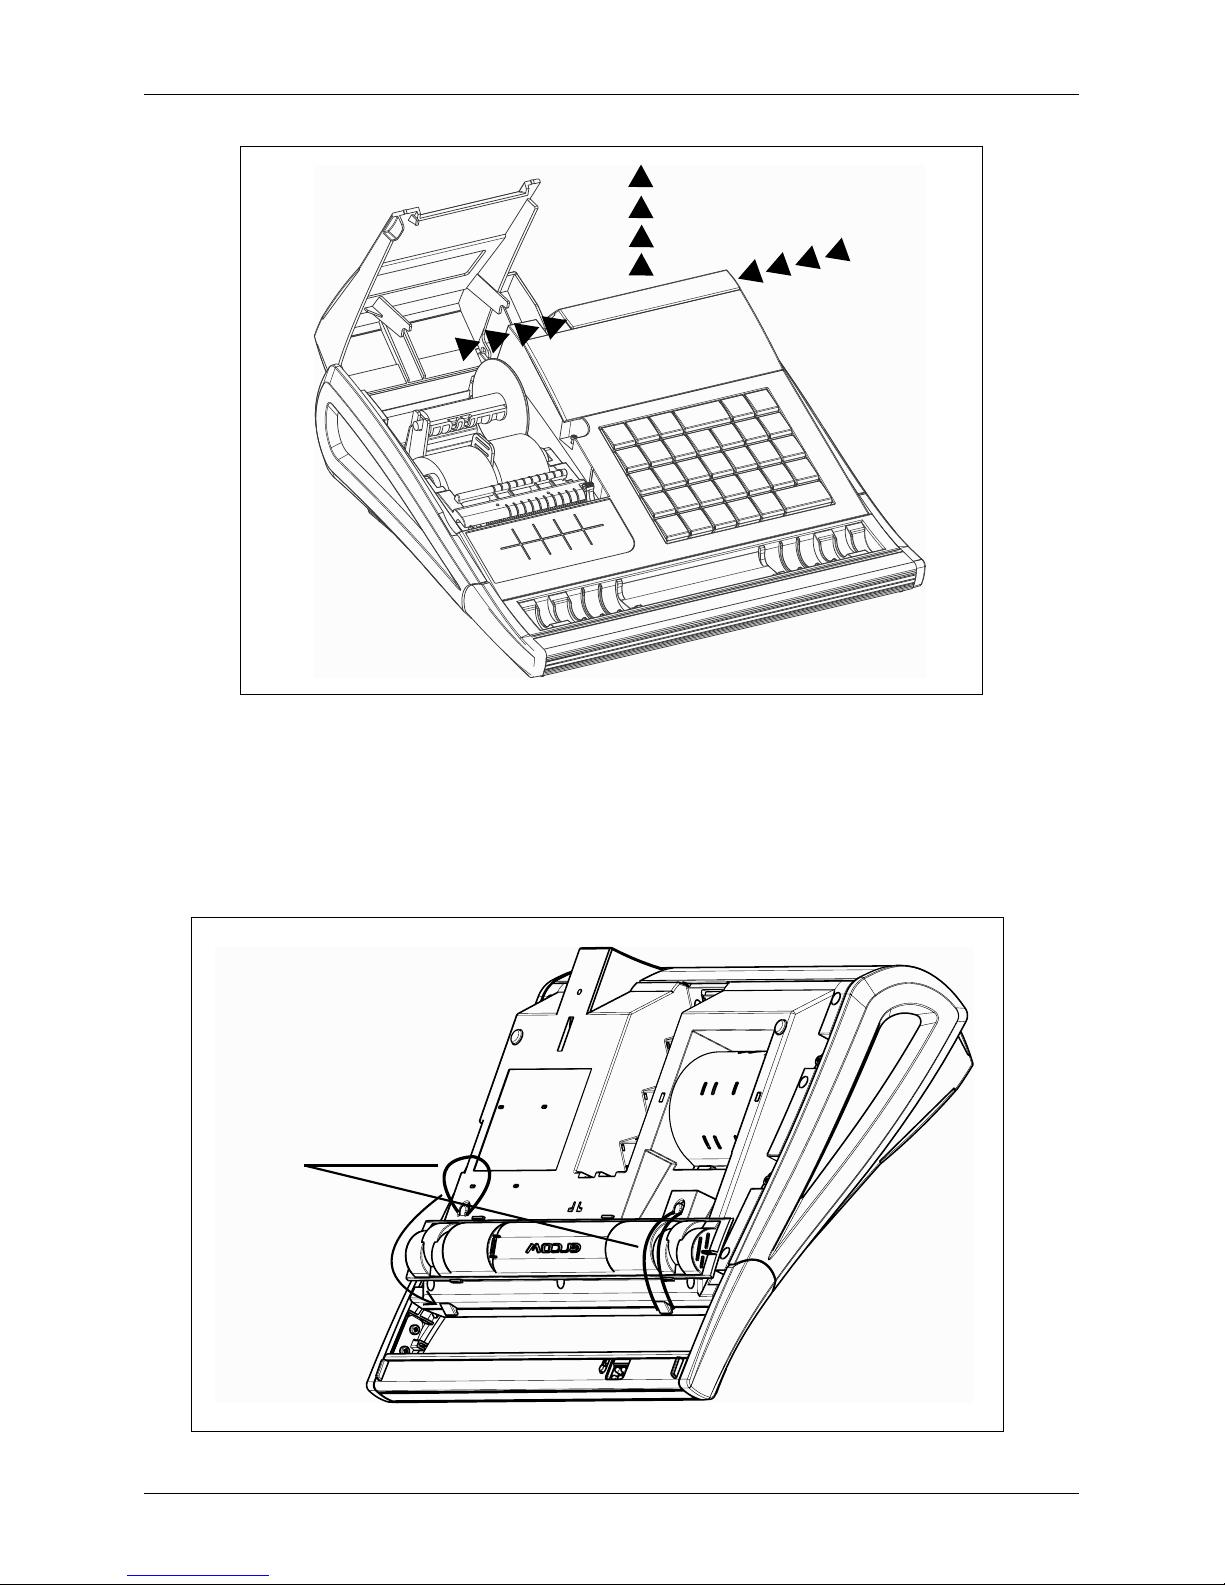
GRIPPING OF MONEY SEPARATOR TO ECR
For easier ECR transport it is possible to grip money separator to bottom part of cash register with two
rubber bands supplied with ECR. See Figure 2.12.
Figure 2.12 - Gripping of money separator to ECR
1
1
Page 24

Page 25

PROGRAMMING MANUAL
Page 26
26
Programming manual
INITIALISATION
Before putting the cash register into operation, it must be initialised. The cash register initialisation clears all
programmed data and will return the ECR to default settings. Only following data will be preserved: grand
totals, report numbers (Z1 and Z2) and value of system flag no. 1. ECR initialisation is possible only if daily
and periodical reports have been issued in “Z” mode.
Initialisation procedure:
1) Turn the cash register on and press
to
enter “P” mode.
2) Press
button. The “Memory clea-
ring” label appears on the display.
3) To confirm the initialisation, press the
(Subtotal) button. The ECR printer prints
“Memory clearing” and it begins the initialisation.
4) After initialisation enter the date (DDMMYY)
and time (HHMM).
RECOMMENDED PROCEDURE FOR EURO-200T/TX PROGRAMMING
The recommended procedure for ECR programming advises an user to program the ECR in the following
order: 1) system flags, 2) tax levels, 3) extended flags 4) receipt logo, 5) cashiers, 6) function texts, 7) de-
partments, 8) sale units and finally 9) article items (PLUs).
SYSTEM FLAGS PROGRAMMING
Prior to programming of the ECR, it is recommended that this subchapter is carefully studied and clearly
understood.
Note: If a key is used for two functions, choose the function in a lower part of a key by pressing the key. To
choose the function in the upper part of a key, hold the
(Shift) key and press the particular key.
Initial programming of system flags
The system flags represent settings that have primary influence on the proper performance of ECR (number
of decimal places, rounding, date, time, etc.).
System flags programming procedure:
1) Switch the cash register into the “P” mode by pressing
. On the display appears „P” (left
bottom on the display). Only a cashier autho-
rised for the programming mode can set the
ECR into the “P” mode.
2) Press
(RA) buttons.
3) After entering flag values, store them by pressing the
(Subtotal) button. The programming of
the next flag follows. Continue until you have programmed all necessary flags.
4) Finish flags programming by pressing the (Total) button.
02-02-2005
P 19:05:33
MEMORY CLEARING
P 10:21:09
ENTER DATE
ENTER TIME
301112
SF1:
Page 27
27
Programming manual
System flags correction
1) To change the settings of any system flags, switch the cash register into the “P” mode by pressing
.
2) Enter the flag number to be edited and press the
(RA) buttons.
3) Enter desired flag value and press the (Subtotal) button.
4) Print the new programmed settings by pressing the (Check) button.
5) Finish the programming by pressing the (Total) button.
System flags values print out
In the programming mode, select the flags programming by pressing the
(RA) buttons. Press the
(Check) button to print the flags values. It is possible to print the value of currently programmed flag by
pressing the (EAN) button.
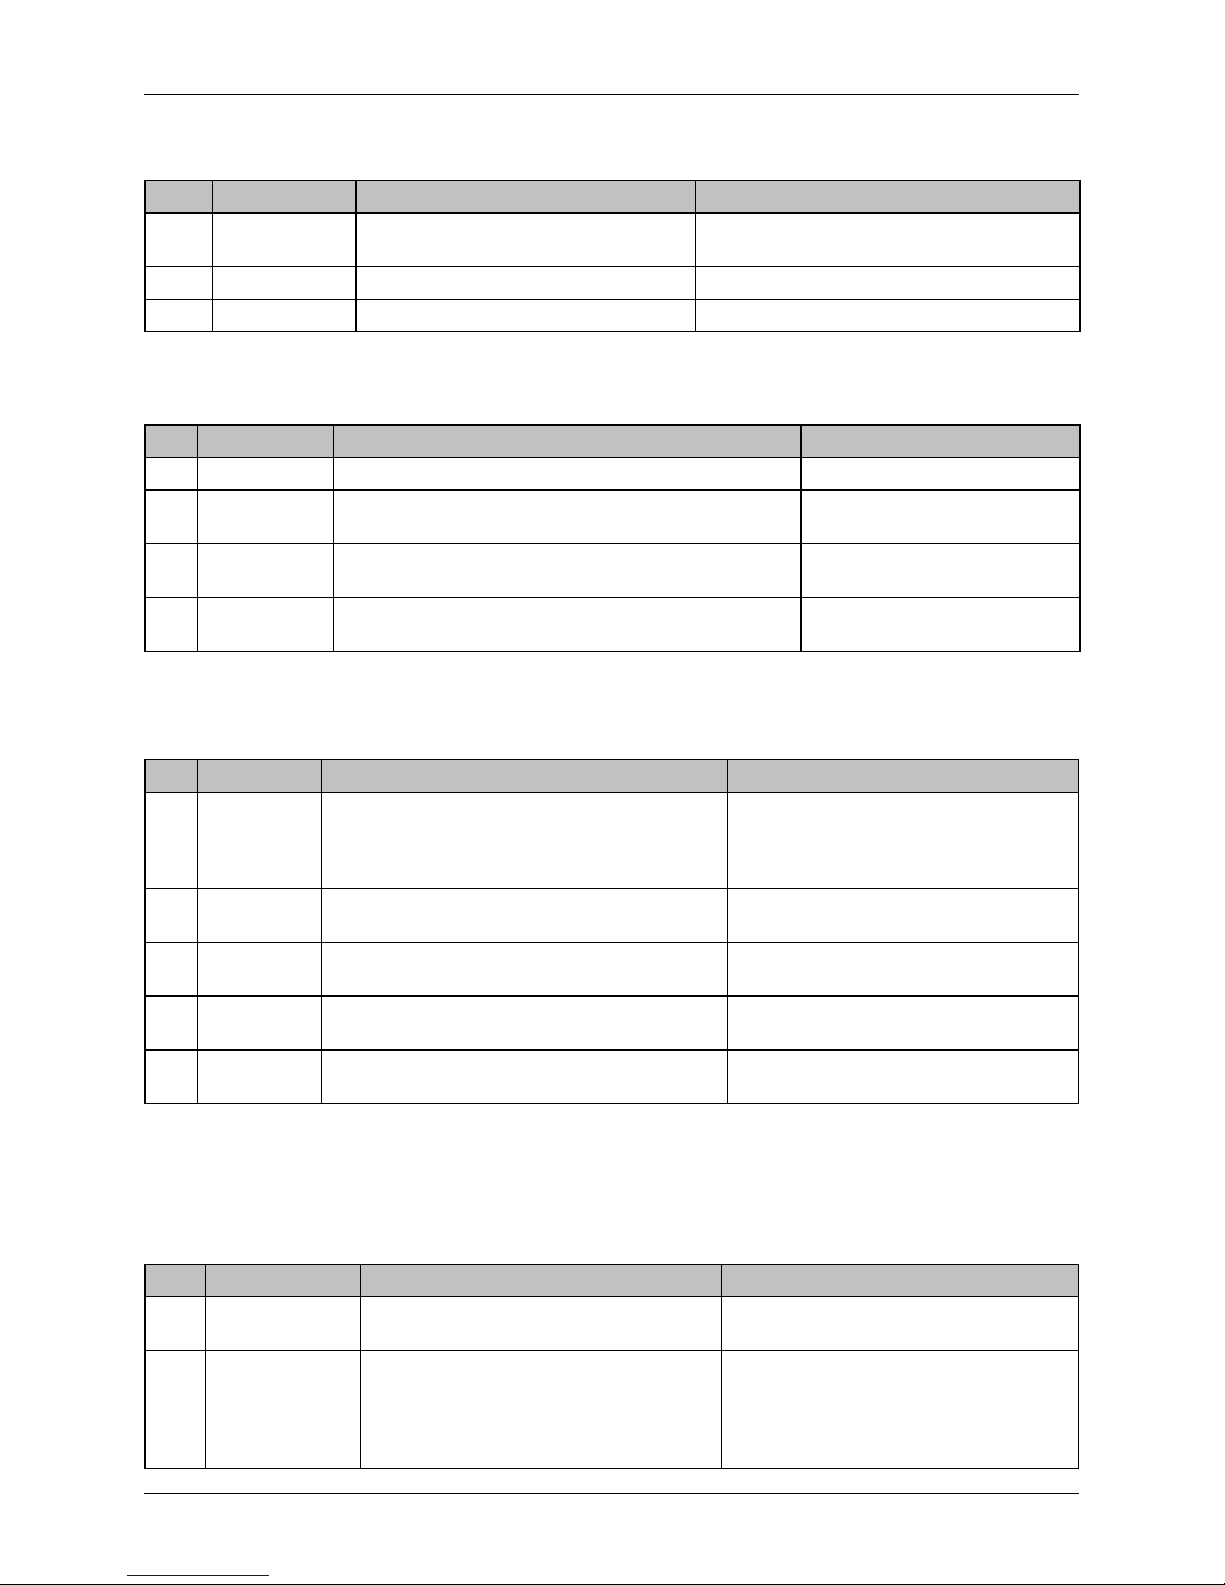
Flag 1 – Number of decimal places, method of rounding, TAX system…
Figure 3.1. First system flag values.
Digit
Default setting
Meaning
Valid values
1 3
System of rounding:
0 – up from 5,
1 – always up,
2 – always down,
3 –special rounding
2 0
Tax system:
0 – VAT
1 – TAX
3 1 No. of decimal places to which total price should be rounded
0 – 3
4 1 No. of decimal places to which VAT should by rounded
5 1 No. of decimal places to which price should be rounded
6 2 No. of decimal places to which price, VAT should be displayed
Note: Value of the first system flag can be changed only if Grand Totals are zero.
Flag 2 - TAX printing, number of logo lines, blank lines…
Figure 3.2. Second system flag values.
Digit
Default setting
Meaning Valid values
1
1
TAX values printing
0 – TAX values not printed,
1 – TAX values printed on receipt
2
0
Date format 0 – dd-mm-yyyy, 1 – mm-dd-yyyy
3
3
No. of decimal places of quantity values 0 – 3
4
2
Number of blank lines between receipts 0 – 6
5
9
Number of logo lines 0 - 9
6
0
Split pricing/successive multiplication entries
0 – split pricing,
1 – successive multiplication
Page 28
28
Programming manual
Flag 3 - Receipt consecutive number, cash register number
Figure 3.3. Third system flag values
Digit Default setting Meaning Valid values
1 0 Receipt consecutive number clearing
0 – after “Z” total (daily) report,
1 – after “Z” periodical report
2 – 3 01 Cash register number (01 – 99)
4 – 7 0001 Receipt consecutive number (01 – 9 999)
Flag 4 - Required operations
Figure 3.4. Fourth system flag values.
Digit Default setting Meaning Valid values
1 1 Subtotal amount print out after Subtotal key is pressed 0 – no, 1 – yes
2 0 Required Subtotal key pressed before receipt is finished
0 – not required,
1 – required
3 0 Required Credit Card number entering if paid by Credit
0 – not required,
1 – required
4 0 Required customer’s payment amount entering
0 – not required,
1 – required
Flag 5 a) - Communication with PC and payment terminal
Figure 3.5. a) Fifth a) system flag values.
Digit Default setting Meaning Valid values
1 5 PC port number
0 – device is not used
1..4 – RS-232 port number (COM1-COM4)
5 - USB port
6 – RS-485 interface on COM2
2 1
Programming of communication speed for the PC.
Parity: none, DataBits: 8, StopBits: 1
0 – 9 600 Bd
1 – 38 400 Bd
3 0 Data transmission direction in PC-ON LINE mode
0 – PC transmits
1 – PC transmits and receives
4 0 Payment terminal port number
0 – device is not used
1..4 – RS-232 port number (COM1-COM4)
5 0 Communication protocol for payment terminal
0 - Dionica
1 - Bull
Two and more devices can´t be assigned in F5a) and F5b) to the same serial port. Port no. 5 (USB) and 6 (RS-485) shares
pins with COM2 port. Only one device can be connected to the same port.
Flag 5 b) - Scanner and scales configuration
Figure 3.5. b) Fifth b) system flag values.
Digit Default setting Meaning Valid values
1 0 Scanner port number
0 – device is not used
1..4 – RS-232 port number (COM1-COM4)
2 3 Bar code scanner communication speed
0
– 1 200 Bd
1
– 2 400 Bd
2 - 4 800 Bd
3 - 9 600Bd
4 - 19 200Bd
Page 29

29
Programming manual
3 0 The terminalcode for the bar code scanner
0 – terminal CR and LF
1 – terminal CR
2 – terminal LF
4 0 1st Scale port number
0 – device is not used
1..4
– RS-232 port number (COM1-COM4)
5 0 Communication protocol for 1st electronic scale
0 - CAS Morcan, MARTES T
1 - Euro scales, MARTES M
2 - Macca K
3 - Dibal
4 - Motex R
6 - Mettler Toledo
6 0 2nd Scale port number
0 - device is not used
1 - 4 RS-232 port number (COM1-COM4)
7 0 Communication protocol for 2nd electronic scale
Same as „Communication protocol for 1st
electronic scale
Two and more devices can´t be assigned in F5a) and F5b) to the same serial port. Port no. 5 (USB) and 6 (RS-485) shares
pins with COM2 port.
Flag 5 c) - External RS-485 converter settings
Figure 3.5. c) Fifth c) system flag values.
Digit
Default setting
Meaning Valid values
1 0 External RS-485 converter using 0 - no, 1 - yes
2 1 Active level of signal for RS-485 converter control 0, 1
3-6 0000
Time in tenths of µs [µs x 10], which ECR has to
wait before packet sending
0 - 2 000 i.e. 0 - 20 000 [µs]
Flag 6 - Printing mode settings
Figure 3.6. Sixth system flag values.
Digit
Default setting
Meaning Valid values
1 0
Printing modes without external power
supply
0 – normal mode,
1, 2 - not used
2 0 Printing modes with external power supply
0 – normal mode,
1, 2 - not used
3 1 Graphical logo printing
0 – no,
1 – yes
4 0 Font size
0 – normal font: character height approx. 2.5 mm,
1 – not used
5 1 Standby mode
0 – standby inactive,
1 – standby after 1 min.,
2 – standby after 5 min.,
3 – standby after 10 min.,
4 – standby after 15 min.
Flag 7 - Limit and value of the percent add-on
You can shift from limit to value programming by pressing the (SUBTOTAL) button. The directional arrow
shows if either limit or value, is actually programmed.
Figure 3.7. Seventh system flag values.
Digit Default setting Meaning Valid values
1 - 2 Left 00 Limit for the percent add-on entered during sale 00–99
3 - 6 Right 0000 Programmed percent add-on value (to program 10% add-on enter 1 0 0 0) 0000–9999
Page 30

30
Programming manual
Flag 8 - Limit and value of the percent discount
You can shift from limit to value programming by pressing the (SUBTOTAL) button. The directional arrow
shows if either limit or value, is actually programmed.
Figure 3.8. Eighth system flag values.
Digit Default setting Meaning Valid values
1 - 2 Left 00 Limit for the percent discount entered during sale 00–99
3 - 6 Right 0000 Programmed percent discount value (to program 15% discount enter 1 5 0 0) 0000–9999
Flag 9 - Time setting
Figure 3.9. Ninth system flag values.
Digit Default setting Meaning Valid values
1 - 2 12 Hours setting 00–23
3 - 4 00 Minutes setting 00–59
Time is possible to change only after daily report.
Flag 10 - Date setting
The cash register handles leap years and adjusts the number of days in each month automatically.
Figure 3.10. Tenth system flag values.
Digit Default setting Meaning Valid values
1 - 2 01 Day 01–31
3 - 4 01 Month 01–12
5 - 6 06 Year 06–99
Date is possible to change only after daily report.
EXTENDED FLAGS PROGRAMMING
In the programming mode select the bar-code flags programming by pressing (DISCOUNT).
Figure 3.11. First extended flag values
Digit Default setting Meaning Valid values
1 0
Look-up algorithm for PLUs when read 18-digits
long bar-code
0 – look-up using the entire
bar-code,
1 – as option 0, but if look-up fails, the
bar-code is considered as EAN 13+5 and
extension is ignored
2 0
Look-up algorithm for PLUs when read 15-digits
long bar-code
0 – look-up using the entire bar-code,
1 – as option 0, but if look-up fails, the
bar-code is considered as EAN 13+2 and
extension is ignored
3 0
Printing format if ECR reads and successfully looks
up the 13+5 bar-code
0 – do not print anything,
1 – print only bar-code extension,
2 – print entire bar-code
4 0
Printing format if ECR reads and successfully looks
up the 13+2 bar-code
Page 31

31
Programming manual
5 0
Printing format if ECR reads and successful
ly looks up bar-code with other length than
15/18 or if a PLU has been read using the
PLU number that has length 15/18 and ECR
database contains the same EAN code with
given length (i. e. it is not considered an EAN
13+2/13+5 code)
0 – do not print anything,
1 – print entire 18-digit long code
programmed for given PLU
Figure 3.12. Second extended flag values
Digit Default setting Meaning Valid values
1 0 Printing of PLU number with sales item 0 - no, 1 - yes
2 1 Time printing on the receipt 0 - no, 1 - yes
Figure 3.13. Third extended flag values
Digit Default setting Meaning Valid values
1 1
Checks and credits charge when total is
negative
0 - cash paid,
1 - charge by type of payment
TAX RATES PROGRAMMING
The cash register allows the use of six tax rates plus one rate without tax. Both the tax rate and its name are
programmable. The seventh rate is not programmable.
Tax level programming procedure:
1) Switch the ECR into the programming mode “P” by pressing
.
2) Press the
(Refund) key. The display shows the number of programmed tax level and its rate.
3) Enter the tax rate without decimal point. First two numerals compose integer part of the rate, last
two compose decimal part (i. e. for tax rate of 19% it is 1 9 0 0). The tax rate can be changed only
after daily and periodical report have been executed in “Z” report mode. If you need to disable
a specific tax level, programme its tax rate as 100.00% or higher.
4) Press the
(Subtotal) key. Display will show label for programming the tax level name.
5) To exit the tax level programming, press
(Total) key.
More details on entering texts are located at the end of this chapter.
Correction of the tax level values
1) Switch the ECR into the “P” mode by pressing
.
2) Enter the number of the tax level you want to edit and press the
(REFUND) button.
3) Re-program the parameters as described in section above.
4) You can print the newly programmed tax level values by pressing
(CHECK) key.
5) Finish the corrections by pressing the
(TOTAL) key.
5.00%
1 TAX RATE
Page 32

32
Programming manual
Printing of the programmed tax values
To verify the programmed values, print them by pressing the (CHECK) button in the tax programming
mode. If working in another programming mode, press the
(REUND) key and then the (CHECK)
key. It is possible to print the rate and name of a particular tax level by pressing the (EAN) button.
RECEIPT TEXT LOGO PROGRAMMING
The Euro-200T/TX can print up to nine lines of text at the beginning of the receipt (e. g. “Roy’s Food Store”,
“Thank you” etc.) Euro-200T can have on each line up to 18 normal sized/9 double sized characters and
Euro-200TX can have on each line up to 24 normal sized/12 double sized characters.
Logo programming procedure:
1) Switch the ECR to the “P” mode by pressing
.
2) Press the
(PO) key.
3) The notification „
1 LOGO LINE“ appears in the second display row and informs you that you
are programming the first line of the text logo and the first display row will show the currently programmed text for that row. If programmed text is longer than is possible to display, then in the left
part will be displayed its length. Enter new data for the current logo line. If you mistype or make
a mistake, you can delete previous characters by pressing (CLEAR) key. Programmed text will
be printed out just as typed in, starting from the left.
4) Press the
(SUBTOTAL) key. The next line will appear on the display and is ready for editing.
5) Press the
( TOTAL) key to finish the programming of receipt logo lines.
Correction of the text logo lines
1) Switch the ECR to the “P” mode by pressing
.
2) Enter the line number you want to correct and press
(PO).
3) Re-programme with corrected value as shown in section above.
4) You can print out the entire logo by pressing
(CHECK) key; print out the current line by pressing
(EAN) key.
5) Finish corrections by pressing the
(TOTAL) key.
Printing the programmed logo lines
Programmed logo lines can be printed in text logo programming mode by pressing the (Check) key.
Print a particular programmed line by pressing the (EAN) key.
Euro-200
1 Logo line
Page 33

33
Programming manual
RECEIPT GRAPHIC LOGO PROGRAMMING
In the ECR is preprogrammed graphic logo by its producer. You can reprogram it using communication
software (Euro2A, ECR.dll, Com2A.exe, Com32.dll), available at producer‘s web site (www.elcom.eu).
Graphical logo parameters:
format bmp, 1 bit (black and white)
resolution T model 160x180 pixels, TX model 240x160 pixels
CASHIERS PROGRAMMING
The programming of cashiers consists of three steps:
• cashier’s name
• cashier’s password
• cashier’s access rights
The ECR allows you to program up to six cashiers. This programming allows you to assign a password to
each cashier, which will be used by him/her to log into the ECR and use its functions. This password will
also identify the cashier working on the ECR: the receipts issued by that cashier are identified by his/her
name and all operations are assigned to him/her.
Programming procedure:
1) Switch the ECR to the “P” mode by pressing
.
2) Press the
(PASSWORD) key. Display will show the current cashier number and label (“NAME”)
in the second display row which indicates that you are programming the cashier’s name. First display row contains the current cashier’s programmed name.
3) Enter the name for the current cashier. Cashier name can have up to ten characters. If you mistype
or make a mistake while entering text, you can use the (CLEAR) key to delete recent characters.
See the end of the chapter for hints on entering texts.
4) Finish the cashier name programming by pressing (S
UBTOTAL
) key. The ECR shows the current cashi-
er number in the second display row, together with the label (“
PASSW
”) that indicates programming of
cashier’s password. Press (T
OTAL
) to finish the programming procedure (next steps will not run).
5) Enter the cashier’s password. The password is composed by the up to four numerals. If you mistype
during entering of the password, you can use (CLEAR) key to correct your mistakes.
6) Finish the programming of cashier’s password by pressing (SUBTOTAL) key. The ECR will then
show the current cashier number in the second display row along with label (“ACCESS”) that
indicates programming of cashier’s access rights for ECR modes. Press (TOTAL) to finish the
entire programming procedure (next steps will not run).
CASHER1
1 NAME
0001
1 PASSW
1111
1 ACCESS
Page 34

34
Programming manual
7) Program the mode access flags according to the Figure 3.14. If you mistype, correct your mistakes
using (CLEAR) key.Warning: you cannot deny access to programming mode “P” for the cashier
no. 1.
Figure 3.14. Cashier access rights.
Digit Meaning Valid values
1 Access to the “X” mode
0–no, 1–yes
2 Access to the “Z” mode
3 Access to the “P” mode
4 Access to the “T” mode
8) Press the (SUBTOTAL) key to continue programming of the remaining cashiers; continue with step
3. If you press (TOTAL) key, you finish the programming procedure for the cashiers.
Correction of cashiers values
1) Switch the ECR to the “P” mode by pressing
.
2) Enter the number of the cashier you wish to correct and press
(PASSWORD) key.
3) Continue in the same way as shown in section above.
4) You can print out data of all cashiers by pressing (CHECK) key; press key to print out data of
the current cashier only.
5) Finish the corrections by pressing (TOTAL) key.
Printing of cashiers values
To check the programmed names and other settings, press the (CHECK) key in the cashier programming. In the programming mode, press the
(PASSWORD) key first and then press (CHECK) key. Print
the programmed values of the current cashier by pressing the (EAN) key.
FUNCTION TEXTS PROGRAMMING
The Euro-200T/TX allows you to program all the operation labels that can be displayed/printed to the
receipt. The default values for all function texts are shown in the Figure 3.15. You can adjust all of them to
your needs.
Function texts programming procedure:
1) Switch the ECR to the “P” mode by pressing
.
2) Press the (VOID) key. ECR will display the number of the currently programmed function text in
the second display row and contents of that text in the first display row.
3) Enter new function text that could have up to 17 characters. If you mistyped, you can correct mistakes
by pressing
(CLEAR) key. Details on entering texts are located at the end of this chapter.
4) Press (SUBTOTAL) key to programme next available function text; continue with step 3). Finish the
function texts programming by pressing (TOTAL) button at any time.
Correction of function texts
1) Switch the ECR to the “P” mode by pressing
.
CASH
1 Func. text
Page 35

35
Programming manual
Figure 3.15. Default function texts.
Text no. Default setting Description
1 CASH Cash payment denomination
2 CHECK Check payment denomination
3 CREDIT Credit card payment denomination
4 CHANGE Change value denomination
5 REFUND Refund value denomination
6 VOID Void denomination
7 RA Received on account denomination
8 PO Paid out denomination
9 TOTAL Total value
10
DOC.NUMBER Document number
2) Enter the number of text to be corrected and press (VOID) key.
3) Continue in the same way as when programming function texts (consult section above).
4) Print out all programmed function texts by pressing (CHECK) key; print the currently edited function text by pressing (EAN) key.
5) Correction of function texts is finished by pressing (TOTAL) button.
Function texts print out
To check the programmed function texts, press (CHECK) key in function texts programming mode. If in
programming mode, press (VOID) key first and then the (CHECK) key. Print the value of a particular
function text by pressing (EAN) key.
DEPARTMENTS PROGRAMMING
The Euro-200T/TX cash register has 30 departments (DPT) available. Each department has three basic
components:
1) Price
2) Department flag
3) Name
Programming procedure:
1) Switch the ECR to the “P” mode by pressing
.
2) Press the
(DPT) key. The current department number and the label (“price”) appear in the
second line on the display to indicate department price programming. The programmed price appears in the first display row.
0.00
1 DPT price
Page 36

36
Programming manual
3) Enter the new department price (maximum eight digits, including decimals). If you mistype, you can
correct your mistakes by pressing (CLEAR) key.
4) Press the
(SUBTOTAL) key to continue with programming the flag for the current department. The
display shows current department number in the second display row together with label (“
flag”)
to indicate department flag programming. The value of department’s flag is shown in the first display row. Press (TOTAL) key to stop department programming (next steps will not run).
5) Enter the department flag for the current department according to the Figure 3.16. If you mistype,
you can correct it using the
(CLEAR) key.
Figure 3.16. Department flag values
Digit Default setting Meaning Valid values
1 0 Assigning VAT level to a department
0 – no tax ,
1 – tax level 1,
2 – tax level 2,
3 – tax level 3,
4 – tax level 4,
5 – tax level 5,
6 – tax level 6
2 0 Type of department
0 – normal,
1 – single item department
3 0 Negative department
0 – no,
1 – yes
4 3 Sale feature
0 – sale forbidden,
1 – open price (manually entered price),
2 – fixed price (preprogrammed price),
3 – 1+2 (preprogrammed price or the possibi
-
lity to enter a price manually)
5 8
HALO limit, maximum 8 (maximum number of
digits allowed)
1-8
6) Press (SUBTOTAL) key to continue with programming the name for the current department. The
ECR display shows current department number along with the label (“name”) in the second dis-
play row; first display row contains current department name on the right.
7) Enter the department name. If you mistype, you can correct your mistakes by pressing
(CLEAR).
See the end of chapter for more detailed instructions on entering texts.
8) Press the
(SUBTOTAL) to continue department programming for next department; proceed to step
3). The programming of departments can be finished at any time by pressing (TOTAL) key.
Departments correcting
1) Switch the ECR to the “P” mode by pressing
.
2) Enter the number of the department you want to adjust (1–30) and press
h
(DPT) key, or press
the selected department button to directly choose required department.
DPT01
1 DPT name
00038
1 DPT flag
Page 37

37
Programming manual
3) Continue re-programming desired values as shown in the section above.
4) You can print out all the programmed department values by pressing (CHECK) key; to print out
the currently programmed department, press (EAN) key.
5) Finish the corrections by pressing (TOTAL) key.
Department values print out
Check the programmed department values by pressing the (CHECK) key in the department programming mode. In the programming mode, press the direct button of a department or a department number
and then press the h (DPT) button. Afterwards press the (CHECK) button. To print the settings of
currently programmed department, press the (EAN) key.
SALE UNITS PROGRAMMING
Sale unit can be assigned to each PLU and represents the unit in which the PLU is sold. It is possible to
program eight sales units with up to three characters each. Figure 3.17 shows the default settings for sale
units; you can adjust these defaults to your needs.
Sale units programming procedure:
1) Switch the ECR to the “P” mode by pressing
.
2) Press the
(SURCHARGE) key. The ECR display shows the current sale unit number along with
the label (“sale unit”) in the second display row and programmed unit in the first row.
3) Enter the text for the current sale unit (up to three characters). You can correct mistypes by pressing
(CLEAR) key. See the section on entering texts at the end of this chapter.
Figure 3.17. Default sale units.
Digit Units Digit Units
1 5 m
2 PCS 6 m
2
3 kg 7 btl
4 l 8 pkg
4) Press (SUBTOTAL) key to continue sale units programming with the next sale unit. Finish sales unit
programming at any time by pressing the (TOTAL) key.
Programmed sale units correcting
1) Switch the ECR to the “P” mode by pressing
.
2) Enter the number of the sales unit you want to modify and press
(SURCHARGE) key.
3) Continue the programming as described in the previous section (see above).
4) You can print out all programmed sale units by pressing (CHECK) key; to print the currently programmed sale unit, press (EAN) key.
5) Finish the corrections by pressing (TOTAL) key.
Sale unit settings print out
If you want to check the settings of the sale units, press the (CHECK) key in the sale units programming
mode. If the ECR is in the programming mode, first press the
(Surcharge) key, then the (CHECK)
key. For a printout of the current sale unit, press the (EAN) key.
PCS
2 sale unit
Page 38

38
Programming manual
ARTICLE ITEMS (PLU) PROGRAMMING
The article item is referenced as PLU (Price Look-Up) throughout this document. The Euro-200T/TX cash
register has up to 2 400 PLUs available (10 000 PLUs with extension memory module). The PLU has five
basic programmed components:
1) PLU price
2) PLU 1st flag
3) PLU 2nd flag
4) PLU name
5) PLU bar c
ode
Programming procedure:
1) Switch the ECR to the “P” mode by pressing
.
2) If you wish to programme a PLU with a specific number, enter that number now and press (PLU)
key. If you don’t supply any number, the ECR starts programming from the first PLU. The ECR display
shows the current PLU number and label (“price”) that indicates programming of the PLU’s price.
3) Enter the price for the programmed PLU; maximum eight numerals, including decimals. You can
delete mistyped numerals using (Clear) key.
4) Press (SUBTOTAL) to continue with programming of first PLU flag. The display will show current
PLU number and label (“flag1”) in the second display row and current value of the first PLU flag
in the first row. Press (TOTAL) to leave PLU programming (next steps will not run).
5) Enter the data for the first PLU flag; orient yourself by the table 3.18. Correct mistypes by using
(CLEAR) key. PLUs within 1001–1015 mustn’t be assigned to a negative department.
If you set up an article item as descriptive, that item shows its name when sold, but it doesn’t include
any sale data (its quantity/value doesn’t count in quantity/value of sold items).
Figure 3.18. First PLU flag values.
Digit Default setting Meaning Valid values
1 0
Assigning a VAT level to the PLU 0 – no tax,
1 – tax level 1,
2 – tax level 2,
3 – tax level 3,
4 – tax level 4,
5 – tax level 5,
6 – tax level 6
2,3 01 Assigning a department to the PLU 1 – 30
4 0 Descriptive PLU 0 – no, 1 – yes
5 0
Type of PLU
0 – normal PLU,
1 – single item PLU
6 0 Sale feature
0 – sale forbidden,
1 – open price (manually entered price),
2 – fixed price (preprogrammed price),
3 – 1+2 (preprogrammed price or the possibility to
enter a price manually)
0.00
1 PLU price
001000
1 PLU flag 1
Page 39

39
Programming manual
6) Press (SUBTOTAL) to continue with programming of second PLU flag. The display will show current
PLU number and label (“flag2”) in the second display row and current value of the flag in the first
row. Press (TOTAL) to leave PLU programming (next steps will not run)
7) Enter the data for the second PLU flag; orient yourself by the Figure 3.19. Correct mistypes by using
(CLEAR) key. To the PLUs within 1001–1015 can not be linked any other PLU.
Figure 3.19. Second PLU flag values.
Digit Default setting Meaning Valid values
1, 2
00
Assigning the sale of another PLU to the sale of
an actual PLU (linked PLU)
00 – no linked PLU,
01 – PLU No. 1001 is linked,
02 to 15 – PLUs 1002-1015 are linked
3 1
Sales unit assigning 1 – The first sales unit assigning,
2 to 8 – assigning the sales unit 2 – 8
4 0 PLU stock information on PLU report 0 – no, 1 – yes
5 1 PLU sale possibility even if stock is negative 0 – no, 1 – yes
6 1 Split pricing possibility 0 – no, 1 – yes
7 8
HALO limit, maximum 8 (maximum number of di
-
gits allowed)
1 - 8
8) Press (SUBTOTAL) to continue with name programming for the current PLU. The display shows
current PLU number and label (“name”) in the second display row and the name in the first display
row. Press (TOTAL) to finish the PLU programming (next steps won’t run).
9) Enter the PLU name/description, maximum 18 characters (or 9 double width characters) for T mo
-
del and maximum 24 characters (or 12 double width characters) for TX model. See the end of this
chapter on how to enter texts. You can correct mistypes by using (Clear) key.
10) Press
(SUBTOTAL) key to continue with programming of the bar-code for the current PLU. The
display shows the current PLU number and label (“
barcod”) in the second display row and the
currently assigned bar-code in the first row. Press (TOTAL) to finish the PLU programming (next
steps won’t run).
11) Enter the PLU bar-code either using the keyboard or using a scanner (scanner has to be connected
to ECR and properly configured). You can correct mistypes using
(Clear) key.
12) Press
(SUBTOTAL) key. If you entered a bar-code that is already assigned to a PLU, the ECR will
warn you on this by displaying “barcode duplicate” along with the PLU number of the
PLU that bar-code is assigned to already.
1 PLU name
0000000000000000000
1 PLU barcod
0010118
1 PLU flag 2
Page 40

40
Programming manual
13) After the bar-code has been successfully assigned, the ECR continues with programming of next
PLU; proceed to step 3). Press (Total) to finish the PLU programming. After the PLU programming is over, the ECR will sort all the bar-codes and indicates that it’s doing so on its display. If the
ECR is disconnected from power supply, it will resume sorting after turned on again.
Setting up the bar-code scanner
To secure a reliable functioning of bar code scanning it is important to program the scanner correctly and
connect it properly to the cash register. Parameters of the bar code scanner setting:
• eight data bits
• none parity
• one stop bit
• transmission speed and terminal character is according to setting of the fifth ECR‘s system flag
The default setting of flag no. 5 corresponds to Metrologic bar code scanners (MS 951, MS 6720, MS 7100,
MS 860, MS 6130 and MS 9520). All you have to do is read the following bar codes from the scanner pro
-
gramming manual:
1) Enter/Exit
2) Recall Default
3) Enter/Exit
The ECR is able to handle bar codes containing data for product weight. The format is the following: PP
XXXX V MMMMM K; PP - prefix of bar code (28 or 29), XXXX - PLU number (0001-2400), V - scales check
digit, MMMMM - product weight (3 decimal digits) and K - bar code check digit.
In the case of usage of scanner with keyboard wedge connector it is necessary to program the scanner as
follow:
1) Enter / Exit
2) Emulation for PS/2
3) STX prefix
4) ETX sufix
5) Enter/Exit
Quick PLU price programming
If you need to change only the prices of several PLUs, you can easily do it by the following procedure:
1) Switch the ECR to the “P” mode by pressing
.
2) Enter the PLU number and press the
(PRICE) button. If you don’t enter any number, the ECR will
start form PLU no. 1. The PLU number and the label (“price”) appear in the second display row,
current PLU price is displayed in the first row.
0.00
1 PLU price
CODE SORTING
BAR CODE DUPLICATE
3 PLU barcod
Page 41

41
Programming manual
3) Enter the new price (maximum eight digits including decimals).
4) Press
(SUBTOTAL) key to continue in the price programming of the next PLU; proceed to step 3).
5) Press
(TOTAL) key to finish the quick PLU price programming.
Quick PLU stock programming
The cash register also records stock information for each PLU. The PLU stock information can be changed
to another value directly, or you can alter stock by operations in the registration mode.
1) Switch the ECR to the “P” mode by pressing
.
2) Enter the PLU number and press the
(SCALES) key. If you didn’t enter any number, the ECR will
start from PLU no. 1. The display shows current PLU number and label “stock” in the second
display row and the current stock for that PLU in the first row.
3) Enter stock value (up to nine digits, three decimal places including) and press:
•
(SUBTOTAL) key to apply the entered number as the new stock value,
•
(SURCHARGE) key to add the entered number to the current stock or
•
(DISCOUNT) key to subtract the entered number from the current stock.
Maximum stock value is 999 999.999. If you enter integer amount, enter the number and just
press
. After pressing any of the above three keys, the ECR will continue with programming of
the stock for the next PLU.
4) Press
(TOTAL) to finish the quick PLU stock programming.
Correction of programmed PLUs
1) Switch the ECR to the “P” mode by pressing
.
2) Enter the PLU number and press the
(PLU) button. You can also use the bar-code scanner:
scanning the bar-code will jump to the said PLU.
3) Continue programming the PLU values as described in the relevant section.
4) You can print out all programmed PLUs by pressing
(CHECK) key or you could print out the cur-
rently programmed PLU by pressing (EAN) key.
5) You can jump to any PLU using the procedure in step 2). Press
(TOTAL) key to finish correcting
the PLUs.
Programmed PLUs print out
To verify programmed values, print them by pressing the (CHECK) key in the PLU programming mode. If
the cash register is in root programming mode, press the (PLU) key and then the (CHECK) key. Only
PLUs that have been programmed will be printed. It is possible to print the programmed value of a particular
PLU by pressing (EAN) key.
0.000
1 PLU stock
Page 42

42
Programming manual
PROGRAMMING THE EURO CURRENCY
The Euro-200T/TX allows you to use the Euro currency. Depends on the phase of the Euro currency implementation, it is also possible to register in the national currency (phase no. 1 and no. 2) or in a foreign
currency (phase no. 3). Registration with the Euro is divided into four phases.
Phase without Euro currency
The cash register works without the Euro. All transactions are performed in the national currency.
First Euro currency phase
In the first Euro phase the main currency is the national one, the secondary currency is the Euro. The customer can pay either in the national currency or with Euro. Going back to the phase without Euro isn’t possible
without resetting of the ECR. Call your service technician in that case.
Entering into the first Euro phase procedure:
1) Switch the ECR to the “P” mode by pressing
.
2) Enter the code by pressing
.
3) Enter the acronym for the national currency (three characters maximum) and press
(S
UBTOTAL
) key.
4) Enter the exchange rate for Euro, maximum rate is 10000, minimum rate is 0,0001 and maximum
number of digits is 9 with max. 4 decimals (caution – in this case decimals are not recognized automatically, e.g. in the case that required value is „42,124“, it is necessary to use comma) and press
(SUBTOTAL).
5) Enter the currency flags according to figure 3.20 and press
(SUBTOTAL).
After programming, the information about transition into first phase of Euro currency is displayed. The same
information is also printed out along with values entered during the transition.
Figure 3.20. Currency flags
Digit Meaning Valid values
1. System of rounding
0 – up from 5,
1 – always up,
2 – always down,
3 – special quarter rounding
2. No. of decimal places for currency displaying
0 - 3
3. No. of decimal places for currency rounding
During the first Euro phase the actual exchange rate can be set by the following procedure:
1) Switch the ECR to the “P” mode by pressing
.
2) Press the
(DRAWER) key.
3) Enter the current exchange rate (maximum currency value is 10000, minimum currency value is 0,0001
and maximum number of digits is 9 with maximum 4 decimals) and press (
SUBTOTAL
).
Before change is applied it is necessary to perform total (daily) „Z“ report.
1 EUR=1GBP
Curr. rate
Page 43

43
Programming manual
Second Euro currency phase
In the second Euro currency phase the main currency is Euro, the secondary one is the national currency,
i.e. main and secondary replace each other (replaced are currency description code, displaying and rounding flags). The customer can pay either in Euro or in the national currency. ECR grand totals will be erased
by transition into the second phase. The transition is possible only if daily, periodical and PLU report in “Z”
mode are performed. Reversal into first Euro currency phase is impossible without resetting the ECR. Call
your service technician in that case.
Entering into the second Euro currency phase procedure:
1) Switch the ECR to the “P” mode by pressing
.
2) Enter the code by pressing
.
3) Enter the actual exchange rate ( maximum rate is 10 000, minimum rate is 0,0001 and maximum number of digits is 9 with maximum 4 decimals) and press (SUBTOTAL).
After programming, the information about transition into second phase of Euro currency is displayed. The
same information is also printed out along with values entered during the transition.
After transition to second phase, it is necessary to change prices of PLU articles and DPTs, as this is not
done automatically.
During the second Euro phase the actual exchange rate can be set by the following procedure:
1) Switch the ECR to “P” mode by pressing
.
2) Press the
(DRAWER) key.
3) Enter the current Euro exchange rate (maximum currency value is 10 000, minimum currency value is
0,0001 and maximum number of digits is 9 with maximum 4 decimals) and press
(
SUBTOTAL
).
Before change is applied it is necessary to perform total (daily) „Z“ report.
Third Euro currency phase
The main currency is the Euro, the secondary currency is any foreign currency, i.e. the secondary currency
is programmable. The customer can pay either in Euro or in the secondary foreign currency. Transition to
the third Euro currency phase is possible only after daily (total) and monthly (periodical) report in „Z“ mode
is performed. Reversal to second Euro phase is not possible without resetting the ECR. Call your service
technician
in that case.
Entering into the third Euro currency phase procedure:
1) Switch the ECR to the “P” mode by pressing
.
2) Enter the code by pressing
.
3) Enter the acronym for the secondary foreign currency (three characters maximum) and press
(SUBTOTAL) key.
4) Enter the exchange rate (minimum rate is 0.000 1 and maximum is 10 000) and press
(SUBTO-
TAL) key.
5) Enter currency flags according to figure 3.20 and press
(SUBTOTAL).
After programming, the information about transition into the third phase of Euro currency is displayed. The
same information is also printed out along with values entered during the transition.
During the third Euro phase the actual exchange rate and secondary currency can be set by the following
procedure:
1) Switch the ECR to the “P” mode by pressing
.
Page 44

44
Programming manual
2) Press the (DRAWER) key.
3) Enter the secondary currency acronym (up to three characters) and press
(SUBTOTAL) key.
4) Enter the current exchange rate and press
(SUBTOTAL) key.
5) Enter currency flags; set the flags of secondary currency according to figure 3.20 and press
(SUBTOTAL).
New exchange rate is saved and printed at the same time. To change exchange rate it is necessary to
perform daily „Z“ report. To modify other parameters of secondary currency it is necessary to perform daily
and monthly „Z“ report.
ENTERING TEXTS INTO THE ECR
The numerical keys are used in text programming (logo, PLU names, cashiers names etc.). There are
numbers in the upper part of the keys and letters and other characters are in the lower part. In national versions, all letters and characters of the alphabet are on the keys. To enter a capital letter hold the
(SHIFT) key and press the relevant key. For instance, enter letter “a” by simply pressing the key, letter
“F” by holding and pressing the key three times, number
“5” by pressing the key four times, to get the space character
press .
Characters that are not printed on the keys are „ ’“ (2 × ), „ ; “ (3
× ), „ < “ (4 × ), „ > “ (5 × ), „ = “ (6 × ), „ ? “ (7 × ) a „ $ “
(8 × ).
If you want to print a double-spaced character, press the
key
before each double-width character. The double-width character is
displayed as character with space in front on the ECR display. If the
programmed text string has characters which are on the same key,
press the particular key as needed, wait until a full character appears
on the display, and then press the key again. If there are successive
characters that belong to different keys, simply press the buttons in
order without waiting. Mistakes caused when entering characters can
be corrected by (CLEAR) key to clear the incorrect characters.
PROGRAMMING OF THE OPTIONAL PROGRAMMABLE KEYBOARD KEYS
Programmable keyboard is optional accessory of ECR. If your ECR does not have this keyboard, you can
skip to next chapter.
Optional programmable keyboard contains 10 keys.
This procedure describes how to programme the programmable ECR keys. An individual key could be
programmed with arbitrary keystroke sequence (function keys, up to 16) that will be generated when the
programmed key is pressed in the future.
The programming of keys starts in programming mode
. Press the key you wish to program.
1. The display shows the ID number of programmable key, the label „Key name“ and the current name
assigned to that key.
Numeric keys
Page 45

45
Programming manual
2. Enter a new name and confirm by pressing the (Subtotal) key. If you press (Subtotal) key without entering anything, you just confirm the previous assigned name. When you press (Total),
the key programming procedure ends.
3. If you have changed name for the programmed key, the ECR will update its settings and print the
information about key name change on the receipt (ID number of programmed key and the data of
changed parameter -- label „Key name“ and its newly programmed value).
4. The display will then show the ID number of the programmable key, information label for the functi
-
on programming „01.Function“ and text description of the current key function.
5. Press
(MULTIPLY) key to enter the key programming mode. The display will ask you to press a key.
By pressing a function key, you‘ll assign its value to the programmed key. Keep pressing to add further function keys to the programmable sequence or press the currently progammed key to finish
programming and assign the programmed function sequence to that key. The ECR will update the
key definition and print the change information messages to both receipt and journal (this information includes programmed key ID number, record type „01.Key“, info label on function programming
and its number „01.Function“ and the programmed function sequence). The ECR then continues with
programming of next key, or goes to the first key if the currently programmed key was the last one.
6. If you didn‘t enter into the key programming mode, then you can press
(Subtotal) to confirm the
current value and proceed to the next key (or the first key if you were on the last key) and the programming procedure continues again with step 1.
7. Press
(Total) button to exit the programming mode.
The key function deleting
You can delete function sequece assigned to a key if you press (Clear) key during step 4. of the programming procedure.
The display will show that you are about to delete the function sequence assigned to a key and awaits
a confirmation. Press
(Clear) key to delete the value or press (Subtotal) to cancel the deletion. When
you cancel the deletion you can proceed with programming procedure as usual. If you decide to confirm
deletion, the ECR will delete the assigned function sequence assigned to that key and prints the information
about deleted function (this information includes programmed key ID number, record type „01.Key“, info
label on function programming and its number „01.Function“ and the keyword „deleted“). The programming
procedure then continues normally.
Printing of the programmed key name
The name of the programmed key will be printed if you press (EAN) key during step 1 of the programming procedure.
The ECR will print to both, receipt and journal following information on the key: ID number of the program
-
med key, parameter label „Key name“ and current value of that parameter.
Printing of the programmed key function
The function of the programmed key will be printed if you press (EAN) key during step 4 of the programming procedure.
The ECR will print to both, receipt and journal following information about the key: ID number of the pro
grammed key and record type „01.Key“, parameter label „01.Function“ and text description of the current key
function.
Printing of the settings for all keys
You can print the settings for all ECR key if you press (Cheque) key in either step 1 or step 4 of the
programming procedure.
Page 46

46
Programming manual
The display will show „Keyboard prog.“ label and the same will be printed to both, receipt and journal. For
each key, the ECR will print:
– ID number and record type: „01.Key“
– parameter label „Key name“ and the name of the current key
– for each function in the current key‘s assigned function sequence will print number and label
„1.Fucntion“ and the current value of that function.
Page 47

OPERATION
IN REGISTRATION MODE
Page 48

48
Operation in registration mode
The functions that are described in the following chapters are used in the registration mode. All financial
transactions are stored in this mode.
If the cash register allows you to use the training mode, you can try the following functions in the training
mode first (sales data are not stored in the memory).
RECOMMENDED PROCEDURES AT THE BEGINNING OF THE DAY
1) Check if there is enough paper on the printer roll for the day. Insert a new paper roll, if necessary.
2) Print out an “X” report and make sure that:
a) date and time are correct,
b) a daily report was executed.
3) Check whether there is enough cash in drawer.
4) Register the initial cash put into the drawer by entering cash value and pressing the
(RA) key.
STATUS AND FUNCTIONS THAT ARE REQUIRED
TO KNOW BEFORE THE BEGINNING OF REGISTRATION
If a key is used for two functions, choose the function in the lower part of the key by simply pressing the key
and choose the function in the upper part of key by holding the (SHIFT) key and pressing the key.
Error warning: the CLEAR key
If a function key is used incorrectly or the registration range is exceeded, the ECR issues an error beep and
an error message appears on the display. To recover and correct the condition, simply press the (CLEAR)
key. The error code is cleared from the display. Then enter the correct function or amount.
Cashier log in: the Password key
The cash register can assign a secret identification number (password) for up to six cashiers. Cashier
passwords, as well as names, are programmed in the programming mode. To use the cashier identificati
on function, enter the numeric password and press the
(PASSWORD) key. For extra security, press
the
button before the password entry. Display will show a “PASSWORD” label. The entered
password numbers are not visible on the display at this time. If an incorrect password is entered, the ECR
beeps twice and remains locked. Enter the correct number and press the
(PASSWORD) key to unlock
the cash register. The password protection prevents unauthorised use of ECR. If the cashier’s name has
been programmed, it will be printed in the receipt header area after the cashier logs in.
Cashier log out: the Password key
If the cash register has been protected from unauthorised use, the cashier should log out by pressing the
(PASSWORD) key after finishing of registration. Display shows the “PASSWORD” label and the
cash register is locked until the correct password is entered and the
(Password) key is pressed.
When the cash register is locked, registration cannot be performed and the cash drawer will not open. This
function is used when changing cashiers or when a cashier leaves the ECR.
Page 49

49
Operation in registration mode
Finalizing a transaction: Cash, Cheque, Credit keys
Pressing one of the payment keys determines the payment method (by cash, by credit card or by cheque).
Finish the transaction by pressing one of the following buttons (CASH), (CREDIT), (CHEQUE).
SAMPLES OF BASIC REGISTRATION PROCEDURES
1) Switch the cash register into the “R” mode:
, or into the training „T“ mode
2) If needed, enter the password to log in.
3) Enter the PLU code of the registered item.
4) Press the
(PLU) key.
5) Repeat step 3 and 4 for each PLU.
6) Press the
(SUBTOTAL) key. Total amount of the sale (including the VAT value) appears on the dis-
play.
7) Announce the amount to the customer.
8) Enter the amount tendered by customer and press the corresponding payment button:
(CASH),
(CHEQUE), (CREDIT).
9) The cash drawer opens. When the amount tendered is greater than the due amount, the ECR will
show the change.
10) Tear off the receipt and give it to your customer together with the change, if any.
Figure 4.1. Sample sale receipt:
1 - receipt logo (header),
2 - ECR tax ID number,
3- taxpayer
’s identification,
4- weekday, date
5- time
6- receipt number and ECR number,
7- cashier name,
8 - item (PLU) name,
9 - assigned tax level,
10 - sold quantity and value,
11 - total item sale value
.
MONGOOSE
Grocery Store
T H A N K Y O U
Your receipt
DKP: 7242020012345001
TPN:0123456789876
09:42:00 Wen.04-01-2005
01.0007 Cashier
Bread
1*2.70 =2.70
[
Roast coffee
1*2.50 =2.50
[
Fruit tea
1*1.20 =1.20
[
----------------------------TAXABLE VAT19% 6.40
[
NET VAT19% 5.40
[
VAT19% 1.00
[
NET TOTAL 5.40
VAT TOTAL 1.00
ROUNDING 0.10
TOTAL 6.50
----------------------------CASH 6.50
4
9
11
3
1
5
6
8
10
7
2
Page 50

50
Operation in registration mode
REGISTRATION USING DEPARTMENTS
To get better information about revenue of particular items, split the articles into departments (article groups).
The “department” means articles grouped in the same category (such as dairy products, pastry, alcohol
etc.), or of the same tax level (VAT 16%, TAX 10% etc.). The Euro-200T/TX cash register enables the use of
a maximum of thirty departments.
Item registration is finished by pressing the proper department key
–
. After pressing a department
key, the registered amount, the corresponding tax level, the maximum registration amount, a pre-programmed price and others parameters are assigned to the revenue of the department. The sale informations are
is stored in the ECR memory and used for department reports.
Numeric keys
–
and department keys
–
are used for registration (see keyboard picture). It
is possible to register through departments by entering the department number and pressing the
(DPT)
key (
,
…). Thus, you can register any department. It is also possible to register depart-
ments 1 to 10 by pressing a department keys
–
.
Basic registration using departments
The ECR can be programmed to use pre-programmed price or the price entered from the keyboard during
registration using departments. If both types are allowed, the cash register will use the price entered from
the keyboard.
Registration using departments with price entry from keyboard
• Using the (DPT) key
DEPARTMENT 7
1 27.00
Department 7
1*27.00 =27.00
[
Department 10
1*31.20 =31.20
[
SUBTOTAL 58.20
------ - - - - - ------- - - - TAXABLE VAT5% 58.20
[
NET VAT5% 55.43
[
VAT5% 2.77
[
NET TOTAL 55.43
VAL TOTAL 2.77
TOTAL 58.20
--------------------------CASH 58.20
Step Press
1.
2.
3.
4.
Page 51

51
Operation in registration mode
• Using the direct department keys
–
Registration using departments with pre-programmed price
Example: The pre-programmed price for DPT 1 is 7.50 and for DPT 2 is 43.20.
• Using the
(DPT) key
• Using the direct department keys
–
Step Press
1.
2.
3.
4.
Department 1
1*24.00 =24.00
[
Department 2
1*31.20 =31.20
[
SUBTOTAL 55.20
- - - - - - - - - - - - - - - - - - - - - TAXABLE VAT5% 55.20
[
NET VAT5% 52.57
[
VAT5% 2.63
[
NET TOTAL 52.57
VAT TOTAL 2.63
TOTAL 55.20
--------------------------CASH 55.20
Step Press
1.
2.
3.
4.
Department 1
1*7.50 =7.50
[
Department 2
1*43.20 =43.20
[
SUBTOTAL 50.70
- - - - - - - - - - - - - - - - - - - - - TAXABLE VAT5% 50.70
[
NET VAT5% 48.29
[
VAT5% 2.41
[
NET TOTAL 48.29
VAT TOTAL 2.41
TOTAL 50.70
----------------------------CASH 50.70
Step Press
1.
2.
3.
4.
1*7.50 =7.50
Department 1
1*7.50 =7.50
[
Department 2
1*43.20 =43.20
[
SUBTOTAL 50.70
- - - - - - - - - - - - - - - - - - - - - TAXABLE VAT5% 50.70
[
NET VAT5% 48.29
[
VAT5% 2.41
[
NET TOTAL 48.29
VAT TOTAL 2.41
TOTAL 50.70
-----------------------------CASH 50.70
Page 52

52
Operation in registration mode
Registering multiple items using departments
It is not necessary to enter the price repeatedly if more than one of the same item are being sold. After entering the unit price, just press the corresponding DPT key repeatedly for the number of sold items.
• Using the direct department keys –
• Using the (DPT) key
Items multiplying during registration using departments
• Multiplication of items with price entered via keyboard
The customer buys 12 pieces of the same items at 16.20:
• Multiplication of items with pre-programmed price
Example: The customer buys 12 pieces of the same item with pre-programmed price of 14.20:
This feature helps when you need to enter a large amount of items or you need to enter quantities that
contain decimals (1.5, 0.125, etc.). Multiplication of numbers with a decimal point is often used for weighed
items (meat, vegetables, salads, etc.) where the unit price is known (e. g. for 1 lb, for 1 litre, etc.). The largest
allowed multiplicand is 10 000.
Registering fractions of items using departments
The cash register can be programmed for registration of split prices. This functionality is programmed by
setting the second system flag, digit no. 6 to 0.
Step Press
1.
2.
3.
Department 2
1*31.20 =31.20
[
Department 2
1*31.20 =31.20
[
Department 2
1*31.20 =31.20
[
Step Press
1.
2.
h
3.
h
Department 16
1*31.20 =31.20
[
Department 16
1*31.20 =31.20
[
Department 16
1*31.20 =31.20
[
Department 2
12*16.20 =194.40
[
Step Press
1.
2.
resp. (
)
Step Press
1.
2.
resp. (
)
Department 2
12*14.20 =170.40
[
Page 53

53
Operation in registration mode
Example: The price is determined for a package that includes five pieces of the item (e. g. a box of processed cheese). The customer buys only three pieces, paying three fifths of the price of the whole box.
• Fractional entry with entering the price via keyboard
• Fractional entry with pre-programmed price
Double multiplication of items during registration using departments
The cash register can be programmed for double price multiplication. The function is practical, for example,
when entering a sale of items sold by area (square metres). This function must be programmed by setting
the second system flag, digit no. 6 to 1.
• Double multiplication with entering the price via keyboard
Example: The price is determined for a square metres. Your customer buys a 3 by 5 metres piece.
• Double multiplication of items with pre-programmed price
Example: The pre-programmed price is 32.00 determined for a square metre. Your customer buys 3 by 5
metres.
Single item sales using departments
Some services often sell a single item (for example, cigarettes). To simplify the sale of such items, it is
possible to programme the price into a department and set it up as single item sale department. Then, by
pressing the department key, the item is automatically registered, the sale is automatically finished and the
cash drawer is automatically opened. This group is called a single item sale group. In the following example,
DPT 4 is programmed with the price of 27.00.
Step Press
1.
2.
3.
resp. (
)
Department 2
3/5*31.20 =18.70
[
Step Press
1.
2.
3.
resp. (
)
Department 2
3/5*22.50 =13.50
[
Step Press
1.
2.
3.
resp. (
)
Department 2
3*5*31.20 =468.00
[
Step Press
1.
2.
3.
resp. (
)
Department 2
3/5*32.00 =480.00
[
Page 54

54
Operation in registration mode
If other transactions have already taken place before a single item sale, the transaction is not finalised and it is possible to continue with registration
of other items.
PLU REGISTRATION
Articles have assigned codes (PLU numbers). For example, RAMA butter – PLU no. 5, Skimmed milk - 23,
Rum 0.5 l - 189, etc. Data concerning the articles (name, price, assignment to the department, etc.) are programmed in the cash register memory and linked to a particular PLU number. Entering the PLU number and
pressing the
(PLU) key looks up the data in the ECR memory and registers it automatically.
PLU registration allows storing of information about the sale of each particular item, printing the names
of articles automatically on the receipt, printing the unit price automatically and assigning the transaction
to a department. It also prevents mistakes in keyboard registration. The name of each item on the receipt
satisfies the customer for correctness of items purchased. By automatically calling programmed data from
the cash register memory, faster customer service and greater accuracy is provided.
PLU registration makes it possible to get a clear overview of the sale of each particular item. A personal
computer and a bar code scanner can supplement the advantages of PLU registration.
Basic PLU registration
Multiplication in PLU registration
Example 1: The customer buys twelve pieces of the same PLU with the price of 21.40 each.
Step Press
1.
(
)
Department 4
1*27.00 =27.00
[
-----------------------------TAXABLE VAT5% 27.00
[
NET VAT5% 22.70
[
VAT5% 4.30
[
NET TOTAL 22.70
VAT TOTAL 4.30
TOTAL 27.00
-----------------------------CASH 27.00
Bread
1*27.00 =27.00
[
Butter
1*31.20 =31.20
[
SUBTOTAL 58.20
-----------------------------TAXABLE VAT5% 58.20
[
NET VAT5% 55.43
[
VAT5% 2.77
[
NET TOTAL 55.43
VAT TOTAL 2.77
TOTAL 58.20
-----------------------------CASH 58.20
Bread
1 27.00
Step Press
1.
2.
3.
4.
Page 55

55
Operation in registration mode
Example 2: The customer buys twelve pieces of the same PLU with entering the price of 20.50 via keyboard.
This feature helps when you enter a large quantity of items or need to enter quantities that contain decimals
(1.5, 0.125; etc.). Multiplication by numbers with the decimal part is often used by the weighed items (meat,
vegetables, salads etc.) where the unit price is known (e. g. for 1 lb or for 1 litre, etc.). The maximum multiplicand is 10 000.
Individual PLU registration
In some services, just a single item is often sold, e.g. cigarettes. To simplify the sale of such items, it is
possible to program a single sale PLU flag (see PLUs programming). By entering the PLU number and the
(PLU) key, the item is registered, the sale is automatically finished and the drawer opened. This PLU is
called a single sale PLU. PLU 4 is programmed with price 70.00 in the example.
Note: If other transactions have already been performed before the single item sale, then that sale does not
complete the transaction. It is possible to continue registering of other items.
Overwriting the pre-programmed PLU price
Either the pre-programmed price or a price entered from the keyboard may be used for PLU registration. If
both methods are allowed, the cash register uses the price entered from the keyboard.
Example: The customer has been given a special price, different from the pre-programmed one. PLU 3 has
the pre-programmed price of 21.40, but the special price is 20.50.
Step Press
1.
12
2.
1
Bread
12*21.40 =256.80
[
Step Press
1.
2.
3.
Bread
12*20.50 =246.00
[
Step Press
1.
Cigarettes
1*70.00 =70.00
[
-----------------------------TAXABLE VAT5% 70.00
[
NET VAT5% 66.67
[
VAT5% 3.33
[
NET TOTAL 66.67
VAT TOTAL 3.33
TOTAL 70.00
-----------------------------CASH 70.00
Step Press
1.
2.
Bread
1*20.50 =20.50
[
Page 56

56
Operation in registration mode
Fractional PLU registration
The function must be programmed by setting the second system flag, digit no. 6 to 0.
Example: The price is determined for packing including five pieces of the article (e. g. a box of processed
cheese) at the price of 15.60. The customer buys only three pieces. Thus, he is to pay three fifths of the unit
price of the whole box.
Double multiplication in PLU registration
The function must be programmed by setting the second system flag, digit no. 6 to 1.
Example: The price is determined for the a square metre. Your customer buys 3 by 5 meters.
Linked PLUs registration.
If sold item has first and second digit in second PLU flag (Figure 3.19) programmed, ECR automatically
continue in sale of linked item.This behaviour is used e.g. for sale of item with its returnable container.
Rules for linked PLUs registering:
• with void of main PLU is canceled also linked PLU
• with refund of main PLU is refunded also linked PLU
• linked PLU is registered with same quantity as main PLU
• discount/surcharge applying on main PLU is not applied on linked PLU
• price for main PLU entered from the keyboard is not valid for linked PLU
OTHER POSSIBILITIES OF REGISTRATION
Registration using bar-codes
• registration using a bar-code scanner
A bar-code scanner can be connected to the cash register. Information is then registered simply by scanning the bar-code on the article’s packaging. If the bar-code scanner is to operate correctly, it has to be
properly configured and the ECR has to have its relevant flags set to proper values, more specifically the
fifth system flag (see PLU bar-codes programming section in the previous chapter).
Example: Customer buys three pieces of butter that have a bar codes on its packaging.
• registration by a bar-code entered via the keyboard
In the case of bar-code scanner failure or if a bar-code is damaged, it is possible to enter the bar-code via
the keyboard.
Step Press
1.
2.
3.
Butter
3/5*15.60 =9.40
[
Step Press
1.
3
2.
5
3.
2
Linen
3*5*15.60 234.00
[
Step Press
1.
2. using a bar-code scanner
Butter
3*34.90 =104.70
[
Page 57

57
Operation in registration mode
Example 1: Registration of butter with the bar-code 8 586001 760096.
Example 2: Registration of five butters with the bar-code 8 586001 760096.
Weight entry by electronic scales
The Euro-200T/TX is able to read the weight of an article directly from connected electronic scale. Communication between the cash register and the scales is possible only in “R” and “T” mode. For scales connection to ECR check syst. flags settings (5b).
Press the
(SCALES) button to communicate the weight with the scales. You can change the weight of the
article (add or take from the goods on the scales) until the any key is pressed at the ECR keyboard. After the
weight is read by the cash register, enter the PLU number and press the (PLU) button. If the weight on
the scales is unstable or zero and less, it is not possible to continue the sale.
Example: Registration of PLU no. 21 with weight 0.253 kg.
To achieve the correct operation of the electronic scales, it is necessary to set the type of scales by program
-
ming the fifth system flag of cash register.
Ask your local dealer for more information on the particular electronic scales type connectivity.
Connection of two electronic scales
It is possible to connect two scales at the same time to weight goods separately because of sanitary purposes (e. g. meat.).
1. If from first scale is read positive weight, ECR continue with reading weight from this scale. If first scale
is not connected or weight is zero or negative, ECR continue to second scale.
2. If from second scale is read positive weight, ECR continue with reading weight from this scale. If second
scale is not connected or weight is zero or negative, ECR continue to first scale.
3. If both scales are not connected, or there is other problem with communication, ECR will show error
message.
Registration using an external PC keyboard
The standard PC keyboard can be easily connected to the Euro-200T/TX. Registration is then similar as
registration via the internal keyboard.
Apples
0,253*31.20 =7.90
[
Step Press
1.
2. reading of weight from scales
3.
Step Press
1.
2.
…
3.
Butter
1*12.40 =12.40
[
Step Press
1.
2.
3.
…
4.
Butter
5*12.40 =62.00
[
Page 58

58
Operation in registration mode
Figure 4.2 PC keyboard layout for the Euro-200T/TX ECRs.
If one key is used for more characters, then the character in a lower part is chosen by pressing the actual
key, the character in the upper part on the left side is chosen by pressing this key along with the Shift key
and the character in the upper part on the right side is chosen by pressing this key along with the Alt key.
Ask your local dealer for more information about external PC keyboard connection.
PC ON-LINE mode
Data are transmitted from a PC to the cash register
The cash register software allows the use of the Euro-200T/TX as a fiscal printer. The cash register replaces
the POS printer and the PC fiscal module. This means that the cash register prints the receipt based on
your data from your PC software.
This feature is useful where simple registration is not sufficient due to the high quantity of PLUs and where
sales’ cadence is not high.
Setting up the PC ON-LINE mode:
The cash register is ready to communicate with a PC (PC ON-LINE mode) in “R” or “T” mode, when no sale
is in a process of registration. The PC can transmit information on a PLU sale, a PLU refund, a sale finishing
signal, or a PC-ON LINE mode finishing signal. The text “PC” is displayed on the display.
Sales data transmitted from PC are added into the financial data of departments, tax levels, and sales data
of regular PLU , or special PLU called PC ON-LINE. The keyboard is inoperable in the PC ON-LINE mode,
except the
(CLEAR) key. By using this key it is possible to exit the PC ON-LINE mode any time. The text
“PC” will disappear from the display.
Switching the cash register off and on prepares the cash register for standard registration.
Data are transmitted from the cash register to PC
The cash register software allows use the Euro-200T/TX as on-line information source for PC or payment
terminal. This allows transmission of the sales data to a PC for processing or transmitting data for payment
terminal. It allows the preparation of an invoice or delivery note by the PC according to information from the
cash register.
Setting up the PC ON -LINE:
If the cash register is in “R” mode, pressing the
(CASH),
(CHEQUE) or (CREDIT) keys will transmit
information about the PLU sale, PLU refund, purchase finishing signal and information about type and
PC White wine
1 ks 86.20
Page 59

59
Operation in registration mode
amount of payment to the PC. The text “PC” will appear on the display during the communication at the
end of sale.
The data transmission direction for the PC ON-LINE mode is set by the setting the 5a system flag, digit no. 3 to 1.
Ask your local dealer for more information about PC ON-LINE mode.
CORRECTIONS
Clearing
In the following example, the price 12.30 was incorrectly registered instead of 12.90
Voidance
Void is used just to correct already sold items in the the non-finished sales.
• correction of the last entry (direct voidance)
Example: The previous item was registered incorrectly and it is necessary to make a correction. If a mistake
is made in an incorrect department, PLU, percentage, deduction or other entry, void the incorrect entry by
pressing the
(Void) key immediately after the incorrect entry.
• correction of the previous entries (indirect voidance)
You can void any previous registrations. Pressing the special keys, you can display any previous registra
-
tion. Then press the (VOID) key. Special keys are:
(jump to the previous), (jump to next),
(jump five items back) and
(jump five items forth). To search the item you have to start with
(jump to the previous), (jump to next).
Example: Void the first PLU in the sale (Gentian Cheese).
Step Press
1.
2.
3.
2 c
Butter (0002) [
1*12.90
=12.90
Step Press
1.
2.
3.
Department 2
1*12.50 =12.50
[
VOID
Department 2
1*12.50 =12.50
[
Department 2
1*13.50 =13.50
[
VOID
-12.50
Step Press
1.
2.
3.
(search the item)
4.
Gentian Cheese
1*27.00 =27.00 [
Butter
1*31.20 =31.20 [
VOID
Gentian Cheese
1*27.00 =-27.00 [
(1) Gentian Cheese
1 *27.00
Page 60

60
Operation in registration mode
• voidance of receipt (subtotal voidance)
Example: Void the whole receipt. Subtotal voidance is used for total voidance of a sale. It can be used only
before pressing the
(T
OTAL
) key.
PERCENT SURCHARGE AND DISCOUNT
The system permits programming of a percent value that is used for a surcharge
and for a discount
and limits for manual entry.
If you need to register a different rate than the one pre-programmed,
enter the numeric value of the surcharge or of the discount before pressing the relevant key. The value of
the new rate will be effective only for one registration.
Percent surcharge
Example 1: A five percent surcharge for special services is added. In the following example the
(Surcharge) key was programmed for five percent.
If all items within a transaction have the same handling charge, the charge may be added at one time for the
whole transaction. When all items have been registered on which the surcharge is applied, press the
(S
UBTOTAL
) and then the
(S
URCHARGE
) key.
Example 2: Enter other than pre-programmed rate (10 %).
Entering the surcharge value from the keyboard is possible only if the value is lower than the pre-programmed limit (see seventh system flag).
In the case of a linked PLU, the surcharge is applied to the first item only.
Step Press
1.
2.
Department 2
1*31.20 =31.20
[
ADD ON%+ 5.00%
=1.60
ADD ON%+
1.60
Step Press
1.
2.
Department 2
1*31.20 =31.20
[
ADD ON%+
10%
=3.10
Step Press
1.
2.
3.
4.
5.
6.
Department 1
1*31.20 =31.20
[
Department 2
1*18.60 =18.60
[
Department 6
2*6.30 =12.60
[
SUBTOTAL 62.40
SUBTOTAL VOID =-62.40
***************************
SUBTOTAL VOID
***************************
Page 61

61
Operation in registration mode
Percent discount
Example: Pensioners are provided with a 10% discount.
If the same discount is to be deducted from all PLUs within the transaction, the discount for the whole transaction may be entered in one operation. When all items on which the discount is to be applied are registe-
red, simply press the
(SUBTOTAL) key, then the
(DISCOUNT) key. Use of other than pre-programmed
percent discounts is the same as a percent surcharge.
Entering the discount value from the keyboard is possible only if the value is lower than the pre-programmed
limit (see eighth system flag).
In the case of a linked PLU, the discount is applied to the first item only.
Value surcharge and discount
It is possible to apply value surcharge or discount on last registered item, or on whole sale.
Value of value surcharge or discount can not be more than price of the item or group of items, on which the
surcharge or discount is to be applied.
Example no. 1: Applying of value surcharge 5.50
Example no. 2: Applying of value discount 2.00
Step Press
1.
2.
Department 2
1*31.20 =31.20
[
DISCOUNT%-
10%
=-3.10
DISCOUNT%-
3.10
Step Press
1.
2.
Department 2
1*31.20
31.20 [
+
5.50*
Step Press
1.
2.
1*31.20
+
+
Department 2
1*31.20 =31.20 [
DISCOUNT- 2.00
Page 62

62
Operation in registration mode
PLU PRICE LOOKUP
Cash register allows to find out the price of PLU article in „R“ and „T“ mode(also during open receipt). Price
is checked by pressing the keys
(SHIFT PLU), cash register ask to enter PLU code. There are 3
ways for code entry:
1. „number“ +
(PLU) ( or direct PLU from programmable keyboard)
2. scan bar code with scanner
3. press
(EAN) key, enter bar code manually and press (EAN) key
Consequently price of current PLU is displayed. Switching between displayed price, name of PLU and bar
code is possible by pressing key
(SUBTOTAL). Registering of displayed PLU is possible by pressing the
key (MULTPLY) or entering quantity (integral number) and pressing key (MULTIPLY). Exit of PLU price
lookup operation without registering PLU is possible by pressing the keys
(SHIFT PLU).
REFERENCE NUMBER OR CUSTOMER NUMBER PRINTING
Certain transactions require that a reference number is printed on the receipt. If a reference number is
required, use the (EAN) key, enter number and finish it with (DRAWER) key.
Maximum length of reference number is 18 digits. It is possible to enter reference number also by using bar
codes scanner, bar code has to start with prefix 20. Bar code has to follow EAN13 standards.
The text „
DOC.NUMBER“ can be changed in the programming mode. See Function texts programming
section.
RECEIVED ON ACCOUNT
The
(RA) key is used to record non-fiscal payments (that are received on account). As an example,
daily initial cash can be entered into the cash register drawer. The register enables printing a document that
confirms the receive on account transaction. The RA transactions are reported in the cash register financial
report. According to your needs, the document can contain the name of the person that performed the RA
and the reason for the RA. The name and reason of an RA can contain up to 18 for T model and 24 for TX
model characters. There is space for a signature on the document.
Entry of person name and reason is not mandatory. If you do not need to enter these data, finish RA operation by double pressing of the
(SUBTOTAL) key.
RA
GBP 500.00
NAME
Initial cash
REASON
RA
WHO:
Brown
REASON:
Initial cash
SIGNATURE:
CASH 500.00
DOC.NUMBER
#312085
Step Press
1.
2.
Page 63

63
Operation in registration mode
PAID OUT (CASH OR CHEQUE)
Cash or cheques paid out from the register drawer that is not connected with a sale is recorded using the
(PO) key. This function is used, for example, to take away revenue, when cashiers are changing, or
when it is suitable to lower the amount of money in the drawer. According to your needs, the document can
contain the name of a person and the reason for the PO operation. The name and reason of the PO can contain up to 18 for T model and 24 for TX model characters. There is space for a signature on the document.
Entry of a name and a reason is not mandatory. If you do not need to enter these data, finish the PO operation by double pressing the
(SUBTOTAL) key.
To Paid Out cheques press (Cheque) instead of (Total) in step 2.
REFUNDS
The
(REFUND) key records refund entries during a PLU sale or as an independent operation. The
function is used, for example, in handling complaints.
Example 1: It is necessary to refund goods registered under department no. 2 with programmed price
25.20.
After pressing the
(REFUND) keys, the “REFUND” label appears on the display. After pressing the
(DPT) key the name of DPT is displayed in the upper right side of the display; the value and amount of
refunded product with negative sign is displayed in the bottom line.
Step Press
1.
2.
3. enter name
4.
5. enter reason
6.
PO
GBP 2000.00
PO
WHO:
BROWN
REASON:
Cashier change
SIGNATURE:
CASH 2000.00
Step Press
1.
2.
3. enter name
4.
5. enter reason
6.
REFUND
Department 2
1*-25.20 =-25.20
[
Department 2
1 -25.20
Step Press
1.
2.
Page 64

64
Operation in registration mode
Example 2: Returning of goods registered under department no. 13 with entering of price via keyboard.
Example 3: Returning of three pieces of the same item registered under department no. 13 with entering of
price via keyboard.
Example 4: Returning of items registered under the PLU no. 3.
After pressing the
(REFUND) keys, the “REFUND” label appears on the display. By pressing the
(PLU) key the name of refunded product is displayed in the upper right side of the display and the value
and amount of refunded product with negative sign is displayed in the bottom line.
Example 5: Returning of five pieces of the same item registered under PLU no. 13 with entering of price via
keyboard.
Example 6: Returning of goods registered under PLU no. 13 with entering of price via keyboard. Payment
was made with cheques (the value of refund flag is 1).
The manner of handling of cheques and credit refund depends on the setting of the third extended flag
(Figure 3. 13)
REFUND
Chocolate
1*-31.20 =31.20
[
Step Press
1.
2.
resp. (
)
3.
Step Press
1.
resp. (
)
2.
REFUND
Butter
1*-31.20 =-31.20
[
Step Press
1.
2.
resp. (
)
REFUND
Chocolate
5*-31.20 =-156.00
[
Step Press
1.
2.
resp. (
)
REFUND
Department 13
1*-31.20 =-31.20
[
Step Press
1.
2.
resp. (
)
REFUND
Department 13
3*-31.20 =-93.60
[
Page 65

65
Operation in registration mode
REGISTRATION USING THE EURO CURRENCY
The Euro-200T/TX cash register is able to register sales in the Euro currency. According to the Euro phase,
it is possible to register in Euro, particular national currency (1st and 2nd phase), or any other foreign currency (3rd phase).
The registration in Euro is divided into four phases:
Phase without Euro
The cash register works without Euro, i.e. works with one (national) currency only.
First Euro currency phase
In the first phase, the main currency is the national one, the secondary is Euro.
Transition to the first Euro currency phase is described in programming part of this user manual.
The customer can pay either in national currency or in Euro, however within one sale with one currency only.
Procedure:
If the (Subtotal) key is pressed, the amount of the sale on the display is in national currency. Displayed
is also code of main currency (e.g. GBP). If the (Price) key is pressed, the amount of sale is converted to
Euro and value is displayed on the display. Displayed is also code of secondary currency (EUR). By pressing
the (Price) key again, the subtotal amount currency toggles from national to Euro.
After choosing the required currency, press the (Total) key or other according to the selected type of
payment. In the case of payment in secondary currency it is possible to use cash payment only. In the case
that paid amount (in main or secondary currency) is higher than total sale, remaining amount is paid back
in main currency.
In the case of payment in secondary currency receipt contains exchange rate and total amount of sale in
main and secondary currency, including code of secondary currency.
All financial data are stored in the national currency. Only the cash amount, the cash in the drawer, and RA
and PO amounts are stored in both currencies. The RA or PO operation in the national currency can be done
according to the procedure described in previous chapter. As to an RA or PO operation in Euro, it is similar to
any common operation, but first it is necessary to press the (PRICE) button.
Receive on account and Paid out operations in secondary currency are possible in the case of cash payment only.
Example: RA of 500.00 Euro in the first phase of the Euro currency.
Step Press
1.
2.
3.
4. enter name
5.
6. enter reason
7.
RA
WHO:
Brown
REASON:
Initial cash
SIGNATURE:
CASH 500.00 EUR
Page 66

66
Operation in registration mode
Second Euro currency phase
In the second phase, the main currency is Euro, the secondary currency is national one. The customer can
pay either in Euro or in national currency, however within one sale with one currency only.
Procedure
:
If the (Subtotal) key is pressed, the amount of the sale on the display is in main currency - Euro. Displayed is also code of main currency (EUR). If the (Price) key is pressed, the amount of the sale is
converted to the national currency and it is displayed on display. There is displayed also code of secondary
currency (e.g. GBP). By pressing the (Price) key again, the subtotal amount is converted and displayed
in the national currency or in Euro.
After choosing the required currency, press the
(Total) key or other according to selected type of payment. In the case of payment in secondary currency it is possible to use cash payment only. In the case that
paid amount (in main or secondary currency) is higher than total amount of sale, remaining amount is paid
back in the main currency.
In the case of payment in secondary currency receipt contains exchange rate and total amount of sale in
main and secondary currency, including code of secondary currency.
All financial data are stored in Euro. Only the cash amount, the cash in the drawer, and RA and PO amounts
are stored in both currencies. The RA or PO operation in the Euro can be done according to the procedure
described in the previous chapter. As to RA or PO operation in the national currency, it is similar to any
common operation, but first it is necessary to press the (Price) key. Receive on account and Paid out
operations in secondary currency are possible in the case of cash payment only.
Example: Pay out cash of 2,000 GBP in the 2nd phase of Euro currency.
The transition into the second stage is described in the program manual of this user manual.
Third phase of the Euro
In the 3rd phase, the main currency is Euro, the secondary currency is any foreign one. The customer can
pay either in Euro or in any foreign currency, however within one sale in one of currency only.
Procedure:
If the
(Subtotal) key is pressed, the amount of the sale on the display is in the main currency – Euro.
Displayed is also code of main currency (EUR). If the (Price) key is pressed, the amount of the sale is
converted to the foreign currency and it is displayed on display including code of secondary currency (e.g.
GBP). By pressing the
(Price) key again, the subtotal amount is converted and displayed in the foreign
currency or in Euro.
PO
WHO:
Brown
REASON:
Cashier change
SIGNATURE:
CASH
2000.00 GBP
Step Press
1.
2.
3.
4. enter name
5.
6. enter reason
7.
Page 67

67
Operation in registration mode
After choosing the required currency, press the (Total) key or other according to selected type of payment. In the case of payment in secondary currency it is possible to use cash payment only. In the case that
paid amount (in main or secondary currency) is higher than total amount of sale, remaining amount is paid
back in the main currency.
In the case of payment in secondary currency receipt contains exchange rate and total amount of sale in
main and secondary currency, including code of secondary currency.
All financial data are stored in Euro currency. Only the cash amount, the cash in drawer, and RA and PO
amounts are stored in both currencies. The RA or PO operation in the Euro currency can be done according
to the procedure described in the previous chapter. As to an RA or PO operation in the secondary currency,
it is similar to any normal operation, but first it is necessary to press the
(Price) key. Receive on account
and Paid out operations in secondary currency are possible in the case of cash payment only.
Note: The transition into the 3rd stage is described in the program manual of this user manual.
Page 68

68
Operation in registration mode
Page 69

REPORTS
Page 70

70
Reports
HOW TO PRINT OUT REPORTS
There are two modes for printing reports: “X” mode and “Z” mode.
Use “X” mode reports if it is necessary to obtain sales information since the last resetting. It is used to generate reports during the day, between two shifts, etc. The reading may be made in any numbers, it does
not affect the cash register memory.
Use “Z” mode reports when you need to print reports and to clear the register’s memory. “Z” report is usu
-
ally carried out once a day after finalising the daily sales.
GENERATED REPORTS
Table 5. 1. Generated reports.
Report “X” mode “Z” mode
Department •
PLU • •
PLU Stock •
Cashier •
Financial •
Total (daily) • •
Periodical • •
Hours daily • •
Hours periodical (monthly) • •
In the “Z” mode the department report, the cashiers report and the financial report are carried out within
the total “Z” report.
REPORTS CONTENTS
Department report
When printing a full department report, only departments with non-zero sales are printed.
Report contains:
1) Name of the department
2) Number of items sold in the department
3) Total value of the items sold in department
4) Total value of sales including all departments
In the “Z” mode it is possible to print the department report only within the total “Z” report. See chapter
regarding total daily “Z” report.
PLU report
Three different types of PLU reports can be printed: the individual PLU report, report of PLU range, and the
full PLU report. Each of these types can contain the PLU number (depends on the report mode) and stock
status according to the setting of second PLU flag.
When printing a PLU report, only PLUs with non-zero sales are printed.
A PLU report contains:
1) Number of the PLU (selective according to the mode of report function calling).
2) The name of the PLU.
3) Number of sold PLUs.
4) Financial value of sold PLUs.
5) PLU stock status (according to the setting of the second PLU flag).
The full PLU report prints also the total financial value of sales from the last reset. PLUs that were not acti
-
vated are not printed.
Page 71

71
Reports
PLU stock report
Euro-200T/TX allows to print more types of stock level reports: stock level report of one PLU, stock level
report of the range of PLUs and total stock level report.
Only stock of programmed PLUs (with non zero price) is printed in PLU stock report.
Report contains:
1. PLU number (selective according to the mode of report function calling)
2. PLU name
3. Current PLU stock level
Financial report
The financial report contains:
1) Value of cumulative totals (grand totals) GT1, GT2 and GT3.
2) Taxable amounts and taxes of all tax levels.
3) Overall sales value.
4) Overall sales value without tax.
5) Value of total tax.
6) Number and value of voids.
7) Number and value of refunds.
8) Number and value of discounts.
9) Number and value of add-ons.
10) Number and value received by cash payment.
11) Number and value received by cash in foreign currency (Euro)
12) Number and value received by check payment.
13) Number and value received by credit card payment.
14) Number and value received on accounts by cash.
15) Number and value received on accounts by cash in foreign currency (Euro)
16) Number and value received on account by cheques.
17) Number and value paid out by cash.
18) Number and value paid out by cash in foreign currency (Euro)
19) Number and value paid out by cheques
20) Cash value in the cash drawer.
21) Cash value in the cash drawer in foreign currency (Euro)
22) Cheque value in the cash drawer.
None of the above categories with zero values will be printed (excepting tax informations). In the „Z“ mode
the financial report is printed only within of the total “Z” report. See chapter regarding total daily “Z” report.
Cashier report
When printing the full cashiers report, only non-zero values will be printed.
The cashier report prints:
1) The cashier’s name.
2) The number of sales transactions (number of customers) per cashier.
3) Total sales value for each cashier.
4) Total sales in cash for each cashier
5) Total sales in cash (foreign currency) for each cashier
6) Total sales in cheques for each cashier
7) Total sales in credit for each cashier
8) Total amount of refunded items for each cashier
9) Total amount of void items for each cashier
10) Total amount of subtotal voidance for each cashier
In the “Z” mode the cashier report can be printed only by means of the total “Z” report. See chapter regar-
ding total daily “Z” report.
Page 72

72
Reports
Total daily “X” report
Total “X” report contains:
• consecutive number of the total “Z” reports that have already been executed
• department report
• cashier report
• financial report
Periodical “X” report
The periodical “X” report gathers financial data from the total “Z” reports in the course of longer time period (i.e.
a week, a month, etc.). This report prints all financial data accumulated since the last periodical “Z” report.
Total daily “Z” report
The total “Z” report contains:
• consecutive number of the total “Z” report being executed on the machine
• department report
• cashier report
• financial report
After printing the memory contents of the total “Z” report, is added to the memory registers of the periodical
report and counters of total daily „Z“ report are then reset.
Periodical “Z” report
The periodical “Z” report gets the data from the total “Z” reports in the course of a longer time period. It is
usually printed weekly, monthly, or quarterly or as needed. After printing the memory contents of the perio
-
dic “Z” report, the memory is cleared.
Hours daily report
Hours daily report provides view of sales flow during the day and contains:
1. Hours summary.
2. Number of sales and value of sales in current hours.
3. Total value of all sales.
Hours daily report must be performed always at the end of the day (otherwise there is cumulative value
from more days). After hours daily report is printed in „Z“ mode, values are added to the values of hours
periodical report and counters are erased.
Hours periodical report
Hours periodical report provides view of sales flow in current hours in total through whole month and
contains:
1. Hours summary.
2. Number of sales and value of sales in current hours.
3. Total value of all sales.
Hours periodical report is usually performed at the end of the month after hours daily report.
It is possible to perform it also in other period. Values of hours monthly report are erased after it is printed
in „Z“ mode.
HOW TO PRINT “X” REPORTS
Switch the cash register into the “X” mode:
.Press
any of the key combinations shown in table 5. 2. to print
proper reports. The “X” report can be printed as many ti
-
mes as desired without influencing data in ECR memory.
15-12-2005
X
11:07:39
Page 73

73
Reports
For „X“ PLU report with PLU numbers press keys
and for „X“ PLU stock level report with PLU numbers press
keys
.
Table 5. 2. „X“ reports.
“X” report Key operation
Cashier
Financial
Departments department button (
- ,
)
Full PLU (
)
Individual PLU
… (
)
PLU range starting PLU number
finishing PLU number
(
)
Full PLU stock level (
)
Individual PLU stock level
… (
)
PLU stock level range starting PLU number
finishing PLU number
(
)
Total (daily)
Periodical
Hours daily
Hours periodical (monthly)
Samples of “X” reports
The cashier’s report provides an overview of the activity of individual cashiers. The report provides a summary of the number of customers served by a particular cashier and the total receipts. This data permits
rewarding the staff based on total receipts or productivity and intensity of work.
The department report provides a picture of the sales frequency of individual articles within a group of products. The cash register provides data concerning the number of items sold and turnover in the department,
as well as the share of department sales as a whole.
********* X *********
CASHIER REPORT
*** *** *** *** **** *** *
Smith
TOTAL SALE
4Q 81.50
CASH
4Q 81.50
REFUND
1Q -24.00
VOID
2Q -12.00
SUBTOTAL VOID
1Q -35.00
Hopkins
TOTAL SALE
5Q 89.00
********* X ********
* DPT REPORT *
*************************
Groceries
3.000Q 93.60
Dairy
6.000Q 111.60
Stationery
4.000Q 124.80
DPT TOTAL: 330.00
CASH
3Q 19.00
CHECK
1Q 45.00
CREDIT
1Q 25.00
REFUND
2Q -30.00
VOID
2Q -20.00
SUBTOTAL VOID
1Q -62.00
Page 74

74
Reports
PLU report provides the most exact preview of each item sales. Example of report on the right side is without
listing the stock level and number of PLU. Example of report on the left side contains maximal available data
of PLU report. Because this report provides most extended data, we recommend to use a PC with attached
SW for programming of PLU, stock level control and for the sales preview print outs.
The total “X” report provides detailed sales information during the day. It contains sales information within
departments, total sales, the cashier’s share of sales, taxable revenue corresponding to the tax rate, the
number of corrections and refunds, and the cash or check amounts in the drawer. Sales are separated from
non-business transactions, i. e. received on accounts and payouts.
The “X” report is often used to check revenues and cash received when the operator changes during the
working day. Management can obtain sales information at any time during a day.
The number of all total “Z” reports performed on the cash register is marked as Z1 and number of all periodical reports is marked as Z2.
********* X *********
PLU REPORT
***************************
00001
Apple Cake
6.000Q 30.00
STOCK 99.000
00002
Beef Soup
2.000Q 12.00
STOCK 100.000
00003
Beef Steak
4.000Q 48.00
STOCK 100.000
00004
Goulash
2.000Q 15.60
STOCK 100.000
00005
Boiled Noodles
9.000Q 45.80
STOCK 100.000
00006
Fruit Cup
6.000Q 12.00
STOCK 100.000
00008
Tomato Soup
2.000Q 12.00
STOCK 100.000
PLU TOTAL: 175.40
********* X *********
PLU REPORT
***************************
Apple Cake
6.000Q 30.00
Beef Soup
2.000Q 12.00
Beef Steak
4.000Q 48.00
Goulash
2.000Q 15.60
Boiled Noodles
9.000Q 45.80
Fruit Cup
6.000Q 12.00
Tomato Soup
2.000Q 12.00
PLU TOTAL: 175.40
Page 75

75
Reports
********* X *********
MONTHLY REPORT
***************************
*Z2# 0000*
*Z1# 0001*
***************************
DPT REPORT
***************************
DPT01
31.000Q 175.40
DPT07
3.000Q 56.60
DPT TOTAL: 232.00
***************************
CASHIER REPORT
***************************
Smith
TOTAL SALE
6Q 143.00
CASH
6Q 143.00
REFUND
1Q -24.00
VOID
2Q -12.00
SUBTOTAL VOID
1Q -35.00
Hopkins
TOTAL SALE
5Q 89.00
CASH
3Q 19.00
CHECK
1Q 45.00
CREDIT
1Q 25.00
REFUND
2Q -30.00
VOID
2Q -20.00
SUBTOTAL VOID
1Q -62.00
***************************
FINANCIAL REPORT
***************************
GT1 286.50
GT2 232.00
GT3 -54.50
VAT [ 19.00%
VAT \ 0.00%
TAXABLE [ 105.60
TAXABLE \ 12.00
TAX FREE 114.40
NET [ 88.70
NET \ 12.00
VAT [ 16.90
VAT \ 0.00
********* X *********
TOTAL REPORT
***************************
*Z1# 0000*
***************************
DPT REPORT
***************************
DPT01
31.000Q 175.40
DPT07
3.000Q 56.60
DPT TOTAL: 232.00
***************************
CASHIER REPORT
***************************
Smith
TOTAL SALE
6Q 143.00
CASH
6Q 143.00
REFUND
1Q -24.00
VOID
2Q -12.00
SUBTOTAL VOID
1Q -35.00
Hopkins
TOTAL SALE
5Q 89.00
CASH
3Q 19.00
CHECK
1Q 45.00
CREDIT
1Q 25.00
REFUND
2Q -30.00
VOID
2Q -20.00
SUBTOTAL VOID
1Q -62.00
***************************
FINANCIAL REPORT
***************************
GT1 286.50
GT2 232.00
GT3 -54.50
VAT [ 19.00%
VAT \ 0.00%
TAXABLE [ 105.60
TAXABLE \ 12.00
TAX FREE 114.40
NET [ 88.70
NET \ 12.00
VAT [ 16.90
VAT \ 0.00
NET TOTAL 215.10
VAT TOTAL 16.90
TOTAL SALE
11Q 232.00
ADD ON
2Q 0.90
DISCOUNT
2Q -0.50
REFUND
3Q -54.00
VOID
4Q -32.00
SUBTOTAL VOID
2Q -97.00
CASH
9Q 162.00
CHECK
1Q 45.00
CREDIT
1Q 25.00
RA-CASH
1Q 0.00
CASH DRAWER
162.00
CHECK DRAWRER
45.00
CREDIT DRAWER
25.00
NET TOTAL 215.10
VAT TOTAL 16.90
TOTAL SALE
11Q 232.00
ADD ON
2Q 0.90
DISCOUNT
2Q -0.50
REFUND
3Q -54.00
VOID
4Q -32.00
SUBTOTAL VOID
2Q -97.00
CASH
9Q 162.00
CHECK
1Q 45.00
CREDIT
1Q 25.00
RA-CASH
1Q 0.00
CASH DRAWER
162.00
CHECK DRAWRER
45.00
CREDIT DRAWER
25.00
Page 76

76
Reports
HOW TO PRINT “Z” REPORTS
Switch the cash register into the “Z” mode: . Press the required keys according to the table 5.3. If a large number of PLUs is used, it is recommended that a computer will be used to print the PLU report.
During PLU report cash register allows by pressing
(REFUND) before pressing the key to print
of PLU number in a front of sales data.
To execute a PLU report without printing, press
. PLU sales amounts will be deleted
without printing.
Table 5. 3. „Z“ reports.
“Z” report Key operation
Full PLU (
)
Individual PLU
0
… 9 (
)
PLU range
starting PLU number
finishing PLU number
(
)
Total (daily)
Periodical
Hours daily
Hours periodical (monthly)
Samples of “Z” reports
The PLU report provides the most precise overview of the sales of each product. The sample report on the
left side is without stock printouts and without PLU numbers (without pressing
(Refund) before
pressing (PLU). The sample report on the right contains all information. As it provides the most detailed
information, it is recommended that a computer be used for PLU programming, for running store records,
will and for the sales reports print outs.
Number of all Total “Z” reports performed on the cash register is designated as Z1 and the number of all
Periodical “Z” reports performed on the cash register is Z2.
15-12-2005
Z 11:07:39
********* Z *********
PLU REPORT
***************************
Apple Cake
6.000Q 30.00
Beef Soup
2.000Q 12.00
Beef Steak
4.000Q 48.00
Goulash
2.000Q 15.60
Boiled Noodles
9.000Q 45.80
Fruit Cup
6.000Q 12.00
Tomato Soup
2.000Q 12.00
PLU TOTAL: 175.40
********* Z *********
PLU REPORT
***************************
00001
Apple Cake
6.000Q 30.00
STOCK 99.000
00002
Beef Soup
2.000Q 12.00
STOCK 100.000
00003
Beef Steak
4.000Q 48.00
STOCK 100.000
00004
Goulash
2.000Q 15.60
STOCK 100.000
00005
Boiled Noodles
9.000Q 45.80
STOCK 100.000
00006
Fruit Cup
6.000Q 12.00
STOCK 100.000
00008
Tomato Soup
2.000Q 12.00
STOCK 100.000
PLU TOTAL: 175.40
Page 77

77
Reports
********* Z *********
MONTHLY REPORT
***************************
*Z2# 0001*
*Z1# 0001*
***************************
DPT REPORT
***************************
DPT01
31.000Q 175.40
DPT07
3.000Q 56.60
DPT TOTAL: 232.00
***************************
CASHIER REPORT
***************************
Smith
TOTAL SALE
6Q 143.00
CASH
6Q 143.00
REFUND
1Q -24.00
VOID
2Q -12.00
SUBTOTAL VOID
1Q -35.00
Hopkins
TOTAL SALE
5Q 89.00
CASH
3Q 19.00
CHECK
1Q 45.00
CREDIT
1Q 25.00
REFUND
2Q -30.00
VOID
2Q -20.00
SUBTOTAL VOID
1Q -62.00
***************************
FINANCIAL REPORT
***************************
GT1 286.50
GT2 232.00
GT3 -54.50
VAT [ 19.00%
VAT \ 0.00%
TAXABLE [ 105.60
TAXABLE \ 12.00
TAX FREE 114.40
NET [ 88.70
NET \ 12.00
VAT [ 16.90
VAT \ 0.00
********* Z *********
TOTAL REPORT
***************************
*Z1# 0001*
***************************
DPT REPORT
***************************
DPT01
31.000Q 175.40
DPT07
3.000Q 56.60
DPT TOTAL: 232.00
***************************
CASHIER REPORT
***************************
Smith
TOTAL SALE
6Q 143.00
CASH
6Q 143.00
REFUND
1Q -24.00
VOID
2Q -12.00
SUBTOTAL VOID
1Q -35.00
Hopkins
TOTAL SALE
5Q 89.00
CASH
3Q 19.00
CHECK
1Q 45.00
CREDIT
1Q 25.00
REFUND
2Q -30.00
VOID
2Q -20.00
SUBTOTAL VOID
1Q -62.00
***************************
FINANCIAL REPORT
***************************
GT1 286.50
GT2 232.00
GT3 -54.50
VAT [ 19.00%
VAT \ 0.00%
TAXABLE [ 105.60
TAXABLE \ 12.00
TAX FREE 114.40
NET [ 88.70
NET \ 12.00
VAT [ 16.90
VAT \ 0.00
NET TOTAL 215.10
VAT TOTAL 16.90
TOTAL SALE
11Q 232.00
ADD ON
2Q 0.90
DISCOUNT
2Q -0.50
REFUND
3Q -54.00
VOID
4Q -32.00
SUBTOTAL VOID
2Q -97.00
CASH
9Q 162.00
CHECK
1Q 45.00
CREDIT
1Q 25.00
RA-CASH
1Q 0.00
CASH DRAWER
162.00
CHECK DRAWRER
45.00
CREDIT DRAWER
25.00
NET TOTAL 215.10
VAT TOTAL 16.90
TOTAL SALE
11Q 232.00
ADD ON
2Q 0.90
DISCOUNT
2Q -0.50
REFUND
3Q -54.00
VOID
4Q -32.00
SUBTOTAL VOID
2Q -97.00
CASH
9Q 162.00
CHECK
1Q 45.00
CREDIT
1Q 25.00
RA-CASH
1Q 0.00
CASH DRAWER
162.00
CHECK DRAWRER
45.00
CREDIT DRAWER
25.00
Page 78

Page 79

EURO2A SOFTWARE
Page 80

80
Euro2A software
The Euro-200T/TX ECR is also deliver with the Euro2A software that makes programming, reporting and
set-up for the Euro-200T/TX user easier.
The software allows simple and easy editing and transfer of all possible ECR data (ranging from setting of
the system flags, through logos up to programming PLUs and departments), enables back-up of the ECR
data, processes sales data and many more useful functions.
The most up-to-date version of Euro2A software is available for you to download from company‘s web page,
http://www.elcom.eu.
Page 81

OPTIONAL
ECR ACCESSORIES
Page 82

82
Optional ECR accessories
Cash drawers
The Euro-200T/TX ECR allows connection of majority of cash drawers that
are based on solenoid opening mechanism (12 V; max. 30
�). The ECR is
equipped with cash drawer interface by default.
The cash drawer is connected to the ECR via a cable that enables its automatic opening. The cable and the connector is easily detachable. Small
establishments will surely welcome the possibility to place the cash drawer
anyplace they wish and open it automatically using the ECR.
Ask your authorised Euro-200T/TX dealer on delivery and installation of cash drawers.
Electronic scales
The Euro-200T/TX ECR allows connection of multiple types of electronic scales.
The scales are usually equipped with the serial interface that enables them to co-
-operate with the Euro-200T/TX cash registers. It is possible to connect two scales
in the same time to the Euro-200T/TX. You can use electronic scales also, without connection to the Euro-200T/TX. The electronic scales that are delivered with
Euro-200T/TX ECRs are certified and equipped with a communication cable upon
request.
Ask your authorised Euro-200T/TX dealer on delivery and installation of electronic
scales.
Bar-code scanners
Interface for connecting bar-code scanners is a default feature of Euro-200T/TX
ECRs. In case you wish to use bar-code scanners, this chapter will help you
select the bar-code scanner suitable for your establishment. In any case, we recommend consulting this decision with your authorised Euro-200T/TX dealer.
The bar-code scanner is connected to the ECR via the standard RS-232 interface. The same interface must be available on the bar-code scanner. The ECR
supplies +5 V DC voltage to power the bar-code scannner on COM1 and COM2
ports. Optional ports COM3 and COM4 does not supply +5 V DC, that is why you have to use external power
supply for bar codes scanners connected to that ports. Both the ECR and the scanner must be programmed appropriately in order to work together properly.
Metrologic bar-code scanners are the recommended option for Euro-200T/TX ECRs. Ask your authorised
Euro-200T/TX dealer on further information for bar-code scanners.
Metrologic MS-5145 ECLIPSE
Scanning after pressing a trigger, hand scanner without stand, power
supply 5 V, 72 lines/s, scanning range 140 mm, RS-232 interface (model 5145 R).
Metrologic MS-6720
Combination of hand and stand scanner, great ergonomics, concentrated omnidirectional scanning mode,
flexible handling, adjustable stand, easy programming, low cost, power supply 5 V, 1 000 rows/s, maximum
scanning range 205 mm.
Metrologic Orbit MS-7120
Multidirectional, quick, presentable laser bar-code scanner. It‘s equipped with holographic scanning technology for barcodes. HoloPrism VLD technology allows focusing of rays in very large scanning field depth
(0-215 mm). The design is directed at use in limited space. Orbit is ideal for small stores. Its unique shape
Page 83

83
Optional ECR accessories
allows this scanner to be also used as a hand scanner for large packages. The scanning head can be vertically tilted up to 30 degrees. Power supply is 5 V, 1,200 rows/s, RS-232 interface available.
Metrologic MS-9520 Voyager
Handheld laser scanner, hand and stand use. Row scanning mode, easy programming, scanning speed 72 rows/s, scanning range 205 mm, power supply 5 V,
RS-232 interface (model 9520 R).
Ask your authorised Euro-200T/TX dealer on further information for scanner types
not mentioned here.
Electronic payment terminals
The Euro-200T/TX ECR allows connection of electronic payment terminal to
allow payment by credit/debit cards. You can ask any banking institution to
supply and connect the payment terminal.
External keyboard
There are multiple types of external keyboards available for the Euro-200T/TX ECR.
The first type of external keyboard is the EK-3000 keyboards that ideally
complement the system in retail, since their use is easy to learn and quick.
The keys are fully programmable and of course it‘s possible to easily replace
the key labels. Every key on a EK-3000 keyboard can sustain up to 50 million
strokes which is 15 times more than a PC keyboard can sustain. The logging
in of cashiers is made easy thanks to the RF reader, which is an optional
accessory of the EK-3000.
Another advantage over a PC keyboard is the programmable key layout, along with pleasing design. The
keyboard covers are manufactured in attractive green or blue, in grey or in wood imitation. The EK-3000 can
also be connected to a PC or any electronic device that is equipped with PS/2 port. The Elcom keyboard
allow our customers to express their uniqueness and identity.
The second option is the standard PS/2 PC keyboard.
UV LED banknote checker
The Euro-200T/TX ECR can optionally be equipped with UV LED banknote checker. Since the ratio of
forged banknotes is not negligible, this accessory will help you uncover false banknotes. Now you can use
your Euro-200T/TX to check banknotes and save on buying separate equipment.
LAN connection options
The possibility to connect Euro-200T/TX ECR into an Ethernet network is offered by the RS-232/Ethernet
converter.
What is to be gained from this? You can save lot of finances, since this will enable you to create single ECR
network that can be composed from various types of Elcom cash registers.
New features of Elcom ECRs
The GSM communication widens the possibilities for ECR/PC data interchange. Detailed and quickly obtained data are crucial for proper management in retail. This modern technology will greatly facilitate connection with any of Euro-200T/TX ECRs.
Page 84

84
Optional ECR accessories
Optional programmable keyboard
It is possible to connect programmable keyboard to Euro200T/TX. It contains 10 keys, which are pre-programmed
as PLU1 to PLU10. You can change keys functionality by
description in ECR programming chapter.
Extended RS-232 ports
ECR ports is possible to extend by using module with two extra RS-232 ports. Like that you can connect
scales, PC, scanner and payment terminal at the same time.
RS-485 interface
Ask your authorised Euro-200T/TX dealer on further information about this type of connection.
Page 85

HELPFUL ADVICE
Page 86

86
Helpful advice
Message Meaning
100
%
No external power supply is connected. The power supply is internal accumula
-
tor. The percentage value indicates the status of internal accumulator charge.
ADD ON - DISCOUNT LIMIT OVER Add on or discount amount limit over. Check the system flags.
ADD ON - DISCOUNT
TO NEGATIVE VALUE
Add on or discount to negative amount disabled.
ADD ON - DISCOUNT
TO RETURNABLE PACKS
Add on or discount to returnable packs disabled.
AMOUNT DUE Information about amount that has to be paid for sale finish.
BAR CODE DUPLICATE Bar code is assigned to another PLU.
CARD NOT ACCEPTED Credit card not accepted during EFT terminal payment.
CODE SORTING ECR sorts programmed bar codes.
COMMUNICATION ERROR Communication error between ECR and PC or EFT terminal.
CONTINUE ON SALE ECR is ready to continue on sale.
CREDIT CARD PAYMENT LIMIT OVER Credit card payment limit is over.
DATE ERROR Incorre
ct date entry.
DATE REVERSE ORDER Incorre
ct date entry.
DECIMAL PLACES
LIMIT OVER
Second system flag disables sale with more decimal places.
DPT INACTIVE Sale through this DPT is forbidden.
DUPLICATE PRINT The printing of duplicate of last receipt.
ECR -- PC The communication between ECR and PC is running.
ECR AFTER REPORT No sale from daily (total) report execution.
ENTER SERVICE CODE Unblocking programming mode can be done only by entry of service code.
ENTER THE AMOUNT
OF CUSTOMER CASH
Enforced entry of customer cash before sale finishing.
ENTRY ERROR Unexp
ected entry. Incorrect sequence of keys pressed.
FINISH PURCHASE
Maximum count of PLU in a sale has been reached (100), or maximum count
of lines in one receipt has been reached.
FLAG ERROR Incorrect flag entry.
FORBIDDEN ENTRY
OF RETURNABLE PACKS
Operation of bottles not can be performed.
GT LIMIT OVER
EXECUTE REPORTS
Grandtotals reached the maximum amount. Execute daily (total) and periodical
report. Call your service technician.
GT NEGATIVE VALUE Performed operation caused negative Grandtotal.
HEAD OVERHEAT
Information on the thermal head overheat. Wait a moment until normal con
-
dition returns.
HEAD UP POSITION The thermal head is in an up position. Move it down to enable printing.
ILLEGAL EURO PHASE Access is not possible to this Euro phase.
INFORMATION AND ERROR MESSAGES
If it is necessary to inform the operator on the current status of the ECR, or the ECR is in error state, the error
messages shown in table 8.1 are displayed.
Figure 8.1 - List of ECR messages
Page 87

87
Helpful advice
ILLEGAL INVASION TO EPROM Call for service!
ILLEGAL PAYMENT This way of payment is not possible.
ILLEGAL TAX RECEIPT Receipt data has not been counted to ECR financial data. Illegal receipt.
INACTIVE TAX Tax level cannot be assigned to DPT or PLU.
INCORRECT MODE Incorrect mode. Finish operation before mode switching.
INVALID RECEIPT Receipt data is not counted to ECR financial data.
ITEM NOT SOLD PLU not sold.
MAX. STOCK/LIMIT OVER Stock amount reached max. 999 999,999.
MULTIPLICATION/LIMIT OVER Multiplication reached max. amount 10 000.
NOT PROCESSED BARCODE Bar code not processed during sale.
OPEN PRICE INACTIVE DPT (PLU) flag prevents entry of price from keyboard.
OPERATION CAUSED/NEGATIVE STOCK
PLU flag prevents entry to negative stock.
PAPER MISSING Paper is missing in the printer.
PARAMETER ERROR Incorrect setting of ECR parameters.
PASSWORD It is necessary to cashier login.
PASSWORD DUPLICATE Password is assigned to another cashier already.
PAYMENT NOT ACCEPTED Payment not accepted during EFT terminal payment.
PERFORM DAILY REPORT Perform daily (total) report.
PERFORM MONTHLY REPORT Perform periodical report.
PLU INACTIVE
PLU flag disables the sale of this PLU.
PRESS KEY SUBTOTAL Press subtotal.
PRICE HALO LIMIT OVER HALO limit over. Check the flags of DPT or PLU.
PRICE MISSING Programmed price is zero.
Prn Receipt printing off. The printing can be switched on by pressing button.
PROCESSING ERROR Error occurs during payment through EFT terminal.
PROGRAMMED PRICE/INACTIVE DPT or PLU flag setting prevents use of programmed price.
RECHARGE BATTERY It is necessary to connect external adapter.
SALE Normal sale mode. Data on receipt in R mode are counted to GTs.
SALE AMOUNT/LIMIT OVER Sale amount reached maximum. Terminate the sale.
SCALES DISCONNECTED Electronic scales are disconnected, or no data has been read.
SPLIT PRICING/DENIED PLU flag disables split pricing.
STANDBY Standby mode. Exit the “standby” mode by pressing the
(MODE) button.
TAX LEVEL INACTIVE DPT or PLU is assigned to inactive tax level.
TAX LEVEL/LIMIT OVER
Particular tax level amount over limit from the last daily report. Perform daily
(total) report.
UNAUTHORIZED ACCESS Cashier has no authorization to enter into this mode.
UNKNOWN CODE Bar code is assigned to no PLU.
WAIT PLEASE ECR executes operation that takes a longer time.
OFF&ON ECR To correct the problem turn off and turn on ECR.
REFUND CNT.LIMIT Maximal amount of refunded items is reached. Perform daily (total) report.
CNT.LIMIT OVER Maximal amount of discounts is reached. Perform daily (total) report. „DISC
Unknown batt. state Battery status unknown, recharge the battery.
Page 88

88
Helpful advice
LowBAT, finish sale
It is shown when receipt it printing, when it is needed bigger power input.
Connect ECR to power supply with external adapter.
Very low battery Connect ECR to power supply with external adapter.
RESET CODE Memor y can be damaged. Call for service.
Battery checking Checking battery condition.
Perform PLU report While switching to the second Euro phase. Perform „Z“ PLU report.
Perform DPT report While switching to the second Euro phase. Perform „Z“ DPT report
Perform clerk report While switching to the second Euro phase. Perform „Z“ cashiers report.
BAD PSW Password was not find in list of cashiers passwords.
Perf. hour.rep.daily
Message is shown when you trying to perform Hours periodical report without
Hours daily report performed
Perf.hour.rep.period
Message is shown when you tr ying to switch into the second Euro phase
without Hours periodical report performed.
WHAT TO DO IN CASE OF POWER FAILURE?
Power failure
Power failure does not affects functionality of Euro-200T/TX, because this ECR is equipped with internal
accumulator.
Failures of ECR as a result of interference in power network
Accidental failures of electronic equipment are frequently caused by the power network or by electromagnetic interference. In case of intensive interference in your working area, or in case of over or under voltage,
installation of protective devices can help significantly. Ask your authorised dealer or service technician for
help.
Signalization of internal accumulator conditions
The status of internal accumulator charge defines the percentage value in the upper left corner of the
cashier display. This percentage value informs also that power supply of the ECR is internal accumulator
(the external adapter is not connected). In the case the charge is low (low percentage value) the ECR displays the text Low BAT., finish sale for a short time and peeps alerting tone.
If the internal accumulator is very discharged and you want to charge it by the external adaptor, first of all
be sure that ECR is turned off, then connect the external adapter for at least 15 minutes (ECR is off). The
internal accumulator is charging even the ECR is turned off.
Care of internal battery:
• a complete battery charge takes 8 hours.
• we suggest to charge a battery to 100 % and use it till cash register starts to signalize the battery char
-
ge requirement. Repeat this process three times at least (it elongates an endurance of the battery).
• we suggest to change the battery in case of the battery decrease, e. g. shorter work cycle of the
ECR after a battery charge.
SELF TESTS
Self tests of the Euro-200T/TX cash register permit the checking of its functionality simply and quickly. Self
testing permits the automatic checking of the functionality of electronic circuits, display segments, keyboard
buttons, communication ports and the printer.
Page 89

89
Helpful advice
Self-test of the electronics and display
By executing this test, characters are gradually lightened on and off on the both displays.
Procedure for running the self-test of the electronics and display:
Customer display:
1) Switch ECR into the “P” mode:
.
2) Press
on the keyboard.
3) Press the
(MULTIPLY) button.
Cashier display:
1) Switch ECR into the “P” mode:
.
2) Press
on the keyboard.
3) Press the
(MULTIPLY) button.
Display test end is announced by a beep. You can continue testing other parts of register.
Self-test of the printer
The self-test of the printer prints the identification data of the Euro-200T/TX on the receipt and journal. It
prints the program version number, cash register configuration (number of departments, number of PLUs),
serial interface and FM enable/disable information and the complete character set in standard size with
related hexadecimal codes.
Procedure for running the self-test of the printer:
1) Switch ECR into the “P” mode:
.
2) Press
on the keyboard.
3) Press the (MULTIPLY) button.
The printer test end is announced by a beep. You can continue in testing of other parts of register.
Self-test of the thermo printer head position
Procedure for self-test running:
1) Switch ECR into the “P” mode: .
2) Press
on the keyboard.
3) Press the
(MULTIPLY) button.
Self-test of the paper ribbons sensor
Procedure for self-test running:
1) Switch ECR into the “P” mode:
.
2) Press
on the keyboard.
3) Press the
(MULTIPLY) button.
Self-test of the keyboard
The self-test of the keyboard displays the position, hexadecimal code and name after pressing a key. The
test checks functionality of the register keys.
Page 90

90
Helpful advice
Procedure for running self-test of keyboard:
1) Switch ECR into the “P” mode:
.
2) Press
on the keyboard.
3) Press the
(MULTIPLY) button.
4) Press the individual buttons one after another and check the values on the display.
5) To finish the test press the
(TOTAL) button.
If the key is functional, its position, code and name will appear on the display. Press the
(TOTAL) button
to finish the keyboard test.
Self-test of the keyboard II.
This second self-test of keyboard evaluate consecutive pressing of keys. If ECR contains also optional
programmable keyboard self-test evaluate also this keyboard. If the keys are pressed in exact defined order
as shown at the Figure 8. 1. (8. 2) and keyboard and its control circuits are working fine, test is finished
successfully.
1) Switch ECR into the “P” mode:
.
2) Press
on the keyboard.
3) Press the
(MULTIPLY) button.
4) Press the individual buttons one by one following direction as shown at Figure 8. 1. (8. 2)
.
5) To finish the test press the
(TOTAL) button.
Figure 8.1 - Keyboard
DPT 1
SHIFT
DPT 2
DPT 3
DPT 4
DPT 5
DPT 6
DPT 7
DPT 8
DPT 9
DPT 10
SCALE
EAN
MODE
PRICE
CLEAR
C
RF
!" #% ABC
MULTIPLY
SUBTOTAL
TOTAL
TL
ST
CH CR
PLU
DPT
DE F
GH I JKL MN O
PQ RS T UV WXYZ
&( )* +
– /,: @
Page 91

91
Note
Figure 8.2 - Optional programmable keyboard
Page 92

92
Note
 Loading...