

Page 1
Euro-150TE/TX Flexy
cash Register
User Manual
manual version 1.0.5
Page 2

This manual was not subject to any language revision.
This manual or any part of it may not be copied, reproduced or otherwise distributed
without the publisher‘s consent.
All rights reserved. ELCOM, spoločnosť s ručením obmedzeným, Prešov
© ELCOM, spoločnosť s ručením obmedzeným, Prešov, 2013
Page 3

3
Contents
TABLE OF CONTENTS
Important notices .......................................................................................................................................... 7
Basic definitions ............................................................................................................................................ 8
Logo ...................................................................................................................................8
Tax level ..............................................................................................................................8
Measure units ......................................................................................................................8
The connection between departments and PLUs ........................................................................9
Reports ...............................................................................................................................9
Barcodes ............................................................................................................................9
Weight and price barcodes ................................................................................................... 10
Expanded barcodes ............................................................................................................ 10
The barcode scanner ..........................................................................................................10
Cumulated totals (grandtotals ................................................................................................ 11
Concepts defining payments in a foreign currency .................................................................... 11
Primary currency .......................................................................................................... 11
Foreign (secondary) currency ......................................................................................... 11
Parts of the cash register, basic parameters ..........................................................................................13
Attaching peripheral devices .....................................................................................................................15
The Euro -150TE/TX Flexy keyboard........................................................................................................15
Names and functions of keys ................................................................................................16
Description of displays ............................................................................................................................... 17
Description of the cashier display ..........................................................................................17
Description of the customer display ....................................................................................... 17
Entering cash register modes ................................................................................................................... 17
Paper ribbons installation ..........................................................................................................................18
Usage and storage of paper ribbons ......................................................................................20
Setting the contrast of the display ..........................................................................................20
Menu map .....................................................................................................................................................22
Initialization ..................................................................................................................................................23
Basic rules for navigating in a menu .......................................................................................24
Printing of programmed values ..............................................................................................24
Revision of programmed values .............................................................................................24
Editing text in EditMode .......................................................................................................25
Recommended procedure when programming the cash register ................................................25
Price and tax parameters ...........................................................................................................................26
Overview of individual price and tax parameters .......................................................................26
Settings for prices .........................................................................................................26
Settings for cash ...........................................................................................................27
Settings for taxes ..........................................................................................................27
Currencies ....................................................................................................................................................27
Taxation levels..............................................................................................................................................28
TRAILER logo ...............................................................................................................................................29
Graphic logo .................................................................................................................................................30
Programming cashiers ................................................................................................................................30
Departments .................................................................................................................................................31
Jumping to a specific product DPTs .......................................................................................31
Printing of programmed values ..............................................................................................31
Revision of programmed values .............................................................................................32
MEASURE units ............................................................................................................................................32
Functional texts ...........................................................................................................................................32
Product items - PLU .....................................................................................................................................32
Page 4

4
Contents
Jumping to a specific product item .........................................................................................34
System parameters .....................................................................................................................................34
Exporting and Importing of data .............................................................................................35
Exporting of data ..........................................................................................................35
Importing of data ...........................................................................................................36
Peripherals ...................................................................................................................................................37
Journal ..........................................................................................................................................................38
Text and binary journal* .......................................................................................................38
Programming the keyboard .......................................................................................................................39
Advertising texts ..........................................................................................................................................40
Program equipment Euro2A ......................................................................................................................40
Error warning - the CLEAR key ..............................................................................................42
Keys for finalizing payment with CASH, CHECK and CREDIT......................................................42
Changing the cashier ..........................................................................................................42
Logging in a cashier ............................................................................................................42
Registration mode menu ............................................................................................................................42
Samples of basic registration procedures...............................................................................................43
PLU registration ...........................................................................................................................................44
Basic PLU registration .........................................................................................................44
Repeated registration of an item ............................................................................................44
Multiplication in PLU registration ............................................................................................45
PLU registration using a price not programmed ........................................................................45
Multiplication in PLU registration using a price not programmed ..................................................45
Double multiplication in PLU registering ..................................................................................46
Fractional PLU registration ...................................................................................................46
Other types of PLU sales ............................................................................................................................46
Linked PLU registration ........................................................................................................46
Registering of refundable packaging ......................................................................................46
Registration using a barcode ................................................................................................47
Entering amounts using electronic scales ...............................................................................48
Searching for a PLU in registration mode ................................................................................49
Corrections and voids .................................................................................................................................49
Clearing ............................................................................................................................49
Voiding (cancellations) .........................................................................................................50
Surcharges and discounts .........................................................................................................................51
Percent surcharge/discount on an item .................................................................................. 51
Percent surcharge/discount on a subtotal ...............................................................................52
Value surcharges and value discounts ....................................................................................53
Refunds .........................................................................................................................................................53
Refund of a product ............................................................................................................53
Refund of packaging ...........................................................................................................54
DPT registration ...........................................................................................................................................55
Multiplication in DPT registration ............................................................................................55
DPT registration using a price not programmed ........................................................................55
Multiplication in DPT registration using a price not programmed ..................................................56
Double multiplication in DPT registering ..................................................................................56
Fractional DPT registration ...................................................................................................57
Depositing cash ...........................................................................................................................................57
Withdrawing cash or checks ......................................................................................................................58
Registration with a secondary currency ..................................................................................................59
JOURNAL ......................................................................................................................................................60
Text journal ........................................................................................................................60
Binary journal .....................................................................................................................60
Page 5

5
Contents
PC ONLINE MODE .......................................................................................................................................66
PC ONLINE MODE: Data is transmitted from the PC to the cash register ......................................66
Description of work in PC ONLINE mode: ...............................................................................66
Report modes...............................................................................................................................................68
Generated reports .......................................................................................................................................68
Financial report ..................................................................................................................68
Daily financial X-report .........................................................................................................69
Monthly financial X-report .....................................................................................................69
Daily financial Z-report .........................................................................................................69
Monthly financial Z-report .....................................................................................................69
Daily turnover .....................................................................................................................69
X-report for cashiers ............................................................................................................69
Z - report for cashiers ..........................................................................................................70
DPT X-report ......................................................................................................................70
DPT Z - report ....................................................................................................................70
PLU X-report ......................................................................................................................70
PLU Z - report ....................................................................................................................70
Stock X-report .................................................................................................................... 71
Cash drawer X-report...........................................................................................................71
Cash drawer Z - report - (Daily / Monthly) ...............................................................................72
Combined Z - report - (Daily / Monthly) ..................................................................................72
How to print an X-report .............................................................................................................................72
How to print out a Z-report .........................................................................................................................73
Digital scales ......................................................................................................................76
Barcode scanners ..............................................................................................................76
MS-5145 Eclipse ..........................................................................................................76
Metrologic Orbit MS-7120 ..............................................................................................76
Metrologic MS-9520 Voyager .........................................................................................77
Birch CD-108e .............................................................................................................77
Expanding RS-232 ports ................................................................................................77
Internal accumulator ......................................................................................................78
Cash drawer .................................................................................................................................................78
External display ............................................................................................................................................78
MANDATORY SERVICE MAINTENANCE....................................................................................................80
Informational and error messages ............................................................................................................80
Testing the cash register ............................................................................................................................82
Testing the electronic circuits and display ...............................................................................82
Customer display ..........................................................................................................83
Cashier display .............................................................................................................83
Testing the keyboard ...........................................................................................................83
Testing the printer ...............................................................................................................84
Testing the position of the thermal printer head ........................................................................84
Paper ribbon sensor test ......................................................................................................85
Page 6

INTRODUCTION
Page 7

7
Introduction
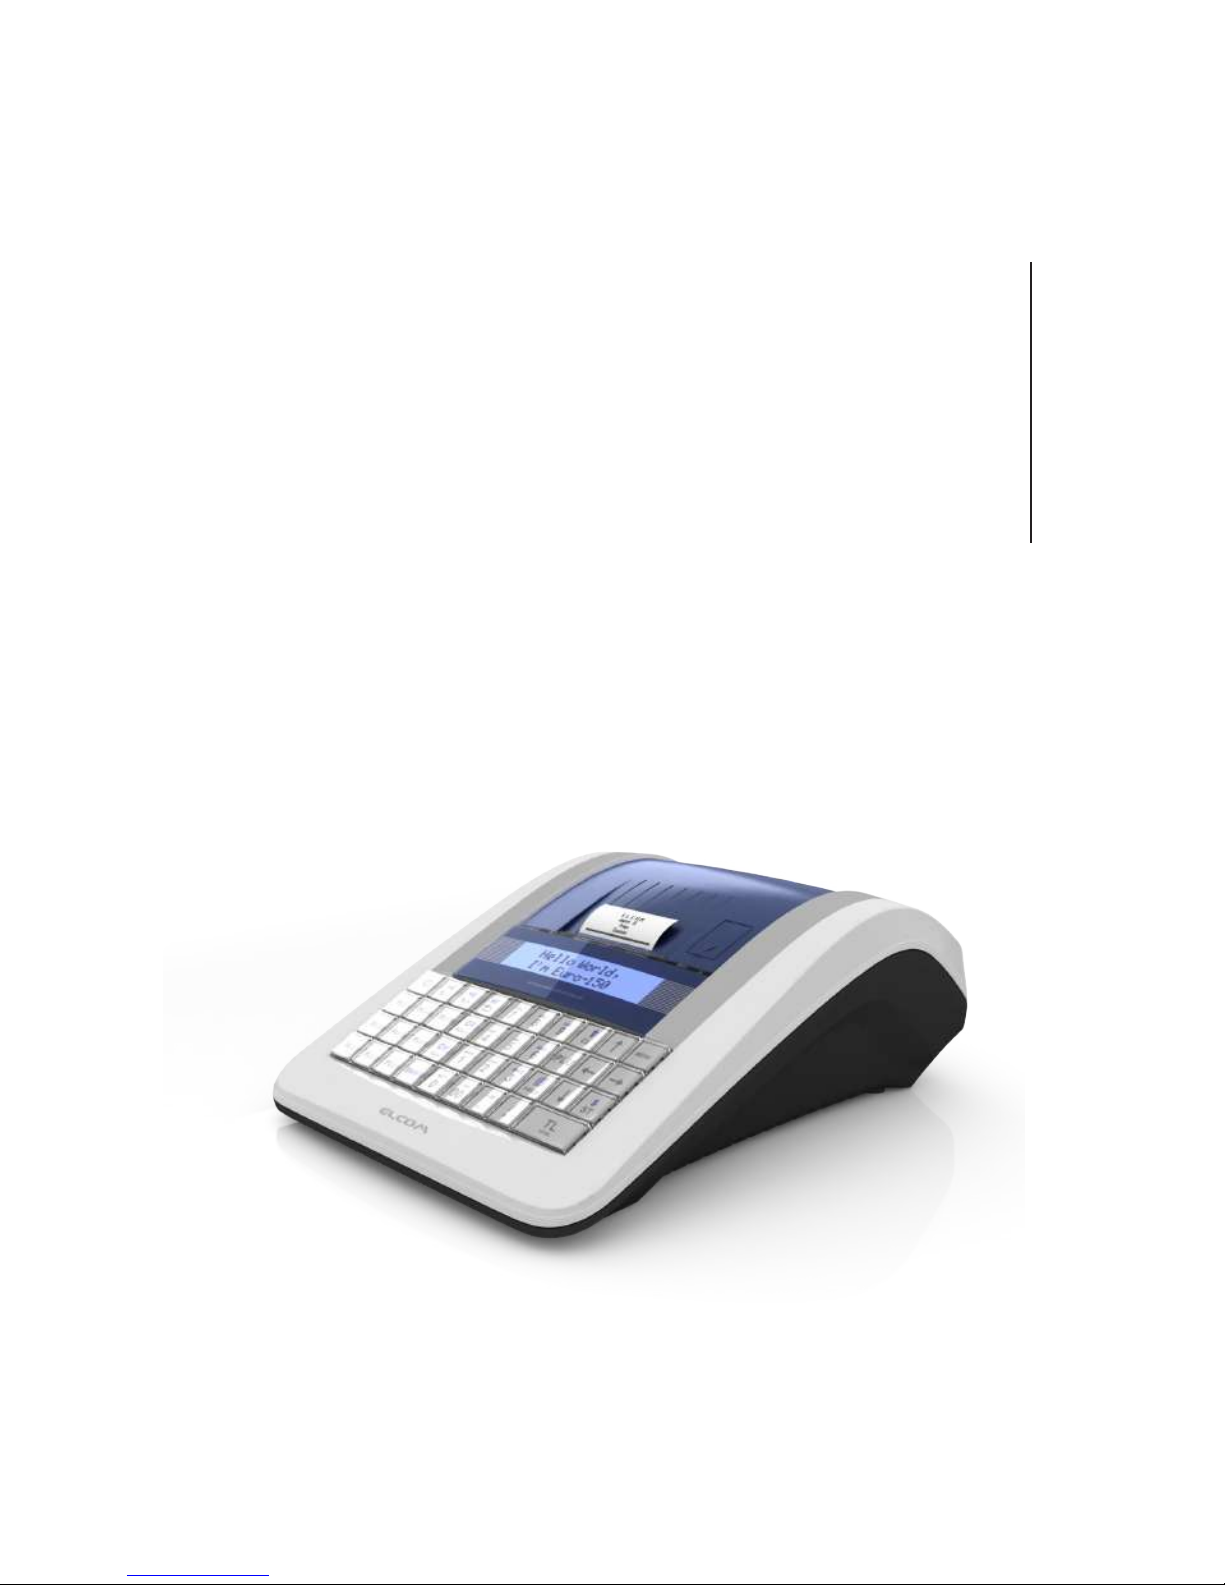
Thank you for choosing the Euro-150TE/TX Flexy electronic cash register. Before you begin using the cash
register, read these instructions to become familiar with the register‘s features and functions. Be sure to save
this manual for future use. It will help you resolve problems that may arise.
IMPORTANT NOTICES
• Do not leave switched-on equipment unattended!
• Install the cash register in a place where it will not be exposed to direct sunlight, unusual changes in temperature
(below 0°C and over 45°C) or high humidity. Installation in an unsuitable place could cause damage to the
casing and electrical components.
• Prior to use, leave the cash register connected to the power adapter for at least 4 hours in order to charge the
internal battery (if the cash register is equipped with an internal battery).
• When charging the battery, the external casing of the cash register may heat up; therefore, we recommend that it
not be placed near inflammable materials (if the cash register is equipped with an internal battery).
• Upon carrying the cash register from a cool environment to a warm one, or vice versa, do not switch it on for at
least 20 minutes.
• The cash register should not be operated by a person with wet hands. Water could penetrate to the interior and
cause the failure of parts.
• Clean the cash register with a soft, dry cloth. Never use cleaning agents such as petrol and other solvents. The
use of such chemicals can lead to damage to the register casing or discoloration.
• Prevent beverages from being spilled over the register. Liquids can damage the functionality of the cash register.
The register keyboard in particular should be thoroughly protected.
• Connect the cash register to a standard electrical socket (230V±10%) using the adapter provided. Some electrical equipment connected in the same network circuit can cause the improper functioning of the cash register.
In such a case, use a special anti-jamming device recommended by the maker of the register.
Notice: The adapter is specified only for interior use!
• If the cash register is not working properly, take it to an authorized service center technician. Do not attempt to
repair the cash register yourself. Do not open the cash register and do not damage the seal!
• If the equipment is to be fully disconnected from the electrical network, unplug the AC/DC adapter from its elec-
tric outlet.
• If an external adapter is connected to the cash register, the internal battery which powers the cash register is also
charged even when the cash register is turned off.
• If a red streak appears at the end of the paper ribbon, change the ribbon as soon as possible. Changing the ribbon too late could damage to the printer or decrease its lifespan.
• Use a paper ribbon that is not glued at its end. If such a paper ribbon is used and not changed early enough,
the printer could be damaged or its lifespan could be shortened. In such a case, the warranty for the damaged
printer is no longer valid.
• We recommend using only high-quality thermal paper ribbons. Improper ribbons may damage the cash register
printer or possibly shorten its lifespan. With the use of suitable ribbons and proper maintenance, the printer
has an average lifespan up to 25 million printed lines. You can find detailed information in the chapter Usage
and Storage of Paper Ribbons.
• Journal paper storage recommendations: Do not expose thermal paper to direct sunlight and temperatures above
40°C. Avoid contact with PVC, mollifiers, organic solvents, glues and water. When taping a report into an accounts book, only press tape at the end of the paper ribbon in order not to damage the printed data. Paper
ribbons must be kept in proper storage conditions in order to preserve data according to valid provisions. It is
important to use only paper ribbons which meet all of the required characteristics of the manufacturer. If storage conditions are not met or low-quality paper ribbons are used, the Elcom company cannot guarantee the
quality of the printing or the preservation of data.
Page 8
8
Introduction
• Use only the AC/DC adapter provided or an adapter recommended by an authorized dealer. The use of other
types of adapters may result in damage to the adapter or the cash register.
Notice: For communication between the cash register and a computer, use only the program recommended by your
authorized dealer and the original connection cable for the cash register.
• If the cash register is used in different ways than those described in these instructions, the dealer cannot be re-
sponsible for any incorrect data or damage that may result.
• Only equipment which conforms to European Union standards (CE) should be connected to the Euro-150TE/TX
Flexy. In other cases, the Elcom company cannot guarantee the adherence to standards of whole system. Your
authorized dealer or the Elcom company can inform you about the possibilities of connecting the Euro-150TE/
TX Flexy cash register with different equipment.
• A symbol on the product or on its packaging indicates that this product, upon completion of its use, should not
be treated as common household waste. Instead it should be handed over to a special take-back scheme for
the recycling of electrical equipment and electronic components. By ensuring the proper disposal
of this product, you will help preserve natural resources and help prevent potential negative
consequences on the environment and on human health. You can get further details from your
local office or from the nearest waste-collection centre.
•
The product contributes to environmental protection through the use of non-lead technology during
its production.
BASIC DEFINITIONS
Logo
The heading of each printed receipt contains introductory information, followed by a description of the
goods purchased. It is primarily used to identify the owner of the cash register (company name, address,
tax information, company identification, etc.)
Figure 1.1 – Receipt logo
YOUR SHOP
Grocery store Prešov
Stromová 234
DKP: 0123456789876
DIČ: 01234567/9876
THANK YOU
Your receipt
Tax level
Tax level is used to determine the tax on the goods sold. It is characterized by a percent value.
Measure units
Sales units are used in connection with the quantity of goods sold (meters, liters, etc.). Each PLU has a specific
sales unit assigned which indicates the quantity of the goods sold. It is possible to program 8 specific sales
units with a maximum of three characters.
Page 9
9
Introduction
PLU
PLU (Price Look Up) is an abbreviation used to denote a specific product item. The PLU code represents
the name of the product, the sale price, its barcode and flags (assignment to a department, VAT level, PLU
type, etc.)
DPT
Departments (DPTs) are used to denote groups of goods having some common features (dairy products,
foodstuffs, fruit, etc.). A department is characterised by it’s name, parameters, and by the preprogrammed
selling price, if it is used for direct sale.
For example: whole milk – 0.63 GBP, plain yogurt – 0.31 GBP.
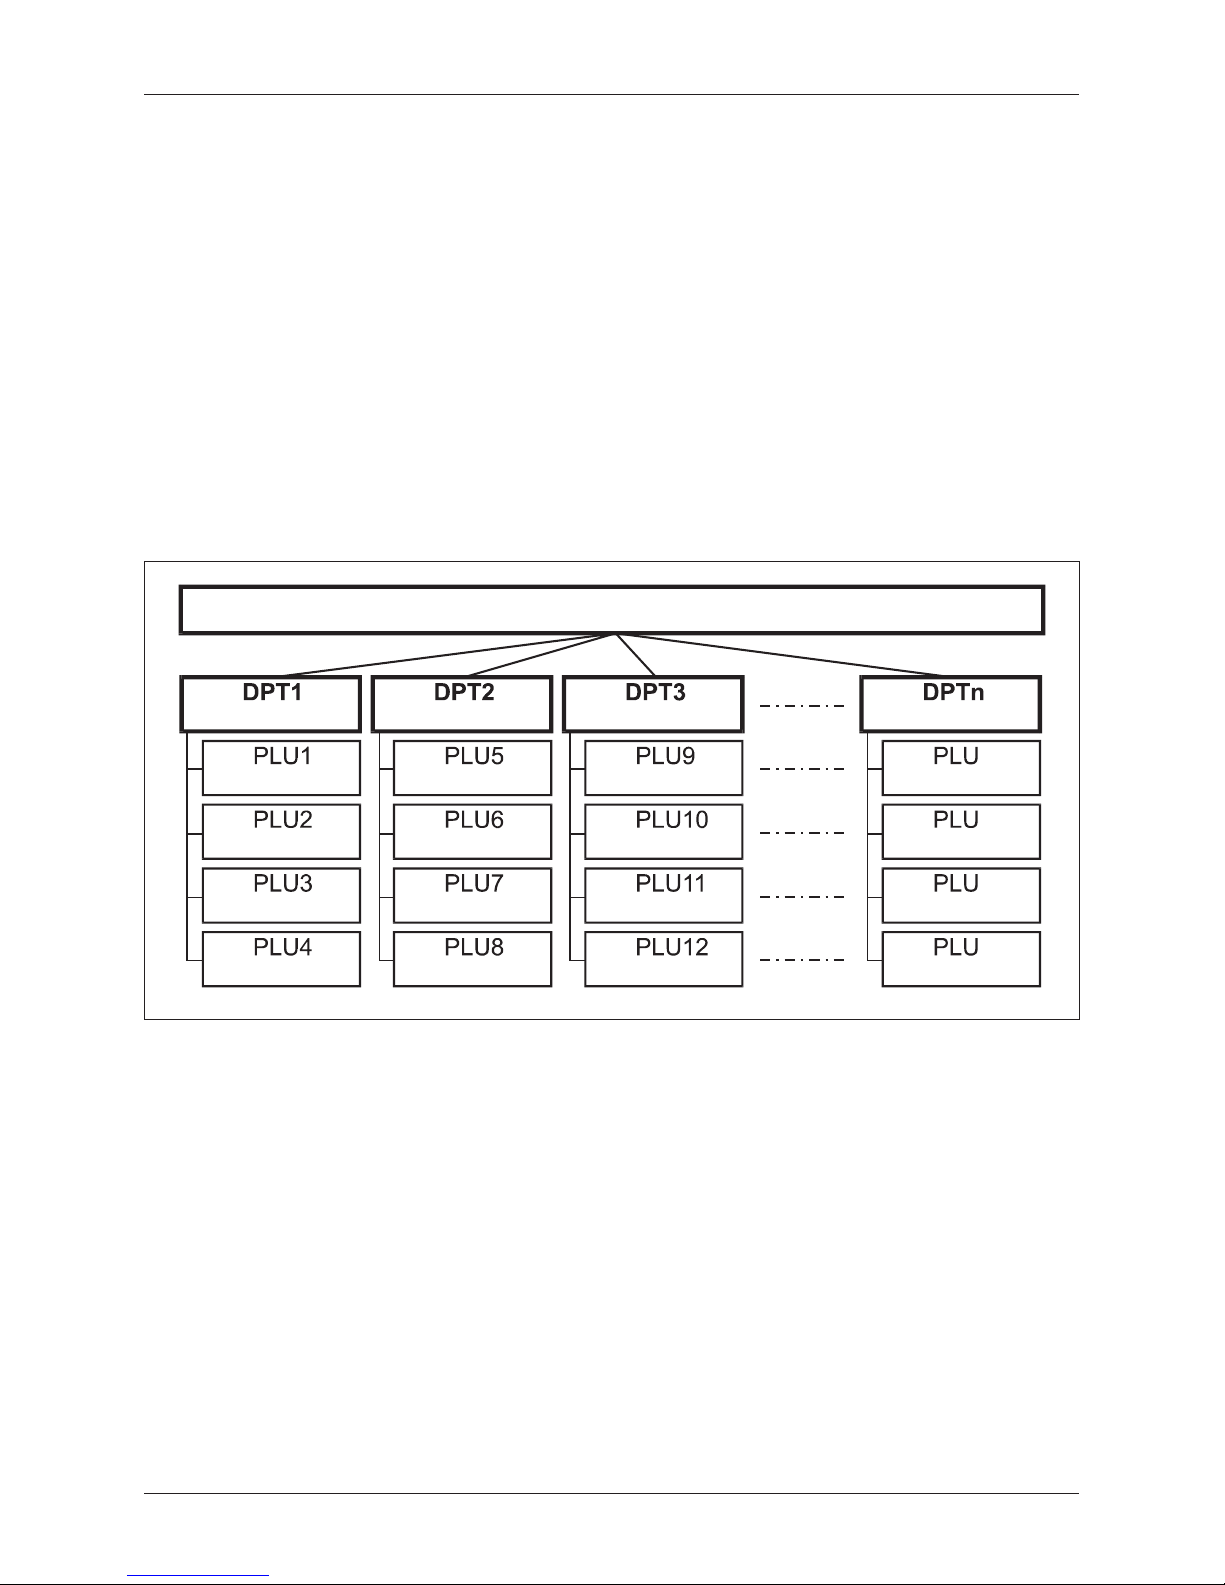
The connection between departments and PLUs
The example in figure 1.2 clearly illustrates the relation between the departments and the product items
(PLUs).
Figure 1.2 – The connection between departments and PLUs
PRODUCTS
Dairy products
Plain yoghurt
Whole milk 1 L
Pudding
Eidam cheese 30%
Kaiser roll
White bread
Challa Bread
Sweets
Mints
M&Ms
Baked goods
Alcohol
Whole wheatroll
Tatranky wafers
Candy bar
Vodka 1 L
Brandy 0,5 L
Beer 12
o
0,5 L
Wine 0,7 L
m
m+1
m+2
m+3
Reports
Reports provide an overview of sales according to selected criteria (daily totals, periodical (e.g., monthly),
etc.). There are two basic types of reports: „X“ and „Z“.
„X“ reports print out specific sales values (according to the report selected) without zeroing out this data in
the cash register memory
„Z“ reports print out the sales values of the selected report, and after the printing of these values, zeroes
out the cash register memory.
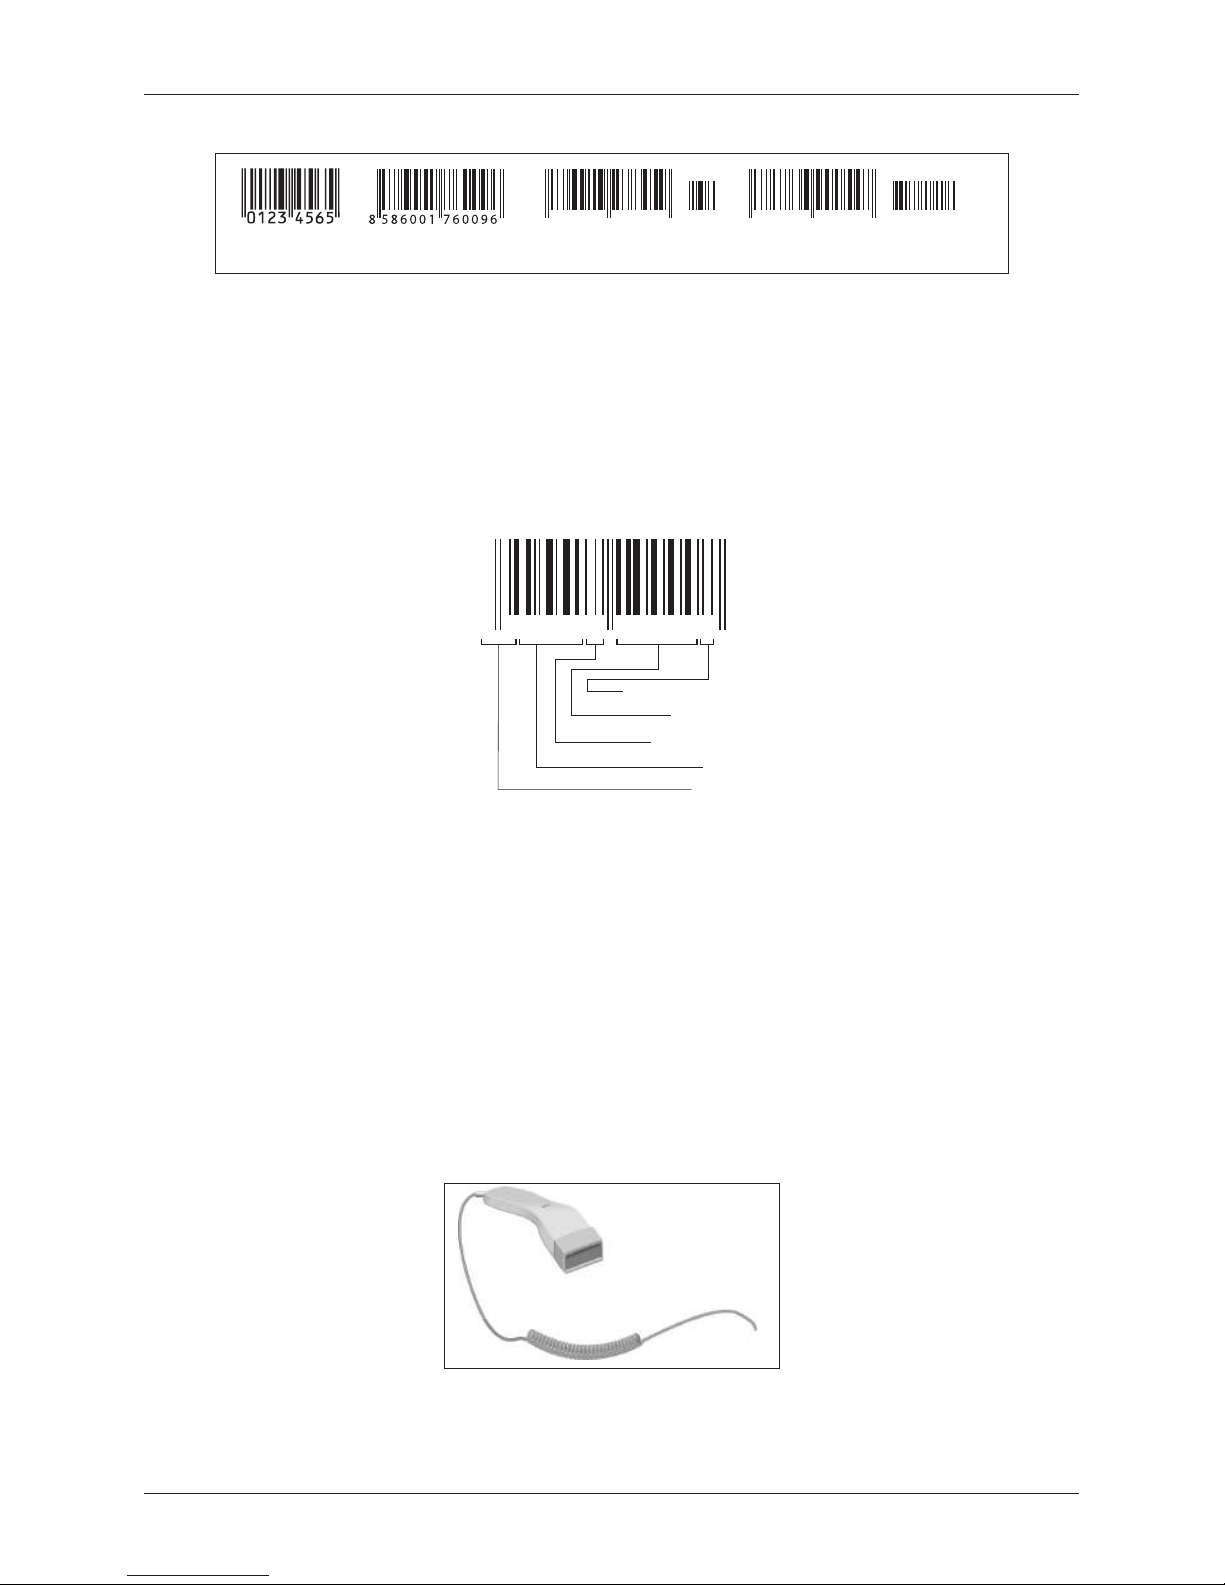
Barcodes
A barcode is a graphic encoding of a number signifying a product according to strictly defined international
regulations. If a product has a barcode assigned, the barcode is depicted on each packaging for this product.
The most frequently used codes for products in Europe are the 13-digit code according to the EAN norm
(EAN - 13) and the 8-digit code (EAN-8). The Euro-150TE/TX Flexy cash register is also capable of working
with EAN barcodes which contain an expanded 2 or 5-digit section. The cash register does now allow the
same code to be assigned to different products.
Page 10
10
Introduction
Figure 1.3 – EAN barcodes
0
&"/ &"/ &"/ &"/
Weight and price barcodes
The cash register is also capable of processing barcodes containing product weights or the price of a product.
The recommended prefixes for coding amounts are 27, 28 or 29 and for coding prices are 24, 25 or 26.
A weight barcode is in the format: PPXXXXVMMMMMK, where PP is the barcode prefix, XXXX is the PLU
number (0001 – 2400, up to. 9999), V is the control number for the scale, MMMMM is the weight of the
product to the third decimal place and K is the control number for the barcode. A price barcode is also in
this same format, but MMMMM is the price of the product, not the weight.
Figure 1.4 - A weight barcode
2 9 0 0 0 1 8 1 0 0 0 0 7
Generated no.
Amount
Checksum
PLU
Prefix
Expanded barcodes
The Euro-150TE/TX Flexy cash register allows you to work with expanded barcodes EAN-13 (+2) and EAN-13
(+5) with the prefixes 977 and 978, which are used to designate serial publications. If in the programming
mode an item is assigned an expanded barcode through the barcode scanner, the cashier must decide
whether to store the entire code or only its 13-place base. When entering of an expanded barcode from
the keyboard the entire code is stored, including the expanded portion. If in registration mode, an item is
registered by entering an expanded barcode, the entire entered code is initially searched for. If an item is not
found, an additional search is made, but only with the 13-place basis of the entered code.
The barcode scanner
A barcode scanner is a device which ensures the scanning of a barcode. The device is used at the point-of-
sale for the rapid and accurate registering of products being purchased.
Figure 1.5 – Barcode scanner
Page 11

11
Introduction
Cumulated totals (grandtotals
Cumulated totals are variables that cumulate the values from all sales. There are usually three known
grandtotals: GT1, GT2, and GT3. Their meaning is as follows:
GT1 - gross turnover - this means the cumulated total of all positive values registered in the ECR
GT2 - net turnover - the net turnover means the difference between gross turnover and negative turnover
GT3 - negative turnover - this means the cumulated total of all negative vlaues (refunds, discounts...) registered
in the ECR.
Concepts defining payments in a foreign currency
Primary currency
The currency in which all important financial calculations in the cash register are kept.
Foreign (secondary) currency
An optional other currency serving for making payments and withdrawals concurrently with the primary currency. The cash register allows a record of withdrawals and payments to be kept in one foreign currency.
Page 12

CASH REGISTER
CHARACTERISTICS
Page 13
13
Cash register characteristics
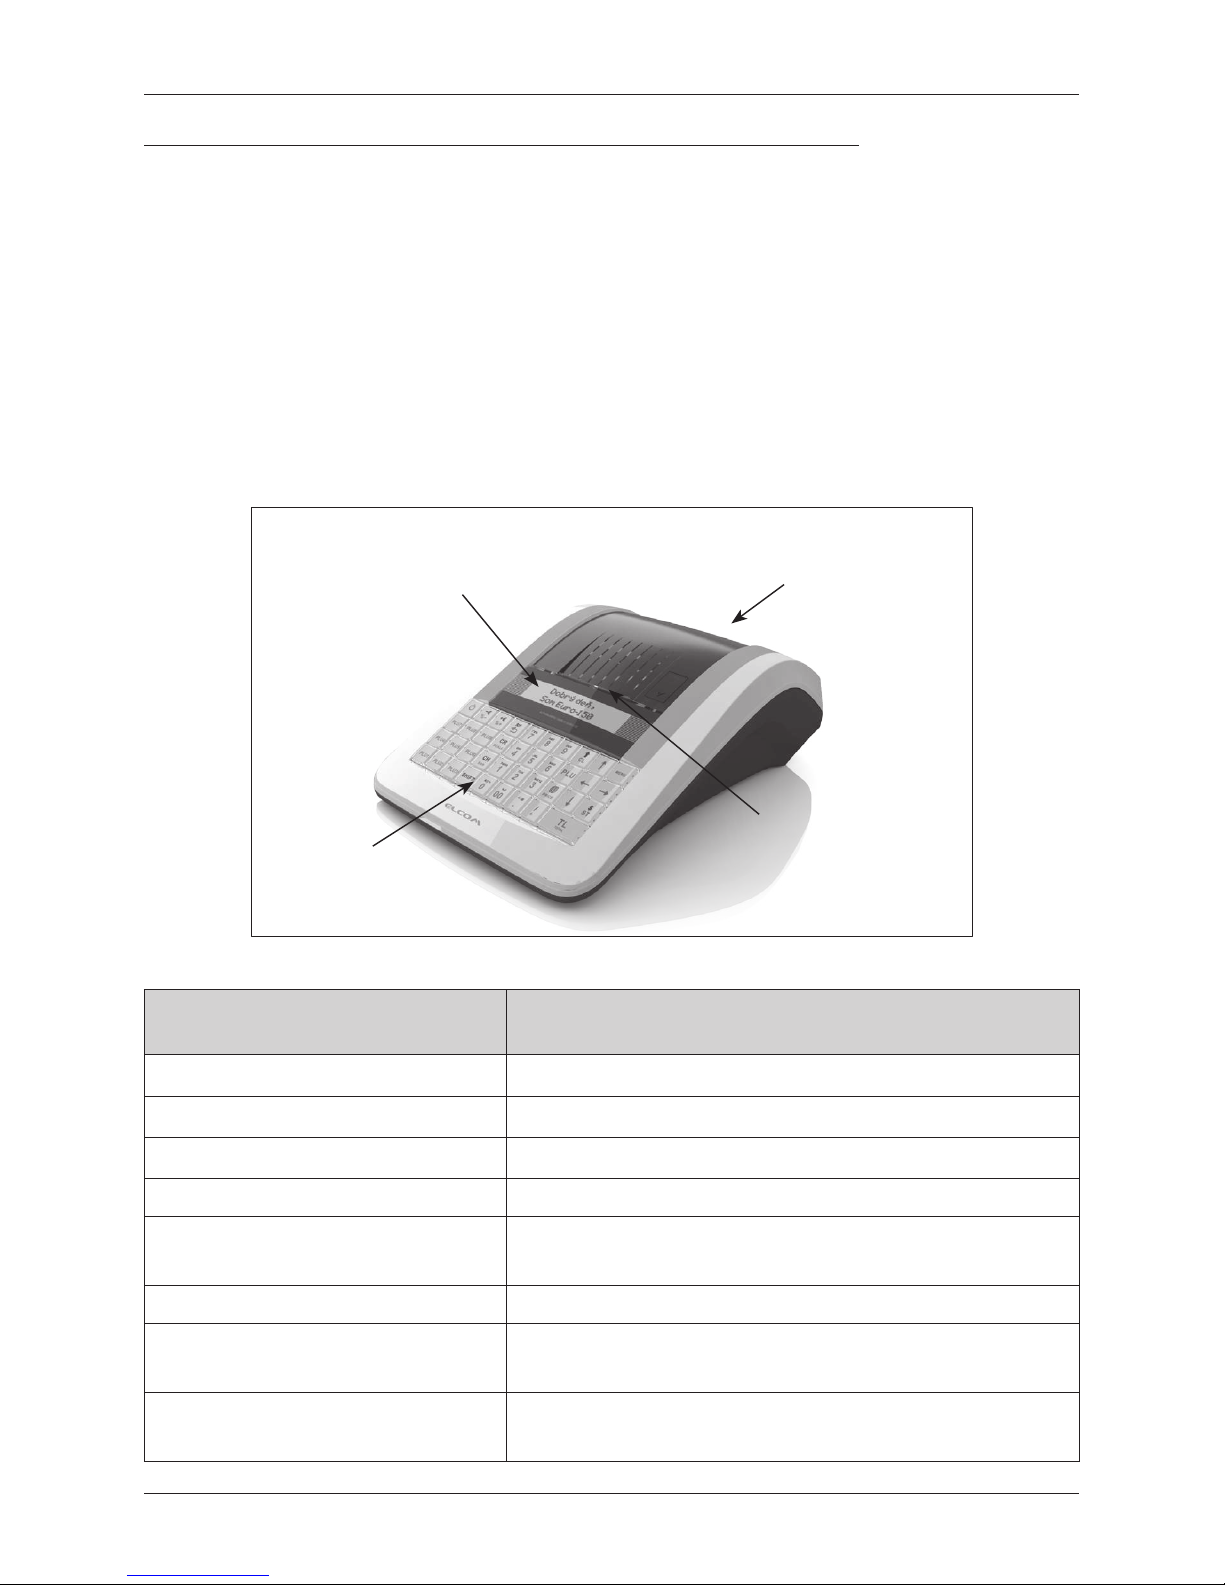
PARTS OF THE CASH REGISTER, BASIC PARAMETERS
Using and programming the cash register is simple and intuitive thanks to its clearly arranged menu (see the MENU
MAP in the chapter „Programming the cash register“).
The high quality Euro-150TE/TX Flexy cash register emerges from the experiences of the most successful
business with regard to simple handling of the cash register and a functional design. It is designed for smaller
to medium-large operations, grocery stores, drug stores, textile shops fast food operations and others.
The Euro-150TE/TX Flexy cash register can be powered by:
• an electrical network 230V (± 10%) via the supplied power adapter
• a built-in accumulator, which is not a standard component of the cash register
The package includes the cash register, the adapter, the user manual, an SD card and a presentational CD.
The cash register fully supports the English language.
Figure 2.1 – Basic parameters of the Euro-150TE/TX Flexy cash register
Cashier display
Customer display
Keyboard
Receipt
outlet
Table 2.1 – Parameters of the Euro-150TE/TX Flexy
Designed for
all types of counter operations, smaller to medium size self-
service sellers, operations of services, taverns and bars
Number of PLUs
10 - 2790
Number of DPTs
20
Number of cashiers
10
Number of VAT tax levels 7
Printer Euro-150TE Flexy: Seiko LTPD-245
Euro-150TX Flexy: Seiko LTPD345D-576-E5
Average printer speed 12 lines/s
Thermal paper ribbon Euro-150TE Flexy: 1 x 57mm
Euro-150TX Flexy: 2 x 38 mm
Number of characters in a PLU name Euro-150TE Flexy: 42
Euro-150TX Flexy: 28
Page 14
14
Cash register characteristics
Number of characters in a logo line Euro-150TE Flexy: for 57mm - 42 / 21*
Euro-150TX Flexy: for 38 mm - 28/14*
*(normal. characters / double-sized characters)
Upper text logo max. 9 lines
(10th line – Company ID/VAT ID)
(11th line - Unique No.)
Lower text logo max. 9 lines
Graphic logo Euro-150TE Flexy: max. size of 360x240 dots
Euro-150TX Flexy: max. size of 240x240 dots
format - BMP, 1 bit depth
Capital and small characters
yes
Bold characters
Language programming
EnglishLanguage for receipts
Language for reports
Reports Financial, PLU, DPT, cashiers, cash drawers, inventory,
Combined
Operating condition temperature 0-45�C, humidity 80% at a temperature of 35�C
and lower
Cashier display alphanumeric, 2 * 16 characters with back-lighting
Customer display 10-place LCD with back-lighting
PC interface USB
Interface for scale, scanner, payment
terminal or external display
1xRS232 (possible expansion to 3xRS232)
Memory card* SD card
Dimensions in mm 340 x 253.5 x 120.5 mm (Wx D x H)
Weight 1.66 kg
Power adapter 100-240V / 9V DC, 3A
Battery as an optional accessory
Energy-saving mode yes
Standard specifications
EN 55024, EN 61000-4-2, 3, 4, 5, 6, EN 61000-3-2, 3, EN55022 –
class B
* memory card serves for import and export of product items t (e.g. departments DPT) and storage of
electronic journal. (electronic journal. for Euro-150TE Flexy)
Page 15
15
Cash register characteristics
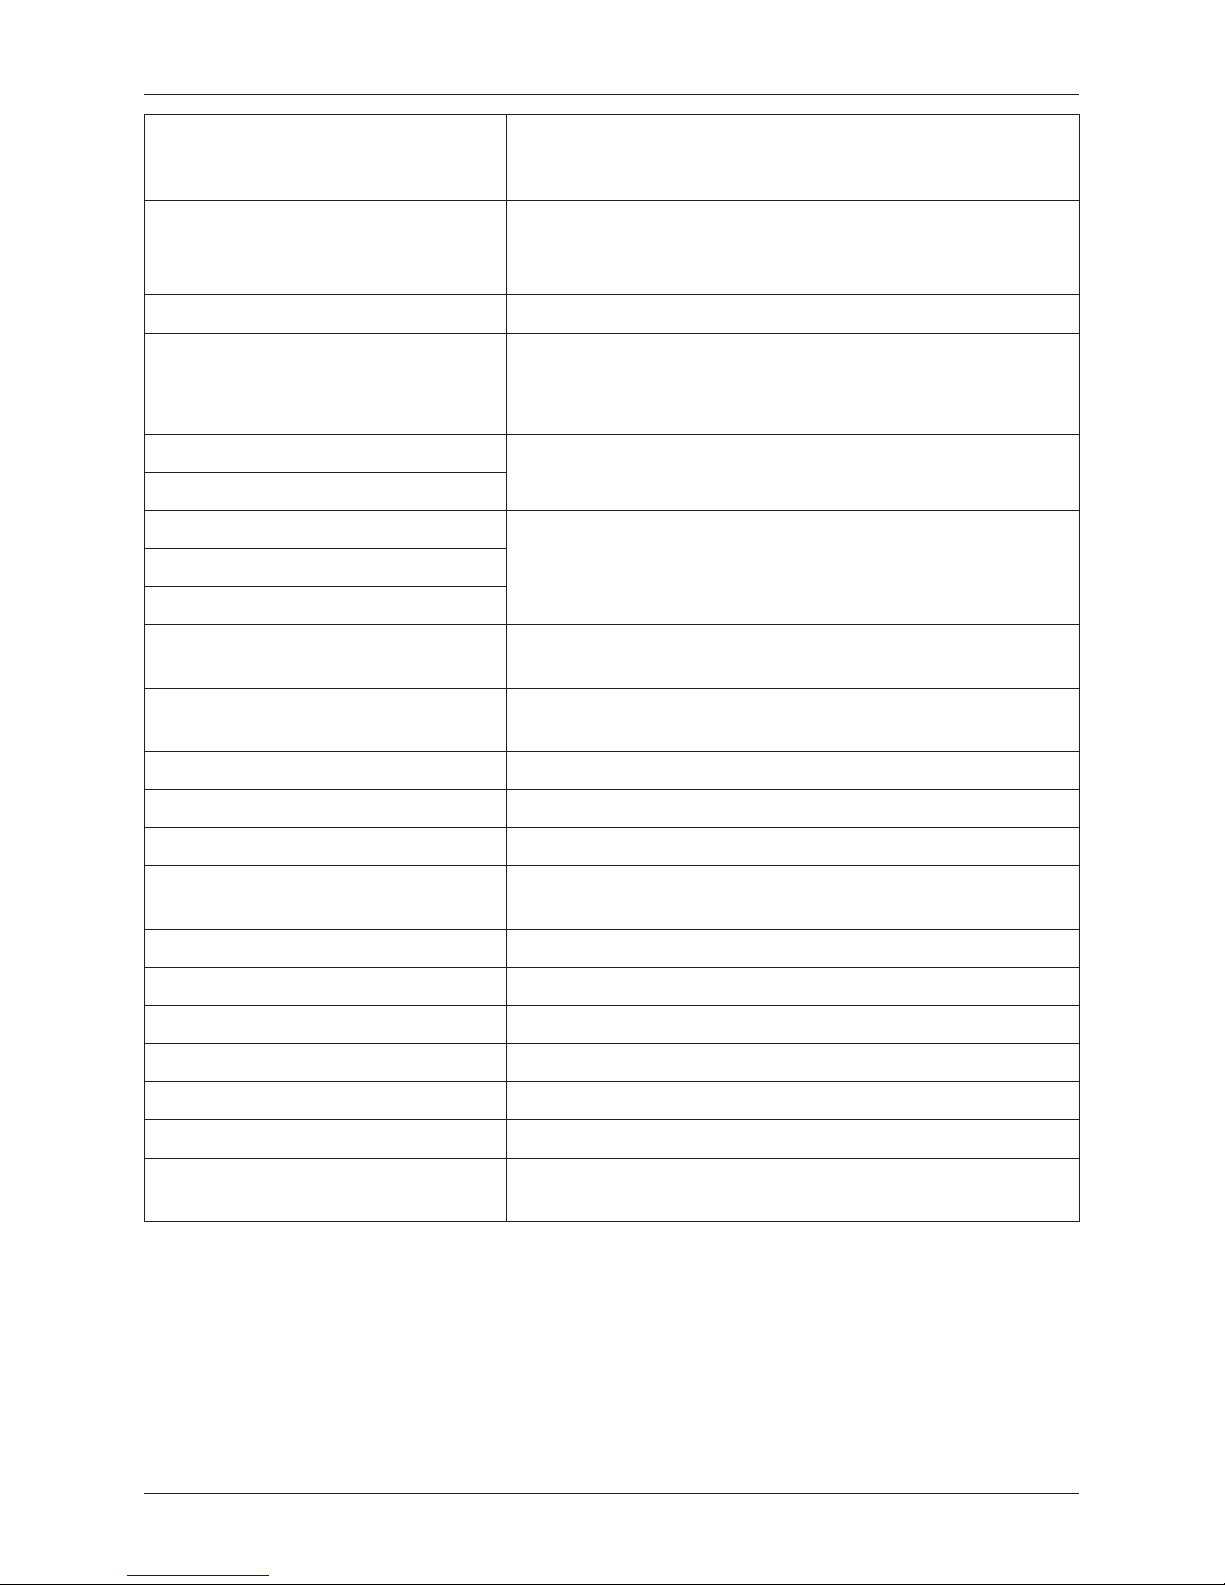
ATTACHING PERIPHERAL DEVICES
Notice: Your supplier can inform you about the possibilities of attaching individual peripheral devices.
Figure 2.2 – Connectors to the Euro-150TE/TX Flexy cash register
COM3 COM2 COM1
Connecting to a com-
puter via a USB
Connecting an adapterDrawer port
Connecting a scanner, elec-
tronic scale, external display
and a payment terminal
(max 3xRS-232)
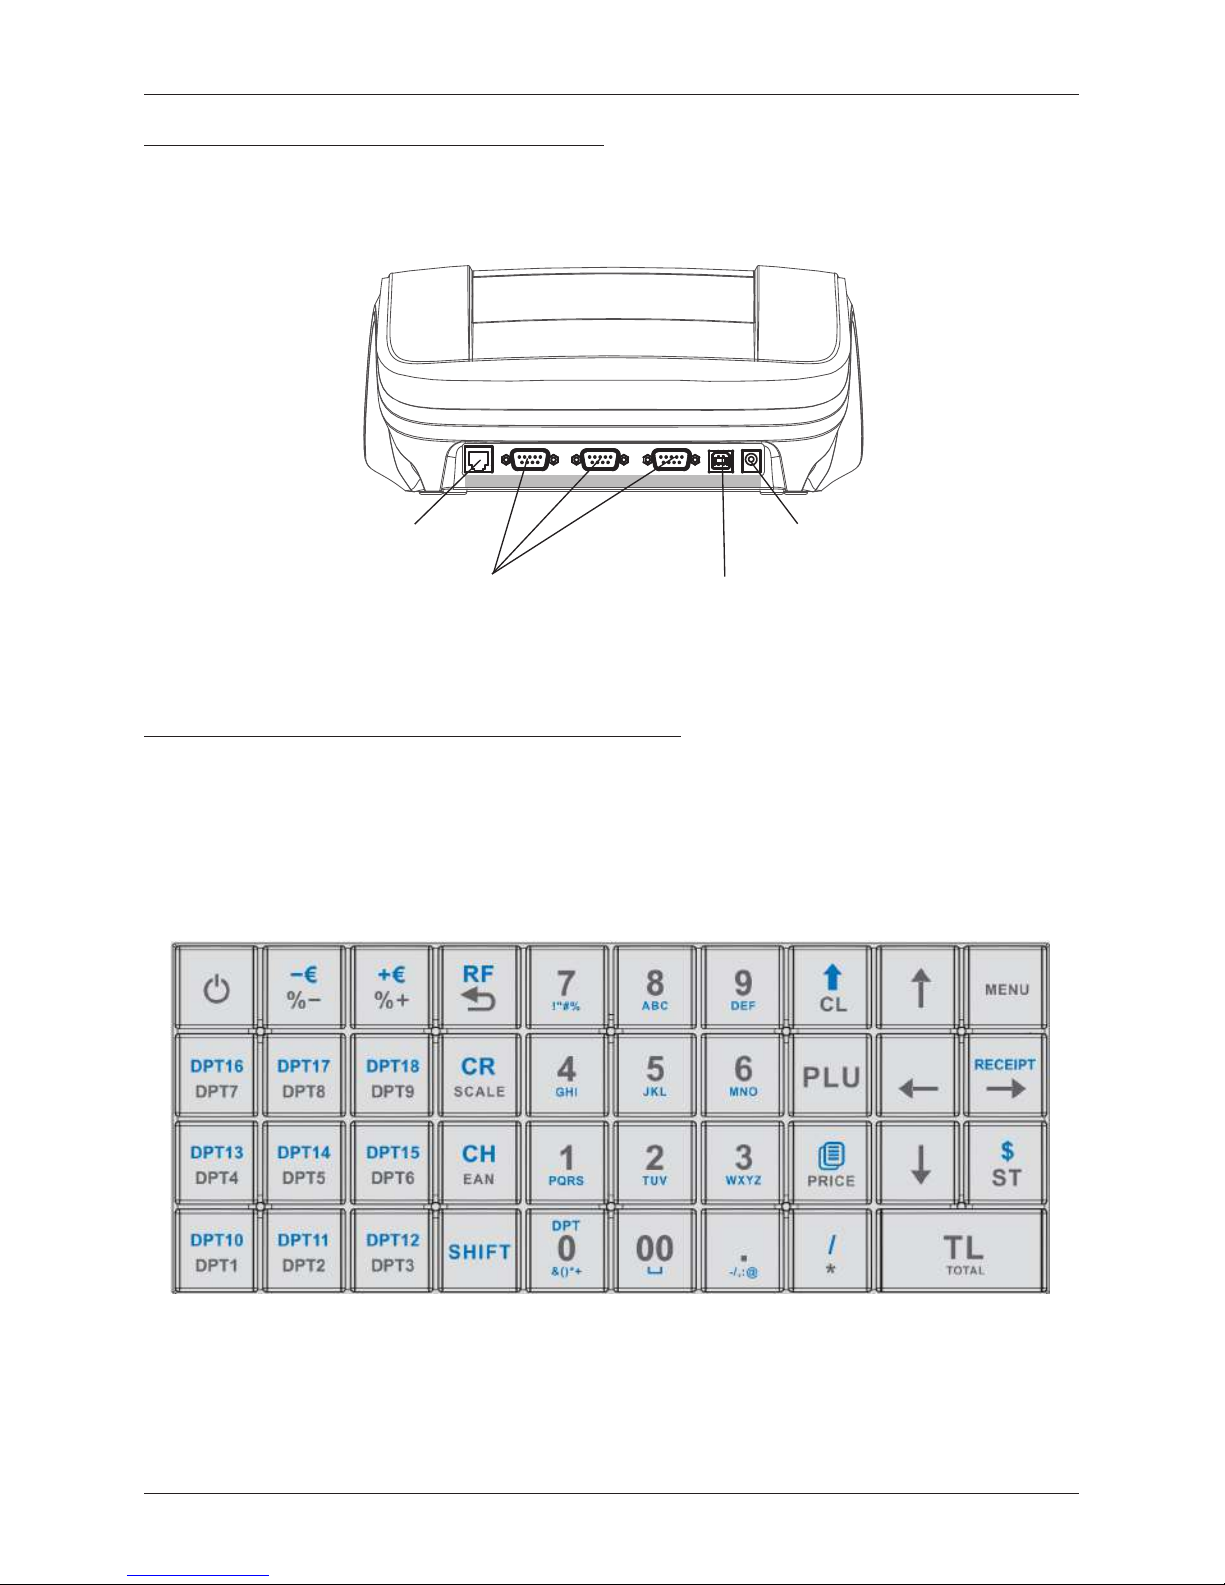
THE EURO -150TE/TX FLEXY KEYBOARD
The cash register keyboard is made up of a numeric part (numbers), programmable keys (immediate PLU1PLU9) and function keys. If there are two functions on a single key, it is necessary to select individual functions
as follows: the function on the lower part of the key is selected by simply pressing the key. To choose the upper
function on the key, it is necessary to first push and hold the „SHIFT“ key. The keyboard is very comfortable
and is ready for all-day operation. The keys are marked by large and simple icons for fast orientation.
Figure 2.3 – The Euro-150TE/TX Flexy keyboard
Notice:
Use a clean, dry cloth to clean the keyboard. Never use cleaning agents such as petrol or solvents. The use of
such chemicals can lead to damage to the keyboard or cause discoloration. If you need to clean a heavily soiled
keyboard, we recommend using a 3M cleaning spray.
Page 16

16
Cash register characteristics
Names and functions of keys
…
NUMERICAL KEYS are used to enter numerical values and to enter text in programming „P“ mode.
Holding down the SHIFT key and then pressing a key with dual functions selects the function
written on the upper part of the key.
The CLEAR key is used to clear an amount that has been entered incorrectly from the numeric
keyboard. This key also cancels an incorrectly entered function and the sound signalling ERROR/ALARM. It cancels incorrect characters when entering text.
The VOID key is used to correct an item that has already been registered. In the “P mode this
key is used for printing out all active items on the given menu.
The REFUND key enables you to buy back returned packages during a sale or as an independent
transaction.
In the “R” and “T” mode press the EAN key after entering barcode value to sell the item with this
barcode. In the “P“ mode, pressing this key allows you the specific programmed values.
When the cash register is connected to an electronic scale, the SCALES key is used to read the
weight of the weighed goods. In the „P“ mode this key is used to print out all the programmed
parameters in the given item.
The SHIFT key advances the receipt ribbon without printing. Pressing the key moves the paper rib-
bon by about 1.5 cm.
Searching for a PLU in registration mode by name, internal number in the cash register database or by barcode.
Opening of the cash drawer.
The MULTIPLY key is used for multiplication if two or more of the same item are being sold.
The DIVIDE key is used for sales of fractional amounts.
The PRICE key enables the manual entry of a price rather than registering the preprogrammed
PLU price for one item. It is also used for fast PLU price programming in the “P” mode.
After completing a transaction, it is possible to print out a duplicate receipt by pressing the DU-
PLICATE key. The receipt is marked “DUPLICATE.
The PLU key (PRICE LOOK UP)
…
DEPARTMENT KEYS are used for registration of department sales.
This combination you can use for next programmable DPTs
The CREDIT key is used to finalize a sale when payment is made with a credit card.
The CHECK key is used to select the type of payment when payment is made by check. In the
„P“ mode it is used to print out programmed data.
and These two keys are used for adding a percent surcharge or subtracting a percent discount for a given
item or for a complete transaction according to the programmed values.
and This function services for logging off of a cashier (active only if at least one of the cashiers has a pro-
grammed password). To log off, it is first necessary to press repeatedly until main menu appears
(go to the MAIN MENU – R -mode.)
and
These two keys are used for adding a value surcharge or subtracting a value discount for
a given item or for a complete transaction.
The SUBTOTAL key displays and prints out the current subtotal value.
The TOTAL/CASH key is used to finalize a sale when payment is made in cash. In the cash register
menu this key serves to transition to a sub-menu or confirmation of a selected/entered value.
The MENU key is used to call up the cash register menu. With the menu open, this key serves to
shift the selected level up one line.
The arrow keys serve for movement within the cash register menus. In „R“ mode, upon
opening a sale, the
keys serve for the moving of individual registered product items.
The ON/OFF key is used for switching the cash register on and off. This key is also used to wake
the cash register up from the Power-saving mode.
Page 17
17
Cash register characteristics
Turn on/off the printing receipt.
Turn on the cash register Euro-150TE/TX Flexy to Mass Storage. Power off to exit.
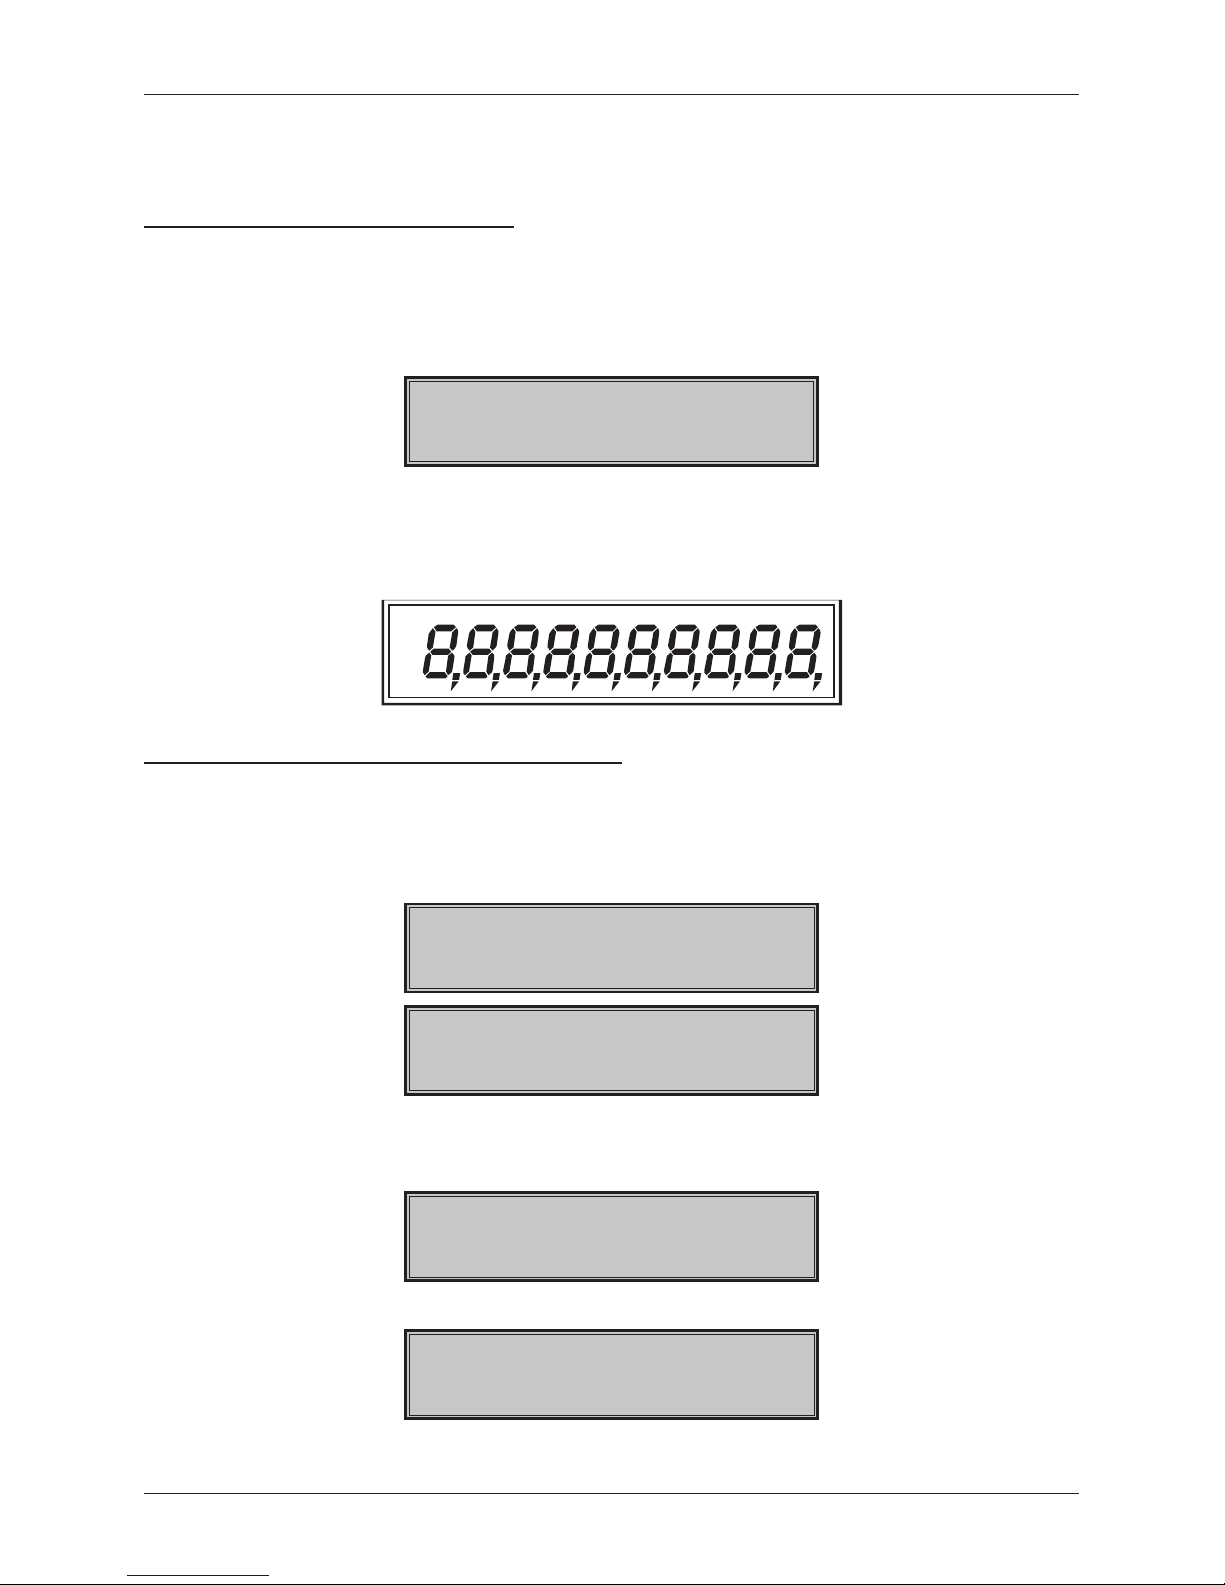
DESCRIPTION OF DISPLAYS
Description of the cashier display
The cashier display is a double-line LCD character display with back-lighting. In the first and second lines up to
16 characters can be displayed.
Figure 2.4 – Alphanumeric LCD display
28-06-2013
R 11:07:39
Description of the customer display
The customer display of the Euro-150TE/TX Flexy is a 10-character, 7-segment LCD display with back-
lighting.
Figure 2.5 – Division of the 7-segment LCD display
ENTERING CASH REGISTER MODES
Pressing the key (MENU) calls up the cash register‘s Main Menu, where by using the arrow keys or
and subsequently confirming with the key TOTAL, it is possible to select a cash register mode. Such
mode switching allows a worker using the cash register to work in a variety of modes (registering sales,
programming, printing reports, etc.).
MAIN MENU
R-mode
28-03-2013
R 11:07:39
Registration mode. This mode is used for all registering and sales transactions. Upon switching into this
mode, the display shows the actual date in the first line and the actual time in the second line until registration of sales begins.
X-mode
Financ. report
The “X”-mode is used to print out all types of sales reports, which do not zero-out the cash register‘s sales
data.
Z-mode
Financ. report
The ”Z“-mode is used to print out all types of summary reports, which zero-out the cash register‘s sales data.
Page 18
18
Cash register characteristics
P-mode
PLU
The „P“ mode is used for programming all values and functions of the cash register.
MAIN MENU
T-mode
Training mode has all the functions of the „R“ mode (except deposits and withdrawals). The cash register
records for training mode the number of documents created and their turnover from the last performed daily
Z-report. Receipts printed out in this regime are labeled with the text “Training“..
Standby
„Standby”. The cash register goes into power-saving mode when a determined time limit passes without any
activity. In power-saving mode the cash register has low energy consumption. The text „Standby“ appears
on the display. All buttons, aside from the (ON/OFF) button are non-functional in this mode. The power-
saving mode is ended by pressing the (ON/OFF) key.
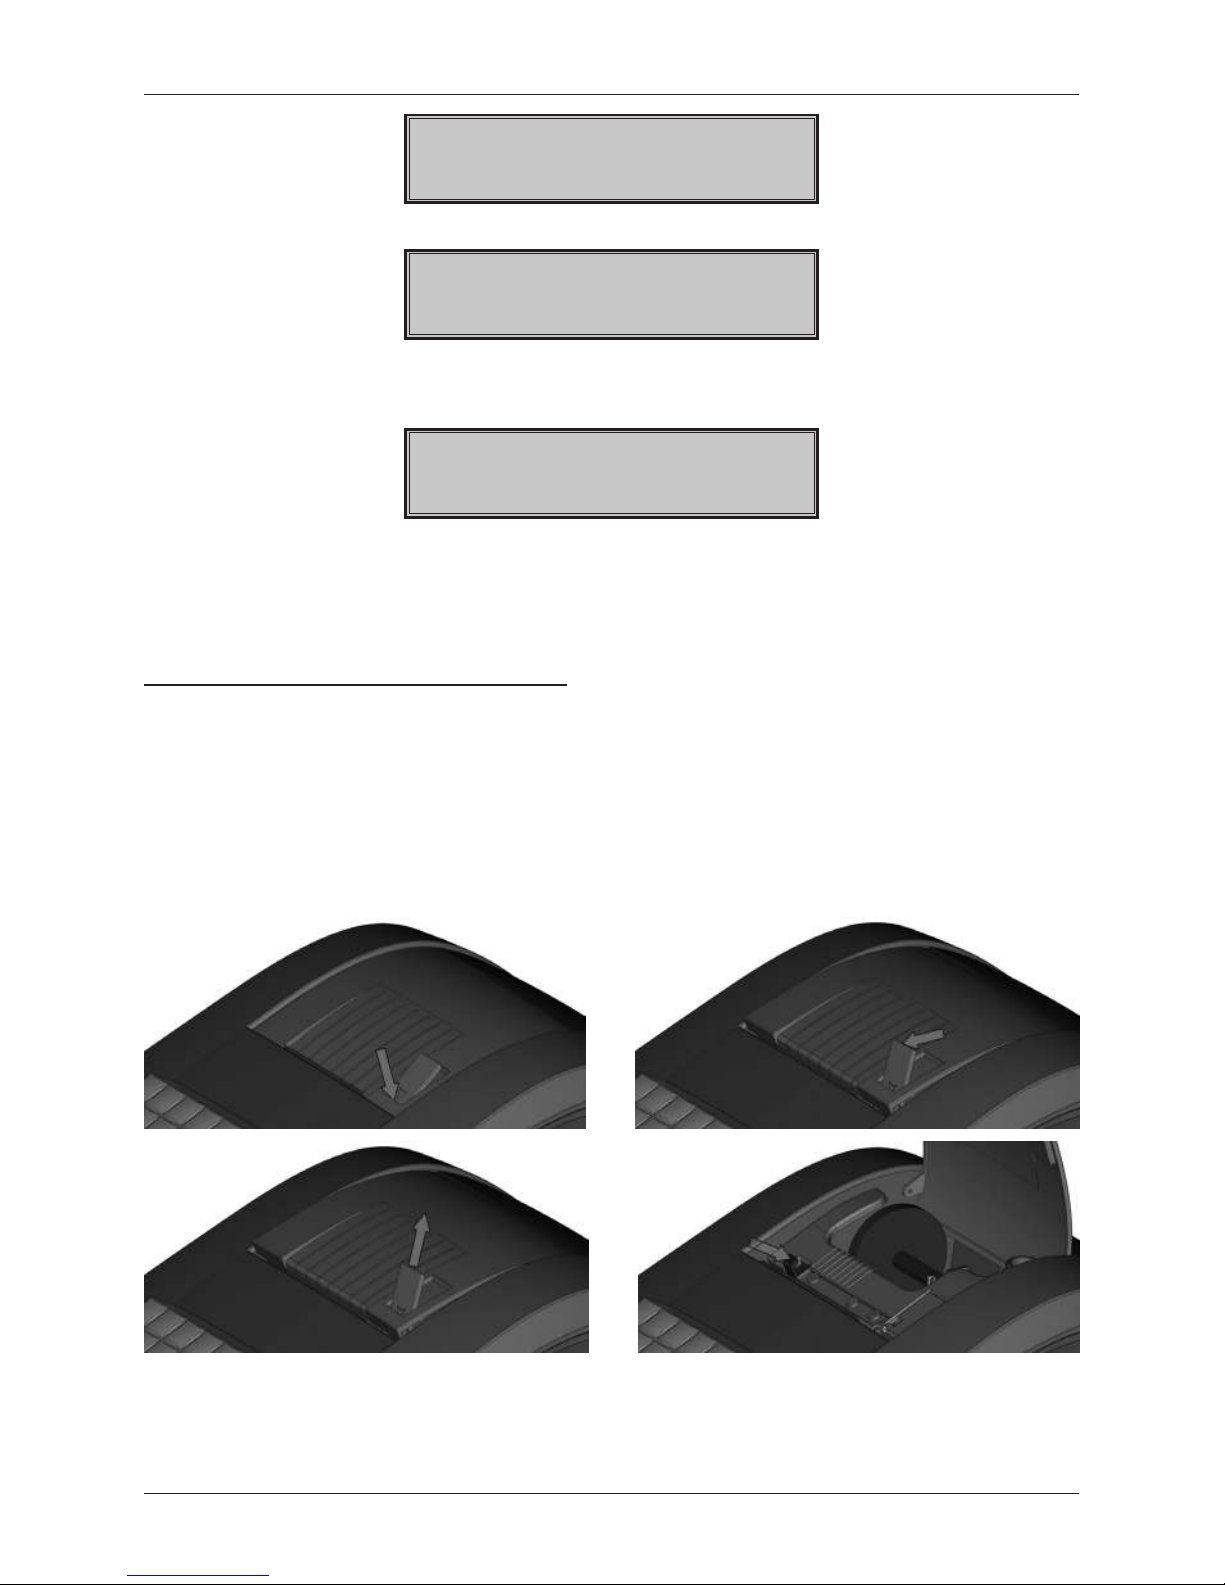
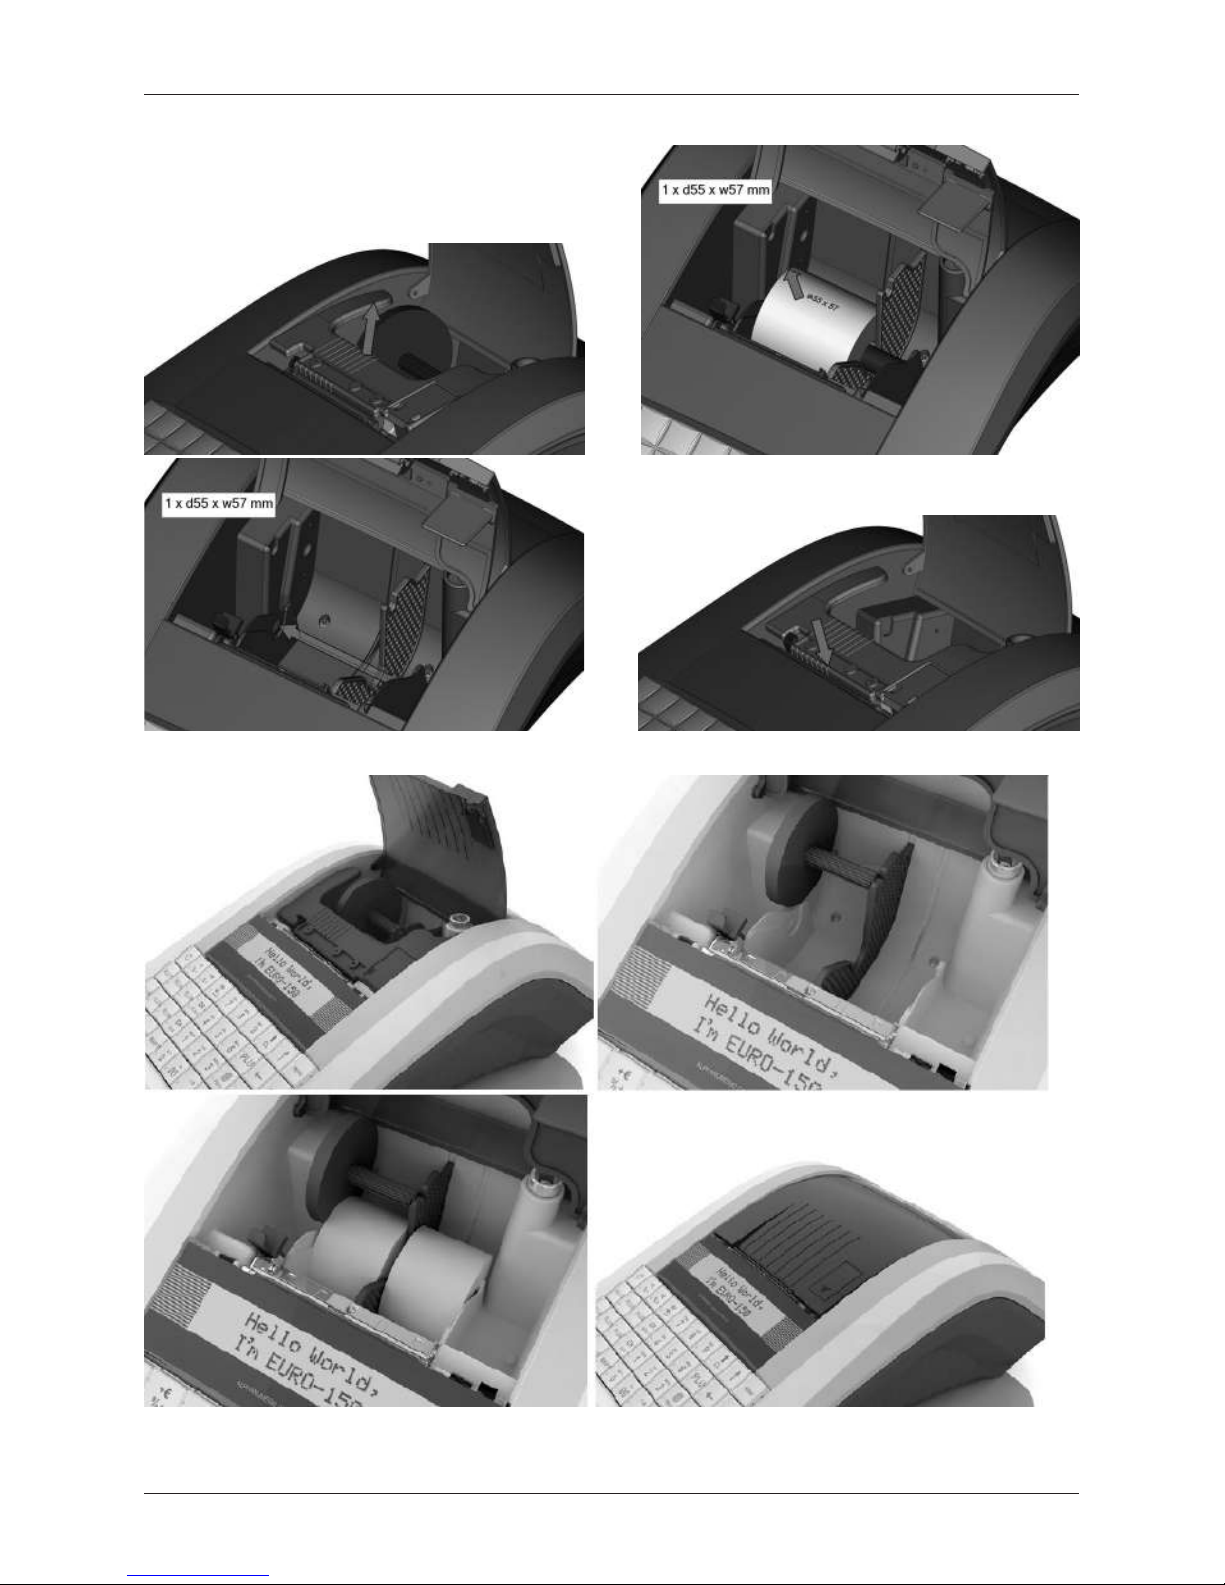
PAPER RIBBONS INSTALLATION
The Euro-150TE Flexy cash register uses one thermal paper ribbon whose width is 57 mm. The Euro-150TX
Flexy cash register uses two thermal paper ribbons whose width is 38 mm The ribbon serves for the printing
of customer receipt. The cash register keeps the control receipt in electronic form. for Euro-150TE Flexy
version and for Euro-150TX Flexy cash register keeps the control receipt in paper form
We recommend using only rolls of good quality paper with a maximum diameter of 55 mm. To ensure proper
cash register operation, it is important to be sure that the print is sufficiently saturated. If any problems occur,
contact your local authorized Euro-150TE/TX Flexy dealer.
Figure 2.4 – Installation of paper ribbon into the Euro-150TE/TX Flexy
Page 19
19
Cash register characteristics
Figure 2.4.1 Euro-150TE Flexy
Figure 2.4.2 Euro-150TX Flexy
Page 20
20
Cash register characteristics
Usage and storage of paper ribbons
Conditions for the proper storage of thermal paper rolls supplied by Elcom, with which the producer guarantees the
consistency of the printer output for at least 5 years and special ribbons of the type TC for minimally 12 years:
• room temperature of 18 to 25°C,
• relative air humidity of. 40 to 60% max,
• keep away from direct sunlight.
Among impacts limiting the consistency of the printer are:
• long exposure to temperatures over 40 °C,
• being kept in a damp or humid environment,
• contact with softening materials (stored in PVC folio), with solvents, mollifiers, glues, with carbon and self-
adhesive paper, direct sunlight.
When taping a report into an accounts book, only press tape at the end of the paper ribbon in order not to damage
the printed data. If proper storage conditions are not maintained or non-quality journal paper is used, Elcom cannot
guarantee the quality of printing.
If the red color stripe marking the ribbon end appears, change the paper ribbon immediately. Delay in changing
the paper roll can damage the printer or possibly shorten its lifespan.
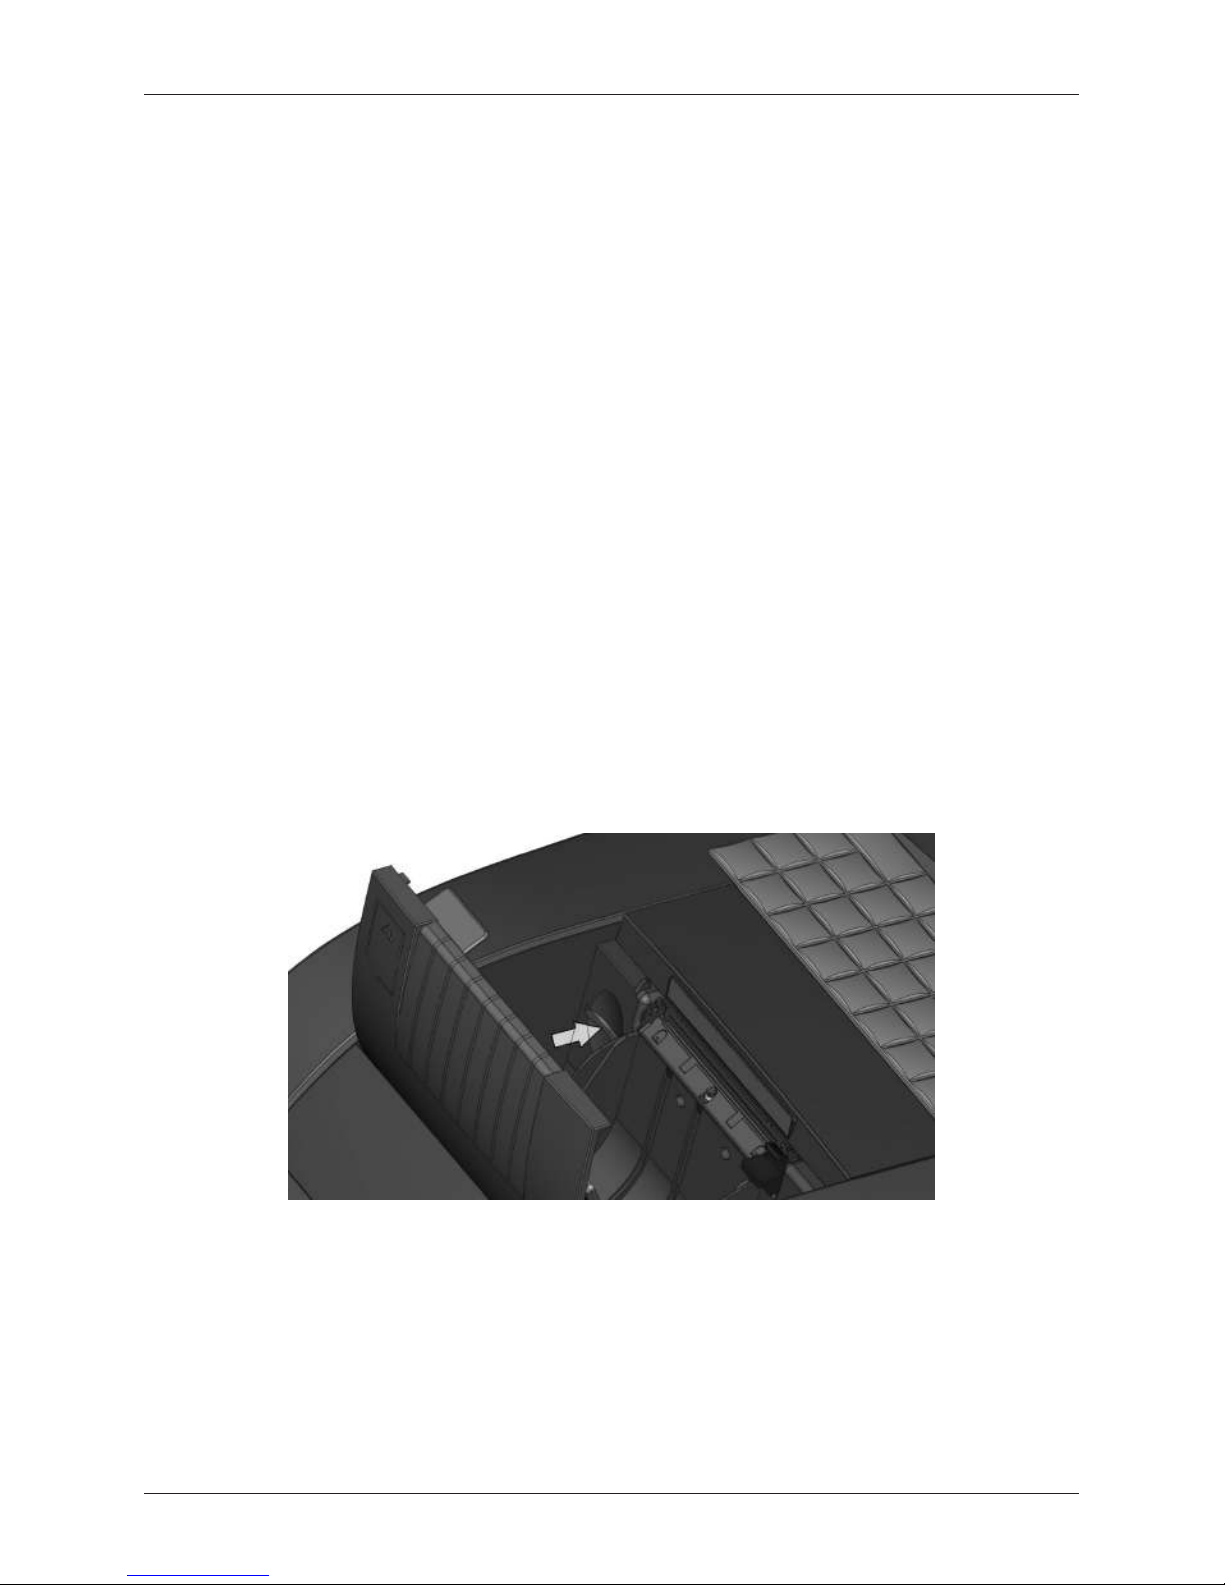
USING A MEMORY CARD
The slot for the memory card is located in the space for the cash register ribbon spool (see Fig. 2.8). For
access to the memory card it is necessary to open the printer cover and lift the printer head. The Euro-150TE/
TX Flexy cash register supports work with memory cards of the SD type (up to a capacity of 2 GB) and SDHC
(the Elcom company does not guarantee functionality of the cash register with cards of the micro and mini
SD type). At present it is possible to use the memory card for the export and import PLU databases, DPT,
cashiers, text and graphic logos and storage of electronic journals (see the chapter „Export and Import“).
-Turn on the cash register Euro-150TE/TX Flexy to Mass Storage. Power off to exit.
Figure 2.5 – Installing an SD card into the cash register
Setting the contrast of the display
With different intensities of the surrounding lighting, it is possible to set the contrast of the characters depicted
on the display for the cash register operator.
The contrast can be set in all cash register modes by pressing the key (SHIFT) and by pressing the arrow
key or increasing the contrast or decreasing the contrast. The value set for the contrast is automatically stored and will be used even after switching off and then switching on the cash register.
Page 21

PROGRAMMING
THE CASH REGISTER
Page 22

22
PROGRAMMING THE CASH REGISTER
* from the main menu after selecting R-mode you will go directly to ”Sale“; you can get to the registration mode
menu (Sale / Cash In / Cash/Check Out / Refund) by pressing the key (MENU) in R or T mode
MENU MAP
MAIN MENU
R-mode *
X-mode
Price cong
P-mode
Scale
Payment terminal
Scanner
External display
PC
PLU
DPT
Tax group
Header text
Trailer text
Measure unit
Surcharge/Disc.
Currency
Price tax param.
Graphic logo
Prog. Keys
Journal
Cashier
Functional text
Advertis. text
Ext. devices
Service
System params
Settings
Date and time
Tests
Initialization
Software version
Export
Import
Z-mode
Cash total set.
Tax setting
Financ. report
Flash report
Cashier report
DPT report
PLU report Interval (from - to)
Stock report
Drawer report
T-mode
Daily
Monthly
Sale
Refund
Standby time
Backlighting
POS ID
Sale
Cash In
Cash/Check out
Refund
Financial report
Cashier report
DPT report
PLU report
Drawer report
Combine report
Interval (from - to)
Daily
Monthly
Daily
Monthly
Execution
Conguration
Daily
Monthly
Daily
Monthly
Daily
Monthly
Daily
Monthly
EAN Searching
PLU/Journal
Prog. Keys
All
Print Journal
Export to SD
Erase Journal
Journal info
Settings
Page 23
23
PROGRAMMING THE CASH REGISTER
INITIALIZATION
If you are launching the cash register into operation for the first time, it is useful to initialize it. Initialization of
the cash register clears all programmed data and their meters for product items, departments, sales units,
surcharges and discounts. All other settings and register counters are preserved. You can select to initiate
programmable keys only.
Procedure for initialization
Sequence of steps Display
Turn the cash register on and using the buttons (MENU),
TOTAL
and or enter into the initialization menu (Main menu – P-mode
– System params – Initialization)
System params
Initialization
Select what you want to initiate with keys or
Programmable keys
or All settings.
Initialization
Prog. Keys
Initialization
All
Press TOTAL nd then confirm the initialization by pressing the
SUBTOTAL key.
Continue?
yes=ST, no=any
The cash register begins initialization and „Clearing...” appears on the
display. After successful completion of initialization the display reads:
Store init. OK
Procedure of programming size of memory for PLU and Journal
Sequence of steps Display
Turn on the cash register and using the buttons (MENU),
TOTAL
and or enter into the menu (Main menu – P-mode – System
params – PLU/Journal). Please save all PLU and journal before changing
the size of memory for PLU and Journal.
Change of value
deletes PLU&JRN!
Set the number of PLU. Interval is 10 - 2790 and press TOTAL
PLU Count
2000
Information about capacity for journal. Press buttons (MENU),
Journal Capacity
906kB/580
Press the SUBTOTAL key to confirmation and press any button for
canceling.
Save change?
yes=ST, no=any
The cash register begins initialization and „Clearing...” appears on the
display. After successful completion of initialization the display reads:
System params
PLU/Journal
GENERAL PROCEDURE WHEN PROGRAMMING IN “P”-MODE
Before you start programming the cash register, we recommend that you read this chapter at least one time
through!
Note:
If a button has two functions, the function in the lower part of the button is selected by directly pushing the button;
in order to select the upper function, it is necessary to first press the (SHIFT) button.
Page 24

24
PROGRAMMING THE CASH REGISTER
Basic rules for navigating in a menu
1) Switch the cash register into the Main Menu by pressing the key and then use the arrow keys or
to navigate to the P-mode menu,
MAIN MENU
P-mode
confirm your choice by pressing the TOTAL key. The display appears as follows:
P-mode
PLU
2) By pressing the arrow keys or you can navigate through the individual lines of the programming
mode, which are described in more detail in the following chapter.
3) Press the TOTAL key to enter into the selected item menu, or to confirm (save) a programmed
value. Continue in this way until you have programmed all of the necessary parameters. Or press the
(MENU) key to switch to a menu one level higher (back)..
4) After selection of a specific parameter, a value is set either by manually entering a numerical value
(price, EAN,...), entering text on the keyboard (names of PLU, DPT, sales units,...) or by pressing the ar-
row keys or . After setting a correct value, confirm it by pressing the TOTAL button; the newly
programmed parameters is then printed out.
5) Should you make a mistake when entering a numerical value or text, you can remove the incorrectly
entered character by pressing the CLEAR key.
6) If there is no necessity to change (save) a given parameter, it is possible to pass to another item using
the arrow keys or or to leave the given menu by pressing the (MENU) key.
7) Complete the programming by pressing the (MENU) key.
TIP: Press
or
to switch between equal parameters for individual items. For example, when
programming the name of the first product item, after pressing
you automatically switch to programming
the name of the second product item.
Printing of programmed values
Print a value for a specific programmed parameter by pressing the (EAN) key; print all parameters in a given
item by pressing SCALE , and use the VOID key to print out all active items in the given menu.
Revision of programmed values
1) In order to change the setting of any parameter, switch the cash register into P-mode and find the relevant parameter in the menu.
2) Enter the new value and confirm by pressing the TOTAL key.
Note:
Proceed according to the chapter “Basic rules for navigating in a menu”.
Warning:
Some parameters can be changed only after meeting the requirement for a change (for example a daily, monthly
Z report, an exchange rate setting,...); conditions for a change will be presented along with the specific parameters.
Page 25
25
PROGRAMMING THE CASH REGISTER
Editing text in EditMode
EditMode is a function for editing and adding new text. It is started with a text item immediately after entering
new text, which deletes the original content or by pressing , with which the original text remains and which
can then be altered.
The following keys are used to switch on EditMode:
- Entry/Exit from EditMode. Switching on Edit Mode is indicated by a blinking „ “
- shift the cursor to the left,
- shift the cursor to the right,
- shift the cursor to the start of the text,
- shift the cursor to the end of the text,
- switching on/switching off the inserting or replacement of text (InsertMode). The mode for inserting
text is indicated by the symbol „ _“,
- switching on/switching off typing in of numbers (NumLock),
- deletion of a whole line.
* the cursor is displayed at the end of the line marking the current position where text will be added or
changed.
Recommended procedure when programming the cash register
We recommend that when programming individual functions of the cash register that a user do so in the
following order:
1) price and tax parameters
2) currencies (if you accept payment in a foreign currency)
3) taxation levels
4) receipt logo
5) departments
6) sales units
7) product items
8) surcharges and discounts
9) system parameters - Date and time
10) peripherals (if applicable)
Table 3.1 - Structure of the menu in P-mode
Mode ABBR.* Menu name Menu description
P-mode 1 PLU Menu for programming of PLUs
2 DPT Programming the name of a DPT
3 Cashier Programming cashier parameters
4 Tax group Menu for programming rates and types of taxes
5 Header text
In this menu you program the logo with data about your company
6 Trailer text In this menu you program the logo with advertising information
7 Functional text Change of functional text
8 Advertis. text Programming of texts depicted on the external display
9 Measure unit Possibility of programming sales units
- Surcharge/Disc. Programming values and limits for surcharges and discounts
- Currency Settings for primary and secondary currencies
Page 26
26
PROGRAMMING THE CASH REGISTER
- Price tax param. Setting parameters for prices and taxes
- Graphic logo Setting for switching off/on printer
- Prog. Keys Programming of keys
- Journal Possibilities of a text and binary journal together
- System params
Menu for system settings for the cash register, Changeover to
the euro
- Ext. devices Setting for peripherals (scanner, scale, payment terminal, PC)
- Service Service functions
* abbreviations are used for faster navigation in the menu
Example: if you are in P-mode and press, for example, the number 5, you‘ll jump to the menu for program-
ming the text logo
PRICE AND TAX PARAMETERS
Note:
Prior to programming, read the „General procedure when programming in P mode“, which is located at the beginning of the chapter „Programming the cash register“.
P-mode
Price tax param.
Table 3.2 –Parameters for prices and taxes - move through the menu using the arrow keys or
Menu ABBR.* Sub-menu name Sub-menu description
Price and tax
parameters
1 Price config Basic settings for prices
2 Cash total set. Basic settings for cash
3 Tax setting Basic settings for taxes
* abbreviations are used for rapid navigation in the menu
These parameters are data which have a primary impact on the proper functioning of the entire cash register
(number of decimal places, rounding off, etc.). Settings for all parameters, in accordance with applicable law,
are created after launching the cash register into operation.
Overview of individual price and tax parameters
Settings for prices
Price tax param.
Price config
The table provides an overview of individual parameters for setting prices, including the range of possible
values, basic settings and a brief description.
Page 27
27
PROGRAMMING THE CASH REGISTER
Table 3.3 – Settings for prices – move through the menu using the arrow keys or
Name of parameter Default settings Range Description
Unit price scale * 2 0-3
Setting the number of unit price decimal
places
Price round type * up from 5
down, up, up from 5,
quarter, eighth
Method of rounding prices
Price round plac * 2 0-2 Position of rounding prices
* method of editing – use the arrow keys or
Settings for cash
The table provides an overview of individual parameters for setting cash showing the range of possible
values, default settings and a brief description
Table 3.4 – Settings for cash –move through the menu using the arrow keys or
Name of parameter Default settings Range Description
Nat.curr.-round* up from 5
down, up, up from 5,
quarter, eighth
Method of rounding cash in the primary
currency
Nar.curr.-place* 2 0-2
Parameter for position of rounding in the
primary currency
For.curr.-round* up from 5
down, up, up from 5,
quarter, eighth
Method of rounding cash in the second-
ary currency
For.curr.-place* 2 0-2
Parameter for position of rounding in the
secondary currency
* method of editing – use arrow keys or
Settings for taxes
The table provides an overview of individual parameters for the settings for taxes showing the range of possible values, default settings and a brief description.
Table 3.5 – Settings for tax levels – move through the menu using the arrow keys or
Parameter name Default settings Range Description
Round type * up from 5
down, up, up from 5,
quarter, eighth
Method of rounding taxes in the primary
currency
Round place * 2 0-2
Position where taxes should be rounded
Print taxes * yes no
Print taxes on receipt, for non-payers of tax,
set to “no”
* method of editing – use arrow keys or
CURRENCIES
Note:
Prior to programming read as soon as possible the section „General procedure when programming in P-mode“,
which is found at the start of the chapter „Programming the cash register“.
P-mode
Currency
Page 28

28
PROGRAMMING THE CASH REGISTER
The cash register allows you to accept payment in cash in a foreign currency as well. For this purpose there
is a menu for setting currencies which contains the following parameters:
Table 3.6 – Currencies – move through the menu using the arrow keys or
Parameter name Default setting Range Description
Nat.curr.-Name GBP 3 characters Programming the name of the primary currency
Nat.curr.-scale * 2 0-2 Number of decimal places - primary currency
For.curr.-Name EUR 3 characters
Programming the name of the secondary cur-
rency
Rate MC = ? FC 1.144600 Exchange rate for secondary currency
For.curr.-scale * 2 0-2 Number of decimal places - secondary currency
* method of editing – use arrow keys or
Note:
Some parameters can be programmed only after fulfilling certain conditions. For example, performing a daily
Z-report (a change in the exchange rate of the secondary currency).
TAXATION LEVELS
Note:
Prior to programming read as soon as possible the section „General procedure when programming in P-mode“,
which is found at the start of the chapter „Programming the cash register“.
P-mode
Tax group
The cash register allows you to work with up to 7 levels of taxes (VAT). Taxation rates just be programmed
in accordance with the valid legislation.
Note:
For a change in taxation it is necessary to perform a daily Z and a monthly Z report. See the chapter „Reports“.
Table 3.7 - parameters for programming taxation rates
Parameter Default setting Range Description
TAX-rate
VAT1 = 20%, VAT2 = 10%, VAT3=0%;
VAT4 =0%; VAT5 = 100%; VAT6 = 100%;
VAT7 = 0%
0-100% Setting of a taxation rate
TAX-type*
VAT1 – VAT, VAT2 – VAT, VAT3- VAT,
VAT4 – Tax free, VAT5 – VAT, VAT6 –
VAT, VAT7 – VAT
VAT, Tax free,
Invoice
Type of tax, characterizes, whether
it involves a VAT, a non-taxable
level or payment by invoice
* method of editing – use arrow keys or
Note:
Tax level set to a value of 100% is inactive. A PLU assigned to an inactive taxation level cannot be registered.
Changed values become valid upon completion of tax programming and after confirmation and storage of them
by the cashier,
Page 29

29
PROGRAMMING THE CASH REGISTER
HEADER TEXT
Note:
Prior to programming, read the „General procedure when programming in P mode“, which is located at the
beginning of the chapter „Programming the cash register“.
P-mode
Header text
The cash register allows for the printing a company logo up to 9-lines at the top of the receipt (e.g.: “Chestnut
Grocers, Thank You”, etc.) Each line enables the printing of 42 characters of normal width or 21 double-width
characters. For Euro-150TX Flexy it is 28 characters of normal width or 14 double-width characters. Enter a
double-width character by pressing
. before the character. The character ”~“ will appear on the display,
indicating that the following character will be double-width.
1. header line
~E ~L ~C ~O ~
M
To navigate between individual lines of a text logo, use the arrow keys or . For confirmation (storing)
of a change in content of a logo line, press the key TOTAL, or leave programming of a logo, press the
key MENU.
The cash register only prints lines of a text logo which contain a character (a space is also considered as a
character). Lines left empty will not be printed. Delete a line by pressing the key PERCENTAGE SALE.
Programming ID/VAT ID and Unique No.
The 10th and 11th lines of a text logo are reserved for programming in ID/VAT ID and Unique No. For launching
a cash register into operation, it is necessary to program in this information; e.g. VAT ID: SK123456789
TRAILER LOGO
Note:
Prior to programming, read the „General procedure when programming in P mode“, which is located at the
beginning of the chapter „Programming the cash register“.
P-mode
Trailer text
The cash register allows for the printing a company logo up to 9-lines of text at the end of the receipt (e.g.:
“Thank You”, opening hours, etc.). Each line enables the printing of 42 characters of normal width or 21
double-width characters for Euro-150TE Flexy cash register. For Euro-150TX Flexy it is 28 characters of normal
width or 14 double-width characters. Enter a double-width character by pressing
. before the character.
The character ”~“ will appear on the display, indicating that the following character will be double-width.
1.trailer line
* * * * * * * * * * * * * * * * * * *
To navigate between individual lines of a text logo, use the arrow keys or . For confirmation (storing)
of a change in content of a logo line, press the key TOTAL; to leave programming of a logo, press the
key MENU.
Page 30

30
PROGRAMMING THE CASH REGISTER
The cash register only prints lines of a text logo which contain characters (a space is also considered as a
character). Lines left empty will not be printed. Delete a line by pressing the key PERCENTAGE SALE.
GRAPHIC LOGO
Programming of a graphic logo in the cash register can be done with the use of communication software
accessible at www.elcom.eu or using the function Import from an SD card.
or with help of the Import function from SD card.
Print logo:
no
* method of editing – use arrow keys or
Graphic logo parameters:
• bmp format
• bit depth 1bit (black and white, without shading)
• maximum logo size for Euro-150TE Flexy is 360 x 240 dots and for Euro-150TX Flexy is 240 x 240
dots (with a lower resolution graphic logo the maximum size is not filled in)
Printing of a graphic logo can be switched off by pressing the key in the menu for the graphic logo,
subsequently it is necessary to confirm the setting by pressing TOTAL. If printing a graphic logo is set
on ”yes“ and the logo has not been programmed in, no graphic logo will be printed on the receipt.
PROGRAMMING CASHIERS
Note:
Prior to programming, read the „General procedure when programming in P mode“, which is located at the beginning of the chapter „Programming the cash register“.
P-mode
Cashier
The cash register allows the recording of financial operations for ten independent cash registers. Programming
of cash registers is made up of nine programmable types of data:
Table 3.8 - parameters for programming of cashiers
Cashier
Name
Cashier
password
Cash.
X mode
Cash.
Z mode
Cash.
P mode
Cash.
T mode
Cash. R:
Return
Cash. R:
Void.
Cash. R:
%+/-
10
characters4 characters
yes yes yes yes yes yes yes
no no no no no no no
Programming of passwords for cashiers enables a unique password to be created for each cashier, who can
then use it to log into the cash register and thus use the individual functions of the register. After logging in
of a specific cashier, a receipt will be printed out with the cashier’s name and all operations then performed
will be recorded under that name.
Note:
If the name of the current cashier is changed, it is necessary to perform a logging out and repeat the log in so
that the change will be reflected on the receipts.
Page 31

31
PROGRAMMING THE CASH REGISTER
DEPARTMENTS
Note:
Prior to programming, read the „General procedure when programming in P mode“, which is located at the beginning of the chapter „Programming the cash register“.
P-mode
DPT
The Euro-150TE/TX Flexy cash register allows you to program up to 20 different departments (To see what
constitutes a department and for an example, look in the introduction of this manual in the chapter „Basic
Definitions“). For Euro-150TE Flexy a department can only be programmed with a name up to 42 characters
or 21 double-sized characters in length. For Euro-150TX Flexy a department can only be programmed with
a name up to 28 characters or 14 double-sized characters in length.
1) Press the TOTAL key to enter into the selected item menu, or to confirm (save) a programmed
value. Continue in this way until you have programmed all of the necessary parameters. Or press the
(MENU) key to switch to a menu one level higher (back)..
2) After selection of a specific parameter, a value is set either by manually entering a numerical value
(Price), entering text on the keyboard (Name) or by pressing arrow keys or (TaxRate). After
setting a correct value, confirm it by pressing the TOTAL button; the newly programmed parameters
is then printed out.
5) Should you make a mistake when entering a numerical value or text, you can remove the incorrectly
entered character by pressing the CLEAR key.
6) If there is no necessity to change (save) a given parameter, it is possible to pass to another item using
the arrow keys or or to leave the given menu by pressing the (MENU) key.
7) Complete the programming by pressing the (MENU) key.
TIP: Press
or
to switch between equal parameters for individual items. For example, when
programming the name of the first product item, after pressing
you automatically switch to programming
the name of the second product item.
Jumping to a specific product DPTs
If we want to change a parameter, for example, for the 9th DPT, this can be done as follows:
Sequence of steps Display
Set the cash register to the P-mode for programming DPT; the setting
of a price for the first product item is displayed:
0001.DPT-Name
DPT01
Enter the DPT9 button wish you want to jump to and jump to the
0001.DPT-Price
25.00
Cash register jumps to the programmed price for the DPT no. 09
0009.DPT-Price
0.00
Printing of programmed values
Print a value for a specific programmed parameter by pressing the (EAN) key; print all parameters in a given
item by pressing SCALE , and use the VOID key to print out all active items in the given menu.
Page 32

32
PROGRAMMING THE CASH REGISTER
Revision of programmed values
1) In order to change the setting of any parameter, switch the cash register into P-mode and find the
relevant parameter in the menu.
2) Enter the new value and confirm by pressing the TOTAL key.
Table 3.9-1 – parameters for programming product items
Parameter Default settings Range Description
DPT-Name DPT01
Euro-150TE Flexy: max. 42 char.
Euro-150TX Flexy: max. 28 char.
Name of the product
DPT-Price 0,00
max. 8 digits
Price of the product
DPT-TaxRate * 0.00% (A) Assign to a tax level
* method of editing – use arrow keys or
MEASURE UNITS
Note:
Prior to programming, read the „General procedure when programming in P mode“, which is located at the beginning of the chapter „Programming the cash register“.
P-mode
Measure unit
For each PLU it is possible to assign a sales unit which characterizes the specific product. It is possible to
program 8 measure units to a maximum of 3 characters for each.
Table 3.9 - basic pre-programmed measure units
Unit, number Description Unit, number Description
1 5 m
2 pcs 6 m2
3 kg 7 btl
4 l 8 pkg
FUNCTIONAL TEXTS
In this part it is possible to change the description “REFERENCE NUMBER“ displayed upon entering a reference
number. After entering the setting, confirm by pressing TOTAL. Upon deletion of the text an empty line is
printed. The text can be programmed with 42 characters or 21 double-sized characters for Euro-150TE Flexy
and for Euro-150TX Flexy the text can be programmed with 28 characters or 14 double-sized characters.
P-mode
Functional text
PRODUCT ITEMS - PLU
Note:
Page 33

33
PROGRAMMING THE CASH REGISTER
Prior to programming, read the „General procedure when programming in P mode“, which is located at the
beginning of the chapter „Programming the cash register“.
P-mode
PLU
The Euro-150TE/TX Flexy cash register offers the opportunity to program up to 2790 PLUs.. For each product
item it is possible to program the following:
Table 3.10 – parameters for programming product items
Parameter Default settings Range Description
PLU-Price 0.00 max. 8 digits Programmed price of the product
PLU-Name
Euro-150TE Flexy:
max. 42 characters
Euro-150TX Flexy:
max. 28 characters
Name of the product
PLU-Barcode*
0000000000000
max. 18 digits Item barcode number
PLU-Flags** 0101010000100 Attribute of the item
PLU-TaxRate*** 20.00% (A) Assign to a tax level
PLU-DPT*** DPT01 Assign to a department
PLU-unit*** Assign to a measure unit
PLU-linkPLU**** 0000 0-2000 PLU number which is linked
PLU-otPrice*** yes yes, no
Possibility for entering another price other than
programmed
PLU-descr.*** no yes, no
Attribute if a descriptive item is involved. In this
case print out a name PLU but sale doesn't
impact financial count.
PLU-ret. con.*** no yes, no
Attribute for assigning item to a category of
returnable packaging (bottle, crate, barrel,...).
PLU-stock 0.000 max. 2 147 483.647 State of inventory for given item
* a barcode can be entered manually or using a barcode scanner
** to program the attributes of product items, press the key TOTAL, or enter the attribute manually
for the given PLU and confirm the change with the TOTAL key. When you want to switch out of
the programming attributes, press the key
*** method of editing – use arrow keys or
**** if a PLU is linked to another product, upon sale of the given PLU the linked product item is
automatically registered. This can be used with different activities, in the case of a refundable
package (bottle, crate, …).e.g. the purchase of PLU 1 (mineral water) and along with it charging PLU
1 500 (bottle). Upon setting a value of 0, no PLU is linked to the linked product. It is not possible
to link a PLU to itself!
Note:
A product item without a name or assigned to an inactive taxation level is inactive (it cannot be registered).
TIP:
By pressing
or
you can shift between equal parameters for individual items. For example, when
programming the name of the first product item, after pressing
you are automatically shifted to programming
the name of the next product item. When programming prices of items the buttons PRICE function in a similar
Page 34

34
PROGRAMMING THE CASH REGISTER
way, that is, when programming the price for the first product, press the PRICE key and you‘ll automatically
shift to programming the price of the second item.
Jumping to a specific product item
If we want to change a parameter, for example, for the 25th PLU item, this can be done as follows:
Sequence of steps Display
Set the cash register to the P-mode for programming product items; the
setting of a price for the first product item is displayed:
0001.PLU-price
0.00
Enter the number of the item you wish to jump to; in our case the 25th,
and press the button (PLU)
0001.PLU-price
25.00
Cash register jumps to the programmed price for the PLU no. 25
0025.PLU-price
0.00
SURCHARGES AND DISCOUNTS
Note:
Prior to programming, read the „General procedure when programming in P mode“, which is located at the beginning of the chapter „Programming the cash register“.
P-mode
Surcharge/Disc.
Table 3.11 – parameters for programming surcharges and discounts
Parameter name Default setting Range Description
1.Surcharge rate 0.00 0.00-100% Programmed value of percent surcharge
2.Surch. limit 0.00 0.00-100% Limit for manual entry of surcharge during sale
3.Discount rate 0.00 0.00-100% Programmed value of percent discount
4.Discount limit 0.00 0.00-100% Limit for manual entry of discount during sale
The parameters “Surcharge limit” and „Discount limit“ also determine the possibility of using a value surcharge,
or discount respectively. This means that if you want to forbid the use of value surcharges/discounts, it is
necessary to set the limit of percentage surcharge/discount to value 0.
SYSTEM PARAMETERS
Note:
Prior to programming, read the „General procedure when programming in P mode“, which is located at the
beginning of the chapter „Programming the cash register“.
P-mode
System params
Page 35

35
PROGRAMMING THE CASH REGISTER
Tabu¾ka 3.12 – System parameters - navigate through the menu using the keys or
Menu ABBR.*
Name of
sub-menu
Description of sub-menu
System
params 1 Settings
Setting the time for transfer to power-saving mode (0-60 min), setting
the backlight of the display (Automatic shut-off, Switch off/on), and
setting of number of cash register (01-99), EAN searching
2 PLU/Journal ** Programming number of PLU
3 Date and time Programming the date and time
4 Tests Basic cash register tests
5 Initialization ***
Clears all programmed data and returns register to default settings
6
Software
version
Cash register displays actual version of software in the register. Press
(EAN) to print out the version number.
7 Export Export PLUs (all programmed data) to a memory card
8 Import
Imports PLUs from a memory card
• ADVERTXT.EDF - advertisement texts
• DPT.EDF – departments
• FUNCTEXT.EDF - functional texts
• LOGO.BMP – graphic logo
• MEASUNIT.EDF – sales units
• OPERATOR.EDF – cashiers
• PLU.EDF – product items
• SURDISC.EDF – surcharges and discounts
• TAXGROUP.EDF – tax levels
• TEXTLOGO.EDF – upper text logo
• TRAILLOG.EDF - lower text logo)
* abbreviations are used for rapid navigation in the menu
** operation deletes PLU and Journal
*** more information in the chapter „Initialization“.
Exporting and Importing of data
Exporting of data
The „Export“ function serves for the storing of data from the cash register to an SD memory card. This function
can be used for the backing up of product items (PLU), departments (DPT), measure units, surcharges and
discounts, tax levels, a text logo (header and trailer), cashiers, a graphic logo, or in the case of a software
upgrade, for backing up and subsequently renewing data. Thus it is possible to store the electronic journal
on a memory card.
System params
Export
You can, if you wish, backup only selected individual parts (PLU, DPT, Measure units, Surcharges and
discounts, Taxation levels, Text logos, cashiers, graphic logo) or export all at the same time.
Export
PLU
Export
All
Page 36

36
PROGRAMMING THE CASH REGISTER
When the export of PLUs is successful, the following files are created: “DPT.EDF, LOGO.BMP, MEASUNIT”. EDF,
OPERATOR.EDF, PLU.EDF, SURDISC.EDF, TAXGROUP.EDF, TEXTLOGO.EDF, TRAILLOG.EDF”. Files belong
to the project, which can be edited in the software program available for download from our Web site, www.
elcom.eu. After saving changes to the project, you can then import the data back to the cash register.
When you choose the option Export-All, the following files are created on the memory card:
• ADVERTXT.EDF - advertisement texts
• DPT.EDF – departments
• FUNCTEXT.EDF - functional texts
• LOGO.BMP – graphic logo
• MEASUNIT.EDF – sales units
• OPERATOR.EDF – cashiers
• PLU.EDF – product items
• SURDISC.EDF – surcharges and discounts
• TAXGROUP.EDF – tax levels
• TEXTLOGO.EDF – upper text logo
• TRAILLOG.EDF - lower text logo
Warning:
If data from the cash register has been previously stored to a memory card, further exporting will cause it to be
overwritten and irrevocably lost.
Importing of data
The „Import“ function serves for the storing of data from an SD memory card into the cash register memory.
This function can be used for the backing up of product items (PLU), departments (DPT), measure units,
surcharges and discounts, tax levels, a text logo (header and trailer), cashiers, a graphic logo..
System params
Import
Import
PLU
For the successful importing of data the following files must be on the memory card “DPT.EDF”, “LOGO.
BMP”, “MEASUNIT. EDF”, “OPERATOR.EDF”, “PLU.EDF”, “SURDISC.EDF”, “TAXGROUP.EDF”, “TEXTLOGO.
EDF, TRAILLOG.EDF”, which was created by export from the cash register or with the help of the program
for editing cash register data, which is available for download at www.elcom.eu.
Warning:
• When importing, all data stored in the cash register will be overwritten with data from the SD memory
card and will be irrevocably lost.
• During an export or import of cash register data, do not turn off the register and do not open the
printer cover!
• For proper functioning of import the name of the file containing data is definitive and must be in the
form listed above.
Page 37

37
PROGRAMMING THE CASH REGISTER
PERIPHERALS
Note:
Prior to programming, read the „General procedure when programming in P mode“, which is located at the
beginning of the chapter „Programming the cash register“.
P-mode
Ext. devices
In this menu you can configure the parameters for peripheral attachments such as a barcode scanner and
electronic scales.
Table 3.13 – Peripherals - navigate through the menu using the keys or
Menu ABBR.*.
Name of sub-menu
Description of sub-menu
Peripherals
1 Scanner
Parameters and communications port for communicating with
a scanner
2 Scale
Parameters and communications port for communicating with
scales
3 Payment terminal
Parameters and communications port for communicating with
a payment terminal
4 External display
Parameters and communications port for communicating with
an external display
5 PC** Allows setting of the port for communication with a PC
* abbreviations are used for rapid navigation in the menu
** if communication with a PC is not used, we recommend setting the port as none, in order to improve
performance when working on the battery.
Table 3.14 - parameters for programming a scanner
Parameter Default setting Range Description
Terminative char* Scanner CRLF
Scanner CRLF,
Scanner CR,
Scanner LF
Terminal code for barcode scanner
Com. port* None
none, Port 1, Port 2,
Port 3
Communication port for barcode scanner
* method of editing – use the arrow keys or
Table 3.15 - parameters for programming a scale
Parameter Default settings Range Description
Scale type * Morcan, MARTES T
Morcan, MARTES T,
Euro, MARTES M,
Macca K,
DIBAL,
Motex R,
Mettler Toledo,
ACOM,
CAS Morcan TP2
Communication protocol for electronic
scales
Com. port * none
none, Port 1, Port 2,
Port 3
Communication port for an electronic
scale
Page 38

38
PROGRAMMING THE CASH REGISTER
* method of editing – use the arrow keys or
Table 3.16 - parameters for programming a payment terminal
Parameter Default settings Rozsah Description
Paym. term. type* Bull SK
Dionica SK SLSP,
Bull SK,
Firstdata l5100
Communication protocol for a payment terminal
Com. port * none
none, Port 1, Port 2,
Port 3
Communication port for a payment terminal
* method of editing – use the arrow keys or
Table 3.17 - parameters for programming an external display
Parameter Default settings Range Description
Display Type * ED-2500 ED-2500 Type of external display used
Com. port * none
none, Port 1, Port 2,
port 3
Communication port for an external display
* method of editing – use the arrow keys or
Table 3.18 - parameters for programming a PC port
Parameter Default settings Range Description
PC port * USB port USB port, none Communication port for PC
JOURNAL
Text and binary journal*
The control ribbon is preserved in the cash register in the form of an electronic journal. The journal is stored
continuously in the cash register memory. It is possible upon its being filled to export it onto a memory card,
or transfer it via a communication library to a PC and subsequently delete it from the cash register. In order
to simplify work with the electronic journal it is possible to set it for automatic export to a memory card (not
included with the register) upon performing of a daily report.
Table 3.19 – Parameters of the text journal - navigate through the menu using the arrow keys or
Menu ABBR.* Name of sub-menu Description of sub-menu
Journal 1 Print Journal Print texts journal onto a receipt
2 Export to SD
Save the text and binary journal to a memor y
card
3 Erase Journal
Clear the text and binary after previously exporting
or transferring it to PC
4 Journal Info
Displays the free capacity of the journal as a per-
centage
5 Settings
Enables the setting for automatic export of the
journal after performing a Z report
* only for Euro-150TE Flexy
Serves for preservation of structured information about sales. Stored data can then be transferred to a PC
to use for evaluation of different sales statistics.
Page 39

39
PROGRAMMING THE CASH REGISTER
PROGRAMMING THE KEYBOARD
Serves for assigning functions to a selected key. Each key contains two functions. One function will be
available by directly pressing the key and the second will be accessible upon pressing the key together with
the SHIFT key.
Table 3.21 - Programming the keyboard
Menu Description
01. Key Assign function to 1st key
01. Shift + Key
Assign function to 1st key with simultaneous pressing of the SHIFT key
… ...
38. Key Assign function to 38th key
38. Shift + Key Assign function to 38th key with simultaneous pressing of the SHIFT key
Use the arrow keys , to select the keys to be set with the requested function from the list.
Use the arrow keys , to assign the given key a function from the list of all functions available in the
cash register.
Use the TOTAL key to confirm and store the change of function for the given key.
For assigning a specific PLU for a given key enter the PLU number and confirm by pressing TOTAL.
Use the keys to complete programming of the keyboard, and the changes made are subsequently stored
by pressing the key (pressing a key other than will not save the changes).
After storing changes, the cash register, prints out the assigned function for each key.
The cash register has a number of key functions defined as mandatory. This means that those functions must
be assigned to a key, they can not remain unassigned. A list of mandatory cash register functions:
Function Description Function Description
VK_NUMPAD0
VK_NUMPAD00
VK_DECIMAL
VK_NUMPAD1
VK_NUMPAD2
VK_NUMPAD3
VK_NUMPAD4
VK_NUMPAD5
VK_NUMPAD6
VK_NUMPAD7
VK_NUMPAD8
VK_NUMPAD9
VK_MENU
VK_LOGOUT
VK_CLEAR
Number 0
double 0
decimal separator
number 1
number 2
number 3
number 4
number 5
number 6
number 7
number 8
number 9
menu
cashier log out
clear
VK_FEED
VK_UP
VK_CONTRUP
VK_LEFT
VK_PGUP
VK_RIGHT
VK_PGDOWN
VK_DOWN
VK_CONTRDOWN
VK_SUBTOTAL
VK_SHIFT
VK_RETURN
VK_PLU
VK_DRAWER
shift paper ribbon
arrow up
increase display contrast
arrow to the left
shift one page up
arrow to the right
shift one page down
arrow down
reduce display contrast
subtotal
shift
total
PLU
cash drawer opening
Page 40

40
PROGRAMMING THE CASH REGISTER
ADVERTISING TEXTS
Serves for displaying of advertising texts on the external display (display aimed at customer) when no open
purchase being registered, the cash register is not in energy-saving mode and on the cashier display the
current date and time are shown.
Table 3.22 – Advertising texts
Menu
Default set-
ting
Range Description
1.Advert.-Text 40 characters Advertising text appears on first line of display
1.Advert.-Type Time
Advert.text Shows advertising text entered
Date Shows the actual date
Time Shows the actual time
1.Advert.-Lookup Off Static
Method of display for the text type of advertising.
For date and time advertising types, the method
of display is ignored.
Blinking
Rolling
Rol.– 2 lines
Off
2.Advert.-Text
40 characters
Advertising text appears on second line of display
2.Advert.-Type Time Advert.text Shows advertising text entered
Date Shows the actual date
Time Shows the actual time
2.Advert.-Lookup Off Static
Method of display for the text type of advertising.
For date and time advertising types, the method
of display is ignored
Blinking
Rolling
Rol.– 2 lines
Off
Note:
With the static method of displaying advertising text the maximum number of characters possible will be displayed
in a single line.
When setting the two-lines method for the advertising text only one advertising text will be displayed.
PROGRAM EQUIPMENT EURO2A
The Euro-150TE/TX Flexy cash register comes supplied with the Euro2A program, which serves to prepare
data for programming the Euro-150TE/TX Flexy, individual settings and reports. It allows simple and easy
modification and transmission of all programmable data for the cash register (from setting of system attributes
through logos and programming PLUs and departments) from the PC to the cash register, and it handles
the storing of data from the cash register and processing data on sales as well as other useful functions.
The latest version of the Euro2A program can be downloaded and installed from our Web page at: http://
www.elcom.eu.
Page 41

OPERATION IN
REGISTRATION MODE
Page 42

42
OPERATION IN REGISTRATION MODE
The functions that are described in the following chapters are used in the registration mode. The cash
register preserves all financial operations in this mode. All of the below-described functions can first be tried
in training mode without preserving any financial data in the cash register.
STATUS AND FUNCTIONS WHICH ARE REQUIRED TO KNOW PRIOR TO
THE START OF RINGING SALES
If there are two functions on a key, the function in the lower part of the key is selected by simply pressing the
key. To select the upper function, you must first press and old the SHIFT key.
Error warning - the CLEAR key
With the incorrect use of a function key, or if the range for registering is exceeded, an error message appears
on the display. The description of the error can be removed by pressing the CLEAR key. Afterwards simply
enter the correct information.
Keys for finalizing payment with CASH, CHECK and CREDIT
All business transactions are completed by pressing certain keys determined for payment, or a combination of keys. Depending on the method of payment (in cash, with a credit card, check, etc.) a transaction is
completed by pressing the relevant keys: TOTAL ,
CREDIT, or
CHECK.
Prior to pressing the key for determining payment, it is possible to enter a value which the customer wants
to pay towards the given payment. So long as the value entered is smaller than the required sum, the cash
register will then request the payment of the remaining sum (possibility of combining individual payments);
otherwise the cash register shows the sum which needs to be entered.
With payment by credit card or check, neither the payment nor the value of the sale is rounded.
Note: The subtotal commonly appears in its unrounded form.
Changing the cashier
Changing the cashier is done by logging off from the main menu of the cash register and subsequently
logging on of the new cashier.
MAIN MENU
R - mode
Logging off is done by pressing the keys
MENU in the main menu, until the message “Logged out...”
is displayed. After logging off it is necessary to proceed with logging on a cashier as is described in the
previous section.
Logging off of a cashier can only be done under the assumption that at least one of the cashiers has been
assigned a password.
Logging in a cashier
When logging in a cashier, the name of the cashier account is selected by pressing the keys . After
a cashier is selected, the cashier is confirmed by pressing the key TOTAL and the cash register asks
the cashier to enter his/her password. After entering the password, press the TOTAL key to confirm the
password and after successful log in the cash register shifts into registration mode. The cash register will
notify the operator if an incorrect password is entered.
REGISTRATION MODE MENU
This menu is reached when in the registration mode (the sales mode) by pressing (MENU). Pressing
or will shift you through the individual menu items, which are described in detail in Table 4.1 and in
Page 43

43
OPERATION IN REGISTRATION MODE
the following chapters. By pressing the TOTAL key you enter into the selected menu item, or perform a
cash register function.
Table 4.1 – Structure of the menu in registration mode
Mode ABBR.* Menu name Menu description
REGISTERING 1 Sale Sales mode
2 Cash In Deposit cash, for example, at the start of the day
3 Cash/Check out
Withdraw cash, or checks in the primary or secondary
currency
4 Refund Product refund
* abbreviations are used for rapid navigation in a menu
SAMPLES OF BASIC REGISTRATION PROCEDURES
Notice:
Trial registration of items after launching of the register into operation can be done in T-mode.
1) Log the cashier in with a password.
2) Switch the cash register into registration mode „R“ (training mode „T”).
3) Enter the code of the item sold.
4) Press the PLU key.
5) Repeat points 2 and 3 for each item you wish to ring in.
6) Once you have rung in all items, press the SUBTOTAL key. The total amount of the sale, including
tax, appears on the display.
7) Announce the sum to the customer.
8) Enter the portion which the customer has paid and press the corresponding key for the type of payment:
TOTAL, CREDIT, or
CHECK.
9) On the display will appear the amount to return to the customer, if the requested sum is smaller than the
amount received.
10) Tear off the receipt and give it to
the customer along with any change.
Figure 4.1 – Sample sales receipt:
1 – receipt header (logo),
2 – register ID information, owner of the operation
3 – date,
4 – time,
5 – receipt no and register no,
6 – cashier name,
7 – item name,
8 – tax level assigned,
9 – amount sold and unit price,
10 - sales price for the item
11 - TAX sumar
ABC GROCERIES
Main Street 3
080 01 Prešov
BIN: 1222345
VAT ID: SK20200123
Thank you
G O O D B Y E
Milk
1 x1.23 =1.23A
Yogurt
1 x1.23 =1.23A
Subtotal 2.46
******************************************************
Total G B P 2 . 4 6
Cash G B P 2 . 4 6
******************************************************
VAT rate Netto VAT Taxable
A 20.00% 2.05 0.41 2.46
Total 2.05 0.41 2.46
******************************************************
13-03-2013 12:08 0008 01 Cashier1
1
2
4
5
7
9
3
6
8
10
11
Page 44

44
OPERATION IN REGISTRATION MODE
PLU REGISTRATION
Each product item is assigned a number (a PLU number), for example, RAMA butter-5, whole milk-23, Rum189, etc. Individual PLU numbers are programmed with information about the product - name, price, DPT,
etc. Entering a PLU number and pressing (PLU) automatically calls up and rings in the product from the
cash register‘s database.
PLU registration allows the recording of the sale of individual items. The names of the items are taken from
the cash register memory and printed on the receipt and the transaction is recorded in the department.
PLU selling reduces errors when ringing in sales, lists each item individually on the receipt, clearly organizes
the sale and increases the speed of registering. This method of selling gives you an overview of the sale of
each individual item.
Basic PLU registration
Example: A customer buys Encian cheese with a price of 0.90 and Butter with a price of 1.04:
Sequence of steps Operator display Receipt
1*Encian cheese
0.90
Encian cheese
1 x 0.90 =0.90 A
Butter
1 x 1.04 =1.04 A
Subtotal 1.94
*************************************************************
Total GBP 1.94
Cash GBP 1.94
*************************************************************
VAT rate Netto VAT Taxable
A 20.00% 1.62 0.32 1.94
Total 1.62 0.32 1.94
1*Butter
1.04
Subtotal
1.94
Cash
1.94 GBP
Repeated registration of an item
Example: A customer buys one package of cheese (PLU 1: Encian cheese with a price of 0.90), which is
rung in, and then decides to buy a second package of cheese:
Sequence of steps Operator display Receipt
1*Encian cheese
0.90
Encian cheese
1 x 0.90 =0.90 A
Encian cheese
1 x 0.90 =0.90 A
Subtotal 1.94
*************************************************************
Total GBP 1.80
Cash GBP 1.80
*************************************************************
VAT rate Netto VAT Taxable
A 20.00% 1.50 0.30 1.80
Total 1.50 0.30 1.80
1*Encian cheese
2 0.90
Subtotal
1.80 GBP
Cash
1.80 GBP
Page 45

45
OPERATION IN REGISTRATION MODE
Multiplication in PLU registration
Example: A customer buys 12 units of Encian cheese (PLU no. 1) with the programmed price of 0.90 GBP.
Sequence of steps Operator display Receipt
12*
Encian cheese
12 x 0.90 =10.80 A
*************************************************************
Total GBP 10.80
Cash GBP 10.80
*************************************************************
VAT rate Netto VAT Taxable
A 20.00% 9.00 1.80 10.80
Total 9.00 1.80 10.80
12*Encian cheese
10.80
PLU registration using a price not programmed
The cash register can be programmed such that for registering with PLUs it is possible to use a price already
programmed in or one entered via the keyboard (see the chapter Programming the Cash Register – Product
Items). A customer gets a special price, but the given PLU already has a price programmed in. In the following
example, PLU no. 2 has a programmed price of 1.04, but the sale price is 0.95 GBP.
Sequence of steps Operator display Receipt
Price
0.95
Butter
1 x 0.95 =0.95 A
*************************************************************
Total GBP 0.95
Cash GBP 0.95
*************************************************************
VAT rate Netto VAT Taxable
A 20.00% 0.79 0.16 0.95
Total 0.79 0.16 0.95
1*Butter
0.95
Multiplication in PLU registration using a price not programmed
Example: A customer buys 12 packages of Encian cheese (PLU no. 1 with a price of 0.90 GBP). With this
number of units, he gets a special sale price of 0.83 GBP entered at the cash register. (You can multiply a unit
price also by fractional numbers: 1.5; 0.125; etc.). The multiplier with the decimal part is used for direct sale of
weighed goods (meat, vegetables, salads, and the like), where the unit price is determined (for example, per
1 kg, per 100g, etc.).
Sequence of steps Operator display Receipt
12*
Encian cheese
12 x 0.83 =9.96 A
*************************************************************
Total GBP 9.96
Cash GBP 9.96
*************************************************************
VAT rate Netto VAT Taxable
A 20.00% 8.30 1.66 9.96
Total 8.30 1.66 9.96
Price
0.83
12*Encian cheese
9.96
Page 46

46
OPERATION IN REGISTRATION MODE
Double multiplication in PLU registering
Example: The price programmed in for a square meter of carpet is 1.06 GBP (sample PLU no. 3 – Carpet).
The customer purchases 3x5 square meters.
Sequence of steps Display Receipt
3*5*
Carpet
3 x 5 x 1.06 =15.90 A
*************************************************************
Total GBP 15.90
Cash GBP 15.90
*************************************************************
VAT rate Netto VAT Taxable
A 20.00% 13.25 2.65 15.90
Total 13.25 2.65 15.90
3*5* Carpet
15.90
It is possible to also use manual price entry; the process was presented in the chapter „PLU registration
with a price not programmed“.
Fractional PLU registration
Example: A price is set for package containing 5 units (e.g. a box of light bulbs) at a price of 1.99 GBP. The
customer buys only 3 of them. Procedure:
Sequence of steps Display Receipt
3/5*
light bulb 40W
3 / 5 x 1.99 =1.19 A
*************************************************************
Total GBP 1.19
Cash GBP 1.19
*************************************************************
VAT rate Netto VAT Taxable
A 20.00% 0.99 0.20 1.19
Total 0.99 0.20 1.19
3/5* light bulb 40W
1.19
It is possible to also use manual price entry; the process was presented in the chapter „PLU registration
with a price not programmed“.
OTHER TYPES OF PLU SALES
Linked PLU registration
If the PLU being sold has a different item linked to it (package, crate, sale product,...), the cash register
automatically continues with the sale of the linked PLU item. (see the chapter Programming the cash register
- Product items).
Applicable rules for registering linked PLUs:
• The voiding of the main PLU automatically cancels the linked PLU.
• With the refunding of the main PLU, a refund of the linked PLU is automatically registered.
• The linked PLU is registered in the same quantity as the main PLU.
• Registering of a surcharge/discount to the main PLU is not applied to the linked PLU, but only to the
main PLU.
• The price of the main PLU entered at the keyboard is not valid for the linked PLU.
Registering of refundable packaging
When programming a refundable package it is necessary to set the relative attribute (PLU-ret.con. – yes). For
more, see the chapter Programming the cash register – Product items. Subsequently, it is possible to link a
given product item to another PLU.
Page 47

47
OPERATION IN REGISTRATION MODE
Example: A customer buys Mineral water (PLU no. 4 with a price of 0.62 GBP), and PLU no. 4 is further
linked with PLU no. 100 (Bottle with a price of 0.13 GBP).
Sequence of steps Display Receipt
1*Bottle
0.13
Mineral water
1 x 0.62 =0.62 A
Bottle
1 x 0.13 =0.13 A
Subtotal 0.75
*************************************************************
Total GBP 0.75
Cash GBP 0.75
*************************************************************
VAT rate Netto VAT Taxable
A 20.00% 0.52 0.10 0.62
D Non-taxable 0.13 0.00 0.13
Total 0.65 0.10 0.75
Subtotal
0.75 GBP
Cash
0.75 GBP
Note:
In the first step, for a brief moment, there information about the sale of mineral water is shown, then information
about the sale of the linked PLU is shown (bottle)...
Registration using a barcode
• a sale using a barcode scanner
A barcode scanning device can be connected to the cash register. The sale of a product using this scanner
consists of simply scanning the barcode on the item‘s packaging. For proper functioning of the barcode
scanner with the cash register it is necessary to program the parameters of the scanner into the cash register
(see Programming the cash register – Peripherals).
Example 1: The sale of 3 identical items using the barcode scanner.
Sequence of steps Display Receipt
3*
Butter
3 x 1.16 =3.48 A
*************************************************************
Total GBP 3.48
Cash GBP 3.48
*************************************************************
VAT rate Netto VAT Taxable
A 20.00% 2.90 0.58 3.48
Total 2.90 0.58 3.48
scanning of the barcode
3* Butter
3.48
Note:
A barcode must be programmed for the given PLU
• a sale of a product by manually entering the barcode
If necessary, when the barcode scanner is not functioning or the barcode of an item cannot be read by the
scanner, it is possible to manually enter the barcode number directly into the register using the keyboard.
Page 48

48
OPERATION IN REGISTRATION MODE
Example 2: The sale of a single product with the barcode 8586001760096.
Sequence of steps Display Receipt
...
8586001760096
Beer 12%
1 x 0.41 =0.41 A
*************************************************************
Total GBP 0.41
Cash GBP 0.41
*************************************************************
VAT rate Netto VAT Taxable
A 20.00% 0.34 0.07 0.41
Total 0.34 0.07 0.41
1* Beer 12%
0.41
Example 3: The sale of 5 units of a single product with barcode 8586001760096.
Sequence of steps Display Receipt
5*
Beer 12%
5 x 0.41 =2.05 A
*************************************************************
Total GBP 2.05
Cash GBP 2.05
*************************************************************
VAT rate Netto VAT Taxable
A 20.00% 1.71 0.34 2.05
Total 1.71 0.34 2.05
...
5*
8586001760096
5*Beer 12%
0.41
Entering amounts using electronic scales
The Euro-150TE/TX Flexy is capable of reading the weight of products from a connected electronic scale.
Communication with a scale is possible only in the „R” or „T” modes. An electronic scale is connected to the
cash register through a port which was set in the menu „Ext. devices - Scale“.
After initiating communication (reading the weight) with the electronic scale by pressing the key SCALE ,
the weight of the product being weighed can be changed (add or remove products) as long as the no other
key has been pressed on the keyboard. After the cash register has read the weight of the goods, simply
enter the PLU number and press the (Plu) key.
Example: The sale of product no. 21 (PLU 21) with a weight of 0.253 kg read from the electronic scale.
Sequence of steps Display Receipt
(reading weight from the elec-
tronic scale)
Weighing...
0.253
Oranges
0.253 x 1.04 =0.26 A
*************************************************************
Total GBP 0.26
Cash GBP 0.26
*************************************************************
VAT rate Netto VAT Taxable
A 20.00% 0.22 0.04 0.26
Total 0.22 0.04 0.26
0.253*Oranges
0.26
For proper functioning of the electronic scale connected to the register, it is necessary to program the type
of scale into the cash register (see the chapter „Ext- devices - Scale“).
Your local cash register supplier can inform you about the possibilities of connecting specific types of
electronic scales.
Page 49

49
OPERATION IN REGISTRATION MODE
Searching for a PLU in registration mode
Note:
Prior to searching for a PLU read as soon as possible the section „General procedure when programming in
P-mode“, which is found at the start of the chapter „Programming the cash register“.
The functionality of searching for a PLU is used only in registration mode, namely before the start of a purchase
or during the registering of PLUs during a sale/refund. Its purpose is to allow the operator to search for a PLU
by name, an internal number in the database or by the barcode.
The cash register displays the searched-for item on the operator display, where the name of the item is listed
in the first line, and in the second line an internal number in the cash register database on the left side and the
price of the item on the right side.
The function can be called up or ended by pressing the key combination
. If searching for an item is
active, it is possible to proceed in one of these ways:
searching an item by name – by entering part of the item name and confirming by pressing the key
searching an item by internal number – by entering the given number of the item and confirming with
the PLU key
searching an item by the barcode – it is possible to use a scanner and by scanning the barcode, or by
manually entering the barcode and confirming it by pressing the EAN key
When searching for an item by name, a number of items may fit the search criteria; it is possible to move
through the list of items by using the up and down arrow keys.
When searching for an item by internal number in the database, the searched for item is found by navigating
through the entire database by using the up and down arrow keys.
When searching for an item it is possible using the right arrow key or left arrow key to show on the
display the state of the inventory for the found PLU.
Pressing the key leads to selection of an item from a list of found items and to its sale (if in the selling mode),
or refund (if it involves a refund).
Notice: If prior to using the PLU search function a procedure was begun (amount, refund of return packaging),
this will be cancelled.
CORRECTIONS AND VOIDS
Clearing
Example: You entered an incorrect price which has still not been printed out. In the following example,
number 1230 was entered erroneously in place of the correct number 1290.
Sequence of steps Display
1230
16-02-2013
R 14:57:50
1290
Page 50

50
OPERATION IN REGISTRATION MODE
Voiding (cancellations)
The void (cancellation) function is used only to correct a sold item in one specific, still unfinished sale.
An example of use: During a sale we accidentally ring in a bad PLU or the customer rethinks the purchase
of the given item.
• Voiding of the last registered item - a direct void.
Procedure: You sold the items Encian cheese and butter, but you want to remove the butter and complete the
purchase:
Sequence of steps Display Receipt
1*Encian cheese
0.90
Encian cheese
1 x 0.90 =0.90 A
Butter
1 x 1.04 =1.04 A
Void
Butter
1 x 1.04 =-1.04 A
*************************************************************
Total GBP 0.90
Cash GBP 0.90
*************************************************************
VAT rate Netto VAT Taxable
A 20.00% 0.75 0.15 0.90
Total 0.75 0.15 0.90
1*Butter
1.04
Void
-1.04
Cash
0.90 GBP
• Voiding of one of the previous items registered (not the last item registered) - an indirect void.
Procedure: If you want to void in a purchase one of the previously registered items (not the most recent,
however), it is necessary to use the arrow keys or skim through the record of items sold, afterwards
press (VOID).
Example: You sold Encian cheese and Butter and then you want to void the Encian cheese from the sale:
Sequence of steps Display Receipt
1*Encian cheese
0.90
Encian cheese
1 x 0.90 =0.90 A
Butter
1 x 1.04 =1.04 A
Void
Encian cheese
1 x 0.90 =-0.90 A
*************************************************************
Total GBP 1.04
Cash GBP 1.04
*************************************************************
VAT rate Netto VAT Taxable
A 20.00% 0.87 0.17 1.04
Total 0.87 0.17 1.04
1*Butter
1.04
1*Butter
(2) 1.04
1*Encian cheese
(1) 0.90
Void
-0.90
Cash
1.04 GBP
Note:
The number in parenthesis tells you the line number of the item in purchase.
Page 51

51
OPERATION IN REGISTRATION MODE
• Voiding (annulling) an entire receipt.
Procedure: If you wish to void an entire receipt, proceed as follows:
Sequence of steps Display Receipt
1*Encian cheese
0.90
Encian cheese
1 x 0.90 =0.90 A
Butter
1 x 1.04 =1.04 A
Subtotal 1.94
Voided receipt
*************************************************************
Total GBP 0.00
Cash GBP 0.00
*************************************************************
VAT rate Netto VAT Taxable
Total 0.00 0.00 0.00
1*Butter
1.04
Subtotal
1.94 GBP
Receipt void
-1.94
SURCHARGES AND DISCOUNTS
Percent surcharge/discount on an item
The cash register allows you to program a percentage rate that is used for a surcharge with the key
(PER-
CENT SURCHARGE) and for a discount with the key (PERCENT DISCOUNT) and also limits for manual
entry of discounts or surcharges. If you need to register a rate different than the one that is pre-programmed,
enter the numeric value of the surcharge or of the discount before pressing the
(PERCENT SURCHARGE),
or (PERCENT DISCOUNT) key. The value of the new rate will be effective only if it does not exceed the
pre-programmed limit for manual entry and will apply for a single registration
Surcharges or discounts cannot be applied to product items which are programmed as refunded packaging.
If a refunded package was charged during purchase, after applying the surcharge/discount for a purchase,
(after pressing ) it is not applied to the refunded packaging.
Procedure for applying a programmed percentage discount: (condition: programmed values in the
P-mode for surcharges and discounts, see the chapter „Programming the cash register - Surcharges and
discounts“). We want to apply a programmed 10% discount on Encian cheese:
Sequence of steps Display Receipt
1*Encian cheese
0.90
Encian cheese
1 x 0.90 =0.90 A
Discount
10.00% -0.09 A
*************************************************************
Total GBP 0.81
Cash GBP 0.81
*************************************************************
VAT rate Netto VAT Taxable
A 20.00% 0.67 0.14 0.81
Total 0.67 0.14 0.81
Discount %-
-0.09
Cash
0.81 GBP
• the procedure for applying a surcharge is similar, only in place of the key (PERCENT DISCOUNT) we
press (PERCENT SURCHARGE).
Procedure for manually entering a percent discount: (conditions: programmed limits in the P-mode for
surcharges and discounts, see the chapter „Programming the cash register - Surcharges and discounts“). We
want to apply a 5% discount on Encian cheese (if a surcharge or discount is more than the limit for manual
entry, an error message is shown):
Page 52

52
OPERATION IN REGISTRATION MODE
Sequence of steps Display Receipt
1*Encian cheese
0.90
Encian cheese
1 x 0.90 =0.90 A
Discount
5.00% -0.05 A
*************************************************************
Total GBP 0.85
Cash GBP 0.85
*************************************************************
VAT rate Netto VAT Taxable
A 20.00% 0.71 0.14 0.85
Total 0.71 0.14 0.85
Discount %-
-0.05
Cash
0.85 GBP
• the procedure for applying a surcharge is similar, only in place of the key (PERCENT DISCOUNT) we
press (PERCENT SURCHARGE).
Percent surcharge/discount on a subtotal
Procedure: If all items in a single transaction (purchase) are subject to the same discount or surcharge, it
is possible to register the discount or surcharge at one time for the entire transaction (purchase). Once the
entire sale has been registered (all items), press SUBTOTAL and then apply the programmed surcharge
or discount or to do so by manual entry.
Example: for discretionary items sold with a total price, for example, of 23.00 GBP we apply a
programmed 10% discount:
Sequence of steps Display Receipt
items sold
Subtotal 23.00
ST discount
10.00% -2.30
*************************************************************
Total GBP 20.70
Cash GBP 20.70
Subtotal
23.00 GBP
Discount %-
-2.30
Cash
20.70 GBP
• the procedure for applying a surcharge is similar, only in place of the key (PERCENT DISCOUNT) we
press (PERCENT SURCHARGE).
Procedure for manually entering a discount: we use the previous example but with a manually entered
4% discount.
Sequence of steps Display Receipt
items sold
Subtotal 23.00
ST discount
4.00% -0.92
*************************************************************
Total GBP 22.08
Cash GBP 22.08
Subtotal
23.00 GBP
Discount %-
-0.92
Cash
22.08 GBP
• the procedure for applying a surcharge is similar, only in place of the key (PERCENT DISCOUNT) we
press (PERCENT SURCHARGE).
Page 53

53
OPERATION IN REGISTRATION MODE
Value surcharges and value discounts
The cash register allows for the application of a value surcharge or discount on the most recently registered
item or on all the items sold. The size of the value surcharge or discount entered cannot be greater than the
value of the item or the group of items to which the surcharge or discount applies.
Entering a value surcharge/discount is conditioned on setting a limit for the percentage of surcharge/discount. If the limit for a percentage surcharge/discount is set to a value of 0, it is not possible to enter a value
surcharge/discount. If the value is not zeroed out, a value surcharge/discount can be entered.
Procedure for entering a value discount on a subtotal: We will use the previous example, but with a
manually entered value discount of 10,00 GBP.
Sequence of steps Display Receipt
items sold
Subtotal 25.00
ST discount
-10.00
*************************************************************
Total GBP 15.00
Cash GBP 15.00
Subtotal
25.00 GBP
Discount -
-10.00
Cash
15.00 GBP
• the procedure for applying a value surcharge on a subtotal is similar, only in place of the keys
we press
.
Procedure for entering a value discount on a single item: a discount on Encian cheese worth 0.50 GBP.
Sequence of steps Display Receipt
1*Encian cheese
0.90
Encian cheese
1*0.90 0.90 A
Discount
-0.50 A
Discount -
-0.50
Cash
0.40 GBP
• the procedure for applying a value surcharge on a subtotal is similar, only in place of the keys
we press
.
REFUNDS
Refund of a product
This function is used for reclamation or refunding of products for any reason whatsoever. This function can
be used only as an independent operation. It cannot be used during an open (registered) sale.
In the cash register the „Refunds” menu is used for the purpose of refunds.
Page 54

54
OPERATION IN REGISTRATION MODE
Procedure: Refunding the item Encian cheese with a programmed price (0.90 GBP).
Sequence of steps Display Receipt
R-mode
08-04-2013
R 12:00:00
Refund receipt
Encian cheese
1 x 0.90 =-0.90 A
*************************************************************
Total GBP -0.90
Cash GBP 0.00
Change GBP 0.90
*************************************************************
VAT rate Netto VAT Taxable
A 20.00% -0.75 -0.15 -0.90
Total -0.75 -0.15 -0.90
press
REGISTERING
Sale
using arrows or go
to the Refund menu
REGISTERING
Refund
confirm by pressing
Item return
1*Encian cheese
-0.90
confirm by pressing
Change
0.90 GBP
Note:
In the refund menu it is possible to use all the preceding methods for the sale of items (entering a price, multiplying, dividing amounts,…). It is not possible to use the operation of surcharges or discounts!
Refund of packaging
This function is used to return the containers (bottle, crate, barrel, …) . In the cash register, the keys
(PACKAGE REFUND) are used for this purpose. The packaging refund function can be used only as an
independent operation or in the course of a registered sale.
Procedure: For refunding five bottles programmed as PLU no. 20 with a programmed price (0.13 GBP). It is
necessary that PLU no. 20 be programmed as a package refund (see the chapter „Programming the cash
register - Product items“).
Sequence of steps Display Receipt
R-mode
08-08-2008
R 12:00:00
Container refund
Bottle
5 x 0.13 =-0.65 D
*************************************************************
Total GBP -0.65
Cash GBP 0.00
Change GBP 0.65
*************************************************************
VAT rate Netto VAT Taxable
A 20.00% -0.65 0.00 -0.65
Total -0.65 0.00 -0.65
press
Container return
5*
5*Bottle
-0.65
complete the receipt by
pressing
Change
0.65 GBP
With the refund of a package it is possible to use all preceding methods of registering items (entering of a
price, multiplication, division of amounts, …). However, it is not possible to use the operation for surcharges
or discounts!
Page 55

55
OPERATION IN REGISTRATION MODE
DPT REGISTRATION
To get better information about revenue of particular items, split the articles into departments (article groups).
The “department” means articles grouped in the same category (such as dairy products, pastry, alcohol
etc.), or of the same tax level (VAT 16%, TAX 10% etc.). The Euro-150TX Flexy cash register enables the use
of a maximum of thirty departments.
DPT registration is finished by pressing the proper department key
–
. After pressing a department
key, the registered amount, the corresponding tax level, the maximum registration amount, a pre-program-med
price and others parameters are assigned to the revenue of the department. The sale informations are
stored in the ECR memory and used for department reports.
Numeric keys
-
(for price) and department keys
–
are used for registration (see keyboard
picture). key (
,
...). With using button you can use next DPTs (DPT10 - DPT18)
Basic DPT registration
Example: A customer buys Encian cheese with a price of 0.90 and Butter with a price of 1.04:
Sequence of steps Operator display Receipt
1*Encian cheese
0.90
Encian cheese
1 x 0.90 =0.90 A
Butter
1 x 1.04 =1.04 A
Subtotal 1.94
*************************************************************
Total GBP 1.94
Cash GBP 1.94
*************************************************************
VAT rate Netto VAT Taxable
A 20.00% 1.62 0.32 1.94
Total 1.62 0.32 1.94
1*Butter
1.04
Subtotal
1.94
Cash
1.94 GBP
Multiplication in DPT registration
Example: A customer buys 12 units of Encian cheese (DPT no. 1) with the programmed price of 0.90 GBP.
Sequence of steps Operator display Receipt
12*
Encian cheese
12 x 0.90 =10.80 A
*************************************************************
Total GBP 10.80
Cash GBP 10.80
*************************************************************
VAT rate Netto VAT Taxable
A 20.00% 9.00 1.80 10.80
Total 9.00 1.80 10.80
12*Encian cheese
10.80
DPT registration using a price not programmed
The cash register can be programmed such that for registering with DPTs it is possible to use a price already
programmed in or one entered via the keyboard. A customer gets a special price, but the given DPT already
has a price programmed in. In the following example, DPT no. 1 has a programmed price of 1.00, but the
sale price is 0.95 GBP.
Page 56

56
OPERATION IN REGISTRATION MODE
Sequence of steps Operator display Receipt
Price
0.95
Encian cheese
1 x 0.95 =0.95 A
*************************************************************
Total GBP 0.95
Cash GBP 0.95
*************************************************************
VAT rate Netto VAT Taxable
A 20.00% 0.79 0.16 0.95
Total 0.79 0.16 0.95
1*Encian cheese
0.95
Multiplication in DPT registration using a price not programmed
Example: A customer buys 12 packages of Encian cheese (DPT no. 1 with a price of 0.90 GBP). With this
number of units, he gets a special sale price of 0.83 GBP entered at the cash register. (You can multiply a unit
price also by fractional numbers: 1.5; 0.125; etc.). The multiplier with the decimal part is used for direct sale of
weighed goods (meat, vegetables, salads, and the like), where the unit price is determined (for example, per
1 kg, per 100g, etc.).
Sequence of steps Operator display Receipt
12*
Encian cheese
12 x 0.83 =9.96 A
*************************************************************
Total EUR 9.96
Cash EUR 9.96
*************************************************************
VAT rate Netto VAT Taxable
A 20.00% 8.30 1.66 9.96
Total 8.30 1.66 9.96
Price
0.83
12*Encian cheese
9.96
Double multiplication in DPT registering
Example: The price programmed in for a square meter of carpet is 1.06 GBP (sample DPT no. 1 – Carpet).
The customer purchases 3x5 square meters.
Sequence of steps Display Receipt
3*5*
Carpet
3 x 5 m2 x 1.06 =15.90 A
*************************************************************
Total GBP 15.90
Cash GBP 15.90
*************************************************************
VAT rate Netto VAT Taxable
A 20.00% 13.25 2.65 15.90
Total 13.25 2.65 15.90
3*5m2* Carpet
15.90
It is possible to also use manual price entry; the process was presented in the chapter „DPT registration
with a price not programmed“.
Page 57

57
OPERATION IN REGISTRATION MODE
Fractional DPT registration
Example: A price is set for package containing 5 units (e.g. a box of light bulbs) at a price of 1.99 GBP. The
customer buys only 3 of them. Procedure:
Sequence of steps Display Receipt
3/5*
light bulb 40W
3 / 5 x 1.99 =1.19 A
*************************************************************
Total GBP 1.19
Cash GBP 1.19
*************************************************************
VAT rate Netto VAT Taxable
A 20.00% 0.99 0.20 1.19
Total 0.99 0.20 1.19
3/5* light bulb 40W
1.19
It is possible to also use manual price entry; the process was presented in the chapter „DPT registration
with a price not programmed“.
DEPOSITING CASH
A deposit is used for the recording of non-business payments (deposits). An example is the daily adding of
cash to the cash register drawer. The cash register allows the depositor to print proof of the cash deposit. At
your request, the document can even include the name of the depositor and the reason for the deposit. A
name and a reason can be entered up tof 42 characters of normal width or 21 double-width characters for
Euro-150TE Flexy cash register. For Euro-150TX Flexy it is 28 characters of normal width or 14 double-width
characters. There is a place assigned for the signature of the depositor on the printed document. Entering
the name of the depositor and the reason for the deposit is not mandatory. If you do not want to enter this
data, simply end the deposit operation by pressing TOTAL two times.
Page 58

58
OPERATION IN REGISTRATION MODE
Procedure: Deposit 1000.00 GBP in cash:
Sequence of steps Display Receipt
R-mode
08-04-2013
R 12:00:00
LOAN
Cash
Loan 1000.00
Name:
John
Loan reason:
Opening for the day
Signature:
press
REGISTERING
Sale
use arrows or to go to
the Cash In menu
REGISTERING
Cash In
conrm
by pressing
Value:
Value:
1000.00
enter the cashier‘s name, confirm
by pressing
Name:
John
enter the reason for the deposit,
confirm with
Reason:
opening for the day
The receipt prints out; in the lower part there is a place where the cashier can sign the document.
WITHDRAWING CASH OR CHECKS
The withdrawal of cash or checks from the cash register drawer not associated with a sale is recorded using
the „Cash/Check out“ operation. We use this function, for example, when delivering revenue when changing
cashiers or to decreasing the amount of money in the drawer. The cash register allows for the printing of a
document on the withdrawing of cash. The document can even include the name of the person withdrawing
and the reason for it. For Euro-150TE Flexy a name and a reason can be entered up to 42 characters or 21
double-sized characters. For Euro-150TX Flexy a name and a reason can be entered up to 28 characters or
14 double-sized characters. There is a place assigned for the signature of the person making the withdrawal
on the printed document. Entering the name of the person withdrawing and the reason for the withdrawal
is not mandatory. If you do not wish to enter this data, simply end the withdrawal operation by pressing
TOTAL two times.
Page 59

59
OPERATION IN REGISTRATION MODE
Example: Withdraw 500.00 GBP (primary currency in cash):
Sequence of steps Display Receipt
R-mode
08-04-2013
R 12:00:00
PICK UP
Cash
Pick up GBP 500.00
Name:
John
Pickup reason:
end of day
Signature:
press
REGISTERING
Sale
use arrows or to go to
the Cash/Check out menu
REGISTERING
Cash/Check out
confirm by pressing
for the
withdrawal of checks, with the
arrows
or go to the
Check - main curr.
Cash/Check out
Cash-main curr.
confirm by pressing
Value:
Value:
500.00
enter the cashier‘s name, con-
firm by pressing
Name:
John
enter the reason for the with-
drawal, confirm with
Reason:
end of day
TIP: If you wish to take out the entire contents of the drawer (for example, a withdrawal in the primary currency) it is imperative to enter 0.00 as the value of the withdrawal.
ENTERING A REFERENCE NUMBER
With certain transactions it is necessary for monitoring reasons to print out a receipt with a reference number. A
reference number can be entered manually using the numerical keys and then by pressing the key combination
, or by using the barcode scanner to read a barcode. A reference number can contain a maximum of
18 numbers, but in the case of using a barcode as a reference number, this code must begin with number
22 followed by the other 16 numbers indicating the unique reference number.
Using a reference number it is possible to enter onto the receipt, for example, a customer ID number. This
number can be entered prior to the start of purchasing or during the purchase.
After entering a reference number the display will show in the upper line the programmed text (the default
value is “Reference number”) and the lower line shows the entered reference number. The cash register then
expects another input from the cashier in order to continue registration.
A reference number is printed out on the receipt in the “Informations” section..
REGISTRATION WITH A SECONDARY CURRENCY
Before you begin reading the chapter, reach the chapter “Concepts defining payment in a foreign currency”.
The Euro-150TE/TX Flexy cash register is capable of working with a primary and a foreign (secondary)
currency.
Payment in a foreign currency can be done as follows:
Page 60

60
OPERATION IN REGISTRATION MODE
• in the case that it involves the first payment of a still open sale, it is necessary to press the SUBTOTAL
key, thus displaying the value of the purchase in the primary currency. For selecting a foreign currency,
it is necessary to press the PRICE key and the value of the purchase is then calculated in the value
of the foreign currency. The cash register then expects completion of the purchase by payment in cash
without entering a sum, or entering the sum in a foreign currency received from the customer and
confirming it by pressing TOTAL for a payment in cash.
• if a partial payment has already been made it is necessary for selecting the foreign currency to press
the PRICE key; this will cause the unpaid portion to be calculated in the foreign currency. Further,
we proceed the same as in the previous case.
If the value of the payment in the foreign currency exceeds the amount requested by the cash register the
cash register will calculate the payout in the primary currency and it is then necessary to return this portion
to the customer to complete the purchase.
Note: Due to the possibilities for setting a different number of decimal places for different currencies (e.g. for
GBP displaying and programming of prices with 3 or 2 decimal places, or for another currency displaying and
programming of prices for 2 decimal places) we recommend using the decimal point when entering the value
into the cash register. For example, for entering 23.00, press the keys 23.; for entering 38,500, it’s enough to
press 38.5 and the cash register will automatically fill in the decimal places according to the setting flag for the
given currency for displaying and programming of prices.
JOURNAL
Text journal
The cash register preserves a control ribbon in the cash register memory in electronic form. The text journal
has a capacity of 14,500 lines (including empty lines), which with receipts having 3 items in 3 different tax
levels represents approximately 450 receipts.
For the purposes of archiving of control records it is necessary to use the medium which meets the requirements
of law. The Elcom company recommends using a DVD of media type GOLD (e.g. DVD-R Archival Grade).
The Euro-150TE/TX Flexy cash register allows the transfer of the journal to a PC using the functions of a
communications library, or exporting onto a memory card. The cash register allows for the setting of an
automatic export of the electronic journal onto an SD card simultaneously with the running of a daily report
(P-mode - Journal - Settings - Autoexport jrn.). With this setting an automatic export of the journal to a memory
card is done and the cash register memory is deleted (under the assumption that no error occured during
exporting).
The text journal cannot be cleared if no successful export operation or downloading to a PC has taken place.
In the course of registering the cashier is informed when the memory capacity for the journal is nearly full.
A report displays upon switching on the cash register after exceeding 80% of capacity and after surpassing
95%. In this case we recommend downloading (exporting) the text journal, then clearing it and continuing
with registration. After completely filling the journal, the cash register does not allow the registration of a new
receipt until the journal is cleared from the register through export or downloading to a PC.
Binary journal
(a copy of numerical data from cash register documents,).
It serves for the storage of sales information and its further processing and evaluation through a PC. The
possibilities for work with the binary journal are: export to an SD card, clearing, ascertaining size. The cash
register controls the filling of the journal and after it reaches 80% of capacity it makes the cashier aware of
this status.
Page 61

61
OPERATION IN REGISTRATION MODE
For the purpose of archiving of control records it is necessary to use a medium which meets the criteria
demanded by law. The Elcom company recommends using DVD media of the type GOLD (e.g. DVD-R
Archival Grade).
The binary journal is composed of documents. Each document is composed of entries, among which header
and an trailer have special purpose - they mark borders of the document.
Individual entries are composed of values of their elements which are divided by a TAB (0x09). Each entry
is completed at the end of the line by NL (0x0A).
Description of entries in the binary journal:
DocumentHeader – start of document
DOCHDR dt st zzzz i mcurr vd
dt: Document Type – possible values
FISREC - fiscal receipt of registration mode (sales, refund)
NONFISC - registration mode (loan, cah out)
- print in the programming mode and print service reports
REPORTX - X report
REPORTZ - Z report
TRAINREC - trainning mode (sales, refund)
st: Document Subtype – possible values
SALES - sales - Fiscal receipt of registration mode
- Non fiscal receipt of training mode
REFUND – refund - Fiscal receipt of registration mode
- Non fiscal receipt of training mode
LOAN – Cash in (Non fiscal receipt of registration mode)
CASHOUT – Cash out (Non fiscal receipt registration mode)
FINANCD – Daily fianancial report
FINANCM - Monthly financial report
CASHIERD - Monthly financial report
CASHIERM - Monthly report of cashiers
DPTD - Daily report of departments
DPTM - Monthly report of departments
PLU - Reports of item
STOCK - PLU stock report
st: DRAWERD - Daily report of drawer
DRAWERM - Monthly report od drawer
MAINTEN - print in the programming mode and print service reports (non fiscal
receipt)
zzzz – number of report
i – flag of set currency:
0 – withou tax
1 – with tax
mcurr – maximum three-letter abbreviation of the main currency
vd – version of document binary journal like X.Y
X-main version of number clearly indicates the specific of cash register (2 - Mini E50 TE Mini EN)
Page 62

62
OPERATION IN REGISTRATION MODE
Y-side version of number indicates the contents of the binary log
SoldItem – item sold, returned, or voided
SI it id dbID text uuuu pppp qqqq unit i C D R L V
it
– type of sales item
PLU – item
DPT – department
id: Position of sold item in the purchase
dbID Position of sold item in the database of cash register
text: PLU Name
uuuu: Uni tPrice
pppp: Price
qqqq: Amount (rounded to 3 decimal places)
unit: Name of unit
i: tax Identifier – possible value A/B/C/…
C:*
Container item –the presence of this value depends on the type of item being purchased
D:*
Descript item – the presence of this value depends on the type of item being purchased
R:* Return operation – the presence of this value depends on the type of operation
L:*
Linked item –the presence of this value indicates the linking of a given item to a main
one (linking) item.
V:*
Void operation – the presence of this value depends on the type of operation. If the
value is present, then the value “id” identifies the item which was voided
ItemAdjustment –an entry modifiying the price of another entry
ADJI id adjt pppp aaaa V
id: ID of sold items in the purchase whose price is to be modified
adjt:
AdjustmentType – possible values
P + : Percentage discount
P - : Percentage surcharge
V + : Value discount
V - : Value surcharge
pppp:
size of the percentage modification for P+ and Pif it is not a modification of the price by the percentage discount / surcharge (value
discount / surcharge) value is zero
aaaa:
value of modification:
if is a modification of the price by value discount / surcharge
if is a modification of the price by percentage discount / surcharge
– it is convertted to value.
V: * Void operation – the presence of this value depends on the type of operation
* - Flag is stored only when the situation is occurred
Subtotal
SBTL aaaa
Page 63

63
OPERATION IN REGISTRATION MODE
aaaa value of subtotal
Void of Receipt – the entry indicates the voiding of a purchase
RCPV this item is followed by RCPDT and RCPID
SubtotalAdjustment – entry for modifying the value of a subtotal
ADJSBTL id adjt pppp ssss aaaa V
id: ID of the sold items in the purchase
adjt: AdjustmentType – possible values P+/P-/V+/V
pppp: size of the percentage modification
ssss:
value of the subtotal which is modified (without including refunded packaging and
linked PLUs)
aaaa: value of the modification
V:
Void operation – the presence of this value depends on the type of operation. If the
value is present, then the value “id” identifies the item which was voided
TenderItem – entry for payment
TNDR tttt cccc aaaa ffff ssss rrrr nnnn
tttt: TenderType – possible values CASH/CHECK /CARD
cccc: CurrencyType – possible values CU RN/CU RF for national/foreign currency
aaaa: Amount – value of payment in national currency
ffff: Foreign –value of payment in foreign currency if payment is in foreign currency
rrrr:
exchange rate for foreign currency if this is a payment in foreign currency
if is payment in the foreign currency otherwise the value is zero
nnnn: number of card if is payment of card otherwise the value is empty
TotalItem – summary of a purchase
TTL gggg tttt rrrr
gggg: Gross – total value of purchase with tax
tttt: Tax – total value of tax
rrrr:
Rounding – value for rounding of a purchase price. The value can also be negative
TaxItem – entry for the tax level used in the purchase
TAXI tl rrrr gggg nnnn tttt ff
tl: TaxLevel – possible values A/B/C/…
rrrr: taxRate – rate of taxes in percentages
gggg: value of the purchase with tax for the tax level
Page 64

64
OPERATION IN REGISTRATION MODE
nnnn: value without of taxes at the tax level
tttt: value of taxes at the tax level
ff:
flag of the type tax level
T - taaxble
F- non taxable
Reference Number
REFNUM retx renu
retx:
functional text of reference number (possible to change in programming functional
texts)
renu: reference number of receipt (may include characters)
ReceiptDateTime - Date and time of a receipt
RCPDT DD.MM.YYYY HH:MM:SS
DD.MM.YYYY End date of the document in the format day.month.year
HH:MM:SS Time of end of document in the format hour: minute: second
ReceiptID – indentification of a receipt
RCPID nn rrrr oooo
nn: ECR number (electronic cash register number)
rrrr:
Receipt Number – zero for LOAN and LOANT
- Separate numbering receipt
- Document with a choice of cash and subtype = mainten contain a blank
value
oooo: Name of cashier
DocumentTrailer – end of the document
DOCTR
LoanItem – deposit of means of payment into cash drawer
LOANPIC tttt cccc aaaa ffff rrrr lf
tttt:
CASH: Cash
CHECK: Check
CARD: Credit
cccc: abbreviation currency
aaaa:
value cash in / cash out in the main currency (if the cash out is in a foreign currency,
the value is converted to the main menu by the exchange rate)
ffff:
value of cash out in a foreign currency (if the cash out in a foreign currency - otherwise
the value is zero)
rrrr:
Foreign currency exchange rate (if the cash out is in the foreign currency - otherwise
the value is zero)
Page 65

65
OPERATION IN REGISTRATION MODE
lt:
type pf operation:
L: Cash in
P: Cash out
Sample of a document from the binary journal in text form:
DOCHDR SALE
SI 1 bread 10.00 60.00 2.000 * 3.000 19.00 A
SI 2 dessert 20.00 240.00 3.000 * 4.000 10.00 B
SI 3 bottle 4.00 4.00 1.000 * 1.000 0.00 G C
SI 4 btl. water 30.00 30.00 1.000 * 1.000 0.00 G
SI 5 bottle 4.00 4.00 1.000 * 1.000 0.00 G C
ADJI 4 P- 10.00 3.00
SI 7 btl. water 30.00 30.00 1.000 * 1.000 0.00 G
SI 8 bottle 4.00 4.00 1.000 * 1.000 0.00 G C
ADJI 7 P- 10.00 3.00
ADJI 7 P- 10.00 3.00 V
SI 10 btl. water 30.00 30.00 1.000 * 1.000 0.00 G
SI 11 bottle 4.00 4.00 1.000 * 1.000 0.00 G C
SI 12 btl. water 30.00 30.00 1.000 * 1.000 0.00 G
SI 13 bottle 4.00 4.00 1.000 * 1.000 0.00 G C
ADJI 12 P+ 10.00 3.00
SI 12 btl. water 30.00 30.00 1.000 * 1.000 0.00 G V
SI 13 bottle 4.00 4.00 1.000 * 1.000 0.00 G C V
ADJI 12 P+ 10.00 3.00 V
SI 15 bottle 4.00 4.00 1.000 * 1.000 0.00 G C R
SI 15 bottle 4.00 4.00 1.000 * 1.000 0.00 G C R V
SI 16 bread 10.00 10.00 1.000 * 1.000 19.00 A
ADJI 16 P- 10.00 1.00
ADJI 16 P- 10.00 1.00 V
ADJSBTL 18 P+ 10.00 397.00 39.70
ADJSBTL 19 P+ 10.00 436.70 43.70
ADJSBTL 19 P+ 10.00 436.70 43.70 V
TNDR CURN CASH 452.50 0.00 0.0000
TTL 452.50 36.30 -0.20
TAXI A 19.00 77.00 12.30
TAXI B 10.00 263.90 24.00
TAXI G 0.00 111.60 0.00
RCPID 01 0056 CASHIER.01
Page 66

66
OPERATION IN REGISTRATION MODE
DOCTR
PC ONLINE MODE
PC ONLINE MODE: Data is transmitted from the PC to the cash register
The programme equipment of the cash register allows the Euro-150TE/TX Flexy to be used as a printer. With
this function the cash register replaces a POS printer. This means that the cash register prints out a receipt
on the basis of a document in the programs in a PC. Such use of the cash register is suitable everywhere,
where a simple cash register is not enough for work with a large number of items and the frequency of
sales is too high. In order for you to use the register in PC ONLINE mode it is necessary that your program
equipment in the PC supported communication with the Euro-150TE/TX Flexy cash register. Your software
supplier can inform you about whether your PC programs support PC ONLINE communication with the
Euro-150TE/TX Flexy cash register.
Description of work in PC ONLINE mode:
Connect the cash register using a communication cable (USB). The cash register is prepared for communication with a computer (PC ONLINE mode) when no receipt has been registered (selling is not blocked). From
the computer it is possible to transmit information on PLU sales, PLU returns, surcharges or discounts for
an item or a subtotal, regarding the voiding of an item or an entire purchase, a payment order, or an instruction for a subtotal, a command for opening the cash drawer, a command for entering a reference number, a
command for payment of an invoice or of a chargeback.
Page 67

REPORTS
Page 68

68
Reports
REPORT MODES
There are two modes for printing reports: “X” mode and “Z” mode.
An „X“ mode report is printed without clearing the contents of the memory. It is used for generating an
overview of sales during the day, when switching cashiers and the like. An „X“ mode report may be printed
out at different times during the day.
In “Z” mode a report is printed out and clears the content of the register‘s memory of the sales data printed
in the report. A “Z” report is usually carried out once a day after finalizing the daily sales.
Reports are always printed in the primary currency..
GENERATED REPORTS
Table 5.1 - An overview of reports in the „X“ and „Z“ modes
Report „X“ mode „Z“ mode
Financial report - Daily • •
Financial report - Monthly • •
Cashiers report - Daily • •
Cashiers report - Monthly • •
DPT report - Daily • •
DPT report - Monthly • •
PLU report • •
Stock report •
Flash report (daily turnover) •
Drawer report - Daily • •
Drawer report - Monthly • •
Combine report - Daily •
Combine report - Monthly •
REPORT CONTENTS
Financial report
Daily report is a printed output containing data on daily summaries of financial operations relating to the sale
of goods or the provision of services.
Performing this type of report causes the zeroing out of data from the operational memory of the cash
register
Financial report contains:
1) The values of cumulated sums (grand totals) GT1, GT2 and GT3
2) Taxables sums and taxes in all taxation categories
3) Overall sales value
4) Overall sales without tax
5) Value of total tax
6) Number of receipts
7) Number and value of voids
8) Number and value of discounts
9) Number and value of voided discounts
10) Number and value of surcharges
11) Number and value of voided surcharges
Page 69

69
Reports
12) Number and value of refunds
13) Number and value of voided refunds
14) Number and value of returnable packs refunds
15) Number and value of voided returnable packs refunds
16) Number and value of subtotal discounts
17) Number and value of voided subtotal discounts
18) Number and value of subtotal surcharges
19) Number and value of voided subtotal surcharges
20) Number and value of voided receipts
21) Number and value of deposits in cash
22) Number and value of withdrawals of cash
23) Number and value of received by cash payment
24) Number and value of received by check payment
25) Number and value of received by credit card payment
26) Number and value of differences in rounding
Daily financial X-report
A daily (overall) X-report includes:
- the number of all daily (overall) Z-reports already performed
- financial report
Monthly financial X-report
A monthly (periodic) X-report collects financial data from the daily (overall) Z-reports accumulated over a
time period. This report allows the printing out of financial data accumulated from the last monthly (periodic)
Z-report. Does not clear the register memory.
Daily financial Z-report
A daily (overall) Z-report contains:
- sequential number of the performed daily (overall) Z-report
- financial report
After printing, the contents of the memory in a daily (overall) Z-report are added to the contents of the monthly
(periodic) report and then zeroed out.
Monthly financial Z-report
A monthly (periodic) Z-report gathers information from daily (overall) Z-reports over a longer time period. By
printing out the contents of the memory monthly (periodically) the Z-report is cleared.
Inactive categories (that is with zero sales information) are not printed out (with exception of tax
information)
Daily turnover
Menu item X-mode -> Flash report invokes a simple, fast report which shows the daily turnover on the cash
register display.
X-report for cashiers
A daily/monthly Z-report for cashiers prints out:
• name of the cashier,
• the number and value of the sums of positive and negative sales operations and refunded goods since
the last Z-report/monthly report for cashiers,
• total value of sales.
A monthly X-report is updated up to the time a Z-report is run for the cashiers.
Page 70

70
Reports
Z - report for cashiers
A daily/monthly X-report for cashiers prints out:
• name of the cashier,
• the number and value of the sums of positive and negative sales operations and refunded goods since
the last Z-report/monthly report for cashiers,
• total value of sales for the day/month.
After printing out of a daily report for cashiers the contents of the memory are added to the contents of the
monthly report for cashiers and subsequently zeroed out.
After printing out of a monthly Z - report for cashiers the content of the monthly report for cashiers is zeroed
out.
DPT X-report
A daily/monthly X-report for cashiers prints out:
• DPT name,
• number and value of sold DPT,
• the sum of the values of all DPT sold for the day/month..
DPT Z - report
A daily/monthly DPT report prints out:
• DPT name,
• number and value of sold DPT,
• the sum of the values of all DPT sold for the day/month.
After printing out of a daily DPT report the contents of the memory are added to the contents of the monthly
DPT report and subsequently zeroed out.
After printing out of a monthly DPT Z - report the content of the monthly DPT report is zeroed out.
PLU X-report
Procedure when printing a PLU X-report:
• selection of lower limit, selection of PLU number, from which the PLU report should print out,
• confirmation by pressing TOTAL,
• selection of upper limit, selection of PLU number, to which the PLU report should print out,
• confirmation by pressing TOTAL,
• "Print rec. num.?" - when setting the print numbers of a record ”yes” the PLU number is also printed out
for each PLU,
• confirmation by pressing TOTAL.
A PLU X-report prints out:
• PLU number (as long as “Print rec. num.?” was set to “yes”),
• PLU name,
• the number and value of the PLUs sold,
• the sum of the values of all PLU sold.
PLU Z - report
Procedure when printing a PLU Z-report:
• selection of lower limit, selection of PLU number from which the PLU report should print out,
•confirmation by pressing TOTAL,
• selection of upper limit, selection of PLU number, to which the PLU report should print out,
•confirmation by pressing TOTAL,
• "Print report?" - in this step with the selection to print a report – “yes” prints the PLU report on a receipt
within the selected range. If the print report is set to “no”, a PLU report is not printed on the receipt but
Page 71

71
Reports
the report is only cleared from memory after which it is possible to newly start the periodic tracking of
PLU sales. If the setting is on “no”, steps 7) and 8) do not take place,
• confirmation by pressing TOTAL ,
• "Print rec. num.?" - when setting the print numbers of a record ”yes” the PLU number is also printed out
for each PLU,
• confirmation by pressing TOTAL.
A PLU Z-report prints out:
• PLU number (so long as “Print rec. num?” was set to “yes”),
• PLU name,
• the number and value of the PLUs sold,
• the sum of the values of all PLU sold.
After printing of a PLU Z-report, data from the counters are zeroed out.
Stock X-report
Procedure when printing an inventory X-report
• selection of lower limit, selection of PLU number from which the PLU report should print out,
• confirmation by pressing TOTAL,
• selection of upper limit, selection of PLU number, to which the PLU report should print out,
• confirmation by pressing TOTAL,
• "Print rec. num.?" - when setting the print numbers of a record ”yes” the PLU number is also printed out
for each PLU,
• confirmation by pressing TOTAL.
An inventory X-report prints out:
• PLU numbers (so long as "Print rec. mum.?" was set to “yes”),
• PLU name and inventory status
Cash drawer X-report
A cash drawer report prints out:
• the number of payments in cash and their value,
• the number and sum of payouts in cash (refunded goods),
• the number of payments by check and their value,
• the number and sum of payouts by check (refunded goods)
• the number and sum of payouts by check (refunded goods)
• the number of payments by credit card and their value,
• the number and sum of payouts by credit card (refunded goods)
• the number and sum of payouts by credit card (refunded goods)
• the number of payments in cash in a foreign currency and their value,
• the number of operations of depositing cash and their value,
• the number of operations of withdrawing cash and their value,
• the number of operations of withdrawing checks and their value
• the number of operations of withdrawing cash in a foreign currency
• remaining cash in the cash drawer,
• the value of checks in the cash drawer,
• the total sum paid by credit card,
• the value of foreign currency in the cash drawer.
Page 72

72
Reports
Cash drawer Z - report - (Daily / Monthly)
A cash drawer report prints out:
• the number of payments in cash and their value,
• the number and sum of payouts in cash (refunded goods),
• the number of payments by check and their value,
• the number of payments by credit card and their value,
• the number of payments in cash in a foreign currency and their value,
• the number of operations of depositing cash and their value,
• the number of operations of withdrawing cash and their value,
• the number of operations of withdrawing checks and their value
• the number of operations of withdrawing cash in a foreign currency
• remaining cash in the cash drawer,
• the value of checks in the cash drawer,
• the total sum paid by credit card,
• the value of foreign currency in the cash drawer.
After printing out of a cash drawer Z-report, information from counters are zeroed out, after which a periodic
monitoring of cash in the drawer is possible.
Combined Z - report - (Daily / Monthly)
A collective report allows for the defining of optional reports which we want to regularly run. We can define
two independent reports, one for a daily purpose and the other for a monthly report.
Procedure when printing a daily collective report in the menu Z-mode -> Combine report -> Daily:
• choice of performance or configuration,
• confirmation of choice TOTAL, with selection of configuration
• selection print daily report “yes” or “no”,
•confirmation of choice TOTAL,
• selection print cashiers report “yes” or “no”,
•confirmation of choice TOTAL,
• selection print DPT report “yes” or “no”,
•confirmation of choice TOTAL,
• selection print PLU report “yes” or “no”,
•confirmation of choice TOTAL,
• selection print cash drawer report “yes” or “no”,
•confirmation of choice TOTAL.
Procedure when printing a monthly collective report in the menu Z-mode -> Combine report -> Monthly:
• choice of performance or configuration,
• confirmation of choice TOTAL,
* with selection of configuration:
• selection print cashiers report “yes” or “no”,
• confirmation of choice TOTAL,
• selection print DPT report “yes” or “no”,
• confirmation of choice TOTAL.
*The description of individual reports is in the preceding section.
HOW TO PRINT AN X-REPORT
Call up the Main Menu by pressing the MENU key, then using the arrows or select „X“ mode.
MAIN MENU
X-mode
Page 73

73
Reports
Enter the X-report menu by pressing TOTAL, where by using the or keys you can select which
report you want to run. The report will be printed out after pressing the TOTAL key.
We can print out X-reports any number of times without influencing the values of the data stored in the cash
register.
With the help of this type of report, you can get an overview of sales during the day. You can use these
values, for example, to check the balance of cash in the drawer, follow the course of sales throughout the
day, check sales with the changing of shifts or cashiers, etc.
HOW TO PRINT OUT A Z-REPORT
Press the MENU button to enter the Main menu, then use the arrows or to select „Z“ mode.
MAIN MENU
Z-mode
You get into „Z“ reports by pressing the TOTAL key, where by using the keys or you can select the
report you wish to run. The report will print out upon pressing the TOTAL key.
ABC GROCERY
Shop: Hlavná 67
Námestie mládeže 3
080 01 Prešov
******************
* W E L C O M E *
******************
VAT ID: SK20200123
***************************** X **************************
Financial report
Daily
*************************************************************
Daily report count 1
GT1 12.00
GT2 8.00
GT3 -4.00
-----------------------------------------------------VAT rate Netto VAT Taxable
-----------------------------------------------------A 20.00% 2.50 0.50 3.00
B 10.00% 0.00 0.00 0.00
C 0.00% 0.00 0.00 0.00
D Tax free 0.00 0.00 0.00
E ------ ---- ---- ---F ------ ---- ---- ---G ------ ---- ---- ----
-----------------------------------------------------Total 2.50 0.50 3.00
-----------------------------------------------------Receipt count 5x
Refund 2x -3.00
Loan 1x 100.00
Pick up 1x 50.00
Cash 5x 3.00
16-01-2011 14:02 01 CASHIER.01
Sample printout of an
Daily X-report
ABC GROCERY
Shop: Hlavná 67
Námestie mládeže 3
080 01 Prešov
******************
* W E L C O M E *
******************
VAT ID: SK20200123
***************************** Z **************************
Financial report
Daily
*************************************************************
Z daily report no. 2
GT1 12.00
GT2 8.00
GT3 -4.00
-----------------------------------------------------VAT rate Netto VAT Taxable
-----------------------------------------------------A 20.00% 2.50 0.50 3.00
B 10.00% 0.00 0.00 0.00
C 0.00% 0.00 0.00 0.00
D Tax free 0.00 0.00 0.00
E ------ ---- ---- ---F ------ ---- ---- ---G ------ ---- ---- ----
-----------------------------------------------------Total 2.50 0.50 3.00
-----------------------------------------------------Receipt count 5x
Refund 2x -3.00
Loan 1x 100.00
Pick up 1x 50.00
Cash 5x 3.00
16-01-2011 14:02 01 CASHIER.01
Sample printout of a Daily
Z-report
Page 74

74
Reports
ABC GROCERY
Shop: Hlavná 67
Námestie mládeže 3
080 01 Prešov
******************
* W E L C O M E *
******************
VAT ID: SK20200123
***************************** X **************************
Financial report
Monthly
*************************************************************
Monthly report count 0
Daily report count 3
GT1 12.00
GT2 8.00
GT3 -4.00
-----------------------------------------------------VAT rate Netto VAT Taxable
-----------------------------------------------------A 20.00% 2.50 0.50 3.00
B 10.00% 0.00 0.00 0.00
C 0.00% 0.00 0.00 0.00
D Tax free 0.00 0.00 0.00
E ------ ---- ---- ---F ------ ---- ---- ---G ------ ---- ---- ----
-----------------------------------------------------Total 2.50 0.50 3.00
-----------------------------------------------------Receipt count 5x
Refund 2x -3.00
Loan 1x 100.00
Pick up 1x 50.00
Cash 5x 3.00
16-01-2011 14:02 01 CASHIER.01
Sample printout of an
Monthly X-report
ABC GROCERY
Shop: Hlavná 67
Námestie mládeže 3
080 01 Prešov
******************
* W E L C O M E *
******************
VAT ID: SK20200123
***************************** Z **************************
Financial report
Monthly
*************************************************************
Z monthly report no. 1
Daily report count 3
GT1 12.00
GT2 8.00
GT3 -4.00
-----------------------------------------------------VAT rate Netto VAT Taxable
-----------------------------------------------------A 20.00% 2.50 0.50 3.00
B 10.00% 0.00 0.00 0.00
C 0.00% 0.00 0.00 0.00
D Tax free 0.00 0.00 0.00
E ------ ---- ---- ---F ------ ---- ---- ---G ------ ---- ---- ----
-----------------------------------------------------Total 2.50 0.50 3.00
-----------------------------------------------------Receipt count 5x
Refund 2x -3.00
Loan 1x 100.00
Pick up 1x 50.00
Cash 5x 3.00
16-01-2011 14:02 01 CASHIER.01
Sample printout of a
Monthly Z-report
Page 75

OPTIONAL ACCESSORIES
Page 76

76
Optional accessories
Digital scales
The Euro-150TE/TX Flexy allows for the connection of digital electronic scales with an RS-232 interface. You
can also use them without a connection to the cash register. We supply scales with official certification and
on request with a connecting cable.
Figure 6.1 - Digital scales
Ask your authorized Euro-150TE/TX Flexy dealer about the supply and connection of an electronic scale..
Barcode scanners
The Euro-150TE/TX Flexy cash register comes equipped with an interface for connecting a barcode scanner.
If you decide to use a barcode scanner, this section offers some recommendations for how to choose one.
In each case we recommend buying and connecting a scanner with the help of your local Euro-150TE/TX
Flexy dealer.
Barcode scanner connects to the cash register via a built-in serial RS-232 interface. The barcode scanner
must be equipped with the same interface. For a scanner connection, the cash register offers a single direction +5V adapter for the port COM1 (Port1 optional accessory); if you are using the COM2 (Port2) and
COM3 (Port3) ports to connect the scanner, you must use an external power supply. Prior to connecting a
scanner it is necessary to correctly program both the scanner and the cash register. We recommend using
a scanner with its own power supply.
We recommend Metrologic scanners for working with the cash register. Ask your Euro-150TE/TX Flexy
dealer for more information.
MS-5145 Eclipse
A manual scanner with no holder, which scans upon the pressing of a trigger. The method of scanning is
the LED 650 nm ± 5 nm, scanner speed is 72 lines/s, scanning distance is 140 mm and the minimal width
of the bar is 0.102 mm. RS-232 interface.
Figure 6.2 - MS-5145 Eclipse scanner
Metrologic Orbit MS-7120
An omnidirectional, very fast, laser barcode scanner. The scanner uses an LED 650 nm ± 5 nm for scanning,
the speed of the omnidirectional scanning is 1200 lines/s (20 scanning lines), scanning grid of 5 x 4 parallel
lines, scanning distance is 203 mm and the minimum bar width of 0.13 mm.
Page 77

77
Optional accessories
Figure 6.3 - Metrologic Orbit MS-7120 scanner
Metrologic MS-9520 Voyager
A hand-held single-line laser scanner with automatic barcode scanning, also offered with a holder. The method
of scanning is an LED 650 nm ± 10 nm, scanning speed is 72 lines/s, scanning distance of 203 mm and
the minimum bar width is 0.132 mm.
Figure 6.4 - Metrologic MS-9520 Voyager scanner
Birch CD-108e
A great favorite, this hand-held CCD scanner is characterized by its low energy consumption, which makes
it suitable for connecting to a cash register working on a battery or to a laptop computer. This scanner is
ergonomically designed and reliably reads all commonly used barcodes, and working with it, including
configuration settings, is simple and easy for all users. It uses a CCD scanning with a speed of 100 scans
per second.
Figure 6.5 - Birch CD-108e scanner
You can get information about other types of scanners from your authorized Euro-150TE/TX Flexy cash register
dealer. You can find a complete list of scanners sold on our Web site: www.elcom.eu.
Expanding RS-232 ports
If you need to connect a number of devices to the cash register, it’s possible to expand the register by two
more RS 232 ports. In this way you can connect the cash register simultaneously with, for example, a scan-
ner, a payment terminal and an external display.
Page 78

78
Optional accessories
Internal accumulator
The cash register can be expanded by an internal accumulator which is an optional accessory and ensure
operation even in case of a power outage.
A component of the accumulator expansion is also a change of the register power adaptor. A service organization provides installation of the accumulator.
CASH DRAWER
The Euro-150TE/TX Flexy cash register allows you to connect a larger cash drawer outfitted with an opening
device with a solenoid (12V and with max. 30Ω resistance). The cash register comes with a built-in interface
for automatic cash drawer opening.
The cash drawer is connected to the cash register by a cable which allows for automatic opening. The cable
with a connector allows for easy disconnection of the cash drawer when moving the cash register. Small
operations certainly will welcome the opportunity to place the cash drawer as needed in a freely chosen
location and open it automatically via the cash register.
Figure 6.6 Cash drawer
Ask your authorizedEuro-150TE/TX Flexy dealer about supply of a connecting cash drawer.
EXTERNAL DISPLAY
External display ED-2500R can be connected to the Euro-150TE/TX Flexy cash register. The display can show
programmed advertising texts in „R“ mode after a receipt is closed. For more information see the chapter
“Advertising texts” in the section “Programming the cash register”.
Figure 6.7 External display
Page 79

HELPFUL ADVICE
Page 80

80
Helpful advice
MANDATORY SERVICE MAINTENANCE
The Euro-150TE/TX Flexy cash register requires the performing of mandatory service maintenance after
reaching a certain number of printed out lines and before using up the capacity of the floating battery.
INFORMATIONAL AND ERROR MESSAGES
If it is necessary to inform the operator about the current activities of the cash register or if the register enters
into an error state, the following messages will appear on the display:
Table 7.1 - List of cash register error messages
MESSAGE MEANING
Cover open
The printer head is lifted.
Receipt paper
missing
There is no receipt paper in the printer.
Printer
disconnected
Communication with the printer was unsuccessful. Printer is probably disconnected.
Receipt total
overflow
The operation was not performed because it would cause the exceeding of the
purchase limit.
Head temperature
out of range
Printing of data was stopped. Cooling of the printer head is required.
Purchase full
end receipt
The memory for recording sales has filled up. Purchase must be voided or paid
(The limit for one sale is 101 PLUs).
Realize last
payment
Limit reached for the number of partial payments allowed in a purchase. Full
amount must be paid.
Value adjustment
limit
The entered value cannot be zero and less than the price of the item, or the
value of the subtotal.
Percent. adjust
limit
The entered value cannot be zero, less than the programmed limit and no greater
than 100%.
Not adjustable
item
It is not possible to apply a surcharge/discount to the selected item - for example,
a refundable package.
Quantity1 limit
exceeded
First amount exceeds limit.
Quantity2 limit
exceeded
Second amount exceeds limit.
Quantity limit
exceeded
Resulting amount exceeds limit.
Invalid
quantity1
A zero or very large (invalid) value for the first amount.
Invalid
quantity2
A zero or very large (invalid) value for the second amount.
Invalid
quantity
A zero or very large (invalid) value for the resulting amount.
Invalid
unit price
A zero or very, very large unit price for an item was entered.
Loan forbidden
The requested deposit is not allowed.
Page 81

81
Helpful advice
Pickup forbidden
The requested withdrawal is not allowed.
Not enough
currency
Pay out not possible – the cash register drawer does not have the requested
amount.
Sale impossible
inactive PLU
A PLU with an undefined name or assigned an inactive taxation level cannot
be registered. Equally, an item with a zero-programmed price and no price for
registration cannot be registered.
Sale impossible
inactive DPT
A DPT with an undefined name or assigned an inactive taxation level cannot
be registered. Equally, an item with a zero-programmed price and no price for
registration cannot be registered.
Unit price chang
not allowed
Item does not allow for entering unit price for registering.
Item not found
The item with the entered number or bar code is not in the register database.
Item has
zero price
A resulting price of zero for an item is not allowed.
No sale yet
The requested operation cannot be performed because the purchase contains
no PLUs.
Oper. impossible
in this state
In the mode for refunding goods, only registration of PLUs; its voiding and a one-
time payment in the sense of refunding cash to a customer is allowed.
Item is not
container
The given PLU cannot be used in an operation for buying back returnable
packaging.
Linked PLU
is not container
The given PLU cannot be used in an operation for buying back returnable
packaging.
Sbtl. adjusment
It's not possible to cancel the PLU because a discount/surcharge has already
applied to the subtotal and the given PLU was included.
Descript. PLU
can't be voided
Descriptive PLU cannot be cancelled separately, but only together with the main
PLU to which it is linked.
Desctipt. PLU
can't be sold
Descriptive PLU cannot be sold separately but only when linked to a main PLU.
Bad tender value
The value entered for a payment cannot be realized in the valid banknotes and
coins.
Invalid
value
An extremely large value in the operation deposit, withdrawal or payment.
Value
too large
The value entered for payment cannot be processed.
Illegal
tender
Only cash can be used for payment in foreign currency.
After daily
report
A daily Z-report was already run - no sales have been run since the last Z-
report.
Do Z report
daily
The activated operation requires the running of a daily Z-report.
Do Z report
monthly
The activated operation requires the running of a monthly Z-report.
Do Z reports
Activated operation requires running a Z-report.
Cannot set value
Value of data cannot be changed in the given state, for example, no reports
have been run.
Page 82

82
Helpful advice
Report
done
The requested report was run.
No item
Operation on sale which does not contain a PLU
Illegal
operation
Prohibited sequence of keys were pressed.
Change
too large
The value of the payment causes a payout value that cannot be shown on the
customer display.
Continue
registration
After switching on, the cash register informs about an open purchase – It is possible to continue in charging items or complete the sale.
Continue
payment
After switching on cash register informs about a purchase waiting to be paid –
only payments are possible at this point.
Scales
error
Scale is not connected or communication with scale was unsuccessful.
Memory card
not found
Error during export or import of data.
Error open
file
Cannot close
file
Error during export or import of data.
Error
read file
Cannot
write file
Batt. discharged
connect adapter
Current state of the battery doesn't allow for regular cash register operation. Attaching an adapter is imperative. Cash register can be shut off.
Batt. discharged
charging...
Current state of the battery doesn't allow for regular cash register operation.
Adapter is now attached. Cash register can be shut off.
Print.line.limit
call service(CL)
Call service for cash register maintenance.
After daily
report
An attempt at running a Z-report, but nothing was registered. At least one sale,
return or deposit must first take place, then it is possible to run the report.
Dev.disconnected
call service,pls
Disconnection of the customer display or printer detected. Cash register cannot
be used for registration of sales. Call a service technician.
TESTING THE CASH REGISTER
Tests for the Euro-150TE/TX Flexy allow you to simply and rapidly check the functionality of the cash register.
With the help of self-tests, we can check: the functioning of electronic circuits, display elements, keys and
the keyboard and the printer. Only the most commonly used tests are described in this chapter. Other tests
are designed for service technicians.
System params
Tests
Testing the electronic circuits and display
Page 83

83
Helpful advice
Customer display
Self-test for the electronic circuits and the displays shows selected characters on the display.
Procedure for initiating the customer display test:
Sequence of steps Display
In the P-mode press or and then TOTAL to enter the menu
for testing the customer display (P-mode – System params – Tests):
Tests
Customer display
Confirm by pressing TOTAL. The customer display will gradually
show selected characters
Customer display
executing...
After successful completion of the test, the display reads:
Test executed OK
Cashier display
Self-test for the electronic circuits and the displays shows selected characters on the display.
Procedure for initiating the cashier display test:
Sequence of steps Display
In the P-mode press or and then TOTAL to enter the menu
for testing the cashier display (P-mode – System params – Tests):
Tests
Operator display
Confirm by pressing TOTAL. The display will gradually light up all
points on the cashier display
After successful completion of the cashier display test, the display
reads
Test exeuted OK
Testing the keyboard
The keyboard test evaluates the successive pressing of keyboard keys. If the keys are pressed in the exact
order defined in Figure 7. 1 and the keyboard or its circuits are not damaged, the test will be completed
successfully.
Procedure for initiating the keyboard test:
Sequence of steps Display
In the P-mode press or and then press TOTAL to enter the
menu for testing the keyboard (P-mode – System params – Tests):
Tests
Keyboard
Confirm by pressing TOTAL and gradually press the keys in the
order shown in figure 7. 1. Begin with the key and end with the
TOTAL key.
Keyboard
executing...
After successful completion of the test, the display reads:
Test executed OK
Course of the test:
Gradually press the individual keyboard keys in the direction of the arrows in Figure 7. 1.
Page 84

84
Helpful advice
If a key is pressed in the incorrect order, a sound signal will announce the error until the correct key is pressed
(the next according to the test).
You can end the keyboard test at any time by pressing TOTAL.
Figure 7.1 – The Euro-150TE/TX Flexy keyboard test sequence
Testing the printer
The printer‘s self-test will print out the entire set of characters in standard size on the receipt ribbon.
Procedure for initiating the printer’s self-test:
Sequence of steps Display
In the P-mode press or and then TOTAL to enter the menu
for the printer test (P-mode – System params – Tests):
Tests
Print
Confirm by pressing TOTAL. The printer will print out the cash register‘s character set on the thermal ribbon.
Print
executing...
After successful completion of the test, the display reads:
Test executed OK
Testing the position of the thermal printer head
The display will show the current position of the printer head. Movement of the head‘s lifting mechanism
changes the depiction of the head position on the display according to the actual position of the head‘s
lifting mechanism.
Procedure for initiating the test:
Sequence of steps Display
In the P-mode press or and then TOTAL to enter the menu
or testing the position of the thermal printer head (P-mode – System
params – Tests):
Tests
Platten position
Confirm by pressing TOTAL. If the printer head is in place, the
display will show:
Cover close
If the printer head is lifted, the display will show:
Cover open
Page 85

85
Helpful advice
Complete the test by pressing TOTAL.
Cover close
Paper ribbon sensor test
The display will show the current state of paper ribbon present. Installing and removing paper from the sensors
changes the status depicted on the display, depending on the presence of the paper in the sensor.
Procedure for initiating the test:
Sequence of steps Display
In the P-mode press or and then TOTAL to enter the menu for
testing the paper ribbon sensor (P-mode – System params – Tests):
Tests
Paper sensor
Confirm by pressing TOTAL. If the thermal ribbon is correctly inserted
in the printer, this will appear on the display:
Receipt OK
If there is an error in the thermal paper, the display will show
Receipt error
Complete the test by pressing TOTAL.
Receipt OK
Page 86

86
Notes
Page 87

87
Notes
Page 88

88
Notes
 Loading...