

Page 1
Operating Instruction CAWI Electronic Lock „ElCom“ 7205
1. General
Even though using this lock system is very easy, please read these operating instructions carefully and completely
before using the lock; this will help to avoid operating errors. These instructions refer to an electronic lock installed in a
high-security container such as a safe.
The green LED will blink to confirm each keypad entry. The time period between any two entries may not exceed 20
seconds as otherwise all previous entries will be cleared.
The keypad could be supplied with two differend keypad prints. (see Fig.1 and Fig.2)
Fig.1 Input of numerical acces code
e.g.
Fig.2 Input of alpha-numeric acces code
e.g. ROLF12
2. Opening the electronic lock
Enter the six-digit combination set at the factory by pressing buttons 1 – 2 – 3 – 4 – 5 – 6 or enter your own six-digit
combination.
Please note: Press the C button to correct your entry; in this case the entire combination will have to be entered again.
The green LED will light for about 6 seconds to indicate that the lock has been cleared for opening. At the same time,
the electronic lock will clear the mechanism for opening. The door to the safe can now be unlocked with the keypad lever
and opened using the fingertip grip. The electronic locking element is then locked again automatically after about 6
seconds; this is indicated by the red and green LEDs blinking once. The electronic lock is only secured when the keypad
lever is moved manually into its locked position.
3. Closing the electronic lock
Close the door to the safe and return the keypad lever to its locked position, moving it all the way to the mechanical stop.
The red cap must be completely concealed by the keypad lever. The green LED goes out at the same time to indicate
that the electronic lock has been mechanically secured in this position.
Please note: Try to operate the keypad lever to verify that the container is closed correctly and securely.
4. Response to erroneous entries
The red LED lights for about 3 seconds whenever an invalid combination is entered. The combination may now be
entered again. After the third consecutive incorrect entry, however, a 10-second time-out period starts; the keypad will
accept no entries during this period. This time-out period will be extended by 10 seconds following each subsequent
incorrect entry. The time-out periods cannot be interrupted with the ”C” button.
5. Correction with the C button
If you press the C button during the entry sequence, then the entire series of digits previously entered will be cancelled.
If a programming phase has been initiated, then the lock will exit the programming mode; you must re-start programming
from the very beginning by pressing the * button.
Exception: The time-out period following erroneous entries and the low-battery warning period cannot be interrupted by
pressing the C button.
Page 2
6. Monitoring the battery charge level, replacing the batteries
If the charge remaining in the batteries is insufficient, then the red and green LEDs will blink alternately 10 times after
the combination has been entered. This is to remind you to install two new 1.5 Volt AA (alkaline) cells in the next few
days.
Note: If you ignore the low-battery warning over a longer period of time, then you must be aware of the hazard that it will
be possible to open the lock and, as a consequence, the safe only after new batteries have been installed.
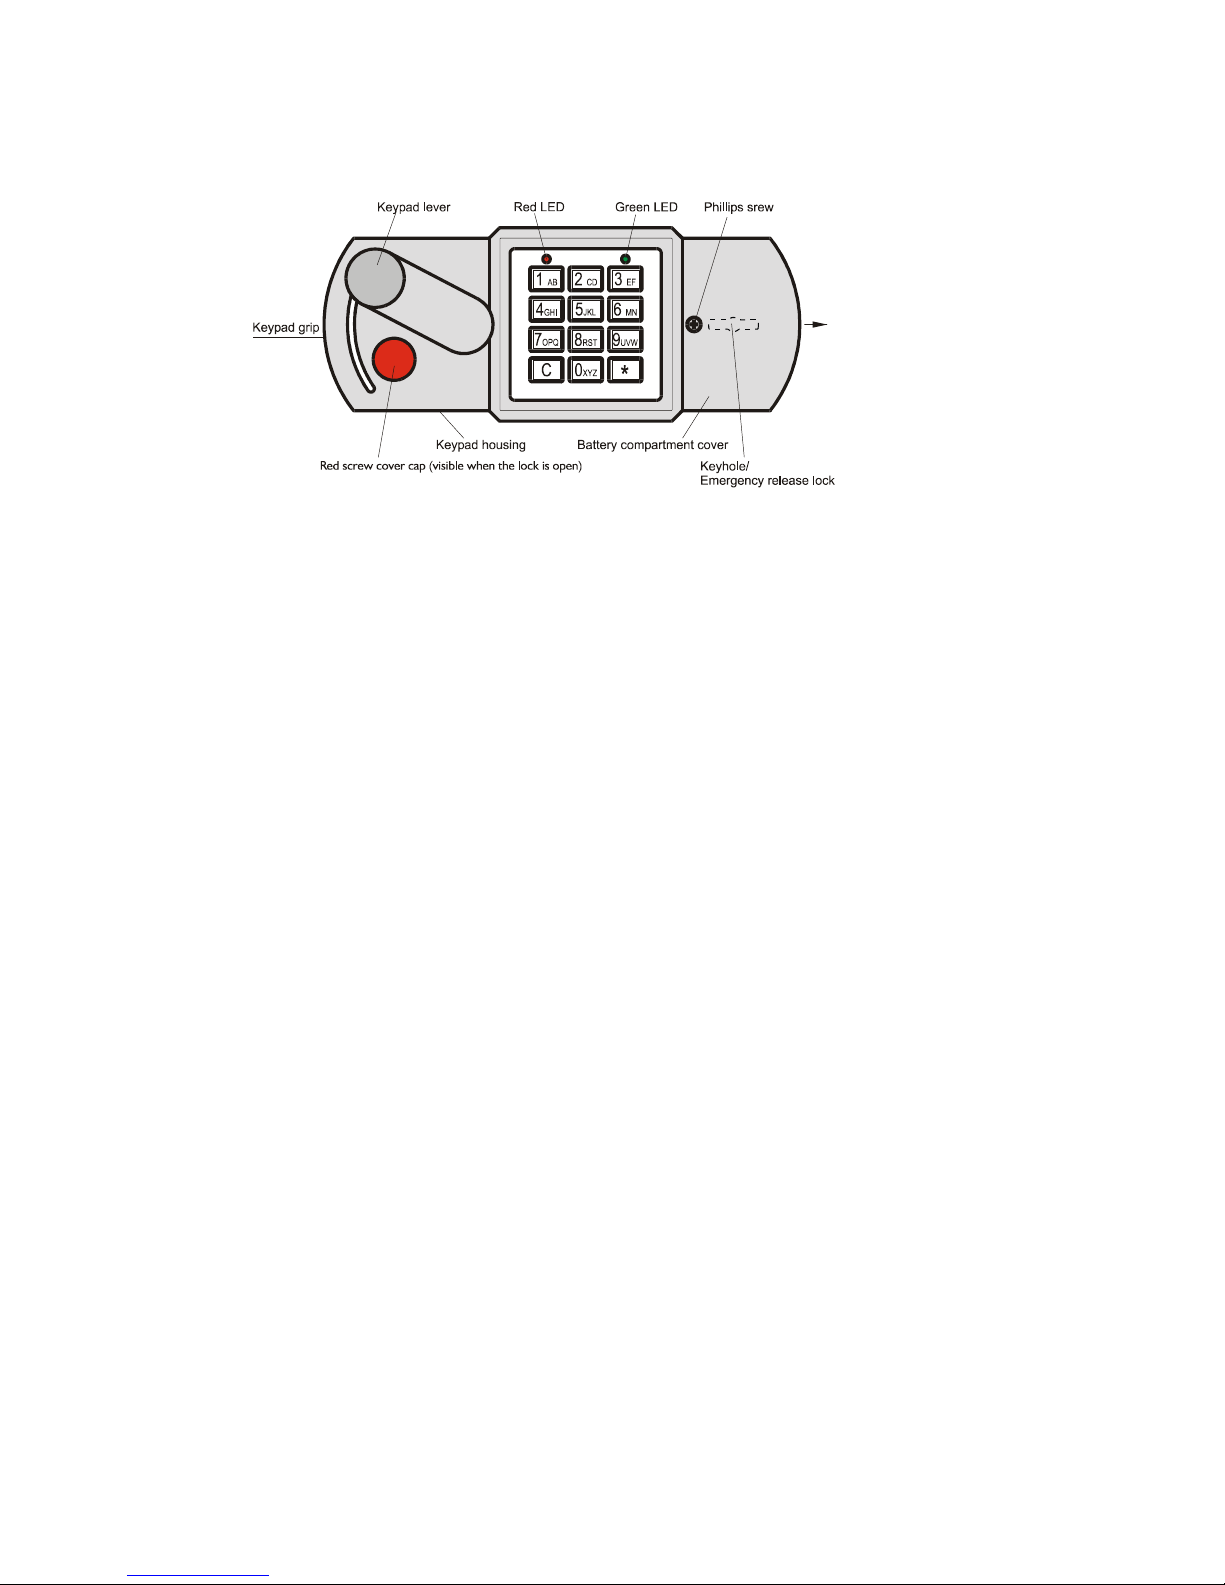
The battery compartment cover is located to the right of the keypad housing. Remove the Phillips screw and then slide
the battery compartment cover carefully off of the keypad housing in the direction indicated by the arrow. See Figure 1.
Remove the exhausted batteries and replace them with two new 1.5 volt AA (alkaline) batteries. The direction in which
the batteries are to be installed is shown inside the battery compartment cover. The programmed combination will be
retained during battery replacement.
7. Programming the electronic lock
Before you use your safe for the first time it is necessary, for security reasons, to enter your personal combination; the
factory combination must not be retained. The lock should be programmed only with the door open and with the
electronic lock released. Select your new six-digit combination before starting the easy programming sequence. Do not
use any personal data for this combination, such as birthdays or other information which could be derived from
knowledge about your person. Store your combination in a safe place so that only you have access to it.
7.1 Programming the master combination
Note: Program only with the door open and the electronic lock released. The green LED must not be lit.
Note:
We can assume no guarantee liability for malfunctions caused by erroneous reprogramming or application of undue
force or improper treatment nor in case of injury to property or assets which, for example, is due to a failure to close the
safe properly.
We recommend obtaining suitable insurance coverage to protect the contents of your safe. Your property insurance
sales agent can provide details.
8. Troubleshooting in case of malfunction
If it is not possible to open your safe in spite of having carried out the instructions above, then please contact the safe
manufacturer.
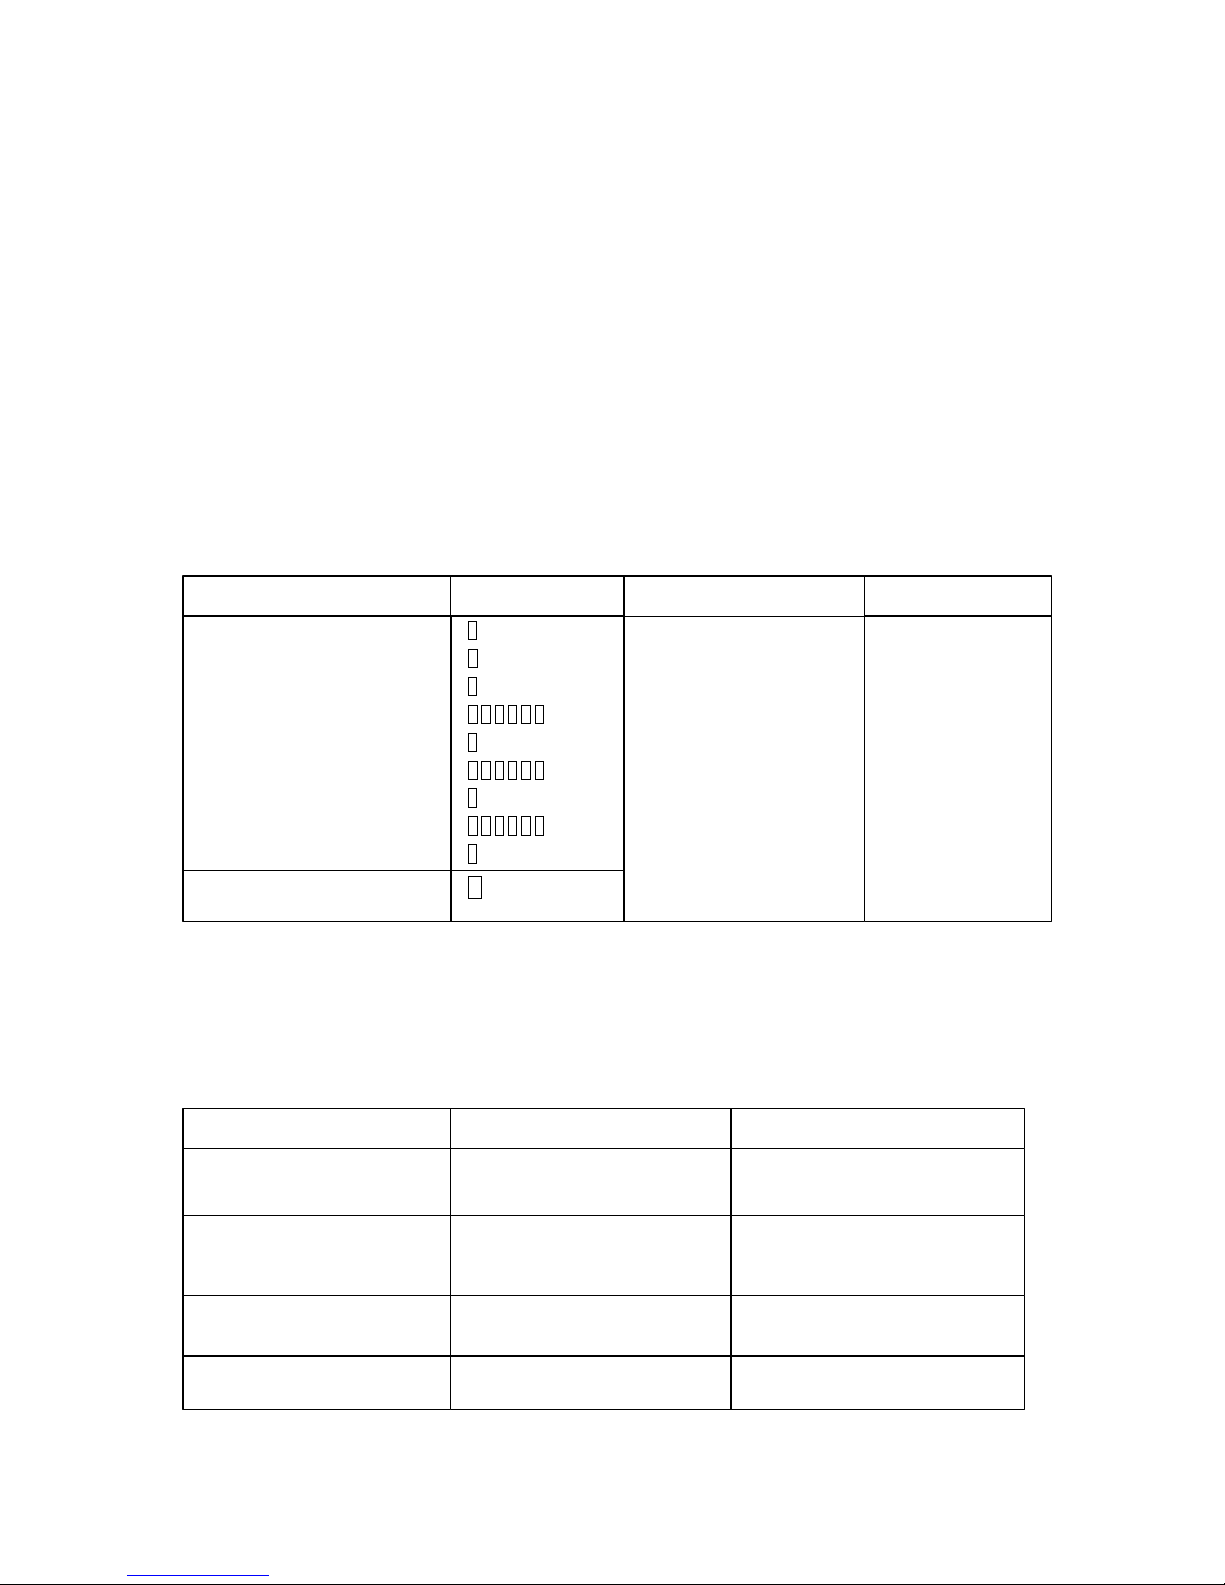
Function
Activate programming mode
Select programming mode
Confirm entry
Enter the previous six-digit
combination
Confirm entry
Enter the new six-digit combination
Confirm the entry
Verify the new combination by
repeating your entry
Confirm entry
Cancel
Operation,Button(s)
*
0
*
1 2 3 4 5 6
*
6 5 4 3 2 1
*
6 5 4 3 2 1
*
C
Response
OK = Green LED blinks twice
Invalid = Red LED lights for 3
seconds
Comments
Set for 1 - 2 - 3 - 4 - 5 - 6
at the factory
Important: Please check
to see that the lock
functions correctly with
the new master
combination before you
close the door to the
container
Problem
Red LED lights for about 3 seconds
after the combination is entered.
Electronic lock does not respond to
any keypad entries.
The red and green LEDs blink
alternately, ten times.
Possible cause
Invalid combination was entered.
The lock-out period was activated by
entering an invalid combination
several times in sequence.
Low battery charge
Red LED lights for about 3 seconds
after programming a new master
combination.
The new master combination was
improperly programmed. The old
combination is retained.
Remedy
Enter valid combination.
Repeat the programming of the new
combination as described in Item 7.1 of
the operating instructions.
See Item 4 in the operating instructions.
Change out the batteries. See Item 6 in
the operating instructions.
Page 3
Gebruiksaanwijzing CAWI elektronisch slot 7205
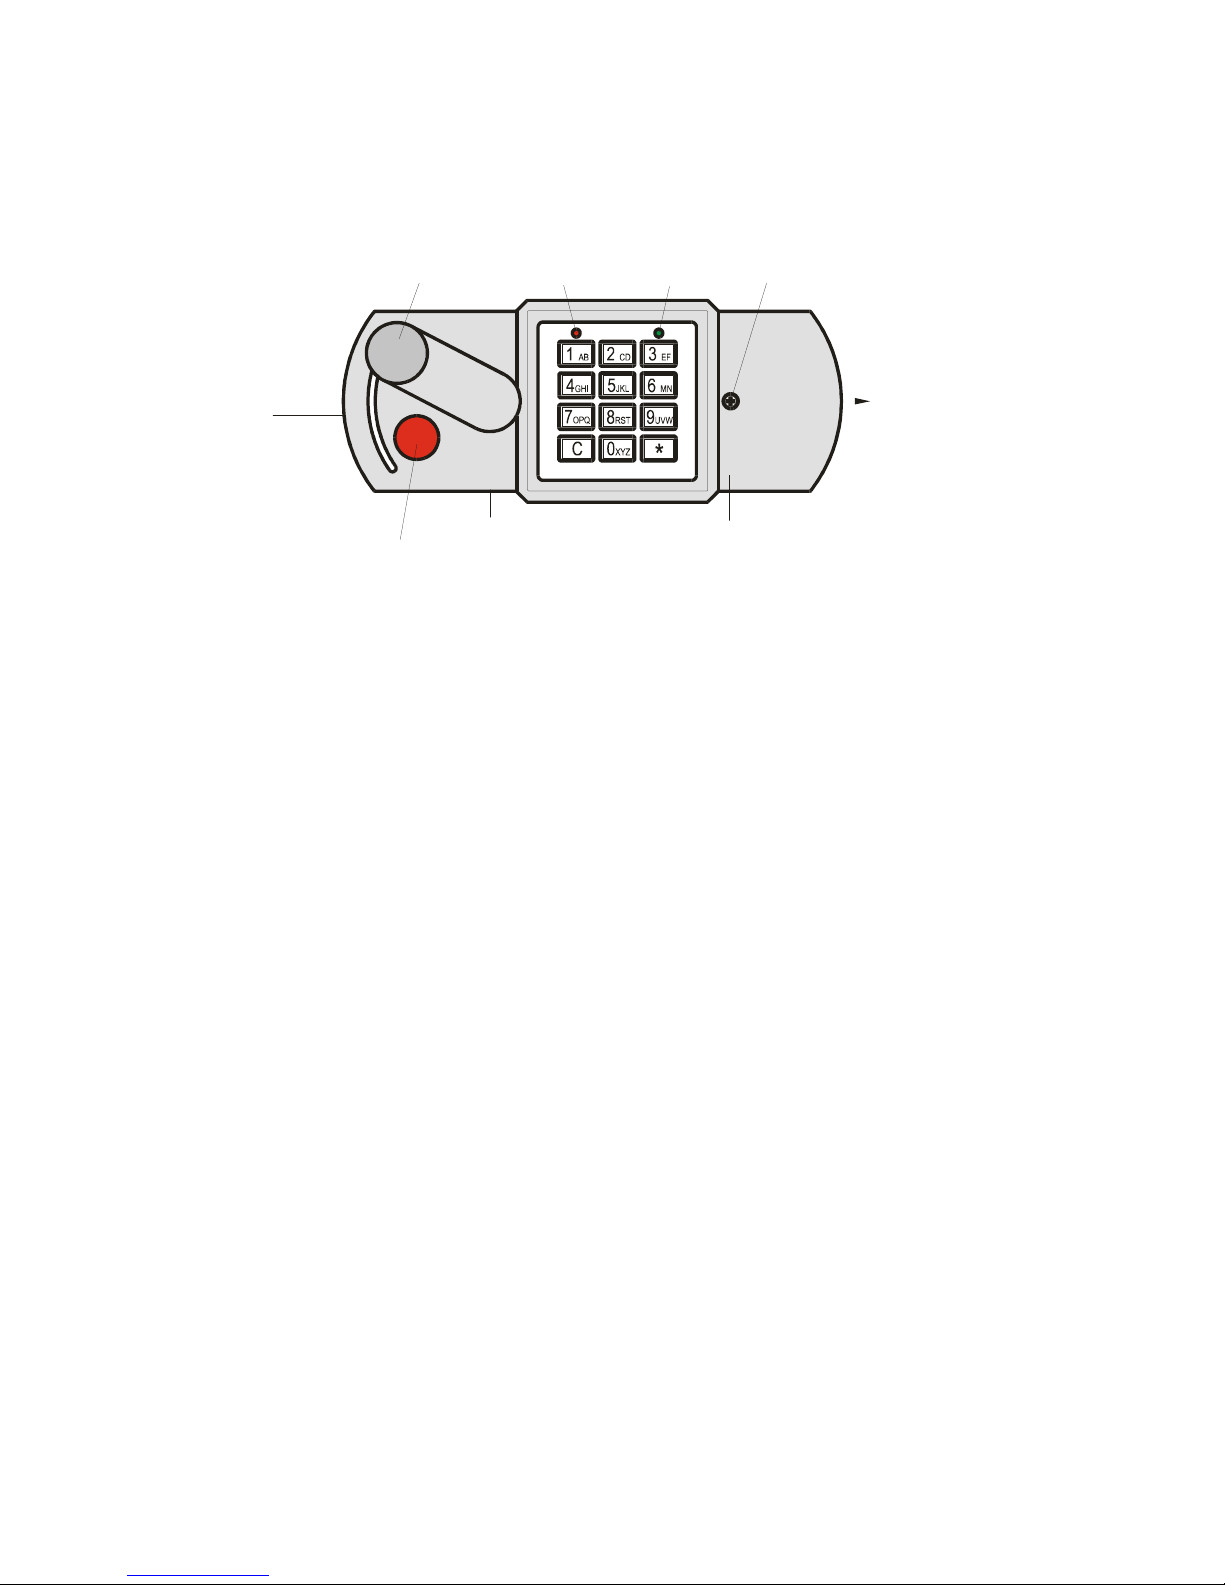
Toetsenbordhendel LED rood LED groen Kruiskopschroef
Toetsenbordarmatuur Deksel batterijhouder
Handgreep
toetsenbord Rood markeringsplaatje (indien zichtbaar, slot is geopend)
Afb. 1
1. Algemeen
De bedieningswijze is heel eenvoudig, maar leest u desondanks eerst de volledige gebruiksaanwijzing zorgvuldig door,
om bedieningsfouten te voorkomen. De gebruiksaanwijzing heeft betrekking op een elektronisch slot, dat is ingebouwd
in een relevante veiligheidshouder, zoals bijv. een brandkast. Elk toetscontact wordt door het oplichten van de groene
LED bevestigd. De maximale tijdsduur tussen het indrukken van de toetsen mag niet meer bedragen dan 20 seconden,
anders wordt de tot dan toe verrichte invoer weer gewist.
1 Invoermogelijkheid van cijfercodes.
Voorbeeld: 3 2 7 9 6 1
2 Invoermogelijkheid van cijfer- en lettercodes.
Voorbeeld: invoer van de code ROLF12
8 7 5 3 1 2
2. Openen van het elektronische slot
Voor de aflevercode van 6 cijfers in met de toetsen 1 – 2 – 3 – 4 – 5 – 6 of voer uw eigen code van 6 cijfers in.
Let op: De invoer kan worden gecorrigeerd met behulp van de C-toets. In dat geval dient u de volledige invoer te
herhalen. Een correcte invoer wordt bevestigd door het oplichten van de groene LED gedurende 6 seconden.
Tegelijkertijd wordt het elektronische slot gedurende ca. 6 seconden gedeblokkeerd om de deur te kunnen openen. De
kluisdeur kan nu door middel van de toetsenbordhendel worden ontgrendeld en worden geopend met de handgreep.
Het elektronische blokkeerelement wordt na ca. 6 seconden automatisch vergrendeld. Dit wordt bevestigd door het
eenmalig oplichten van de rode en de groene LED. Het elektronische slot is pas geblokkeerd, wanneer de
toetsenbordhendel handmatig in de blokkeerstand wordt gebracht.
3. Vergrendelen van het elektronische slot
Sluit de deur en draai de toetsenbordhendel terug tot de aanslag. Daarbij dient de rode markering volledig overdekt te
zijn door de toetsenbordhendel. In deze stand is het elektronische slot mechanisch vergrendeld, wanneer de groene
LED tegelijkertijd gedoofd is.
Let op: Om veiligheidsredenen dient u middels de toetsenbordhendel te controleren of de kast is vergrendeld volgens
de voorschriften.
4. Reactie bij een foutieve invoer van de code
Wanneer er een foutieve code wordt ingevoerd licht de rode LED gedurende ca. 3 seconden op. U heeft nu nog drie
pogingen om de juiste code in te voeren. Wanneer u meer dan viermaal een verkeerde code heeft ingevoerd, start de
blokkeertijd voor foutieve invoer. Gedurende deze tijd reageert het slot 10 seconden op geen enkele invoer. Elke
verdere foutieve invoer verlengt deze blokkeertijd voor foutieve invoer met nog eens 10 seconden extra. De blokkeertijd
voor foutieve invoer kan niet worden afgebroken met de C-toets.
5. Correctie met de C-toets
Page 4

Wanneer u tijdens het invoeren de C-toets indrukt, wordt de volledige invoer van gegevens tot dan toe afgekeurd. Ook
een eventueel begonnen programmeermodus wordt verlaten en u dient de programmering van begin af aan door het
indrukken van de * toets opnieuw te beginnen.
Uitzondering: De blokkeertijd bij foutieve invoer en het waarschuwingssignaal ‘batterij leeg’ kunnen door het indrukken
van de C-toets niet worden afgebroken.
6. Batterijcontrole, batterijen vervangen
Wanneer de batterijen te zwak worden, lichten na het invoeren van de code, de groene en de rode LED afwisselend 10
maal achter elkaar op. Dit dient ter herinnering, zodat u in de daaropvolgende dagen 2 nieuwe batterijen van 1,5 Volt
van het type PENLITE (alkaline) plaatst.
Aanwijzing: Wanneer u gedurende langere tijd de waarschuwing ‘batterij leeg’ negeert, dient u er rekening mee te
houden, dat het slot en daarmee ook de brandkast pas na het plaatsen van nieuwe batterijen kan worden geopend.
De deksel van de batterijhouder bevindt zich aan de rechterzijde van het toetsenbordarmatuur. Draai de kruiskopschroef
los en schuif de deksel van de batterijhouder naar rechts (zie afb. 1).
Verwijder de oude batterijen en vervang deze door 2 nieuwe batterijen van 1,5 Volt van het type PENLITE (alkaline) In
de batterijhouder staat aangegeven hoe de batterijen dienen te worden geplaatst. De geprogrammeerde code blijft na
het vervangen van de batterijen behouden.
7. Programmeren van het elektronische slot
Alvorens uw brandkast voor de eerste maal in gebruik te nemen dient om veiligheidsredenen uw persoonlijke code te
zijn ingevoerd, d.w.z. de afleveringscode mag niet gehandhaafd blijven. De programmering dient alleen te worden
uitgevoerd wanneer de deur geopend is en het elektronische slot vergrendeld. Voordat u de zeer eenvoudige
programmering van uw nieuwe code van 6 cijfers uitvoert, dient u deze eerst vast te leggen. Gebruik voor deze code
geen persoonlijke gegevens, zoals bijv. verjaardagen of andere datums die men te weten zou kunnen komen doordat
men u kent. Bewaar uw code zorgvuldig, zodat deze alleen voor u zelf toegankelijk is.
7.1 Programmering van een nieuwe code
Aanwijzing: Alleen uitvoeren bij geopende deuren en vergrendeld elektronisch slot. De groene LED dient gedoofd te
zijn. Deur geopend laten, elektronisch slot vergrendelen door middel van toetsenbord hendel.
Functie Bediening, toets Reactie Opmerkingen
Start programmeermodus *
Kies programmeermodus 0
Bevestig de invoer *
Voer de tot nu toe geldende cijfer- of
lettercode van 6 cijfers in
1-2-3-4-5-6
* bij aflevering ingesteld op
1-2-3-4-5-6
Bevestig de invoer *
Voer een nieuwe cijfer- of lettercode
van 6 cijfers in
6-5-4-3-2-1
.
Bevestig de invoer *
Let op: controleer of het
Bevestig de code door herhaling 6-5-4-3-2-1
OK = groene LED licht 2x
op
Ongeldig = rode LED
slot foutloos werkt na het
invoeren van de nieuwe
code, voordat u de deur
Bevestig de invoer * licht 3 sec. op van de brandkast vergrendelt
Afbreken C
Aanwijzing: Wij staan niet in voor storingen die zijn veroorzaakt door een verkeerde bediening of door het gebruik van
geweld of een onjuiste behandeling en niet bij financieel nadeel en materiële schade, die bijv. te wijten zijn aan het
onjuist vergrendelen van de brandkast. Ten behoeve van de verzekering van de inhoud van uw brandkast adviseren wij
u een verzekering af te sluiten. Neemt u daartoe contact op met uw verzekeringsadviseur.
8. Oplossen van problemen bij storingen
Probleem Mogelijke oorzaak Maatregel
Rode LED licht gedurende ca. 3
seconden op na code-invoer
Foutieve code-invoer Voer de juiste code in.
Rode LED licht gedurende ca. 3
seconden op na programmering van een
nieuwe code
Nieuwe code werd verkeerd
geprogrammeerd. De oude code blijft
behouden.
Herhaal de programmering van een
nieuwe code volgens punt 7.1 van de
gebruiksaanwijzing.
Elektronisch slot reageert op geen
enkele invoer
Blokkeertijd werd geactiveerd doordat
meerdere keren een foutieve code werd
ingevoerd
Zie gebruiksaanwijzing punt 4.
Rode en groene LED lichten 10 maal
afwisselend op.
Onvoldoende capaciteit batterijen Vervang de batterijen. Zie
gebruiksaanwijzing punt 6.
Wanneer de brandkast ondanks bovenstaande aanwijzingen niet kan worden geopend, kunt u contact opnemen met uw
handelaar.
Page 5

Mode d’emploi Serrure électronique CAWI 7205
Figure 1 : légende
Diode électroluminescente rouge (LED rouge)
Diode électroluminescente verte (LED verte)
Levier de commande du clavier Vis à tête cruciforme
Plaquette indicatrice rouge (si elle est visible, la serrure est ouverte)
Poignée du clavier Couvercle du compartiment à piles
Armature du clavier
1. Généralités
La commande de la serrure est très simple, mais lisez néanmoins attentivement le mode d’emploi avant la première
utilisation, afin d’éviter toute erreur de manipulation. Le mode d’emploi se rapporte à une serrure électronique intégrée
dans un support de sécurité approprié, p. ex. dans le cas d’un coffre-fort. Chaque pression d’une touche est confirmée
par l’éclairage de la LED verte. La durée maximale d’actionnement entre les touches ne peut pas être supérieure à 20
secondes, sinon l’ensemble des données introduites jusqu’à ce moment est effacé.
1. Possibilité d’introduction de codes numériques.
Exemple : 3 2 7 9 6 1
2. Possibilité d’introduction de codes alphanumériques.
Exemple : introduction du code ROLF12
8 7 5 3 1 2
2. Ouverture de la serrure électronique
Introduisez le code de 6 chiffres livré d’usine à l’aide des touches 1 – 2 – 3 – 4 – 5 – 6 ou introduisez votre propre code
de 6 chiffres.
Attention : L’introduction peut être corrigée à l’aide de la touche C. Dans ce cas, vous devez répéter l’ensemble de
l’introduction. Une introduction correcte est confirmée par l'allumage de LED verte pendant 6 secondes. Simultanément,
la serrure électronique est débloquée pendant environ 6 secondes pour permettre l’ouverture de la porte. La porte du
coffre-fort peut à présent être déverrouillée à l’aide du levier du clavier et ouverte à l’aide de la poignée. L’élément de
blocage électronique est automatiquement verrouillé après environ 6 secondes. Ce verrouillage est confirmé par le fait
que les LED rouge et verte s’allument brièvement. La serrure électronique n’est bloquée que lorsque le levier du clavier
est placé manuellement dans la position de blocage.
3. Verrouillage de la serrure électronique
Fermez la porte et ramenez le levier du clavier jusqu’à la butée. Lors de cette opération, la plaquette indicatrice rouge
doit être entièrement recouverte par le levier du clavier. Dans cette position, la serrure électronique est mécaniquement
bloquée quand la LED verte est simultanément éteinte.
Attention : Pour des raisons de sécurité, vous devez contrôler à l’aide du levier du clavier si le coffre-fort est verrouillé
suivant les prescriptions.
4. Réaction en cas d’introduction d’un code incorrect
Si un code incorrect est introduit, la LED rouge s’allume pendant environ 3 secondes. Vous disposez encore de trois
tentatives pour introduire le code correct. Si vous avez introduit plus de quatre fois un code incorrect, le temps de
blocage pour introduction incorrecte est entamé. Pendant 10 secondes, la serrure ne réagit à aucune introduction. Toute
introduction incorrecte supplémentaire prolonge ce temps de blocage de 10 secondes supplémentaires. Le temps de
blocage pour introduction incorrecte ne peut pas être interrompu à l’aide de la touche C.
Page 6

5. Correction à l’aide de la touche C
Si vous actionnez la touche C au cours de l’introduction, toutes les données introduites jusqu’à ce moment sont
refusées. Tout mode de programmation entamé à ce moment est également interrompu et quitté, et vous devez
recommencer la programmation depuis le début en actionnant à nouveau la touche *.
Exception : Le temps de blocage pour introduction incorrecte et le signal d’avertissement « piles vides » ne peuvent
pas être interrompus à l’aide de la touche C.
6. Contrôle des piles, remplacement des piles
Quand les piles deviennent trop faibles, la LED verte et la LED rouge s’allument alternativement 10 fois après
l’introduction du code. Ce signal lumineux sert à vous rappeler que vous devez mettre 2 nouvelles piles de 1,5 Volt du
type PENLITE (alcaline) en place dans les jours qui suivent.
Remarque: Si vous ignorez l’avertissement « piles vides » pendant une durée prolongée, vous devez tenir compte du
fait que la serrure et donc également le coffre-fort ne peuvent être ouverts qu’après la mise en place de nouvelles piles.
Le couvercle du compartiment à piles se trouve à droite de l’armature du clavier. Desserrez la vis à tête cruciforme et
faites coulisser le couvercle du compartiment à piles vers la droite (voir figure 1).
Enlevez les piles usées et remplacez-les par 2 nouvelles piles de 1,5 Volt du type PENLITE (alcaline). Le sens dans
lequel les piles doivent être mises en place est indiqué dans le compartiment à piles. Le code programmé est conservé
après le remplacement des piles.
7. Programmation de la serrure électronique
Pour des raisons de sécurité, avant d’utiliser votre coffre-fort pour la première fois, vous devez avoir introduit votre code
personnel. En effet, le code livré d’usine ne peut pas être conservé. La programmation peut uniquement se faire quand
la porte est ouverte et la serrure électronique verrouillée. Avant de procéder à la programmation, extrêmement simple,
de votre nouveau code de 6 chiffres, vous devez préalablement le déterminer. N’utilisez pas de données personnelles
pour ce code, p. ex. des anniversaires ou d’autres dates que des personnes qui vous connaissent peuvent facilement
déterminer. Conservez soigneusement votre code de manière à ce qu’il ne soit accessible qu’à vous seul.
7.1 Programmation d’un nouveau code
Remarque : Ne procédez à la programmation qu’avec la porte ouverte et la serrure électronique verrouillée. La LED
verte doit être éteinte.
Laissez la porte ouverte, verrouillez la serrure électronique au moyen du levier du clavier.
Fonction Commande, touche Réaction Remarques
Lancez le mode de
programmation
*
Sélectionnez le mode de
programmation
0
Confirmez l’introduction *
Introduisez le code numérique
ou alphanumérique de 6
caractères valable jusqu’à
présent
1-2-3-4-5-6 Le code livré d’usine est
programmé sur 1-2-3-4-5-6
Confirmez l’introduction *
Introduisez un nouveau code
numérique ou
alphanumérique de 6
caractères
6-5-4-3-2-1
Confirmez l’introduction * Attention : contrôlez si
Confirmez le code en le
répétant
6-5-4-3-2-1 OK = la LED verte s’allume 2
x
Non valable = la LED rouge
s’allume pendant
la serrure fonctionne
correctement après
l’introduction du nouveau
code avant de
Confirmez l’introduction * 3 secondes verrouillez la porte du coffre-
fort
Clôturez la programmation C
Remarque
Nous déclinons toute responsabilité pour les perturbations causées par une commande incorrecte, par l’usage de
violence ou par un traitement inadéquat, ainsi que pour les préjudices financiers et les dommages matériels imputables
p. ex. au verrouillage incorrect du coffre-fort. Pour assurer une protection optimale au contenu de votre coffre-fort, nous
vous recommandons de soustraire une assurance. Pour ce faire, prenez contact avec votre courtier.
Page 7

8. Résolution de problèmes en cas de perturbations
Problème Cause possible Mesure à prendre
La LED rouge s’allume pendant ± 3
secondes après l’introduction du code.
Introduction d’un code incorrect. Introduisez le code correct.
La LED rouge s’allume pendant ± 3
secondes après la programmation d’un
nouveau code.
Le nouveau code a été programmé de
manière incorrecte. L’ancien code est
conservé.
Répétez la programmation d’un nouveau
code suivant le point 7.1 du mode
d’emploi.
La serrure électronique ne réagit à
aucune introduction.
Le temps de blocage a été activé par
l’introduction répétée d’un code incorrect
Consultez le point 4 du mode d’emploi.
Les LED rouge et verte s’allument
alternativement 10 fois l’une après
l’autre.
Charge des piles insuffisante. Remplacez les piles. Pour ce faire,
consultez le point 6 du mode d’emploi.
Si le coffre-fort ne peut pas être ouvert malgré le respect des instructions susmentionnées, prenez contact avec votre
fournisseur.
 Loading...