

Page 1
Operating Instruc tions
Only for Authorized Service Technicians
Brine-Water a nd Water-Water
Heat Pumps
AQUA TOP TC
02/2008 Art. No. 11 051 525
Page 2

2
Table of Contents
Table of Contents …………………………………………………....... 2
Basic Information Safety Information…………………….................. 3
General Info................................................ ....... 4
Legal Guidelines, Rules...................................... 5
Warranty Terms............................. ..................... 5
Receiving Inspection............................................ 5
Installation and
Connection Instructions Delivery Scope..................................................... 6
Transport and Setup........................................... 7
Hydraulic Connections........................................ 8
Heat Reclamation Connection............................ 9
Heater-Side Connection...................................... 11
Condensate and Safety Line.............................. 13
Electrical Connection General.............................................................. 14
Wiring Diagram and Terminal Assignment......... 15
Assembly Control Panel....................................................... 16
Charging
Geothermal Heating Systems Problems and Issues........................................... 18
Incorrect Brine Concentration............................. 18
Flushing.............................................................. 18
Charging with Antifreeze..................................... 19
Correctly Charging a Geothermal Heating System 19
Initial Startup Heat Pump Controller LOGON B RVS51........... 21
Quickstart........................................................... 22
LOGON B RVS51.843, Control Elements.......... 22
Basic Display..................................................... . 24
Parameterization.................................................. 27
Troubleshooting
Troubleshooting AQUATOP LOGON WP........... 35
System Characteristic Curve of Sensor NTC 1 k............ 38
Characteristic Curve of Sensor NTC 10 k.......... 38
Equipment Dimensions AQUATOP T05C+T06C, T08C-T14C,
T07C-HT, T11C-HT, T19C................................. 39
Technical Data AQUATOP T05C-T10C...................................... 40
AQUATOP T12C-T19C...................................... 42
AQUATOP T07C-HT, T11C-HT......................... 44
Initial Startup Lo g ........................................................................... 46
Notes ........................................................................... 47
Page 3

3
Basic Information
Safety Notes
E
Components and piping of the cooling
circuit may never be used for transport.
E
The heat pump is fastened to the
transport pallet.
E
All electric circuits must be de-energized
before opening the unit.
E
All work on the cooling circuit must be
carried out by trained technicians who
must be familiar with and trained in the
use and handling of the coolant.
L
Never us harsh, abrasive, acidic or
chlorine-containing cleansers on the
surface of the equipment.
Safety Notes
The following notes and information are
generally used in the operating
instructions:
L Comply with information about
function and operation.
E Always comply with and
observe all safety notes and
safety information.
Information about the operating
instructions of the controller
LOGON B WP
E
Setup, installation, configuration, and
initial startup of the heat pump system
must be carried out by a qualified
technician applying the relevant
statutory rules, regulations, and guidelines, as well as the operating
instructions.
E
The use of the heat pump must be
reported to the local utility or electric
company.
E
Do not exceed a tilt of 30° when transporting the heat pump. Avoid exposing
the heat pump to any type of moisture
or humidity.
Protect the heat pump from damage
and dirt during all construction phases.
Page 4

Basic
Information
General
4
General
Usage Range
The heat pump is designed only for
heating as well as generating service
water.
The heat pump can be utilized in newly
installed or existing heating systems
by complying with the usage limits as
defined by the AQUATOP planning
document.
E
Setup
The heat pumps can be set up on a
smooth, level, and plane surface
without the need of a base or pedestal.
The installation room must be dry and
frost-free. Rooms with much humidity
such as laundry rooms, etc. are not
very suitable for installing the heat
pump. The min. clearances must be
adhered with for all equipment to
ensure access in case of maintenance
and control tasks.
Function Principle of the
Brine-Wat er/Water-Wat er Heat Pump
The heat pump converts the heat
contained in the soil or rock
(groundwater) with a low temperature
into heat with a higher temperature.
This is achieved by routing the brine
liquid through a heat exchanger in the
soil (groundwater) and a pump to the
evaporator. The liquid working medium
in the evaporator boils and evaporates
at a low temperature and low pressure.
The evaporation heat required is drawn
from the brine liquid and returned to
the heat exchanger.
The evaporated working medium is
suctioned by the compressor and
compressed to a higher pressure.
The compressed, gaseous working
medium is fed to the condenser where
it is condensed at a high pressure and
high temperature.
The condensation heat is transferred
to the heating water and the temperature of that water increases.
The energy transferred to the heating
water corresponds with the energy
previously extracted from the soil
(groundwater) plus the small amount
of electrical energy required for
compressing the working medium.
Energy-Saving Use of the Heat
Pump System
Your decision to obtain a heat pump
heating system is an important contribution to saving the environment by
having lower emissions and reduce
your primary energy use.
Please observe the following points to
ensure your new heating system
functions efficiently:
L
The heat pump heating system must
be carefully dimensioned and installed.
L
Avoid unnecessarily high flow temperatures. The lower the flow temperature
on the heating side the more efficient
the heat pump is working. Make sure
the controller is set correctly and
properly.
L
Rush airing (several windows open at
once for short period) is to be preferred
over continuously leaving a small gap
open. Rush airing reduces the energy
consumption.
Page 5

5
Basic Information
Legal Guidelines, Rules,
Warranty Terms,
Receiving Inspection
General Information
These operating instructions serve the
correct installation, adjustment, and
maintenance of the equipment.
The following information must therefore be read carefully and the heat
pump must be installed, inspected, and
maintained by correspondingly trained
technicians.
The manufacturer is not liable for
mechanical, hydraulic, or electrical
modifications after the warranty
expires. The warranty becomes null
and void in case of not explicitly
authorized actions carried out contrary
to or in violation of these operating
instructions.
All applicable safety standards must
be observed during installation. Check
whether the properties of the power
supply system match those of the heat
pump (type plate).
These operating instructions and the
electrical scheme (diagram) of the heat
pump must be stored carefully and
made available to the operating personnel if needed.
E
The manufacturer is not liable for personal injury or property damage, direct
or indirect, caused by noncompliance
with these instructions.
The equipment may be opened only
by qualified personnel.
Legal Guidelines and Rules
All guidelines based on CE standards
were observed during design and
manufacture of the heat pump.
(See CE Conformity Declaration.)
Compliance with the corresponding
SEV, EN, and IEC standards is
required for the electrical connection
of the heat pump. The connection
specifications of the local utility or
electric company must be complied
with as well.
E
Explanations Concerning Our
Warranty Terms
Our warranty does not cover damages
caused by or due to the following
reasons:
- Unsuitable or improper use or
operation,
- Incorrect setup, adjustment, or
incorrect initial startup by buyer
or third parties
- Installation of third party parts
- Operating the equipment under
overpressure or in excess of the
specifications indicated by the
factory
- Noncompliance with the notes
and information of the operating
instructions
The heat pumps have a warranty
period of 24 months after the day of
delivery. The sales, delivery, and
warranty terms and conditions according to the order confirmation apply
in all other instances.
Receiving Inspection
The equipment is shipped on a
wooden pallet and a corresponding
protective cover.
The equipment must be checked for
completeness and transport damage
upon receipt.
E
If damages are detected, the corresponding damage must be noted
immediately on the shipping document
and identified with the following
phrase: "Conditional acceptance due
to obvious damage."
Page 6

Installation and Connection Instructions
Delivery Scope
6
1
2
3
4
5
6
7
8
Preattached tubes in rear of unit
Additional items enclosed in accessory bag
The following components are included
with the heat pump:
1 1 Plexiglas cover
2 1 controller receptacle
3 1 front panel
4 1 LOGON B WP controller
5 1 exterior sensor
6 4 vibration dampening rubber
pads
7 4 tube seals
8 1 set of documentation
9 4 vibration-dampening tubes
Page 7
7
Installation and Connection Instructions
Transport and Setup
Transport
Before every transport, make sure the
lifting or transport equipment has the
lifting power needed to transport the
respective equipment weight. All of the
tasks described here must be carried
out based on the relevant safety
standards. This applies to tasks associated with the equipment as well as
the process or procedure of each task
itself.
Transport with Forklifts, Lifting
Platform or Similar Equipment
Insert forks lengthwise under the
wooden pallet.
When lifting, make sure the weight is
equally distributed. Never tilt the heat
pump beyond max. 30
º
(in any direction)
when transporting it. Avoid exposing
the heat pump to any type of moisture
or humidity.
(Also applies to setup and installation!)
Never stack objects on the heat pump or
hang up wet clothes over it.
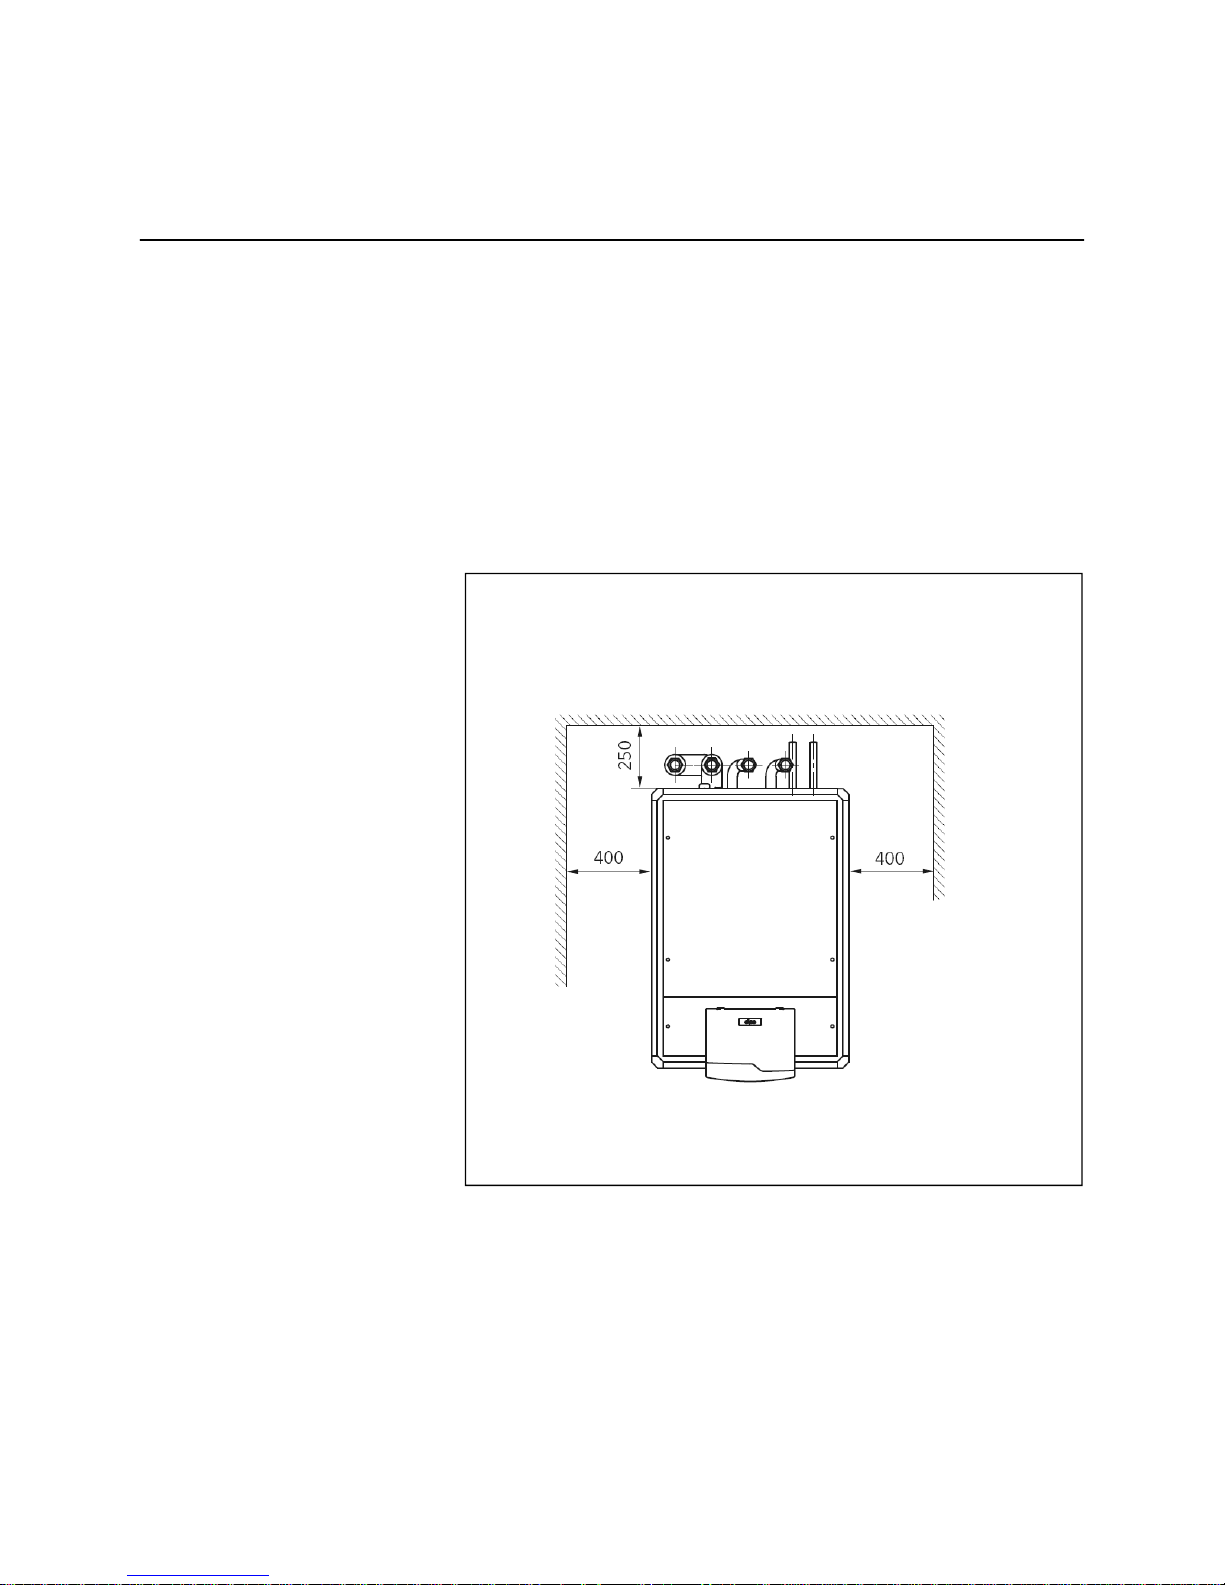
Setup
The heat pump is designed to be set
up in an interior location (IPXO, i.e.
only dry rooms). The base frame must
be set up on a smooth, level, and plane
surface.
The heat pump must be setup in a way
that allows servicing the pump without
access problems. This is ensured
when complying with the wall
clearances depicted below.
Control station
Plan view with min. clearances
After moving the unit to the installation
location, remove the transport
protection and safety elements and
attach the vibration dampening rubber
pads included with the equipment into
the now exposed threaded openings
at the bottom of the unit.
These pads are also adjustable to
ensure the heat pump is level.
Page 8

8
Installation and Connection Instructions
Transport and Setup
Hydraulic Connections
After the unit is placed into position,
make sure to check for visible damage.
Properly dispose off the packaging
material.
Transport safety device
The flexible connection tubes and
hoses included in the delivery scope
are attached to the rear of the
AQUATOP TC.
The heating and the heat reclamation
sides are connected to the rear as
well (hold on to nut when tightening
cap nut to prevent twisting the flexible
connection lines).
Page 9
9
Connections
Connection pipes and distributor
Delivery/installation by
ELCO/ installation company
On-site
Trenches and openings
Geothermal Heating System
Boreholes for geothermal heating
systems/installation and backfill
Delivery/installation by
ELCO/ drilling company
On-site
sludge trough
Recommended: 8 m
Heat Pump Connection
Heat source booster pump and
safety devces, connection lines,
insulation, heat carrier fill
Delivery/installation by
ELCO/ installation company
Probe depth
Installed in compact
heat pumps
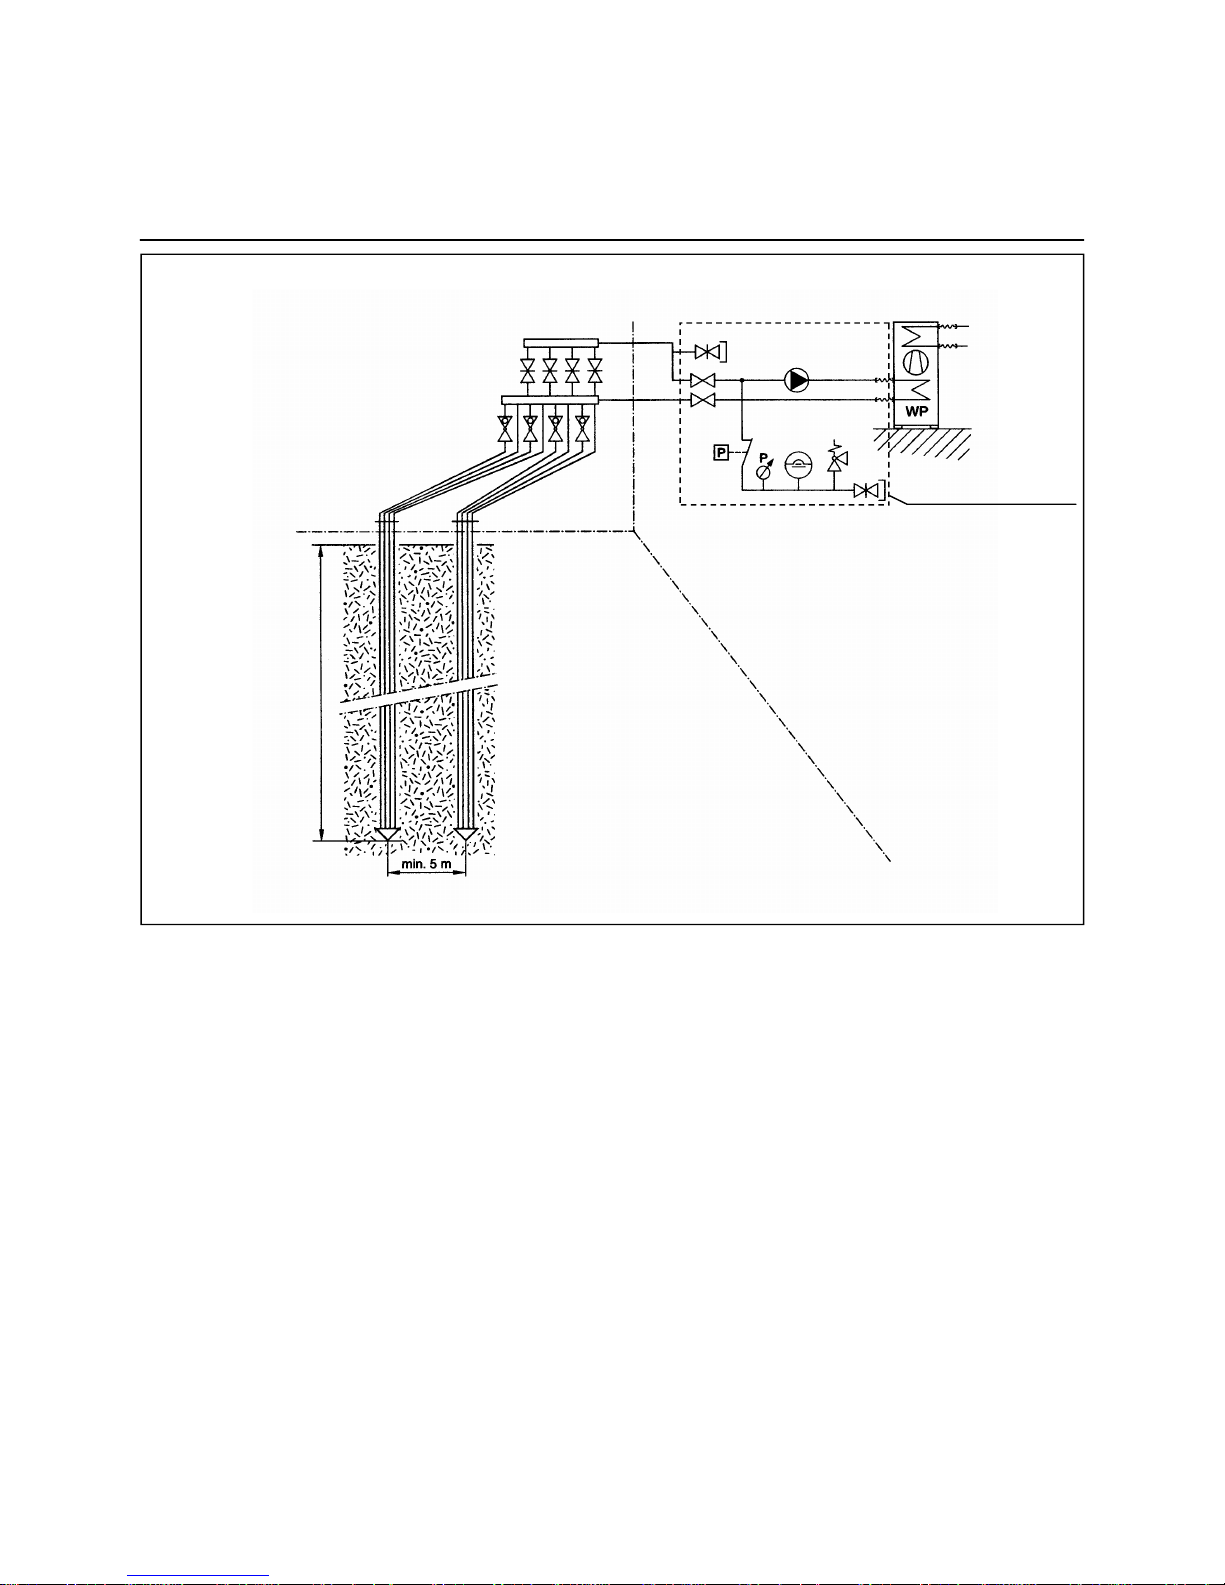
Installation and Connection Instructions
Heat Reclamation Connection
The general schematic also applies to
geothermal tube collectors.
L
Brine-side circulating pump, expansion
vessel, manometer, charging element,
and safety valve are already installed
into the AQUATOP TC unit.
L
Lead safety line at an incline into
suitable collection container.
Geothermal Heating System / Geotherma l Tube Collector
Page 10
10
Installation and Connection Instructions
Heat Reclamation Connection
Connections
• Tapping and return lines
• Trenches and opening
Delivery/installation by installation
company or builder
Intermediate Circuit
• Poss. groundwater pump
• Establishing intermediate
circuit incl. heat carrier fill
Delivery/installation by installation company
Heat Pump
Bank
Terrain
Brine concrete
Sealing
borehole
Heat Source Systems
• Establishing tapping
and return wells
• Poss. groundwater
pump
• Delivery/installation by
installation company
or drilling company
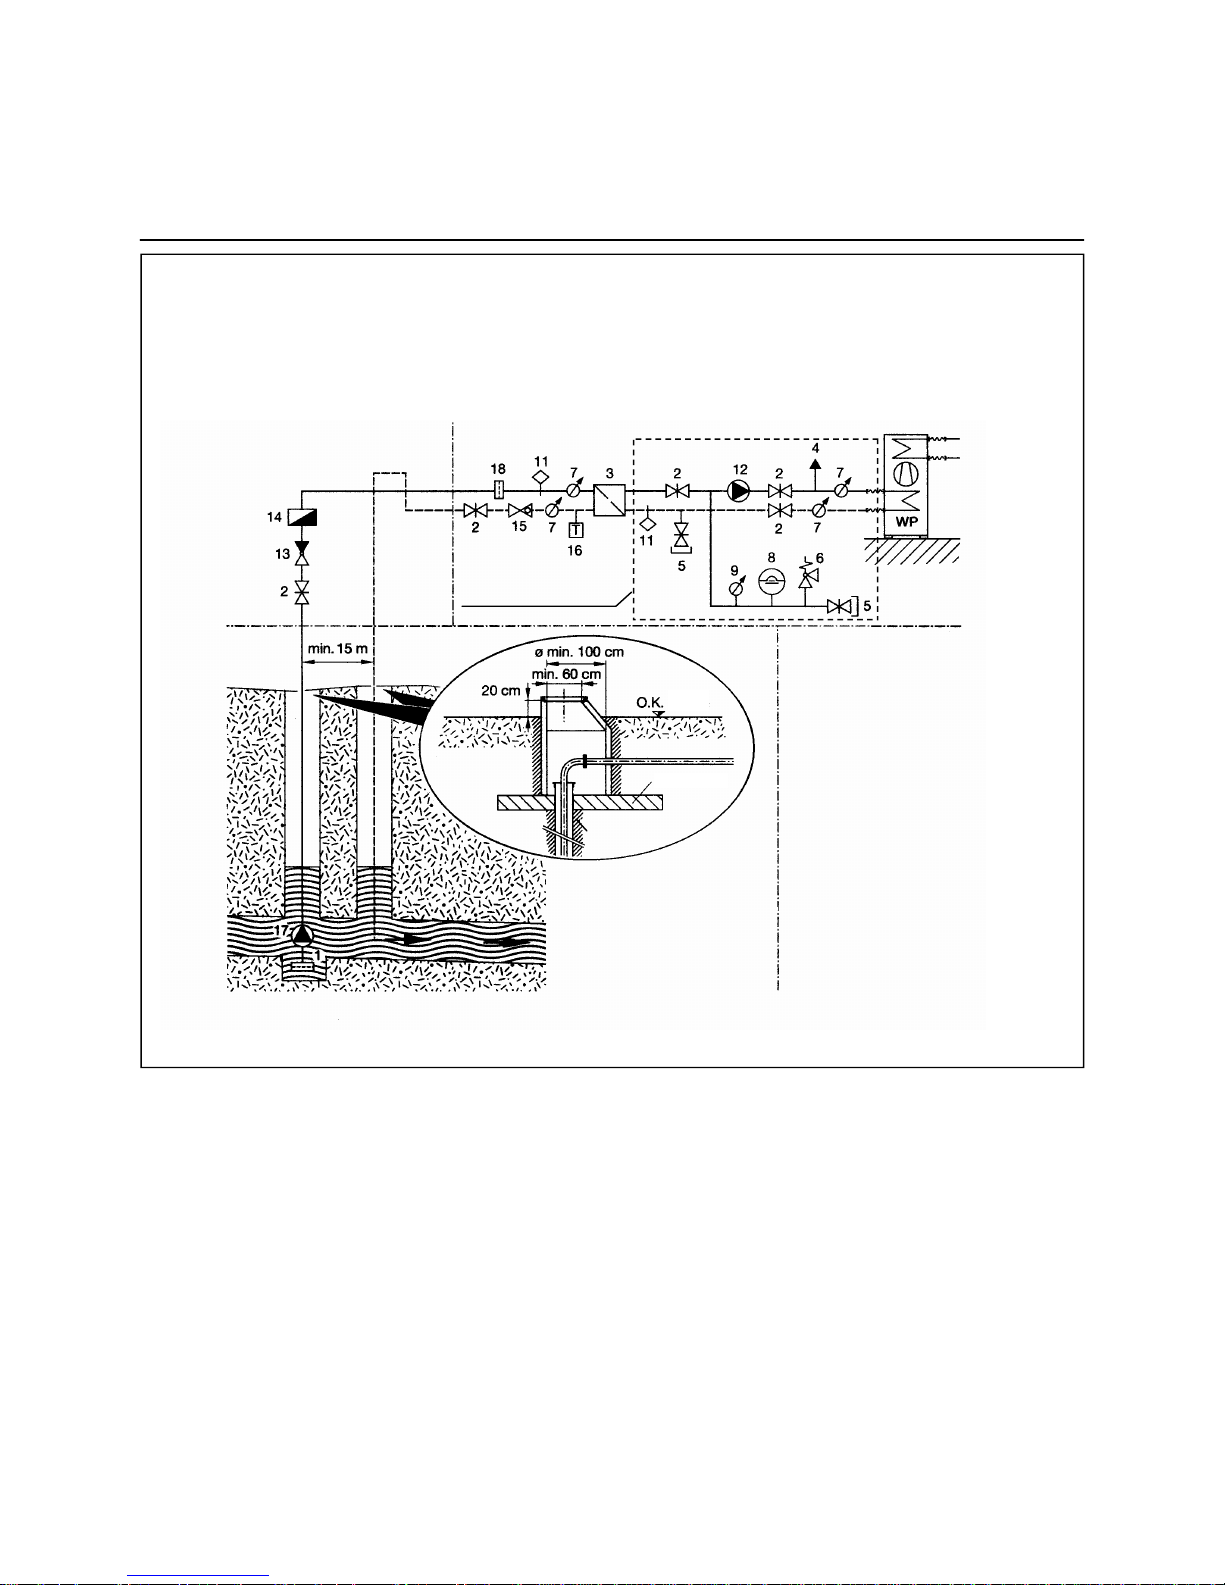
Key
1 Poss. filter
2 Slide valve
3 Intermediate exchanger
4 Manual air exhauster
5 Filling and draining valve
6 Safety valve
7 Thermometer
8 Expansion vessel
9 Manometer
11 Flow monitor
12 Circulating pump
13 Return valve
14 Poss. flow rate meter
15 Flow control valve
16 Antifrost thermostat
17 Submerged pump
18
Fine filter, mesh size
= 280 – 350 my
Installed in compact
heat pumps
L
When using groundwater or well water
as heat source, the following must be
observed:
- Min. temperature > = 7°C
- Filtered, clean water; provide water
filter in pressure line
L
Brine-side circulating pump, expansion
vessel, manometer, charging element,
and safety valve are already integrated
into the AQUATOP TC.
L
Lead safety line at an incline into
suitable collection container.
Water (with intermediate circuit)
Page 11
11
Installation and Connection Instructions
Heater-Side Connection
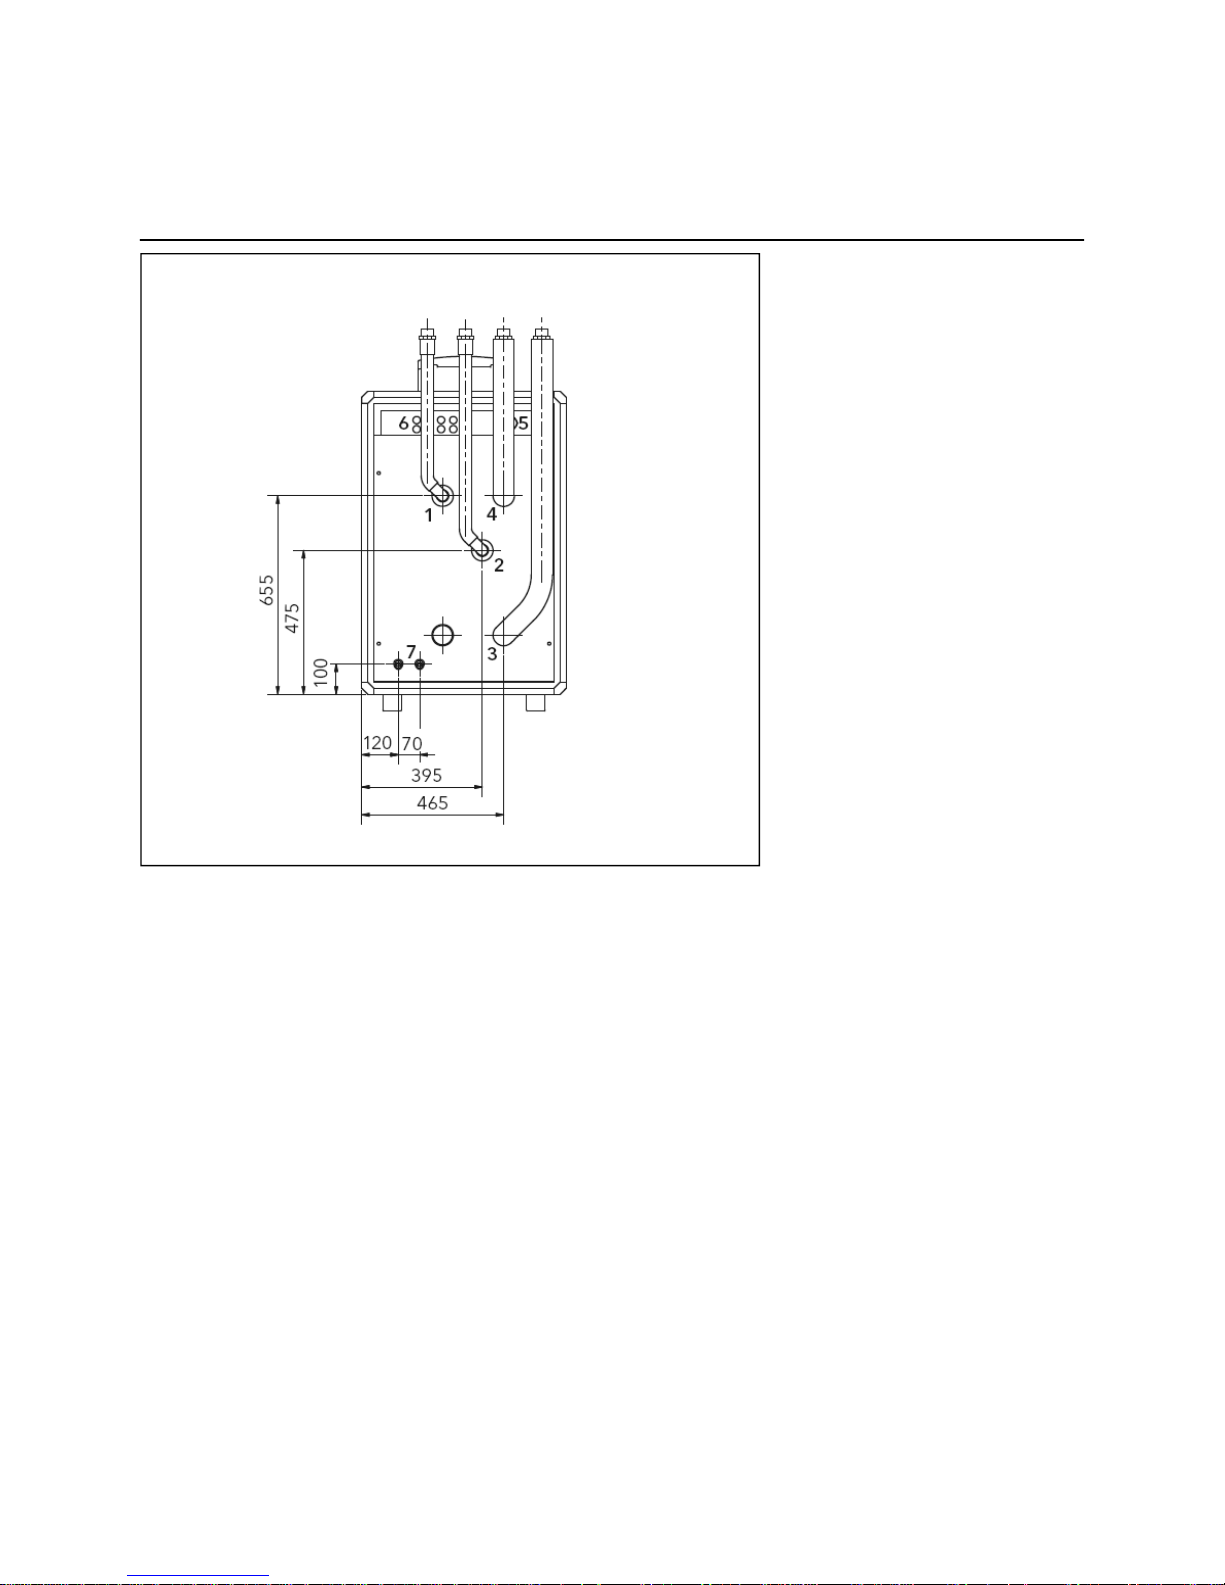
Key
1 Heating water outlet, inside thread
2 Heating water inlet, inside thread
3 Heat source outlet, inside thread
4 Heat source inlet, inside thread
5 Electrical feed
6 Sensor cable
7 Safety valve outlet
Page 12
12
Installation and Connection Instructions
Heater-Side Connection
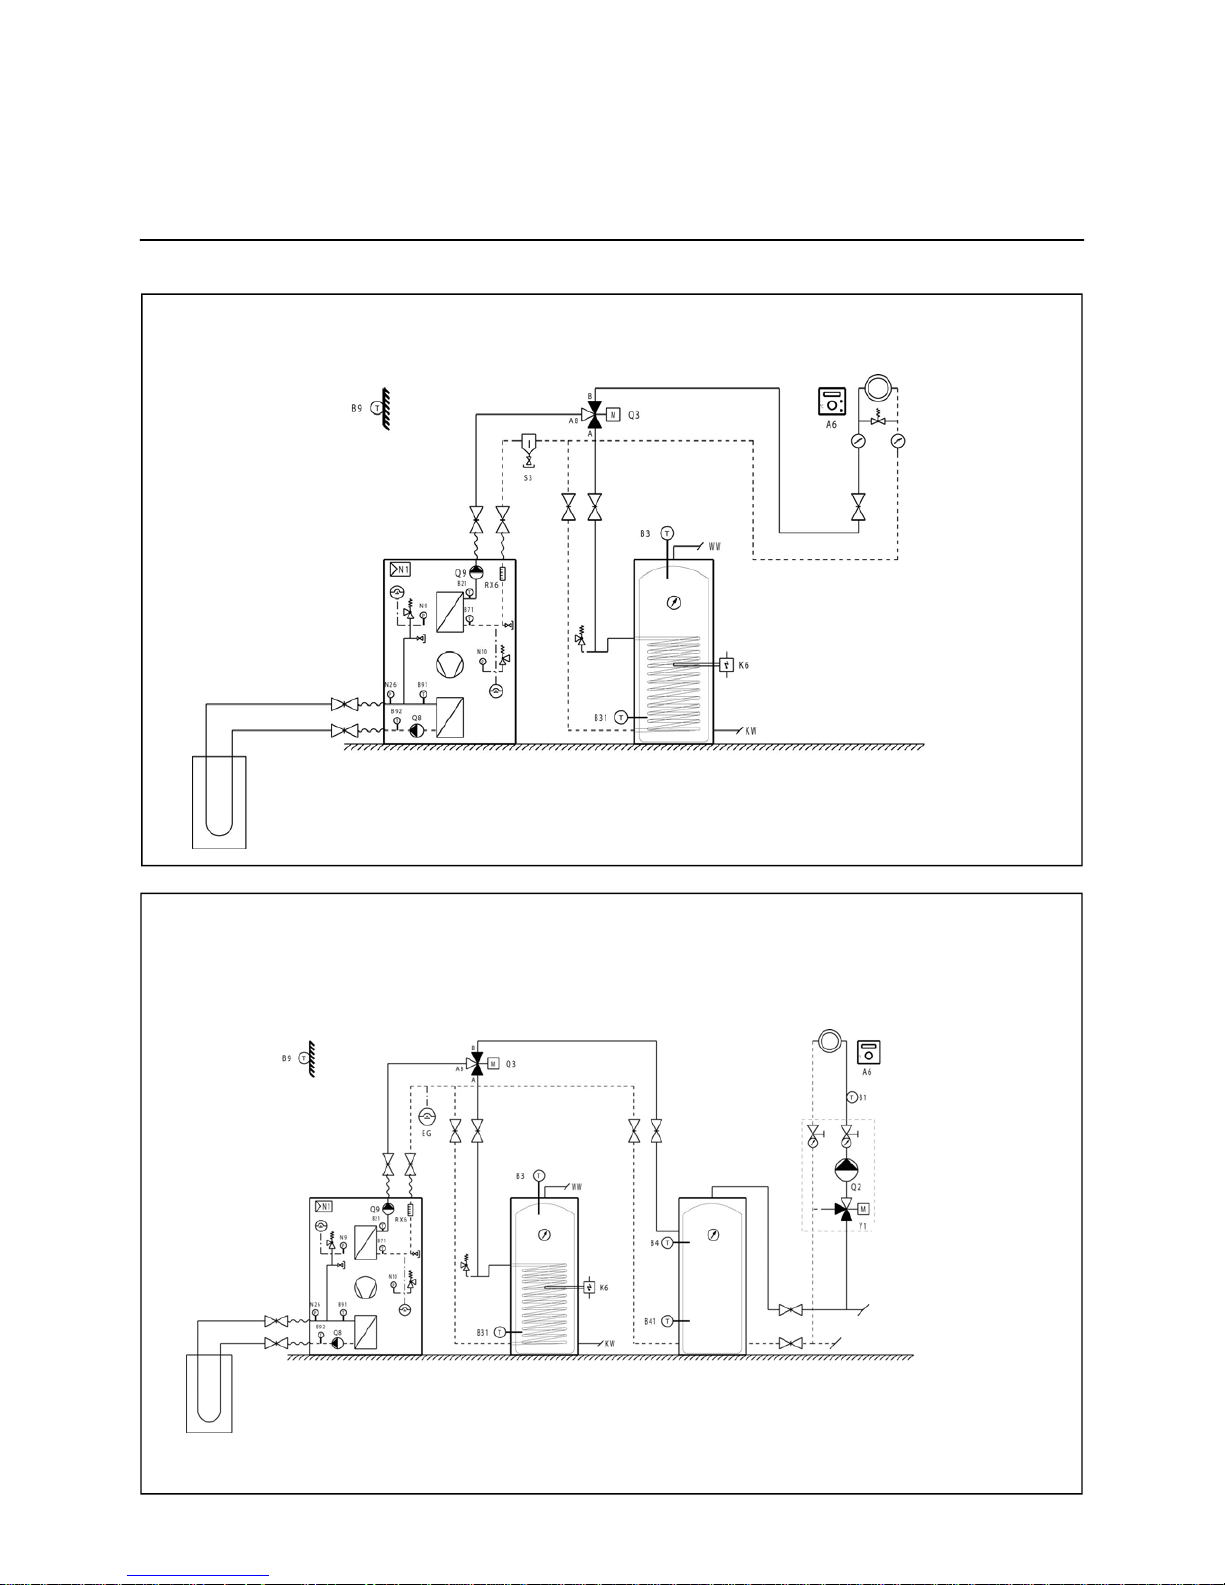
Two different basic concepts exist:
a) Direct connection, without buffer storage, comply with min. circulating water volume requirement
The coil area of the service water storage
must be adjusted to the heat pump capacity.
b) Indirect connection, with buffer for hydraulic decoupling
The coil area of the service
water storage must be
adjusted to the heat pump
capacity.
Page 13

13
Installation and Connection Instructions
Condensate and Safety Line
The condensate line and the safety
line of the heating side must be installed
freely visible and at an incline towards
the building drainage system.
L
The safety line of the heat reclamation
side (heat gain with brine) must be
installed freely visible and at an incline,
leading into a suitable collection
container.
Page 14

14
Electrical Connection
General
E
Compliance with the corresponding SEV,
EN, IEC, as well as the corresponding
VDE standards is required for the
electrical connection of the heat pump.
The connection specifications of the
local utility or electric company must be
complied with as well.
E
The power supply to the equipment must
be interrupted before each electrical
connection or service or maintenance
work. The upper cover on the equipment
must be removed for the electrical
connection. This requires unscrewing
four hexagonal screws on the rear
upper cover plate of the unit and removing the cover by pulling towards
the top.
The power supply is carried out via the
inlet of the cable connection at the rear
side of the heat pump. All other necessary control connections such as flow
monitor, frost protection, thermostat,
and temperature sensor are also at the
rear of the heat pump.
E
Power Supply to the Switchbox
The power supply for the heat pump
must feature
a main switch or all-pole
cut-off switch with a contact distance
of at least 3 mm, as well as a 3-pole
circuit breaker with shared trigger for all
outer conductors. See technical data or
type plate on rear of heat pump for the
tripping current! The power cables must
have a cross-section that meets the
equipment output as well as locally
applicable rules and standards.
Page 15
15
Electrical Connectio n
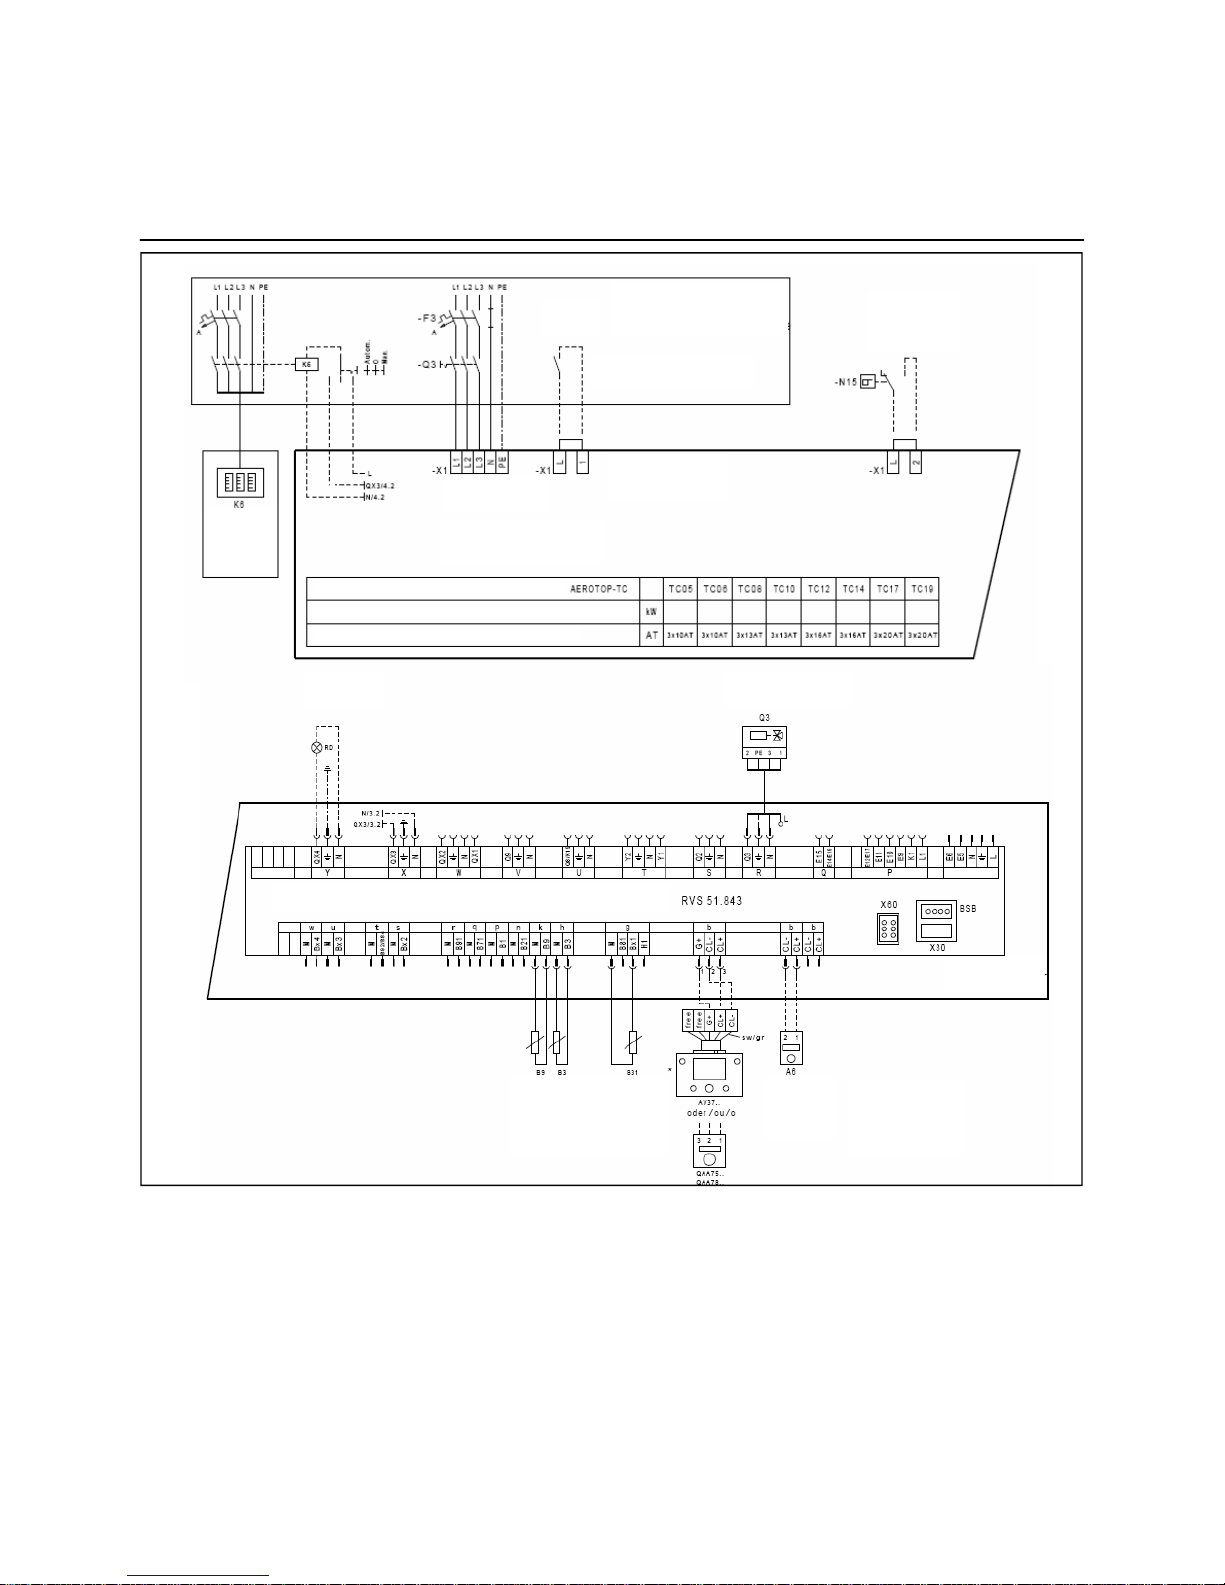
Wiring Diagram and Terminal Assignment
L
The sensors, pumps, mixing valves, etc.
to be connected may vary depending
on the system configuration and are
listed in the corresponding standard
documentation.
L
Depending on the technical connection
requirements (TCR) of the electric
company, a separate input of power
element (compressor) and control
element (control, pumps) may be
needed. Comply with the corresponding
connection scheme (diagram)!
L
Hot cables and sensor cables must be
installed separately!
Electric
company
block
On-site setup
Contact closed – HP released
Flow monitor
HP supply
Terminals in HP
Heat pump
Heat pump
Power consumpti on
Ext. fuse
Load
(optional)
Malfuncti on
Switching valve
Heizungsregler
Heat pump
Exterior - Service- Service
sensor water - water
sensor sensor
Remote
control
Control unit
(optional)
Page 16

16
Assembly
Control Panel
The front cover, the controller case, and
the control panel are to be assembled
in the following order:
Connection P l u g to Control Panel 1
Insert the connection plug to the control
panel through the opening in the front
upper cover plate.
Connection Plug to Control Panel 2
Insert Controller Receptacle into
Upper Front Cover Plate
The controller receptacle is inserted
into the 4 lengthwise grooves of the
upper front cover panel.
Make sure the connection plug is
threaded through the opening for the
control panel.
Insert Connection Plug into
Control Panel
Page 17

17
Assembly
Control Panel
Insert Control Panel into
Controller Case
Attach Front Cover
Insert the front cover panel into the
controller case from bottom to top
while holding at a slant.
Snap Front Cover into Place
Snap front cover into the provided
lengthwise grooves.
Page 18

18
Charging Geothermal Heating Systems
Problems and Issues
Incorrect Brine Concentration
Flushing
Problems
Problems with charging a geothermal
heating system (GHS) with antifreeze
may occur occasionally and result in a
reduced capacity of the system or even
total system failure. Most problems are
as follows:
Dirt in the Circ ui t
Drilling companies generally strive to
fill only clean water into geothermal
heating systems. However, dirt may
reach the probe due to inattention.
This dirt can damage the circulating
pump or the evaporator of the heat
exchanger.
Insufficiently Mixed Brine Solution
If the correctly calculated antifreeze
volume is charged directly as a concentrate without corresponding mixing
device, individual probes may jam or
become completely disconnected due
to the viscosity of the concentrate.
Water without the required glycol
content circulates in the remaining
probes. Without the required glycol
content, the heat pump may freeze
already upon initial startup, which may
destroy the associated evaporator.
Incorrect Brine Concentration
In some cases, the detected glycol
concentration differed greatly from the
calculation.
This was mostly due to a lack of the
proper equipment to prepare the
mixture correctly. If the concentration
is too high, the heat pump's capacity is
reduced and works less efficiently.
The heat pump may also overheat.
An insufficient concentration (<20%)
may cause corrosion and frost damage.
Correctly Charging the GHS with the
Help of a Mixing Tank, Mixing
Equipment with Filter
All of the problems listed previously
can be avoided by properly charging the
GHS circuit. The right equipment can
make all the difference as well.
Use a mixing and charging tank to
charge the GHS circuit according to
the following requirements:
- Clean mixture
- Correct concentration:
- Homogeneous mixing
Flushing
Use filtered potable water and pressure to flush first the circulating pump
of the GHS circuit and the evaporator
and remove pollutants such as welding
beads, little stones, and dirt.
After closing a slider in the heat pump
circuit, each circuit of the GHS is
flushed one after the other.
A pressure of 2 bar is used to flush
a 140-m long ø 32 mm probe for
6 minutes as depicted below.
Min. Flushing
Time for 32-mm Probe
10
9
8
7
6
5
4
3
2
1
0
0 50 100 150 200
Probe length
Duration in minutes
2 bar pressure
3 bar pressure
Charging hose
Excess pressure
valve 2.5 bar
Mixing
tank
120 l
Jet pump.
e.g. Grundfos
max. 5 m
3
/h
max. 5 bar
GHSs
Brine circulat ing pump
Heat pump
Expansion vessel
GHS circuit
Drain hose
Filter
Page 19

19
Charging Geothermal Heating Systems
Charging with Antifreeze
Correctly Charging a Geothermal Heating System Circuit
Charging with Antifreeze
After flushing, the entire geothermal
heating system circuit is to be filled
with clean tap water. Follow the steps
below to prepare the required concentration of antifreeze with a 100%
concentrate. For example:
The required antifreeze concentration
is 25% (ideal range is 25-30%) with a
140-m Duplex® ø 32 mm BHE.
(Content per meter = 4 pipes x 10 dm,
length x 0.13 dm,
inner radius
2
x rr = 2.12 l/m.)
Correctly Charging a Geothermal
Heating System in 14 Steps
1. Flush the GHS circuit as described
on page 18.
2. Calculate the probe volume acc. to
table above. One GHS (GHS
ø 32 mm) has 2.12 l/m content per
meter. This yields the following
GHS content for our example:
140 m x 2.12 l/m = 296.8 liters
(297 l). Do not forget the content of
the connection lines up to the heat
pump, 30 liters in our example.
This results in a total system content
of 297 liters + 30 liters = 327 liters.
3. Required volume of 100% anti freeze concentrate:
25% of 327 liters = 82 liters.
4. Close the sliders to the heat pump.
Remove the drain hose from the
tank and place in drain.
5. Open the sliders of the GHS – if
several probes have been
installed, one slider after the other
is opened during charging.
6. Fill the mixing tank with an approx.
mixture of 1:1 of antifreeze
concentrate and fresh water.
Depending on tank size, not all of
the 82 liters of concentrate fit into
the tank (see calculation, item 3).
7. Switch the feed pump on.
As soon as the tank begins to
empty, continuously fill in the
remaining antifreeze concentrate
and additional fresh water into the
mixing tank at a ratio of approx.
1:1. Make sure that always at least
40 liters of mixed reserve remains
in the tank. Volume markers can
be attached to the edge of the
tank to help you determine its
volume.
8. The feed pump is allowed to run
until the entire antifreeze
mixture – except for the 40 liters
reserve – are filled in and then is
switched off at once. Excess tap
water drains from the drain hose
into the drain.
9. Now insert the drain hose into the
tank, turn the feed pump back on,
and allow it to run until glycol and
water are thoroughly mixed. This
takes about 6-times to 8-times as
long as it takes for flushing (see
diagram, item flushing).
10. Close charging valves at drain
hose and then those at the
geothermal heating system
distributor. The excess pressure
valve (2.5 bar) routes the excess
mixture back into the tank. Shut off
feed pump. About 40 liters remain
in the tank. Some of the mixture
was absorbed by the expansion
of the geothermal heating system.
11. In case of relatively long geo thermal heating systems and
insufficiently mixed mixture, the
excess pressure valve at the tank
is triggered and thereby intensifies
mixing.
12. If several GHSs are combined into
one system, the second, third, etc.
GHS is first flushed and then
charged individually until all have
been processed.
13. Once all geothermal heating
systems are charged, the eva porator and the brine circulating
pump must be charged next.
All sliders to the geothermal
heating systems are closed for
this purpose and the sliders to the
evaporator are opened.
The remaining mixture is now
carefully pumped via the slider at
the filling hose. Allow water in the
circuit to escape via the drain
hose. As soon as the glycol
mixture emerges as the drain hose
(color change), close the corre sponding valve and allow the
pump pressure to charge the
expansion vessel (2.5 bar). Then
close the valve at the filling hose.
The system is now charged with
the correct concentration and
correct operating pressure without
introducing pollutants to the
system.
14. Now carry out a pressure test.
This test should be performed
over an extended period to avoid
the hassle of finding leaks later on.
Note: Antifreeze mixtures are
more likely to result in leaks earlier
than water alone!
Geothermal heating
system (probe)
diameter
Content per
meter
25 mm 1,31 l/m
32 mm 2,12 l/m
40 mm 3,34 l/m
Page 20

20
Charging Geothermal Heating Systems
Charging with Antifreeze
Correctly Charging a Geothermal Heating System Circuit
Heating and Brine Charging Valves
L
The brine circuit is to be charged with
a charging pressure of 1 bar
(diaphragm-type expansion vessel
initial pressure) + 0.3 bar as brine
header = total of
1.3 bar
.
L
The temperature difference during
this operation should not exceed 4 K
between sole inlet and outlet.
Flushing and charging (heating side).
The heating side must be flushed and
charged as well.
The initial pressure in the diaphragmtype expansion vessel (heater, factoryset at 1 bar) must be adjusted to meet
local requirements. (Static height in
m 0.1
bar.).
The charging pressure should be as
follows while cold: initial pressure
diaphragm-type expansion vessel
+ 0.2 bar (water header).
L
The Aquatop TC 19 and the
AQUATOP TC 11 HT are equipped
with 2 heater-side expansion vessels.
L
Important: Comply with water quality,
VDI 2035
L
Charging must be carried out in
accordance with DIN EN 1717.
Page 21

21
Initial Startup
Heat Pump Controller LOGON B RVS51
R
E
S
E
T
1
4
5
7
2
3
6
8
9
Control Based on Atmospheric
Conditions, Featuring the Following:
• lluminated display, status and
function indicators in plain text.
• Standard program default setting,
setpoints, date, time.
• Automatic switching
between summer/winter time.
• Preset standard timed programs
for heating and hot water heating.
• Complete control and monitoring
of the HP incl. 2 heating circuits
and potable water heating, buffer
in one unit.
• Highly flexible application options
due to wireless transfer to room
controller and exterior sensor
(optimal for renovations).
• Vacation program.
• Info key for quickly querying the
most important temperatures and
system states.
• Floor drying function.
• Room temperature control with
accessory QAA75 and QAA78.
• Demand-based heater
shut-off.
• Easy initial startup of
system due to sensor self-detection
or presetting to specific scheme.
• Adjustable min. and max.
flow temperatures.
• Pump overrun.
• Integrated operating hours counter.
• Thermal disinfection of hot water
with electrical immersion heater in
PWH tank can be enabled in
addition.
• 2-lead bus interface for
controller accessories.
• Trend logging
(data logging function).
Key:
1 Operating mode key service
water
Switches on potable water heating.
(Bar in display below water faucet.)
2 Select heating operation
Sets 4 different heating operating
modes.
3 Info key
Displays information without
affecting control.
4 Service plug (BSB)
2-wire connection.
5 Return key ESC
6 Confirmation key OK
These two keys are needed
together with the large rotary knob
(7) for programming and confi guring the controller. Settings not
adjustable with the control
elements are programmed into the
control unit.
Press the ESC key to jump one
step back. Set or adjusted values
are not applied.
7 Room temperature control knob,
navigation, and settings
- Changes the
comfort setting of the room.
- Use this rotary knob to select
and adjust settings during
programming.
8 Cooling key
Cooling cycle key activates passive
cooling via the heat source for type
AQUATOP T units in combination
with the corresponding accessories.
9 HP Reset and HP defrosting key
The reset key triggers a reset of
the heat pump.
Page 22

22
Initial Startup
Quickstart
LOGON B RVS51.843, Control Elements
Control Units
Control Panel AVS37.294/309
Control unit installation variations:
Snapped into HP front panel (interior
HP setup) or inside the building, with
the help of the wall mounting plate,
attached to wall (exterior HP setup).
Room Controllers QAA75...
QAA75.611 /301:
Room controller, wired.
Operating Options
Using control panel "plain text"
(Additional room controller optional)
A Basic unit RVS...
C Room controller QAA75...
D Exterior temp. sensor AVS13...
E Control panel AVS37.294 (plain text)
The room controller should be placed
in the primary occupancy room after
considering the following items:
• Select the placement location in
such a way that the sensor is able
to obtain accurate room temperature
readings and is not affected by
direct sunlight or another heat or
cold source (approx. 1.5 above
floor level).
• When mounting to wall, there
must be sufficient room to slide unit
in and out.
If the unit is removed from its base, it is
no longer functional.
Select potable water operation
Select heating operation
Display information
Apply setting
Reset / defro s t key
Exit setting
Service plug (BSB)
Cooling key
Adjust room comfort setpoint
Navigation and settings
Select heating operation
Select potable water operation
Exit setting
Apply setting
Adjust room comfort setpoint
Navigation and settings
Presence key
Cooling key
Display information
Page 23

23
Initial Startup
Quickstart
LOGON B RVS51.843
Heat to comfort setpoint
Heat to reduced setpoint
Heat to frost protection setpoint
Cool
Process running – please wait
Replace battery
Vacation function activated
Refers to heat circuit
Maintenance/special function
Error messages
Info level activated
Setting level activated
Heater temporary shut off
ECO function active
Basic Display
(Key Level)
Press OK (1x)
End user
• Select desired setting
• Confirm with OK
• Use ESC to return to basic display
Press OK (1x)
Press INFO (3 seconds)
Initial startup / Service technician
• Select desired user level
• Confirm with OK
• Select desired setting
• Confirm with OK
• Use ESC to return to basic display
Page 24

24
Initial Startup
Basic Display
Key Action How To Display/Function
Change operating
mode or cycle
Factory setting:
- Press key 1x
- Press key again
- Press key again
Automatic Mode ON
The automatic operating mode adjusts
the room temperature as set with the
timer program.
Continuous operation
D or C
Keeps the room temperature at the
selected operating level.
D Heat to comfort setpoint ON
• Heating operation without timer
program to comfort setpoint
• Protective functions active
C Heat to reduced comfort setpoint
ON
• Heating operation without timer
program to reduced setpoint
• Protective functions active
• Su/Wi automatic switching (ECO
functions and automatic day heating
limit inactive with continuous
operating with comfort setpoint
Protective mode K ON
While in protective mode, the heater is
switched off but remains protected from
frost (frost-protection temperature).
Adjust room comfort
setpoint
- Use rotary knob left/right.
- Confirm with OK
or:
- Press ESC
Changes the heating comfort setpoint
during the active heating cycle.
Comfort setpoint D applied
Comfort setpoint not applied
- The basic display is depicted after
3 seconds
Press OK
- Select control side heating circuit
and:
- Set the "reduced comfort setpoint"
Reduced comfort setpoint
C applied
Tip: Wait for at least 2 hours after changing settings so that the room temperature
can adjust.
Switch potable water
operation ON or Off
- Press key 1x
Potable water operation ON/OFF
(Bar under potable water symbol visible/hidden)
- ON: Potable water is prepared according to the
selected switching program.
- OFF: No potable water preparation, protective function
is active
Page 25

25
Initial Startup
Basic Display
Key Action How To Display/Function
Cooling operation
Switch ON or Off
- Press key 1x
Cooling operation ON/OFF
(Bar under cooling cycle symbol visible/
hidden)
Passive cooling via HP switched ON/
OFF.
The "cooling" operating mode adjusts the
room temperature as set with the timer
program.
Cooling mode characteristics:
- Manual cooling mode
- Cooling operation acc. to timer
program
- Temp. setpoint acc. to
- "Cooling comfort setpoint"
- Protective functions active
- Su/Wi automatic switching active
Presence key:
(If you are leaving the
rooms for a short time
during the comfort
period, use this key to
lower the temperature
temporary to save
heating or cooling
energy.)
In heating mode:
- Press key 1x
- Press key again
Switching from comfort setpoint to
reduced comfort setpoint
Switching from reduced comfort
setpoint to comfort setpoint
In cooling mode:
- Press key 1x
- Press key again
Switching from comfort setpoint to
OFF.
Switching from cooling OFF to
comfort setpoint.
! The presence function only works while in automatic mode.
! The current selection is active until the next switching acc. to heating program.
Displays various
information.
- Press key 1x
- Press key
again
- Press key
again
- …
- Press key
INFO segment is displayed
1. Use the info key to query and display
various information.
2. The display may depict one of the following
symbols as well:
Error message
If this symbol is depicted, a system malfunction has occurred.
Press the info key for additional information.
Maintenance
If this symbol is depicted, a service message or a special
operating mode has occurred. Press the info key for
additional information.
Back to basic display, INFO segment is turned off
- Room temperature - Heat ci rcuit status
- Room setpoint - Potable water status
- Exterior temperature - Heat pump status
- Potable water temperature - Solar status
- Buffer storage temp. - Buffer storage status
- Puffer storage setpoint - Floor function
- HP setpoint - Date & time
- HP flow temp. - Customer service phone
- HP return temp.
- Inlet/outlet temp . of source
- …
Page 26

Initial Startup
Basic Display
26
Key Action How To Display/Function
Reset and defrost
function
- Press key 1x and less than
3 seconds
Triggers reset
Any pending heat pump error messages,
counters, and other resettable parameters are reset all at one when
pressing this key.
The preset switching-on delay in case
of malfunctions is thereby bridged.
Do not use this function during normal
operation!
RESET
Page 27

27
Initial Startup
Parameterization
Initial startup (sometimes referred to as "commissioning") involves the following tasks:
• The correct assembly, setup, and electrical installation are prerequisites.
• Make all system-specific adjustments. The "configuration" control side is particularly important. Select the
corresponding control level as follows:
• On the room controller, use OK to switch to programming.
• Keep the info depressed for at least 3 seconds and use the rotary knob to select the "initial startup" control level.
Then press OK. Perform function check. Reset the damped exterior temperature.
(Control side "Diagnose consumer," control line damped exterior temperature 8703)
• Basic display "room temperature"
• Press 1 x OK
• Press INFO > 5 seconds
• Use +/- rotary knob to select "initial startup or technician" level, for example
• Press 1 x OK
• Use +/- rotary knob to select "parameter 1612 reduced setpoint," for example from potable water menu
• Press 1 x OK
• Use +/- rotary knob to change current value
• Press 1 x OK -> value is saved
• Press 2 x ESC to return to basic display
Overview of Initial Startup Parameters
Parameter lines E (end user) and I (initial startup) are displayed in the initial startup level.
The complete parameter list (with lines E, I and F) is displayed in the technician level.
Time and date 1 E
Hours/Minutes
hh:mm 00:00 23:59 -
2 E
Day/Month
dd.mm 1.01 31.12 -
3 E
Year
yyyy 2004 2099 -
4 F
Summer time start
dd.mm 1.01 31.12 25.03
5 F
Summer time end
dd.mm
1.01 31.12 25.10
Control unit 20 E
Language
-
Deutsch, English, Francais, Italiano, Nederlands
Deutsch
40 I
Unit address
-
Room controller 1, room controller 2, HMI,
service unit
Room controller 1
42 I
Room contr. 1 assignment
-
Heating circuit 1, heating circuit 1 and 2
Heating circuit 1
44 I
Operation HC2
-
Together with HC1, independent
Together with HC1
46 I
Operation HCP
-
Together with HC1, independent
Together with HC1
48 I
Presence key active duration
-
None, heating circuit 1, heating circuit 2, together
Heating circuit 1
500 E
Preset value
-
Mon - Sun, Mo - Fri, Sat - Sun, Mon, Tue, Wed,
Thu, Fri, Sat, Sun
Mon - Sun
501
E
1. phase ON
hh:mm 00:00 24:00 06:00
502 E
1. phase OFF
22:00
503 E
2. phase ON
- - . - -
504 E
2. phase OFF
- - . - -
505 E
3. phase ON
- - . - -
506 E
3. phase OFF
- - . - -
516
E
Default values
-
Yes No No
Timer program
heating
circuit 1
Control line
Control level Function
Unit Min Max
Factory
settings
F = Function E = End User I = Initial Startup
Page 28

28
Initial Startup
Parameterization
Timer program
heating circuit 2
520 . . . 536 (same as timer program heating circuit 1)
Timer program
3 / HCP
540 E
Preset value
-
Mon - Sun, Mo - Fri, Sat - Sun, Mon, Tue,
Wed, Thu, Fri, Sat, Sun
Mon - Sun
541 E
1. phase ON
hh:mm 00:00 24:00 06:00
542 E
1. phase OFF
22:00
543 E
2. phase ON
- - . - -
544 E
2. phase OFF
- - . - -
545 E
3. phase ON
- - . - -
546 E
3. phase OFF
- - . - -
556 E
Default values
-
Yes No
No
Timer program
4 / PWH
560 E
Preset value
- Mon - Sun, Mo - Fri, Sat - Sun, Mon, Tue, Wed,
Thu, Fri, Sat, Sun
Mo - So
561 E
1. phase ON
hh:mm 00:00 24:00 00:00
562 E
1. phase OFF
05:00
563 E
2. phase ON
- - . - -
5 64 E
2. phase OFF
- - . - -
565 E
3. phase ON
- - . - -
566 E
3. phase OFF
- - . - -
5 76 E
Default values
-
Yes No
No
Vacation heating
circuit 1
642 E
Vacation period 1 HC1:
First day
dd.mm 1.01 31.12 --.--
643 E
Vacation period 1 HC1:
Last day
dd.mm 1.01 31.12 --.--
648 E
Vacation operating level 1
HC1
-
Frost protection Reduced Frost protection
Vacation heating
circuit 2
652 . . . 658 (same as vacation heating circuit 1)
Vacation heating
P
662 . . . 668 (same as vacation heating circuit 1)
Heating circuit 1 710 E
Comfort setpoint
°C
Value from control
line 716
Value from control
line 713
20
712 E
Reduced setpoint
°C
Value from control
line 714
Value from control
line 710
19
714 E
Frost protection setpoint
° C 4
Value from control
line 712
10
720 E
Slope of the characteristic
- 0.1 4 0.8
730 E
Summer/winter
switching temperature
°C - - - / 8 30 20
740 I
Min. flow setpoint
°C 8
Value from control
line 741
8
741 I
Max. flow setpoint
°C
Value from control
line 741
95 50
850 F
Floor drying function
-
OFF, function heating, ready for covering
heating, function/surface ready, manual
OFF
851 F
Floor setpoint, manual
°C 0 95 25
855 E
Floor setpoint, current
°C 0 95 0
856 E
Floor, current day
- 0 32 0
Control line
Control level Function Unit Min Max Factory
settings
F = Function E = End User I = Initial Startup
Page 29

29
Initial Startup
Parameterization
Cooling
circuit 1
901 E
Operating mode
-
OFF
902 E
Comfort setpoint
°C
Value from control
line 710
907 E
Release
- 24h/day, timer program heating circuit,
timer program 3/HCP,
timer program 4/PWH
24h/day
908 I
Flow setpoint at ExT 25°C
°C 8 35 20
909 I
Flow setpoint at ExT 35 °C
°C 8 35 16
912 E
Cooling limit at ExT
°C 8 35 24
923 I
Min. flow setpoint at ExT 25°C
°C 8 35 18
924 I
Min. flow setpoint at ExT 35°C
°C 8 35 18
945 I
Mixing valve in heating mode
-
Opened Closed Opened
Heating
circuit 2
1010 . . . 1156 (same as heating circuit 1)
Heating
circuit P
1300 E Operating mode heating circuit P - Protective mode, automatic, reduced, comfort Automatic
1310 . . . 1456 (same as heating circuit 1)
Potable water 1610 E
Potable water temperature,
rated setpoint
°C
Value from control
line 1612
TempBwMax 55
1612 E
Reduced setpoint
°C 8
Value from control
line 1610
40
1620 I
Potable water release
-
24h/day, timer program, heating circuit, timer program 4
Timer program 4
1630 I
Load priority
-
Absolute, sliding, none, MC sliding, PC absolute
Absolute
1640 F
Legionella function
-
OFF, periodic, fixed day of week
OFF
Heat pumps
2800 I
Frost protection condens. pump
-
OFF ON ON
2802 I
Flow time condens. pump
s 0 240 10
2803 I
Overrun time condens. pump
s 0 240 10
2815 I
Source temp. min. water
HP (B92)
°C - - - / -20 30 3
2816 I
Source temp. min. brine
HP (B91)
°C - - - / -30 50 -5
2817 I
Switching diff. source protect.
°C 1 10 3
2818 I
Increase source protection temp.
°C 0 10 2
2819 I
Flow time, source
s 0 240 40
2820 I
Overrun time, source
s 0 240 10
2840 I
Switching diff. return temp.
°C 1 20 4
2842 I
Compressor run time, min.
min 0 120 10
2843 I
Compressor standstill time, min.
min 0 120 20
2844 F
Switch off temp. max.
°C 8 100 57
2860 F
Block level 2 at PWH
-
OFF ON OFF
2861 F
Release level 2 below ExT
°C -30 30 -5
2886 F
Compensation heat deficit
-
OFF ON ON
2951 I
Source temp. defrost release
°C 5 20 12
2958 I
No. of defrost cycles, max.
- 0 10 4
2962 I
Duration defrost block
min 0 100 15
2963 I
Time until forces defrost
min 60 600 150
2964 I
Defrost duration, max.
min 1 42 15
2965 I
Evaporator drip time
min 0 10 0
3000 I
Switch off temp. max. cooling
°C 20
60 35
Control line Control level Function Unit Min Max
Factory
settings
F = Function E = End User I = Initial Startup
Page 30

30
Initial Startup
Parameterization
Solar 3810 F Temp. diff. ON exchanger 1 °C Value from control line 3811 8
3811 F Temp. diff. OFF exchanger 1 °C 0 4
3812 F Load temp. min. exchanger 1 °C - - - / 8 30
3830 F Collector start function min - - - / 5 10
3831 F Min. run time collect. pump s 5 31
3840 F Collector frost protection °C - - - / -20 - - 3850 F Collector overheat protection °C - - - / 30 90
3860 F Evapor. heat carriers °C - - - / 60 110
Buffer storage 4709 I Forced loading heating - None, forced loading setpoint heating, index
pointer setpoint heating
None
4710 I Forced loading setpoint
heating
°C 20 80 50
4711 I Forced loading point in time hh:mm - - - / 00:00 23:50 02:00
4712 I Max. forced loading duration h 1
20 4
Potable water
storage
5056 F Re-cooling generator/HC - OFF ON OFF
5057 F Re-cooling collector - OFF, summer, always Always
5060 F Electr. immersion heater
operating mode
- Auxiliary, summer, always Auxiliary
5061 F Electrical immersion heater
release
- 24h/day, potable water release, timer program
4/PWH
Potable water release
5090 F With buffer storage - No Yes No
Configuration 5700 I System scheme, preset
values
- - - - / 1 16 - - -
5710 I Heating circuit 1 - OFF ON ON
5711 I Cooling circuit 1
OFF, 4-conductor system, 2-conductor system OFF
5712 I Using mixing valve 1 None, heating, cooling, heating and cooling Heating and cooling
5731
I Potable water actuator Q3 - None, charge pump, reversing valve Charge pump
5800 I Heat source - Brine, water, air Water
5801 I HC spread at ExT -10°C °C 0 20 7
5870
I Combination storage - No Yes No
5890 I Relay output QX1 - None, compressor 2 K2,
electrical immers. heater flow K26,
electrical immers. heater buffer K16
None
5891 I Relay output QX2 -
None, circulating pump Q4, electrical immersion
heater PWH K6 alarm output K10, heating circuit
pump HCP Q20, H1 pump Q15, 2. pump level HC1
Q21, 2. pump level HC2 Q22, pump level HCP Q23,
directional valve cooling Y21, process reversal valve
Y22, collector pump Q5
None
5892 I Relay output QX3 -
None, circulating pump Q4, electrical immersion
heater PWH K6 alarm output K10, heating circuit
pump HCP Q20, H1 pump Q15, 2. pump level HC1
Q21, 2. pump level HC2 Q22, pump level HCP Q23,
directional valve cooling Y21, process reversal valve
Y22, collector pump Q5
None
5894 I Relay output QX4 -
None, circulating pump Q4, electrical immersion
heater PWH K6 alarm output K10, heating circuit
pump HCP Q20, H1 pump Q15, 2. pump level HC1
Q21, 2. pump level HC2 Q22, pump level HCP
Q23, directional valve cooling Y21, process reversal
valve Y22, collector pump Q5
Alarm output K10
5930
5931
5932
5933
I Sensor input BX1, BX2,
BX3, BX4
-
None, buffer storage sensor B4, buffer storage sensor
B41, collector sensor B6, potable water sensor B31,
hot gas sensor B82, coolant sensor fluid B83
None
5950 I
Function input H1 -
Operating mode switching HCs+PWH, operating mode
switching HCs, operating mode switching HC1,
operating mode switching HC2, operating mode
switching HCP, error /alarm message, minimal flow
setpoint, heat demand, dew point monitor, flow
setpoint increase hygro
Operating mode
switching HCP
Control line
Control level Function
Unit Min Max
Factory
settings
Page 31

31
Initial Startup
Parameterization
Configuration 5951 I
Operating action contact H1
-
Normally closed contact (NCC), normally
open contact (NOC
NOC
5952 I
Min. flow setpoint H1
°C 8 120 40
5954 I
Heat demand 10V H1
°C 5 130 60
6007 F
Operating action input
E14, E16
-
NCC NOC NCC
6020 I
Function expansion module 1
-
No function, heating circuit, cooling circuit 1 Heating circuit
6110 F
Time constant, building
h 0 50 10
6120 F
System frost protection
-
OFF ON ON
6200 I
Save sensor
-
No Yes No
6201 F
Delete sensor
-
No Yes No
6204 F
Save parameter
-
No Yes No
6205 F
Reset parameter
-
No Yes No
6212 I
Control number generator 1
- 0 199999 0
6213 I
Control number generator 2
- 0 199999 0
6215 I
Control number storage
- 0 9 19999 0
6217 I
Control number heating
circuits
- 0 199999 2
Failure 6710 I
Reset alarm relays
-
No Yes No
6711 I
Reset heat pump
-
No Yes No
6740 F
Flow temperature 1 alarm
min - - - / 10 240 - - -
6741 F
Flow temperature 2 alarm
min - - - / 10 240 - - -
6800
-
6819
F
Time stamp and error
code, error history 1-18
0 255 Only displays:
Date, time, error code,
error type
Maintenance
Service
7070 I
HP time interval Months
- - - / 1 240 - - -
7071 I
HP time since maintenance Months
0 240 0
7072 I
Max starts compr1 / op hours
- - - - / 0.1 12 - - -
7073 I
Act starts compr1 / op hours
- 0 12 0
7074 I
Max starts compr2 / op hours
- - - - / 0.1 12 - - -
7075 I
Act starts compr2 / op hours
- 0 12 0
7076 I
Spread condens max/week
- - - - / 1 250 - - -
7077 I
Act spread condens max/week
- 0 250 0
7078 I
Spread condens min/week
- - - - / 1 250 - - -
7079 I
Act spread condens min/week
- 0 250 0
7080 I
Spread evap max/week
- - - - / 1 250 - - -
7081 I
Act spread evap max/week
- 0 250 0
7082 I
Spread evap min/week
- - - - / 1 250 - - -
7083 I
Act spread evap min/week
- 0 250 0
7090 I
PWH storage time interval Months
- - - / 1 240 - - -
7091 I
PWH storage since maintenance
Months
0 240 0
7092 I
PWH charge temp HP min
°C 8 80 40
7093 I
Act. PWH charge temp. HP
°C 8 80 -
7141 E
Emergency operation
-
OFF ON OFF
7142 F
Emergency operation function
type
-
Manual Automatic Manual
7150 I
Exterior temp. simulation
°C - - - / -50 50 - - -
7181 I
Customer service phone
Digits 0 16
Control l ine
Control level Function Unit Min Max
Factory
settings
Page 32

32
Initial Startup
Parameterization
Input/output test
7700 I
Relay test
- No test, all off, source pump Q8,
fan K19, condenser 1 K1,
condensate pump Q9,
potable water pump Q3, heat circuit pump Q2,
heat circuit mixing valve open Y1,
heat circuit mixing valve closed Y2,
relay output QX23 module 1,
relay output QX21 module 1,
relay output QX22 module 1,
relay output QX1, relay output QX2,
relay output QX3, relay output QX4
No test
7730 I
Exterior temperature B9
°C -50 50 -
7732 I
Flow temperature B1
°C 0 140 -
7750 I
B3 potable water temperature
°C 0 140 -
7770 I
Flow temperature HP B21
°C 0 140 -
7771 I
Return temperature HP B71
°C 0 140 -
7772 I
Hot gas temperature B81
°C 0 140 -
7775 I
Source input temp. B91
°C -50 50 -
7777 I
Sensor temperature B92, B84
°C -50 50 -
7820 I
Sensor temperature BX 1
°C -28 350 -
7821 I
Sensor temperature BX 2
°C -28 350 -
7822 I
Sensor temperature BX 3
°C -28 350 -
7823 I
Sensor temperature BX 4
°C -28 350 -
7830 I
Sensor temperature BX21
module 1
°C -28 350 -
7840 I
Voltage signal H1
Volt 0 10 -
7841 I
Contact status H1
-
Opened Closed
-
7885 I
Low rate E5
- 0 V 230 V -
7886 I
HP block E6
- 0 V 230 V -
7889 I
Low pressure monitor E9
- 0 V 230 V -
7890 I
High pressure monitor E10
- 0 V 230 V -
7891 I
Coil guard compressor 1 E11
- 0 V 230 V -
7895 I
Pressure/flow source E15
- 0 V 230 V -
7896 I
Signal input E12, E17
- 0 V 230 V -
7897 I
Signal input E14, E16
- 0 V
230 V -
Status 8000 I Status heating circuit 1 -
Different status messages
8001 I Status heating circuit 2 -
8002 I Status heating circuit P -
8003 I Potable water status -
8006 I Heat pump status -
8007 I Solar status -
8010 I Buffer storage status -
8050
-
8069
I Time stamp and status
code, error history 1
Control line
Control level Function
Unit Min Max
Factory
settings
Page 33

33
Initial Startup
Parameterization
8400 I
Compressor 1 K1
-
OFF ON
-
8401 I
Compressor 2 K2
-
OFF ON
-
8402 I
Electr. immers. heater flow K26
-
OFF ON
-
8403 I
Source pump Q8 / fan K19
-
OFF ON
-
8405 I
Condenser pump Q9
-
OFF ON
-
8410 E
Return temperature HP
°C 0 140 -
8411 E
HP setpoint
°C 0 140 -
8412 E
Flow temperature HP
°C 0 140 -
8415 I
Hot gas temperature 1
°C 0 140 -
8416 I
Hot gas temperature max
°C 0 140 -
8417 I
Hot gas temperature 2
°C 0 140 -
8420 I
Coolant temperature, liquid
°C 0 140 -
8425 I
Temp. spread condenser
°C -50 140 -
8426 I
Temp. spread evaporator
°C -50 140 -
8427 E
Source input temperature
°C -50 50 -
8428 I
Source input min
°C -50 50 -
8429 E
Source output temperature
°C -50 50 -
8430 I
Source output min
°C -50 50 -
8440 I
Rest level 1 standstill time min
min (0) 1 255 ---
8441 I
Rest level 2 standstill time min
min (0) 1 255 ---
8442 I
Rest level 1 run time min
min (0) 1 255 ---
8443 I
Rest level 2 run time min
min (0) 1 255 ---
8444 I
Rest time limit source temp min
min (0) 1 65535 ---
8445 I
Rest time auto reset
h (0) 1 255 ---
8446 I
Compressor sequence
- 1-2, 2-1 ---
8450 F
Op hours compressor 1
h 0 65535 0
8451 F
Start counter compressor 1
- 0 199999 0
8470 I
Fan K19
-
OFF ON
---
8471 I
Process reversal valve Y22
-
OFF ON
---
8475 I
Evaporator temperature
°C -50 50 0
8477 I
Temp. diff. defrost actual value
°C -50 50 0
8478 I
Temp. diff. defrost setpoint
°C -50 50 0
8480 I
Rest time defrost block
min 0 255 0
8481 I
Rest time forced defrost
h/min 00:00 07:00 00:00
8485 I
No. of defrost cycles
- 0 10 0
8510 I
Collector temperature 1
°C -28 350 -
8511 I
Collector temperature 1 max
°C -28 350 200
8512 I
Collector temperature 1 min
°C -28 350 -28
8513 I
dT collector 1 / PWH
°C -28 350 0
Generator
diagnosis
Control line
Control level Function Unit Min Max Factory
settings
Page 34

34
Initial Startup
Parameterization
Consumer
diagnosis
8700 E
Exterior temperature
°C -50 50
8701 E
Exterior temperature min
°C -50 50
8702 E
Exterior temperature max
°C -50 50
8703 I
Exterior temperature damped
°C -50 50
8704 I
Exterior temperature mixed
°C -50 50
8730 I
Heating circuit pump Q2
°C
OFF ON
8731 I
Heating circuit mixing valve open Y1
-
OFF ON
8731 I
Heating circuit mixing valve open Y2
-
OFF ON
8740 E
Room temperature 1
°C 0 50
8741 E
Room setpoint 1
°C 4 35
8743 E
Flow temperature 1
°C 0 140
8744 E
Flow setpoint 1
°C 0 140
8751 I
Cooling circuit pump Q24
- 0 1
8752 I
Cooling circuit mixing valve open Y2
- 0 1
8753 I
Cooling circuit mixing valve close Y2
- 0 1
8754 I
Directional valve cooling Y21
- 0 1
8756 E
Flow temperature cooling 1
°C 0 140
8757 E
Flow setpoint cooling 1
°C 0 140
8760 I
Heating circuit pump Q6
-
OFF ON
8761 I
Heating circuit mixing valve open Y5
-
OFF ON
8762 I
Heating circuit mixing valve open Y6
-
OFF ON
8770 E
Room temperature 2
°C 0 50
8771 E
Room setpoint 2
°C 4 35
8773 E
Flow temperature 2
°C 0 140
8774 E
Flow setpoint 2
°C 0 140
8800 E
Room temperature P
°C 0 50
8801 E
Room setpointP
°C 4 35
8803 E
Flow setpoint P
°C 0 140
8820 I
Potable water pump Q3
-
OFF ON
8821 I
Electrical immersion heater PWH K6
-
OFF ON
8830 E
Potable water temperature 1
°C 0 140
8831 E
Potable water setpoint
°C 8 80
8832 I
Potable water temperature 2
- 0 140
8970 I
Electrical immersion heater buffer
K16
-
OFF ON
8980 E
Buffer storage temperature 1
°C 0 140
8981 E
Puffer storage nominal value
°C 0 140
8982 E
Buffer storage temperature 2
°C 0 140
9031 I
Relay output QX1
- 0 1
9032 I
Relay output QX2
- 0 1
9033 I
Relay output QX3
- 0 1
9034 I
Relay output QX4
- 0 1
-
Control line
Control level Function Unit Min Max Factory
settings
Page 35

35
Troubleshooting
T roubleshooting A QUATOP LOGON WP
Malfunction
Cause
Remedy, Action
106: Source temperature too
low B-W HP
Brine output temperatures too low (parameter
2816, -5°C)
A1 Low volume flow
A2 Geothermal heating system badly charged
A3 Geothermal heating system comp. not in order
A4 Slider closed
A5 Pump not running
A1 Check pump output
A2 Vent geothermal heating system
A3 Set flow control
A4 Open slider
A5 Check thermo relays, phases and relays
106: Source temperature too
low W-W HP
While the HP is running and the groundwater
return temperature at thermostat, built in
downstream of HP, is less than 3°C
(parameter 2815, corresponding setting 3°C),
switching to frost protection.
A Frost protection thermostat incorrectly set
or defective.
B Groundwater volume flow too low.
The module switches the respective unit to
the safety state when a malfunction or error
occurs.
A Check frost protection thermostat for function
or not properly set, replace if needed.
B With too low groundwater output
temperatures, the system cannot be operated.
Min. water temperatures were not determined.
B1 Check filter for dirt
B2 Check evaporator for dirt
B3 With existing intermediate circuit, check function
of intermediate circuit, check plate exchanger
for dirt
B4 Check flow switch setting (triggers too late)
B5 Check water level in well and check its
dropping during operation.
107: Hot gas compressor (B 81) A Too little coolant
B Compressor leak
A Top off coolant
B Replace compressor
The cooling technician must be called in these cases.
222: HP at HP operation, high
pressure malfunction
High pressure compressor
High-pressure pressure controller triggered in
cooling circuit. No heat.
A In heating mode
A1 Insufficient flow rate
A2 Slider closed
A3 Heating circulation pump not running
A4 Overflow valve incorrectly set
A5 Heating curve set too steep
B High-pressure pressure controller actuated
too early
The module switches the respective unit to the
safety state when a malfunction or error occurs.
A1 Check flow heating water (
O
T =3-5 K)
A2 Open slider. Check flap valves
A3 Make heating circuit pump functional
again/replace pump.
A4 Repeat overflow valve setting procedure
A5 Set heating curve lower
B If A can be precluded, check at which heating
water output temperature from the heat pump
the high-pressure pressure controller is actuated.
If the switching point is significantly below 65°C,
it is possible that
B1 The switching point of the pressure controller is
too low (the pressure controller setting has
changed)
B2 The amount of coolant is too high
The cooling technician must be called in these
cases.
Page 36

36
Troubleshooting
T roubleshooting A QUATOP LOGON WP
Malfunction
Cause
Remedy, Action
223: HP when starting HC
High pressure malfunction
when starting heating circuit.
A Water in system too cold. A Below 10 °C: Increase temperature in system
with electr. immersion heater.
224: HP when starting potable
water heating
High pressure malfunction
when starting PWH.
Service water operation.
A Boiler charging pump/3-way valve not running
B Air in system
C Slider closed
D Heat exchanger too small
E Sensor positioned incorrectly (too low)
A Unblock pump/3-way valve or replace
B Vent system
C Open slider, check flap valve
D Check with retailer
E Mount sensor correctly
226: Coil guard compressor A Phase interrupt (compressor is getting hot) A Check all three phases (wait until
coil guard has cooled down, this may take
several hours).
225: Low pressure malfunction Low pressure compressor E9
Low pressure pressure controller triggered in
cooling circuit.
A Insufficient flow of brine-water in evaporator
B Leak in cooling circuit
C Pressure controller defective
D Plugged filter
E Defective or blocked injection valve
F Incorrect amount of coolant
A
A1 Blocked brine pump, make brine pump
function again
A11 Defrost thickened brine in evaporator
(remove insulation, use hairdryer to melt or let
sit for 1 day)
A2 In case of inhomogeneous brine mixtures, the
brine may become thickened in the evaporator.
A21 Better mixing of brine
B If all items above have been checked and of the
compressor switches to low pressure malfunction
within a few seconds after being started, then the
cooling circuit has a leak.
Oil residues in the unit are another indicator of a
leak in the cooling circuit (do not mistake oil for
brine).
B1 In case of a leak in the cooling circuit,
the cooling service technician must be called.
C Check switching point (important: depends on
coolant type)
D Measure temperature upstream and downstream
of filter (AT max 2 K)
E Check or replace injection valve
Check and insulate sensor
F Empty and recharge acc. to type plate.
Page 37

37
Troubleshooting
T roubleshooting A QUATOP LOGON WP
Malfunction
Cause
Remedy, Action
228: Flow controller water source A W-W heat pump
No flow
A1 Checker whether corresponding sliders are
opened
A2 Check function flow switch (while keeping
groundwater pump running, check switching
point of flow switch by slowly closing/opening
slider)
A3 Check function of groundwater pump
229: Pressure monitor
GHS/geothermal probe/tube
collector system
A B-W heat pump
Brine pressure too low
The module switches the respective unit to
the safety state when a malfunction or error
occurs.
A1 Check brine pressure with manometer
A2 Check function of brine pressure monitor
A3 Recharge brine
A4 Check expansion vessel when recharging brine
(if pressure increases quickly when recharging
brine, expansion vessel malfunction)
A5 If occurring several times, check brine circuit for
leaks
230: Thermo relays
230: Thermo relays brine pump Brine pump / groundwater pump
A Pump failure
A1 Pump blocked
A2 Motor protection was triggered
A3 Defective pump
The module switches the respective unit to the
safety state when a malfunction or error occurs.
A1 Eliminate pump block, determine cause of
block
A2 Check why motor protection was triggered
A21 Check power consumption of pump (ampere)
A22 Check trigger value of motor protection
A23 Check motor protection for defects
A3 Replace pump if defective
Electric company block active External block by utility or electric company No malfunction, HP continues to run once block
period is over.
Page 38

38
System
Characteristic Curves NTC 1 k
Characteristic Curves NTC 10 k
T [°C] R[Ohm] T [°C] R[Ohm] T [°C] R[Ohm]
-30.0 13'034 0.0 2'857 30.0 827
-29.0 12'324 1.0 2'730 31.0 796
-28.0 11'657 2.0 2'610 32.0 767
-27.0 11'031 3.0 2'496 33.0 740
-26.0 10'442 4.0 2'387 34.0 713
-25.0 9'889 5.0 2'284 35.0 687
-24.0 9'369 6.0 2'186 36.0 663
-23.0 8'880 7.0 2'093 37.0 640
-22.0 8'420 8.0 2'004 38.0 617
-21.0 7'986 9.0 1'920 39.0 595
-20.0 7'578 10.0 1'840 40.0 575
-19.0 7'193 11.0 1'763 41.0 555
-18.0 6'831 12.0 1'690 42.0 536
-17.0 6'489 13.0 1'621 43.0 517
-16.0 6'166 14.0 1'555 44.0 500
-15.0 5'861 15.0 1'492 45.0 483
-14.0 5'574 16.0 1'433 46.0 466
-13.0 5'303 17.0 1'375 47.0 451
-12.0 5'046 18.0 1'320 48.0 436
-11.0 4'804 19.0 1'268 49.0 421
-10.0 4'574 20.0 1'218 50.0 407
-9.0 4'358 21.0 1'170
-8.0 4'152 22.0 1'125
-7.0 3'958 23.0 1'081
-6.0 3'774 24.0 1'040
-5.0 3'600 25.0 1'000
-4.0 3'435 26.0 962
-3.0 3'279 27.0 926
-2.0 3'131 28.0 892
-1.0 2'990 29.0 859
Characteristic Curve NTC 1K for Exterior Temperature Senso r B9
T [°C] R[Ohm] T [°C] R[Ohm] T [°C] R[Ohm]
-30.0 175203 50.0 3605 130.0 298
-25.0 129289 55.0 2989 135.0 262
-20.0 96360 60.0 2490 140.0 232
-15.0 72502 65.0 2084 145.0 206
-10.0 55047 70.0 1753 150.0 183
-5.0 42158 75.0 1481 155.0 163
0.0 32555 80.0 1256 160.0 145
5.0 25339 85.0 1070 165.0 130
10.0 19873 90.0 915 170.0 117
15.0 15699 95.0 786 175.0 105
20.0 12488 100.0 677 180.0 95
25.0 10000 105.0 586 185.0 85
30.0 8059 110.0 508 190.0 77
35.0 6535 115.0 443 195.0 70
40.0 5330 120.0 387 200.0 64
45.0 4372 125.0 339
Characteristic Curves NTC 10 k
for Sensors B1, B3, B4, B21, B41, B71, B81, B91, and B92
Page 39

39
Equipment Dimensions
AQUATOP
T05C+T06C, T08C-T14C,
T07C-HT, T11C-HT, T19C
AQUATOP T05C+T06C T08C-T14C
T07C-HT
T11C-HT
T19C
1
Heating water Outlet Internal thread 1" 1" 1"
2
Heating water Inlet Internal thread 1" 1" 1"
3
Heat source Outlet Internal thread 1" 1¼" 1½"
4
Heat source Inlet Internal thread 1" 1¼" 1½"
5
Electrical feed PG 13,5 + PG 29
6
Sensor cable
7
Safety valve Outlet Brine and heater
8
Controller
9
Controller cover
10
Front panel holding plate
11
Vibration dampening rubber pads Diameter
Height
ø Screws
40 mm
30 mm
M8x23mm
ø 15/21 mm
Dimensional Drawing
Front view Right view Left view
(control side)
Plane view with min. clearances
Control station
Page 40

40
Technical Data
AQUATOP T05C-T10C
Heat Pump Type AQUATOP T05C T06C T08C T10C
Model Type Compact Heat Pumps
Standard Data Hea t Pu mps Brine
W35 W50 W35 W50 W35 W50 W35 W50
Heating capacity (Qh) B0 kW 5.4 5.0 6.5 6.1 8.2 7.7 9.6 9.0
Cooling capacity (Qo) B0 kW 4.2 3.3 5.0 4.0 6.3 5.0 7.4 5.9
El. power consumption 1) (Pe) B0 kW 1.2 1.8 1.5 2.1 1.9 2.7 2.2 3.1
Performance rating 1) (COP) B0 (-) 4.5 2.8 4.3 2.7 4.4 2.8 4.5 2.9
Standard Data Hea t Pumps Water
Heating capacity (Qh) W10 kW 7.1 6.7 8.7 8.1 11.0 10.2 12.9 12.0
Cooling capacity (Qo) W10 kW 5.9 4.9 7.2 6.0 9.1 7.5 10.8 8.9
El. power consumption 1) (Pe) W10 kW 1.2 1.8 1.5 2.1 1.9 2.7 2.2 3.1
Performance rating 1) (COP) W10 (-) 5.9 3.8 5.8 3.7 5.9 3.8 6.0 3.8
Coolant R 407 c
Oil Ester oil
Oil charge l 1.0 1.1 1.1 1.1
Charge volume coolant kg 1.4 1.7 1.85 2.0
Geothermal heating system length
(50 W/m acc. to AWP)
DN 32 m 84 100 126 2 x 74
Evaporator, Brine Side
Water content WT l 1.5 1.9 1.9 2.4
Volume flow (3.0 K Δt with B0/W35) l/h 1326 1584 1992 2352
Volume flow intermediate circuit
(3.0 K Δt with W10/W35)
l/h 1863 2281 2877 3433
Pressure loss (3.0 K Δt with B0/W35) kPa 11 6 15 10
Pressure loss (3.0 K Δt with W10/W35) kPa 22 12 31 21
Medium water/ethylene glycol % 75/25
Installed brine pump RS 25/7 RS 25/7 Top S 25/10 Top S 25/10
Residual pressure with SO/W35 kPa 46 50 95 102
Residual pressure with W10/W35 kPa 31 35 77 83
Condenser Heating Side
Water content WT l 1.8 1.8 1.8 2.0
Volume flow (10 K Δt) l/h 666 798 1008 1182
Pressure loss (10 K Δt) kPa 2 5 6 6
Medium water % 100
Installed heat pump RS 25/4 RS 25/4 RS 25/4 RS 25/4
Pressure loss 10 K Δt kPa 33 27 24 22
Usage Range
Heat source temperature min./max. °C -8 / +20 -8 / +20 -8 / +20 -8 / +20
Heating flow temperature min./max. °C 20/55 20/55 20/55 20/55
Page 41

41
Technical Data
AQUATOP T05C-T10C
Heat Pump Type AQUATOP T05C T06C T08C T10C
Electrical Data
Operating voltage, feed
Rated input with B0 / W35 PNT kW 1.2 1.5 1,9 2.2
Ext. fuse AT 13 13 13 16
Rated current immersion heater l max. A 10 10 10 10
Rated current heat pump I max. A 4.2 5.1 5.6 7.0
Current with blocked rotor (LRA) LRA A 24 32 40 46
Starting current with soft starter VSA A 12.5 17.5 17.5 17.5
Power consumption el. immersion
heater
max. kW 6/4/2
Power consumption circulating
pumps
max. kW 0.2 0.2 0.45 0.5
Starts per hour max. 3 3 3 3
Start delay after power outage sec. 60-120
Dimensions / Connections / Misc.
Operating weight kg 189 192 193 194
Dimensions WxDxH mm 670x950x1050 670x950x1050 670x950x1050 670x950x1050
Heating circuit connection IT inch 1" 1" 1" 1"
Brine circuit connection IT inch 1" 1" 1¼" 1¼"
Sound power level Lwa dB(A) 41 41 41 43
Sound level at 5-m distance 2) Lpa dB(A) 25 25 25 25
Expansion vessel heater V l 12 12 12 12
Set default pressure heating circuit p bar 1.0 1.0 1.0 1.0
Expansion vessel brine circuit V l 12 12 12 12
Set default pressure brine circuit p bar 1.0 1.0 1.0 1.0
Safety valve (brine/heater) p bar 3 3 3 3
Switching point brine pressure
monitor
p bar 0.65 0.65 0.65 0.65
3 x 400 V
1) without circulating pump
2) measured value averaged around heat pump (free field)
3) residual delivery pressure is indicated at highest level
Page 42

42
Technical Data
AQUATOP T12C-T19C
Heat Pump Type AQUATOP T12C T14C T19C
Model Type Compact Heat Pumps
Standard Data Hea t Pu mps Brine
W35 W50 W35 W50 W35 W50
Heating capacity (Qh) B0 kW 12 11.3 14.4 13.5 18.5 17.3
Cooling capacity (Qo) B0 kW 9.2 7.6 11.1 9 14.5 11.9
El. power consumption 1) (Pe) B0 kW 2.8 3.8 3.3 4.5 4.0 5.5
Performance rating 1) (COP) B0 (-) 4.3 3.0 4.3 3.0 4.6 3.2
Standard Data Hea t Pumps Water
Heating capacity (Qh) W10 kW 15.9 14.7 19.1 17.5 24.5 22.3
Cooling capacity (Qo) W10 kW 13.3 11.0 15.6 12.7 20.3 16.7
El. power consumption 1) (Pe) W10 kW 2.6 3.7 3.5 4.8 4.2 5.8
Performance rating 1) (COP) W10 (-) 6.0 4.0 5.5 3.7 5.8 3.9
Coolant R 407 c
Oil Ester oil
Oil charge l 1.36 1.85 1.89
Charge volume coolant kg 2.2 2.4 2.7
Geothermal heating system length
(50 W/m acc. to AWP)
DN 32 m 2 x 92 2 x 111 3 x 97
Evaporator, Brine Side
Water content WT l 2.0 2.1 2.4
Volume flow (3.0 K Δt with B0/W35) l/h 2928 3516 4625
Volume flow (3.0 K Δt with W10/W35) l/h 4233 4941 6475
Pressure loss (3.0 K Δt with B0/W35) kPa 15 14 21
Pressure loss (3.0 K Δt with W10/W35) kPa 31 28 41
Residual pressure with SO/W35 kPa 93 89 71,5
Residual pressure with W10/W35 kPa 65.5 61 28.5
Medium water/ethylene glycol % 75/25
Installed brine pump Top S 25/10 Top S 25/10 Top S 25/10
Condenser Heating Side
Water content WT l 2,4 2,9 2,9
Volume flow (10 K Δt) l/h 1476 1770 2272
Pressure loss (10 K Δt) kPa 9 10 12
Medium water % 100
Installed heat pump RS 25/6 RS 25/6 RS 25/7
Residual pressure 10 K Δt kPa 35 30 38
Usage Range
Heat source temperature min./max. °C -8 / +20 -8 / +20 -8 / +20
Heating flow temperature min./max. °C 20/55 20/55 20/55
Page 43

43
Technical Data
AQUATOP T12C-T19C
1) without circulating pump
2) measured value averaged around heat pump (free field)
3) residual delivery pressure is indicated at highest level
Heat Pump Type AQUATOP T12C T14C T19C
Electrical Data
Operating voltage, feed 3 x 400 V
Rated input with B0 / W35 PNT kW 2.8 3.3 4.0
Ext. fuse AT 16 20 20
Rated current immersion heater l max. A 10,0 10,0 10,0
Rated current heat pump I max. A 10,0 12,4 14,0
Current with blocked rotor (LRA) LRA A 50 66
Starting current with soft starter VSA A 25 27.5 33.8
Power consumption el. immersion heater max. kW 6/4/2
Power consumption circulating pumps max. kW 0.2 0.3 0.5
Starts per hour max. 3 3 3
Start delay after power outage sec. 60-120
Dimensions / Connections / Misc.
Operating weight kg
Dimensions WxDxH mm 670x960x1050 670x960x1050 670x960x1050
Heating circuit connection IT inch 1" 1" 1"
Brine circuit connection IT inch 1¼" 1¼" 1½"
Sound power level Lwa dB(A) 45 48 51
Sound level at 5-m distance 2) Lpa dB(A) 27 31 34
Expansion vessel heater V l 12 12 2 x 12
Set default pressure heating circuit p bar 1,0 1,0 1,0
Expansion vessel brine circuit V l 12 12 12
Set default pressure brine circuit p bar 0.5 0.5 0.5
Safety valve (brine/heater) p bar 3 3 3
Switching point brine pressure monitor p bar 0.65 0.65 0.65
74
Page 44

44
Technical Data
AQUATOP T07C-HT, T11C-HT
Heat Pump Type AQUATOP T07C-HT T11C-HT
Model Type Compact Heat Pumps
Standard Data Hea t Pu mps Brine
W35 W50 W35 W50
Heating capacity (Qh) B0 kW 7.3 7.2 10.9 10.5
Cooling capacity (Qo) B0 kW 5.7 5.0 8.6 7.4
El. power consumption 1) (Pe) B0 kW 1.6 2.2 2.3 3.1
Performance rating 1) (COP) B0 (-) 4.6 3.2 4.7 3.4
Standard Data Hea t Pumps Water
Heating capacity (Qh) W10 kW 9.6 9.2 14.1 13.6
Cooling capacity (Qo) W10 kW 8.0 6.9 11.7 10.4
El. power consumption 1) (Pe) W10 kW 1.6 2.3 2.4 3.2
Performance rating 1) (COP) W10 (-) 5.9 4.1 6.0 4.2
Coolant R 134a
Oil Ester oil
Oil charge l 1.4 1.7
Charge volume coolant kg 1.75 2.0
Geothermal heating system length (50 W/m acc. to AWP) DN 32 m 1 x 114 2 x 86
Evaporator, Brine Side
Water content WT l 2.4 2.9
Volume flow (3.0 K Δt with B0/W35) l/h 1818 2743
Volume flow intermediate circuit (3.0 K Δt with W10/W35) l/h 2552 3700
Pressure loss (3.0 K Δt with B0/W35) kPa 12 13
Pressure loss (3.0 K Δt with W10/W35) kPa 24 24
Medium water/ethylene glycol % 75/25
Installed brine pump Top S 25/10 Top S 25/10
Residual pressure with SO/W35 kPa 102 96
Residual pressure with W10/W35 kPa 86 78
Condenser Heating Side
Water content WT l 2.0 2.4
Volume flow (10 K Δt with B0/W35) l/h 897 1341
Pressure loss kPa 4 5
Medium water % 100
Installed heat pump RS 25/4 RS 25/6
Residual pressure 10 K Δt kPa 27 40
Usage Range
Heat source temperature min./max. °C -6 / +20 -6 / +20
Heating flow temperature min./max. °C 20/65 20/65
Page 45

45
Technical Data
AQUATOP T07C-HT, T11C-HT
Heat Pump Type AQUATOP T07C-HT T11C-HT
Electrical Data
Operating voltage, feed 3/N/PE400V/50Hz
Rated input with B0 / W35 PNT kW 1.6 2.3
Ext. fuse AT 16 20
Rated current immersion heater l max. A 10.0 10.0
Rated current heat pump l max. A 10.0 13.5
Current with blocked rotor (LRA) LRA A 50 74
Starting current with soft starter VSA A 25 40
Power consumption el. immersion heater max. kW 6/4/2
Power consumption circulating pumps max. kW 0.3 0.4
Starts per hour max. 3 3
Start delay after power outage sec. 60-120
Dimensions / Connections / Misc.
Operating weight kg 198 206
Dimensions WxDxH mm 670x950x1050 670x950x1050
Heating circuit connection IT inch 1" 1"
Brine circuit connection IT inch 1¼" 1¼"
Sound power level Lwa dB(A) 40 45
Sound level at 5-m distance 2) Lpa dB(A) 27 32
Expansion vessel heater V l 12 12
Set default pressure heating circuit p bar 1.0 1.0
Expansion vessel brine circuit V l 12 12
Set default pressure brine circuit p bar 1.0 1.0
Safety valve (brine/heater) p bar 3 3
Switching point brine pressure monitor p bar 0.65 0.65
1) without circulating pump
2) measured value averaged around heat pump (free field)
3) residual delivery pressure is indicated at highest level
Page 46

46
Initial Startup Log
Initial Startup Log
Order No.
For Report No.
Report. E
Compressor
Condenser
Flow
Return
Heater
Evaporator
Expansion
valve
Heat source
Unit address
Name
Street Address
ZIP/City
Installation company
Street Address
ZIP/City
Unit type
Year of manuf.
Serial No.
Standard No.
Fabrikat
Erzeugnis Nr.
Index Nr.
Schema Nr.
Operating modes Construction heating
Monovalent Free cooling
kW capacity 2. HS Activ cooling
Monoenergetic Solar
Bivalent/Parallel Cascade
1 Condensation temperature °C
2 Condensation pressure HP bar
3 Hot ga s temperature °C
4 Heat ing flow temperature °C
5 Heating return temperature °C
6 Subzer o cooling temperature °C
7 Heat source output temperature °C
8 Heat source input temperature °C
9 Overheating temperature °C
10 Evap. temperature NP °C
11 E vap. pressure NO bar
12 Ground water temp. prim. + sec. °C
Compressor 1
Fan/Brine pump
Charge pump
Heating pump 1
Heating pump 2
Boiler pump
Controls
0 = not installed
1 = good
2 = remedied
3 = not
remedied
Coolant
Coolant volume
High pressure
Low pressure
Humidity/Inspection glass
Air gap heater
Heat source brine + water
Heat source air
Electrical setup
Glycol charge heat source
Frost protection
Flow monitor
Dewpoint W (cooling)
Frost protection
Filter strength ground water
Air duct free
Cold bridges
Capping grille
Condensation
water
Defrost
sensor free
Terminals and contacts
Heater controller
Electric company block
Soft starter
Thermal relay
Controlled rotational direc.
Outside installation
Line LOGON B General Settings 5950 Function H1
70 Version
1630 Service wat er pr.
712 Room temper ature
730 Summer/Winter HC1
720 Heating curve HC1
1030 Summer/Winter HC2
1020 Heating curve HC2
5051 Electr. heat use
5700 Preset va lue
5891 Output QX3
5892 Output QX2
1630 Service wat er pr.
741 Max flow HC1
2840 Switching diff. Return
2842 Min. run-time
6212 C. No. Prod. 1
6213 C. No. Prod. 2
6215 C. No. Storage
6217 C. No. HC
7700 Relay test
B50 Screed function
B51 Floor/screed funct ion
LOGON B Sole
2818 QS-Temp.
Cooling
901 Operating m ode
902 Comfort set point
923 Min. flow setpoint
924 Min. flow setpoint at
945 Mixing valve
5711 Cooling circ uit
5712 Mixer use
2815 Antifreeze
Date d/m/y
Signature SFM Signatur Client
Notes:
Make/Model Type Level Capacity W Voltage V Current A Thermal relay Current consumption
L1 L2 L3
Page 47

47
Notes
Page 48

ELCO GmbH
D - 64546 Mörfelden-Walldorf
ELCO Austria GmbH
A - 2544 Leobersdorf
ELCOTHERM AG
CH - 7324 Vilters
ELCO-Renda m a x B.V.
NL - 1410 AB Naarden
ELCO Belgium n.v./s.a.
B - 1731 Zellik
Service:
 Loading...