

Page 1
sideKICK too User Manual
Page 2

__________________________________________________________________________________
ELC sideKICK too User Manual
Page 3

__________________________________________________________________________________
ELC sideKICK too User Manual
sideKICK too User Manual
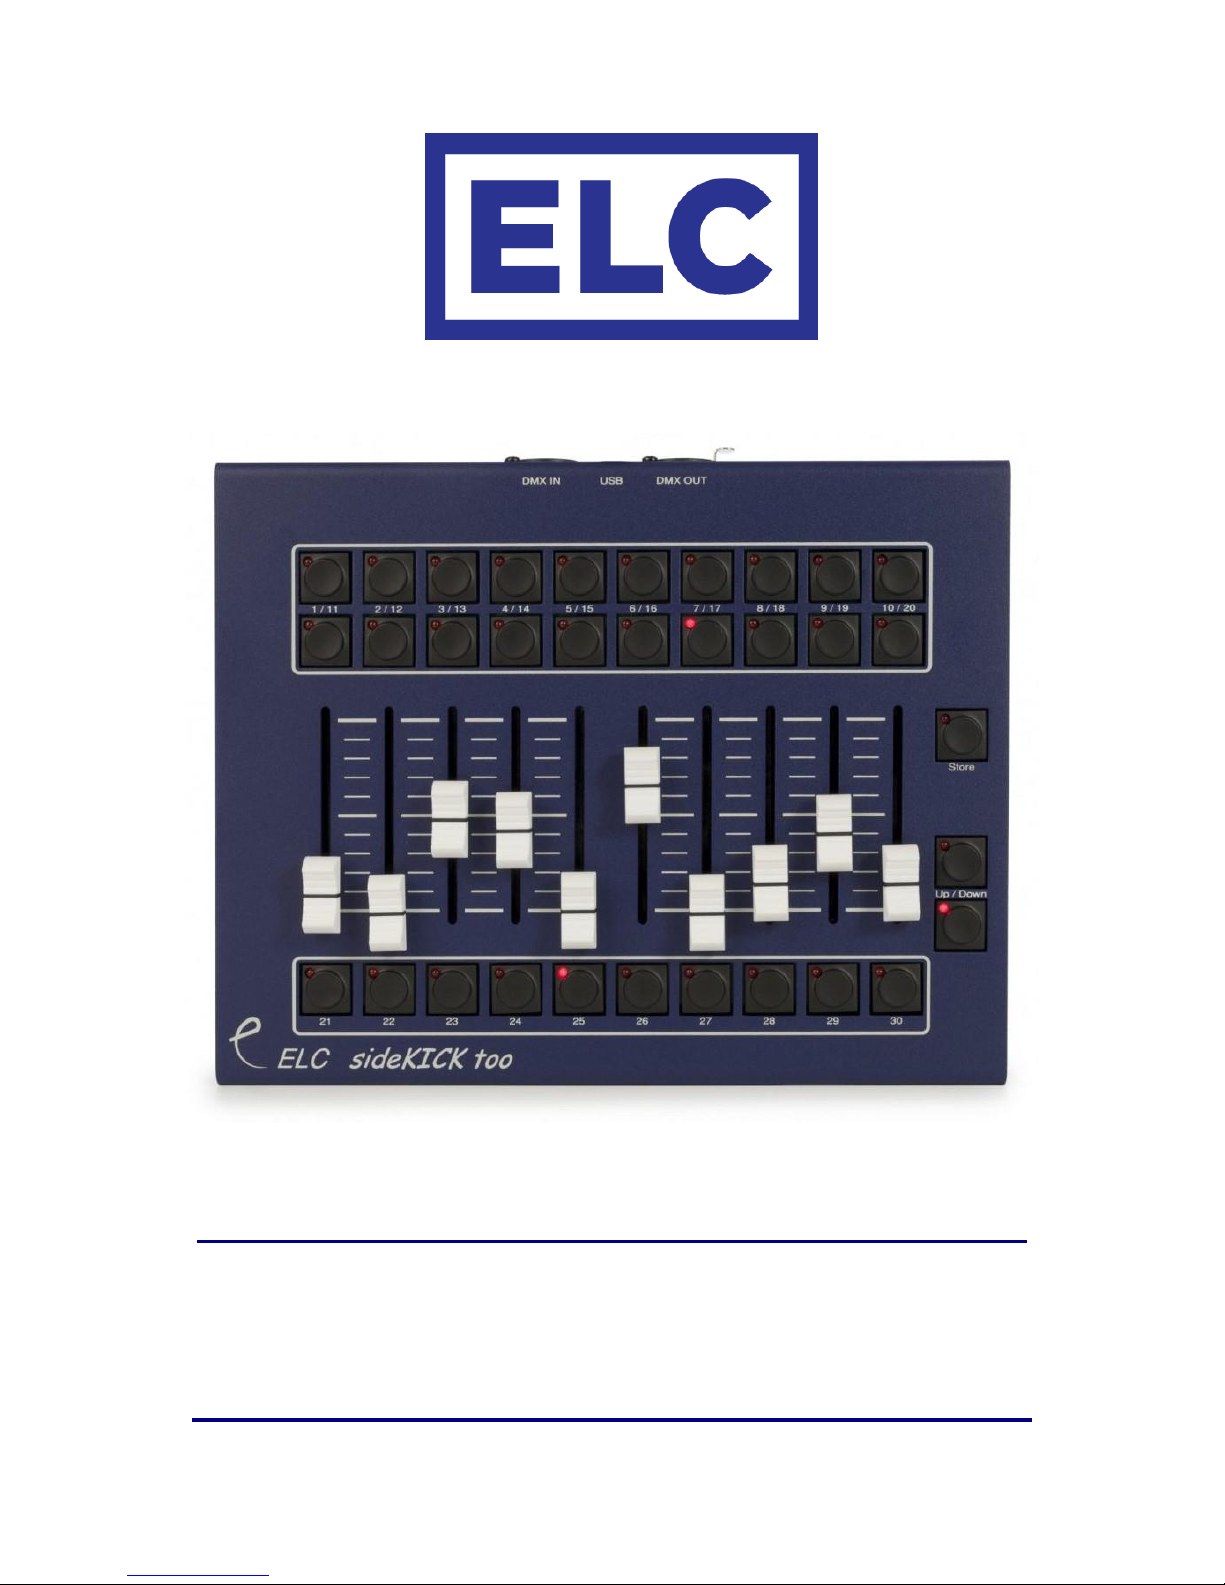
The ELC sideKICK too is a 30-memory playback panel with terminal connections.
The 30 memories can be stored under 20 button playbacks and 10 fader playbacks.
The sideKICK too provides a simple to use DMX scene capture and playback of
memories, each of which can be a single lighting state (up to 512 channels) or a
chaser with individual period and crossfade times.
The desk is fitted with DMX in/out and a programmable DMX merger. It is ideal as a
stand alone control, a backup desk, and it can be used to control other software
applications, such as GrandMA OnPC.
• Captures data from DMX data signal
• 30 memories of 512 DMX channels, individually recalled by a push button
• Each memory can be a scene or a chase (total desk capacity is 126 chase steps)
• Stores chaser step length and times
• Master up/down fade buttons controls lighting states from 0% to 200%
• AC612XU editor freeware provides programming functions
Features
Page 4

__________________________________________________________________________________
ELC sideKICK too User Manual
The ELC sideKICK too has a DMX input, a DMX output and a built-in merger. The
merger has operating modes like HTP/LTP and Priority. The memories are captured
from the DMX input and all have 512 channels. In addition to the memories, there is a
master intensity control that runs from 0% to 200%. The master is controlled by the
Up and Down keys. The master Up/Down can also be set up as speed control.
The sideKICK too is powered through the USB connector, either via the supplied USB
power adapter or by being connected to a computer. The USB connector is also used
for future software upgrades and the AC612XU Editor software.
The AC612XU Editor software – available for download on the ELC website
(www.elclighting.com) – can be used to preprogram the sideKICK too’s memory.
With the AC612XU Editor software it is possible to create memories for each button
or fader with multiple steps (device total of 126). A USB connection is required to
import or export the memories to and from the device.
This product may only be used for
controlling dimmers and moving lights.
Using the product outside of these specifications
will remove all responsibility from the supplier.
Functional overview
Page 5

__________________________________________________________________________________
ELC sideKICK too User Manual
Changing operating modes
The operating mode of the sideKICK too can be changed by entering Setup mode.
Setup mode allows you to change individual settings for the operating modes (e.g.
merger mode, memory handling).
To enter setup mode, follow these steps:
• Press and hold the Store button
• Press and hold the Up button
• Wait for approximately 10 seconds for the LEDs to start flashing (the Up and
Store LEDs remain on)
• The settings can now be changed, as described in the following sections
• When no button has been pressed for about 10 seconds, the unit will timeout
of the setup mode and will store the current settings and go back to normal
operation.
Merger mode
Key
Up
Down
Function
○
○
HTP merge
҉
○
LTP merge
○
҉
Priority merge (memories of the unit are
disabled if a valid DMX signal is on the input)
Store disable
If the LED on the store button is on, then storing new memories is disabled.
Setup mode
Page 6
__________________________________________________________________________________
ELC sideKICK too User Manual
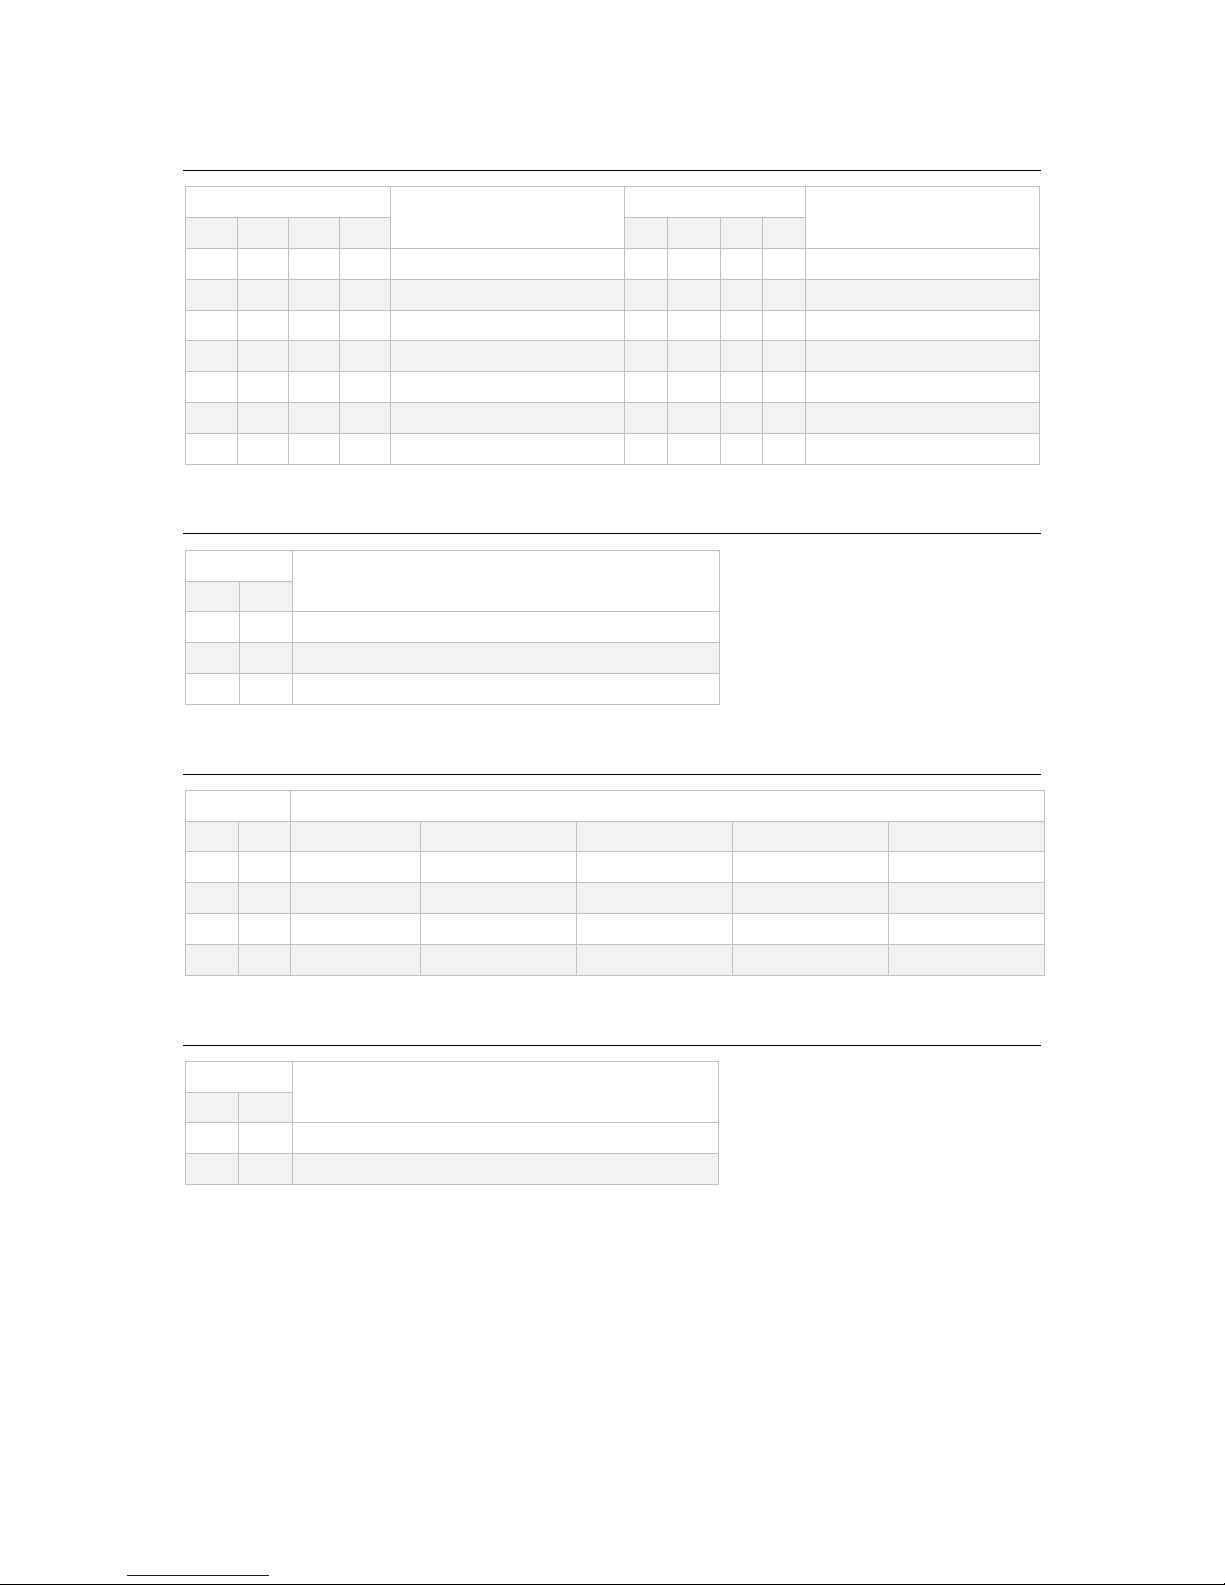
Startup memory (at power on)
Key
Function
Key
Function
1 2 3 4 1 2 3
4
○ ○ ○
○
No startup memory
҉ ○ ○
○
Memory 1
҉
҉ ҉ ○
Memory 7
○ ҉ ○
○
Memory 2
○ ○ ○
҉
Memory 8
҉ ҉ ○
○
Memory 3
҉ ○ ○
҉
Memory 9
○ ○ ҉
○
Memory 4
○ ҉ ○
҉
Memory 10
҉ ○ ҉
○
Memory 5
҉ ҉ ○
҉
Memory 11
○ ҉ ҉
○
Memory 6
○ ○ ҉
҉
Memory 12
Memory mode
Key
Function (Memory Hold)
5
6
○
○
Swap → only one memory active
҉ ○ Toggle → switch memory on/off
○
҉
Flash → temporary memory
Fade tables (see Creating memories)
Key
Fade time tables
7 8 Table
Fade time 1
Fade time 2
Fade time 3
Fade time 4
○
○
1
0 seconds
1 second
2 seconds
5 seconds
҉ ○ 2
0 seconds
5 seconds
10 seconds
15 seconds
○
҉ 3 1 second
10 seconds
15 seconds
20 seconds
҉ ҉ 4
5 seconds
10 seconds
20 seconds
30 seconds
Up/down mode
Key
Function
9
10
○
○
Up/Down buttons control intensity
҉ ○ Up/Down buttons control speed
Page 7

__________________________________________________________________________________
ELC sideKICK too User Manual
Master / Slave / Operation mode
Key
Function
11
12
13
14
○ ○ ○
○
Normal standalone operation
҉ ○ ○
○
Device is master of a system (contains memories)
○ ҉ ○
○
Slave in a system
҉ ҉ ○
○
Last slave in a system (RDM signal is blocked)
○ ○ ҉
○
DMX remote wing with offset 1
҉ ○ ҉
○
DMX remote wing with offset 51
○ ҉ ҉
○
DMX remote wing with offset 101
҉ ҉ ҉
○
DMX remote wing with offset 151
In Master/Slave mode, the master device should be first in the DMX line.
The slaves are then daisy-chained to the master. In daisy-chaining, the output of the
master device is connected to the input of the slave device. The output of the slave
device can then be connected to the input of another slave device, and so on.
The master device communicates with the slave devices through RDM (bidirectional
DMX). If devices after the last slave device are not handling the RDM signal correctly,
the last slave should be programmed as slave-last (this will block the RDM signal).
Creating memories (with faders)
To store a memory (captured from the DMX input) into one of the ten faders, follow
the next steps:
• Press the Store button (the button will now start flashing, indicating that no
fader has been selected). The built-in merger is now disabled and will pass
through the DMX input signal.
• Create the required memory by the external DMX source
• Move the chosen fader to it’s full position. The Store LED will now be on.
(If the fader is already at the full position, move it down first and back up.)
• Selecting the same fader again will undo the selection and a different fader
can be selected.
• Press the Store button to save the memory
Operation
Page 8

__________________________________________________________________________________
ELC sideKICK too User Manual
Creating memories (with buttons)
To store a memory (captured from the DMX input) into one of the 30 buttons,
follow the next steps:
• Press the store button (the button will now start flashing, indicating that no
button has been selected). The built-in merger is now disabled and will pass
through the DMX input signal.
• Create the required memory by the external DMX source
• Press the chosen memory button (1-30) – the Store LED is now on
• Set the fade time for the memory, by using the next table:
Key
Function
(depends on fade time table)
Up
Down
○
○
Fade time 1 (0/0/1/5 seconds)
҉
○
Fade time 2 (1/5/10/10 seconds)
○
҉
Fade time 3 (2/10/15/20 seconds)
҉
҉
Fade time 4 (5/15/20/30 seconds)
• Pressing the same button again will disable the selection
• Press the Store button to save the memory
To set the blackout/fadeout timing, follow the steps above – only instead of selecting
one of the memory buttons, select the blackout button (next to the Store button).
Normal operation
In normal operation, you can recall memories using the faders or buttons.
The master intensity control (0% to 200%) is handled by the Up and Down buttons.
If both the Up and Down button LEDs are off, the master control is at 100%. If the Up
button LED is on, the master control is above 100%. With the Down button LED on,
the master control is below 100%. To set the master control back to 100%, press the
Up and Down buttons simultaneously.
DMX remote wing operation
In DMX remote wing operation, all buttons and faders are sent as separate DMX
channels. Buttons 1 to 30 are sent as channels 1 to 30. The Down button is sent as
channel 31, the Up button as channel 32 and the Store button as channel 33. The
faders are sent as channels 41 to 50. The DMX merge is set to HTP. Multiple sideKICK
too devices can be used when setting the offset to 51, 101 or 151.
Page 9
__________________________________________________________________________________
ELC sideKICK too User Manual
Please note: To get back into the Setup menu, follow the next steps:
• Switch off the device (unplug the USB cable)
• Press and hold both the Up and Down key
• Switch on the device (plug in the USB cable)
The device will now start up in Setup mode (indicated by the blinking LED’s).
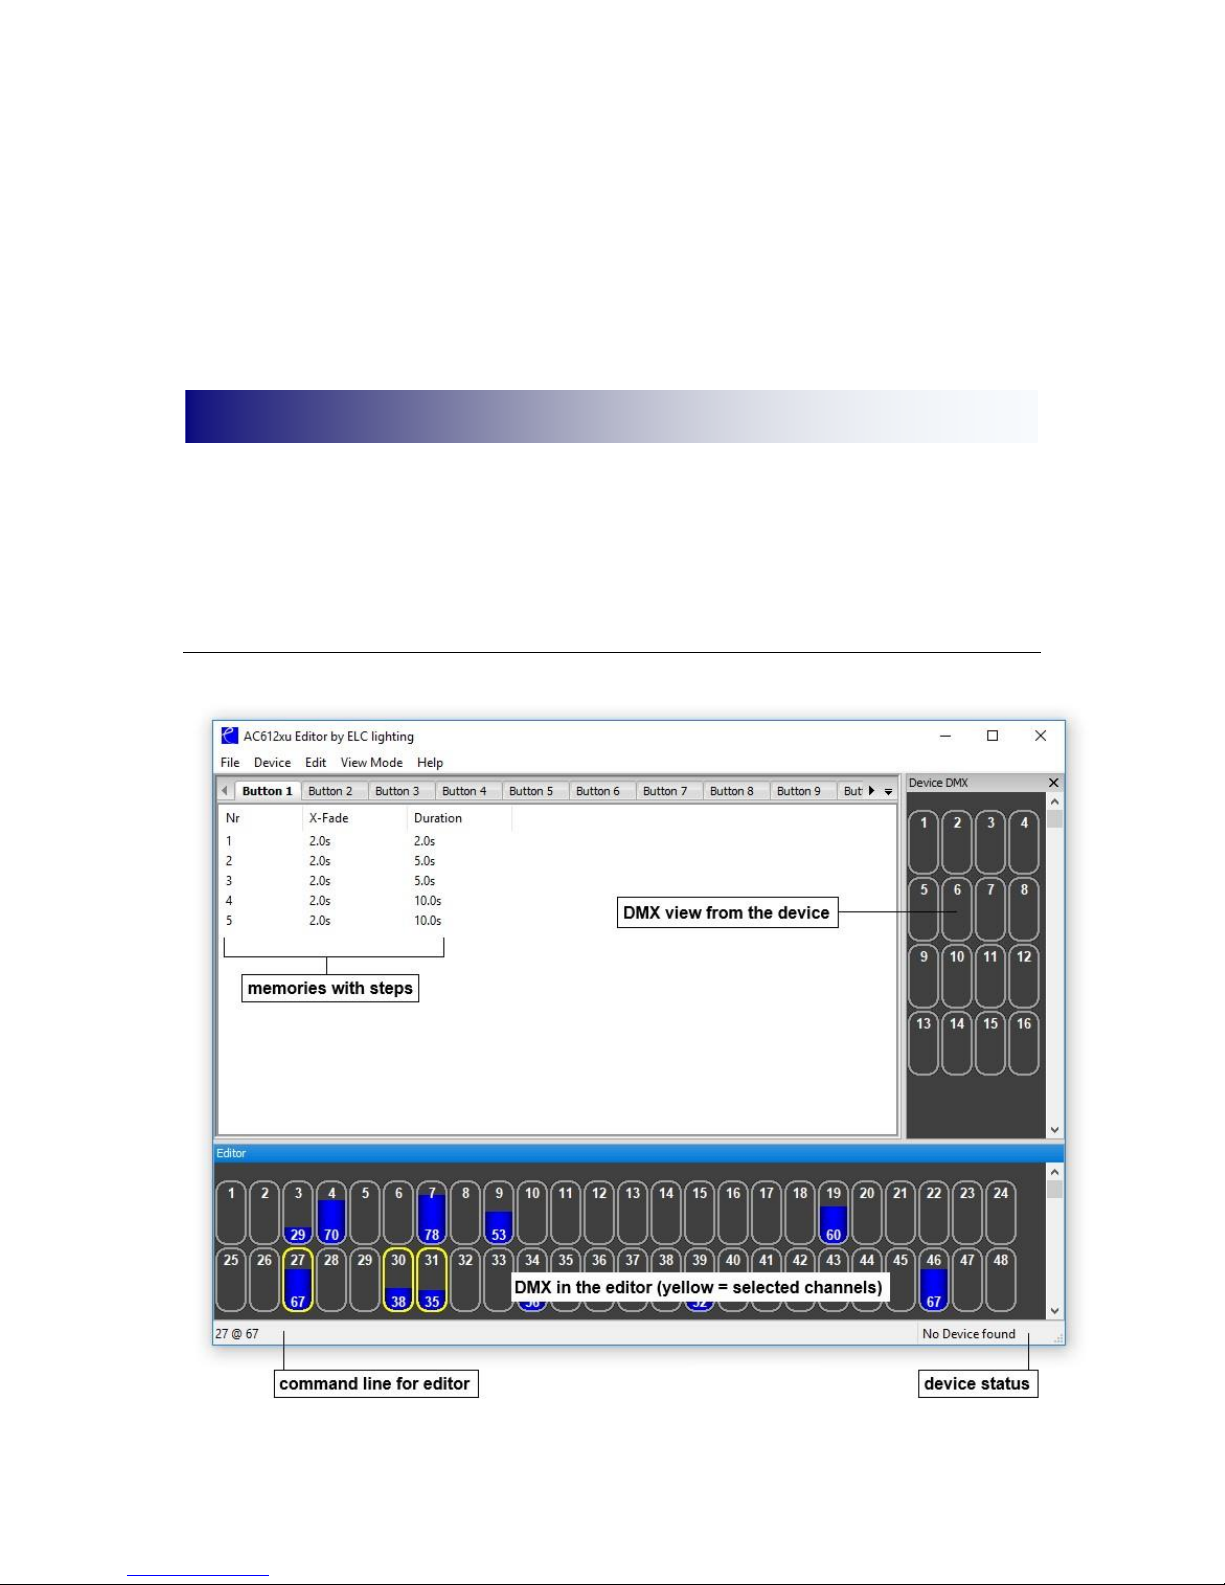
The AC612XU Editor software – available on the ELC website (www.elclighting.com) –
can be used to create the memories. Each memory can have multiple steps and each
step (from a total of 126) can have it’s own crossfade time and duration.
Main window
AC612XU Editor software (PC/Mac)
Page 10

__________________________________________________________________________________
ELC sideKICK too User Manual
File menu
• New → clear all memories and settings
• Open → open a previously created setup of memories and settings
• Save → store all memories & settings to disk
• Save as → store all memories & settings to disk (different file name)
• Exit → quit the application
Device menu
• View DMX → reopen the DMX window if it is not displayed
• Merge DMX → if checked the DMX output of the sideKICK too will be a
HTP merge of the device DMX and the AC612XU Editor
• Grab DMX → load the device DMX data into the AC612XU Editor
• Settings → open the Settings window (explained below)
• Import → load memories & settings from the device into the Editor
• Export → store memories & settings from the Editor onto the device
Edit menu
• Record Step → opens the Record window to update the current step or
store the information to a different/new step
• Add Step → similar to Record step but the step number is incremented
• Delete Step → removes the currently selected step
• Clear Editor → sets all channels in the AC612XU Editor to 0%
• Clear Memory → deletes all steps in the memory
View mode
In this menu you can select the naming of the cue list tabs to match your device.
Help menu
• About → show the software version
Page 11
__________________________________________________________________________________
ELC sideKICK too User Manual
Using the AC612XU Editor
The Editor can be used either with the keyboard (command line) or the mouse.
Using the keyboard (command line)
By typing in the required channels and setting the levels you can create a scene.
The keys used are:
• 0, 1, 2, 3, 4, 5, 6, 7, 8 and 9 → digit entry
• +, –
• t (or / on Windows keypad) → through
• ‘ (or * on Windows keypad) → at
• f (or . on Windows keypad) → full
• Enter → activate the command
Examples:
• 1 t 12 ‘ 50 → 1 → 12 @ 50 (channel 1 through 12 at 50%)
• 1 + 3 f → 1 + 3 full (channel 1 and 3 at 100%)
Using the mouse
Select a channel by left clicking it in the AC612XU Editor window. The channel will be
highlighted in yellow to indicate that it is selected. To select multiple channels hold
the Ctrl key when left clicking channels. To change the value, click and hold the left
mouse button and drag the channel value up and down. Dragging with the right
mouse button will change the value at a slower pace for more precision.
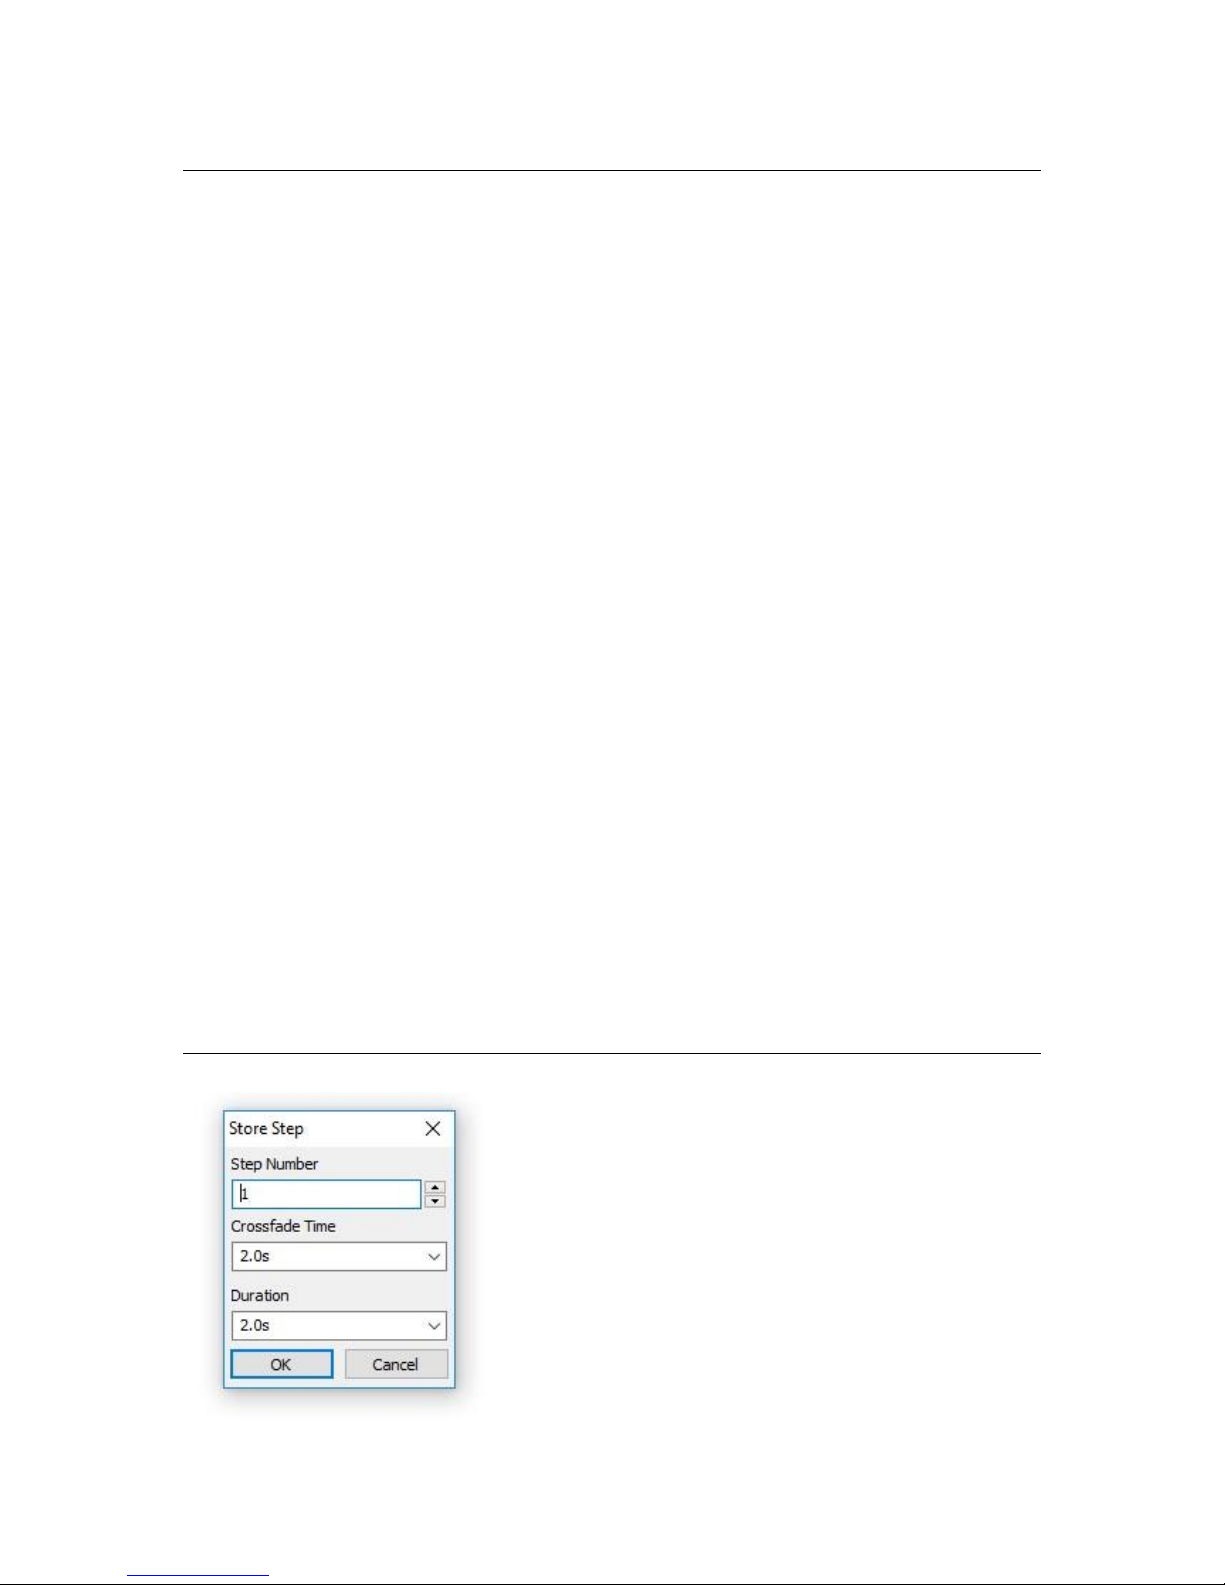
Recording a step
Select Record Step from the Device menu (or press
R or A) to bring up the Record Step window.
Step number indicates the number of the step
(maximum of 126 memories for the device).
Crossfade Time sets the fade time for the step.
Duration sets how long the step will last (time
before the next step is activated).
Setting the duration to STOP will end the playback
of the memory at that step. If no step in a memory
has a STOP programmed, then the memory will loop
through all steps.
Page 12
__________________________________________________________________________________
ELC sideKICK too User Manual
Device settings
To use the sideKICK too with offline software, please download the sidekick too
Interface software from the Download Center of the ELC Lighting website
(www.elclighting.com).
The sideKICK Interface software converts the sideKICK too (or AC612XU) into a DMX
to ArtNet converter. All DMX generated by the device (playback) and the DMX input
are converted to ArtNet and sent to the IP address with the universe number as
selected.
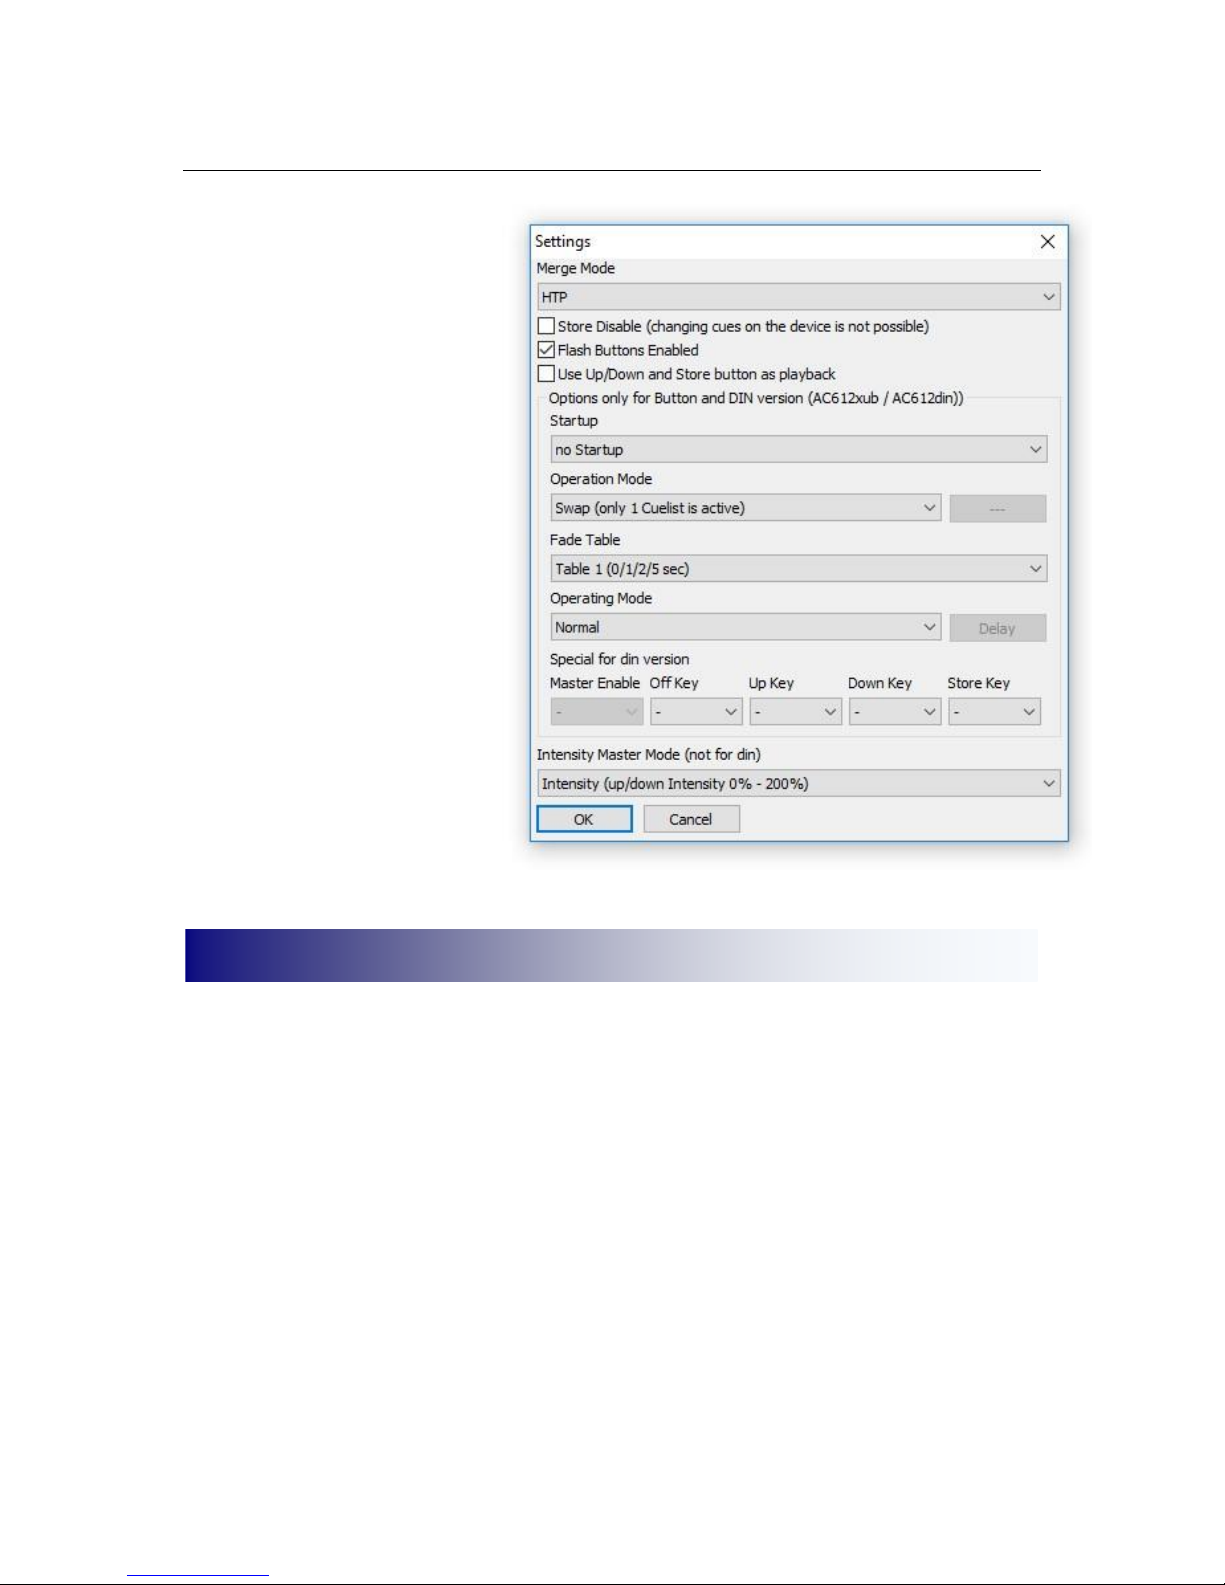
For grandma(2) onPC in combination with sideKICK too.
The Device Settings window
provides an easy menu to
change settings like merge
mode, store disable, etc.
All of these functions are
described in the Setup Mode
section of this manual.
sideKICK too Interface software
Page 13

__________________________________________________________________________________
ELC sideKICK too User Manual
The USB Update software – available in the download center of the ELC website
(www.elclighting.com) – is used to upgrade the firmware of the sideKICK too.
The latest firmware for your device can also be downloaded from there.
Follow the next steps to execute a firmware upgrade:
• Power off the device
• Press and hold the Store button
• Connect the device to the computer using a USB cable
• Windows users might need to install the USB drivers located in the
downloaded .zip-file
• Start the USB Update program
• Press Update
• Select the downloaded firmware
• When the update is completed;
o Exit the program
o Disconnect the USB cable
• Power up the device
PLEASE NOTE: Previously created memories might get lost during the update.
Power: external power supply 9V – 24V 200mA
Dimensions: 250 x 200 x 35 mm
Weight: 1.4 kg
Firmware upgrading
Technical specifications
Page 14
__________________________________________________________________________________
ELC sideKICK too User Manual
Read all instructions - especially the safety requirements - in the user manual before use.
Save these instructions - the safety and operating instructions should be retained for future
reference. Carefully follow all instructions.
Cleaning
Disconnect all connected supply and signal cables before cleaning the unit. Clean with a dry
cloth. Do not use any liquids or aerosols on the unit.
Usage
Do not use the unit near water or moisture. - Do not block any ventilation openings, they are
necessary for the essential airflow within the unit and protect it against overheating. - Install
in accordance with the manufacturer’s instructions. - Do not insert any objects through the
ventilation slots of the unit, as these could come in contact with live parts or could cause
short circuits. This could cause electric shock and/or fire. - Do not install near any heat
sources such as radiators, stoves or other apparatus (including amplifiers) that produce heat.
- Unplug this apparatus during lightning storms or when unused for long periods of time. Do
not place the unit on unstable surfaces.
Servicing
Refer all servicing to qualified service personnel. Servicing is required when the apparatus
has been damaged in any way such as; damage to the power supply cord or plug, spillage of
liquids, objects falling into the apparatus, exposure to rain or moisture, abnormal operation
or falling damage. In all of the previous conditions, disconnect the main plug immediately
and call your distributor or technical support!
WARNING
TO REDUCE THE RISK OF FIRE OR ELECTRIC SHOCK,
DO NOT EXPOSE THIS PRODUCT TO RAIN OR MOISTURE
General safety instructions
Page 15
__________________________________________________________________________________
ELC sideKICK too User Manual
We,
Manufacturers name: ELC lighting b.v.
Manufacturers address: Weerijs 8
5422 WV Gemert
the Netherlands
Herewith take the full responsibility to confirm that the product
Product Category: Lighting control equipment
Name of product: ELC-SDK2
Which refer to this declaration are manufactured in the Netherlands and complies with the
following product specifications and harmonized standards:
Safety: LVD (Low Voltage Directive) 2014/35/EU, EN62368-1
EMC: 2014/30/EG, EN55032
ROHS (II): 2011/65/EU
With the presumption that the equipment is used and connected according to the manual,
supplied with the equipment. All signal input- and output connections must be shielded and
the shielding must be connected to the ground of the corresponding plug.
Gemert, February 16, 2018
ing. Joost van Eenbergen
Declaration of Conformity
 Loading...