

Page 1

STELLA 90-IS BGX Range Hood
Installation Guide
Operation Manual
Page 2

IMPORTANT REMINDERS
USE
This range hood has been designed for residential household use only.
Commercial usage for café’s, restaurants, and other similar establishments
will void the warranty of this product.
Never use the range hood for purposes other than extracting kitchen smoke
and odor.
Never leave high open flames under the hood when it is in operation.
This range hood is not a toy. Please keep children and other unauthorized
persons not instructed to use the hood away from the appliance.
INSTALLATION
The manufacturer will not be held liable for any damages resulting from
improper installation and/or misuse of the product.
Installation must be carried out by a qualified and authorized ELBA Service
Technician. Failure to do so can void the warranty of this product.
The minimum safety distance between the cooktop and the range hood is
650 millimeters (mm).
Check that the electrical supply from the outlet to which the unit is to be
plugged in is matching with the requirements of the hood, as indicated by
the product label on the range hood.
The exhaust pipe should have a minimum diameter of 150 millimeters (mm)
MAINTENTANCE
Switch off and unplug the appliance from the main power supply before
carrying out any maintenance work. (When disconnecting the appliance, do
not pull on the cord as it might cause a short circuit. Instead, hold the plug
and apply pressure on it when pulling from the wall socket.)
Clean the hood using a damp cloth and a neutral liquid detergent.
Clean and/or replace the filters after the specified time period.
There is risk of fire if cleaning is not carried out in accordance with the
guidelines and instructions as highlighted in the section “CLEANING AND
MAINTENANCE”.
LIABILITY
The Manufacturer will not be held liable for any damages incurred as a
result of the improper installation, usage, and maintenance of this product.
Page 3
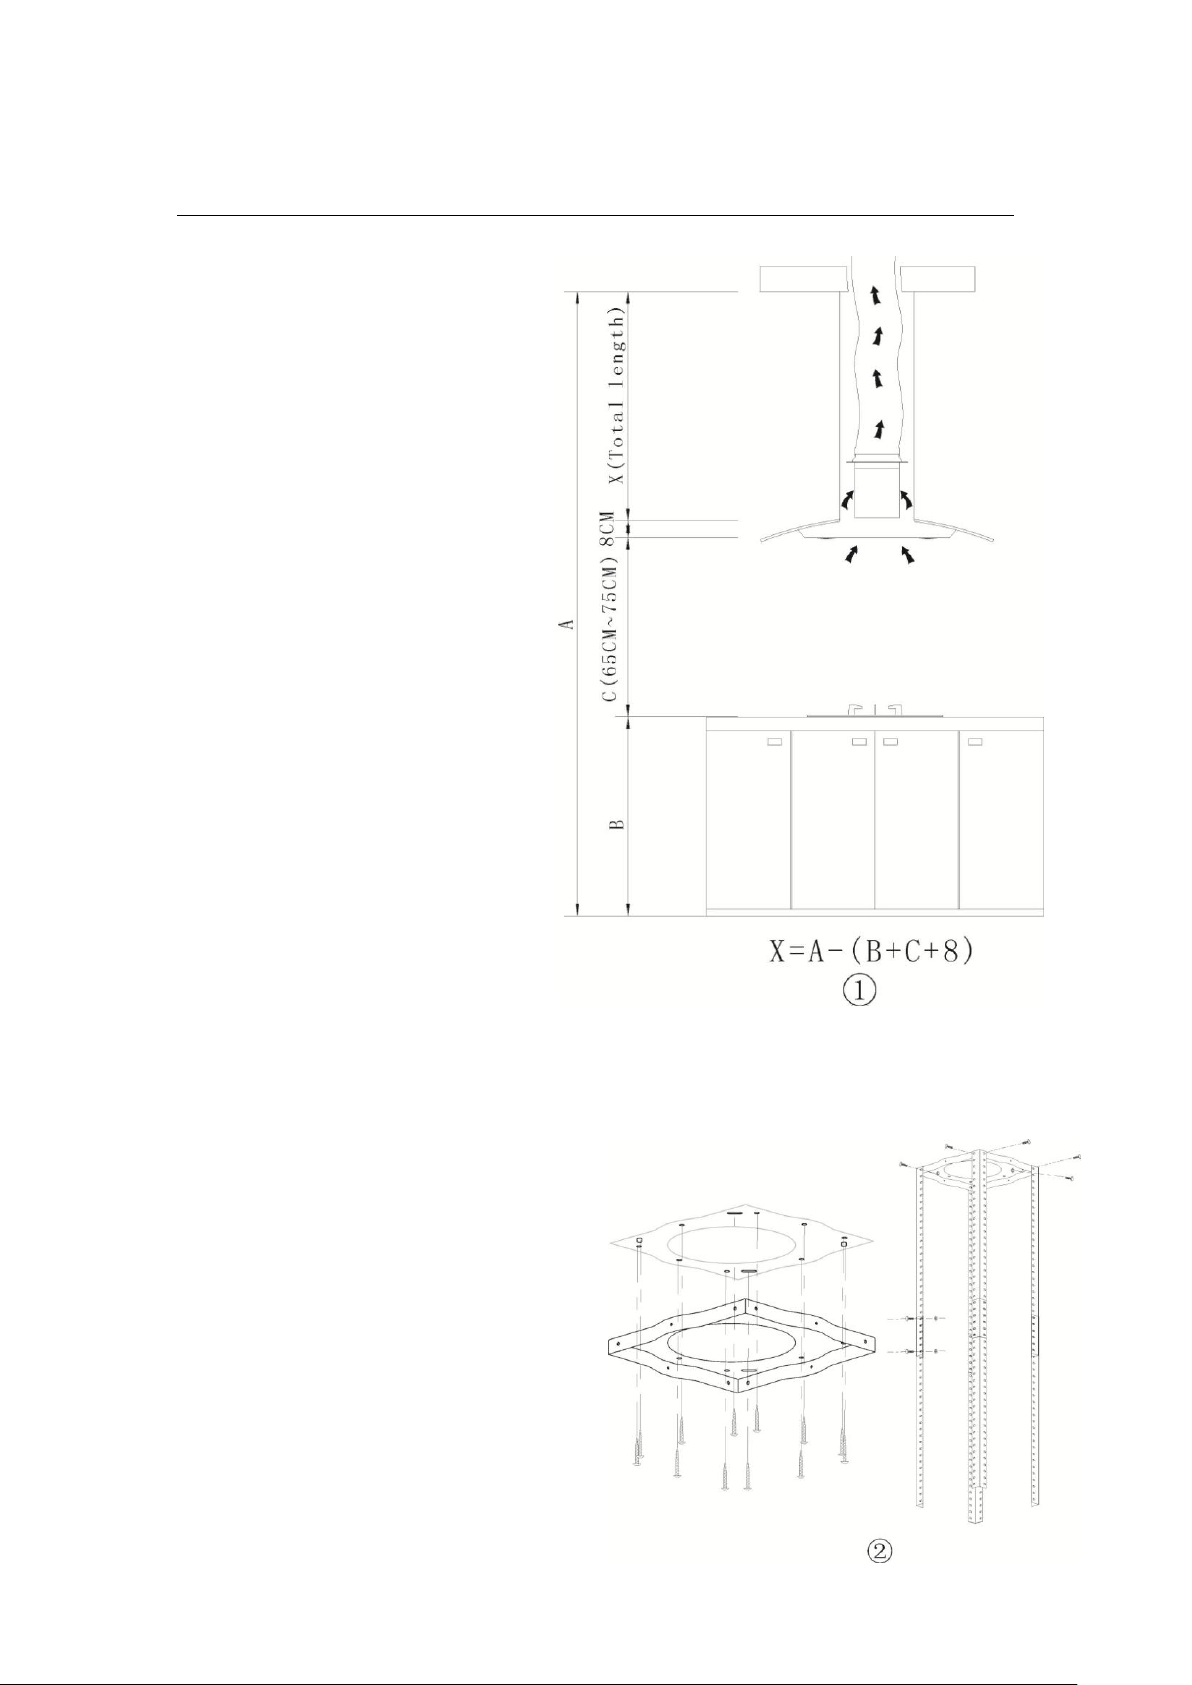
INSTALLATION
Important Notes:
The hood should be placed at
a distance of 65-75cm from the
cooking surface for maximum
performance.
The exhaust pipe should have
a minimum diameter of 150
millimeters (mm)
Install the bracket on a hard
and sturdy surface (with
bracing if possible). Make sure
that the surface screws are
long enough to bite into the
ceiling and tightened with
enough torque.
Make sure that the range hood
is aligned properly, not tilted in
either a sideward or
front/backward direction.
The ceiling must bear at least 40 kilograms (Kg) of weight.
The thickness of the ceiling must be ≧30MM,
Installation Steps:
1. Drill one (1) 170mm round hole in
the centre of the ceiling for the
exhaust pipe as seen in pic 2.
*Note that this should be the centre
of the Island hood directly below the
cooktop.
Page 4

2. According to the hanging board, drill 12 pcs of ST6 * 40mm
flat screws that will be used to fix the hanging board onto the
ceiling as seen in pic 2.
3. Then, 8 pcs of M4*10 screws and M4 nuts with gaskets will
be used to connect the angular bar into the hanging board
mounted on the ceiling as seen in pic 2.
4. If the height is not enough to meet the minimum
requirements, an additional section can be added to lower
the body of the range hood.
5. Calculate the length of the angle bar, and use 16 pcs M4*10
flat screws and M4 nuts with gaskets to connect another
angular bar with the first section.
*Note: The overlap length of angular bar should be at least
100mm to maintain rigidity and stability of the lower section.
6. Make sure that the exhaust pipe is fitted inside the 170mm
opening as seen in pic 3.
7. Use 4 pcs ST4*8 flat screws to connect the upper/internal
chimney onto the hanging board, then put the external
chimney. Two (2) hooks will be used to hold up the chimney
in order to install the lower sections, as seen in pic 4.
8. Use 4 pcs ST4*8 flat screws to install the outlet on the body
casing, as seen in pic 5.
9. Affix the glass portion on the body of the range hood by
using the supplied hardware. Use the 4 screws and check
whether the glass and the body of the range hood fits well,
as seen in pic 6.
Page 5

10. Hold up the hood and insert it in between the angular bars. Align it properly
and use 16 pcs M4*10 flat screws to mount the body of the hood to the
angular bars, as seen in pic 7.
11. Lower the exhaust pipe onto the duct / outlet of the hood and fasten properly
to make sure that exhaust air does not leak through the sides.
12. Remove the hooks supporting the chimney cover and lower the chimney
cover to finish off the installation.
Page 6

OPERATION
LCD Display Symbols:
- Speed setting 1
- Speed setting 2
- Speed setting 3
- Light setting indicator
Touch Pad Operation:
“ + ” – Press to turn on and activate motor. Press again to increase speed
setting. (See display symbols for activated setting)
(When at the timer setting, use this to increase time)
“ – ” – Press to decrease speed setting. When at the lowest speed, press
one more time to turn off and deactivate motor.
(When at the timer setting, use this to decrease time)
“ Light “ – Press to activate and deactivate light. (See LCD display)
“ Timer “ – This activates 2 functions: Time and Time Delay.
Time Function
o Hold the key for 2-3 seconds
o The display will flash indicating adjustment mode
o Press the +/- buttons to adjust desired time
o Press the again to switch adjustment to minute setting
o Press the +/- buttons to adjust desired time
o Press the again to finalize settings and exit mode
Time Delay – This range hood is equipped with a time delay function.
o Press the once to activate 5 minute delay
o Press the again to activate 15 minute delay
o Press the again to activate 30 minute delay
o Press the again to deactivate time delay
Page 7

CLEANING AND MAINTENANCE
Aluminium Filters
This unit comes equipped with removable
aluminium filters that are to be cleaned on a
regular basis in order to maintain the
performance and longevity of the hood.
Instruction: To remove the filters, press the clip
located at the front, pull down the filters, and
release the clip.
Cleaning the Filters
1. Prepare a large basin with 40-60 degrees Celsius of warm water and
add a mild detergent to mix with the water.
Note: DO NOT use any corrosive detergent when cleaning.
2. Soak the aluminium filters for two (2) to five (5) minutes in the basin to
loosen the build-up of oil and grease.
3. Use a soft brush with fine bristles to gently scrub the aluminium filters.
Apply moderate strength, so as not to damage the filter.
4. Allow the filter to air dry until it is completely free from any moisture.
Recommendation: Clean the filters at least once every month for regular
usage, or more frequently for heavy usage. Visually inspect the filter for trapped
oil and grease on a regular basis in order to maximize the performance of the
hood.
Warranty Exemption: The aluminium filters are a consumable item and are
not covered by the warranty of this item. Any defects caused by the negligence
in cleaning the filters will also void the warranty of the hood.
Page 8

LED Lights
This unit comes equipped with energy efficient LED bulbs.
Instruction: Please call the service centre for the replacement of the LED bulb
modules. It is suggested that you do not try to replace this yourself, as it might
cause electrical shock.
Warranty Exemption: The incandescent bulbs are a consumable item and are
not covered by the warranty of this item.
Cleaning the Body Casing
Do not use harsh / aggressive chemicals and rough sponges that can damage
the material finish of the range hood.
1. Use a soft damp cloth to wipe the body casing to remove dust particles.
2. After which, use a dry cloth wipe down any excessive moisture left by the
damp cloth.
3. You may use a dedicated stainless steel cleaner (for stainless steel
finishes) to finish off the cleaning process.
Cleaning the Glass
Do not use harsh / aggressive chemicals and rough sponges that can damage
the material finish of the range hood.
1. Use a soft damp cloth to wipe the body casing to remove dust particles.
2. After which, use a dry cloth wipe down any excessive moisture left by the
damp cloth.
3. You may use a dedicated glass cleaner to finish off the cleaning
process.
Page 9

Technical Diagram
 Loading...