

Page 1
1
STEAM IRON
MODEL: ESI-A2030C(PP)
Owner’s Manual
Please read this manual carefully
before operating your set.
Retain it for future reference.
Record model number and serial
number of the set.
See the label attached on the set and
quote this information to your dealer
when you require service.
For The Warranty Terms & Conditions, Please Refer To Warranty Certificate.
Page 2

2
IMPORTANT SAFEGUARDS
When using this appliance, basic precautions should always be followed, including the
following:
1. Read all instructions before using.
2. Never leave the iron unattended when it is connected to the power.
3. Do not operate iron with a damaged cord or if the iron has been dropped or damaged.
To avoid the risk of electric shock, do not disassemble the iron on your own. Return the
iron to the nearest authorized dealer or after-sales service centre for examination,
repair or mechanical adjustment. Incorrect reassembly can cause a risk of electric shock
when the iron is used.
4. To protect against a risk of electric shock, do not immerse the iron in water or any other
liquids.
5. Never yank cord to disconnect from outlet instead, grasp plug and pull to disconnect.
6. Do not allow the power cord to touch hot surfaces. Let the iron cool down completely
before putting away. Loop cord loosely around iron when storing.
7. Warning: The soleplate of the iron can become extremely hot right after use and may
cause burns if touched.
8. Do not add chemical additive, scented substances or decalcifies into the water tank.
9. Always disconnect iron from electrical outlet when filling with water or emptying and
when not in use.
10. This appliance is not intended for used by persons (including children) with reduced
physical, sensory or mental capabilities, or lack of experience and knowledge, unless
they have been given supervision or instruction concerning use of the appliances by a
person responsible for their safety.
11. Children should be supervised to ensure that they do not play with the iron.
12. Do not operate the appliance for other than its intended use.
13. Do not use this appliance outdoors.
14. Save these instructions for future reference.
15. Close supervision is necessary for any appliance being used by or near children. Do not
leave iron unattended while connected or on an ironing board.
Page 3
3
PRODUCT DESCRIPTION
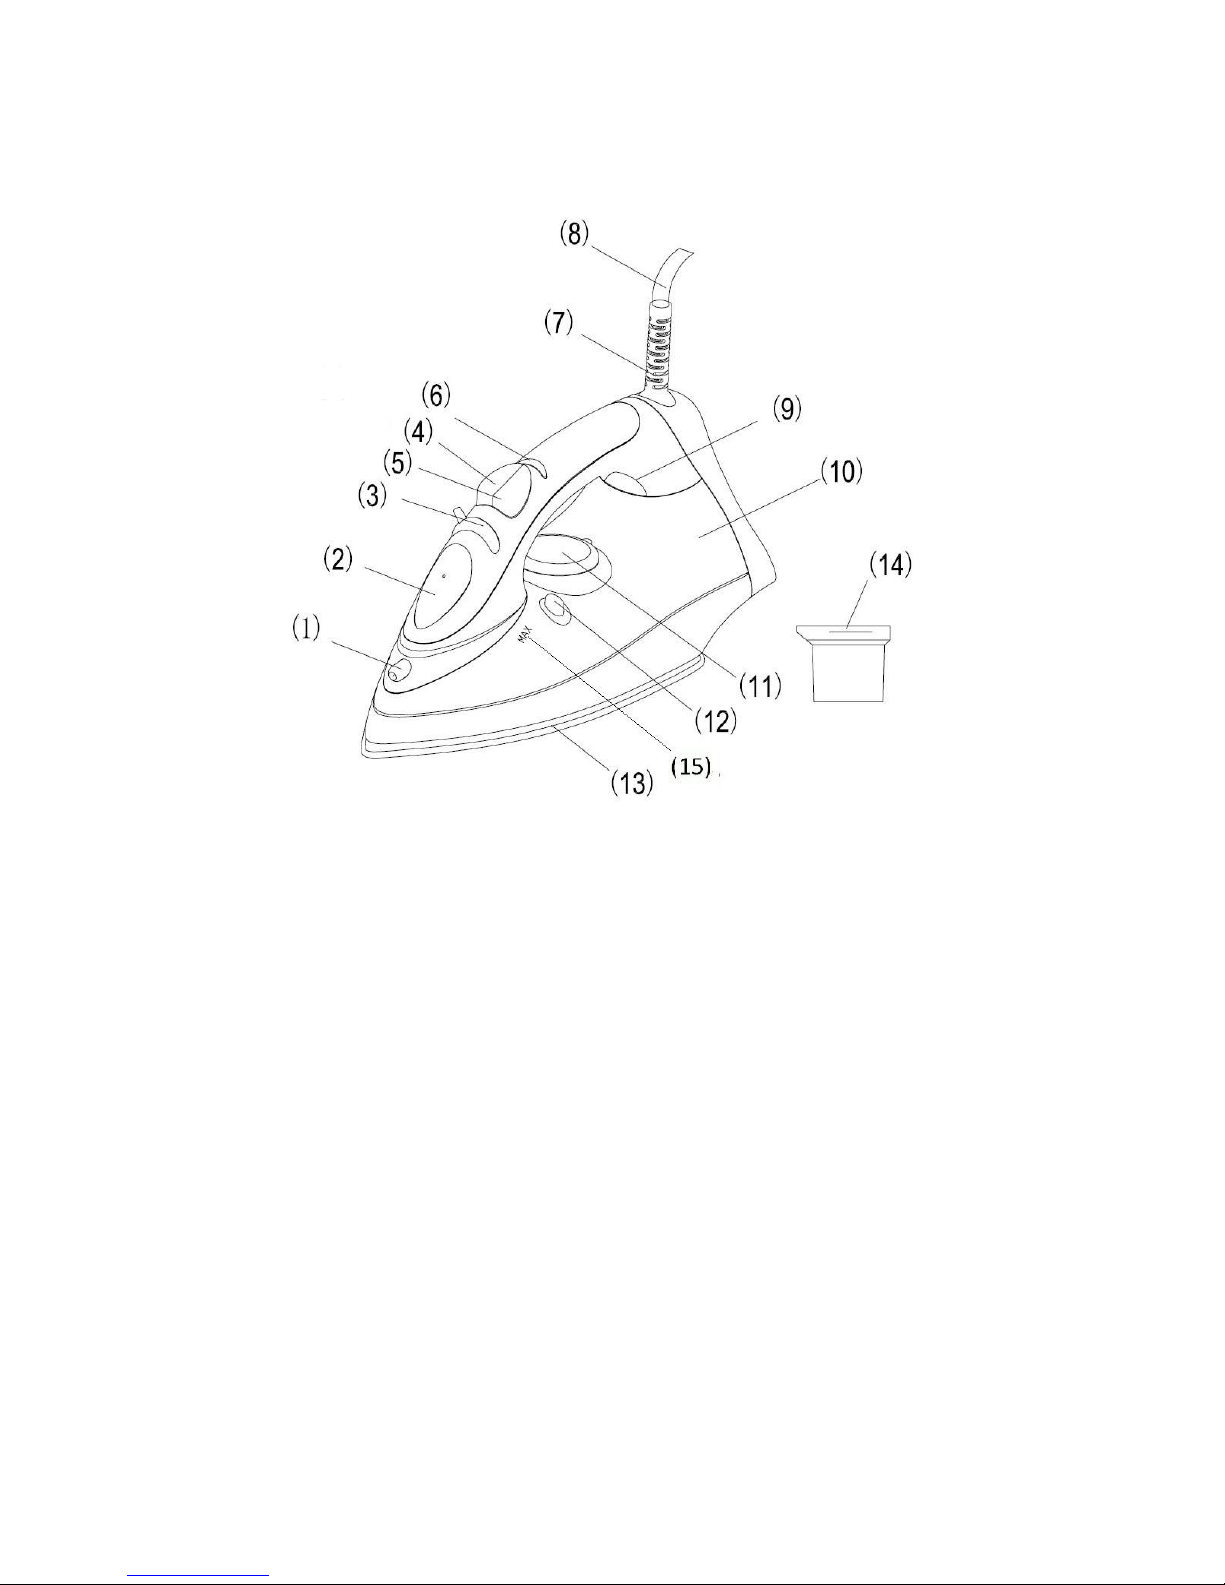
(1) Steam spray outlet (9) Indicator light
(2) Lid (10) Transparent water tank
(3) Steam/dry dial (11) Temperature control dial
(4) Spray button (12) Self-clean button
(5) Short-steam button (13) Ceramic coating soleplate
(6) Handle (14) Water cup
(7) Swivel power cord (15) Maximum water level indicator
(8) Supply cord
USING THE IRON FOR THE FIRST TIME
When using the iron for the first time, you may notice a slight emission of steam and hear
some sounds made by the expanding plastics. This is considered normal and it stops after a
short time. We also recommend passing the iron over an ordinary cloth before using it for
the first time.
Page 4
4
PREPARATIONS
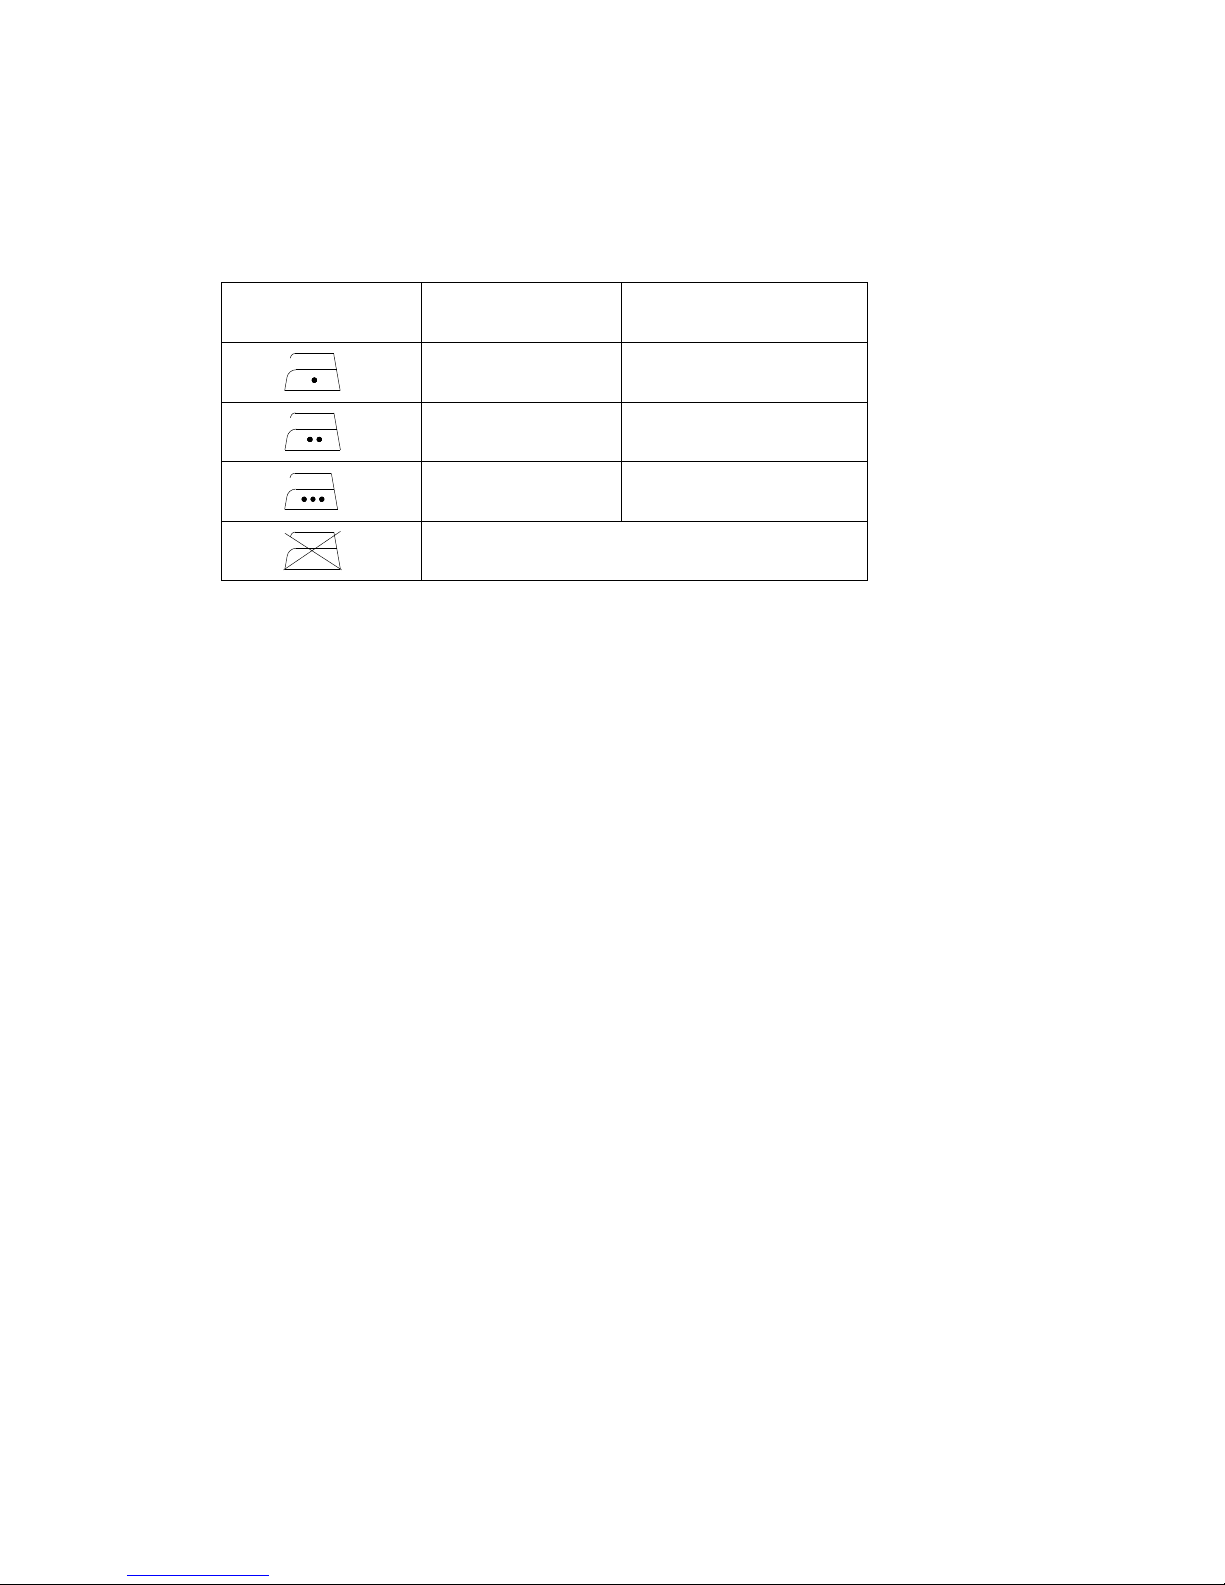
Soft the laundry to be ironed according to the international symbols on the garment label, or
if this is missing, according to the type of fabric.
GARMENT
LABEL
FABRIC
TYPE
THERMOSTAT
REGULATION
synthetic
·
Min./low temperature
silk - wool
··
Medium temperature
Cotton - linen
···
Max./high temperature
Fabric not to be ironed
Start ironing the garments requiring a low temperature.
This reduces the waiting times (the iron takes less time to heat up than to cool down) and
eliminates the risk of scorching the fabric.
STEAM IRONING
FILLING THE RESERVOIR
Check that the plug is disconnected from the socket.
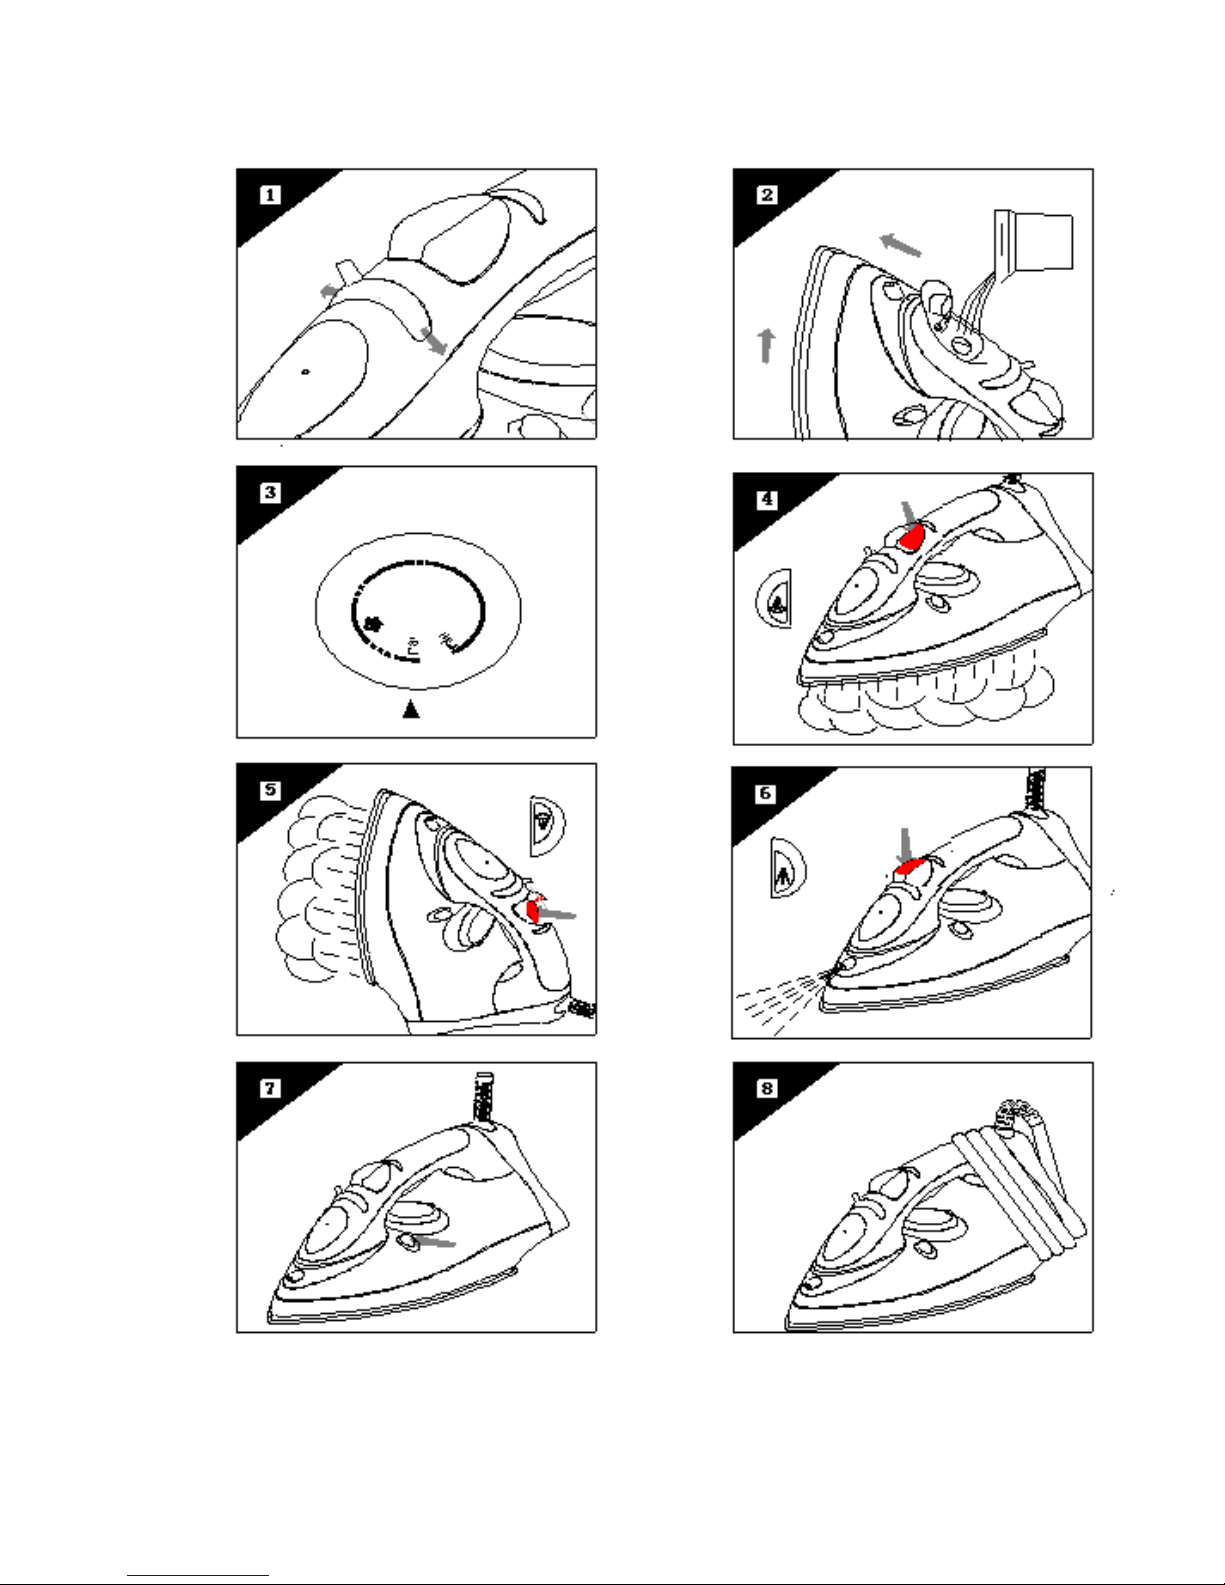
Move the steam dial (3) to “0” [Fig. 1] (please refer to page 8).
Open the lid (2).
Raise the tip of the iron to help the water enter the opening without overflowing.
Slowly pour the water into the water tank (10) using the water cup (14) and never
overfill the maximum level indicated by “MAX” on the reservoir [Fig. 2].
Close the lid (2).
SELECT THE TEMPERATURE
Put the iron in a vertical position.
Put the plug in the socket.
Adjust the temperature control dial (11) according to the international symbol on the
garment label [Fig. 3]. The indicator light (9) indicates that the iron is heating up. Wait
until the indicator light goes off before ironing.
Warning: during ironing, indicator light (9) comes on at intervals, indicating that the
selected temperature is maintained. If you lower the temperature after ironing at a high
temperature, do not start ironing until the indicator light comes on again.
Page 5

5
SELECT THE STEAM
The quantity of steam is regulated by the steam dial (3).
Move the steam dial to a position between minimum and maximum depending on the
quantity of steam required and the temperature selected.
Warning: the iron gives off steam continuously only if you hold the iron horizontally. You
can stop the continuous steam by placing the iron in a vertical position or by moving the
steam dial to “0”. As indicated on the temperature control dial (11) and in the initial table,
you can only use steam at the highest temperatures. If the selected temperature is too
low, water may drip onto the plate.
SELECT THE SHORT-STEAM
Press the shot-steam button (5) to generate a powerful burst of steam that can penetrate
the fabrics and smooth the most difficult and tough creases. Wait for a few seconds
before pressing again [Fig. 4].
By pressing the shot-steam button at intervals you can also iron vertically (curtains, hung
garments, etc.) [Fig. 5].
Warning: the shot-steam function can only be used at high temperatures. Stop the
emission when the indicator light has (9) light up then start ironing again only after the
light has gone off.
SPRAY IRONING
Make sure that there is water in the water tank (10). Press the spray button (4) slowly
(for a dense spray) or quickly (for a vaporized spray) [Fig. 6].
Warning: for delicate fabrics, we recommend moistening the fabric beforehand using the
spray function (4), or putting a damp cloth between the iron and the fabric. To avoid
staining, do not use the spray on silk or synthetic fabrics.
DRY IRONING
To iron without steam, turn the dry dial (3) to “0” position (no steam).
Page 6

6
CLEANING
Before cleaning the iron in any way, make sure that the appliance plug is not connected
to the wall outlet.
Any deposits, starch residue or size left on the plate can be removed using a damp cloth
or an unabrasive liquid detergent.
Avoid scratching the plate with steel wool or metallic objects.
The plastic parts can be cleaned with a damp cloth then wiped over with a dry cloth.
SELF-CLEAN FUNCTION
The self-clean feature helps to cleans inside the plate, removing impurities. We
recommend using it every 10-15 days.
Directions:
Fill the water tank (10) according to the maximum water level indicator.
Plug the product into a standard 220-240V AC electrical outlet near a sink, turn
the temperature control dial (11) to the MAX position. Rest the iron in vertical
position and stable surface and allow it to heat until the indicator light (9) goes
off.
Hold the iron horizontally over the sink and press the self-clean button (12).
Boiling water and steam will be released from the soleplate (13), taking
impurities with them. Move the iron forward and backward until the water tank
is empty. Then, turn the steam dial (3) to “0” position and the temperature
control dial to MIN. Unplug the product, let the appliance to cool down.
If it appears that more self-clean is necessary (e.g., if impurities can still be seen),
repeat above steps until the soleplate and water tank are clean. Dry thoroughly
until impurities are totally cleaned. [Fig. 7].
When the soleplate has cooled down, you can clean it with a damp cloth.
STORING THE IRON
Disconnect the plug of the iron from the socket.
Empty the water tank by turning the iron upside down and gently shaking it.
Leave the iron to cool down completely.
Roll up the power cord [Fig. 8].
Always put the iron away in a vertical position.
Page 7
7
IRONING TIPS
We recommend using the lowest temperatures with fabrics that have unusual finishes
(sequins, embroidery, flush, etc.).
If the fabric is mixed (e.g. 40% cotton 60% synthetics), set the temperature to the
temperature of the fibre requiring the lower temperature.
If you do not know the composition of the fabric, determine the suitable temperature by
testing on a hidden corner of the garment. Start with a minimum temperature and
increase it gradually until it reaches the ideal temperature.
Never iron areas with traces of perspiration or any other marks. The heat of the plate
fixes the stains on the fabric, making them irremovable.
The size is more effective if you use a dry iron at a moderate temperature, excess heat
scorches it with the risk of forming a yellow mark.
To avoid marking silk, woolen or synthetic garments shiny, iron them inside out.
To avoid marking velvet garments shiny, iron in one direction (following the fibre) and do
not press down on the iron.
The heavier the washing machine is loaded, the more garments come out creased. This
also happens when the spin drying revolutions are very high.
Many fabrics are easier to iron if they are not completely dry. For example, silk should
always be ironed damp.
ENVIRONMENT-FRIENDLY DISPOSAL
You can help to protect the environment!
Please remember to respect the local regulations: hand in the non-working
electrical equipments to an appropriate waste disposal centre.
Page 8
8
Page 9
9
 Loading...