

Page 1
COOKER
COOKER
COOKER
COOKER
Model
EC 967F SS
Page 2

Dear Customer, IMPORTANT INSTRUCTIONS AND
ADVICE FOR THE USE OF
We thank you very much for choosing
ELECTRICAL APPLIANCES
our products.
The instructions and advice included in
The use of any electrical appliance requires
this booklet are given to safeguard your
the compliance with some basic rules,
safety and to use this appliance correctly.
namely:
Be so kind as to keep this booklet.
It will be useful to clear any doubt
! Do not touch the appliance with wet or
concerning its operation.
damp hands (or feet)
This appliance must be only assigned
! do not use the appliance bare feet
to the use for which it has been realized,
! do not allow the appliance to be operated
that is for cooking food.
by children or disabled without
Any other use has to be considered
overseeing.
incorrect and therefore dangerous.
The manufacturer declines any
The manufacturer cannot be deemed
liability for damages caused by wrong,
responsible for damages caused by wrong
incorrect or irrational use of the
or incorrect use.
appliance.
Read the instructions carefully before installing and using the appliance.
CAUTION: this apparatus must only be installed in a permanently ventilated room in
compliance with the applicable regulations.
2
Page 3

IMPORTANT PRECAUTIONS AND
RECOMMENDATIONS
! Make sure that electrical cables
! After having unpacked the appliance,
connecting other appliances in the
check to ensure that it is not damaged
proximity of the cooker cannot come into
and that the oven door closes correctly.
contact with the hob or become
In case of doubt, do not use it and consult
entrapped in the oven door.
your supplier or a professionally qualified
! Do not line the oven walls with aluminium
technician.
foil. Do not pace baking trays or the drip
! Packing elements (i.e. plastic bags,
tray on the base of the oven chamber.
polystyrene foam, nails, packing straps,
! The manufacturer declines all liability for
etc.) should not be left around within
injury to persons or damage to property
easy reach of children, as these may
caused by incorrect or improper use of
cause serious injuries.
the appliance.
! Do not attempt to modify the technical
! The various components of the
characteristics of the appliance as this
appliance are recyclable. Dispose of
may become dangerous to use.
them in accordance with the regulations
! Do not carry out cleaning or
in force in your country. If the appliance is
maintenance operations on the
to be scrapped , cut off the power cord.
appliance without having previously
disconnected it from the electric power
CAUTION:
supply.
! If the burner is accidentally extinguished,
! If you should decide not to use this
turn the gas off at the control knob and
appliance any longer (or decide to
wait at least 1 minute before attempting
substitute an older model), before
to relight.
disposing of it, it is recommended that it
! Gas cookers produce heat and humidity
be inoperative in an appropriate manner
in the environment in which they are
in accordance to health and
installed. Ensure that the cooking area is
environmental protection regulations,
well ventilated by opening the natural
ensuring in particular that all potentially
ventilation grilles or by installing an
hazardous parts be made harmless,
extractor hood connected to an outlet
especially in relation to children who
duct.
could play with unused appliances.
! If the cooker is used for a prolonged time
! Do not allow children or other incapable
it may be necessary to provide further
people to use the appliance without your
ventilation by opening a window or by
supervision.
increasing the suction power of the
! After use, ensure that the knobs are in off
extractor hood (if fitted).
position, and close the main gas delivery
valve or the gas cylinder valve.
! When the appliance is not being used, it
is advisable to keep the gas tap closed.
! During and after use of the cooker,
FIRST USE OF THE OVEN
certain parts will become very hot. Do not
It is advised to follow these instructions:
touch hot parts.
! Clean the interior of the oven with cloth
! Keep children away from the cooker
soaked in water and detergent (neutral)
when it is in use.
then dry carefully.
! Some appliances are supplied with a
! Furnish the interior of the oven by placing
protective film on steel and aluminium
the wire racks as described at chapter
parts. This film must be removed before
“Cleaning and maintenance”.
using the appliance.
! Insert shelves and try.
! Fire risk! Do not store flammable
! Switch on the empty oven on max to
material in the oven and in the
eliminate grease tracks from the heating
dishwarmer compartment.
elements.
3
Page 4
15-06
9
10
225
175
200
50
75
100
125
150
C
Fig. 1.1a
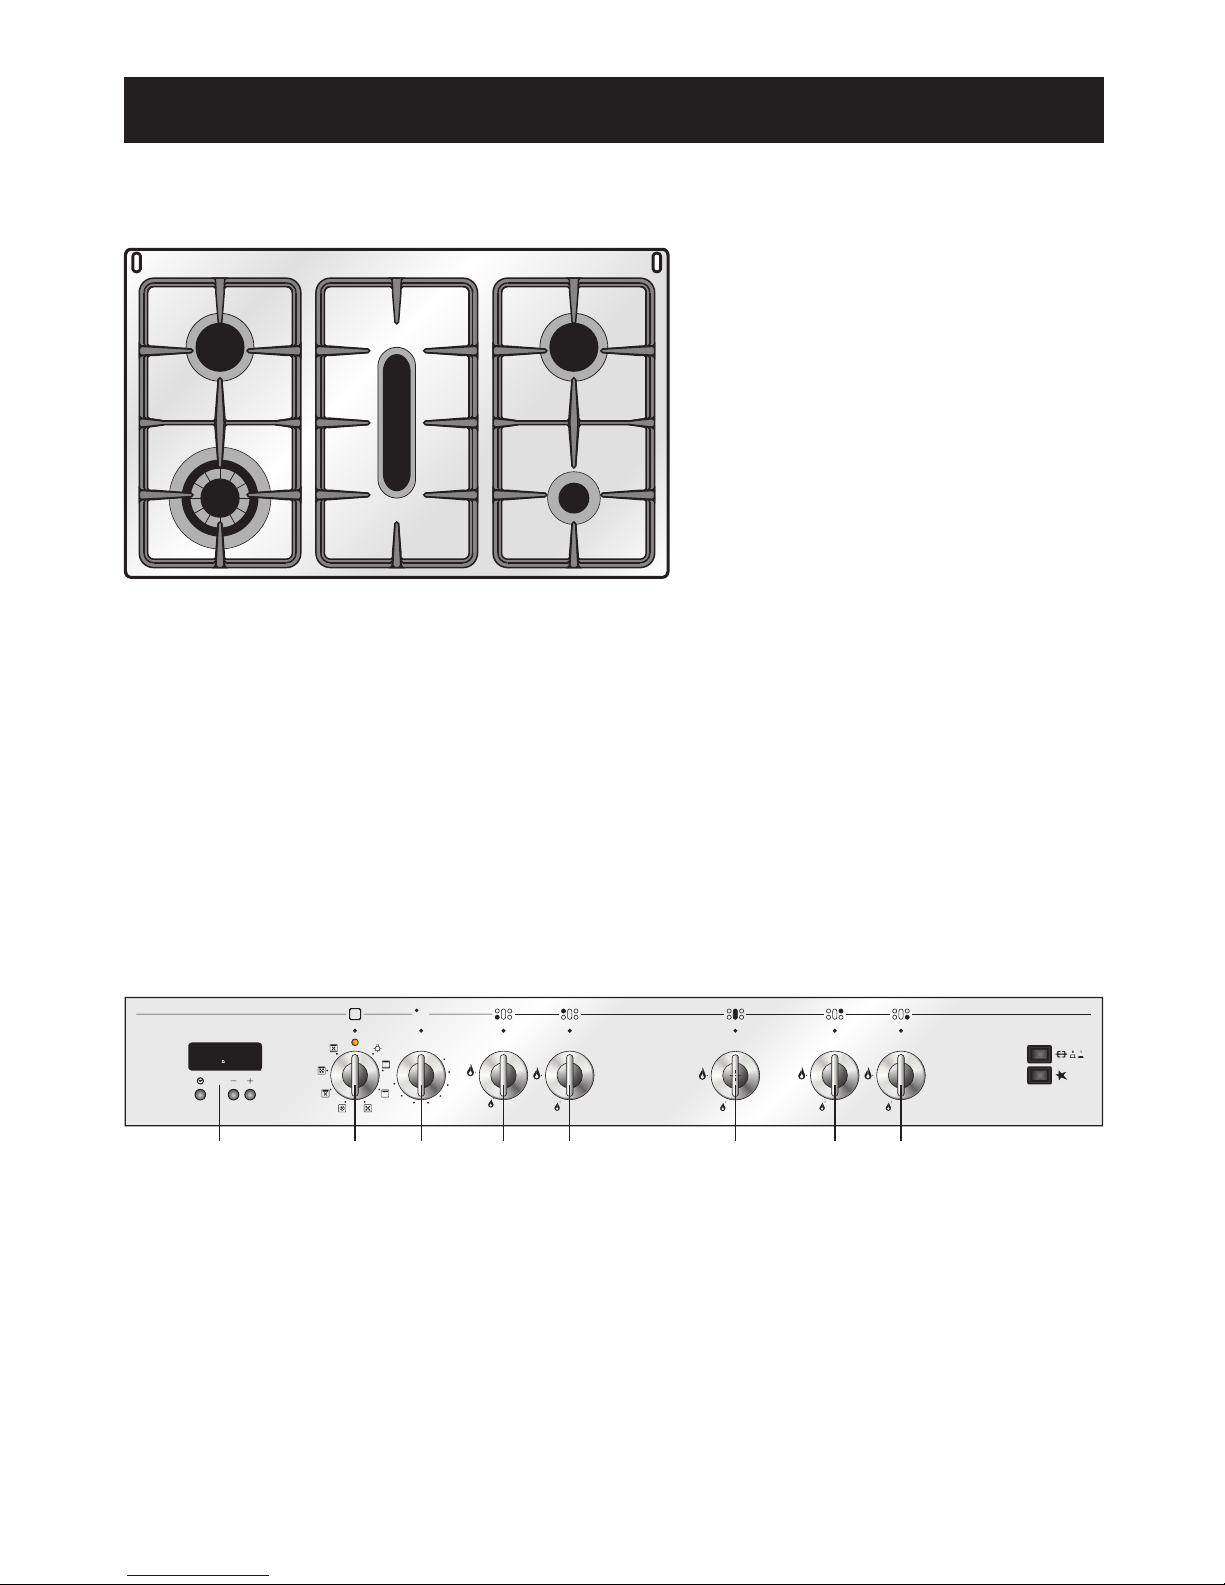
COOKING HOB
1. Double-ring burner (PB) 3,45 kW
2. Semi-rapid burner (SR) 1,90 kW
3. Fish burner (PE) 3,55 kW
4. Semi-rapid burner (SR) 1,90 kW
5. Auxiliary burner (A) 1,00 kW
Fig. 1.1b
CONTROLS DESCRIPTION Pushbuttons
1. Electronic clock / End cooking timer 9. Rotisserie switch
2. Multifunction oven switch knob 10. Electronic ignition pushbutton
3. Multifunction oven thermostat knob
4. Front left burner control knob
5. Rear left burner control knob
6. Central burner control knob
7. Rear right burner control knob
8. Front right burner control knob
1
2
3
4
5
1 2
4
5
6
7
8
3
Note: The gas burners are fitted
with safety valves device which
stop the gas flow if the flame
should go out.
4
1 - COOKING HOB - CONTROL PANEL
Page 5
2 - USE OF THE COOKING HOB
GAS BURNERS
Each burner is controlled by a gas tap
assuring the opening and the closing of the
gas supply.
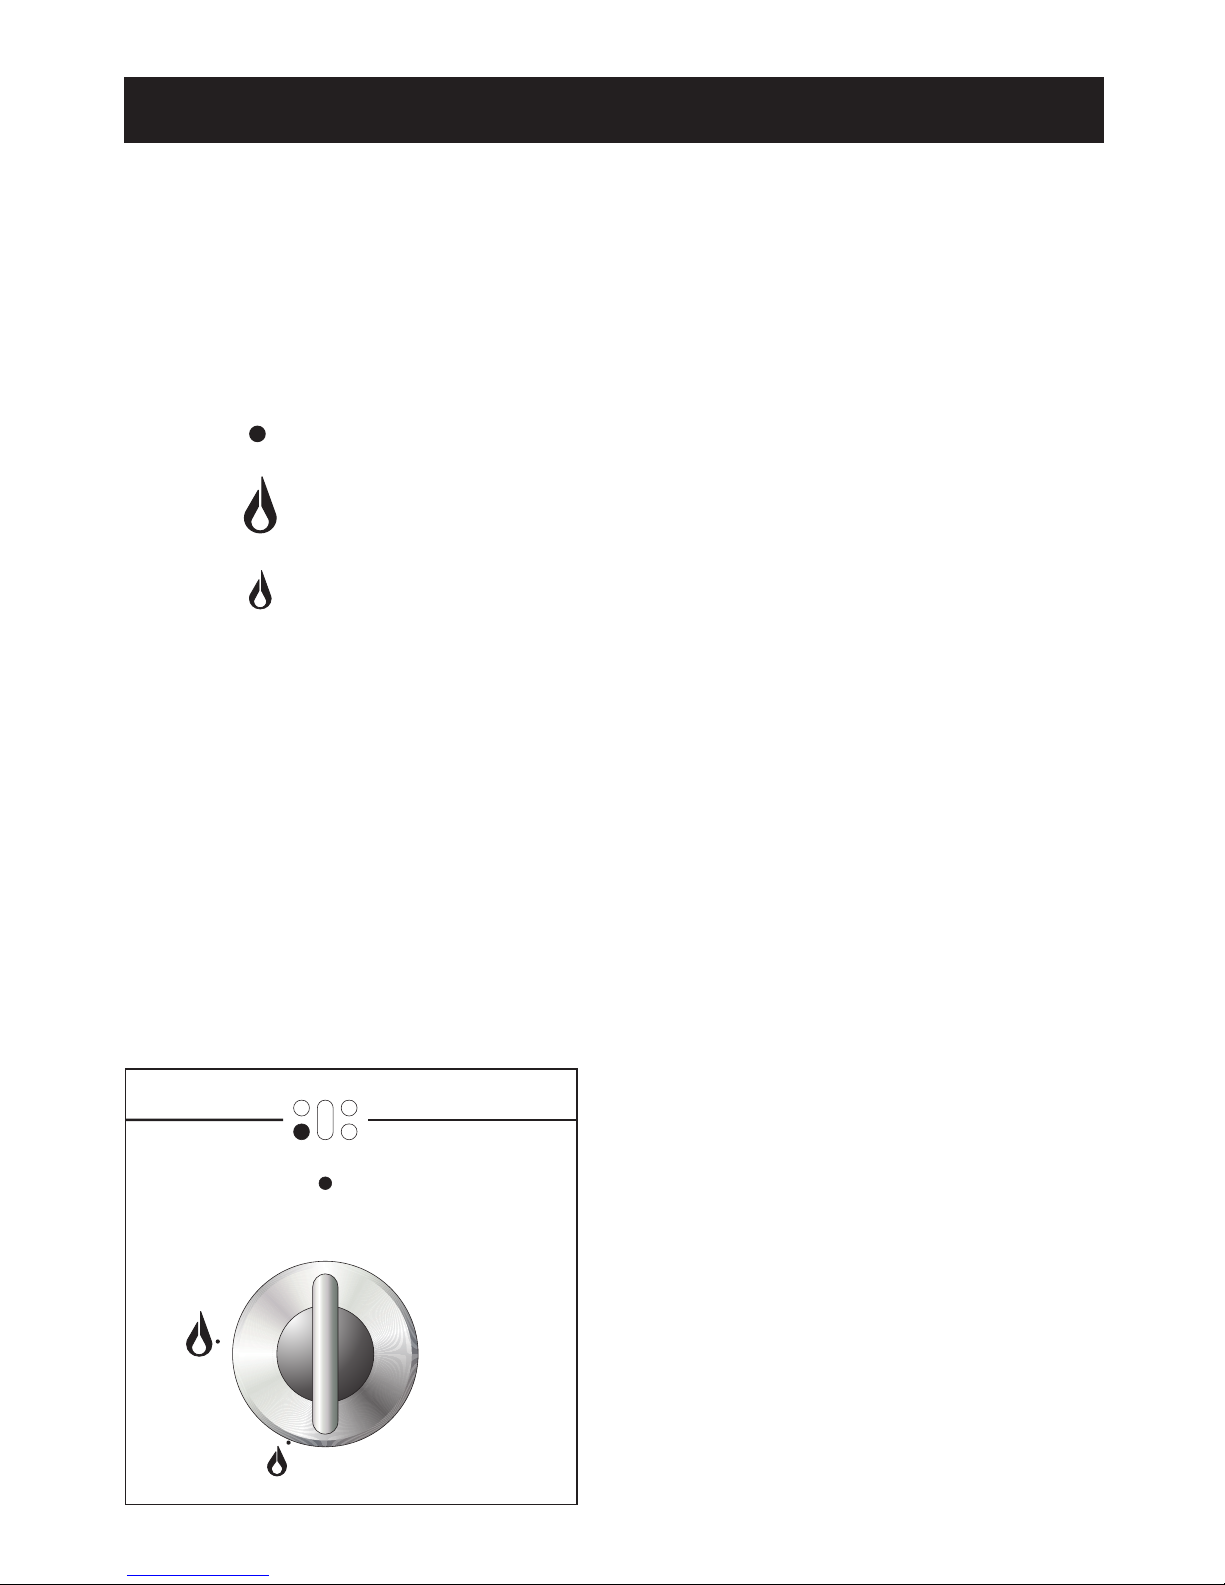
Turning the knob so that the indicator line
points to the symbols printed on the panel
achieves the following functions:
- symbol : off
- symbol : full on (nominal rate)
- symbol : reduced rate
To reduce the gas flow to minimum, rotate
the knob further anti-clockwise to point the
indicator towards the small flame symbol.
The maximum aperture position permits
rapid boiling of liquids, whereas the
minimum aperture position allows slower
warming of food or maintaining boiling
conditions of liquids.
Other intermediate operating adjustments
can be achieved by positioning the indicator
between the maximum and minimum
aperture positions, and never between the
maximum aperture and closed positions.
Fig. 2.1
5
Page 6
IMPORTANT NOTE:
LIGHTING GAS BURNERS FITTED
The device shall not be operated for
WITH SAFETY VALVE DEVICE
more than 15 seconds. If after 15
To ignite the burners, the following
seconds the burner has not lit, stop
instructions are to be followed:
operating the device and wait at least 1
minute before attempting a further
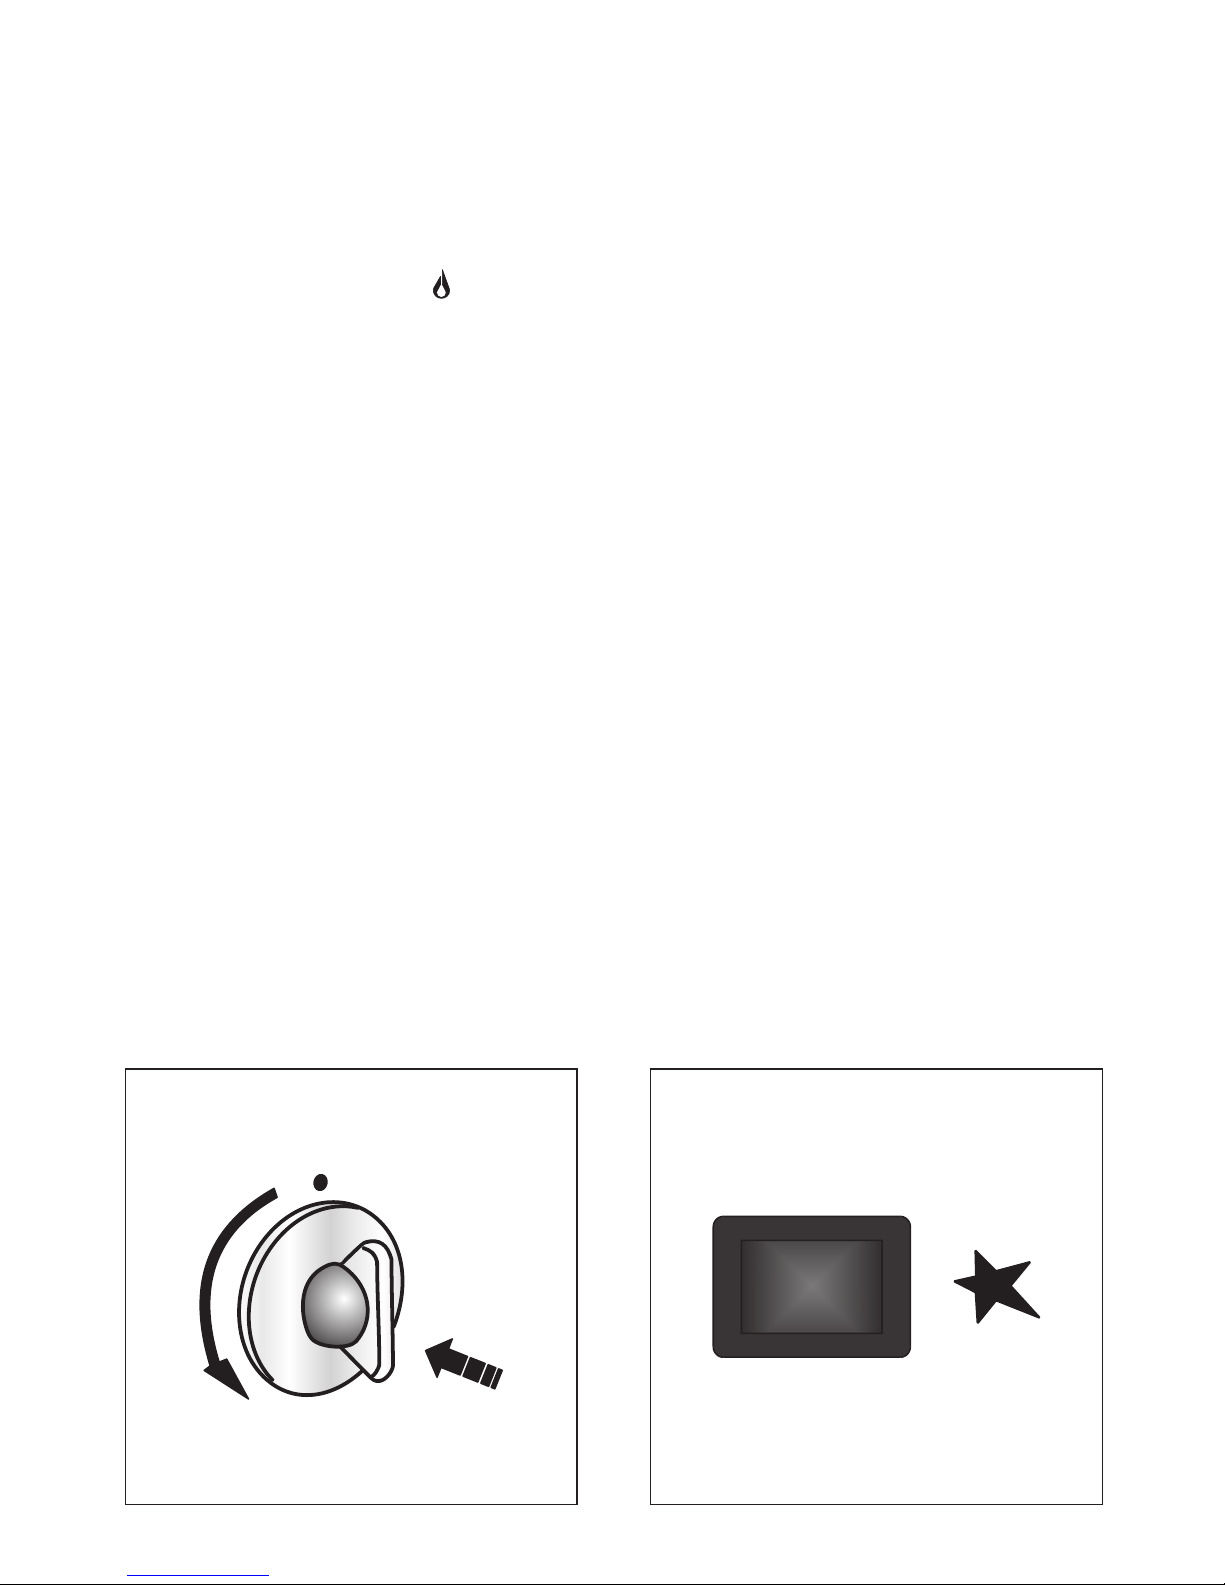
Press in the corresponding knob and turn
ignition of the burner.
counter-clockwise to the fu
until the flame has been lit (Fig. 2.2).
Press the electronic ignition push-button;
in the case of a mains failure light the
burner with a match or lighted taper.
Wait for about ten seconds af er the gas
burner has been lit before letting go of the
knob (valve activation delay);
Adjust the gas valve to the desired
position.
If the burner flame should go out for some
reason, the safety valve will automatically
stop the gas flow.
To re-light the burner, return the knob to
the closed position, wait for at least 1
minute and repeat the operations for
lighting.
If your local gas supply makes it difficult to
light the burner with the knob set to
maximum, set the knob to minimum and
repeat the operation.
!
!
!
!
ll flame
position marked by the “ full on”
symbol (Fig. 2.1) and hold the knob in
t
6
Fig. 2.2 Fig. 2.3
Page 7
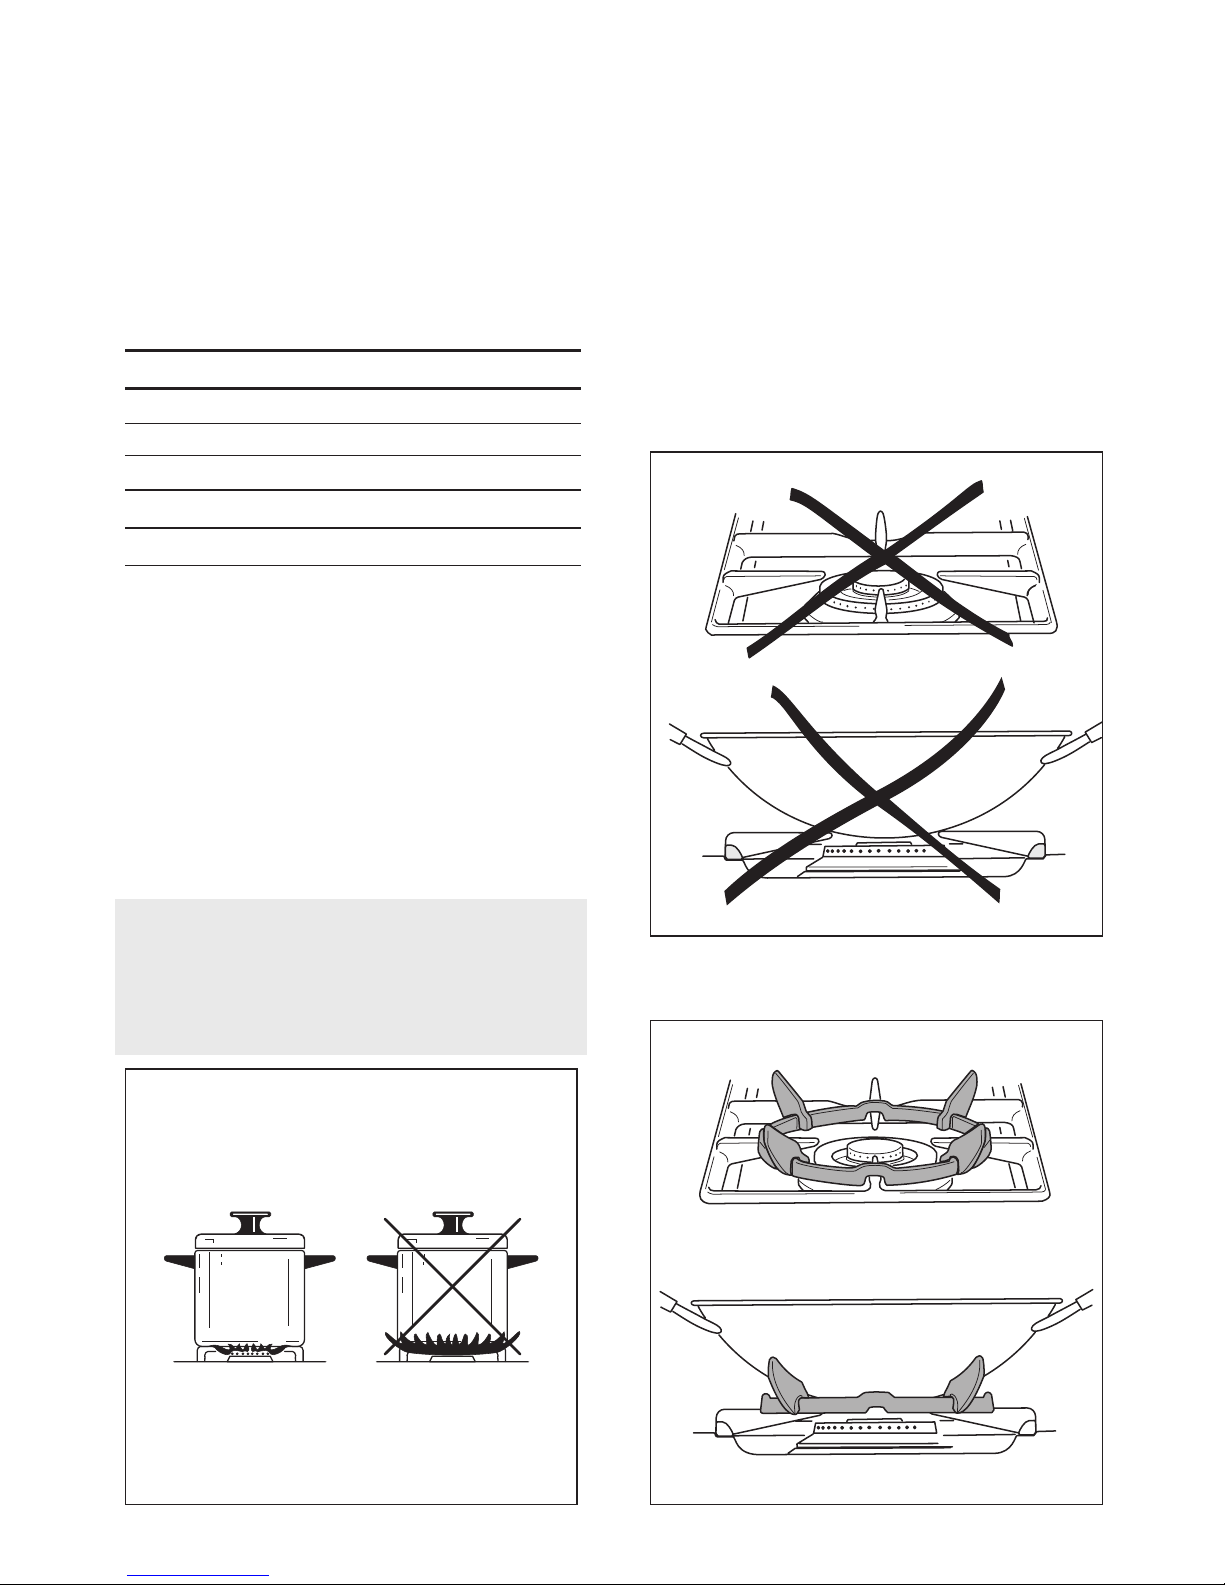
CHOICE OF THE BURNER CORRECT USE OF THE
On the control panel, near every knob, there
DOUBLE-RING BURNER
is a diagram that indicates which burner is
controlled by that knob.
The flat-bottomed pans are to be placed
The suitable burner must be chosen
directly onto the pan-support.
according to the diameter and the capacity
used.
To use the WOK you need to place the
As an indication, the burners and the pots
proper stand in order to avoid any faulty
must be used in the following way:
operation of the double-ring burner
(Figures. 25a, 2.5b).
It is important that the diameter of the pot be
suitable to the potentiality of the burner so
as not to compromise the high output of the
burners and therefore energy waste.
A small pot on a large burner does not give
you a boiling point in a shorten amount of
time since the capacity of heat absorption of
a liquid mass depends on the volume and
the surface of the pot.
N.B. When the cooker is not being used,
set the gas knobs to their closed
positions and also close the cock valve
on the gas bottle or the main gas supply
line.
Fig. 2.4
7
WRONG
CORRECT
Fig. 2.5b
Fig. 2.5a
BURNERS
POT DIAMETER
Auxiliary
12 - 16 cm
Semi-rapid
16 - 22 cm
Rapid
20 - 24 cm
Double-ring
up to 30 cm
from 12 x 30 to 18 x 40 cm
Fish
do not use pans with concave or convexe bases
Page 8

3 - MULTIFUNCTION ELECTRIC OVEN
ATTENTION: the oven door becomes
OPERATING PRINCIPLES
very hot during operation. Keep children
away.
Heating and cooking in the MULTI-
Models with lid: The cooker lid must be
FUNCTION oven are obtained in the
kept open when the multifunction
following ways:
electric oven is in use.
> by normal convection
The heat is produced by the upper and
lower heating elements.
As its name indicates, this is an oven that
> by forced convection
presents particular features from an
A fan sucks in the air contained in the
operational point of view.
oven muffle, which sends it through the
In fact, it is possible to insert 7 different
circular heating element and then
programs to satisfy every cooking need.
sends it back through the muffle. Before
The 7 positions, thermostatically controlled,
the hot air is sucked back again by the
are obtained by 4 heating elements which
fan to repeat the described cycle, it
are:
envelops the food in the oven,
- Lower element 2050 W
provoking a complete and rapid
- Upper element 1250 W
cooking. It is possible to cook several
- Grill element 2200 W
dishes simultaneously.
- Circular element 2500 W
> by semi-forced convection
The heat produced by the upper and
lower heating elements is distributed
NOTE:
throughout the oven by the fan.
Upon first use, it is advisable to operate the
> by radiation
oven for 60 minutes in the and position
The heat is irradiated by the infra red
with the thermostat knob set to 225°C and
grill element.
for another 15 minutes (thermostat knob on
> by radiation and ventilation
position 200) in the position, to eliminate
The irradiated heat from the infra red
possible traces of grease on the heating
grill element is distributed throughout
elements.
the oven by the fan.
Clean the oven and accessories with warm
water and washing-up liquid.
THERMOSTAT
To turn on the heating elements of the oven,
set the switch knob (Fig. 3.1a) on the
desired program and the thermostat knob
(Fig. 3.1b) onto the desired temperature.
The elements will turn on or off
automatically according to the energy need
which is determined by the thermostat.
The operation of the heating elements is
signalled by a light placed on the control
panel.
8
Page 9
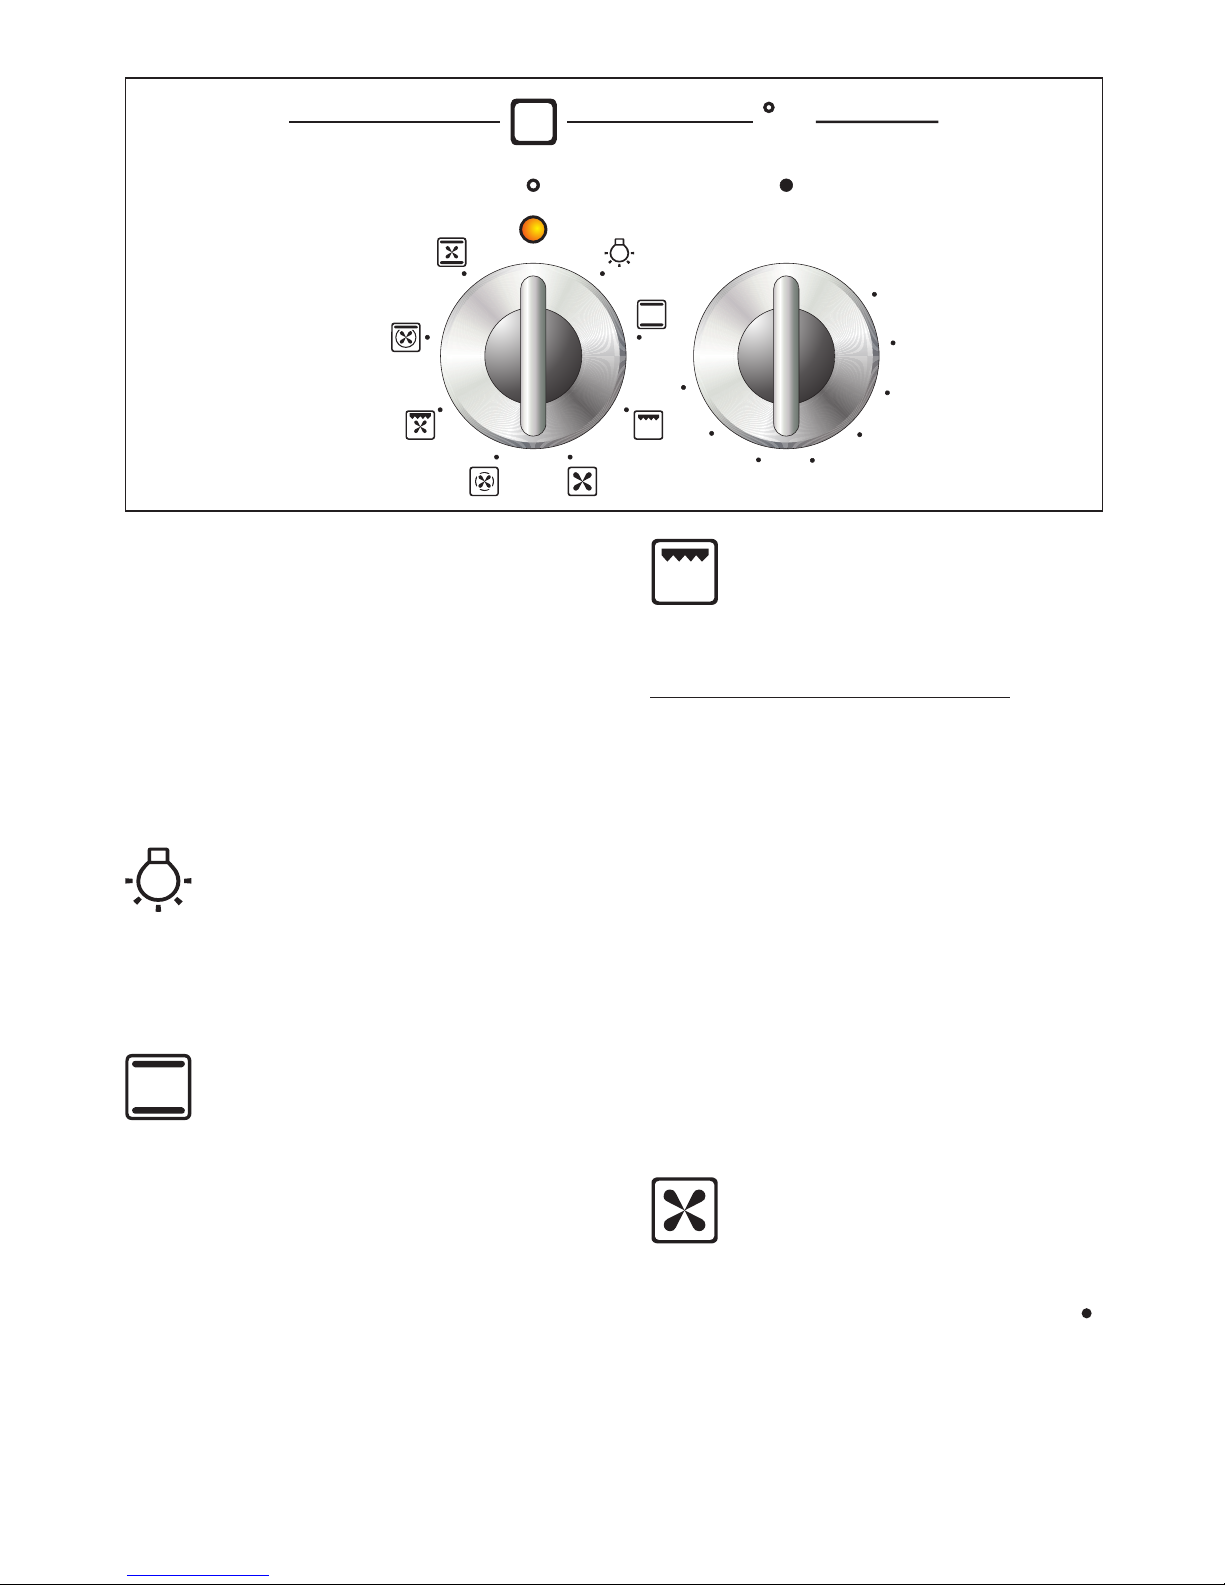
THERMOSTAT KNOB (Fig. 3.1b)
This only sets the cooking temperature and
GRILLING
does not switch the oven on. Rotate
clockwise until the required temperature is
The infra-red heating element is switched
reached (from 50 to 225°C).
on. The heat is diffused by radiation.
Use with the oven door closed and the
FUNCTION SELECTOR KNOB (Fig.
thermostat knob to position 225°C for 15
3.1a)
minutes, then to position 175°C.
Rotate the knob clockwise to set the oven
For correct use see chapter “USE OF THE
for one of the following functions.
GRILL”.
It is recommended that you do not grill
for longer than 30 minutes at any one
OVEN LIGHT
time.
Attention: the oven door becomes very
By turning the knob onto this setting we light
hot during operation. Keep children
the oven cavity.
away.
The oven remains alight while any of the
functions is on.
Recommended for:
Intense grilling action for cooking with the
TRADITIONAL
broiler; browning, crisping, “au gratin”,
CONVECTION COOKING
toasting, etc.
The upper and lower heating elements are
switched on. The heat is diffused by natural
DEFROSTING FROZEN
convection and the temperature must be
FOODS
regulated between 50° C and 225° C with
the thermostat knob.
Only the oven fan is on.
It is necessary to preheat the oven before
To be used with the thermostat knob on “ ”
introducing the foods to be cooked.
because the other positions have no effect.
The defrosting is done by simple ventilation
Recommended for:
without heat.
For foods which require the same cooking
temperature both internally and externally, i.
Recommended for:
e. roasts, spare ribs, etc.
To rapidly defrost frozen foods; 1 kilogram
9
Fig. 3.1a Fig. 3.1b
225
175
200
50
75
100
125
150
C
Page 10
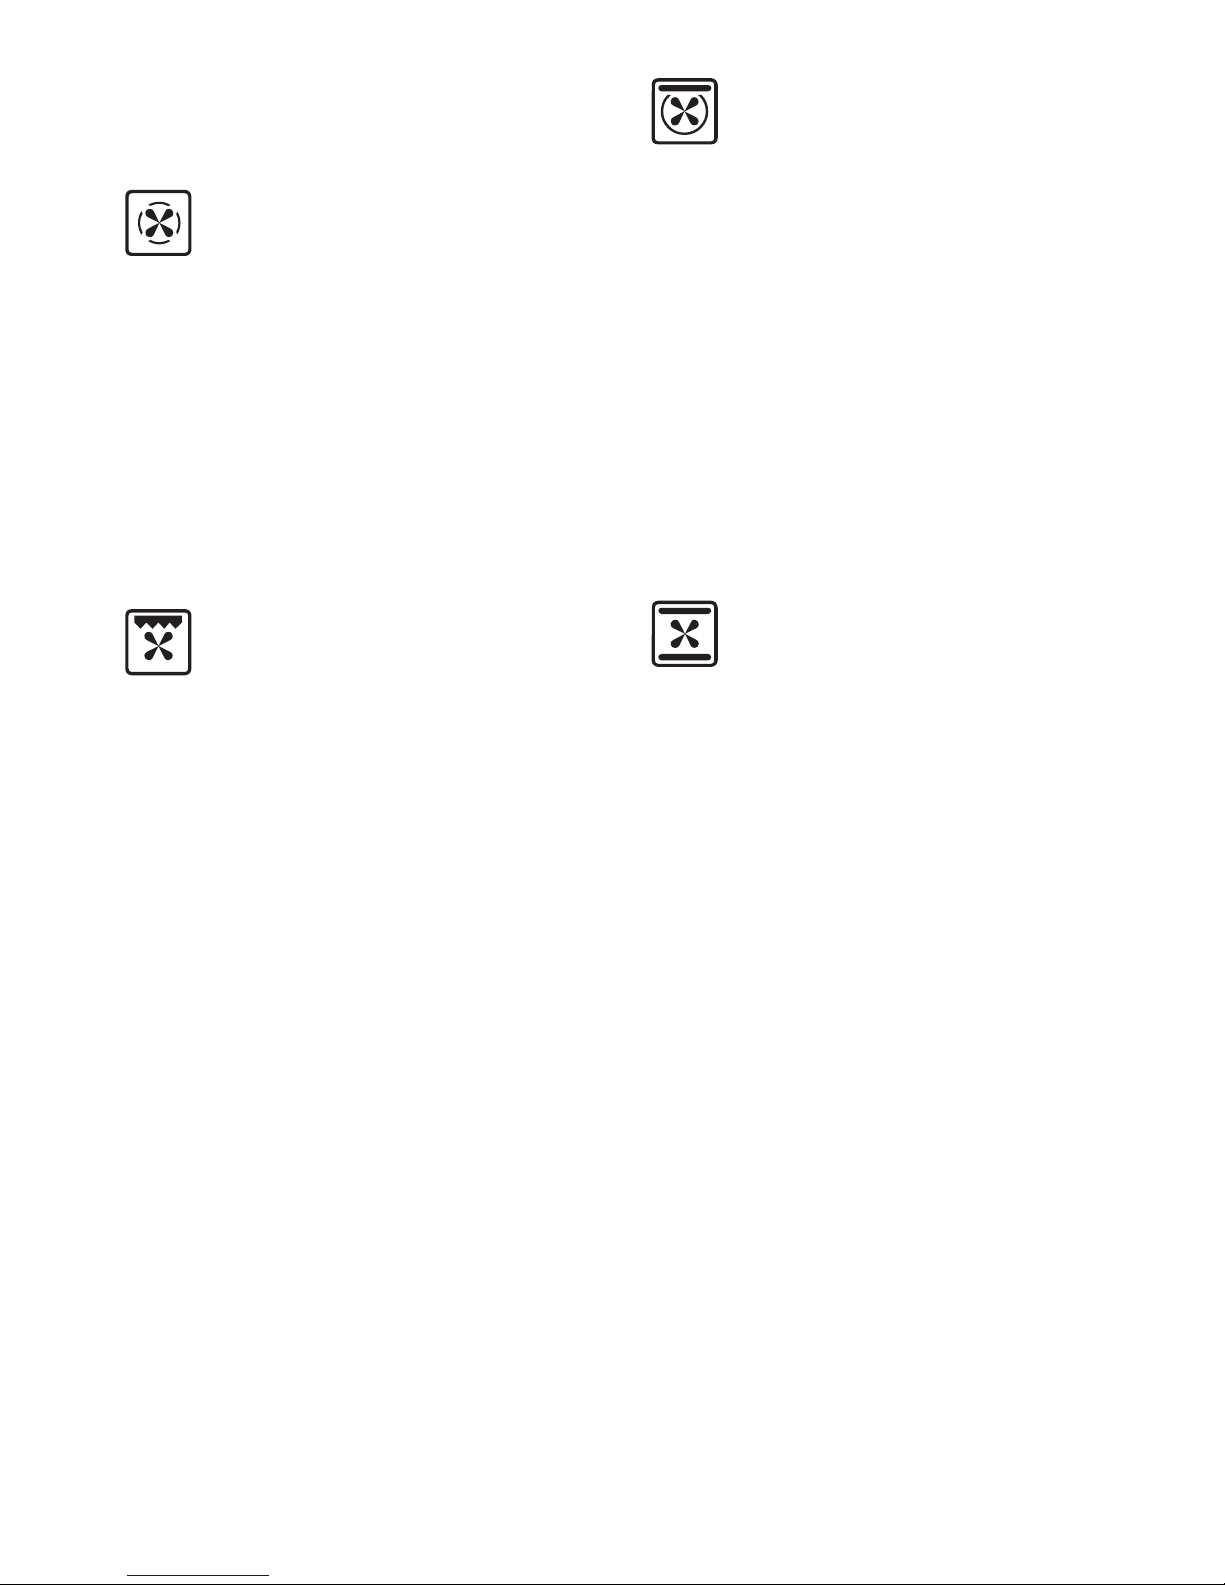
requires about one hour. The defrosting
MAINTAINING
times vary according to the quantity and
TEMPERATURE AFTER
type of foods to be defrosted.
COOKING OR SLOWLY
HEATING FOODS
The upper element and the circular element
HOT AIR COOKING
connected in series, are switched on; also
the fan is on.
The circular element and the fan are on.
The heat is diffused by forced convection
The heat is diffused by forced convection
with the most part being produced by the
and the temperature must be regulated
upper element.
between 50° and 225 °C with the thermostat
The temperature must be regulated
knob.
between 50° and 150 °C with the thermostat
It is not necessary to preheat the oven.
knob.
Recommended for:
Recommended for:
For foods that must be well done on the
To keep foods hot after cooking.
outside and tender or rare on the inside, i. e.
To slowly heat already cooked foods.
lasagna, lamb, roast beef, whole fish, etc.
CONVECTION COOKING
VENTILATED GRILL
WITH VENTILATION
COOKING
The upper and lower heating elements and
The infra-red ray grill and the fan are on.
the fan turn on.
The heat is mainly diffused by radiation and
The heat coming from the top and bottom is
the fan then distributes it throughout the
diffused by forced convection.
oven.
The temperature must be regulated
The temperature must be regulated
between 50° and 225 °C with the thermostat
between 50° and 175°C max. with the
knob.
thermostat knob. It is necessary to preheat
the oven for about 5 minutes.
Recommended for:
For correct use see chapter “GRILLING
For foods of large volume and quantity
AND AU GRATIN”.
which require the same internal and
external degree of cooking; for ex: rolled
Grilling with the oven door closed.
roasts, turkey, legs, cakes, etc.
It is recommended that you do not grill
for longer than 30 minutes at any one
time.
Attention: the oven door becomes very
hot during operation. Keep children
away.
Recommended for:
For grill cooking when a fast outside
browning is necessary to keep the juices in,
i. e. veal steak, steak, hamburger, etc.
10
Page 11

to remember:
COOKING ADVICE
! that it is advisable to maintain a tem-
perature between 180 and 200 °C.
STERILIZATION
! that the cooking time depends on the
Sterilization of foods to be conserved, in full
quantity and the type of foods.
and hermetically sealed jars, is done in the
following way:
SIMULTANEOUS COOKING OF
! Set the switch to position .
DIFFERENT FOODS
! Set the thermostat knob to position
The MULTI-FUNCTION oven set on
175 °C and preheat the oven.
position and consents a simultaneous
! Fill the dripping pan with hot water.
heterogeneous cooking of different foods.
! Set the jars onto the dripping pan
Different foods such as fish, cake and meat
making sure they do not touch each
can be cooked together without mixing the
other and the door and set the
smells and flavors together.
thermostat knob to position 125 °C.
This is possible since the fats and vapors
are oxidized while passing through the
When sterilization has begun, that is, when
electrical element and therefore are not
the contents of the jars start to bubble, turn
deposited onto the foods.
off the oven and let cool.
The only precautions to follow are:
! The cooking temperatures of the
REGENERATION
different foods must be as close to as
Set the switch to position and the
possible, with a maximum difference of
thermostat knob to position 150° C.
20°-25 °C.
Bread becomes fragrant again if wet with a
! The introduction of the different dishes
few drops of water and put into the oven for
in the oven must be done at different
about 10 minutes at the highest
times in relation to the cooking times of
temperature.
each one.
The time and energy saved with this type of
GRILLING AND “AU GRATIN”
cooking is obvious.
Grilling may be done without the roasting
jack on position of the switch, because
TRADITIONAL OVEN COOKING
the hot air completely envelops the food
Preheat the oven to the required
that is to be cooked.
temperature (the temperature light above
Set the thermostat to position 175 °C and
the thermostat knob will go out) and place
after having preheated the oven, simply
the food inside.
place the food on the rack.
Remember to use ovenproof dishes and to
Close the oven door and let the oven
alter the oven temperature during cooking if
operate with the thermostat on position
necessary.
between 50 and 175 °C, until grilling is
done.
USE OF THE GRILL
Adding a few dabs of butter before the end
Turn on the grill as indicated in the previous
of the cooking time gives the golden “au
paragraph and leave to warm up for
gratin” effect.
approximately 5 minutes with the door
Grilling with the oven door closed.
closed.
It is recommended that you do not grill
Introduce the food to be cooked, positioning
for longer than 30 minutes at any one
the rack as close to the grill as possible.
time.
The dripping pan should be placed under
Attention: the oven door becomes very
the rack to catch the cooking juices and fats.
hot during operation. Keep children
Grilling with the oven door closed and do
away.
not grill for longer than 30 minutes at any
one time. Attention: the oven door
ROASTING
becomes very hot during operation.
To obtain classical roasting, it is necessary
Keep children away.
11
Page 12
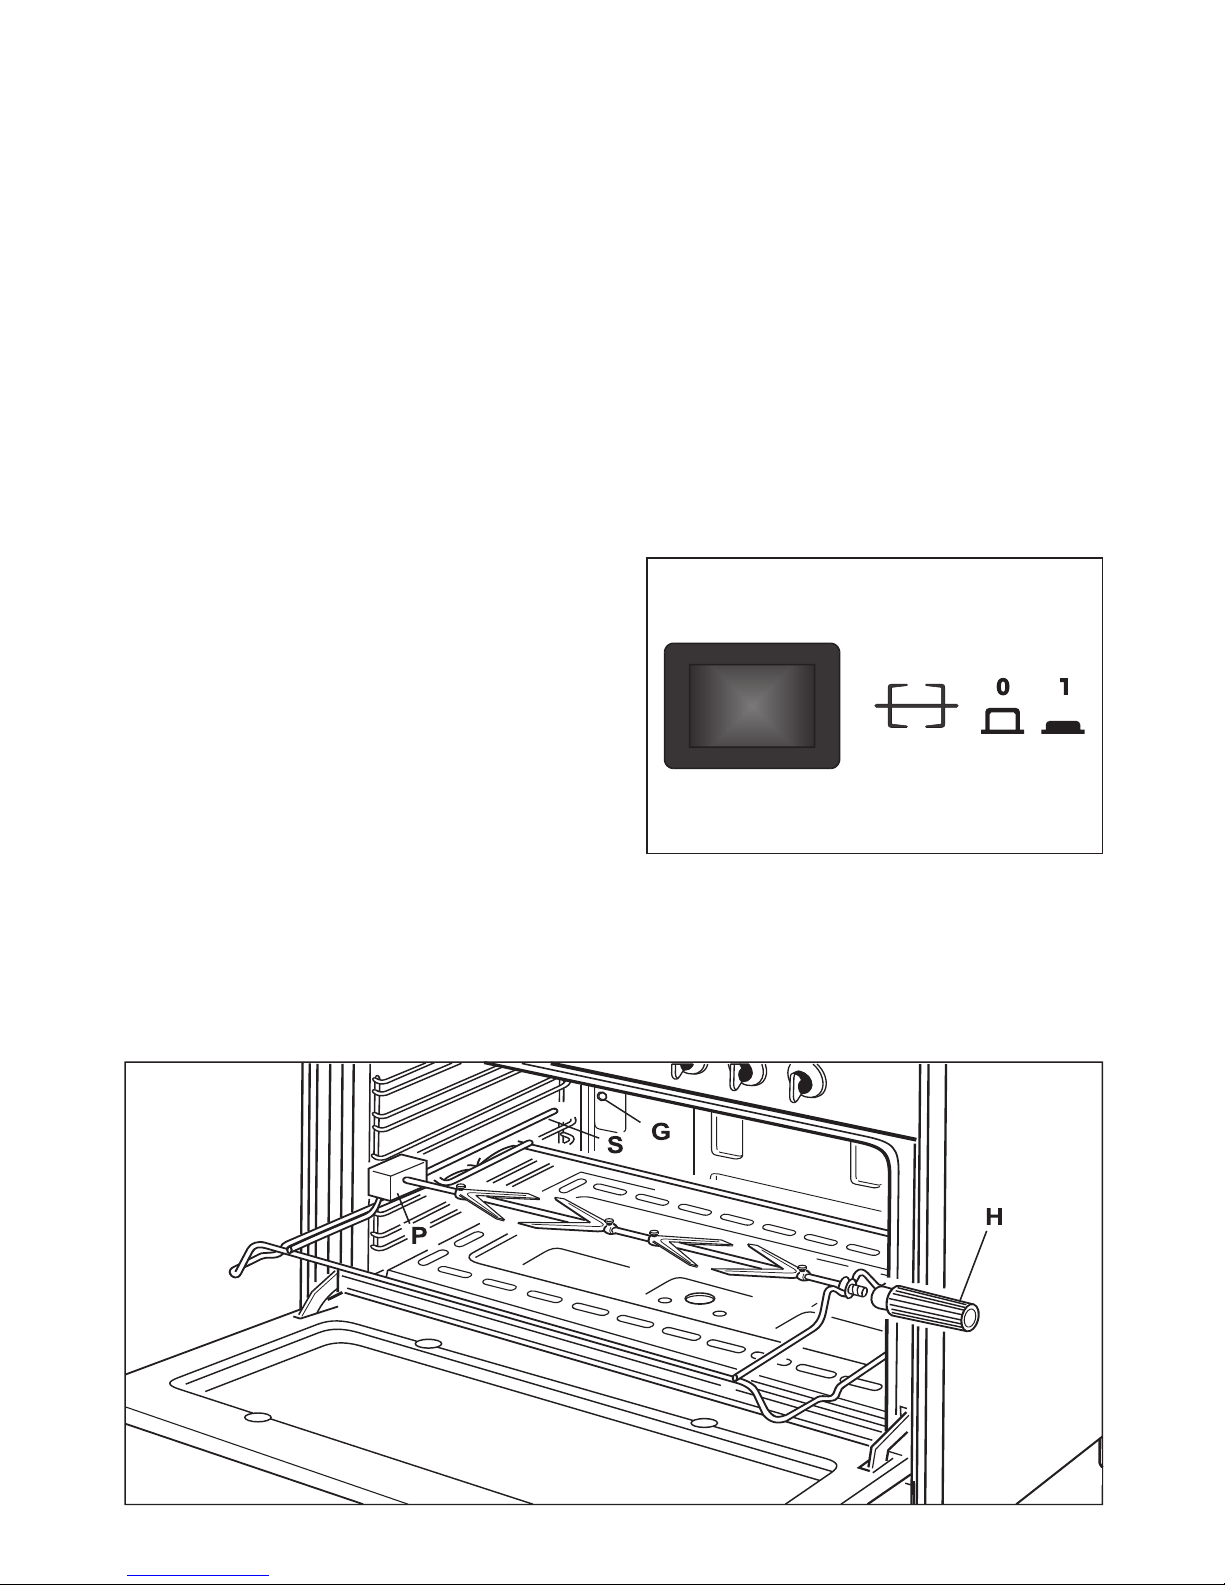
Fig. 3.2
COOKING ADVICE
For the consumer’s information, the
following table gives some dishes with their
relative cooking temperatures in °C.
The cooking time varies with the quantity.
ROTISSERIE (fig. 3.2)
This device is made up of:
an electrical motor mounted on the rear
part of the oven
stainless steel spit with a removable
DISHES TEMPERATURE
stay-cool handle and two adjustable sets
of prongs
Baked lasagna 220°
spit support to be inserted in the central
Oven cooked pasta 220°
guide of the oven.
Pizza with anchovies 225°
Rice creole 225°
The spit roaster is operated by pressing the
Baked onions 225°
relative pushbutton (fig.3.3).
Spinach crepes 200°
Potatoes in milk 200°
The rotation direction of the rotisserie can
Stuffed potatoes 225°
be either clockwise or counter-clockwise.
Cheese soufflè 200°
Potatoes soufflè 200°
Roast veal 200°
Grilled veal joints 225°
Chicken breasts in tomato 200°
Grilled chicken - roast chicken 220°
Meat balls 200°
Veal meatloaf 200°
Turkish shishkebab 225°
Roast beef 220°
Sole fish filet 200°
Whiting 200°
Cream puffs 200°
Doughnuts 180°
Plum pie 200°
Marmalade pie 225°
Pound cake 225°
Cakes 180°
Biscuits 200°
Lemon cake 220°
12
Fig. 3.3
Page 13

Attention: the oven door becomes very
USE OF THE ROTISSERIE
hot during operation. Keep children
Very important: the rotisserie must
away.
always be used with the oven door
It is recommended that you do not grill
closed.
for longer than 30 minutes at any one
time.
! Insert the tray into the lowest rack
holders of the oven and insert the rod
support into the intermediate rack
holders.
! Put the meat to be cooked onto the rod,
being careful to secure it in the centre
with the special forks.
! Insert the rod into the side gear opening
“P”
! Remove the grip “H” by turning it to the
left
! Insert completely the rotisserie support;
he shaft “S” must be inserted in the spit
motor collar “G”
SAFETY GUARD
The glass on the oven door reaches high
temperatures during operation.
For child safety, a door guard can be fitted to
prevent contact with the hot glass.
The door guard is supplied as an accessory
at extra cost on request. Contact one of our
dealers or Service Centre and indicate the
relevant appliance model.
13
Page 14
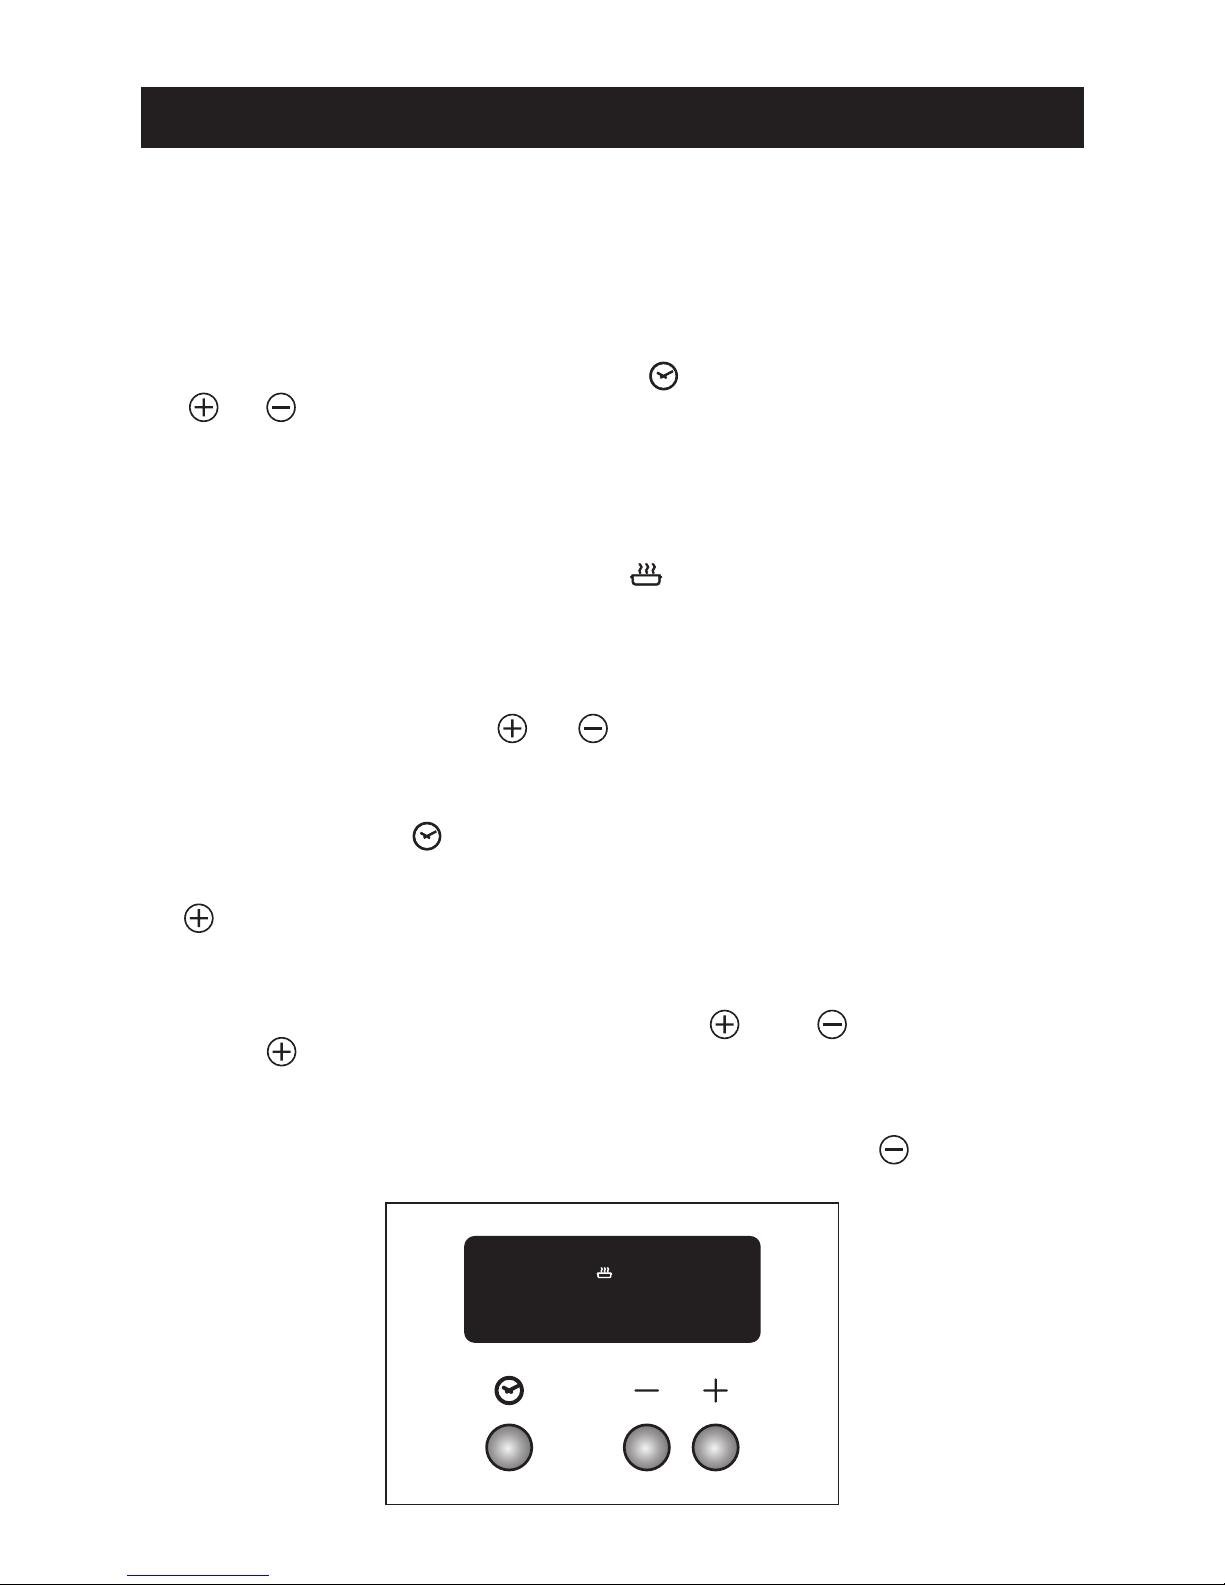
4 - ELECTRONIC CLOCK / END COOKING TIMER
The electronic clock / end cooking timer is a device with the following functions:
> 24 hours clock with illuminated display;
> Timing of oven cooking with automatic switch-off (max. 99 minutes).
ELECTRONIC CLOCK
Upon immediate connection of the cooker or after a mains failure, three zeros will flash on
the programmer panel.
To set the clock it is necessary to push the button and then, within 7 seconds,
the or button until you have set the correct time.
The clock will show zero after a mains failure.
Attention: When the programmer display shows three flashing zeros the oven cannot be
switched on.
The oven can be switched on when the symbol is shown in the display.
COOKING WITH AUTOMATIC SWITCH-OFF
The aim of this function is to automatically stop the cooking after a pre programmed time, for
a maximum period of 99 minutes.
To set the cooking time, push the or button until you obtain the desired time in the
display. The symbol AUTO will be shown in the display. Then you adjust the oven thermostat
knob according to the required temperature. The oven will immediately start to operate and
will work for the pre programmed time. The display shows the count down. Clock time can be
displayed by pressing the button.
Once the time has elapsed, the oven will switch off automatically, the symbol AUTO will go
off and an intermittent buzzer, lasting 7 minutes, will start; this can be stopped by pressing
the button.
Important: Before the buzzer is stopped switch off the oven manually.
To cancel the cooking program at any time press the and buttons together and
release the button first.
SETTING THE FREQUENCY OF THE ALARM SOUND
The selection from 3 possibilities of sound can be made by pressing the button.
14
Fig. 4.1
15-06
A
U
T
O
Page 15

5 - CLEANING AND MAINTENANCE
GENERAL ADVICE
! When the appliance is not being used, it
is advisable to keep the gas tap closed.
! Every now and then check to make sure
that the flexible tube that connects the
gas line or the gas cylinder to the
appliance is in perfect condition and
eventually substitute it if it shows signs of
wearing or damage.
! The periodical lubrication of the gas taps
must be done only by specialized
personnel.
! If the gas tap becomes stiff, it is
necessary to dismount it accurately,
clean it with gasoline and spread a bit of
special grease resistant to high
temperatures on it. This operation must
be executed by a qualified technician.
! Important: Before any operation of
cleaning and maintenance
disconnect the appliance from the
electrical network.
Do not use a steam cleaner because the
moisture can get into the appliance thus
make it unsafe.
15
Page 16
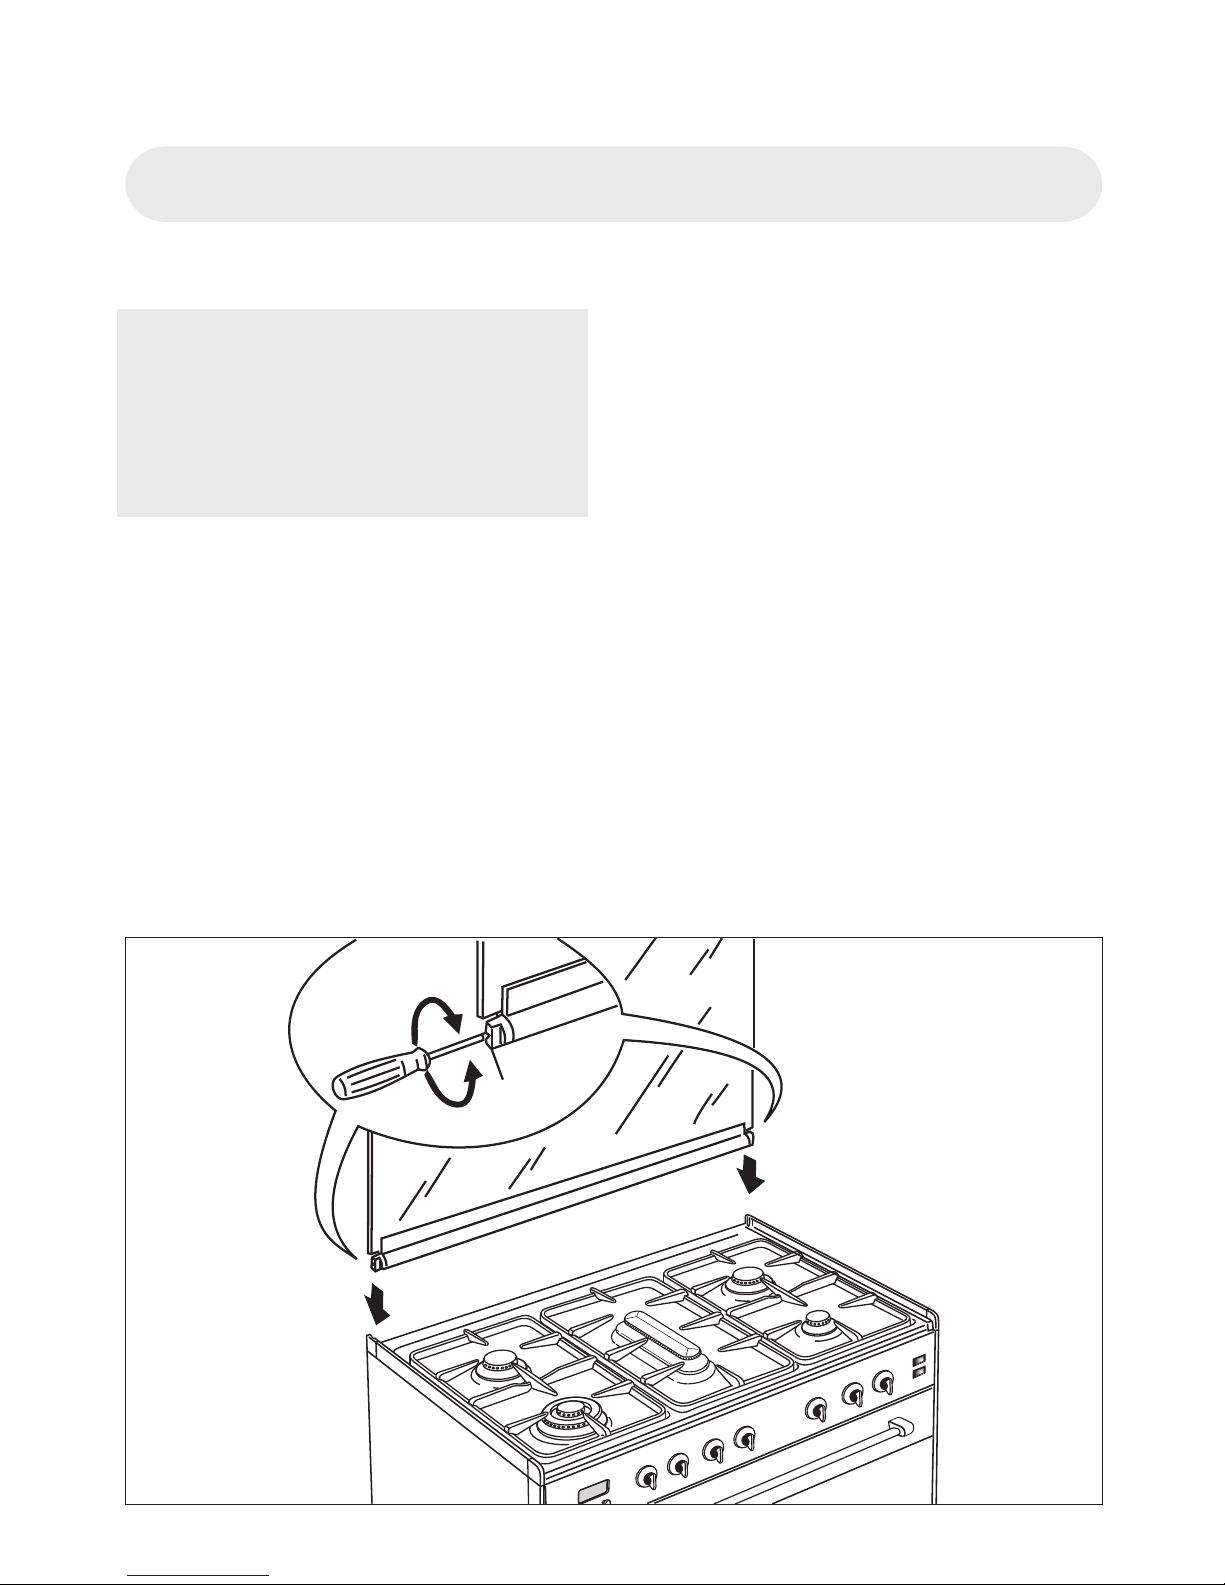
Do not close the cooker lid when the
REGULATING OF THE BALANCE
burners or electric plates are still hot and
Lower the lid and check the correct balance.
when the oven is on or still hot.
While opened at 45° it should hang up.
Do not rest hot pans or heavy objects on
The springs of the hinges can be adjusted if
the cooker lid.
necessary by turning the screws “R”
Remove any spillages from the surface
clockwise (fig. 5.1).
of the cooker lid before opening.
GLASS LID
For cleaning purposes, the lid can be easily
removed upwards once taken to the upright
position.
Should the hinges slip off, replace them in
their housing being careful that:
! The right housing must receive the hinge
marked “D” while the left housing must
receive the hinge marked “S” (fig. 5.1).
Models with glass lid
Fig. 5.1
16
SS
DD
RR
Page 17
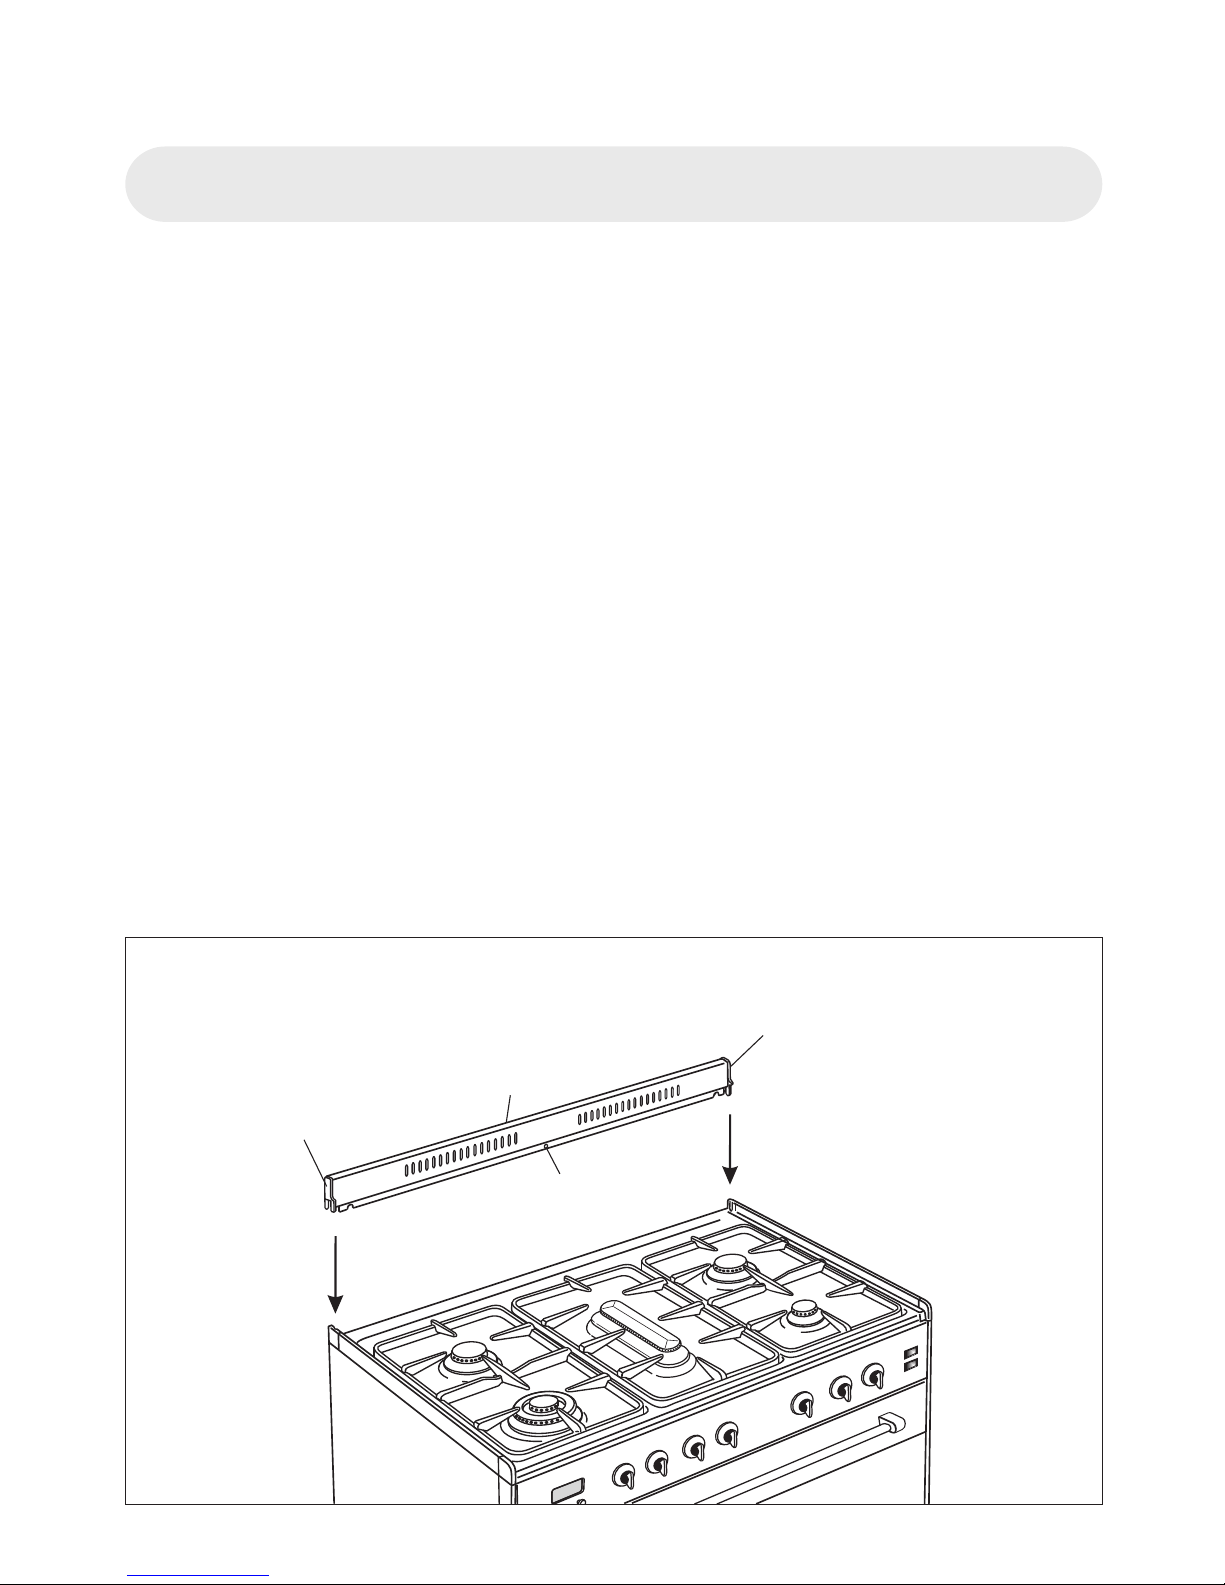
ASSEMBLING THE BACKGUARD
Please note that :
! Before assembling remove any protective film/adhesive tape.
! The backguard “B” can be found packed on the cooktop.
! Check that the side supports “S” and “D” are correctly mounted in the backguard as
indicated in the picture.
! Insert the backguard group into the support guides in the cooker.
! The backguard can be removed for cleaning or fixed with a screw through the hole C.
Models with BACKGUARD
Fig. 5.2
S
D
B
C
17
Page 18
CLEANING BURNERS
All the enamelled parts must be cleaned They can be removed and washed only with
with a sponge and soapy water or other a soapy water.
non-abrasive products. Detergents can be used but must not be
Dry preferably with a soft cloth. abrasive or corrosive.
Acid substances like lemon juice, tomato Do not use abrasive sponges or pads.
sauce, vinegar etc. can damage the enamel Do not put in dishwasher.
if left too long.
After cleaning or wash, check that burnercaps and burner-heads are dry before
placing them in the respective housings.
STAINLESS STEEL SURFACES
CAUTION
Special attention has to be paid in order
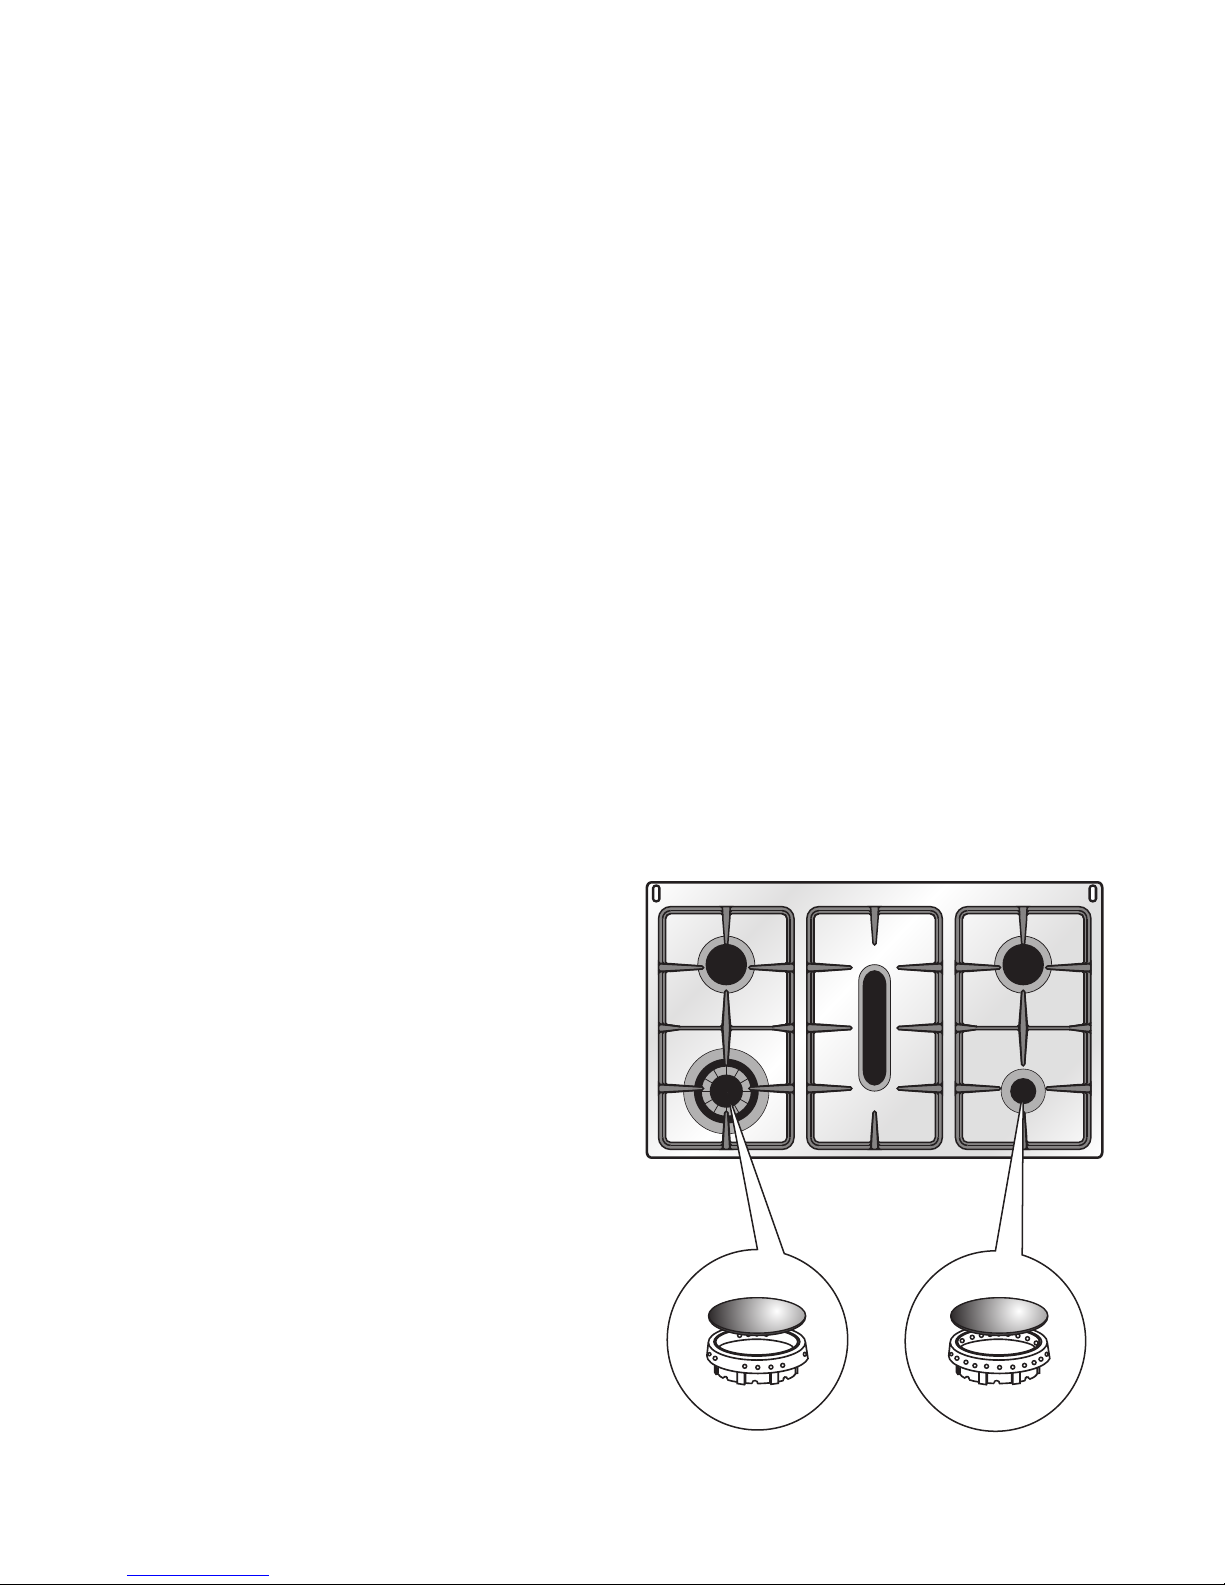
The STAINLESS STEEL front panels on this
not to exchange the housing of the two
cooker (facia, oven door, storage
small burners shown in fig.5.3.
compartment) are protected with a Special
It is absolutely necessary to check the
Lacquer to reduce finger-print marks.
perfect housing of the burner ring as an
To avoid damaging this lacquer, do not
incorrect housing may cause serious
clean the stainless steel with abrasive
inconvenience.
cleaners or abrasive cloths or scouring
Check that the electrodes for ignition be
pads.
always clean in order to ensure a regular
spark shooting.
ONLY SOAP/WARM WATER MUST BE
Check also that the probe next to each
USED TO CLEAN THE STAINLESS STEEL
burner is always clean to ensure correct
SURFACES.
operation of the safety valves.
Both the probe and ignition plug must be
INSIDE OF OVEN
very carefully cleaned.
This must be cleaned every time it is used.
Remove and refit the side runner frames as
described on the next chapter .
With the oven warm, wipe the inside walls
with a cloth soaked in very hot soapy water
or another suitable product. The bottom of
the oven, side runner frames, tray and rack
can be removed and washed in the sink.
REPLACING THE OVEN LIGHT
BULB
Switch the cooker off at the mains.
Unscrew and replace the bulb with another
one resistant to high temperatures (300°C),
voltage 230 V (50 Hz), 15 W, E14.
WARNING - Ensure that the
appliance is switched off before
replacing the lamp to avoid the
possibility of electric shock.
Burner-cap ring
partially drilled
Burner-cap ring
fully drilled
Fig.5.3
18
Page 19
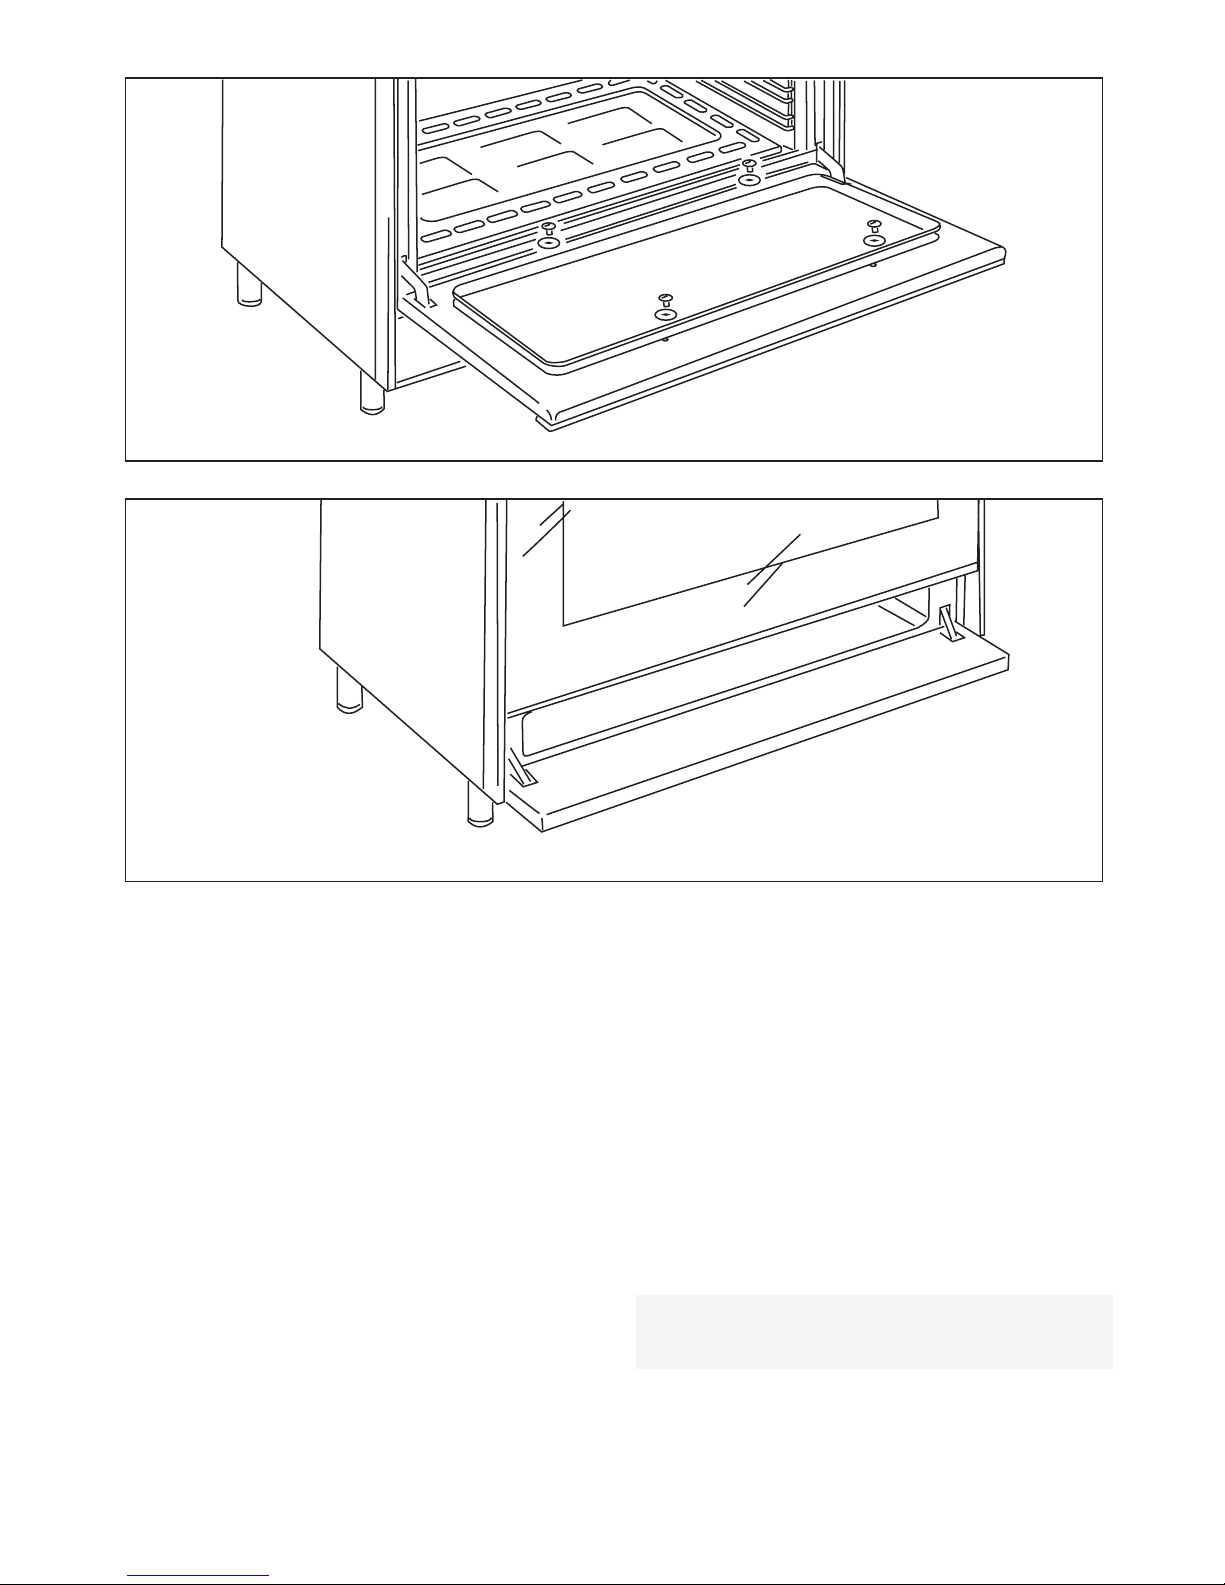
Fig. 5.4
Fig. 5.5
OVEN DOOR STORAGE COMPARTMENT
The internal glass panel can be easily The storage compartment is accessible
removed for cleaning by unscrewing the 4 through the pivoting panel (fig. 5.5).
retaining screws (fig. 5.4).
Do not store flammable material in the
oven or in the storage compartment.
19
Page 20
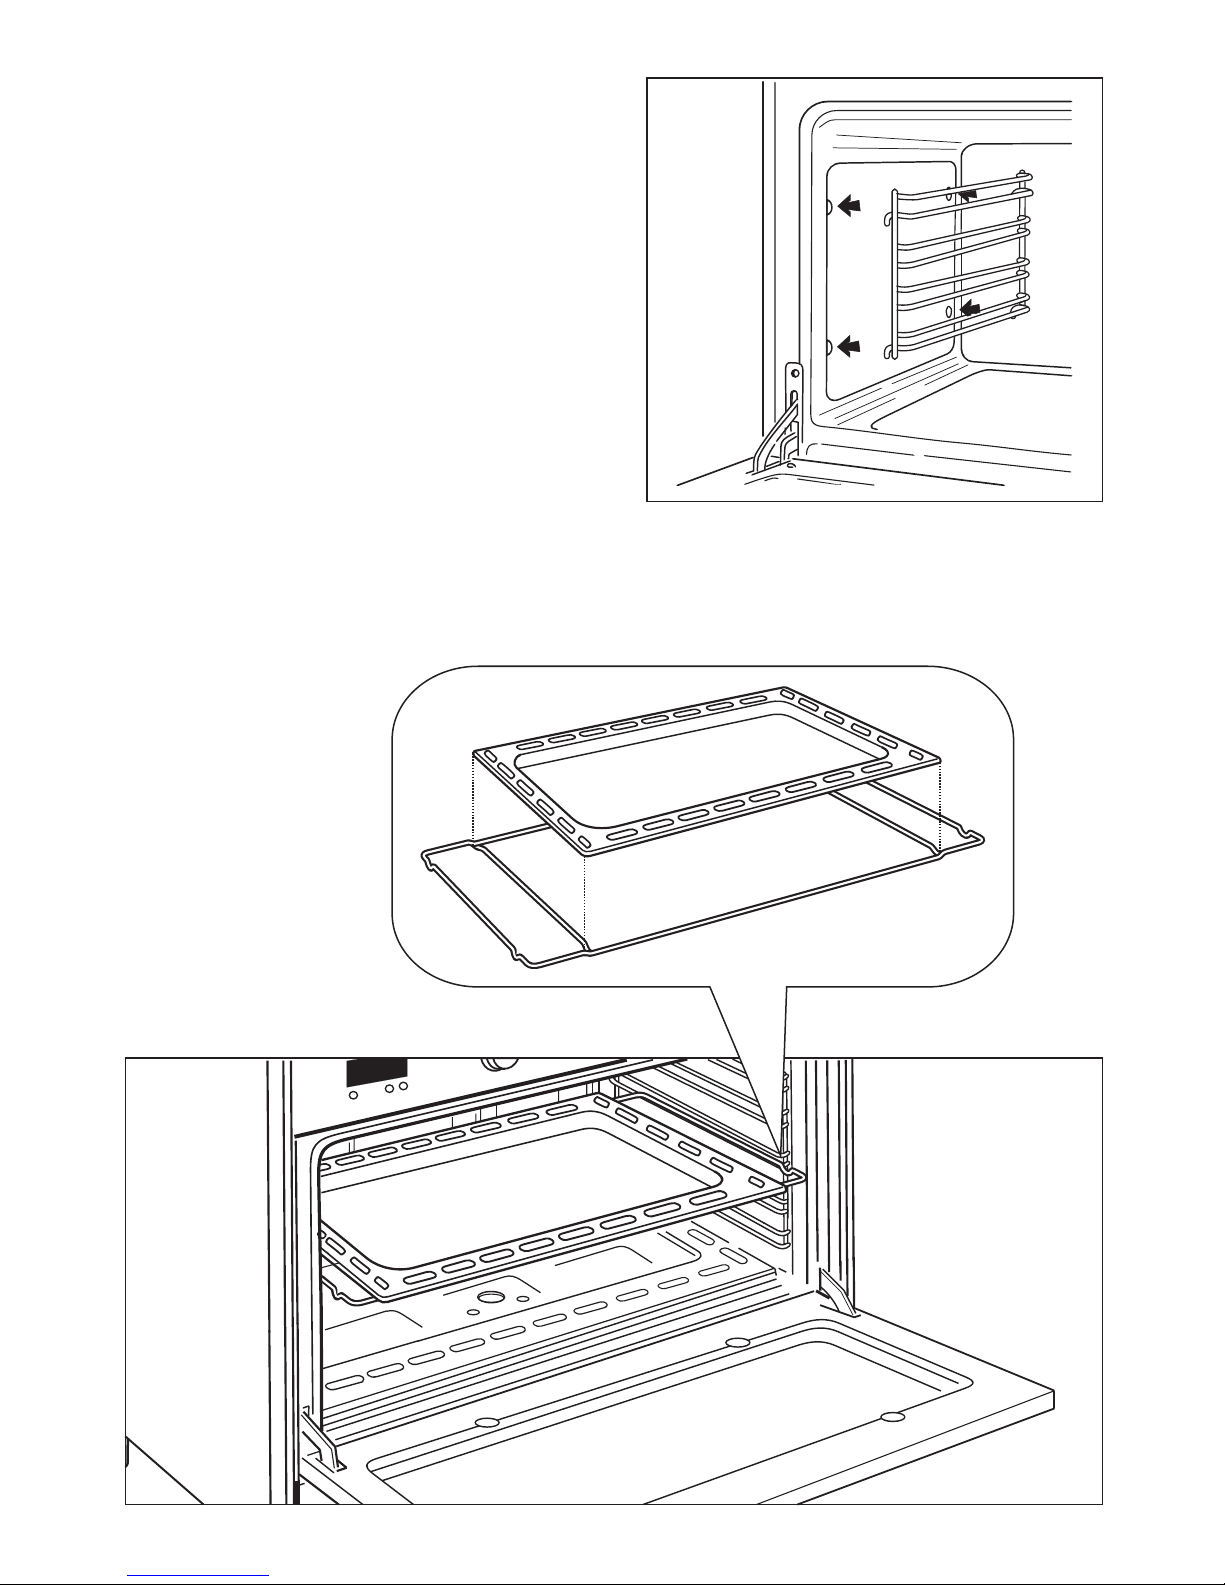
ASSEMBLY AND DISMANTLING OF
THE SIDE RUNNER FRAMES
[ Fit the side runner frames into the holes
on the side walls inside the oven (fig.5.6).
[ Slide the tray and rack into the runners.
[ To dismantle, operate in reverse order.
OVEN FLOOR
The oven floor “F” (fig. 5.7) can be easily
removed to facilitate cleaning.
Remember to replace the floor correctly
afterwards.
Be careful not to confuse the tray “L” with
the oven floor “F”.
OVEN TRAY
The oven tray must be correctly placed on
its wire shelf support then insert into the
side runners (fig. 5.7).
Fig. 5.6
20
Fig. 5.7
L
F
Page 21
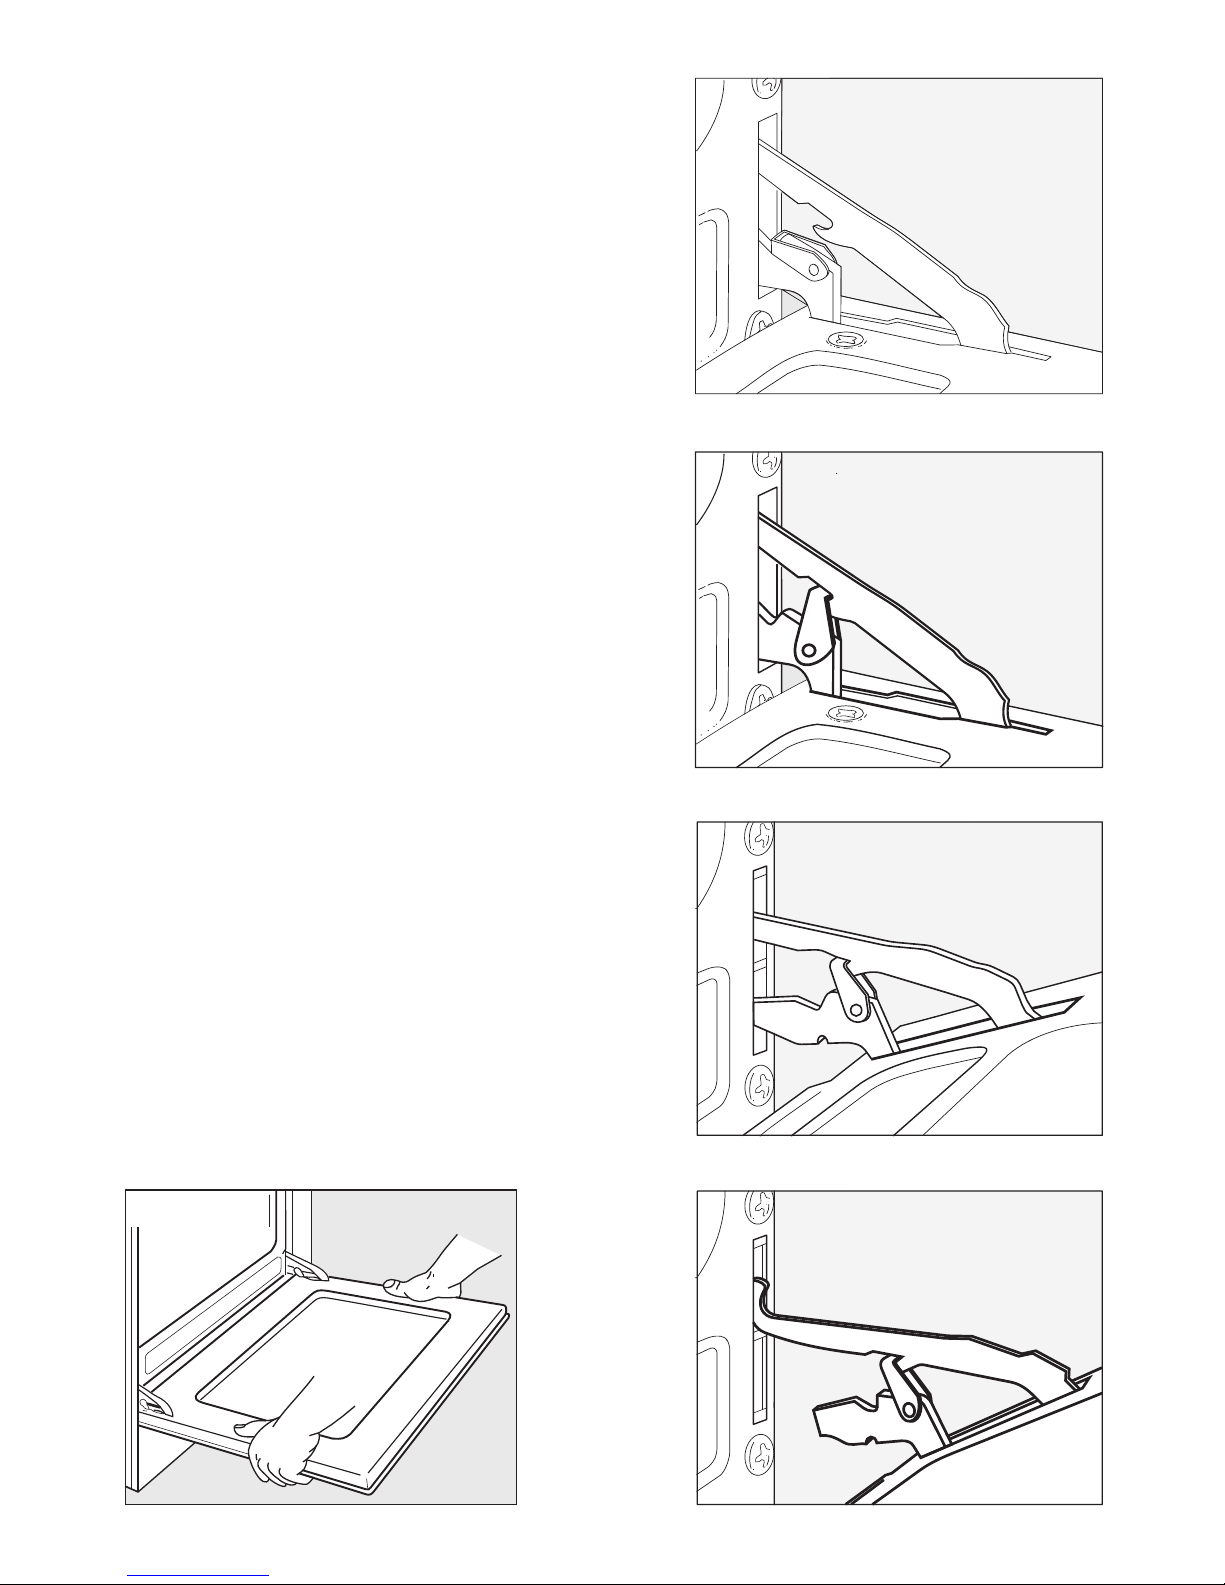
REMOVING THE OVEN DOOR
The oven door can be easily removed as
follows:
! Open the door to the full extent (fig.
5.8A).
! Attach the retaining rings to the hooks on
the left and right hinges (fig.5.8B).
! Hold the door as shown in fig. 5.8.
! Gently close the door and withdraw the
lower hinge pins from their location (fig.
5.8C).
! Withdraw the upper hinge pins from their
location (fig. 5.8D).
! Rest the door on a soft surface.
! To replace the door, repeat the above
steps in reverse order.
Fig. 5.8A
Fig. 5.8B
Fig. 5.8C
Fig. 5.8D
Fig. 5.8
21
Page 22

ADVICE FOR
THE
INSTALLER
IMPORTANT
! Cooker installation, regulation and conversion to other gas types must only be carried out
by QUALIFIED TECHNICIANS and in compliance with local safety standards. Failure to
observe this rule will invalidate the warranty.
! The electrical mains outlet, if located behind the cooker, must not be higher than 18 cm
above the floor level
! Some appliances are supplied with a protective film on steel and aluminium parts. This film
must be removed before using the cooker.
22
Page 23
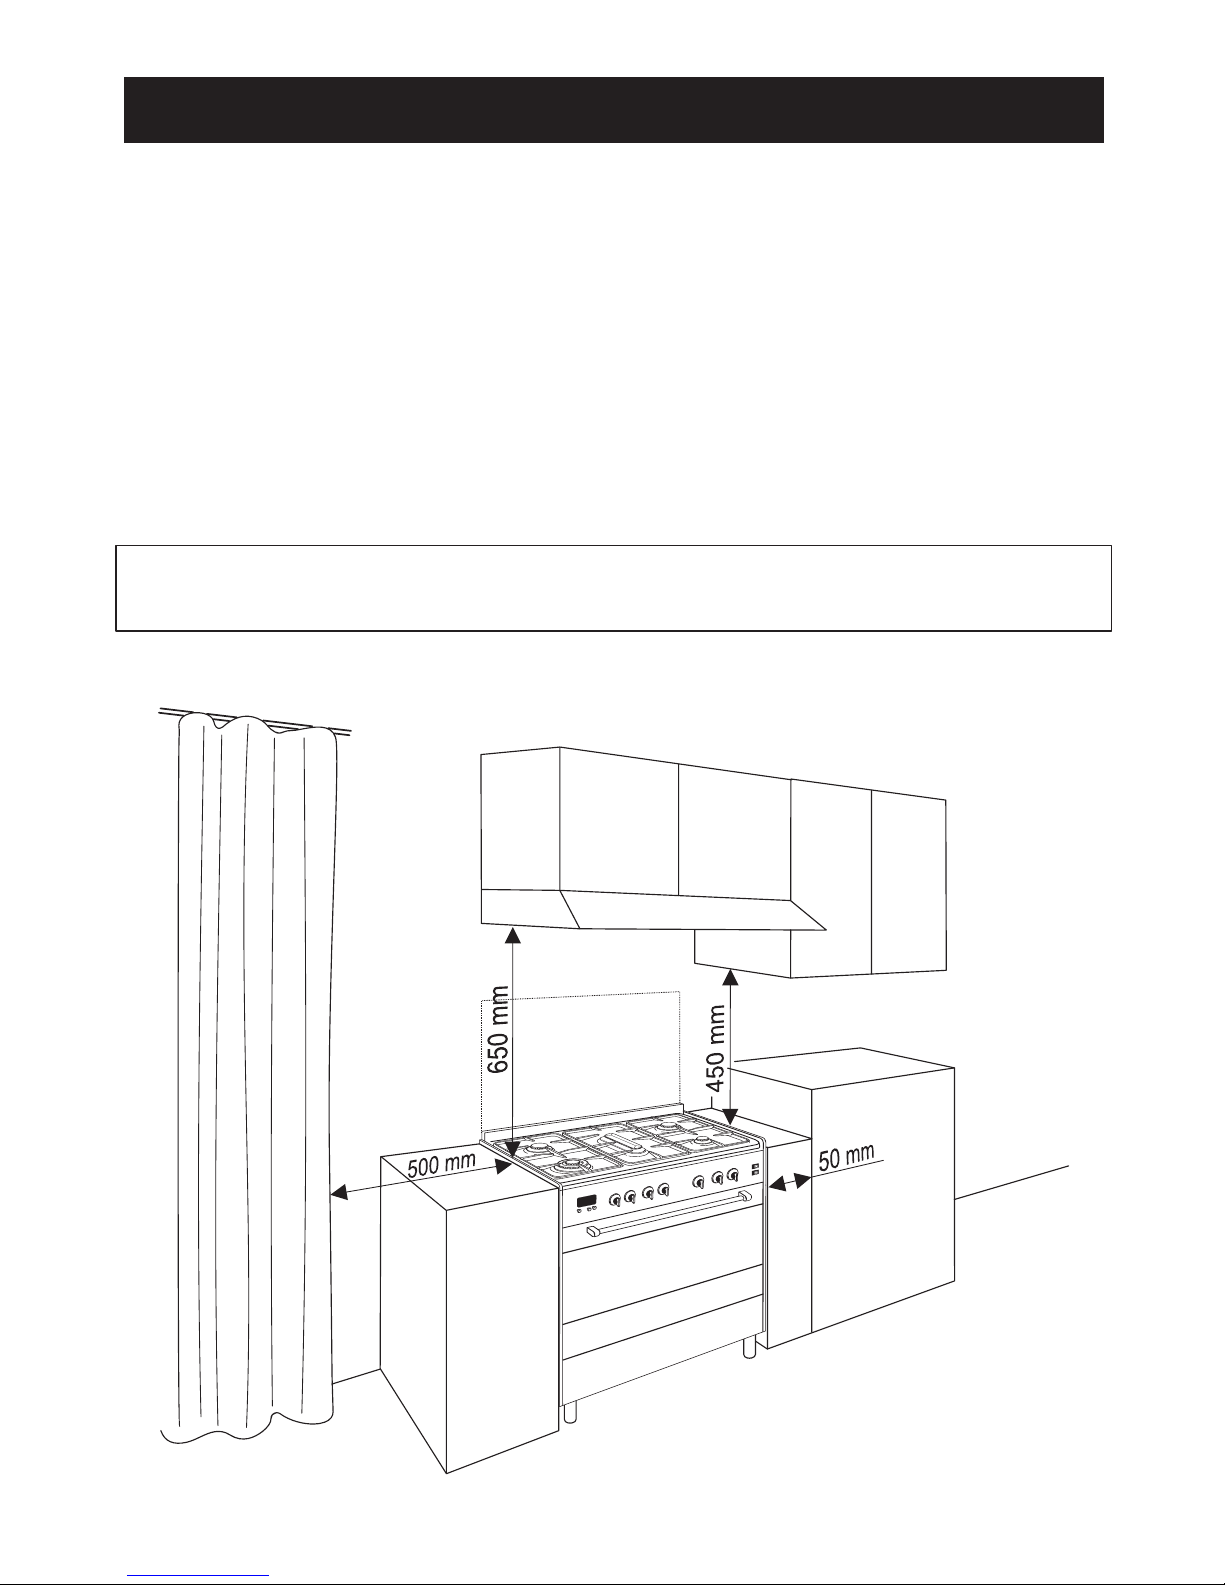
6 - INSTALLATION
Fig. 6.1
23
INSTALLATION
This cooker has class “2/1” overheating protection so that it can be installed next to a
cabinet.
The cooker must be kept no less than 50 mm away from any side wall which exceed the height
of the cooktop.
The surfaces of adjacent furniture must be capable of withstanding temperatures up to
75°K.
The cooker may be located in a kitchen, a kitchen/diner or a bed-sitting room but not in a room
containing a bath or shower.
Curtains must not be fitted immediately behind appliance or within 500 mm of the sides.
It is essential that the cooker is positioned as stated below.
If the cooker is placed on a base, measures have to be taken to prevent the appliance
slipping from the base.
Page 24
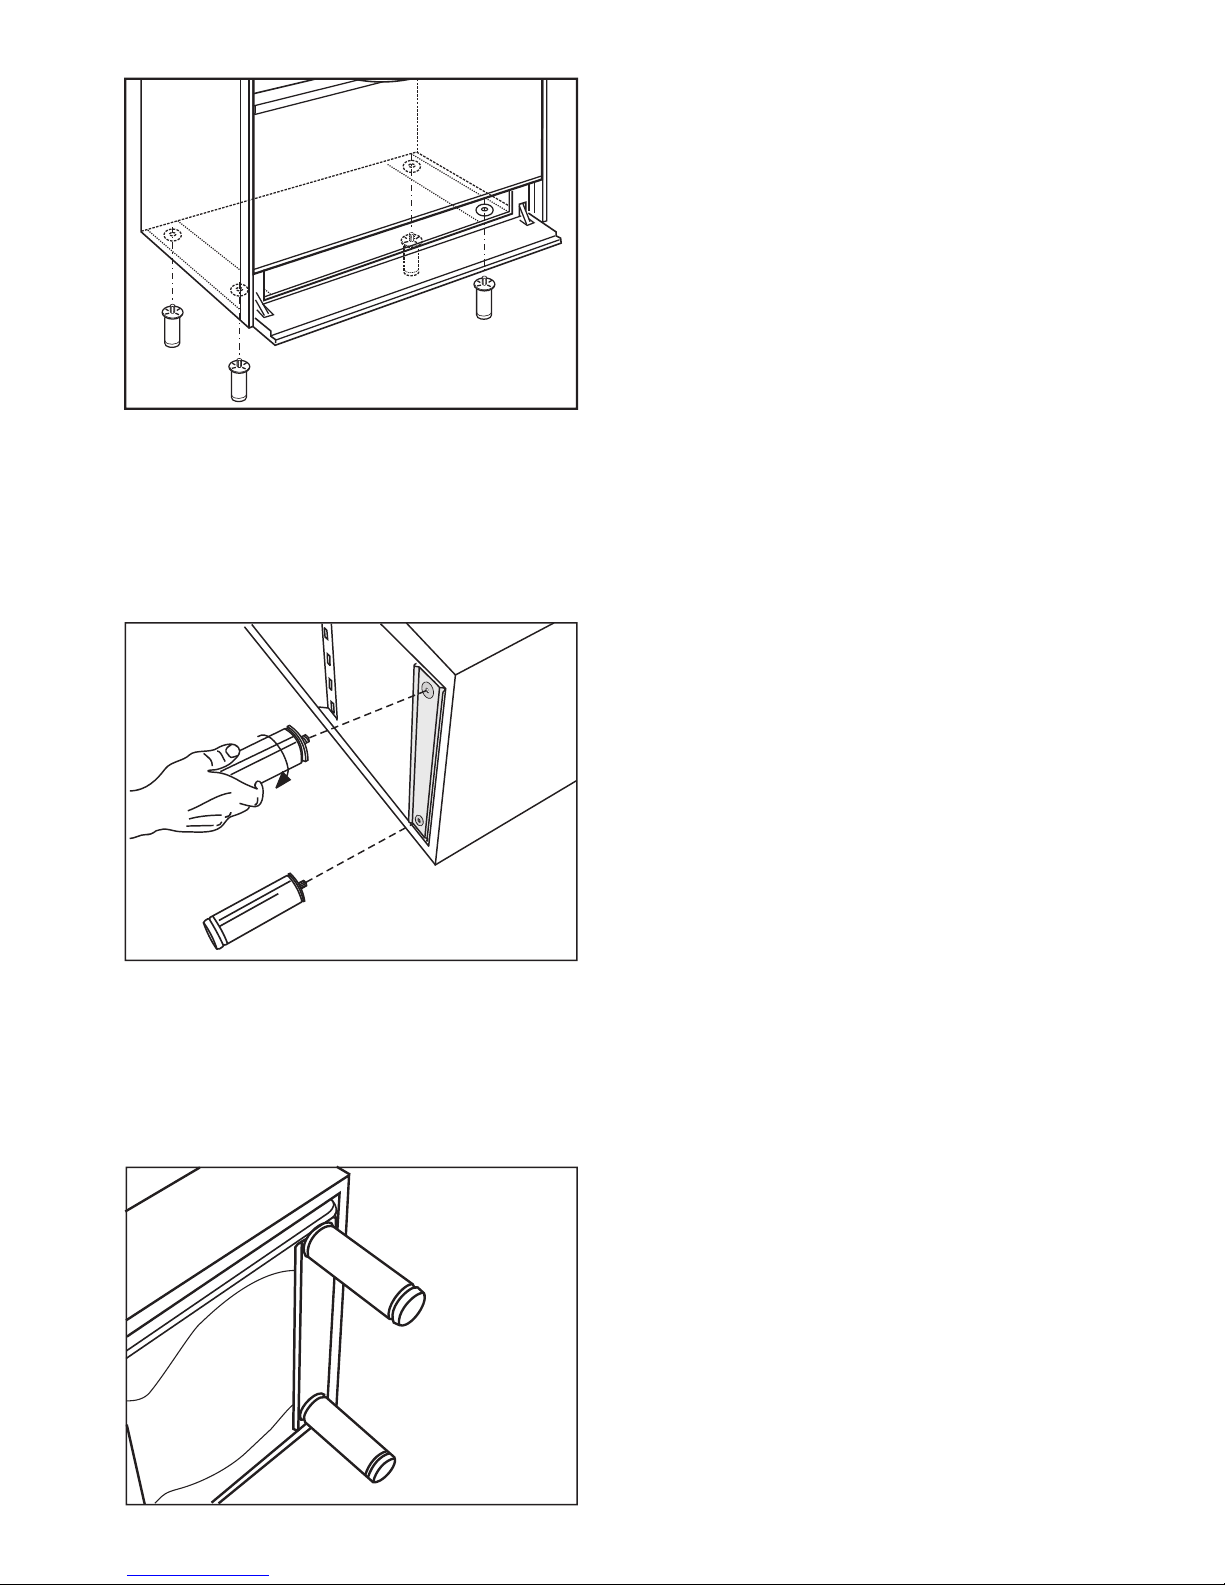
FITTING THE ADJUSTABLE FEET
The adjustable feet must be fitted to the
base of the cooker before use.
Rest the rear of the cooker an a piece of the
polystyrene packaging exposing the base
for the fitting of the feet.
Fit the 4 legs by screwing them tight into the
support base as shown in pictures 6.2-6.3-
6.4
Fig. 6.3
Fig. 6.4
Fig. 6.2
24
Page 25
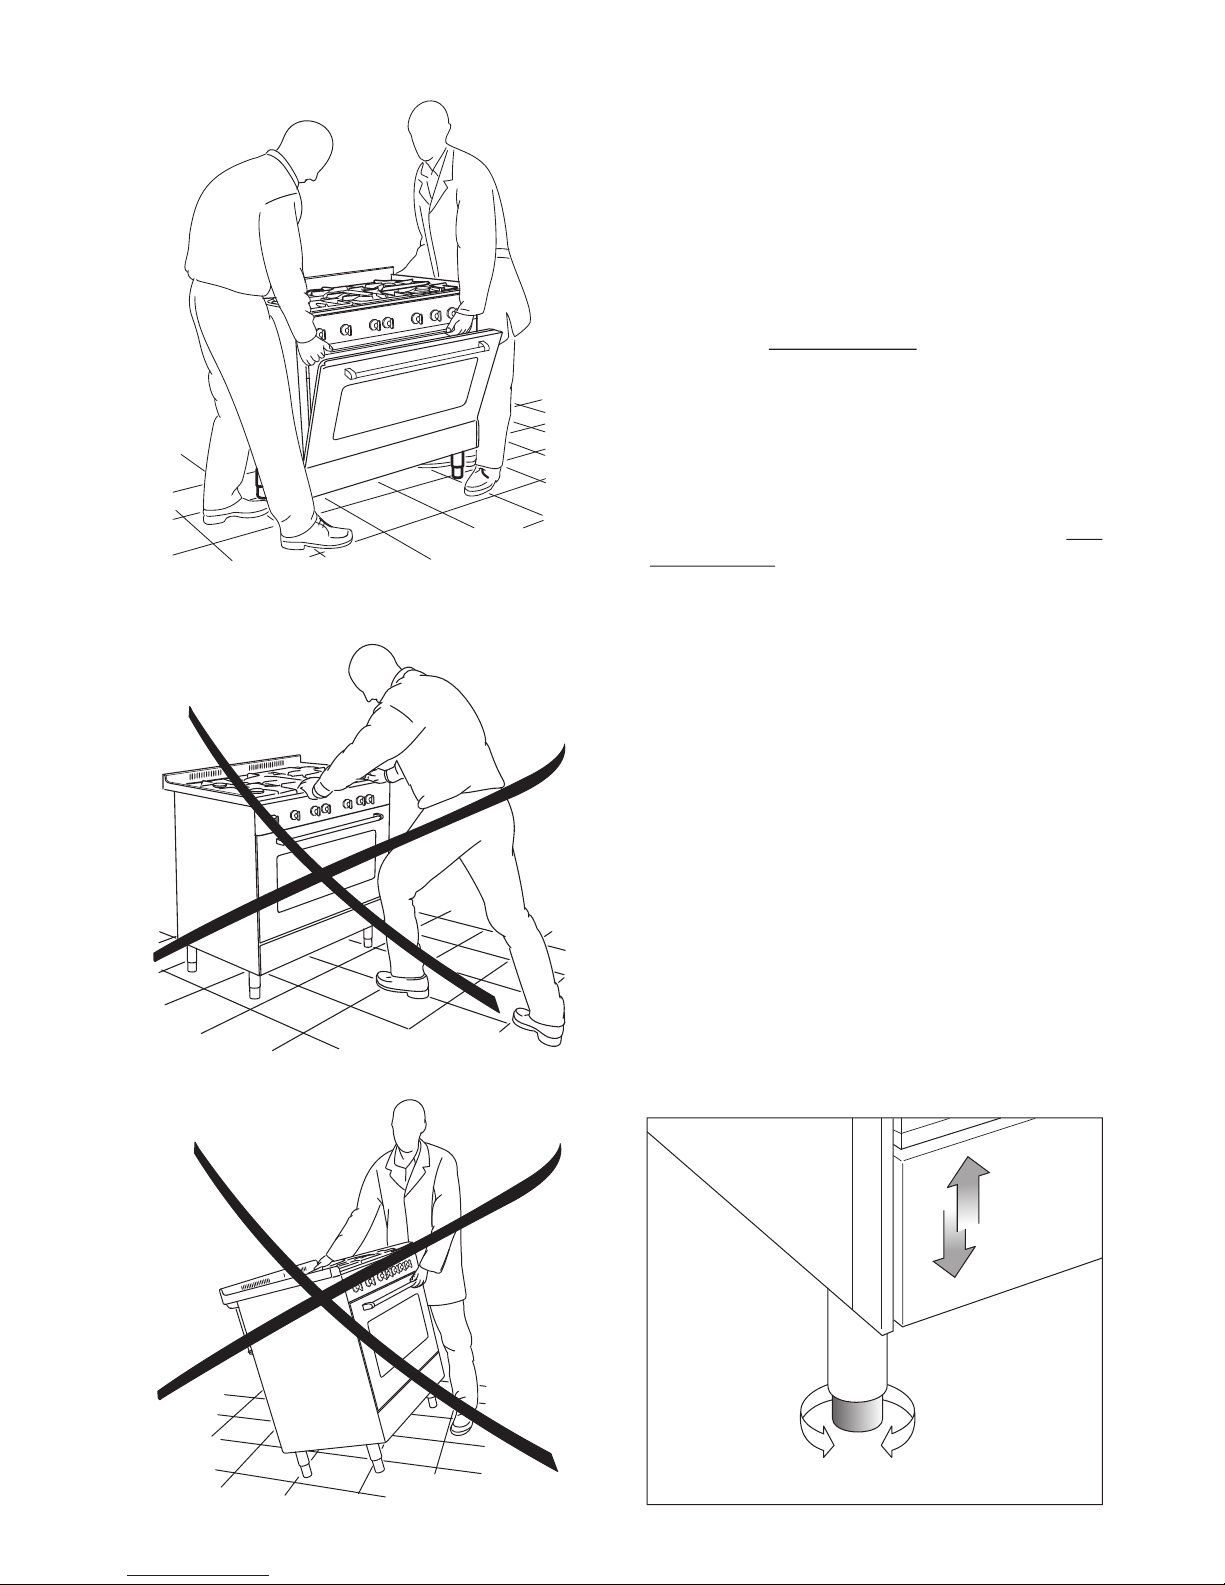
WARNING
When raising cooker to upright position
always ensure two people carry out this
manoeuvre to prevent damage to the
adjustable feet (fig. 6.5).
WARNING
Be careful: DO NOT LIFT the cooker by the
door handle when raising to the upright
position (fig. 6.7).
WARNING
When moving cooker to its final position DO
NOT DRAG (fig. 6.6).
Lift feet clear of floor (fig. 6.5).
LEVELLING THE COOKER
The cooker may be levelled by screwing the
lower ends of the feet IN or OUT (fig. 6.8).
Fig. 6.8
Fig. 6.5
Fig. 6.6
Fig. 6.7
25
Page 26
CHOOSING SUITABLE
SURROUNDINGS
In the room chosen to accommodate the
gas appliance, there must be an adequate
natural draft to allow combustion of the gas.
The natural draft must be produced directly
by one or more vents made in the external
walls and providing a total opening of at
2
least 100 cm .
The vents must be positioned close to the
floor, preferably on the opposite side to the
combustion discharge outlet and must be
designed in such a way that they cannot be
obstructed either from the inside or the
outside.
When it is not possible to provide the
necessary vents, the draft may be supplied
from an adjacent room, ventilated in the
required manner, provided it is not a
bedroom or an area at risk.
In this event, the door of the kitchen must be
opened to allow the draft to enter the room.
DISCHARGING PRODUCTS OF
COMBUSTION
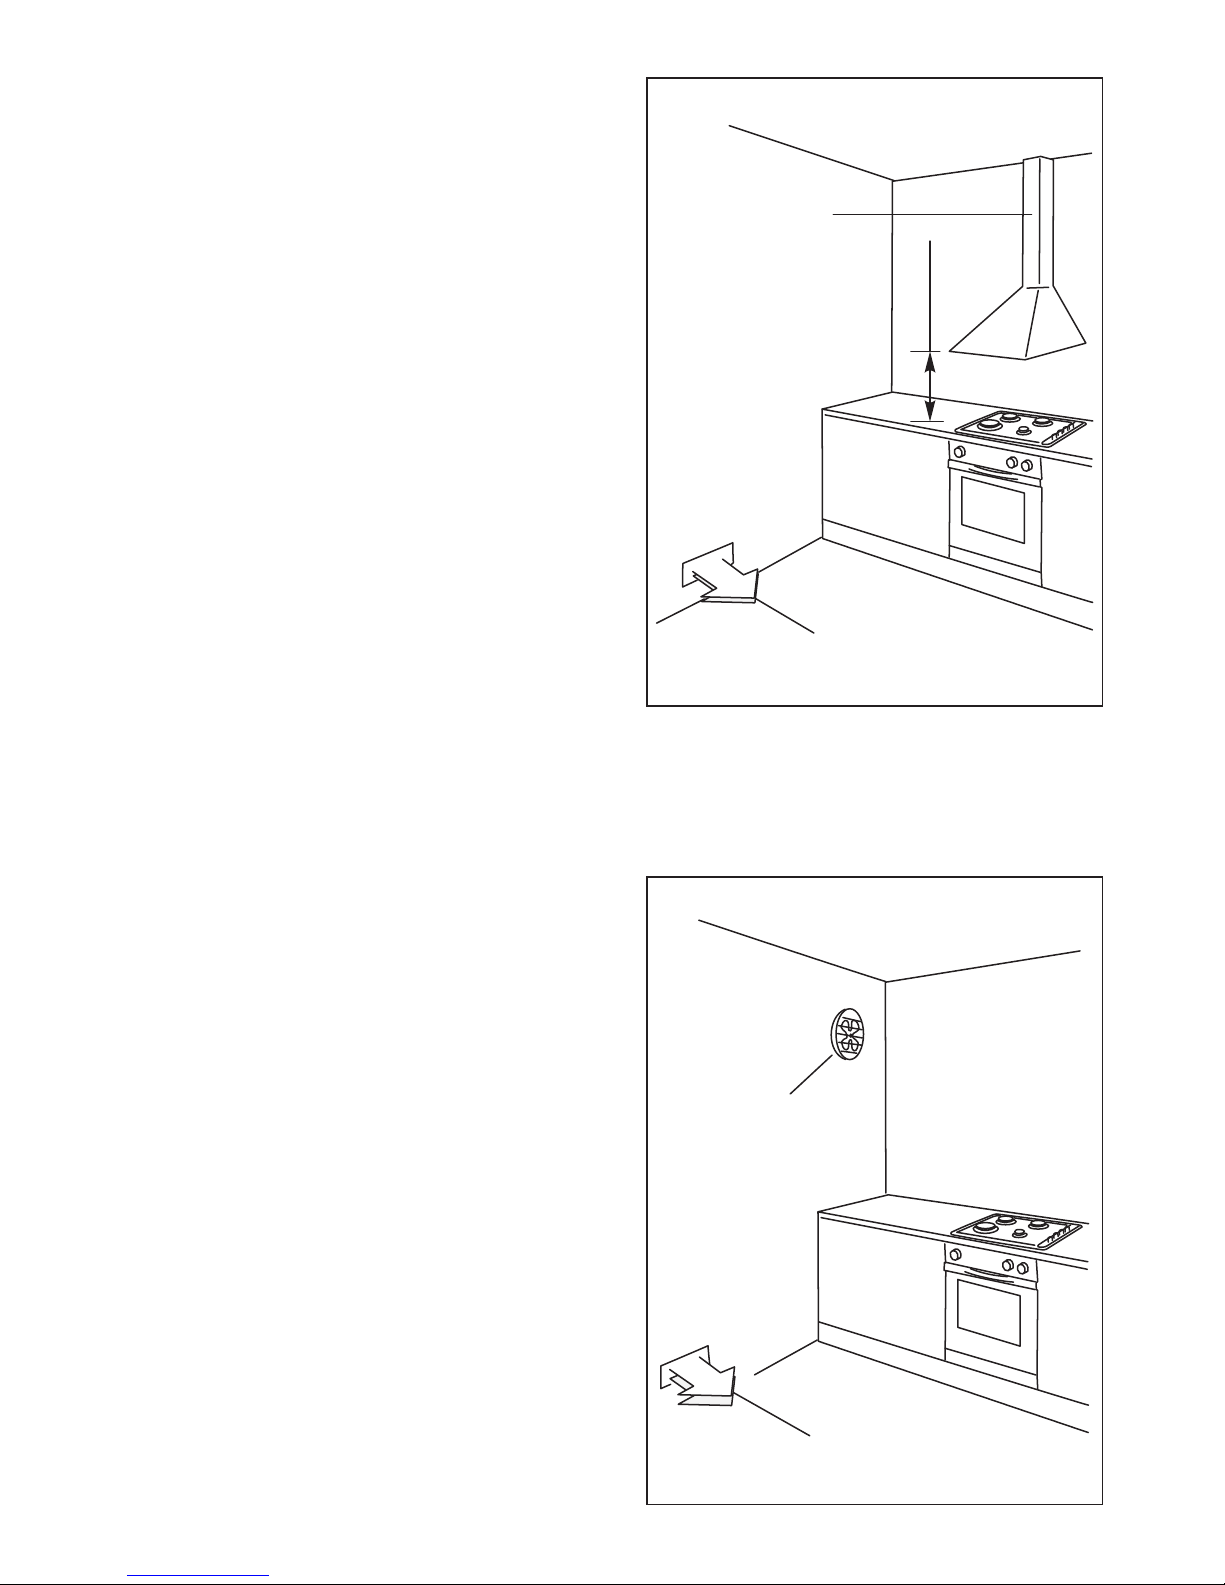
Extractor hoods connected directly to the
outside must be provided , to allow the
products of combustion of the gas appliance
to be discharged (fig. 6.9).
If this is not possible, an electric fan may be
used, attached to the external wall or the
window; the fan should have a capacity to
circulate air at an hourly rate of 3-5 times the
total volume of the kitchen (fig. 6.10).
The fan can only be installed if the room has
suitable vents to allow air to enter, as
described under the heading “Choosing
suitable surroundings”.
Air ventAir vent
Electric fan to
extract products
of combustion
Electric fan to
extract products
of combustion
Fig. 6.10
26
Extractor hood
for products of
combustion
Extractor hood
for products of
combustion
Air ventAir vent
H min. 650 mmH min. 650 mm
Fig. 6.9
Page 27
7 - GAS SECTION
INSTALLATION GAS CONNECTION
The gases used for the operation of cooking The connection must be executed by a
appliances may be grouped by their qualified technician according to the
characteristics into three types: relevant standards.
[ G20 (Natural Gas) Ensure that the room in which the cooker is
[ G30/ G31 (L.P.G.) to be installed is adequately ventilated, in
[ G110 (Town Gas) compliance with applicable regulations.
Connection to the gas supply pipe or gas
Th e ap pl ia nc e is pr ed is po se d and cylinder must be made in accordance with
calibrated to operate with the gas indicated th e requ ir emen ts of the ap plic ab le
on the specifications plate. regulations.
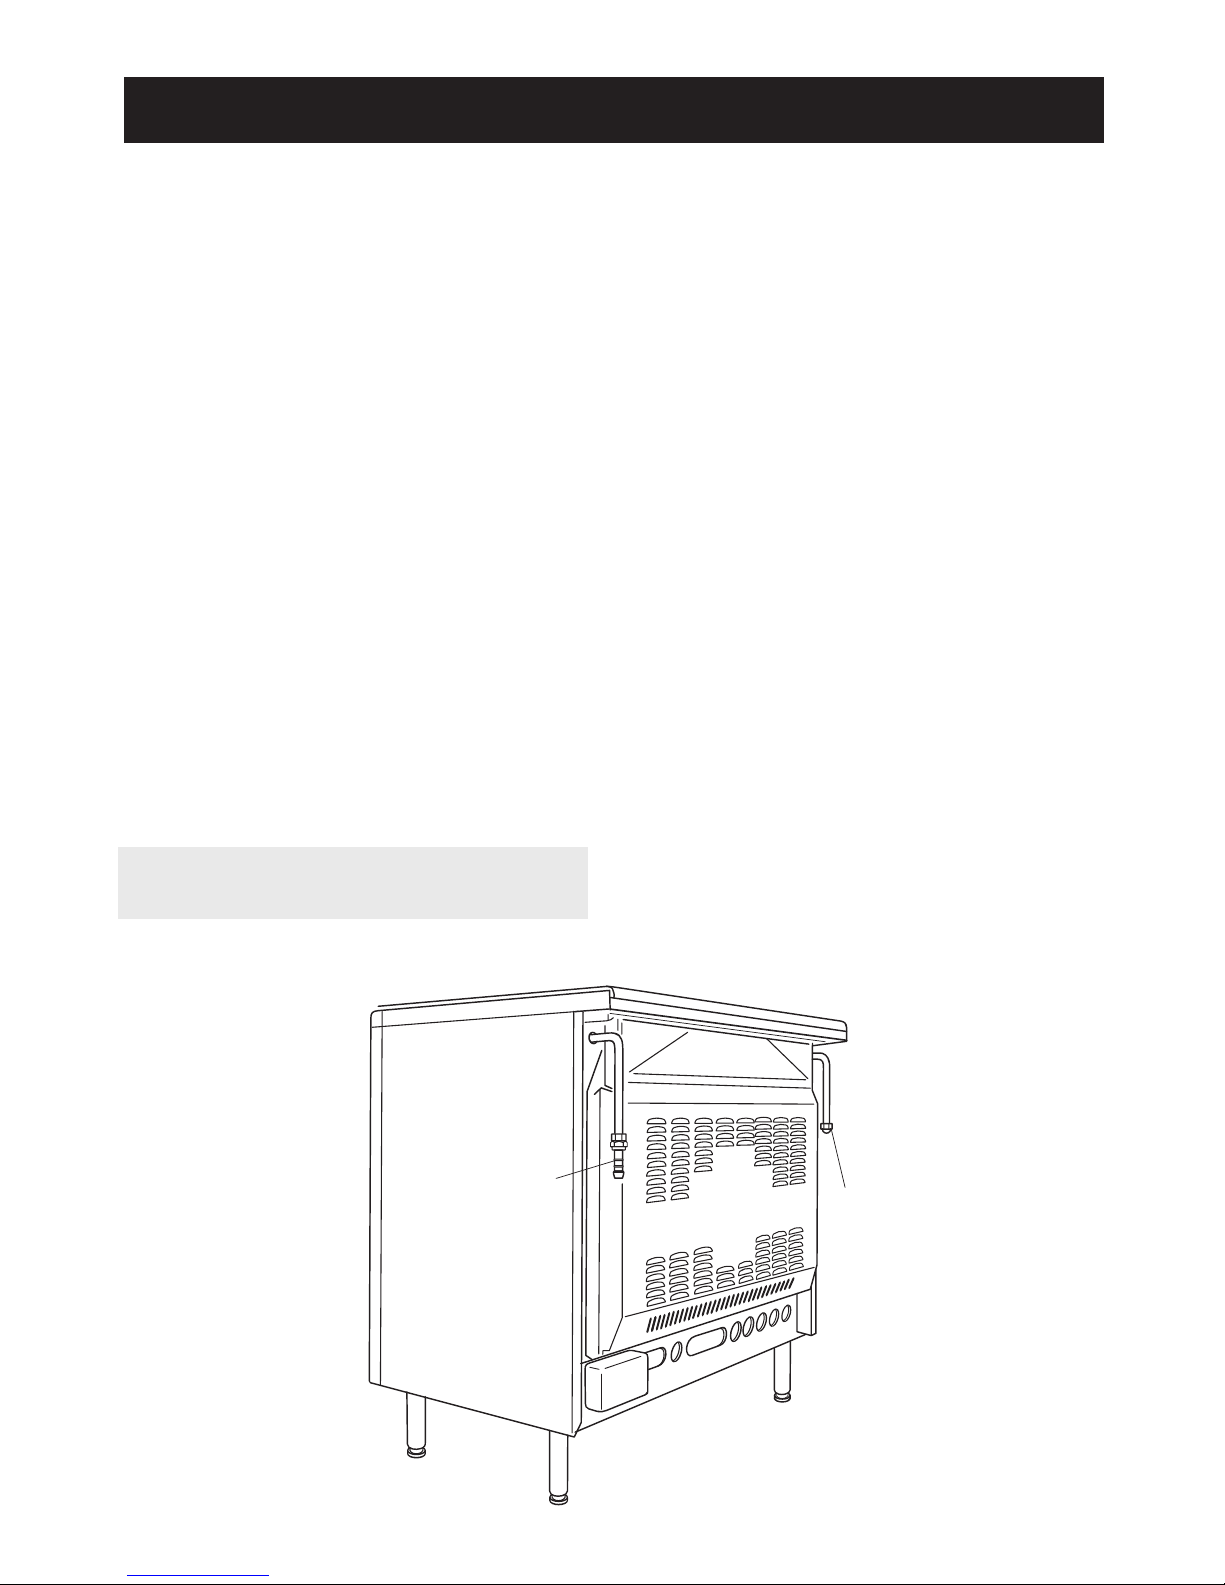
If the appliance must be alimented with a The gas supply is connected at the rear of
gas different than that indicated on the the cooker (fig. 7.1) to the R or T terminal of
plate, it is necessary to execute the the gas inlet pipe; the connection pipe must
following operations: not cross the rear of the appliance.
- Gas connection The terminal not used must be closed off
- Replacement of the top burner injectors with the plug T and gasket.
- Regulating of the primary air of the top
burners
- Adjustment of the minimum of the top
burners
The walls adjacent to the cooker must be
of material resistant to heat.
T
R
Fig. 7.1
27
Page 28
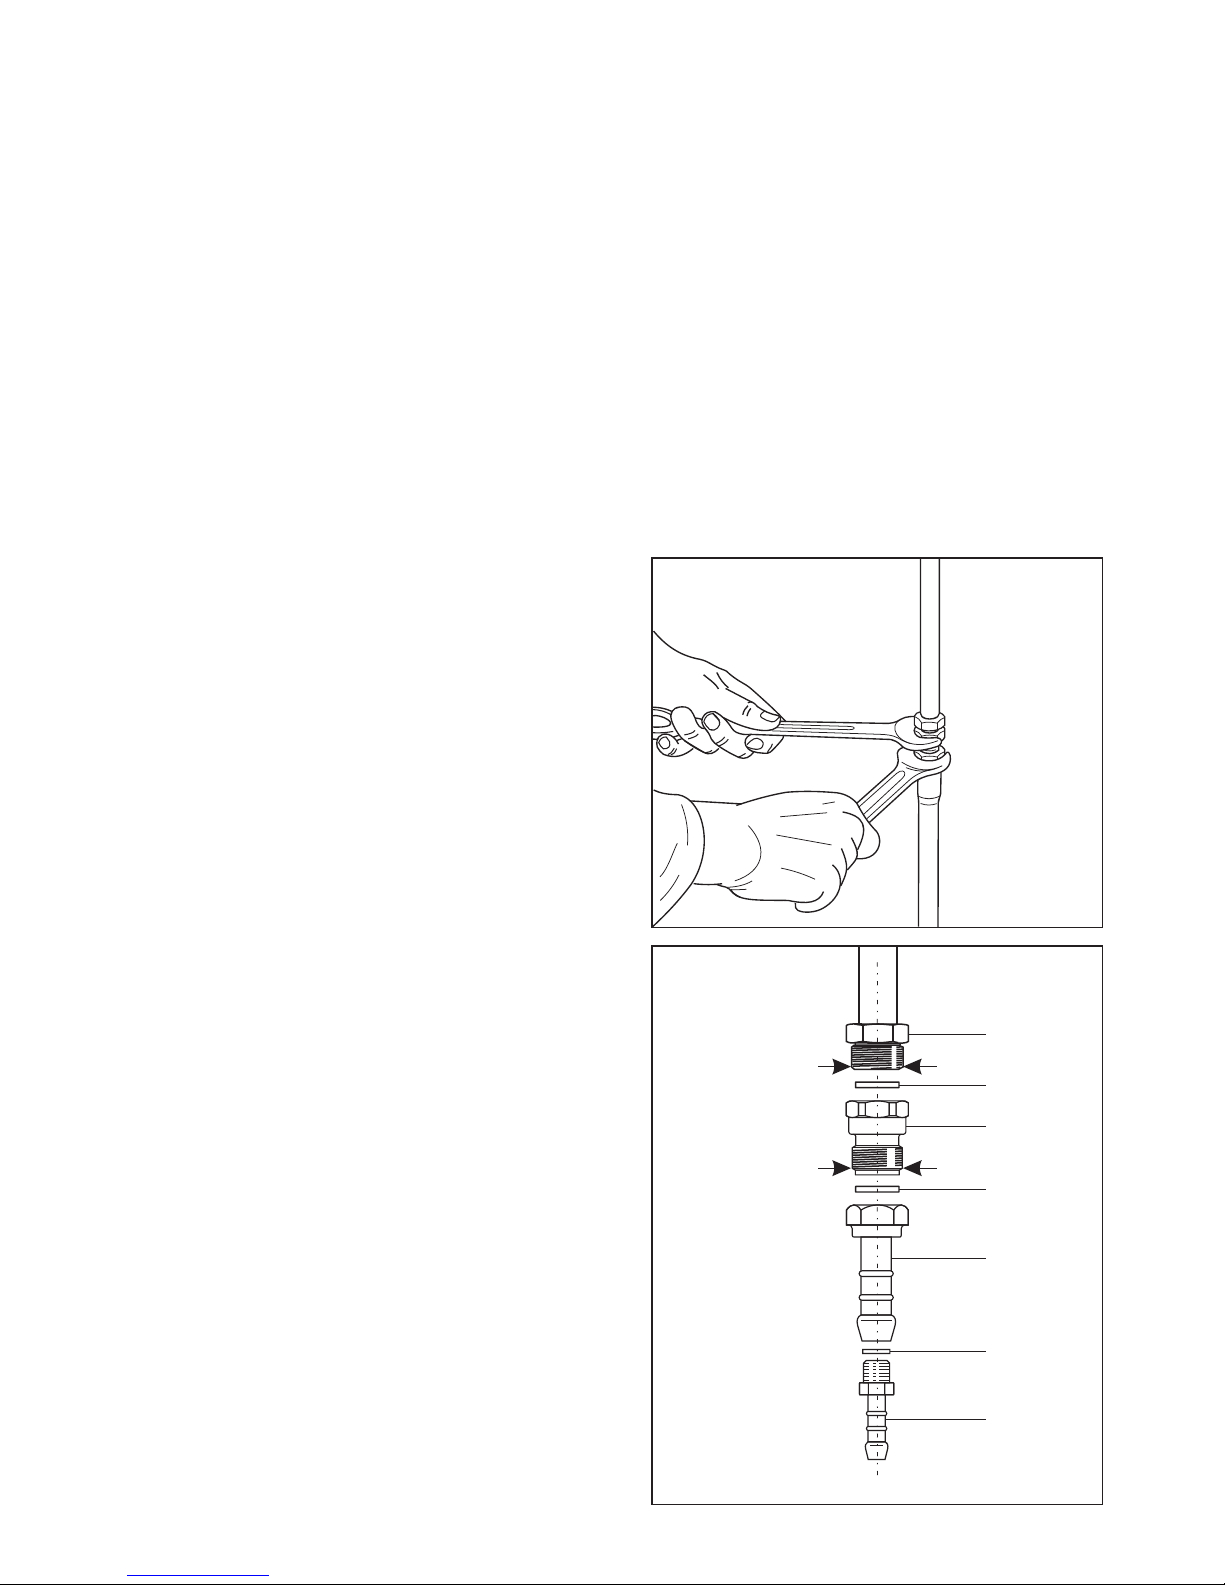
The fitting (fig. 7.3) is made up of:
A - Gas train terminal fitting (rh or lh)
B - Adapter for G20 and Town gas
C - Adapter for G30/G31
D - Gasket
E - Gasket
F - 1/2” G connection
To replace the adapter it is
necessary to operate with 2
spanners (fig. 7.2).
After connecting to the mains,
check that the couplings are
correctly sealed, using soapy
solution, but never a naked flame.
they are not squashed, and do not
come into contact with moving parts.
[ The seals “D” and “E” (fig. 7.3) are
the elements that guarantee the seal
in the pipe-ramp connector. It is
recommended that they be replaced
whenever they show even the
slightest deformation or
Natural gas (G20) or city gas (G110) imperfection.
[ Fit up the holder “B” interposing gasket [
“D” (figure 7.3).
[ Connect the cooker to the gas net by a
suitable rubber tube (inside diameter [
13 mm). Make sure the tube is snugly fit
at both ends and use a standard tube
clamp (not supplied) to fasten it.
L.P.G. (in cylinders) (G30/G31)
[ Fit up the holder “C” interposing gasket
“E” (figure 7.3).
[ Connect the cooking hob to the
cylinder pressure regulator by a
suitable rubber tube (inside diameter 8
mm). Make sure the tube is snugly fit at
both ends and use a standard tube
clamp (not supplied) to fasten it.
IMPORTANT:
Connection with rubber tube
The rubber tube:
[ must be as short as possible, without
contractions or kinks;
[ must be easy to inspect along its entire
length to check its wear;
[ must never be at any point in its length
in contact with the “hot” parts of the
appliance;
[ Make sure the tube is snugly fit at both
ends and use a standard tube clamp
(not supplied) to fasten it.
[ From time to time check to make sure
that the rubber tube is in perfect
condition and substitute it at printed
due date or if it shows signs of wearing
or damage.
Connection with metal pipes
[ Any connection to fixed metal pipes
must be done in such a way so as not to
place undue stress on the manifold.
[ If using flexible metal pipes, make sure
28
Fig. 7.3
Fig. 7.2
E
C
D
B
A
½” G
D
½” G
F
Page 29
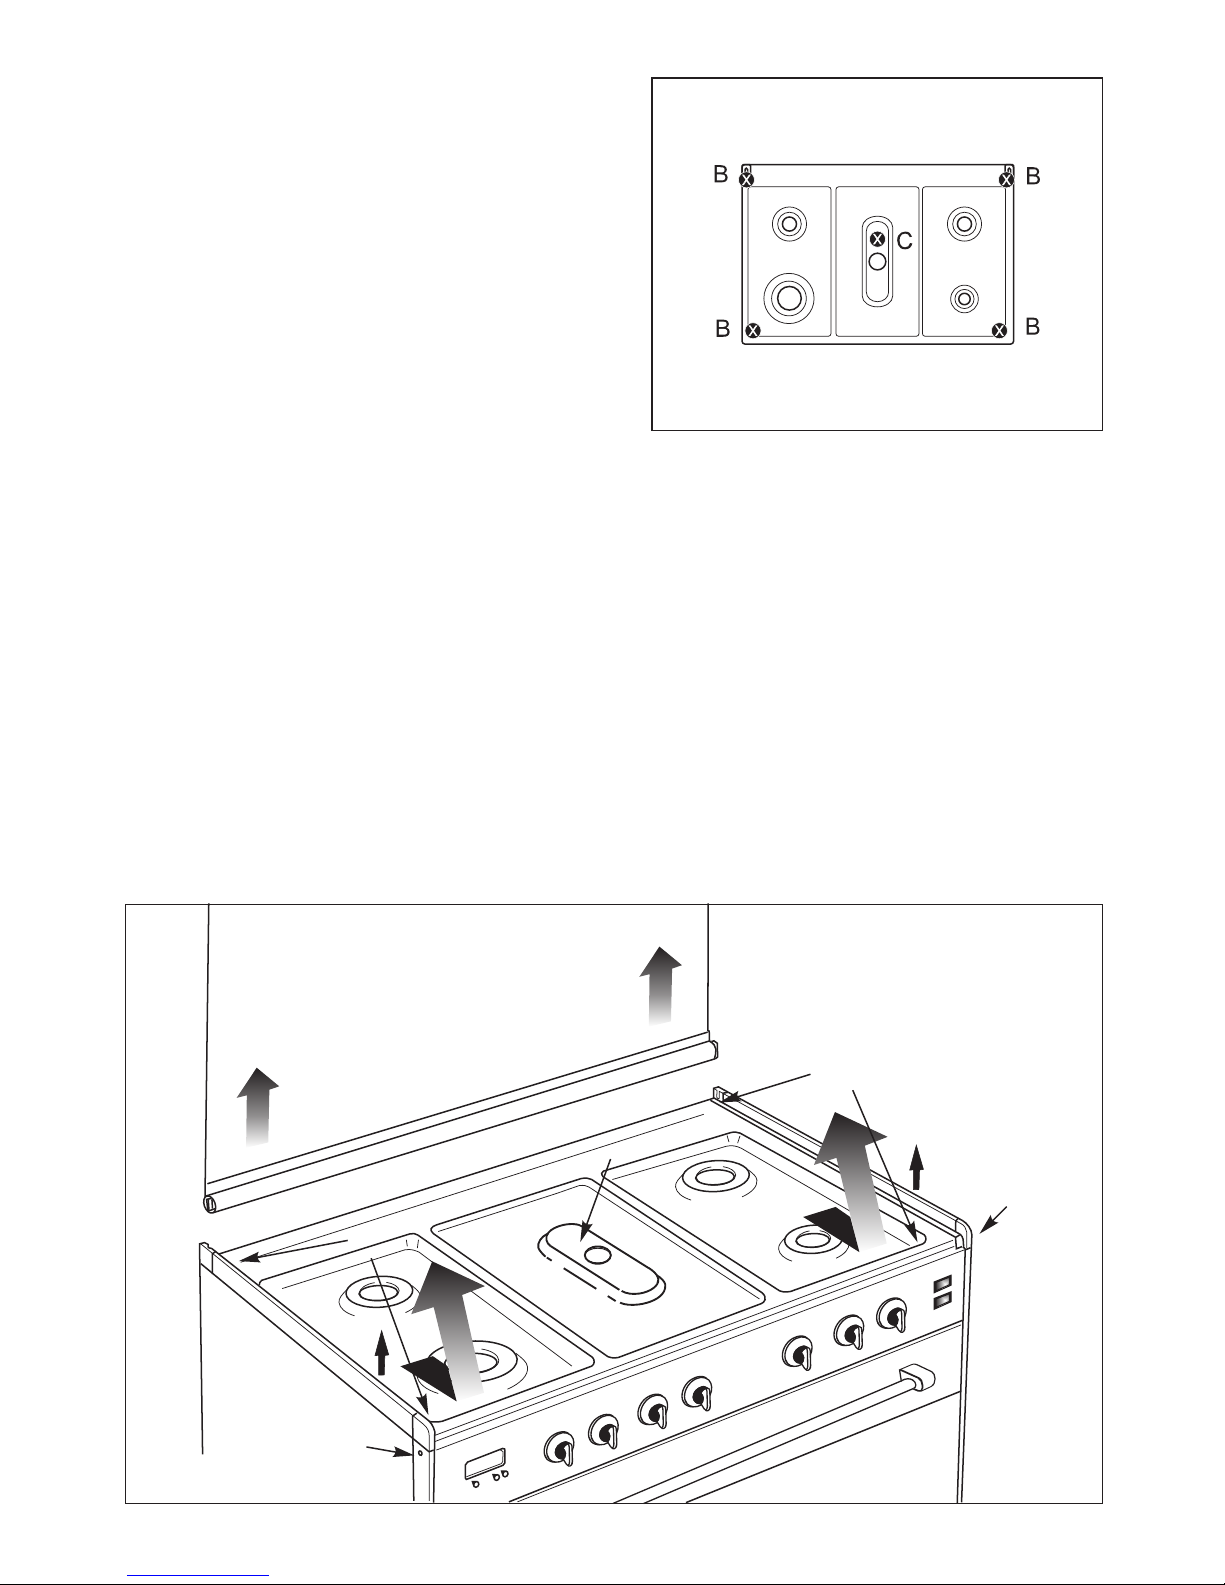
Fig. 7.4
DD
DD
BB
AA
BB
CC
EE
EE
REPLACEMENT OF TOP BURNER
INJECTORS
Note: if the injectors are not supplied
with the appliance they can be obtained
from the “Service Centre”.
To replace the injectors, raise the cooktop in
the following manner:
! Remove the pan-supports and burners
from the cooktop.
! Pull the lid “A” upwards to remove from
the cooker (models with glass lid - fig.
7.4) or pull the backguard “G” upward
after unscrew the possible screw “V”
(models with backguard - fig. 7.5).
! Remove the 4 screws “B”.
! Remove the central screw “C” (fig. 7.4a).
! Unscrew the two screws “D” and remove
the two side profiles and head sections
by pulling them upwards.
! Raise the cooktop in the direction shown
by the arrow “E”.
! Prop the cooktop up.
Fig. 7.4a
29
Page 30
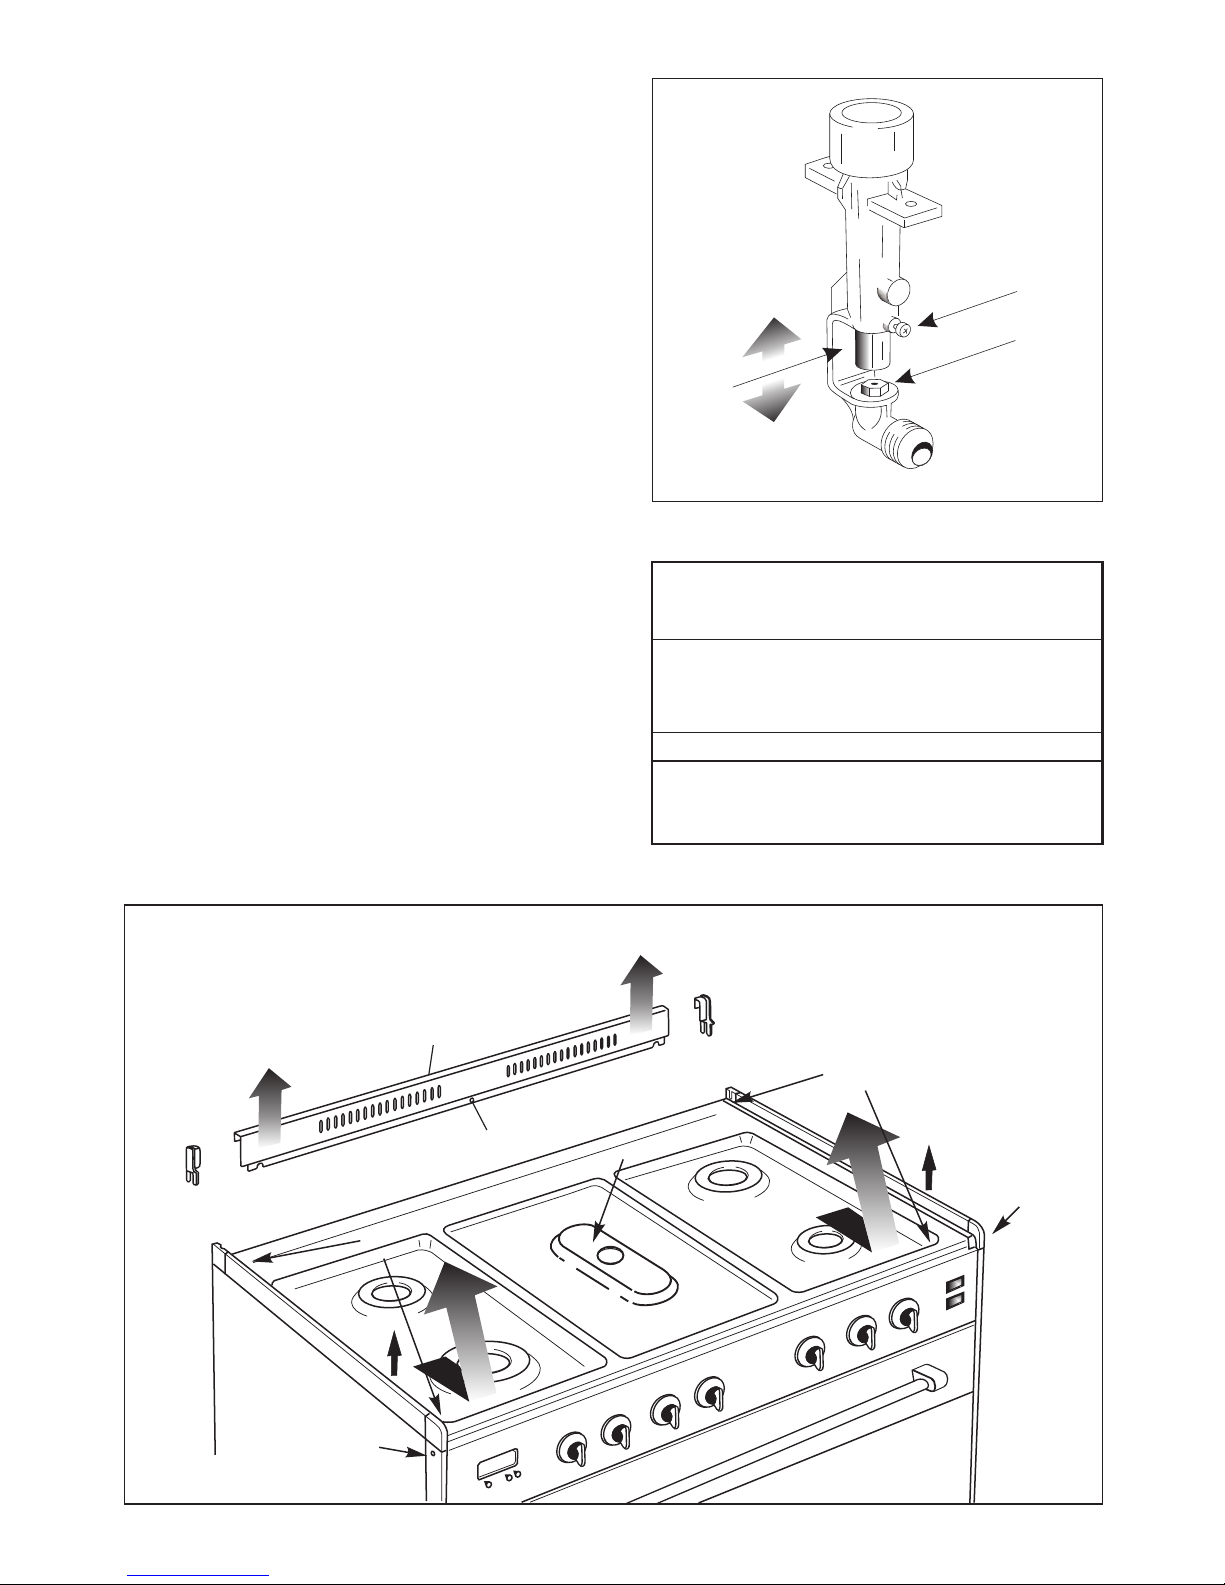
INJECTORS REPLACEMENT
! Fully raise the adjusting air tube A (fig.
7.6) in order to easily reach the injector.
! By an angle 7 spanner, remove the
injector from its housing and replace it by
the proper one according to the kind of
gas (see “TABLE FOR THE CHOICE OF
THE INJECTORS”).
ADJUSTING OF PRIMARY AIR OF
THE TOP BURNERS
By operating the screw “M”, reset the air
adjuster “A” according to the instructions
(see “Injector table”), where the distance
between injector and air adjuster is
recommended (in mm).
Before lowering the hob top, set the burners
on their sites and light them in order to
check whether the flames are correct, as
per the specifications given in the next
page. In case of incorrect flame, lift or lower
the air adjuster.
M
A
J
Fig. 7.6
Fig. 7.5
G
V
30
Flame
faulty in
primary air
Flame
correct
Flame
with excess
primary air
Long, yellow
and
trembling
Clear
interior blue
cone
Short and sharp
too blue interior
cone tending to
detach
CAUSE
Air regulating
tube, too
closed
Correct
distance of
the tube
Air regulating
tube, too
open
DD
DD
BB
BB
CC
EE
EE
Page 31
ATTENTION:
ADJUSTING OF THE MINIMUM OF
THE TOP BURNERS
After regulating the burners, replace the
In passing from one type of gas to another,
cooktop by repeating the steps
the gas flow must also be changed,
described above in reverse order. Be
considering that in this position the flame
especially careful not to confuse the
must have a length of about 4 mm and must
positions of the two small flame
remain lit even with a brusque passage from
spreaders shown in fig. 5.3.
the maximum position to that of minimum.
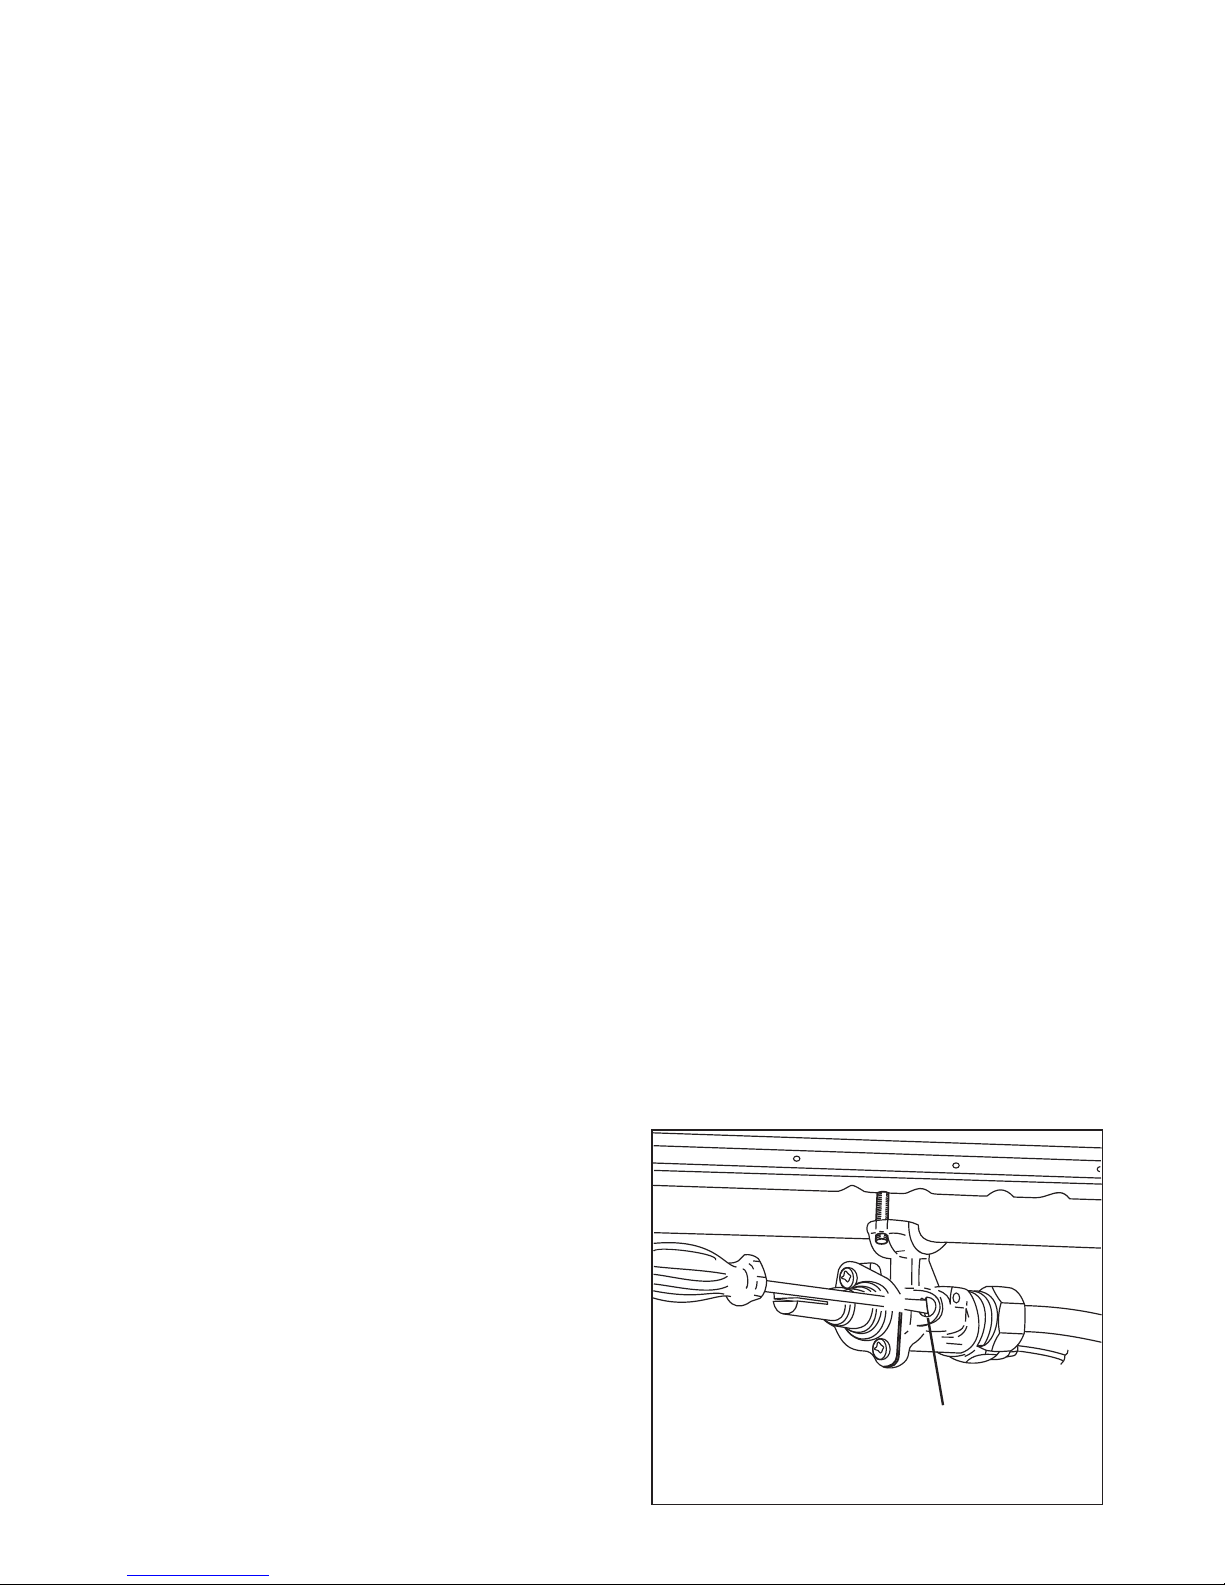
The flame adjustment is done in the
following way:
! Turn on the burner
! Turn the tap to the MINIMUM position
! Take off the knob
! With a small flat screwdriver turn the
screw F (fig. 7.7) to the correct
regulation.
_
For G30/G31 gas, tighten up the regulation
screw.
Fig. 7.7
F
31
Page 32
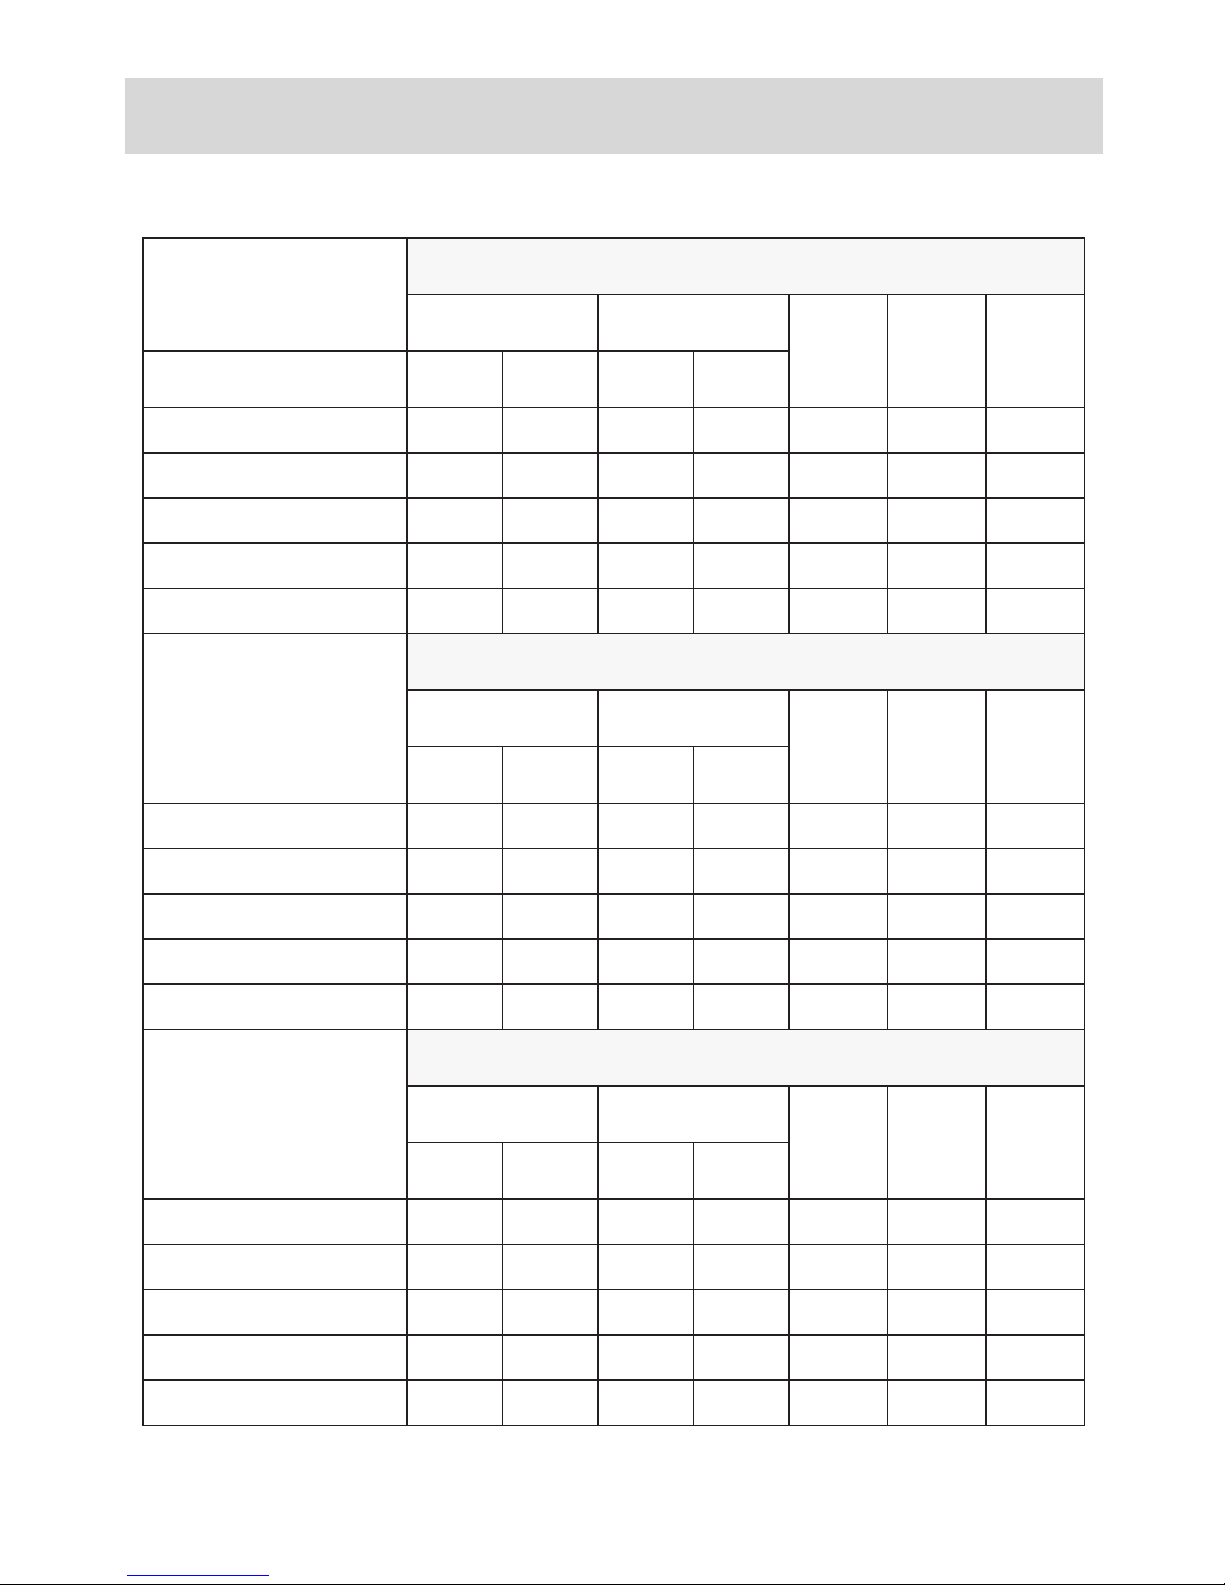
TABLE FOR THE CHOICE OF THE INJECTORS
BURNERS
NOMINAL
NOMINAL
MEASURED
HEAT INPUT (kW)
MEASURED
HEAT INPUT (kW)
MANUFACTURER’S
DECLARATION (kW)
MANUFACTURER’S
DECLARATION (kW)
NOMINAL
NOMINAL
REDUCED
REDUCED
REDUCED
REDUCED
0,95
1,00
1,00
1,00
1,76
1,77
1,90
1,90
1,90
1,90
1,90
1,90
3,18 3,55
0,45
0,30
0,30
0,30
0,98
0,87
0,38
0,38
0,38
0,38
0,38
0,38
1,84 0,85
AUXILIARY(A)
AUXILIARY(A)
SEMI-RAPID (SR) - Rear right
SEMI-RAPID (SR) - Rear left
SEMI-RAPID (SR) - Rear right
SEMI-RAPID (SR) - Rear left
FISH (PE)
3,31 3,451,77 0,85
DOUBLE-RING
LPG
BY-PASS
[1/100 mm]
BY-PASS
[1/100 mm]
ø
INJECTOR
[1/100 mm]
ø
INJECTOR
[1/100 mm]
RING
OPENING
[mm]
RING
OPENING
[mm]
27
29
29
47
50
67
67
92
3 *
5,7 *
5,7 *
FULLY OPEN *
47
92
FULLY OPEN *
NATURAL GAS
ADJUSTABLE
72
100
100
ADJUSTABLE
ADJUSTABLE
1 *
2 *
2 *
NOMINAL
MEASURED
HEAT INPUT (kW)
MANUFACTURER’S
DECLARATION (kW)
NOMINAL
(10 mbar)
REDUCED
REDUCED
(10 mbar)
1,01 1,00
1,88
1,90
1,90
1,90
3,55
3,48
3,55
3,55
0,53 0,30
1,00
1,03
0,38
0,38
0,85
1,60
0,85
0,85
AUXILIARY(A)
SEMI-RAPID (SR) - Rear right
SEMI-RAPID (SR) - Rear left
FISH (PE)
FISH (PE)
3,45
3,40
3,45
3,45
0,85
1,64
0,85
0,85
DOUBLE-RING
DOUBLE-RING
BY-PASS
[1/100 mm]
ø
INJECTOR
[1/100 mm]
RING
OPENING
[mm]
135
ADJUSTABLE
135
5 *
ADJUSTABLE
5 *
TOWN GAS
ADJUSTABLE
135
190
190
290
ADJUSTABLE
ADJUSTABLE
ADJUSTABLE
290
5 *
ADJUSTABLE
1 *
1,5 *
1,5 *
5 *
* REFERENCE VALUE
32
Page 33
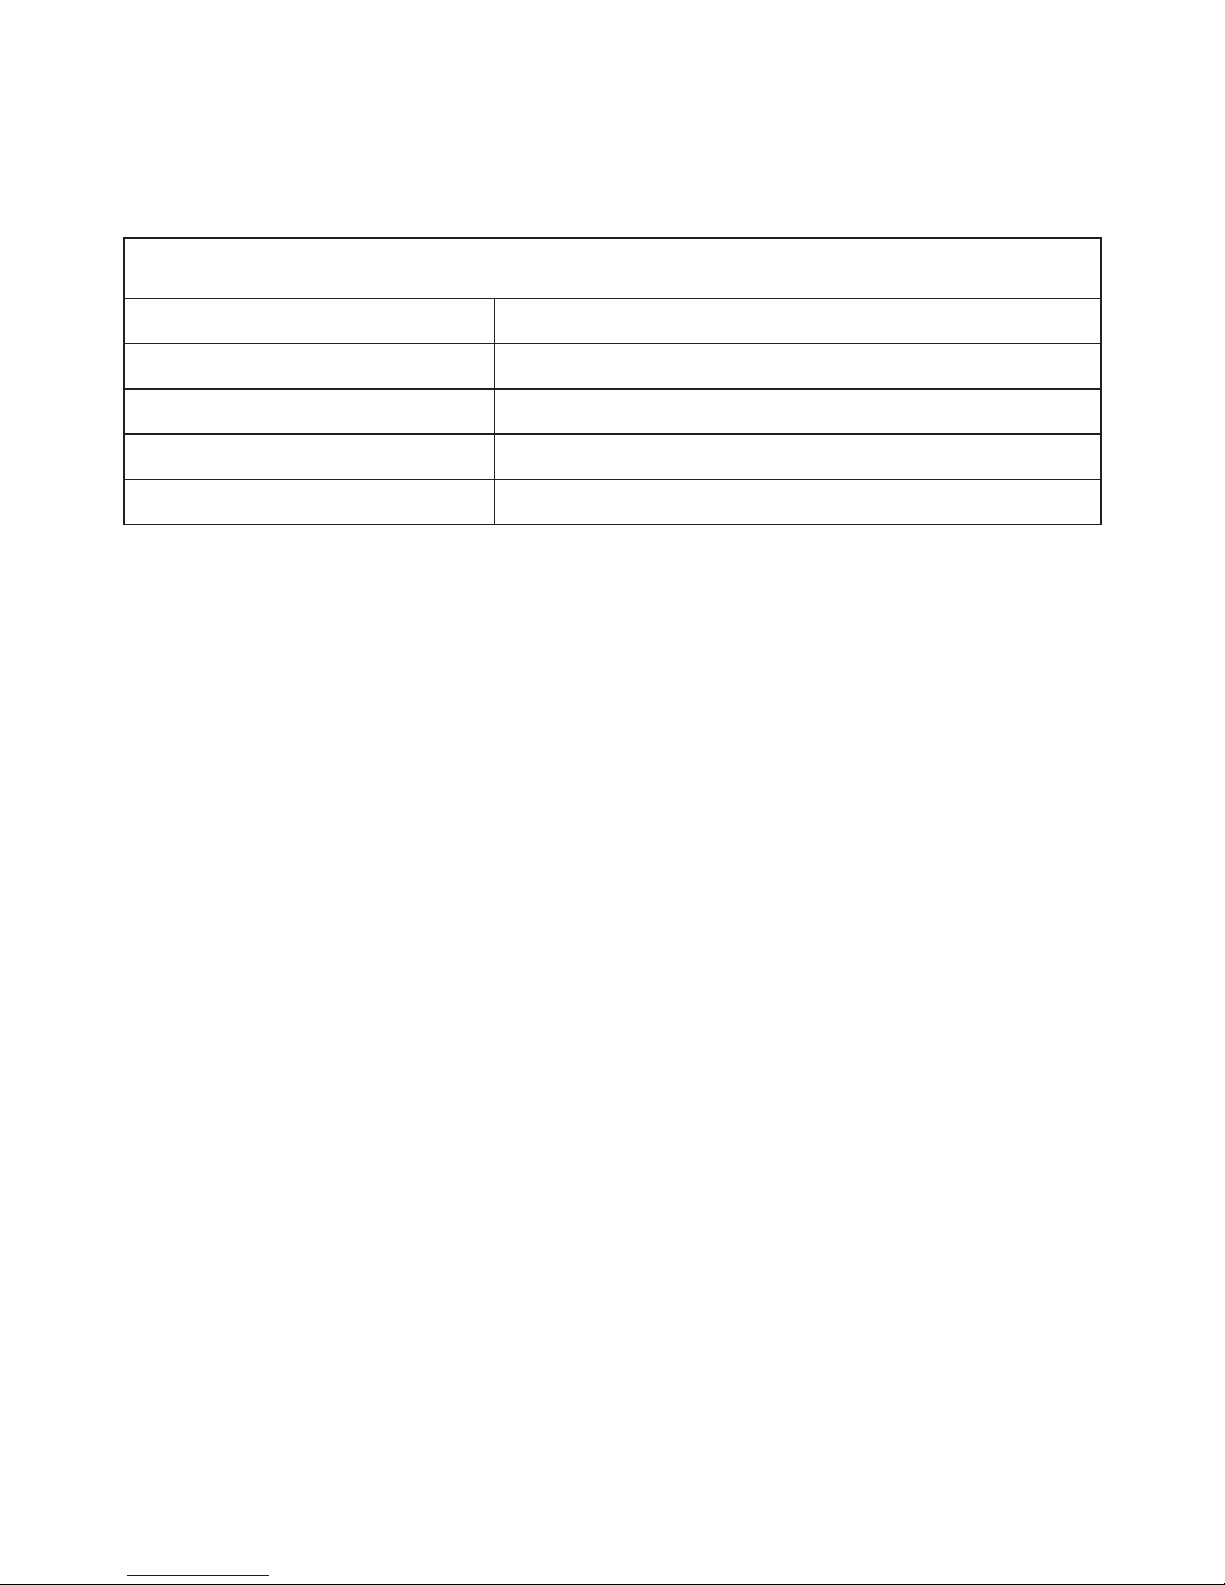
3
INCREASE OF AIR NECESSARY FOR GAS COMBUSTION (2 m /h x kW)
BURNERS
AUXILIARY(A)
SEMI-RAPID (SR)
FISH (PE)
3
AIR NECESSARY FOR COMBUSTION [m /h]
2,00
3,80
6,90DOUBLE-RING
7,10
33
Page 34

8 - ELECTRICAL SECTION
N.B. For connection to the mains, do not
IMPORTANT:
use adapters, reducers or branching
The cooker must be installed in
devices as they can cause overheating
accordance with the manufacturer’s
and burning.
instructions.
Incorrect installation, for which the
If the installation requires alterations to the
manufacturer accepts no responsibility,
domestic electrical system call an expert.
may cause damage to persons, animals
He should also check that the socket cable
and things.
section is suitable for the power absorbed
by the appliance.
GENERAL
! Connection to the mains must be carried
out by qualified personnel in accordance
with current regulations.
! The appliance must be connected to the
mains checking that the voltage
corresponds to the value given in the
rating plate and that the electrical cable
sections can withstand the load specified
on the plate.
! The appliance is supplied without a
supply plug and therefore if you are not
connecting directly to the mains, a
standardized plug suitable for the load
must be fitted.
! The plug must be connected to an
earthed socket in compliance with safety
standards.
! The appliance can be connected directly
to the mains placing an omnipolar switch
with minimum opening between the
contacts of 3 mm between the appliance
and the mains.
! The power supply cable must not touch
the hot parts and must be positioned so
that it does not exceed 75 °C at any point.
! Once the appliance has been installed ,
the switch or socket must always be
accessible.
The connection of the appliance to earth
is mandatory.
The manufacturer declines all
responsibility for any inconvenience
resulting from the in observance of this
condition.
34
Page 35
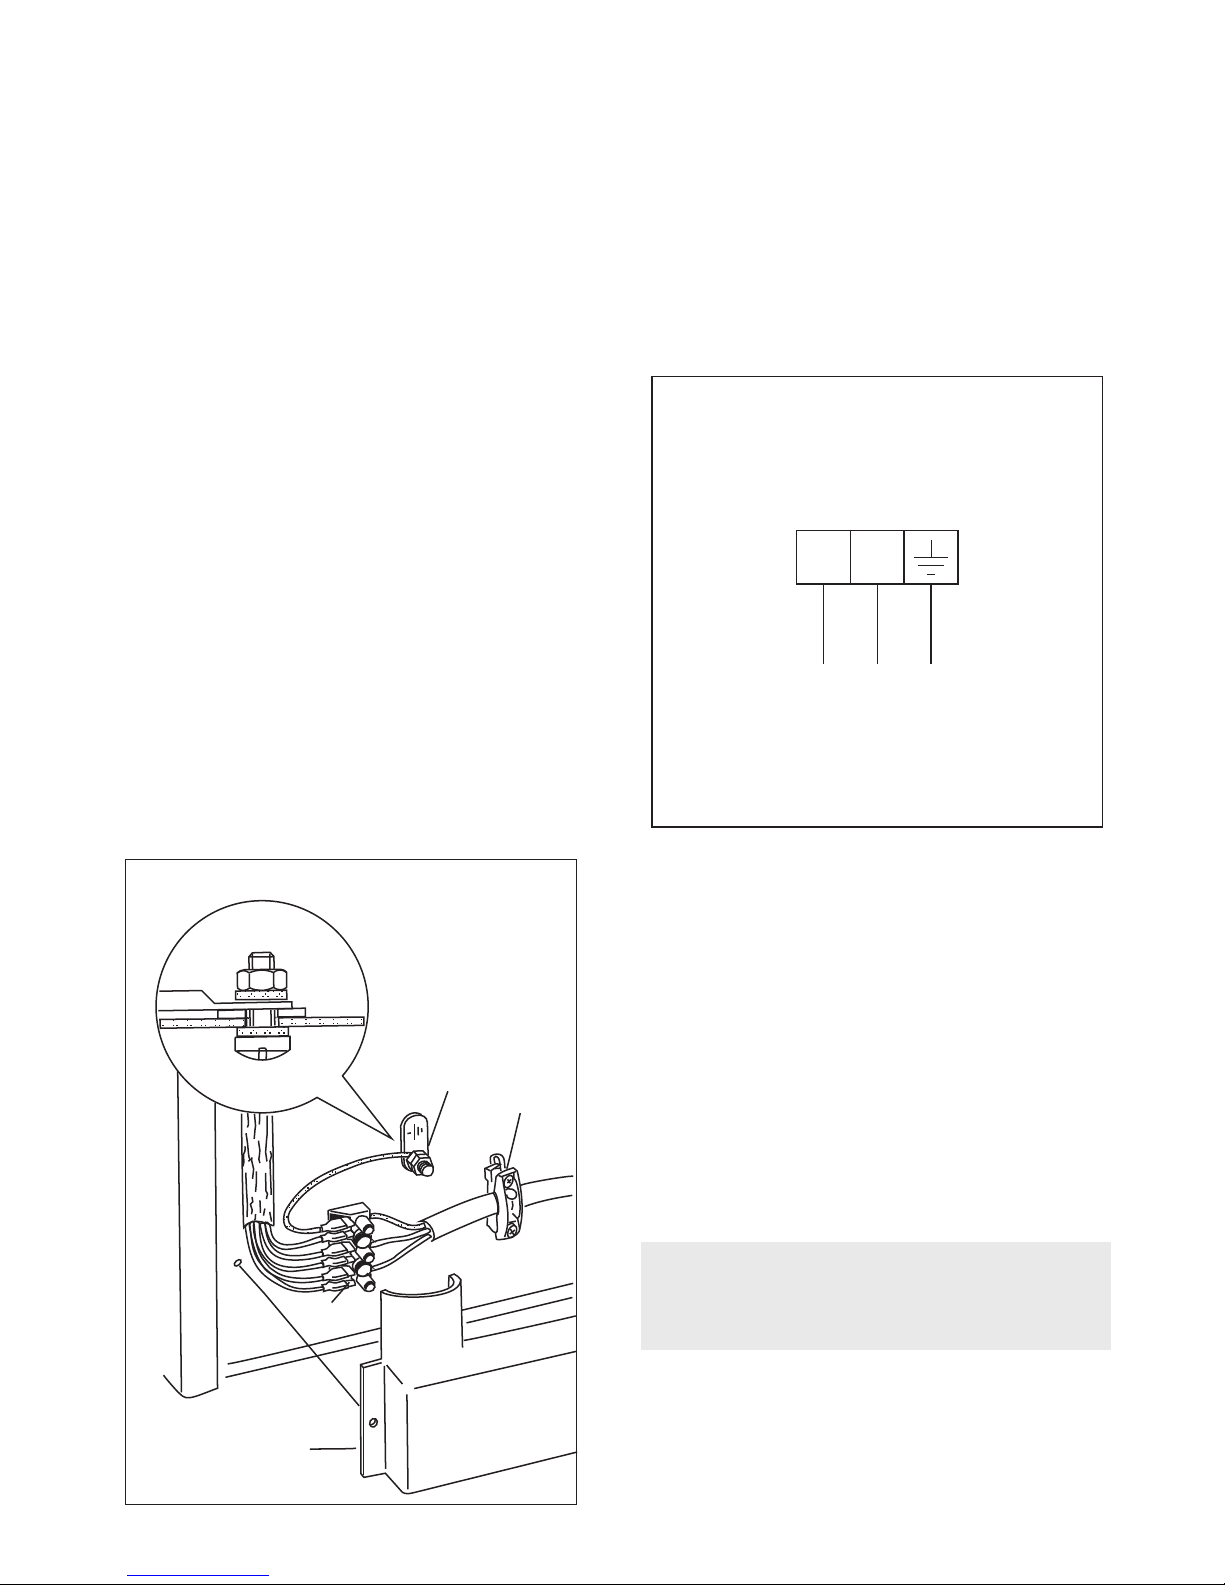
ELECTRICAL FEEDER CABLE
FEEDER CABLE SECTION TYPE
CONNECTION
H05RR-F
To connect the supply cable:
2
230 V ~ 3 x 1,50 mm
! Remove the screws securing the cover
“A” on the rear of the cooker (fig. 10.1).
! Feed the supply cable through the cable
clamp “D”. The supply cable must be of a
suitable size for the current requirements
of the appliance; see the section “Feeder
cable section” (fig. 10.1).
! Connect the wires to the terminal block
“B” as shown in the diagram in figure
10.2; or connect the phase wires to the
terminal block “B” and the earth wire to
the terminal PE as shown in figure 10.1.
! Take up any slack in the cable and
secure with the cable clamp “D”.
! Replace the cover “A”.
If the power supply cable is damaged it
must be substituted by a suitable cable
available in the after sales service.
REPLACEMENT OF ELECTRICAL
COMPONENTS SITUATED UNDER THE
COOKTOP
Before effecting any intervention on the
electrical parts of the appliance, the
connection to the network must be
interrupted.
Switches and thermostats, igniter and electrodes
can be replaced after lifting the cooktop, following
the instructions shown in the chapter
“REPLACEMENT OF THE INJECTOR OF THE
COOKTOP”
AA
BB
PEPE
DD
Fig. 8.1
230 V ~
L1N
(L )
2
PE
Fig. 8.2
35
Page 36
The manufacturer cannot be held responsible for possible inaccuracies due to printing or transcription errors in
the present booklet.
The manufacturer reserves the right to make all modifications to its products deemed necessary for manufacture
or commercial reasons at any moment and without prior notice, without jeopardising the essential functional and
safety characteristics of the appliances.
Cod. 1101972 - ß5
 Loading...