

Page 1
DESIGNER HOOD
MODEL: COVO 669/90GP
COVO 668/90
CASA 679/90
COVO 779/90
VETRINO EH-D9160SL(BK)
VETRINO EH-D9161SL(BK)
Owner's Manual
Please read thi s man ual c are ful ly before
operating you r set .
Retain it for future r efe ren ce.
Record model nu mbe r and s eri al number
of the set.
See the label attach ed on t he se t and
quote this informa tio n to yo ur de aler.
For The Wa rra nty Term s & Con ditions, Please Re fer To Wa rra nty Certificate
*Produc t im ag e is f or i ll ustration p ur po se o nl y. Actual produ ct m ay v ar y de pe nding on th e mo de l.
Page 2
Pl ease re ad this in struc tion ca reful ly. It is ad visab le to keep t his ins truct ion
ma nual in a sa fe place f or futu re refe rence .
SAFETY PRECAUTIONS
1. Keep electrical a ppl ian ces o ut of reach from children. Do not let them to
operate the applia nce s wit hou t supervision.
2. To prot ect a gai nst the risk of electrical shock, do not immers e the p rod uct ,
cord or plug into wate r or an y oth er li quid.
3. Thi s pro duct is for household and indoor use only.
4. Thi s pro duc t is not intended for use by person (including ch ild ren ) wit h
reduced physical , sen sor y or me ntal capabilities unless they have been
given supervisio n or in str uct ion concerning use of the appliance by a
person responsib le fo r the ir sa fety.
5. If the power cord or pl ug ha s dam age d, it must be replaced by the service
centre or a qualifie d ser vic e tec hnician to avoid hazard.
6. Before installa tio n,c hec k if the mains supply voltage is matched with the
voltage stated on th e rat ing p lat e of the hood.
7. The re mu st be a dequate air ventilation of the room when the co oke r hoo d
is used with the cooki ng ap pli anc es with burning gas or other fuels.
8. Ensure that the ins tal lat ion o f ducting complies with the standard of local
building, gas and el ect ric al authorities.
9. Do not ignite flame s in th e pan s.
10.There is a risk of fir e if cl ean ing i s not carried out in accordance with this
instruction.
1
NOTICE
This product must no t be di spo sed t ogether with domestic
waste. It has to be disp ose d at an a uth ori zed place for
recycling of elect ric al an d ele ctronic appliances. By
collecting an d rec ycl ing w aste, you help to save natural
resources and make s ure t he pr odu ct is disposed in an
environment al fr ien dly a nd healthy way.
14
Page 3
CLEANING AND MAINTENANCE
● The hood must alw ays b e dis con nected from the electricity supply before
carrying out the mai nte nan ce.
● Clean the hood wi th da mp cl oth , hot water and mild detergent. Do not use
chemical, steel, w ood en or a bra sive cleaners to clean the hood.
● Clean the oil cup s whe n the y are m ore than half filled to avoid the oil from
spilling.
● Remove the filt er, wa sh in h ot so apy water, dry and fit back into the hood.
Do not use the hood with out t he fi lte r installed.
MAIN SPECIFICATION
Rated Vo ltage : 220 -240V/50Hz
LED Lig ht : 2 x 2W
Sucti on Power : 1, 000m³/hr □
1,400m³/hr □
Motor P ower : 250W □
200W □
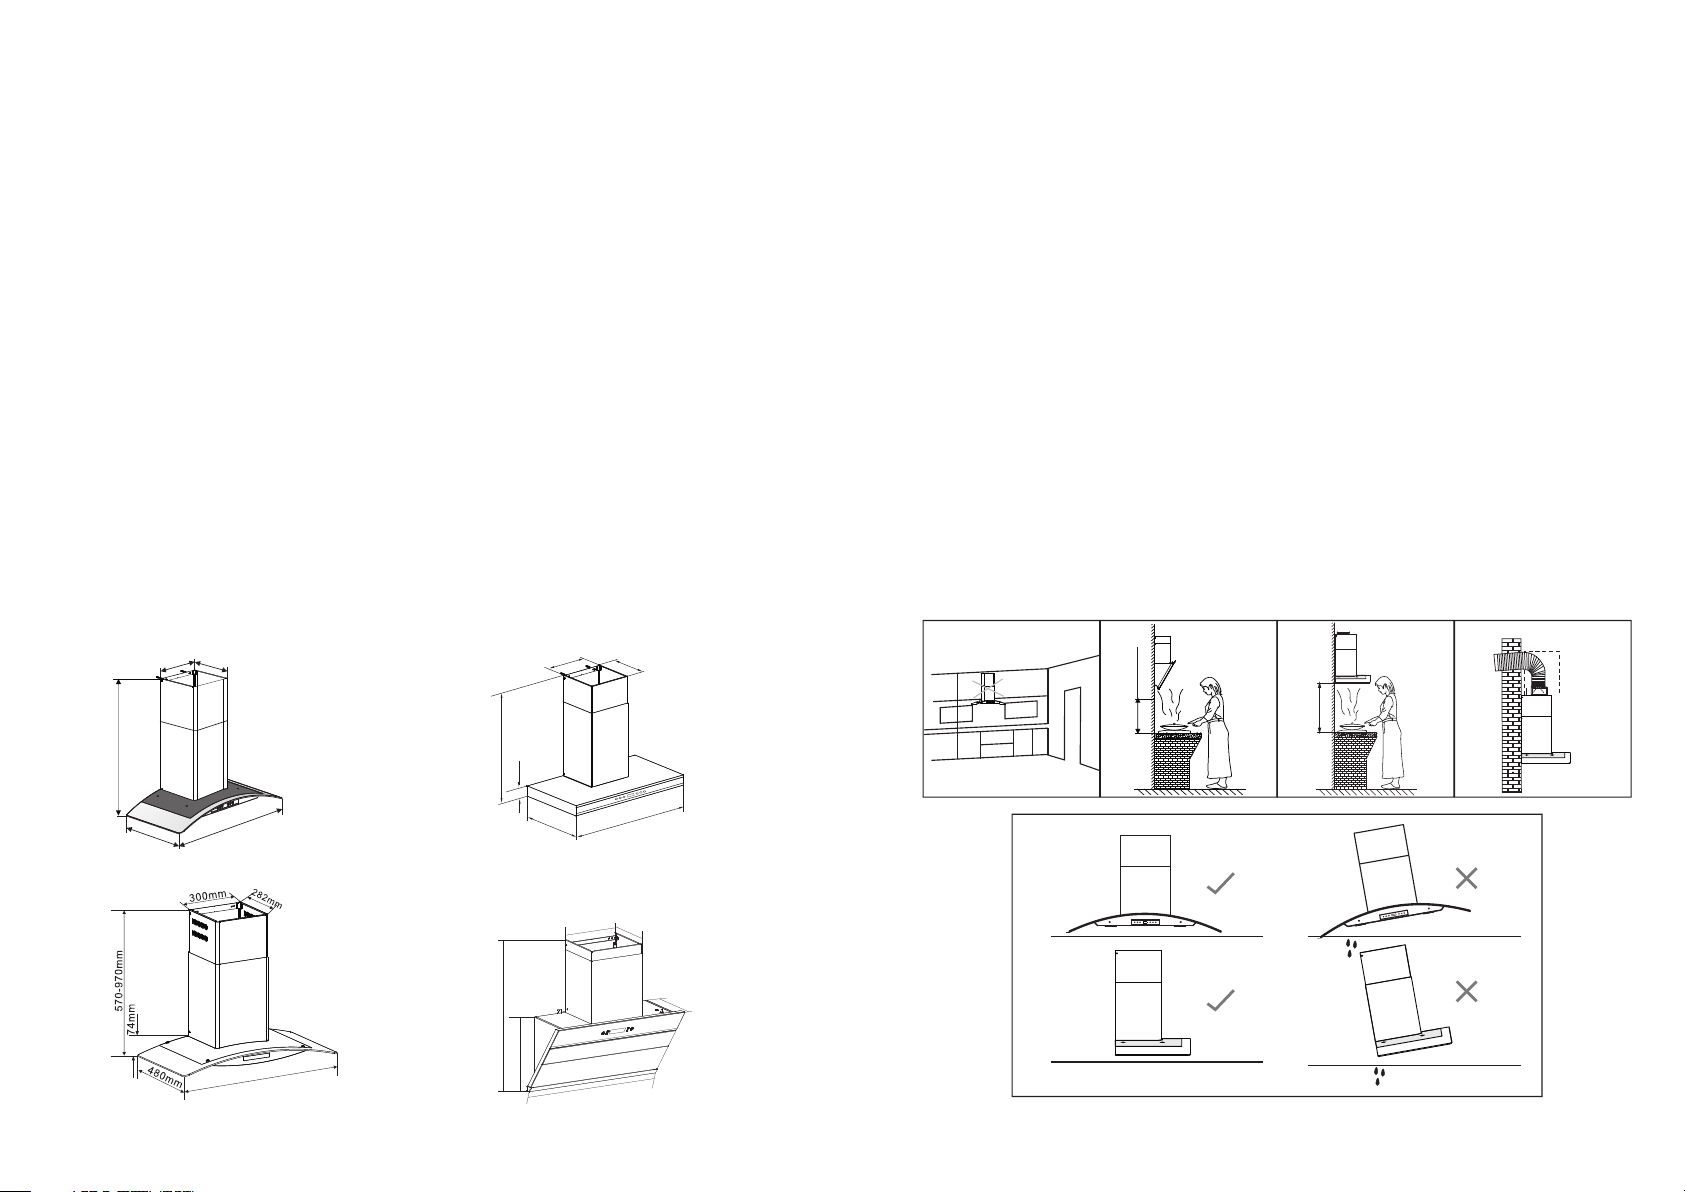
Produ ct Dimens ion:
565- 965mm
283m
mm
m
300
mm
5
9
47
5
mm
8
Covo 668 /9 0 & Co vo 6 69 /9 0GP
m
0m
92
0
52
VETRINO EH-D9 16 0S L( BK )
00
3
mm
0
7
480
mm
Casa 679/90
m
2
8
m
3mm
m
m
5
89
INSTALLATION REQUIREMENT
1. Do not install the co oke r hoo d whe re there are many doors or windows
in order to avoid affecting the exhaust effic ien cy of t he co oker hood
caused by air convec tio n. (F ig. 1 )
2. Install the cooke r hoo d rig ht ab ove the hob. The recommend ed di sta nce
between the hob and th e low er ed ge of t he co oker hood is minimum
300mm and maximum 35 0mm (Or m ini mum 650mm and maximum 700mm).
(Fig 2)
3. In order to get the opt imu m per for man ce, do not elongate the exhaust
pipe too long, and try t o mak e the b end o f the e xhaust pipe less and
biggest, ensure th e con nec tio n is airproof. (Fig. 3)
4. After hanging the u nit o n the w all , ensure the hood is level and vertical
(Fig. 4).
5. The air outlet must n ot be c onn ect ed to c himney flues or combustion gas
ducts. Th e air o utlet must under no circumstances be connected t o
ventilation duct s for r oom i n whi ch fu el-burning appliances are installe d.
6. The installatio n of th e exh aus t duct is optional when the charcoal filter is
installed for reci rcu lat ion p urpose. Installation of the charcoal filt er wi ll
gradually reduce t he su cti on po wer a nd reduced the suction
performance of the u nit .
Fig.2
300~ 350mm
650~7 00mm
Fig.2 Fig.3Fig.1
Fig.4
95
8
Covo 7 79/90
3 2 2
3 6 0
3
9 0
8 6 5 - 1 1 8 0
m
m
4 6 5
8 9 5
LEVE L
VERTIC AL
LEAN
LEAN
VETR IN O EH -D 9161SL(BK )
13
2
Page 4

ASSEMBLY INSTRUCTIONS
Please ch eck t he following be for e installa tio n:
● Install ati on of hood must be ca rried out by an aut hor ized or qualifi ed technician .
● The insid e of th e hood may have sha rp edges. Befor e ins talling, remo ving or
cleanin g, pl ease wear prote cti ve gloves to a voi d injury.
1)Fix the position o f the c ook er ho od
in accordance with the
recommended heig ht be twe en
10m m
650 -700m m
650mm to 700mm from the hob
and the lower edg e of th e hoo d.
2)According to the s pac e bet wee n
the holes A and B, drill 2 hole s in
level on the wall with 8mm
diameter and 60-70 mm de pth .
Press the two expand ing t ube s
provided into the ho les .
REPLACING THE LED LAMP
Caution: Lamp u nit m igh t be ho t aft er cooking. Wai t unt il it is cool before
carrying out re pai r and r epl acement. Always use the same type of light bulb.
Make sure all con tro l swi tch es are turned off and the cook er ho od is u npl ugged
from the electrica l mai ns. F oll ow below instruction to carry out
replacement :
1. Use a flat head screw dri ver t o pop o ut the lamp subassembly.
2. Disconnect the la mp fr om th e int ernal wires.
3. Remove the screws u sin g cro ss he ad screwdriver.
4. Remove the lam p cov er an d tak e out t he lamp bulb.
5. Replace with a new 2W l amp b ulb a nd ma ke sure the bulb is connected
into the light socke t.
6. Replace the la mp co ver a nd fi x it ge ntly with screws.
7. Connect the lamp su bas sem bly w ith internal wires and push the lamp into
the hood.
Expan di ng Tube
5x60
Wood S crew
A
Hook
243 mm
Exhau st p ip e
Air out le t
3)Tighten the two metal screws of
5x60mm provided to t he ex pan din g
tube and make sure it is f ixe d and
cannot be moved.
B
4)Hang the cooker ho od on t he 2
metal screws and mak e sur e it is i n
level and stabl e.
362 mm
5)Take out the exhaust p ipe a nd
connect to the air out let w hic h has
installed on the coo ker h ood . Mak e
sure it is connected t o the a ir ou tle t
tightly.
3
12
Page 5

FOR VET RINO EH-D 9160SL(BK), VETRINO EH-D9161 SL(BK)
Inner d uc t cover
Outer d uc t cover
6)Take out the inner and ou ter d uct
cover from the carton box a nd
insert the inner duc t cov er in to th e
outer duct cover.
D C display screen B A
A: Touch “A ” once then enter in stand by mode , you can start operation. If touch
“A” when the motor is running, then machine wi ll be Automat ic off after 60
seconds . Or you can touch “A ” twice, to stop all operations immediately.
B: In standb y mode, touch “B” and the cooker hood will starting at the High
speed, p ress again to change the sp eed level, fo rm high speed to low speed, total
have 6 d ifferent speed level. If you touch it for the sixth time, the fan function
will be tur ned off.
Display screen: In standby mode, finger slide the display screen can also
adjusti ng the s peed(from left to right are low speed to high speed, total it has 6
different speed).
C: On ly when the moto r is running, touch “C” once, to enter in time delay mode.
Under time delay mode , kee p touching “C” to request de lay, your every touch
can add 3 min s (MAX 9mins dela y).
Note: Please make sure operation in 1min after enter i n time dela y mode or the
machine w ill exit the dela y status.
D: Touch “D” to turn on or off th e LED lamp.
K
Expan di ng Tube
5x60
Wood S crew
Inner d uc t cover
Outer d uc t cover
fix scr ew s
Expan di ng Tube
5x60
Wood S crew
K
Orien ta tion Slot
7)Make sure the inne r duc t cov er is
fixed into the orien tat ion s lot ( K)
on the outer duct cove r.
8)Place the inner an d out er du ct
cover on the cooker ho od bo dy
and use two M4x10 scre ws to f ix
the outer duct cover to the u nit
body.
9)Take out the ducting br ack et fr om
the carton box. Posi tio n the i nne r
duct cover to a suitab le he igh t and
mark the wall with a pen .
10)Put down the inner d uct c ove r
gently. Dr ill t he keyholes in 60-
70mm depth in level us ing 8 mm
drill. Using the exp and ing t ube ,
install the bracke t wit h the w ood
screws provided.
11)Fix t he in ner d uct cover to the
ducting bracket us ing M 4 scr ews .
11
12)Extend the air out let o f the
exhaust pipe ou t of th e kit che n. Try
to make the bend of the ex hau st
pipe more than 12 0º.
4
Page 6

METAL GREASE FILTER INSTALLATION
OPERATING INSTRUCTIONS
1.Match the fix pin to th e fix h ole
and push the metal gre ase f ilt er
gently as the direct ion A sho wn.
A dire ction
2.To remove the metal gre ase f ilt er
for cleaning purpo se, g ent ly pu sh
the clip to eject and us e bot h han d
Fix h ole
Fix p in
to remove the filter c are ful ly.
CHARCOAL FILTER INSTALLATION
FOR COV O 668/90, C OVO 669/90GP, COVO 779 /90, CASA 679/90 &
VETRI NO EH-D91 60SL(BK)
1.The charcoal filt ers a re su ppl ied
together with the un it. F oll ow th e
A
A
B
B
A
B
B
direction of B and fix on the
designer hood m oto r ass emb ly.
A
2.To remove the charcoa l fil ter,
follow the directi on A an d rem ove
accordingly.
FOR COV O 668/90, C OVO 669/90GP, CASA 679/90
A: Low Speed – Pres s onc e to op era te at l ow speed. Press again to turn off .
B: Medium Speed – Pres s onc e to op era te at medium speed. Press again to
turn off.
C: High Speed – Pre ss on ce to o per ate at high speed. Press again to turn off.
D: Timer – When the hood is o per ati ng, press D to control the working time of
the hood. Each inter val i s equ al to o ne minute and the maximum time is one
hour.
E: LED Lamp – Press once t o ill umi nat e the LED lamp. Press again to turn off.
F: ON/OFF Button – Pre ss to t urn o n/o ff the unit.
To set the time – When the hoo d is no t ope rat ing and power is connected,
press and hold D fo r 3 sec ond s. Pr ess C a nd E to adjust the hours and minutes
respectivel y. The display G will sho w the t ime s et.
FOR COV O 779/90
When the hood is
operating, touch this
button once to set
timer. Each interval
is one minute and the
longest time is 60
minutes.
When the hood is not
operating, touch and
hold this button for 3
seconds. It shows
" " on the digital
display. You can u se
“ " to set hour and
" " to set minute
to operate as a clock.
Touch this button to
adjust the fa peed
(High, Medium, and
Low). Touch a ga in
the button again to
turn off th e fa n.
n s
5
10
Touch this button
once to i ll um in at e
the LED lamp.
Touch again to turn
off .
1. When the hood is
operating, touch
this button once
to prolong the
operating time to
one minute.
2. Touc h ag ai n to
turn off th e un it
immediately.
Page 7
VETRINO EH-D9161SL(BK)
Ducting bracket
Electri cal box
Hook
Motor
Blower
Screw
Oil cup
Inner cover duct
Outer cover duct
Exhaust p ipe
Shutter
Blower bo x
Blower as sembly
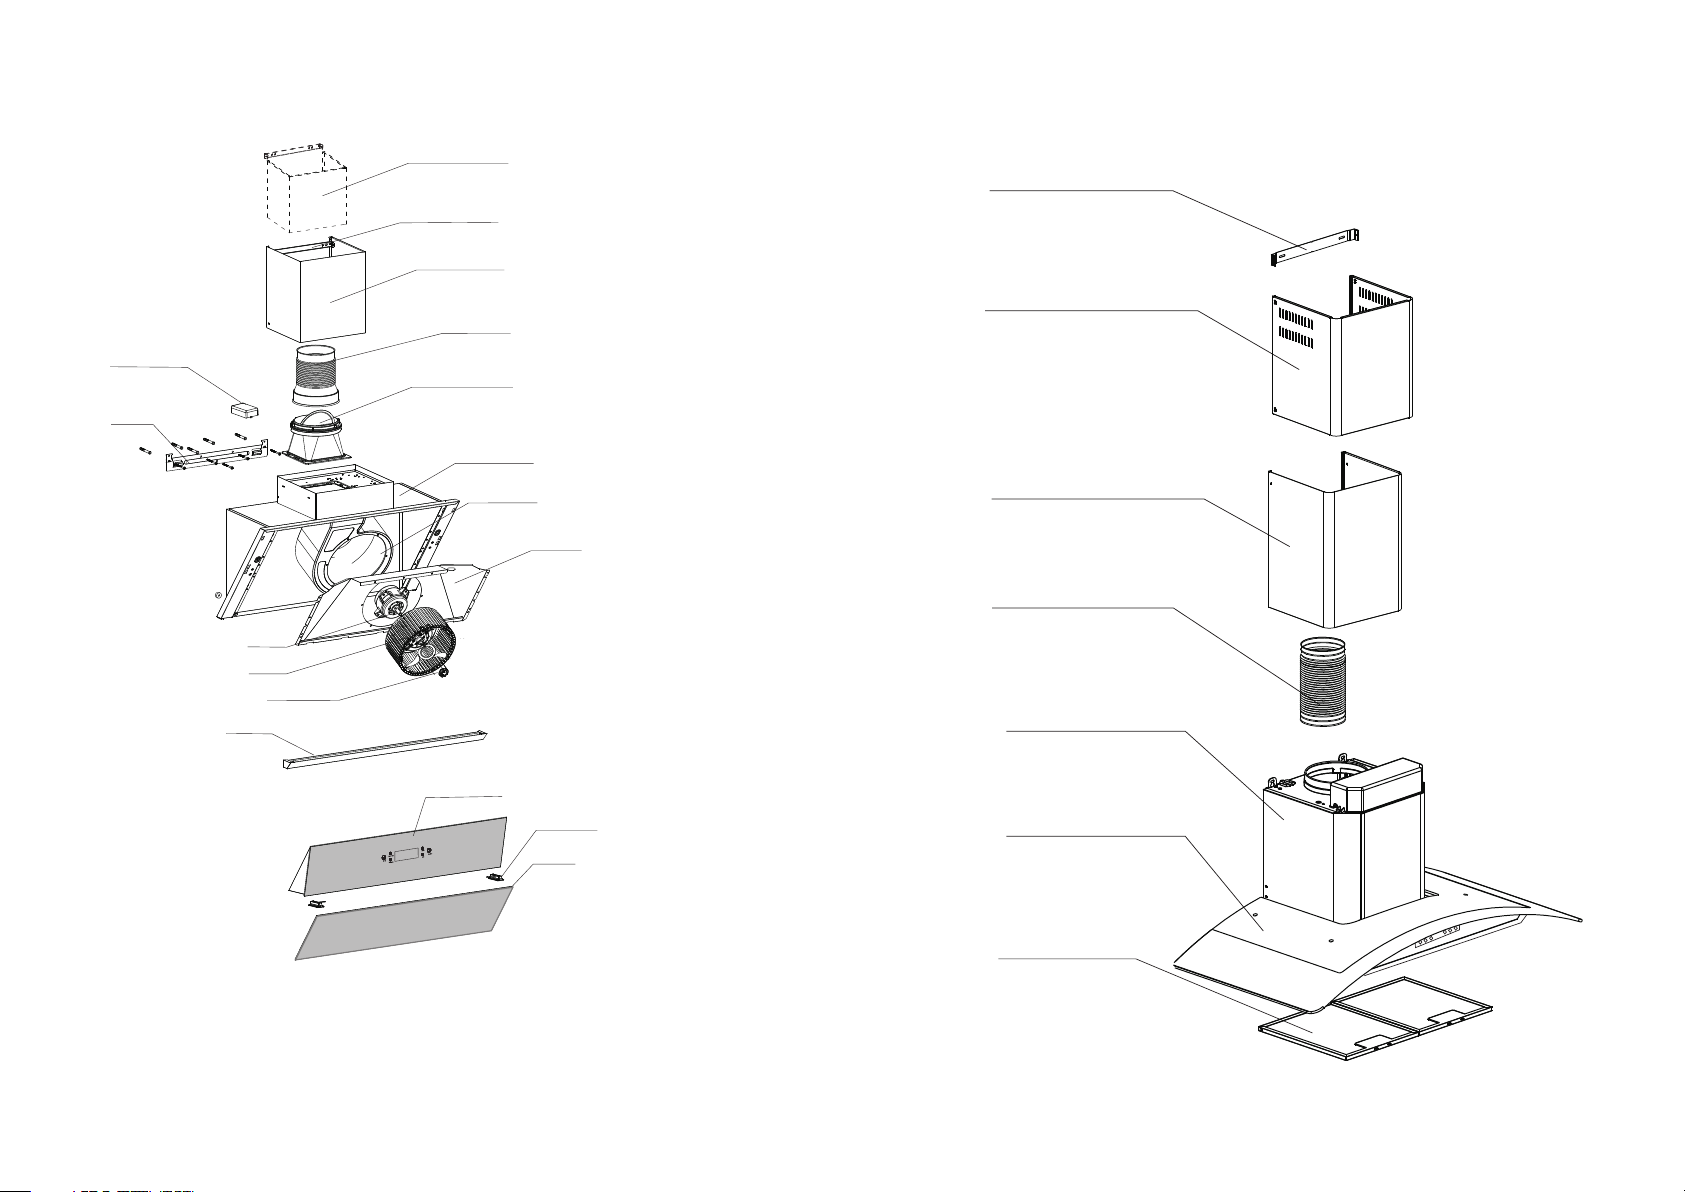
PRODUCT DESCRIPTION
Covo 66 8/90 & Covo 6 69/90GP
Ducting bracket
Inner duct cover
Outer duct cover
Inner cov er
Exhaust pipe
Blower box
Glass pan el
9
LED lamp
Glass
Glass
Metal grease filter
6
Page 8

Casa 679/90
VETRINO EH-D9160SL(BK)
Ducting bracket
Covo 779/90
Ducting bracket
Inner duct cover
Outer duct cover
Exhaust pipe
Reducer
Blower box
Inner duct cover
Outer duct cover
Air outlet
Exhaust pipe
Top cover
Blower box
Metal grease filter
Remarks :Screws are pro vided (4×expanding tubes,
4×wood scre ws, 4×M4 screws, 2×M4×1 0 screws)
Glass
Metal grease filter
7
8
 Loading...