

Page 1

Instruction Manual
Version 1.02
Elation Professional
4295 Charter Street
Los Angeles CA 90058
e-mail: Info@ElationLighting.com
Web site: www.elationlighting.com
Page 2
(V1.02) 2
Page 3

Contents
1 Introduction...........................................................................................................................5
1.1 Safety rules....................................................................................................................6
2 Installation .............................................................................................................................7
2.1 Mounting.........................................................................................................................7
2.1.1 Clamps...............................................................................................................7
2.2 Securing.........................................................................................................................7
2.3 Connectors....................................................................................................................7
2.3.1 AC Connectors.................................................................................................7
2.3.2 DMX...................................................................................................................7
2.4 Fuse................................................................................................................................7
3 The Menu Field .....................................................................................................................8
3.1 DMX Channel addressing............................................................................................8
3.2 Read outs.......................................................................................................................9
3.2.1 Lamp Time 1.....................................................................................................9
3.2.2 Lamp Time 2.....................................................................................................9
3.2.3 Life Time............................................................................................................9
3.3 The CODE Level...........................................................................................................9
3.4 The Test Level.............................................................................................................10
3.5 Temperature Control 1 ............................................................................................... 10
4 Channel selection (Overview table)..............................................................................11
5 Programming......................................................................................................................14
5.1 Engaging Program Mode..........................................................................................14
5.2 Writing a program....................................................................................................... 14
5.3 Call on the Standalone Program............................................................................... 15
(V1.02) 3
Page 4

6 Lamp Installation............................................................................................................... 15
6.1 Safety Rules.................................................................................................................15
6.2 How to install new lamp..............................................................................................15
7 Gobos Replacment ........................................................................................................... 16
7.1 Safety Rules .................................................................................................................16
7.2 How to replace the Gobos .........................................................................................16
8 Maintenance ....................................................................................................................... 17
8.1 Mirror and Optical System.........................................................................................17
9 Technical Data / Overview............................................................................................... 18
(V1.02) 4
Page 5
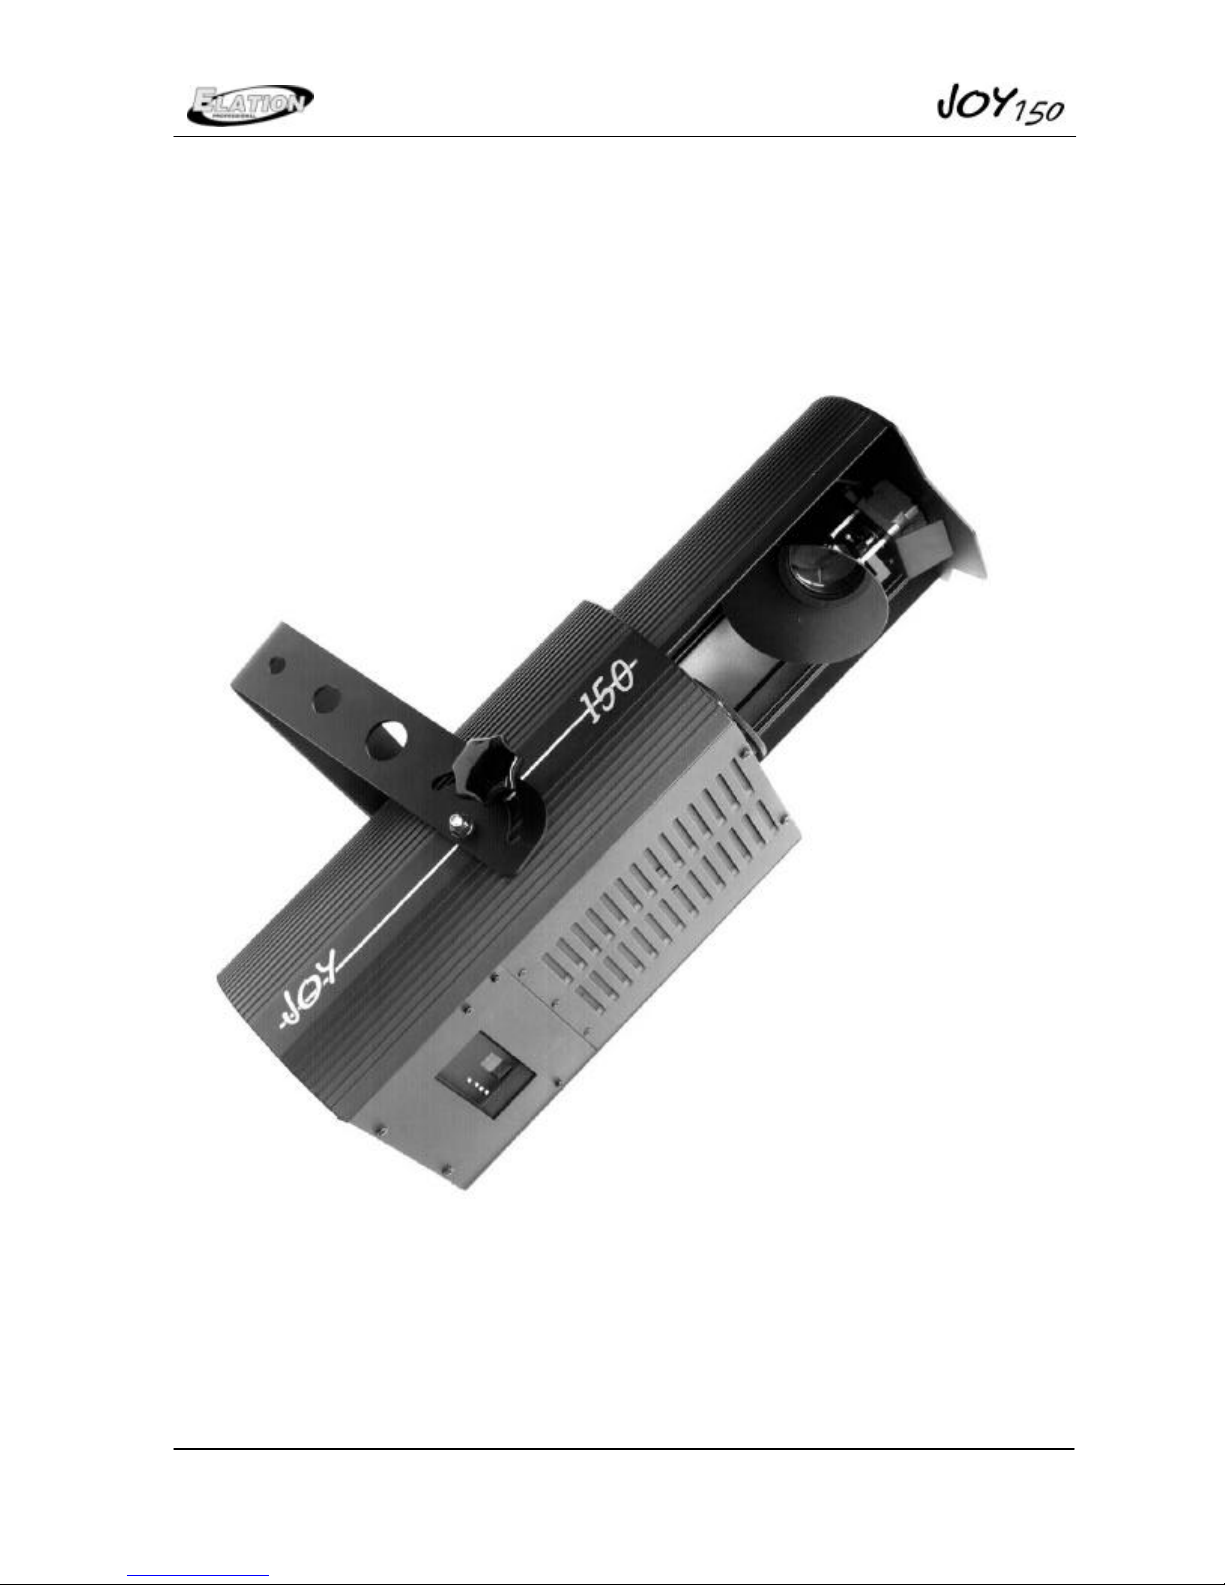
1 Introduction
Figure 1-1
(V1.02) 5
Page 6

1.1 Safety rules
The JJOOYY--115500 is a High-Tech Product. To guarantee smooth operation, it is
necessary to follow all safety rules.
1. Make sure that the mirror of the JJOOYY--115500, can move without any mechanical
problems and that all fan openings are clean and are not blocked by anything.
2. Touching the mirror while moving can cause serious injuries.
3. Unplug the JJOOYY--115500 from the AC outlet before attempting any service.
4. It is necessary to wait at least 30 minutes after disconnecting the AC before
opening the JJOOYY--115500 . Please do not touch the Bulb if you are not absolutely sure
it is cold. -Danger of BURNING-
5. The JJOOYY--115500 is provided with a protecting switch which disconnects the power
from the lamp while the cover is opened. Never bridge this protecting switch.
It can damage your retina.
6. To allow a secure operation, follow the installation guide described in chapter 2.
Operating the JJOOYY--115500 without suited safety aids like safety cables or
clamps/hooks can increase the risk of an accident.
7. The installation should be done by a qualified staff member only.
(V1.02) 6
Page 7

2 Installation
2.1 Mounting
The JJOOYY--115500 is fully operational whether it hangs or is mounted to the wall.
2.1.1 Clamps
Mount clamps and/or hooks directly to the bracket of the JJOOYY--115500.. Please
make sure to use right sized clamps and hooks and fit them securely.
2.2 Securing
Always use safety cables to secure the JJOOYY--115500, Use the eyelet at the rear of unit
(see Drawing 1-1).
2.3 Connectors
2.3.1 AC Connectors
230 Volt, 50 Hz, 0,9AT (power compensated)
115 Volt, 60 Hz, 1,8AT (power compensated)
Please see printing on the case for the right Power supply !
2.3.2 DMX
DMX 512 Standard input/output.
[+] = Pin 3 / [-] = Pin 2 / [Ground] = Pin 3
Die DMX - Address starts at [001].
Please see printing on the case for the right Pin usage!
2.4 Fuse
The JJOOYY--115500 electronic system is protected by a 5x20 T4A fuse 250V.
Disconnect AC outlet before changing a fuse !!!
(V1.02) 7
Page 8

Menü
Cursor
Data-
Data+
3 The Menu Field
3.1 DMX channel addressing
Right after turning on the JJOOYY--115500 you can see the current DMX- Address. Choose
this as follows:
Count up or down the DMX- Address with the Data + or Data – buttons. To speed up
the counting press the cursor button, this wi ll turn on all decimal dots to indicate fast
counting. Pushing the Cursor button again will set DMX addressing to slow speed.
Confirm the DMX-Address by pressing the Menu key once.
Attention: As long as you see the decimal dot flashing the new address is not
saved.
If there is no DMX- Signal, the d in the display will flash.
The DMX -Address will be stored when switching off the JJOOYY--115500 !!!
(V1.02) 8
Page 9

3.2 Read out the Running Time of Lamp and Unit
Select the time level by pressing the Menu key twice.
Select the requested time by pressing the Cursor key,
3.2.1 Lamp Time 1
The current lamp time is shown alternating with LA 1. This is the total hours
used by the current lamp.
This tim e can be cleared by pressing the Data + and Data – keys at the same
time. Usually done when adding a new lamp.
3.2.2 Lamp Time 2
The total lamp time is shown alternating with LA 2. This time can’t cleared.
This is the total hours of all lamp lives.
3.2.3 Life Time
The life time is shown alternating with LIFE. This is total hours of usage for the
entire fixture.
3.3 The CODE Level
This level is accessed by authorized dealers only.
In this level you can adjust all functions.
(V1.02) 9
Page 10

3.4 The Test Level
The Test Level makes a self test procedure possible.
Select the self test Procedure by pressing the Menu key three times.
Start the self test program by pressing the Cursor key. The lamp will be started
automatically and a self test procedure with 8 steps will run. To leave the self test
press the Menu key again.
3.5 Temperature Control 1
If the temperature value deviates to much from the system standard, the lamp will turn
off automatically. Unit will be inoperable.
Reconnection can only be made by authorized dealers.
(V1.02) 10
Page 11

4 Channel selection (Overview table)
Channel Description DMX Hex Value in %
1) PAN – High 0..180° 0..255 00..FF 0..100
2) PAN – Low High-Pos .. High -Pos + 0,7° 0..255 00..FF 0..100
3) TILT – High 0..150° 0..255 00..FF 0..100
4) TILT – Low High-Pos .. High -Pos + 0,59° 0..255 00..FF 0..100
5) Color Open 0..3 00..03 0..1
Open / Color 1 4..7 04..07 2..3
Color 1 8..11 08..0B 3..4
Color 1 / Color 2 12..15 0C..0F 4..5
Color 2 16..19 10..13 5..7
Color 2 / Color 3 20..23 14..17 8..9
Color 3 24..27 18..1B 9..10
Color 3 / Color 4 28..31 1C..1F 10..11
Color 4 32..35 20..23 12..13
Color 4 / Color 5 36..39 24..27 14..15
Color 5 40..43 28..2B 16..17
Color 5 / Color 6 44..47 2C..2F 17..18
Color 6 48..51 30..33 19..20
Color 6 / Color 7 52..55 34..37 20..21
Color 7 56..59 38..3B 21..22
Color 7 / open 60..127 3C..7F 23..49
Rot. Color, slow – fast CW 128..191 80..BF 50..75
Rot. Color fast – slow CCW 192..253 C0..FD 76..98
Audio Color -change slow 254 FE 99
Audio Color -change fast 255 FF 100
6) Gobo Gobo 1 big spot 0..15 00..0F 0..6
Gobo 2 16..31 10..1F 7..12
Gobo 3 32..47 20..2F 13..18
Gobo 4 48..63 30..3F 19..24
Gobo 5 64..79 40..4F 25..31
Gobo 6 80..96 50..5F 32..37
Gobo 7 96..127 60..7F 38..50
Rot. Gobo, slow - fast CW 128..191 80..BF 51..75
Rot. Gobo, fast – slow CCW 192..253 C0..FD 76..98
(V1.02) 11
Page 12

Channel Description DMX Hex Value in %
Audio Gobo -change slow 254 FE 99
Audio Gobo -change fast 255 FF 100
7) Shutter Shutter closed 0..15 00..0F 0..6
Shutter frequence slow – fast 16..239 10..EF 7..93
Shutter open 240..255 F0..FF 94..100
8) Gobo Gobo position 0..700° 0..127 00..7F 0..50
Rotation Gobo rotation slow - fast CW 128..191 80..BF 51..75
Gobo rotation fast – slow CCW 192..253 C0..FD 76..100
Audio Gobo Rotation slow 254 FE 99
Audio Gobo Rotation fast 255 FF 100
9) Special No function 0..15 00..0F 0..6
Gobo-wipe +/ - 10° slow - fast 16..31 10..1F 7..12
Gobo-wipe +/ - 20° slow - fast 32..47 20..2F 13..18
Gobo-wipe +/ - 30° slow - fast 48..63 30..3F 19..24
Color Chaser C / C+1 slow - fast 64..79 40..4F 25..31
Color Chaser C / C+2 slow - fast 80..95 50..5F 32..37
Audio Pan / Tilt slow 96..111 60..6F 38..43
Audio Pan / Tilt fast 112..127 70..7F 44..50
Engage Program – Modeà ** 192..207 C0..CF 75..81
Engage Program-Receive-Modeà ** 208..223 D0..DF 82..87
Engage Program–Send–Modeà ** 224..239 E0..EF 88..93
No Function 240..249 F0..F9 94..97
Reset 250..255 FA..FF 98..100
10) Speed Pan/Tilt relative 0..15 00..0F 0..6
Pan/Tilt slow – fast 16..255 10..FF 7..100
11* Save Step X à 255 à 0, X à FF à 0 save program
step in the Scanner
Call saved program steps 00..15 00..15 0..6
Set DMX-Values 16..254 10..FE 7..99
12* Next Time Audio – min. Time 0,4 sec 0..04 0..04 0..2
Next Time in 1/10 sec 5..199 05..C7 3..78
Audio – min. Time 1 sec 200..209 C8..D1 79..82
Xà255à0 XàFFà0 Xà100à0
Audio – min. Time 2 sec 210..219 D2..CB 83..85
Audio – min. Time 3 sec 220..229 DC..E5 86..89
Audio – min. Time 5 sec 230..239 E6..EF 90..93
(V1.02) 12
Page 13

Channel Description DMX Hex Value in %
Audio – min. Time 10 sec 240..255 F0..FF 94..100
13* Step No. Program step No. 1 0..7 00..07 0..2
Program step No. 2 8..15 08..0F 3..5
Program step No. 3 .... 16..23 10..17 6..9
Program step No. 25 224..239 F0..F7 87..93
Engage Learn – Mode with channel 11 and
channel 12, 0 à 255 à 0
Lamp ON Shutter open 240..255 F0..FF 94..100
Lamp OFF Shutter close and
Special channel 9 and
Speed channel 10
240..255 F8..FF 94..100
0..15
0...10
Xà255à0
00..0F
0...0A
XàFFà0
0..6
0...4
Xà100à0
* These channels are only activated in the Program – Mode
** You can activate the Program – Mode either with an DMX controller or direct at the
display of the JJOOYY--115500..
At the scanner choose the function “P” with the Menu key. Than select the Program –
Mode with the Cursor key.
If you use a DMX controller choose one of the Program – Modes with the
Channel (No.09). Than engage channel
mode engage channel S
If the Send- or Receive – Mode is engaged the channels 11, 12 and 13 are activated.
(V1.02) 13
ave Step
Step No.
(No.13) to DMX 255. To save this
(No.11) from 0à255à0.
Special
Page 14

5 Programming the JJOOYY--115500
You can program the JJOOYY--115500 in a standalone program within 25 steps. This program can
run automatically after turning on the unit. This means you need a DMX Controller for
programming but not for running the stand alone program.
5.1 Engage the Program Mode
Normal - Mode: Receive standard DMX signal.
Receive - Mode: The scanner receives DMX signals for program ming and stores
the steps.
Send - Mode: The scanner works stand alone and sends DMX signals to other
scans.
a) Engage at the JJOOYY--115500
Press the Menu key once. P_n_. You are now in the Normal–Mode.
Change with the Cursor key to the Receive – Mode P._r_ or further to the Send–
Mode P._S_
Press the Menu key again to confirm the changes.
b) Engage with a DMX Controller
Look at the channel selection overview table.
5.2 Write a program
You must be in the Receive- or Send – Mode to program the JJOOYY--115500.. In this mode
the DMX Channels 11, 12 and 13 are act ivated.
Procedure:
1) Activate the Receive- or Send - Mode.
2) Set Channel No.11 to
“Set DMX-Values”
(DMX 16..254).
3) Choose the program step with DMX Channel No.13.
4) Set your DMX adjustments with the DMX Channels No.1..10.
5) Choose the Next Time or the Audio control with DMX Channel No.12.
6) Save the step with DMX Channel No.11 xx àà 255 àà 00.
7) etc.
(V1.02) 14
Page 15

5.3 Call on the Standalone Program
Engage the Send – Mode at the JJOOYY--115500..
The program starts automatically after turning on the unit. In the display you can see
the Next Time for the following step. At the last step the program will jump
automatically to the beginning of the program.
6 Change the Lamp
For a hassle free change of the Light bulb, it is absolutely necessary to follow all
descriptions in this chapter step by step.
6.1 Safety Rules
• Unplug AC power connection
• Allow to cool (min. 30 minutes)
• Don’t touch lamp with bare fingers.
• Install the lamp with the filler to the right direction.
• Distance between lamp and lens holder must be min. 5mm.
• Close the JJOOYY--115500 before you connect t he AC power!
6.2 How to change the lamp
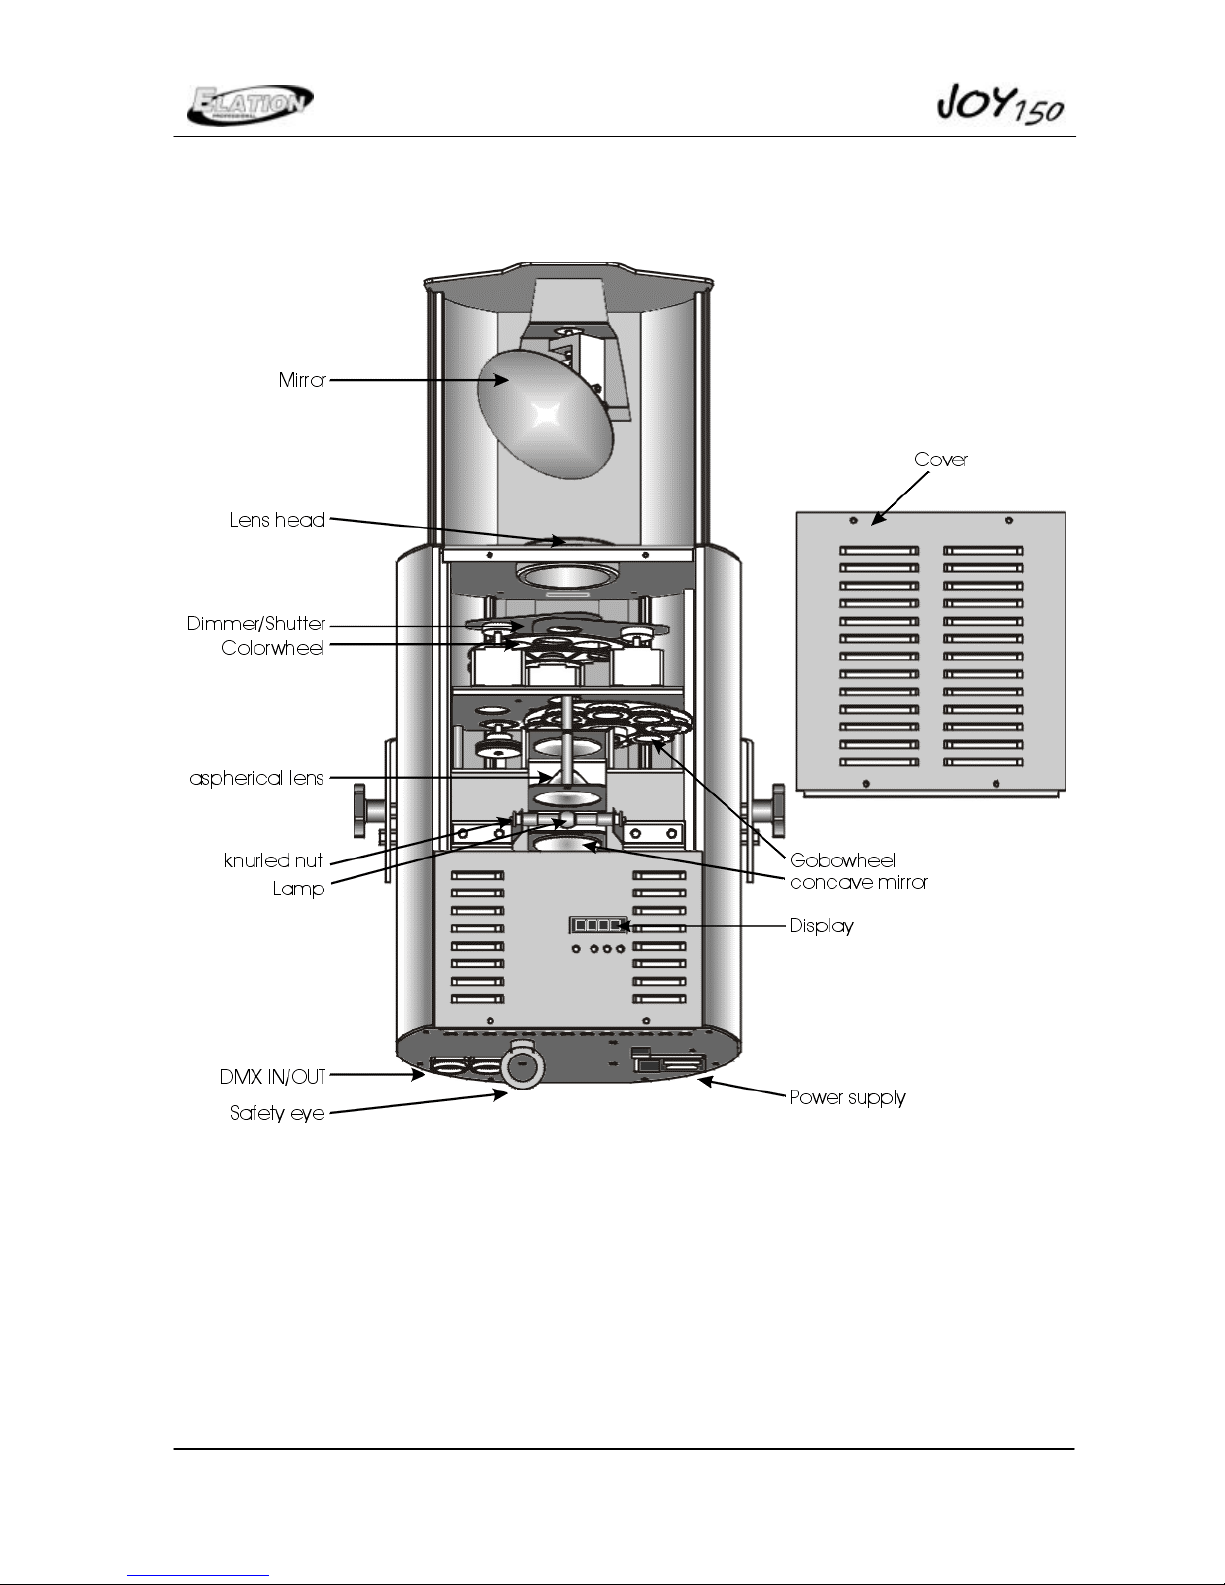
Please see Figure 1-1.
1. Open the two screws at the top plate.
2. Take off the broken 150 CMD lamp and put in an new one.
3. Close the JJOOYY--115500 in reverse order.
Attention:
Please make sure that you don’t touch the bulb of the lamp with bare fingers !!!
(V1.02) 15
Page 16

7 Change the Gobos
The JJOOYY--115500 is fitted with standard Gobos (∅26 mm, picture size 22mm).
7.1 Safety Rules
• Unplug AC power connection
• Allow to cool (over 30 minutes)
• Don’t touch lamp with bare fingers.
• Close the JJOOYY--115500 before you connect the AC power!
7.2 How to change the Gobos
Please see Figure 1-1.
1. Open the two screws at the top plate.
2. Remove the gobo springs with the help of an small screwdriver.
3. Change the Gobo’s and fix them with the gobo springs.
4. Close the JJOOYY--115500 in reverse order.
Do the same with the Effect Wheel.
Attention:
If you use glass gobo’s the mirror - side of the Gobo must align towards the
mirror.
Close the JJOOYY--115500 in reverse order.
(V1.02) 16
Page 17

Never clean the aspheric lens besides the lamp with water or cleaner. Only use a
8 Maintenance the JJOOYY--115500
The cleaning of the inner optical System, color filters, color correction filter and lenses
should be done by qualified technician only! Contact your local ELATION Dealer for
details.
Do not use strong detergents, acid etc. for cleaning the case.
8.1 Mirror and Optical System
Clean the JJOOYY--115500 optical system with a moistened cloth and a little cleaner.
Attention:
clean and dry piece of cloth.
It is necessary to clean the fan openings, air channels and fan gratings on a
regular base (depending on the local environment, about every two weeks).
(V1.02) 17
Page 18

9 Technical Data / Overview
• AC 230V/0,9 AT or AC 115V/1,8 AT
• 150 CMD Lamp with 9000h lifetime
• Power compensated
• DMX 512 Standard
• Weight 12 kg
• Dimensions: 600 x 175 x 265 mm
• 16 Bit Pan/Tilt
Pan- movement: 180°
•
• Pan- movement: 150°
• angle of spread: 16°
• 5 rotating and positioning Gobos
• 1 fixed Gobos
• 7 Colors + white
• 8 Half colors
• Rainbow effect
• High Speed Shutter
• Audio controlled
• Programmable up to 25 steps
(V1.02) 18
Page 19

NOTES:
(V1.02) 19
 Loading...