

Page 1
premium entertainment products
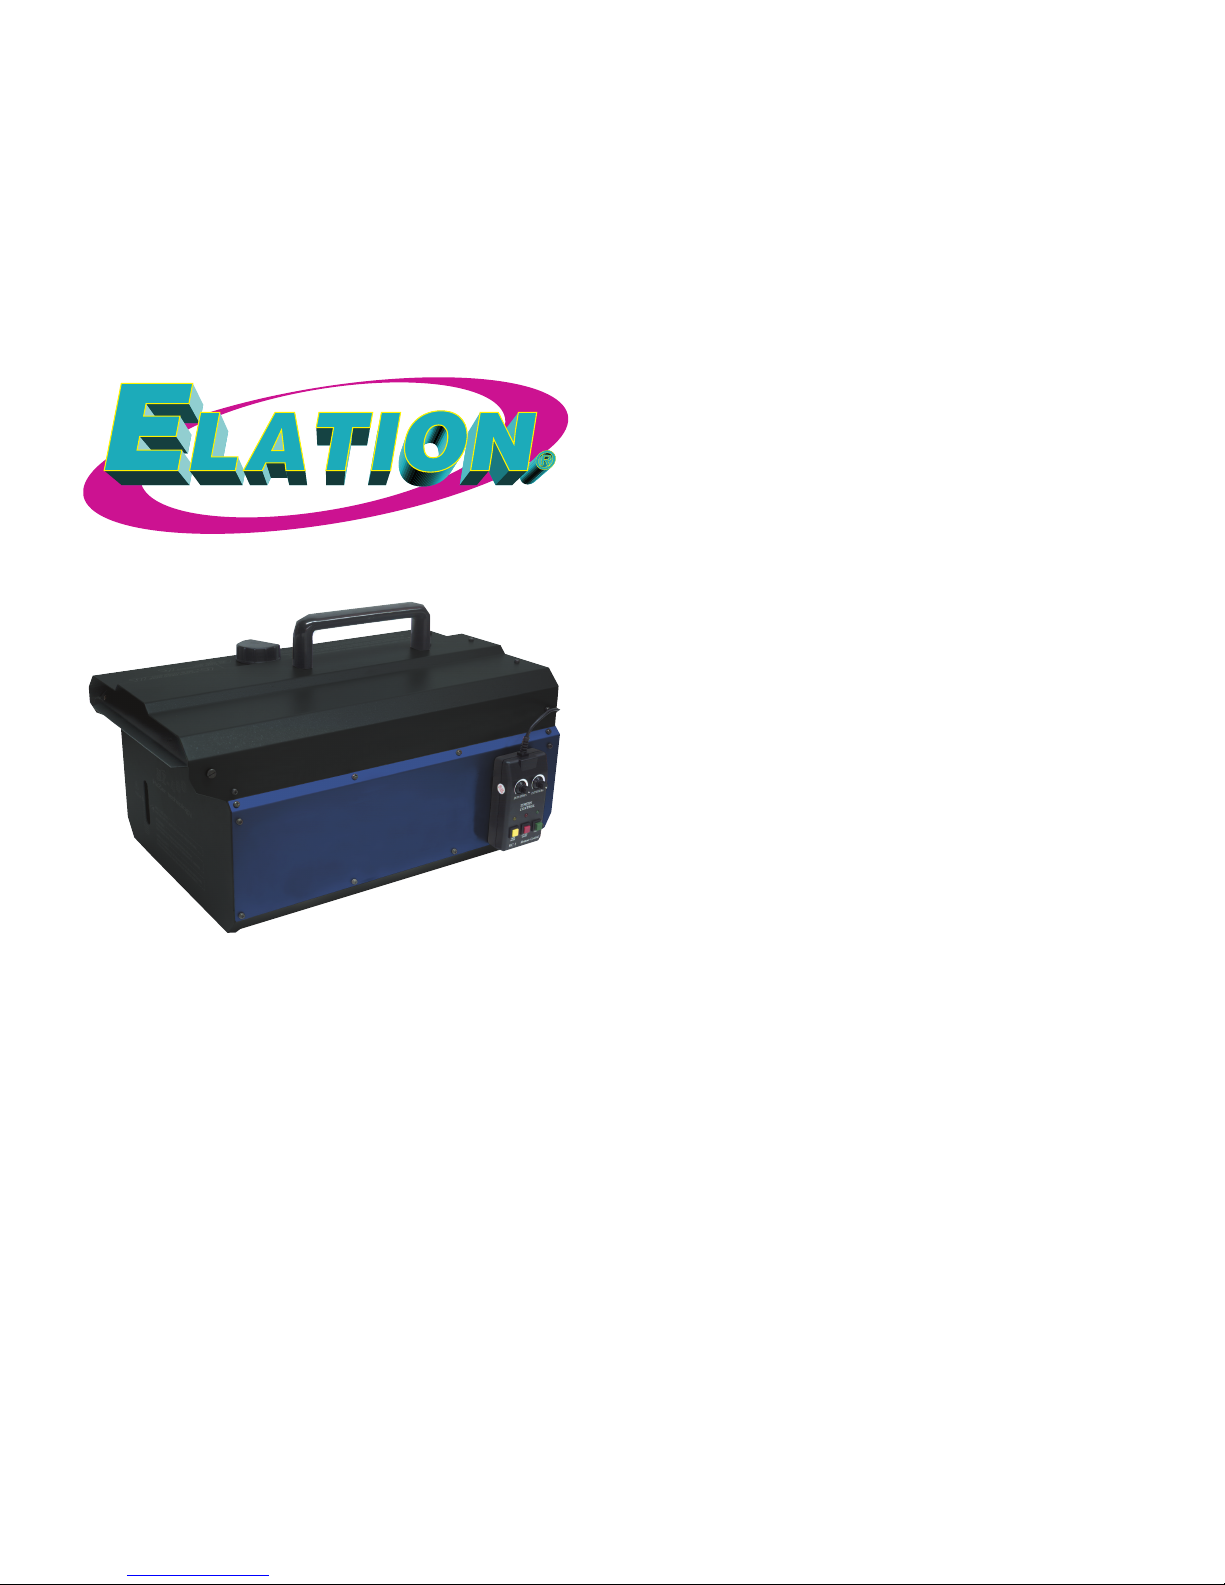
HAZE 400
USER INSTRUCTIONS
Elation Lighting
4295 Charter Street
Los Angeles Ca. 90058
www.elationlighting.com
©Elation Lighting® - www.elationlighting.com - Haze 400™ Instruction Manual Page 2
Page 2

©Elation Lighting® - www.elationlighting.com - Haze 400™ Instruction Manual Page 4©Elation Lighting® - www.elationlighting.com - Haze 400™ Instruction Manual Page 3
Table of Contents
Introduction...................................................................................3
Customer Support..........................................................................3
Warnings...................................................................................5
Features..................................................................................6
Getting Started...............................................................................7
Operating Instructions..................................................................10
Remote Control............................................................................11
Trouble Shooting...........................................................................14
Warranty...........................................................................14
Specications...........................................................................15
Important Safety Issues:
• NEVER POINT OR AIM THIS DEVICE TOWARDS PEOPLE OR THEIR
CLOTHING.
• USE ONLY THE HIGH-QUALITY HAZER LIQUID THAT YOUR DEALER
RECOMMENDS.
• ALWAYS MAKE SURE THERE IS SUFFICIENT LIQUID IN THE HAZER
LIQUID TANK. OPERATING THIS UNIT WITHOUT LIQUID MAY CAUSE
PERMANENT DAMAGE TO THE MACHINE.
• IF YOUR HAZER FAILS TO WORK PROPERLY, DISCONTINUE USE
IMMEDIATELY. CONTACT ELATION® FOR FUTHER INSTRUCTIONS.
• NEVER DRINK HAZER LIQUID. IF IT IS INGESTED, CALL A DOCTOR
IMMEDIATELY. IF HAZER LIQUID COMES IN CONTACT WITH SKIN OR
EYES, RINSE THOROUGHLY WITH WATER.
• USE ONLY THE HIGH-QUALITY HAZER LIQUID THAT YOUR DEALER
RECOMMENDS.
• ALWAYS MAKE SURE THERE IS SUFFICIENT LIQUID IN THE HAZER
LIQUID TANK. OPERATING THIS UNIT WITHOUT LIQUID MAY CAUSE
PERMANENT DAMAGE TO THE MACHINE.
Introduction:
The Haze 400 is a professional hazer. It is capable of producing
very large quantities of haze quickly and quietly. In addition, with
DMX on board operators are able to control the unit completely
and conveniently. The Haze 400 will provide very large amounts
of fine, translucent haze in any environment.
Customer Support:
Elation Lighting provides a toll free customer support line, to provide set up help and to answer any question should you encounter problems during your set up or initial operation. You may also
visit us on the web at www.elationlighting.com for any comments
or suggestions.
Service Hours are Monday through Friday 9:00 a.m. to 6:00 p.m.
Pacic Standard Time.
Voice: (800) 322-6337
Fax: (323) 582-2610
E-mail: support@elation.com
Warning! To prevent or reduce the risk of electrical shock or
re, do not expose this unit to rain or moisture.
Caution! There are no user serviceable parts inside this unit.
Do not attempt any repairs yourself, doing so will void your manufactures warranty.
Please protect our environment, do not discard this carton in the
trash. Please recycle when ever possible.
IF THE POWER SUPPLY CORD IS DAMAGED, IT MUST BE
REPLACED BY MANUFACTURER OR ITS SERVICE AGENT
OR SIMILARLY QUALIFIED PERSON IN ORDER TO AVOID A
HAZARD.
Haze 400™ Introduction
Page 3

©Elation Lighting® - www.elationlighting.com - Haze 400™ Instruction Manual Page 5
Please read and understand the instructions in this manual
carefully and thoroughly before attempting to operate this
unit. These instructions contain important information regarding
safety during use and maintenance. Please keep this manual
with the unit, as future reference.
©Elation Lighting® - www.elationlighting.com - Haze 400™ Instruction Manual Page 6
• Keep this device dry at all times. Do not spill water or other liquids in to or
on to your haze machine. Be sure that all the haze uid is kept inside
the uid reservoir.
• Be sure to save the packing carton in case you may ever have to return
the unit for service.
• Never overll the unit’s reservoir. Overlling may cause the unit to clog.
• This unit is designed for interior use only. Do not use this unit outdoors.
• Be sure that the local power outlet match that or the required voltage for
your haze machine.
• Do not attempt to operate this unit if the power cord has been frayed or
broken. Please route your power cord out of the way of foot trafc.
• Do not attempt to remove or break off the ground prong from the electrical
cord. This prong is used to reduce the risk of electrical shock and re in
case of an internal short.
• Disconnect from main power before making any type of connection.
• Do not remove the top cover under any conditions. There are no user
serviceable parts inside.
• Disconnect the unit’s main power when left unused for long periods of
time.
• Never connect this unit to a dimmer pack
• Always be sure to mount this unit in area that will allow proper ventilation.
Allow about 6” (15cm) between this device and a wall.
• Never block the ventilation holes.
• Do not attempt to operate this unit, if it becomes damaged in any way.
• Never operate this unit when it’s cover is removed.
• For adult use only. Hazer must be installed out of the reach of children.
• Never leave the unit running unattended.
• Never aim the output at open ames.
• Never add ammable liquids of any kind (oil, gas, perfume) to the hazer
liquid.
• Use only Elation® brand haze liquid.
• Always make sure there is sufcient liquid in the hazer liquid tank.
Operating this unit without liquid may cause permanent damage to the
machine.
• Always mount this unit in an upright position.
Haze 400™ Safe ty Warnings
Haze 400™ Gene ral Instructions
• No Warm-Up time
• 560 watt professional heater core.
• 2500 cubic feet of haze output.
• Rear on/off switch
• Built in fuse protection
• 2.5 liter tank capacity.
• Wired timer/volume remote control.
• Standard DMX -512 protocol.
• Optional wireless remote control.
• Optional 10 meter remote extension cable
Haze 400™ Feat ures
Haze 400™ Unpa cki ng
Every Haze 400™ has been thoroughly tested and has been shipped in
perfect operating order. Carefully check the shipping carton for damage
that may have occurred during shipping. If the carton appears to be
damaged, carefully inspect your xture for any damage and be sure all
equipment necessary to operate the system has arrived intact. In the
case damage has been found or parts are missing, please contact our
toll free customer support number for further instructions.
Page 4

cable may be purchased at almost all pro sound
and lighting stores). Your cables should be made
with a male and female XLR connector on either
end of the cable. Also remember that DMX cable
must be daisy chained and can not be split.
Notice: Be sure to follow gure three when
making your own cables. Do not use the ground
lug on the XLR connector. Do not connect the
cable’s shield conductor to the ground lug or allow
the shield conductor to come in contact with the XLR’s outer casing.
Grounding the shield could cause a short circuit and erratic behavior.
Special Note: Line Termination.
When longer runs of cable are used, you may need to use a terminator
on the last unit to avoid erratic behavior. A terminator is a 90-120 ohm
1/4 watt resistor which is connected between pins 2 and 3 of a male
XLR connector (DATA + and DATA -). This unit is inserted in the female
XLR connector of the last unit in your daisy chain to terminate the line.
Using a cable terminator will decrease the possibilities of erratic behavior.
©Elation Lighting® - www.elationlighting.com - Haze 400™ Instruction Manual Page 7
Haze 400™ Set Up
©Elation Lighting® - www.elationlighting.com - Haze 400™ Instruction Manual Page 8
Figure 1
Figure 2
DMX512 IN
3-PIN XLR
REMOTE
CONTROL
INPUT
POWER
INPUT OUTPUT
SOUND
REMOTE
CONTROL
INPUT
POWER
INPUT OUTPUT
SOUND
REMOTE
CONTROL
INPUT
POWER
INPUT OUTPUT
DMX512
DMX+,DMX-,COMMON
1
2
3
Termination reduces signal errors and
avoi ds signal tr ansmiss ion proble ms
and inte rference. It is always adv isable
to connect a DMX terminal, (Resistance
120 Ohm 1/4 W) be tween PIN 2 (DMX-)
and PIN 3 (DMX +) of the la st fixtur e.
1
2
3
1
2
3
DMX +
DMX -
COMMON
DMX512 OUT
3-PIN XLR
Figure 3
POWER
SOUND
REMOTE
CONTROL
INPUT
POWER
INPUT OUTPUT
1
2
3
Termination reduces signal errors and
avoi ds signal tr ansmiss ion proble ms
and inte rference. It is always adv isable
to connect a DMX terminal, (Resistance
120 Ohm 1/4 W) be tween PIN 2 (DMX-)
and PIN 3 (DMX +) of the la st fixtur e.
Figure 4
Haze 400™ Set Up
Set Up:
Before beginning initial setup of your Elation® Haze 400,™ make sure
that there is no evident damage caused in transit. In the event that the
unit’s housing or power cable is damaged do not attempt to use. Contact Elation® customer support for assistance.
• Remove all packing materials from shipping box. Be sure all foam
and plastic padding is removed.
• Place the hazer on a at surface and remove the hazer reservoir
cap.
• Note: The maximum uid level mark is located on the rear of the
hazer, do not ll uid beyond this mark.
• Fill the reservoir only with hazer liquid, being careful not to exceed
the maximum uid level. DO NOT OVERFILL. Use only Elation®
brand haze liquid. Any other types of uid can damage the unit.
When liquid level reaches the ll line, place cap back on liquid tank.
• Your hazer may be operated with or without a remote controller. If
you will be controlling your unit remotely, rmly attach the remote
control cable before plugging the unit in.
Power Supply:
Before plugging your unit in be sure the source voltage in your area
matches the required voltage for your Elation® Haze 400.™ The Elation®
Haze 400™ is available in a 115v and 230v version. Line voltage may
vary from venue to venue, you should be sure to plug your power supply
into a matching wall outlet before attempting to operate your hazer.
Data Cable (DMX Cable) Requirements (For DMX Operation Only):
The Haze 400 can be controlled via DMX-512 protocol. The Elation®
Haze 400™ uses one channel to control the output operation. The DMX
address is set on the rear panel of the Haze 400. DMX Traits: channel
value 0 to 5 no haze output, channel value 6 to 249 the Haze 400 will
produces haze.
Your hazer and your DMX controller require a standard 3-pin XLR connector for data input and data output (Figure 1). If you are making your
own cables, be sure to use standard two conductor shielded cable (This
1 Ground
1 Ground
XLR Male Socket
XLR Pin Conguration
3 Hot
2 Cold
2 Cold
3 Hot
XLR Female Socket
Pin 3 = Data True (positive)
Pin 2 = Data Compliment (negative)
Pin 1 = Ground
Page 5

Stand Alone Operation (Without the remote and a DMX
Controller):
Plug power cord into a grounded electrical outlet. To operate without
remote control, simply turn hazer on. Haze emission will begin automatically.
Remote Operation:
Place your haze machine in a well ventilated area. Be sure your hazer
is placed on a flat, level surface. Be sure your hazer remote has been
plugged in securely. If you are using your hazer in DMX mode, be sure
your hazer is connected to a DMX line and the dip switches on the
rear of the unit have been properly set. Always maintain an adequate
supply of Elation Haze Juice™ in the fluid reservoir. Running the haze
machine dry will cause pump failure and or clogging. Running a haze
machine dry is the largest cause of haze machine failure. Only Elation
Haze Juice™ is recommended and not all haze juice is created equal.
Plug your haze machine into a standard 110V/120V supply. Once the
machine is plugged in and turned on, the power switch and a red
L.E.D. on the remote will begin to glow indicating the unit is receiving
power. The unit has a warm up time of ten (10) minutes.
DMX Operation:
The Haze-400 has on board DMX control. Currently, it uses 1 channel
to control output operation. The DMX channel is set on the back panel
of the Haze-400 by setting the dip switches to the desired channel.
If Channel A has a value from 0 to 5, the unit is OFF. Between the
values 6 to 249 the Haze-400 produces haze.
©Elation Lighting® - www.elationlighting.com - Haze 400™ Instruction Manual Page 9 ©Elation Lighting® - www.elationlighting.com - Haze 400™ Instruction Manual Page 10
Haze 400™ Oper ati ng Instructions
Haze 400™ Set Up
Linking:
The Haze 400™ is a DMX intelligent hazer and must follow standard
DMX protocol when used in DMX mode. A DMX signal cannot be split
unless you are using an approved DMX splitter such as the American
DJ® DMX Branch 4.™ Link your hazers together using standard DMX
cable as described on page 4 of this manual. Be sure that each xture
follows an “IN”/”OUT” pattern starting from your DMX controller. Your
controller will always be the rst output in a DMX chain. Link all your
DMX devices together regardless of their brand or type. To control all
the hazers at once, set all the hazers to the same DMX address.
Haze 400™ Haze Fl uid
Hazer Liquid:
Only use Elation® brand haze juice. Elation® juice is specially formulated to be used in this machine, other brand uids may be made out
of chemicals that may clog your haze machine. Using haze juice other
than Elation® brand will void your manufactures warranty. Do not allow
the hazer liquid to become contaminated. Always replace the caps on
the hazer liquid container and the hazer’s liquid tank immediately after
lling.
Important: Never mix oil-based and water-based hazer liquids. Before
switching the kind of hazer liquid in use, completely drain the hazer’s
tank to avoid mixing. Do not reuse any unused protions of haze juice.
Page 6

Remote Functions and Controls:
Caution: Before removing or replacing the remote unit, disconnect the power supply.
Duration:
1. This function allows you to set the time the haze will burst when
in the timer mode.
2. You can adjust the time the hazer will burst from one second to
200 seconds.
3. To set the duration, turn the duration knob in a clockwise/counter clockwise direction. Turning the knob clockwise will increase the
duration, turning the knob counter-clockwise will decrease the
duration.
Interval:
1. In timer mode, this function allows you to set the time interval
between haze burst.
2. Haze burst interval can be set from one second to 200 seconds.
3. To set the interval turn the interval knob in a clockwise/counter clockwise direction. Turning the knob clockwise will increase the
interval, turning the knob counter-clockwise will decrease the
interval.
Timer On/Off:
1. This Function allows you to set the hazer on an automatic setting.
You can set the Interval, Duration, and as described on the
previous page.
2. This button allows you turn the timer function on and off. A glowing
yellow LED will indicate this function is on.
©Elation Lighting® - www.elationlighting.com - Haze 400™ Instruction Manual Page 11 ©Elation Lighting® - www.elationlighting.com - Haze 400™ Instruction Manual Page 12
Haze 400™ Remo te Control
Remote Control:
The haze machine comes with a full function remote control.
The remote control is connected to the rear of the unit. Be
sure to connect the remote to the proper jack. Do not try to
force the remote connection in to the jack. You could damage
your remote. The remote has three LED’s that will indicate the
different functions.
If you experience low output, mechanical noise or no output
at all, unplug immediately. Check fluid level, the external
fuse, remote connection, and power from the wall. If all of
the above appears to be O.K., plug the unit in again. If
hazer does not function after 30 seconds, discontinue operation or permanent damage to the unit may result. Return
the machine to your Elation dealer. Always drain tank before
mailing or transporting this unit.
Haze 400™ Oper ati ng Instructions
Page 7

If you experience low output, pump noise, or no output at all,
disconnect immediately. Do not attempt to continue pushing the
remote button as this may damage unit. Check fluid level, the
external fuse, remote connection, and check power from wall.
If all of the above appear to be in good condition, and the unit
fails to operate correctly, the unit will require service. Return the
machine to an Elation Authorized dealer or service center.
The HAZE 400™ hazer carries a one year limited warranty. We
recommend you fill out the enclosed warranty card to validate
your purchase. All returned service items whether under warranty or not, must be freight pre-paid and accompany a R.A.
Number. If the unit is under warranty, you must provide a proof
of purchase invoice.
©Elation Lighting® - www.elationlighting.com - Haze 400™ Instruction Manual Page 14
1-YEAR LIMITED WARRANTY
A. Elation Lighting® hereby warrants, to the original purchaser, Elation Lighting® products
to be free of manufacturing defects in material and workmanship for a period of 1 Year (365
days) from the date of purchase. This warranty shall be valid only if the product is purchased
within the United States of America, including possessions and territories. It is the owner’s
responsibility to establish the date and place of purchase by acceptable evidence, at the time
service is sought.
B. For warranty service, send the product only to the Elation Lighting® factory. All shipping
charges must be pre-paid. If the requested repairs or service (including parts replacement)
are within the terms of this warranty, Elation Lighting® will pay return shipping charges only to
a designated point within the United States. If the entire instrument is sent, it must be shipped
in its original package. No accessories should be shipped with the product. If any accessories
are shipped with the product, Elation Lighting® shall have no liability whatsoever for loss of
or damage to any such accessories, nor for the safe return thereof.
C. This warranty is void if the serial number has been altered or removed; if the product is
modied in any manner which Elation Lighting® concludes, after inspection, affects the reliability of the product; if the product has been repaired or serviced by anyone other than the
Elation Lighting® factory unless prior written authorization was issued to purchaser by Elation Lighting®; if the product is damaged because not properly maintained as set forth in the
instruction manual.
D. This is not a service contract, and this warranty does not include maintenance, cleaning
or periodic check-up. During the period specied above, Elation Lighting® will replace defective parts at its expense, and will absorb all expenses for warranty service and repair labor
by reason of defects in material or workmanship. The sole responsibility of Elation Lighting®
under this warranty shall be limited to the repair of the product, or replacement thereof,
including parts, at the sole discretion of Elation Lighting®. All products covered by this warranty were manufactured after January 1, 1990, and bear identifying marks to that effect.
E. Elation Lighting® reserves the right to make changes in design and/or improvements
upon its products without any obligation to include these changes in any products theretofore
manufactured.
F. No warranty, whether expressed or implied, is given or made with respect to any accessory supplied with products described above. Except to the extent prohibited by applicable
law, all implied warranties made by Elation Lighting® in connection with this product, including warranties of merchantability or tness, are limited in duration to the warranty period set
forth above. And no warranties, whether expressed or implied, including warranties of merchantability or tness, shall apply to this product after said period has expired. The consumer’s and or Dealer’s sole remedy shall be such repair or replacement as is expressly provided
above; and under no circumstances shall Elation Lighting® be liable for any loss or damage,
direct or consequential, arising out of the use of, or inability to use, this product.
G. This warranty is the only written warranty applicable to Elation Lighting® Products and
supersedes all prior warranties and written descriptions of warranty terms and conditions
heretofore published.
Haze 400™ Warranty Ca rd
Haze 400™ Trouble Shootin g Haze 400™ Warranty
©Elation Lighting® - www.elationlighting.com - Haze 400™ Instruction Manual Page 13
Page 8

Elation Lighting World Headquarters:
4295 Charter Street Los Angeles, CA 90058 USA
Tel: 323-582-2650 Fax: 323-582-2610
Web: www.elationlighting.com E-mail: info@americandj.com
©Elation Lighting® - www.elationlighting.com - Haze 400™ Instruction Manual Page 15
SPECIFICATIONS:
MODEL - Haze 400™
ELECTRONIC THERMAL SENSING
WEIGHT: 27 LBS./18.5 Kgs.
DIMENSIONS: 15” x 8.5” x 8”/500x 320x 250mm
CURRENT: 1.4 Amps Maximum Drawl
SUPPLY VOLTAGE: 120V
FUSE: 7A
WARM UP TIME: None Needed
TANK CAPACITY: 2 Quart Removable/2.5 Liters
OUTPUT: 2,500 cubic feet per minute
FLUID TYPE: Water Base Elation Haze Juice™
HEATER: 560 Watt
DUTY CYCLE: Not to exceed 6 hours turned on.
Haze 400™ Spec ifi cations
 Loading...