

Elation COLOR SPOT 575 User Manual

Version 1.0
COLOR SPOT 575


Table of contents
1. Safety instructions ........................................................................................................ 4
2. Operating determinations ............................................................................................. 5
3. Description of the device.............................................................................................. 6
4. Installation ..................................................................................................................... 7
4.1Fitting the lamp .......................................................................................................... 7
4.2 Lamp adjustment:...................................................................................................... 8
4.3 Inserting/Exchanging rotating gobos......................................................................... 8
4.4 Rigging the fixture ..................................................................................................... 9
4.5 Connection to the mains ........................................................................................ 10
4.6 DMX-512 connection/connection between fixtures ................................................. 10
5. DMX PROTOCOL ......................................................................................................... 11
6. Addressing...................................................................................................................14
7. Remotely controllable functions ................................................................................ 14
7.1 Lamp ....................................................................................................................... 14
7.2 Switching On and Off the lamp by the control board............................................... 14
7.3 Colour wheels ......................................................................................................... 14
7.4 Static gobo wheel.................................................................................................... 14
7.5 Rotating gobo wheel ............................................................................................... 15
7.6 3-facet rotating prism .............................................................................................. 15
7.7 Iris ........................................................................................................................... 15
7.8 Focus-multistep zoom ............................................................................................. 15
7.9 Dimmer/Shutter/Strobe ........................................................................................... 15
7.10 Fan ........................................................................................................................15
8. Control Board .............................................................................................................. 15
8.1 Main functions ......................................................................................................... 15
8.2 SPEC - Special functions ........................................................................................ 17
9. Error and information messages ............................................................................... 23
10. Technical specifications ............................................................................................ 24
11. Maintenance and cleaning ........................................................................................ 26
12. Appendix ....................................................................................................................27
COLOR SPOT 575

4
CAUTION!
Keep this device away from rain and moisture!
Unplug mains lead before opening the housing!
FOR YOUR OWN SAFETY, PLEASE READ THIS USER MANUAL CAREFULLY
BEFORE YOU INITIAL START - UP!
1. Safety instructions
Every person involved with installation and maintenance of this device have to:
- be qualilfied
- follow the instructions of this manual
Caution ! Be careful with your operations.
With a a dangerous voltage you can suffer
a dangerous electric shock when touching the wires!
This device has left our premises in absolutely perfect condition. In order to maintain this condition and to ensure
a safe operation, it is absolutely necessary for the user to follow the safety instructions and warning notes written
in this manual.
Important:
The manufacturer will not accept liability for any resulting damages caused by the non-observance of this manual
or any unauthorized modification to the device.
Please consider that damages caused by manual modifications to the device are not subject to warranty.
Never let the power-cord come into contact with other cables! Handle the power-cord and all connections with
the mains with particular caution!
Always plug in the power plug last. Make sure that the power-switch is set to OFF-position before you connect
the device to the mains. The power-plug has to be accessible after installing the device.
Make sure that the power-cord is never crimped or damaged by sharp edges. Check the device and the powercord from time to time.
Always disconnect from the mains, when the device is not in use or before cleaning it. Only handle the powercord by the plug. Never pull out the plug by tugging the power-cord.
This device falls under protection class I. Therefore it is essential to connect the yellow/green conductor to earth.
The electric connection, repairs and servicing must be carried out by a qualified employee.
Do not connect this device to a dimmer pack.
Do not switch the fixture on and off in short intervals as this would reduce the lamps life.
During the initial start-up some smoke or smell may arise. This is a normal process and does not necessarily
mean that the device is defective.
Do not touch the devices housing with bare hands during its operation (housing becomes hot)!
For replacement use lamps and fuses of the same type and rating only.
CAUTION ! EYEDAMAGES !
Avoid looking directly into the light source
(meant especially for epileptics) !

5
2. Operating determinations
This device is a moving-head spot for creating decorative effects and was designed for indoor use only.
If the device has been exposed to drastic temperature fluctuation (e.g. after transportation), do not switch it on
immediately. The arising condensation water might damage your device. Leave the device switched off until it
has reached room temperature.
Never run the device without lamp!
Do not shake the device. Avoid brute force when installing or operating the device.
Never lift the fixture by holding it at the projector-head, as the mechanics may be damaged. Always hold the
fixture at the transport handles.
When choosing the installation-spot, please make sure that the device is not exposed to extreme heat, moisture
or dust. There should not be any cables lying around. You endanger your own and the safety of others!
The minimum distance between light-output and the illuminated surface must be more than 1 meter.
Make sure that the area below the installation place is blocked when rigging, derigging or servicing the fixture.
Always fix the fixture with an appropriate safety-rope. Fix the safety-rope at the correct eye bolt only.
Only operate the fixture after having checked that the housing is firmly closed and all screws are tightly fastened.
The lamp must never be ignited if the objective-lens or any housing-cover is open, as discharge lamps may
explose and emit a high ultraviolet radiation, which may cause burns.
The maximum ambient temperature ta = 40° C must never be exceeded. Otherwise, the lamp is switched off and
the fixture is out of operation for 5 minutes.
Allow the fixture to cool for at least 15 minutes before replacing the lamp.
CA UTION!
The lens has to be replaced when it is obviously damaged,
so that its function is impaired, e. g. due to cracks or deep scratches!
Operate the device only after having familiarized with its functions. Do not permit operation by persons not
qualified for operating the device. Most damages are the result of unprofessional operation!
CA UTION!
The lamp has to be replaced when it is damaged
or deformed due to the heat!
Please use the original packaging if the device is to be transported.
Please consider that unauthorized modifications on the device are forbidden due to safety reasons!
If this device will be operated in any way different to the one described in this manual, the product may suffer
damages and the guarantee becomes void. Furthermore, any other operation may lead to dangers like shortcircuit, burns, electric shock, burns due to ultraviolet radiation, lamp explosion, crash etc.
6
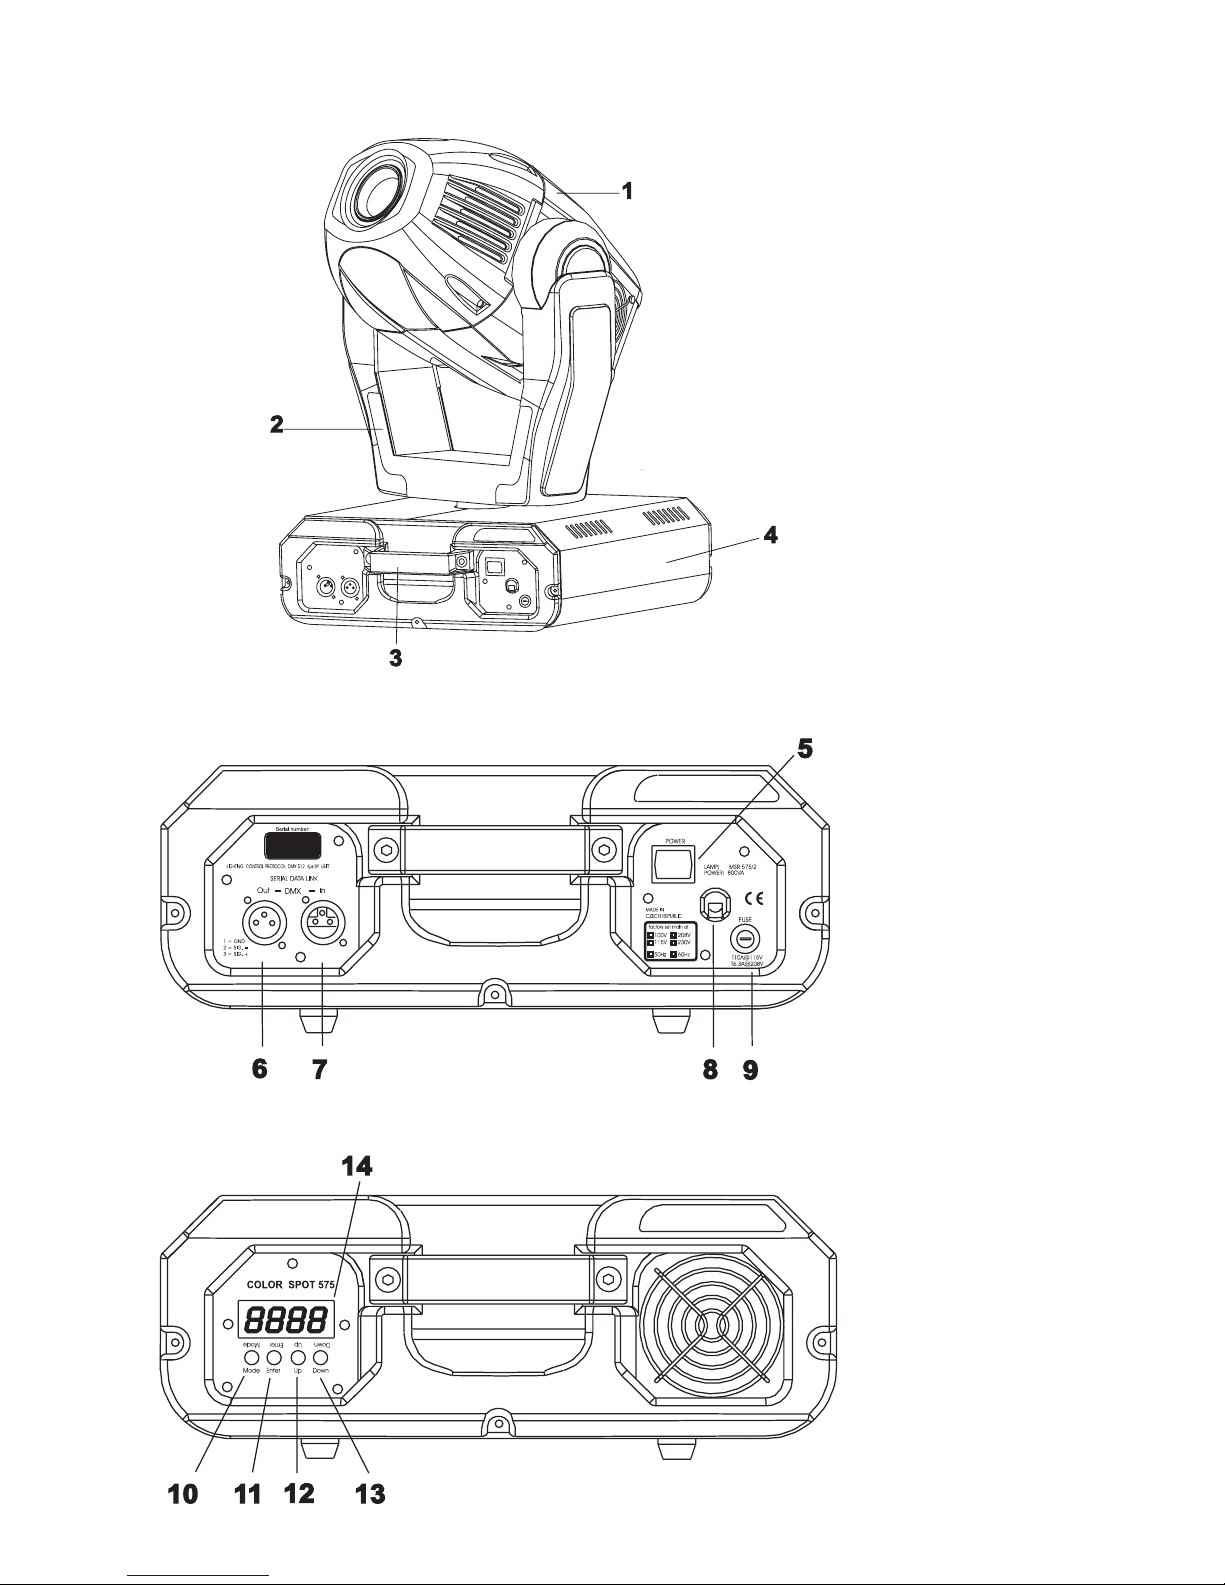
1 - Moving head
2 - Yoke
3 - Carry handles
4 - Base
3. Description of the device
Rear panel:
5 - Power switch
6 - DMX output
7 - DMX input
8 - Power cord
9 - Fuse holder
Front panel:
10 - Mode-button
11 - Enter-button
12 - Up-button
13 - Down-button
14 - Display
7
4. Installation
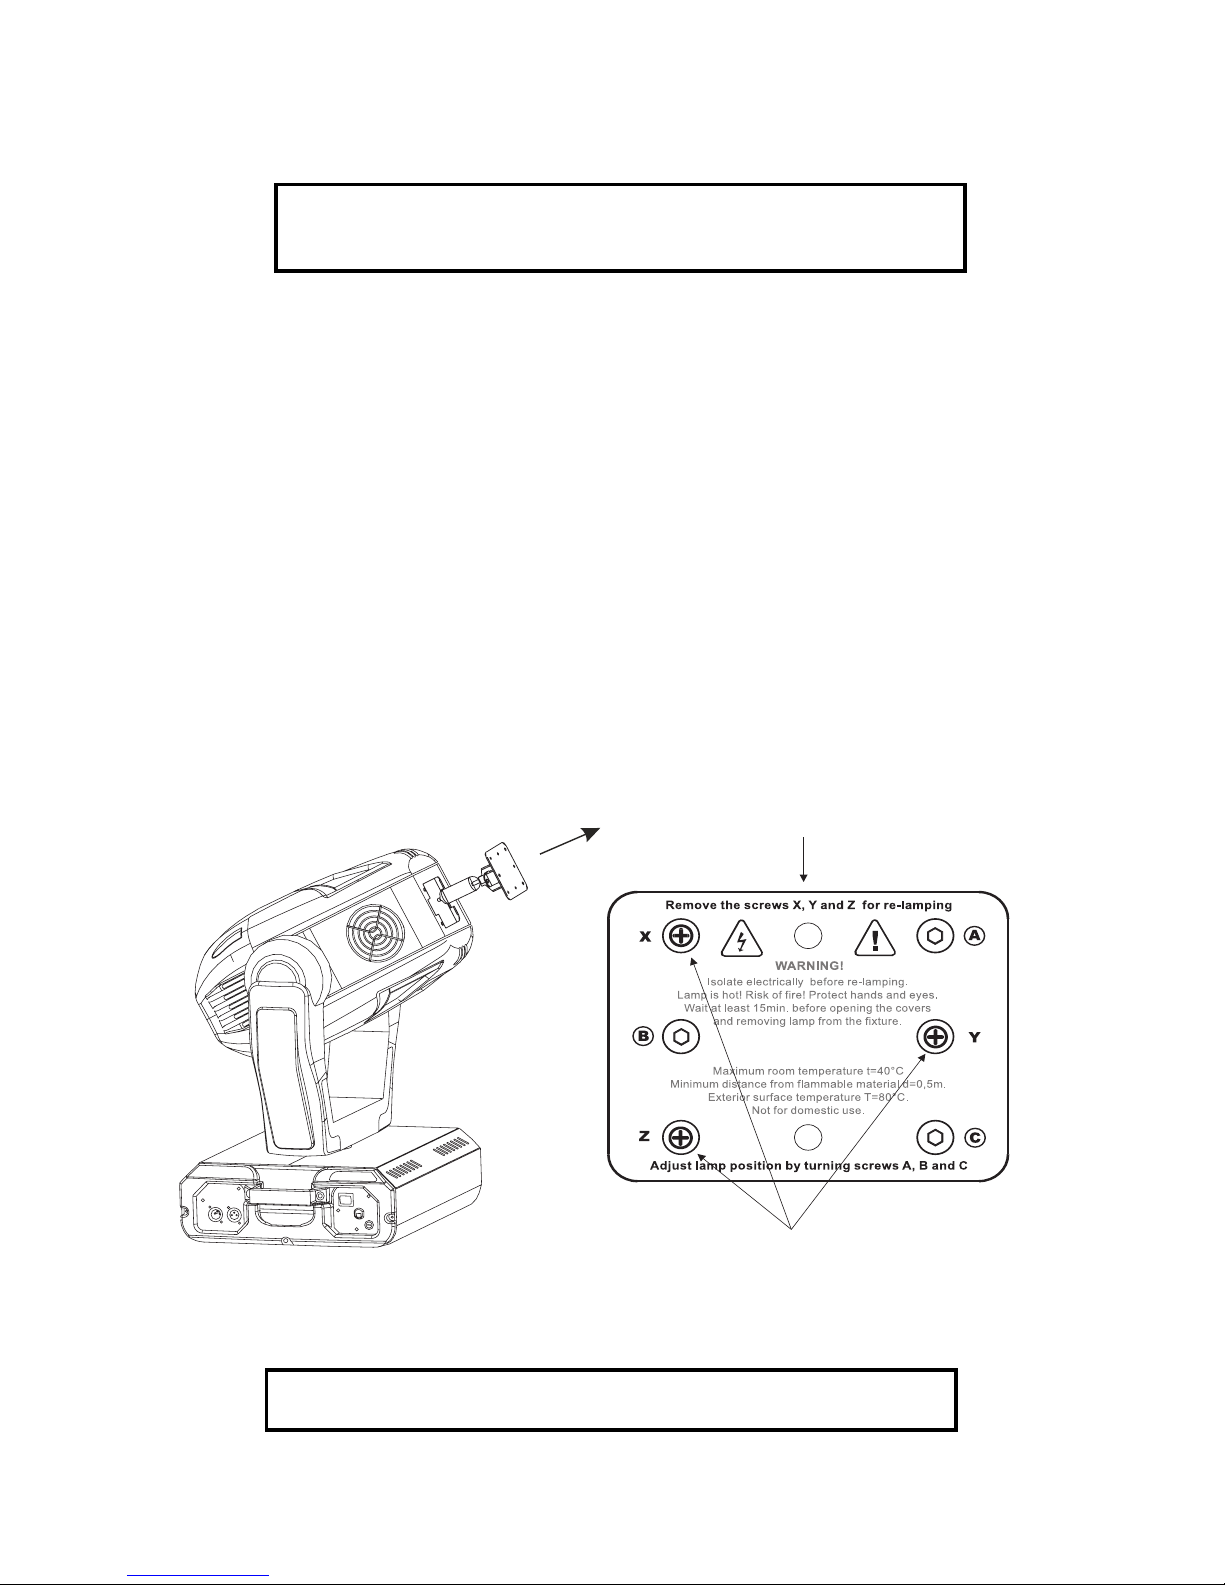
4.1Fitting the lamp
DANGER !
Install the lamps with the device switched off only.
Unplug from mains before !
To insert the lamp OSRAM HSR 575/2 95V/575W GX-9,5 or PHILIPS MSR 575/2 95V/575W GX-9,5 , MSD 575
95V/575W GX-9,5 loosen the lamp cover at the rear of head (see the drawings ) by remowing the 3 fastening
screws which are marked "X,Y,Z".Carefully pull out the cover with the lamp socket assembly.If changing the
lamp, remove the old lamp from the socket. Insert the lamp to the socket.
Do not install a lamp with a higher wattage! A lamp like this generates temperatures the device is not designed for.Damages caused by non-observance are not subject to warranty. Please follow the lamp
manufacturers notes!Do not touch the glass-bulb with bare hands during the installation! Make sure that the
lamp is installed tightly into the lampholder system.
Reclose the lamp cover and tighten the 3 screws.
Before striking the lamp, reset the "LAti" counter in the main menu of the Control Board, by pressing the
"Up" and "Down" buttons in one time and then confirming with the Enter-button.
Adjust the lamp position by turning the screw "A,B,C" (see "Lamp adjustment " below).
Do not operate this fixture with opened housing-cover!
Lamp assembly:
3 phillips screws "X,Y,Z"
Lamp cover
8
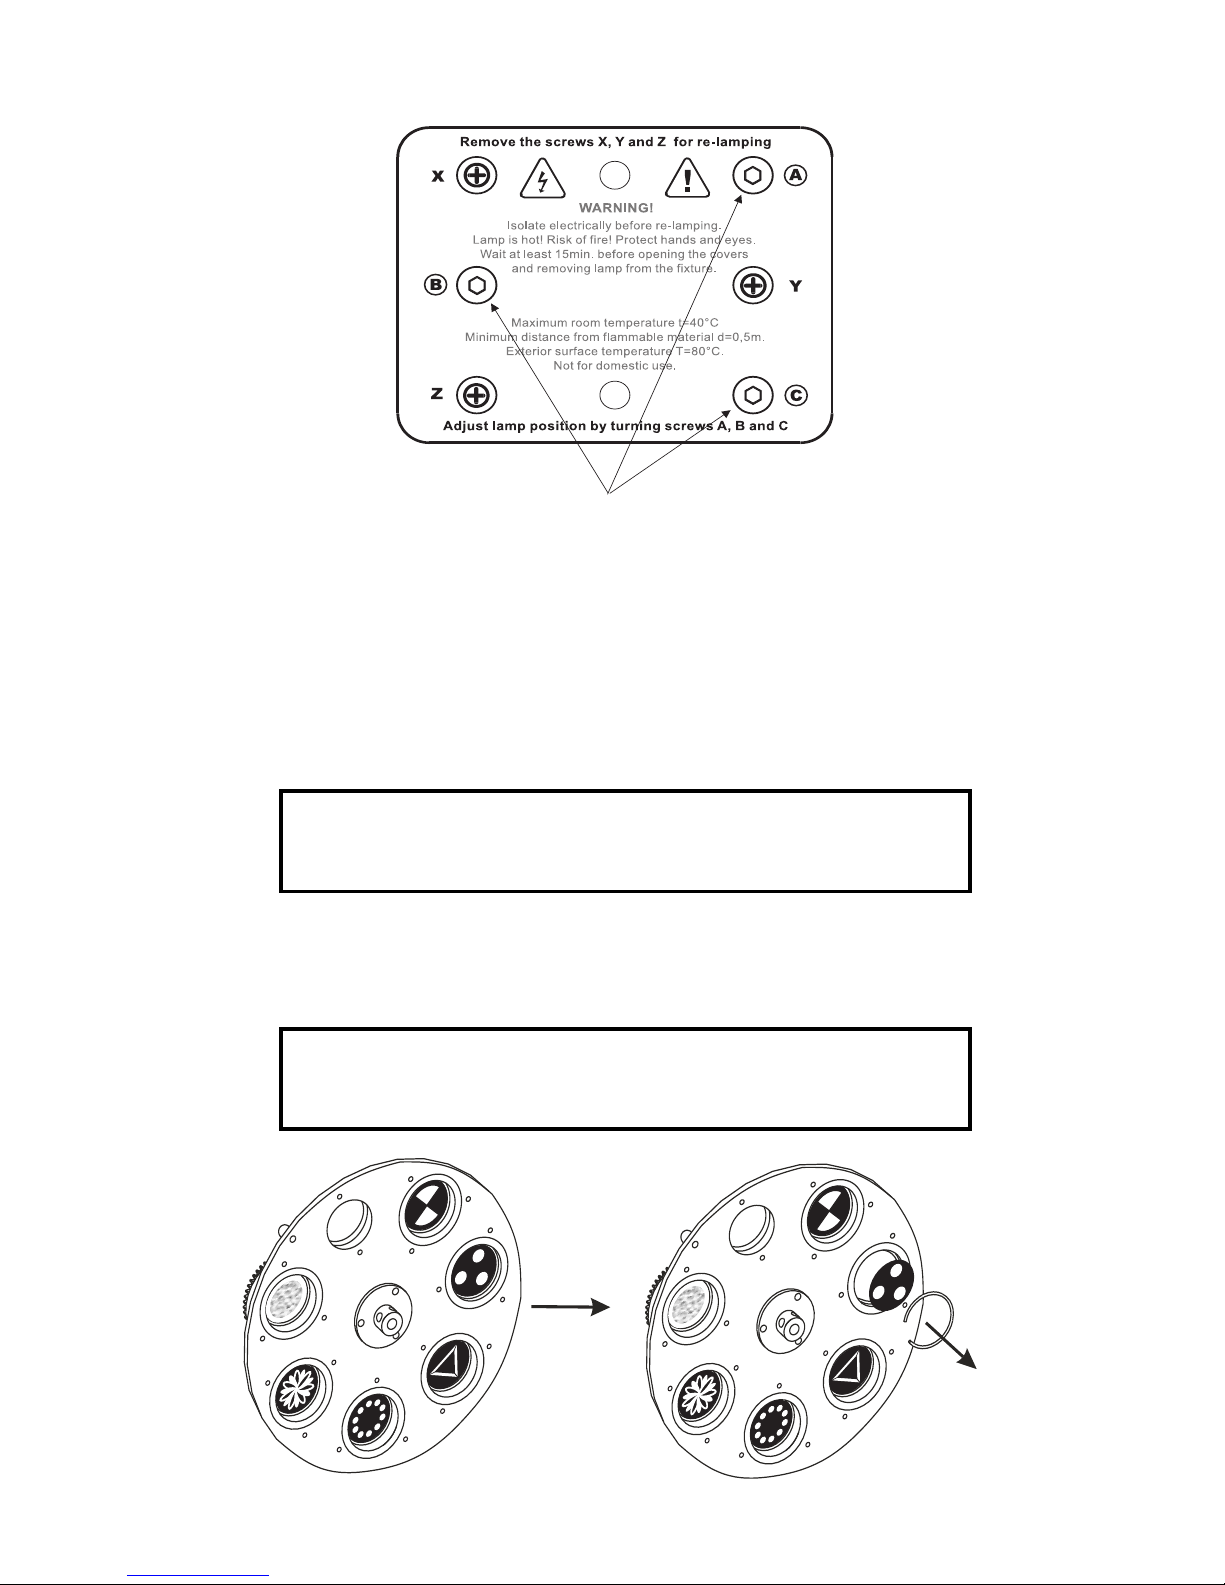
4.2 Lamp adjustment:
The COLOR SPOT 575 lampholder is aligned at the factory. Due to differences between lamps, fine adjustment
may improve light performance.
Strike the lamp,open the shutter and the iris,set the dimmer intensity onto 100% and focus the light on a flat
surface (wall).Center a hot-spot(the brightest part of the image) by using the 3 adjustment screws "A,B,C".Turn
one screw after another a quarter-turn clokwise(counter-clokwise) to set the hot-spot in the center of the image.If
you cannot detect the hot-spot,adjust the lamp until the light is evenly distributed.
4.3 Inserting/Exchanging rotating gobos
DANGER!
Install the gobos with the device switched off only.
Unplug from mains before!
If you wish to use other forms and patterns as the standard-gobos, or if gobos are to be exchanged, open the top
cover of the head by loosening 2 screws on the top cover.
Remove the fixation ring with an appropriate tool. Remove the gobo and insert the new gobo. Press the fixation
ring together and insert it in the front of the gobo.
CA UTION!
Never unscrew the screws of the rotating gobo
as the ball bearing will otherwise be opened!
3 adjustment screws "A,B,C"
9
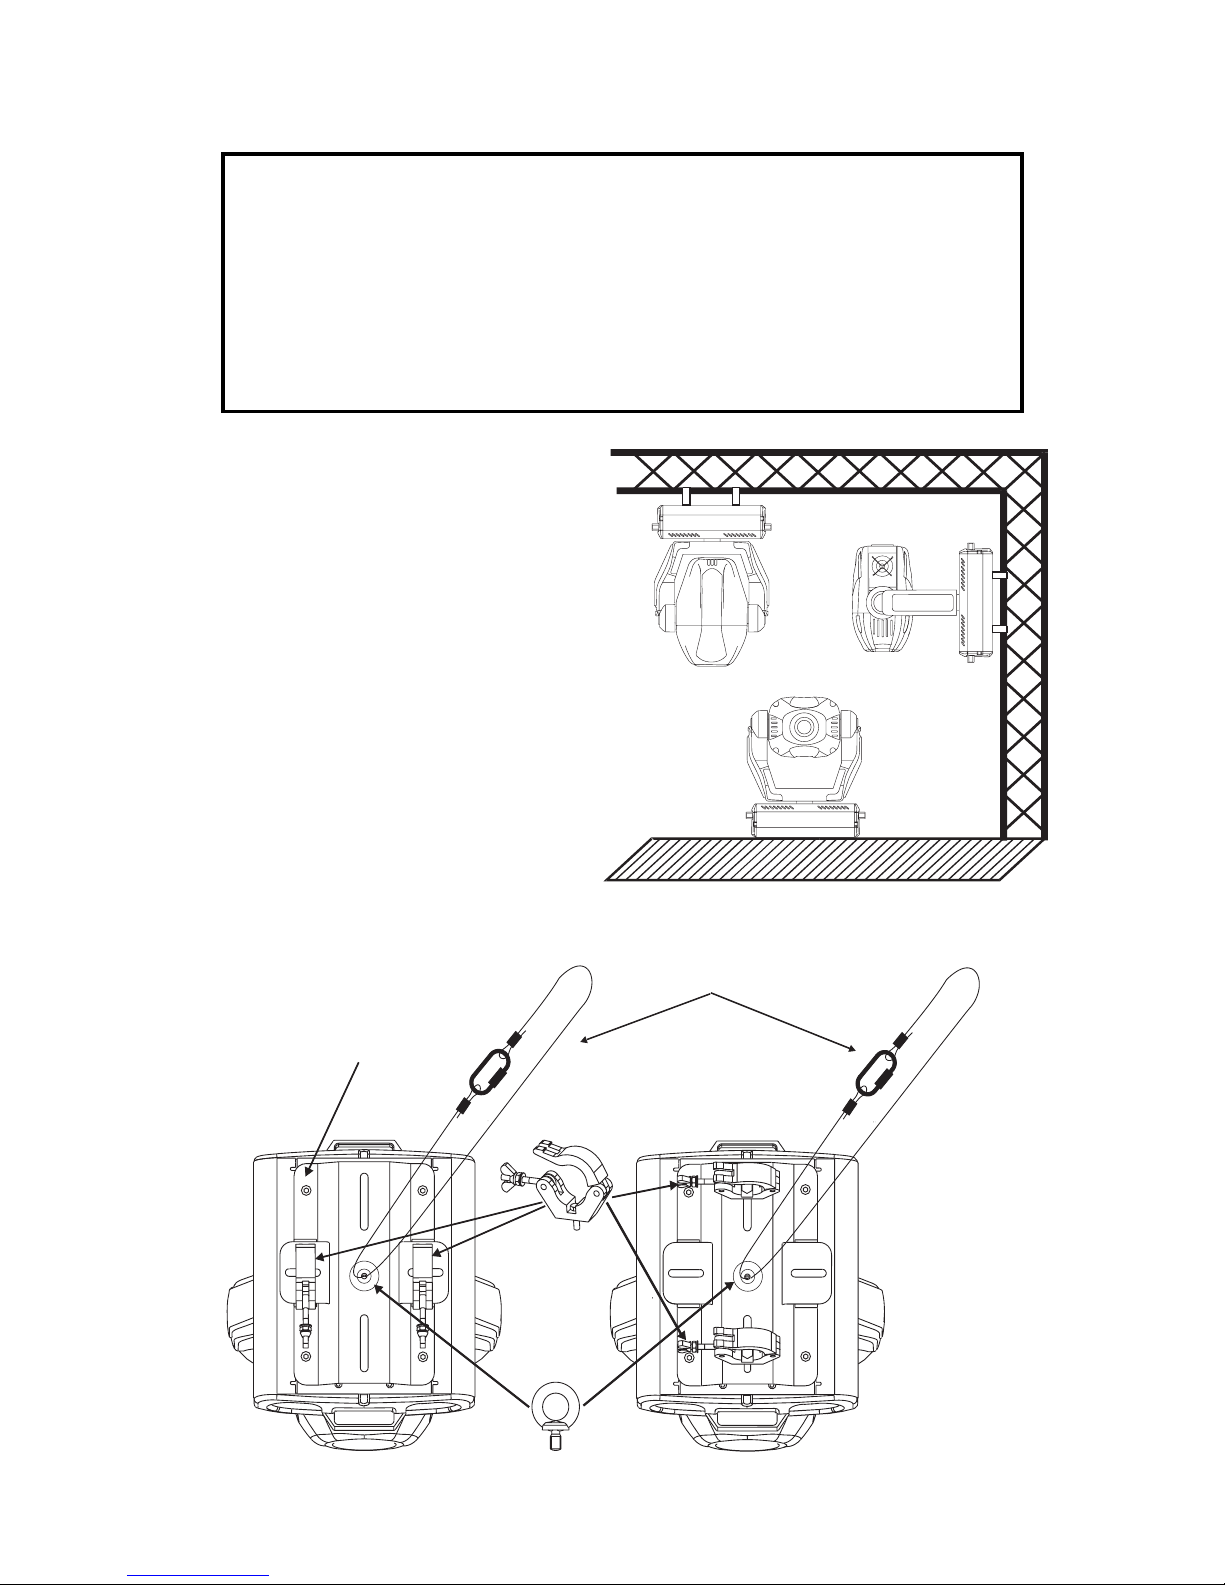
4.4 Rigging the fixture
Danger of fire !
When installing the device, make sure there is no highly inflammable
material (decoration articles, etc.) in between a distance of min. 0,5 m.
Warning ! Use 2 clamps to rig the fixture on the truss.
Follow the instructions mentioned at the bottom of the base.
Make sure that the device is fixed properly! Ensure that
the structure (truss) to which you are attaching the fixtures is secure.
The COLOR SPOT 575 can be placed directly on the
stage floor or rigged in any orientation on a truss
without altering its operation characteristics (see the
drawing).
The fixtures base enables to be mounted in two ways.
Use the clamps with screws M12.
Fix a mounting plate and an eye bolt (a part of delivery)
on the underside of the base(see the drawing below).
Fasten a safety chain to eye bolt.The safety
chain(cord) must hold at least 10 times the weight of
the fixture. Never use the carrying handles for
secondary attachment.
Secure chain
Clamp
Eye bolt
Mounting plate
 Loading...