

Page 1
08-01002-01
Elastic Networks
Elite Modem
Installation Guide
Document Version: Standard
Document Revision: 2.01
Publication Date: November 1999
Page 2

2
©1999 Elastic Networks
The Elite Modem Installation Guide is c opyrig hted and all righ ts are reserv ed. Th is do cu men t may no t,
in whole or in part, be copied, photocopied, reproduced, translated, or reduced to any electronic medium
or machine readable form without prior consent in writing from Elastic Networks. EtherLoop is a
trademark of Elastic Networks. IBM is the trademark of Int ernational Bu siness Machine s, Incorporated ;
Windows 95, Windows NT and Windows 3.1 are trademarks of Microsoft, Incorporated; Quadra 610,
OS 7.5, Mac, and Macintosh are trademarks of Apple Computer.
Page 3

Revision 2.01 Elite Modem Installation Guide 08-01002-01
Elastic Networks
Elite Modem
Installation Guide
1999 Elastic Networks
All ri
g
hts reserved
All information contained in this document is subject to change without notice. Elastic Networks reserves the right to make cha nges
to equipment design or program components, as progress in engineering, manufacturing methods, or other circumstances may
warrant.
EtherLoop is a trademark of Elastic Networks.
Publication Number: 08-01002-01
Document Version: Standard
Document Revision: 2.01
Publication Date: November 1999
Page 4

ii
Revision 2.01 Elite Modem Installation Guide 08-01002-01
Page 5

iii
Revision 2.01 Elite Modem Installation Guide 08-01002-01
Publication histor
y
November 1999
Standard document (Revision 2.01) released for general publication.
October 1998
Standard document initial release for general publication.
Page 6

Revision 2.01 Elite Modem Installation Guide 08-01002-01
iv
Page 7

v
Revision 2.01 Elite Modem Installation Guide 08-01002-01
Contents
About this document vii
Safety Considerations vii
Elite Modem Requirements viii
Installing the Elite Modem 1-1
The Elite Modem 1-2
The Elite Modem and the EtherLoop System 1-2
Always-on Internet connection 1-2
Factory-tested components 1-2
Materials Included with the Elite Modem 1-3
Task: Installin
g
the Modem 1-5
Modem Indicators 1-6
Status and Activity Indicators 1-6
Additional telephones on the modem phone line 1-7
Task: Installin
g
the Desk Mount Filter 1-8
Task: Installin
g
the Wall Mount Filter 1-9
Appendix A: Troubleshooting A-1
Appendix B: Regulatory Information B-1
FCC Compliance Information B-1
FCC Information to User B-2
Customer Instructions B-2
Industry Canada Compliance Information B-4
Appendix C. Warranty and Disclaimers C-1
Coverage C-1
Exclusions C-2
Page 8

vi
Contents
Revision 2.01 Elite Modem Installation Guide 08-01002-01
Page 9
vii
Revision 2.01 Elite Modem Installation Guide 08-01002-01
About this document 1-
This document provides instructions for installing, using and troubleshooting
the Elite Modem. Before installing or using the modem, be sure to read the
Safety Considerations and Elite Modem Requirements in this section.
!
Safety Considerations
The Elite Modem complies with the regulatory requirements of CSA C22.2#950M95 for Canada and UL 1950 Edition 3 for the United States. Althou
g
h this
product is desi
g
ned with your complete safety in mind, there are precautions you
should adhere to for your individual safety as well as the safety of your
equipment. These precautions include, but are not limited to the followin
g
:
• Read and understand all instructions.
• Place your modem on a stable surface. Droppin
g
the modem can cause
dama
g
e that is not covered under the manufacturer’s warranty.
• Do not disassemble the modem! Openin
g
the unit may expose you to electrical
shock!
• Use caution when installin
g
or modifying telephone lines.
• Do not use modem near water to avoid shock hazard.
• Never install telephone jacks in wet locations unless the jack is specifically
desi
g
ned for wet locations.
• Never touch uninsulated telephone wires or terminals unless the telephone
line has been disconnected.
• Avoid installin
g
telephone wiring during an electrical storm.
• Do not place objects on top of modem.
Page 10

viii
About this document
Revision 2.01 Elite Modem Installation Guide 08-01002-01
Elite Modem Requirements
The Elite Modem has specific requirements. Please insure that all of the
information and equipment is available prior to proceeding with the
installation procedure. The requirements are as follows:
If you need help, call distributor technical support.
Requirement Description
Elite Modem Service Contact your local Internet service provider (ISP)
and subscribe to hi
g
h-speed Internet service.
Your modem will not function until the common
local exchan
g
e carrier activates the service.
Network Access A 10Base-T Ethernet Card with a standard RJ-45
connector must be installed and confi
g
ured in
your computer. Any computer (MAC, PC, UNIX
workstation) that can run Windows 3.1 or OS5 or
hi
g
her can be used with the Elite Modem.
Network Address Internet Protocol (IP) address from your Internet
service provider or corporate IS network
administrator. Simply ask for the IP address
requirements for your connection. Your Internet
service provider must use TCP/IP protocol.
Only one Elite Modem per phone
line
The Elite Modem will not operate with multiple
computers. Only the computer that is directly
connected to the Elite Modem throu
g
h the
10Base-T Ethernet cable is supported.
Elite Modem must be connected
to line one (1) on multiple line
telephone systems
Data transfer rates will vary somewhat,
dependin
g
on the speed of your computer, the
network (ISP, corporate, etc.) throu
g
h which you
are communicatin
g
, and the speed and
connection of the computer with which you are
transferrin
g
data.
Page 11

1-1
Revision 2.01 Elite Modem Installation Guide 08-01002-01
Installing the Elite Modem 1-
This chapter describes the Elite Modem and contains the installation
procedures for the modem and support equipment.
Chapter contents
This chapter includes the following information.
Chapter task list
This chapter includes the following tasks.
Table 1-1.
Topic See
The Elite Modem pa
g
e1-2
Materials Included with the Elite Modem pa
g
e1-3
Modem Indicators page1-6
Additional telephones on the modem phone line pa
g
e1-7
Task See
Installin
g
the Modem page1-5
Installin
g
the Desk Mount Filter page1-8
Installin
g
the Wall Mount Filter page1-9
Page 12

1-2
Installin
g
the Elite Modem
Revision 2.01 Elite Modem Installation Guide 08-01002-01
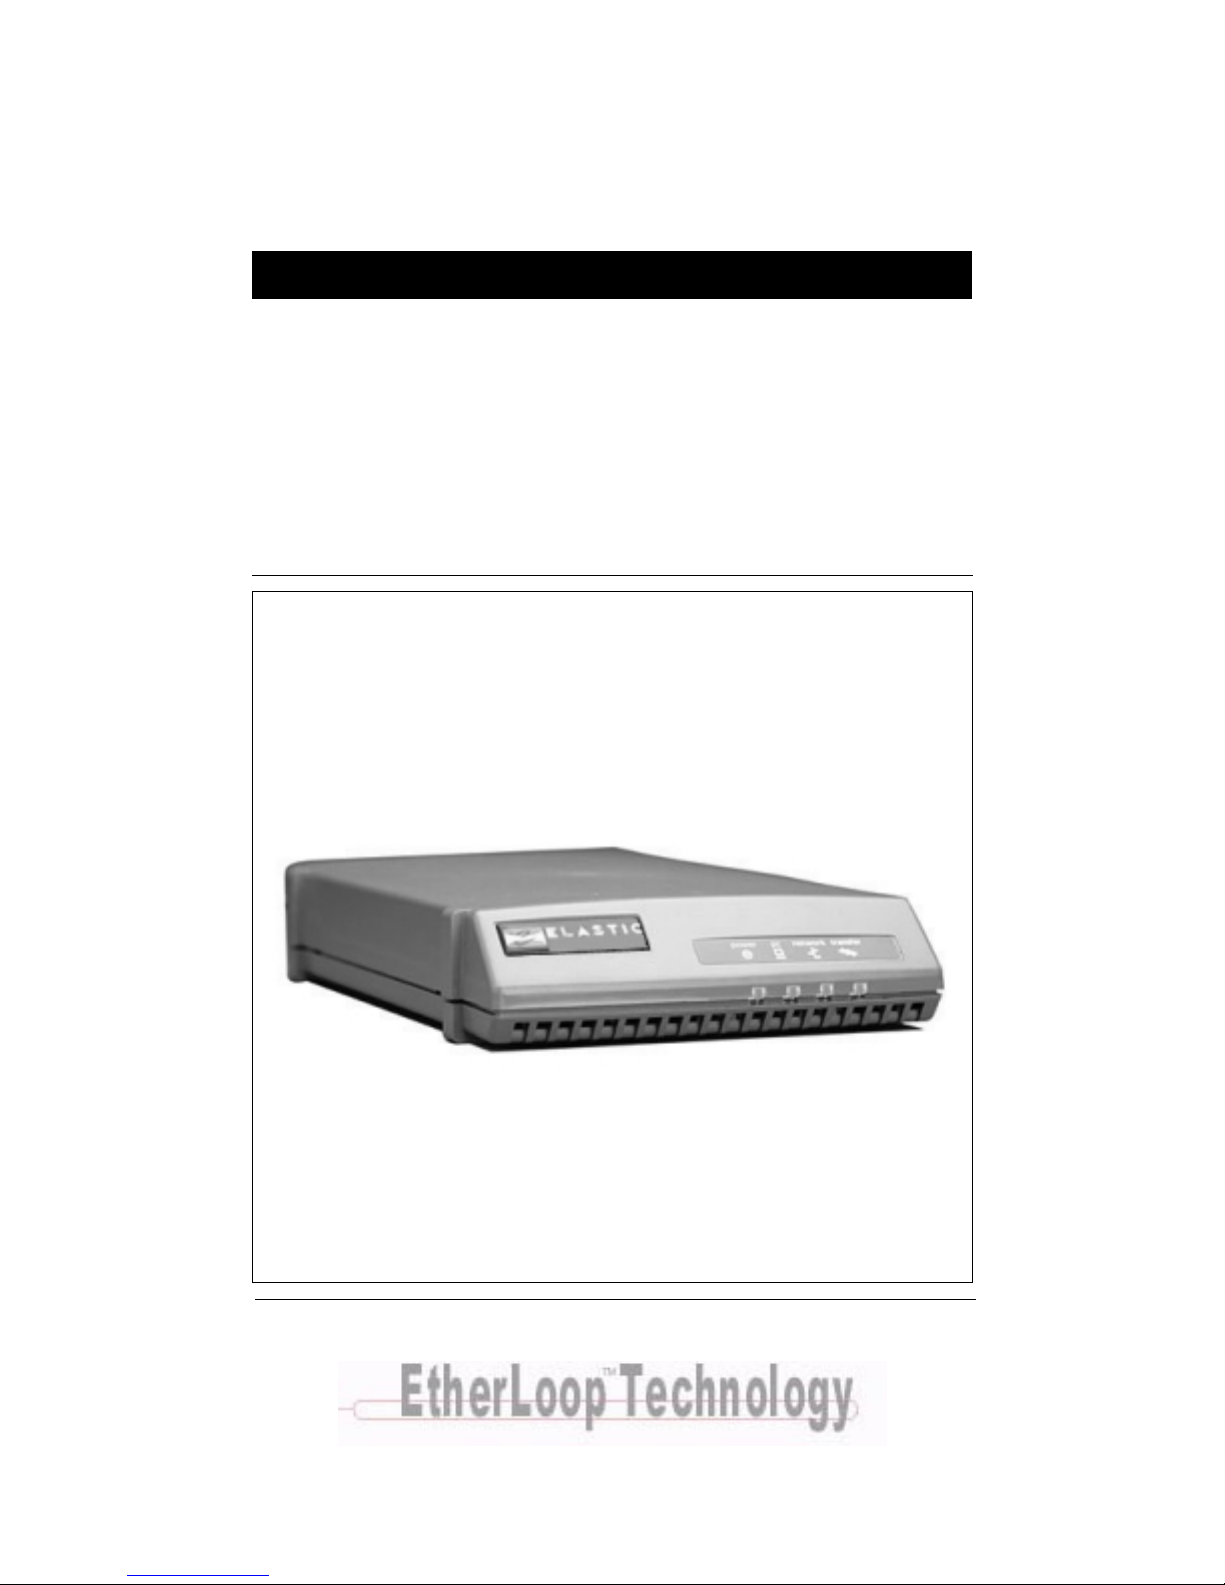
The Elite Modem
The Elite modem allows an end user with an Ethernet-configured PC and an
ordinary phone line to access the Internet or corporate intranet at
multi-megabit speeds. The Elite Modem also permits simultaneous voice (or
analog data) transmission on the same telephone line. Y ou can use the st andard
telephone cable provided in the installation kit to connect a telephone, fax, or
answering machine directly to your Elite Modem.
This document contains all of the procedures you need to install and use the
Elite Modem. This guide takes you through step-by-step procedures for
installing the modem.
The Elite Modem and the EtherLoop System
The Elite Modem is a component of an EtherLoop system. EtherLoop is an
Elastic Networks technology that supports high-speed data simulaneously
with voice using existing phone lines. If the other network components of the
EtherLoop system have
not
been correctly installed,
the Elite modem will not
work.
Contact your service provider or distributor technical support if you have
problems completing the installation
.
Always-on Internet connection
The Elite Modem is a state-of-the-art, high-speed data modem that delivers an
“always-on” connection to a service provider or corporate Information Service
(IS) network. This direct access eliminates the time-consuming dial-up
sequence that is required by other modems. You won’ t have to dial and wait to
access the Internet or download large files to your home computer.
Factory-tested components
The Elite Modem has been factory-tested. If you have a problem using the
modem, review the procedures in this guide. Contact your service provider or
distributor technical support if you have questions.
Page 13

Installing the Elite Modem
1-3
Revision 2.01 Elite Modem Installation Guide 08-01002-01
Materials Included with the Elite Modem
The Elite modem contains standard RJ-11 telephone and jack interfaces to
connect the existing voice facility , and a 10Base-T Ethernet RJ-45 interface to
connect the Ethernet cable from the end-user PC.
The following table shows the components included in the Elite Modem
package. If you are missing any item, contact your product distributor for a
replacement.
Table 1-2List of Materials
Description Item
Elite Modem
Class 2, 5V, AC Power Supply
10Base-T Ethernet
Cable Assembly, RJ-45, 8 PIN 8
Conductor
Cable Assembly, RJ-11, 6 PIN, 6
Conductor
Page 14

1-4
Installin
g
the Elite Modem
Revision 2.01 Elite Modem Installation Guide 08-01002-01
Elite Modem User’s Guide
Table 1-2List of Materials
Description Item
Page 15

Installing the Elite Modem
1-5
Revision 2.01 Elite Modem Installation Guide 08-01002-01
Task:
Installing the Modem
Note:
Some computers require an adapter between the RJ-45
Ethernet cable and the Ethernet connector on the back of the
computer (the adapter is often a round, 8-pin connector).
Step Action
1
Make sure that all of your Elite Modem equipment is available before
proceedin
g
.
2
Connect the RJ-45 Ethernet cable to the 10Base-T Ethernet Card connector
on the rear of your computer. Connect the other end of cable to the Ethernet
port on the rear of the modem labeled:
To PC
.
3
Your telephone is connected with an RJ-11 modular phone line cord to a
telephone wall jack. Disconnect the telephone line cord from the telephone
wall jack and insert it into the jack in the rear of the modem identified with this
icon:
4
Connect the RJ-11 modular phone cord to the connector on the rear of the
modem labeled,
To Wall Jack
. This connector is identified with a telephone
line symbol.
5
Insert the other end of the phone cord into the telephone wall jack.
6
Connect the rounded plu
g
end of the power supply cord into the 5V AC
connector on the rear of the modem.
7
Plu
g
the power supply into wall outlet. This completes the modem physical
installation. Proceed to Setup. At this point, the Power and the Loop Status
indicator li
g
hts should be green.
Note:
See “Modem Indicators” on page 1-6 for more information on the Elite
modem LED indicators.
STOP
You have completed this task.
Page 16

1-6
Installin
g
the Elite Modem
Revision 2.01 Elite Modem Installation Guide 08-01002-01
Modem Indicators
Status and Activity Indicators
The front panel of the Elastic Net works Elite Modem has six status and ac tivity
indicators. Currently four of the indicators are used. The indicators provide
you with modem status and diagnostic information as listed in the following
table.
Table 1-2. Elite Modem Front Panel Indicators
Position
(left to ri
g
ht)
Indicator
1 Reserved
2Power
3PC
4Network
5Transfer
6 Reserved
Page 17

Installing the Elite Modem
1-7
Revision 2.01 Elite Modem Installation Guide 08-01002-01
Additional telephones on the modem phone line
The Elite Modem allows you to hook-up your computer and telephone to the
same line, providing simultaneous voice service with high-speed data service.
T elephones or answering devices connected directly to the Elite Modem do not
require external telephone filters. The Elite Modem has a built-in voiceband
filter on the telephone connection, so that the signal noise of the data traffic
does not interfere with voice conversations.
However, if you have additional phones (on different jacks) connected to the
same line as the modem (extension phones, etc.), you may need an external
filter.
Test all additional lines for correct operation (no data noise) while the Elite
Modem is running and in service. If you hear noise interference while using an
extension phone, you may need to install a telephone filter between that phone
and its wall jack. T est all extension telephones for noise interference and install
filters as needed using the task instructions on the following pages.
You can order voiceband filters from the Elite Modem product distributor or
service provider.
Table 1-3. Telephone Filters
Filter Description
Desk Mount Filter
Use to connect fax machines,
answerin
g
machines, and desk
telephones that are not directly
connected to the Elite Modem.
See “Installin
g
the Desk Mount Filter” on
pa
g
e 1-8.
Wall Mount Filter
Use with wall-mounted telephones.
See “Installin
g
the Wall Mount Filt er” on
pa
g
e 1-9.
Page 18

1-8
Installin
g
the Elite Modem
Revision 2.01 Elite Modem Installation Guide 08-01002-01
Task:
Installing the Desk Mount Filter
It is important that the telephone filters be installed correctly. Follow these
instructions precisely . If the telephone filter is instal led incorrectly (reversed),
the filter will not allow voice signals to pass. (See Figure 1-1, Desk Mount
Filter Connections.)
Step Action
1
Check for a dial tone.
2
Disconnect the telephone line cord from the wall jack and insert it into the jack
on the filter identified with this telephone icon:
3
A 7-foot RJ-11 telephone line cord is supplied with the filter. Connect one end
of the line cord into the jack on the filter identified with this icon:
4
Plu
g
the other end of the 7-foot line cord into the wall jack.
5
Verify that ther is a dial tone. If a dial tone is not present, check all
connections.
Figure 1-1. Desk Mount Filter Connections
STOP
You have completed this task.
Page 19

Installing the Elite Modem
1-9
Revision 2.01 Elite Modem Installation Guide 08-01002-01
Task:
Installing the Wall Mount Filter
It is important that the telephone filters be installed correctly. Follow these
instructions precisely . If the telephone filter is instal led incorrectly (reversed),
the filter will not allow voice signals to pass. (See Figure 1-2, Wall Mount
Filter Installation.)
Step Action
1
Check for a dial tone.
6
Remove the telephone from its wall mount by pushin
g
it upward and pulling
it away fr om th e mounti n
g
pins. The telephone may have a short “pig tail” line
cord connectin
g
it to the jack. If the phone has a “pig tail” line cord, disconnect
it from the wall jack.
7
Plu
g
the filter’s short “pig tail” line cord into the wall jack.
8
Install the wall mount filter by placin
g
it over the wall jack and sliding it
downward until it is seated on the mountin
g
pins.
9
Plu
g
the telephone “pig tail” line cord into the jack located on the front of the
filter.
10
Install the telephone on wall mount filter.
11
Verify dial tone. If a dial tone is not present, check all connections.
Figure 1-2. Wall Mount Filter Installation
STOP
You have completed this task.
Page 20

1-10
Installin
g
the Elite Modem
Revision 2.01 Elite Modem Installation Guide 08-01002-01
Page 21

A-1
Revision 2.01 Elite Modem Installation Guide 08-01002-01
Appendix A: Troubleshootin
g
A-
Table A-1. Modem Troubleshooting
Problem Troubleshooting
No Modem
Power/Power Li
g
ht Off
Make sure there is power to the outlet. Check the
connection to the modem. (Make sure the modem is
plu
gg
ed in). If the power indicator is not lit, try another
power cord. If the indicator is still not lit, call distributor
technical support.
No data transfer Check these items in the followin
g
order:
1. PC Light is OFF
Make sure the cable between the Etherport or
modem and the back of the computer is properly
connected. If the PC Li
g
ht remains off, try another
cable. If the indicator is still not lit, call distributor
technical support.
2. Transfer Light is OFF
This li
g
ht will briefly blink GREEN when the
computer attempts to send data, and briefly blink
when data is sent to the computer. If it doesn’t li
g
ht
when the computer sends data, AND the PC Li
g
ht
is ON, call distributor technical support.
3. Network Light is Off
Check the connection to the network. The li
g
ht
should be GREEN. If the Network li
g
ht is YELLOW,
make sure the Elmo shelf has power. If not call
distributor technical support. .
Page 22

A-2
Appendix A: Troubleshootin
g
Revision 2.01 Elite Modem Installation Guide 08-01002-01
No data transfer
(
continued
)
4. Network Light is Red
The Elite Modem is not receivin
g
any signal from
the Internet service provider. Make sure all
connections are well-connected and the computer
is set up correctly.
Make sure the phone has a clear dial tone. Call your
service provider (phone company). If you are on a
corporate network, contact the network IS
administrator, and make sure the service provider is
havin
g
no technical problems. If the noise persists,
call distributor technical support.
5. Network Light is Yellow
The modem is tryin
g
to synchronize with the service
provider. Make sure the modem is at least 12
inches from the monitor. Wait three minutes for the
li
g
ht to turn steady GREEN, which indicates they
are synchronized and data should transfer.
If Network Li
g
ht doesn’t turn GREEN in three
minutes, call your service provider (phone
company). If you are on a corporate network,
contact the network IS administrator, and make
sure the service provider is havin
g
no technical
problems. Call distributor technical support.
6. Transfer Light Remains Off
Make sure all cables are properly installed and
connected. If the Transfer Li
g
ht remains off, call
distributor technical support.
Table A-1. Modem Troubleshooting
Problem Troubleshooting
Page 23

Appendix A: Troubleshooting
A-3
Revision 2.01 Elite Modem Installation Guide 08-01002-01
Noise interference on
the extension telephone
when usin
g
the modem
Make sure the extension phone is properly filtered. If a
filter is installed, this noise could be a faulty filter, line
cord, phone service, phone, or the Elite1Modem. While
usin
g
the modem, try to eliminate these possibilities in
the followin
g
order:
1. Turn OFF the Elite Modem. Make a call on your
extension phone and check the noise. If the noise is
g
one, the modem may have a fault.
2 Exchan
g
e the line cord between the modem and the
wall jack with a known
g
ood line cord. Check the
noise. If it persists, place the known
g
ood line cord
between the modem and the phone.
3. If you have a known
g
ood spare phone, use it to
replace the suspect phone. If the noise is
g
oes
away, the telephone is bad. If the noise persists, it
may be the Elite Modem. Contact distributor
technical support.
4. Call your phone service and ask them to check the
line for noise. If they assure you that the noise
problem is not with their equipment, check your
phone unit.
Noise interference on
the telephone
connected to the modem
The Elite Modem has a built-in filter to prevent this. The
noise could be a faulty line cord, phone, the Elite
Modem, or it could be comin
g
from your phone service.
Try to eliminate these possibilities in the followin
g
order:
1. Disconnect the phone from the modem and connect
it directly to the wall jack, bypassin
g
the modem.
Disconnect the modem from the wall jack. If the
noise is
g
one, you should probably solve the
problem by replacin
g
the Elite Modem. If the noise
persists, it may be your phone service.
2. Check your telephone line cords by exchan
ging
them one at a time with a known
g
ood line cord. If
you eliminate the line cords as a possibility, check
the phone unit.
3. If you have a known
g
ood spare phone, use it to
replace the suspect phone and reconnect the
modem. A new phone may eliminate the noise. If the
noise persists, call distributor technical support.
Table A-1. Modem Troubleshooting
Problem Troubleshooting
Page 24

A-4
Appendix A: Troubleshootin
g
Revision 2.01 Elite Modem Installation Guide 08-01002-01
Low data throughput
rates/It seems to take a
lon
g
time to download
files to your computer
File transfer rates depend not only on the Elite Modem,
but also on the speed of your computer, the network that
you are communicatin
g
through (ISP, corporate net,
etc.), and the speed and connection of the computer you
are attemptin
g
to transfer data to and from.
If you know yo ur files are bein
g
transmitted to your
computer with hi
g
h-speed equipment and your
downloads still seem slow, it’s possible your modem is
connected to more than one computer.
The Elite Modem supports only one computer at a time.
Your computer may inadvertently be connected lo
g
ically
(or physically) into a hub or other network confi
g
uration
that looks like multiple computers to the modem. Call
your corporate IS network administrator and have any
other computers removed from the modem.
Your PC cannot
communicate with your
Internet service provider
First, make sure that all network software applications
are properly installed and confi
g
ured. Double check to
make sure the IP address is correct. Call your telephone
service provider and make sure Elite Modem service is
enabled.
Next, call your ISP help desk. If you are on a corporate
network, call the network IS administrator. Make sure
your service is active and that the network is not
experiencin
g
technical difficulties.
Table A-1. Modem Troubleshooting
Problem Troubleshooting
Page 25

B-1
Revision 2.01 Elite Modem Installation Guide 08-01002-01
Appendix B: Regulatory Information B
FCC Compliance Information
Federal Communications Commission
Compliance Information Statement (FCC Rules Section 2.1077)
2.1077 (a) (1) Product identification
Name: Elite Modem
Product code: 01-00004-01
2.1077 (a) (2) Compliance Statement
This device complies with part 15 of the FCC rules. Operation is subject to the
following two conditions:
1 This device may not cause harmful interference, and
2
This device must accept any interference receive, including
interference that may cause undesired operation.
2.1077 (a) (3) Responsible Party (FCC 2.909)
Elastic Networks
6120 Windward Parkway, Suite 100
Alpharetta, GA 30005
Phone: 678-297-3100
Fax: 678-297-3110
2.1007 (C) The compliance information statement shall be included in the user
guide or as a separate sheet.
Page 26

B-2
Appendix B: Re
g
ulatory Information
Revision 2.01 Elite Modem Installation Guide 08-01002-01
FCC Information to User
(FCC Rules Section 15.105(b)):
Note: The Elite Modem has been tested and found to comply with the limits
for a Class B digital device, pursuant to part 15 of the FCC Rules. These limits
are designed to provide reasonable protection against harmful interference in
a residential installation. This equipment generates, uses and can radiate radio
frequency energy and, if not installed and used in accordance with the
instructions, may cause harmful interference to radio communications.
However, there is no guarantee that interference will not occur in a particular
installation. If this equipment does cause harmful interference to radio and
television reception, which can be determined by turning the equipment OFF
and ON, the user is encouraged to try to correct the interference by one or more
of the following measures:
• Reorient or relocate the receiving antenna
• Increase the separation between the equipment and receiver
• Connect the equipment into an outlet on a circuit different from
that to which the receiver is connected.
• Consult the dealer or an experienced radio/television
technician for help.
Customer Instructions
The Phone Filters comply with part 68 of the FCC Rules. On the back of this
equipment is a designator that contains the FCC registration number and ringer
equivalence for this equipment. If requested, this information must be
provided to the telephone company. The equipment uses the following
standard connections and codes: USOC-RJ-11.
The Ringer Equivalence Number (REN) shown on the filter is used to
determine the quantity of devices which may be connected to the telephone
line. Excessive RENs on the telephone line may result in another device not
ringing in response to an incoming call. The sum of the RENs should not
exceed (5). To be certain of the number of devices that may be connected to a
line, as determined by the total RENs, contact the local telephone company.
If the equipment causes harm to the telephone network, the telephone
company will notify you in advance that temporary discontinuance of service
may be required. But if advance notice is not practical, the telephone company
will notify the customer as soon as possible. Also, you will be advised of your
right to file a complaint with the FCC if you believe it is necessary.
The telephone company may make changes in its facilities, equipment,
operations or procedures that could affect the operation of the equip-ment. If
this happens the telephone company will provide advance notice in order for
you to make necessary modifications to maintain uninterrupted service.
Page 27

Appendix B: Regulatory Information
B-3
Revision 2.01 Elite Modem Installation Guide 08-01002-01
If the equipment is causing harm to the telephone network, the
telephone company may request that you disconnect the equipment
until the problem is resolved.
The equipment can not b e used o n public co in phon e service pr ovided
by the telephone co mpany. Connection to party lines is subject to state
tariffs. (contact the state public utility commission, public service
commission or corporation commission for information).
No repairs can be perf ormed by the user . If you exper ience trouble with
this equipment and/or for repair and warranty information, please
contact distributor technical support.
Page 28

B-4
Appendix B: Re
g
ulatory Information
Revision 2.01 Elite Modem Installation Guide 08-01002-01
Industry Canada Compliance Information
EMISSIONS:
(Per ICES-003, Issue 2 “Interference-Causing Equipment Standard, Digital
Apparatus”):
This Class B digital apparatus meets all requirements of the Canadian
interference-causing equipment regulations.
Cet Appareil numerique de la Class B respecte toutes les exigences du
reglement sur le materiel brouilleur du Canada.
EQUIPMENT ATTACHMENT LIMITATION
NOTICE: The Industry Canada Label identifies certified equipment. This
certification means that the equipment meets telecommunications network
protective, operational and safety requirements as prescribed in the
appropriate Modem Equipment Technical Requirements document(s). The
department does not guarantee the equipment will operate to the user’s
satisfaction.
Before installing this equipment, users should insure that it is permissible to be
connected to the facilities of the local telecommunications company. The
equipment must also be installed using an acceptable method of connection.
The customer should be aware that compliance with the above conditions may
not prevent degradation in service in some situations.
Repairs to certified equipment should be coordinated by a representative
designated by the supplier . Any repairs or alterations made by the user to this
equipment or equipment malfunctions may give the telecommunications
com-pany cause to request the user to disconnect the equipment.
Users should insure for their own protection that the electrical ground
connec-tions of the power utility, telephone lines and internal metallic water
pipe system, if present, are connected together. This precaution may be
particularly important in rural areas. Caution: Users should not attempt to
make such connections themselves, but should contact the appropriate electric
inspection authority, or electrician, as appropriate.
NOTICE: The Ringer Equivalence Number (REN) assigned to each terminal
device provides an indication of the maximum number of terminals allowed to
be connected to a telephone interface. The termination on an interface may
consist of any combination of devices subject only to the requirements that the
sum of the Ringer Equivalence Numbers of all the devices does not exceed five
(5).
Page 29

C-1
Revision 2.01 Elite Modem Installation Guide 08-01002-01
Appendix C. Warranty and DisclaimersC
Coverage
Elastic Networks warrants this modem set against defects and malfunctions for
a period of ninety days from the date of original purchase. If there is a defect
or malfunction, Elastic Networks at its option, and as the exclusive remedy,
upon receipt of the defective set will either repair or replace this modem set at
no charge, if returned within the warranty period.
If replacement parts are used in making repairs, these parts may be refurbished
or may contain refurbished materials. If it is necessary to replace the modem,
it may be replaced with a refurbished modem of the same design and color. If
it should become necessary to repair or replace a defective or malfunctioning
modem under this warranty, provisions of this warranty shall apply to the
repaired or replaced modem set until the expiration of ninety (90) days from
the date of pick-up or the date of shipment to you of the repaired or
replacement set or until the end of the original twelve month warrant y period,
whichever is later.
Page 30

C-2
Appendix C. Warranty and Disclaimers
Revision 2.01 Elite Modem Installation Guide 08-01002-01
Exclusions
Elastic Networks does not warrant this modem set to be compatible with the
equipment of any particular telephone company. This warranty does not
extend to damage to the product resulting from improper installation or
operation, alteration, or neglect, or abuse, or misuse, fire or natural causes such
as storms or floods after the modem is in your possession.
Elastic Networks
shall not be liable for any incidental or consequential
damages, including but not limited to loss, damage, or expense directly
or indirectly arising from the customer's use of or inability to use this
modem, either separately or in combination with other equipment.
This
paragraph, however, shall not apply to consequential damages for injury to the
person in the case of modems used or bought for use primarily for personal,
family or household purposes.
This warranty sets forth the entire liability and obligations of Elastic
Networks with respect to breach of war ranty, and the warranties set
forth or limited h erein are th e sole warr anties and ar e in lieu of al l other
warranties, ex-pressed or implied including warranties of fitness for
particular purpose and merchantability.
Page 31

Page 32

Elastic Networks
Elite Modem
Installation Guide
© 1999 Elastic Networks
All ri
g
hts reserved
The information contained in this document is subject to
chan
g
e without notice. Elastic Network s reserves the right
to make chan
g
es to equipment design or program
components, as progress in engineering, manufacturin
g
methods, or other circumstances may warrant.
EtherLoop is a trademark of Elastic Networks
Publication Number: 08-01002-01
Document Version: Standard.
Document Revision: 2.01
Publication Date: November 1999
Printed in the United States of America
 Loading...