

Page 1
Page 2

Page 3
¸
Contents
Introduction ........................................................................................ 3
Features & Specifications ...................................................................... 4
Features ............................................................................................ 4
Specifications ................................................................................... 7
Getting Started ................................................................................ 8
Connections ........................................................................................... 9
Connecting the VIA!migo to a Home Stereo or A/V Receiver ........ 10
Control Connections ........................................................................ 11
Connecting VIA!migo to an ELAN Multi-Room Controller .............. 14
Connecting To Your A/V System ...................................................... 20
Connecting Your iPod ...................................................................... 21
Adjusting VIA!migo to Fit Your iPod ................................................ 21
Operation .............................................................................................. 23
VIA!migo Modes ..................................................................................... 23
Dock Mode (On-Screen Navigation) ................................................ 23
iPod Mode ........................................................................................ 25
Basic On-Screen Display Navigation .................................................... 26
On-Screen Display Navigation Page Layout ................................... 27
On-Screen Navigation Tips & Tricks ..................................................... 30
Shuffle Functions .............................................................................. 30
Speed-Scroll Functions .................................................................... 30
Screen Savers ................................................................................... 31
Playing & Controlling Music .................................................................. 32
Tips & Tricks For Playing Music ...................................................... 32
How to Switch Between NTSC and PAL .............................................. 33
©2007 ELAN Home Systems • All Rights Reserved 1
Page 4
Appendix A: FAQ’s/Troubleshooting ................................. 34
Appendix B: Auxiliary Input .................................................... 37
Limited Warranty ............................................................. Back Page
2 ©2007 ELAN Home Systems • All Rights Reserved
¸
Page 5
¸
Introduction
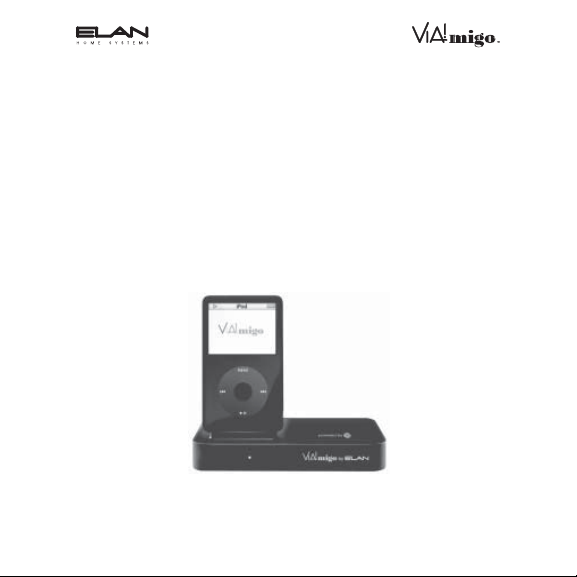
Congratulations on your purchase of the VIA!migo™ iPod® Integration Dock
with On-Screen Navigation. VIA!® & iPod bring you your favorite tunes no
matter where you are. The VIA!migo iPod Integration Dock lets you leave
your headphones behind. Just sit down, relax and enjoy all the wonderful
music in your iPod because now you can hear it everywhere in the house.
Control your iPod from anywhere, while viewing Artist and Song information
from any VIA! Touch Panel in the home.
Place your VIA!migo anywhere in the house where it’s most convenient. You
can even have multiple VIA!migos in different locations around the home. All
you need to do is slide your iPod into any dock and it’ll be available wherever and whenever you want it.
Figure 1: VIA!migo iPod Integration Dock
©2007 ELAN Home Systems • All Rights Reserved 3
Page 6

Features & Specifi cations
With ELAN’s powerful combination of products, you can now listen to your
music anywhere you want. While VIA!migo lets you play all of your music
throughout the house. ELAN’s full line of VIA!®dj Digital Music Servers give
you one-touch, on-screen access to your entire CD collection and include
a fast and easy PC/Mac-to-iPod interface so you can take any of it on the
road. At home or on the go, ALL your music is now right at your fingertips.
•
The ultimate iPod interface for any ELAN Multi-Room System
•
Turns your iPod into a home-based multi-room Audio and Video
player*
Control your iPod from any VIA! Touch Panel in the home
•
View ‘Now Playing’ info (Artist, Song, etc.) on VIA! Touch Panels or
•
TVs using the composite video output
Graphical User Interface with familiar iPod controls
•
S-Video output for TV viewing
•
NTSC and PAL compatible
•
IR receiver for direct (non-VIA!) control
•
Easy auto-programming with VIA!
•
•
IR and RS-232 control
•
Discrete commands for every function
•
Variable/Fixed selectable audio output
•
3.5mm IR input
•
Software upgrades via RS-232 port
•
Docking station also recharges iPod battery
*Requires a Video iPod with the latest version of Apple
4 ©2007 ELAN Home Systems • All Rights Reserved
®
TOOLS Setup Software
®
firmware.
¸
Page 7

¸
NOTE: RS-232 provides two way feedback that enables you to view
media and iPod information, such as Track Titles, Artist information,
Play Status, etc. on Olé Touchpads. This requires the use of
an ELAN SS1 System Station.
©2007 ELAN Home Systems • All Rights Reserved 5
Page 8
¸
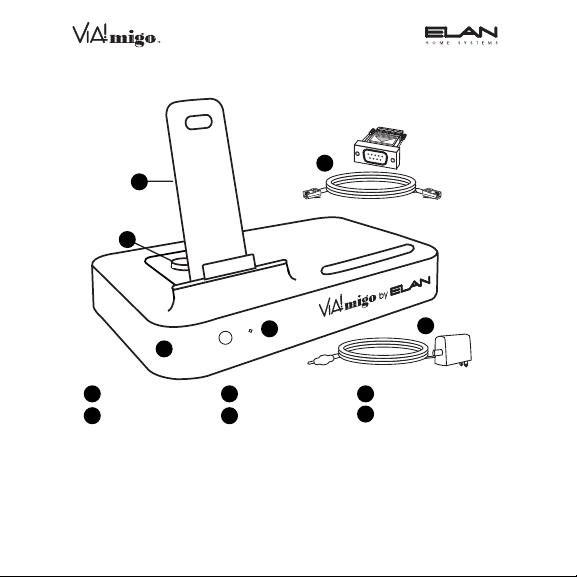
1
6
2
4
5
3
IPOD SUPPORT STAND
1
ADJUSTMENT SCREW
2
VIA!MIGO DOCK
3
POWER STATUS LIGHT
4
AC POWER ADAPTER
5
6
RJ45-DB9 CONNECTOR
AND CABLE
Figure 2: VIA!migo Components
6 ©2007 ELAN Home Systems • All Rights Reserved
Page 9
¸
Specifi cations
Inputs/Outputs
Left/Right Audio
(Variable or Fixed)
Video Composite video output
S-Video
(simultaneously active)
Power Supply Input 100-240VAC, 47-63 Hz
Power Supply 10VDC, 1.5 amps max
RS2-232 Serial Input RJ-45 Jack (RJ-45 to DB9 adaptor
VIDEO FORMAT NTSC/PAL (automatic internal
Description
Analog audio output
Separated analog video output
and cable included)
switching)
iPod Models Supported
•
iPod mini (4GB, 6GB)
•
4G iPod with Click Wheel (20GB, 30GB, 40GB, 60GB, U2)
•
4G iPod with Color Display (20GB, 30GB, 40GB, 60GB, U2)
•
iPod nano (1GB, 2GB, 4GB)
•
5G iPod with Video (30GB, 60GB)
Note: Apple iPod models listed as of March 2006
©2007 ELAN Home Systems • All Rights Reserved 7
Page 10

Getting Started
Connecting your VIA!migo to your Home Entertainment System is a snap.
To connect the VIA!migo to a Home Entertainment System:
1. Assemble your VIA!migo - Attach the VIA!migo iPod Support Stand
and make the proper power, audio and video connections to your
Home Entertainment System.
2. Connect your iPod and adjust VIA!migo Stand - Adjust the VIA!migo
Stand to fit your particular iPod.
3. Select your media and play - Turn on VIA!migo, then select some
music on your iPod.
To assemble the VIA!migo, perform the following steps:
1. Remove the adjustment screw on top of the Dock
2. Fit the iPod Support Stand into the cavity on top of the VIA!migo.
NOTE: Be sure to line up the Support Stand’s cutout slot with the
adjustment screw on the Dock.
3. Tighten the Support Stand’s adjustment screw to secure the Stand in
place. Do not over-tighten the screw.
8 ©2007 ELAN Home Systems • All Rights Reserved
¸
Page 11
¸
Connections
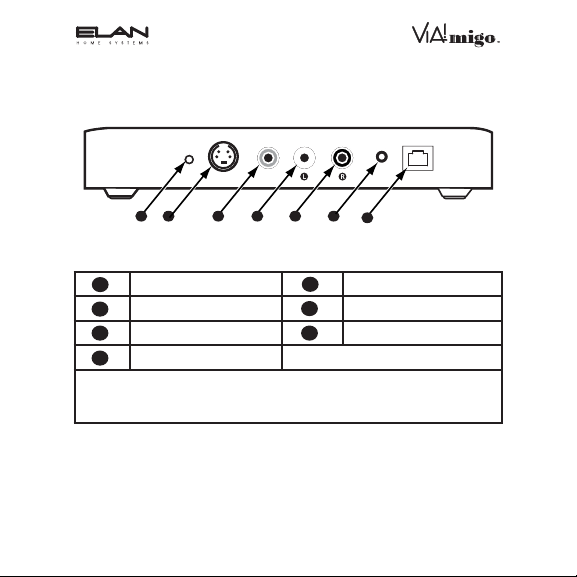
S-VIDEOREMOTE IN VIDEO AUDIO 10V DC DATE I/O
2 6
43 51
7
Figure 3: VIA!migo Connections
1
Remote In Right Audio Out
2
S-Video Out 10VDC PWR Jack
3
Composite Video Out *Data I/O Port
4
Left Audio Out
* Warning: The Data I/O Port is NOT an Ethernet connection and may
cause damage to the router, VIA!migo and the iPod if it is connected to an
ethernet router.
5
6
7
Table 1: VIA!migo Rear Panel Connections
©2007 ELAN Home Systems • All Rights Reserved 9
Page 12
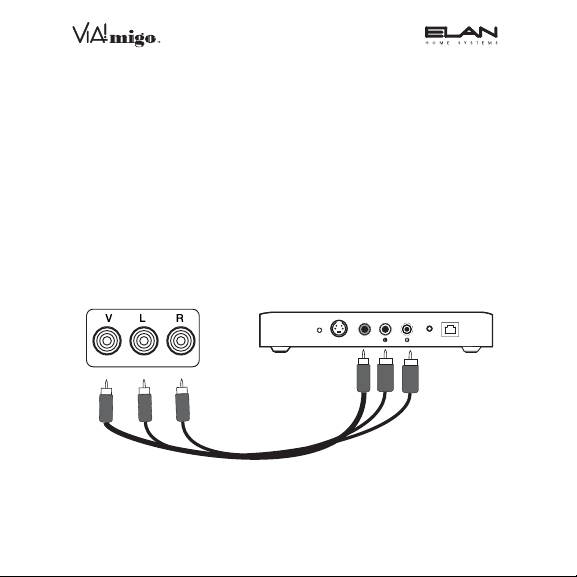
Connecting the VIA!migo to a Home Stereo
A
or A/V Receiver
There are several different ways you can connect the VIA!migo to your existing Home Entertainment System:
1. Connect the Left and Right Audio Outputs to a stereo or A/V
Receiver. Connect the Video Output directly to a TV.
2. Connect the Left and Right Audio Outputs and Video Output to a TV.
3. Connect the Left and Right Audio Outputs to an ELAN Multi-Room
System and the Video Output to an ELAN VIA! Touch Panel.
Note: VIA!migo can be connected solely to a home stereo, but
On-Screen Navigation will not be available.
¸
/V Source Input
VIA!migo
Composite
Video Cable
(included)
S-VIDEO REMOTE IN VIDEO AUDIO 10V DC DATA I/O
Stereo
Interconnect
Cable
Figure 4: Stereo-A/V Receiver Connections
10 ©2007 ELAN Home Systems • All Rights Reserved
Page 13
¸
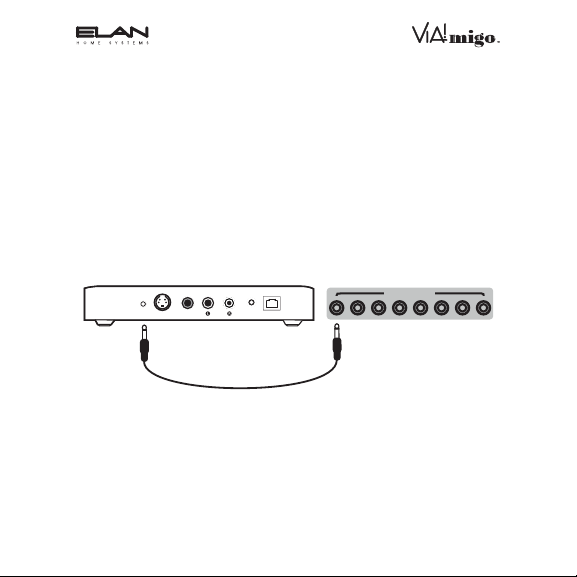
Control Connections
IR Control
The VIA!migo may be controlled by IR or RS-232. IR control is the simplest
connection and will provide all control options but WILL NOT provide feedback when used with Olé Touchpads. Feedback, in the case of IR controlled
applications, occurs on a TV or VIA! Touch Panel dispaly.
Use a mono 3.5mm interconnect cable between an IR Out port from an ELAN
Multi-Room Controller or other IR device and the Remote In port on the
VIA!migo as shown in Figure 5.
VIA!migo
S-VIDEO REMOTE IN VIDEO AUDIO 10V DC DATA I/O
3.5mm Mono
Interconnect
Cable
IR Output
SOURCE IR OUTPUTS
23
4
56
7
81
Figure 5: IR Connections
©2007 ELAN Home Systems • All Rights Reserved 11
Page 14

RS-232 Control
V
RS-232 serial control provides reliable control from VIA! Touch Panels and
Olé Touchpads. In addition to control capabilities, RS-232 control allows
Olé Touchpads to display feedback (Title, Track, etc.). An ELAN SS1 System
Station is required to display feedback on Olé Touchpads. Use the included
RJ-45 to DB-9 Adaptor when connecting the VIA!migo to the SS1.
Note: Maximum distance between the VIA!migo and an SS1 is 300'.
IA!migo
DATA I/O
SS1 System Station
ELAN RS-232
HOST
ELAN
¸
RJ-45
Cable
RS-232
Cable
RJ-45 to
RS-232
Adapter
Figure 6: SS1 to VIA!migo Connections
12 ©2007 ELAN Home Systems • All Rights Reserved
Page 15

¸
RS-232 Adapter DB-9
Pin 2 = TX
Pin 3 = RX
Pin 5 = Ground
12345
6789
WARNING: CONNECT ONLY PINS 2, 3, AND 5.
DO NOT CONNECT OTHER PINS TO THE SS1.
CONNECTING TO OTHER PINS WILL RESULT
IN DAMAGE TO THE UNIT!
RS-232 Adapter RJ-45
Pin 2 (Blue White) = TX
Pin 3 (Orange) = RX
Pin 5 (Green) = Ground
12345678
Figure 7: RS-232 Adapter Pinout
The pinout shown in Figure 7 shows the Transmit (TX), Receive (RX), and
Ground (GND) connections for the RS-232 to RJ-45 Adapter. Connect only
pins 2, 3, and 5 of the RJ-45 to the SS1 System Station.
Note: The VIA!migo IR connections MUST be connected along with
the RS-232 connections when using RS-232 control.
Note: The VIA!migo must be located within 300 feet of the SS1.
©2007 ELAN Home Systems • All Rights Reserved 13
Page 16

Connecting VIA!migo to an ELAN Multi-Room
Controller
Remotely Located Source
VIA!migo connects to ELAN’s Multi-Room Controllers as a Source much like
a DVD player, VCR, or cable box. Figure 8 shows the VIA!migo hooked up
to an ELAN System12 using Cat-5 to connect an LSWP (Local Source Wall
Plate Kit to pass Audio, Video and IR between the VIA!migo and the S12
chassis using Cat-5.
Note: The LSWP is specific to S12 Systems and will not work with
other Multi-Room Controllers
VIA!migo
3.5mm Mono
Interconnect
Cable
47*%&03&.05&*/ 7*%&0 "6%*0 7%$ %"5"*0
Composite
Video Cable
(included)
Stereo
Interconnect
Cable
S12
Blue
White/Blue
Orange
White/Orange
Green
ELAN
White/Green
C45P
Brown
White/Brown
S12
Video Inputs
F-to-RCA
Connector
(Female to Male)
Figure 8: VIA!migo to ELAN S12 Multi-Room Controller w/ LSWP
Cat-5
RG-6 or RG-59
Coaxial Cable
White/Green
White/Brown
White/Orange
White/Blue
LSWP
Local Source
Wall Plate
Green
Brown
Orange
Blue
(Female to Female)
+ R
-
GND - L + GND V+
V+ IR- IR
+
F-to-RCA
Connector
14 ©2007 ELAN Home Systems • All Rights Reserved
¸
Page 17

¸
Figure 9 shows the VIA!migo connected directly to an ELAN Multi-Room
controller using an RSWP (Remote Source Wall Plate Kit) to pass Audio,
Video and IR between the VIA!migo and a Multi-Room Controller using
Cat-5.
Note: The RSWP is NOT system-specific and will work with any
Multi-Room Controller or Stereo-A/V receiver.
VIA!migo
47*%&03&.05&*/ 7*%&0 "6%*0 7%$ %"5"*0
Cable (included)
Composite
Video Cable
(included)
Stereo
Interconnect
3.5mm Mono
Interconnect
Cable
RSWP
Source
Plate
Cat-5
RG-6 or
RG-59 Coax
System
Plate
Stereo
Interconnect
Cable (included)
Mono 3.5mm
Interconnect
Cable
Composite
Video Cable
(included)
(S12/S6/Z•630)
Source Inputs
IR Outputs
(S12, S6, Z•630)
Composite Video
Inputs
+12VDC
Power
Supply
(included)
L
R
IN
(S12 or Z•880)
Figure 9: VIA!migo to ELAN Multi-Room Controller w/ RSWP
©2007 ELAN Home Systems • All Rights Reserved 15
Page 18

Multi-Room Controller Applications
S12
¸
Coax Cable
VIA!64
SS1
PWR
GNDNCCOM
NO
PWR
GNDNCCOM
NO
PWR
GND
RELAY 1 RELAY 2 RELAY 3 RELAY 4 RELAY 5 RELAY 6 RELAY 7 RELAY 8
DC RELAY PWR
HOST RS-232
COM 2
COM 1
ETHERNET
COM 1
COM 4
COM 3
ELAN RS-232
COM 2
COM 3
HOST
COM 4
ELAN
RS-232
to
RJ45
Connector
VIA!migo
Cat-5
EXTIR ANTENNA
TO SENSE INPUTS
USE STEREO 3.5mm PLUGS ONLY
XM FM
345 6 MONO
12
TM
PWR4
16 VDC/
PWR
GNDNCCOM
PWR
GNDNCCOM
NO
IR-LINK
LINK
RX/TX
ZONE1LOCAL2ZONE LOCAL3ZONE LOCAL
1
Cat-5
ZONE4LOCAL5ZONE LOCAL6ZONE6LOCAL
4
LOCAL8ZONE
LOCAL7ZONE VIA!POWER
--
8
+
7
16VDC / 10A
16VDC / 4A
4A
PWR
GNDNCCOM
NO
SENSE INPUTS
2
1
456
VIA!NET
Cat-5
Cat-5
PS12
NO
PWR
GNDNCCOM
NO
PWR
GNDNCCOM
NO
PWR
GNDNCCOM
NO
LEXINGTON, KY • MADE IN CHINA
MODEL: VIA2SS1
WARNING: DO NOT REMOVE COVER.
NO USER SERVICEABLE PARTS INSIDE.
REFER SERVICE TO ELAN-APPROVED
SERVICE TECHNICIAN.
IR OUTPUTS
9
ALL IR OUTPUT
12345
3
EXT IR INPUT
Cat-5
(300' Max)
Cat-5
3.5mm
IR Cable
RCA
A/V Cables
VIA2SS
POWER
16VDC
101112
678
VIA-NET
+
-
PWR
IR
RJ-45
Wall
Plate
Coax Cable
LSWP
Local Source
L
Wall Plate
IN
R
E
C
R
U
O
S
IR
OUT
VIDEO
Figure 10: VIA!migo - RS-232 Control
16 ©2007 ELAN Home Systems • All Rights Reserved
Page 19

¸
S12
VIA!64
VIA!migo
Coax Cable
TM
PWR4
16 VDC/
4A
Cat-5
Cat-5
PS12
3.5mm
IR Cable
RCA
A/V Cables
TO SENSE INPUTS
USE STEREO 3.5mm PLUGS ONLY
345 6 MONO
12
ZONE1LOCAL2ZONE LOCAL3ZONE LOCAL
1
ZONE4LOCAL5ZONE LOCAL6ZONE6LOCAL
4
LOCAL7ZONE VIA!POWER
--
+
7
16VDC / 10A
16VDC / 4A
VIA!NET
EXTIR ANTENNA
XM FM
LOCAL8ZONE
Cat-5
E
C
R
U
O
S
VIDEO
Coax Cable
Local Source
L
IN
R
IR
OUT
LSWP
Wall Plate
8
Figure 11: VIA!migo - IR Control
©2007 ELAN Home Systems • All Rights Reserved 17
Page 20

¸
TO SENSE INPUTS
USE STEREO 3.5mm PLUGS ONLY
345 6 MONO
12
ZONE1LOCAL2ZONE LOCAL3ZONE LOCAL
1
ZONE4LOCAL5ZONE LOCAL6ZONE6LOCAL
4
LOCAL7ZONE VIA!POWER
7
PWR
GNDNCCOM
NO
IR OUTPUTS
9
101112
678
Zone 2 TV Monitor
Composite
Video Cable
Zone 2 Z•250
EXTIR ANTENNA
XM FM
Cat-5
LOCAL8ZONE
--
8
+
16VDC / 10A
16VDC / 4A
VIA!NET
Cat-5
Cat-5
LEXINGTON, KY • MADE IN CHINA
MODEL: VIA2SS1
WARNING: DO NOT REMOVE COVER.
NO USER SERVICEABLE PARTS INSIDE.
REFER SERVICE TO ELAN-APPROVED
SERVICE TECHNICIAN.
VIA-NET
PWR
IR
RJ-45
Wall
Plate
Cat-5
VIA2SS
POWER
16VDC
+
-
LSWP
Coax
L
IN
R
E
C
R
U
O
S
IR
OUT
VIDEO
LSWP
Wall
Plate
RJ-45
Wall
Plate
Coax
L
IN
R
E
C
R
U
O
S
IR
OUT
VIDEO
S12
Zone 1 VIA!64
SS1
PWR
GNDNCCOM
NO
PWR
GNDNCCOM
NO
PWR
GND
RELAY 1 RELAY 2 RELAY 3 RELAY 4 RELAY 5 RELAY 6 RELAY 7 RELAY 8
DC RELAY PWR
HOST RS-232
COM 2
COM 1
ETHERNET
COM 1
COM 4
COM 3
ELAN RS-232
COM 2
COM 3
HOST
COM 4
ELAN
RS-232
to
RJ45
Connectors
Zone 1 VIA!migo
Zone 2 VIA!migo
Coax Cable
TM
PWR
GNDNCCOM
LINK
RX/TX
Cat-5
Cat-5
PWR4
16 VDC/
4A
PS12
PWR
GNDNCCOM
NO
PWR
GNDNCCOM
NO
PWR
GNDNCCOM
NO
PWR
GNDNCCOM
NO
NO
IR-LINK
SENSE INPUTS
2
1
12345
ALL IR OUTPUT
3
456
EXT IR INPUT
Cat-5
(300' Max)
Cat-5
3.5mm
IR Cable
RCA
A/V Cables
Cat-5
3.5mm
IR Cable
RCA
A/V Cables
Figure 12: Multiple VIA!migos - RS-232 Control
18 ©2007 ELAN Home Systems • All Rights Reserved
Page 21

¸
USE STEREO 3.5mm PLUGS ONLY
345 6 MONO
7
+
16VDC / 10A
16VDC / 4A
VIA!NET
EXTIR ANTENNA
--
A/V Cables
A/V Cables
Composite
Video Cable
XM FM
LOCAL8ZONE
8
PS12
RCA
3.5mm
IR Cable
RCA
3.5mm
IR Cable
Zone 2 TV Monitor
Zone 2 Z•250
VIDEO
LSWP
E
C
R
U
O
S
Cat-5
L
IN
R
IR
OUT
Cat-5
E
C
R
U
O
S
VIDEO
LSWP
Local Source
Wall Plate
Coax
Coax
L
IN
R
IR
OUT
S12
VIA!64
Zone 1 VIA!migo
Coax Cable
TM
Zone 2 VIA!migo
Cat-5
Cat-5
TO SENSE INPUTS
12
ZONE1LOCAL2ZONE LOCAL3ZONE LOCAL
1
ZONE4LOCAL5ZONE LOCAL6ZONE6LOCAL
4
LOCAL7ZONE VIA!POWER
16 VDC/
4A
PWR4
Figure 13: Multiple VIA!migos - IR Control
©2007 ELAN Home Systems • All Rights Reserved 19
Page 22

Connecting To Your A/V System
To connect to your A/V System with or without a VIA! Touch Panel:
1. Plug the included AC power adapter into the back of the VIA!migo
base, and the other end into any available AC power outlet.
2. Plug the A/V Cable into the back of the VIA!migo base. Be sure to
match the color on the A/V plugs (Red, White and Yellow) with the
corresponding jack color or input type.
3. Plug the other end of the A/V Cable into the corresponding jacks of
any available input on the A/V system. (White plug - Left Audio, Red
plug - Right Audio and Yellow plug - Video).
When connecting the VIA!migo to an ELAN Multi-Room System, it is treated
exactly like any other Audio/Video source for purposes of audio and video
connections.
NOTE: The S-Video Out connection can be used for even better
video performance (S-Video cable not included).
4. If using a VIA! Touch Panel, use it to select and turn on your
VIA!migo. Also turn on your home stereo and select the correct input
for the VIA!migo.
20 ©2007 ELAN Home Systems • All Rights Reserved
¸
Page 23

¸
Connecting Your iPod
Adjusting VIA!migo to Fit Your iPod
The VIA!migo can fit any dockable iPod. It can even be used with many iPod
protective cases left on. The first time you use your iPod, and if you ever
use another size iPod, you should adjust the VIA!migo’s Support Stand to
accommodate your particular iPod. See Figure 14 for an example.
To adjust the VIA!migo to fit your iPod:
1. Loosen the Support Stand screw and slide the Support Stand as far
back as it can go;
2. Connect your iPod by carefully lowering it onto the iPod dock
connector of the VIA!migo.
3. Slide the Support Stand toward the iPod until the iPod is gently rest
ing against the Support Stand Pad. The back of the iPod should be
parallel to the Support Stand and not leaning forward or backward.
4. Tighten the Support Stand Screw to keep in place. DO NOT
overtighten.
©2007 ELAN Home Systems • All Rights Reserved 21
Page 24

Figure 14: VIA!migo iPod Support Stand
22 ©2007 ELAN Home Systems • All Rights Reserved
¸
Page 25

¸
Operation
VIA!migo Modes
VIA!migo has two distinct modes; Dock Mode (On-Screen Navigation) and
iPod Mode. It’s very important to understand the differences between the
two.
NOTE: To toggle between iPod Mode and Dock (On-Screen
Navigation) Mode, simply issue the Mode IR command to toggle the
mode state or issue the discrete iPod Mode or Dock Mode command.
Dock Mode (On-Screen Navigation)
Dock Mode allows you to view, navigate and select your iPod media on your
TV screen or VIA! Touch Panel. You can change display settings, view currently playing song info, view songs by category, or use iPod song info as a
screensaver.
Use Dock Mode when:
•
The VIA!migo is connected to a TV or VIA! Touch Panel.
•
You want to view and select your iPod music from your TV screen or
VIA! Touch Panel.
You wish to see the currently playing song and information on your
•
iPod.
©2007 ELAN Home Systems • All Rights Reserved 23
Page 26

On-Screen Music Navigation
Use on-screen navigation by selecting the Dock Mode to control and display
your iPod music, including Playlists, Albums, Artists, Songs, etc. You can
also choose Screen Savers to customize your VIA!migo. To navigate through
the categories of your music:
1. Select Music from the Home Menu screen using the UP/DOWN
Navigation Arrows.
2. Select the Enter Button or Right Navigation Arrow to view the
Music Listing page.
3. Select the listing of music you would like to view: Playlists, Artists,
Albums, Songs, Genres, Composers or Audiobooks.
4. Scroll Up or Down to select the particular song you would like to
play, then with the song highlighted, press Enter or hit the Right
Navigation Arrow.
From the Home Menu screen, you can also go immediately to your iPod
Playlists and listen to one. You can even choose Shuffle Songs to play
songs randomly from your library. Any time that you have a track playing
from your iPod using the VIA!migo, the current track info is displayed at the
top of your TV screen. The VIA!migo also displays a track countdown timer,
the track progress bar, the name of your iPod, as well as album and playlist
information (if applicable).
24 ©2007 ELAN Home Systems • All Rights Reserved
¸
Page 27

¸
iPod Mode
iPod Mode lets you browse and select music, pictures and video directly
from your iPod. You can navigate your iPod menu screens via the arrow buttons on a VIA! Touch Panel or directly on the iPod itself while docked on top
of theVIA!migo.
Use iPod Mode when:
•
Using the VIA!migo connected to your stereo
•
Playing and navigating the iPod media
The iPod Mode can be entered by issuing the iPod Mode IR command to
the Dock.
On-Screen Video Navigation
On-Screen Video Navigation operates the same as On-Screen Music
Navigation but require a video iPod with the most current version of Apple®
iPod® firmware.
©2007 ELAN Home Systems • All Rights Reserved 25
Page 28

Basic On-Screen Display Navigation
Figure 8 shows the on-screen button layout features of a VIA! Touch Panel
with a VIA!migo program downloaded to the touch panel.
131112
1
¸
2
3
4
6 7
5
8 9
10
Figure 15: On-Screen Display Navigation Page Layout
26 ©2007 ELAN Home Systems • All Rights Reserved
Page 29

¸
On-Screen Display Navigation Page Layout
Item # Description
Displays the “Now Playing” information of the current track,
1
along with play status.
Returns to the first page in the navigation tree (Home Page).
2
Used to browse up and down through the current menu list.
3
Selects the highlighted menu item or initiates the selected track
4
to play
Allows you to move backward or forward in that navigation tree.
5
Allows you to play or pause the current media track.
6
Allows you to momentarily scan backward or forward through a
7
specific media track.
Toggles the Shuffle Mode On or Off.
8
When pressed returns you back to the main VIA! Touch Panel
9
interface.
©2007 ELAN Home Systems • All Rights Reserved 27
Page 30

Item # Description
Controls the volume up or down for the current zone.
10
Mute the audio in the specific zone.
11
Allows you to select the next or previous media track
12
Indicates the highlighted menu item on the screen.
13
.
28 ©2007 ELAN Home Systems • All Rights Reserved
¸
Page 31

¸
For basic On-Screen Display Navigation, perform the steps shown in
Figure 16.
1. Select Music from the Home
Menu Screen.
2. Select the listing of music
you would like to view: Playlist,
Artist, Albums, Songs, Genres,
Composers, or Audiobooks.
3. Scroll Up or Down to select
the particular song you would
like to play, then with the song
highlighted, press Enter or the
Right Navigation Arrow.
Figure 16: On-Screen Display Navigation
©2007 ELAN Home Systems • All Rights Reserved 29
Page 32

On-Screen Navigation Tips & Tricks
Shuffl e Functions
There are two ways to use Shuffle with your VIA!migo in On-Screen
Navigation Music Mode:
1. To immediately begin shuffling your entire Music Library, select
Shuffle Songs from the VIA!migo Home Menu.
2. Shuffle your music in any song list, such as Playlists, Artists, Albums,
Songs, etc. Simply press the Shuffle button on a VIA! Touch Panel
and the VIA!migo will then randomly select and play songs from
the current list. The Shuffle icon will appear in the right corner of the
Status Bar when you are playing songs in Shuffle Mode.
Speed-Scroll Functions
Since your iPod might contain thousands of songs, the VIA!migo features
a handy Speed-Scroll feature that lets you rapidly scroll through large lists
in seconds. By holding the Down Navigation Arrow or Up Navigation Arrow
button, your VIA!migo will scroll through several screens of selections and
then begin Speed Scrolling through multiple pages until you arrive at your
particular choice.
30 ©2007 ELAN Home Systems • All Rights Reserved
¸
Page 33

¸
Screen Savers
A Screen Saver will automatically come on after a period of user inactivity.
Music will continue to play. Select from the following:
Status Bar - displays the current song information and play status.
•
VIA!migo Logo - bounces the VIA!migo logo around the screen.
•
Black - displays a dark screen.
•
Pushing any button on the VIA! Touch Panel wakes the VIA!migo screen.
Screen Saver Time-Out
Set the Screen Saver to appear after 2 minutes, 5 min., 10 min. or Never. The
default is Never.
NOTE: You can start up the VIA!migo Screen Saver at any time by
selecting a Screen Saver and a Time-Out or by issuing the discrete
IR Screensaver On command.
©2007 ELAN Home Systems • All Rights Reserved 31
Page 34

Playing & Controlling Music
The VIA!migo lets you enjoy your iPod music through your home stereo, A/V
receiver, ELAN Multi-Room System, powered speakers and/or television.
You can either select your music directly from your iPod (iPod Mode) or
you can view, navigate and select music using VIA!migo’s On-Screen Music
Navigation (Dock Mode).
Tips & Tricks For Playing Music
Here are some tips and tricks to use to play music with your VIA!migo:
•
USE PLAYLISTS - Playlists are a good way to group music by moods,
genres, new albums. etc. For example: set up a “Cocktails” Playlist,
then a “Dinner” Playlist, then an “After Dinner” Playlist.
NOTE: Next Music Playlist and Previous Music Playlist buttons
operate in iPod Mode only.
32 ©2007 ELAN Home Systems • All Rights Reserved
¸
Page 35

¸
How to Switch Between NTSC and PAL
Switching between between NTSC and PAL can be accomplished using the
template in VIA!TOOLS software (see VIA!TOOLS “Help” file) or by issuing the
following commands:
1. Undock the iPod from the dock
2. Issue the “Home” IR Command or navigate to the Main page and
then:
A. To set the VIA!migo to NTSC (default) issue the following
commands:
Left, Up, Left, Up.
B. To set the VIA!migo to PAL mode, issue the following commands:
Left, Down, Left, Down.
©2007 ELAN Home Systems • All Rights Reserved 33
Page 36

Appendix A:FAQs/Troubleshooting
FAQs
FAQ Answer
Does the VIA!migo
charge battery in my
iPod?
Do I have to use a TV
with the VIA!migo?
34 ©2007 ELAN Home Systems • All Rights Reserved
Yes. The VIA!migo fully charges and powers
your iPod whenever your iPod is connected.
No. The VIA!migo is a music-based, remote
controlled home docking system for your iPod
that requires nothing but a stereo or powered speakers to play your iPod media. Of
course, to get the most out of your VIA!migo,
you should connect it to a TV, VIA! Touch
Panel and home stereo or ELAN Multi-Room
System. Remember, in order to use Dock
Mode with On-Screen Music Navigation to
select and choose your music, you have to
connect your VIA!migo to your TV or VIA!
Touch Panel.
¸
Page 37

¸
FAQ Answer
Where are my Podcasts
when I’m using onscreen navigation?
The VIA!migo categorizes your Podcasts
under Genres. Just select Genres from the
Music Menu and find the Podcast you’d like
to hear. If you want, you can organize your
Podcasts into a Playlist in iTunes and then
access them on your television using the
VIA!migo.
NOTE: Your iPod will sometimes organize certain Podcasts under Albums
or Artists, so be sure to check there
as well.
Troubleshooting
My VIA!migo isn’t
working...
Unit not turned ON. Turn unit ON.
Incorrect Mode. Make sure that you are in the desired mode -
©2007 ELAN Home Systems • All Rights Reserved 35
Possible Solution
Dock Mode or iPod Mode. To change modes,
simply issue the “Mode” IR command.
Page 38

¸
My VIA!migo isn’t
Possible Solution
working...
IR not working. 1. Ensure that the DB-9 to RJ-45 Adaptor
Video Output is unreadable.
iPod will not sync with
dock.
used is the one that came with the VIA!migo.
Disconnect the adaptor and resend IR
command.
2. If the Dock is near IR interference (Plasma
TV, LCD TV, sunlight, etc.) the IR Receiver
Window may be flooded. Cover the IR
Window and use the 3.5mm IR Input port.
See p. 33 for steps necessary to switch
between NTSC and PAL video formats.
Ensure iPod compatibility (p. 7) and has the
latest firmware from Apple.
36 ©2007 ELAN Home Systems • All Rights Reserved
Page 39

¸
Appendix B:
Auxiliary Input
The VIA!migo has an available Auxiliary Input on the side of the docking
station. This stereo 3.5 mm mini jack allows input from an outside source to
pass through the Left/Right audio outputs of the docking station.
When this Auxiliary Input is used, it bypasses the iPod signal until the
input jack has been removed. If the 3.5 mm mini jack is inserted while the
iPod is docked and playing that will also cause the iPod audio signal to be
bypassed.
AUX IN
Figure 17: Auxiliary Input
©2007 ELAN Home Systems • All Rights Reserved 37
Page 40

Notes:
38 ©2007 ELAN Home Systems • All Rights Reserved
¸
Page 41

¸
Notes:
©2007 ELAN Home Systems • All Rights Reserved 39
Page 42

Notes:
40 ©2007 ELAN Home Systems • All Rights Reserved
¸
Page 43

Page 44

Limited Warranty
ELAN HOME SYSTEMS L.L.C. (“ELAN”) warrants the VIA!migo™ iPod® Integration Dock to
be free from defects in materials and workmanship for the period of one year (1 year) from
date of purchase. If within the applicable warranty period above purchaser discovers that
such item was not as warranted above and promptly notifies ELAN in writing, ELAN shall
repair or replace the item at the company’s option. This warranty shall not apply (a) to equipment not manufactured by ELAN, (b) to equipment which shall have been installed by other
than an ELAN authorized installer, (c) to installed equipment which is not installed to ELAN’s
specifications, (d) to equipment which shall have been repaired or altered by others than
ELAN, (e) to equipment which shall have been subjected to negligence, accident, or damage by circumstances beyond ELAN’s control, including, but not limited to, lightning, flood,
electrical surge, tornado, earthquake, or other catastrophic events beyond ELAN’s control,
or to improper operation, maintenance or storage, or to other than normal use of service.
With respect to equipment sold by, but not manufactured by ELAN, the warranty obligations of ELAN shall in all respects conform to the warranty actually extended to ELAN by
its supplier. The foregoing warranties do not cover reimbursement for labor, transportation,
removal, installation or other expenses which may be incurred in connection with repair or
replacement.
Except as may be expressly provided and authorized in writing by ELAN, ELAN shall not be
subject to any other obligations or liabilities whatsoever with respect to equipment manufactured by ELAN or services rendered by ELAN.
THE FOREGOING WARRANTIES ARE EXCLUSIVE AND IN LIEU OF ALL OTHER EXPRESSED
AND IMPLIED WARRANTIES EXCEPT WARRANTIES OF TITLE, INCLUDING BUT NOT
LIMITED TO IMPLIED WARRANTIES OF MERCHANTABILITY AND FITNESS FOR A
PARTICULAR PURPOSE.
ATTENTION: TO OUR VALUED CONSUMERS
To ensure that consumers obtain quality pre-sale and after-sale support and service, ELAN
Home Systems products are sold exclusively through authorized dealers. ELAN products
are not sold online. The warranties on ELAN products are NOT VALID if the products have
been purchased from an unauthorized dealer or an online E-tailer. To determine if your ELAN
reseller is authorized, please contact ELAN Home Systems at (859) 269-7760.
P/N 9900865 REV:B
 Loading...