

Page 1
CABLED-60-BEAM-Z-
FPTR
Thank you for purchasing the CABLED-60-BEAM-Z-FPTR. Every suit has been
thoroughly tested and shipped in perfect condition. Carefully check the shipping
carton for damage that may have occurred during shipping. If the carton appears
to be damaged, carefully inspect your unit for any damage and be sure all
accessories necessary to operate the unit has arrived intactly. In the case damage
has been found or parts are missing, please contact Acson Comercial or your
local supplier for further instructions. Do not return this unit without any warning.
USER’S MANUAL
Page 2

2
Contents
FOR YOUR OWN SAFETY, PLEASE READ
THIS USER MANUAL CAREFULLY BEFORE
POWERING OR INSTALLING. SAVE IT FOR
FUTURE REFERENCE
1. Dimensions ............................................................................................................................. 3
2. Before Using ........................................................................................................................... 3
What’sinside
Unpacking
ACPowerSupply
SafetyInstruction
3. Introduction ..............................................................................................................................4
Specications
Productfeatures
ProductDiagram
4. Installation................................................................................................................................5
Powersupplyconnection
DMXSignalConnection
5. Operating Instructions ............................................................................................................ 7
Controlboardfunction
MenuInstructions
6. DMX Channel Table .................................................................................................................9
Page 3
3
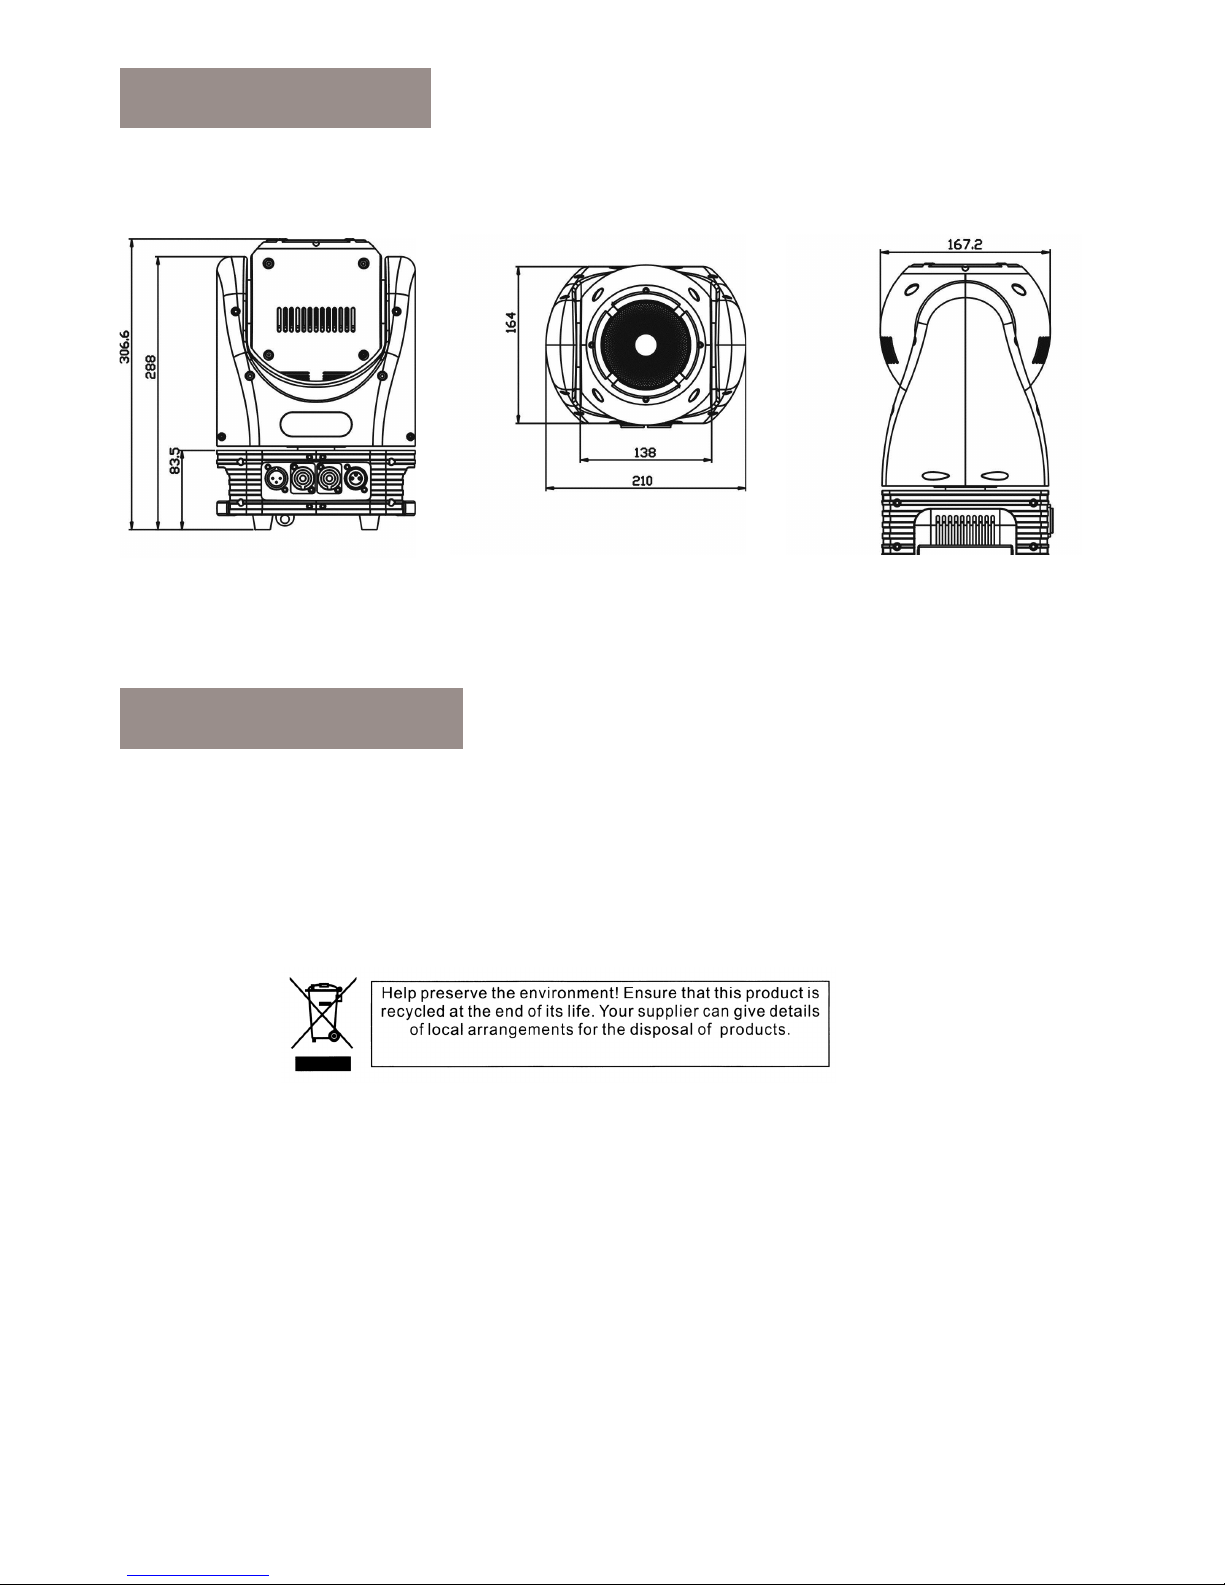
1. Dimensions
2. Before Using
All dimensions are in millimeters
Please open the equipment carefully ,and check all the spare parts are included or not.If any part of the
cause of the failure due to improper transportation or carton,please keep the packing materials and immediately inform the shipper to check.If the equipment must be returned to the factory,the equipment should
be use the original carton and packaging.
The equipment power supply is able to adapt to the wide input voltage.Please conrm the input voltage is
in the scale of rated voltage. The equipment can adapt to100V-240V AC voltage, Frequency50-60HZ. It
can not run a rheostat (variable resistor) or dimmer circuits.
• Equipment x 1
• Power cable with Plug x 1
• User manual x 1
• Iron holder x 1
What’s inside
Unpacking
AC Power Supply
Page 4

4
• XLR sockets input/output 3Pin
• Power input/Power output
• 3 kinds of control model: DMX512,Sound,Master/slave
• Black plastic
• 2.4inch TFT color display screen
• Display board can be 180°in turn it can be ted
in different setting
• Indoor Temperature -20°C +40°C
• 3 DMX modes selection 19CH (Basic mode)/
21CH(Stand mode)/35CH(Extend mode)
• Dimmer:0-100% linear dimmer
• Tilt/Pan movement 16bit pan/tilt ne
• Smooth and accurate locating
• Pan: 540° Tilt:270°
• ZOOM: 5-45°
• Pan/Tilt innite rotation, and adjustable speed
• Memorable scan point,automatic reset after no
appointed movement
• Default function in Pan/tilt
• Perfect mixing color and rainbow effect
• 0-20HZ Strobe (pulse strobe) Asynchronous
stroboscopic effect.
• Perfect total dimmer
• Fan cooling(fan speed based on temperature)
• Special cooling system
3. Introduction
• This product is I level protection equipment,so it is must be connected well and connected by the professional people.
• Make sure the voltage don’t be above or below which the user manual rated values.
• Conrm the power cord is not a sword cut or damaged.
• Must be cut off the power supply in the condition of no using or cleaning.
• Only allowed with the power cord plug connection.Please do not force when unplug the power cord to
pull the plug.
• Be careful in the process of installation of equipment.Avoid touching the bare wire,otherwise it will suffer
fatal shocks.
• Don’t look the light source directly,otherwise it will hurts the eyes.
• When choosing installation position of equipment and the equipment must be more than 0.5m distance
between objects.
• Please use the equipment wires appropriate.
• Without the manufacturer’s authorization or laypeople don’t remove,repair and modication of equip-
ment.The maximum operating temperature is 40℃ don’t operate the equipment when it is over 40℃
• Do not connect the equipment to the dimmer equipment
• Under 120V voltage,output power don’t series more than 8 pcs equipment,voltage 230V.Output power
don’t series more than 15 pcs
Safety Instruction
• Rated Voltage: AC100V / 240V 50-60HZ
• Rated Power: 120W
• LED Qty: 60W RGBW high power LEDs 8x
0.5W RGB LEDs
• LED Drive Current: 4.5A
• Beam Angle: 5-45°
• Lens: 94mm efcient bright PMMA lens
• IP: IP20
• DMX Mode: 19CH (Basic mode) / 21CH (Stand
mode) / 35CH (Extend mode)
• Packing Size: 350x260x310mm
• Net weight: 5.1 Kg
• Gross weight: 6.2Kg
Specications
Product features
Page 5

5
• This equipment can be used in many places, it
can hang and put on the ground
• Choosing a suitable place to put or hang the
equipment when installation.Must be use the
special screws and hook to make sure the
lamp’s weight is in the weight range
• When installing the equipment,ensure no inammable and explosive goods at 0.5 meter distance.
• Please ask the professionals to install the equipment,any improper installation will cause perso-
nal injury or material damage.
• To prevent others entering the working ares below,the installation or maintenance of equipment
with suitable and stable platform
• The equipment must be placed in ventilated
place, at least 50 cm from the ground,please
ensure that the vent without clogging.
4. Installation
Product Diagram
Page 6

6
Power supply connection
DMX Signal Connection
The equipment can be used in the wide voltage input. Please make sure the voltage is the scale of rated
voltage when connecting the power. The equipment can adapt to 100V to 240 V AC voltage and 50-60 Hz.
1. Use DMX512 controller, use the DMX signal (male) to plug into the rst lamp (female) 3 pin
2. Put out of the equipment of the rst signal wire(head),connected to the equipment of the next 3 pin plug(-
female),so on. See pictures below.
s Connection Pin
Brown AC Live 1
Blue AC Neutral 2
Green/Yellow AC Ground 3
Page 7

7
Control board function
Menu Instructions
[DMX address setting]
[Function selection]
• Press MENU when it shows [Address]
then press ENTER
• Change the DMX address by UP or DOWN
• Press MENU until it shows [Intro] press ENTER
• Press UP or DOWN to choose [Reset] , [Run].
• When choosing [Reset] press ENTER and press UP or DOWN to choose [YES] or [NO]. When choosing [YES],press ENTER into the whole light reset.
• When choosing Run, press ENTER. Press UP or DOWN to choose [DMX512], [Auto1], [Auto2],
[Sound1] [Sound2], [Slave] When choosing [DMX512] the DMX controller sending the signal (3 pin
signal is valid),the corresponding display board DMX 512LED ashing.
• When choosing [Auto1], [Auto2], [Sound1 ] or [Sound2], [Auto1], [Auto2], [Sound1], [Sound2],
choose Auto or Sound mode, it can be used as the master.
• When choosing [Slave] it is Slave receive the Master signal.Choose the Slave need to quit to the main
menu can be controlled.
MenuMap
5. Operating Instructions
Button Function
MENU Choose Menu or function exit
ENTER Current show menu or enter into the current selected
function
UP Increase the value
DOWN Decrease the value
Page 8

8
[DMX Mode selection]
[Test Procedure]
[Check equipment information]
[Adaptive function setting]
• Press MENU until it shows [Users mode],
press ENTER
• Choose Channel mode by pressing UP or
DOWN] [Stand mode] [Basic mode] or
[Extend mode]
• Press MENU until it shows [Test] and then
press ENTER.
• Press UP or DOWN to choose [All], [Pan&Tilt] and [LED]. When selecting [All] it is
testing the motor and LED.
• When selecting [Pan&Tilt] to test the motor
choose [LED] it is only LED operated.
• Press MENU until it shows [Set] and then
press ENTER.
• Press UP or DOWN to choose [Fan control]
[Disp.setting] [Pan] [Tilt] [Factory Reset]
• When selecting [Fan control] press ENTER
Press UP or DOWN to choose the 3 kinds
of Fan control. [Auto] mode will according
the lamp’s head to auto control the fan’s
speed. [High] mode is the fan’s high speed
operation, [Low] mode is fan’s low speed
operation.
• When selecting [Disp.setting] press EN-
TER. Press UP or DOWN to choose [Shut
off time] [Flip display] [Key lock] or [Disp
ash] If selecting [Shut off time] press
ENTER. Operate UP or DOWN. It can be
set LCD backlight close from 2-60 mins.
If selecting [Flip display] press ENTER
[operate UP or DOWN] press [ON/OFF] to
choose [ON], the screens can rotate 180°.
When selecting [Key lock] press ENTER.
Operate UP or DOWN. Press [ON/OFF] to
choose [ON],when the backlight closed,the
button key is locked,the operation is invalid
at this time. Must be long press ENTER 3
seconds to unlock.When selecting [Disp
ash], Press the ENTER key to ENTER,
operate UP or DOWN key, can choose the
“ON/OFF”, select [ON], receives the DMX
signal lamps and lanterns, LCD backlight is
not ashing, has received the DMX signal.
• When selecting [Pan] or [Tilt], press ENTER. Operate UP or DOWN. Choose
[Normal] or [Reverse] to set the forward anf
reverse operation.
• When selecting [Factory Reset], press
ENTER. Operate UP or DOWN. Choose
[YES], restore factory setting.
• Press MENU until it shows [Info]. Press
ENTER.
• Operate UP or DOWN to choose [Time
Info] [Temp Info] [Software Ver]
• When selecting [Time Info] press ENTER.
Operate UP or DOWN to choose: [Power
on] or [Last Run Hrs]. If choosing [Power
on] Press ENTER to display equipment
running time “XXXX” hours. If selecting
[Last Run Hrs] Press ENTER to display
equipment last running time “XXXX”hours.
• When selecting [Temp Info] press ENTER to show [Head Temp],and then press
ENTER,it will show the head temperature“XXX°C”.
• When selecting [Software Ver] press ENTER ,it will show the equipment software
version.
Page 9

9
6. DMX Channel Table
DMX channel functions and their values (35 DMX CHANNELS)
Mode/Channel Value Function
St Ba Ex
1 1 1 PAN Movement 8bit
0-255 Pan Movement
2 2 Pan Fine 16bit
0-255 Fine control of Pan Movement
3 2 3 TILT Movement 8bit
0-255 Tilt Movement
4 4 Tilt Fine 16bit
0-255 Fine control of Tilt Movement
5 3 5 Speed Pan/Tilt movement
0-225 max to min speed
226-235 Blackout by movement
236-255 No function
6 4 6 Pan Motor continuous rotation
0-127 no function
128-189 Forwards Pan rotation from fast to slow
190-193 No rotation
194-255 Backwards Pan rotation from slow to fast
7 5 7 Tilt Motor continuous rotation
0-127 No function
128-189 Forwards Tilt rotation from fast to slow
190-193 No rotation
194-255 Backwards Tilt rotation from slow to fast
8 6 8 ZOOM
0-255 ZOOM 45-5°
9 7 9 ZOOM Speed
0-255 ZOOM Speed , Fast-Slow
10 8 10 Red LED – all arrays
0-255 Red(0-Black, 255-100% Red)
11 9 11 Green LED – all arrays
0-255 Green (0-Black, 255-100% Green)
12 10 12 Blue LED – all arrays
0-255 Blue (0-Black, 255-100% Blue)
13 11 13 White LED – all arrays
0-255 White (0-Black, 255-100% White)
14 12 14 Strobe
0-31 LED turn off
32-63 LED turn on
64-95 Strobe effect slow to fast
96-127 LED turn on
128-159 Pulse-effect in sequences
160-191 LED turn on
192-223 Random strobe effect slow to fast
224-255 Led turn on
Page 10

10
15 13 15 Dimmer
0-255 Intensity 0 to 100%
16 14 16 0-7 No function
8-39 From RED to YELLOW
40-71 from YELLOW to GREEN
72-103 from GREEN to CYAN
104-135 from CYAN to BLUE
136-167 from BLUE to MAGENTA
168-199 from MAGENTA to RED
200-231 from RED to WHITE
232-255 Cross fading colours from slow to fast
17 15 17 ColorPresets
0-4 No function
5-9 White2700k
10-14 White3200k
15-19 White4200k
20-24 White5600k
25-29 White6500k
30-34 White8000k
35-39 Warm White
40-44 Magenta
45-49 Cyan
50-54 Salmon
55-59 Turquoise
60-64 Light Green
65-69 Steel Blue
70-74 Orange
75-79 Straw
80-84 Pale Lavander
85-89 Pink
90-94 Red
95-99 Green
100-104 Blue
105-109 White
110-255 Reserved
18 16 18 Color Presets Dimmer
0-255 Intensity 0 to 100%
19 17 19 Reset:
0-5 No function
6-63 Head Reset
64-127 Pan&Tilt Reset
128-191 All Motor Reset
192-255 No function
20 Red LED1
0-255 Red(0-Black, 255-100% Red)
21 Green LED1
0-255 Green (0-Black, 255-100% Green)
22 Blue LED1
0-255 Blue (0-Black, 255-100% Blue)
Page 11

11
23 Red LED2
0-255 Red(0-Black, 255-100% Red)
24 Green LED2
0-255 Green (0-Black, 255-100% Green)
25 Blue LED2
0-255 Blue (0-Black, 255-100% Blue)
26 Red LED3
0-255 Red(0-Black, 255-100% Red)
27 Green LED3
0-255 Green (0-Black, 255-100% Green)
28 Blue LED3
0-255 Blue (0-Black, 255-100% Blue)
29 Red LED4
0-255 Red(0-Black, 255-100% Red)
30 Green LED4
0-255 Green (0-Black, 255-100% Green)
31 Blue LED4
0-255 Blue (0-Black, 255-100% Blue)
32 strobe
0-31 Led turn off
32-250 strobe(0-20Hz)
251-255 Led turn on
33 Dimmer Color Ring
0-255 Intensity 0 to 100%
20 18 34 Color Ring Macro
0-7 No function
8-38 Color Macro 1
39-69 Color Macro 2
70-100 Color Macro 3
101-131 Color Macro 4
132-162 Color Macro 5
163-193 Color Macro 6
194-224 Color Macro 7
225-255 Color Macro 8
21 19 35 Color Ring Macro Speed
0-255 Color Macro Speed from slow to fast
Page 12

Note: All information is subject to change without prior notice.
IMPORTANT INFORMATION!
In order to optimize the recovery and recycling of the materials that old appliances contain
and reduce the impact on human health and the environment, please make sure that this
product is recycled at the end of its life.
Importer:
ACSON COMERCIAL
C/Pallars, 405
08019 Barcelona
www.acson.com
acson@acson.com
 Loading...