

Page 1
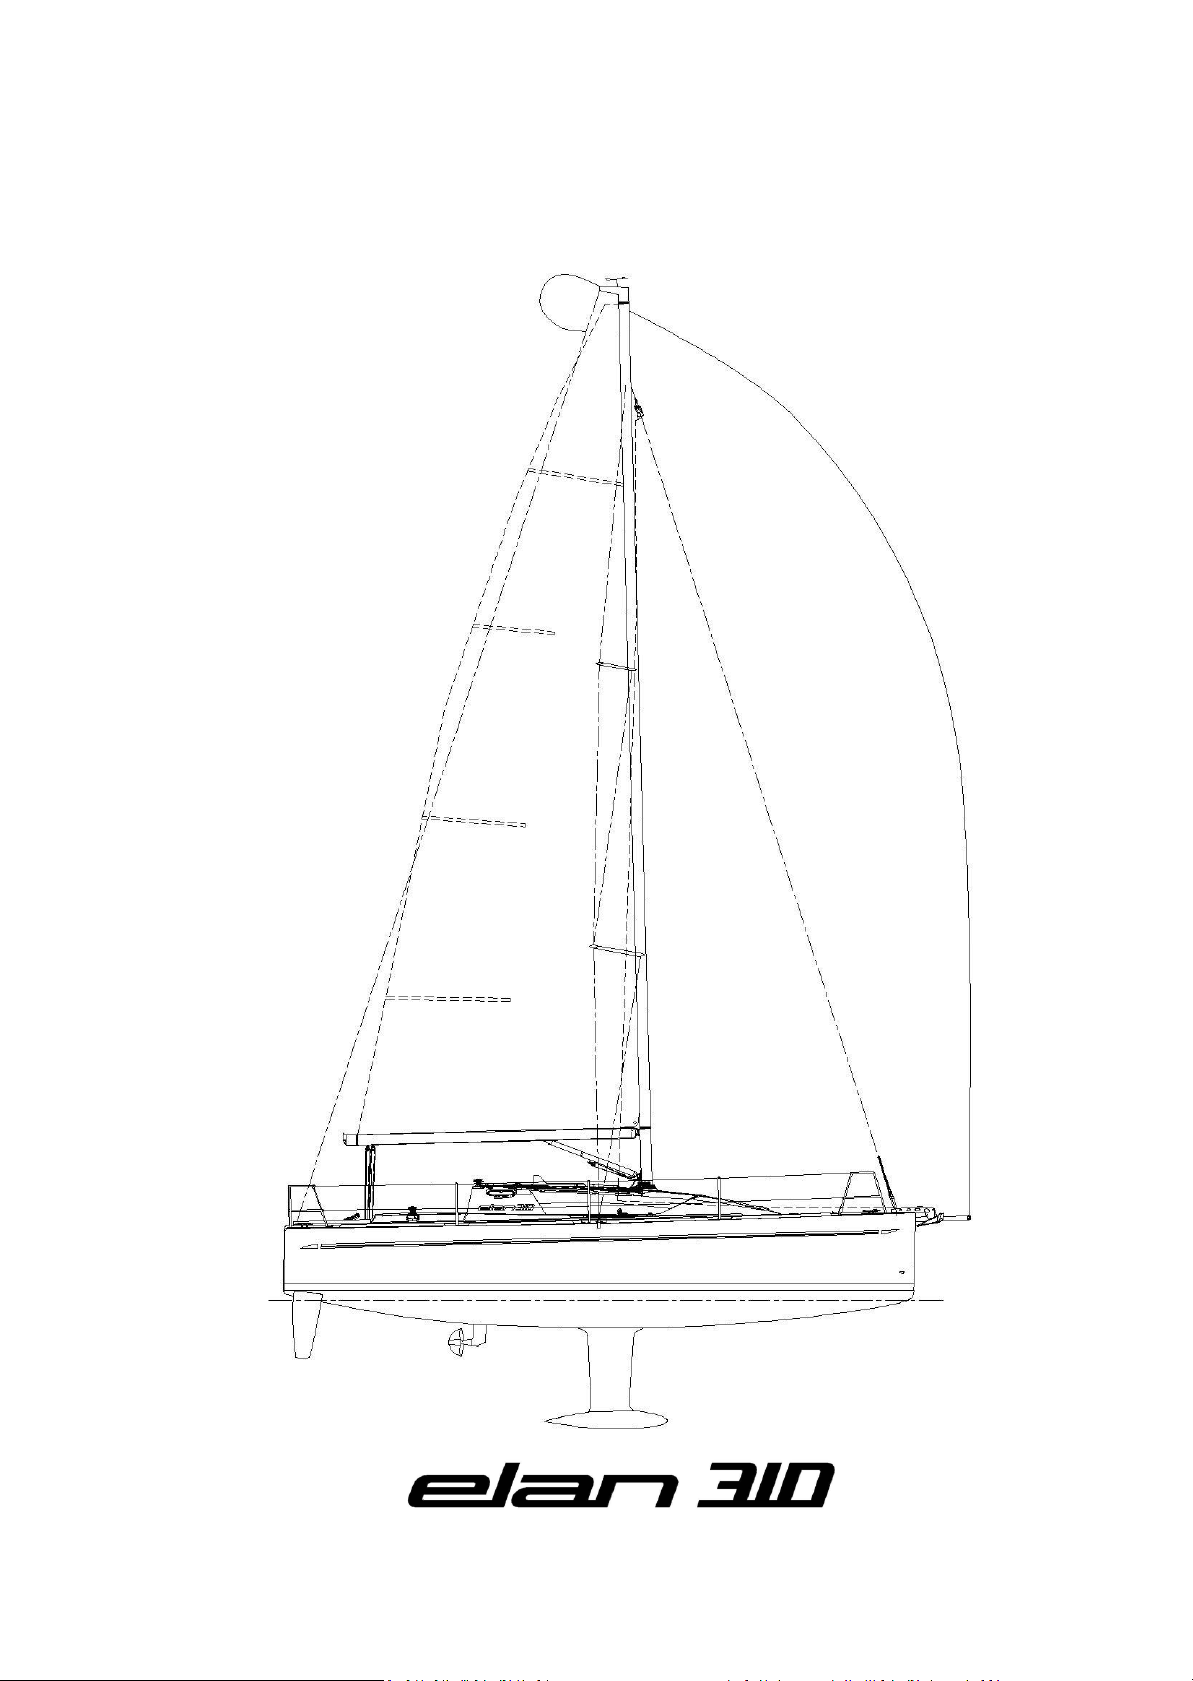
O
O
w
wnneerr’’ss
M
Maannuuaall
CIN: SI-ELA31E______
Page 2

Owner’s Manual
Dear sailor,
Setting sail towards distant shores and pristine ocean sunsets has always been
a little boys dream. Sailing is an act of nature; it is one of the last means to
freely live your passion. We filled this Elan sailing yacht with passion - passion
of design, woodwork, traditional craftsmanship and beauty.
We gave her passion - all you need is to give her love…
Your ELAN Marine Team
ELAN MARINE d.o.o.
Begunje 1
4275 Begunje na Gorenjskem
Slovenia
Tel: +386 45 351 370
Fax: +386 45 351 360
e-mail: [email protected]
http: www.elan-yachts.com
2
Page 3

Owner’s Manual
OWNER MANUAL PREFACE
Dear ELAN owner,
We are proud you have chosen an ELAN sailing yacht and we would like to thank you for
your trust!
We wish you fair winds on the seas wherever you go….!
Your sailing yacht represents an investment for you, and we therefore hope that you will
follow our advice in order to protect its value over time.
To become fully acquainted with your ELAN sailing yacht, we suggest dedicating adequate
time to carefully reading the owner’s manual and its supplements.
In order to obtain optimum performance from your ELAN sailing yacht and to make the best
use of its advanced performance features, as well as for your personal safety, you should
carefully follow the instructions and standards set forth in this manual.
The manual describes the full equipment provided at the moment of printing. ELAN Marine
reserves the right to modify said equipment without prior notification and without the
obligation to upgrade products already built and/or sold.
Features indicated with (*) are available as optional equipment.
The ELAN Marine boatyard works unceasingly to enhance all our sailboat models. So please
bear with us, and understand if we must reserve the right to make modifications in
manufacture, shape, equipment and technology without giving prior notification.
This manual and the data, illustrations and descriptions it contains do not constitute
grounds for making claims against the manufacturer.
Elan Marine d.o.o. reserves the right to modify specifications without prior notice or
obligation.
3
Page 4

Owner’s Manual
FFOORREEWWOORRDD
PPLLEEAASSEE KKEEEEPP TTHHIISS MMAANNUUAALL IINN AA DDRRYY AANNDD SSEECCUURREE PPLLAACCEE AANNDD HHAANNDD IITT OOVVEERR
TTOO TTHHEE NNEEWW OOWWNNEERR WWHHEENN YYOOUU SSEELLLL TTHHIISS SSAAIILLIINNGG YYAACCHHTT..
Even if everything has been planned and designed for the safety of the sailing yacht and its
users, boating is highly dependant on the weather conditions, the sea conditions, the
experience and physical shape of the crew, etc. and one can never ensure full safety.
This manual has been compiled to help you operate your sailing yacht with safety and
pleasure. It contains details of the sailing yacht; the equipment supplied or fitted, its systems
and information on its operation and maintenance. Please read it carefully, and familiarise
yourself with the sailing yacht before using it.
If this is your first sailing yacht or you are changing to a type of sailing yacht you are not
familiar with, for your own comfort and safety, please ensure that you obtain handling and
operating experience before assuming command of the sailing yacht. Your dealer, national
sailing federation or yacht club will be pleased to advise you about local sea schools or
competent instructors.
4
Page 5

Owner’s Manual
CCOONNTTEENNTTSS
1. FOREWORD ……………………………………………………………………… 4
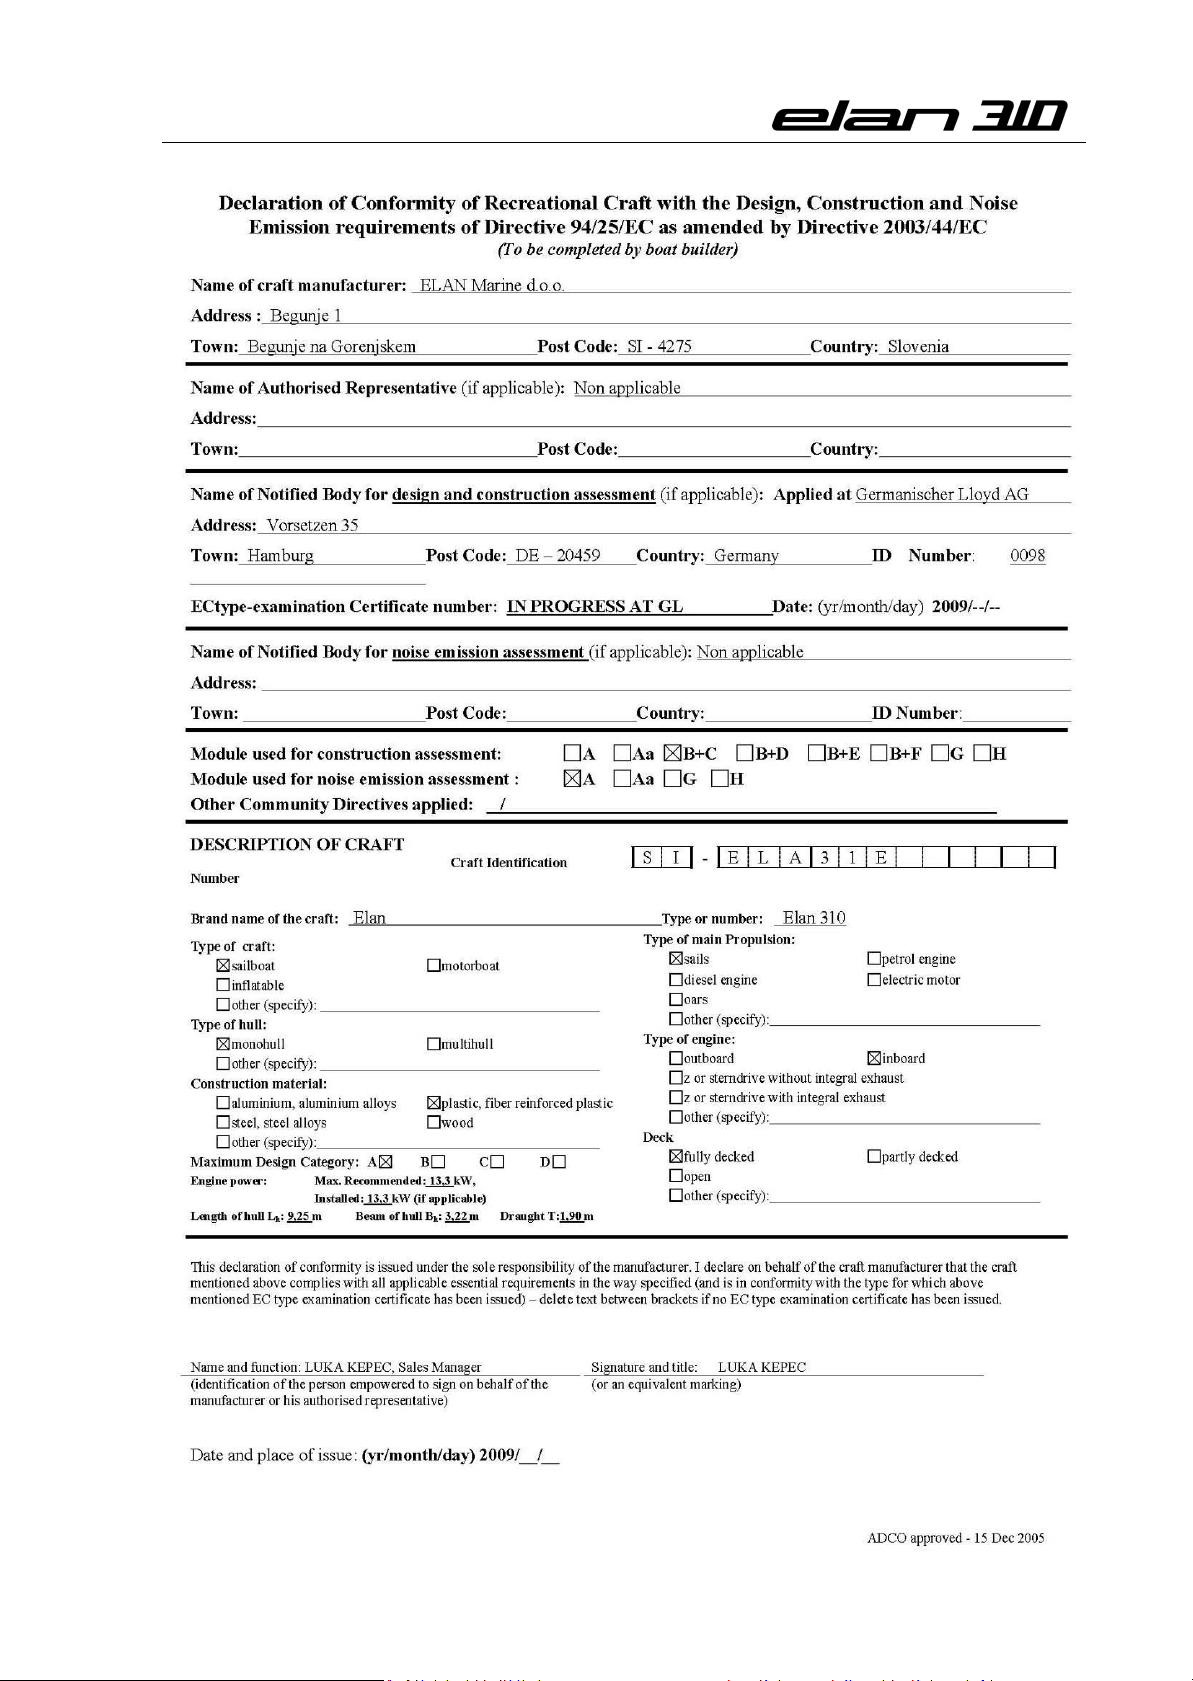
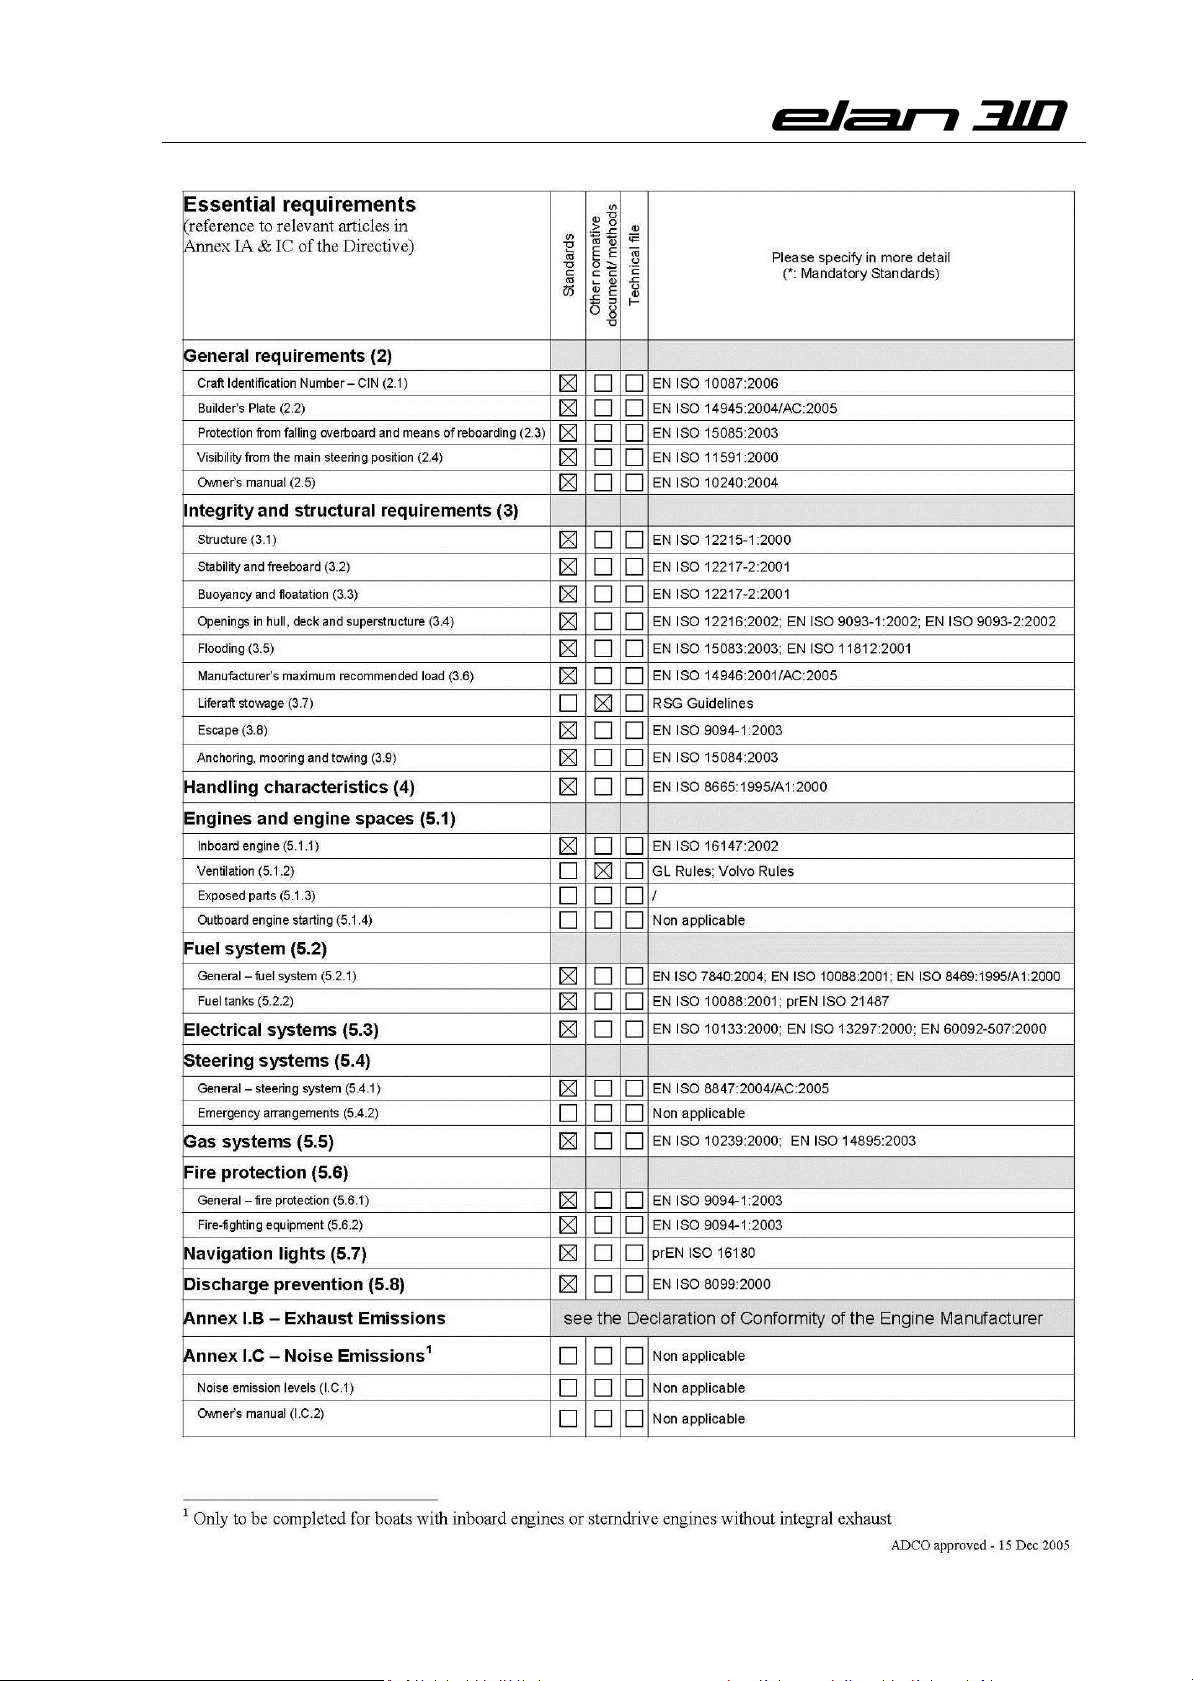
1.1. DECLARATION OF CONFORMITY …………………………………………………………………………………………. 7
2. WARRANTY CONDITIONS OF YOUR ELAN ………………………… 9
3. IMPORTANT INFORMATION ……………………………………………… 12
3.1. DEGREES OF DANGER …………………………………………………………………………………………………………. 12
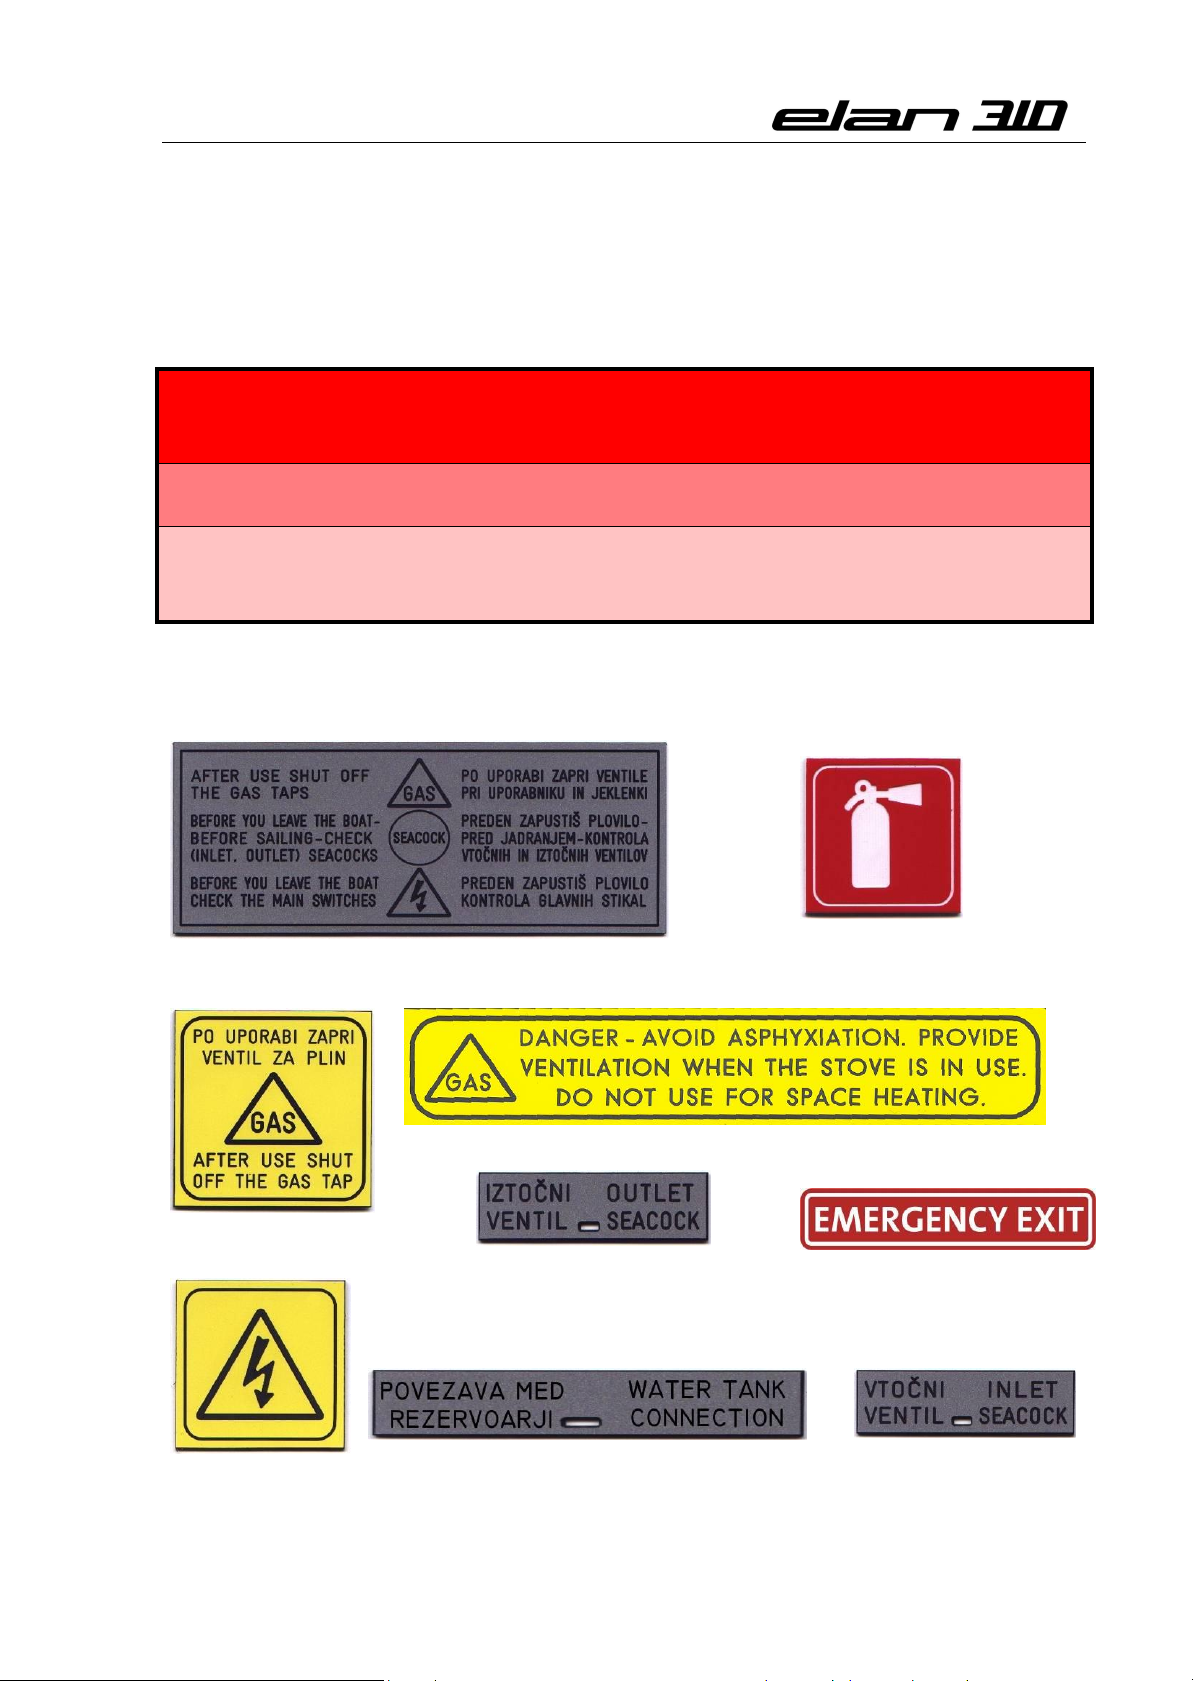
3.2. LABELS ON BOARD …………………………………………………………………………………………………………….. 12
3.3. LIABILITY OF THE OWNER/OPERATOR ………………………………………………………………………………. 13
3.4. FIRE PROTECTION AND ESCAPE PLAN …………………………………….…………………………………………. 13
3.5. PRE-DEPARTURE CHECK LIST ……………………………………………………………………………………………. 14
3.6. WATER INTAKE DURING SAILING AND STRANDING ………………….…………………………………….. 14
3.7. CLOSING UP YOUR CRAFT AFTER SAILING CHECK LIST ……………….……………………………………… 15
3.8. CRAFT IDENTIFICATION, BUILDER’S PLATE ………………………………………………………………………. 15
4. TECHNICAL SPECIFICATIONS …………………………………………… 16
4.1. TECHNICAL DATA ………………………………………………………………………………………………………………. 16
4.2. DEFINITION OF DESIGN …………………………………………………………………………………………………… 17
4.3. MAXIMUM TOTAL LOAD …………………………………………………………………………………………………… 17
5. GENERAL ARRANGEMENT ………………………………………………… 17
5.1. DECK LAYOUT ………..…………………………………………………………………………………………………………. 17
5.2. INTERIOR LAYOUT …………………………………………..………………………………………………………..……… 18
5.3. PROFILE …………………………………………………………………………………………………………………………… 19
6. PROPULSION SYSTEM …………..………………………………………… 20
6.1. SAILS AND MAST …………………………………………………………………………………………………………………. 20
6.2. ENGINE SYSTEM ……………………………………………..………………………………………………………..……… 20
6.2.1. ENGINE OPERATION ……………………………………………………………………………………………… 21
6.2.2. ENGINE AND PROPELLER INSTALLATION ………………………………………………………………… 22
6.2.3. FUEL SYSTEM ………………………………………………………………………………………………………… 23
7. SYSTEMS AND CIRCUITS …………..……………………………………… 24
7.1. POSITION OF SEACOCKS AND THROUGH-HULL FITTINGS …………………………………………………. 24
7.2. WATER SYSTEMS ……………………………………………..………………………………………………………..……… 25
7.2.1. FRESH WATER SYSTEM ………….……………………………………………………………………………… 25
7.2.2. HOT WATER SYSTEM ……………………………………………………………….…………………………… 26
7.3. SEA AND WASTE WATER SYSTEM …………………..………………………………………………………..……… 27
7.4. BILGE WATER SYSTEM …………………..………………….……………………………………………………..……… 28
7.5. GAS SYSTEM …………………..………………………….…….……………………………………………………..……… 28
7.6. ELECTRICAL SYSTEMS ……………………………………..………………………………………………………..……… 31
7.6.1. 12 V SYSTEM ………….………………..…………………………………………………………………………… 31
7.6.2. 230 V SYSTEM ………………………………………………………………………….…………………………… 32
5
Page 6

Owner’s Manual
7.7. RUDDER AND STEERING SYSTEM ………………………………………..……………………………………..……… 33
8. GARBAGE DISCHARGE …………..……….……………………………… 35
9. MAINTENANCE ………...……….…..……….……………………………… 36
9.1. HAULAGE …………..…………..………………………….…….……………………………………………………..……… 36
9.2. UNDERWATER STRUCTURE …………..…………..……………………………………………………………..……… 36
9.2.1. HULL ………….………………..………………………………………………………………………………………… 36
9.2.2. PROTECTION OF TERMINALS …………………………………………………….…………………………… 37
9.3. HULL AND DECK …………………………...…………..……………………………………………………………..……… 37
9.3.1. CLEANING ………….………………………………………………………………………………………………… 37
9.3.2. STAINS, SCRATCHES AND ABRASION ……….…………………………….…………………………… 38
9.4. MAST, SAILS AND RIGGING …………………………...…………..……………………………………………..……… 38
9.5. DECK EQUIPMENT …………………………...……..……………………………………………………………..……… 39
9.5.1. LIFELINES, PULPITS AND STANCHIONS …………………………………………………………………… 39
9.5.2. WINCHES AND BLOCKS ……….…………………………………………………………..…………………… 39
9.5.3. ANCHOR WINDLASS ……….…………………….………………………………………..…………………… 39
9.5.4. TEAK ……….………………………………………………………………………………………..…………………… 39
9.5.5. PLEXIGLAS, PORTLIGHTS AND HATCHES …………………………………………..…………………… 40
9.6. INTERIOR ………………………….……………..……..……….……………………………………………………..……… 40
9.6.1. INTERIOR WOOD SURFACES ………………….……………………………………………………………… 40
9.6.2. CUSHIONS AND CURTAINS ……….………………………………………………………..…………………… 40
9.6.3. REFRIGERATOR ……….………………….……………………………………………………..…………………… 40
9.6.4. COOKER ……….…………………….…………………………………………………………..…………………… 40
9.6.5. SINK ………………………………………………………..………………………………………..…………………… 41
9.6.6. BILGE STRAINERS AND PUMPS ………………………………………………………..…………………… 41
9.6.7. FUEL AND WATER TANKS ………………………………………………………………..…………………… 41
10. WINTERISATION ……...……….…..……….……………………………… 41
10.1. BLOCKING THE HULL …………..…………..………….…….……………………………………………………..……… 41
10.2. COOKER ……………………………………....…………..……………………………………………………………..……… 41
10.3. ELECTRICAL SYSTEM ……………………………………....….……………………………………………………..……… 42
10.4. WATER SYSTEMS ……………………………………..……………………………………………………………..……… 42
10.5. SEACOCKS ………………………………....…………..……………………………………………………………..……… 42
10.6. FUEL TANK ………………………………....…………..……………………………………………………………..……… 42
10.7. ENGINE ……………………………………....…………..……………………………………………………………..……… 42
10.8. SAILS ……………………………………....…………..……………………………………………………………..……… 42
10.9. COVERING ………………………………....…………..……………………………………………………………..……… 42
10.10. CUSHIONS ……………………………....…………..……………………………………………………………..……… 43
10.11. INTERIOR ………………………………………………..……………………………………………………………..……… 43
11. PRODUCT END OF LIFE DISPOSAL ……………………………………… 43
12. ANNEX …………...…...……....….....……….……………………………… 44
12.1. WEBASTO HEATING SYSTEM .…….……….….….………………………………………………………..……… 47
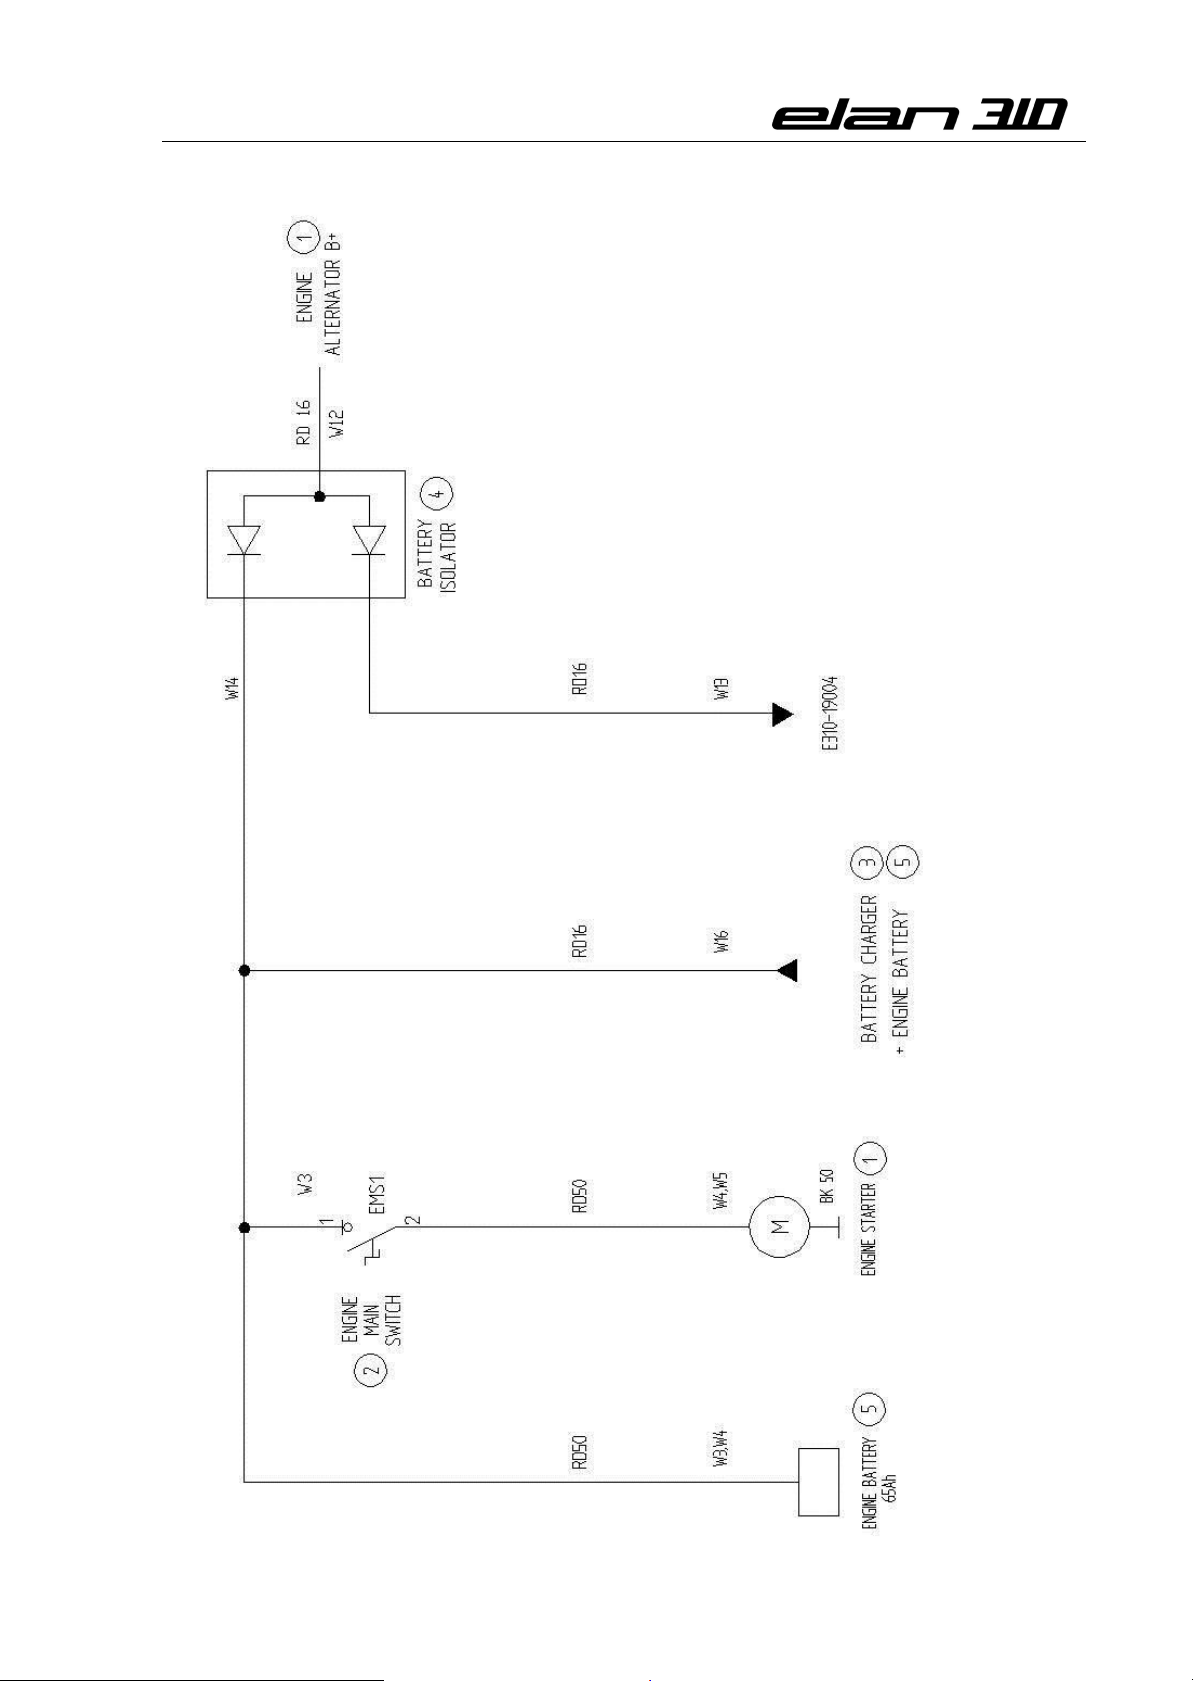
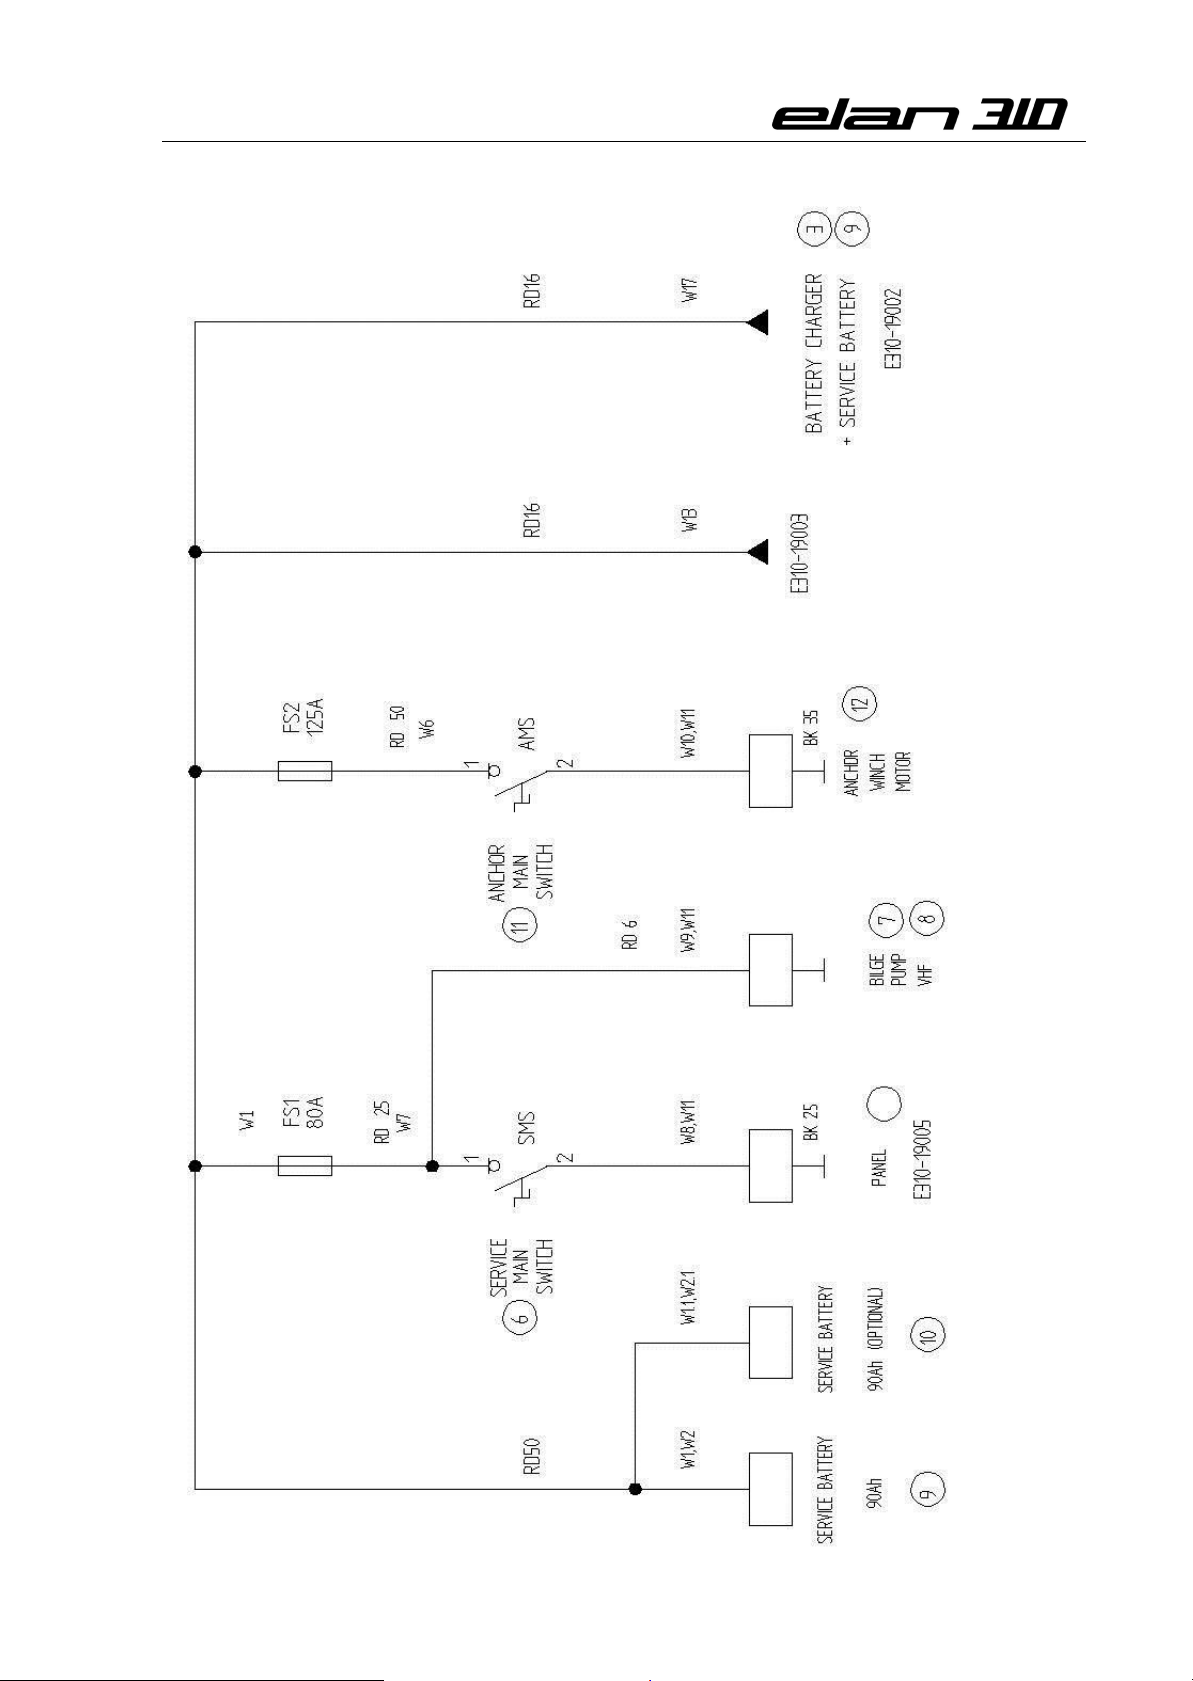
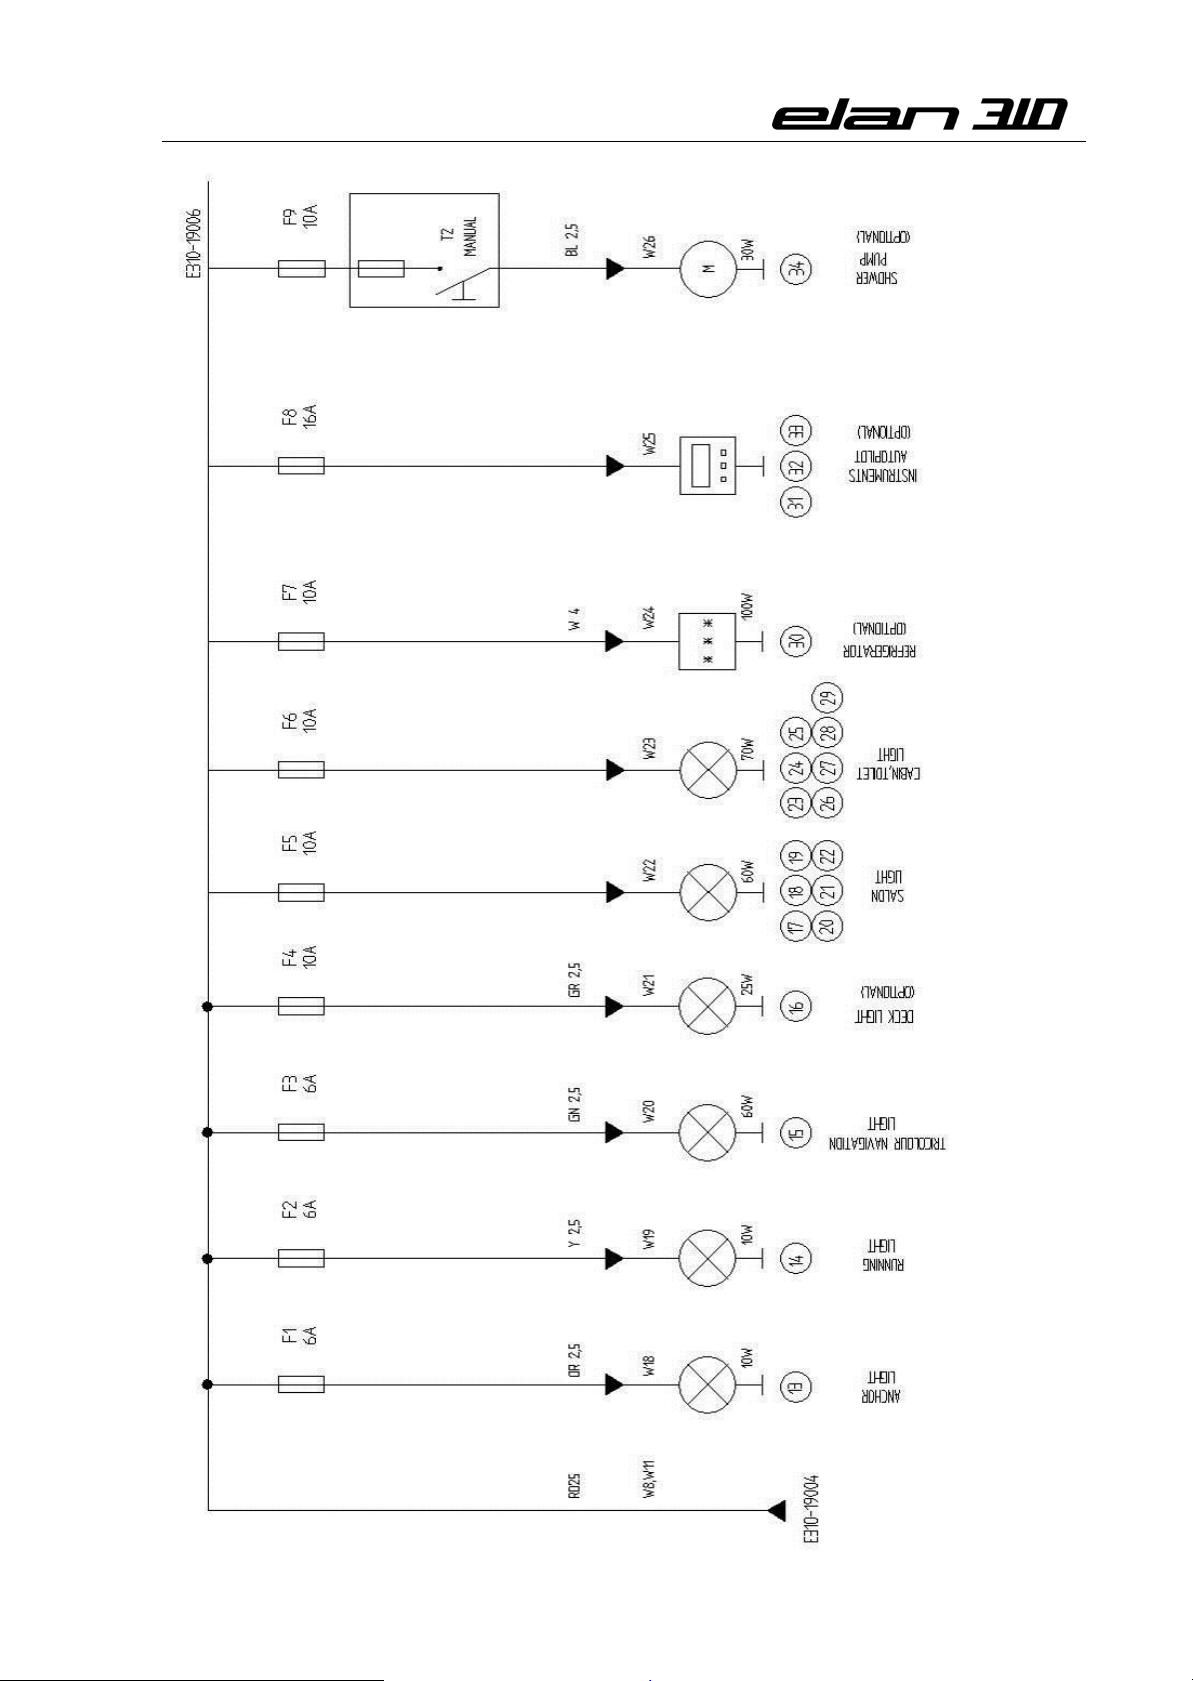
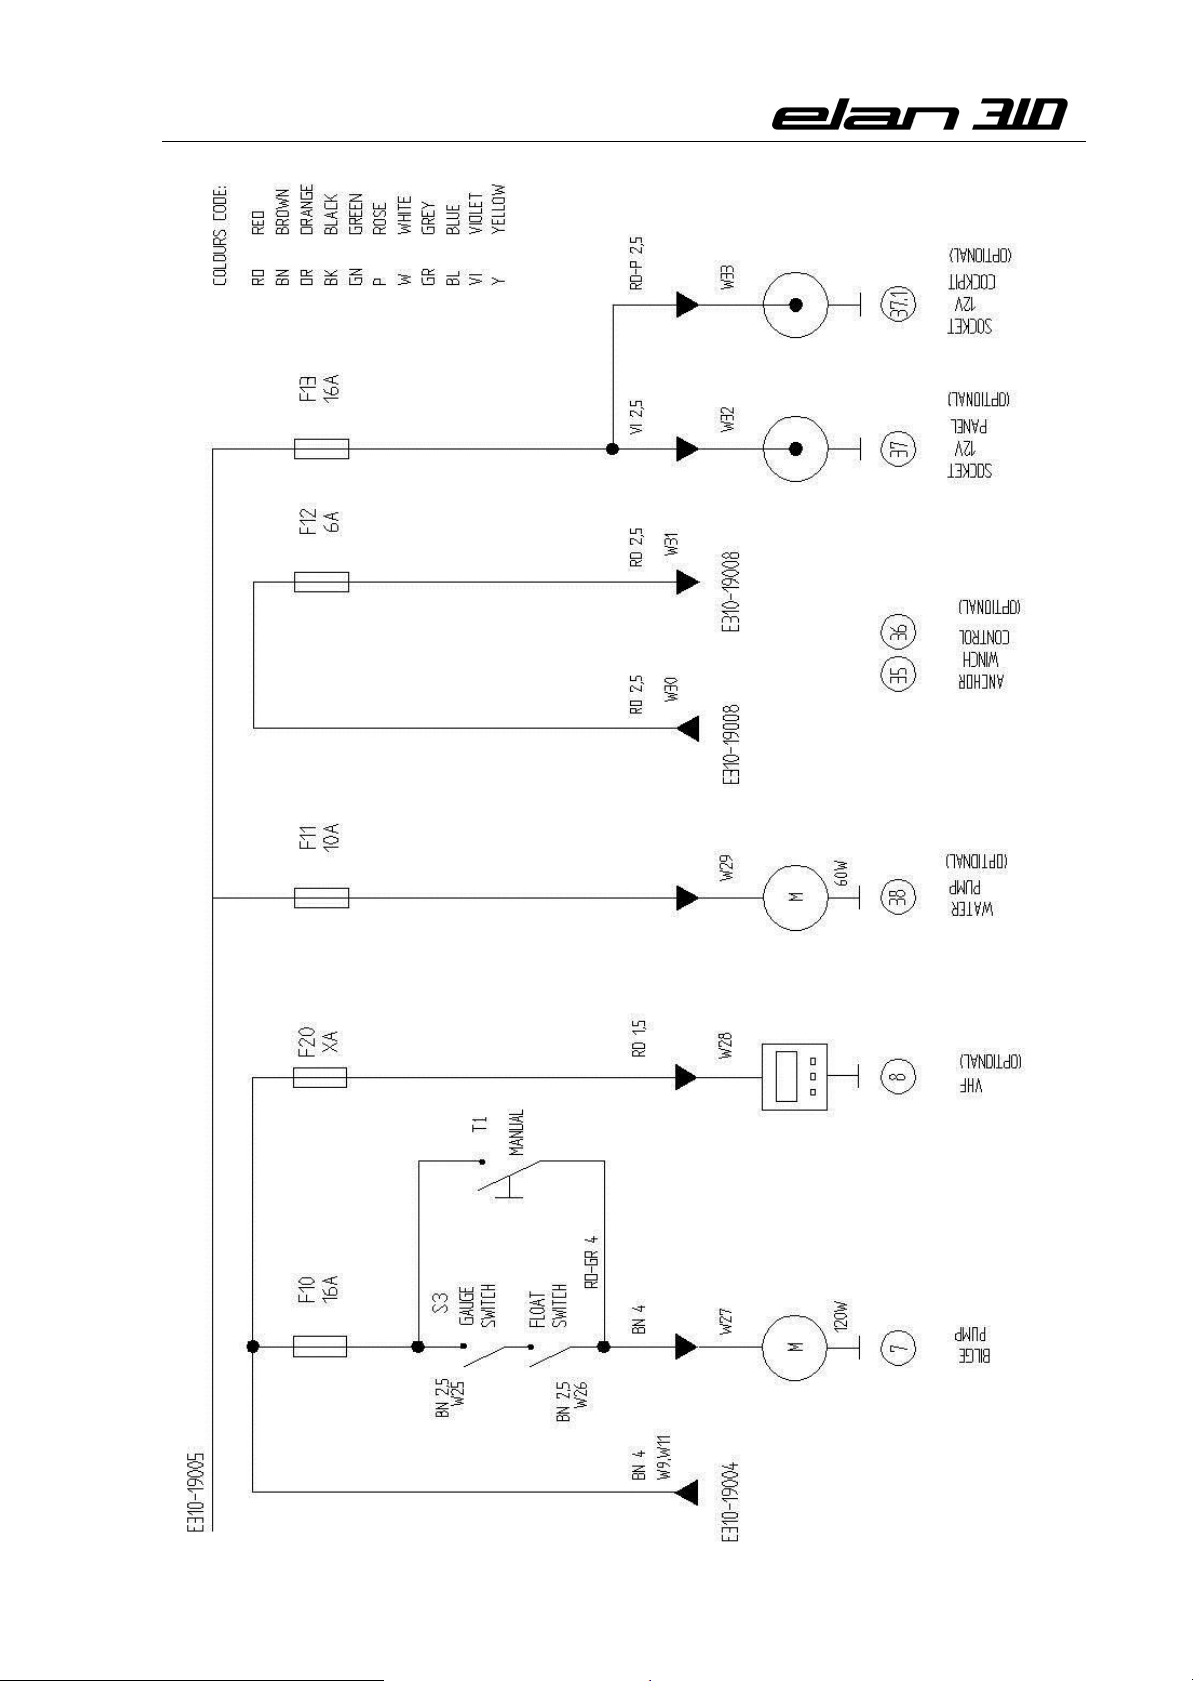
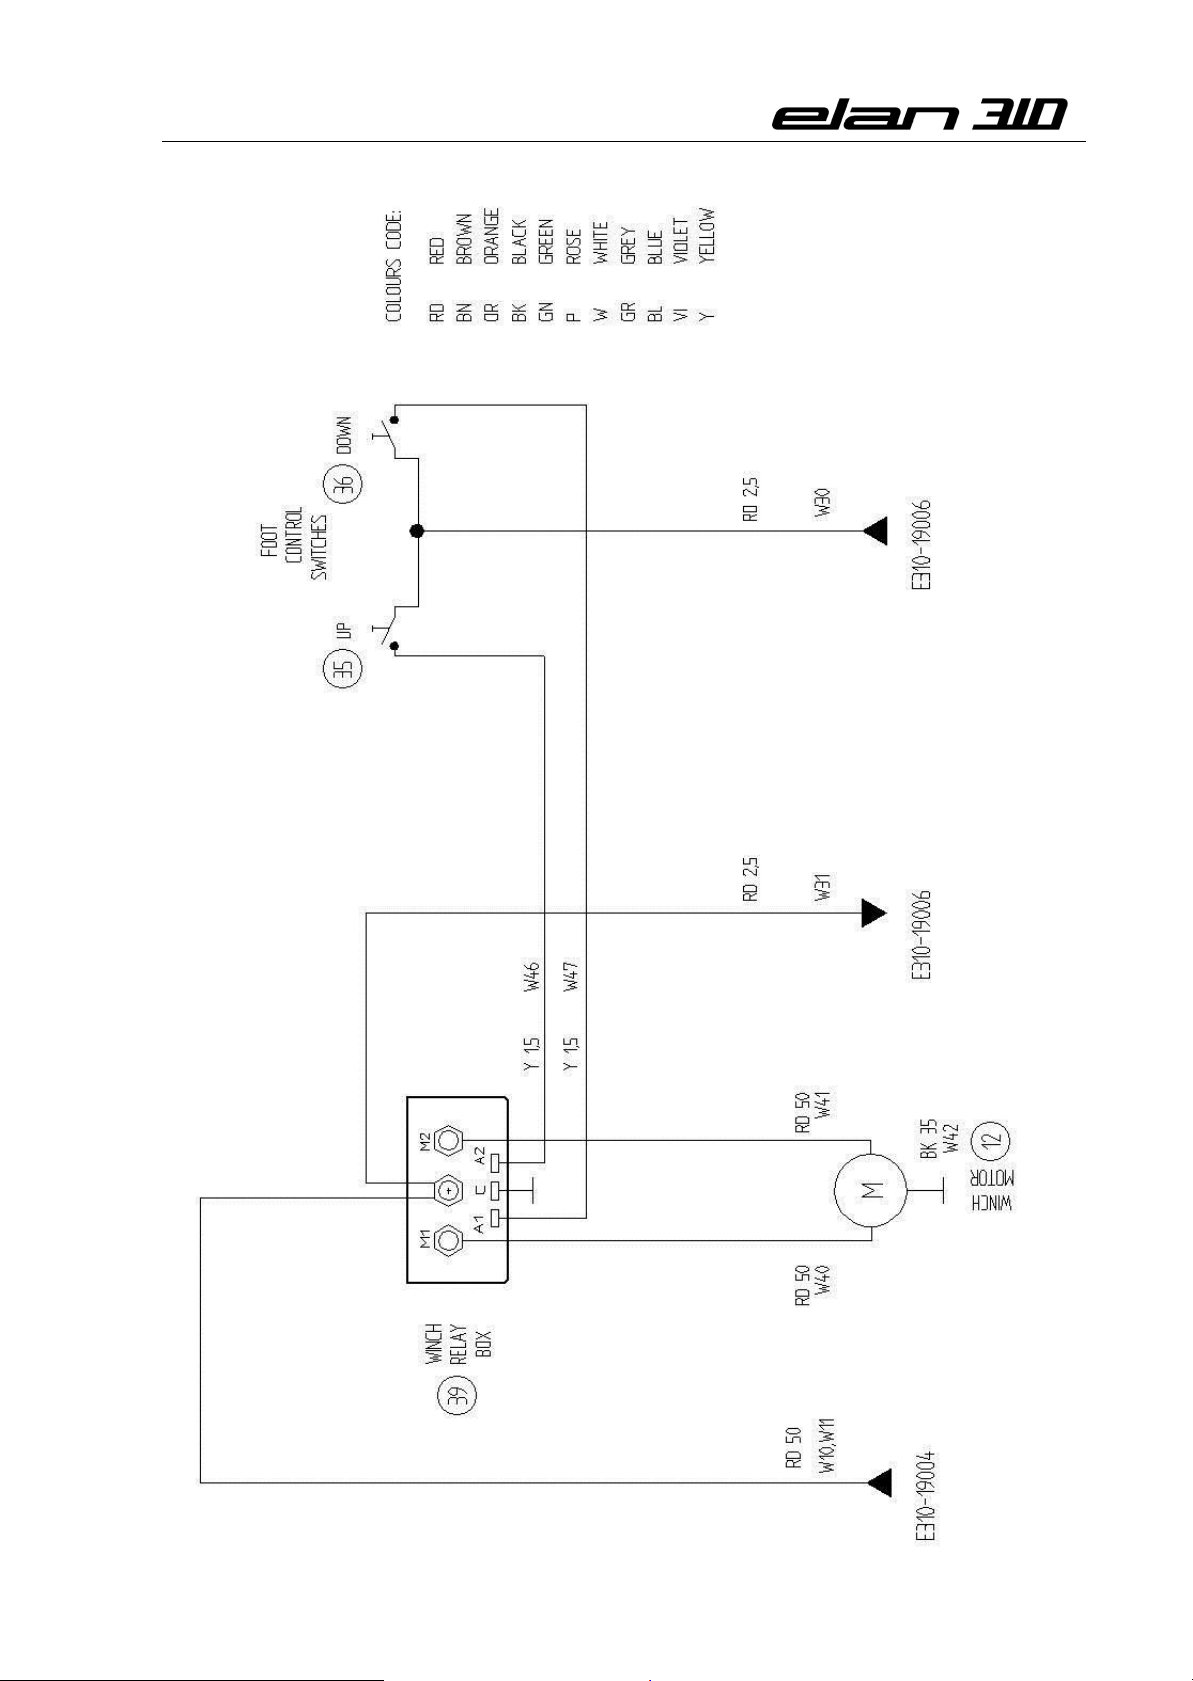
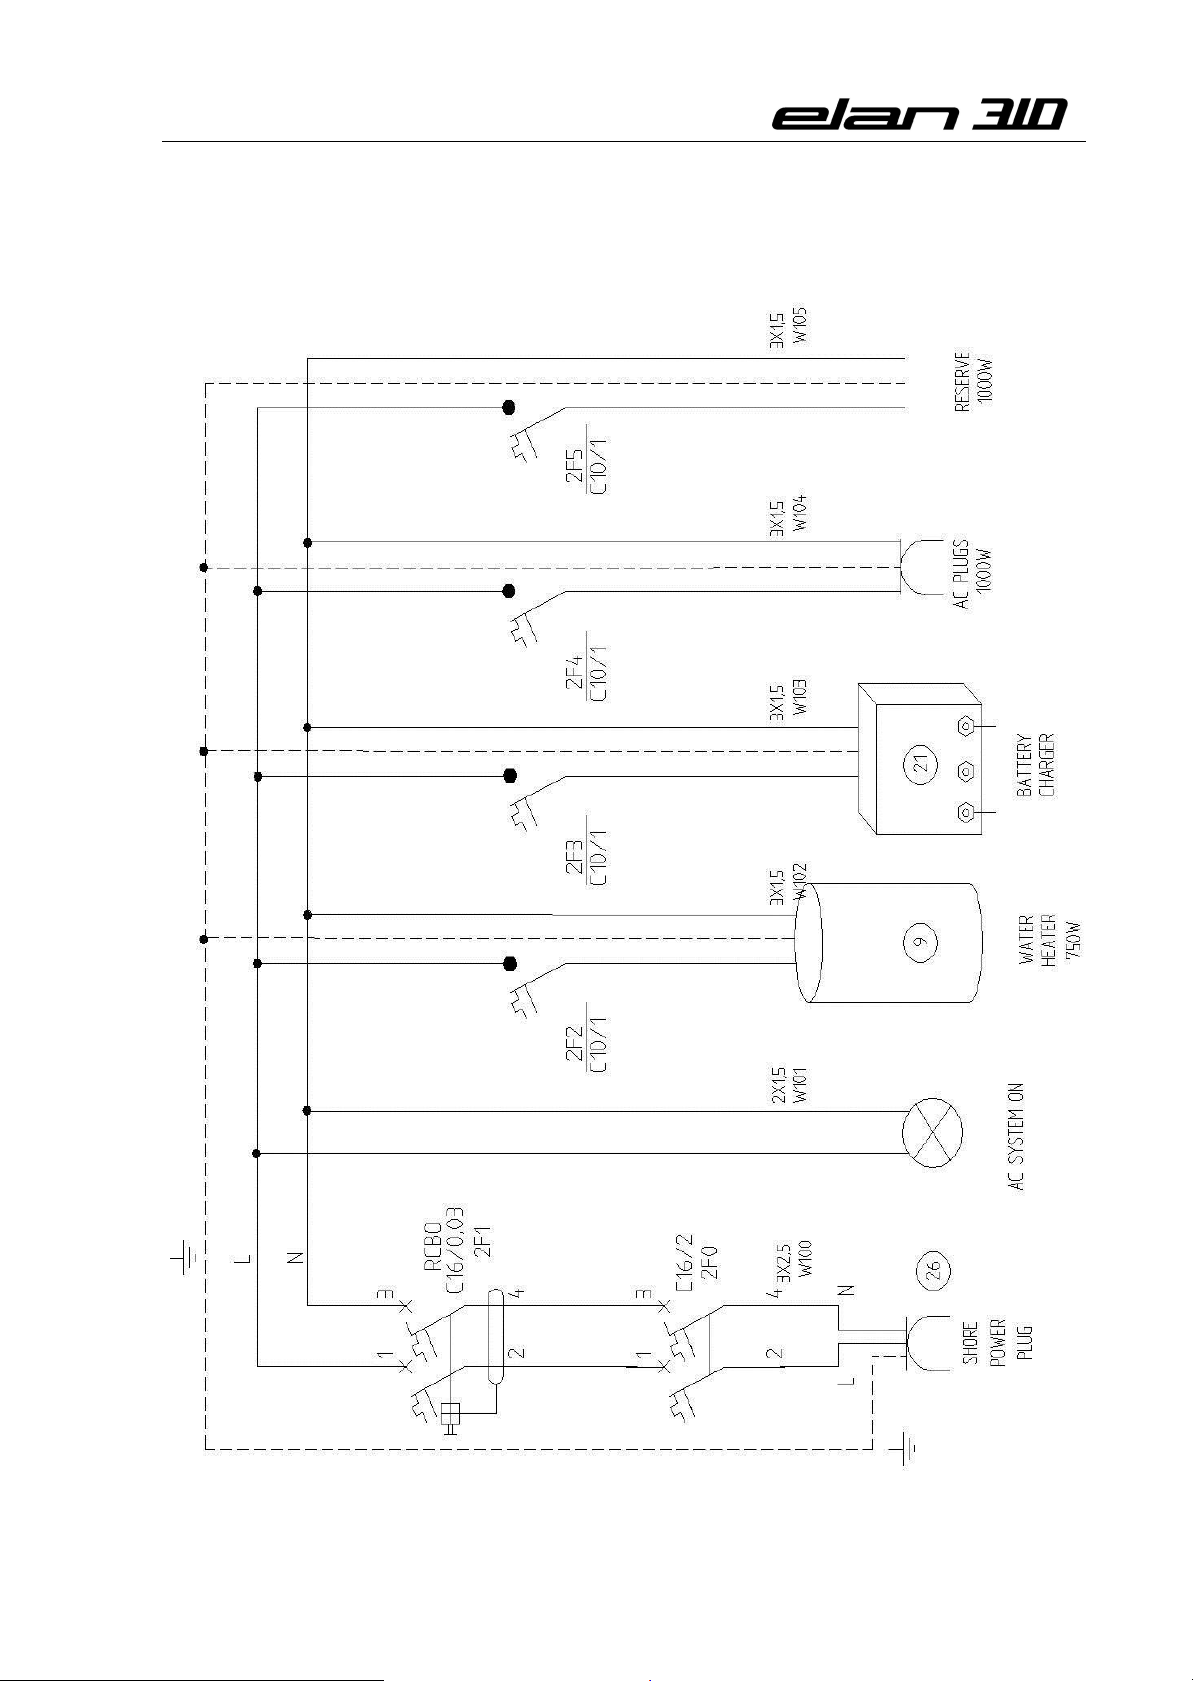
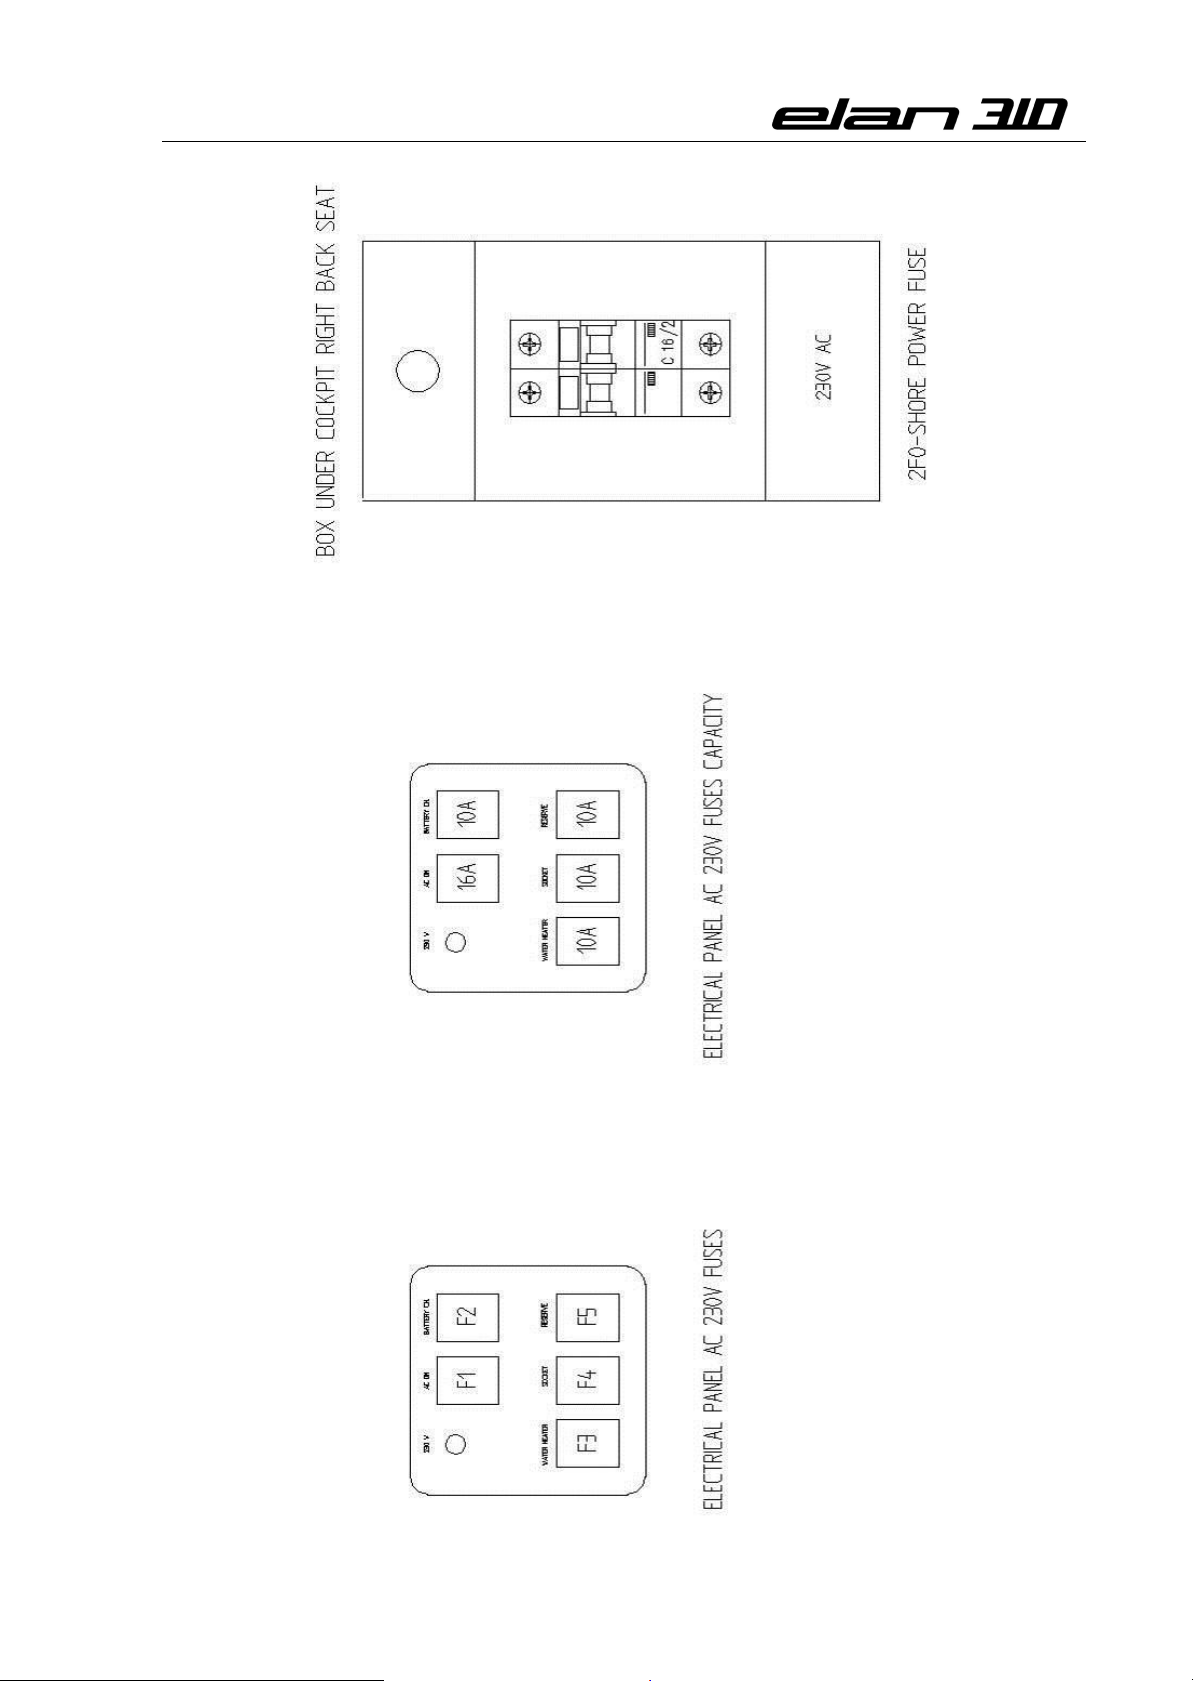
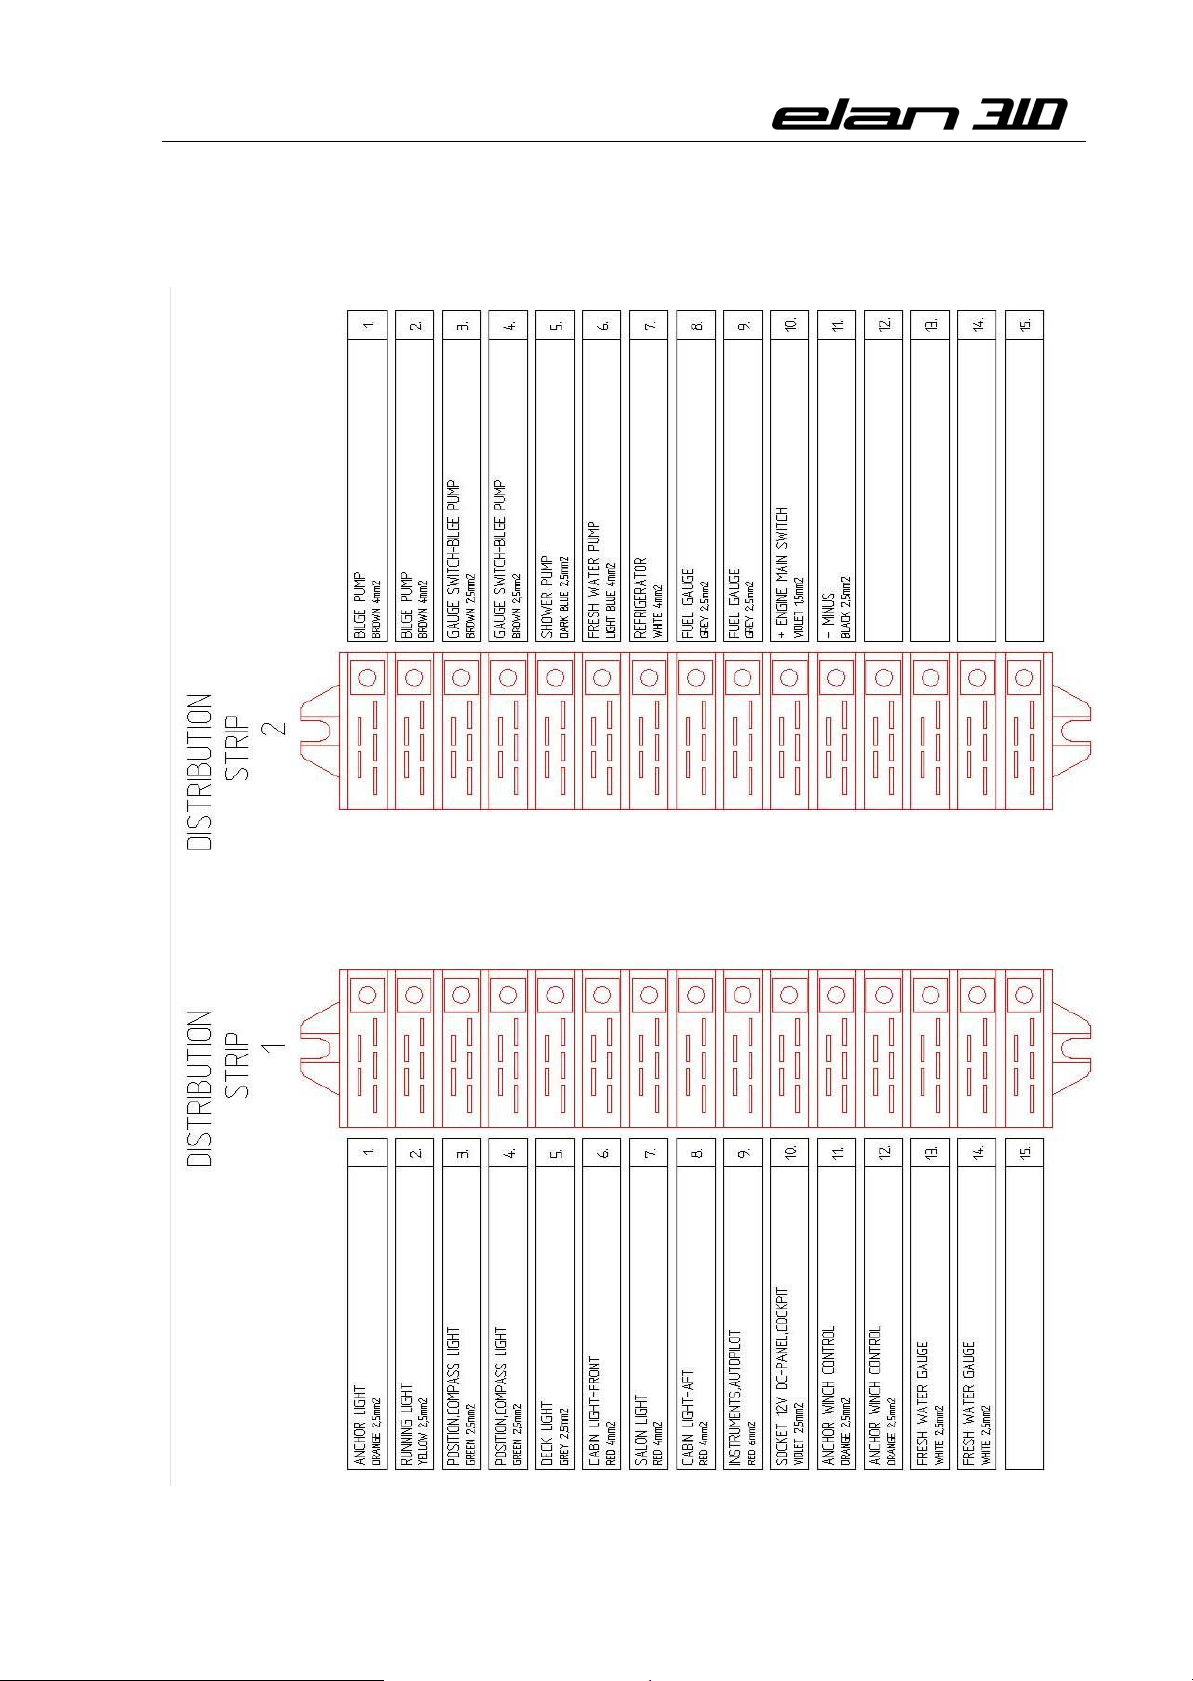
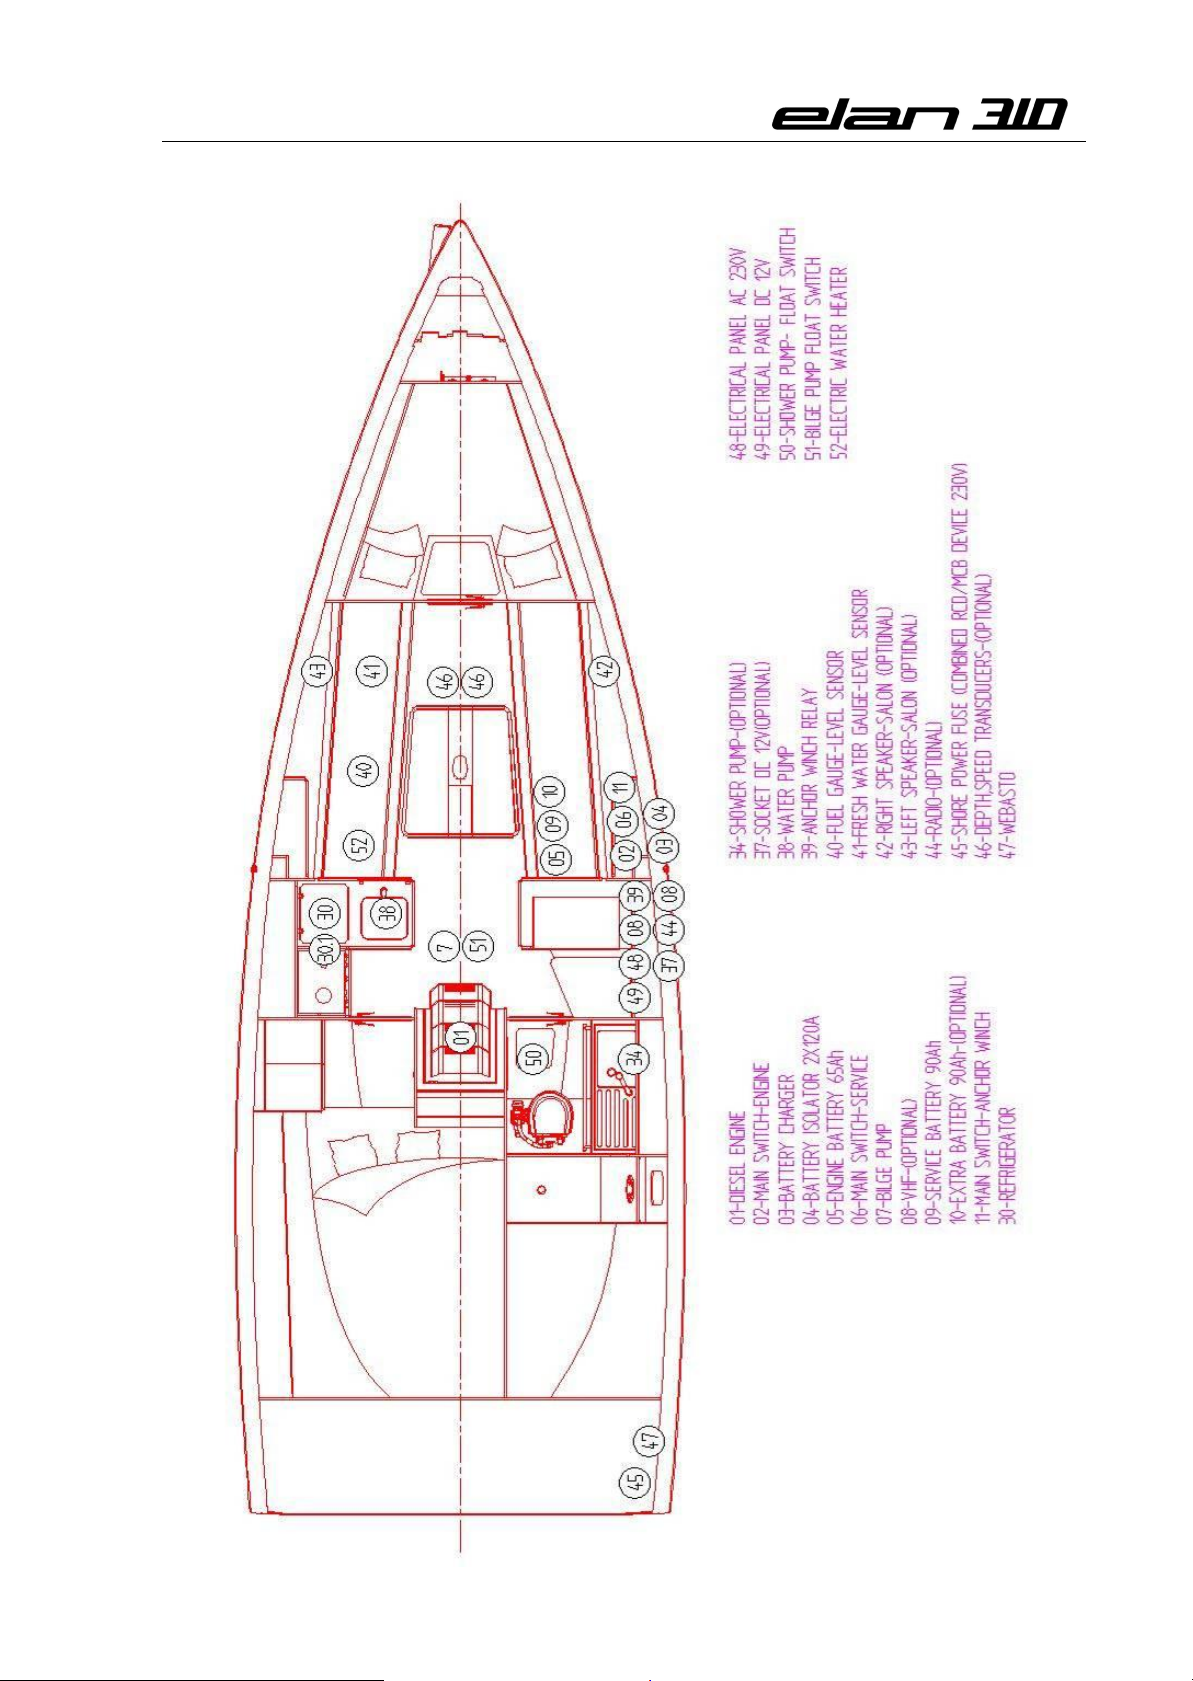
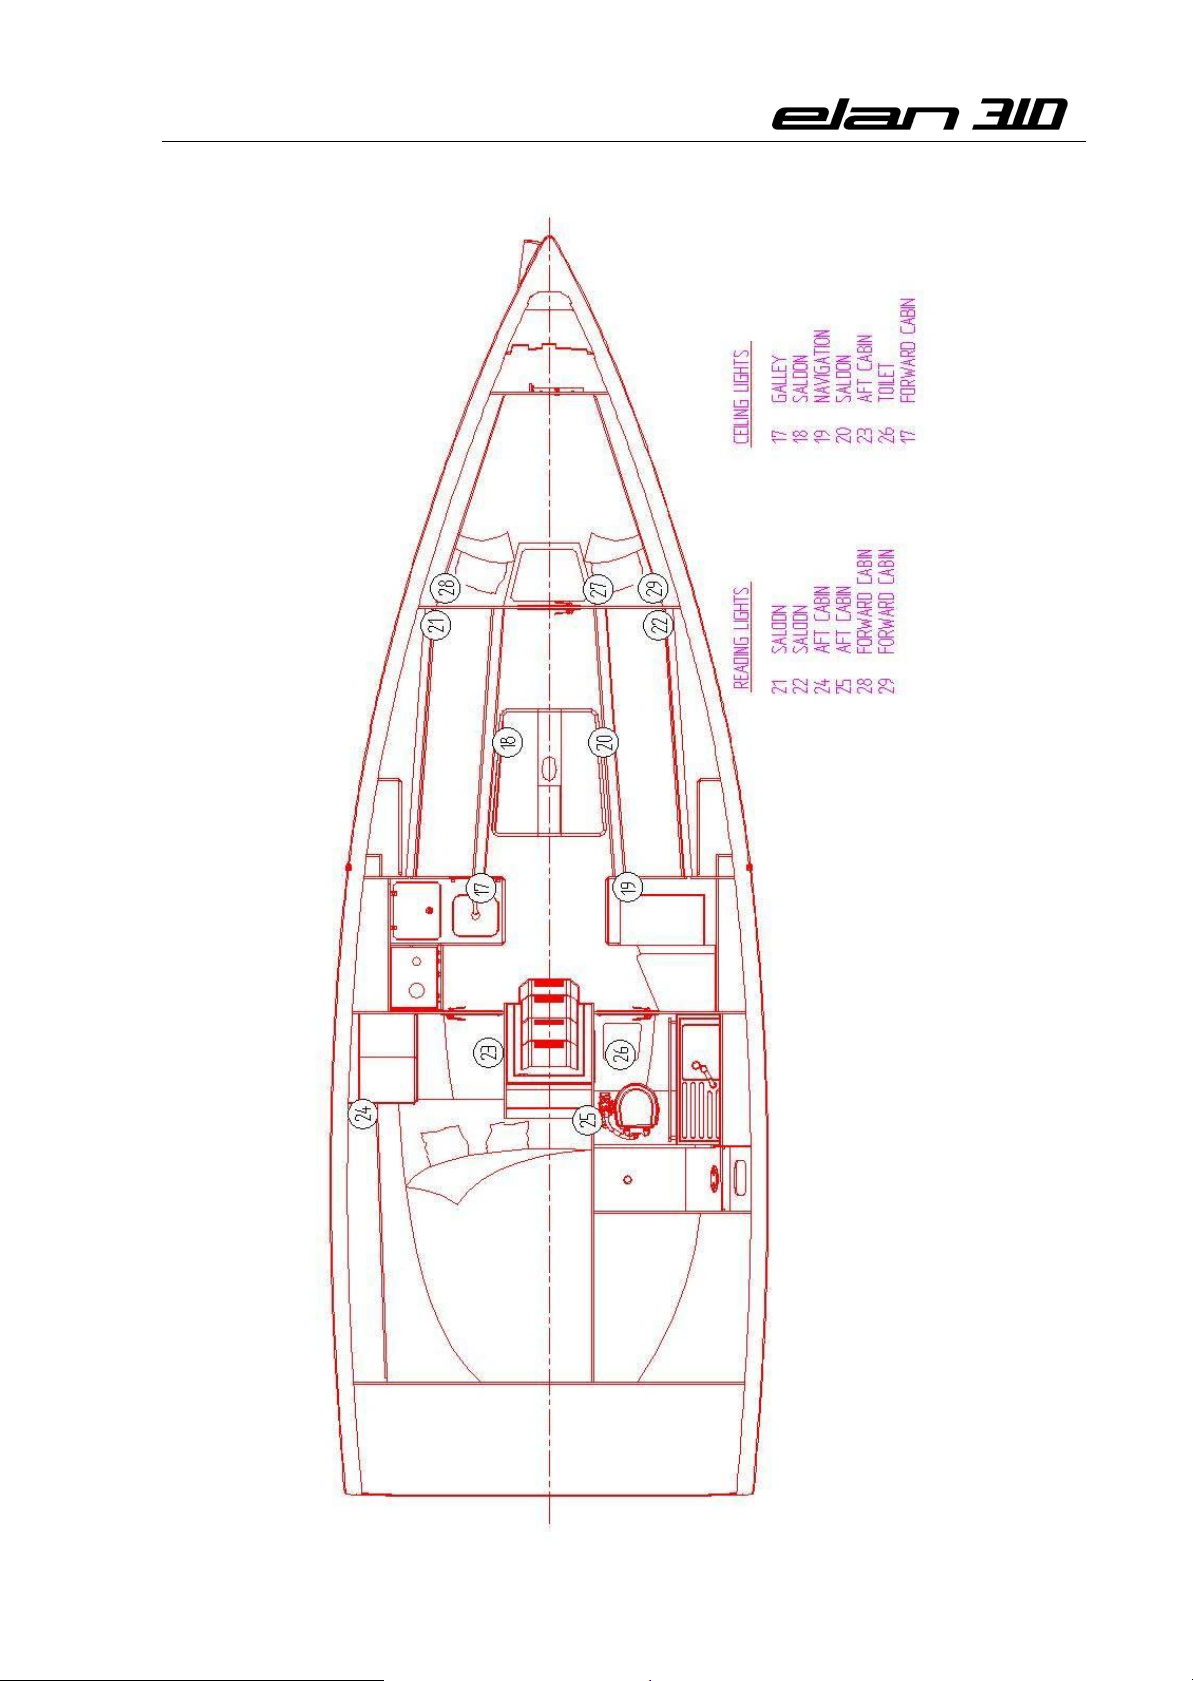
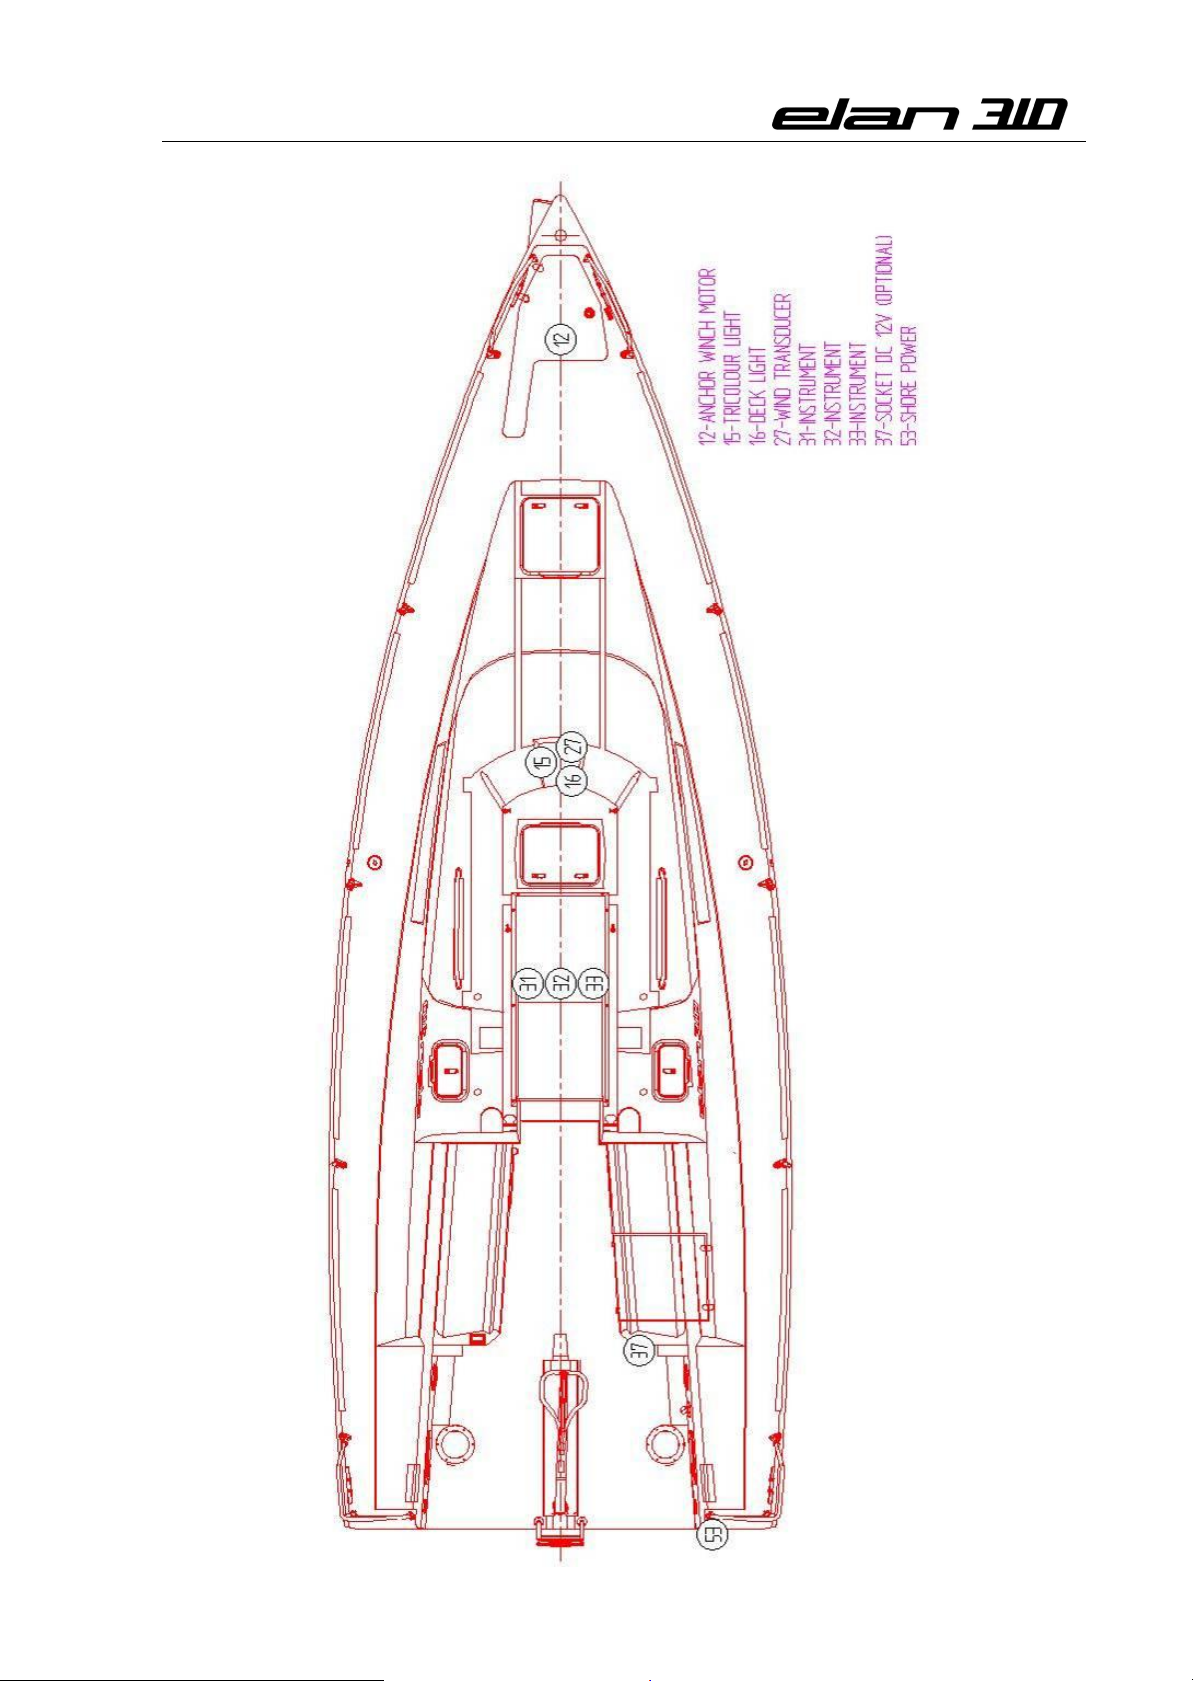
12.2. ELECTRICAL SYSTEMS DRAWINGS .…….…….….………………………………………………………..……… 48
6
Page 7
Owner’s Manual
7
Page 8
Owner’s Manual
8
Page 9

Owner’s Manual
2. WARRANTY CONDITIONS OF YOUR ELAN
2.1. GENERAL WARRANTY CONDITION
2.1.1. The warranty is valid for two years, starting to run from the date of delivery and is
strictly limited, at the sole builder’s discretion, to the free replacement of repair of
any parts which have been recognized as being defective by its technical
departments.
No indemnity whatsoever shall be paid in connection thereto.
However by derogation at what is said above:
The warranty is limited to one year with respect to:
boats being used for professional purposes, including but not limited to
charter, sailing schools, fishing or workboats,
boats built for competition specifically when equipped and/or conceived for
racing,
one-design boats,
parts that rapidly deteriorate due to wear and tear, including but not limited
to sails, running rigging batteries, external decorations, cushions, hull bottom
protection…,
Parts or accessories visibly bearing the trademark of another supplier only
benefit from the warranty provided by that supplier.
2.1.2. The costs of transporting the boat or any defective part as well as any additional
related costs due to the impossibility of using the boat and/or its equipment are to be
borne exclusively by the purchaser.
2.1.3. This warranty is only valid after establishing and sending of all bellow documents to
Elan Marine QA and AS Dept., according to the conditions specified on each of them
hand over and commissioning certificate,
control certificate after first year of use,
Cost related to handling, transportation, standing, sailing for delivery, etc… with
regards to these, hand over and control are to be borne exclusively by the purchaser.
2.1.4. The application of this warranty prolongs the warranty period for the sole part or
accessory thus repaired or exchanged, during a period equal to the necessary time to
perform the warranty work only, provided that said work necessitates at least 7
consecutive days of labour to be performed.
2.1.5. The following and potential consequences thereof are specifically excluded from the
warranty:
effects of normal wear,
gel-coat fissures, cracks or discoloration,
deterioration of parts that were replaced by maladapted parts, or from another
origin or which were modified or repaired, even partly by a shop not authorized
by the builder,
damage resulting from:
9
Page 10

Owner’s Manual
non-observance of maintenance recommendations as described in the book
remitted with the boat, or non-compliance with the normal rules of boat
maintenance,
improper use, especially negligent, reckless, abusive or abnormal use,
participation in competitions,
negligence with regards to the use of protective measures when necessary,
an accident or disaster such as explosion, fire, storm, lightning,
transportation, riot, theft or shock.
2.1.6. In order to be covered by the contractual warranties set out above, the purchaser /
user of the boat must present its certificate of origin and notify his distributor / seller
of any defect(s) in writing. Notification must be detailed and precise and made within
15 days from the day the defect discovered. Upon receipt of notice from the
purchaser / user, the distributor / seller shall then have 8 days to notify the builder.
His failure to notify the builder within 8 days shall result in his liability for the
consequences of his delay.
2.1.7. The dealers, agents or re-sellers of the builder are not qualified to modify the above
described warranty but are authorized, for their own account and under their sole
responsibility, to grant other warranties that would in no way be under the builder’s
responsibility.
2.2. HULL DECK WARRANTY
2.2.1. The warranty is valid for 5 years against any manufacturing defect which is
recognized as such by the builder’s technical departments, and starts to run from the
day the boat is put into use or upon the last day of its model year at the latest, that is
on August 31 of said year.
However, the warranty is limited to one year after date of first handover for boats:
being used for professional purposes, including but not limited to charter,
sailing schools, fishing or workboats,
boats built for competition specifically when equipped and/or conceived for
racing,
of one-design nature.
The warranty is strictly limited to the free repair of above-mentioned manufacturing
defects, either in the builder’s yards or by a repair shop or shipyard chosen by the
builder. No indemnity whatsoever shall be paid in this respect.
Any event which affects the structure of the boat and which is not the result of a
manufacturing defect under warranty, which may or may not have qualified for a
reparation of the hull and deck, will result in the immediate cancellation of the
warranty, without prejudice.
The costs of transportation, as well as the possible costs resulting from the loss of use
of the boat will be entirely borne by the buyer.
10
Page 11

Owner’s Manual
The application of the warranty prolongs the warranty period on the repair works
during a period equal to the necessary time to perform the warranty work only,
provided that said work necessitates at least 7 consecutive days of labour to be
performed.
The following and potential consequences thereof are specifically excluded from the
warranty:
effects of normal wear.
gel-coat fissures, cracks or discoloration,
damage resulting from:
non-observance of maintenance recommendations as described in the book
remitted with the boat, or non-compliance with the normal rules of boat
maintenance,
improper use, especially negligent, reckless, abusive or abnormal use,
participation in competitions,
negligence with regards to the use of protective measures when necessary,
an accident or disaster such as explosion, fire, storm, lightning,
transportation, riot, theft or shock.
2.2.2. In order to be covered by the contractual warranties set out above, the purchaser /
user of the boat must presents its certificate of origin and notify his distributor /
seller of any defect(s) in writing. Notification must be detailed and precise and made
within 15 days from the day the defect discovered. Upon receipt of notice from the
purchaser / user, the distributor / seller shall then have 8 days to notify the builder.
His failure to notify the builder within 8 days shall result in his liability for the
consequences of his delay.
2.2.3. The dealers, agents or re-sellers of the builder are not qualified to modify the above
described warranty but are authorized, for their own account and under their sole
responsibility, to grant other warranties that would in no way be under the builder’s
responsibility.
11
Page 12
Owner’s Manual
33..11.. DDEEGGRREEEESS OOFF DDAANNGGEER
R
33..22.. LLAABBEELLSS OONN BBOOAARRDD
3. IMPORTANT INFORMATION
This manual used the following degrees of danger:
DANGER: Denotes that an extreme intrinsic hazard exists which would result in high
probability of death or irreparable injury if proper precautions are not
taken.
WARNING: Denotes that a hazard exists which can result in injury or death if proper
precautions are not taken.
CAUTION: Denotes a reminder of safety practices or directs attention to unsafe
practices which could result in personal injury or damage to the sailing yacht
or components.
General warning label Fire extinguisher position
Main switch label Water tank connection Inlet seacock
Cooker warning label
Outlet seacock Emergency exit
12
Figure 1
Page 13
Owner’s Manual
33..33.. LLIIAABBIILLIITTYY OOFF TTHHEE OOWWNNEERR//OOPPEERRAATTOORR
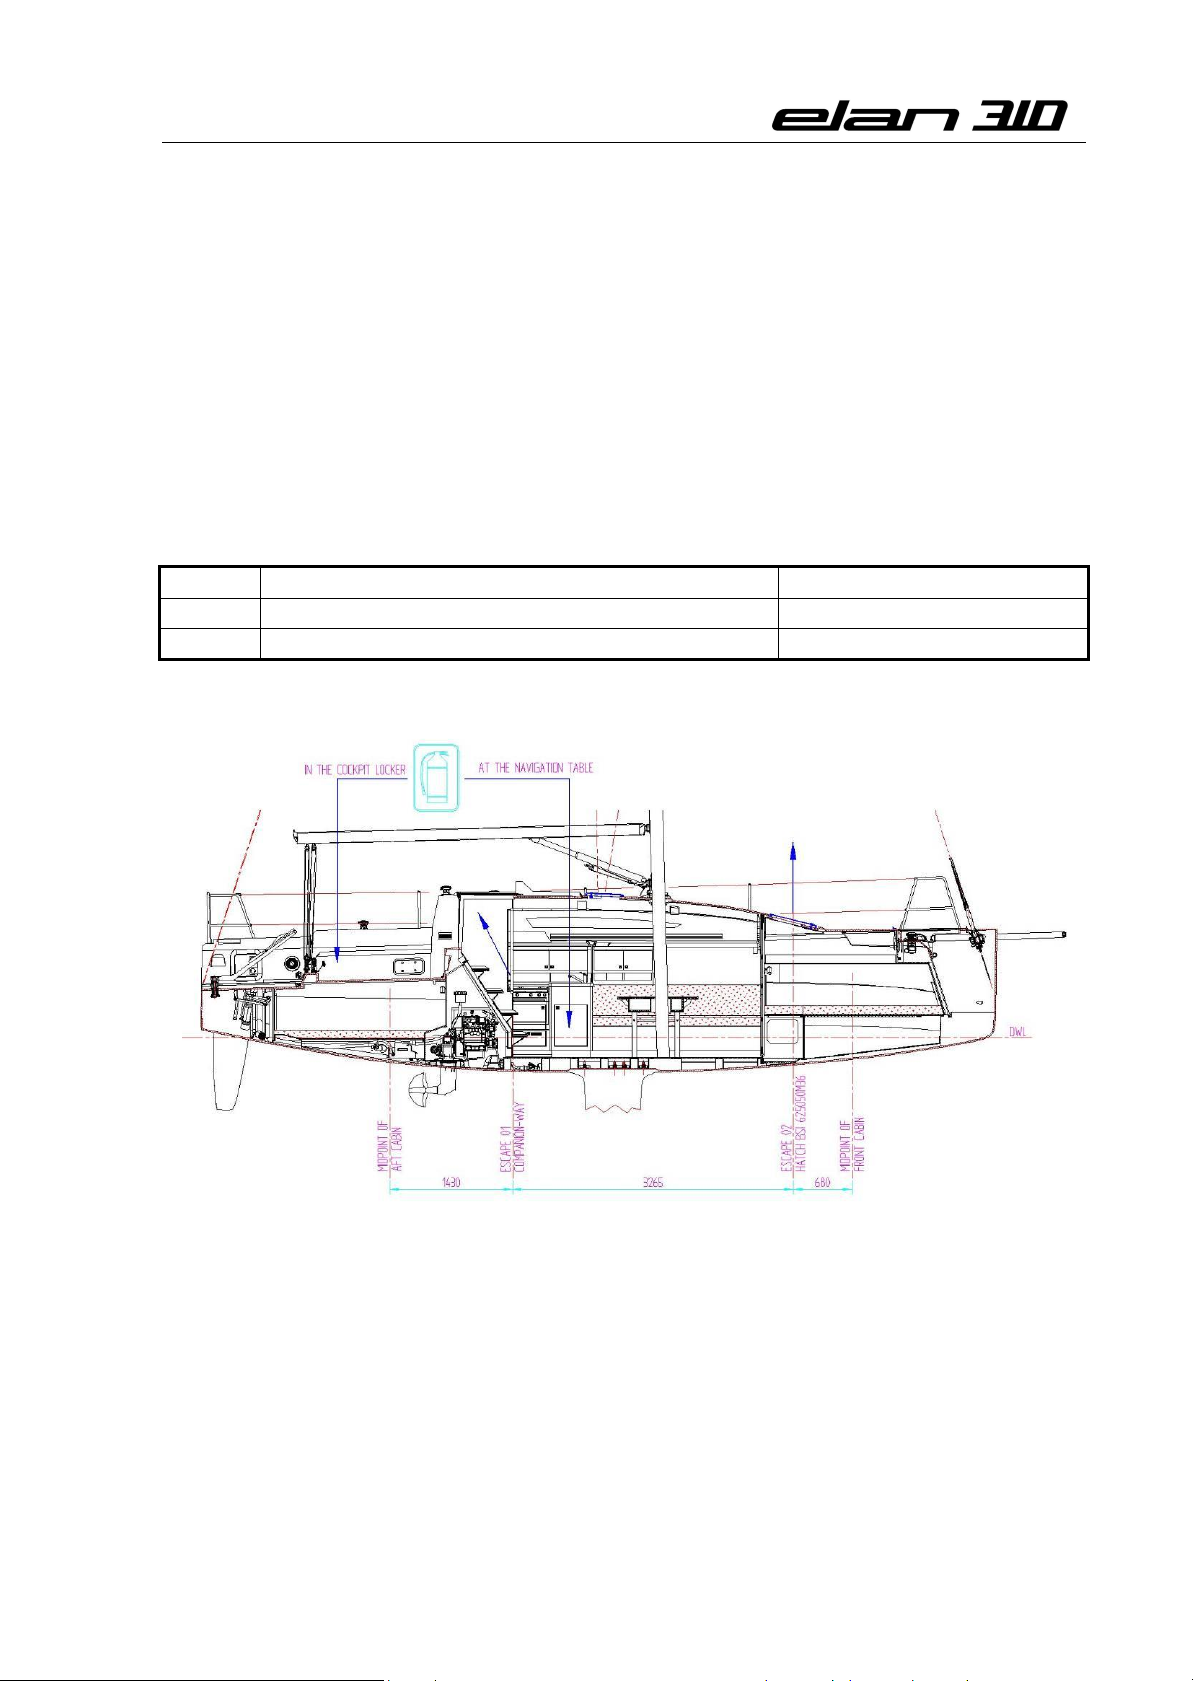
33..44.. FFIIRREE PPRROOTTEECCTTIIOONN AANNDD EESSCCAAPPEE PPLLAANN
No.
Location
Capacity
1
In the cockpit locker
1 kg
2
At the navigation table
1 kg
Before sailing, the sailing yacht owner/operator should read this manual and familiarize
himself / herself with its contents, in particular with all the warnings relating to safe use and
emergency procedures. It is the responsibility of the owner to ensure that, when sailing, the
sailing yacht is equipped with all the (safety) equipment required under the law. The
owner/operator shall also inform all the other crew members about the proper use of the
craft and equipment and the emergency procedures.
This sailing yacht is equipped with portable fire extinguishers of the following extinguishing
capacities and at the following locations (see Fig. 2):
In case of need for evacuation, use the following escape routes:
Keep the bilges clean and check for fuel and gas vapours at regular intervals.
It is the responsibility of the sailing yacht owner/operator to:
Have the fire-fighting equipment checked at the intervals indicated on the equipment.
Replace the fire-fighting equipment if expired or discharged by devices of identical or
greater fire-fighting capacity.
Inform members of the crew about the location and operation of the fire-fighting
equipment and the location of the escape routes.
13
Figure 2
Page 14

Owner’s Manual
33..55.. PPRREE--DDEEPPAARRTTUURREE CCHHEECCKK LLIISSTT
33..66.. WWAATTEERR IINNTTAAKKEE DDUURRIINNGG SSAAIILLIINNGG AANNDD SSTTRRAANNDDIINNGG
In case the fire in engine room use fire port hole located on the companionway.
Ensure that the fire-fighting equipment is readily accessible when the craft is occupied.
WARNING: - NEVER obstruct passageways to exits and hatches.
- NEVER obstruct safety controls, e.g. fuel valves, gas valves, switches
of the electrical system.
- NEVER obstruct portable fire extinguishers stowed in lockers.
- NEVER leave the craft unattended when cooking appliances are in use.
- NEVER use gas light in the craft.
- DO NOT modify any of the craft’s systems (especially electrical, fuel,
and gas).
- NEVER fill the fuel tank or replace gas bottles when the engine is
running or when cooking appliances are in use.
- NEVER smoke while handling fuel or gas.
- DO NOT fit free hanging curtains or other fabrics in the vicinity of or
above the cookers or other open flame devices.
- DO NOT store combustible material in the engine room.
Close the portlights and hatches.
Check the position of all the inlet/outlet seacocks in the hull.
Open the engine cooling valve and close all the other valves, including water tank
connection; do not forget to close them if they are used during sailing.
Switch on the main switches of the engine and other users.
Check if cooling water runs through the engine exhaust; if not, check the water pump.
Check if the bilges are clean and if the bilge pumps operate properly.
Check the navigations lights.
Check the required safety equipment.
If during sailing you notice water in the craft, stay calm and immediately check if all the
seacocks are closed and turn on the bilge pumps. Use a manual bilge pump as well to pump
the water out. Switch off the engine and close the engine cooling valve. Close the tank valves
as well. Try to find out the cause of the leak as quickly as possible. If you fail to find out the
cause and if the water level in the craft continues to rise, start evacuation procedures.
If you run aground while sailing, open the inspection covers in the saloon floor and
immediately check for any leaks at the keel screws. Through the stowage compartment
check the installation of the steering wheel as well. In case of a leak, follow the directions in
the previous paragraph and have the sailing yacht lifted from water as soon as possible.
14
Page 15
Owner’s Manual
33..77.. CCLLOOSSIINNGG UUPP YYOOUURR CCRRAAFFTT AAFFTTEERR SSAAIILLIINNGG CCHHEECCKK LLIISST
T
33..88.
.
CCRRAAFFTT IIDDEENNTTIIFFIICCAATTIIOONN,, BBUUIILLDDEERR’’SS PPLLAATTEE
S
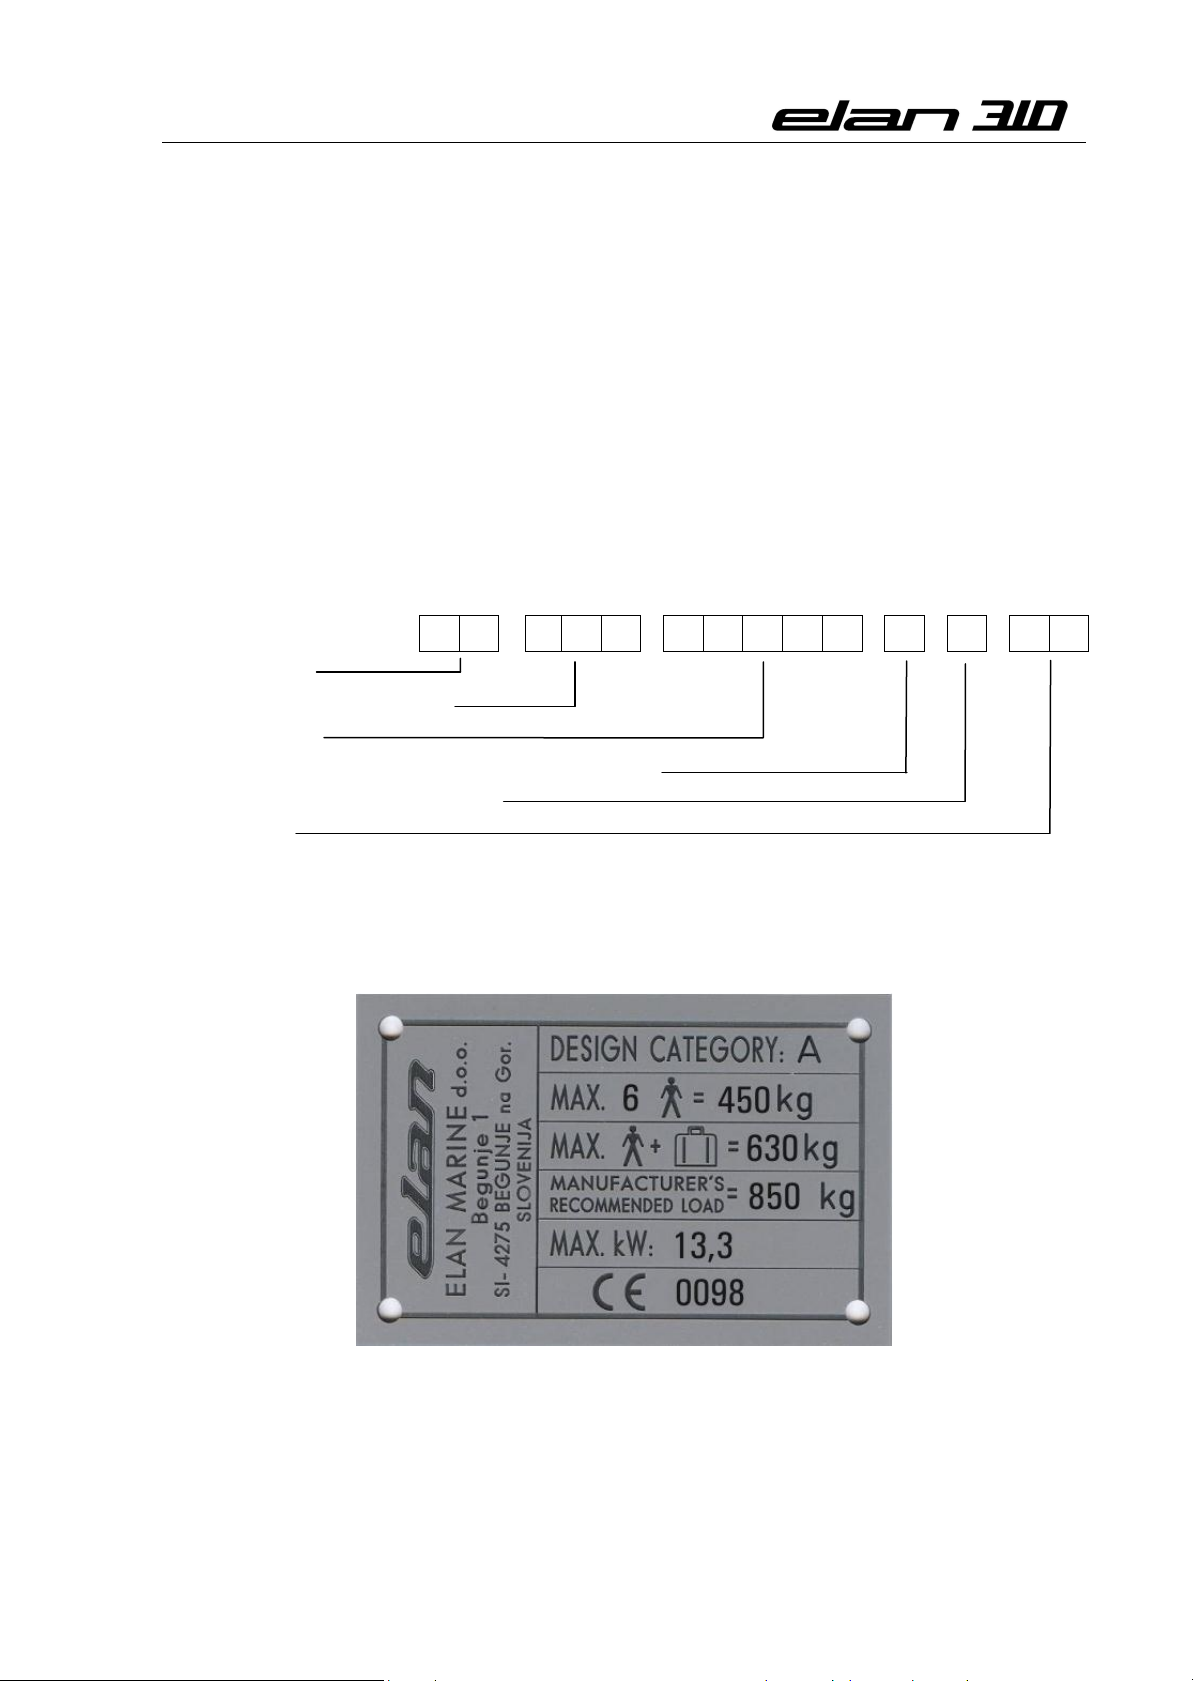
I - E L A 3 1 E 0 1 J 9 1
0
1. Close all inlet/outlet seacocks in the hull.
2. Turn off the electrical system.
3. Turn off the gas valve on the gas bottle.
4. Switch on bilge pump (if automatic) and pump the bilge.
5. Close all the portlights and hatches.
The sailing yacht has moulded Craft Identification Number (CIN) visible on the starboard side
of the transom.
Country code
Manufacturer’s identification
Serial Number
Month of manufacture (letter: January = A, February = B etc.)
Year of manufacture (last numeral)
Model year
The duplicate CIN plate is fastened on innerhull structure in the starboard cockpit stowage.
The builder’s plate is readily visible, located in the cockpit, with the following information:
- manufacturer’s name
- the CE mark followed by the ident.number of the notified body ("0098" for "Germanischer Lloyd")
- the design category: A B C D
- the number of persons recommended, for which the craft is designed to carry when underway
- manufacturer´s recommended load
15
Page 16
Owner’s Manual
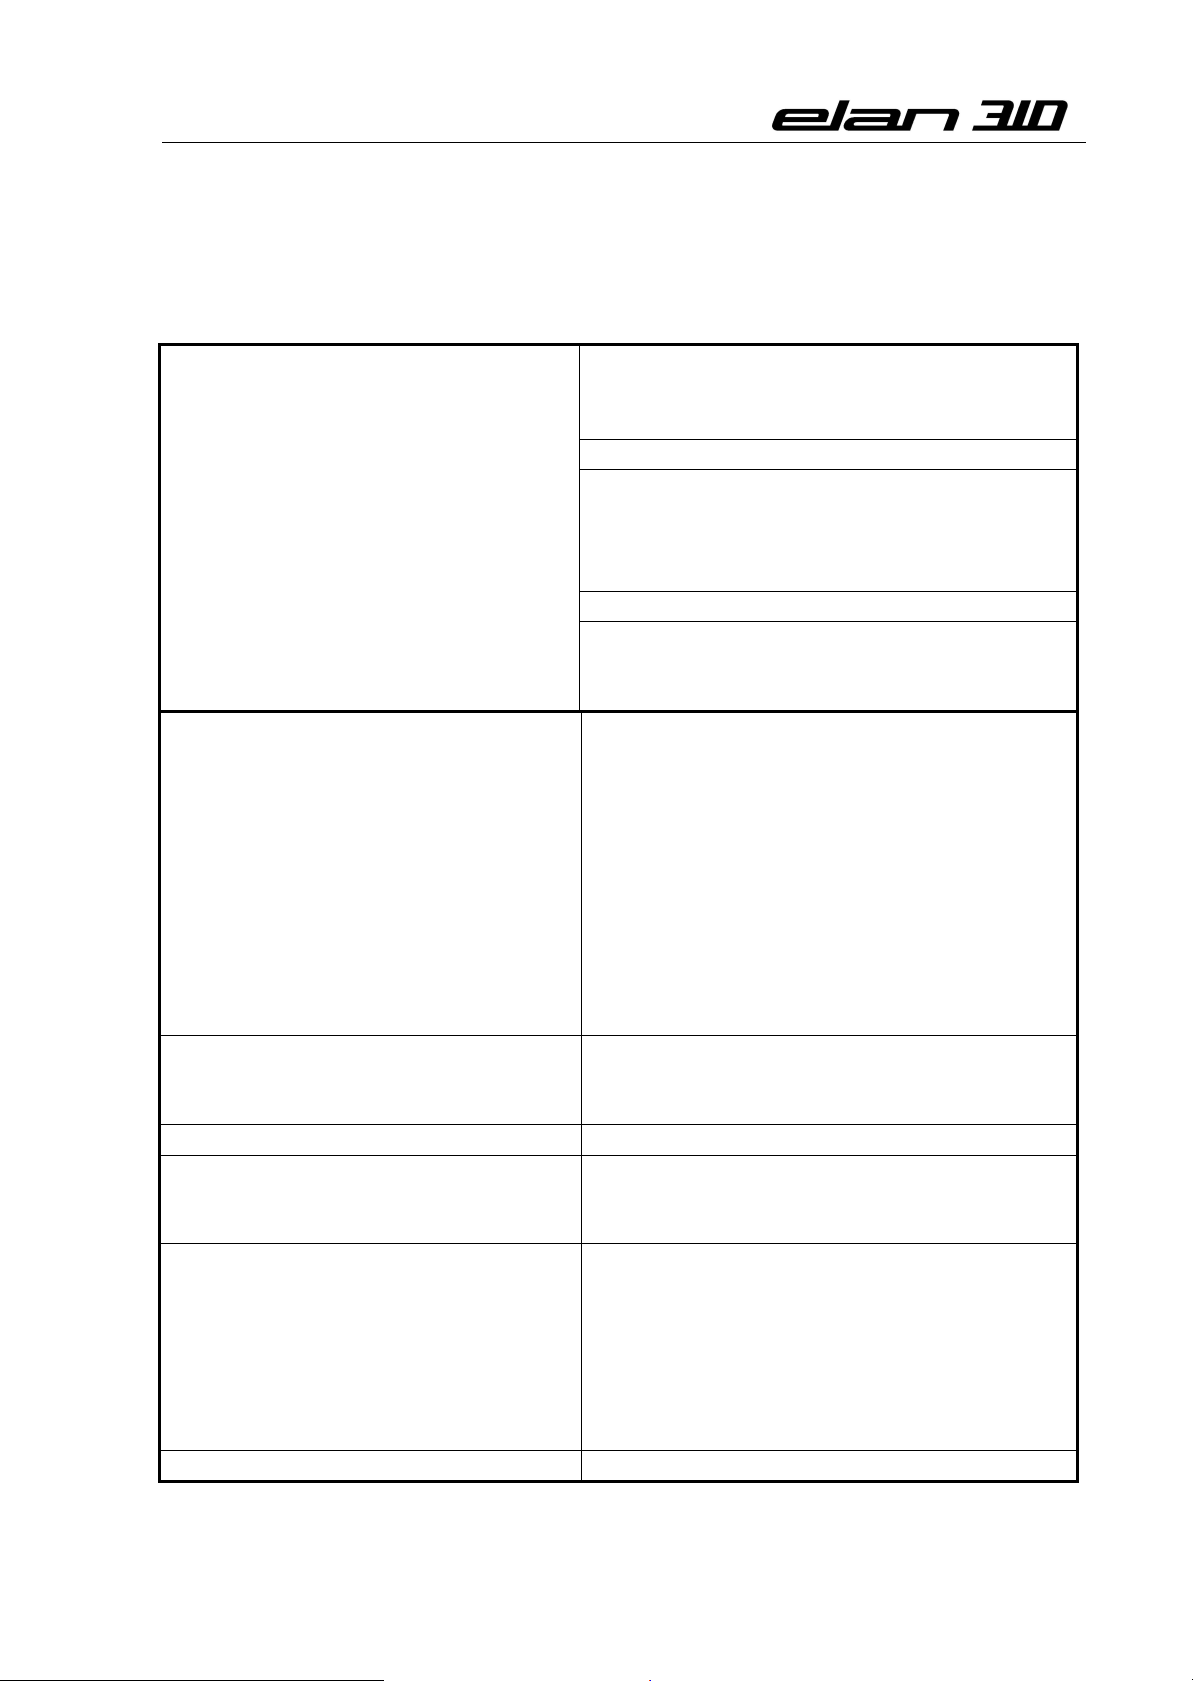
44..11.. TTEECCHHNNIICCAALL DDAATTAA
Boat Type
Elan 380
Boat Class
Sailboat
Boat Design Category
A “Ocean”
CIN
SI-ELA31E_ _ _ _ _ _
Manufactured by
ELAN MARINE, d.o.o.
Begunje 1, 4275 Begunje na Gorenjskem,
Slovenia
Certification
Examination Report Module B+C
Certificate No.
Notified body
GERMANISCHER LLOYD
Head office
Vorsetzen 35, D-20459 Hamburg, Germany
Length max.
9,25 m
Hull length
9,25 m
Length at waterline
8,71 m
Beam max.
3,22 m
Draft
1,90 m
Airdraft (incl. 1m antenna)
15,30 m
Unladen weight
3750 kg
Manufacturer’s recommended load
850 kg
Displacement max.
4600 kg
Ballast
1040 kg
Engine power max.
13,3 kW / 18 hp
Fuel capacity
45 litres
Water capacity
140 litres
Holding tank (optional)
70 litres
Gas bottles (propane/butane)
2 kg
Maximum crew
6 persons
Cabins
2
Berths
4 + 2
Mainsail
30,15 m
Genoa
23,47 m
Genaker
75,00 m
I
12,25 m
J
3,58 m
P
12,05 m
E
4,13 m
Design
Humphreys Yacht Design
4. TECHNICAL SPECIFICATIONS
16
Page 17
Owner’s Manual
44..22.. DDEEFFIINNIITTIIOONN OOFF DDEESSIIGGNN
44..33.. MMAAXXIIMMUUMM TTOOTTAALL LLOOAADD ((ddiissppllaacceemmeenntt mmaaxx))
55.. GGEENNEERRAALL AARRRRAANNGGEEMMEENNTT
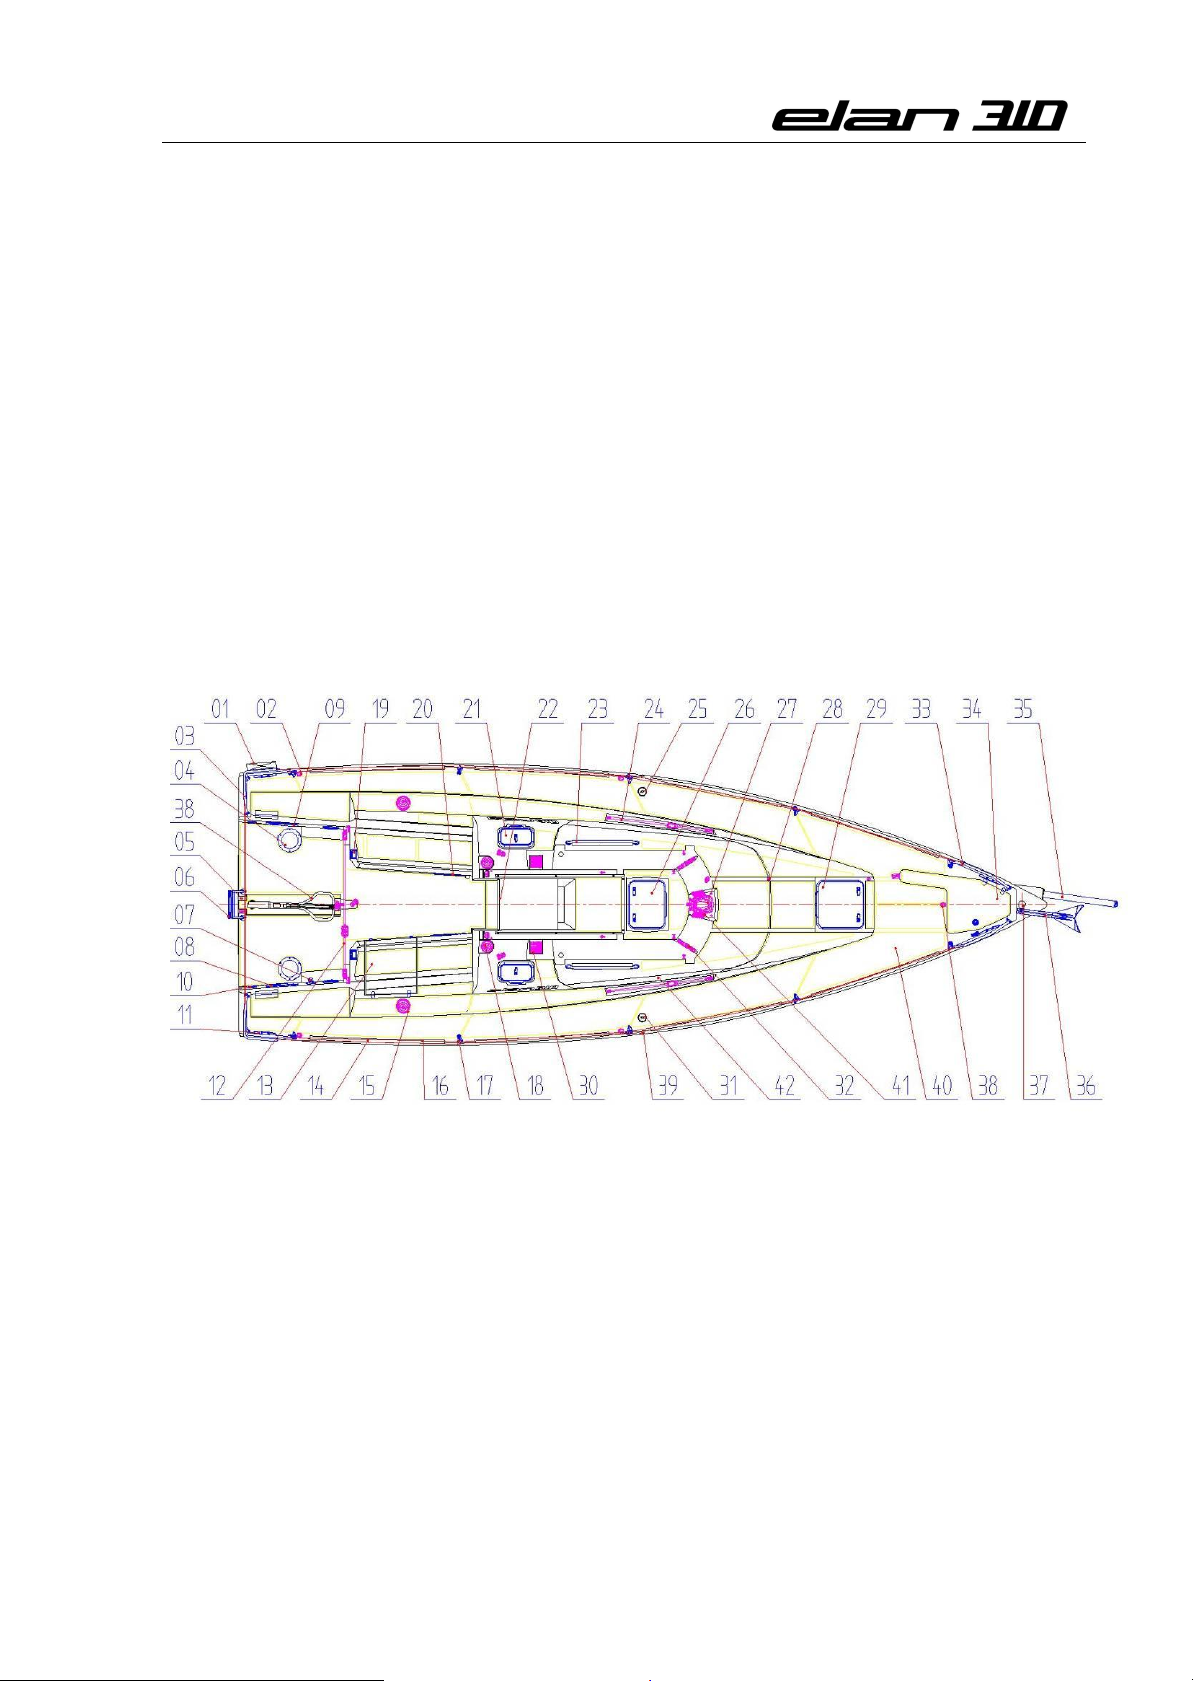
55..11.
.
DDEECCKK LLAAYYOOUUTT
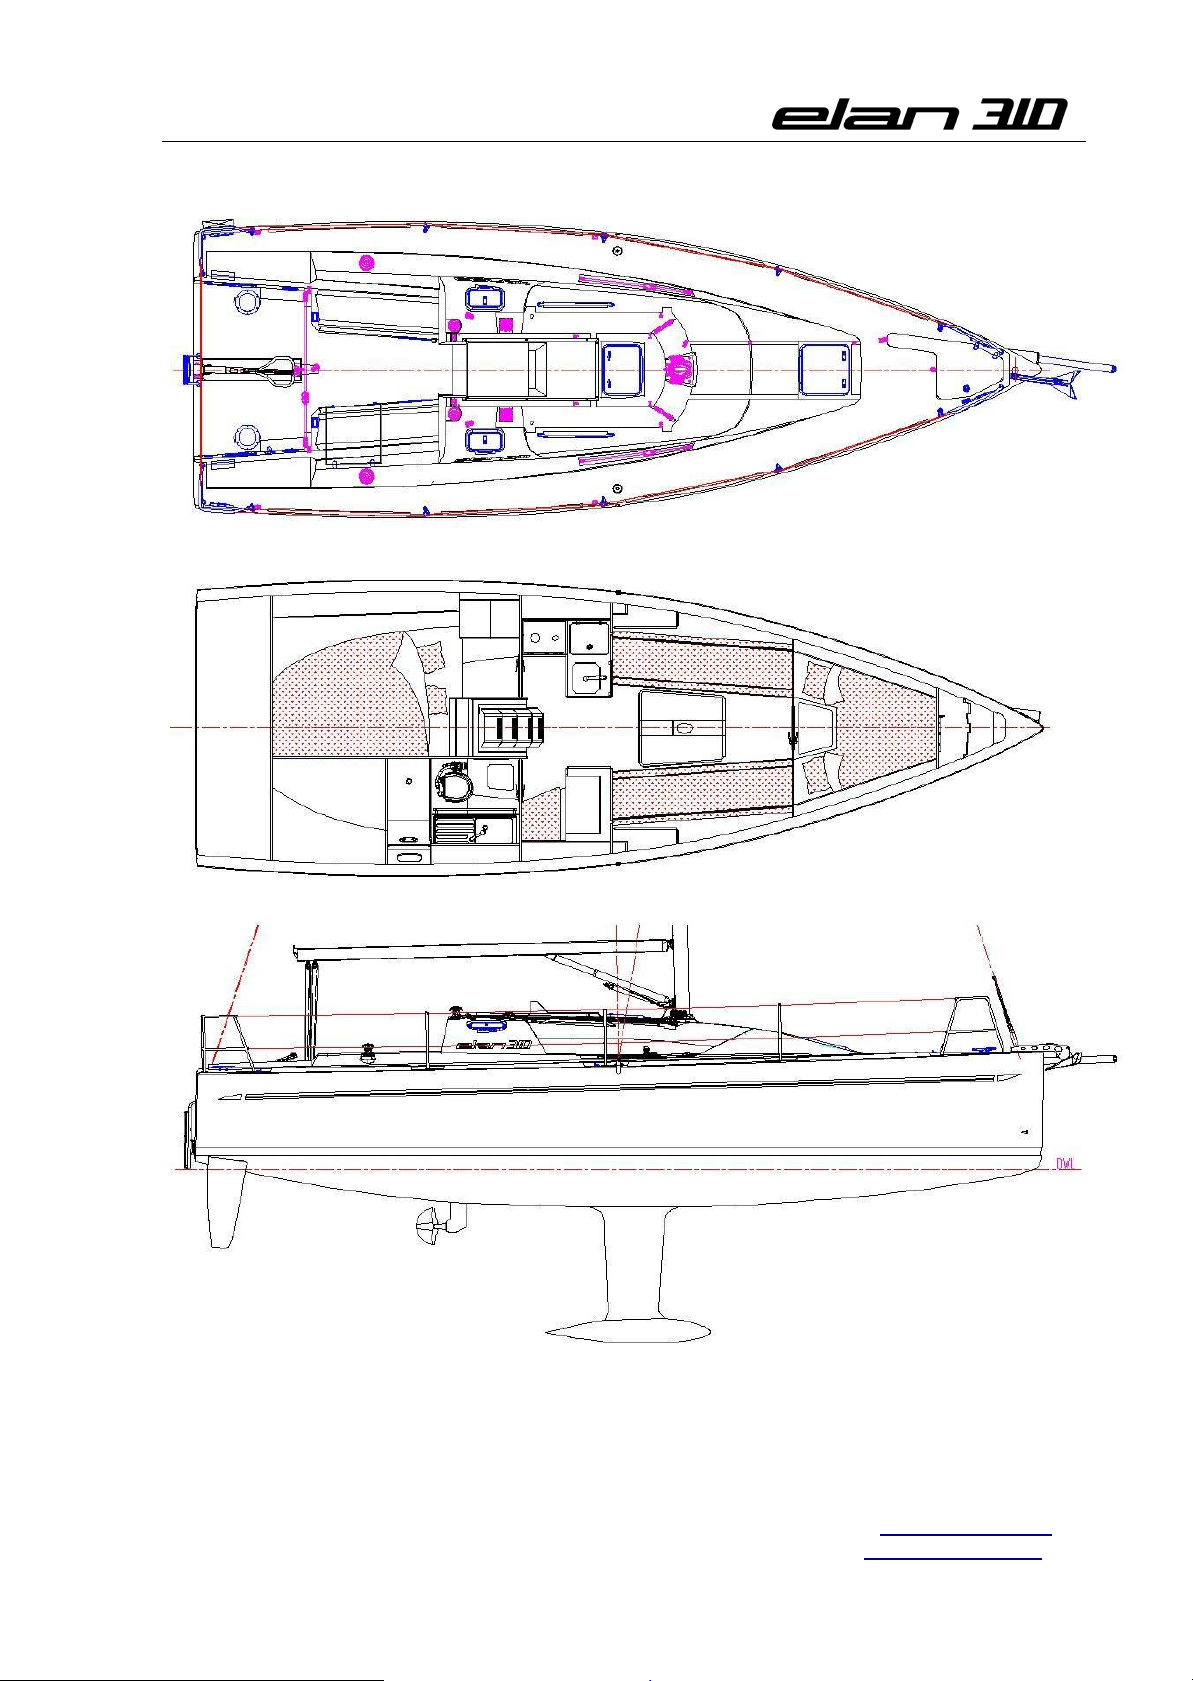
ELAN 310 is designed and built in conformity with the requirements of the “A” ocean sailing”
design category. The “A” category sailing yacht is designed and built for sailing in waves up to
7 m and winds up to 10 Beaufort, i.e. 55 knots, 28 m/s or 100 km/h. It has to be suitable for
longer cruises, for instance ocean sailing as well as for coast sailing in the regions that are
not protected against winds and waves for several hundred miles.
Keep the total weight of boat provisions, miscellaneous equipment not supplied by
manufacturer and persons on board, below maximum total load and suitably distributed.
1. Horseshoe lifebuoy
2. Pad eye
3. Pushpit
4. Rudder bearing covers
5. Backstay system
6. Folding swimming ladder
7. Engine lever
8. Gas bottle compartment
9. Storage box
10. Hand operated bilge pump
11. Mooring cleats
12. Mainsheet track & system
13. Cockpit locker
14. Toe rail
Figure 3
15. Genoa winches 35.2 STA
16. Lifelines
17. Stanchions
18. Halyard winches 20.2 STA
19. Autopilot display
20. Cockpit portlights
21. Hatch
22. Sliding hatch
23. Grabrail
24. Genoa tracks & systems
25. Fuel filler
26. Hatch
27. Mat deck ring
28. Bullseye
29. Escape hatch
30. Stoppers
31. Water filler
32. Organizers
33. Bow pulpit
34. Anchor storage cover
35. Sliding bowsprit
36. Anchor bow roller
37. Forestay fitting
38. Steering tiller
39. Chainplates
40. Anti-slip surfaces
41. Mast base blocks
42. Custom glass portlights
17
Page 18
Owner’s Manual
WARNING: - Keep portlights, windows, washboards, doors, hatches and ventilation
openings closed when appropriate, e.g. in rough weather or at surfing
speeds.
- Secure unfixed equipment safely when underway.
- If a liferaft shall be fitted, recommended stowage area is on the deck in
front of the mast.
- If a liferaft is fitted please strictly follow instructions of liferaft
manufacturer.
- In case if somebody falls overboard, use swimming ladder fitted on the
aft to climb back.
- If cockpit lockers are taken out, the sealant must be ensured when they
are fitted back.
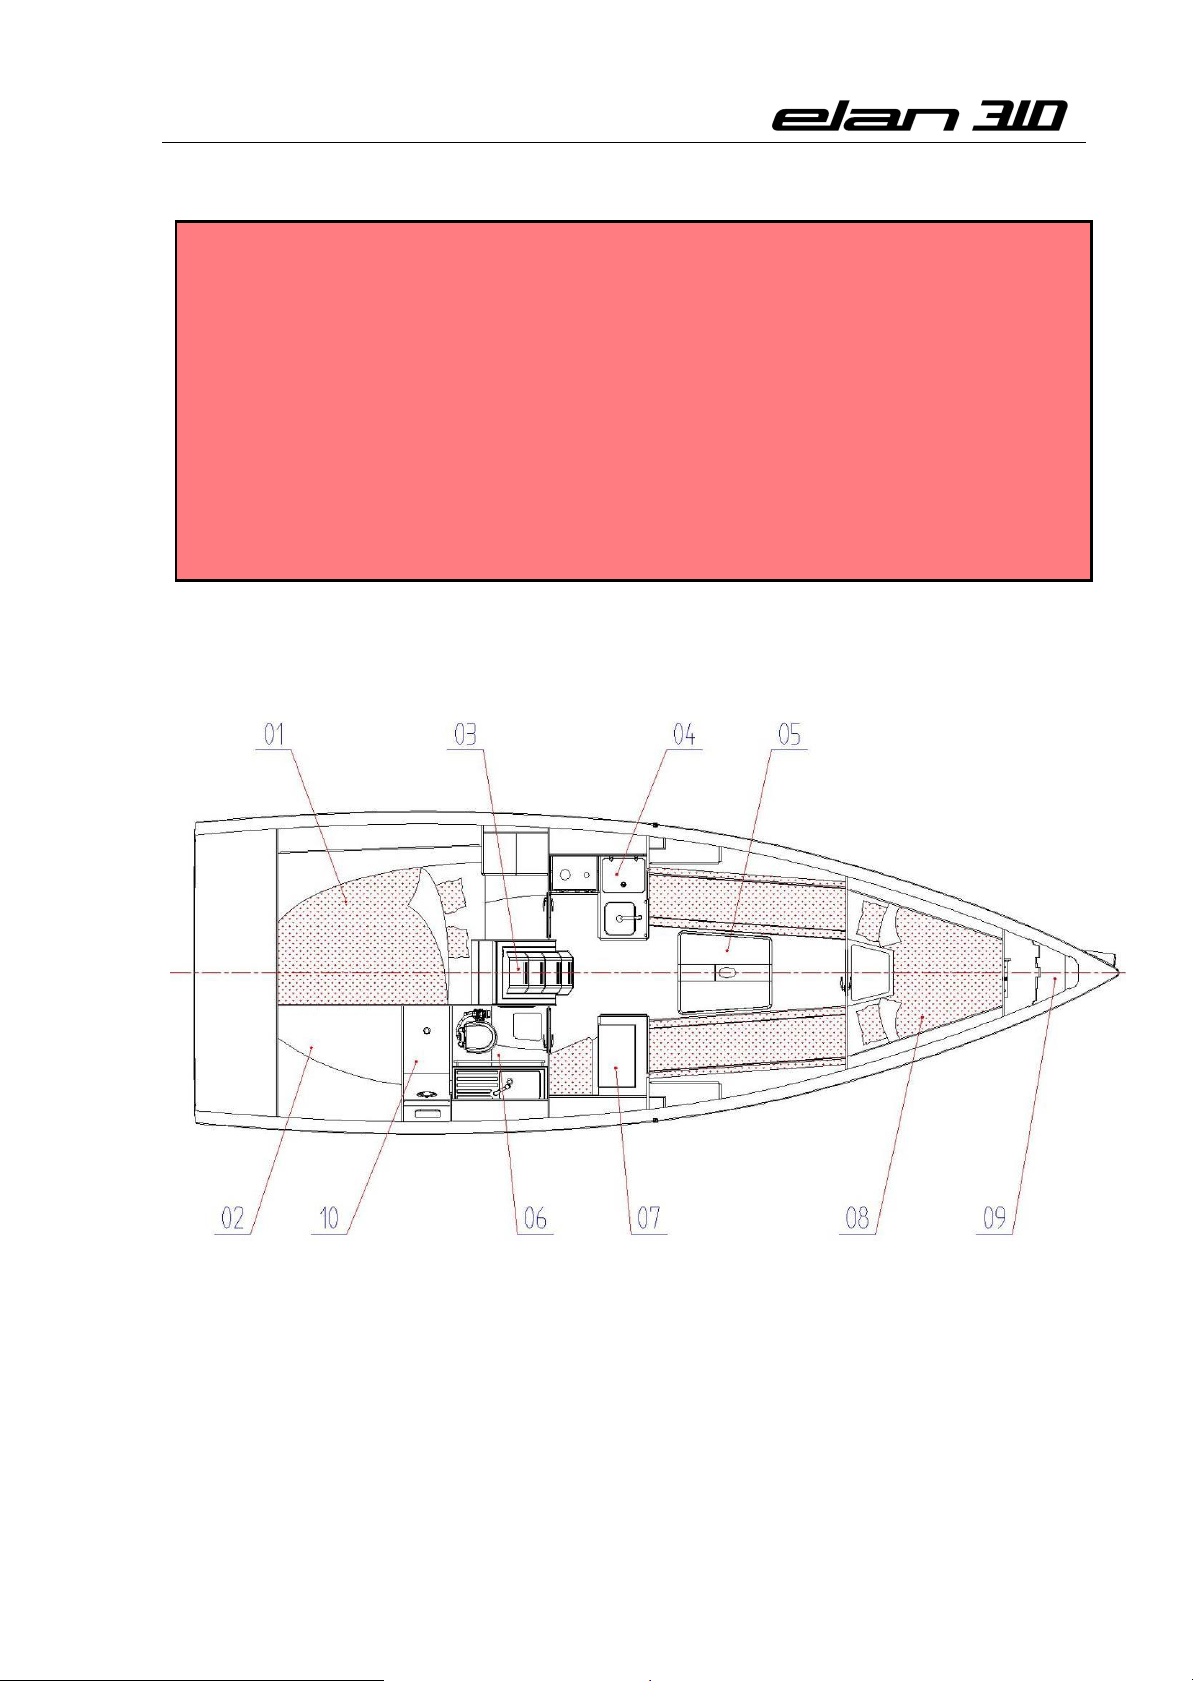
5.2. INTERIOR LAYOUT
1. Aft cabin
2. Storage
3. Companionway /
engine compartment
18
Figure 4
4. Galley
5. Saloon
6. Head / shower
7. Navigation table
8. Forward cabin
9. Anchor locker
10. Wet locker
Page 19
Owner’s Manual
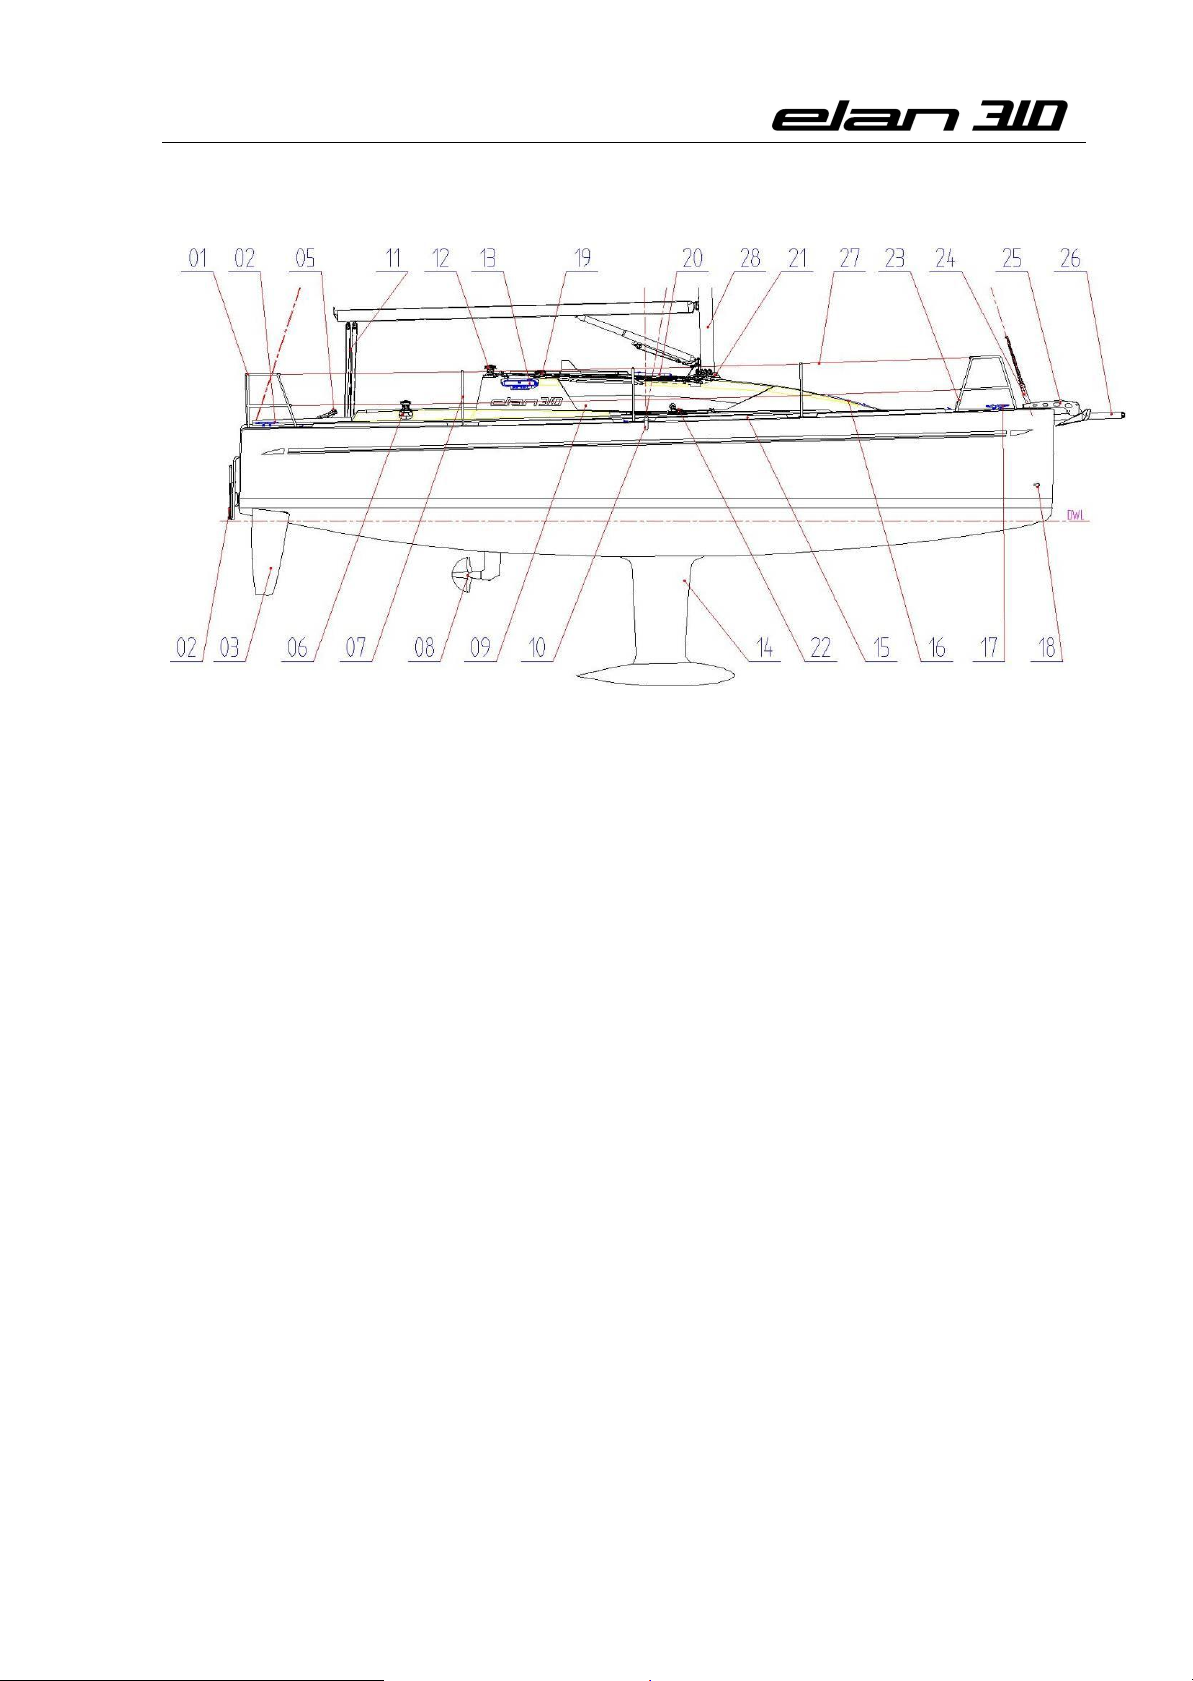
55..33.
.
PPRROOFFIILLEE
1. S/S pushpit
2. Folding swimming ladder
3. Twin rudders
4. Mooring cleat
5. Steering tiller
6. Genoa winch 35.2 STA
7. Stanchions
8. Propeller
9. Custom glass portlight
10. Chainplates
Figure 5
11. Mainsheet system
12. Halyard winch 20.2 STA
13. Hatch
14. Keel
15. Toe rail
16. Escape hatch
17. Mooring cleat
18. Anchor drainage
19. Stoppers
20. Hatch
21. Mast deck ring
22. Genoa track & system
23. Bow pulpit
24. Forestay
25. Anchor bow roller
26. Sliding bowsprit
27. Life lines
28. Keel stepeed mast
19
Page 20
Owner’s Manual
66.. PPRROOPPUULLSSIIOONN SSYYSSTTEEMM
66..11.
.
SSAAIILLSS AANNDD MMAASSTT
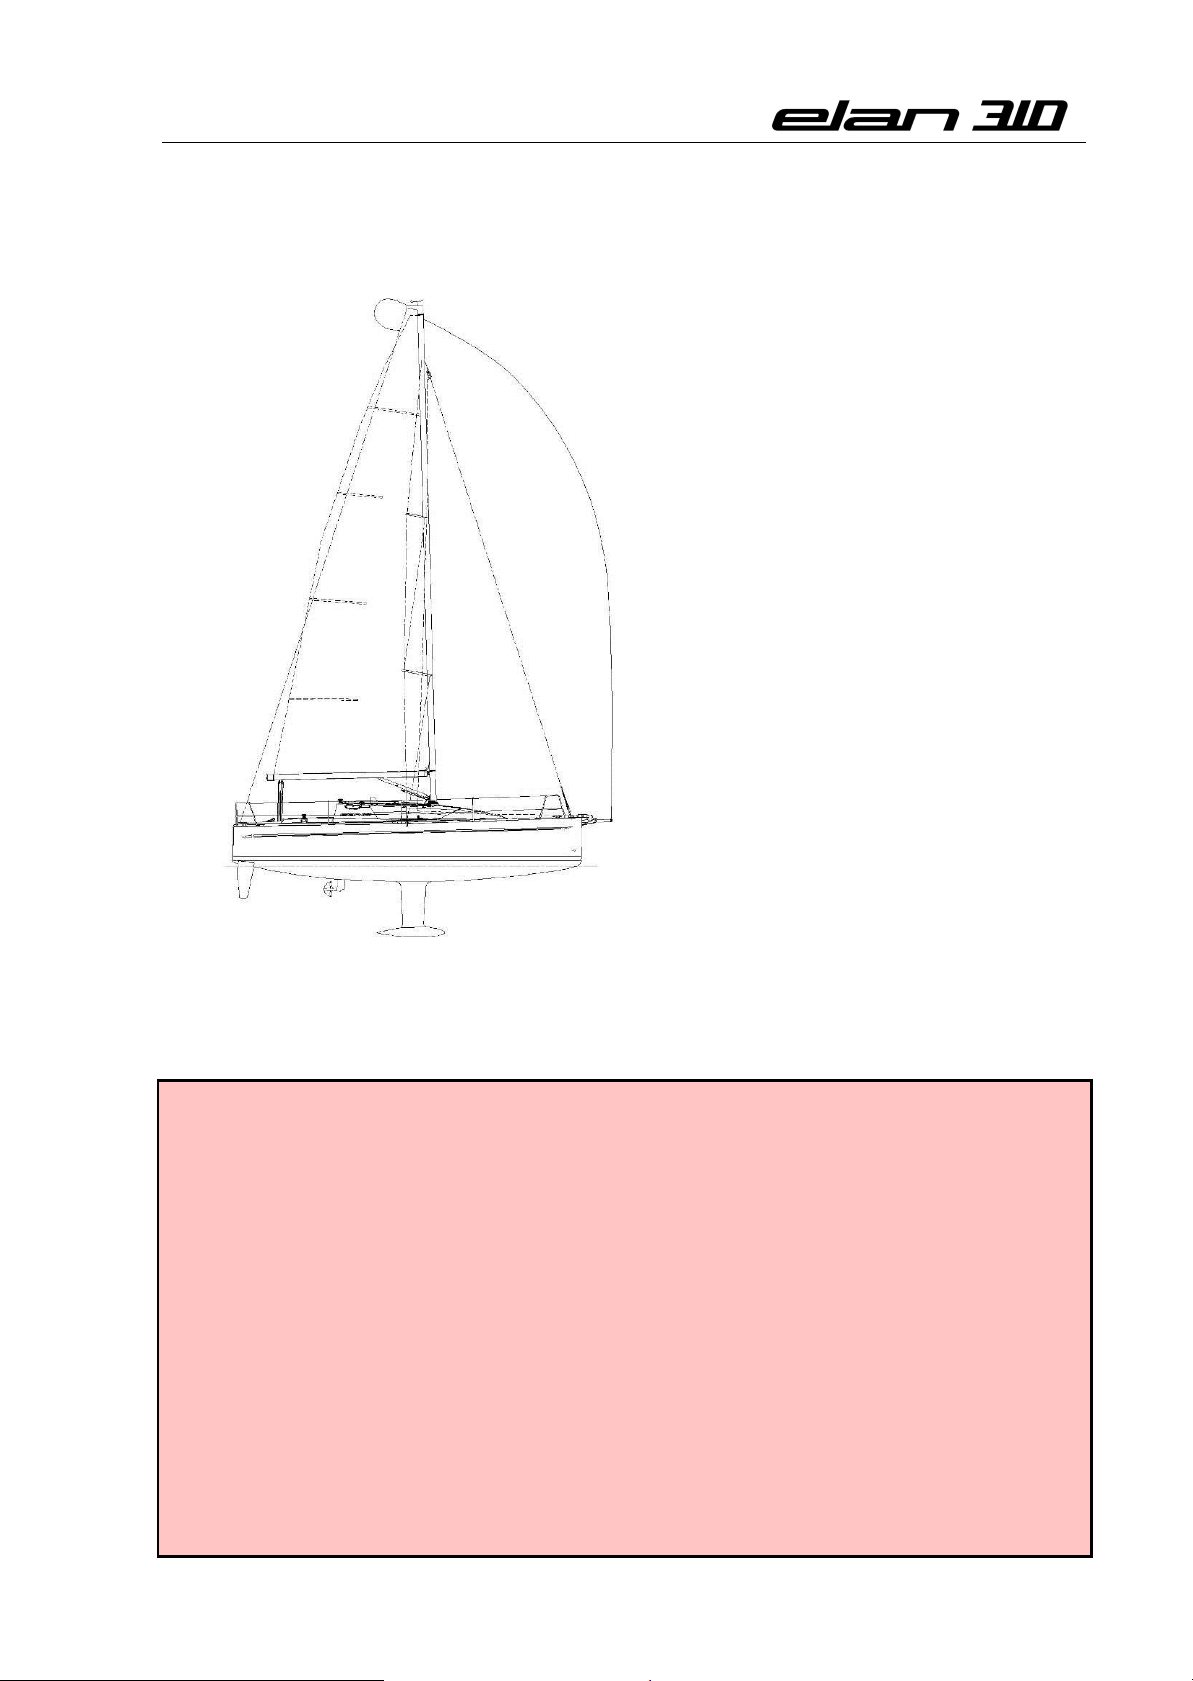
66..22.. EENNGGIINNEE SSYYSSTTEEMM
Mainsail: 30,15 m2
Genoa: 23,40 m2
Gennaker: 75,00 m2
I = 12,25 m
J = 3,58 m
P = 12,05 m
E = 4,13 m
CAUTION: - Follow the instructions for use supplied by the engine manufacturer,
especially with regard to the RPM and load of a new engine.
- When shifting from one gear to another via the idle position, keep the
handle in the idle position long enough for the engine to rotate at the
minimum rpm.
- Check the engine oil level.
- When putting in reverse, hold the steering wheel firmly to avoid breaking
the steering mechanism.
- Shut the engine down before opening the engine compartment. The
engine has rotating and moving parts that can be dangerous.
- Never switch the main engine switch or turn the key with the engine is
running.
- Do not operate the starter for more than 10 seconds at a time. If the
engine does not start; wait for at least 30 seconds before trying again.
- Each engine has its critical RPM which is indicated by an increase in
engine vibrations. You should always avoid this speed.
20
Figure 6
Page 21

Owner’s Manual
66..22..11.. EENNGGIINNEE OOPPEERRAATTIIOONN
The following instructions for engine operation are provided for information purposes only
and do not include all the details of engine operation and maintenance. For detailed
information see the operation instructions, supplied by the engine manufacturer, which are
included in the Owner’s Manual. Before operating the engine, you should familiarize yourself
with those instructions.
The warranty will be valid only provided the maintenance instructions are strictly observed.
For details see the enclosed instructions supplied by the engine manufacturer.
Before starting the engine:
Switch on the main engine switch.
Check and open the engine coolant water intake valve.
Check and open the fuel supply valve on the fuel tank.
Starting the engine:
Put the throttle into the idle position by pressing the button and shifting the handle
forwards/backwards - always away from any obstacles - by 30o (the engine is ready to be
started at appropriate throttle).
Press the button to start the engine. When the engine starts, release the button.
Back the throttle off to the idle (central) position and from that position move the
throttle up or down (without pressing the button) and the craft will move forwards or
backwards depending on the position of the handle.
Make sure all the warning lamps and sound alarm are off and the engine is adequately
cooled - check the coolant water pump function.
Stopping the engine:
Put the handle into the idle position and wait a few seconds for the engine to rotate at
the minimum RPM.
Press the button to shut-off the engine. When the engine stops, the warning lamps go on
and the sound alarm sounds.
CAUTION: - When sailing with inclination over 20 degrees, stop the engine.
- All fuel capacity can not be used. Make sure that the tank will be filled over
10 % of its capacity.
21
Page 22
Owner’s Manual
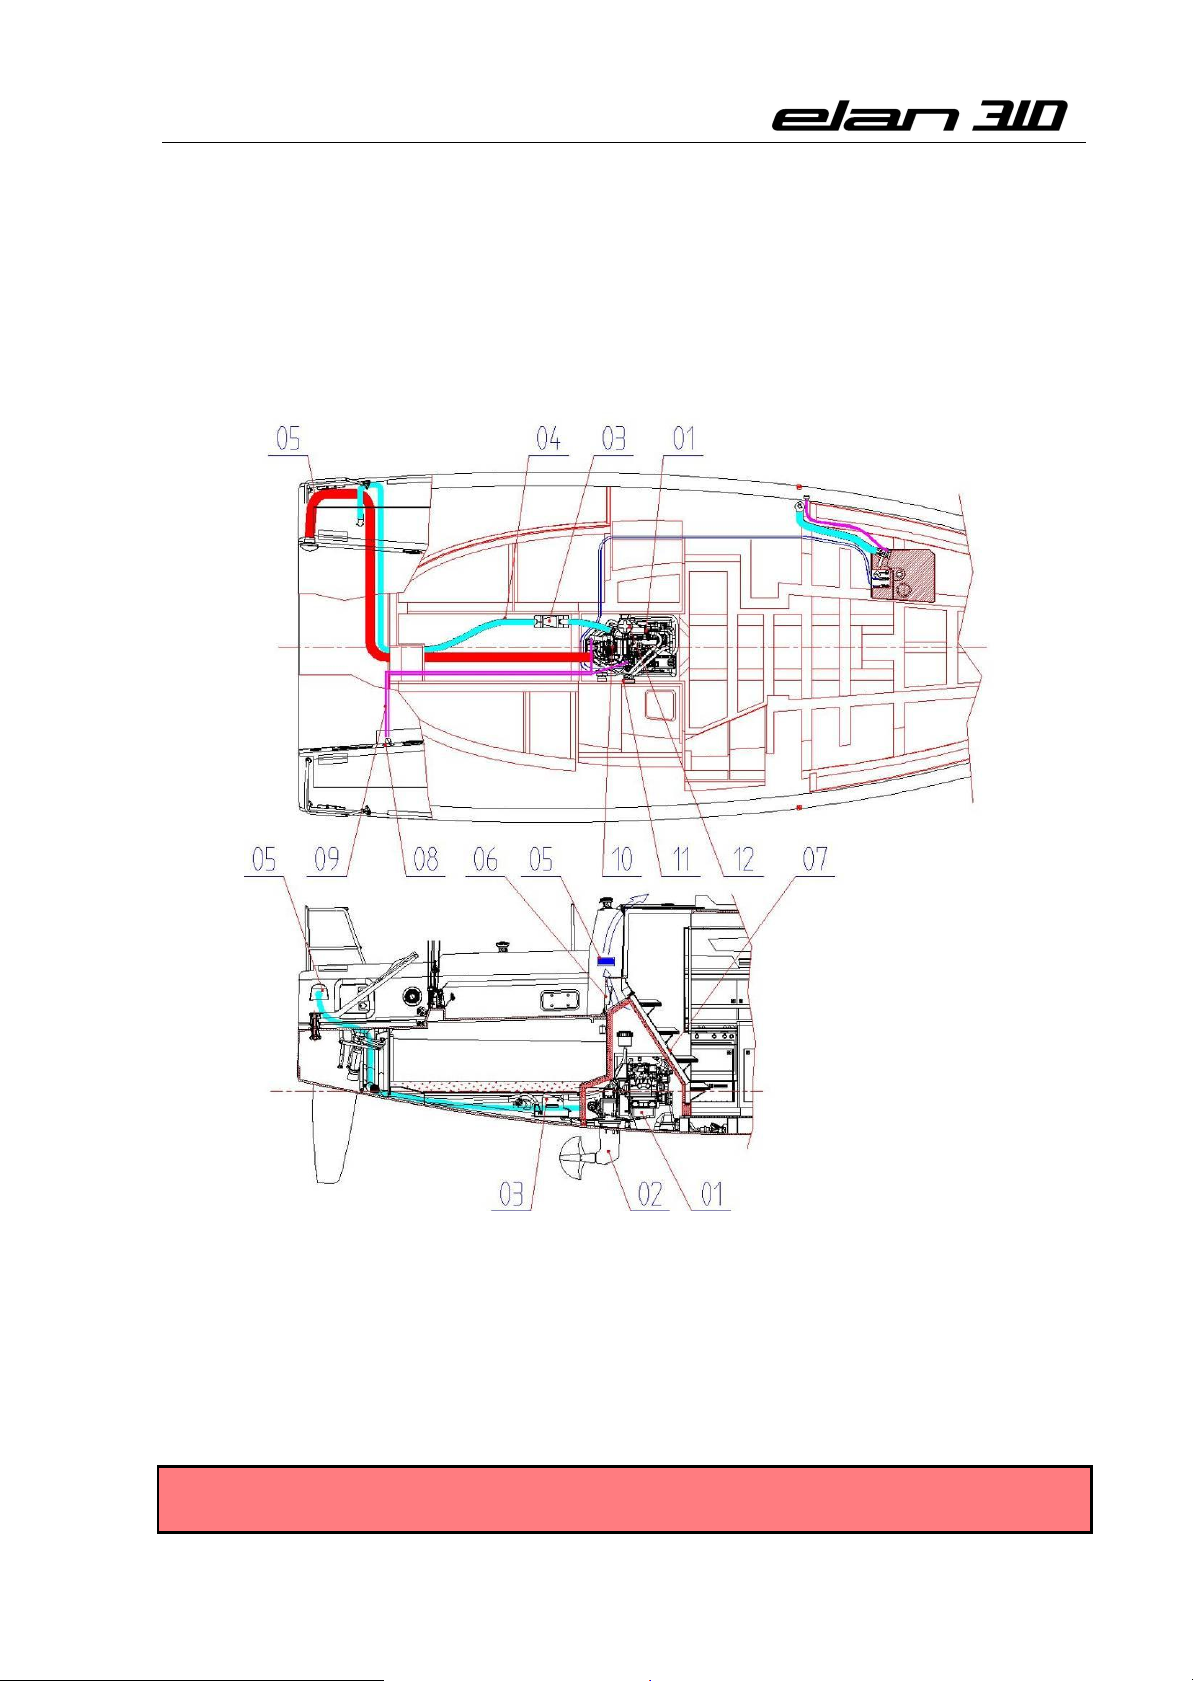
6.2.2. ENGINE AND PROPELLER INSTALLATION
The standard version of the ELAN 310 is equipped with a VOLVO D1-20 engine - sail drive
version. The engine runs on normal diesel fuel D2. It is cooled with seawater in a closed
cooling circuit. Access to the engine is possible from the front by lifting the companionway
and via the engine compartment covers in the aft cabin or head/shower. For further
information see operation instructions supplied by the engine manufacturer.
1. Engine Volvo D1-20
2. Sail-drive gearbox
3. Exhaust waterlock
4. Exhaust hose
5. Engine room ventilation
WARNING: - Do not obstruct fuel lines (possible damage).
- Do not put flammable material in contact with hot engine parts.
22
Figure 7
6. Engine panel
7. Fire extinguisher hole
8. Engine lever
9. Engine control cables
10. Sea water inlet seacock
(on sail-drive)
11. Sea water air vent
12. Sea water filter
Page 23
Owner’s Manual
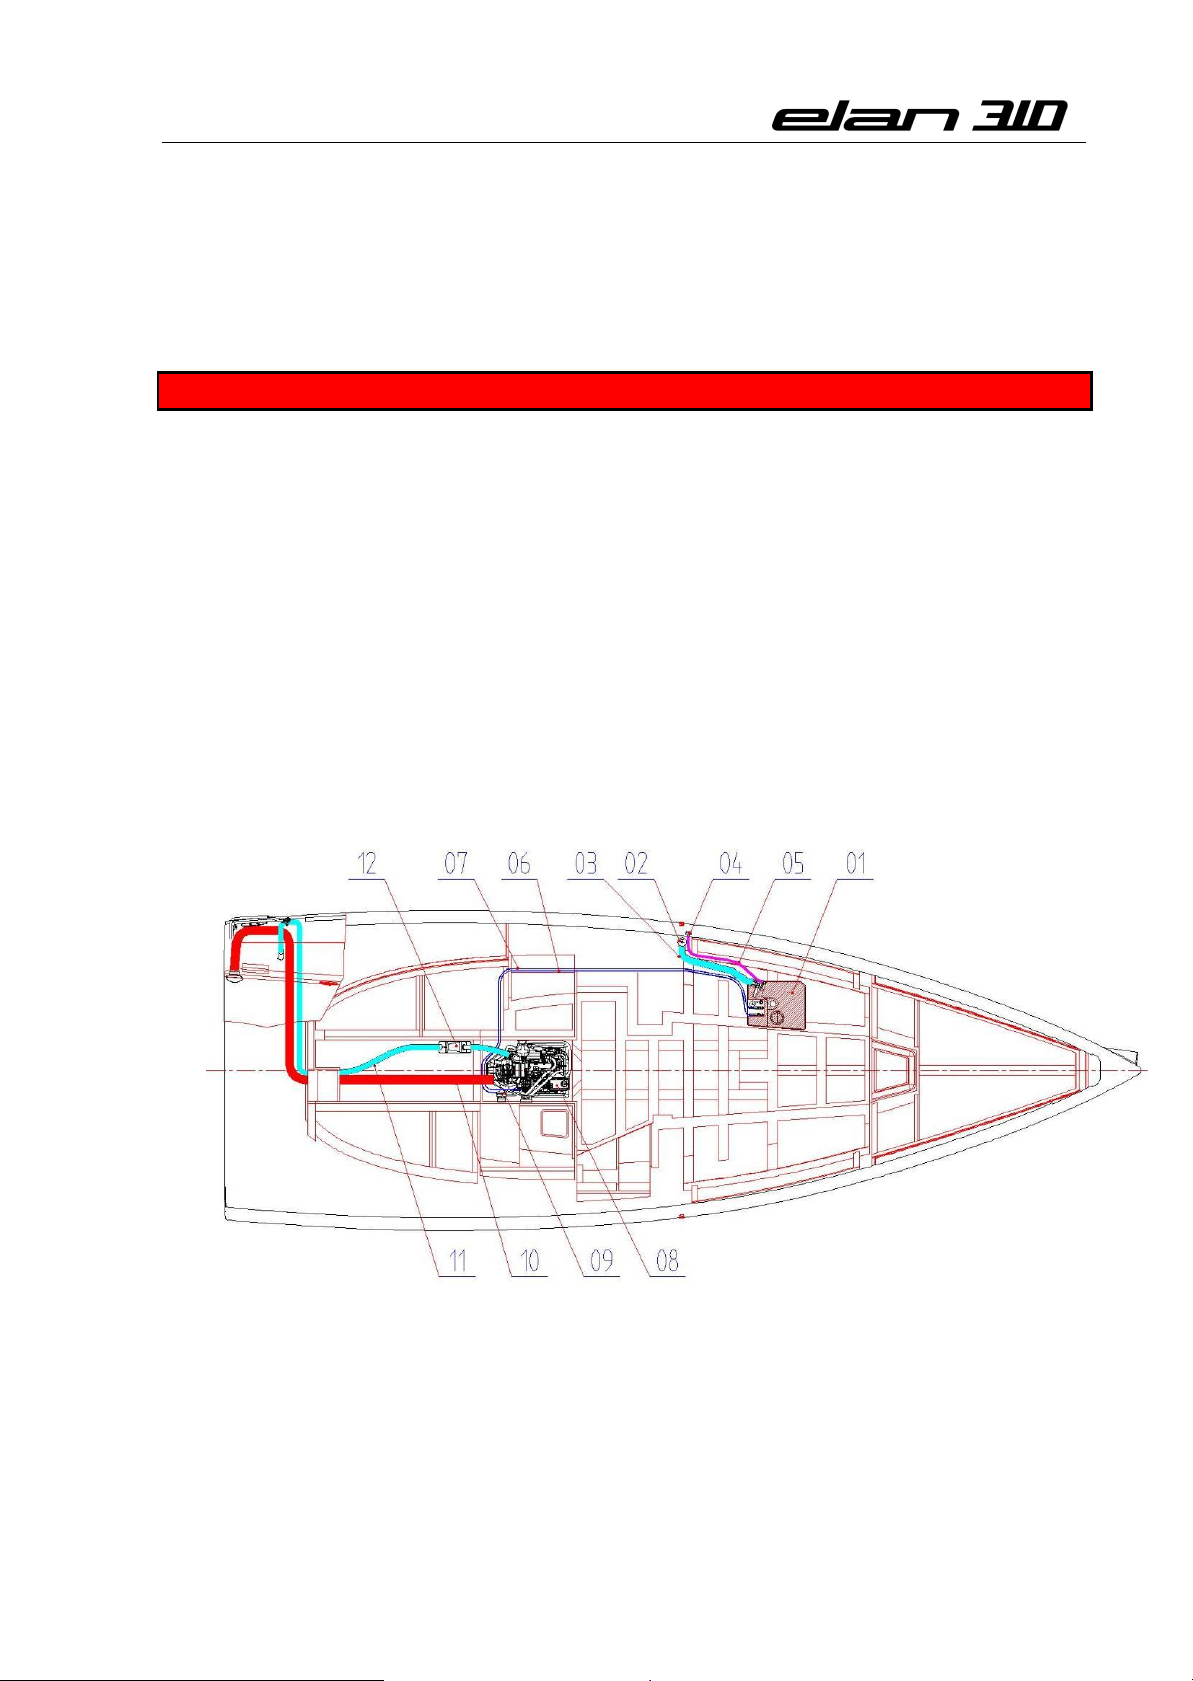
6.2.3. FUEL SYSTEM
The fuel required for engine operation is stored in a fuel tank. The fuel tank has a capacity of
45 liters. The fuel tank is stowed under the port side saloon seat (see Fig. 8). Fuel tank is
accessed from saloon by lifting the seat panels.
DANGER: - When filling the tank, turn off the engine and do not smoke.
Filling the fuel tank:
Fill the fuel tank with diesel via the deck filler. The position of the deck filler is shown
in Fig.8
The fuel filler is marked “DIESEL”. Unscrew the plug using a winch handle.
Before filling the tank, close the portlights in vicinity of the fuel filler.
Fill the fuel tank slowly in order to avoid spilling fuel on the deck.
In case of spilling fuel on the deck, clean it immediately using a detergent and a large
amount of fresh water.
Keep the fuel tank full because a low fuel level can cause air penetration and
improper engine operation and stoppage.
Close the fuel filler carefully and screw it tight.
1. Fuel tank 45 l
2. Fuel inlet deck filler
3. Diesel tank inlet hose
4. Diesel air vent
23
Figure 8
5. Diesel tank air vent
6. Fuel line to engine
7. Engine overflow line
8. Diesel engine D1-20
9. Diesel fuel filter
10. Engine ventilation
11. Engine exhaust hose
12. Exhaust waterlock
Page 24
Owner’s Manual
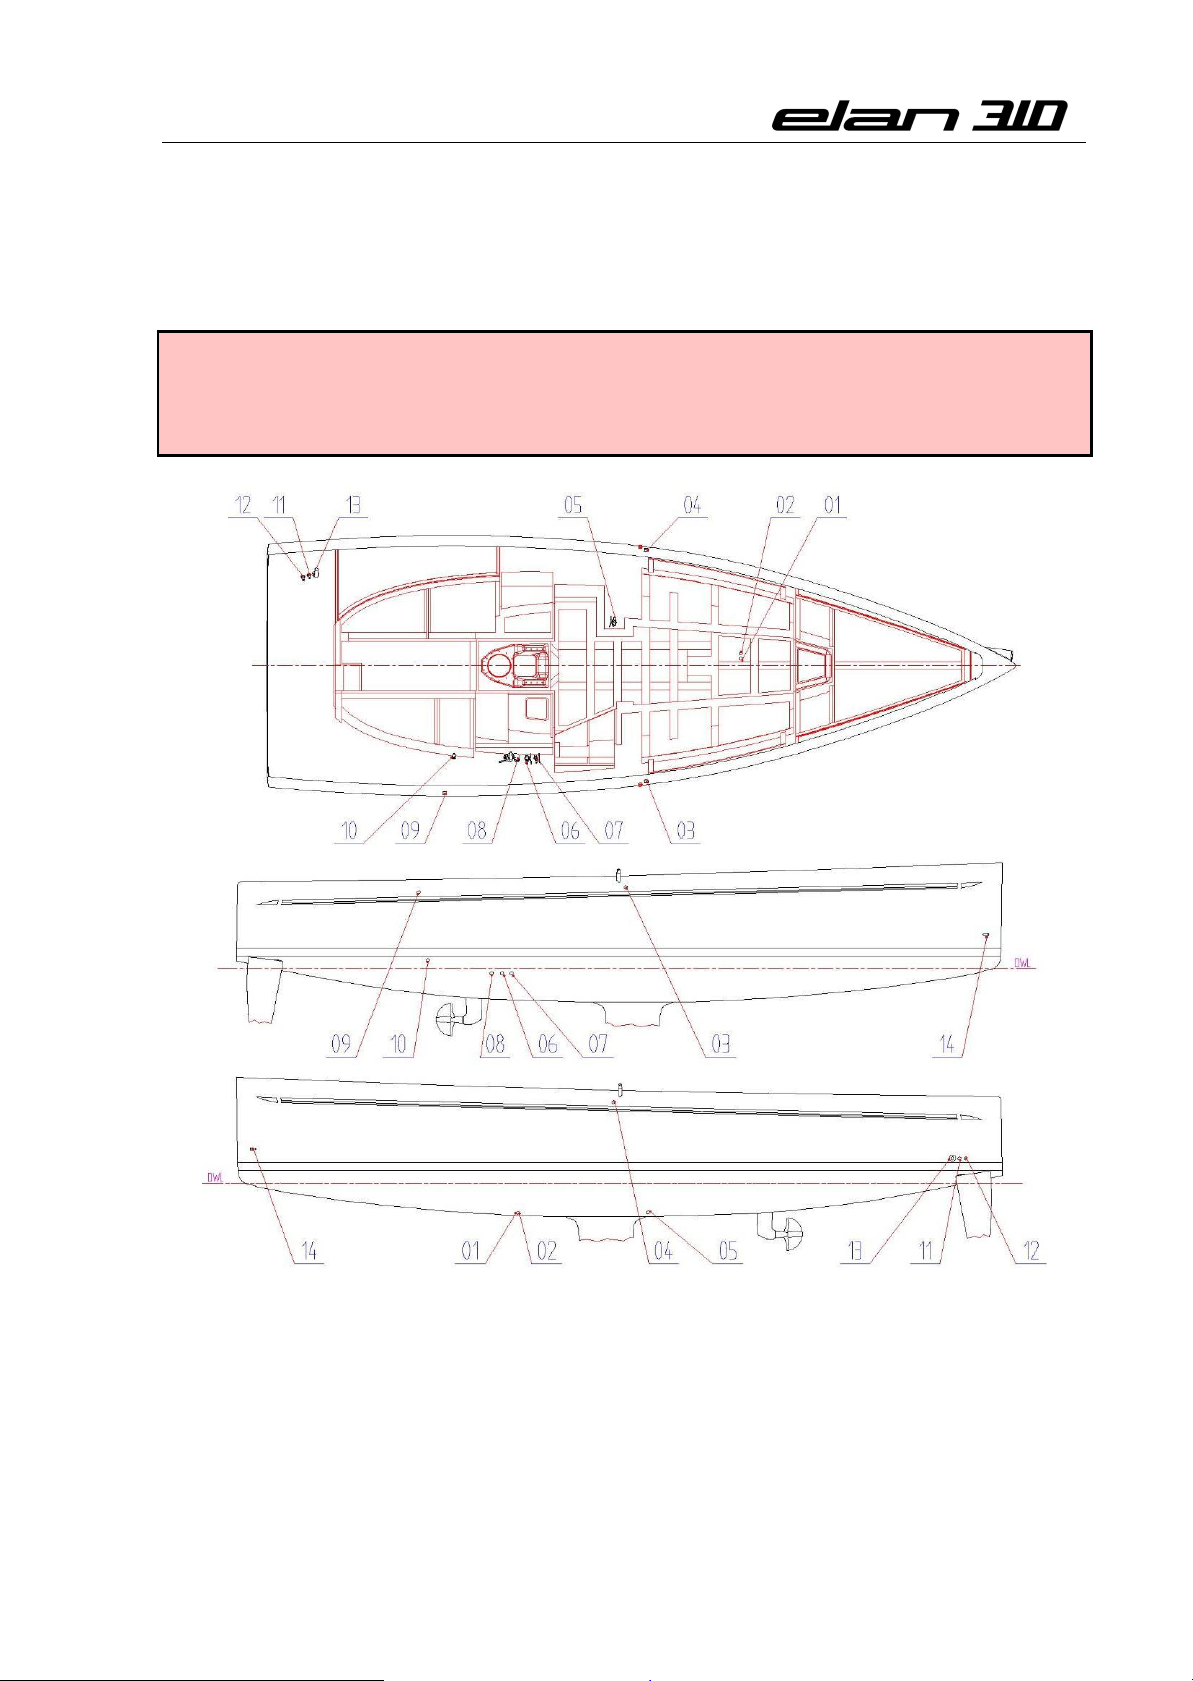
77.. SSYYSSTTEEMMSS AANNDD CCIIRRCCUUIITTSS
77..11.. PPOOSSIITTIIOONN OOFF SSEEAACCOOCCKKSS AANNDD TTHHRROOUUGGHH--HHUULLLL FFIITTTTIINNGGSS
CAUTION: -Keep the seacocks closed when not in operation to avoid the possibility
of water penetration or leakage.
- When sailing, the seacocks must be kept closed.
- When sailing close the water tank connection valve.
1. Depth sounder
2. Speedomater
3. Through-hull – water tank air vent
4. Through-hull – diesel tank air vent
5. Seacock – galley sink waste outlet
6. Seacock – toilet sink waste outlet
7. Seacock – toilet sea water inlet
Figure 9
8. Seacock – toilet waste outlet
9. Through-hull - waste tank air vent
10. Through-hull – shower bilge outlet
11. Through-hull - electric bilge pump outlet
12. Through-hull - manual bilge pump outlet
13. Through-hull – Engine exhaust
14. Through-hull – Chain storage outlet
24
Page 25

Owner’s Manual
77..22.. WWAATTEERR SSYYSSTTEEMMSS
77..22..11.. FFRREESSHH WWAATTEERR SSYYSSTTEEMM
OPERATION:
The seacock is open when the lever is in line with the pipe.
The seacock is closed when the lever is at a right angle (90°).
CAUTION: - Keep seacocks, cockpit drains, bungs and other opening/closing devices
in the hull closed or open, as appropriate, to minimise the risk of flooding.
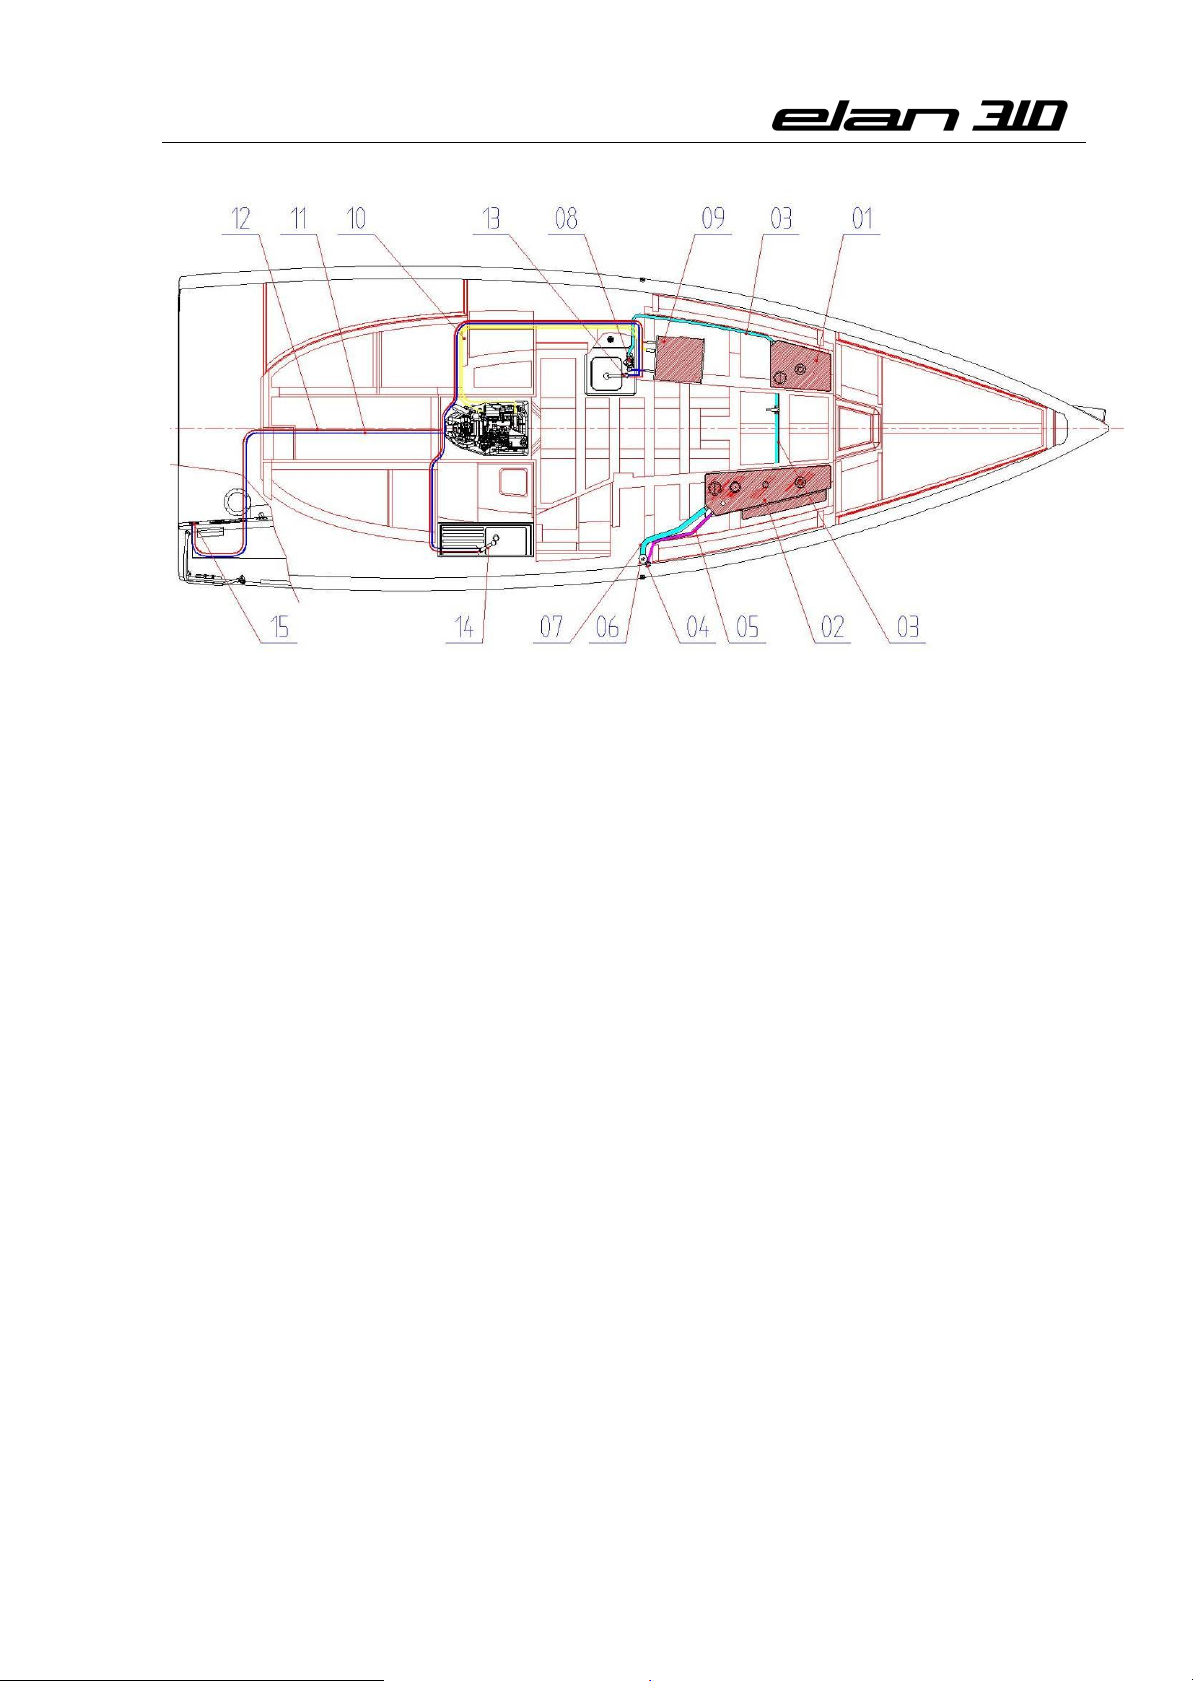
TANKS
The sailing yacht is equipped with fresh water tanks (see Fig.10). They are filled via fresh
water fillers (see Fig.10) marked “WATER”. Unscrew the plug using a winch handle. A fresh
water level indicator is located on the electrical control panel. The tanks are connected, so
that the water level is equal in all tanks. At the top of the tanks, there is an opening for
inspection and cleaning.
CAUTION: - After filling the tanks, close the fillers carefully and screw them tight to
avoid the risk of seawater entering the fresh water tanks.
- To avoid the risk of contaminating one liquid with the other one, never fill
fresh water and fuel at the same time.
CONSUMERS
An electrical fresh water pump (see Fig.10) located inside the galley is used to pump fresh
water to the consumers. The fresh water pump is automatically shut off by a pressure valve
when pressure reaches 1.5 bar.
CAUTION: - Take care not to operate the electric pump when the fresh water tanks
are empty.
- Always open the sink and waste water seacocks when using fresh water
from the tanks.
- When sailing close the water tank connection valve.
25
Page 26
Owner’s Manual
77..22..22.. HHOOTT WWAATTEERR SSYYSSTTEEMM
Figure 10
1. Fresh water tank - port ~ 45 l
2. Fresh water tank - starboard ~ 95 l
3. Water tank connection
4. Air vent
5. Tank ventilation hose
6. Fresh water deck filler
7. Fresh water filler hose
8. Electric fresh water pump
9. Water heater
10. Engine to water heater exchange
11. Cold water tube
12. Hot water tube
13. Galley tap
14. Head toilet tap
15. Cockpit shower tap
A separate hot water system leads hot water from the water heater (see Fig. 10) to the
users. The hot water system is filled with fresh water from the fresh water system. When the
empty hot water system is being filled, open the hot water seacocks at the taps to let air out
of the system.
For further details see the instructions supplied by the manufacturer and included in the
Owner’s Manual. Before using the hot water system, you should familiarize yourself with
those instructions.
The warranty will be valid only provided the maintenance instructions are strictly observed.
For details see the enclosed instructions supplied by the engine manufacturer.
Fresh water is heated in two ways:
With the coolant water from the engine when the engine is in operation. The coolant
water runs through the water heater where it is used to heat the fresh water filled from
the fresh water system.
26
Page 27
Owner’s Manual
77..33.. SSEEAA AANNDD WWAASSTTEE WWAATTEERR SSYYSSTTEEMM
With an electrical spiral that can be turned on when the boat is connected to a 230V
supply.
CAUTION: - Do not operate the water heater if the fresh water system is empty.
- Do not turn the water heater on if the fresh water tanks are empty.
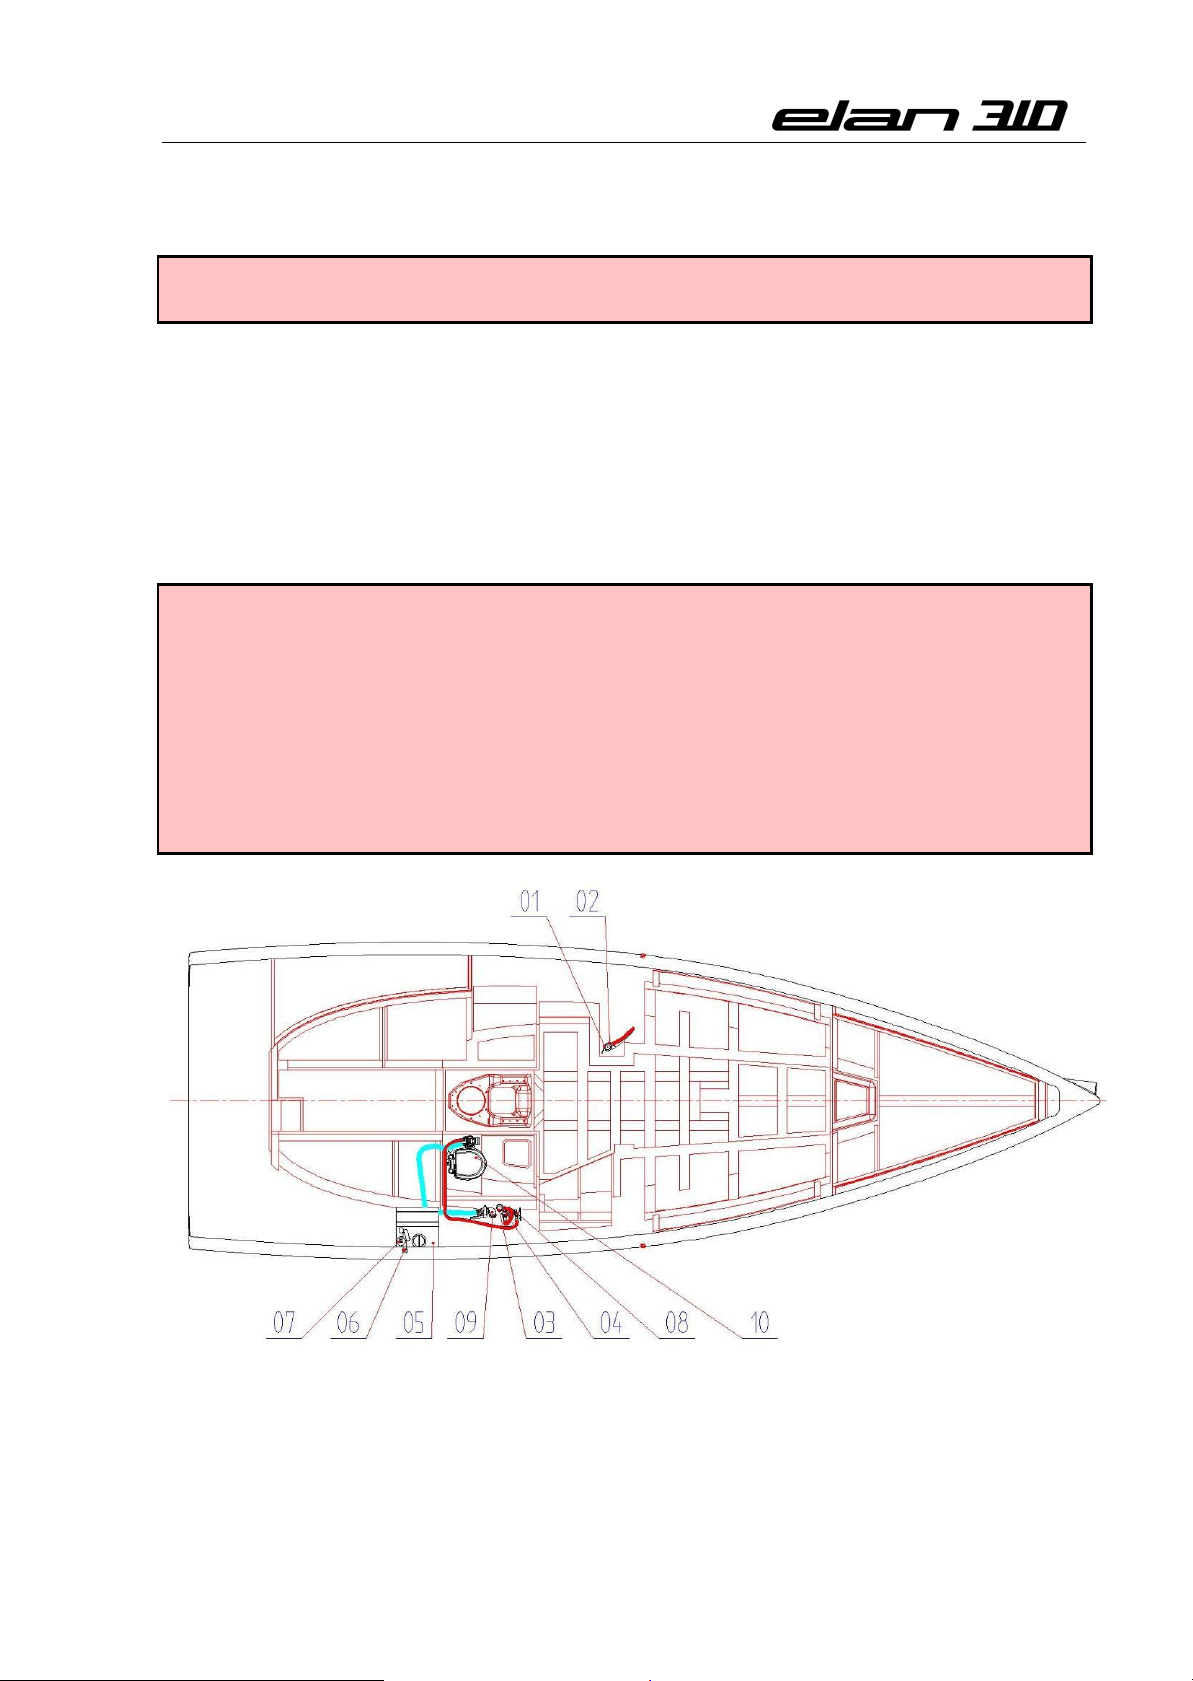
Sea water is used for flushing the toilets and as extra water for the sink (optional). The toilets
are flushed with a manual pump that is built into the toilet. The sea water for the sink is
pumped via foot pump. The waste water from the toilets and the wash basins in the toilets
and the sink is emptied via outlet seacocks.
CAUTION: - Never use the waste water pump with the outlet seacock closed.
- Never use any other but thin absorbent toilet paper and never too
much. Any other kind may damage the pump.
- Follow carefully the instructions for use and precautions marked on the
pump.
- If the pump breaks down, it will have to be taken apart and cleaned.
- The mechanism is maintained by rinsing the whole system with fresh
water. This is done by operating the pump.
- NOTE: Observe local regulation on discharge.
Figure 11
1. Galley sink outflow
2. Galley sink water seacock
3. Toilet sink outflow
4. Toilet sink water seacock
5. Waste water holding tank ~ 70 l
27
6. Holding tank air vent
7. Waste tank dockside suction
8. Toilet sea water inlet seacock
9. Toilet waste water seacock
10. Manual toile
Page 28
Owner’s Manual
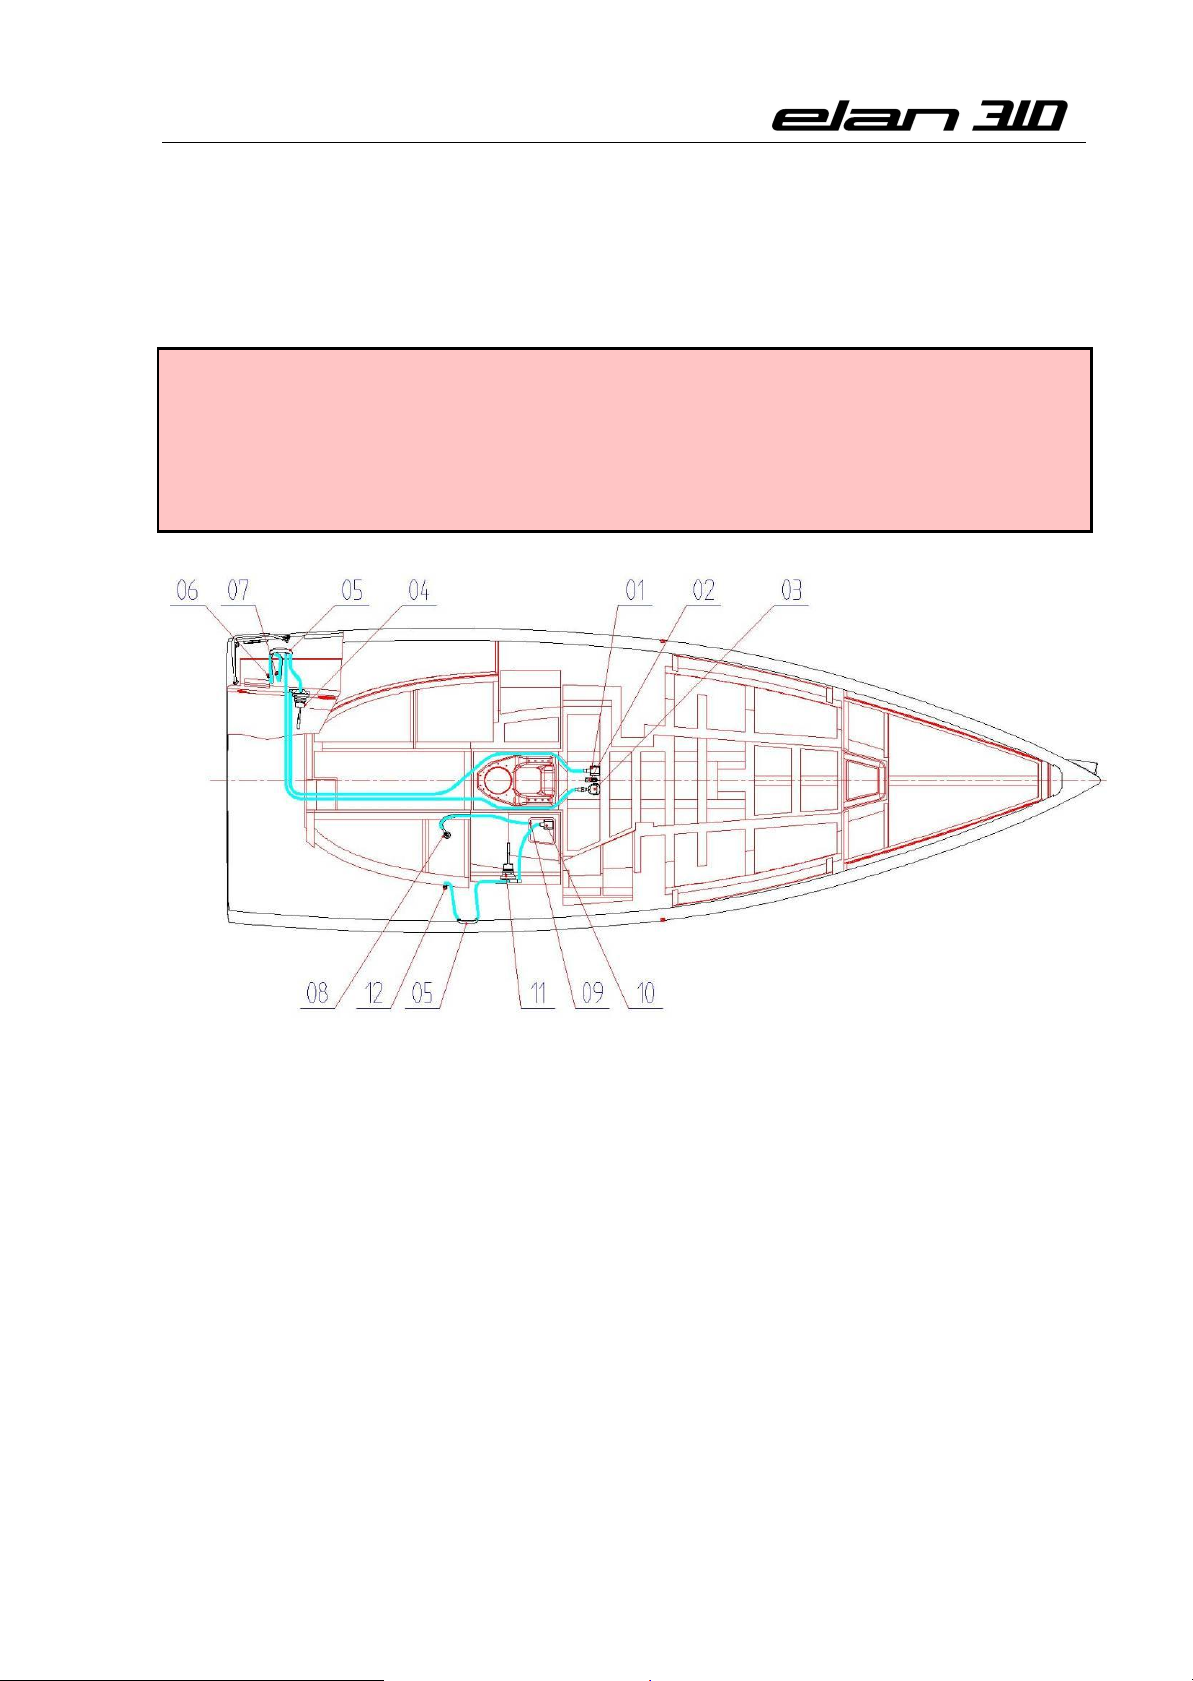
77..44.. BBIILLGGEE WWAATTEERR SSYYSSTTEEMM
77..55.. GGAASS SSYYSSTTEEMM
The bilge strainer is located under the saloon floor. Lifting the boards in front of the
companionway will allow you access to the bilge pump via a bilge strainer.
CAUTION: - Check the bilge pump for bilge water before leaving dock, during sailing
and when leaving the boat for a longer period.
- Switch on the bilge water pump switches on the control panel and check
the operation of the bilge pump.
- Follow carefully the instructions for use and precautions marked on the
pump.
Figure 12
1. Retention bilge strainer
2. Retention bilge strainer - float swith
3. Electrical bilge water drain pump
4. Manual bilge water drain pump
5. Goose-neck
6. Manual bilge pump outlet
7. Electrical bilge pump outlet
8. Wetlocker strainer
9. Wetlocker outlet
10. Shower bilge strainer
11. Manual shower drain pump
12. Shower bilge water outlet
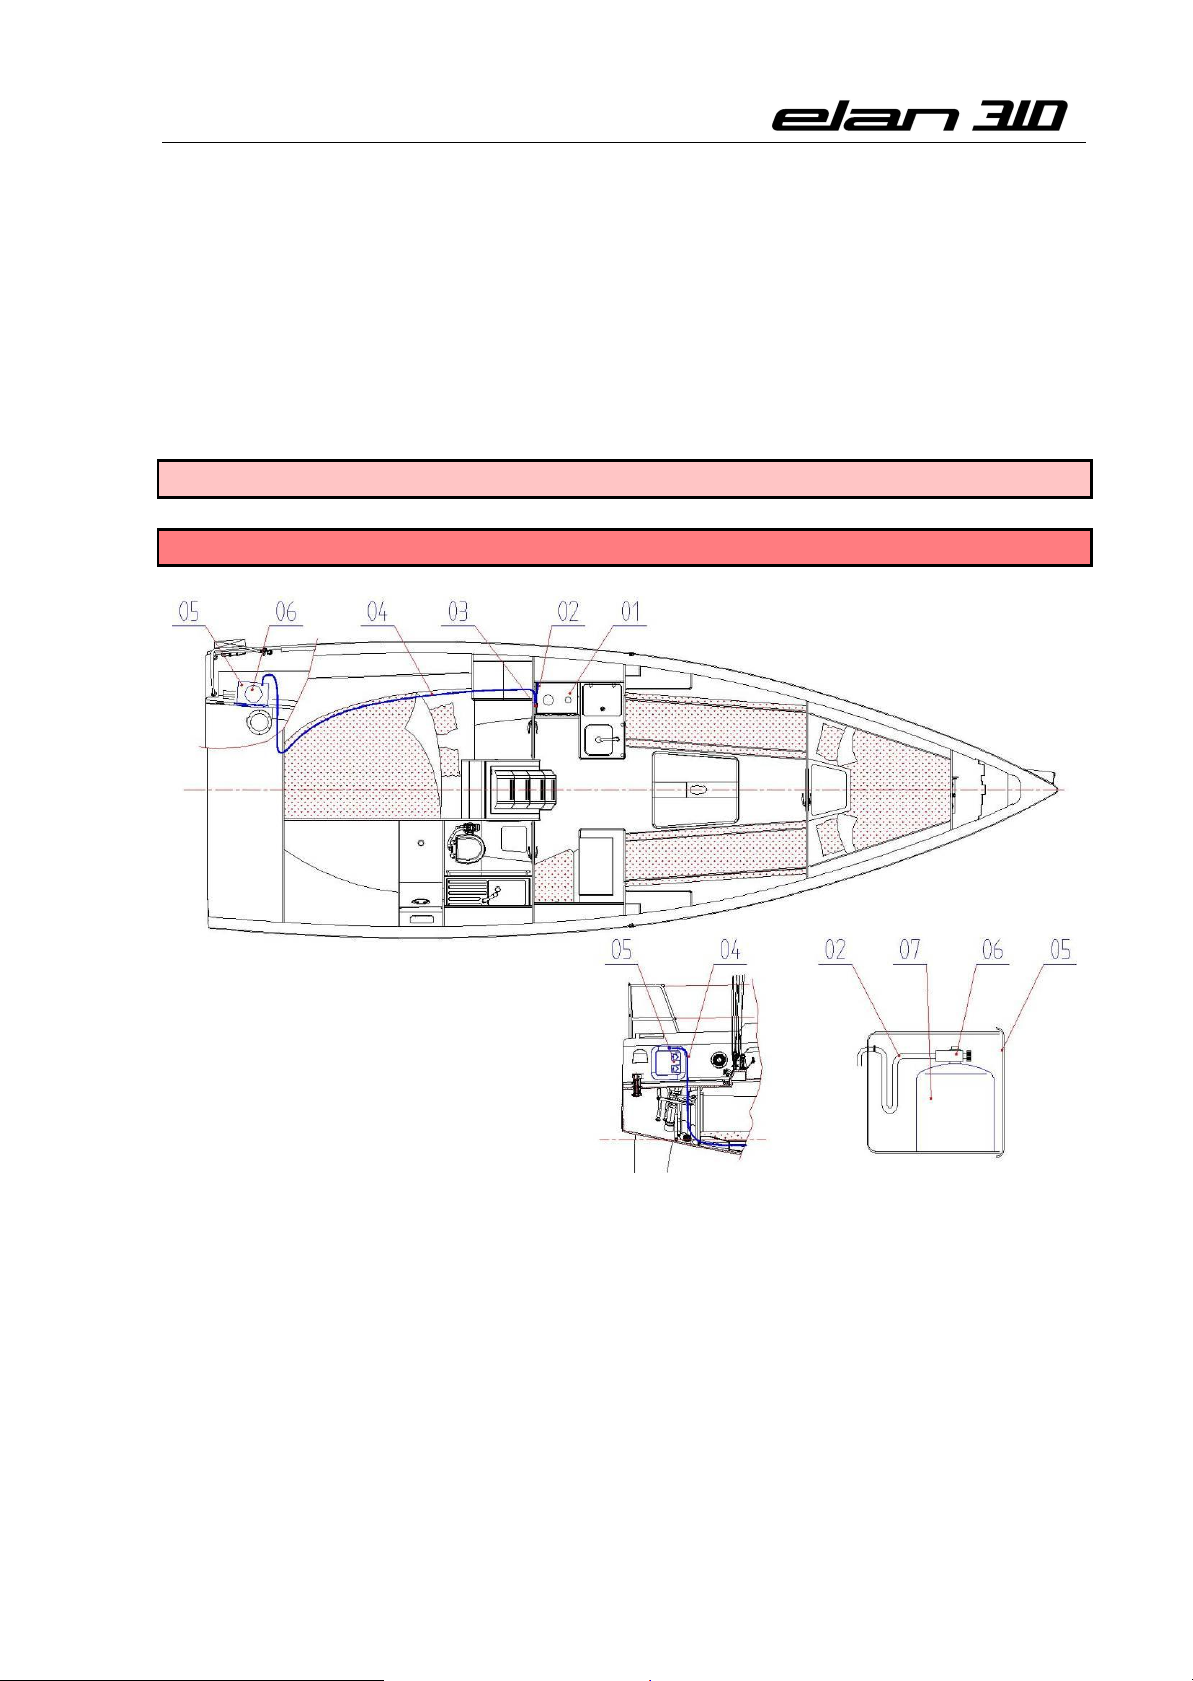
The boat is equipped with a gas cooker. A copper tube leads from the gas bottle to the
cooker. A certified rubber hose is used to connect the cooker and the gas bottle to the
copper tube. The screw valve on the gas bottle is connected to a safety non-return valve.
There is an extra gas valve installed in the galley, marked with a label (see Fig. 1). The gas
bottle of LPG propane butane is stowed in the stowage compartment under the steering
mehanism cover in the cockpit (see Fig. 13).
28
Page 29
Owner’s Manual
Close gas supply valves and cylinder valve when appliances are not in use. Close valves
immediately in an emergency.
Be sure appliance valves are closed before opening cylinder valve.
Test the LPG system regularly; check all connections for leakage by manual look-testing or by
testing with soapy water or detergent solution (with appliance burner valve closed and
cylinder and system valves open). If leakage is present, close cylinder valve and have the
system repaired before further use. System repairs should be made by a competent person.
CAUTION: - DO NOT use solutions containing ammonia.
WARNING: - NEVER USE FLAME TO CHECK FOR LEAKS!
1. Gas cooker
2. Flexible hose line
3. Gas valve
4. Copper tube
Fuel burning appliances consume cabin oxygen and release combustion products into the
craft. Ventilation is required when appliances are in use. Never obstruct ventilation
openings.
Gas cylinder must be stored only in specified locker. Do not use LPG cylinder housing or
lockers for storage of any other equipment.
29
Figure 13
5. Gas bottle compartment
6. Safety screw valve
7. Gas bottle
8. Overboard drainage
Page 30

Owner’s Manual
WWHHEENN LLEEAAVVIINNGG YYOOUURR BBOOAATT OORR WWHHEENN TTHHEE SSYYSSTTEEMM IISS NNOOTT IINN UUSSEE,, DDOO NNOOTT FFOORRGGEETT TTOO
CCLLOOSSEE TTHHEE SSCCRREEWW VVAALLVVEE OONN TTHHEE GGAASS BBOOTTTTLLEE AANNDD TTHHEE SSAAFFEETTYY VVAALLVVEE IINN TTHHEE GGAALLLLEEYY..
DANGER: - Avoid asphyxiation. Provide ventilation when the stove is in use.
- Do not use for space heating.
- Do not smoke or use open flame when replacing LPG bottles.
Never leave craft unattended when LPG consuming appliances are in use.
Hoses in the LPG system must be inspected regularly, at least annually and replaced if any
deterioration is found.
Keep valves on empty cylinders closed and disconnected. Keep protective covers, caps or
plugs in place. Store reserves or empty cylinders on open decks or in gas-tight lockers, which
are vented overboard and intended for this purpose.
The ambient operating temperature range of the LPG system is -40 to +40°C for Propane Butane LPG.
Avoid contact of materials with naked flame and other hot area.
DANGER: - In case you smell gas or the flame goes out, turn all the valves off and
create a draught to allow the gas to escape. Find the origin of the problem.
Changing the gas bottle:
1. Close the gas valve under the cooker.
2. Close the screw valve and the safety valve on the gas bottle.
3. Put the gas bottle into the compartment under the helmsman’s seat.
4. Open the screw valve on the gas bottle.
5. Open the gas valve to the left of the cooker and turn the cooker on.
30
Page 31
Owner’s Manual
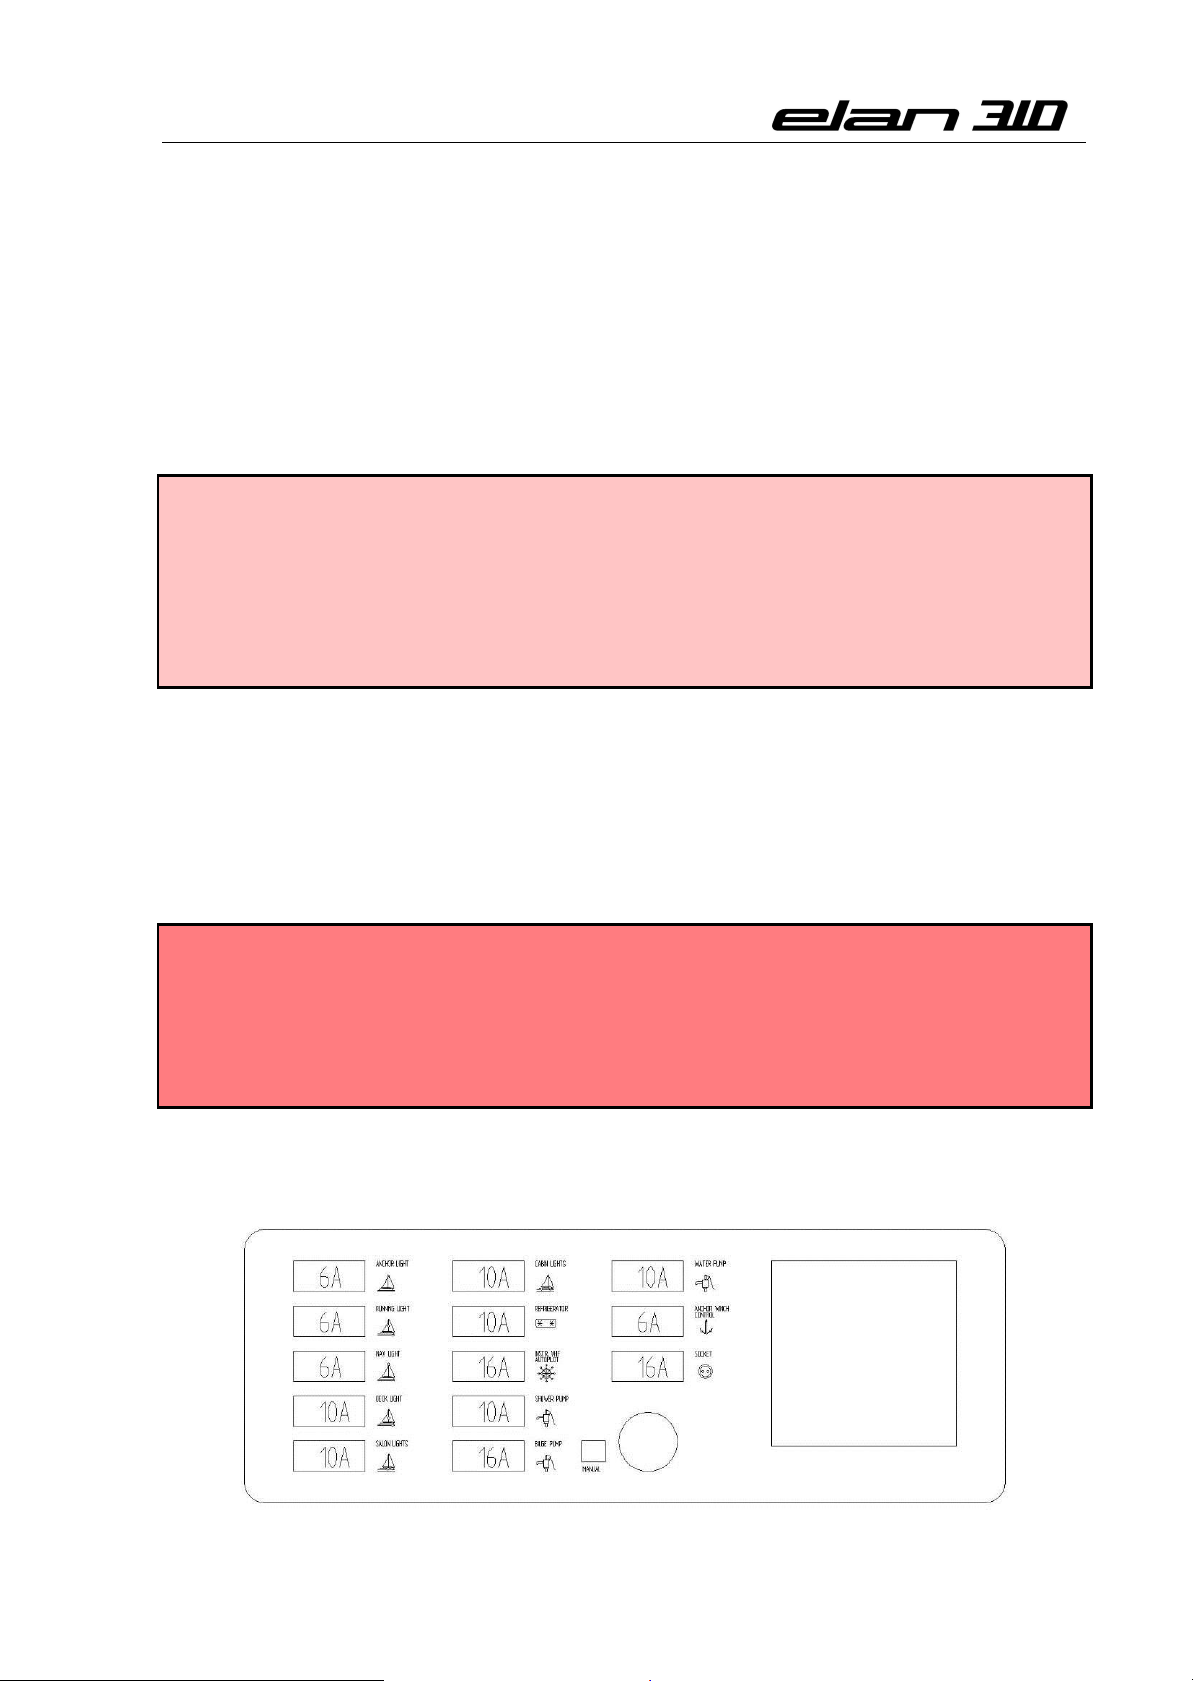
77..66.. EELLEECCTTRRIICCAALL SSYYSSTTEEMMSS
77..66..11.. 1122 VV SSYYSSTTEEM
M
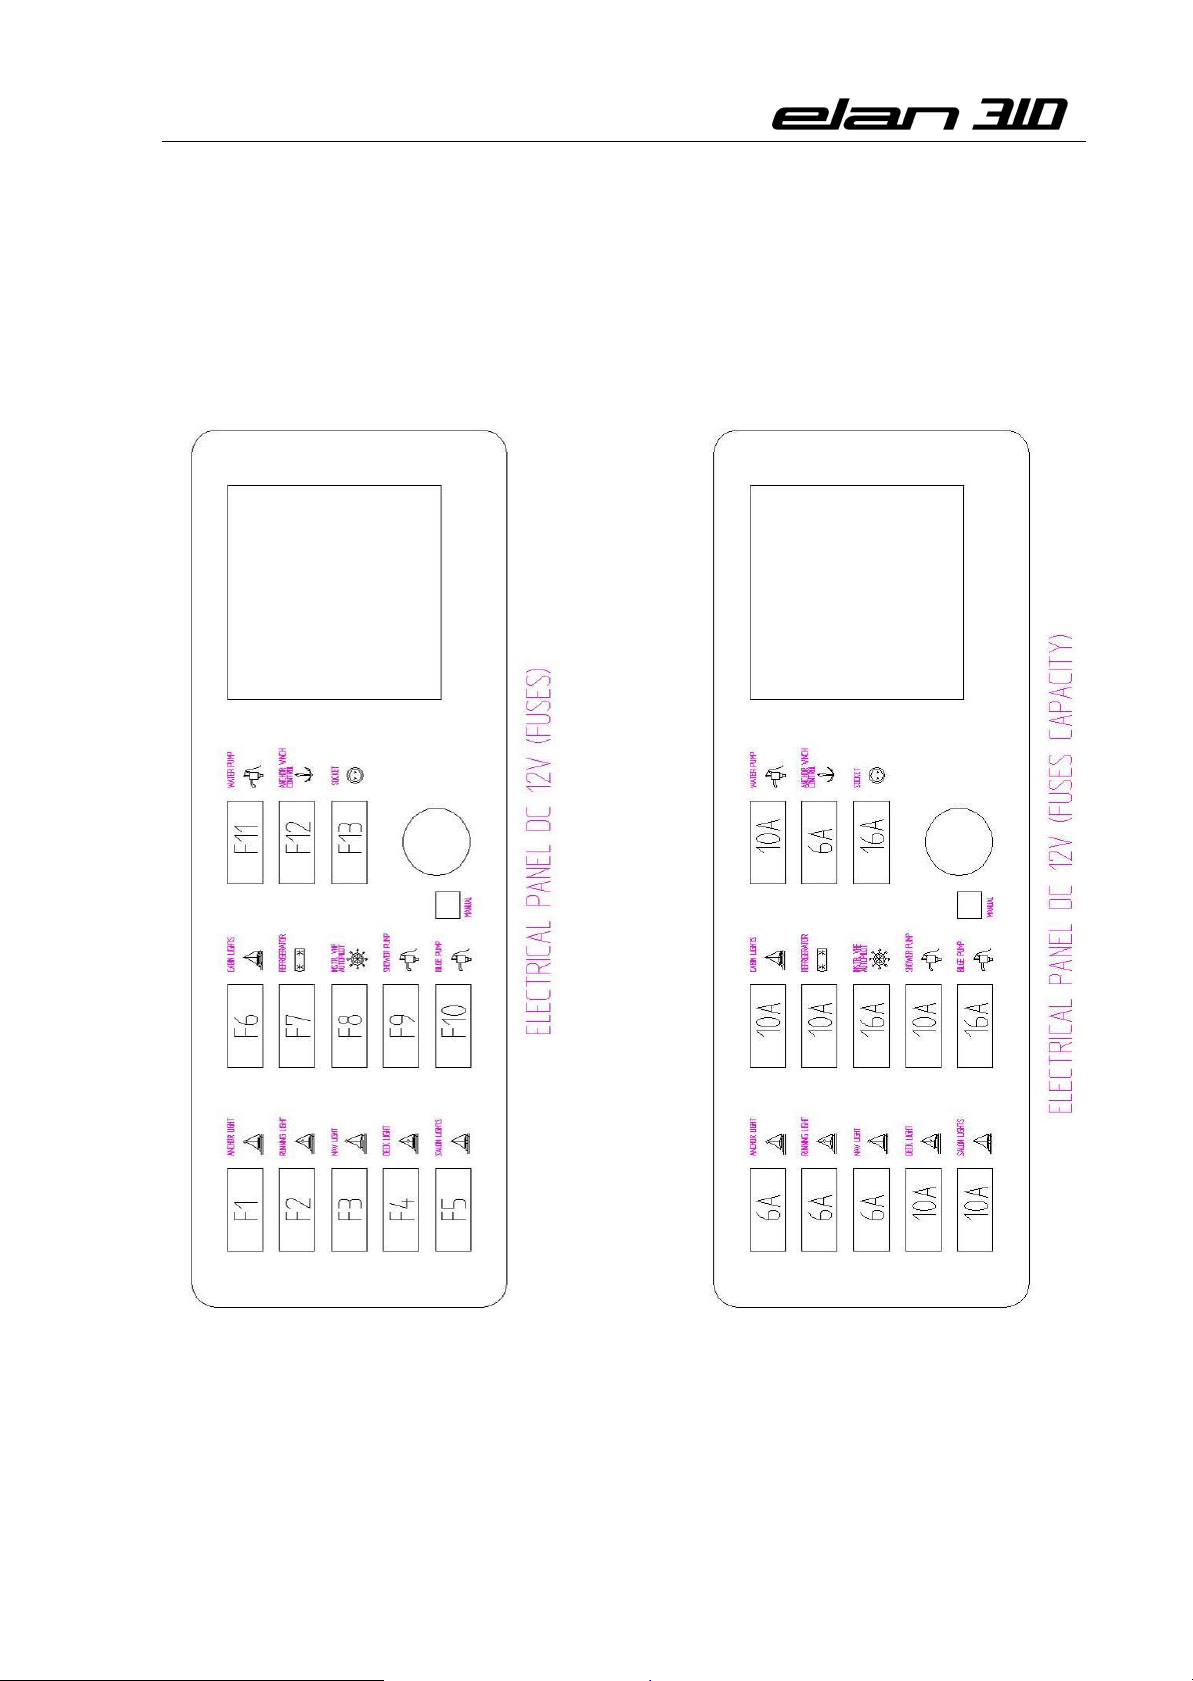
CCOONNTTRROOLL PPAANNEELL 1122 V
V
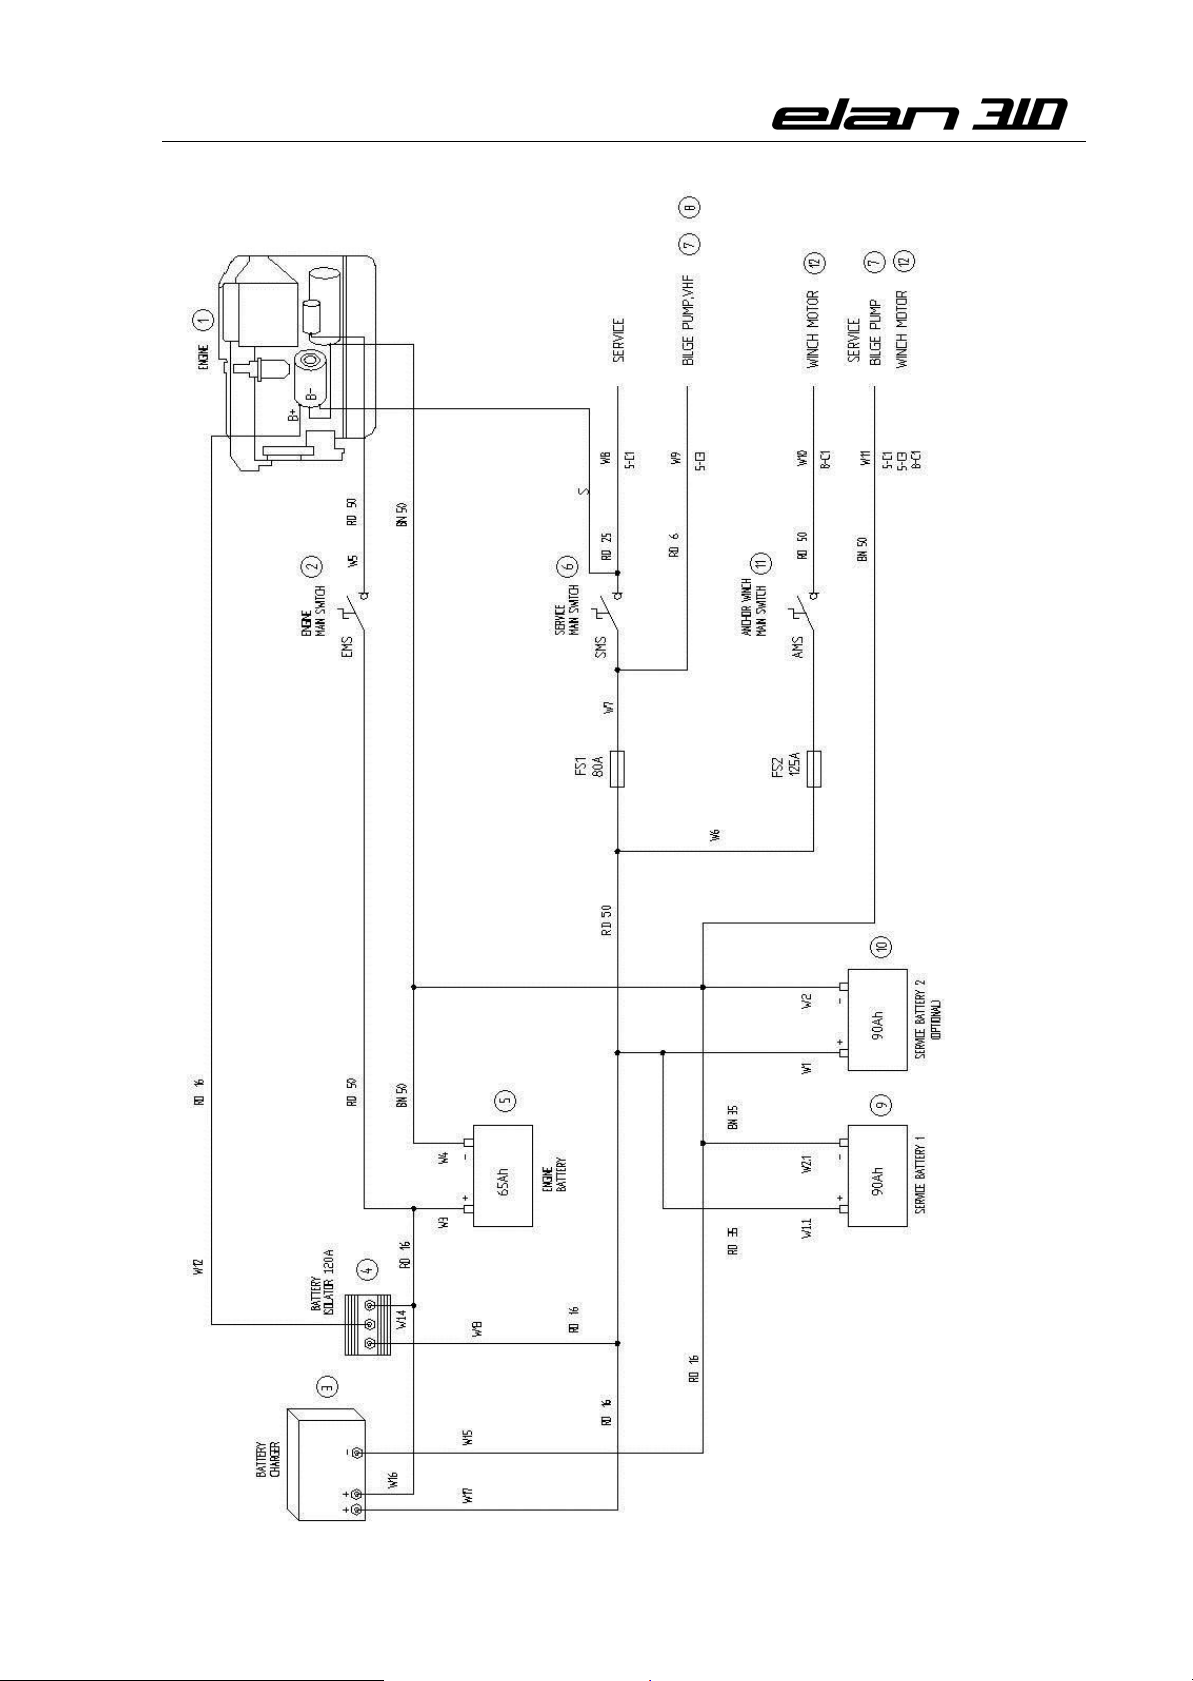
The boat is equipped with 12 V AGM (gel) batteries. The number of batteries depends on the
equipment installed (Standard 2). The batteries are charged via a alternator driven by the
boat’s engine. They can also be charged via a battery charger when the boat is connected to
an external 230 V supply.
CAUTION: - In case of disassembly, first interrupt the minus cable.
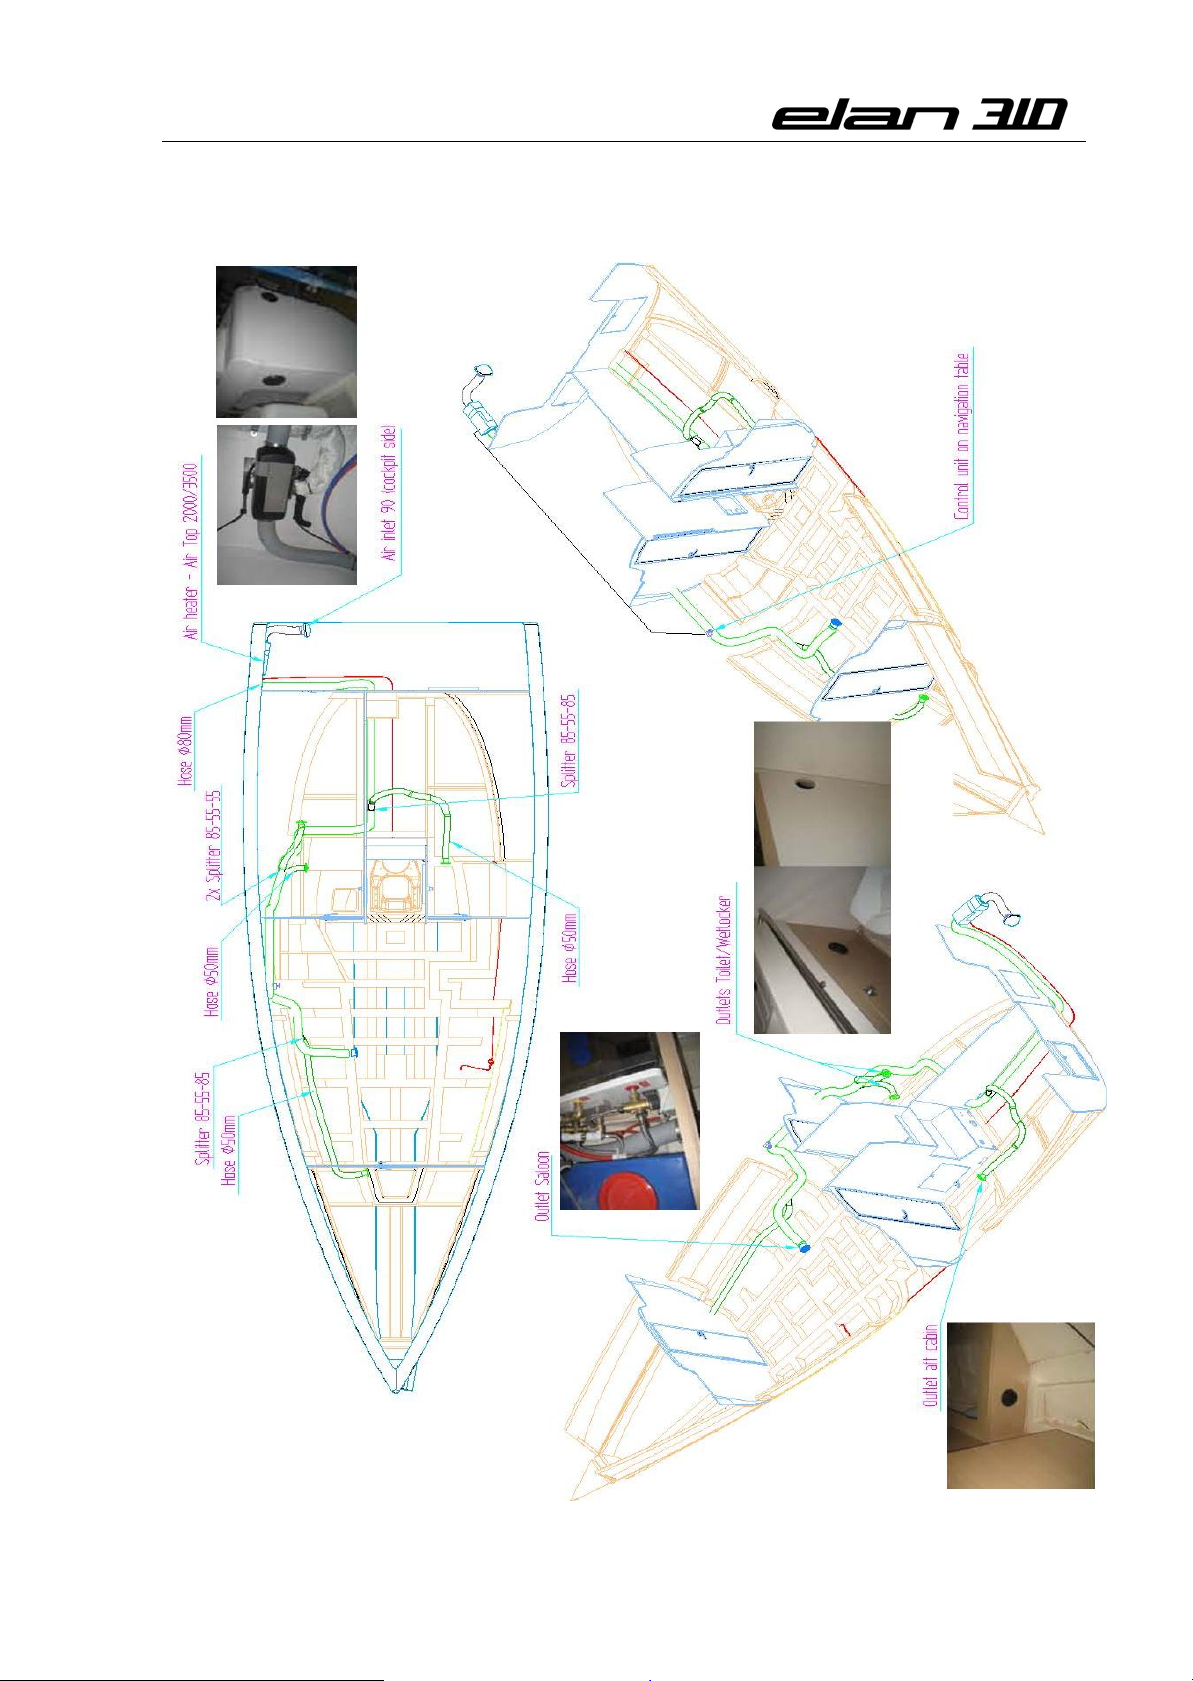
- If Webasto heating system is installed, please follow the manufacturer’s
User’s manual.
- It is recommended that any faulty original battery be replaced with a
similar GEL battery.
- In case you fitted an ACID battery, it is obligatory to put it in an acid proof
box to prevent eventual acid spillage.
All electrical consumers are connected via control panel. Each consumer is equipped with an
automatic circuit breaker, a signal light and a switch to turn it ON/OFF. There are three main
switches, one for the engine system, one for the anchor windlass and one for the other
consumers. The main switches are located under the chart table.
On the electrical control panel, there are three TEST buttons. When pressed, they indicate
the operating voltage of the batteries, the fresh water level and the fuel level.
WARNING: - Never work on the electrical installation without disconnecting the
power supply.
- The batteries must be kept carefully fastened.
- Do not store conducting objects near the batteries (metal tools).
- Never modify an electrical installation.
- When leaving the boat, switch off all the main switches.
Figure 14
31
Page 32
Owner’s Manual
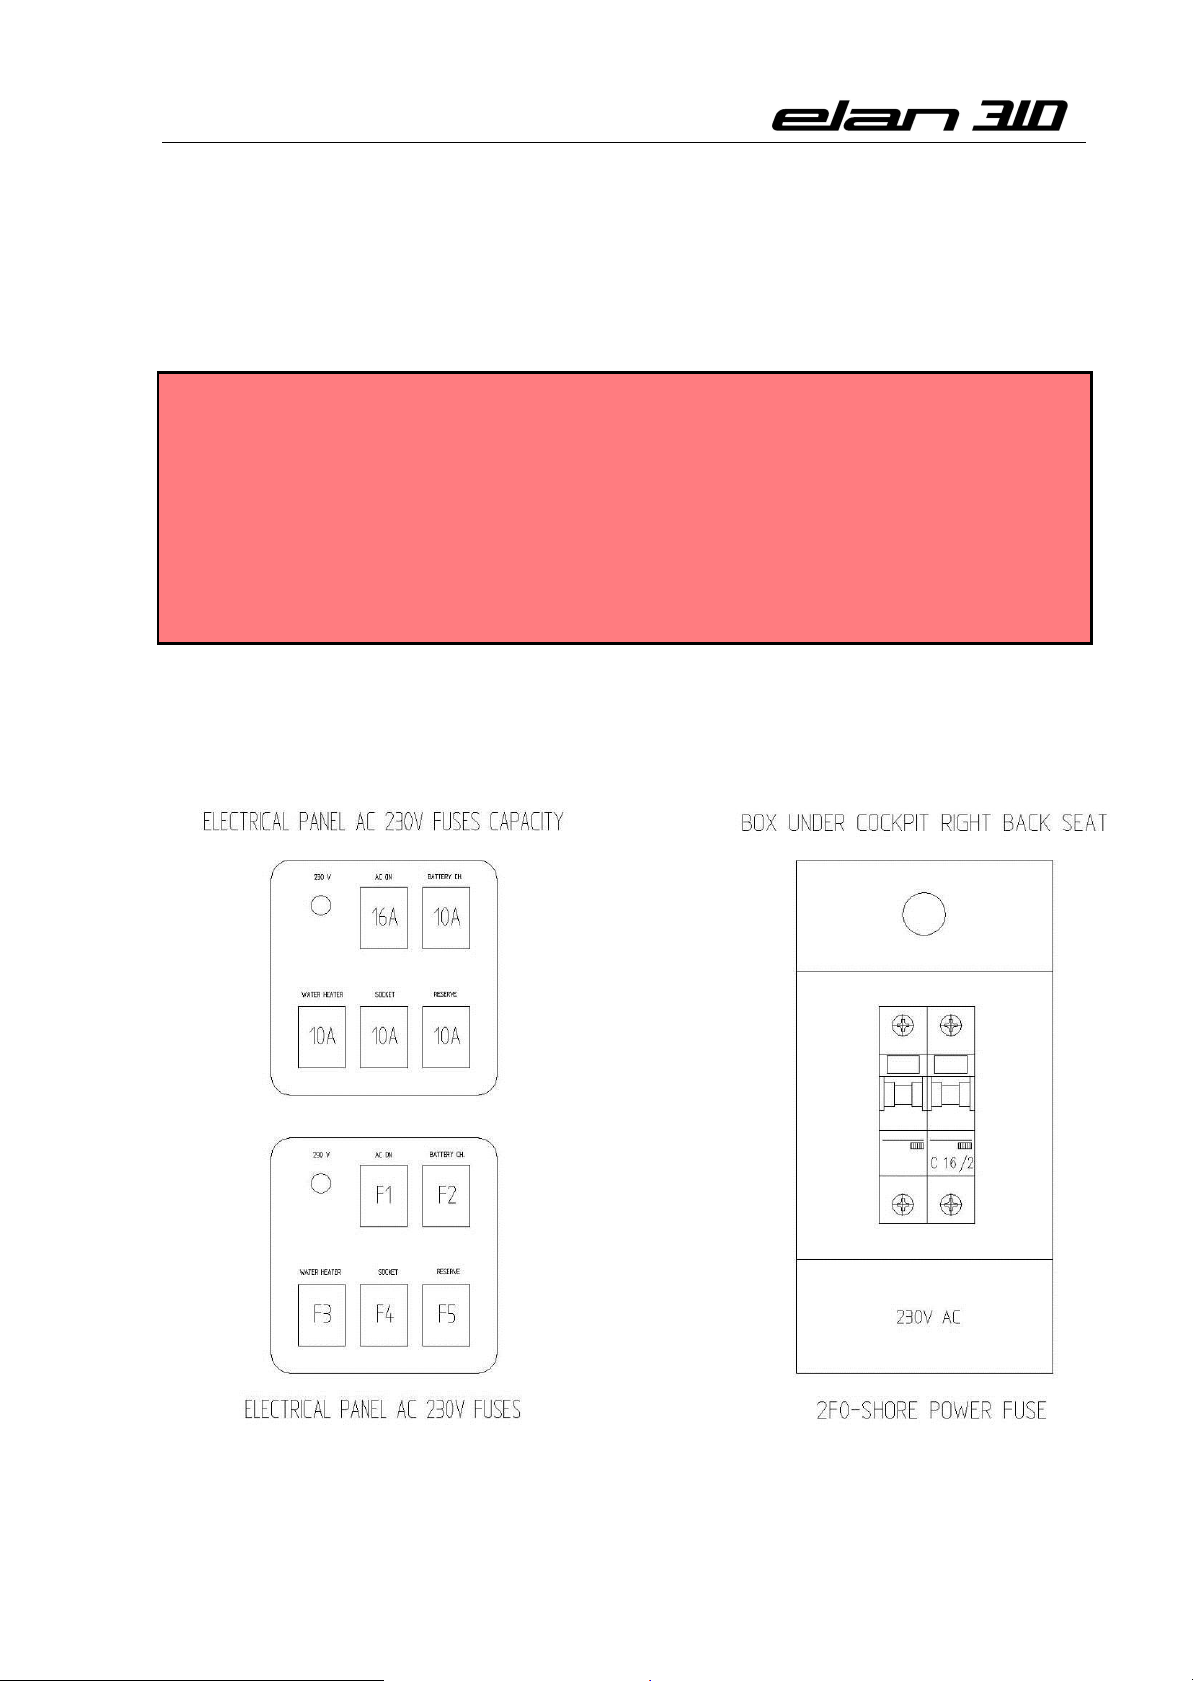
77..66..22.. 223300 VV SSYYSSTTEEMM
CCOONNTTRROOLL PPAANNEELL 223300 V
V
The boat is optionally equipped with a 230 V electrical circuit. The shore power plug is
located in the cockpit. In addition to the battery charger, the circuit also comprises sockets
for 230 V consumers.
WARNING: - Never work on the electrical installation without disconnecting the
power supply. An electrical shock can cause fire.
- Before connecting the cable on the shore, connect it to the boat first.
- Disconnect the cable after use.
- First swich off the main switch in the boat, then disconnect the cable on
the shore and last, disconnect it on the boat.
- Do not soak the catches of the cable in the water.
- Do not modify any terminals of the electrical cable.
- Never modify an electrical installation.
32
Figure 15
Page 33
Owner’s Manual
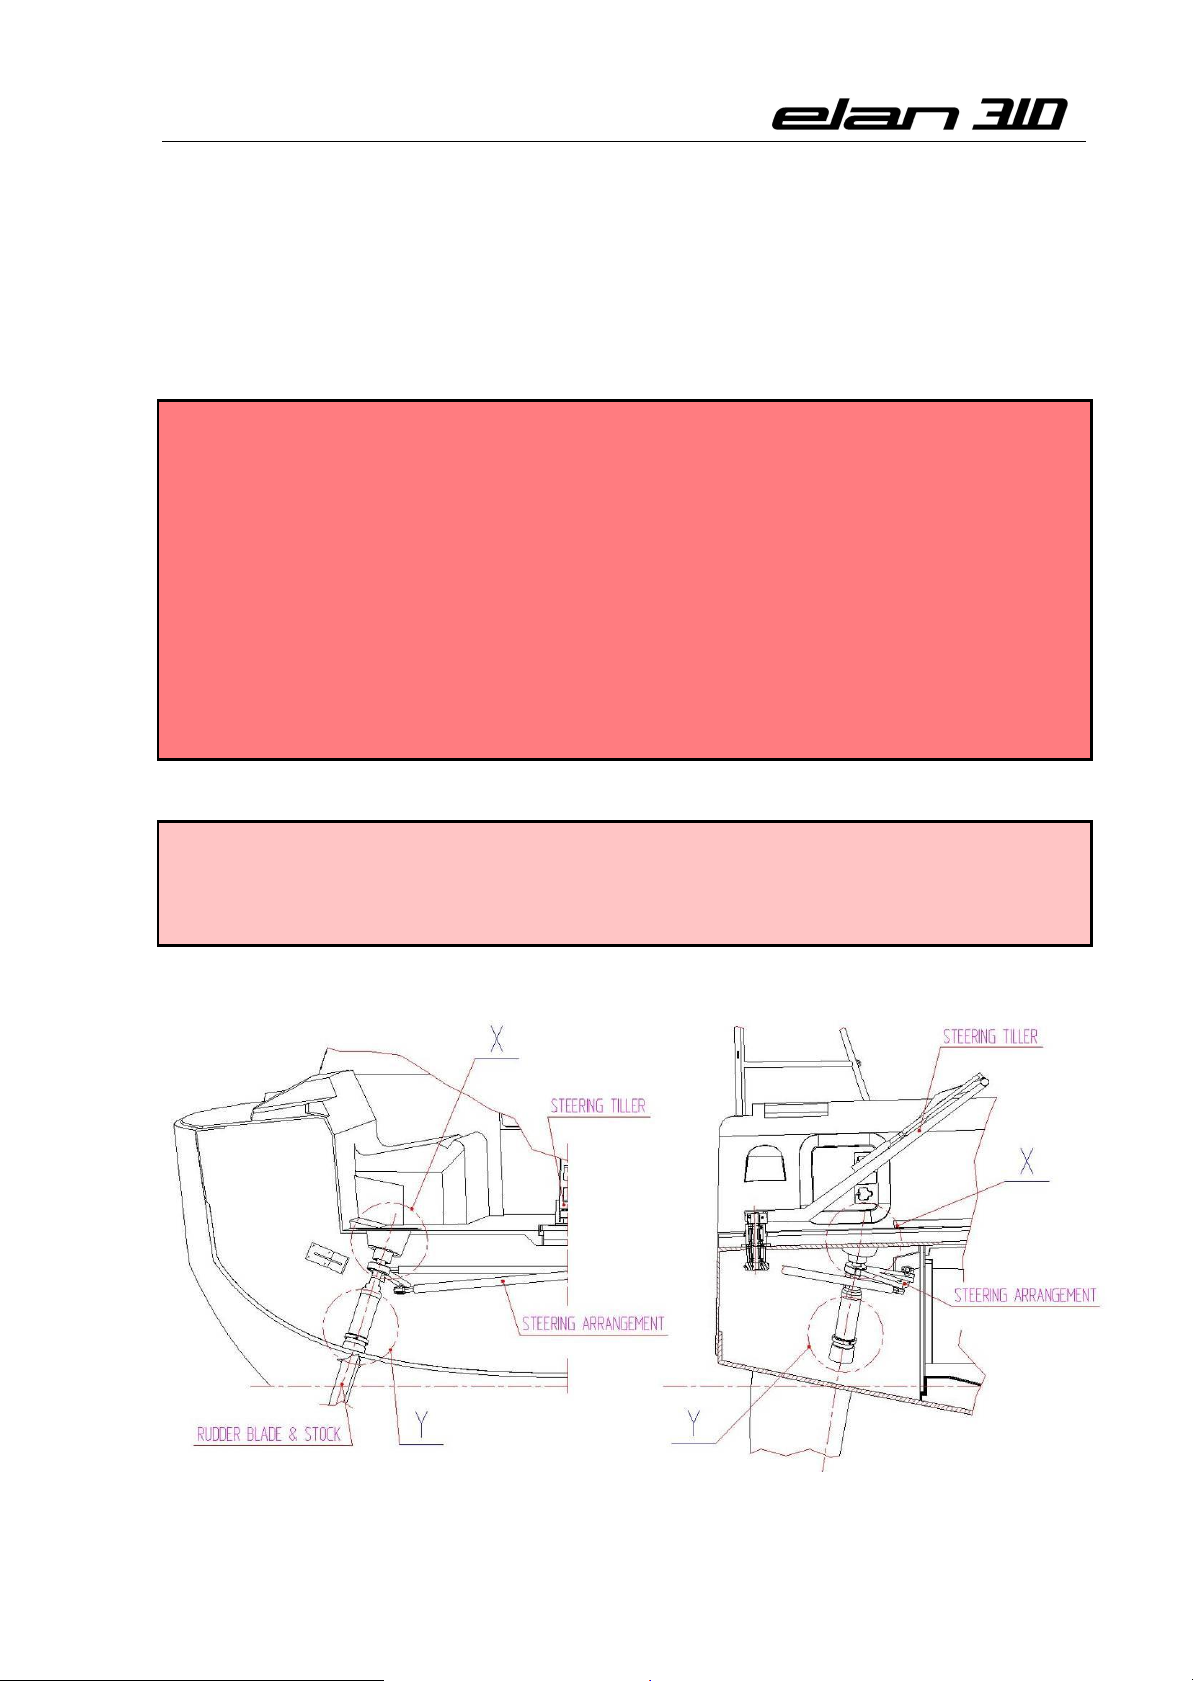
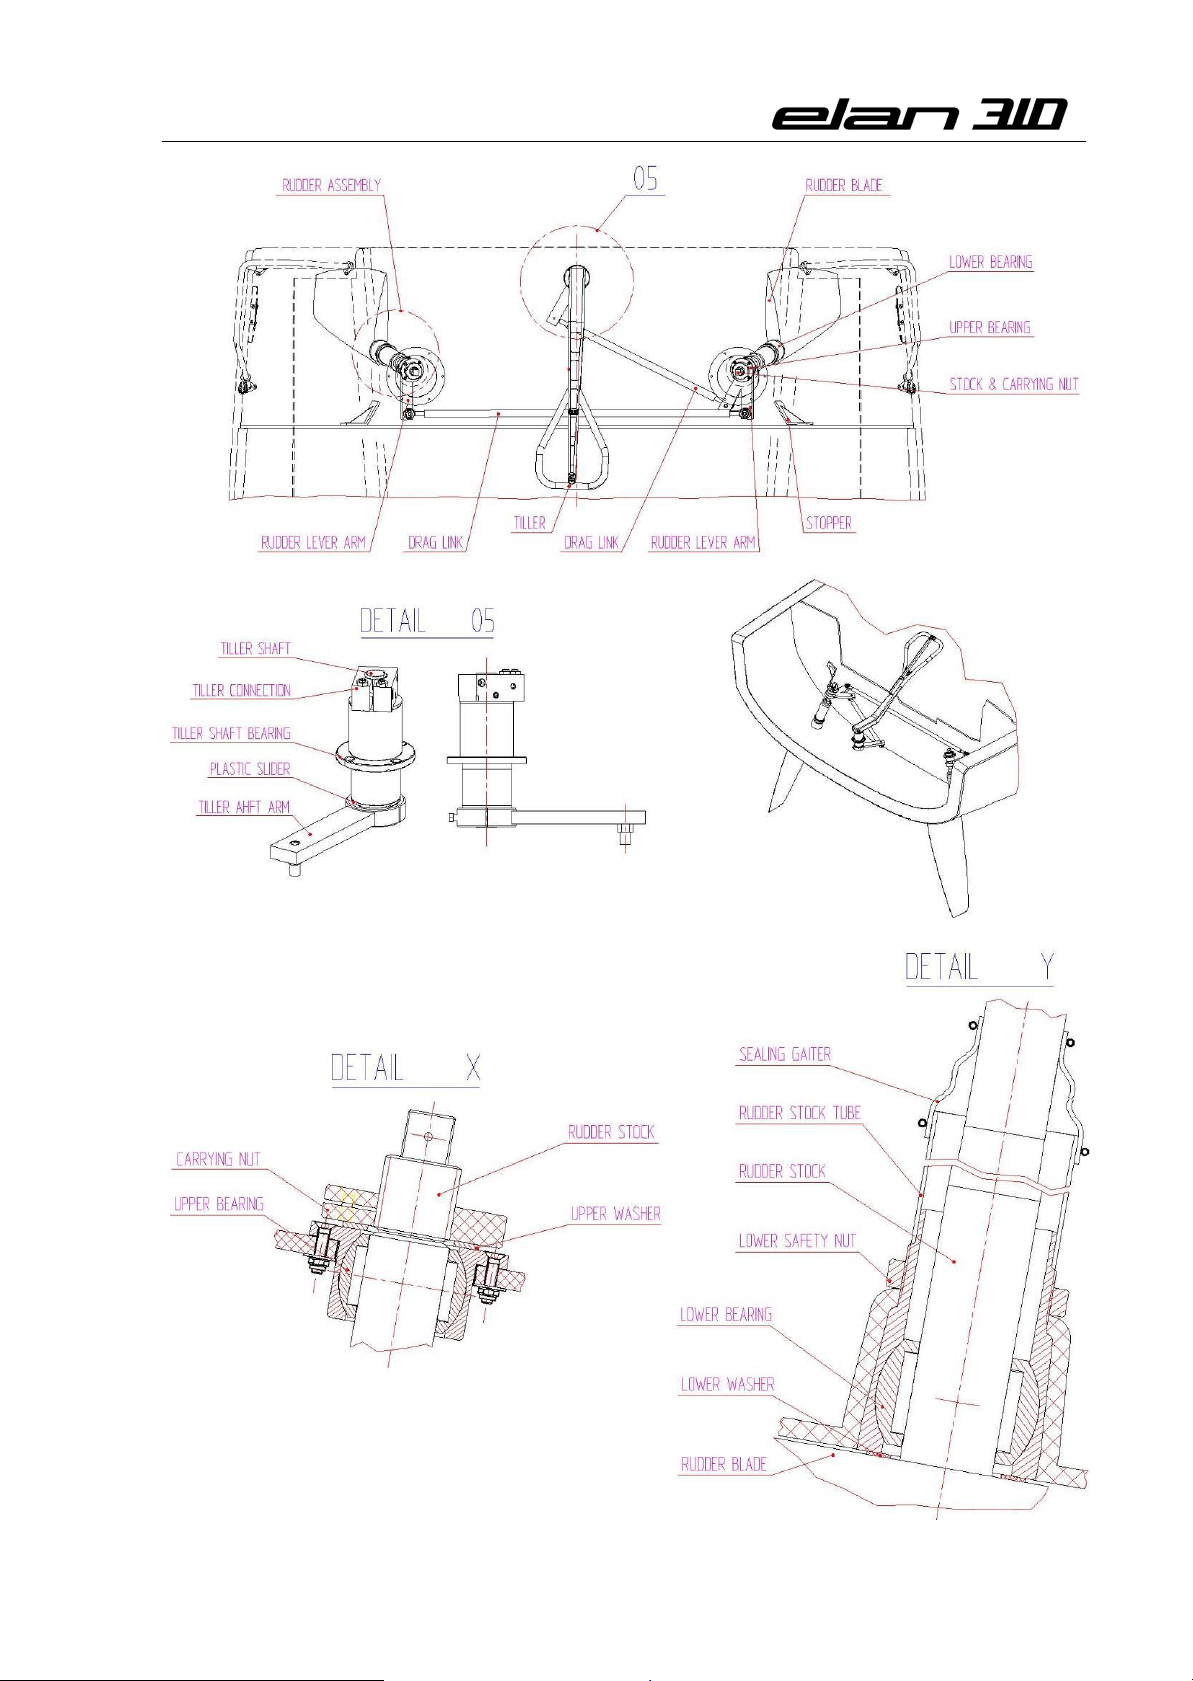
77..77.. RRUUDDDDEERR AANNDD SSTTEEEERRIINNGG SSYYSSTTEEMM
The boat is fitted with two connected rudders consisting of a long aluminium shafts passing
through the deck and hull and a GRP rudder blade. The shaft goes almost to the end of the
rudder blade. The rudders can be operated by either a tiller or a wheel (optional).
WARNING: - In case of a defect of the steering mechanism, use the emergency tiller,
available on the boat (in the cockpit locker) to get the boat to the nearest
marina or service station.
- Put the tiller on the shaft through the cover on the top bearing. The covers
are located port and starboard in the cockpit floor.
- In case of a defect of the mechanism, first remove the drag link (Fig.16)
- Any contact of the rudder with the ground can cause the blade to break or
split or the shaft to bend. It requires immediate checking and consultation
with an expert.
- Do not let go the steering tiller when you navigate backwards. Self-turning
of the rudder can damage the steering mechanism.
- Recommended speed should not exceed 2 knots.
CAUTION: - It is recommended to disassemble the steering mechanism every two
years to lubricate it and thoroughly check the rudder blade.
- Clean the bearings and when reassembling, lubricate them with a
lubricant resistant to sea water.
33
Page 34
Owner’s Manual
34
Figure 16
Page 35

Owner’s Manual
88.. GGAARRBBAAGGEE DDIISSCCHHAARRGGEE
Annex V of the Marpol Treaty is an International Convention providing for a cleaner, safer
marine environment.
IT IS THEREFORE ILLEGAL FOR ANY VESSEL TO DUMP PLASTIC GARBAGE INCLUDING
SYNTHETIC ROPES, FISHING NETS AND PLASTIC GARBAGE BAGS ANYWHERE IN THE
OCEANS OR NAVIGABLE WATERS.
Violations of these requirements may result in civil penalties being imposed upon offenders
in the form of fines and/or legislation. Garbage must be disposed of as described in the
ship’s Garbage Management Plan and details of all garbage disposals must be kept in the
garbage record book.
WARNING:
WITHIN 3 NAUTICAL MILES OF NEAREST LAND, ALL INLAND WATERS & FROM OR WITHIN
500M OF FIXED OR FLOATING PLATFORMS:
You can not throw anything overboard.
WITHIN 3-12 NAUTICAL MILES OFFSHORE:
You can not throw overboard paper, crockery, rags, metal, glass, food, plastic, dunnage and
lining and packing materials that float.
You can throw overboard paper, crockery, rags, metal, glass and food, provided it is ground
to less than 25 mm.
WITHIN 12-25 NAUTICAL MILES OFFSHORE:
You can not throw overboard plastic, dunnage, lining and packing materials that float.
You can throw overboard paper, crockery, rags, metal, glass and food etc.
OUTSIDE 25 NAUTICAL MILES OFFSHORE:
You can not throw overboard plastic.
NOTE:
In each case, plastic includes, but is not limited to synthetic rope, nites & plastic garbage
bags.
All garbage discharges must be recorded in the garbage record book.
35
Page 36
Owner’s Manual
99.. MMAAIINNTTEENNAANNCCEE
99..11.. HHAAUULLAAGGE
E
99..22.. UUNNDDEERRWWAATTEERR SSTTRRUUCCTTUURREE
99..22..11.. HHUULLLL
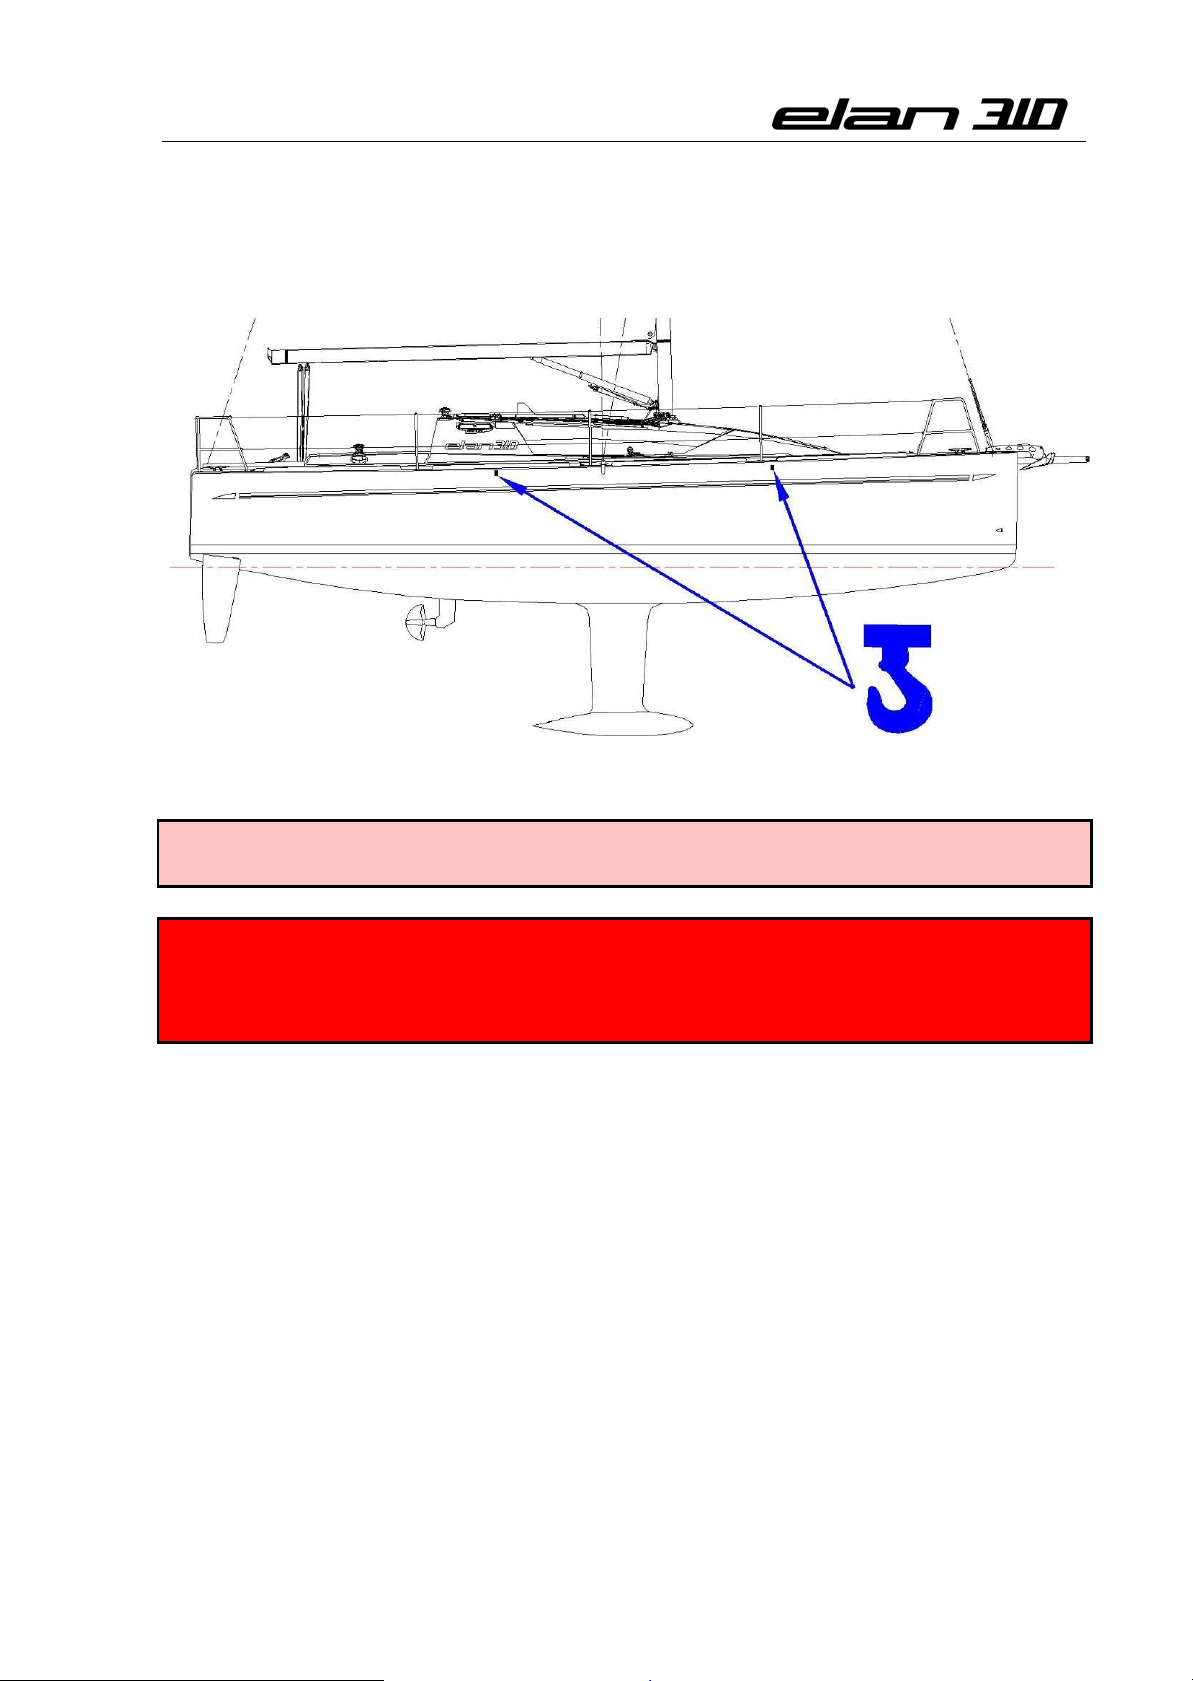
Figure 17
CAUTION: - Look for the labels on the boat to place the lifting straps (see Fig.17).
- Make sure the straps do not damage the sail drive or propeller.
DANGER: - It is not allowed to stay on board or stand under the boat when the boat
is being hauled out.
- Make sure that the lifting straps meet all the safety requirements and
that they are not damaged.
An antifouling protects the underwater structure against fouling by marine growths that run
down the performance and sailing ability of the boat. It is applied on the hull section that is
immersed in water and up to about 100 to 150 mm above the waterline or up to the top
stripe. It needs to be serviced at least once a year.
For a new boat it is very important to observe the following steps:
Use a 95% proof alcohol to remove all traces of the mould release agents and then wipe with
absorbent paper or cloth.
To prepare the hull for the antifouling, gently sand it with sandpaper (400 grade).
Rinse thoroughly with cold fresh water without applying pressure or detergent and allow it
to dry.
36
Page 37

Owner’s Manual
99..22..22.. PPRROOTTEECCTTIIOONN OOFF TTEERRMMIINNAALLSS
99..33.. HHUULLLL AANNDD DDEECCKK
99..33..11.. CCLLEEAANNIINNGG
Apply the antifouling with a spray gun or a roller in accordance with the antifouling
manufacturer’s instructions.
For maintenance of the hull follow the next steps:
Remove all algae and shells using a brush and fresh water.
When cleaning with a high pressure hose and cold water, do not bring the hose any
closer than 0,5 m.
Allow the hull to dry.
Apply the antifouling with a spray gun or roller in accordance with the antifouling
manufacturer’s instructions.
CAUTION: - When applying the antifouling, do not apply it on the instrument probes
and terminals ends.
- Some antifouling paints are not compatible which is why particular care
is required. When choosing another antifouling, consult a professional
and keep records of the antifouling paints used.
- Follow the specifications and instructions laid down by the antifouling
manufacturer.
WARNING: - When cleaning the underwater structure,
- NEVER use any solvent other than alcohol.
- NEVER use hot water under pressure.
- NEVER use cleaning agents under pressure.
- NEVER use a scraper.
The zinc terminals of the underwater metal components (cast iron keel, sail drive and
propeller) have to be replaced as soon as the terminals corrode up to half their length in
order to ensure an adequate protection of the terminal ends.
WARNING: - Improper positioning or inadequate protection of terminal ends can
cause irreparable damage to the metal parts.
We recommend that you wash the exterior fibreglass surfaces of your boat several times
each season using a mild detergent and large amounts of fresh water in order to remove the
salt and dirt accumulated during use and as a result of air pollution.
After the boat has dried, use a good quality wax for protection against UV rays. We suggest
that you should use a wax that does not contain silicone.
CAUTION: - DO NOT use aggressive (alkaline) cleaning agents for cleaning because
they may cause changes in the gelcoat.
37
Page 38

Owner’s Manual
99..33..22.. SSTTAAIINNSS,, SSCCRRAATTCCHHEESS AANNDD AABBRRAASSIIOONNSS
99..44.. MMAASSTT,, SSAAIILLSS AANNDD RRIIGGGGIINNGG
Use 95% proof alcohol to remove the stains that cannot be removed with a detergent and
fresh water. Do not clean teak with alcohol. If the surfaces are not cleaned regularly, the top
gelcoat layers can change color. Such stains can only be removed using a medium graderubbing compound. If this is ineffective, rub the area lightly with wet 800 to 1200-grade
paper (used with water) until the mark disappears. A cleaning agent with fine abrasives can
also be used to remove stains and minor scratches. After the stain has been removed, apply
a wax polish.
WARNING: - Rubbing with abrasive compounds and materials removes the gelcoat.
As this is only a thin layer, great care should be taken.
- DO NOT use organic solvents other than alcohol because they can
cause result in permanent damage to the gelcoat and discoloration.
Gelcoat that is used as the exterior layer on your boat is very hard and resistant to shocks
and scratching. However, it is practically impossible to avoid scratches when the boat is
used. Minor scratches can be removed by sanding and polishing like stains. You will probably
not be able to remove them completely but they will be less visible. Any scratches reaching
to the fiberglass layer need to be repaired by applying gelcoat or another putty. If a scratch
goes deep into the laminate or if it is a major scratch, we recommend you to have it repaired
by a professional.
Any customer must be aware, if ordering a blue hull, that there may be white pixels visible in
the blue hull. When sanding or polishing the hull the micro porosity of the laminate may be
exposed. After final production, Elan yachts are sanded and polished, therefore extreme care
must be exercised should further polishing be required.
DANGER: - In case of a crack or possible delamination, immediately consult an
expert on laminates or contact the boat builder.
The standing rigging on your sailing yacht should be inspected regularly to ensure safe and
trouble-free sailing. New rigging will often form a thin layer of rust, especially at the terminal
ends. This is caused by impurities surfacing when the wire is cold-worked during
manufacture. The oxidation should stop after a certain period of time, and when it does,
remove the stain with an unchlorinated cleaner or a stainless steel polish. Rinse the
turnbuckles and grease them lightly each season. Inspect the mast parts as well. Make sure
that the Furlex system rotates easily. Wash away the salt, and then lubricate the bearings.
The sails need constant attention as the slightest wear in the stitching or at reinforced parts
can quickly lead to their deterioration. Keep a small sail-maker’s kit at hand. Bigger repairs
should be made by a professional sail-maker. Sails dislike salt water and sunshine, so
whenever you have the possibility, rinse the sails with plenty of fresh water and dry them
completely before folding them.
38
Page 39

Owner’s Manual
99..55.. DDEECCKK EEQQUUIIPPMMEENNT
T
99..55..11.. LLIIFFEELLIINNEESS,, PPUULLPPIITTSS AANNDD SSTTAANNCCHHIIOONNSS
99..55..22.. WWIINNCCHHEESS AANNDD BBLLOOCCKKS
S
99..55..33.. AANNCCHHOORR WWIINNDDLLAASSS
S
99..55..44.. TTEEAAKK ((ooppttiioonnaall)
)
To protect the sails from UV rays, always cover the mainsail folded on the boom with the
mainsail cover. Remember to relieve outhaul tension before you start folding the mainsail.
Genoa leech and foot already have sewn-on protective stripes that give a complete UV
protection to a furled sail. When leaving the boat for a longer period or after the season,
always remove, fold and store the sails in the sail sacks.
WARNING: - DO NOT ever let the sails flatter in the wind while drying as heavy
damage to the stitching and sailcloth may result.
Lifelines and other rigging should be checked periodically. The terminal ends should be
engaged properly in the barrels of the turnbuckles and the lock nuts tight. As the lines
stretch, the slack should be taken up.
Stainless steel hardware can now and then show signs of rust that should be removed using
an unchlorinated rust remover or a stainless steel polish. Rinse the equipment with fresh
water and grease turnbuckles every year.
The winches should be cleaned and inspected before you go sailing. Check that the holding
bolts are tight.
Blocks require little maintenance, except for periodic washing in fresh water and a light
oiling with a silicone lubricant.
Rinse the anchor locker and windlass with fresh water when you have the possibility. Clean
and grease the rotating parts with the water resistant grease at least once a season. The
internal parts of the windlass do not require maintenance for at least three seasons.
A teak deck is exposed to sunlight and heat and salt water. If exposed to UV rays, it begins to
put on a grey appearance and loose its original color. Scrub the teak deck, always across the
grain of the wood with fresh water and a mild detergent several times a year and let it dry
out. Then apply teak oil. Some teak treatments are not compatibile with original Sika PU
deck caulking. We recommend original Sika Marine Teak Deck Maintenance System
according to their recommedations.
WARNING: - DO NOT clean teak deck with alcohol, acetone or gasoline or use teak
maintenance systems based on the afore-mentioned substances.
- DO NOT use for teak strong or aggressive cleaners and brighteners.
39
Page 40

Owner’s Manual
99..55..55.. PPLLEEXXIIGGLLAASS,, PPOORRTTLLIIGGHHTTSS AANNDD HHAATTCCHHEESS
99..66.. IINNTTEERRIIOORR
99..66..11.. IINNTTEERRIIOORR WWOOOODD SSUURRFFAACCEES
S
99..66..22.. CCUUSSHHIIOONNSS AANNDD CCUURRTTAAIINNSS
99..66..33.. RREEFFRRIIGGEERRAATTOORR
99..66..44.. CCOOOOKKEERR
Wash your acrylic hatches and other acrylic components on your boat with a mild soap and
plenty of warm water. Use a clean, soft cloth, applying only light pressure. Apply wax or nonacidic oil to such frames after cleaning.
WARNING: - To avoid cracking, never use any type of solvent when cleaning acrylic
glass.
- DO NOT subject acrylic material to high temperature.
- DO NOT use cleaning agents like acetone, gasoline etc.
Clean the varnished wood surfaces with fresh water and a clean cloth. Do not use organic
solvents or expose surfaces to high temperatures to prevent permanent damage to the
varnish.
Please keep in mind that wood is a natural product, therefore minor differences in colour
can occur.
WARNING: - Worn wood parts can be painted with good quality polyurethane
varnish. The varnish used must be compatible with the original one. Before
applying the varnish, prepare the surface in accordance with the
manufacturer’s recommendations.
Use an upholstery shampoo of the foam type. When you leave the boat for a longer period
of time, lift the cushions, allowing them to dry completely in order to prevent the growth of
mildew underneath.
Clean your refrigerator before each sail and when leaving the boat for a longer period.
Remove all the food and clean the fiberglass interior surfaces with a sponge and an
appropriate cleaning agent. Leave the refrigerator cover open when you leave the boat to let
the interior dry completely.
Because only a clean cooker is safe, after any use clean the cooker thoroughly including the
burners.
40
Page 41

Owner’s Manual
99..66..55.. SSIINNKK
99..66..66.. BBIILLGGEE SSTTRRAAIINNEERRSS AANNDD PPUUMMPPSS
99..66..77.. FFUUEELL AANNDD WWAATTEERR TTAANNKKS
S
1100.. WWIINNTTEERRIISSAATTIIOONN
1100..11.. BBLLOOCCKKIINNGG TTHHEE HHUULLLL
1100..22.. CCOOOOKKEERR
Stainless steel sinks may be cleaned with a non-abrasive cleaner and sponge.
After cleaning the boat’s interior, proceed to inspect the bilge pump strainer and bilge,
removing the dirt and drying it to prevent odour and mildew.
WARNING: - Dirt, hair, etc. should not be directly washed into the bilge during any
cleaning process because they may plug the bilge pump and prevent it
from regular functioning.
Inspect your tanks for any dirt regularly. Pay particular attention to any dirt accumulating at
the bottom. The best way to clean the tanks is with a vacuum cleaner.
WARNING: - Inspect the fuel and water tanks only when you are sure that they are
empty. Never unscrew the inspection hole when the tank is not empty.
It is recommended that all yachts should be lifted from water annually to allow the hull to
dry out. The GRP that the hull is made of absorbs moisture when immersed in water, which
can result in osmosis.
A sailing yacht is properly supported when the weight of the hull is resting on the keel. The
purpose of cradle bulkhead is just to keep the boat balanced in an upright position. Before
hauling the boat out, check that the crane straps are positioned on the signed marks on the
hull (see Fig.18)
Clean the cooker thoroughly, including the burners. Burn off excess gas in the feed line by
closing the valve on the gas bottle with the gas burner lit. When the flame is extinguished,
the gas in the feed line is burned. Be sure to turn all the valves on the appliance to the OFF
position. Make sure that the gas locker is clear.
41
Page 42

Owner’s Manual
1100..33.. EELLEECCTTRRIICCAALL SSYYSSTTEEMM
1100..44.. WWAATTEERR SSYYSSTTEEMMSS
1100..55.. SSEEAACCOOCCKKSS
1100..66.. FFUUEELL TTAANNKK
1100..77.. EENNGGIINNEE
1100..88.. SSAAIILLSS
1100..99.. CCOOVVEERRIINNGG
Remove all the batteries from the boat and clean the poles. Store the batteries in a warm
and dry location. The batteries should be completely charged before storing. The rest of the
electrical system requires little maintenance. Extremely adverse weather conditions may
cause corrosion. In that case we recommend you to clean off any corrosion and apply an
anti-corrosive agent.
Pump tanks as dry as possible, than add a non-toxic water system winterised. Pump this
solution through the entire fresh-and waste-water systems.
WARNING: - Leave all the seacocks open.
- DO NOT use antifreeze or other poisonous substances.
Clean them carefully from inside and outside of the boat and put some water resistant
grease on all the moving parts.
Fill the fuel tank completely to prevent water condensation and corrosion.
Thoroughly clean oil and fuel from the engine compartment. Winterisation should be done in
accordance with the engine manufacturer’s recommendations. Remember to disconnect the
cooling water intake to make sure no water remains in the system. Inspect all the electrical
connections and spray them with an anti-corrosion spray.
Thoroughly wash all the sails, inspecting them at the same time. Fold the completely dried
sails and store them in a dry and dark place. If necessary, use a mild soap to remove the
stains. If you find any damage, bring the sail to a sail-maker for a detailed inspection and
repair.
It is much better to store a sailing yacht under cover than to leave it exposed to the weather
conditions. The teak and gelcoat will fare far better during the winter and the boat will not
be exposed to the pressure of the freezing water, a common cause of gelcoat stress cracks.
42
Page 43

Owner’s Manual
1100..1100.. CCUUSSHHIIOONNSS
1100..1111.. IINNTTEERRIIOOR
R
1111.. PPRROODDUUCCTT EENNDD OOFF LLIIFFEE DDIISSPPOOSSAALL
Remove the cushions from the boat for winterisation, let them dry out and store them in a
dry place.
Make sure that the interior is well ventilated. Open all the lockers, covers and doors to allow
for adequate air circulation.
Prior the boat disposal (after end-of-life cycle) the owner needs to identify all legal
requirements that are applicable to this environment aspect. Since our boats are generally
sold worldwide, this may include:
National and international legal requirements;
State / provincial / department legal requirements;
Local government legal requirements.
Your sailing boat is a highly complex product, with many different sub-systems and installed
sub-products, therefore we suggest contacting applicable authorities for further information.
Additional special care needs to be taken for more aggressive items, such as batteries, fuels
and cooling agents, engine fluids etc., which should be disposed according to the suppliers
instructions.
In some areas boat disposal companies are also available, which will help you to dispose a
product in a right and environment friendly way.
43
Page 44
Owner’s Manual
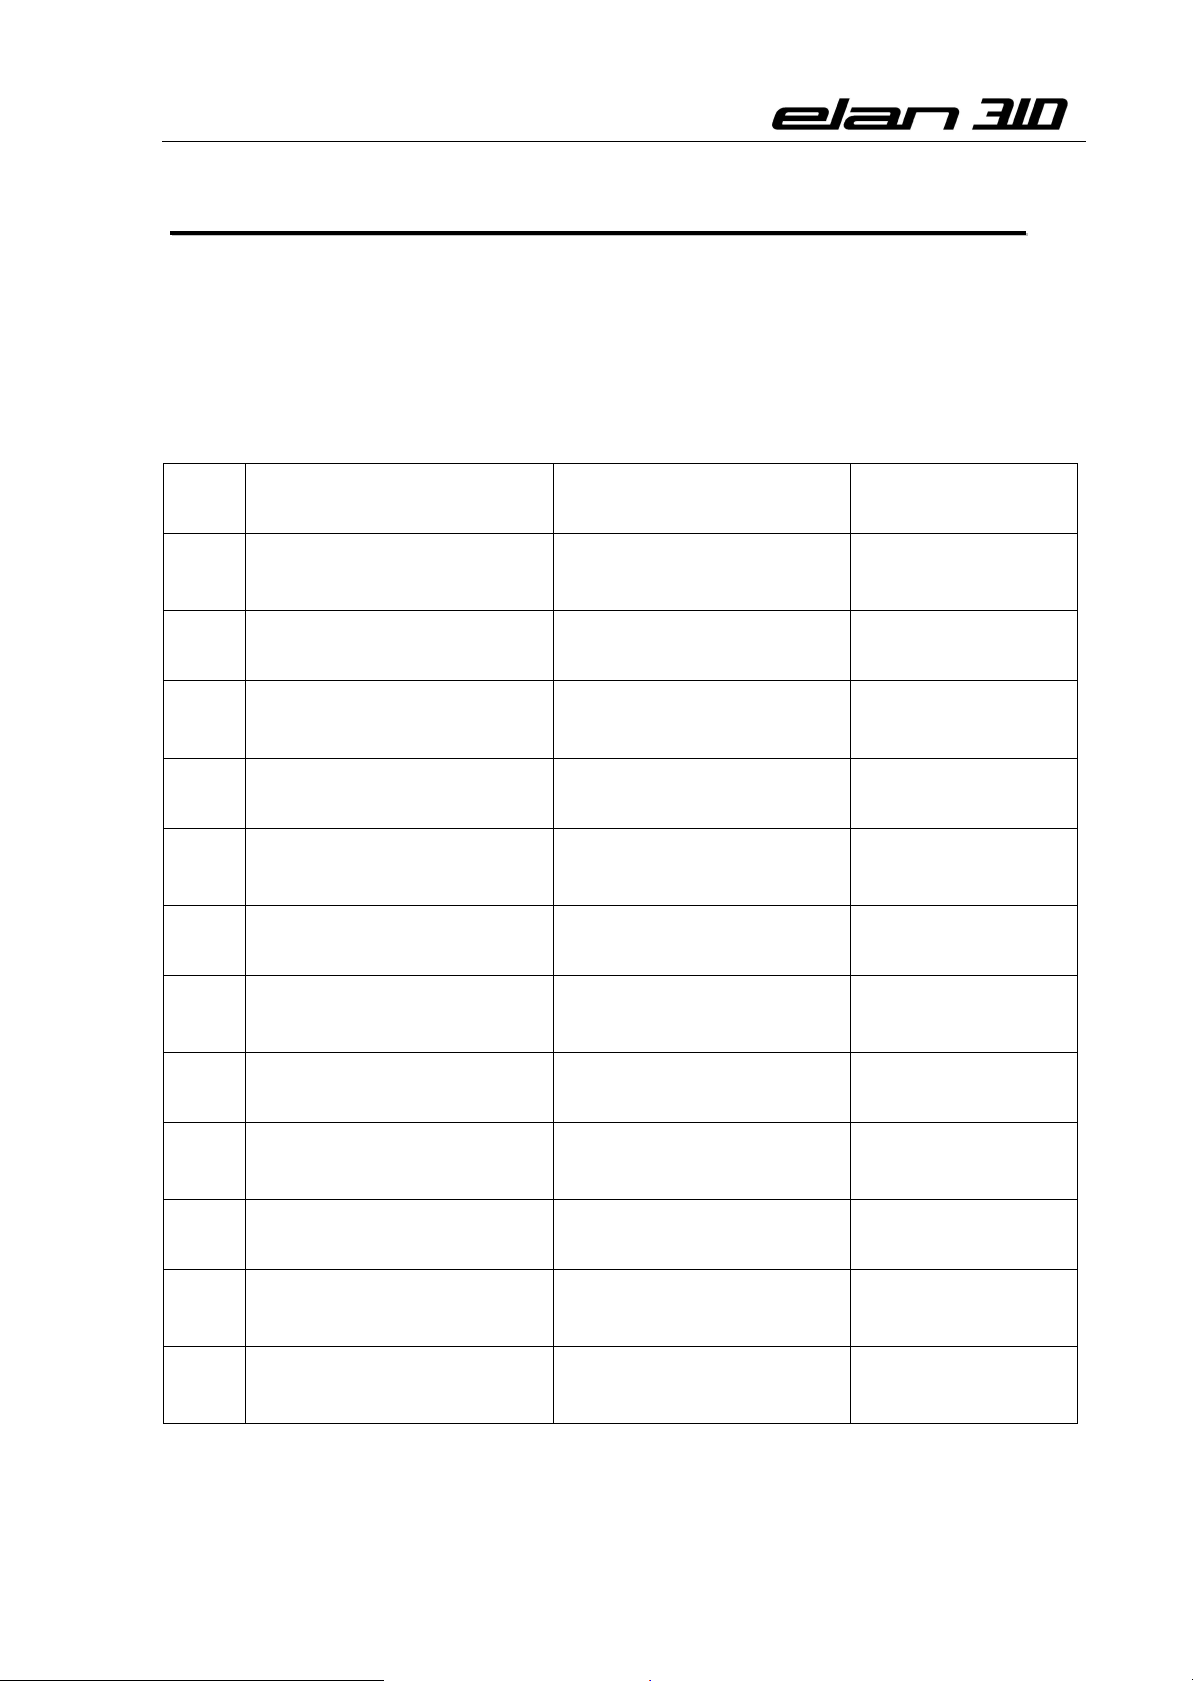
IINNSSTTRRUUCCTTIIOONNSS FFOORR UUSSEE OOFF IINNSSTTAALLLLEEDD EEQQUUIIPPMMEENNTT
ELEMENT
MANUFACTURER
TYPE
1
2
3
4
5
6
7
8
9
10
11
12
1. Refrigerator…….
2. Water heater………
3. Instruments…..
4. Engine……..
5. Etc.
44
Page 45

Owner’s Manual
NNOOTTEESS::
Make notes of any modification on your sailing yacht.
……………………………………………………………………………………………………………………………………………………………
……………………………………………………………………………………………………………………………………………………………
……………………………………………………………………………………………………………………………………………………………
……………………………………………………………………………………………………………………………………………………………
……………………………………………………………………………………………………………………………………………………………
……………………………………………………………………………………………………………………………………………………………
……………………………………………………………………………………………………………………………………………………………
……………………………………………………………………………………………………………………………………………………………
……………………………………………………………………………………………………………………………………………………………
……………………………………………………………………………………………………………………………………………………………
……………………………………………………………………………………………………………………………………………………………
……………………………………………………………………………………………………………………………………………………………
……………………………………………………………………………………………………………………………………………………………
……………………………………………………………………………………………………………………………………………………………
……………………………………………………………………………………………………………………………………………………………
……………………………………………………………………………………………………………………………………………………………
……………………………………………………………………………………………………………………………………………………………
……………………………………………………………………………………………………………………………………………………………
……………………………………………………………………………………………………………………………………………………………
……………………………………………………………………………………………………………………………………………………………
……………………………………………………………………………………………………………………………………………………………
……………………………………………………………………………………………………………………………………………………………
……………………………………………………………………………………………………………………………………………………………
……………………………………………………………………………………………………………………………………………………………
……………………………………………………………………………………………………………………………………………………………
……………………………………………………………………………………………………………………………………………………………
……………………………………………………………………………………………………………………………………………………………
……………………………………………………………………………………………………………………………………………………………
……………………………………………………………………………………………………………………………………………………………
……………………………………………………………………………………………………………………………………………………………
……………………………………………………………………………………………………………………………………………………………
……………………………………………………………………………………………………………………………………………………………
……………………………………………………………………………………………………………………………………………………………
……………………………………………………………………………………………………………………………………………………………
……………………………………………………………………………………………………………………………………………………………
……………………………………………………………………………………………………………………………………………………………
……………………………………………………………………………………………………………………………………………………………
……………………………………………………………………………………………………………………………………………………………
……………………………………………………………………………………………………………………………………………………………
……………………………………………………………………………………………………………………………………………………………
……………………………………………………………………………………………………………………………………………………………
……………………………………………………………………………………………………………………………………………………………
……………………………………………………………………………………………………………………………………………………………
……………………………………………………………………………………………………………………………………………………………
……………………………………………………………………………………………………………………………………………………………
……………………………………………………………………………………………………………………………………………………………
……………………………………………………………………………………………………………………………………………………………
……………………………………………………………………………………………………………………………………………………………
45
Page 46
Owner’s Manual
46
ELAN MARINE d.o.o.
Begunje 1
4275 Begunje na Gorenjskem
Slovenia
Tel: +386 45 351 370
Fax: +386 45 351 360
e-mail: [email protected]
http: www.elan-yacht.com
Page 47
Owner’s Manual
Webasto heating assembly:
47
Figure 18
Page 48
Owner’s Manual
48
Page 49
Owner’s Manual
49
Page 50
Owner’s Manual
50
Page 51
Owner’s Manual
51
Page 52
Owner’s Manual
52
Page 53
Owner’s Manual
53
Page 54
Owner’s Manual
54
Page 55
Owner’s Manual
55
Page 56
Owner’s Manual
56
Page 57
Owner’s Manual
57
Page 58
Owner’s Manual
58
Page 59
Owner’s Manual
59
Page 60
Owner’s Manual
60
 Loading...