

Page 1

HC308
Ultra Fast Fill Quick Coupler
SAE Male
Instruction Manual
Failure to follow these instructions or to properly install and maintain this equipment could result in gas leak-
age, fire or explosion causing property damage and personal injury or death.
Oasis products must be installed, operated and maintained by trained and competent personnel in
accordance with all applicable local codes, rules and regulations in addition to the Oasis Instructions.
Oasis Engineering Ltd. will not be held liable in such circumstances where installation, operation and
maintenance procedures were performed by incompetent personnel resulting in improper assembly, unsafe
operation, equipment damage or personal injury.
Oasis Engineering Ltd
129 Birch Avenue, Tauranga, New Zealand.
T: +64 7 928 3808 F: +64 7 928 3809
E: info@oasisNGV.com
W: www.OasisNGV.com
Page 2

Safety
Warning!
High pressure gas and gas equipment can cause serious harm to
both infrastructure and personnel if safety precautions are not
followed.
Oasis recommends considering the use of the following PPE when
working with high pressure along with any other site specific health
and safety requirements:
Tools Required
(Wrenches)
Ensure the system is vented and
isolated before any installation or
servicing work is carried out.
Thread Tape Spanner
Spray bottle
(Snoop or soapy water)
Anti Seize Grease
- Swagelok Silver Goop
- Omega 99
- or similar
We reserve the right to modify product specifications without prior notice.
2
HC308-INS-01 0419 © Oasis Engineering Limited
Page 3
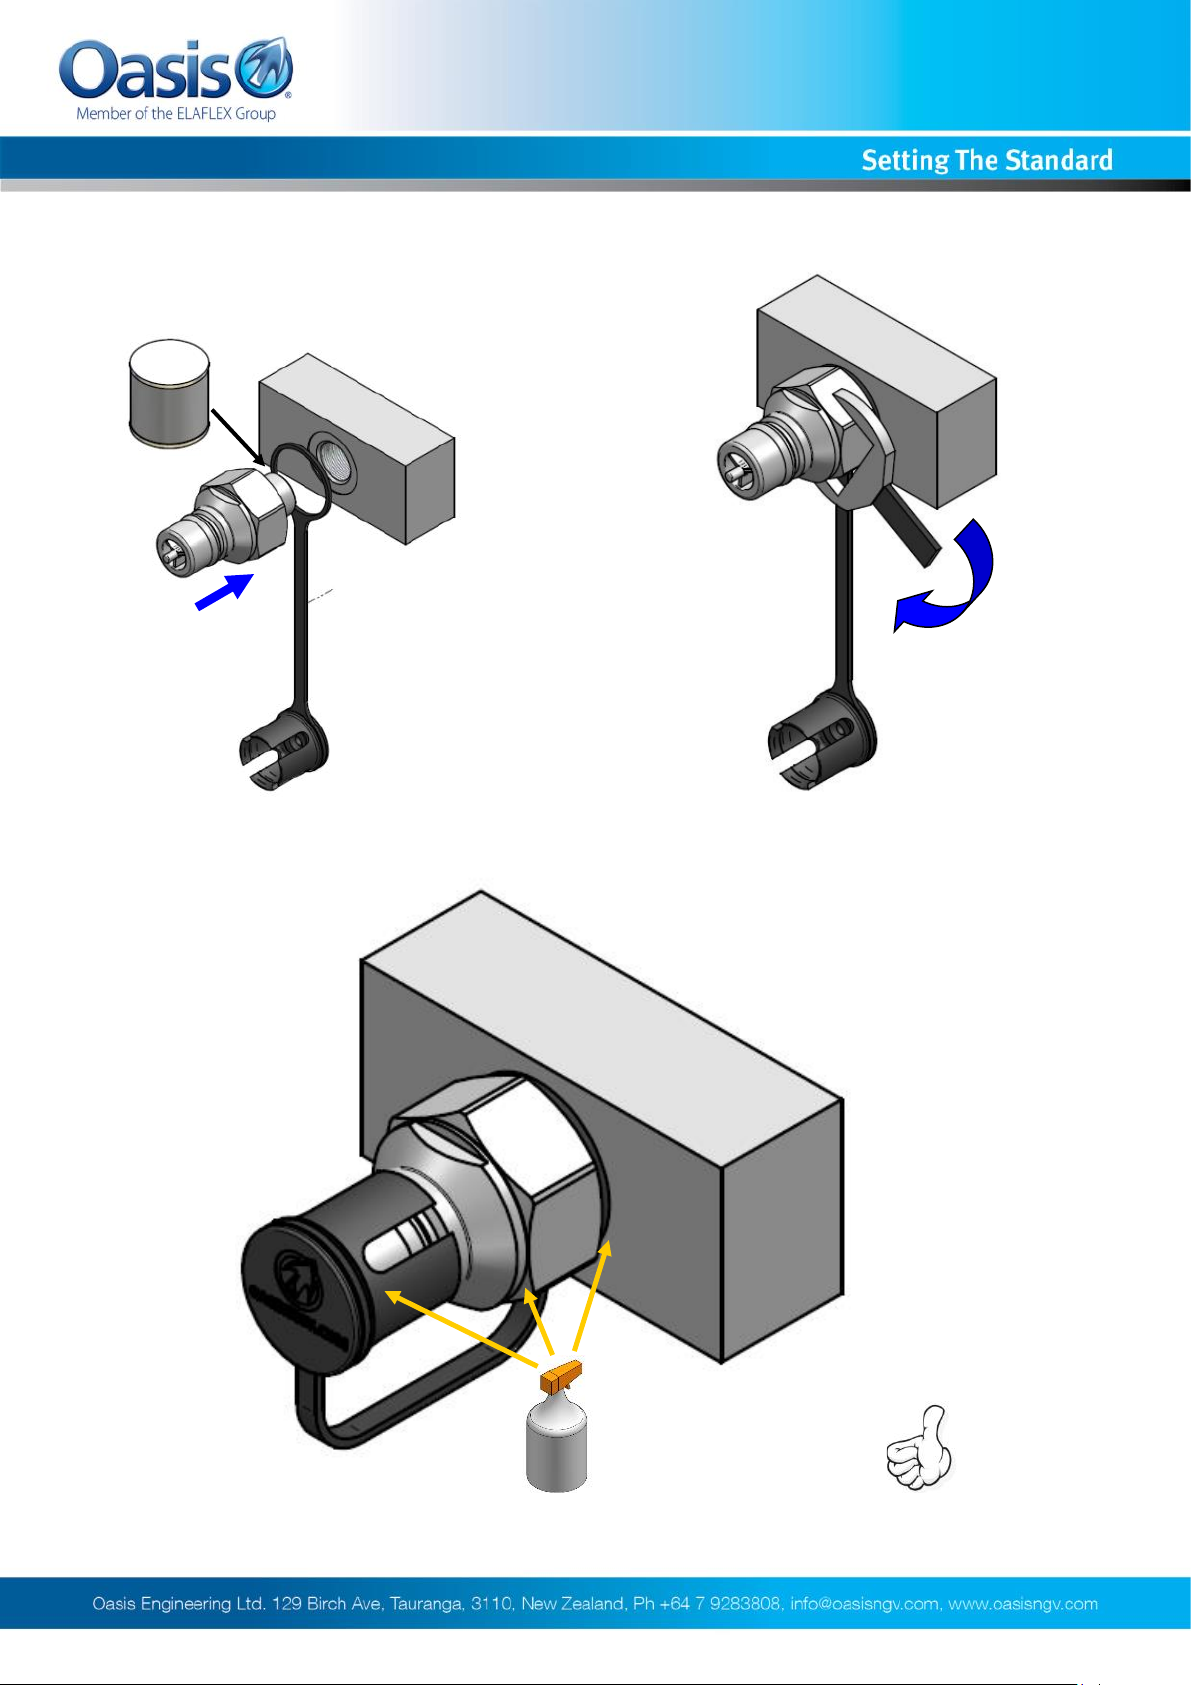
Installation Instructions
1. Apply never seize to SAE thread and
screw coupler into port. Ensure dust
cap strap is around body.
2. Tighten connection to 180 Nm
(132.8 ft lb).
Ensure dust cap strap is
not caught between end
cap and spot face.
3. Installation complete. Put dust cap over coupler when not in use.
We reserve the right to modify product specifications without prior notice.
Check for leaks on first
use with snoop or soapy
water.
3
HC308-INS-01 0419 © Oasis Engineering Limited
Page 4

Operation Instructions
1. Remove dust cap from male
coupler.
2. Connect with female coupler, ensure
coupler is connected correctly.
3. Use coupler as required. Ensure
system is vented before disconnecting.
4. Reattach dust cap on male coupler
after use.
We reserve the right to modify product specifications without prior notice.
4
HC308-INS-01 0419 © Oasis Engineering Limited
Page 5

Operation Instructions
Warning!
Do not use excessive impact or twisting force to try and remove
coupler if frozen. Doing so may damage the coupler or cause fixed
connections to come loose. To aid use of the coupler when ice is
present use HC308-COVER (sold separately).
Oasis recommends the use of the following PPE when
operating coupler:
Stand clear of coupler when in use.
We reserve the right to modify product specifications without prior notice.
5
HC308-INS-01 0419 © Oasis Engineering Limited
Page 6

Servicing Instructions
Service Kit Parts
Poppet spring
1x Backup O-ring
The Complete Oasis Seal Kit must be used
Male poppet
(pre - assembled)
1x Body O-ring
Tools Required
1x 916 O ring
Silicone Grease
Rocol MX22 or similar
(For all O-rings)
Cleaner (Warm Soapy
Water or Similar)
Spanner/
Wrenches
(60mm)
We reserve the right to modify product specifications without prior notice.
Pick Tool
Torque Wrench
6
Anti Seize Grease
(Loctite 771 or Similar)
For All Threads
Vice
HC308-INS-01 0419 © Oasis Engineering Limited
Page 7

Disassembly
1. Clamp male coupler in vice.
2. Remove 916 O ring and discard.
3. Unscrew end cap from body.
4. Remove end cap.
We reserve the right to modify product specifications without prior notice.
7
HC308-INS-01 0419 © Oasis Engineering Limited
Page 8
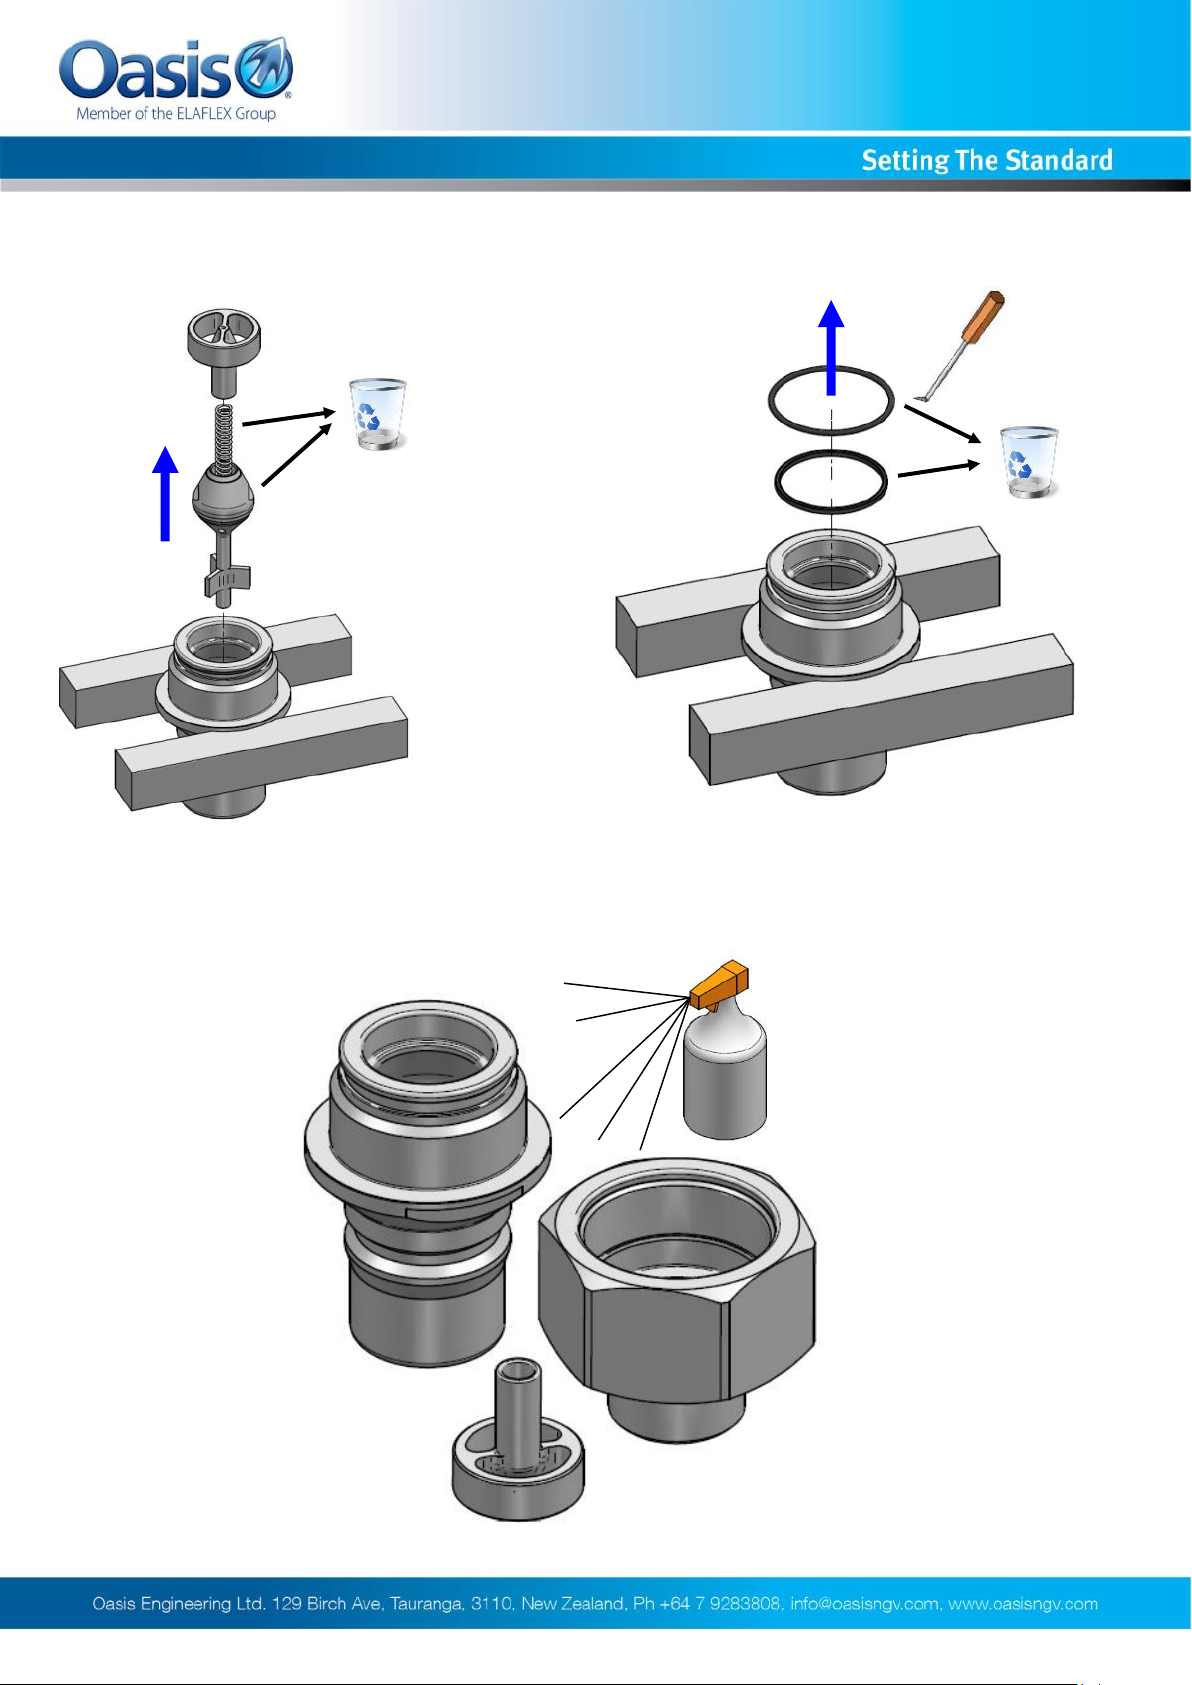
Disassembly
5. Remove and discard the
poppet and spring.
6. Pick out the O-ring and backup and
discard. Be careful not to damage body.
7. Clean all components and inspect for damage. In particular
the sealing faces, poppet retainer and coupler profile.
We reserve the right to modify product specifications without prior notice.
8
HC308-INS-01 0419 © Oasis Engineering Limited
Page 9

Assembly
1. Install O ring and backup. 2. Install the new poppet, spring and retainer.
O-ring
Backup
3. Screw end cap back into body.
4. Torque end cap to 200 Nm
(147.5 ft lb).
We reserve the right to modify product specifications without prior notice.
9
HC308-INS-01 0419 © Oasis Engineering Limited
Page 10
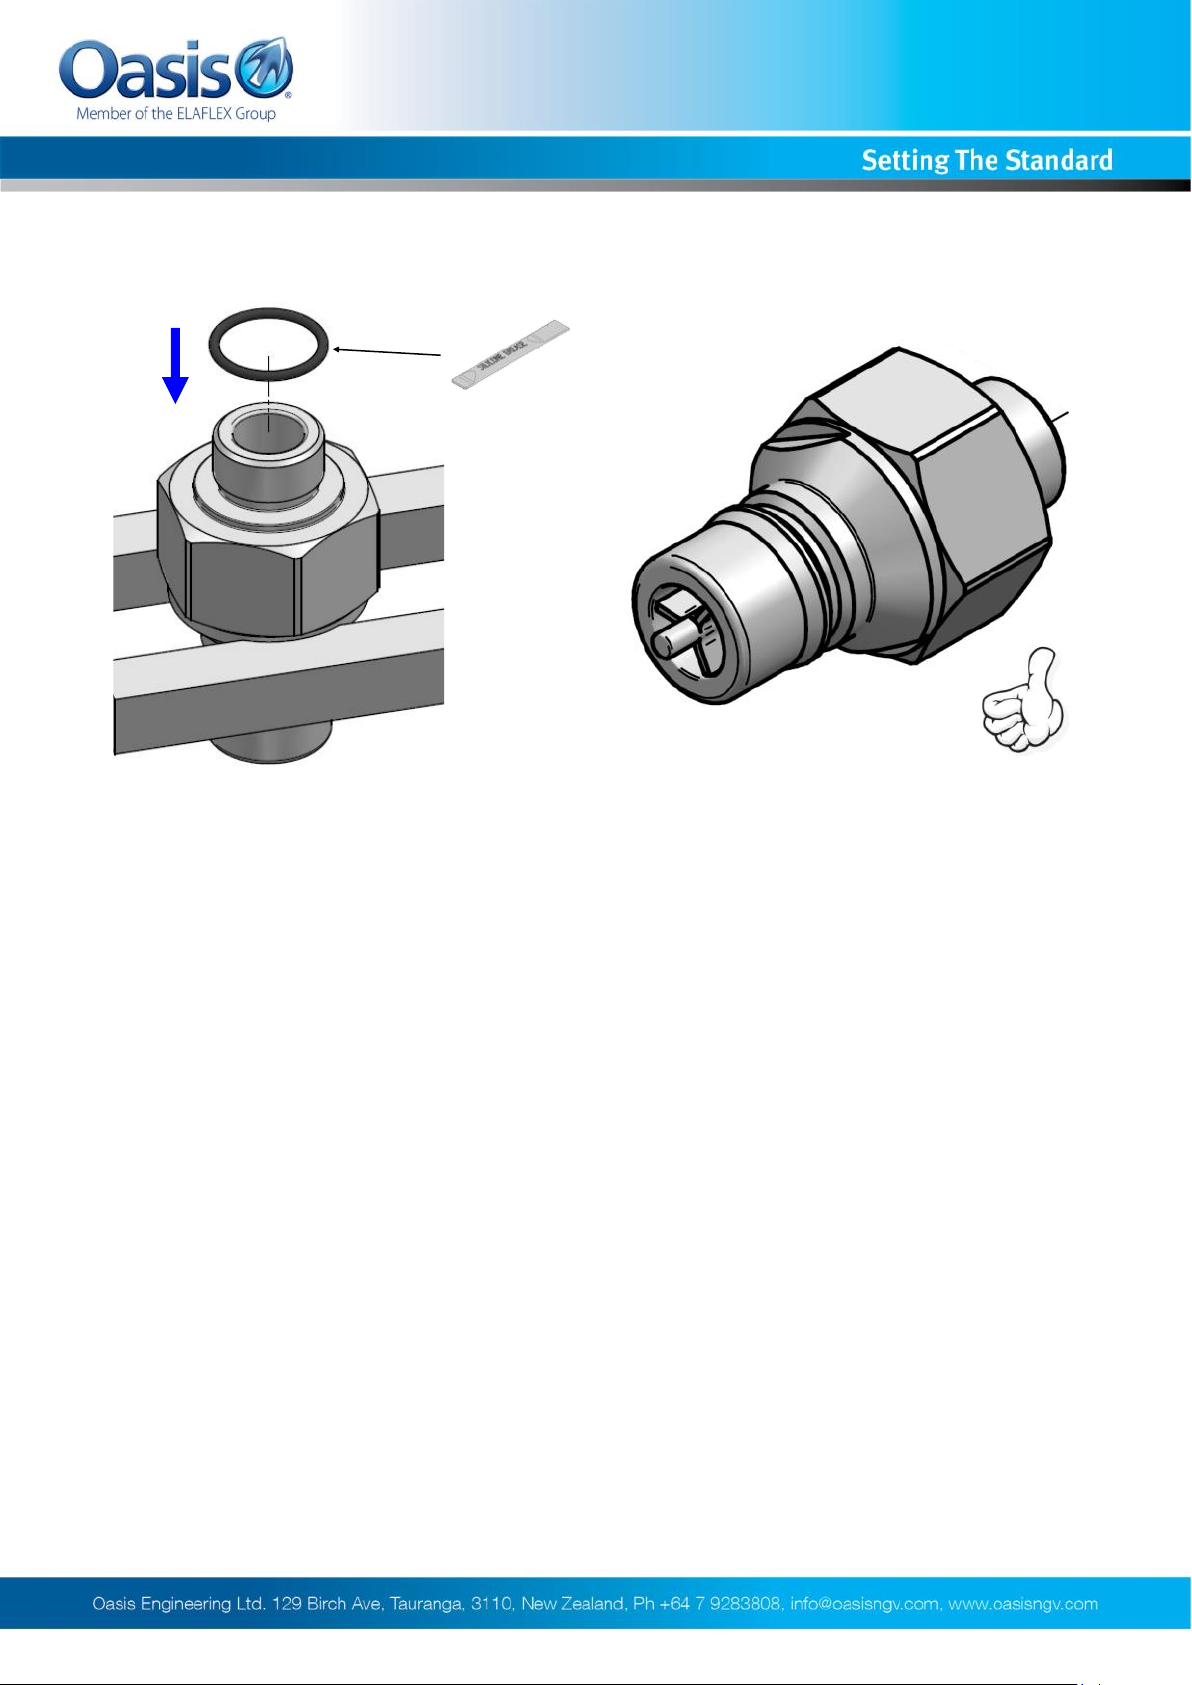
Assembly
5. Replace 916 O-ring.
6. Servicing of coupler complete.
Refer to installation instructions for re-fitment of coupler.
We reserve the right to modify product specifications without prior notice.
10
HC308-INS-01 0419 © Oasis Engineering Limited
Page 11

Accessories
Accessories Available
HC308-SDC — SAE Male dust cap
We reserve the right to modify product specifications without prior notice.
11
HC308-INS-01 0419 © Oasis Engineering Limited
 Loading...