

Page 1
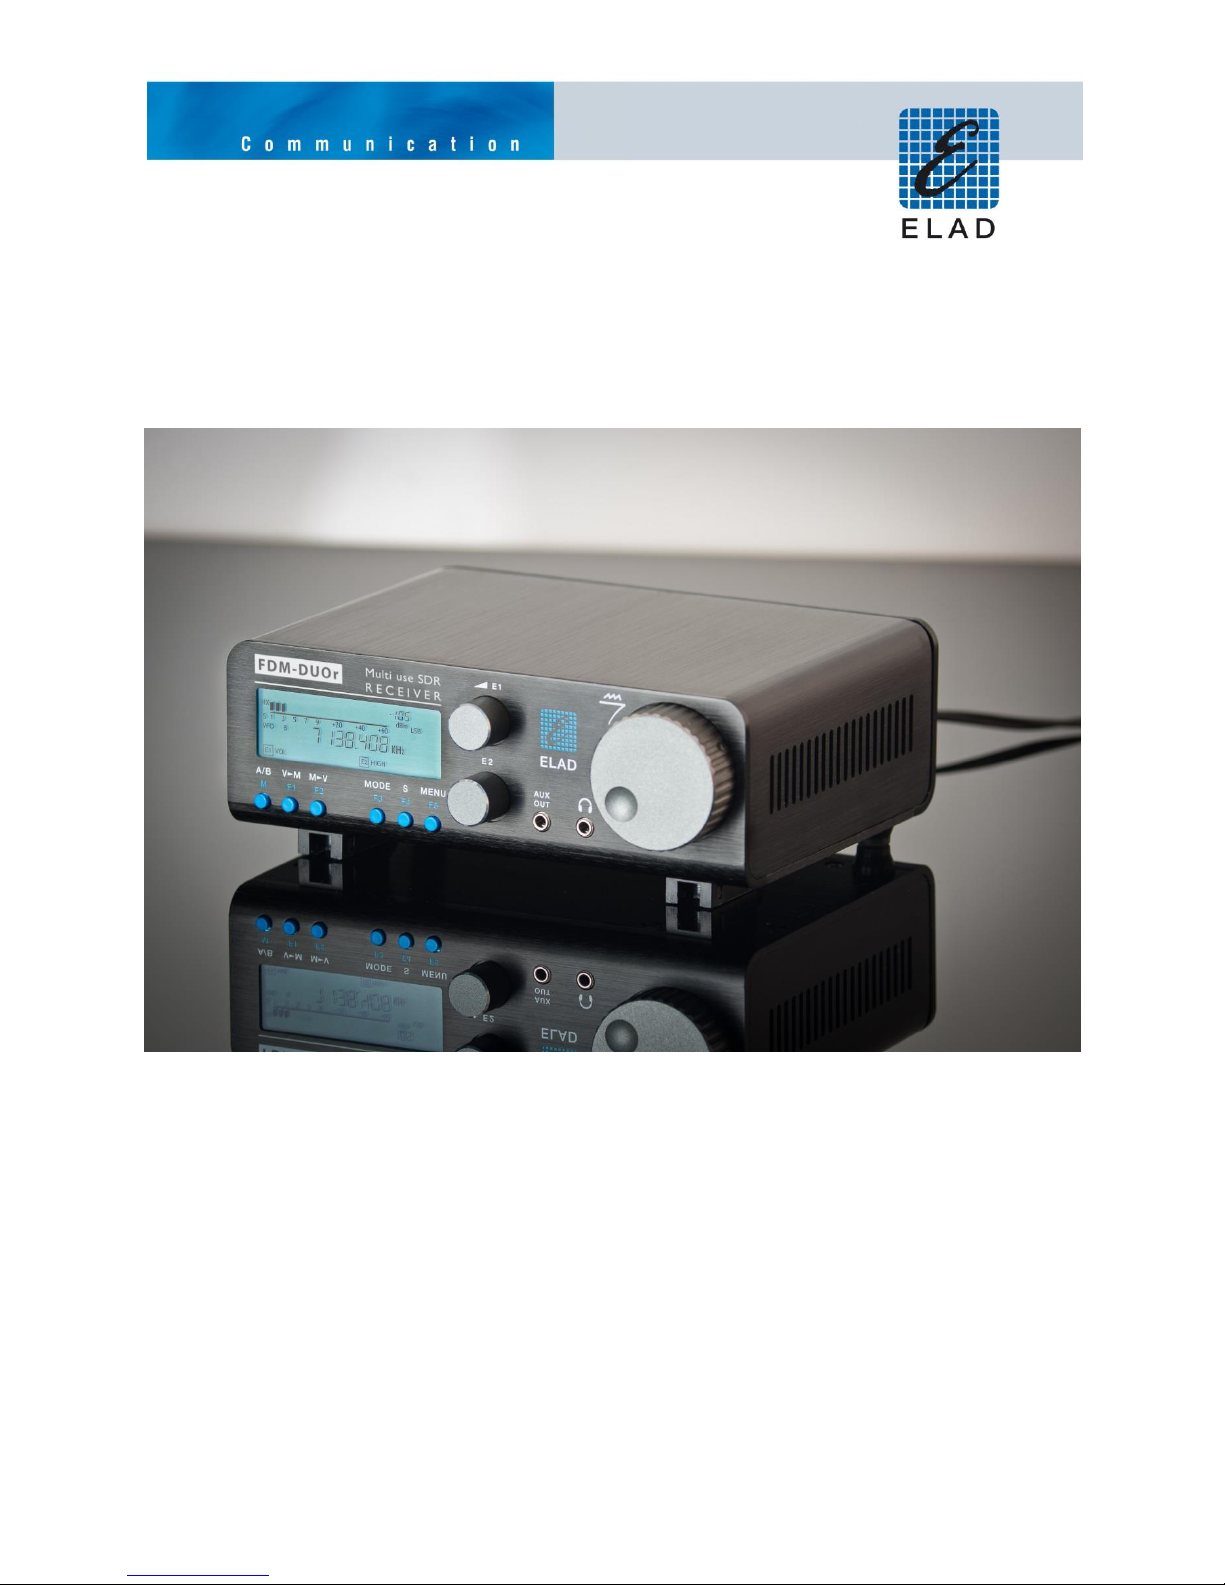
ELAD FDM-DUOr
Dual Mode SDR Receiver
USER MANUAL
www.eladit.com
Page 2

ELAD FDM-DUOr User Manual Rev 0.04 12/2014
1 Index
2 FDM-DUOr Overview ............................................................................................................................ 4
2.1 Notice ............................................................................................................................................ 4
2.2 Firmware versions ......................................................................................................................... 4
2.3 Introduction .................................................................................................................................. 4
2.3.1 Main Features ....................................................................................................................... 4
2.3.2 Block Diagram ....................................................................................................................... 5
2.4 Precautions ................................................................................................................................... 6
3 Hardware Description ........................................................................................................................... 7
3.1 Front Panel Description ................................................................................................................ 7
3.2 Rear Panel Description .................................................................................................................. 8
3.3 Internal Hardware Description ................................................................................................... 10
3.3.1 ELAD Filter Module Family .................................................................................................. 11
3.3.2 FPCB-B3 Module Schematic ................................................................................................ 11
3.3.3 FPCB-H5 Module Schematic ................................................................................................ 12
4 LCD ...................................................................................................................................................... 13
5 Quick Start ........................................................................................................................................... 14
6 User Interface ..................................................................................................................................... 15
6.1 VFO Mode ................................................................................................................................... 15
6.1.1 Tuning.................................................................................................................................. 15
6.1.2 E1 Receiver Settings ............................................................................................................ 16
6.1.3 E2 Receiver Settings ............................................................................................................ 16
6.1.4 Switch VFO .......................................................................................................................... 16
6.1.5 Store VFO to memory ......................................................................................................... 16
6.1.6 “QuickMem” mode ............................................................................................................. 17
6.1.7 VFO-A = VFO-B .................................................................................................................... 17
6.1.8 Change Operating Mode ..................................................................................................... 17
6.1.9 “QuickStep” ......................................................................................................................... 17
6.2 MEM Mode ................................................................................................................................. 18
6.2.1 Select and edit a memory ................................................................................................... 18
6.2.2 Delete a memory................................................................................................................. 18
6.2.3 Set memory to VFO ............................................................................................................. 18
6.2.4 Change the memory display mode ..................................................................................... 19
6.3 Knobs functions ........................................................................................................................... 20
© 2014 ELAD S.r.l. All rights reserved. No part of this document may be reproduced, published, used, disclosed or disseminated in any form or
by any means, electronic, photocopying or otherwise, without prior written permission of ELAD S.r.l.
2
Page 3

ELAD FDM-DUOr User Manual Rev 0.04 12/2014
6.4 Keys functions ............................................................................................................................. 21
6.5 Settings Menu List ....................................................................................................................... 22
6.5.1 Frequency visualization offset menu .................................................................................. 23
7 CAT Remote Control ........................................................................................................................... 24
7.1 Introduction ................................................................................................................................ 24
7.2 Computer control commands ..................................................................................................... 24
7.3 CAT Commands List ..................................................................................................................... 25
7.3.1 Active commands list .......................................................................................................... 25
7.3.2 Active commands tables ..................................................................................................... 26
7.3.3 Parameters details .............................................................................................................. 33
7.3.4 Dummy commands tables .................................................................................................. 34
8 Software & Driver Installation ............................................................................................................ 41
8.1 Software installation ................................................................................................................... 41
8.1.1 First-time install in Windows 8 and Windows 7 ................................................................. 41
8.1.2 First-time install in Windows XP ......................................................................................... 46
8.1.3 Update an existing software version .................................................................................. 49
8.2 USB driver ................................................................................................................................... 50
8.2.1 USB driver installation in Windows 8 and Windows 7 ........................................................ 50
8.2.2 USB driver installation in Windows XP ................................................................................ 53
8.2.3 USB CAT Serial port ............................................................................................................. 64
9 Firmware update ................................................................................................................................. 65
9.1 User interface firmware update ................................................................................................. 65
9.2 RX demodulator firmware update .............................................................................................. 67
9.3 USB interface firmware update .................................................................................................. 69
9.4 FPGA DDC update ....................................................................................................................... 69
Declaration of Conformity (EC) ................................................................................................................... 70
© 2014 ELAD S.r.l. All rights reserved. No part of this document may be reproduced, published, used, disclosed or disseminated in any form or
by any means, electronic, photocopying or otherwise, without prior written permission of ELAD S.r.l.
3
Page 4

ELAD FDM-DUOr User Manual Rev 0.04 12/2014
RX Demodulator
User Interface
USB Interface
FPGA
Ver: 1.08
Date: 12/19/2014
Ver: 4.17
Date: 12/18/2014
Ver: 4.08
Date: 09/18/2014
Ver: 2.00
Date: 07/30/2014
2 FDM-DUOr Overview
2.1 Notice
Amateur radio regulations vary from country to country. Confirm your local amateur radio regulations
and requirements before operating the ELAD FDM-DUOr.
2.2 Firmware versions
The features described in this manual refers the following firmware versions :
2.3 Introduction
Thank you for choosing the FDM-DUOr. It is an innovative dual mode SDR receiver covering the
frequency range from 9kHz to 54MHz. The FDM-DUOr can be used like a standard receiver in standalone mode or connect to a PC to exploit the full potential of the ELAD FDM-SW2 software.
2.3.1 Main Features
Frequency range: RX 9kHz to 54MHz direct sampling receiver
Double antenna connectors (RX input and TX input)
11 slot for user selectable filters
Operating Modes: CW LSB USB AM
ADC Linear LTC2165,16bit @122.88MHz
DDC FPGA Spartan 6 XC6SLX25 + Serial Flash for stand-alone mode
Stand-alone RX demodulator with STM32F4 ARM floating point μController
LPC1766 Cortex M3 for LCD & Keyboard control
Clocking source Si5338 driven by 10MHz TCXO or External reference input
CAT USB interface with FTDI controller
© 2014 ELAD S.r.l. All rights reserved. No part of this document may be reproduced, published, used, disclosed or disseminated in any form or
by any means, electronic, photocopying or otherwise, without prior written permission of ELAD S.r.l.
4
Page 5
ELAD FDM-DUOr User Manual Rev 0.04 12/2014
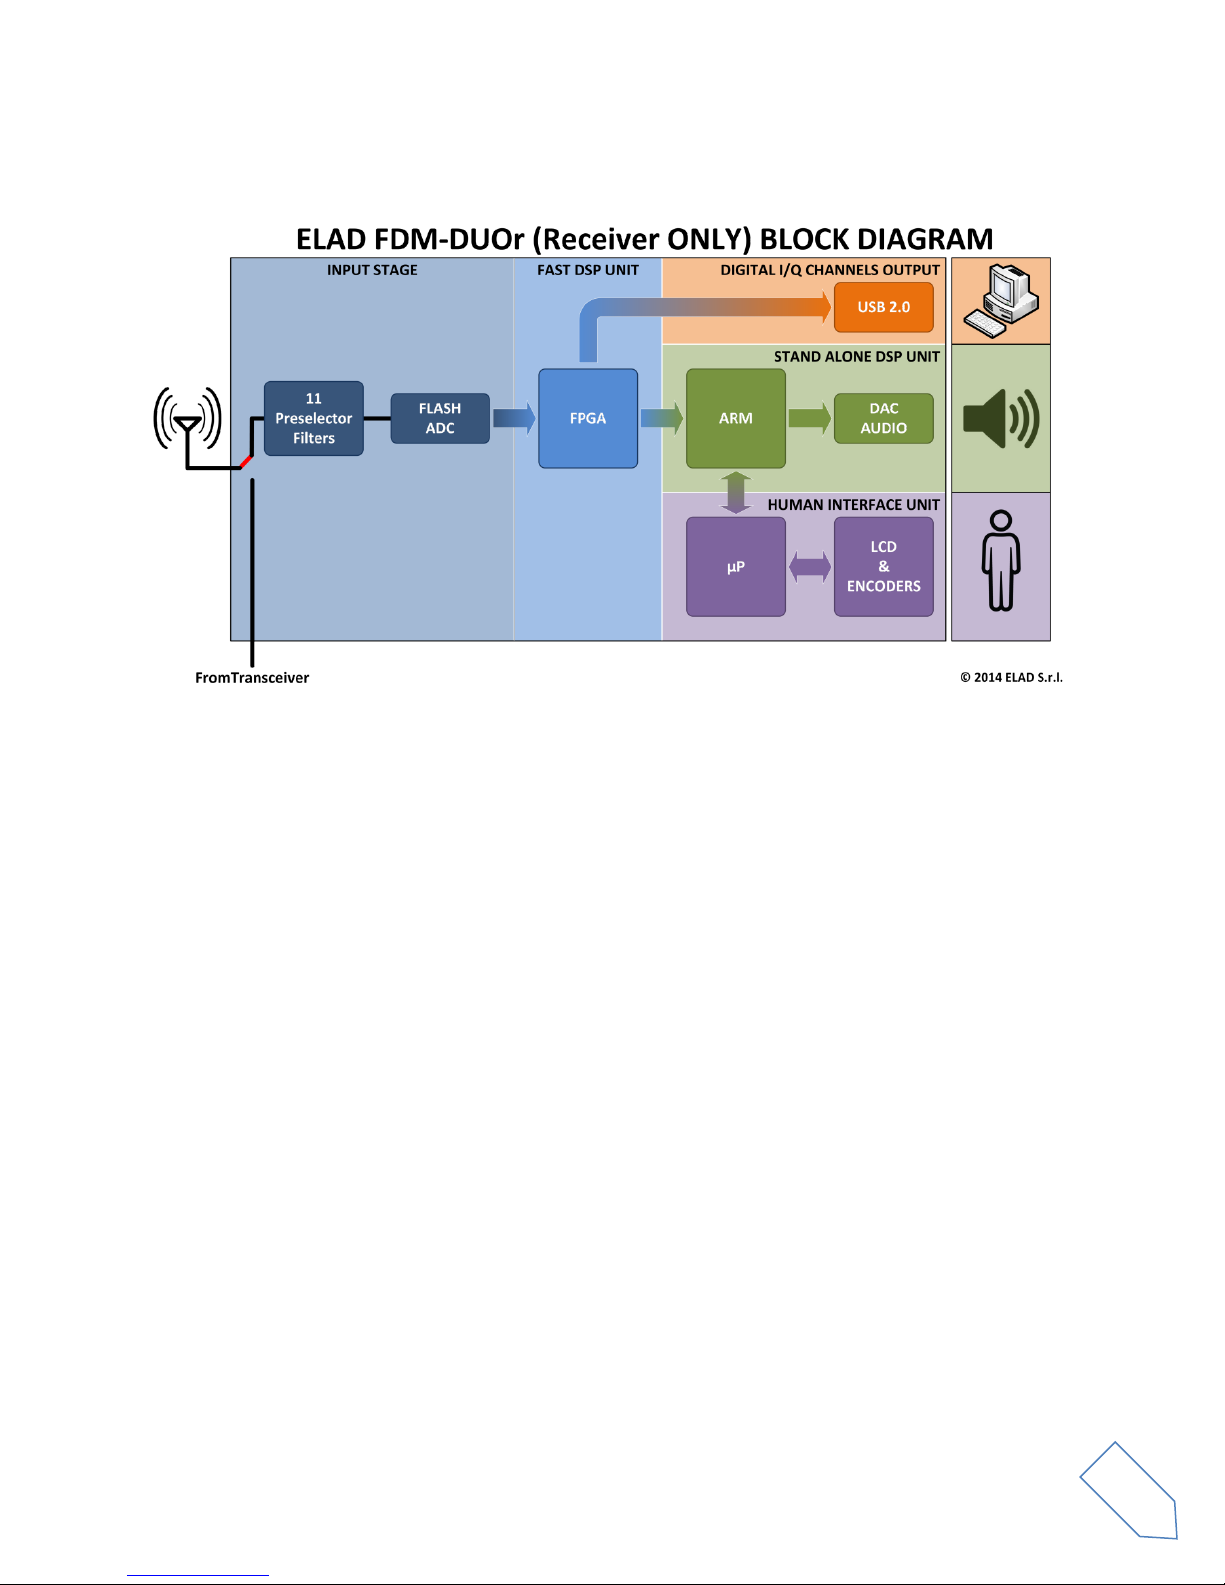
2.3.2 Block Diagram
© 2014 ELAD S.r.l. All rights reserved. No part of this document may be reproduced, published, used, disclosed or disseminated in any form or
by any means, electronic, photocopying or otherwise, without prior written permission of ELAD S.r.l.
5
Page 6

ELAD FDM-DUOr User Manual Rev 0.04 12/2014
2.4 Precautions
Connect the receiver only to a power source described in this manual.
Take care when plugging in cables, avoid applying sideways pressure that might damage the
connectors.
Avoid operating in wet conditions.
For better performance and safety, connect the receiver to good earth ground using a short,
heavy, braided cable.
Ground all outdoor antennas for this receiver using approved methods. Grounding helps protect
against voltage surges caused by lightning. It also reduces the chance of build-up of static
charge.
© 2014 ELAD S.r.l. All rights reserved. No part of this document may be reproduced, published, used, disclosed or disseminated in any form or
by any means, electronic, photocopying or otherwise, without prior written permission of ELAD S.r.l.
6
Page 7
ELAD FDM-DUOr User Manual Rev 0.04 12/2014
3 Hardware Description
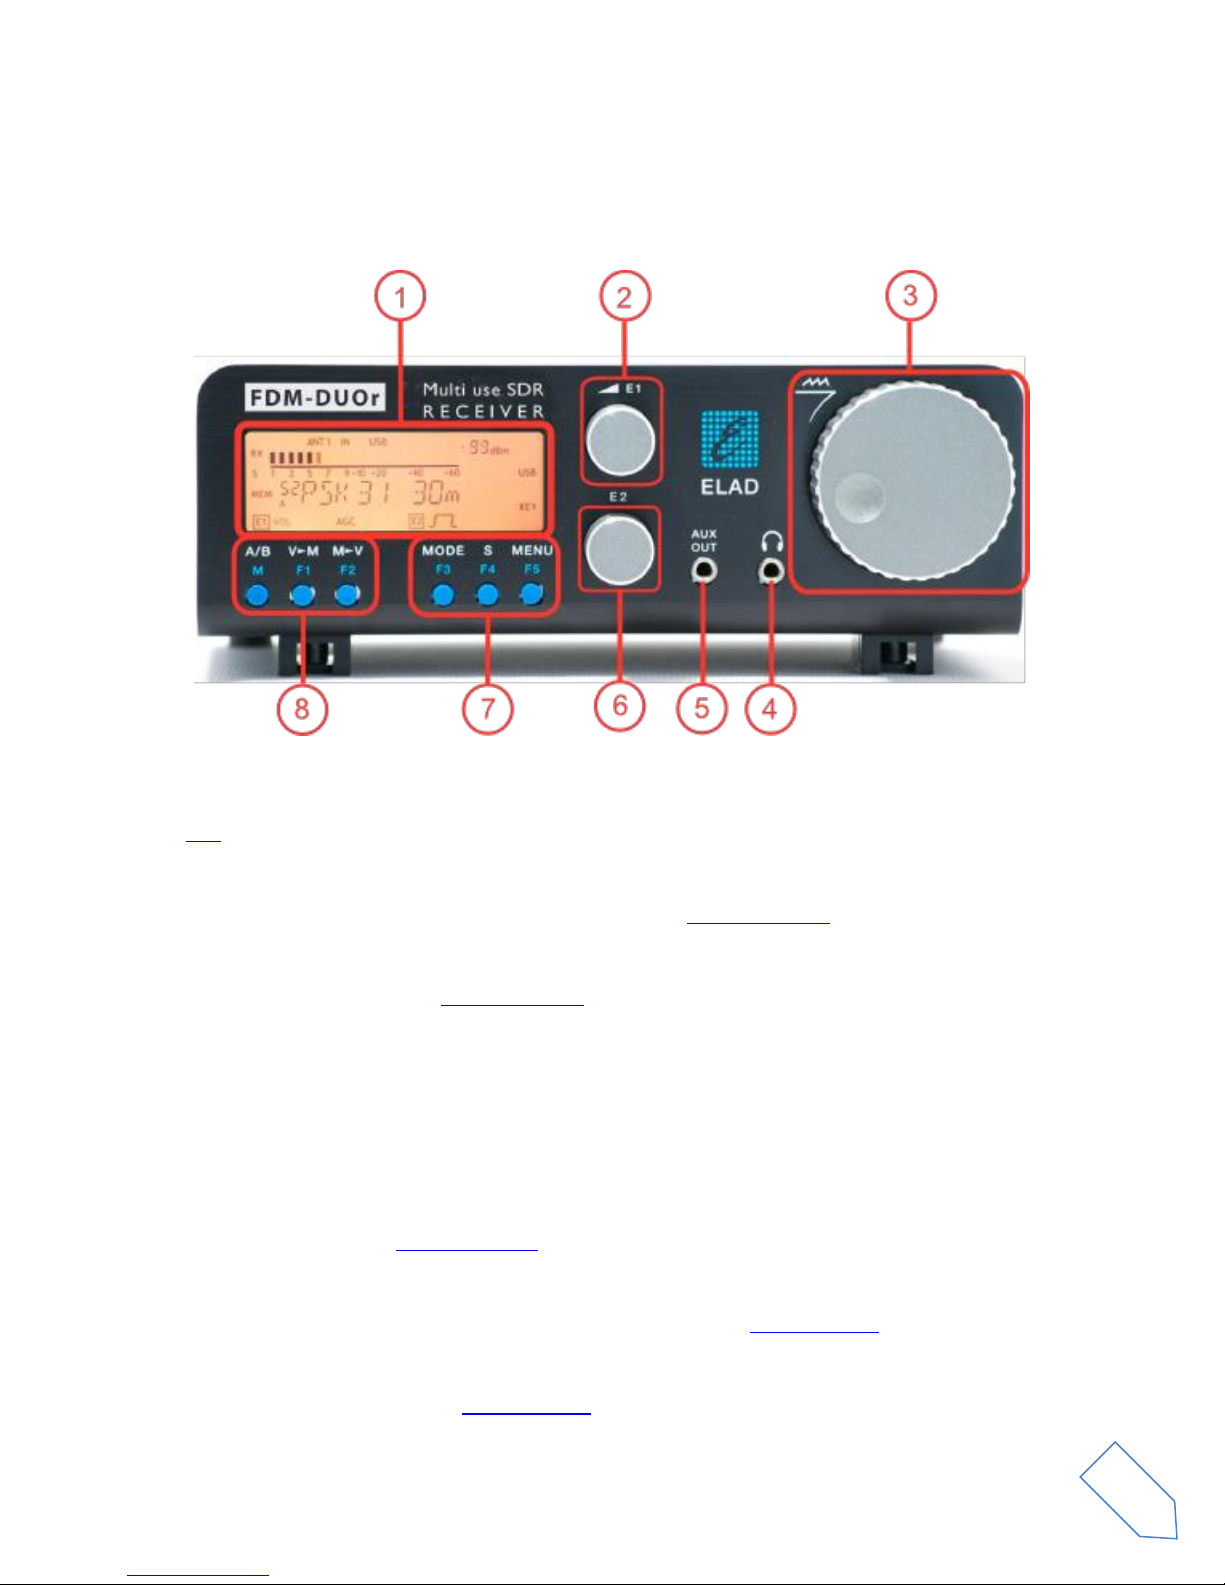
3.1 Front Panel Description
1 - LCD Display
See LCD.
2 - E1 Knob
Audio volume , AGC, noise reduction, noise blanker control. Knobs functions
3 - Main Knob
Main VFO and MEM control. See Knobs functions
4 - Speaker/Headphones Audio Output
The main FDM-DUOr audio output.
5 - Auxiliary Output
Auxiliary audio output.
6 - E2 Knob
Filter and pitch control. See Knobs functions
7 - MODE and MENU buttons
Change operating mode and enter the FDM-DUOr setup menu. See Keys functions
8 - VFO and MEM buttons
Basic VFO Memory operations. See Keys functions
© 2014 ELAD S.r.l. All rights reserved. No part of this document may be reproduced, published, used, disclosed or disseminated in any form or
by any means, electronic, photocopying or otherwise, without prior written permission of ELAD S.r.l.
7
Page 8
ELAD FDM-DUOr User Manual Rev 0.04 12/2014
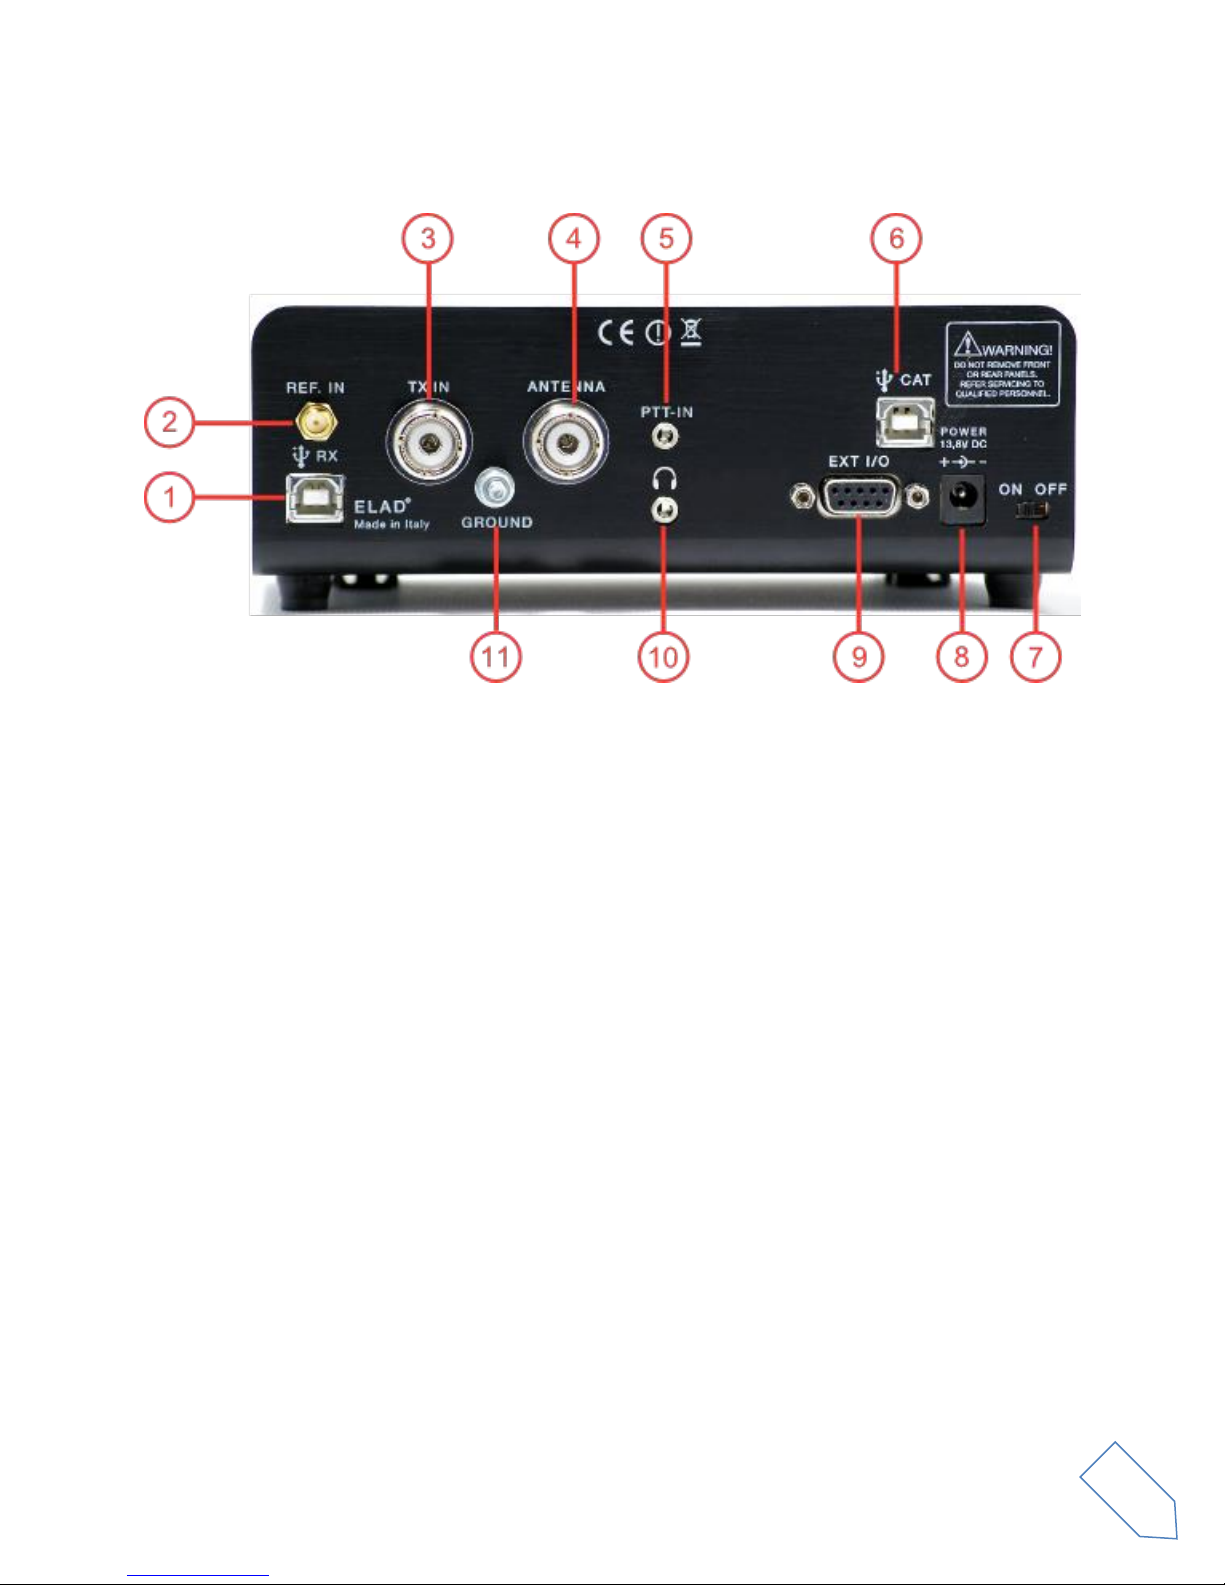
3.2 Rear Panel Description
1 - USB Receiver Data Connector
USB 2.0 port to connect with the PC. Please use the supplied cable.
2 - Frequency Reference Input
SMA 50 Ohm 10MHz, 0 dBm frequency reference input.
3 – TX IN Connector
M-type TX Input 50 Ohm antenna connector.
4 - Antenna Connector
M-type RX 50 Ohm antenna connector.
5 - PTT Input Connector
PTT Input to command the internal switch-box.
6 - CAT USB Serial Port
USB serial port for CAT communication.
7 - Power Switch
Turn On/Off the FDM-DUOr.
8 - Power supply
13.8V, 2.5A DC power supply connector.
© 2014 ELAD S.r.l. All rights reserved. No part of this document may be reproduced, published, used, disclosed or disseminated in any form or
by any means, electronic, photocopying or otherwise, without prior written permission of ELAD S.r.l.
8
Page 9
ELAD FDM-DUOr User Manual Rev 0.04 12/2014
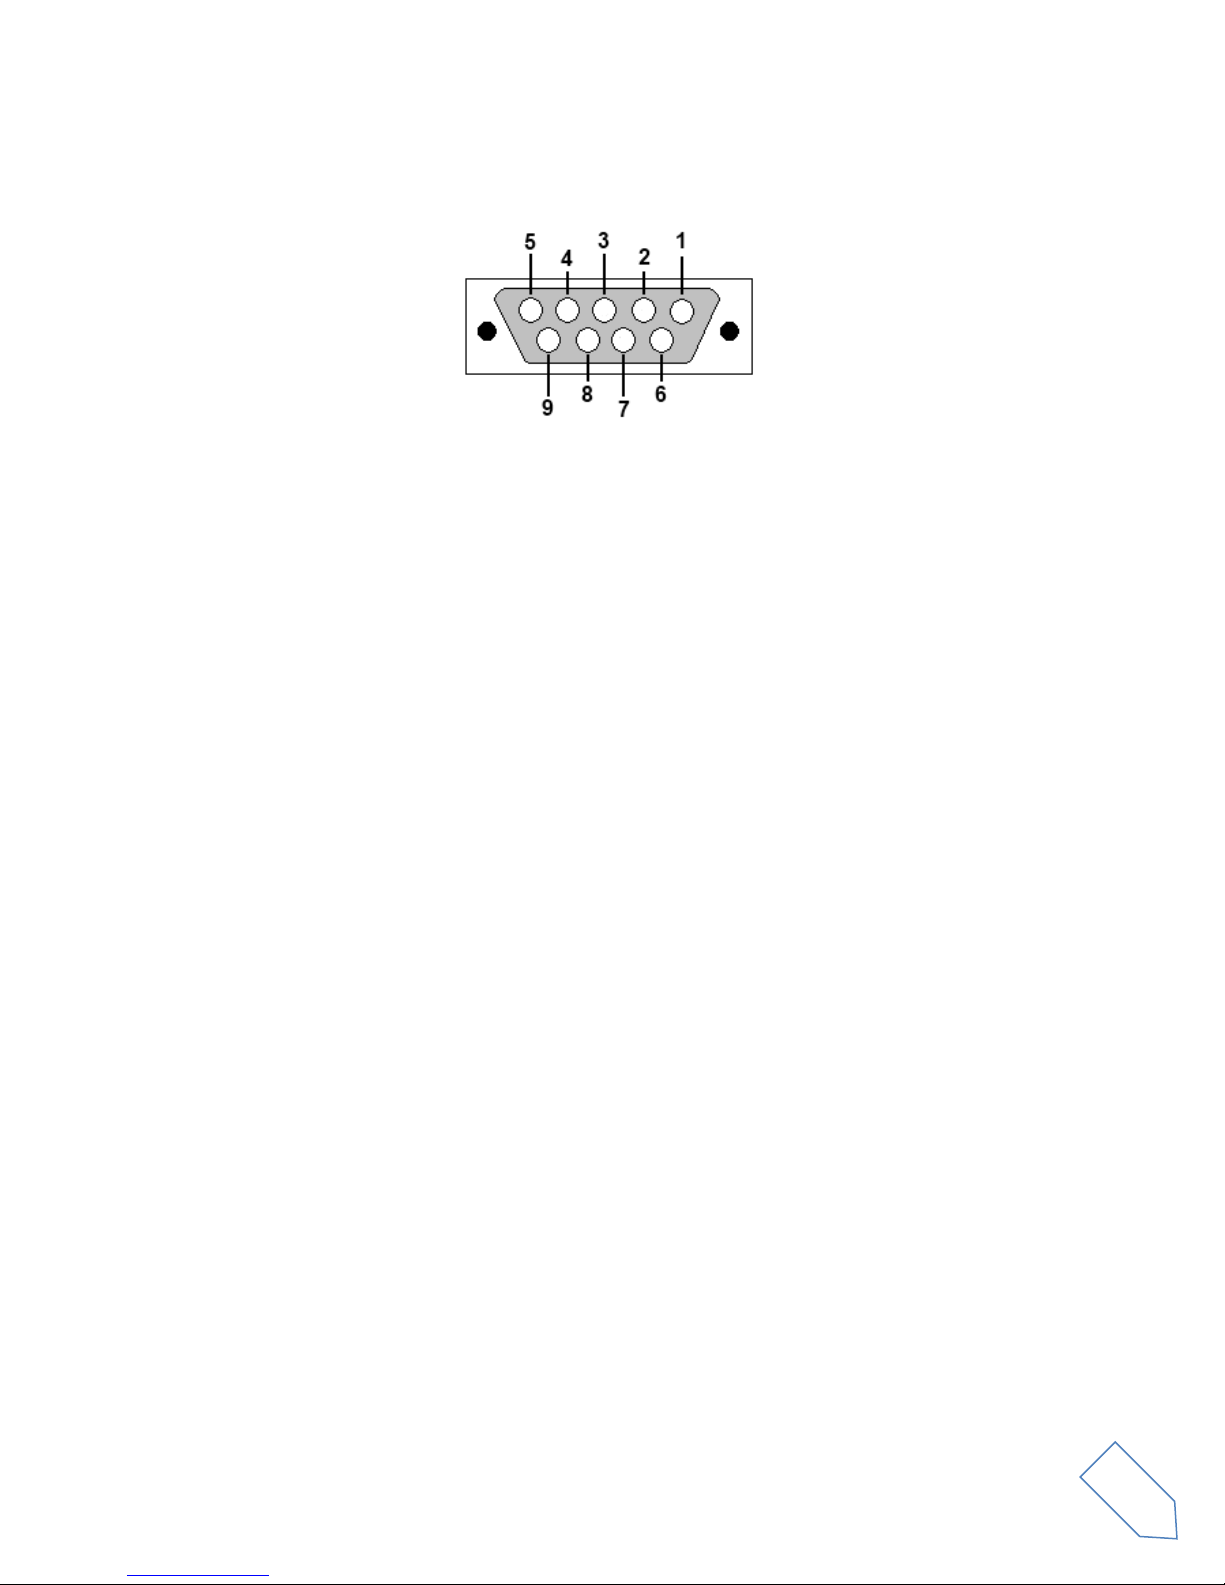
9 - Expansion Port
DB9 connector for external hardware. This is NOT a standard serial port.
Pin 1: SPI Latch
Pin 2: I2C SCL
Pin 3: SPI Clock
Pin 4: I2C SDA
Pin 5: Ground
Pin 6: TX Duo
Pin 7: RX Duo
Pin 8: SPI Data
Pin 9: +5V
10 – Speaker/Headphones Audio Output
The main FDM-DUOr audio output
11 – Ground Connector
For better performance and safety, connect to an earth ground using a short, heavy cable.
© 2014 ELAD S.r.l. All rights reserved. No part of this document may be reproduced, published, used, disclosed or disseminated in any form or
by any means, electronic, photocopying or otherwise, without prior written permission of ELAD S.r.l.
9
Page 10
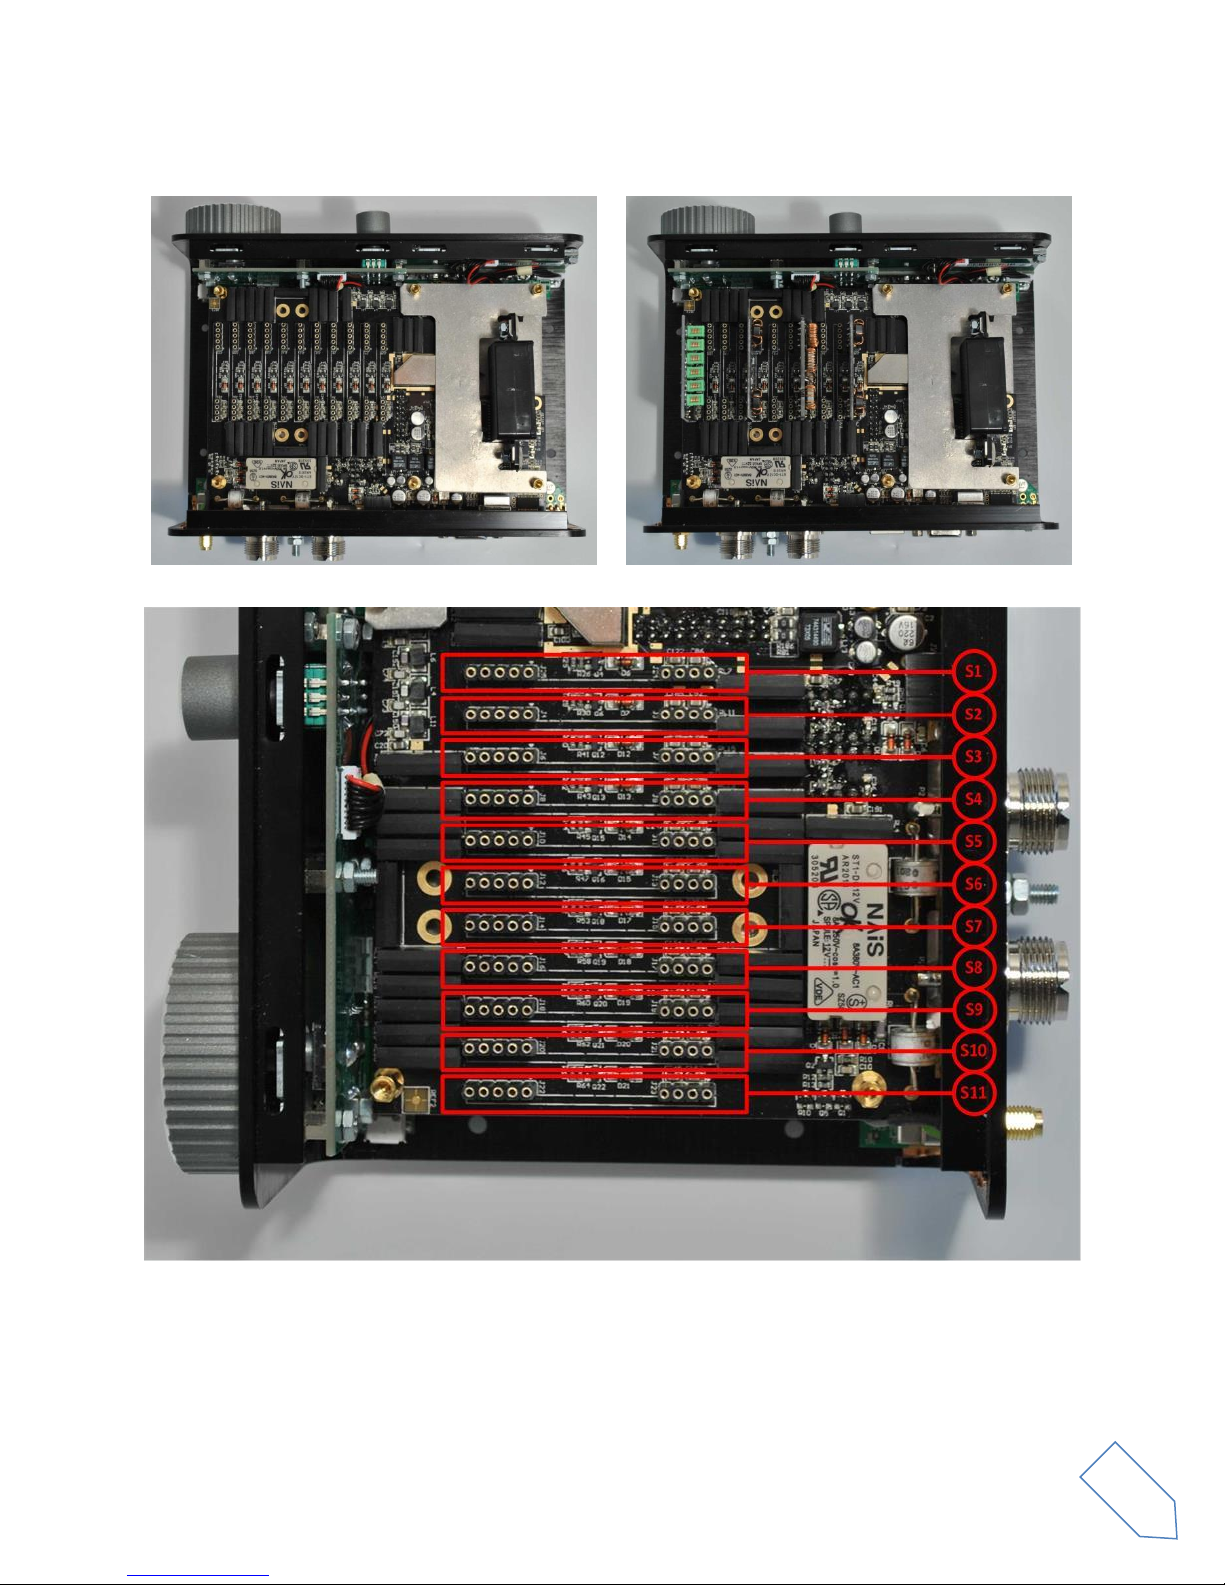
ELAD FDM-DUOr User Manual Rev 0.04 12/2014
Empty FDM-DUOr board
FDM-DUOr board with 3 filter modules
3.3 Internal Hardware Description
S1 ÷ S11
Eleven slots for filter modules from 1 to 11.
N.B. If FBPY Bypass module is used, it must be placed in Slot No. 11.
© 2014 ELAD S.r.l. All rights reserved. No part of this document may be reproduced, published, used, disclosed or disseminated in any form or
by any means, electronic, photocopying or otherwise, without prior written permission of ELAD S.r.l.
10
Page 11
ELAD FDM-DUOr User Manual Rev 0.04 12/2014
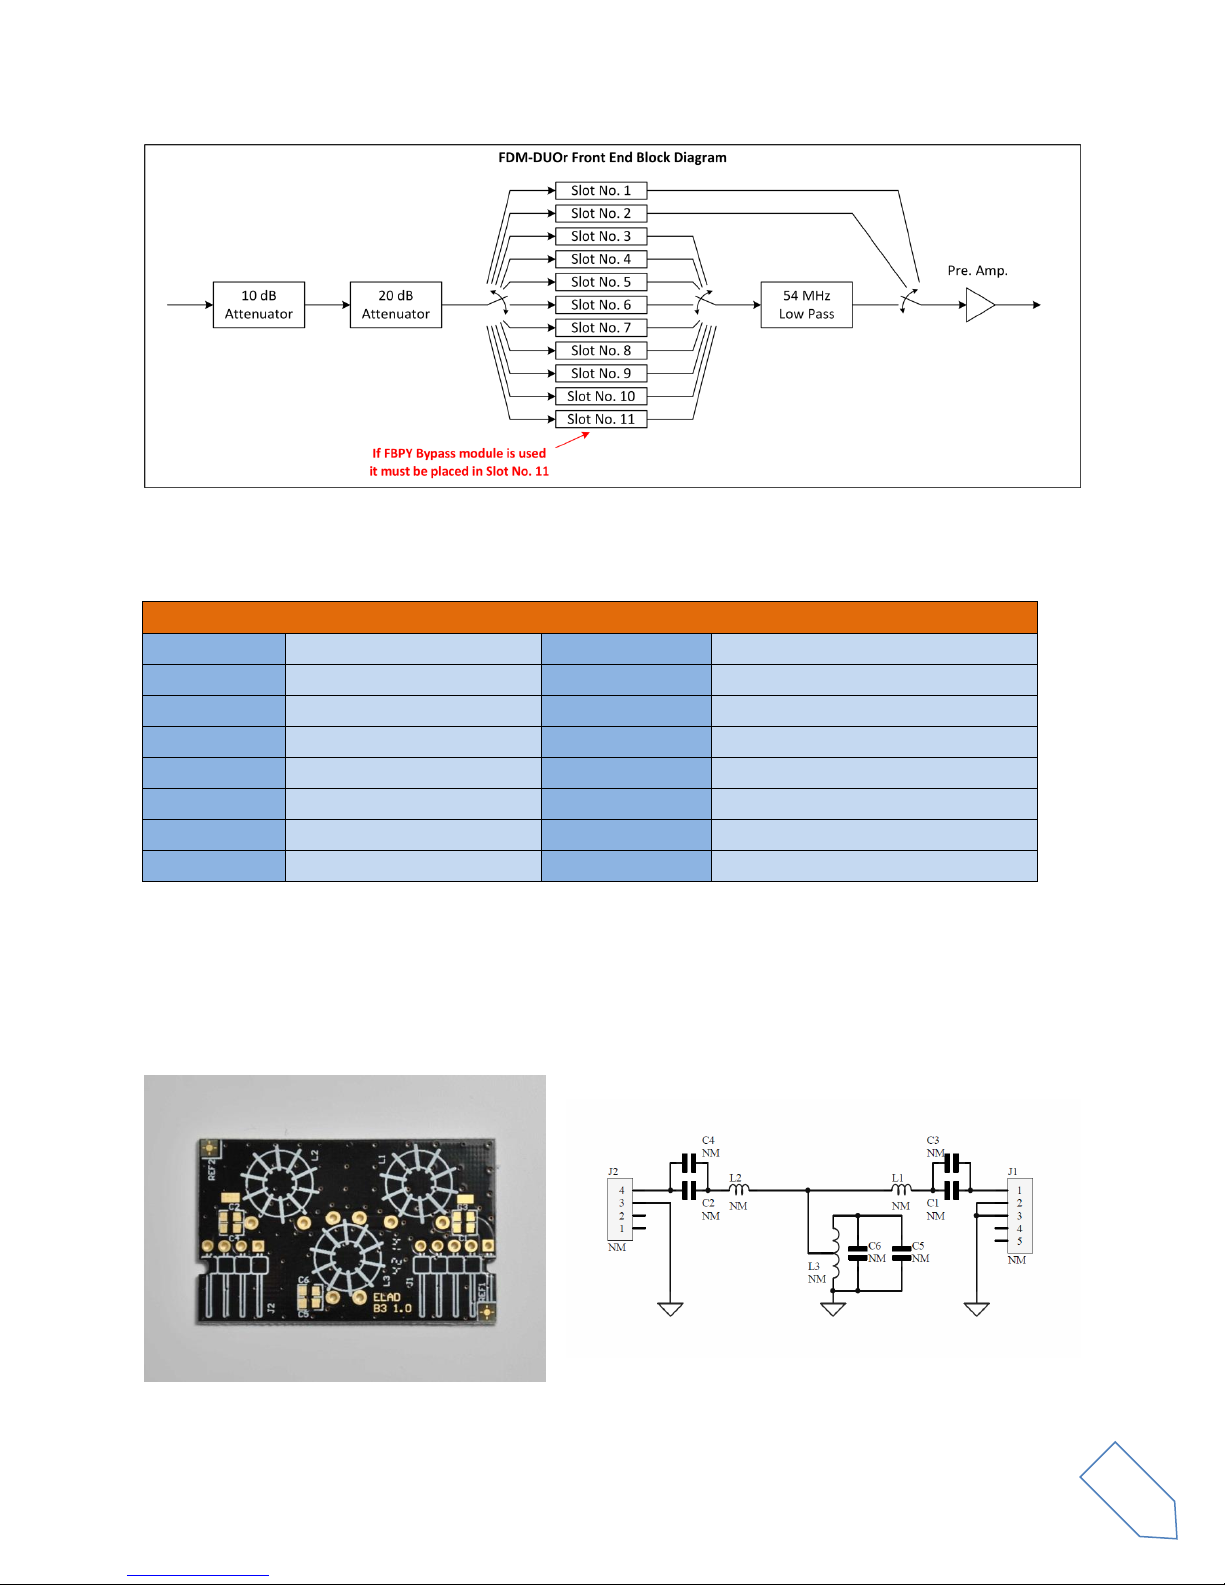
Actual SFP-08 available filter modules
(*)
Module Code
Module Description
Module Code
Module Description
FHP05M-1
High Pass 500 kHz
FBP17-1
Band Pass 17 m
FHP1M7-1
High Pass 1700 kHz
FBP15-1
Band Pass 15 m
FBP160-1
Band Pass 160 m
FBP12-1
Band Pass 12 m
FBP80-1
Band Pass 80 m
FBPY
Bypass module
(**)
FBP40-1
Band Pass 40 m
FPCB-B3
Empty module for self-made filters
FBP30-1
Band Pass 30 m
FPCB-H5
Empty module for self-made filters
FBP20-1
Band Pass 20 m
3.3.1 ELAD Filter Module Family
(*)
Please refer to ELAD website for updated list of filter modules.
(**)
Bypass module is included with the FDM-DUOr.
3.3.2 FPCB-B3 Module Schematic
© 2014 ELAD S.r.l. All rights reserved. No part of this document may be reproduced, published, used, disclosed or disseminated in any form or
by any means, electronic, photocopying or otherwise, without prior written permission of ELAD S.r.l.
11
Page 12
ELAD FDM-DUOr User Manual Rev 0.04 12/2014
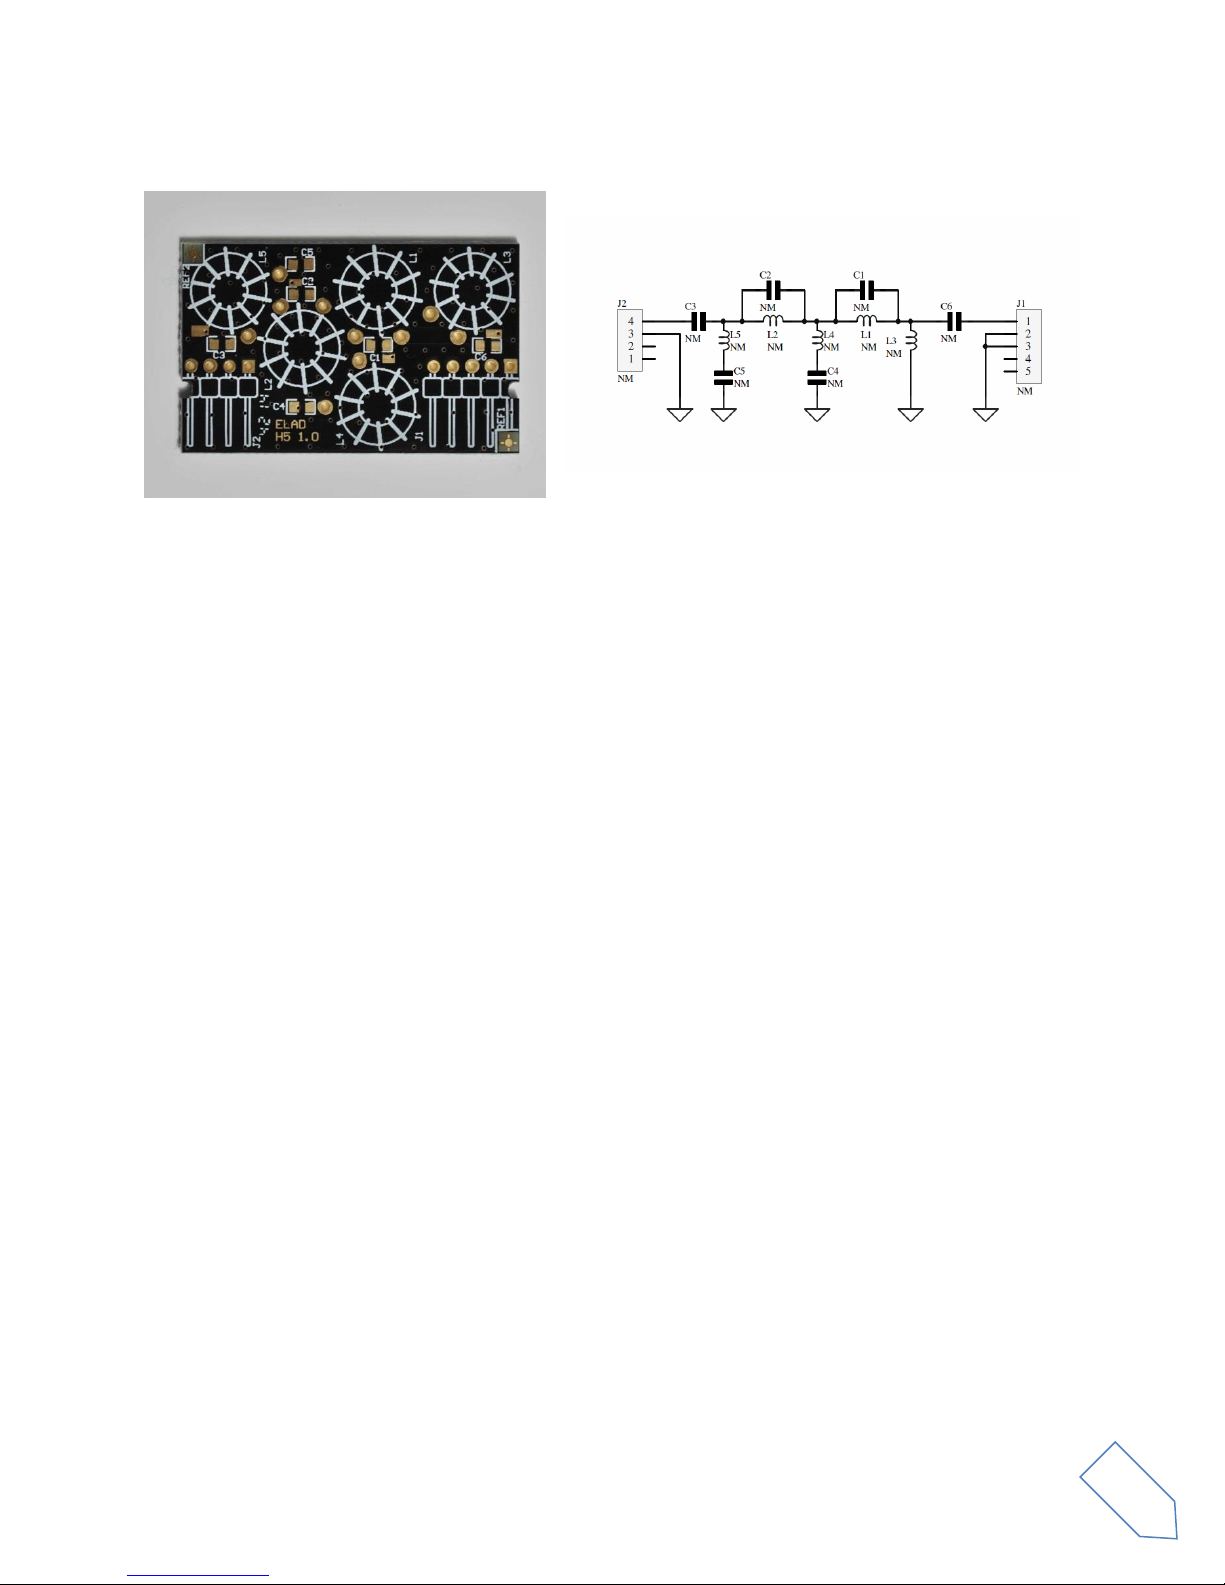
3.3.3 FPCB-H5 Module Schematic
© 2014 ELAD S.r.l. All rights reserved. No part of this document may be reproduced, published, used, disclosed or disseminated in any form or
by any means, electronic, photocopying or otherwise, without prior written permission of ELAD S.r.l.
12
Page 13
ELAD FDM-DUOr User Manual Rev 0.04 12/2014
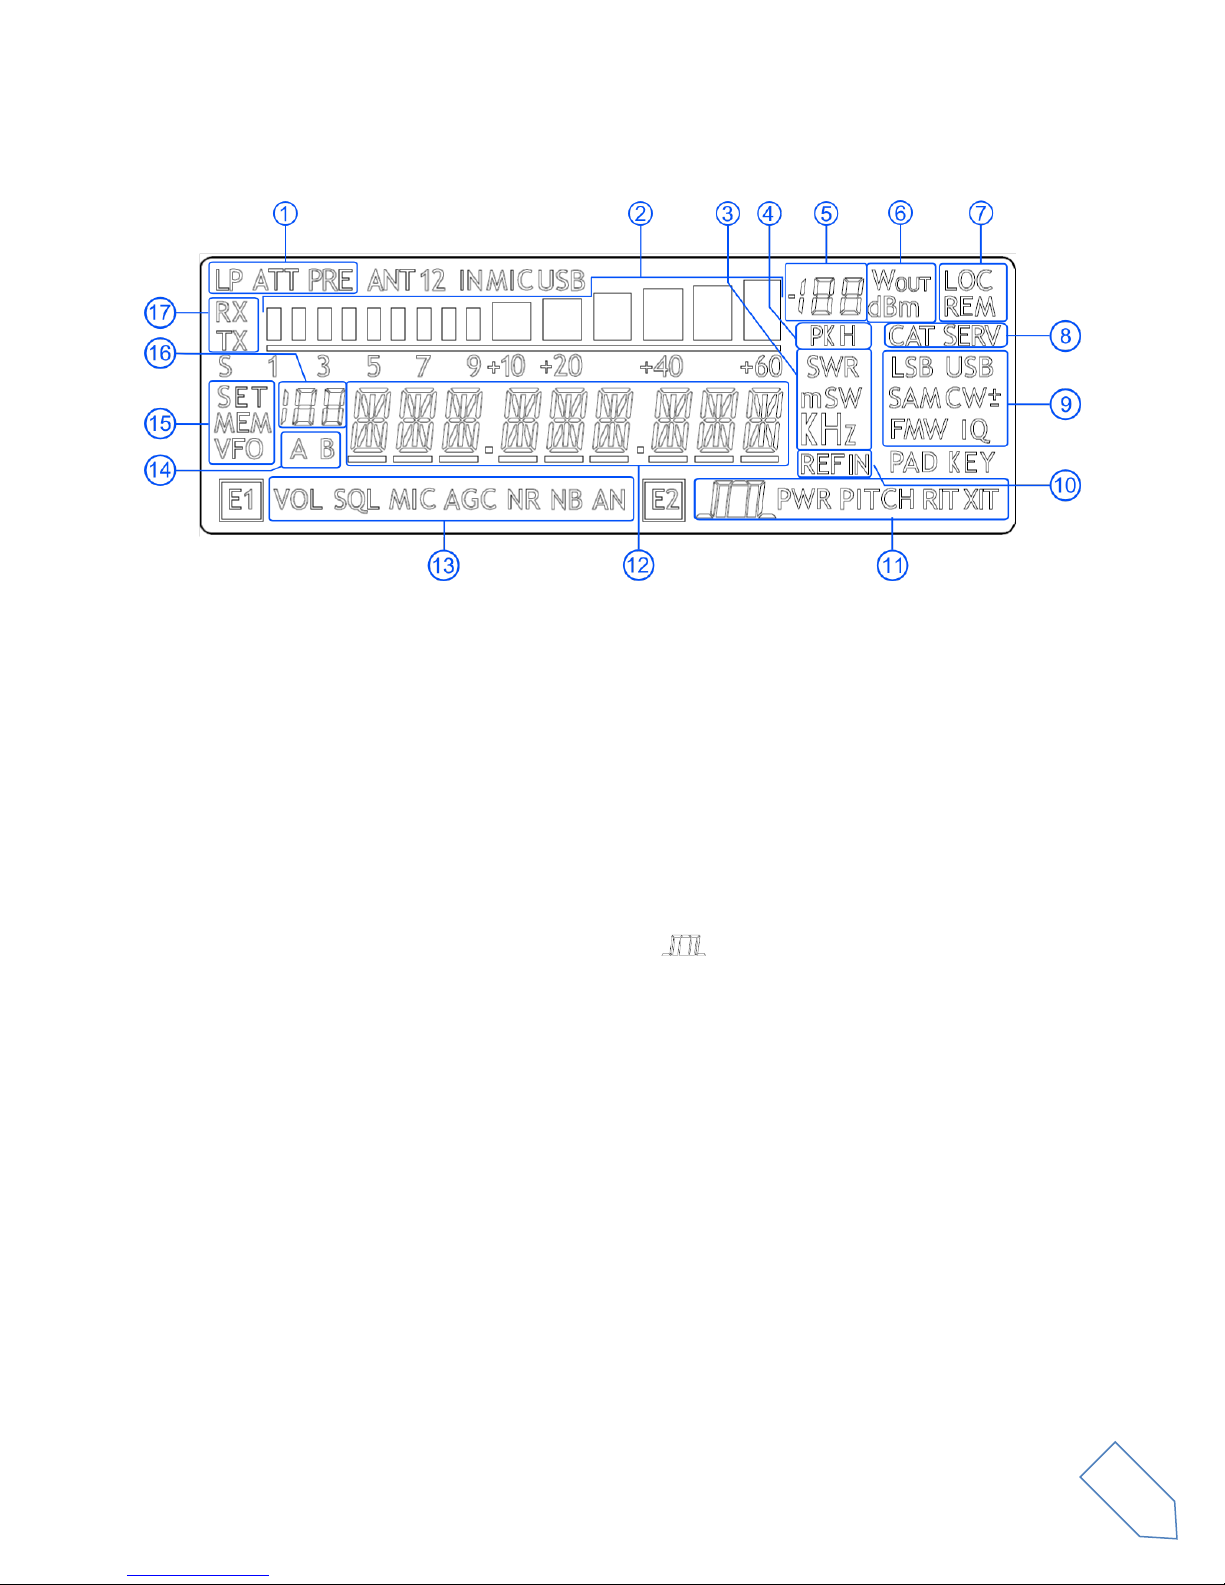
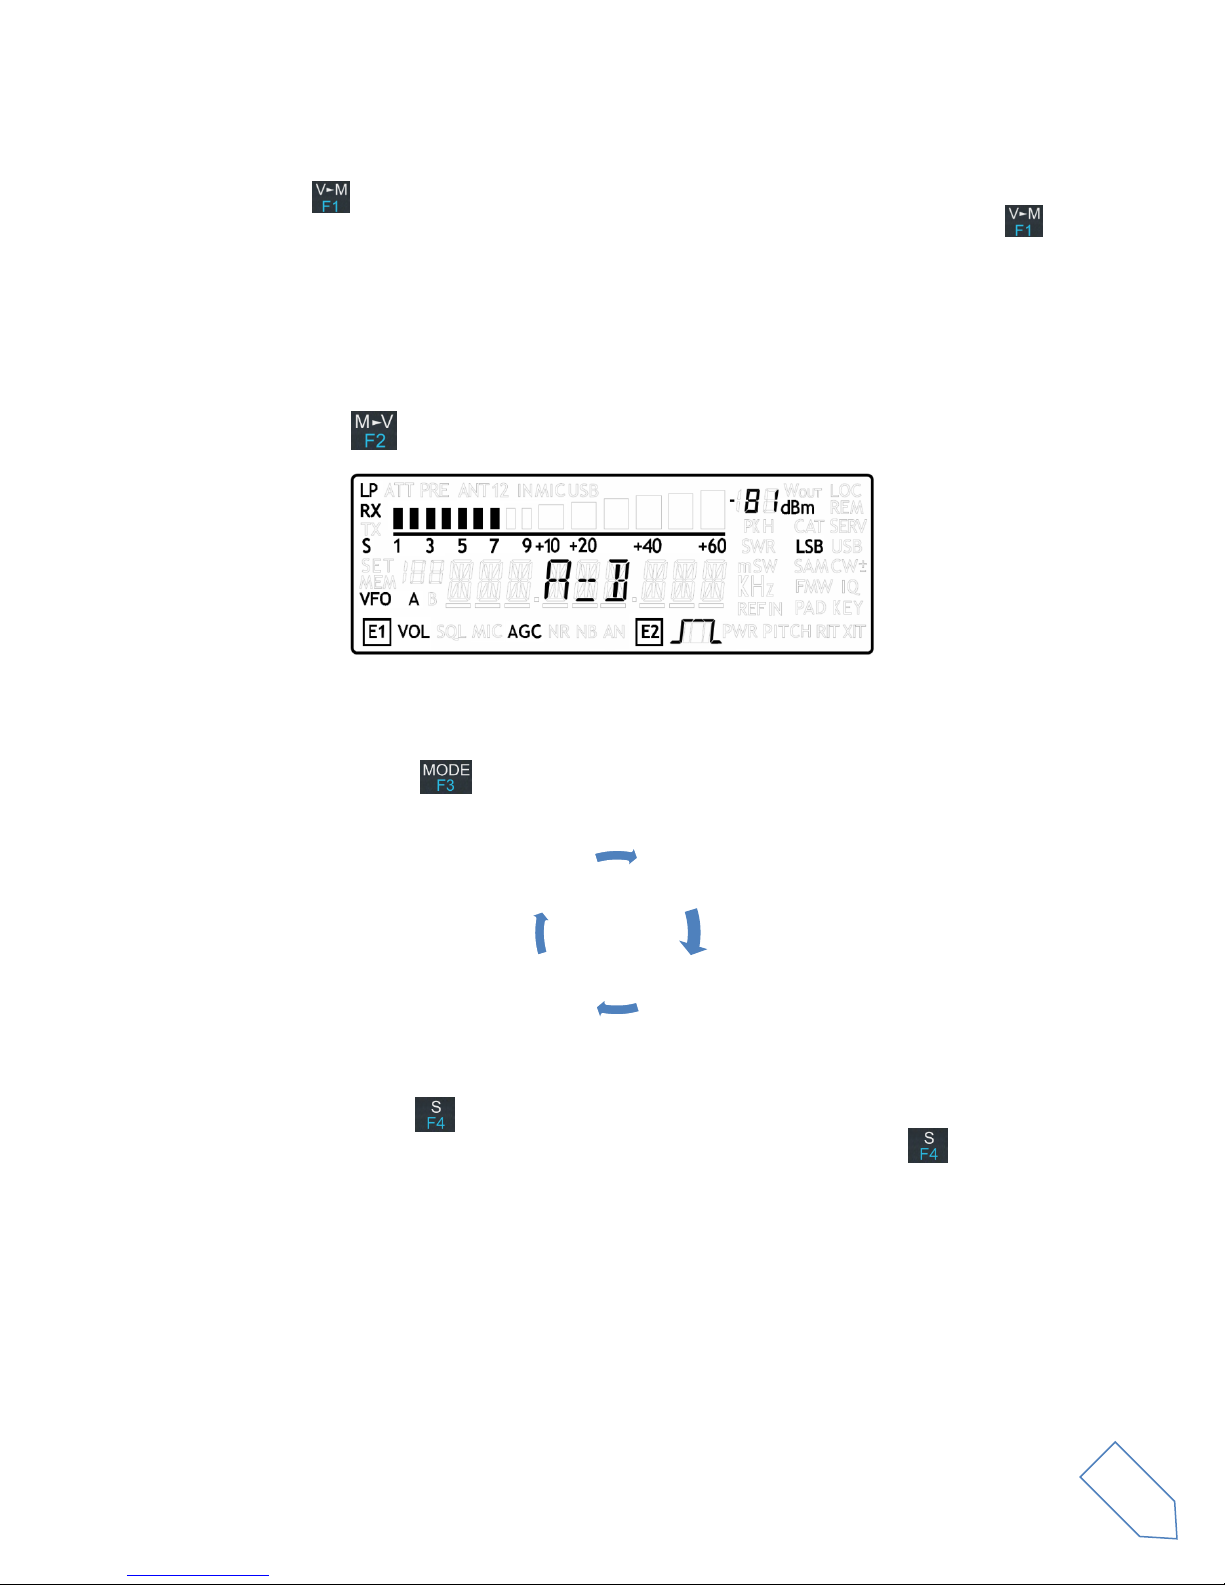
4 LCD
1. LP: Low pass input filter active. ATT: input attenuation active.
2. Bar meter: in receiver mode displays the signal strength in S-units, in transmission mode
displays the forward power transmitted.
3. Measurements unit for the main display. The “S” of SWR is also used to indicate the “QuickStep”
function.
4. PK: blinks if the case of internal ADC overload.
5. Secondary display that displays the signal strength.
6. Measurement unit for the secondary display.
7. LOC: on when the Main Knob is locked.
8. CAT: on when a CAT command is received, SERV: Service mode enabled.
9. Operating mode.
10. External frequency reference present.
11. E2 Selected function. PITCH: CW pitch frequency, :Demodulation filter bandwidth.
12. Main display.
13. E1 Selected function. VOL: main volume, AGC: automatic gain control settings, NR: noise
reduction, NB: noise blanker.
14. Display the selected VFO.
15. SET: settings menu mode, MEM: memory mode, VFO: VFO mode
16. In memory mode, displays the selected memory index, in settings mode display the menu
number.
17. RX: receive, TX: internal switch box activated.
© 2014 ELAD S.r.l. All rights reserved. No part of this document may be reproduced, published, used, disclosed or disseminated in any form or
by any means, electronic, photocopying or otherwise, without prior written permission of ELAD S.r.l.
13
Page 14
ELAD FDM-DUOr User Manual Rev 0.04 12/2014
5 Quick Start
These instructions are intended only for a quick guide, detailed instructions are given later in this
manual
Turn on the FDM-DUOr using the rear panel switch. The receiver start in VFO mode with the
VFO-A selected.
Turn the E1 knob until you hear a suitable level of noise.
Use the Main knob to tune a frequency.
Press to select the desired communication mode.
Use the E2 to set the demodulation filter.
© 2014 ELAD S.r.l. All rights reserved. No part of this document may be reproduced, published, used, disclosed or disseminated in any form or
by any means, electronic, photocopying or otherwise, without prior written permission of ELAD S.r.l.
14
Page 15
ELAD FDM-DUOr User Manual Rev 0.04 12/2014
6 User Interface
6.1 VFO Mode
The VFO mode is the default mode of FDM-DUOr. Each VFO memorize the tuning frequency, mode and
tuning step
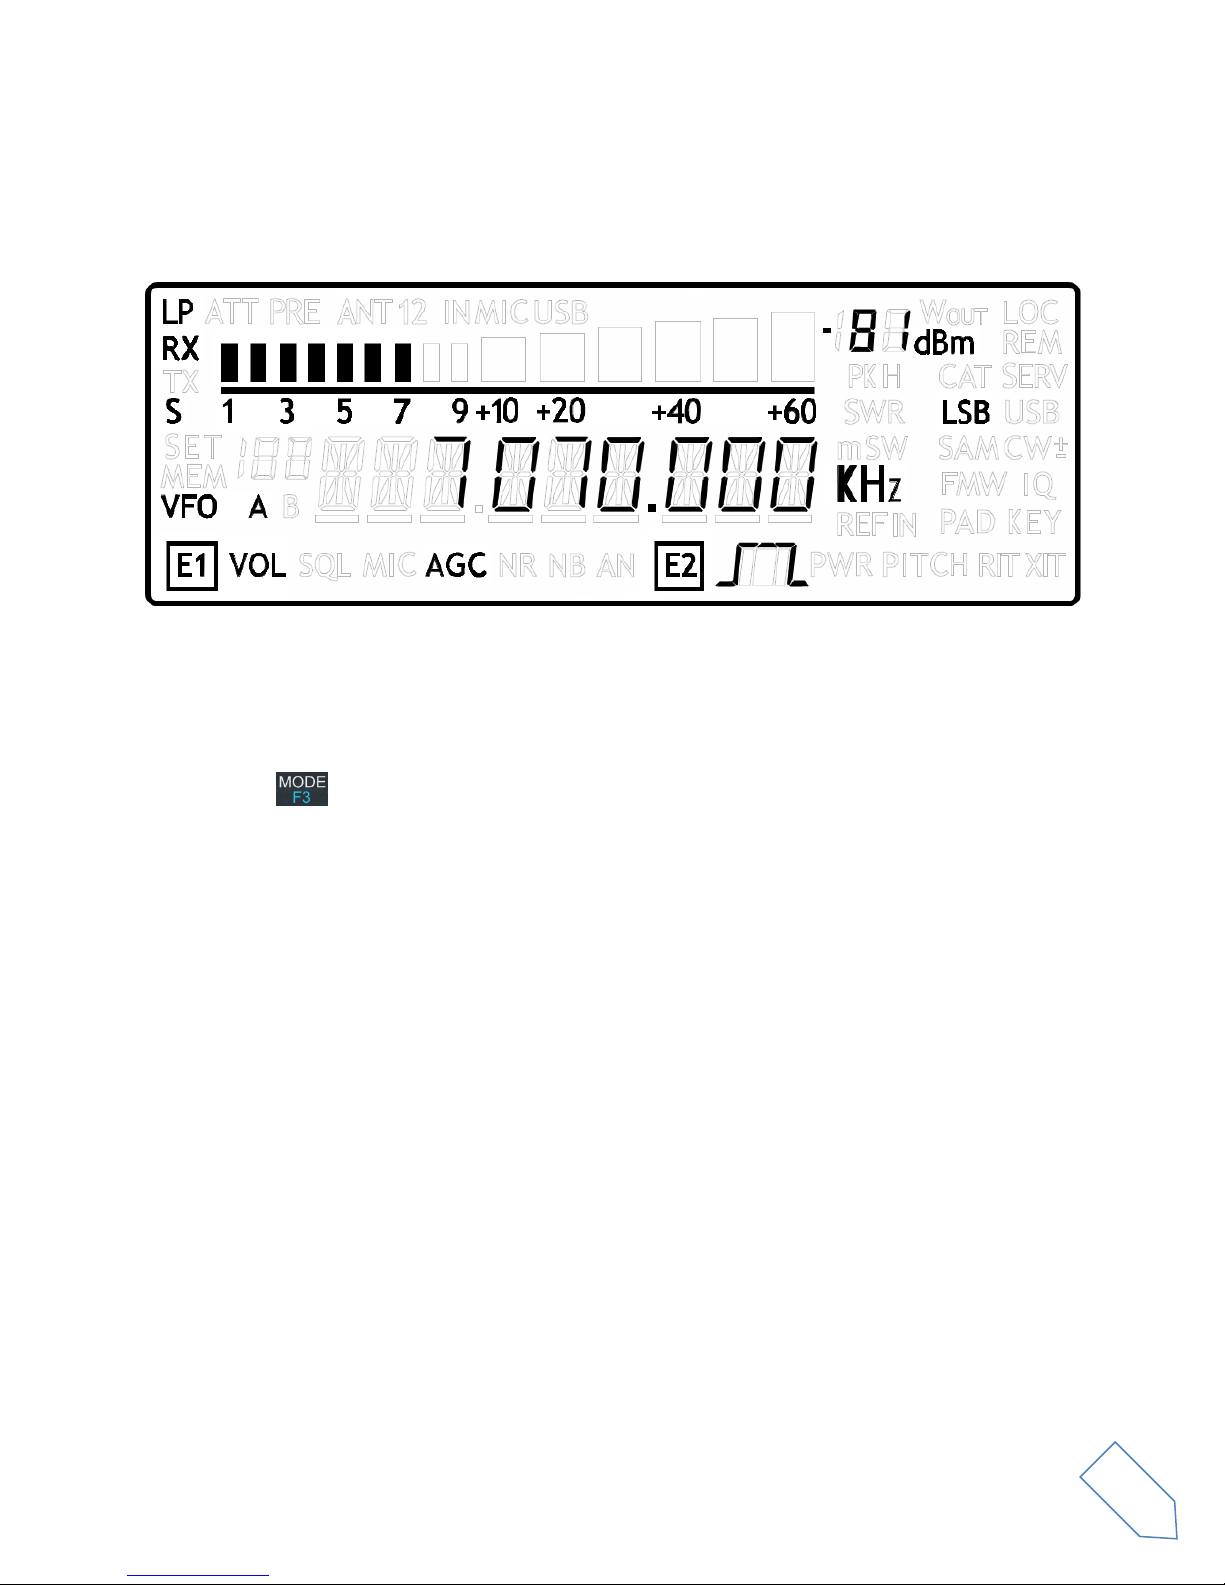
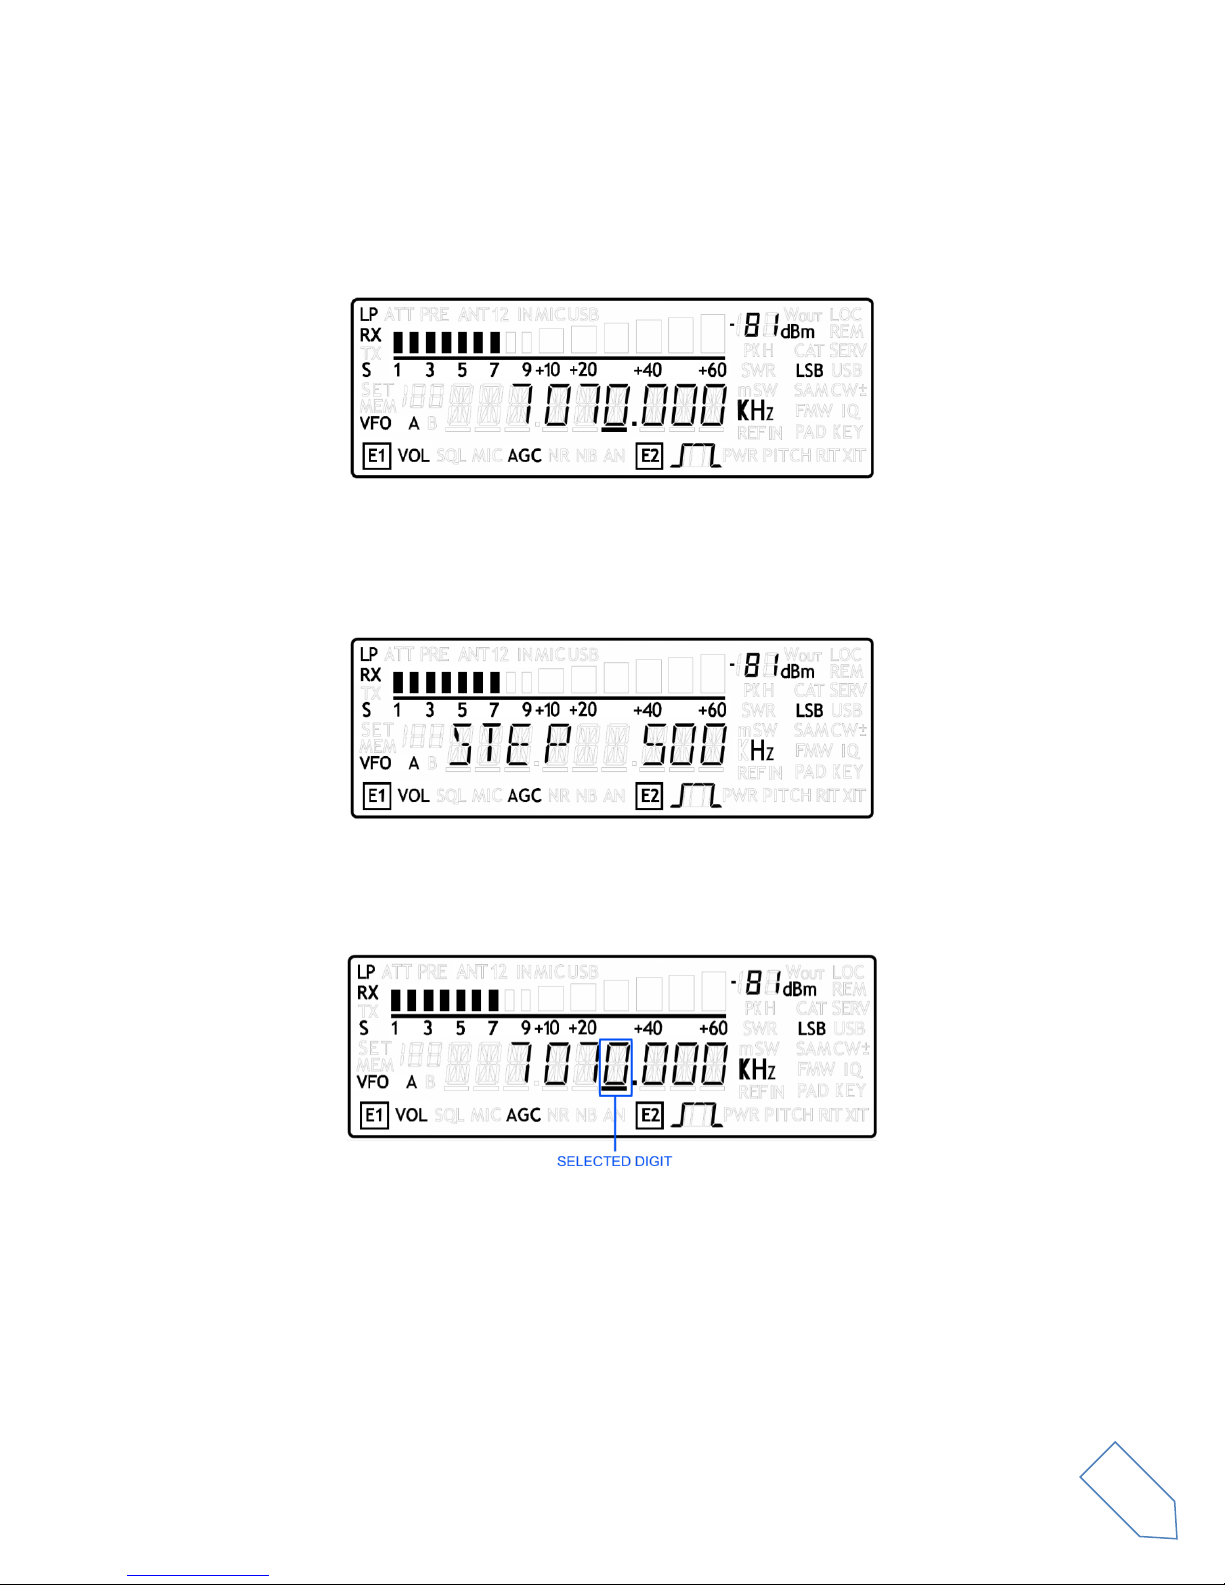
6.1.1 Tuning
In this mode, use the Main Knob to tune a frequency.
A short pressure on the main knob enter the frequency step menu
Use the main knob to modify the tuning step, then with a short pressure return in the VFO menu.
With a long pressure over the main knob, the Digit by Digit Frequency tuning mode is activated
In this mode use the main knob to modify the selected digit and E1 or E2 to change witch digit you want
to modify. Apply a short pressure on main knob to return in the standard tuning mode.
© 2014 ELAD S.r.l. All rights reserved. No part of this document may be reproduced, published, used, disclosed or disseminated in any form or
by any means, electronic, photocopying or otherwise, without prior written permission of ELAD S.r.l.
15
Page 16
ELAD FDM-DUOr User Manual Rev 0.04 12/2014
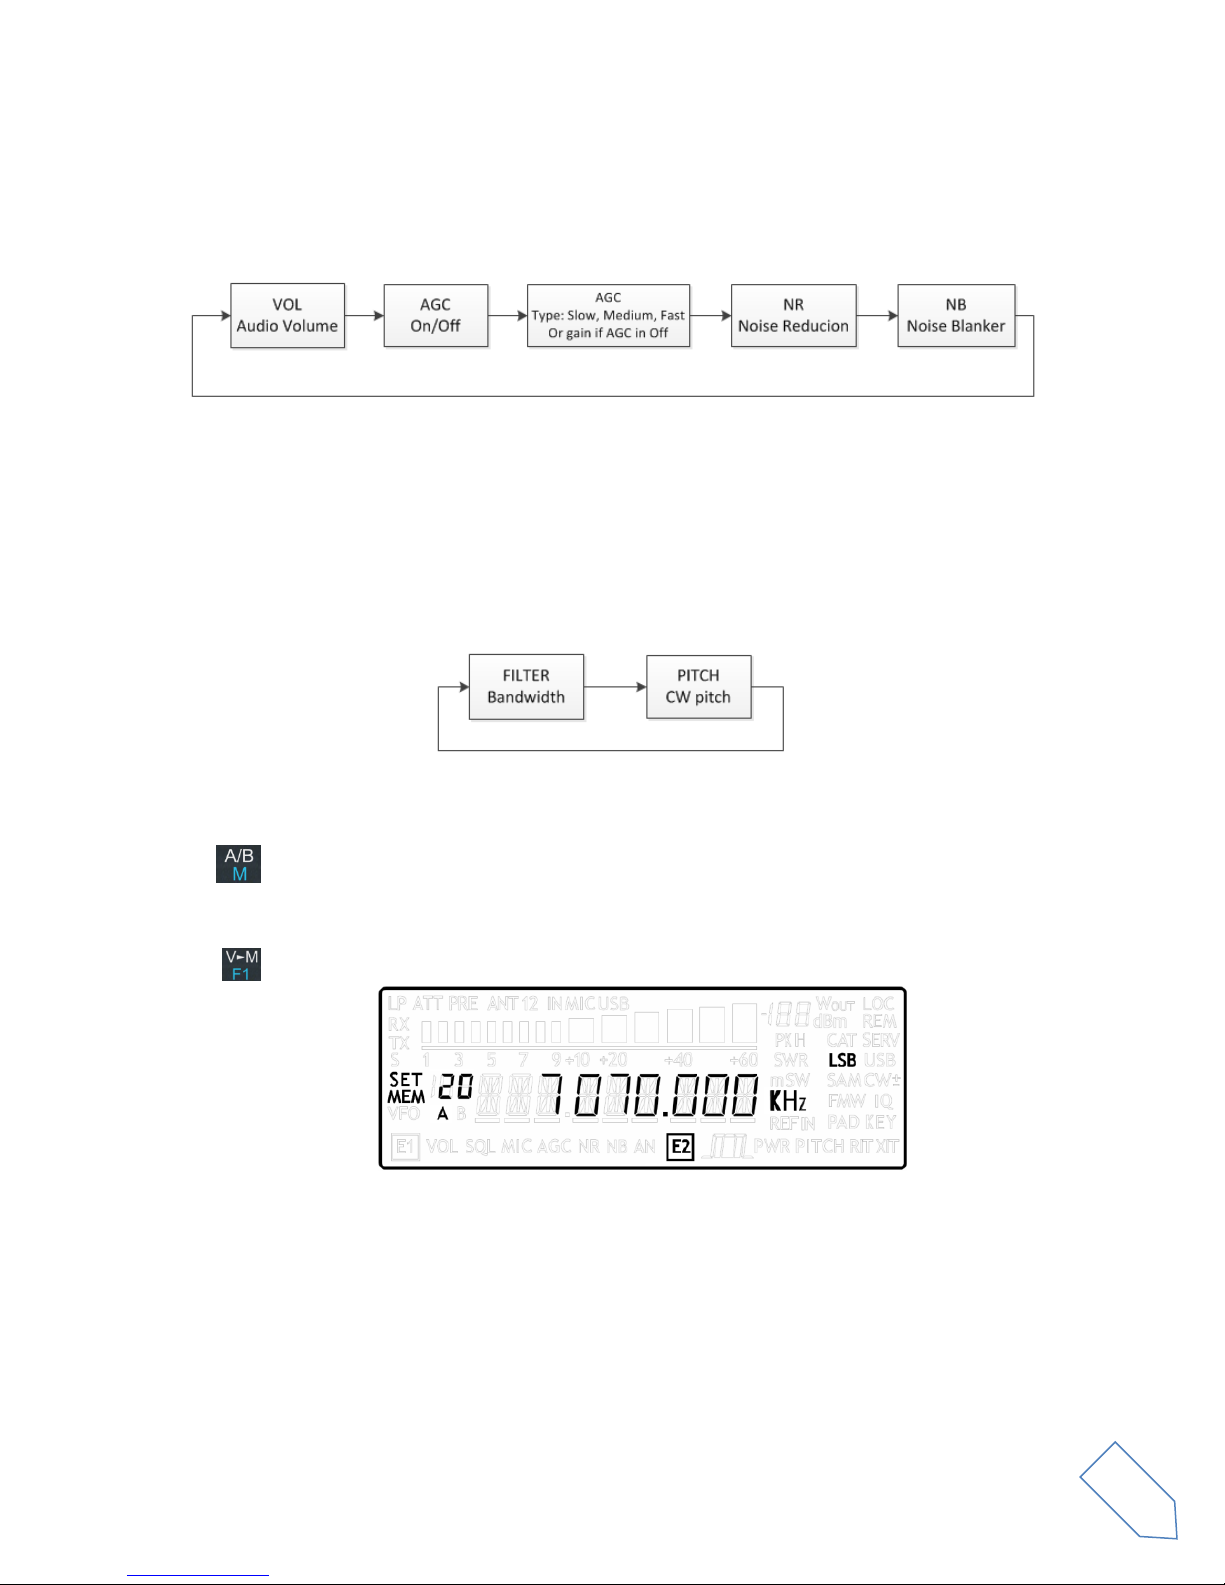
6.1.2 E1 Receiver Settings
Apply a short pressure on the E1 knob to change the E1 selected parameter, the selected parameter
icon is turned on in the LCD. Turn until one click the E1 knob to display the parameter value, then turn
again E1 to modify the parameter value.
AGC: if the AGC is turned OFF (manual gain mode), the AGC icon blinks.
NR and NB: if the Noise Reducer or the Noise Blanker is turned on the relative NR or NB icon blinks.
6.1.3 E2 Receiver Settings
Apply a short pressure on the E2 knob to change the E2 selected parameter, turn until one click the E1
knob to display the parameter value, then turn again E1 to modify the parameter value.
6.1.4 Switch VFO
Use the button to switch VFO-A/B.
6.1.5 Store VFO to memory
Use the key to store the current VFO settings into a memory
Use E2 knob or main knob to select the destination memory and confirm with a short pressure on E2.
© 2014 ELAD S.r.l. All rights reserved. No part of this document may be reproduced, published, used, disclosed or disseminated in any form or
by any means, electronic, photocopying or otherwise, without prior written permission of ELAD S.r.l.
16
Page 17
ELAD FDM-DUOr User Manual Rev 0.04 12/2014
USB
CW AM
LSB
6.1.6 “QuickMem” mode
Keep pressed the key to enter the “QuickMem” mode.
The memory channels 180 to 199 are reserved for the “QuickMem” selection. Keep pressed the key
until the desired frequency appears on the LCD display, then release the key and the current VFO is set
to the frequency and mode saved in the memory channel.
You can use the “FDM-DUOr Manager” feature in the ELAD FDM-SW2 software to customize the
memory channels.
6.1.7 VFO-A = VFO-B
With long pressure on key you get VFO-A = VFO-B
6.1.8 Change Operating Mode
With a short pressure on the button, you can change the receiver mode between the available
modes:
6.1.9 “QuickStep”
With a short pressure on the key, the “QuickStep” function is activated. This function quickly sets
the frequency step preset selected in the “QuickStep” setting menu, press again the key to set the
previous frequency step.
© 2014 ELAD S.r.l. All rights reserved. No part of this document may be reproduced, published, used, disclosed or disseminated in any form or
by any means, electronic, photocopying or otherwise, without prior written permission of ELAD S.r.l.
17
Page 18

ELAD FDM-DUOr User Manual Rev 0.04 12/2014
6.2 MEM Mode
To activate the memory mode, apply a long pressure on .
6.2.1 Select and edit a memory
Use the main knob to select a memory. Apply a long pressure on the main encoder to enter the edit
memory menu. In this menu it is possible to modify the selected memory frequency in digit by digit
mode.
Use the button to select the VFO-A/B. This is useful if you want to set the memory settings to a
specific VFO.
6.2.2 Delete a memory
Apply a long pressure to the key to enter the delete menu
Use the E2 knob to set yes or no and make a short pressure on E2 to confirm.
6.2.3 Set memory to VFO
Use the key to set the selected VFO to the selected memory frequency and mode. When this
function is used, the FDM-DUOr automatically switches to the VFO mode.
© 2014 ELAD S.r.l. All rights reserved. No part of this document may be reproduced, published, used, disclosed or disseminated in any form or
by any means, electronic, photocopying or otherwise, without prior written permission of ELAD S.r.l.
18
Page 19
ELAD FDM-DUOr User Manual Rev 0.04 12/2014
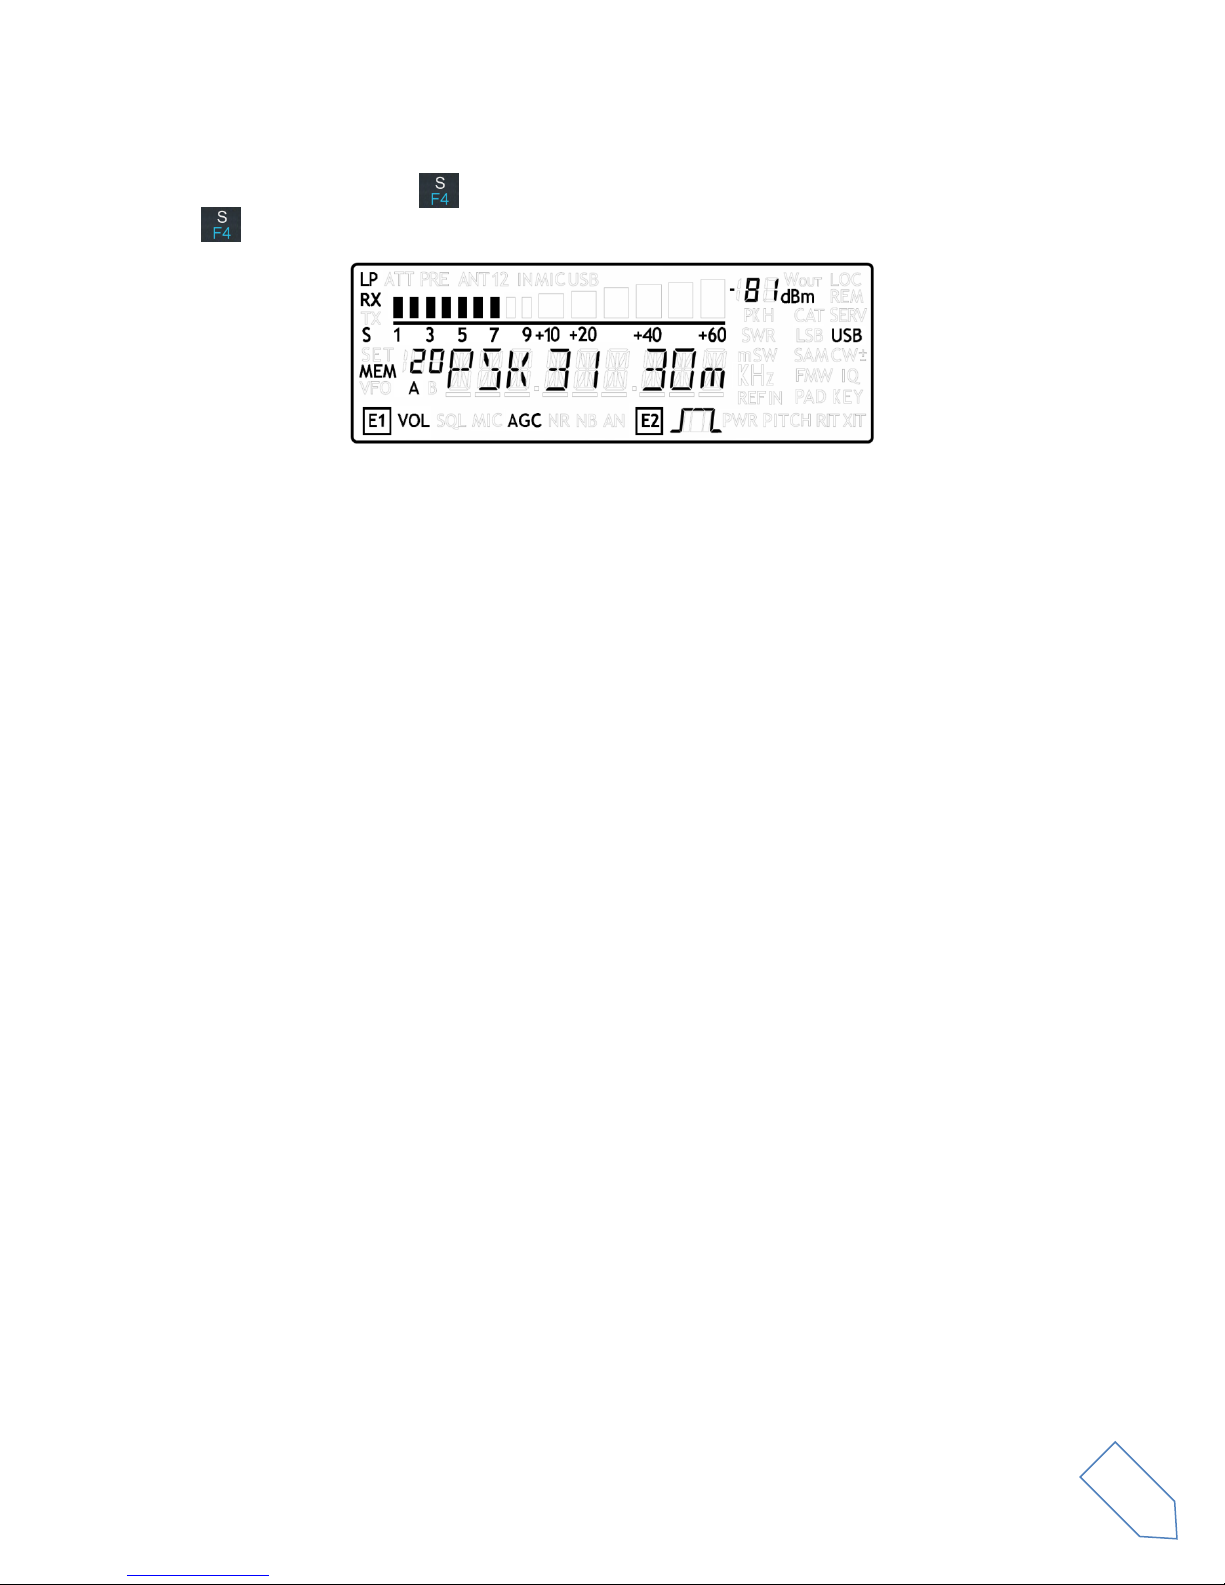
6.2.4 Change the memory display mode
Apply a short pressure on the key to show the memory label in the LCD main display. Press shortly
again to return to display the memory frequency.
You can use the “FDM-DUOr Manager” feature in the ELAD FDM-SW2 software to customize the
memory channels.
© 2014 ELAD S.r.l. All rights reserved. No part of this document may be reproduced, published, used, disclosed or disseminated in any form or
by any means, electronic, photocopying or otherwise, without prior written permission of ELAD S.r.l.
19
Page 20

ELAD FDM-DUOr User Manual Rev 0.04 12/2014
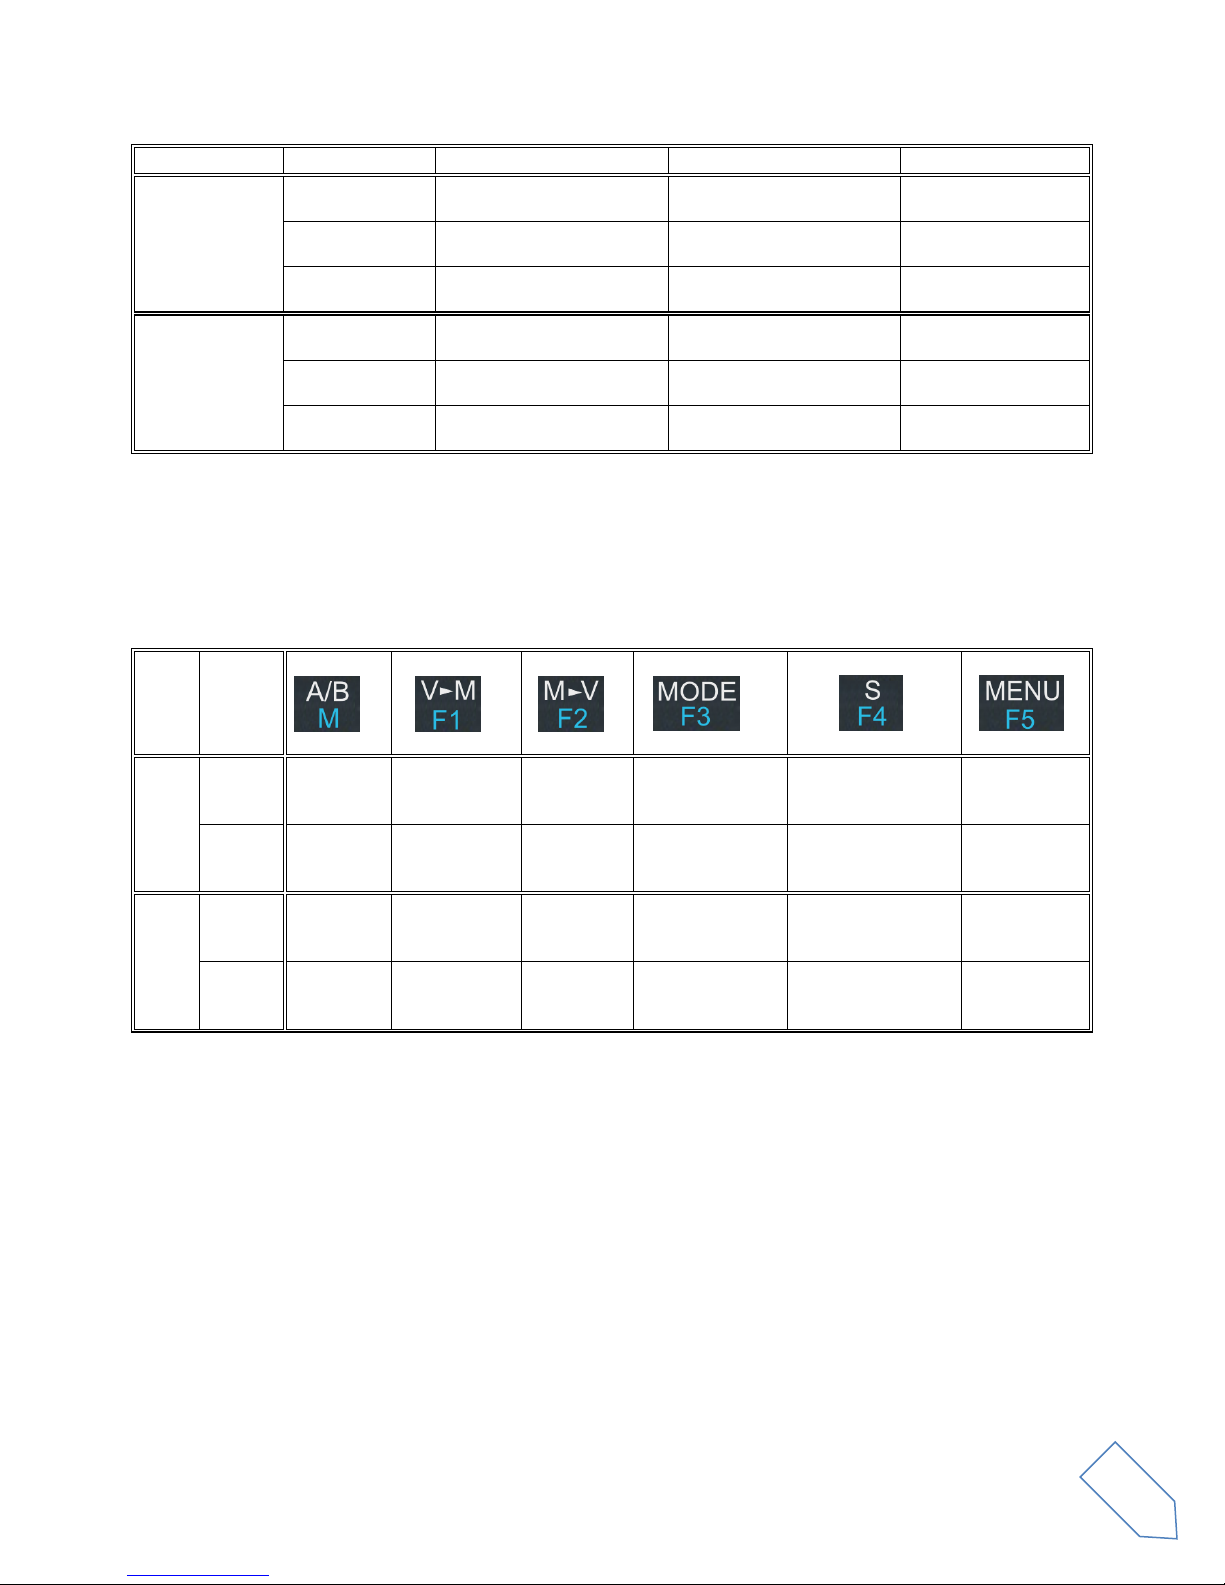
Menu
Action
Main Knob
E1 Knob
E2 Knob
VFO
Value modified
Change selected VFO
frequency
Enter E1 selection
parameter
Enter E2 selection
parameter
Short Pressure
Enter STEP menu
Change E1 selected
parameter
Change E2 selected
parameter
Long Pressure
Switch to DIGIT by DIGIT
tuning mode
(2)
(2)
STEP
Value modified
Change tuning step value
Short Pressure
Exit from STEP Menu
Long Pressure
Switch to DIGIT by DIGIT
tuning mode
(2)
(2)
MEM
Value modified
Select next/previous
memory
Enter E1 selection
parameter
Enter E2 selection
parameter
Short Pressure
Change E1 selected
parameter
Change E2 selected
parameter
Long Pressure
Switch to DIGIT by DIGIT
tuning mode
(2)
(2)
E1 Selection:
VOL - AGC-
NR - NB
Value modified
Back to VFO or
MEM menu
Modify E1 selected
parameter value
Modify E2 selected
parameter value
Short Pressure
Back to VFO or
MEM menu
Change E1 selected
parameter
Change E2 selected
parameter
Long Press
Switch to DIGIT by DIGIT
tuning mode
(2)
(2)
E2 Selection:
FILTER - PITCH
Value modified
Back to VFO or
MEM menu
Modify E1 selected
parameter value
Modify E2 selected
parameter value
Short Pressure
Back to VFO or
MEM menu
Change E1 selected
parameter
Change E2 selected
parameter
Long Pressure
Switch to DIGIT by DIGIT
tuning mode
(2)
(2)
VFO > MEM
Value modified
Change the
destination memory
Change the
destination memory
Short Press
Save VFO in the
selected memory
Long Pressure
(2)
(2)
Delete MEM
Value modified
Change Yes/No
Short Pressure
Confirm Yes/No
Long Pressure
SETUP -
PARAMETER
CHOICE
(MENU button)
Value modified
Change parameter
selection
Short Press
Enter parameter setup
menu
Long Pressure
6.3 Knobs functions
The following table describes the knob functions for some user interface menu :
© 2014 ELAD S.r.l. All rights reserved. No part of this document may be reproduced, published, used, disclosed or disseminated in any form or
by any means, electronic, photocopying or otherwise, without prior written permission of ELAD S.r.l.
20
Page 21
ELAD FDM-DUOr User Manual Rev 0.04 12/2014
Menu
Action
Main Knob
E1 Knob
E2 Knob
SETUP -
PARAMETER
MODIFICATION
Value modified
Parameter coarse
variation (1)
Parameter coarse
variation (1)
Parameter fine
variation
Short Press
Save and exit
Long Pressure
DIGIT by DIGIT
Tuning
Value modified
Modify the current digit
value
Change digit selection
Change digit selection
Short Pressure
Switch to standard tuning
mode
Switch to standard tuning
mode
Switch to standard
tuning mode
Long Pressure
(2)
(2)
Mode
Pressure
VFO
Short
Switch VFO
Enter
VFO to MEM
menu
-
Change selected
VFO operating
mode
Enable/disable
Quickstep function
Enter settings
menu
Long
Switch to
MEM
mode
Enter
“QuickMem”
menu
VFO A = B - -
Lock/Unlock
Main Knob
MEM
Short
Switch VFO
-
Selected
memory to
VFO
Change selected
memory
operating mode
Change memory
display
frequency/label
Enter settings
menu
Long
Switch to
VFO mode
Enter delete
memory
menu
- - -
Lock/Unlock
Main Knob
(1) Available only for certain menu.
(2) Press simultaneously E1 and E2 to lock/unlock all the keys and knobs.
6.4 Keys functions
The following table describes the keys functions :
© 2014 ELAD S.r.l. All rights reserved. No part of this document may be reproduced, published, used, disclosed or disseminated in any form or
by any means, electronic, photocopying or otherwise, without prior written permission of ELAD S.r.l.
21
Page 22

ELAD FDM-DUOr User Manual Rev 0.04 12/2014
Menu
Title
Description
Available Settings
Default
1
RX ATT
Receiver input attenuation
OFF or ON
OFF 3 SNAP
Round to step
OFF or ON
ON 4 AGC TH
AGC Threshold
From 0 to 10
4 6 AUX VOL
Auxiliary output volume
From 0 to 100
50
7
QUICKSTEP
Step selected for the “QuickStep”
mode
1Hz, 5Hz, 10Hz, 25Hz,
50Hz, 100Hz, 250Hz,
500Hz, 1kHz, 2kHz, 3kHz,
4.5kHz, 5kHz, 7.5kHz, 9kHz,
10kHz, 12.5kHz, 25kHz,
50kHz, 100kHz, 125kHz,
250kHz, 500kHz, 1MHz
1kHz
8
CW MUTE
Set mute status during CW
transmission
OFF or ON
OFF
9
xSB MUTE
Set mute status during AM or SSB
transmission
OFF or ON
ON
60
FR OFFSET
Enable / Disable the frequency offset
for the visualization
OFF or ON
OFF
61
OFS VALUE
Frequency offset value for the
visualization
+/- 99.999999999 GHz.
See *
0Hz
70
CAT BAUD
CAT serial port baud rate
9600, 38400,
57600, 115200
38400
71
HOLD TIME
Hold time to detect a long pressure
From 500 to 2500ms
1000ms
72
REPT TIME
Repetition time when a key is pressed
From 100 to 1500ms
600ms
80
SERVICE
Enable Service mode
ON or OFF
OFF
81
DEFAULT
Restore default parameters
YES or NO
NO
82
UI UPDATE
If Service mode is active, enable the
firmware update mode
YES or NO
NO
83
VIEW SN
Display the FDM-DUOr serial number
84
VIEW FW
Display the FDM-DUOr firmware
versions
Firmware
UI
85
CLK ADJ
Sets the internal clock correction
value. It is used to have a fine
frequency setting.
In case of “Ref In” utilization, this
parameter is not relevant.
±50000 dots (not Hz)
-
6.5 Settings Menu List
The following table describes the FDM-DUOr settings menu list. To enter the settings menu mode, press
the key. Use E2 to select the menu, then apply a short pressure on E2 to display the current menu
setting, if you want to change the setting use the E2 knob and confirm the setting with a short pressure
on E2. In some menu you can also use the main knob to change the setting more quickly. To turn back or
exit the menu just press .
© 2014 ELAD S.r.l. All rights reserved. No part of this document may be reproduced, published, used, disclosed or disseminated in any form or
by any means, electronic, photocopying or otherwise, without prior written permission of ELAD S.r.l.
22
Page 23

ELAD FDM-DUOr User Manual Rev 0.04 12/2014
6.5.1 Frequency visualization offset menu
The frequency visualization offset is helpful when using a transverter. The Frequency offset set in digit
by digit mode with some improvements to set a signed 10 digit offset in a 9 digit display.
E2: Select the digit to modify
Main encoder: modify the selected digit value
E1: change the visualization
o kHz: the 8 most significant digit of the frequency offset are displayed
o Hz: the 8 least significant digit of the frequency offset are displayed
E1 or Main encoder short pressure: change the sign of the offset (+/-)
E2 short pressure: save the setting
EXAMPLES:
Frequency offset value: +10,000,034,120 Hz
o kHz Display mode
o Hz Display mode
© 2014 ELAD S.r.l. All rights reserved. No part of this document may be reproduced, published, used, disclosed or disseminated in any form or
by any means, electronic, photocopying or otherwise, without prior written permission of ELAD S.r.l.
23
Page 24

ELAD FDM-DUOr User Manual Rev 0.04 12/2014
Computer control
commands
Input
PC->FDM-DUOr
SET
(set a parameter)
READ
(read a condition)
Output
FDM-DUOr->PC
ANSWER
(transmit a condition)
7 CAT Remote Control
7.1 Introduction
The FDM-DUOr receiver uses a full-duplex, asynchronous, USB serial interface for communicating
through the USB CAT port. Each data is constructed with 1 start bit, 8 data bits, 1 stop bit, no parity is
used (8N1). The baud rate is selectable in the [70] CAT BAUD menu. Available values are 9600, 38400,
57600, 115200 bps.
The FDM-DUO implements proprietary commands and also a subset of the Kenwood TS-480 command
set. Some of those commands have a dummy implementation for compatibility issues with Ham Radio
Deluxe.
7.2 Computer control commands
A computer control command is composed of an alphabetical command, various parameters, and the
terminator that signals the of the command.
For example to set the VFO-A to 14MHz the command is:
FA00014000000;
“FA”: alphabetical command
“00014000000000”: parameter
“;”: terminator
Computer control commands can be classified as shown below:
EXAMPLE
To set the VFO-A to 14MHz the PC sends: “FA00014000000000;” SET command
To read the VFO-A frequency the PC sends: “FA;” READ command
When this command has been sent, the following message is returned to the PC:
“FA00014000000000;” ANSWER
© 2014 ELAD S.r.l. All rights reserved. No part of this document may be reproduced, published, used, disclosed or disseminated in any form or
by any means, electronic, photocopying or otherwise, without prior written permission of ELAD S.r.l.
24
Page 25

ELAD FDM-DUOr User Manual Rev 0.04 12/2014
COMMAND
FUNCTION
SET
READ
ANS.
AT/RA
RF ATTENUATOR
YES
YES
YES
DT
DUO TYPE
-
YES
YES
FA
VFO-A FREQUENCY
YES
YES
YES
FB
VFO-B FREQUENCY
YES
YES
YES
FI
INTERNAL FILTER MODULES
YES
YES
YES
FR
VFO/MEM MODE
YES
YES
YES
GC
GAIN CONTROL
YES
YES
YES
GS
GAIN SETTINGS
YES
YES
YES
IF
INFORMATION
-
YES
YES
LB
LCD BACKLIGHT
YES
YES
YES
LP
LOW PASS
YES
YES
YES
MC
MEMORY CHANNEL
YES
YES
YES
MD
MODE
YES
YES
YES
MR
MEMORY READ
-
YES
YES
MT
MUTE IN TRANSMISSION
YES
YES
YES
MW
MEMORY WRITE
YES - -
NB
NOISE BLANKER STATUS
-
YES
YES
NC
NOISE REDUCTION
YES
YES
YES
NK
NOISE BLANKER
YES
YES
YES
NR
NOISE REDUCTION STATUS
-
YES
YES
OS
FVO STATE
YES
YES
YES
OV
FVO VALUE
YES
YES
YES
PI
PITCH
YES
YES
YES
RF
RECEPTION FILTERS
YES
YES
YES
SE
SERVICE
YES
YES
YES
SM
S METER - YES
YES
SN
SERIAL NUMBER
-
YES
YES
VA
AUX VOLUME
YES
YES
YES
VM
MAIN VOLUME
YES
YES
YES
VS
FIRMWARE VERSION
-
YES
YES
7.3 CAT Commands List
7.3.1 Active commands list
© 2014 ELAD S.r.l. All rights reserved. No part of this document may be reproduced, published, used, disclosed or disseminated in any form or
by any means, electronic, photocopying or otherwise, without prior written permission of ELAD S.r.l.
25
Page 26

ELAD FDM-DUOr User Manual Rev 0.04 12/2014
AT
Reads or sets the input attenuator status
Parameters:
P1
‘0’: 0dB
‘1’: 10dB
‘2’: 20dB
‘3’: 30dB
Set
1 2 3
4
5 6 7 8 9
10 A T
P1
;
Read
1 2 3 4 5 6 7 8 9
10
A T ;
Answer
1 2 3
4
5 6 7 8 9
10
A T P1
;
DT
Reads the FDM-DUO type
Parameters:
P1
Always 002
Set
Read
1 2 3 4 5 6 7 8 9
10
D T ;
Answer
1 2 3 4 5 6 7 8 9
10
D T P1
P1
P1
;
FA
Reads or sets the VFO A frequency
Set not available during power transmission
Parameters:
P1
Frequency in Hz (11 digit)
Set
1 2 3 4 5 6 7 8 9
10
F A P1
P1
P1
P1
P1
P1
P1
P1
11
12
13
14
15
16
17
18
19
20
P1
P1
P1
;
Read
1 2 3 4 5 6 7 8 9
10
F
A
;
Answer
1 2 3 4 5 6 7 8 9
10
F A P1
P1
P1
P1
P1
P1
P1
P1
11
12
13
14
15
16
17
18
19
20
P1
P1
P1
;
FB
Reads or sets the VFO B frequency
Set not available during power transmission
Parameters:
P1
Frequency in Hz (11 digit)
Set
1 2 3 4 5 6 7 8 9
10
F B P1
P1
P1
P1
P1
P1
P1
P1
11
12
13
14
15
16
17
18
19
20
P1
P1
P1
;
Read
1 2 3 4 5 6 7 8 9
10
F B ;
Answer
1 2 3 4 5 6 7 8 9
10
F B P1
P1
P1
P1
P1
P1
P1
P1
11
12
13
14
15
16
17
18
19
20
P1
P1
P1
;
7.3.2 Active commands tables
© 2014 ELAD S.r.l. All rights reserved. No part of this document may be reproduced, published, used, disclosed or disseminated in any form or
by any means, electronic, photocopying or otherwise, without prior written permission of ELAD S.r.l.
26
Page 27

ELAD FDM-DUOr User Manual Rev 0.04 12/2014
FI
Reads or sets the internal filter modules settings
Parameters:
P1 module index, from ‘0’ to ‘10’
P2 module state;
‘0’ not used
‘1’ used
P3 module low frequency
P4 module high frequency
Set
1 2 3 4 5 6 7 8 9
10
F I P1
P1
P2
P3
P3
P3
P3
P3
11
12
13
14
15
16
17
18
19
20
P3
P3
P3
P3
P3
P3
P4
P4
P4
P4
21
22
23
24
25
26
27
28
P4
P4
P4
P4
P4
P4
P4
;
Read
1 2 3 4 5 6 7 8 9
10
F I P1
P1
;
Answer
1 2 3 4 5 6 7 8 9
10
F I P1
P1
P2
P3
P3
P3
P3
P3
11
12
13
14
15
16
17
18
19
20
P3
P3
P3
P3
P3
P3
P4
P4
P4
P4
21
22
23
24
25
26
27
28
P4
P4
P4
P4
P4
P4
P4 ;
FR
Reads or sets the VFO or M.CH mode
Set not available during transmission
Parameters:
P1
0: VFO-A
1: VFO-B
2: M.CH
Set
1 2 3 4 5 6 7 8 9
10
F R P1
;
Read
1 2 3 4 5 6 7 8 9
10
F R ;
Answer
1 2 3 4 5 6 7 8 9
10
F R P1
;
GC
Reads or sets the active gain control
Parameters:
P1
0: auto (AGC)
1: manual
Set
1 2 3 4 5 6 7 8 9
10
G C P1 ;
Read
1 2 3 4 5 6 7 8 9
10
G C ;
Answer
1 2 3 4 5 6 7 8 9
10
G C P1
;
GS
Reads or sets the control gain settings
Parameters:
P1
0: auto (AGC)
1: manual
P2 for P1=’0’
0 : slow
1 : medium
2 : fast
P2 for P1=’1’
0 : OFF
1 a 10 : active
Set
1 2 3 4 5 6 7 8 9
10
G S P1
P2
P2
P2 ;
Read
1 2 3 4 5 6 7 8 9
10
G S P1 ;
Answer
1 2 3 4 5 6 7 8 9
10
G S P1
P2
P2
P2 ;
© 2014 ELAD S.r.l. All rights reserved. No part of this document may be reproduced, published, used, disclosed or disseminated in any form or
by any means, electronic, photocopying or otherwise, without prior written permission of ELAD S.r.l.
27
Page 28

ELAD FDM-DUOr User Manual Rev 0.04 12/2014
IF
Retrieves the transceiver status
Parameters:
P1: Frequency 11 digit
P2: 5 spaces
P3: Always 0
P4: Always 0
P5: Always 0
P6/P7: Memory ch. Number 0-199
P8: 0:Rx 1:Tx
P9: Operating Mode (See MD)
P10: See FR
P11: Always 0
P12: Always 0
P13: Always 0
P14: Always 0
P15: Space
Set
Read
1 2 3 4 5 6 7 8 9
10
I F ;
Answer
1 2 3 4 5 6 7 8 9
10
I F P1
P1
P1
P1
P1
P1
P1
P1
11
12
13
14
15
16
17
18
19
20
P1
P1
P1
P2
P2
P2
P2
P2
P3
P3
21
22
23
24
25
26
27
28
29
30
P3
P3
P3
P4
P5
P6
P7
P7
P8
P9
31
32
33
34
35
36
37
38
39
40
P10
P11
P12
P13
P14
P14
P15 ;
LB
Sets/Reads the LCD backlight parameters
Parameters:
P1 mode
0 : temporary set
1 : Rx Stand Alone
2 : Rx Remote (PC Controlled)
3 : Tx
P2 mode selection
1 : Rx Stand Alone
2 : Rx Remote (PC Controlled)
3 : Tx
P3 : RED component (0 to 100)
P4 : GREEN component (0 to 100)
P5 : BLUE component (0 to 100)
Set
1 2 3 4 5 6 7 8 9
10
L B P1
P3
P3
P3
P4
P4
P4
P5
11
12
13
14
15
16
17
18
19
20
P5
P5
;
Read
1 2 3 4 5 6 7 8 9
10
L B P2
;
Answer
1 2 3 4 5 6 7 8 9
10
L B P2
P3
P3
P3
P4
P4
P4
P5
11
12
13
14
15
16
17
18
19
20
P5
P5
;
MC
Recalls or reads the Memory channel
Parameters:
P1: 0 or 1
P2: 00 to 99
Set
1 2 3 4 5 6 7 8 9
10
M C P1
P2
P2
;
Read
1 2 3 4 5 6 7 8 9
10
M C ;
Answer
1 2 3 4 5 6 7 8 9
10
M C P1
P2
P2
;
MD
Recalls or reads the operating mode status
Parameters:
P1:
1: LSB
2: USB
3: CW
5: AM
Set
1 2 3 4 5 6 7 8 9
10
M D P1
;
Read
1 2 3 4 5 6 7 8 9
10
M D ;
Answer
1 2 3 4 5 6 7 8 9
10
M D P1
;
LP
Reads the Low-Pass Filter Status
Parameters:
P1
0: not active
1: active
Read
1 2 3 4 5 6 7 8 9
10
L P ;
Answer
1 2 3 4 5 6 7 8 9
10
L P P1
;
© 2014 ELAD S.r.l. All rights reserved. No part of this document may be reproduced, published, used, disclosed or disseminated in any form or
by any means, electronic, photocopying or otherwise, without prior written permission of ELAD S.r.l.
28
Page 29

ELAD FDM-DUOr User Manual Rev 0.04 12/2014
MR
Reads the Memory channel data
Parameters:
P1: 0
P2/3: 000 to 199 Memory No.
P4: Frequency (11 digit)
P5: Mode (see MD command)
P6: Always 0
P7: Always 0
P8: Always 0
P9: Always 0
P10 to P13: Memory label, last 14
chars
P14: 00
P15: Memory status
B: used
F: free
P16: Memory label, first 8 chars
Set
Read
1 2 3 4 5 6 7 8 9
10
M R P1
P2
P3
P3
Answer
1 2 3 4 5 6 7 8 9
10
M R P1
P2
P3
P3
P4
P4
P4
P4
11
12
13
14
15
16
17
18
19
20
P4
P4
P4
P4
P4
P4
P4
P5
P6
P7
21
22
23
24
25
26
27
28
29
30
P8
P8
P9
P9
P10
P10
P10
P10
P10
P10
31
32
33
34
35
36
37
38
39
40
P10
P10
P10
P10
P10
P10
P10
P10
P11
P12
41
42
43
44
45
46
47
48
49
50
P15
P16
P16
P16
P16
P16
P16
P16
P16
;
MT
Reads or sets the mutes status during transmission
Set not available during transmission
Parameters:
P1 CW MUTE
0: not active
1: active
P2 SSB MUTE
0: not active
1: active
Set
1 2 3 4 5 6 7 8 9
10
M T P1
P2
;
Read
1 2 3 4 5 6 7 8 9
10
M T ;
Answer
1 2 3 4 5 6 7 8 9
10
M T P1
P2
;
MW
Store the data to the Memory channel
Parameters:
P1:0
P2/3: 000 to 199 Memory No.
P4: Frequency (11 digit)
P5: Mode (see MD command)
P6: Always 0
P7: Always 0
P8: Always 0
P9: Always 0
P10 to P13: Memory label, last
14 chars
P14: 00
P15: Memory status
B: used
F: free
P16: Memory label, first 8 chars
Set
1 2 3 4 5 6 7 8 9
10
M W P1
P2
P3
P3
P4
P4
P4
P4
11
12
13
14
15
16
17
18
19
20
P4
P4
P4
P4
P4
P4
P4
P5
P6
P7
21
22
23
24
25
26
27
28
29
30
P8
P8
P9
P6
P10
P10
P10
P10
P10
P10
31
32
33
34
35
36
37
38
39
40
P10
P10
P10
P10
P10
P10
P10
P10
P11
P12
41
42
43
44
45
46
47
48
49
50
P15
P16
P16
P16
P16
P16
P16
P16
P16
;
Read
Answer
NB
Reads the noise blanker function status
Parameters:
P1
0: Noise Blanker OFF
1: Noise Blanker ON
Set
Read
1 2 3 4 5 6 7 8 9
10
N B ;
Answer
1 2 3 4 5 6 7 8 9
10
N B P1
;
© 2014 ELAD S.r.l. All rights reserved. No part of this document may be reproduced, published, used, disclosed or disseminated in any form or
by any means, electronic, photocopying or otherwise, without prior written permission of ELAD S.r.l.
29
Page 30

ELAD FDM-DUOr User Manual Rev 0.04 12/2014
NC
Reads or sets the noise reduction value
Parameters:
P1 always 0
P2 noise reduction value
0: OFF
01 ~ 10 (active)
Set
1 2 3 4 5 6 7 8 9
10
N C P1
P2
P2
P2
;
Read
1 2 3 4 5 6 7 8 9
10
N C P1 ;
Answer
1 2 3 4 5 6 7 8 9
10
N C P1
P2
P2
P2
;
NK
Reads or sets the noise blanker value
Parameters:
P1 always 0
P2 noise blanker value
0: OFF
01 ~ 10 (active)
Set
1 2 3 4 5 6 7 8 9
10
N K P1
P2
P2
P2 ;
Read
1 2 3 4 5 6 7 8 9
10
N K P1
;
Answer
1 2 3 4 5 6 7 8 9
10
N K P1
P2
P2
P2
;
NR
Reads the noise reduction function status
Parameters:
P1
0: Noise Reduction OFF
1: Noise Reduction ON
Set
Read
1 2 3 4 5 6 7 8 9
10
N R ;
Answer
1 2 3 4 5 6 7 8 9
10
N R P1
;
OS
Sets/Reads the Frequency view offset status
Set not available during transmission
Parameters:
P1
0: not active
1: active
Set
1 2 3 4 5 6 7 8 9
10
O S P1
;
Read
1 2 3 4 5 6 7 8 9
10
O S ;
Answer
1 2 3 4 5 6 7 8 9
10
O S P1
;
OV
Sets/Reads the Frequency view offset value
Set not available during transmission
Parameters:
P1
Always ‘0’
P2
Offset sign‘+’ /‘-‘
P3
Absolute value in Hz
Set
1 2 3 4 5 6 7 8 9
10
O V P1
P2
P3
P3
P3
P3
P3
P3
11
12
13
14
15
16
17
18
19
20
P3
P3
P3
P3
P3
P3
P3
P3
P3
;
Read
1 2 3 4 5 6 7 8 9
10
O V P1
;
Answer
1 2 3 4 5 6 7 8 9
10
O V P1
P2
P3
P3
P3
P3
P3
P3
11
12
13
14
15
16
17
18
19
20
P3
P3
P3
P3
P3
P3
P3
P3
P3
;
PI
Reads or sets the pitch value
Parameters:
P1 pitch value in Hz
0000 ~ 1000 in 10Hz step
Set
1 2 3 4 5 6 7 8 9
10
P I P1
P1
P1
P1
;
Read
1 2 3 4 5 6 7 8 9
10
P I ;
Answer
1 2 3 4 5 6 7 8 9
10
P I P1
P1
P1
P1
;
© 2014 ELAD S.r.l. All rights reserved. No part of this document may be reproduced, published, used, disclosed or disseminated in any form or
by any means, electronic, photocopying or otherwise, without prior written permission of ELAD S.r.l.
30
Page 31

ELAD FDM-DUOr User Manual Rev 0.04 12/2014
RA
Reads or sets the attenuator function status
Parameters:
P1
00: ATT OFF
01: ATT ON (20dB)
P2: always 00
Set
1 2 3
4
5 6 7 8 9
10
R A P1
P1
;
Read
1 2 3 4 5 6 7 8 9
10
R A ;
Answer
1 2 3
4
5 6 7 8 9
10 R A
P1
P1
P2
P2 ;
RF
Reads or sets the reception filters values
Parameters:
P1 (like MD command)
1: LSB
2: USB
3: CW
5: AM
P2: see parameter details section
Set
1 2 3 4 5 6 7 8 9
10
R F P1
P2
P2 ;
Read
1 2 3 4 5 6 7 8 9
10
R F P1 ;
Answer
1 2 3 4 5 6 7 8 9
10
R F P1
P2
P2
;
SE
Reads or sets the service mode status
Set not available during transmission
Parameters:
P1 always ‘1’. Force the service
mode
P2 always ‘0’. If in service mode
this CAT protocol is not available
Set
1 2 3 4 5 6 7 8 9
10
S E P1
;
Read
1 2 3 4 5 6 7 8 9
10
S E ;
Answer
1 2 3 4 5 6 7 8 9
10
S E P2
;
SM
Reads the S-meter status
Parameters:
P1: Always 0
P2: Meter Read
0000: S0
0002: S1
0003: S2
0004: S3
0005: S4
0006: S5
0008: S6
0009: S7
0010: S8
0011: S9
0012: S9+10
0014: S9+20
0016: S9+30
0018: S9+40
0020: S9+50
0022: S9+60
Set
1 2 3 4 5 6 7 8 9
10
Read
1 2 3 4 5 6 7 8 9
10
S M P1
;
Answer
1 2 3 4 5 6 7 8 9
10
S M P1
P2
P2
P2
P2
;
SN
Reads the receiver serial number
Parameters:
P1
Serial number
Set
1 2 3 4 5 6 7 8 9
10
Read
1 2 3 4 5 6 7 8 9
10
S N ;
Answer
1 2 3 4 5 6 7 8 9
10
S N P1
P1
P1
P1
P1
P1
P1
P1
11
12
13
14
15
16
17
18
19
20
P1
P1
P1
P2
P2
P2 ;
© 2014 ELAD S.r.l. All rights reserved. No part of this document may be reproduced, published, used, disclosed or disseminated in any form or
by any means, electronic, photocopying or otherwise, without prior written permission of ELAD S.r.l.
31
Page 32

ELAD FDM-DUOr User Manual Rev 0.04 12/2014
VA
Reads or sets the auxiliary volume
Parameters:
P1
000 ~ 100
Set
1 2 3 4 5 6 7 8 9
10
V A P1
P1
P1 ;
Read
1 2 3 4 5 6 7 8 9
10
V A ;
Answer
1 2 3 4 5 6 7 8 9
10
V A P1
P1
P1 ;
VM
Reads or sets the main volume
Parameters:
P1
000 ~ 005
010 ~ 100 in 5 dots step
Set
1 2 3 4 5 6 7 8 9
10
V M P1
P1
P1 ;
Read
1 2 3 4 5 6 7 8 9
10
V M ;
Answer
1 2 3 4 5 6 7 8 9
10
V M P1
P1
P1 ;
VS
Reads the FDM-DUO firmware versions.
Parameters:
P1 firmware version to read
I: User Interface
F: FPGA
U: USB audio
R: Rx Demodulator
P2
firmware version “xx.yy”
Set
Read
1 2 3 4 5 6 7 8 9
10
V S P1
;
Answer
1 2 3 4 5 6 7 8 9
10
V S P1
P2
P2
P2
P2
P2
;
© 2014 ELAD S.r.l. All rights reserved. No part of this document may be reproduced, published, used, disclosed or disseminated in any form or
by any means, electronic, photocopying or otherwise, without prior written permission of ELAD S.r.l.
32
Page 33

ELAD FDM-DUOr User Manual Rev 0.04 12/2014
P2
MODE
LSB/USB
CW
AM
0
1600Hz
-
2500Hz
1
1700Hz
-
3000Hz
2
1800Hz
-
3500Hz
3
1900Hz
-
4000Hz
4
2000Hz
-
4500Hz
5
2100Hz
-
5000Hz
6
2200Hz
-
5500Hz
7
2300Hz
100Hz & 4
6000Hz
8
2400Hz
100Hz & 3
-
9
2500Hz
100Hz & 2
-
10
2600Hz
100Hz & 1
-
11
2700Hz
100Hz
-
12
2800Hz
300Hz
-
13
2900Hz
500Hz
-
14
3000Hz
1000Hz
-
15
3100Hz
1500Hz
-
16
4000Hz
2600Hz
-
17
5000Hz
-
-
18
6000Hz
-
-
7.3.3 Parameters details
7.3.3.1 RF command – P2 parameter
© 2014 ELAD S.r.l. All rights reserved. No part of this document may be reproduced, published, used, disclosed or disseminated in any form or
by any means, electronic, photocopying or otherwise, without prior written permission of ELAD S.r.l.
33
Page 34

ELAD FDM-DUOr User Manual Rev 0.04 12/2014
AC
Sets or reads the internal antenna tuner status
DUMMY IMPLEMENTATION
Parameters:
P1: Always 00
P2: Always 0
Set
1 2 3 4 5 6 7 8 9
10
Read
1 2 3 4 5 6 7 8 9
10
A C ;
Answer
1 2 3 4 5 6 7 8 9
10
A C P1
P1
P2
;
AG
Sets or reads the AF gain
DUMMY IMPLEMENTATION
Parameters:
P1: Always 0
P2: Always 000
Set
1 2 3 4 5 6 7 8 9
10
Read
1 2 3 4 5 6 7 8 9
10
A G P1
;
Answer
1 2 3 4 5 6 7 8 9
10
A G P1
P2
P2
P2;
AI
Sets or reads the Auto Information (AI) function ON/ OFF
DUMMY IMPLEMENTATION
Parameters:
P1: Always 0
Set
1 2 3 4 5 6 7 8 9
10
Read
1 2 3 4 5 6 7 8 9
10
A I P1
;
Answer
1 2 3 4 5 6 7 8 9
10
A I P1
;
AN
Selects the antenna connector ANT1/ ANT2
DUMMY IMPLEMENTATION
Parameters:
P1: Always 1
Set
1 2 3 4 5 6 7 8 9
10
Read
1 2 3 4 5 6 7 8 9
10
A N ;
Answer
1 2 3 4 5 6 7 8 9
10
A N P1
;
BC
Sets or reads the Beat Canceller function status
DUMMY IMPLEMENTATION
Parameters:
P1: Always 0
Set
1 2 3 4 5 6 7 8 9
10
Read
1 2 3 4 5 6 7 8 9
10
B C ;
Answer
1 2 3 4 5 6 7 8 9
10
B C P1
;
BY
Reads the busy signal status
DUMMY IMPLEMENTATION
Parameters:
P1: Always 0
P2: Always 0
Set
1 2 3 4 5 6 7 8 9
10
Read
1 2 3 4 5 6 7 8 9
10
B Y ;
Answer
1 2 3 4 5 6 7 8 9
10
B Y P1
P2
;
7.3.4 Dummy commands tables
The following commands have a dummy implementation.
© 2014 ELAD S.r.l. All rights reserved. No part of this document may be reproduced, published, used, disclosed or disseminated in any form or
by any means, electronic, photocopying or otherwise, without prior written permission of ELAD S.r.l.
34
Page 35

ELAD FDM-DUOr User Manual Rev 0.04 12/2014
CA
Sets and reads the CW Auto Zero-beat function status
DUMMY IMPLEMENTATION
Parameters:
P1: Always 0
Set
1 2 3 4 5 6 7 8 9
10
Read
1 2 3 4 5 6 7 8 9
10
C A ;
Answer
1 2 3 4 5 6 7 8 9
10
C A P1
;
CN
Sets and reads the CTCSS tone number
DUMMY IMPLEMENTATION
Parameters:
P1: Always 00
Set
1 2 3 4 5 6 7 8 9
10
Read
1 2 3 4 5 6 7 8 9
10
C N ;
Answer
1 2 3 4 5 6 7 8 9
10
C A P1
P1
;
CT
Sets and reads the CTCSS function status
DUMMY IMPLEMENTATION
Parameters:
P1: Always 0
Set
1 2 3 4 5 6 7 8 9
10
Read
1 2 3 4 5 6 7 8 9
10
C T ;
Answer
1 2 3 4 5 6 7 8 9
10
C T P1
;
DL
Sets and reads the Digital Noise Limiter (DNL) function status
DUMMY IMPLEMENTATION
Parameters:
P1: Always 0
P2: Always 00
Set
1 2 3 4 5 6 7 8 9
10
Read
1 2 3 4 5 6 7 8 9
10
D L ;
Answer
1 2 3 4 5 6 7 8 9
10
D L P1
P2
P2
;
EX
Sets or reads the Extension Menu
DUMMY IMPLEMENTATION
Parameters:
P1: 000 - 060: Menu No.
P2: Always 00
P3: Always 0
P4: Always 0
P5: Always 0
Set
1 2 3 4 5 6 7 8 9
10
Read
1 2 3 4 5 6 7 8 9
10
E X P1
P1
P1
P2
P2
P3
P4
;
Answer
1 2 3 4 5 6 7 8 9
10
E X P1
P1
P1
P2
P2
P3
P4
P5
11
12
13
14
15
16
17
18
19
20
P5
;
FS
Selects or reads the Fine Tuning function status
DUMMY IMPLEMENTATION
Parameters:
P1 Always 0
Set
1 2 3 4 5 6 7 8 9
10
Read
1 2 3 4 5 6 7 8 9
10
F S ;
Answer
1 2 3 4 5 6 7 8 9
10
F S P1
;
© 2014 ELAD S.r.l. All rights reserved. No part of this document may be reproduced, published, used, disclosed or disseminated in any form or
by any means, electronic, photocopying or otherwise, without prior written permission of ELAD S.r.l.
35
Page 36

ELAD FDM-DUOr User Manual Rev 0.04 12/2014
FW
Selects or reads the DSP filtering bandwidth
DUMMY IMPLEMENTATION
Parameters:
P1 Always 0000
Set
1 2 3 4 5 6 7 8 9
10
Read
1 2 3 4 5 6 7 8 9
10
F W ;
Answer
1 2 3 4 5 6 7 8 9
10
F W P1
P1
P1
P1
;
GT
Selects or reads the AGC constant status
DUMMY IMPLEMENTATION
Parameters:
P1 Always 000
Set
1 2 3 4 5 6 7 8 9
10
Read
1 2 3 4 5 6 7 8 9
10
G T ;
Answer
1 2 3 4 5 6 7 8 9
10
G T P1
P1
P1
;
ID
Reads the transceiver ID number
DUMMY IMPLEMENTATION
Parameters:
P1: 020
Set
1 2 3 4 5 6 7 8 9
10
Read
1 2 3 4 5 6 7 8 9
10
I D ;
Answer
1 2 3 4 5 6 7 8 9
10
I D P1
P1
P1 ;
IS
Sets and reads the IF SHIFT function status
DUMMY IMPLEMENTATION
Parameters:
P1: “+”
P2: Always 0000
Set
1 2 3 4 5 6 7 8 9
10
Read
1 2 3 4 5 6 7 8 9
10
I S ;
Answer
1 2 3 4 5 6 7 8 9
10
I S P1
P2
P2
P2
P2
;
KS
Sets and reads the CW electric keyer’s keying speed
DUMMY IMPLEMENTATION
Parameters:
P1: 010
Set
1 2 3 4 5 6 7 8 9
10
Read
1 2 3 4 5 6 7 8 9
10
K S ;
Answer
1 2 3 4 5 6 7 8 9
10
K S P1
P1
P1
;
MF
Sets or reads Menu A or B
DUMMY IMPLEMENTATION
Parameters:
P1: Always 0
Set
1 2 3 4 5 6 7 8 9
10
Read
1 2 3 4 5 6 7 8 9
10
M F ;
Answer
1 2 3 4 5 6 7 8 9
10
M F P1
;
© 2014 ELAD S.r.l. All rights reserved. No part of this document may be reproduced, published, used, disclosed or disseminated in any form or
by any means, electronic, photocopying or otherwise, without prior written permission of ELAD S.r.l.
36
Page 37

ELAD FDM-DUOr User Manual Rev 0.04 12/2014
MG
Sets or reads the Microphone gain status
DUMMY IMPLEMENTATION
Parameters:
P1: Always 000
Set
1 2 3 4 5 6 7 8 9
10
Read
1 2 3 4 5 6 7 8 9
10
M G ;
Answer
1 2 3 4 5 6 7 8 9
10
M G P1
P1
P1
;
NL
Set or reads the NB (Noise Blanker) level
DUMMY IMPLEMENTATION
Parameters:
P1: Always 000
Set
1 2 3 4 5 6 7 8 9
10
Read
1 2 3 4 5 6 7 8 9
10
N L ;
Answer
1 2 3 4 5 6 7 8 9
10
N L P1
P1
P1
;
PA
Sets or reads the pre-amplifier function status
DUMMY IMPLEMENTATION
Parameters:
P1: Always 0
P2: Always 0
Set
1 2 3 4 5 6 7 8 9
10
Read
1 2 3 4 5 6 7 8 9
10
P A ;
Answer
1 2 3 4 5 6 7 8 9
10
P A P1
P2
;
PC
Sets or reads the output power
DUMMY IMPLEMENTATION
Parameters:
P1: Always 005
Set
1 2 3 4 5 6 7 8 9
10
Read
1 2 3 4 5 6 7 8 9
10
P C ;
Answer
1 2 3 4 5 6 7 8 9
10
P C P1
P1
P1
;
PR
Sets or reads the Speech Processor function ON/ OFF
DUMMY IMPLEMENTATION
Parameters:
P1: Always 0
Set
1 2 3 4 5 6 7 8 9
10
Read
1 2 3 4 5 6 7 8 9
10
P R ;
Answer
1 2 3 4 5 6 7 8 9
10
P R P1
;
PS
Sets or reads the Power ON/ OFF status
DUMMY IMPLEMENTATION
Parameters:
P1: Always 1
Set
1 2 3 4 5 6 7 8 9
10
Read
1 2 3 4 5 6 7 8 9
10
P S ;
Answer
1 2 3 4 5 6 7 8 9
10
P S P1
;
© 2014 ELAD S.r.l. All rights reserved. No part of this document may be reproduced, published, used, disclosed or disseminated in any form or
by any means, electronic, photocopying or otherwise, without prior written permission of ELAD S.r.l.
37
Page 38

ELAD FDM-DUOr User Manual Rev 0.04 12/2014
QR
Sets or reads the Quick Memory channel data
DUMMY IMPLEMENTATION
Parameters:
P1: Always 0
P2: Always 0
Set
1 2 3 4 5 6 7 8 9
10
Read
1 2 3 4 5 6 7 8 9
10
Q R ;
Answer
1 2 3 4 5 6 7 8 9
10
Q R P1
P2
;
RA
Sets or reads the Attenuator function status
DUMMY IMPLEMENTATION
Parameters:
P1: Always 00
P2: Always 00
Set
1 2 3 4 5 6 7 8 9
10
Read
1 2 3 4 5 6 7 8 9
10
R A ;
Answer
1 2 3 4 5 6 7 8 9
10
R A P1
P1
P2
P2
;
RG
Sets or read the RF gain status
DUMMY IMPLEMENTATION
Parameters:
P1: Always 000
Set
1 2 3 4 5 6 7 8 9
10
Read
1 2 3 4 5 6 7 8 9
10
R G ;
Answer
1 2 3 4 5 6 7 8 9
10
R G P1
P1
P1
;
RL
Sets or reads the Noise Reduction level
DUMMY IMPLEMENTATION
Parameters:
P1: Always 00
Set
1 2 3 4 5 6 7 8 9
10
Read
1 2 3 4 5 6 7 8 9
10
R L ;
Answer
1 2 3 4 5 6 7 8 9
10
R L P1
P1
;
RM
Sets or reads the Meter function
DUMMY IMPLEMENTATION
Parameters:
P1: Always 1
P2: Always 0001
Set
1 2 3 4 5 6 7 8 9
10
Read
1 2 3 4 5 6 7 8 9
10
R M ;
Answer
1 2 3 4 5 6 7 8 9
10
R M P1
P2
P2
P2
P2
;
SD
Sets or reads the CW Break-in time delay
DUMMY IMPLEMENTATION
Parameters:
P1: Always 0000
Set
1 2 3 4 5 6 7 8 9
10
Read
1 2 3 4 5 6 7 8 9
10
S D ;
Answer
1 2 3 4 5 6 7 8 9
10
S D P1
P1
P1
P1
;
© 2014 ELAD S.r.l. All rights reserved. No part of this document may be reproduced, published, used, disclosed or disseminated in any form or
by any means, electronic, photocopying or otherwise, without prior written permission of ELAD S.r.l.
38
Page 39

ELAD FDM-DUOr User Manual Rev 0.04 12/2014
SH
Sets or reads the DSP filter settings
DUMMY IMPLEMENTATION
Parameters:
P1: Always 00
Set
1 2 3 4 5 6 7 8 9
10
Read
1 2 3 4 5 6 7 8 9
10
S H ;
Answer
1 2 3 4 5 6 7 8 9
10
S H P1
P1
;
SL
Sets or reads the DSP filter settings
DUMMY IMPLEMENTATION
Parameters:
P1: Always 00
Set
1 2 3 4 5 6 7 8 9
10
Read
1 2 3 4 5 6 7 8 9
10
S H ;
Answer
1 2 3 4 5 6 7 8 9
10
S H P1
P1
;
SQ
Sets and reads the squelch level
DUMMY IMPLEMENTATION
Parameters:
P1: Always 0
P2: Always 000
Set
1 2 3 4 5 6 7 8 9
10
Read
1 2 3 4 5 6 7 8 9
10
S Q P1
;
Answer
1 2 3 4 5 6 7 8 9
10
S Q P1
P2
P2
P2
;
TN
Sets or reads the Tone frequency number
DUMMY IMPLEMENTATION
Parameters:
P1: Always 00
Set
1 2 3 4 5 6 7 8 9
10
Read
1 2 3 4 5 6 7 8 9
10
T N ;
Answer
1 2 3 4 5 6 7 8 9
10
T N P1
P1
;
TO
Sets or reads the Tone function ON/ OFF
DUMMY IMPLEMENTATION
Parameters:
P1: Always 0
Set
1 2 3 4 5 6 7 8 9
10
Read
1 2 3 4 5 6 7 8 9
10
T O ;
Answer
1 2 3 4 5 6 7 8 9
10
T O P1
;
TS
Sets or reads the TF-SET function status
DUMMY IMPLEMENTATION
Parameters:
P1: Always 0
Set
1 2 3 4 5 6 7 8 9
10
Read
1 2 3 4 5 6 7 8 9
10
T S ;
Answer
1 2 3 4 5 6 7 8 9
10
T S P1
;
© 2014 ELAD S.r.l. All rights reserved. No part of this document may be reproduced, published, used, disclosed or disseminated in any form or
by any means, electronic, photocopying or otherwise, without prior written permission of ELAD S.r.l.
39
Page 40

ELAD FDM-DUOr User Manual Rev 0.04 12/2014
VD
Sets or reads the VOX delay time
DUMMY IMPLEMENTATION
Parameters:
P1: Always 0000
Set
1 2 3 4 5 6 7 8 9
10
Read
1 2 3 4 5 6 7 8 9
10
V D ;
Answer
1 2 3 4 5 6 7 8 9
10
V D P1
P1
P1
P1
;
VG
Sets or reads the VOX GAIN
DUMMY IMPLEMENTATION
Parameters:
P1: Always 000
Set
1 2 3 4 5 6 7 8 9
10
Read
1 2 3 4 5 6 7 8 9
10
V G ;
Answer
1 2 3 4 5 6 7 8 9
10
V G P1
P1
P1
;
VX
Sets or reads the VOX function status
DUMMY IMPLEMENTATION
Parameters:
P1: Always 0
Set
1 2 3 4 5 6 7 8 9
10
Read
1 2 3 4 5 6 7 8 9
10
V X ;
Answer
1 2 3 4 5 6 7 8 9
10
V X P1
;
© 2014 ELAD S.r.l. All rights reserved. No part of this document may be reproduced, published, used, disclosed or disseminated in any form or
by any means, electronic, photocopying or otherwise, without prior written permission of ELAD S.r.l.
40
Page 41

ELAD FDM-DUOr User Manual Rev 0.04 12/2014
8 Software & Driver Installation
8.1 Software installation
8.1.1 First-time install in Windows 8 and Windows 7
Double-click the file “setup.exe” in the CD .
The windows installer first installs the prerequisites:
Microsoft VC++ 2010 Runtime libraries
Microsoft .NET Framework 4.0 (Only for Windows 7)
and then the FDM-SW2 software.
Click on “Accept” (Only for Windows 7)
© 2014 ELAD S.r.l. All rights reserved. No part of this document may be reproduced, published, used, disclosed or disseminated in any form or
by any means, electronic, photocopying or otherwise, without prior written permission of ELAD S.r.l.
41
Page 42

ELAD FDM-DUOr User Manual Rev 0.04 12/2014
Click on “Install”
Click on “Yes”
Click on Install
© 2014 ELAD S.r.l. All rights reserved. No part of this document may be reproduced, published, used, disclosed or disseminated in any form or
by any means, electronic, photocopying or otherwise, without prior written permission of ELAD S.r.l.
42
Page 43

ELAD FDM-DUOr User Manual Rev 0.04 12/2014
Microsoft Visual C++ 2010 x86 Redistributable installation is complete, click on “Finish”
Click on “Yes” to start the installation of the .Net Framework 4.0 (Only for Windows 7)
© 2014 ELAD S.r.l. All rights reserved. No part of this document may be reproduced, published, used, disclosed or disseminated in any form or
by any means, electronic, photocopying or otherwise, without prior written permission of ELAD S.r.l.
43
Page 44

ELAD FDM-DUOr User Manual Rev 0.04 12/2014
Click to “Next” to start the FDM-SW2 software installation
Chose the installation folder, then click on “Next”
© 2014 ELAD S.r.l. All rights reserved. No part of this document may be reproduced, published, used, disclosed or disseminated in any form or
by any means, electronic, photocopying or otherwise, without prior written permission of ELAD S.r.l.
44
Page 45

ELAD FDM-DUOr User Manual Rev 0.04 12/2014
Click on “Next”
Click on “Yes”
© 2014 ELAD S.r.l. All rights reserved. No part of this document may be reproduced, published, used, disclosed or disseminated in any form or
by any means, electronic, photocopying or otherwise, without prior written permission of ELAD S.r.l.
45
Page 46

ELAD FDM-DUOr User Manual Rev 0.04 12/2014
8.1.2 First-time install in Windows XP
Double-click the file “setup.exe” in the installation folder.
Click on “Accept”
© 2014 ELAD S.r.l. All rights reserved. No part of this document may be reproduced, published, used, disclosed or disseminated in any form or
by any means, electronic, photocopying or otherwise, without prior written permission of ELAD S.r.l.
46
Page 47

ELAD FDM-DUOr User Manual Rev 0.04 12/2014
Click on “Install”
Click on “Install”
© 2014 ELAD S.r.l. All rights reserved. No part of this document may be reproduced, published, used, disclosed or disseminated in any form or
by any means, electronic, photocopying or otherwise, without prior written permission of ELAD S.r.l.
47
Page 48

ELAD FDM-DUOr User Manual Rev 0.04 12/2014
Click on Next to install the FDM-SW2 software
Select the installation folder, then click on “Next”
© 2014 ELAD S.r.l. All rights reserved. No part of this document may be reproduced, published, used, disclosed or disseminated in any form or
by any means, electronic, photocopying or otherwise, without prior written permission of ELAD S.r.l.
48
Page 49

ELAD FDM-DUOr User Manual Rev 0.04 12/2014
Click on “Next”
The FDM-SW2 Software installation is completed
8.1.3 Update an existing software version
Double click on file ELAD_FDM_SW2_V_x.xx.msi included in the update and follow the instructions.
© 2014 ELAD S.r.l. All rights reserved. No part of this document may be reproduced, published, used, disclosed or disseminated in any form or
by any means, electronic, photocopying or otherwise, without prior written permission of ELAD S.r.l.
49
Page 50

ELAD FDM-DUOr User Manual Rev 0.04 12/2014
8.2 USB driver
8.2.1 USB driver installation in Windows 8 and Windows 7
8.2.1.1 First driver installation
To install ELAD FDM-DUOr driver, connect the FDM-DUOr USB RX port to a USB 2.0 socket on PC end
power on the device. When Windows detects the new hardware, follow the steps listed below to install
driver correctly:
Open Control Panel from Start menu, select “System” and “Device Manager”. Expand “Other Devices”
node: FDM-DUO.
Select FDM-DUO, right click on it and execute “Update driver software”.
© 2014 ELAD S.r.l. All rights reserved. No part of this document may be reproduced, published, used, disclosed or disseminated in any form or
by any means, electronic, photocopying or otherwise, without prior written permission of ELAD S.r.l.
50
Page 51

ELAD FDM-DUOr User Manual Rev 0.04 12/2014
When Windows starts the installation procedure, select the option “Browse my computer for driver
software” (the second option).
In the next dialog-box, insert the driver folder location using “Browse” button and check the option
“Include subfolders”. In this way manual driver search is enabled
For 32 bit system select the folder: C:\Program Files\ELAD\ELAD FDM-SW2\ELAD_FDM_Driver
For 64 bit system select the folder: C:\Program Files (x86)\ ELAD\ELAD FDM-SW2\ELAD_FDM_Driver
Then click “Next”.
Click Install.
© 2014 ELAD S.r.l. All rights reserved. No part of this document may be reproduced, published, used, disclosed or disseminated in any form or
by any means, electronic, photocopying or otherwise, without prior written permission of ELAD S.r.l.
51
Page 52

ELAD FDM-DUOr User Manual Rev 0.04 12/2014
Let the hardware installation automatically completes and, at the procedure ending, click on “Close”;
then disconnect and connect FDM-DUOr device on the same USB socket.
Now ELAD FDM-DUOr USB driver is installed on your PC.
© 2014 ELAD S.r.l. All rights reserved. No part of this document may be reproduced, published, used, disclosed or disseminated in any form or
by any means, electronic, photocopying or otherwise, without prior written permission of ELAD S.r.l.
52
Page 53

ELAD FDM-DUOr User Manual Rev 0.04 12/2014
8.2.2 USB driver installation in Windows XP
8.2.2.1 First driver installation
To install ELAD FDM-DUOr driver, connect the FDM-DUOr USB RX port to a USB 2.0 socket on PC and
power on the device. Windows XP detects the new hardware and starts the hardware installation
wizard. Then, next steps to install FDM-DUOr driver are listed below:
At the first dialog box, select the last option “No, not this time” and “Next”.
Select “Install from a list or specific location (Advanced)” and “Next”.
In the next dialog-box, check the options “Search for the best driver in these location” and “Include this
location in the search” to enable manual driver search. Clicking on “Browse”, select the path where the
driver folder is located: Local Drive (C:) \Programs\ELAD\ELAD FDM-SW2\ELAD_FDM_Driver. Then
click “Next”.
© 2014 ELAD S.r.l. All rights reserved. No part of this document may be reproduced, published, used, disclosed or disseminated in any form or
by any means, electronic, photocopying or otherwise, without prior written permission of ELAD S.r.l.
53
Page 54

ELAD FDM-DUOr User Manual Rev 0.04 12/2014
Let the hardware installation automatically completes and click on “Finish”; then disconnect and
connect FDM- DUOr device on the same USB socket.
Now ELAD FDM- DUOr driver is installed on your PC.
8.2.2.1 Driver installation verify in Windows 8 and Windows 7
To verify FDM-DUOr driver current version, connect the device to USB socket (where the device driver is
already installed) and power on the device. Then open Control Panel from Start menu. Click on
“System” and select “Device Manager”.
Expanding “ELAD Samplers” node, right click on “ELAD FDM-DUO” and select “Properties”.
© 2014 ELAD S.r.l. All rights reserved. No part of this document may be reproduced, published, used, disclosed or disseminated in any form or
by any means, electronic, photocopying or otherwise, without prior written permission of ELAD S.r.l.
54
Page 55

ELAD FDM-DUOr User Manual Rev 0.04 12/2014
When dialog box opens, select “Driver” label: you must read provider name, current driver release date
and current driver version. The figure shows an old FDM- DUOr driver version.
8.2.2.2 Manual driver update
To update FDM-DUOr driver, connect the device to USB RX socket (where the device driver is already
installed) and power on the device. Then open Control Panel from Start menu. Click on “System” and
select “Device Manager”.
Under “ELAD samplers” list select “ELAD FDM-DUO”, right click on it and execute “Update driver”.
© 2014 ELAD S.r.l. All rights reserved. No part of this document may be reproduced, published, used, disclosed or disseminated in any form or
by any means, electronic, photocopying or otherwise, without prior written permission of ELAD S.r.l.
55
Page 56

ELAD FDM-DUOr User Manual Rev 0.04 12/2014
When Windows starts the installation procedure, select the last option “Browse my computer for driver
software”.
In the next dialog-box, disable the option “Include subfolders” and choose “Let me pick from a list of
device drivers on my computer”. Don’t click “Next”.
© 2014 ELAD S.r.l. All rights reserved. No part of this document may be reproduced, published, used, disclosed or disseminated in any form or
by any means, electronic, photocopying or otherwise, without prior written permission of ELAD S.r.l.
56
Page 57

ELAD FDM-DUOr User Manual Rev 0.04 12/2014
Verify that “Show compatible hardware” option is checked and ELAD FDM-DUO is selected: then click
on “Have a Disk”. In this way the manual driver update is enabled. Don’t click “Next”.
Click on “Browse” and search for FDM-DUOr driver update folder location; then open
winusb_fdmsampler.inf file. Click “OK” and then “Next”.
Let the hardware installation automatically completes and, at the procedure ending, click on “Close”;
then disconnect and connect FDM-DUOr device on the same USB socket.
© 2014 ELAD S.r.l. All rights reserved. No part of this document may be reproduced, published, used, disclosed or disseminated in any form or
by any means, electronic, photocopying or otherwise, without prior written permission of ELAD S.r.l.
57
Page 58

ELAD FDM-DUOr User Manual Rev 0.04 12/2014
To verify that a correct update is done, enter “Device Manager” in Control Panel; under “ELAD samplers”
label select ELAD FDM-DUO driver (see sub-chapter Driver installation verify in Windows 8 and Windows
7): right click on it and choose “Properties”: select “Driver” label to visualize the last driver version (an
example is depicted in figure below).
© 2014 ELAD S.r.l. All rights reserved. No part of this document may be reproduced, published, used, disclosed or disseminated in any form or
by any means, electronic, photocopying or otherwise, without prior written permission of ELAD S.r.l.
58
Page 59

ELAD FDM-DUOr User Manual Rev 0.04 12/2014
8.2.2.3 Driver installation verify in Windows Xp
To verify FDM-DUOr driver current version, connect the device to USB socket (where the device driver is
already installed) and open Control Panel from Start menu. Click on “System” and select “Device
Manager” under “Hardware” label.
Expanding “ELAD Samplers” node, right click on “ELAD FDM-DUO” and select “Properties”.
When dialog box opens, select “Driver” label: you must read provider name, current driver release date
and current driver version. The old ELAD FDM-DUOr driver version is shown in figure below as example.
© 2014 ELAD S.r.l. All rights reserved. No part of this document may be reproduced, published, used, disclosed or disseminated in any form or
by any means, electronic, photocopying or otherwise, without prior written permission of ELAD S.r.l.
59
Page 60

ELAD FDM-DUOr User Manual Rev 0.04 12/2014
8.2.2.4 Manual driver update in Windows Xp
To update FDM-DUOr driver, connect the device to USB socket (where the device driver is already
installed) and power on the device. Then open Control Panel from Start menu. Click on “System” and
select “Device Manager” under “Hardware” label.
Select “ELAD FDM-DUO” from “ELAD Samplers” list, right click on it and execute “Update driver ”
Now Windows XP launches the hardware update wizard: select the last option “No, not this time” and
“Next”.
© 2014 ELAD S.r.l. All rights reserved. No part of this document may be reproduced, published, used, disclosed or disseminated in any form or
by any means, electronic, photocopying or otherwise, without prior written permission of ELAD S.r.l.
60
Page 61

ELAD FDM-DUOr User Manual Rev 0.04 12/2014
At next step select “Install from a list or specific location (Advanced)” and “Next”.
Then, disable all check-boxes that the system automatically sets and choose the last option for manual
driver update, as depicted in figure. Select “Next”.
Verify that “Show compatible hardware” option is checked and ELAD FDM-DUO is selected: then click on
“Have a Disk”. Don’t click “Next”.
© 2014 ELAD S.r.l. All rights reserved. No part of this document may be reproduced, published, used, disclosed or disseminated in any form or
by any means, electronic, photocopying or otherwise, without prior written permission of ELAD S.r.l.
61
Page 62

ELAD FDM-DUOr User Manual Rev 0.04 12/2014
Click on “Browse” and search for the FDM-DUO driver update folder location; then open
winusb_fdmsampler.inf file, as depicted in figure. Click “OK” and then “Next”.
Now driver update starts: at next dialog box select “Continue Anyway” and ignore the warning.
Let the hardware update automatically completes and, at the procedure ending, click on “Finish”; then
disconnect e connect FDM-DUOr device on the same USB socket.
© 2014 ELAD S.r.l. All rights reserved. No part of this document may be reproduced, published, used, disclosed or disseminated in any form or
by any means, electronic, photocopying or otherwise, without prior written permission of ELAD S.r.l.
62
Page 63

ELAD FDM-DUOr User Manual Rev 0.04 12/2014
To verify that a correct update is done, enter “Device Manager” from Control Panel; under “ELAD
Samplers” list, select ELAD FDM-DUO driver (see chapter Driver installation verify in Windows Xp) right
click on it and choose “Properties”. Select “Driver” label to visualize the last driver version (an example is
depicted in figure below).
© 2014 ELAD S.r.l. All rights reserved. No part of this document may be reproduced, published, used, disclosed or disseminated in any form or
by any means, electronic, photocopying or otherwise, without prior written permission of ELAD S.r.l.
63
Page 64

ELAD FDM-DUOr User Manual Rev 0.04 12/2014
8.2.3 USB CAT Serial port
Connect the CAT USB port of FDM-DUOr to a USB 2.0 port of the PC . Windows download and install
automatically the FTDI FT232R serial port driver.
When the installation process ends, open the windows device manager and check the FDM-DUOr USB
serial port in the node Ports (COM & LPT).
© 2014 ELAD S.r.l. All rights reserved. No part of this document may be reproduced, published, used, disclosed or disseminated in any form or
by any means, electronic, photocopying or otherwise, without prior written permission of ELAD S.r.l.
64
Page 65

ELAD FDM-DUOr User Manual Rev 0.04 12/2014
9 Firmware update
The following section describes how to update the firmware of the various components of the FDMDUOr. The latest versions for the User interface, Rx demodulator, USB interface and FPGA are available
here: http://sdr.eladit.com/FDM-DUO/Firmware Releases/.
To ensure that the receiver still working properly, please download the full update compressed archive
named ELAD_FDM_DUO_Update_YYYY_MM_DD.zip (where YYYY_MM_DD are year, month and day of
the release date). In this archive you can find the latest version of each firmware and also the latest
version of the ELAD FDM-SW2 software.
TO AVOID UPDATE ERRORS, PLEASE UPDATE THE “USER INTERFACE” FIRMWARE AFTER THE OTHERS
FIRMWARE UPDATES
9.1 User interface firmware update
Download the latest version of the UI firmware
DISABLE ANY ANTIVIRUS PROGRAM BEFORE START THE FIRMWARE UPDATE
In order to update the user interface (UI) firmware, you need to install the Flash Magic software. This
program is available here: http://www.flashmagictool.com/
Turn on the ELAD FDM-DUOr and connect the CAT USB serial port to a USB 2.0 port of your PC. Enable
the FDM-DUOr to perform a UI firmware update:
Press the key and select the menu “80 SERVICE”.
Press E2 to enter the setting, turn E2 to select ON then press E2 to store the setting.
Go to menu “82 UI Update”.
Press E2 to enter the setting, turn E2 to select YES then press E2 to store the setting.
You need to identify the CAT USB COM port. Open the windows “Device Manager” and expand the COM
port node. The CAT USB port is listed as “USB Serial Port”.
In this case the CAT USB port is the COM19
© 2014 ELAD S.r.l. All rights reserved. No part of this document may be reproduced, published, used, disclosed or disseminated in any form or
by any means, electronic, photocopying or otherwise, without prior written permission of ELAD S.r.l.
65
Page 66

ELAD FDM-DUOr User Manual Rev 0.04 12/2014
Run Flash Magic software.
In the “Step 1 – Communication” section:
Select LPC1766.
COM Port: the CAT USB com port
Baud Rate: 230400
Interface: None (ISP)
In the “Step 2 – Erase” section:
Check “Erase all Flash+Code Rd Prot”
In the “Step 3 – Hex File” section:
Click on Browse and select the update “.hex” file
In the “Step 4 – Options” section:
Check “Verify after programming
Check the communication with the FDM-DUOr. Click on ISP and click on “Read Device Signatures”. If the
communication with the FDM-DUOr is ok, a new windows with some device information is opened.
If the communication is Ok, click on close and in the Flash Magic main window, click on Start to begin
the programming. Wait until the end of the process, then turn off and restart the FDM-DUOr.
© 2014 ELAD S.r.l. All rights reserved. No part of this document may be reproduced, published, used, disclosed or disseminated in any form or
by any means, electronic, photocopying or otherwise, without prior written permission of ELAD S.r.l.
66
Page 67

ELAD FDM-DUOr User Manual Rev 0.04 12/2014
9.2 RX demodulator firmware update
To update the RX demodulator firmware, you must remove the FDM-DUOr top cover. Remove the four
screws in the FDM-DUOr chassis bottom as shown in the figure below.
Then remove the top cover of the FDM-DUOr
Download the latest version of the RX demodulator firmware.
Replace the file fdmduorx.bin in the USB pen provided with the FDM-DUOr
The file fdmduorx.bin must be in the root of the USB pen
Connect the provided USB pen to the FDM-DUOr RX Micro-USB programming port using the provided
micro-USB adapter.
Connect the power supply, keep pressed the Rx program mode button and power up the FDM-DUOr.
© 2014 ELAD S.r.l. All rights reserved. No part of this document may be reproduced, published, used, disclosed or disseminated in any form or
by any means, electronic, photocopying or otherwise, without prior written permission of ELAD S.r.l.
67
Page 68

ELAD FDM-DUOr User Manual Rev 0.04 12/2014
Keep pressed the Rx program mode button until the red led turns on.
Release the Rx program mode button .
Wait until the red led turns off.
Turn off the FDM-DUOr, disconnect the USB pen and restart the FDM-DUOr.
If during the firmware update the green leds are blinking quickly, it means that the programming
process is failed. In this case contact the technical assistance.
© 2014 ELAD S.r.l. All rights reserved. No part of this document may be reproduced, published, used, disclosed or disseminated in any form or
by any means, electronic, photocopying or otherwise, without prior written permission of ELAD S.r.l.
68
Page 69

ELAD FDM-DUOr User Manual Rev 0.04 12/2014
9.3 USB interface firmware update
Download the latest version of the USB interface
Turn on the FDM-DUOr and connect the USB Receiver data connector port to a USB 2.0 port of your PC.
Disable any antivirus program before start the firmware update
Run the downloaded file and wait until the end of the update process without disconnecting the USB
cable or power off the FDM-DUOr, then turn off and restart the FDM-DUOr.
9.4 FPGA DDC update
Download the latest version of the FPGA DDC.
Turn on the FDM-DUOr and connect the USB Receiver data connector port to a USB 2.0 port of your PC.
Disable any antivirus program before start the firmware update
Run the downloaded file and wait until the end of the update process without disconnecting the USB
cable or power off the FDM-DUOr, then turn off and restart the FDM-DUOr.
© 2014 ELAD S.r.l. All rights reserved. No part of this document may be reproduced, published, used, disclosed or disseminated in any form or
by any means, electronic, photocopying or otherwise, without prior written permission of ELAD S.r.l.
69
Page 70

ELAD FDM-DUOr User Manual Rev 0.04 12/2014
Caneva
Place
July, 30th 2014
Date
Signature
Declaration of Conformity (EC)
The product marked as
FDM-DUOr
manufactured by
Manufacturer: ELAD S.r.l.
Address: Via Col De Rust, 11 - Sarone
33070 CANEVA (PN)
is produced in conformity to the requirements contained in the following EC directives:
R&TTE Directive 1999/5/CE
EMC Directive 2004/108/CE
Low Voltage Directive 2006/95/CE
RoHS Directive 2011/65/CE
The product conforms to the following Product Specifications:
Emissions & Immunity:
ETSI EN 301 489-1 V1.9.2
ETSI EN 301 489-15 V1.2.1
ETSI EN 301 783-2 V1.2.1
Safety:
EN 60950-1:2006 + A11:2009 + A1:2010 + A12:2011 + A2:2013
And further amendments.
This declaration is under responsibility of the manufacturer:
ELAD S.r.l.
Via Col De Rust, 11 - Sarone
33070 CANEVA (PN)
Issued by:
Name: Franco Milan
Function: President of ELAD
© 2014 ELAD S.r.l. All rights reserved. No part of this document may be reproduced, published, used, disclosed or disseminated in any form or
by any means, electronic, photocopying or otherwise, without prior written permission of ELAD S.r.l.
70
 Loading...