

Page 1
D C
M : DCB61
O’ M
Page 2

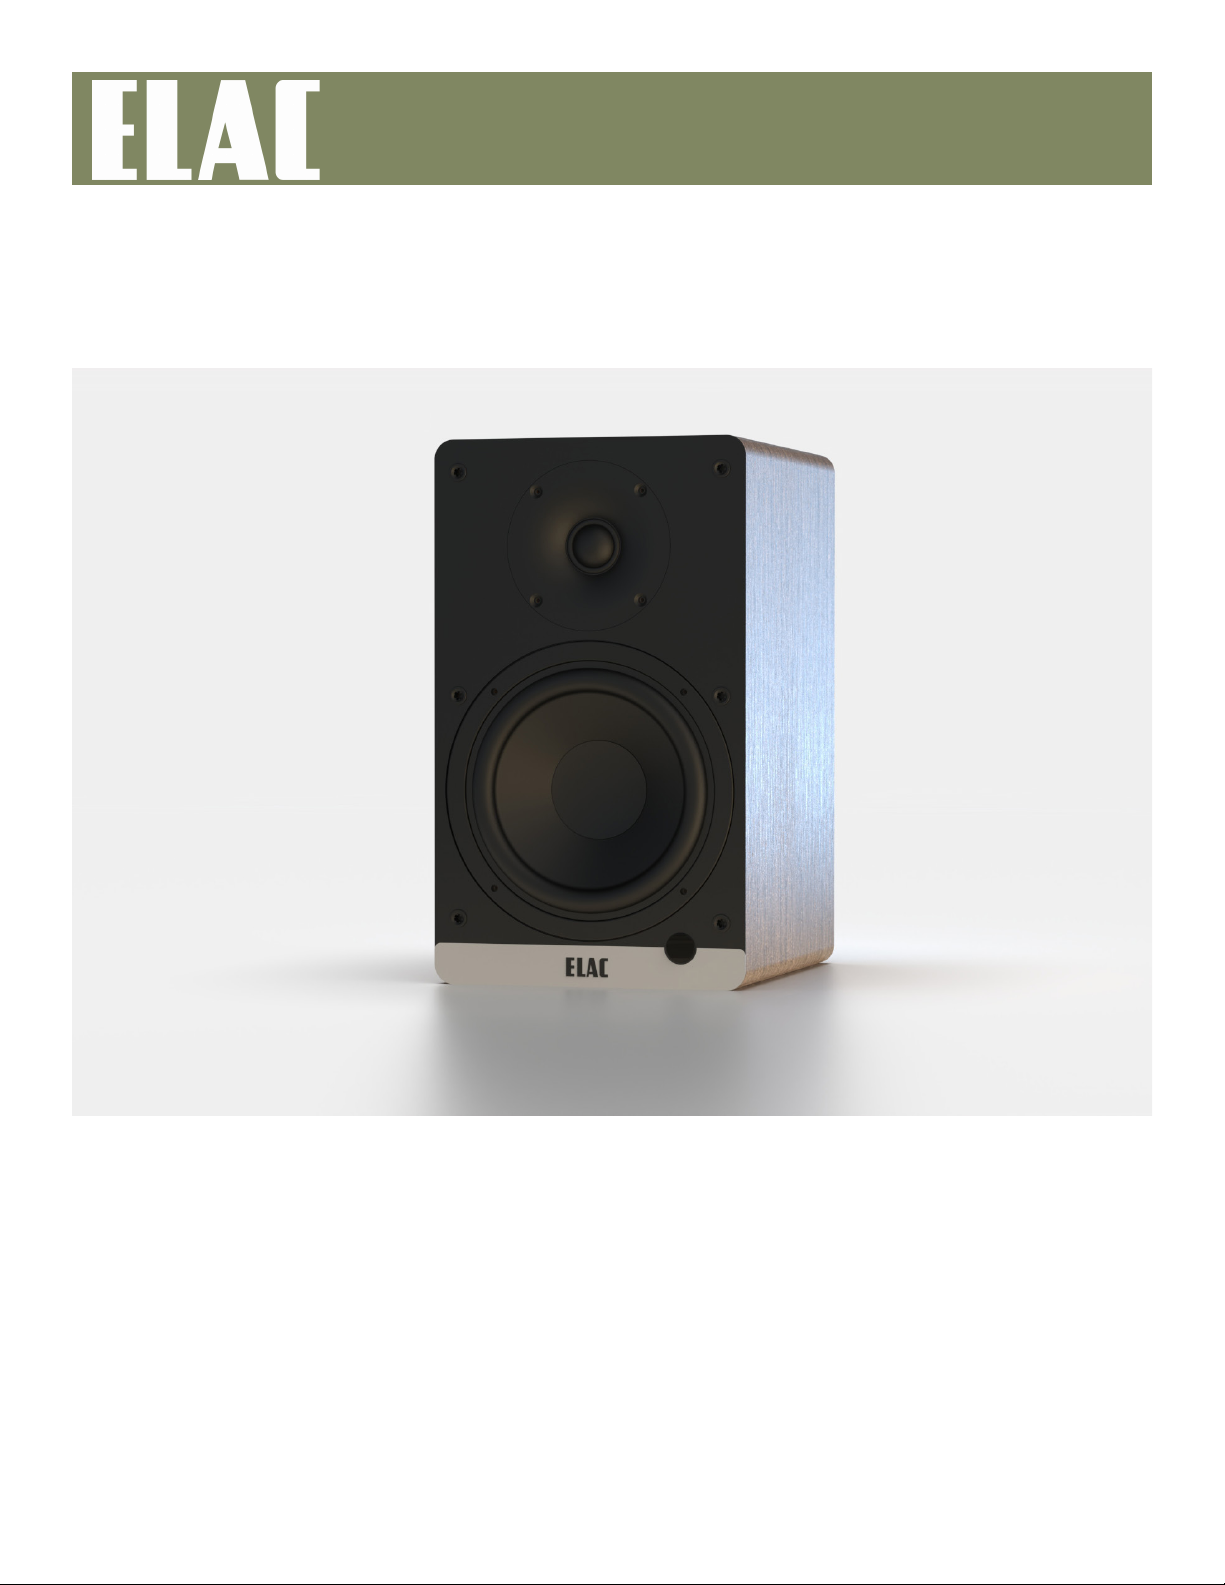
Congratulations on bringing home an ELAC Debut
ConneX Powered Speaker Sytem.
PREMIUM SOUND
Simplicity and Versatility!
Thank you so much for purchasing the ELAC DCB61 speakers! We truly appreciate your
choice and trust in our product. We’re confident that you’ll enjoy the exceptional sound
quality and performance they oer.
The Debut ConneX DCB61 powered bookshelf speakers define how simple it can be to
deliver a premium audio experience for both, movies and music. Featuring a wide variety
of inputs (HDMI ARC, Analog/Phono, Optical, USB and Bluetooth), and matched with opti-
mally designed drivers and amplifiers, the DCB61 delivers a truly exceptional audio expe-
rience.
Journey Together Through - The Life of Sound
ELAC D C M DCB61 | ..
P 2
Page 3
Contents
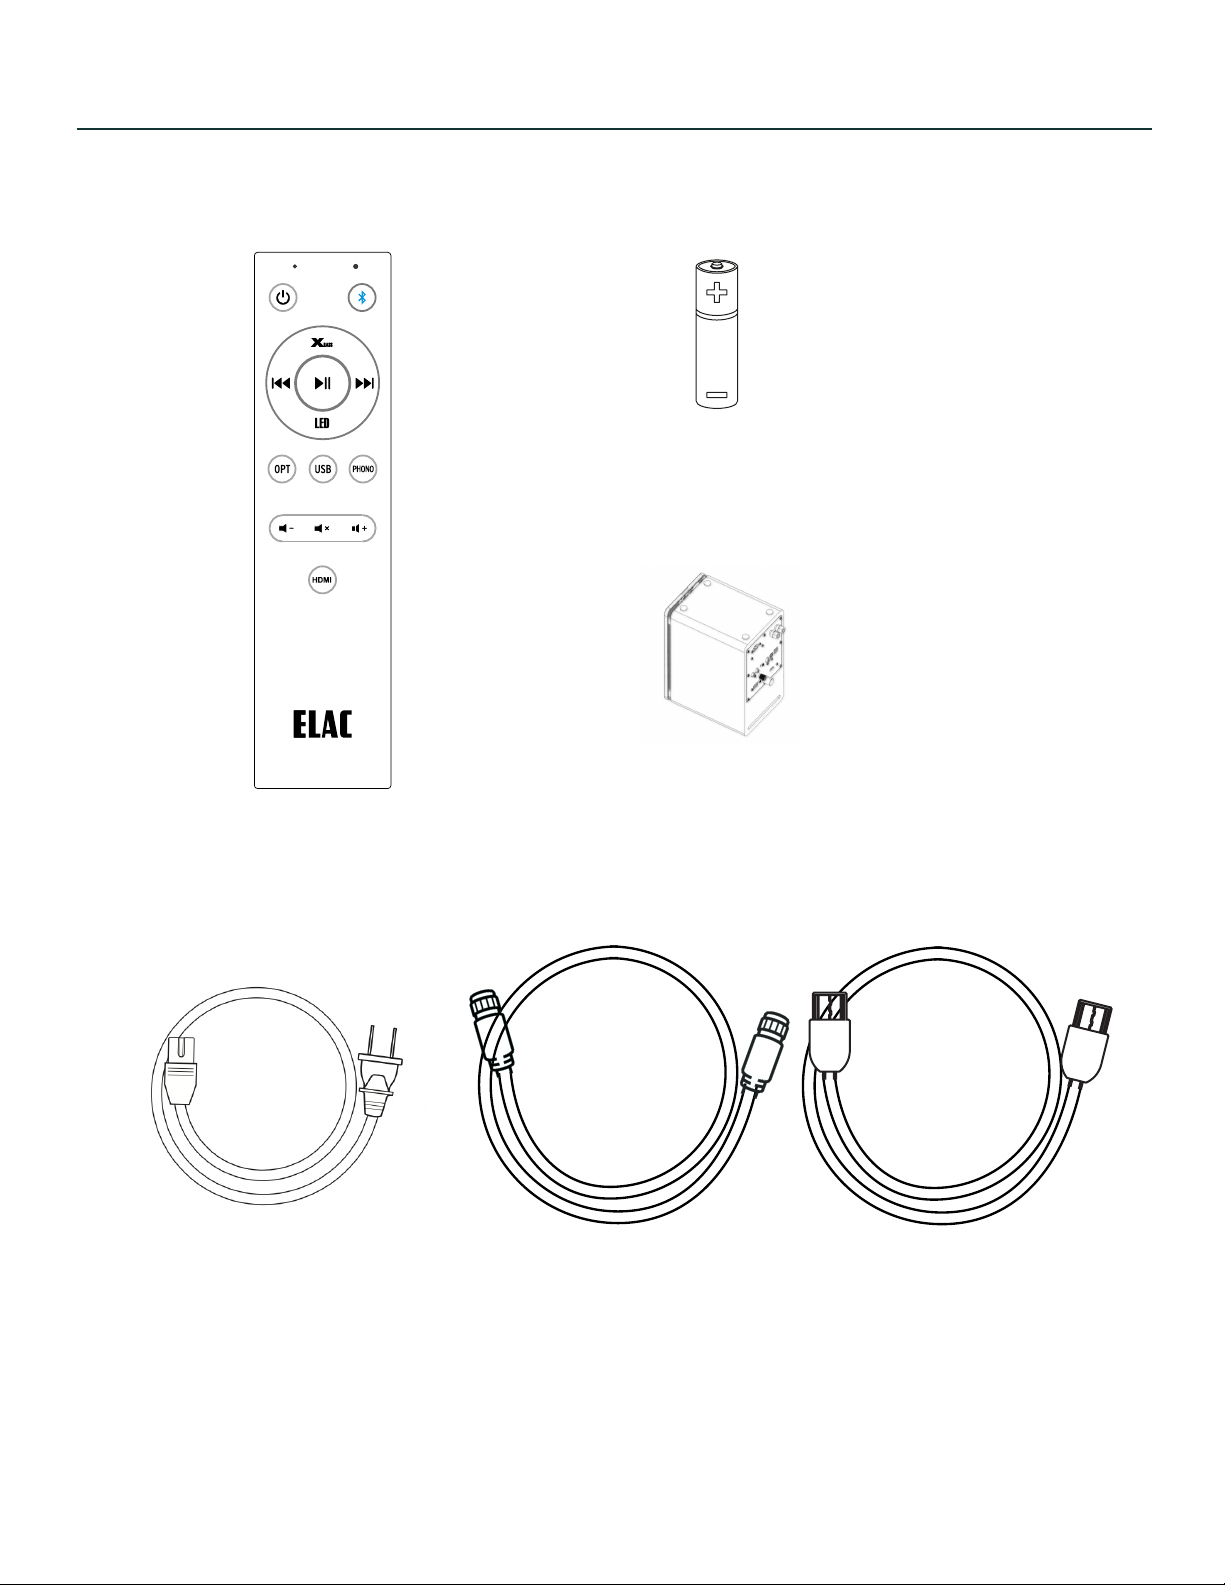
Batteries
Remote Control
Power Cord
Rubber Foot
Speaker Cable
HDMI Cable
ELAC D C M DCB61 | ..
P 3
Page 4
Connections
1
4
2
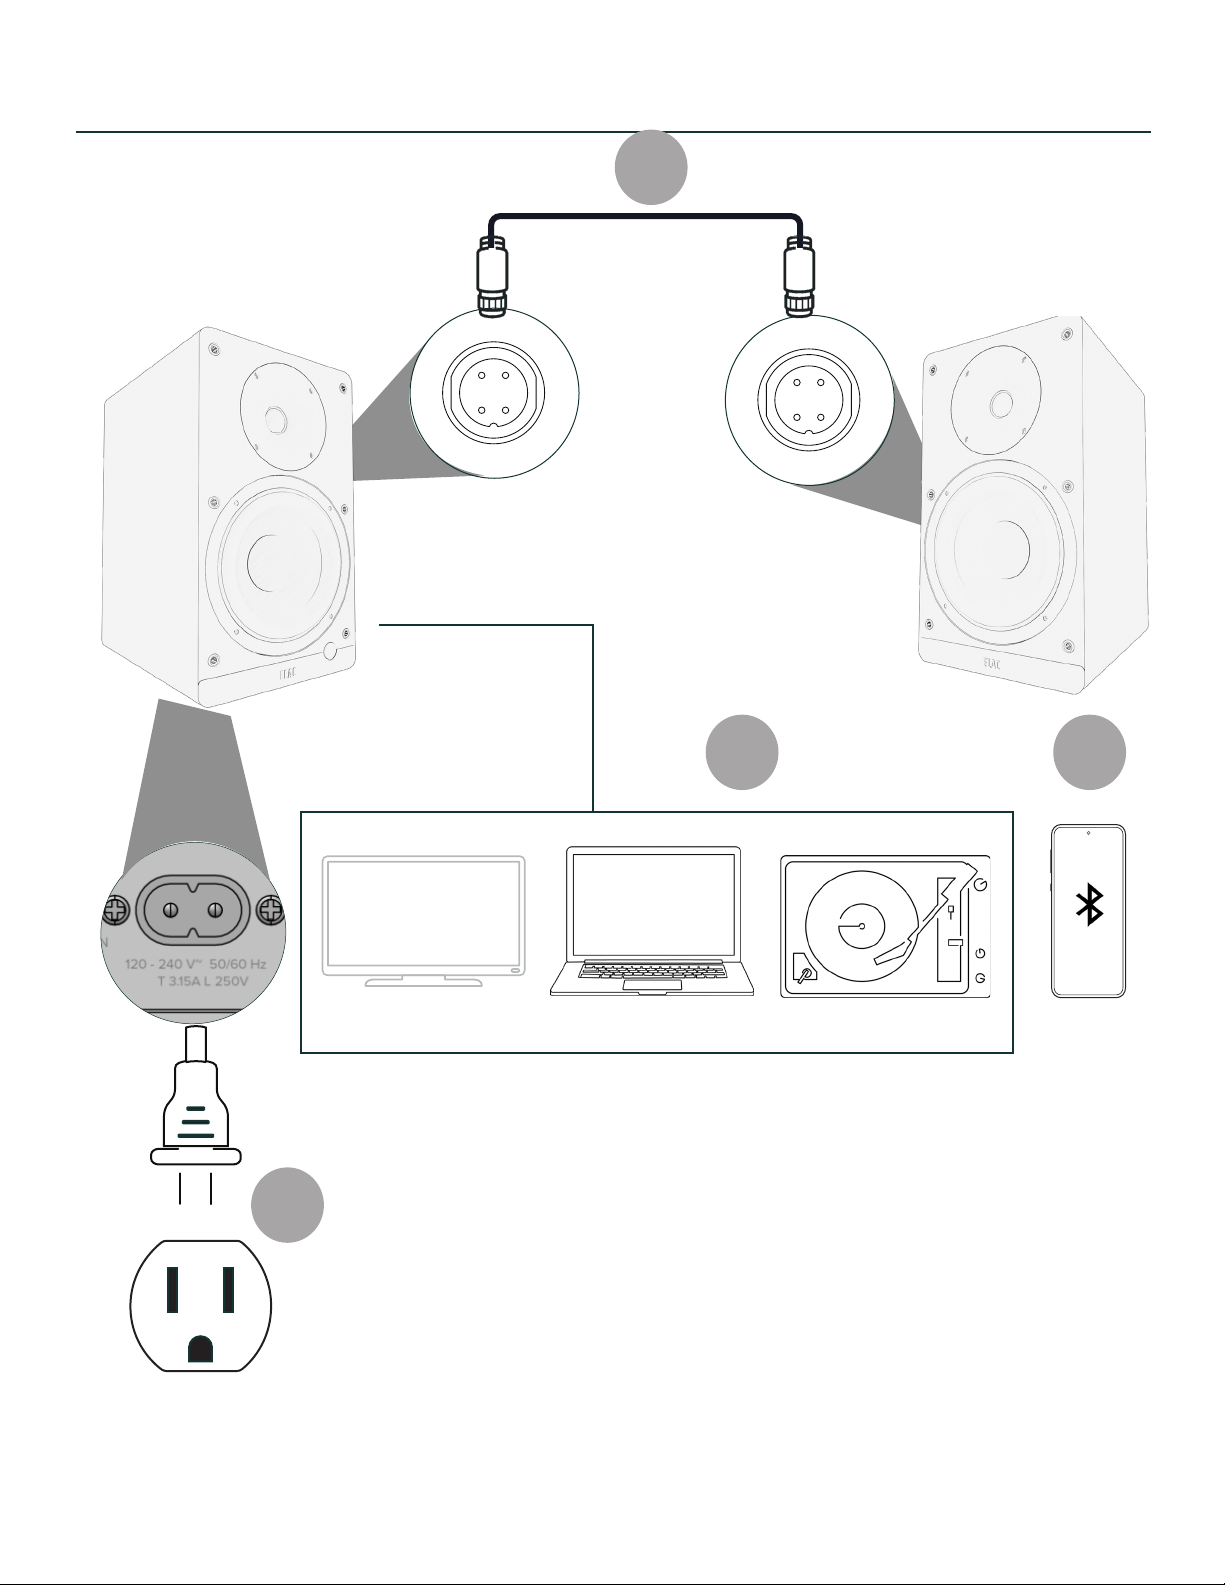
1. Connect speakers together with supplied wire
2. Connect source - TV, Computer, Phono
3. Connect source - Bluetooth
4. Connect AC mains
3
ELAC D C M DCB61 | ..
P 4
Page 5
Controls and Inputs/Output
DEBU T
1938 N. Batavia St.
Suite K
24118 Kiel, Deutschland
Orange, CA, 92865
2
HDMI (ARC)
HDMI (ARC)
PC
OPT
3
SUB OUT
6 7 8 9 10
SERIAL NUMBER
12
LEFT SPEAKER OUT
4
L/R
SPEAKER
OUT
PHONO
ON/OFF
j
CAN ICES-003(B)/NMB-003(B)
FCC ID: 2A7OW-DCB61
IC: 28740-DCB61
Designed by Elac
Made in China
Model : DCB61
5
USB
11
1
~
100-240V 50/60Hz AC
160W
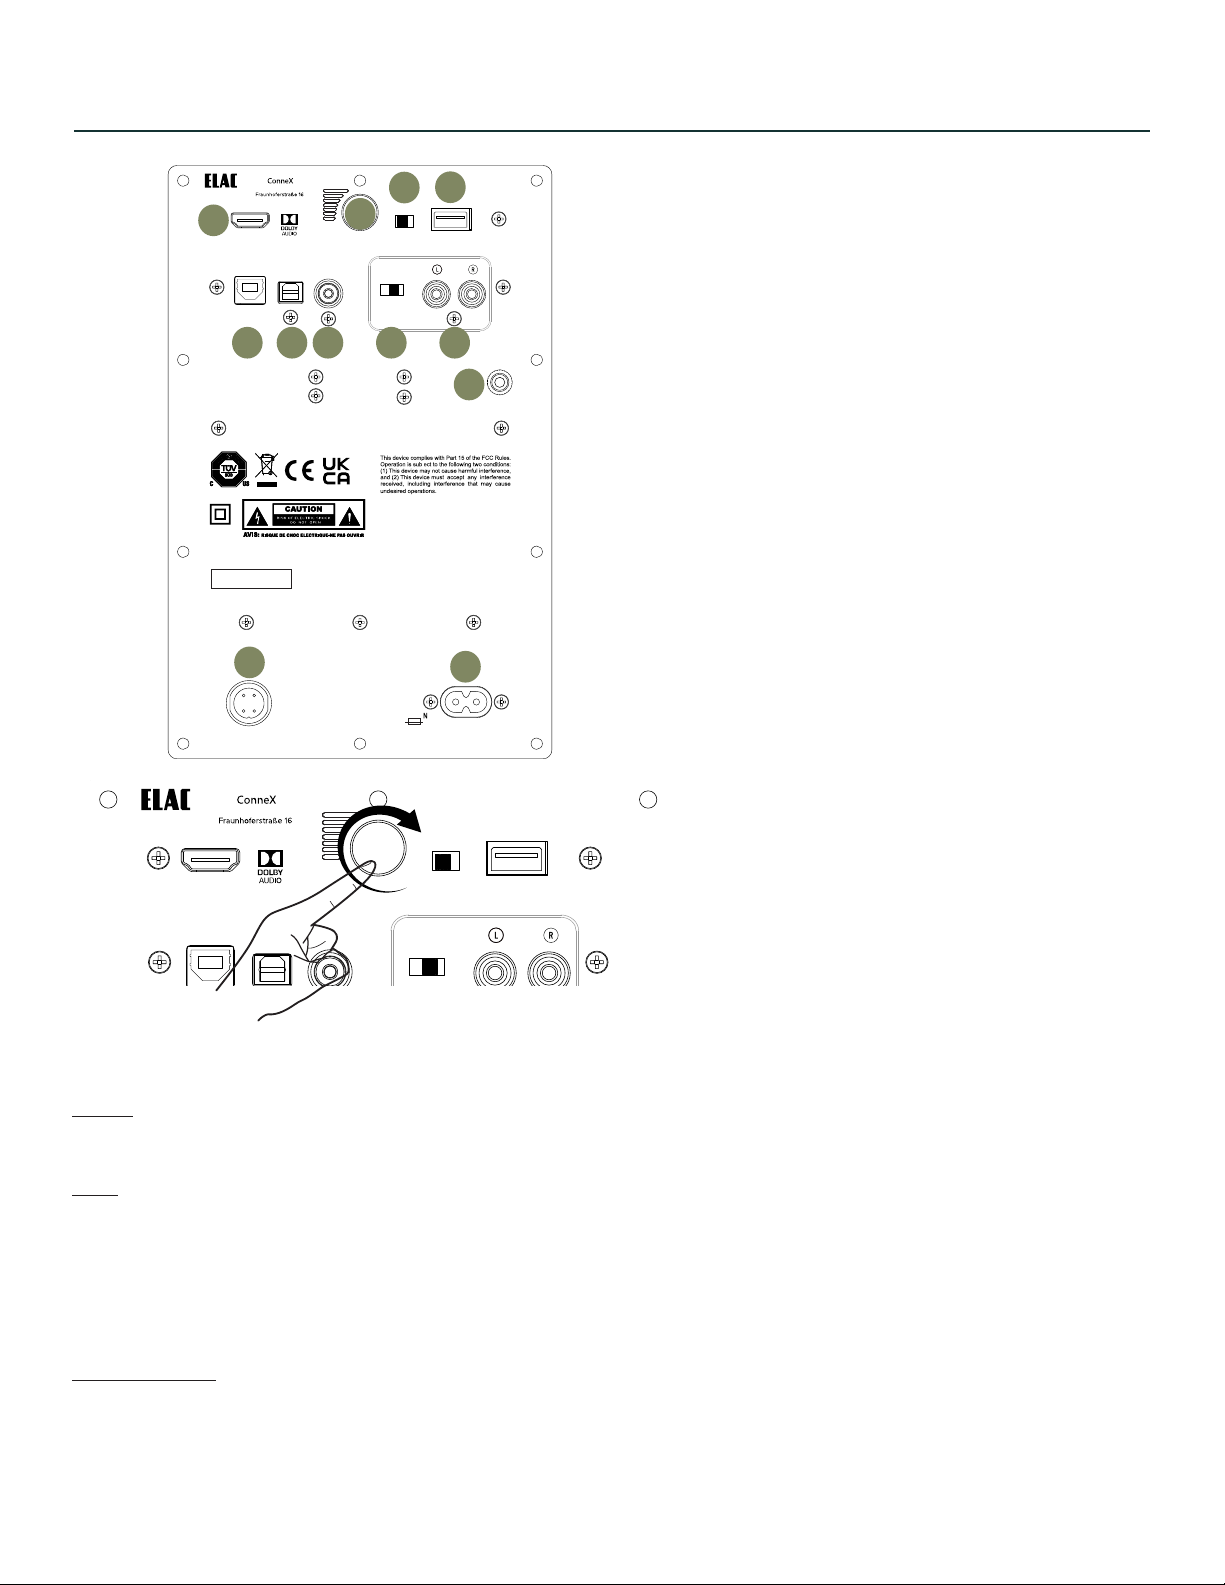
1. AC Mains Inlet
2. HDMI (ARC) Input
3. Volume/Power/Source
GND
4. L/R switch
5. USB for Update
6. USB Audio Input
7. Optical Input
8. Subwoofer Output
9. Phono/Line Switch
10. Phono/Line Input
11. Ground Screw Terminal
12. Speaker Output
DEB UT
1938 N. Batavia St.
Suite K
Orange, CA, 92865
HDMI (ARC)
HDMI (ARC)
24118 Kiel, Deutschland
OPT
PC
SUB OUT
SPEAKER
PHONO
L/R
OUT
Model : DCB61
USB
The Volume knob can be used to adjust volume, change input and power on.
Rotate:
Rotating the knob will increase or decrease volume.
Push:
Press to turn on unit.
Press and hold in BT input to initiate pairing.
Press when unit is on to change input.
Front LED colours are: [BT - Blue] [HDMI - Green] [USB - White] [Optical - Red] [Phono - Pink]
Power/Standby:
The unit will standby after 15 minutes of no use. Pressing or rotating the volume knob as well as pressing power
button on remote will wake up unit.
ELAC D C M DCB61 | ..
P 5
Page 6
Model : DCB41
UPDATE ONLY
HDMI (ARC)
1938 N. Batavia St.
Suite K
Orange, CA, 92865
Fraunhofestrabe 16
24118 Kiel, Deutchland
SERIAL NUMBER
USB OPT SUB OUT
PHONO
ON/OFF
L/R
GND
OUT
SPEAKER
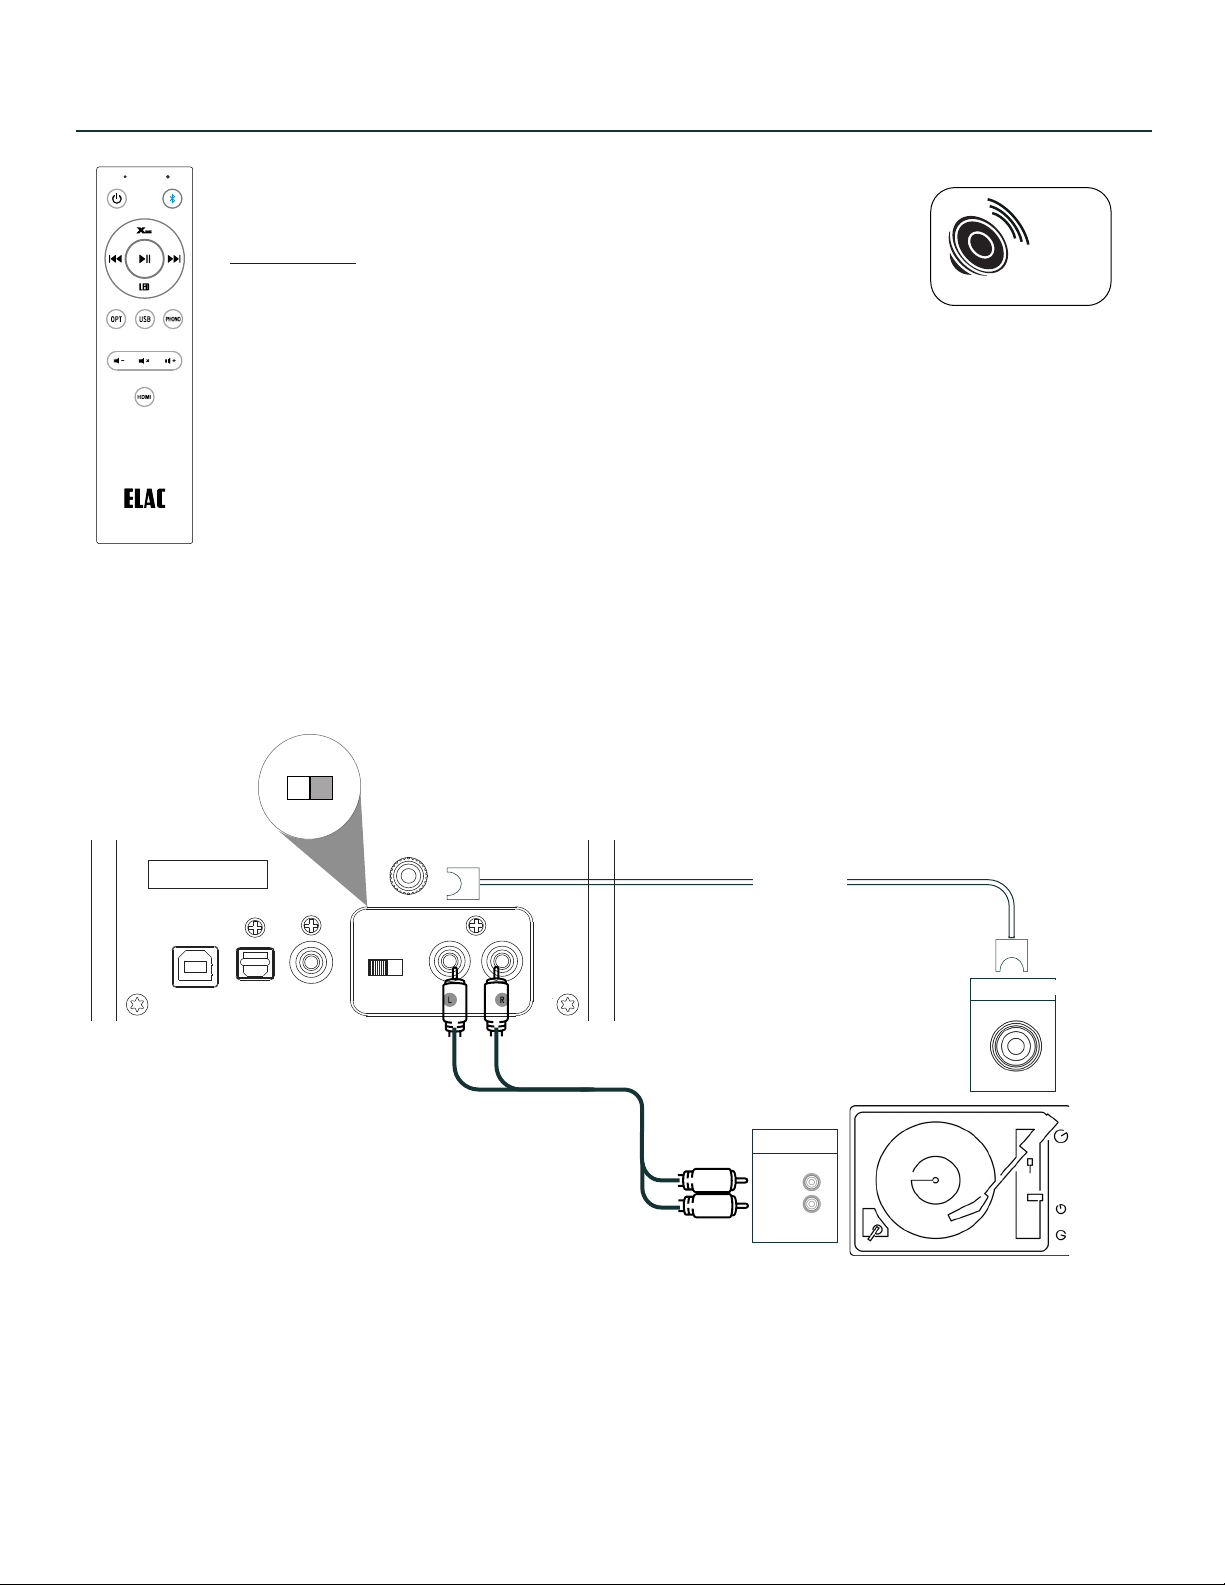
XBASS
XBass is a propietary circuit to boost low frequency performance.
Turn ON/OFF
Press XBass button on remote :
LED display will blink Red for OFF
LED display will blink Green for ON
CONNECTIONS - TURNTABLE
ON/OFF
Set to ON if plugging into a turntable
XBass
Optional
Ground
Audio Out
R
L
Note: Some turntables have built in phono pre-amplifiers that can be disabled. Ensure the turntable pre-amplifier
is set to OFF and DCB41 is set to ON.
If you choose to use the turntable’s Phono pre-amplifier, then ensure its switch is set to ON postion and DCB61 is
set to OFF.
The Ground connection is optional. It is recommended to be used as it can lower residual noise.
ELAC D C M DCB61 | ..
P 6
Page 7
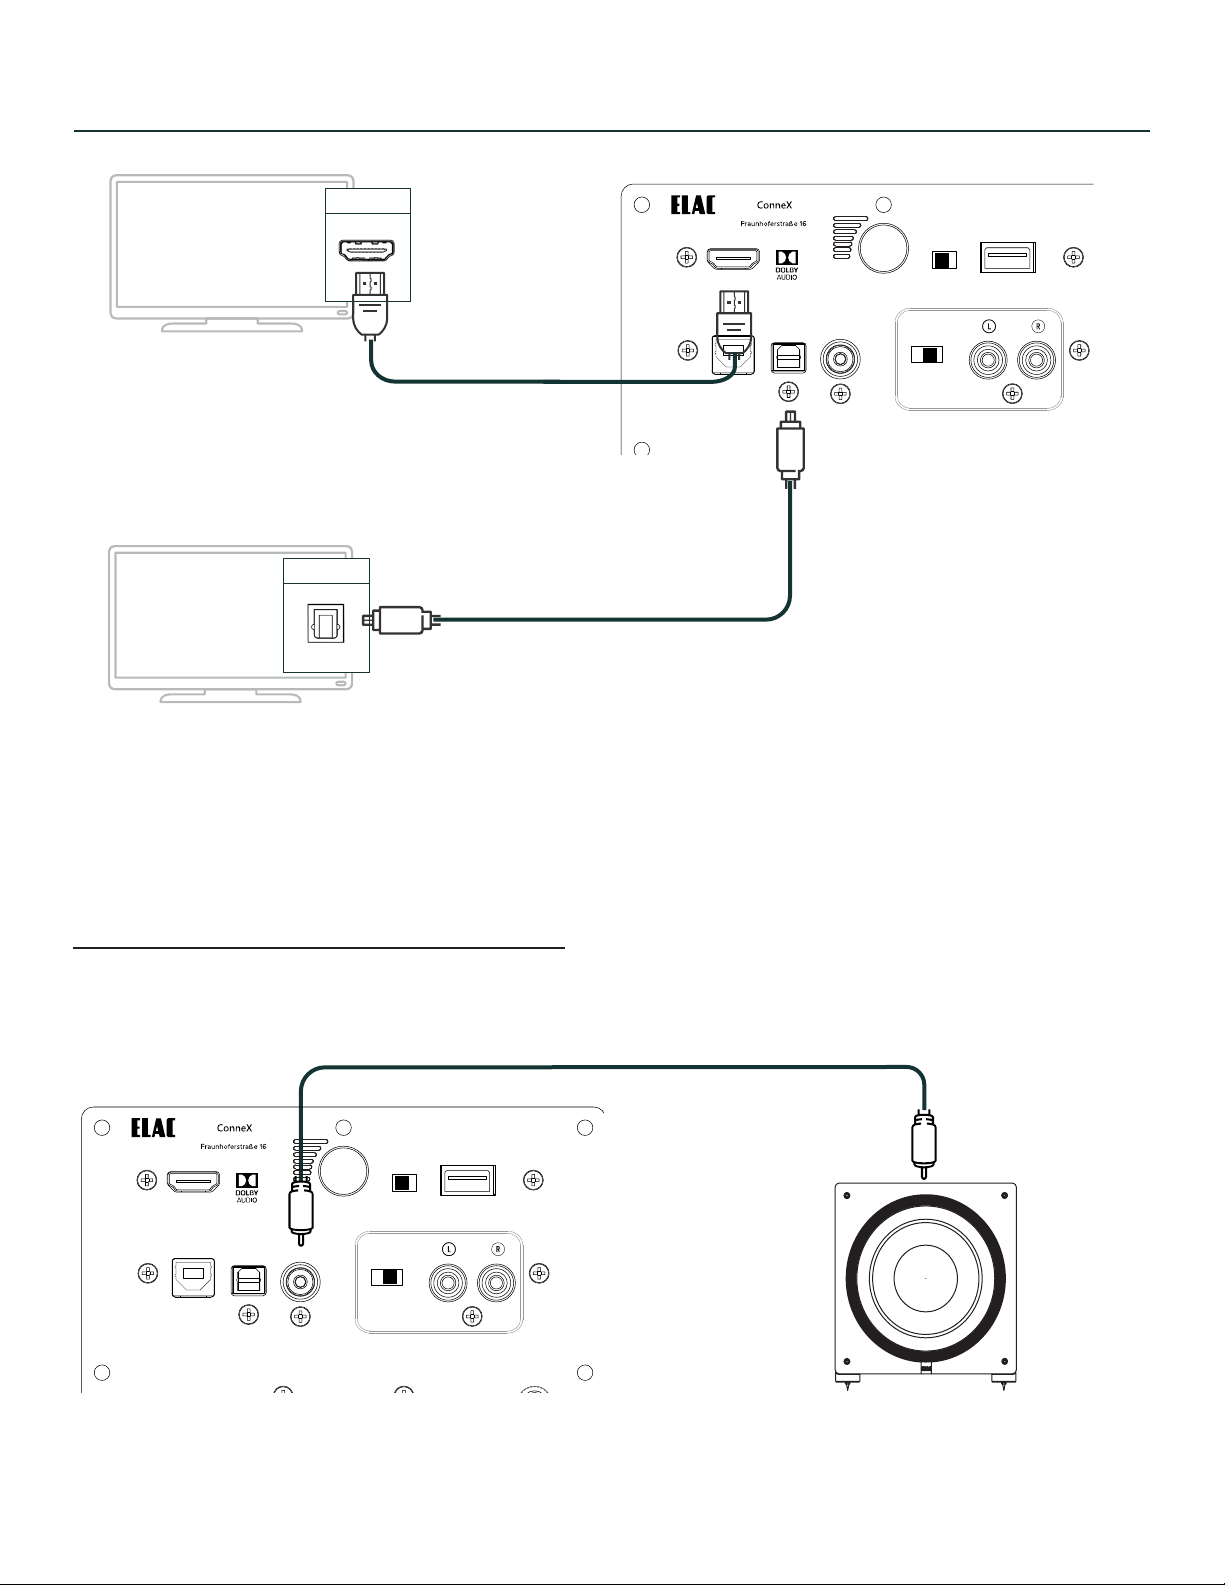
CONNECTIONS - TELEVISION
HDMI-ARC
Can be connected via HDMI or Optical cable.
Optical
Note: HDMI supports eARC and ARC inputs from most televisions.
Your television remote control can also control power, mute and volume of
your DEBUT ConneX.
DEB UT
1938 N. Batavia St.
Suite K
Orange, CA, 92865
HDMI (ARC)
HDMI (ARC)
24118 Kiel, Deutschland
OPT
PC
SUB OUT
SPEAKER
PHONO
ON/OFF
Model : DCB61
L/R
OUT
USB
CONNECTIONS - SUBWOOFER
DEB UT
1938 N. Batavia St.
Suite K
Orange, CA, 92865
HDMI (ARC)
HDMI (ARC)
24118 Kiel, Deutschland
OPT
PC
SUB OUT
SPEAKER
PHONO
ON/OFF
L/R
OUT
Model : DCB61
USB
GND
ELAC D C M DCB61 | ..
P 7
Page 8
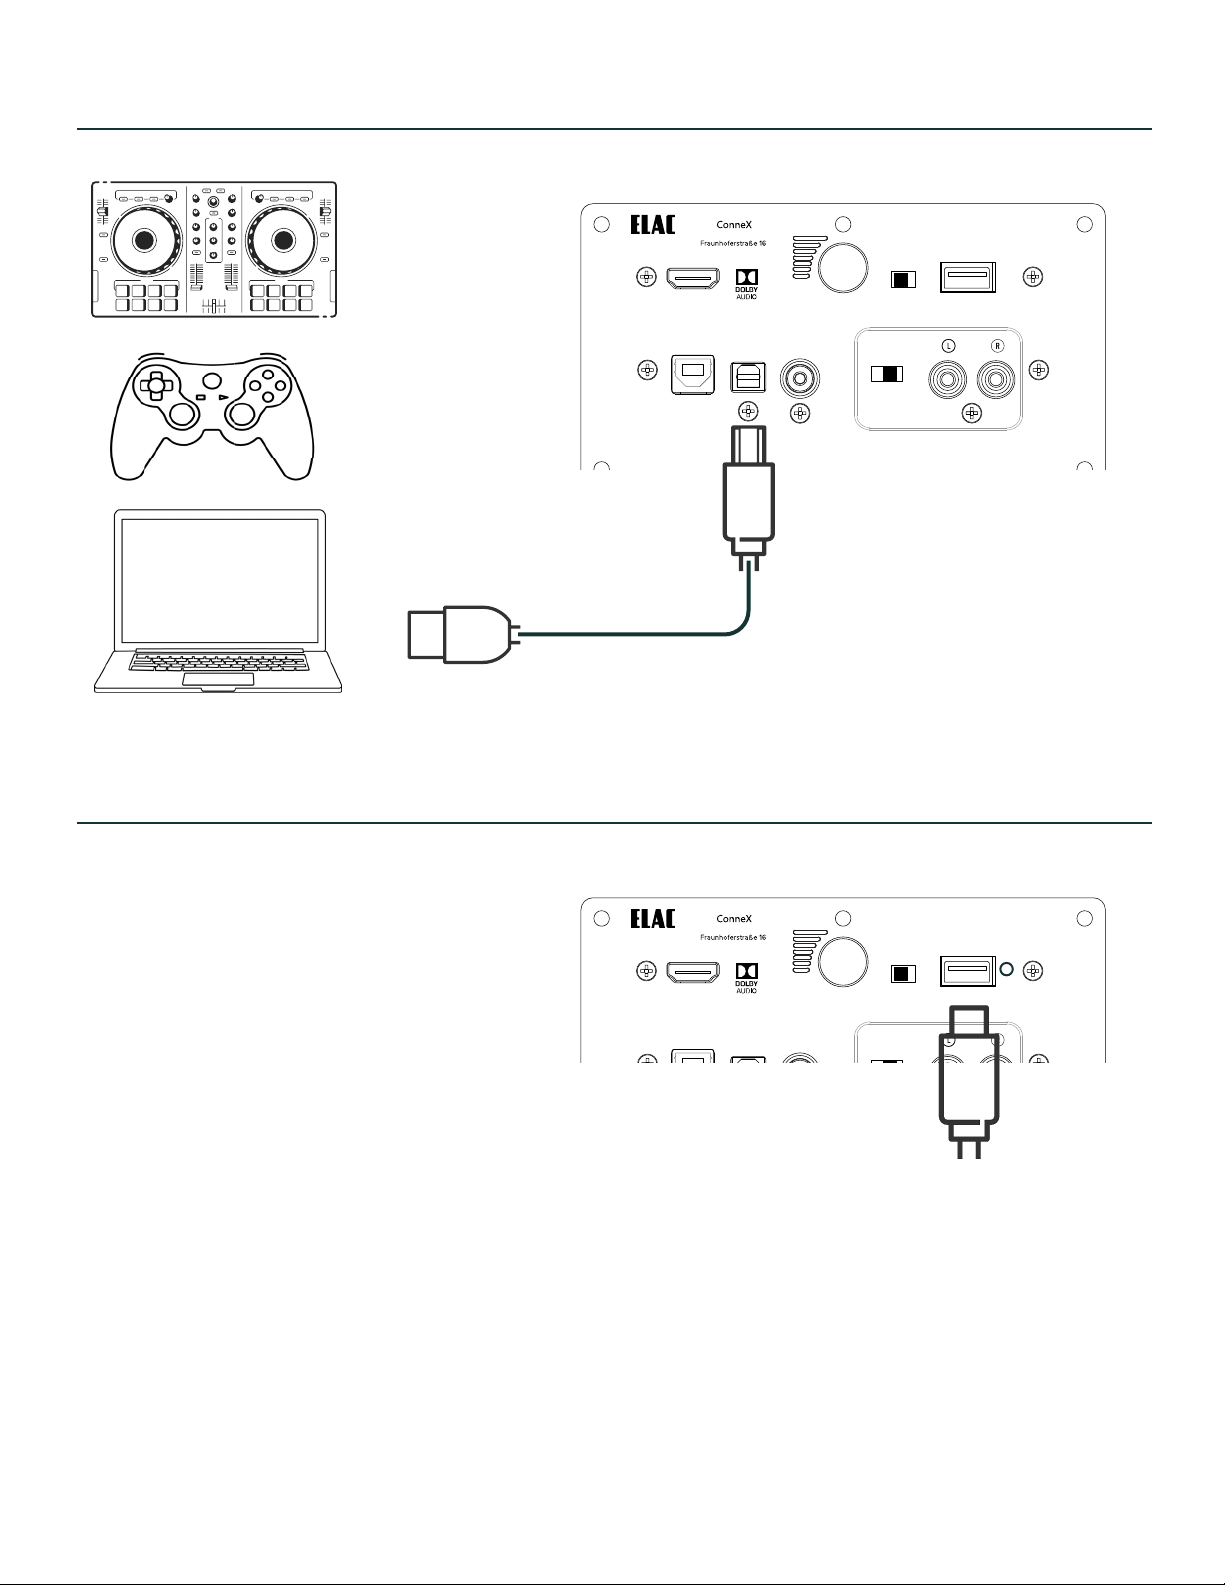
CONNECTIONS - COMPUTER
DEB UT
1938 N. Batavia St.
Suite K
Orange, CA, 92865
24118 Kiel, Deutschland
HDMI (ARC)
HDMI (ARC)
PC
Connect to your USB devices with USB Type B cable (printer cable).
CONNECTIONS - Firmware Update
OPT
SUB OUT
SPEAKER
PHONO
ON/OFF
Model : DCB61
L/R
OUT
USB
Copy the downloaded file onto a USB drive.
It is best if the update file is the only file in the root
directory.
DEB UT
1938 N. Batavia St.
Suite K
Orange, CA, 92865
HDMI (ARC)
HDMI (ARC)
24118 Kiel, Deutschland
OPT
PC
SUB OUT
SPEAKER
PHONO
L/R
OUT
Model : DCB61
USB
Procedure:
1. Ensure unit is powered o and plug in the USB drive.
2. Turn power on.
3. Update will start and LED indicator will blink. (DO NOT unplug or power o unit during update).
4. When LED stops blinking the update is done.
5. Turn o the power and wait for 3 min before turn ON the unit.
Caution:
The unit will be bricked if you unplug or power o the unit during update. To fix this , then repeat step 2 – 6
again.
Page 9
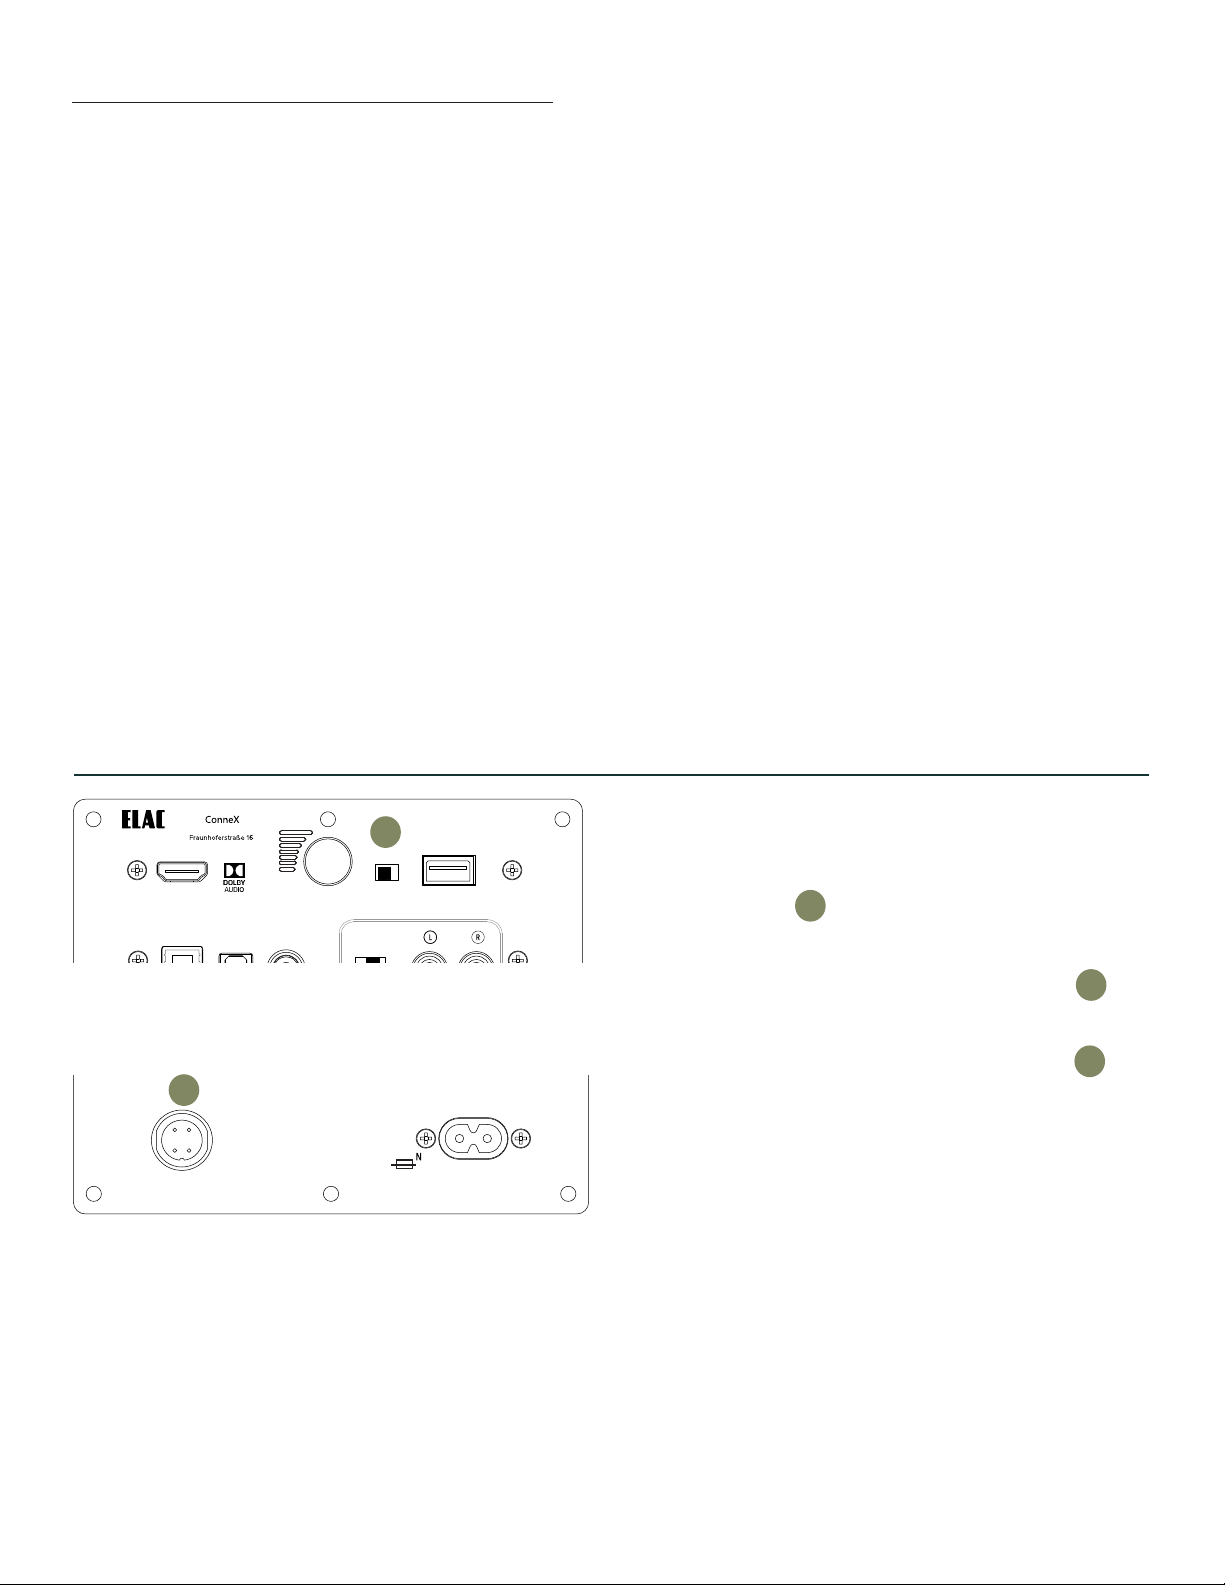
CONNECTIONS - BLUETOOTH
1938 N. Batavia St.
Suite K
Orange, CA, 92865
24118 Kiel, Deutschland
DEB UT
HDMI (ARC)
USB
PHONO
ON/OFF
PC
OPT
SUB OUT
CAN ICES-003(B)/NMB-003(B)
FCC ID: 2A7OW-DCB61
IC: 28740-DCB61
100-240V 50/60Hz AC
160W
~
GND
SERIAL NUMBER
Model : DCB61
LEFT SPEAKER OUT
L/R
OUT
SPEAKER
HDMI (ARC)
Designed by Elac
Made in China
j
When initial power up - BT LED will flash if nothing is paired to it.
When LED is flashing, “ELAC DCB61” is visible on your device.
Pairing can also be initiated as follows:
Press and hold BT source on remote until LED flashes.
Press and hold rear volume button on speaker when in BT input until LED flashes.
SETTING LEFT or RIGHT SPEAKER
1938 N. Batavia St.
Suite K
Orange, CA, 92865
DEB UT
24118 Kiel, Deutschland
HDMI (ARC)
HDMI (ARC)
PC
12
OPT
SUB OUT
4
L/R
SPEAKER
OUT
PHONO
Model : DCB61
USB
The L/R switch is in reference to speaker
4
output terminals.
If L/R switch is set to “L” then speaker output
12
will be the LEFT speaker.
If L/R switch is set to “R” then speaker output
12
will be the RIGHT speaker.
Note, the switch is only read during power on.
ELAC D C M DCB61 | ..
P 9
Page 10
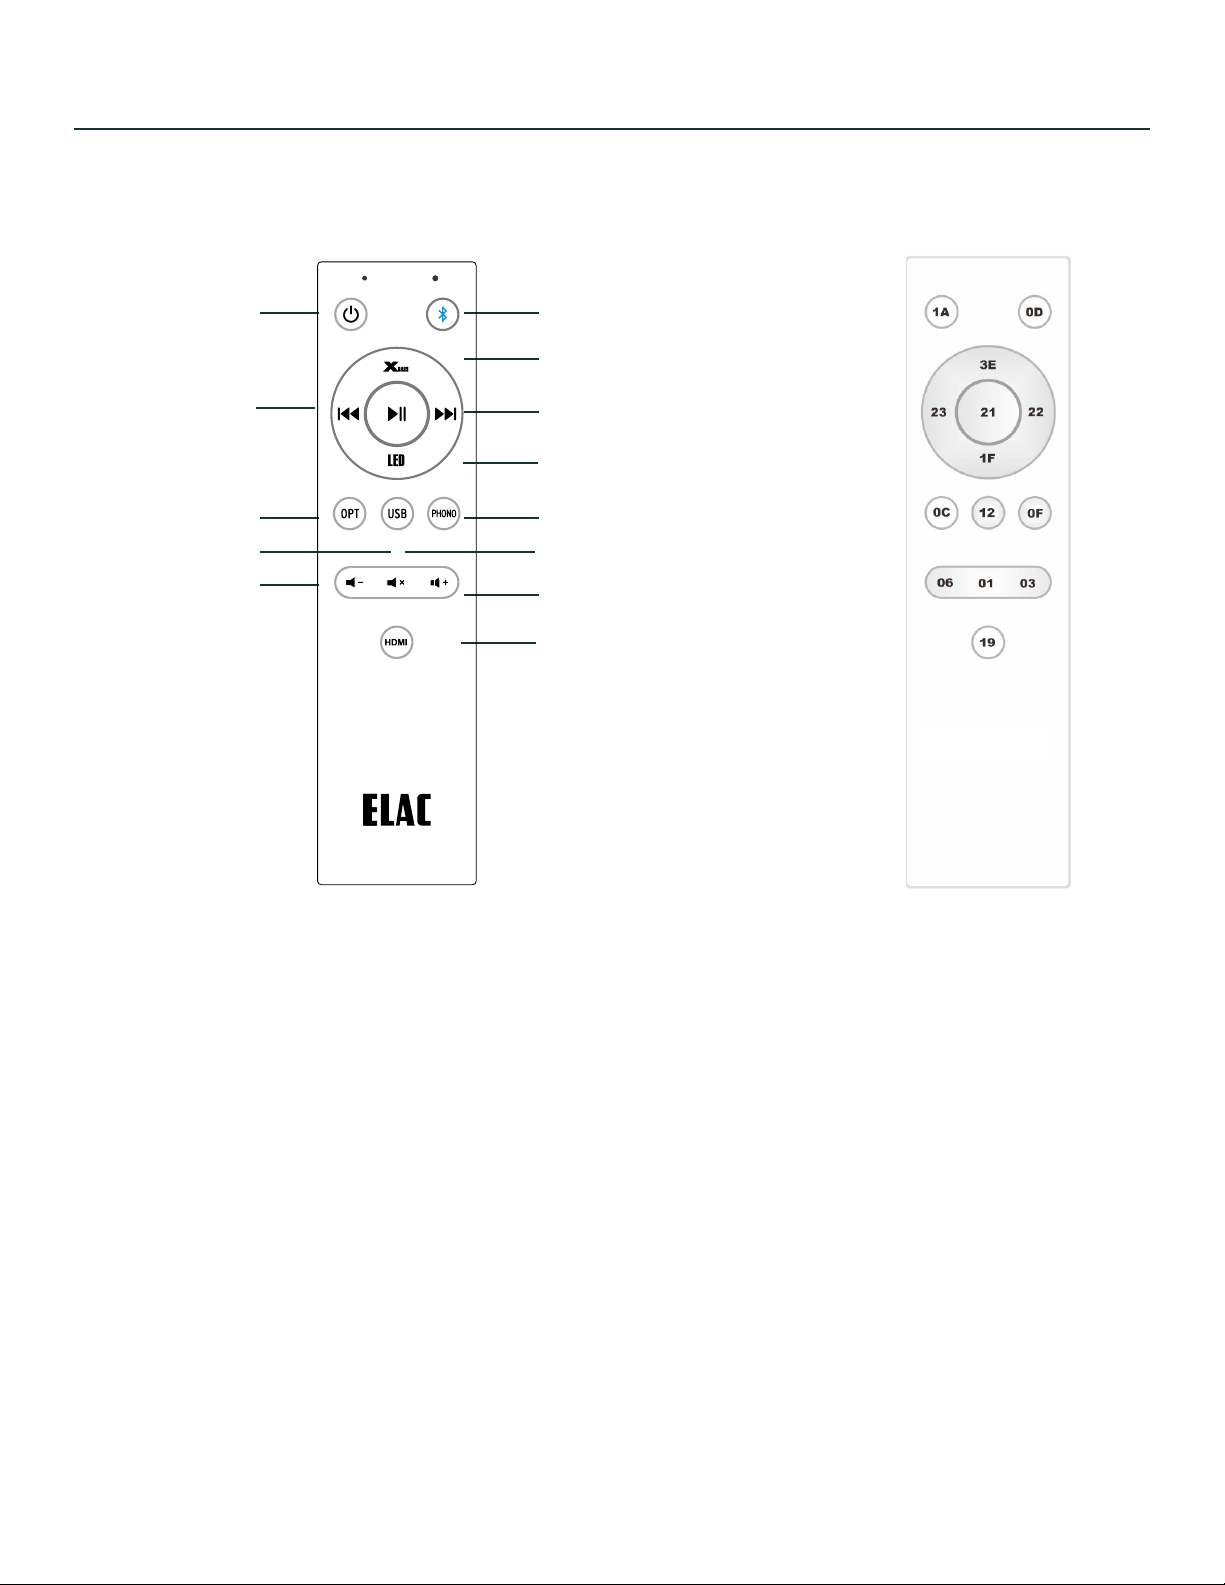
REMOTE CONTROL
Power ON/OFF
Previous (BT)
Optical Source
USB Source
Volume Down
BT Source
Xbass
Next(BT)
Adjust LED Intensity
Phono Source
Mute
Volume Up
HDMI Source
Hex CodesRemote Control
ELAC D C M DCB61 | ..
P 10
Page 11

GENERAL INFORMATION
1. General information
• Please read and follow these safety instructions.
• Keep them safe for future reference.
• Observe all warnings on the speaker and in the manual. Please check the speaker for damage before use.
The speaker must be in perfect working condition. Damaged parts may lead to personal injury.
2. Use only as directed
• Connect the speaker(s) according to the instructions in the manual.
• Many ELAC speakers are equipped with spikes and/or anti-slip feet. They are explicitly provided for
leveling the speaker. For leveling on an uneven floor, unscrew the spikes or anti-slip feet by 2-3 turns of
thread. The speaker should always be in perfect vertical alignment: the stability of the speaker must not be
compromised by using spikes or anti-slip feet as the speaker may tip-over.
3. Location
• Install the speakers on a level surface only.
• When choosing the location of these speakers do not place them in locations that are:
• In direct sunlight
• Very humid
• Prone to vibrations
• Exceptionally hot or cold
• Near CRT Televisions (the speakers are not magnetically shielded and may cause color issues with
a CRT based TV).sa
• Close to magnetic cards (Since the speakers are not magnetically shielded placing magnetic cards
such as credit cards or commuter cards may cause them to fail).
4. WARNING!
Please ensure the product is perfectly stable to avoid injury from tip-over. Please note, that stability can be
increased by using spikes on carpeted surfaces. However, the mounting of spikes must be carried out carefully
due to their very sharp ends which may cause injuries. The stability on slippery floors can be increased by using
Velcro fastening tape or double-sided adhesive tape. Do not install the speaker near any heat sources such as
radiators, heating valves, stoves, or other apparatus (including amplifiers) that produce heat, or in areas where
there is a risk of explosion.
• Do not block any ventilation openings. Install in accordance with the manufacturer’s instructions.
• Do not install the speaker in a closed rack or in a closed cupboard.
• Do not put burning candles on or near the speaker.
• Do not install the speaker near transformers because electromagnetic stray fields can cause hum noise on
woofers.
• In combination with certain materials / lacquers / material surfaces, anti-slip feet or spike washers may
cause colored imprints on the surfaces.
ELAC D C M DCB61 | ..
P 11
Page 12

ELAC AMERICAS INC.
1938 N. BATAVIA St. SUITE K
ORANGE, CA 92865
ELAC ELECTROACUSTIC GMBH
FRAUNHOFERSTRAßE 16
D-24118 KIEL, GERMANY
 Loading...