

Ekol Adept Instruction Manual
IMPORTANT
THIS PRODUCT BECOMES VERY HOT DURING USE. TO AVOID SERIOUS INJURY,
IT IS RECOMMENDED THAT A SUITABLE FIREGUARD IS USED WHEN YOUNG
CHILDREN, THE ELDERLY OR OTHER VULNERABLE PEOPLE ARE PRESENT.
ONLY HIGH QUALITY SEASONED LOGS OR HIGH QUALITY, SUITABLE DOMESTIC
HEATING BIOETHANOL FUEL IS TO BE BURNT ON THIS APPLIANCE (DEPENDENT
ON MODEL VERSION). NEVER ATTEMPT TO BURN RUBBISH.
Please read instructions carefully prior to installation and keep them in a safe place.
Instruction Manual for Woodburning and Bioethanol
range. Inset (Cassette) and free-standing versions.
Instruction manual version 1.1, dated 20.09.2017
Contents
General Specications
(General Dimensions on back page)
Getting Started
User Instructions for Wood-Burning
User Instructions for Bioethanol Option
Maintenance
General Installation Instructions
Connecting to External Air Supply
Specic Installation for Inset version
Specic Installation for Oak Pedestal
Specic Installation for Wall-Hung
Exploded View & Spare Parts
Service Records
Warranty Information
3
4
5-8
8-9
10
12-15
14-15
15-16
17
17-18
19
20
21
When purchased new from an Authorised Ekol Retailer
your new adept stove includes an Extended 10 year
limited warranty.
Details of Authorised Retailers can be found at
www.defrastoves.com
Your warranty needs to be registered within 30 days of
purchase and will be effective from date of purchase.
Appliances purchased outside of the Authorised Ekol
Retailer network will carry the standard 12 month
warranty.
For full details of the warranty and how to register can be
found at the back of this manual.
page
2

General Specications
Achievable Heat Output Range 2.0 to 7.5kW
Nominal Heat Output 5.0kW
Eiciency 80.3%
CO
2
emission 11.4%
CO emission (at 13% O
2
) 0.12%
Mean flue gas temperature 282 ºC
Mean C
ⁿHᵐ
(at 13 % O2 ) 107 Nmg/m
3
Mean NOx (at 13 % O2) 86 Nmg/m
3
DIN Plus dust (at 13 % O2) 30 Nmg/m
3
Weight (Adept Classic Standard) 90 kg
Tested to BS, EN (CE), UK Smoke Control (DEFRA),
EcoDesign 2022 tested and compliant.
Tested to EN 13240:2001+Amd 2 (as freestanding stove)
Tested to EN 13229:2001+A1:2003+A2:2004 (inset stove)
ü
Suggested Clearances to Non-combustible materials 30mm all round (to suitably thick solid materials)
Minimum Clearances to Combustible materials:
Rear of stove = 200mm (as a free standing
stove), when used with optional heat-shield.
Sides of stove = 250mm (when used as a
FREE-STANDING stove).
Sides of stove = 100mm (when used as an
INSET stove).
Above = 400mm
Suitable for positioning on hearth of just 12mm thick
ü
10 Year body warranty
ü
Dual fuel capable, bioethanol and wood (fuels must
never be used together), when purchased with optional
bioethanol burner system (1.5kW output on bioethanol)
ü
(5 hour refuel period when using bioethanol)
(For general dimensions please see final page)
page
3

Getting Started
Welcome
6) Take note of the minimum distance to combustible
items within the ‘Specications’ section of this manual,
and in addition, avoid placing TVs, photographs etc on the
wall above the stove or anywhere close by. Never allow
combustible items or furnishings to be positioned within 1m
from the front of the appliance.
7) Do not store any fuel on or near the appliance.
8) NOT suitable for use in a shared ue system.
9) Your stove will require a constant air supply - Extractor
fans and cooker hoods should never be located in the
same room as the appliance as this will disturb air supply
to the stove potentially causing harmful gases to be emitted
into the room.
10) Never make unauthorised changes to the appliance.
11) Chimney/ ue system should be swept at least once a
year, and more frequently depending on usage and soot
build up, as advised by your qualied chimney sweep.
12) This appliance is designed to be used with the door
shut, with exception of start up procedure when burning
wood, and when burning bioethanol the door should be
slightly ajar (see more detailed user instructions).
13) Upon rst few uses the stove may produce an
unpleasant odour due to the paint curing process. Open a
window in the room if this occurs.
14) Your stove will be heavy and will require between 2 and
4 people to lift. Lifting or trolley equipment may be required
dependent upon the body options chosen and the chosen
stove location.
15) Unpacking: Do not drag the stove to its location,
instead it should be carefully lift into place. Do not use
sharp blades to cut through packaging material as the
stove paint surface and other components may become
damaged. Incidental scratches to paint surfaces on the
stove from moving or installation can be touched up using
suitable high temperature stove paint.
Thankyou for choosing the Ekol Adept.
We are condent that your new stove will provide many
years of pleasure and reliable service.
The main purpose of this manual is to guide you in the use
and maintenance so that you can get the best out of your
home-re experience.
All stoves will vary and we recommend that even those
experienced in the use of wood-stoves read this manual
thoroughly in order to fully understand the workings of the
Ekol Adept.
This manual will also provide installation guidelines
however this is not a step by step installation manual as
each installation will be dependent upon local and national
Building Regulations and safety standards which must be
adhered to in addition to any information given here.
NB. Safety is the most important consideration when
installing and using your stove. If not installed correctly or
used incorrectly a house re or carbon monoxide poisoning
can result.
1) All users of this appliance should fully read and ensure
they understand the ‘User Instructions’ section of this
manual.
2) The appliance must be tted by a registered installer
who is ofcially deemed competent to undertake the
installation, or approved by your local Building Control
department.
3) All local, national and European Standards and
regulations need to be adhered to when installing.
4) Only seasoned, dry logs of between 10% and 20%
moisture are to be burnt (unless you have purchased the
Bioethanol kit). Fuels must never be mixed. Never use as
an incinerator and never burn any liquid fuels other than
bioethanol, and only then when the appliance is fully setup
for bioethanol burning.
5) All surfaces will become hot during use. Ensure that
children, the elderly or other vulnerable people are kept
safe by using a suitable reguard.
Safety & General Points
page
4
User Instructions
Controls for wood-burning
CAUTION HOT! Always use the glove provided or the
extension handle tool to control handle and vents
when in use.
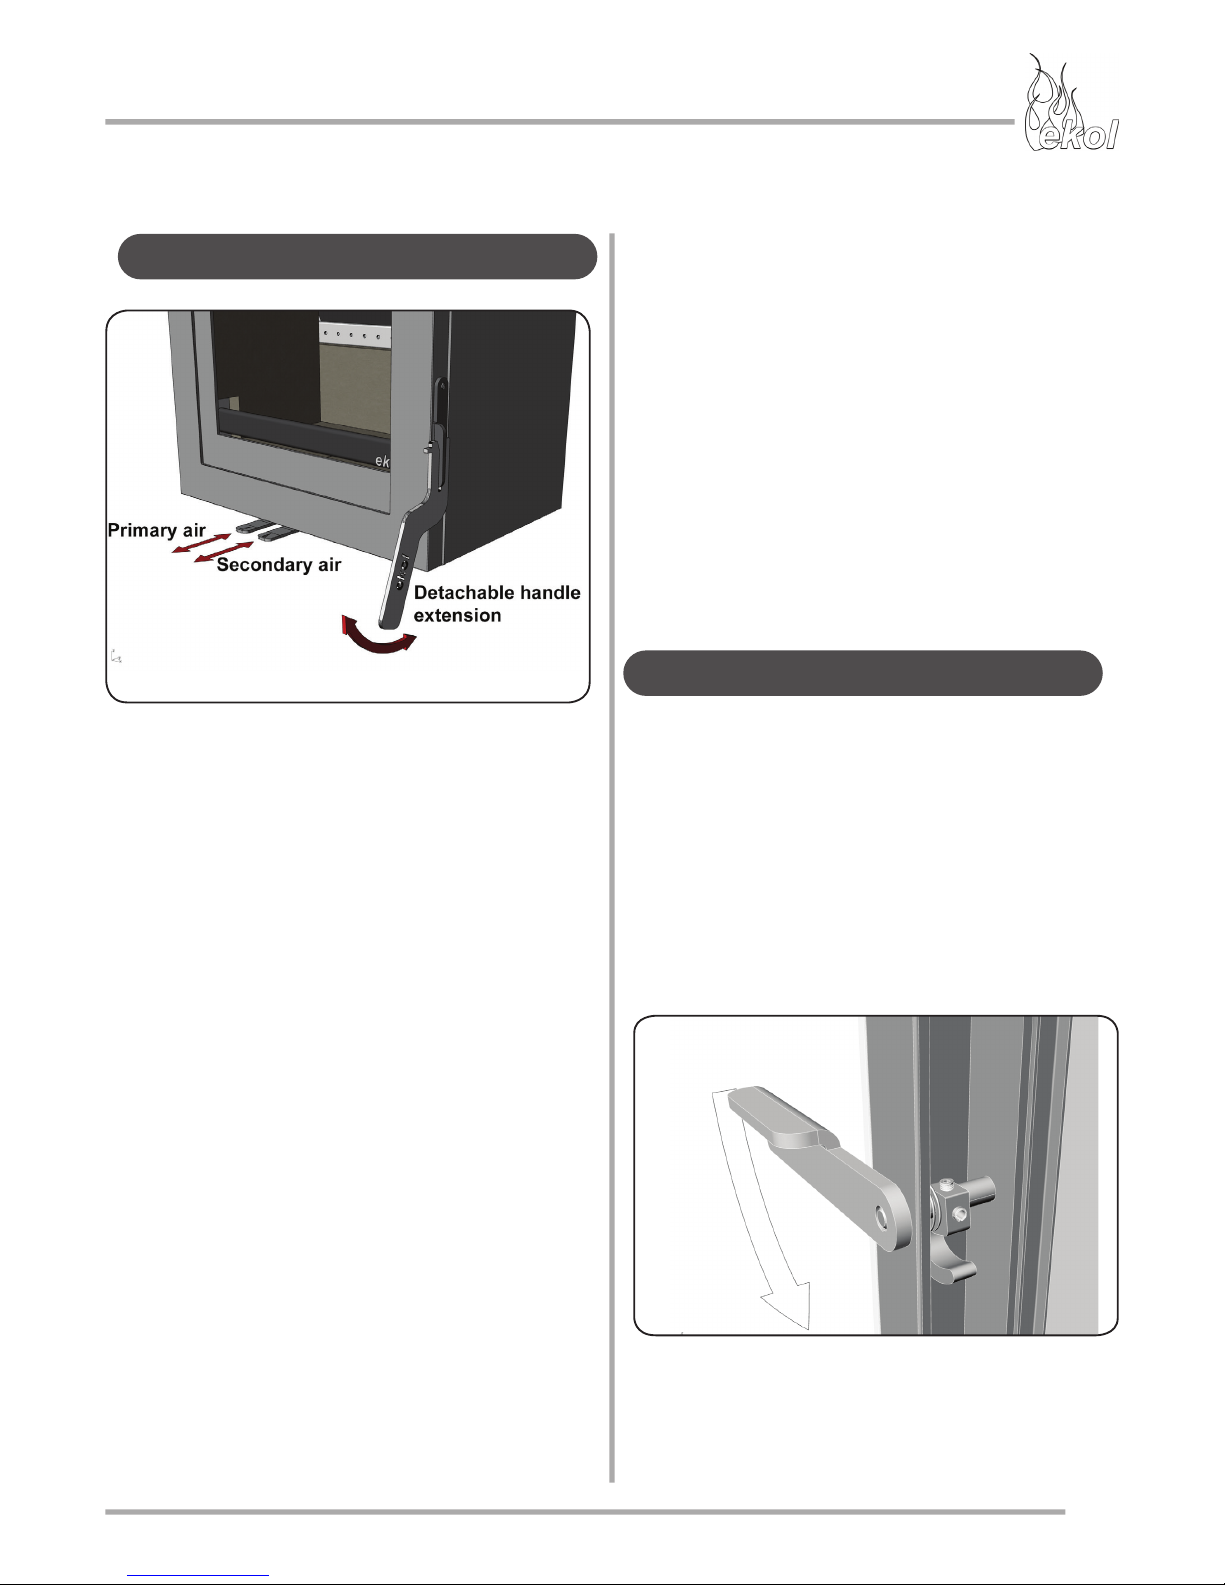
Your Adept stove uses two controls to control the burning
process.
Figure 1.1 shows these controls located under the door.
Each control works by varying the amount of air which can
enter the re box. The more air that can enter the rebox
the faster the fuel will burn.
Each of the vent controls allows air to enter the rebox in
specic places.
1) The ‘Primary’ air control allows air to enter the re box
through a channel plate at the top of the stove window.
This air then ushes down the inside of the glass, keeping
a blanket of air between the glass and the re, therefore
helping to keep the glass clean.
Some of this air also reaches down to the bottom of the
rebed, providing fresh air to enable the wood to burn. We
call this ‘Primary Combustion’.
To increase the ow of this air, pull the lever (on the left
side as you look at the stove), towards you.
To decrease this ow of air, push the lever back inwards.
2) The ‘Secondary air’ control is located next to the
‘Primary control’, on the right hand side as you look at the
stove.
The ‘Secondary’ air enters the rebox via a series of
horizontal holes which can be seen as you look into the
stove above the rear re bricks.
These inlets allow fresh air to reach the upper parts of the
rebox, allowing rising smoke and gases to re-ignite, and
burn thoroughly and cleanly before escaping out into the
ue.
To increase the ow of this air, pull the lever (on the left
side as you look at the stove) towards you.
To decrease this ow of air, push the lever back inwards.
(To comply with the Clean Air Regulations and to ensure
efcient, clean burning, both control levers are set to
always allow a minimum air ow so that the rebox cannot
be starved of fresh air.)
Both the Primary and Secondary controls can if necessary
be operated using by attaching the end of the ‘Detachable
handle extension’ tool. This can be useful when the
controls are hot or if the stove installed into a deep recess.
Your Adept stove is tted with a standard handle for
operation of the door. In addition your stove is supplied
with a separate handle extension tool (gure 1.1). The
detachable handle simply slots over the standard handle
when required. It does not permanently afx.
This handle offers more leverage and is useful for:
a) users with a weaker grip
b) When handle is hot during use
c) When installed into a recess and hand access to the side
of the stove is limited.
IMPORTANT - When closing and locking the door, the
handle must be lifted into the horizontal position before
shutting the door so that the hook can engage. Never slam
the door on the closure hook as this will cause damage
affecting its smooth operation. (Figure 1.2)
Figure 1.1
Handle Operation
Figure 1.2
page
5
Place 4 or 5 pieces of good quality solid chemical
relighter on the base of the stove.
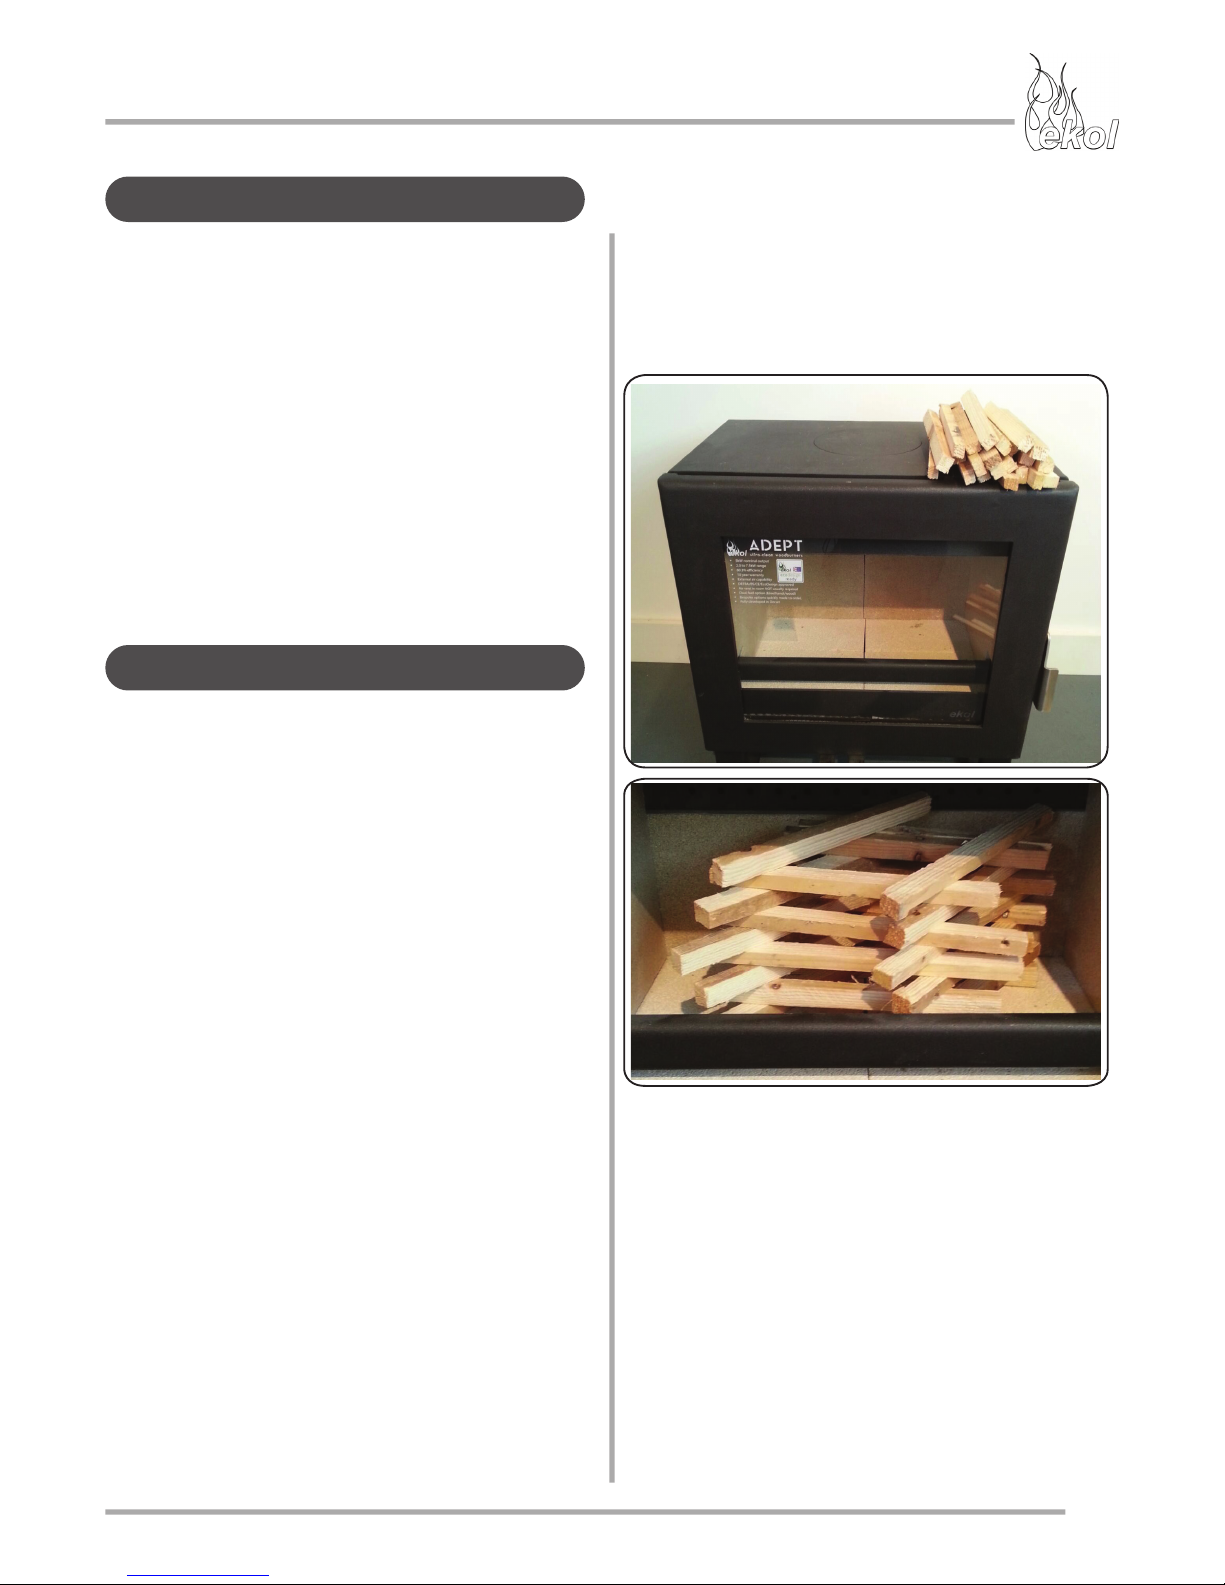
3) Arrange approx’ 500 grams+ of thin thoroughly dry
kindling sticks (gure 1.3 shows 500 grams of softwood
kindling on top of the stove) in an open tower shape
similar to gure 1.4, taking care not to assemble the fuel
too close to the door glass.
4) Ensure both air controls are fully open (pull towards
you)
5) Light the relighters with a long match or long lighter.
6) Close the door but do not lock it - leave it cracked-open
(ajar) an inch or so.
7) The kindling should within a few minutes take light and
begin to heat the ue/chimney.
8) When the kindling is fully alight, glowing red and with
lots of ame, wait for the kindling tower to burn down and
collapse, creating a bed of embers.
9) If it appears there is a good glowing bed of embers,
There are three ways in which the heat generated in your
Adept stove will come into the room.
1) Radiant heat comes through the large window, and
heats objects in the room
2) Some radiant heat also comes from the body of the
stove, though due to the stove’s dual-layer construction,
this heat is less intense and more uniform compared to
single layer type stove.
3) The Adept also benets from convected heat - air
between the two layers of the inner and outer stove body
warms up, then expands out of the venting holes on either
side of the stove, circulating into the room. Cooler air from
lower down in the room is then drawn into the underneath
of the stove creating a cyclical warm air movement.
Once the appliance has been correctly installed, it is ready
for the rst re. We would encourage even experienced
stove users to follow this guide as every stove model
operates differently.
These instructions may at rst seem complicated, but when
followed correctly you will quickly be condent at operating
your Ekol at its optimal level safely and efciently.
The stove needs to go through an initial period of ‘running-
in’ in order to enable the steelwork to normalise to higher
temperatures, and for the paint surfaces to cure correctly.
The stove is nished in specialist high temperature coating
which is air-dry but not yet cured. The stove should be
brought up to temperature gradually over the course
several res to complete this process. If the stove gets too
hot or not hot enough during this process then the curing
process can fail causing issues with the paint surface.
1) For the rst three res (all on the same night), use
KINDLING ONLY, with each burning for 15-20 minutes
and each re using approx 500 grams of kindling. Start
the second and third kindling res whilst the re is still
warm from previous res. Once the three kindling res
has burnt through, and whilst the stove is still warm, but
slightly cooled, light a normal re with three dry logs
weighing around 1.2 kgs in total. This re should burn for
between 45 and 60 minutes. Now allow to FULLY COOL
naturally.
The paint should now be cured.
2) Once the curing process has been completed
satisfactorily, normal res can be lit -
How does heat come out?
Lighting the Fire (wood burning)
Figure 1.4
Figure 1.3
page
6
proceed to step 10), otherwise build another stack of
kindling sticks on top.
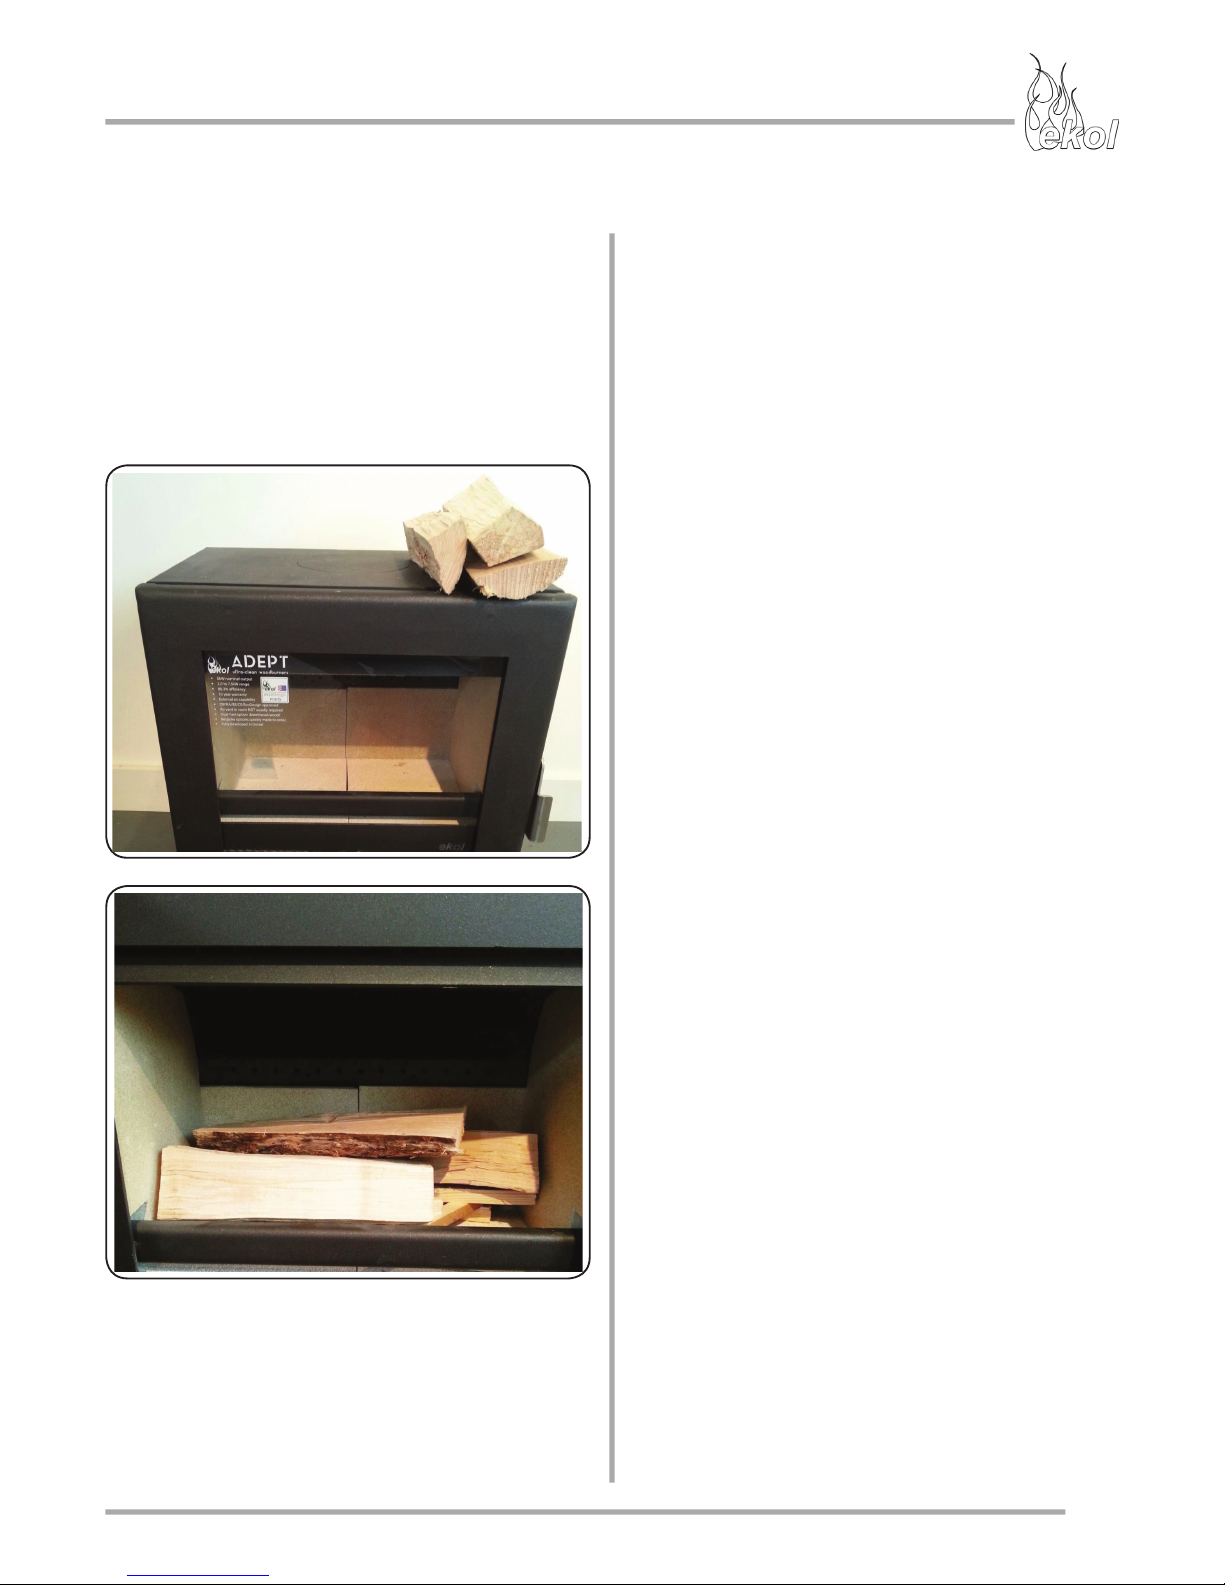
10) Have ready 3 or 4 pieces of seasoned dry hardwood
logs (10 to 20% moisture content), weighing a total of not
more than 1.2kgs (gure 1.5 shows three logs weighing a
total of 1.2kgs).
Load the logs carefully on to the hot ember fuel bed one
at a time and push them down to make contact with the
ember bed. (logs over 80mm diameter or heavier than
500 grams should be split down into smaller pieces).
Figure 1.6 shows the logs laid in the stove.
11) Ensure logs do not extend above the clean-air inlets
at the back of the rebox.
12) Close the door and leave it cracked open an inch or
so.
13) Once these logs are fully ablaze and with glowing
surfaces (usually 5 to 8 minutes), fully secure the door.
14) The ames will reduce to a calmer steadier burn and
already your stove will be burning extremely cleanly and
efciently.
If the ames die down too much and stop glowing, crack
the door ajar an inch or so for a few more minutes until
the re on the logs is fully established.
15) Once the re is established, and to maintain
an average 5kW output, the system will consume
approximately 1.5 kgs of wood per hour, but the best way
to burn for clean and efcient results is to load wood ‘little
and often’.
16) Ensure the rebox is never overloaded and when
refueling always ensure logs are positioned away from
the front, avoiding logs toppling over the front retaining
bar. Keep logs well away from glass to ensure efcient
operation of the airwash system.
17) If the bed of embers builds up too much, allow it to
burn down a bit before refueling.
18) If there is a delay when refueling, and the bed of
embers has mostly burnt through, rst reload with more
kindling or thin logs to establish a new hot ember bed
before putting on larger logs.
19) The two vent controls will control the speed of the
burn. Both should always be open at least enough to
ensure airwash system has a ready supply of air and
that there is constant air supply for the solid particles and
gases to burn cleanly.
You Ekol Adept is tted with constant minimal air supply
such that the appliance cannot be made airtight.
20) When you have nished using the stove for the day,
fully open the vents until any remaining fuel has burnt
away. This nal burning of the day should always be
fast and hot, to help clear deposits form the glass and to
minimise soot/tar and creosote deposits in the appliance
and in the chimney.
21) Prior to relighting from cold, using a scoop/dustpan or
small coal shovel clear out the majority of ashes from the
rebed. It is NOT essential to remove all ash though as
some of the ash will re-burn.
22) Weather conditions including wind pattern and
temperature outside along with ue design and chimney
height and location will all have an effect on draught
strength of your ue system which can vary from day to
day.
Sometimes it may be necessary to use more kindling
or keep the door ajar for longer when establishing a re
(when draught is weak).
Conversely you may need to close the door earlier and
reduce vent openings sooner when there is a strong
draught. - REMEMBER - warm chimneys draw more
Figure 1.5
Figure 1.6
page
7
 Loading...