

EKM IENC Installation Instructions Manual
Indoor Enclosure Spec Sheet
#1
#5
Specications:
• Model: EKM-IENC
• Dimensions: 6.75" Tall x 4.5" Wide x 2.5" Deep
• Weight: 1Lb 6oz
• Materials: ABS plasic box and covers, steel hardware
• Meters Supported: Any electric meters designed by EKM Metering,
including up to four EKM-15E(note that even four of these will not ll the
faceplate hole in the enlosure covers).
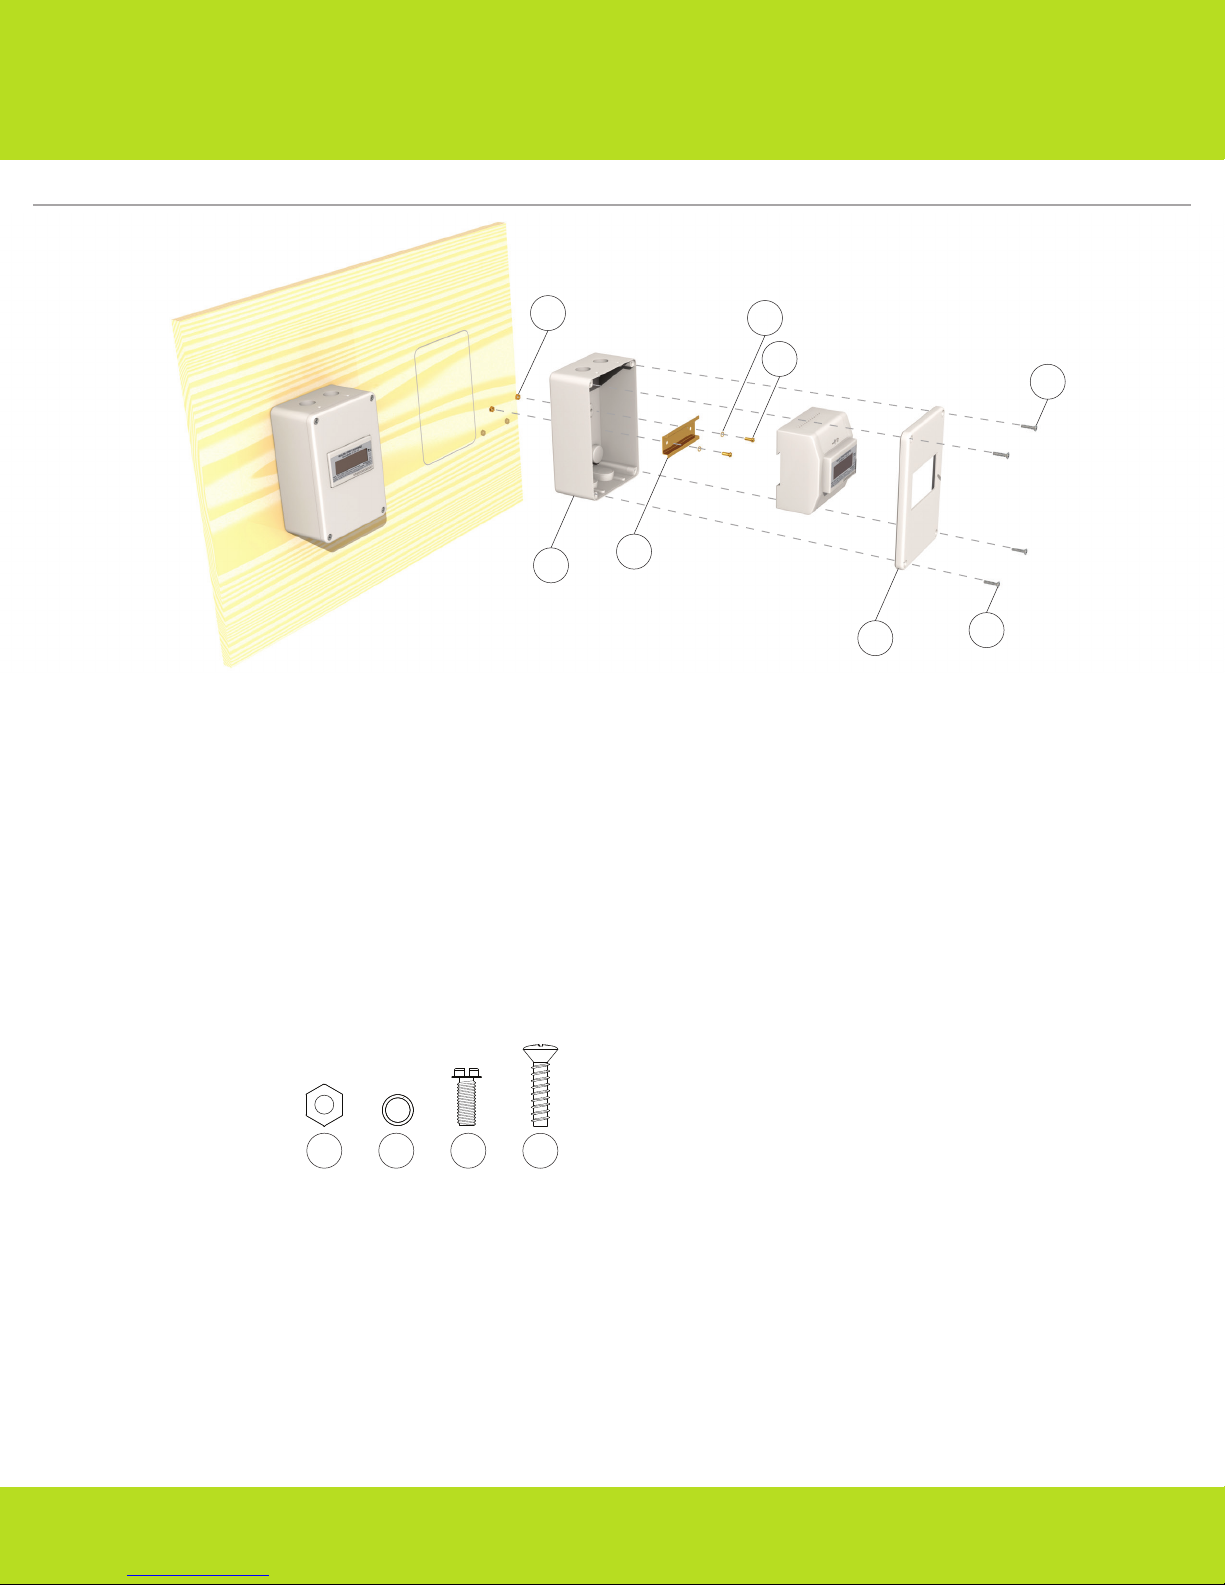
Surface Mount
Parts:
#1: Hex Nut
#2: Lock Washer
#3: Small Bolt
#4: Cover Screw
#5: Enclosure Box
#6: DIN Rail
#7: Surface Enclosure Cover
Principle:
This setup is intended for indoor surface mount applications. The
enclosure should be attached to a surface in an appropriate way at the
discretion of the installer. Any electrical, current transformer, or
communication wires should be routed to the enclosure via conduit.
There are two threaded ports for conduit to enter on the top, bottom,
and rear of the enclosure box.
x2
x2 x2 x4
#1 #2 #3 #4
#2
#3
#4
#6
#7
Installation Instructions:
1. First choose a suitable surface to mount your enclosure on and nd a
good way to attach the Enclosure Box(#5) to the surface. For example,
this can be done by drilling through the back of the enclosure box and
screwing to a wooden structural member.
2. Before you mount the enclosure to the surface you will need to attach
the DIN rail(#6) inside the Enclosure Box. To do this, Insert the Hex
Nuts(#1) into the recesses in the back of the enclosure. This will hold
them in place. Now pass the Small Bolt(#3) through the Lock
Washer(#2), through the DIN Rail(#6), and through the Enclosure Box,
into the Hex Nut(#1). Use a screwdriver to tighten the bolts.
3. Now mount the enclosure to the surface you have chosen.
4. Route all of the wiring to the enclosure before you install your meter.
5. Connect the wires to your meter before you clip it onto the DIN rail.
6. When you have wired up your meter, clip it onto the DIN rail. This is
done by inserting the top of the meter rst. Then pull down on the
spring loaded clip at the bottom to get it to go behind the bottom of
the DIN Rail. If this is done correctly the meter should now be securely
mounted.
7. At this point you can turn the electricity on and make sure that your
meter powers on and that you are getting good reads. If you are using
a smart meter you can also test that your meter is communicating
properly.
8. When you are satised that everything is connected appropriately you
can install the Surface Enclosure Cover(#7) using the four Cover
Screws(#4) and you should now be nished installing your meter and
Indoor Enclosure.
#4
EKM Metering Inc. – www.ekmmetering.com – info@ekmmetering.com – (831)425-7371
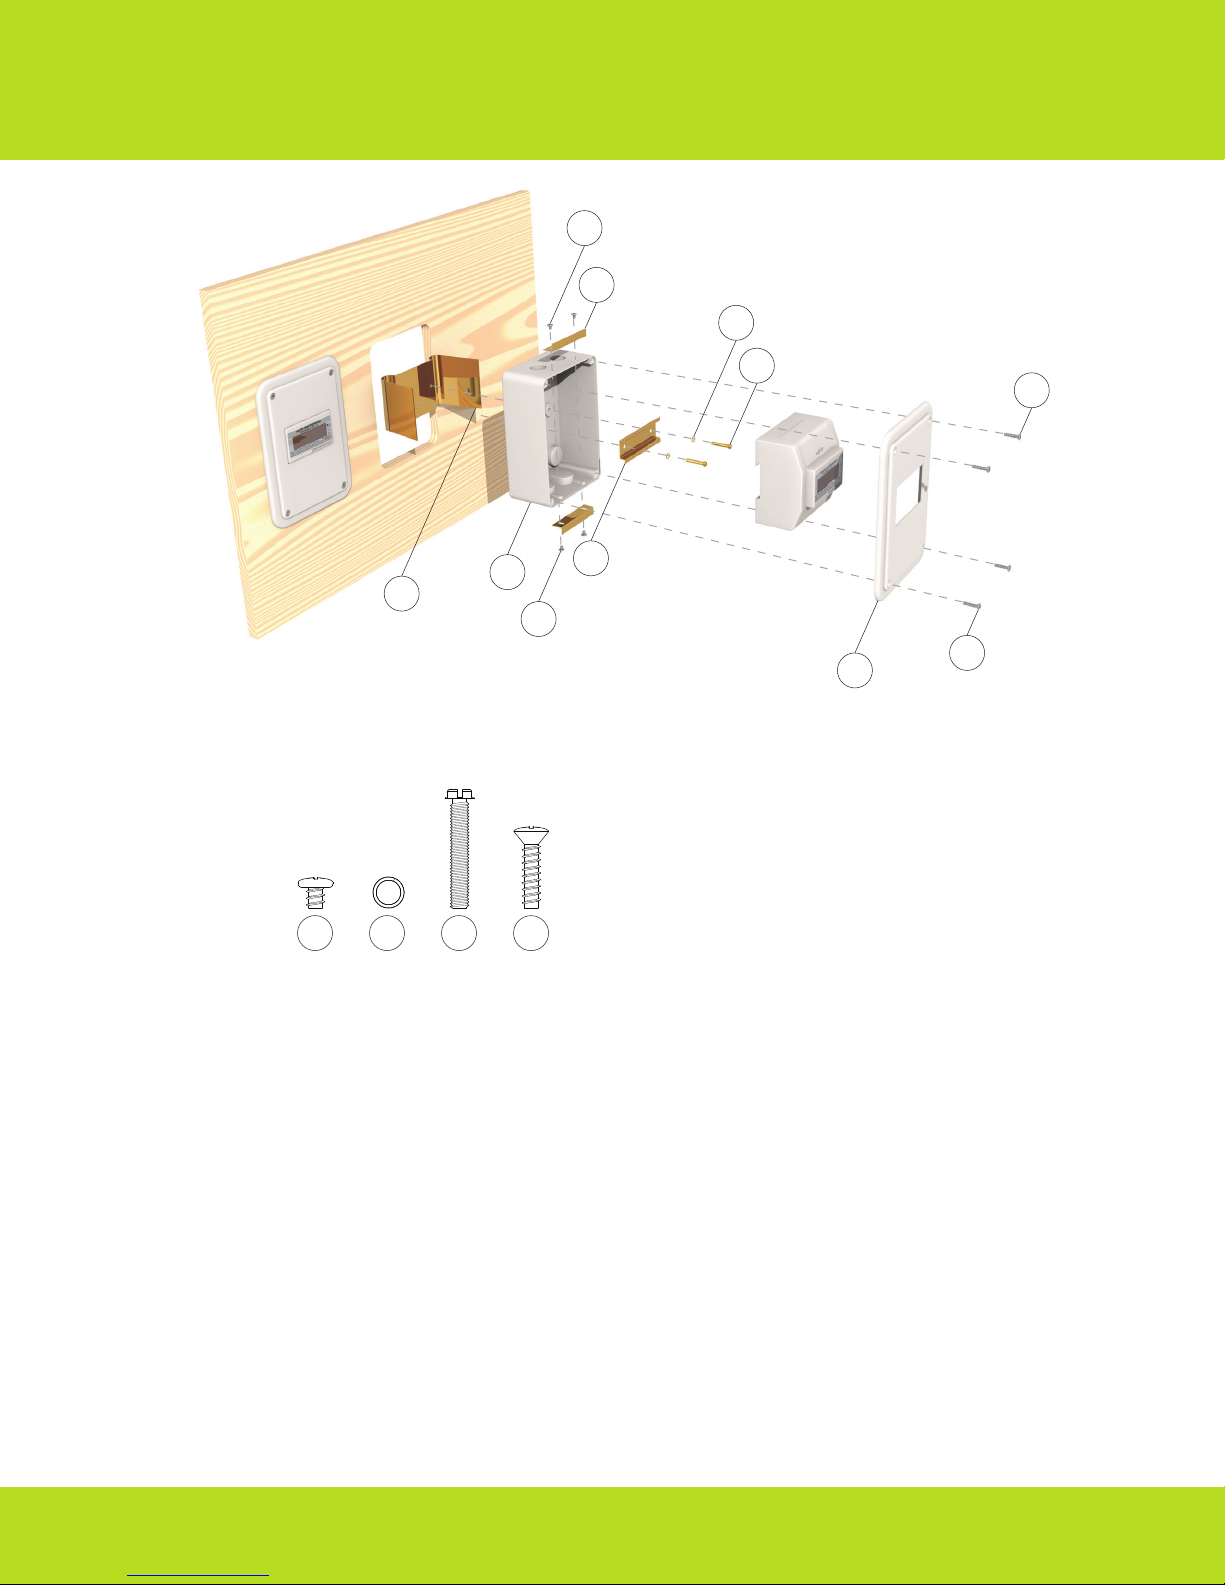
#8
#9
#2
#10
#4
#11
#5
#6
#8
Flush Mount
Parts:
#2: Lock Washer
#4: Cover Screw
#5: Enclosure Box
#6: DIN Rail
#8: L Bracket Screw
#9: L Bracket
#10: Large Bolt
#11: W Bracket
#12: Flush Enclosure Cover
Principle:
This setup is intended for indoor ush mount applications. For this setup
a hole needs to be cut into a surface that the Enclosure Box can t in. This
is typically a wall surface. Which surface is appropriate for this type of
installation is at the discretion of the installer but it should be sturdy
enough to support the enclosure, meter, and wiring. Any electrical,
current transformer, or communication wires should be routed to the
enclosure via conduit. There are two threaded ports for conduit to enter
on the top, bottom, and rear of the enclosure box. When the enclosure is
installed, all of these ports will be behind the surface that the enclosure is
mounted on. Because of this it is important to consider how the wiring
will be installed before you install the enclosure.
Installation Instructions:
1. First choose a suitable surface that you can cut to install your Enclosure
Box(#5).
2. Turn the Enclosure Box around and position it on the surface where
you want it installed. Using it as a template, draw a line around box.
It is best to be a bit liberal and draw the line about 1/8 of an inch away
from the box so that the box and W Bracket(#11) will install easier.
3. Using the appropriate tools and safety precautions, cut along the line
that you drew to open a hole in the surface. When completed, your
Enclosure Box should easily t through the hole.
x4
x2 x2 x4
#8 #2 #9 #4
#12
4. Before you insert the enclosure into the hole you will need to attach
the DIN rail(#6) and W Bracket. Pass the Large Bolts(#10) through the
Lock Washers(#2), through the DIN Rail, and through the Enclosure Box,
into the W Bracket. Only tighten the bolts down a few turns, you want
the assembly to be loose for now.
5. Attach the L Brackets(#9) to the top and bottom of the Enclosure Box
using the L Bracket Screws(#8). The L Brackets should be positioned so
their vertical faces are even with the front edge of the Enclosure Box.
6. If you do not have access to the back side of the installation surface,
you should route all of your wiring to the hole that you created and
then to the Enclosure Box. Once it is installed it will be much harder to
route wires if you don’t have access to the back of the enclosure.
7. Now insert the enclosure box through the hole with the W Bracket rst.
The tips of the W Bracket will need to bend in and should expand again
on the other side of the surface.
8. You can now position the Enclosure Box in the hole and nish
tightening the Large Bolts using a screwdriver. This will pull the W
Bracket towards the Enclosure Box and pinch the mounting surface in
between. If done correctly the Enclosure Box should now be solidly
mounted in the hole.
9 . Connect the wires to your meter before you clip it onto the DIN rail.
10. When you have wired up your meter, clip it onto the DIN rail. This is
done by inserting the top of the meter rst. Then pull down on the
spring loaded clip at the bottom to get it to go behind the bottom of
the DIN Rail. If this is done correctly the meter should now be securely
mounted.
11. At this point you can turn the electricity on and make sure that your
meter powers on and that you are getting good reads. If you are using
a smart meter you can also test that your meter is communicating
properly.
12. When you are satised that everything is connected appropriately,
you can install the Flush Enclosure Cover(#12) using the four Cover
Screws(#4) and you should now be nished installing your meter and
Indoor Enclosure.
#4
EKM Metering Inc. – www.ekmmetering.com – info@ekmmetering.com – (831)425-7371
 Loading...