

EKF Diagnostics Stanbio HemoPoint H2 User Manual
HemoPoint® H2
Hemoglobin Analyzer
User Manual
Diagnostics
for life

Hemoglobin Analyzer
HemoPoint
User Manual
®
H2

The copyright of this document is protected! Copying and
distribution to third parties only by written permission of
EKF Diagnostics Inc.
EKF Diagnostics Inc.
1261 North Main Street
Boerne, Texas 78006 U.S.A.
Tel: (830) 249-0772
Fax: (830) 249-0851
e-mail: stanbiolab@ekfdiagnostics.com
HemoPoint® H2 Analyzer manufactured in Germany for:
EKF Diagnostics Inc., Boerne, Texas U.S.A.
Revised: 02. June 2016
Software-Version: From 2.07.0
Subject to modifications.

Table of contents
0. Table of contents
0. TABLE OF CONTENTS .................................................. 1
1. IMPORTANT INFORMATION ......................................... 5
1.1 WELCOME! .................................................................... 5
1.2 EXPLANATION OF THE GRAPHIC SYMBOLS ........................ 5
1.3 SAFETY NOTES .............................................................. 5
2. INTENDED USE .............................................................. 8
3. SET UP ............................................................................ 9
3.1 UNPACKING THE ANALYZER ............................................ 9
3.2 SETTING UP THE ANALYZER .......................................... 10
3.3 SWITCHING THE ANALYZER ON AND OFF ......................... 11
3.3.1 Using for the first time ........................................... 11
3.3.2 To operate using the power adaptor ..................... 12
3.3.3 Battery operation ................................................... 14
3.3.4 Stand-by mode ...................................................... 14
3.3.5 Displays and symbols in the ready mode ............. 15
4. SAMPLING AND TESTING PROCEDURE .................. 16
4.1 TAKING A SAMPLE ........................................................ 16
4.1.1 Notes on using the microcuvette ........................... 16
4.1.2 Taking a sample of capillary blood ........................ 17
4.1.3 Taking a sample of venous or arterial blood ......... 21
4.2 PERFORMING THE TEST ................................................ 23
4.3 QUALITY CONTROL ....................................................... 27
4.3.1 AutoCheck ............................................................. 27
4.3.2 Blank reading ........................................................ 27
4.3.3 Control cuvette ...................................................... 28
4.3.4 External quality control .......................................... 30
5. FURTHER FUNCTIONS ................................................ 31
5.1 TOUCHSCREEN ............................................................ 31
5.1.1 General .................................................................. 31
5.1.2 Meaning of the buttons / Navigation ..................... 32
5.2 MEMORY (DATA STORAGE) ........................................... 32
5.2.1 Displaying results from memory ............................ 32
5.2.2 Printing out results ................................................ 34
HemoPoint
®
H2 User Manual
1

Table of contents
5.3 MENU FUNCTIONS ........................................................ 35
5.4 STANDARD PRINT MODE ................................................ 42
5.5 EXPANDED PRINT MODE ................................................ 43
5.6 CONNECTING ACCESSORIES ......................................... 45
5.2.3 Deleting the stored test data ................................. 34
5.3.1 Information about the analyzer .............................. 36
5.3.2 Connect ................................................................. 37
5.3.3 Setting the date ..................................................... 37
5.3.4 Setting the time ..................................................... 38
5.3.5 Setting the units ..................................................... 38
5.3.6 Hgb mode and limits.............................................. 39
5.3.7 Setting the display contrast ................................... 39
5.3.8 Settings ................................................................. 40
5.3.8.1 Setting the language ............................................ 40
5.3.8.2 Setting date format ............................................... 40
5.3.8.3 Setting time format ............................................... 41
5.3.8.4 Setting the power frequency ................................. 41
5.3.9 Menu options ......................................................... 41
5.3.9.1 Hematocrit mode .................................................. 41
5.3.9.2 Setting the print mode .......................................... 42
5.4.1 Header (Example) ................................................. 42
5.4.2 Hgb limit mode (On), Hematocrit (On) .................. 43
5.5.1 Header (Example) ................................................. 43
5.5.2 Hgb limit mode (On), Hematocrit (On) .................. 43
5.5.2.1 Setting the tone signal .......................................... 43
5.5.2.2 Setting the backlight mode ................................... 44
5.5.2.3 Setting the stand-by time ...................................... 44
5.5.2.4 Broadcast ............................................................. 45
5.5.2.5 The service menu ................................................. 45
5.5.3 Information on contacting us ................................. 45
5.6.1 Connecting to a PC ............................................... 46
5.6.2 Connecting a printer .............................................. 46
5.6.2.1 Connecting the printer cable ................................ 47
6. MAINTENANCE ............................................................ 48
6.1 CLEANING AND DISINFECTION OF THE INSTRUMENT ........ 48
6.1.1 Housing and touchscreen ..................................... 48
6.1.2 Cuvette holder ....................................................... 48
6.1.3 Optical unit ............................................................ 49
6.1.4 Power adaptor ....................................................... 50
6.2 CHARGING AND CARE OF THE BATTERY .......................... 50
6.2.1 Charging procedure .............................................. 51
6.2.2 Charging time ........................................................ 51
2
HemoPoint
®
H2 User Manual

Table of contents
6.2.3 Self discharge ....................................................... 52
6.3 REPAIRS ...................................................................... 52
6.4 PROPER DISPOSAL ....................................................... 52
7. TROUBLESHOOTING .................................................. 53
7.1 PROBLEM SOLVING ....................................................... 53
7.2 RESETTING OF THE ANALYZER ...................................... 58
8. TECHNICAL DATA ....................................................... 59
8.1 HEMOPOINT
8.2 N•X•T
®
H2 ANALYZER ............................................ 59
®
MICROCUVETTE ................................................ 60
9. REFERENCE RANGE ................................................... 61
9.1 NORMAL RANGE ........................................................... 61
9.2 UNDERSTANDING YOUR RESULT .................................... 61
10. APPENDIX ...................................................................... 62
10.1 REPLACEMENT PARTS AND CONSUMER MATERIALS ........ 62
10.2 FURTHER INFORMATION ................................................ 63
11. INDEX ........................................................................ 64
HemoPoint
®
H2 User Manual
3

Important information
1. Important information
1.1 Welcome!
Congratulations on purchasing the HemoPoint® H2 hemoglobin
testing system. Before you begin using your new HemoPoint
system we strongly recommend you read this manual completely,
with particular attention to the following section with its
introductory explanations and safety notes.
1.2 Explanation of the graphic symbols
DANGER!
WARNING!
TIP
The DANGER symbol!
This symbol warns of situations or actions that could
lead to serious damage to the health of the user or a
patient.
The WARNING symbol!
This symbol warns about incorrect handling that
could cause measuring errors or damage to the
instrument or any accessories used.
The TIP symbol!
Alongside this symbol we provide useful additional
information about the current matter.
®
H2
1.3 Safety notes
It is essential that you read the following notes, in order to avoid
risks to persons and damage to the analyzer and other
equipment. EKF Diagnostics does not accept responsibility for
damage arising from non-observance of the following notes.
HemoPoint
®
H2 User Manual
5
Important information
WARNING!
DANGER!
WARNING!
DANGER!
WARNING!
WARNING!
Follow the user manual!
Each time the analyzer is used, precise knowledge and attention
to these operating instructions is required. Only use the HemoPoint
®
H2 system for the purpose which will be described in Section 2.
Danger of fatal electric shock!
• Under no circumstances should you open the AC power
adaptor. There are no elements inside which require
servicing or maintenance.
• Never use a mechanically damaged AC power adaptor –
live connections might be exposed.
• The AC power adaptor is not waterproof. Therefore, never
let liquids come into contact with it. A lightly dampened
cloth, however, can be used to clean it when
disconnected. Please see the notes on care in Section 6.
• Only use the AC power adaptor in a socket that has been
properly installed.
Check that the AC voltage and frequency printed on the AC power
adaptor label match your electrical socket and whether the shape
and configuration of the plug contacts are compatible for this
connection.
Not to be used in areas where there is a risk of explosion!
The instrument is not approved for use in areas where there is a
risk of explosion.
Keep the analyzer away from liquids!
The analyzer is not waterproof. Fluids entering the instrument
could destroy the electrical and optical components in the
analyzer. A lightly dampened cloth, however, can be used for
cleaning. Please see the notes on care in Section 6.
Allow the instrument to reach room temperature!
Particularly on changing from a cold into a warm environment (i.e.
after storage or transport) condensation can form inside and on
the outside of the instrument. Wait an appropriate time (approx. 1
hour), before you connect to the main power supply or switch on
the instrument.
6
HemoPoint
®
H2 User Manual

Important information
Only use original equipment!
Only attach equipment that is expressly approved for use with the
HemoPoint
®
H2. EKF Diagnostics does not guarantee the function
of the instrument when other equipment is used.
Never open the analyzer!
There are no parts in the analyzer that require customer
maintenance. Repairs can only be carried out by EKF Diagnostics
personnel. Further notes on maintenance can be found in Section
6.
Do not force the cuvette holder!
The cuvette holder is very important for the quality of testing.
Therefore mechanical force on the holder should be avoided and
only the designated microcuvettes should be used. For cleaning
purposes the cuvette holder can be removed from the analyzer
after a mechanical locking device is released. Notes on this can
be found in Section 6.
HemoPoint
®
H2 User Manual
7

Intended use
2. Intended use
The HemoPoint
determination of hemoglobin (Hgb) in whole blood of adults,
infants, and children in a professional point-of-care setting. It
consists of a dedicated photometer and individual, single-use
microcuvettes filled with reagents.
Using the microcuvette, a small amount of arterial, venous or
capillary blood is taken up by capillary action. The filled cuvette is
inserted into the HemoPoint
the chemical reaction in the cuvette is measured, and the Hgb
value is displayed. The microcuvettes are intended to be used
only once and must be disposed after use as potentially infectious
waste, in accordance with the current regulations applicable to
your establishment.
The HemoPoint
practices and in clinical laboratories to assist in medical
diagnostic investigations. In addition it can be used in emergency
and intensive care units and in medical facilities such as blood
banks. This test system has been approved for use in
laboratories with Waived status as defined in 452 CFR
493.15(c)(a).
EKF DIAGNOSTICS INC. DISCLAIMS ALL EXPRESS AND
IMPLIED WARRANTIES OF THE MERCHANTABILITY AND
FITNESS PERTAINING TO THIS PRODUCT WHICH ARE NOT
EXPRESSLY DETAILED IN THIS PACKAGING INFORMATION
OR A WRITTEN AGREEMENT BETWEEN THE BUYER AND
SELLER OF THIS PRODUCT.
EKF DIAGNOSTICS INC. MAINTAINS THAT THIS PRODUCT
CONFORMS TO THE INFORMATION CONTAINED IN THIS
INSERT. PURCHASER MUST DETERMINE THE SUITABILITY
OF THE PRODUCT FOR THEIR PARTICULAR USE. USE
ONLY IN ACCORDANCE WITH LABELING INSTRUCTIONS.
®
H2 system is intended for the quantitative
®
H2 photometer, the color produced by
®
H2 system is designed for use in medical
8
HemoPoint
®
H2 User Manual

3. Set up
3.1 Unpacking the analyzer
Before you set up the HemoPoint® H2 analyzer, first check that all
the items are present and undamaged (see Illustration 1).
Set up
Illustration 1: (1) HemoPoint® H2 analyzer, (1) AC power adaptor and (1) control cuvette.
Materials provided
• One (1) HemoPoint
• One (1) AC power adaptor
• One (1) HemoPoint
®
H2 Analyzer
®
H2 Control Cuvette
• One (1) User Manual
• One (1) Quick Reference Guide
• One (1) Warranty Registration Card
HemoPoint
®
H2 User Manual
9

Set up
WARNING!
Additional materials required but not provided
• Latex Gloves
• Sampling devices for capillary blood collection
• Biohazardous waste container
• Alcohol swabs and gauze for cleaning puncture site
• HemoPoint
• HemoPoint
• HemoPoint
• HemoPoint
®
H2 n•x•t® Microcuvettes
®
H2 Hemoglobin Controls (optional)
®
H2 Optics Cleaner
®
H2 Training Program (optional) – access online at
www.hemopoint.com
Why Register your HemoPoint
®
H2?
Returning the completed Warranty Registration Card will activate
your warranty and allow EKF Diagnostics to provide you with the
latest product updates and improvements.
Even easier – Go to www.stanbio.com/warranty.php and
register your HemoPoint
®
H2 online!
What is your voltage?
Check that the AC voltage and frequency printed on the AC
adaptor label match your electrical socket and whether the shape
of the plug is compatible for this connection. If not, do not connect
the analyzer to the electrical socket under any circumstances.
Contact EKF Diagnostics in this case.
3.2 Setting up the analyzer
Select a suitable place for setting up the analyzer, according to
the following criteria:
• Avoid direct sunlight
• Avoid strong electromagnetic fields
• Avoid direct influence from ionizing radiation
• Avoid rapid temperature fluctuations (keep away from
heaters, open windows, ventilators, fans or airconditioning, etc.)
• Avoid wet areas (i.e. wash basins)
10
HemoPoint
®
H2 User Manual
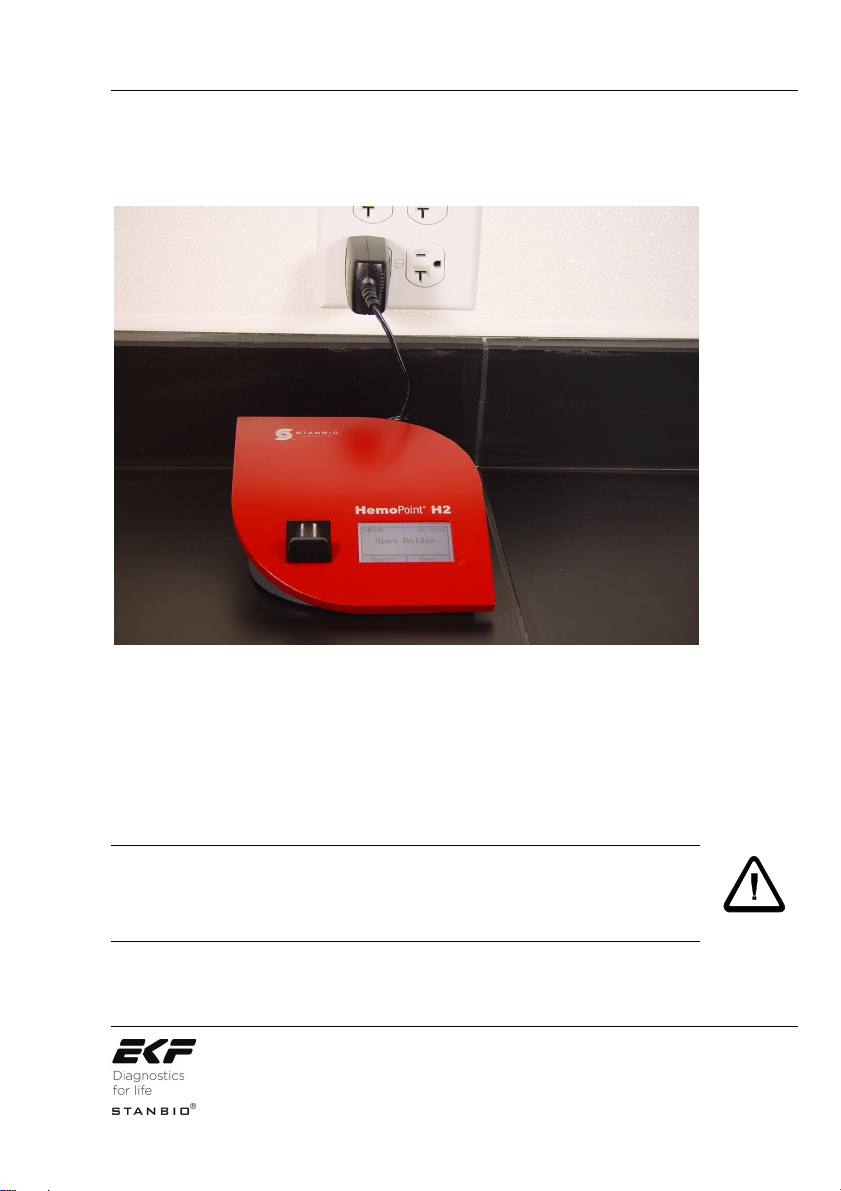
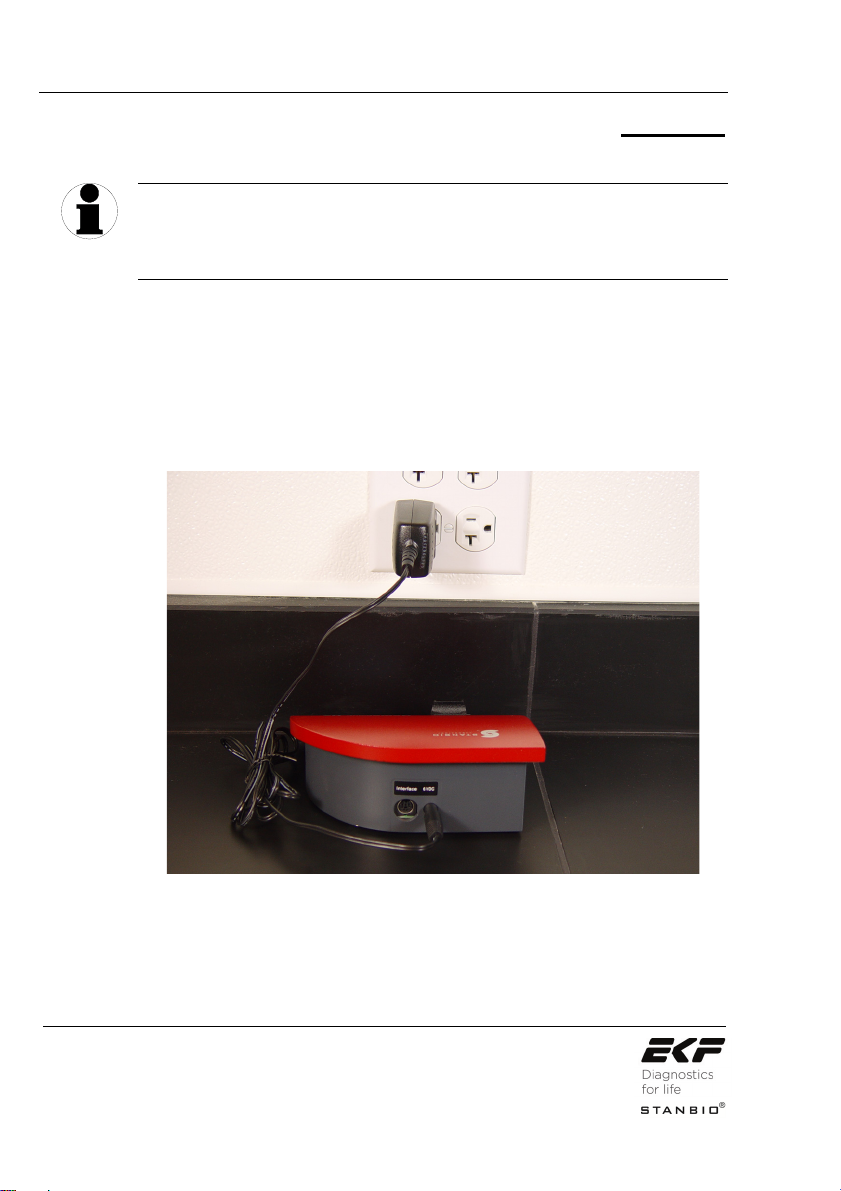
Place the analyzer on a level counter adjacent to a power socket.
Make sure there is enough room for the cuvette holder to be
freely accessible.
Illustration 2: Setting up the analyzer.
Set up
3.3 Switching the analyzer on and off
3.3.1 Using for the first time
Allow the analyzer to reach room temperature!
Changing from a cold to a warm environment (i.e. after storage or
transport), condensation can form both on the inside and the
outside of the analyzer. Wait at least 1 hour, before you connect
the analyzer to a power supply.
As the built-in battery has not yet been charged, the analyzer
must first be connected to the power adaptor (supplied) and
HemoPoint
®
H2 User Manual
WARNING!
11
Set up
TIP
plugged into an electrical socket until the battery is completely
charged.
This procedure is necessary in order for the capacity of the
battery to be checked and the charge indicator to function
correctly. Further information on this can be found in Section 6.2
“Charging and care of the battery”.
3.3.2 To operate using the power adaptor
Use the power adaptor to operate the analyzer, noting the
following steps when connecting the power adaptor:
1. Insert the small round plug on the connecting cable of the
power adaptor into the appropriate socket (6VDC) at the
back of the analyzer.
Illustration 3: Connecting the power adaptor.
2. Next, insert the power adaptor plug into an appropriate
electrical socket. The analyzer itself does not have a
power On/Off switch.
12
HemoPoint
®
H2 User Manual
Please be patient after plugging the analyzer into the electrical
socket. It may be 4 or 5 seconds before anything appears on the
display. This does not indicate a fault but is related to various
initialization steps within the analyzer. Following this initialization
phase, the display illuminates and a welcome screen appears
briefly, after which the instrument is ready to operate.
Set up
TIP
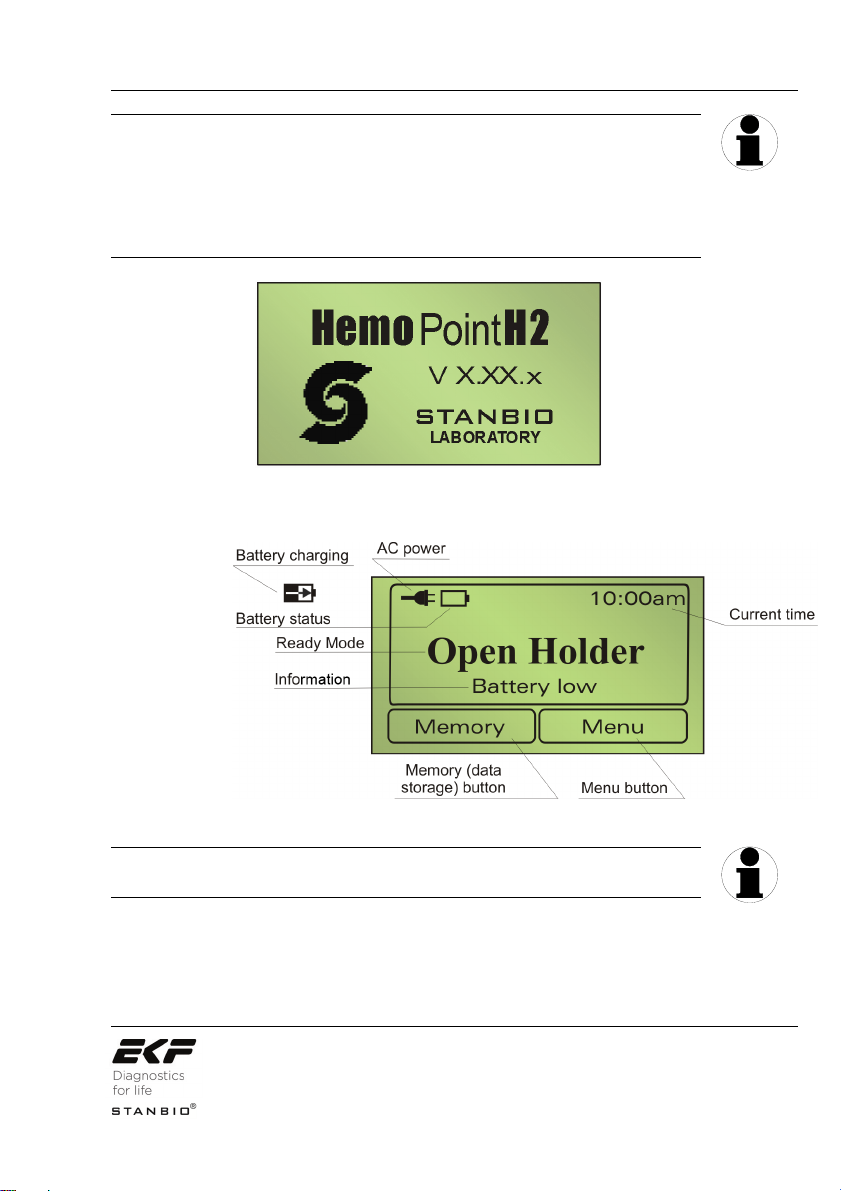
Illustration 4: Welcome display screen.
Illustration 5: Display in ready mode (Open Holder).
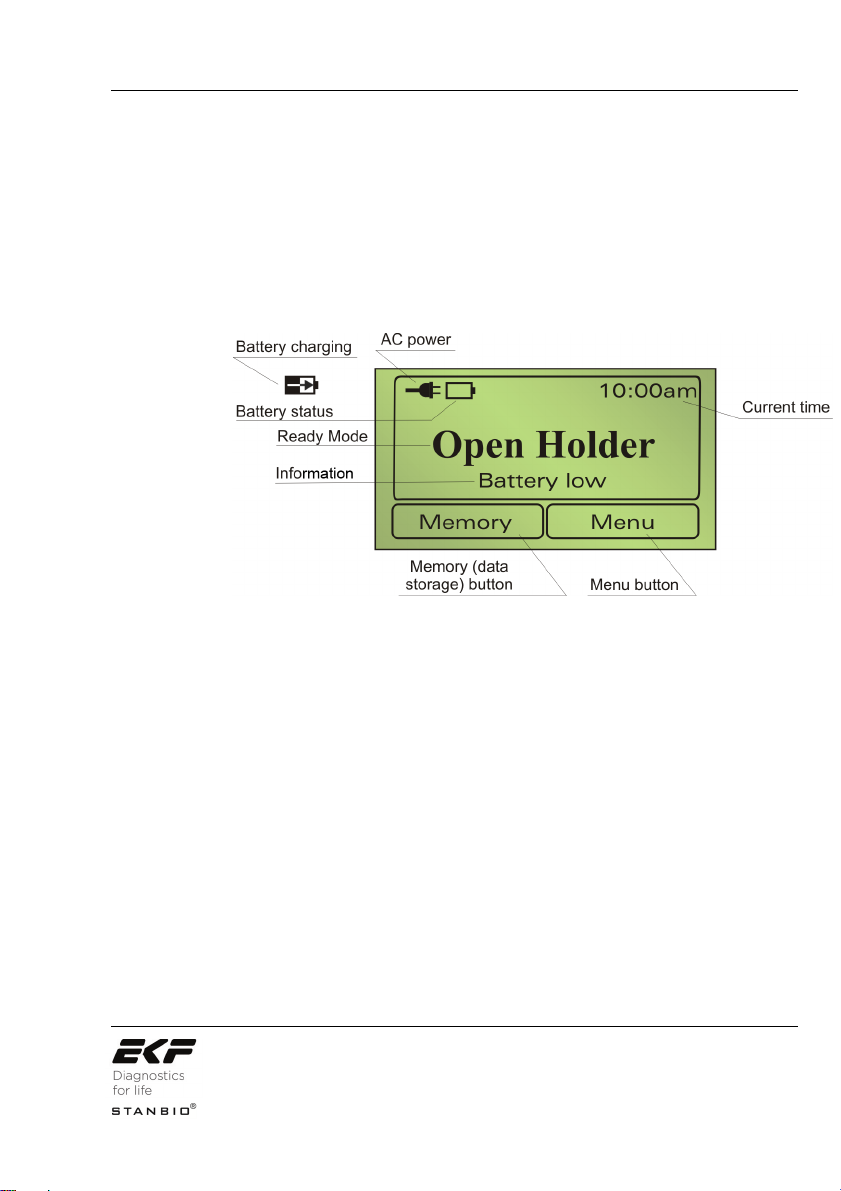
The individual symbols and their meanings are explained in
Section 3.3.5 “Displays and symbols in the ready mode“.
Now you can either start your testing, view results in the memory,
or carry out adjustments in the Menu.
HemoPoint
®
H2 User Manual
TIP
13
Set up
TIP
TIP
WARNING!
TIP
You can find tips on this in Sections 4 “Sampling and Testing
Procedure”, 5.2 “Memory (data storage) and 5.3 “Menu
functions”.
If the analyzer is not in use for some time, it switches into the
energy-saving, Stand-by mode (see Section 3.3.4 “Stand-by
mode”).
3.3.3 Battery operation
®
The HemoPoint
H2 analyzer automatically switches to battery
operation when you unplug the power adaptor from the electrical
socket, or from the instrument (assuming, of course, that the
battery is sufficiently charged).
When the battery is fully charged it will operate for a period of at
least 100 hours.
Tips on charging the battery and battery maintenance can be
found in Section 6.2 “Charging and care of the battery”.
To avoid problems while testing during battery operation, also
note the tips in Section 3.2 “Setting up the analyzer”.
3.3.4 Stand-by mode
The analyzer does not have a separate On/Off-switch. It is
designed so that it automatically switches to the Stand-by mode
when you are not operating the instrument for a certain time
(approximately 5 minutes). The display will go blank in the Standby mode.
This elapsed time can be changed in Section 5.5.2.3 “Setting the
Stand-by time”.
The Stand-by mode reduces power usage to a minimum.
There are (3) three ways of switching the instrument ON again:
14
HemoPoint
®
H2 User Manual
• Touch the Touchscreen
• Open or close the cuvette holder
• Plug the analyzer into an electrical power supply
3.3.5 Displays and symbols in the ready mode
Illustration 6: Display in ready mode (Open Holder).
Set up
HemoPoint
®
H2 User Manual
15
Sampling and testing procedure
4. Sampling and testing procedure
4.1 Taking a sample
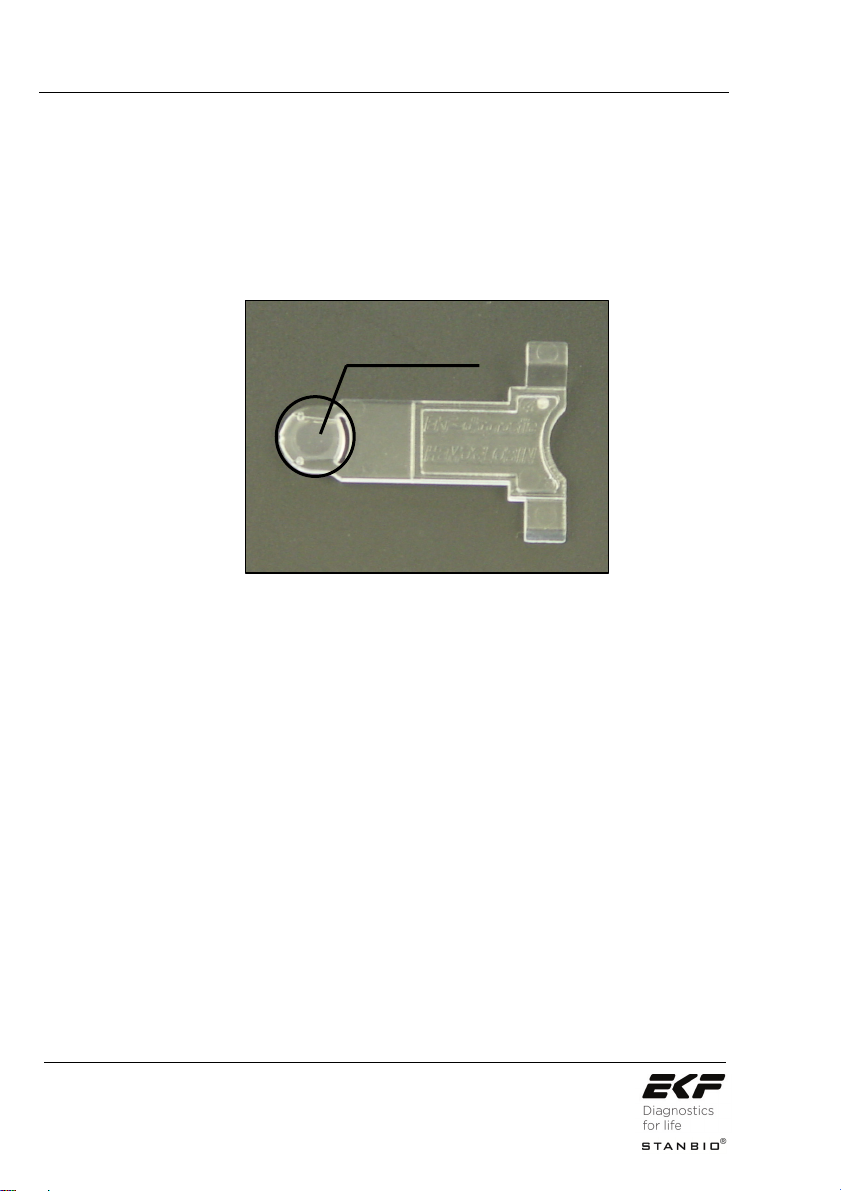
4.1.1 Notes on using the microcuvette
optical eye
Illustration 7: n•x•t
The microcuvette is the most sensitive component in the
HemoPoint
®
microcuvette
®
H2 system. It is therefore necessary to handle the
cuvette carefully, paying particular attention to the following
conditions:
1. Each microcuvette can only be used once!
The microcuvette is designed for single use. The cuvette is
coated during manufacturing with all the reagents necessary for
determining the hemoglobin concentration in the blood sample.
As soon as the blood is taken into the cuvette, a reaction occurs
(within 1 minute).
2. The microcuvette is sensitive to moisture!
The microcuvette will absorb moisture therefore the cuvettes are
supplied in a special airtight container that contains a drying
agent. This drying agent assures that any moisture is readily
absorbed during storage.
16
HemoPoint
®
H2 User Manual

Sampling and testing procedure
Pay attention to the following notes, to preserve the integrity of
the cuvettes:
• Store the cuvettes only in the original container and at
room temperature (59-86°F / 15-30°C).
• Only remove one cuvette at a time from the container and
then immediately close the lid. Make sure that the lid is
completely closed by pressing it down as far as it will go.
The cuvette shelf life is reduced once the lid is opened. See the
HemoPoint
®
H2 cuvette container label for additional information.
Please make a note of the date of opening on the container label.
3. The microcuvette is a precision optical component!
The microcuvette is analyzed optically in the HemoPoint
®
H2
analyzer. The measured absorption is proportional to the
hemoglobin concentration. The light from the light source should
penetrate through the sample to the photo detector with the least
possible influence from the cuvette. Therefore it is important not
to touch the optical eye of the cuvette with fingers or sharp
objects (see Illustration 7).
4. The microcuvette is only designed for in-vitro testing!
5. The reagents that coat the inner walls of the cuvette are
harmful and must not be swallowed.
WARNING!
4.1.2 Taking a sample of capillary blood
1. Take out a microcuvette from the original container and
immediately close the lid.
Please note Section 4.1.1 “Notes on using the microcuvette”.
HemoPoint
®
H2 User Manual
WARNING!
17
Sampling and testing procedure
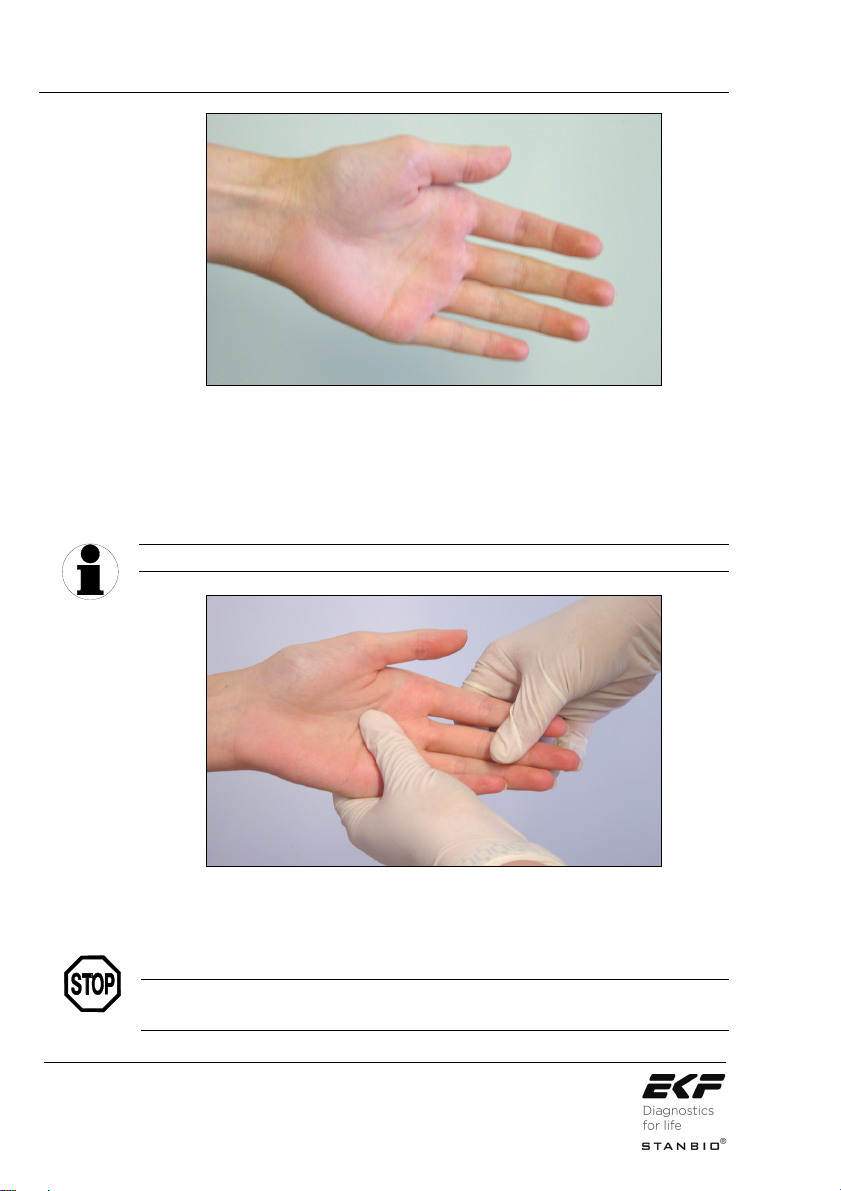
Illustration 8: Preparing to take a blood sample.
2. Make sure that your patient is sitting comfortably. There
should be good blood circulation in the hand from which
you wish to take blood, i.e. it should be warm and
relaxed.
If in doubt, the hands can be warmed in warm water.
TIP
DANGER!
18
Illustration 9: Stimulating the circulation.
3. Lightly massage the fingers, in order to stimulate the
circulation.
Warning, risk of infection!
Please wear suitable protective gloves!
HemoPoint
®
H2 User Manual
 Loading...